

Page 1
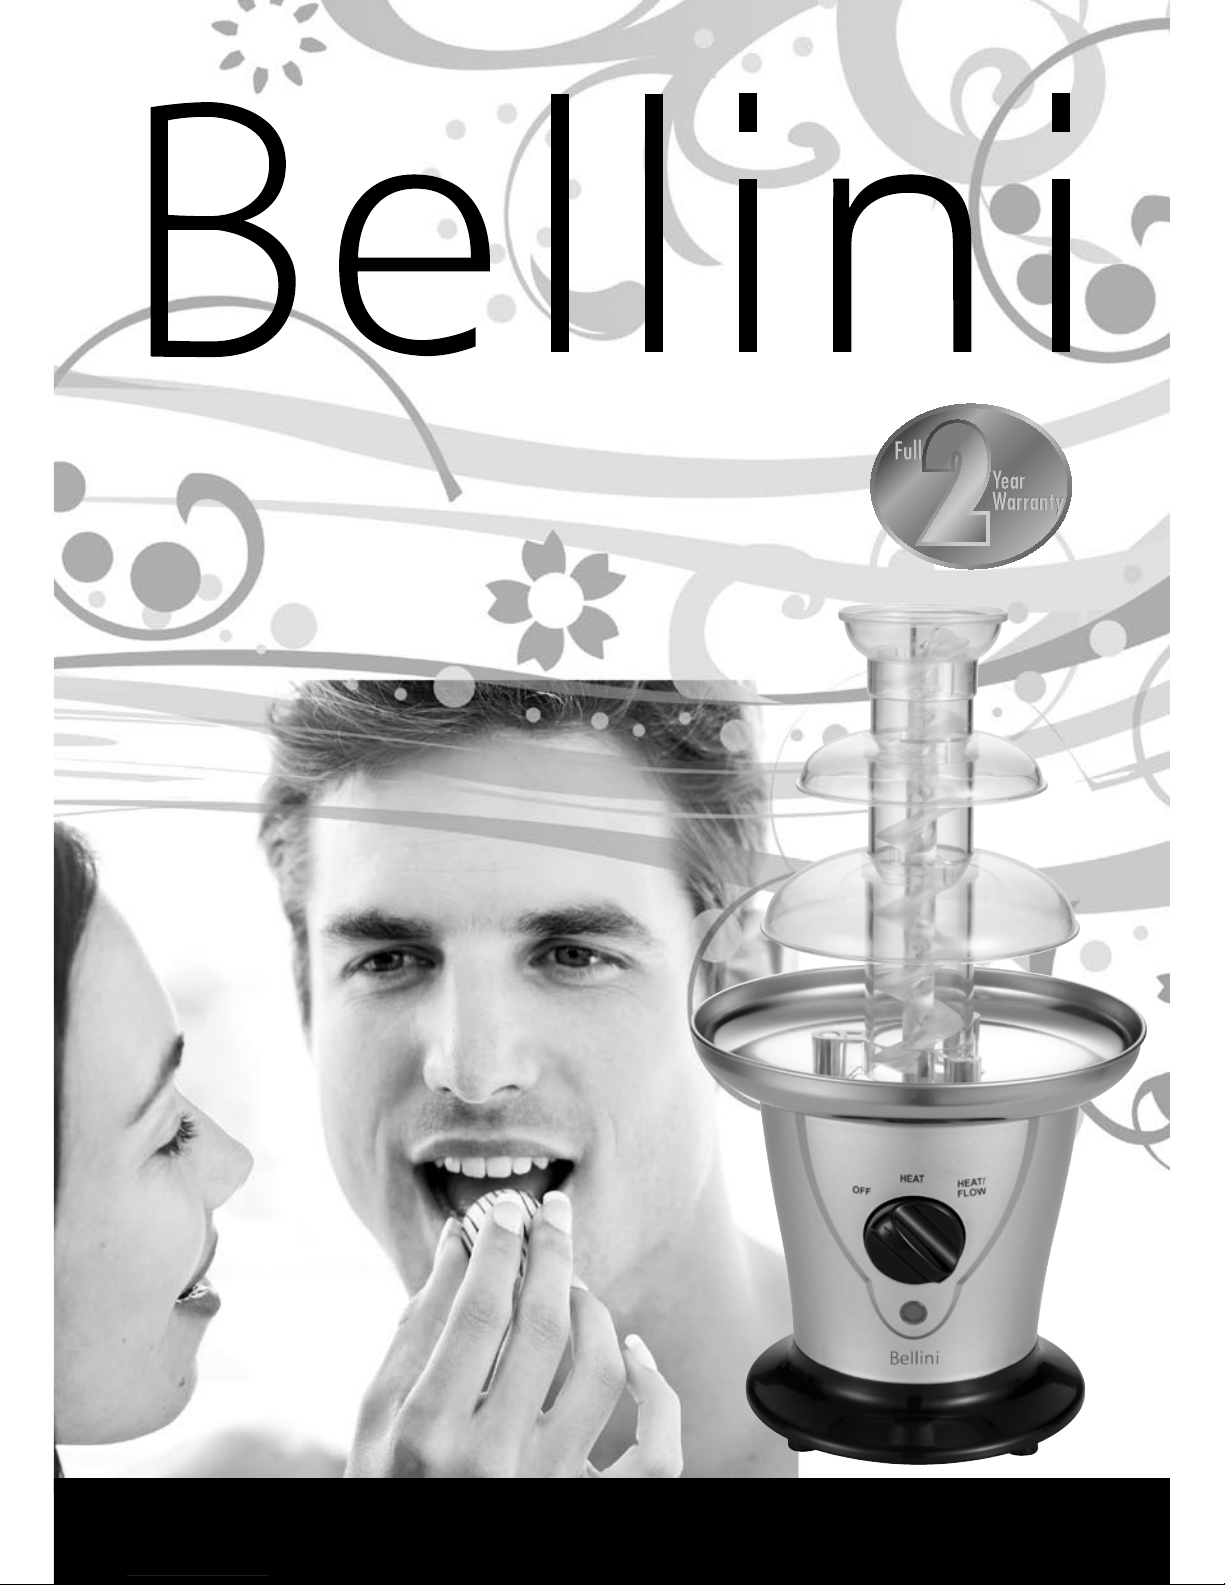
Chocolate Fountain
BECF40
Page 2

2
Important Safeguards
When using electrical appliances, in
order to reduce the risk of fire, electric
shock, and/or injury to persons, basic
safety precautions should always be
followed, including:
For Your Safety
Read all instructions carefully, even if you feel
that you are familiar with the appliance.
• Do not touch hot surfaces.
• To protect against the risk of electric shock,
DO NOT IMMERSE any part of this appliance
in water or any other liquid.
• This appliance is not intended for use by
persons (including children) with reduced
physical, sensory and mental capabilities, or
lack of experience and knowledge, unless they
are being supervised or have received proper
instruction concerning the use of the appliance
by a responsible person.
• Young children should be supervised
to ensure that they do not play with the
appliance.
• Never leave an appliance unattended when it
is in use.
• Switch the appliance off and remove the plug
from the power outlet before cleaning or when
not in use. To unplug, grasp the plug and
remove it from the power outlet. Never pull the
cord. Never carry the appliance by the cord.
• Do not operate any appliance if it has a
damaged cord or plug, if it malfunctions, or if it
has been dropped or damaged in any manner.
• Do not let the cord hang over the edge of a
table or counter, or touch hot surfaces.
• Do not place any part of this appliance on or
near a hot gas or electric burner or in a heated
oven.
• Allow to cool completely before cleaning and
storing away.
• Operate on a level surface. Do not operate the
Chocolate Fountain on sinks, draining boards
or uneven surfaces.
• Do not use outdoors.
• Do not reach for an appliance that has fallen
into water. Switch off at the power outlet and
unplug immediately.
• Do not attempt to repair or disassemble the
appliance. There are no user-serviceable
parts.
Compulsory Warning
If the supply cord is damaged, it must be replaced
by the manufacturer or its service agent, or a
similarly qualified person, in order to avoid a
hazard.
This product has not been designed for any uses
other than those specified in this booklet.
Save These Instructions
Page 3
3
Connection to the
Mains Supply
Check that the voltage marked on the product
corresponds with your supply voltage.
This product is fitted with a 13A plug complying
with BS1363. If this plug is unsuitable or needs to
be replaced, please note the following:
WARNING:
THIS APPLIANCE MUST BE EARTHED
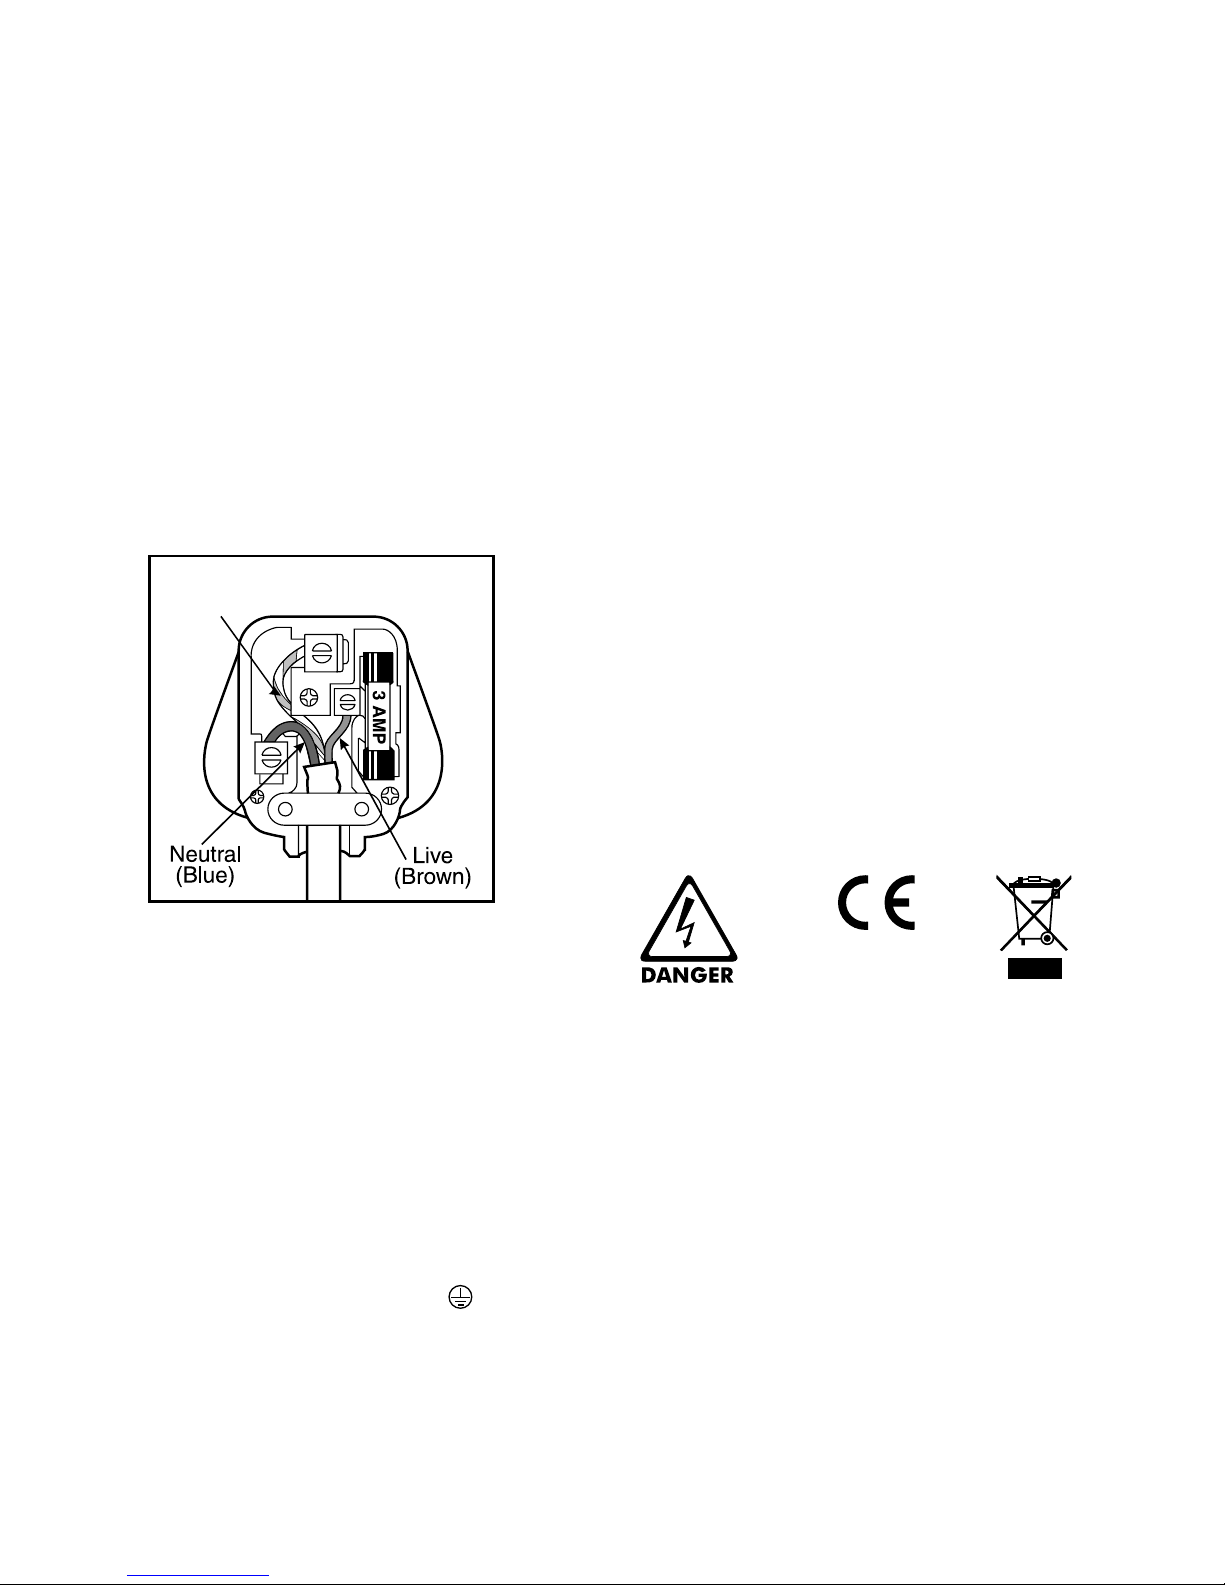
Important: The wires in the mains lead are
coloured in accordance with the following code:
GREEN/YELLOW - EARTH
BLUE - NEUTRAL
BROWN - LIVE
This appliance is fitted with a plug which has a
3 amp fuse. Should the fuse fail, then it must be
replaced with an ASTA approved fuse
(conforming to BS1362) of the same rating. If
you need to replace the plug or if the plug is of
the incorrect type for your socket, remove it and
replace it with an appropriate type. Dispose of the
old plug safely.
As the colours of the wires in the mains lead
of this appliance may not correspond with the
coloured markings identifying the terminals
in your plug, proceed as follows: The GREEN/
YELLOW wire is the EARTH and must be
connected to the terminal which is marked with
the letter E or by the earth symbol
or coloured GREEN or GREEN/YELLOW.
The BLUE wire is the NEUTRAL and must be
connected to the terminal which is marked with
the letter N or coloured BLACK.
The BROWN wire is the LIVE wire and must be
connected to the terminal which is marked with
the Letter L or coloured RED.
Always ensure that the plug cord grip is fastened
correctly.
If in doubt consult a qualified electrician who
will be pleased to do this for you. This product
conforms to EC Directive 92/31 /EEC with respect
to Electromagnetic Compatibility.
NON-REWIREABLE MAINS PLUG
If your appliance is supplied with a nonrewireable
plug fitted to the mains lead, you will find that
it incorporates a fuse, the value of which is
indicated either on the base of the plug or on the
fuse carrier. Should the fuse need replacing, you
must use an ASTA approved one (conforming to
BS1362) of the same rating.
If the fuse cover is lost, the plug must not be used
until a replacement is obtained from an electrical
supplier.
If you need to remove the plug, cut it from the
mains lead and immediately dispose of it. Never
attempt to re-use this plug or insert it into a
socket outlet as there is a very great risk of an
electric shock.
Electric
Shock Risk
Page 4
4
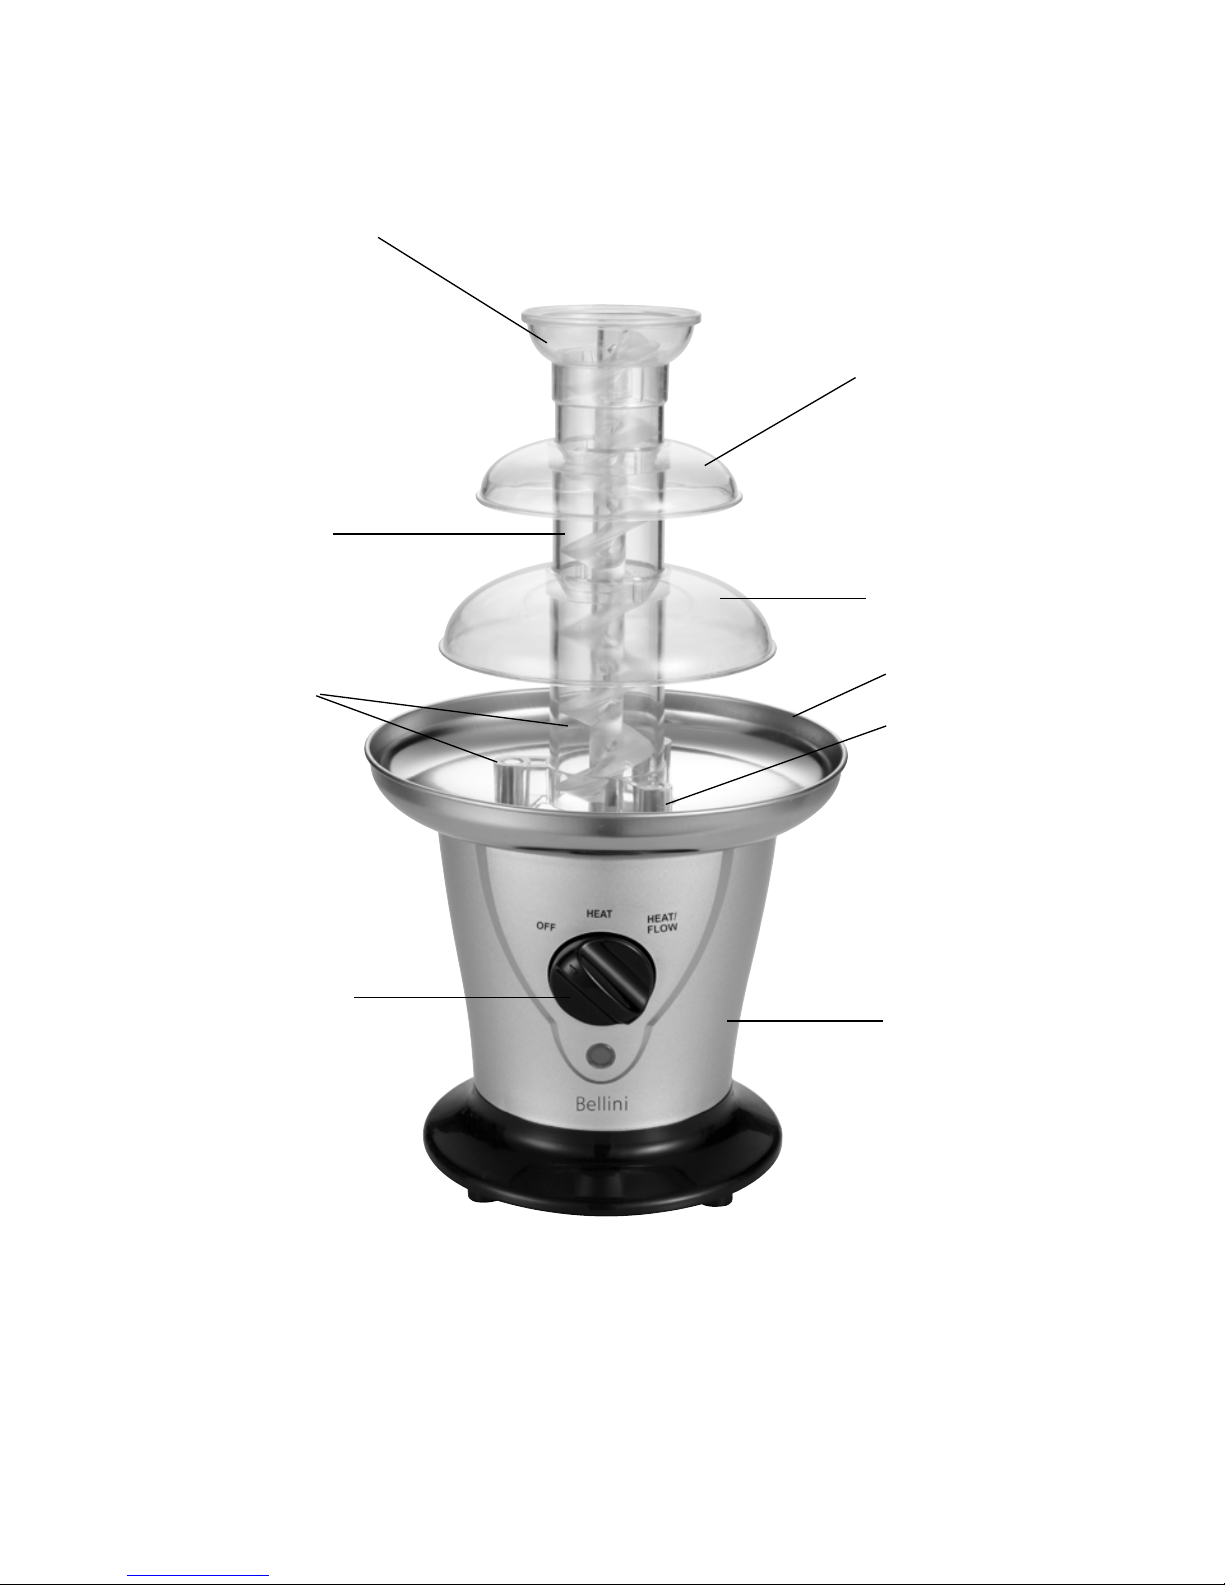
Top Tier Cover
Upper Tier
Lower Tier
Tower
Base
Motor Base Pin
(not shown)
Guiding Pins
Bowl
Features of Your Chocolate Fountain
Control Knob
Page 5
5
Before Using the
Appliance for the First
Time
• Before using the appliance for the first time,
carefully unpack the Chocolate Fountain and
remove all the packaging material. Wipe the
body of the Chocolate Fountain with a soft dry
or damp sponge or cloth. Wash the Auger and
the Tower sections in warm soapy water, rinse
then dry.
• After cleaning, allow all parts to dry completely
before assembly. For detailed instructions
about assembling your Chocolate Fountain,
please refer to page 6.
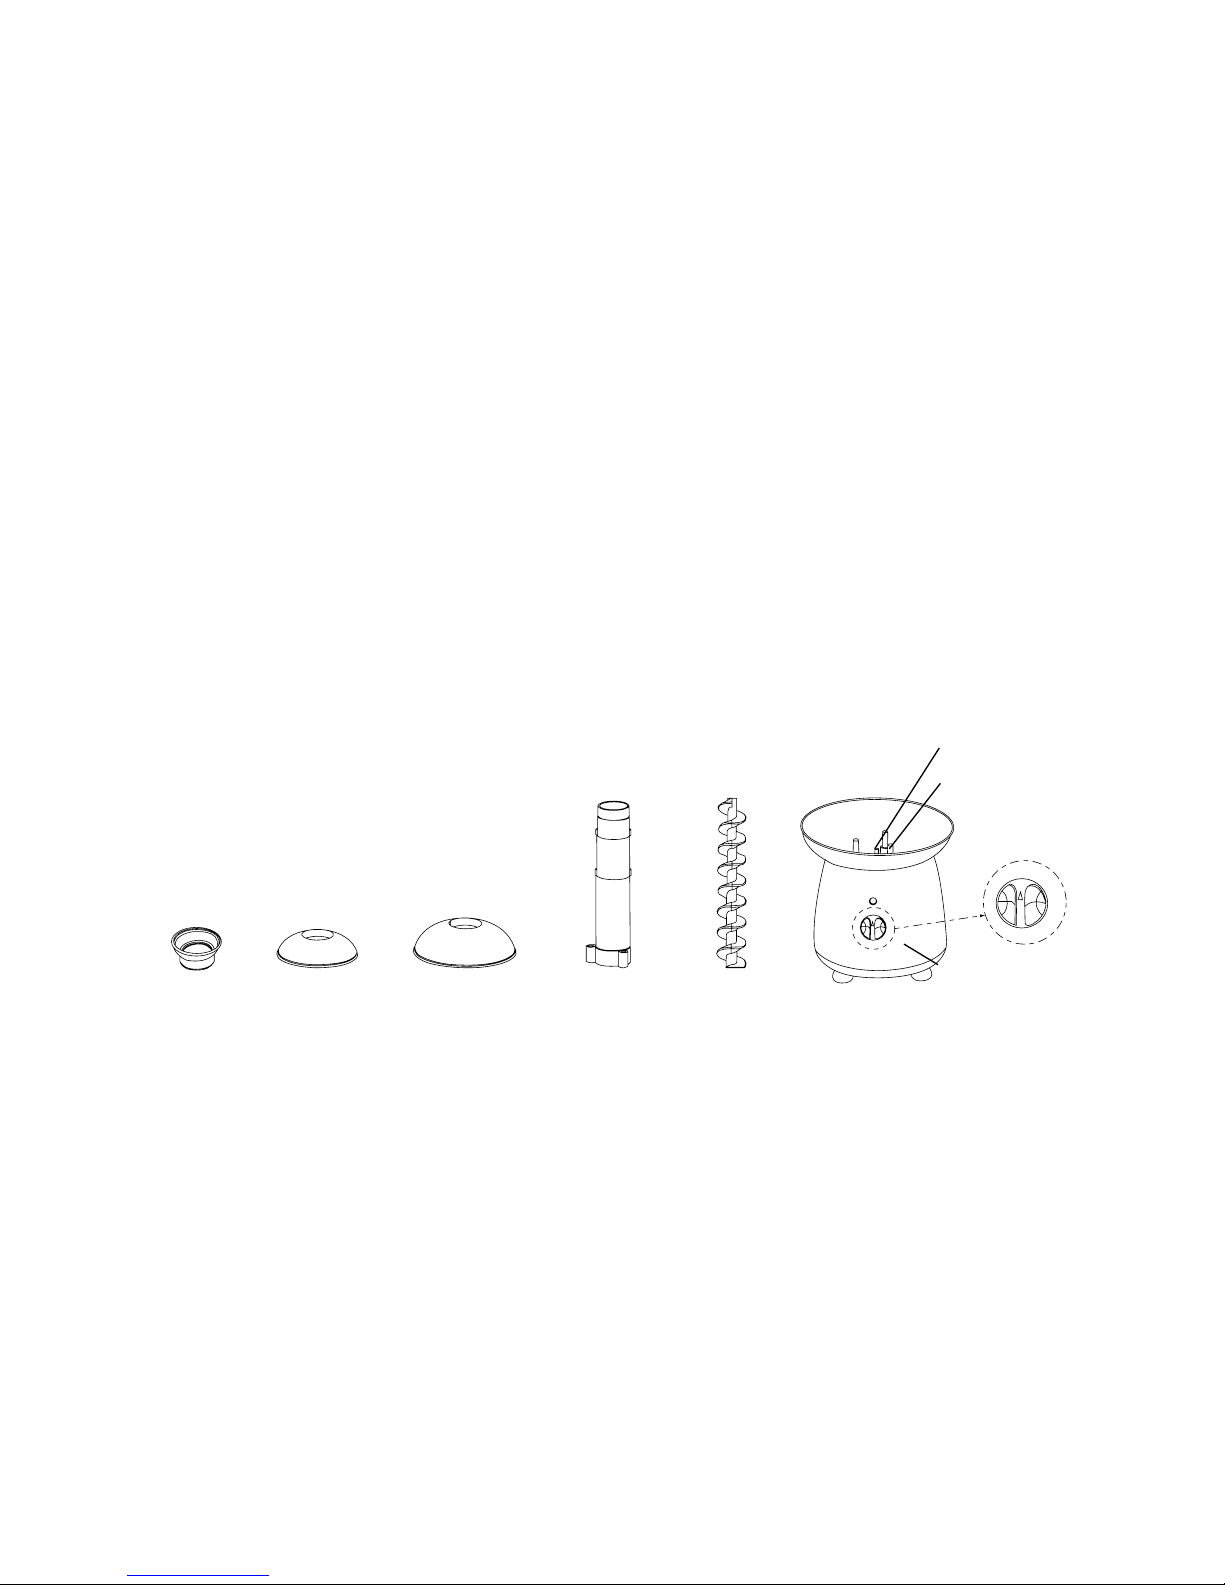
• Return the Auger to the base making sure
it is securely in place by aligning the groove
on the bottom of the Auger to the motor base
pin. Make sure it is secured and locked into
position. Do not attempt to place the Auger
or the Tower on the Base or remove from
the Base while the motor is on. Make sure
the Tower is fitted on the posts on the base
properly.
H
EA
T
/F
L
OW
H
EA
T
O
F
F
4. Tower
H
EA
T
/F
L
OW
H
EA
T
O
F
F
5. Auger
Base
Motor Base Pin
Guiding Pins
H
EA
T
/F
L
OW
H
EA
T
O
F
F
H
EA
T
/F
L
OW
H
EA
T
O
F
F
3. Lower Tier1. Top Tier
Cover
2. Upper
Tier
H
EA
T
/F
L
OW
H
EA
T
O
F
F
H
EA
T
/F
L
OW
H
EA
T
O
F
F
Page 6
6
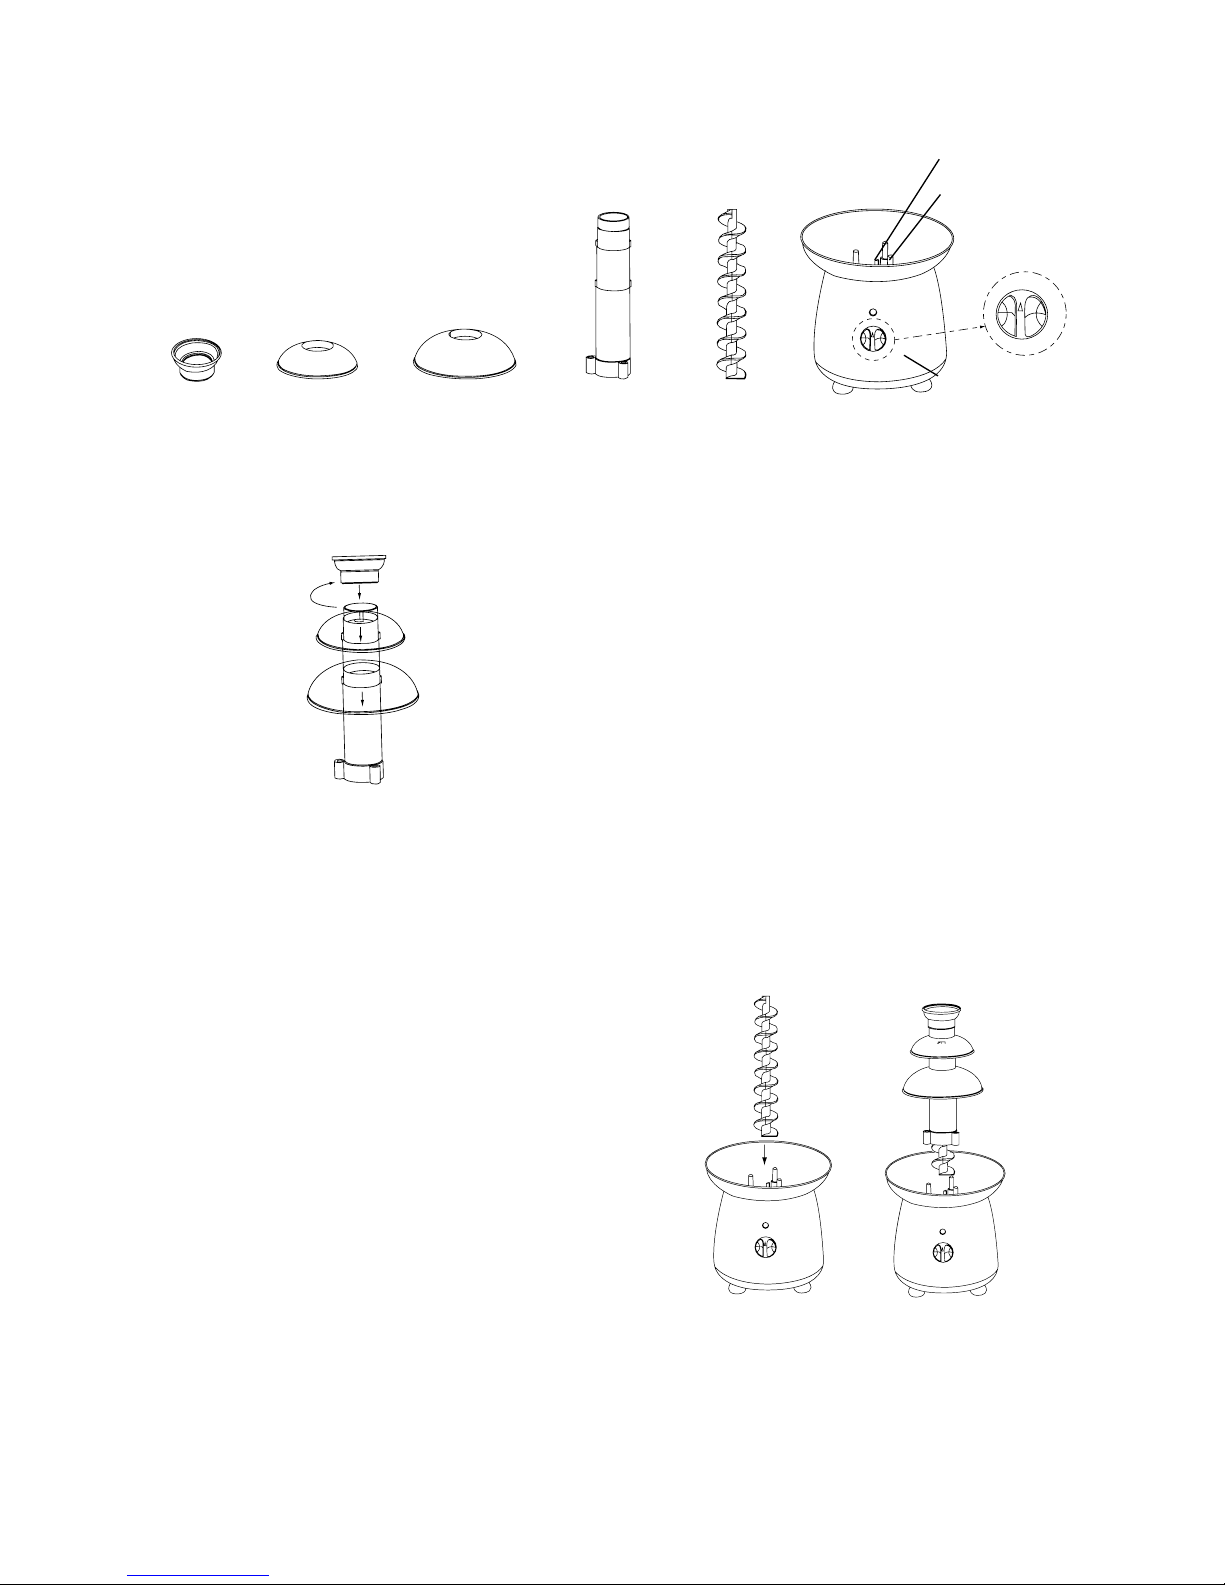
How to Assemble Your Chocolate Fountain
Assembly of the Tower
1. Hold the Tower piece upright and slide the
Lower Tier onto the lower groove.
2. Repeat the above with the Upper Tier.
3. Place the Top Tier Cover on the top of the
Tower. To fit into place you will need to twist
the Cover until it locks firmly into position.
H
EA
T
/F
L
OW
H
EA
T
O
F
F
4. Tower
H
EA
T
/F
L
OW
H
EA
T
O
F
F
5. Auger
Base
Motor Base Pin
Guiding Pins
H
EA
T
/F
L
OW
H
EA
T
O
F
F
H
EA
T
/F
L
OW
H
EA
T
O
F
F
3. Lower Tier1. Top Tier
Cover
2. Upper
Tier
H
EA
T
/F
L
OW
H
EA
T
O
F
F
H
EA
T
/F
L
OW
H
EA
T
O
F
F
Assembly of the
Fountain
1. Place the base on a firm, level surface.
2. Put the Auger onto the Motor Base Pin. The
triangular slot will fit tightly over the Motor
Base Pin.
3. Place the assembled Tower over the Auger
and fit onto the Guiding Pins.
3. Always ensure your Chocolate Fountain is
perfectly level. This is very important as the
Fountain must be level to ensure the chocolate
flow is even and flowing consistently. It may be
helpful to use a spirit level for this purpose.
Page 7

7
Using your Chocolate
Fountain
• The Chocolate Fountain must be level to
operate properly, so ensure it is placed on a
stable flat surface and make sure the power
cord is away from any water source.
• Ensure the Chocolate Fountain is fully
assembled. Plug into a standard domestic
power outlet and switch the power outlet on.
• Turn the switch to the first position “Heat”.
Allow the unit to warm up for at least 3-5
minutes before adding the melted chocolate.
For tips on melting the chocolate please refer
to the instructions on page 8.
• The chocolate needs to be completely
melted and of a thin consistency to allow
proper flow. Add more oil if the chocolate
is too thick. Use a large spoon to test the
consistency of the chocolate. Dip the spoon in
the melted chocolate and then pour from the
spoon. Chocolate should flow freely, in one
continuous line. It should not drip slowly from
the spoon.
• Carefully pour the melted chocolate into the
bowl at the base of the tower. Fill the bowl
with melted chocolate until the chocolate just
covers the top of the guiding pins.
• Turn the switch to the “ Heat/Flow” position.
You will hear the Auger turning and the
chocolate should be drawn under the tower
and carried up the tower by the auger.
Chocolate should then begin to flow from the
top of the tower and filter over the sides evenly
to the next tier and so on.
Note: It may take 2-3 minutes for the air
bubbles to settle and for chocolate to flow
perfectly smoothly.
Page 8

8
Tips for Melting
Chocolate
• The easiest way to melt chocolate is by using
a microwave.
• Place the chopped chocolate, or chocolate
chips into a microwave - safe bowl.
• Turn the microwave on for approximately 2 - 2
1/2 minutes, depending on the wattage of your
microwave. Stir the chocolate well to remove
all lumps of unmelted chocolate. Microwave
for 10-30 seconds longer, if necessary. Check
frequently as chocolate can burn easily.
• Stir in 3/4 - 1 cup of vegetable oil. Mix well
to ensure the mixture is smooth. Check the
consistency to ensure it is thin, add more oil if
necessary.
• Other liquids may be added at this time, before
adding to the Chocolate Fountain. Try adding
your favourite liqueur, for a sophisticated adult
touch.
• Many foods are suitable for dipping in the
chocolate. Try fruit, marshmallows, biscuits,
waffers, ice-cream balls, fudge and nougat.
Just use your imagination!
Note: DO NOT ADD ANY COLD LIQUIDS
TO THE FOUNTAIN DURING OPERATION.
This will cause your mixture to thicken
and not flow properly.
For Liqueur Flavored
Chocolate
• You can enhance your chocolate sauce with
liqueur. Many flavours are suitable. Add the
liqueur to the melted chocolate mixture, before
pouring into the Chocolate Fountain. If desired,
burn off the alcohol content by boiling the
liqueur for 1-2 minutes before adding.
Note: The type of chocolate used will
determine how smoothly the chocolate
flows over the tiers of the Chocolate
Fountain. Good quality chocolate will
give better results as it has a higher
percentage of cocoa butter. The quality of
the chocolate also influences the taste.
For the best possible results, you can use
chocolate with a high cocoa butter content
(known as couverture chocolate). This chocolate
is available in chips or blocks from specialist
catering outlets and gourmet delicatessens.
Couverture chocolate melts down to a very thin,
runny consistency so it is perfect for use in the
Chocolate Fountain and does not require the
addition of any oil.
Regular milk and dark chocolate also work very
well and taste delicious. Choose premium cooking
chocolate. As this chocolate melts to a thicker
consistency than couverture chocolate, you will
need to thin it with vegetable oil. Use about
1/3 to 1/2 cup of oil per 500 grams of chocolate.
The oil is flavourless so does not influence the
taste of the chocolate. Adding oil will make the
chocolate glossy and smooth.
Compound chocolate is usually sold as chocolate
buttons and is often used for baking, as it holds
its shape when warm. As compound chocolate
is quite thick when melted it is not ideal for use
in the Chocolate Fountain. It is possible to use
compound chocolate in the Chocolate Fountain,
but it does not taste as good, and it will require
the addition of more oil than premium cooking
chocolate.
White chocolate is actually not true chocolate, but
a type of compound chocolate. It is quite difficult
to melt successfully, so it is harder to use in the
Chocolate Fountain, and will require the addition
of more oil in order to flow smoothly.
Desired Flavor Use
Orange Chocolate Grand Marnier
Chocolate Hazelnut Frangelico
Coffee Chocolate Kahlua
Mint Chocolate Crème de Menthe
Chocolate Macaroon Malibu
Page 9
9
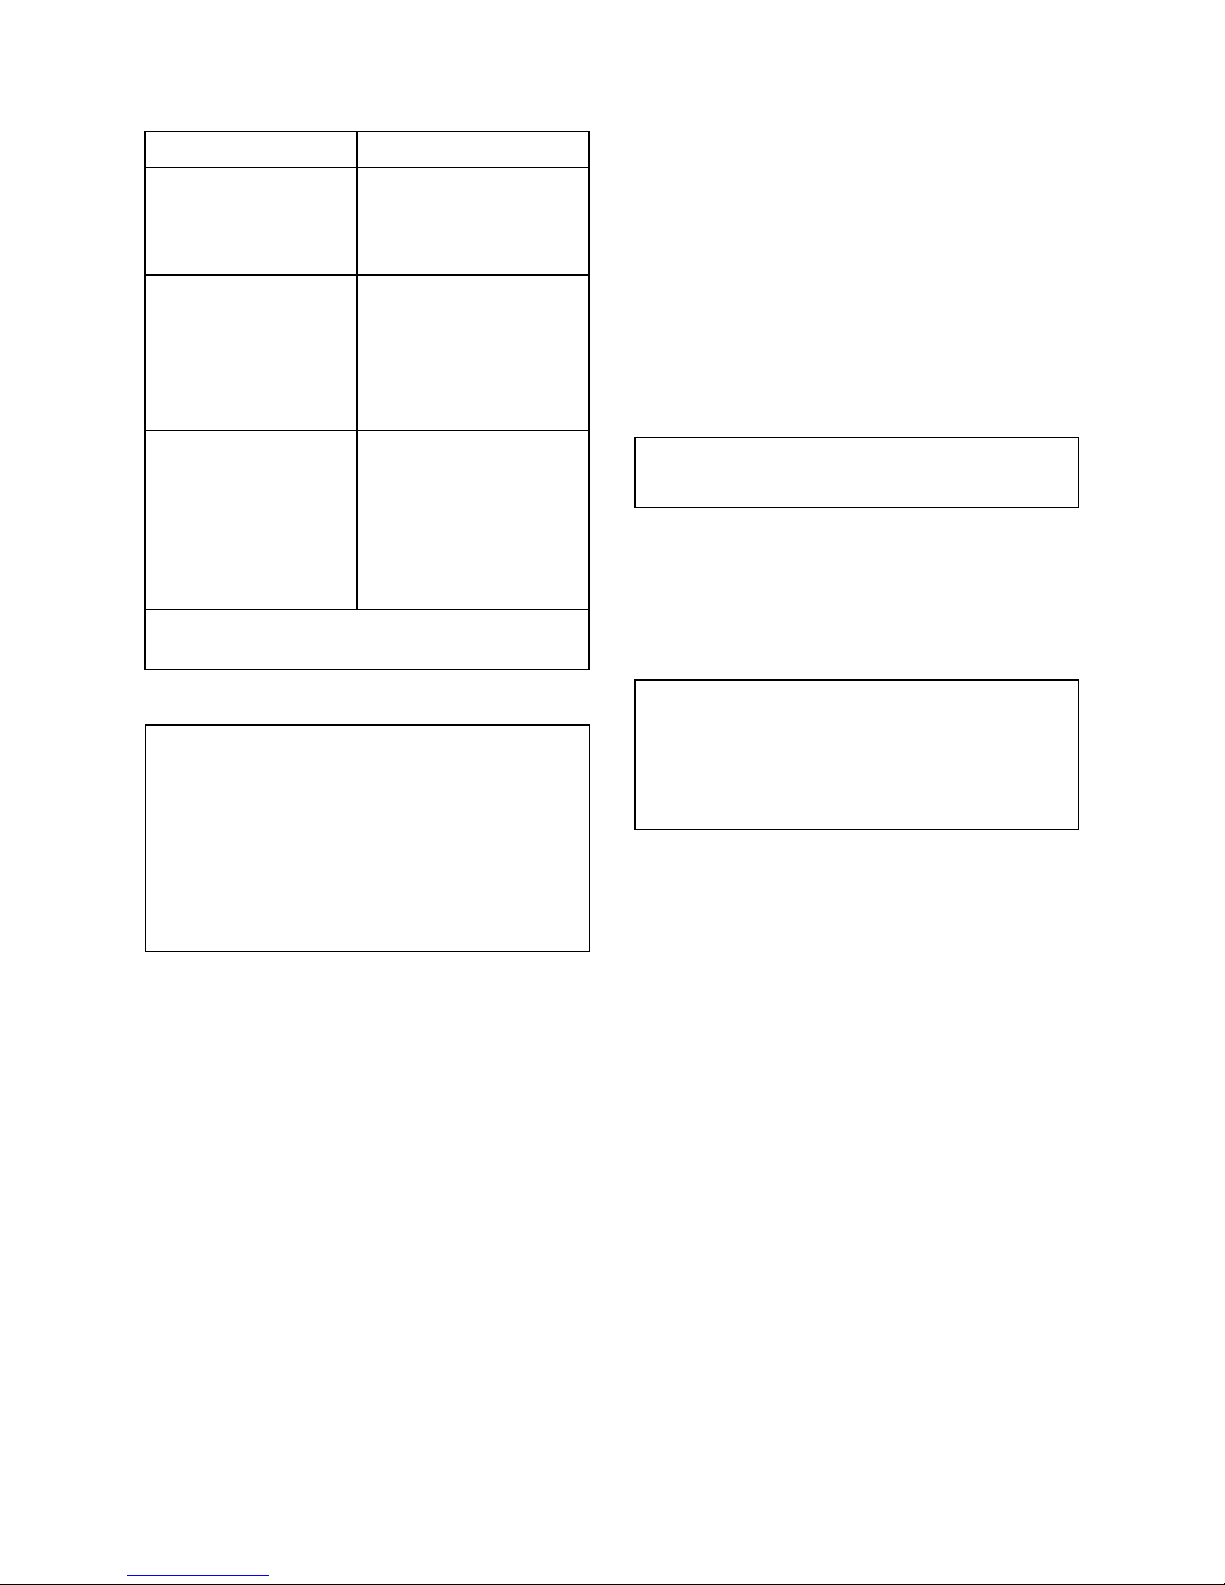
Problem Possible Cause/Remedy
Chocolate is dripping,
not flowing
Chocolate is too thick,
thin with vegetable oil.
Unit is not LEVEL. Level
the unit.
Chocolate is
flowing unevenly, not
in smooth sheets
Unit is not LEVEL,
level the unit so that
the chocolate is evenly
distributed around the
tower to ensure proper
sheeting.
Flow is intermittent,
interrupted,
not flowing properly
Check for chunks of
food in the base that
may be clogging the
chocolate flow to the
base of the tower,
remove any
chunks found.
Trouble Shooting
NOTE: To prolong the life of your
Chocolate Fountain, be sure to follow
the cleaning instructions after every use
and make sure the tower is flushed while
washing the unit to prevent chocolate
build up. Never use anything abrasive
on the base , as abrasive cleaners may
damage the finish.
DO NOT ADD COOL OR COLD LIQUID – THIS
WILL STOP THE FLOW OF THE FOUNTAIN
Cleaning
Before cleaning, switch off the appliance, unplug
at the power outlet and allow to cool. NEVER
IMMERSE THE BASE IN WATER OR ANY
OTHER LIQUID.
• Make sure the unit is unplugged before
cleaning. The Tower, Auger and base can be
Hot. Allow parts to COOL before touching.
• Before using the appliance for the first time
and after every use, ensure the Tower and
Auger are washed thoroughly.
DO NOT WASH ANY PARTS OF THIS
APPLIANCE IN THE DISHWASHER.
• To make cleaning of the Chocolate Fountain
easier, carefully remove the Tower and
Auger (after cooling), wipe off any remaining
chocolate with paper towels. Soak in hot water
for 5 minutes, then wash in warm, soapy
water, rinse and dry.
Note: DO NOT POUR EXCESS OR
LEFTOVER CHOCOLATE DOWN THE
SINK. POUR INTO A PLASTIC BAG
OR DISPOSABLE CONTAINER THEN
DISPOSE INTO THE RUBBISH.
• Carefully pour out as much remaining
chocolate from the base bowl as possible.
Use a damp sponge or cloth to wipe clean the
remainder and to clean the outside of the unit.
Wipe with a non-abrasive towel to dry.
Page 10

10
Notes
Page 11

11
Notes
Page 12
12
DO NOT SEND IN THIS WARRANTY
Fill out the following details and file with your
purchase invoice.
RETAIN & FILE WITH YOUR RECEIPT.
Your Purchase Receipt/Invoice is proof of date
of purchase. You must be able to present it at
the place of purchase to obtain a replacement or
service under warranty.
Premium Appliance Brands Ltd reserves the right
to discontinue items, modify designs and change
specifications without incurring obligation. Whilst
every effort is made to ensure that descriptions,
specifications and other information in this
publication is correct, no warranty is given in
respect thereof and the company shall not be
liable for any errors therein.
Purchased from:
Date of Purchase:
NOTE: Consistent with our continuing
product development policy,
improvements may have been made
which render the contents of this
package slightly different to that shown.
Cat. No. BECF40
June 2008
Warranty
This guarantee does not confer any rights other
than those expressly set out below and does
not cover any claims for consequential loss or
damage.
This guarantee is offered as an additional benefit
and does not affect your statutory rights as a
consumer.
This guarantee is valid in the UK and Ireland only.
Premium Appliance Brands Ltd warrant this
product for a period of 2 years from the date of
purchase for all parts defective in workmanship or
materials.
The product or defective parts will be replaced
free of charge.
WARRANTY CONDITIONS
1. This warranty is only valid for appliances
used according to the manufacturer’s
instructions.
2. This appliance must not be modified or
changed in any way.
3. Connection must be to the voltage
requirements as specified in the ratings label
located on the product.
4. The manufacturer does not accept liability
for any direct or consequential damage,
loss or other expense arising from misuse
or incorrect installation and operation of the
appliance.
5. Warranty will only be given where proof of
purchase is provided, e.g. original invoice.
6. Not designed or warranted for industrial or
commercial use.
 Loading...