

Page 1
1
45cm Dishwasher
BDW86S
BDW86S -F
BDW86X
BDW86X -F
BDW86W
BDW86W -F
20130621 issue0
For warranty service call 1300 373 199 to
connect you to the nearest authorised
service centre
Page 2
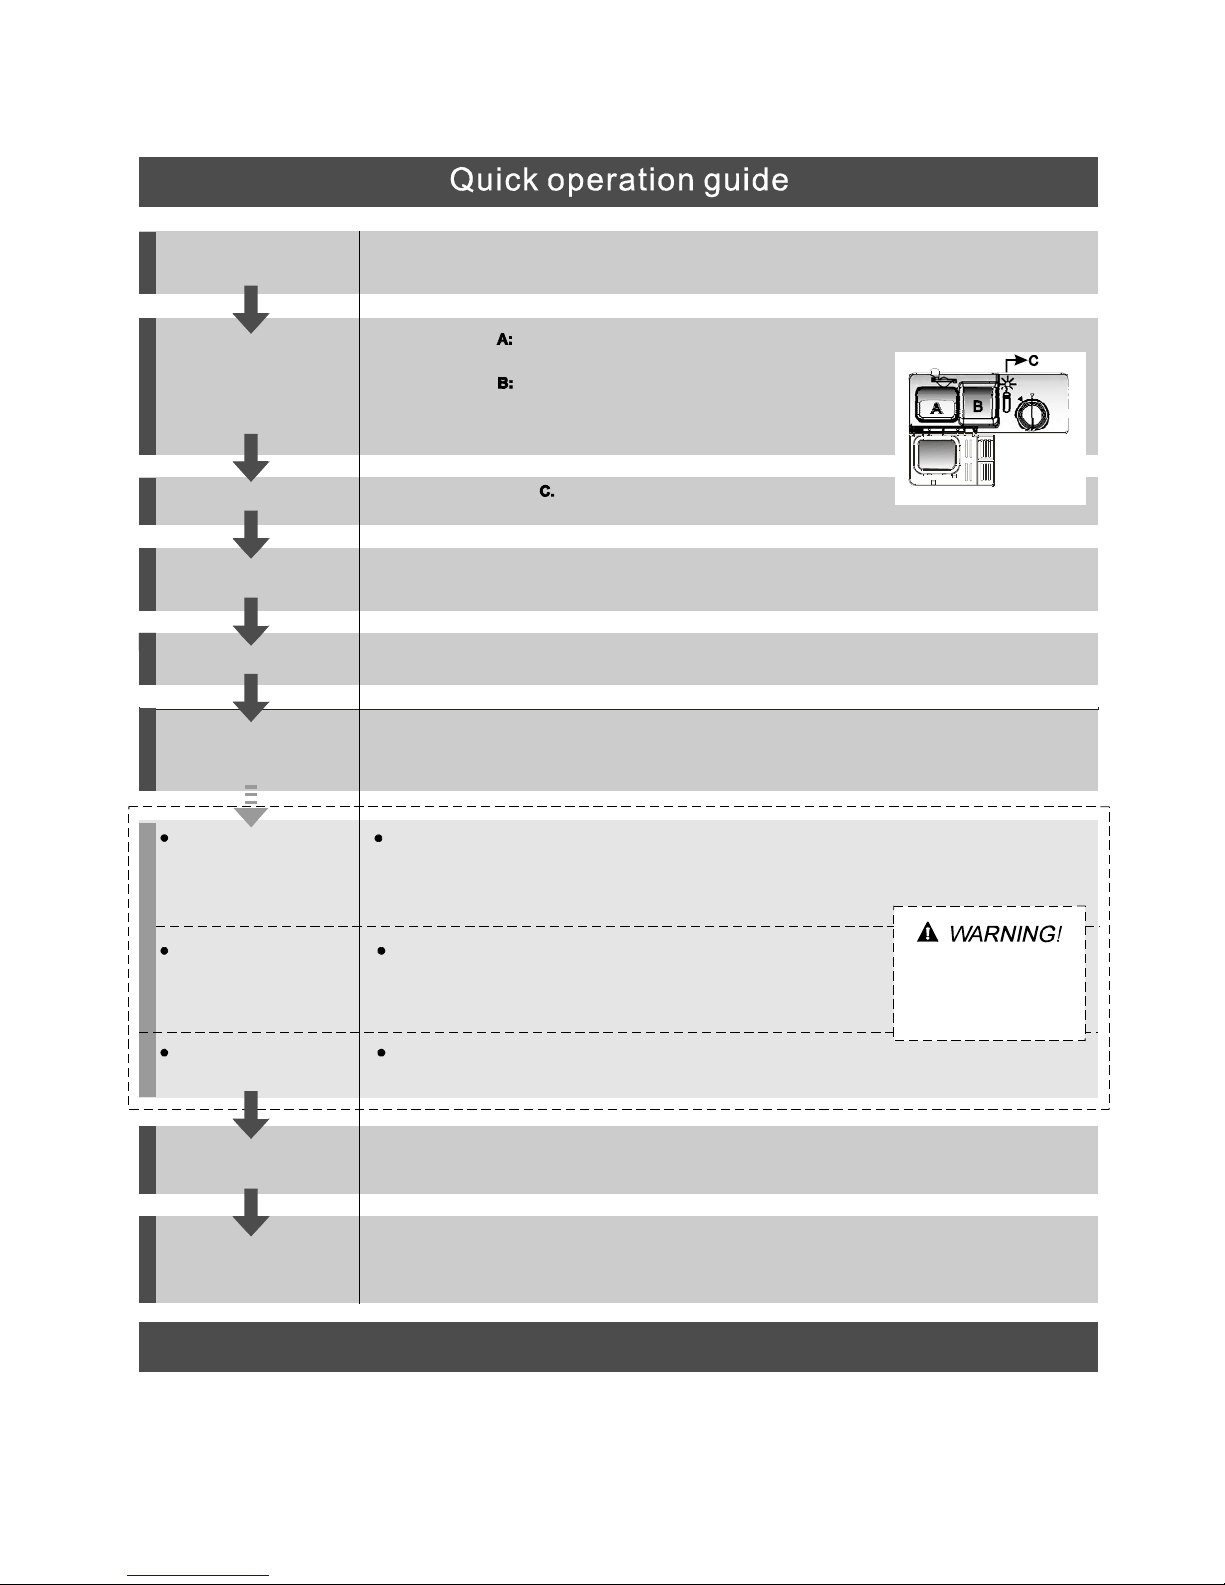
Compartment
Fillmain-washdetergent.
Compartment
Fill pre-wash detergent.
(Follow the user instructions!)
Mechanical indicator
Check the rinse aid level
Load the baskets
Select a programme
Close the door, turn on the water tap . The machine will start working
after about 10 seconds.
Running the dishwasher
Switch off the appliance
Turn off the water tap,
unload the baskets
Fill the detergent dispenser
Warning: wait a few minutes (about 15 minutes) before unloading the dishwasher to avoid handling
the dishes and utensils while they are still hot and more susceptible to break.
They will also dry better. Unload the appliance, starting from the lower basket.
Changing the programme
Add forgottendishes in the
dishwasher.
Scrapeoff any large amount of leftover food.Soften remnantsof burntfoodin pans,
thenl oad the baskets.Refer to the dishwasherloadinginstructions.
Press the Programme button until the selected programme lights up.
( See the section entitled Operationg instruction )“”
When the working cycle has finished, the buzzer of the dishwasher will sound 8 times, then stop.
Turn off the appliance using the ON/OFF button.
If the appliance is switched
off during a wash cycle.
Open t he door carefully.
Hotsteam may escape
when the dooris opened!
If the appliance is switched off during a wash cycle, when switched
on again, please re-select the washing cycle and operate the dishwasher
according to the original Power-on state ).
Switch on the appliance Press the On/Off button to switch on the appliance, Open the door.
1.Open the door a little to stop the dishwasher.
2.After the spray arms stop working, you can open the door completely.
3.Add the forgotten dishes.
4.Close the door, the dishwasher will start running again after 10 seconds.
Electric indicatoron controlpanel(if provided).
Fordetailed o peratingmethodread the correspondingcontenton the instruction manual.
1.A running cycle can only be modified if it has been running for a short time.O therwisethe detergent
may have already been released and the water already drained. If this is the case, the detergent
dispenser must be refilled.
2. Press the running program button more than 3 second to cancel to cancel the running programme .
3. Select a new programme.
4.The dishwasher willrestart after 10second.
Page 3
Toreview the section on t roublesho oting Tips
willhelpyou t osolvesome common problems
byyourself .
Dear Custom er ,
Pleasecarefully read thismanualbeforeusingthe
dishwasher,i t will helpyouto use and maintainthe
dishw ash er properly.
Passit on to any s ubsequent owner of the appliance.
This ma nual c on tain s sec t ion s on s afe ty In stru ct ion s ,
Operating Instructions, Installation Instructions and
Troubles hooti ng Tips, etc .
The man ufacturer, fol lowing a policy of c onstant
development and u pdati ng of the pr oduct, may
make m odifications witho ut giving prior notice.
Keepit torefer to it at a later date.
Ifyou can not solve t he problems by yourself ,
please ask fo r t he help o f professiona l technician s.
DishwasherFeatures.................................... ...2
Attention before or after loading theDishwasher
Baskets..........................................................6
FilteringSystem.............................................11
Car ing fo r the Di s hw as he r.... .. .. .. . ... .. ... . . ....... . .12.
A Fill th e Rins e Aid Dispen ser... .... .. . ... .. .. 3、 ..... ...
B Function of Detergent ............. ............4、 .... .. ..
Loading the upper ......... ....... ........... ...7Basket ...
Loadi ng the Lowe r ....... .... ... . ..... .. .........7Basket ..
Cutlery Basket................................................8
WashCycleTable.... .......................................9
Turningon the Ap pliance................................10
ChangetheProgramme.............. ................10....
At the Ene of the Wash C ycle........ ............. ......10
Positioning theAppliance....... ............ ..........13..
Water C onnec tion........... ... ......... .. ........ . ...... .14.
AboutP owerConnection........................ .......13.
Startof dishwasher................ ................ ......15..
Beforecalling for service........................... .....16.
Errorc odes.. .................................. ..............1 7.
Technical information...... ........................ .....18..
Cont rol Pa n el..... .. .. .. .. . ... ... .. .. .. .. ... . ... .. .. .. .. ....... .2
This a ppliance is intended to be u sed in household and
similar applications such as:
staff kitchen areas in shops, offices a nd other working
environments;
farm ho uses;
byclient s in hot els, motels a nd other residential t ype
environments;
bed and breakfast type e nvironments.
–
–
–
–
Page 4
This appliance must be grounded. In the event of a
malfunction or breakdown, grounding will reduce
the risk of anelectric shock by providing a path of
least resistance of electric current. This appliance
is equipped with a cord having an equipmentgrounding conductor and a grounding plug.
The plug must be plugged into an appropriate outlet
that is installed and grounded in accordance with
all local codes and ordinances.
Improper connection of the equipment-grounding
conductor can result in the risk of an electric shock.
Check with a qualified electrician or service
representative if you are in doubt whether the
appliance is properly grounded. Do not modify the
plug provided with the appliance; If it does not fit
the outlet. Have a proper outlet installed by a
qualified electrician.
Keep children away from detergent and rinse aid, keep
child awayfromthe opendoorof the dishwasher,
there could still be some detergent left inside.
ren
Do not abuse, sit on, or stand on the door or dish
rack of the dishwasher.
Do not touch the heating element during or
immediately after use.
(This instruction is only applicable to machines
with a visual heating element.)
Do not wash plastic items unless they are marked
dishwasher safe or the equivalent. For plastic items
n
ot so marked, check the manufacturer's
recommendations.
Use o nly detergent and rinse additives
designed for an aut omatic dishwasher.
Never u se soap, laundr y de terg ent, or h and
washing detergent in your dishwasher.Keep
these products out of t he reach of children.
During installation, thepower supply mustnot
be excessiv ely or dangerously bentor flattened.
Do not tamper with controls.
Do not operate your dishwasher unless all
enclosure panels are properly in place. Open
the door very carefully if the dishwasher is
operating, there is a risk of water squirting out.
Do not place any heavy objects the
door when it is open. The appliance could tip
forward.
on or stand on
When load in g items to be w ashed :
1) L ocate sharp itemsso thattheyare not likely
todamage thedoorseal;
2 Warni ng: Knives and otherute nsils with
sh a rp points must be load ed in th e basket
with their points d own or p lace din a
horizonta lposition.
)
When us ing your dishwasher, yo u should
prevent plastic items from coming i nto contact
with the he ating element.(T his instruction is only
applicable to m achines with a visual h eat ing
element.)
If th e s upply cord is d am aged, it must be replaced
by th e m anufact urer or its se rvice agent or a
similar ly quali fie d person i n orde r to avoid a
hazard.
Please d ispose of packing materials properl y.
Use the dishwasher only for its intended function.
Remove the door to the washing compartment when
removing an old dishwasher from service or discarding it.
Dishwasherdeterge nts are stronglyalkaline, they
can be extrem e ly dange r ous if swa llow e d.Avoid
contact with skin and eyes and k eep children away
from th e dishwasher when the door is op en.
Check thatthedetergentcomparmentisempty
after com pletio n o f the wash cycle.
The app liance i s to b e connected to t he water
mains u sing new hosesets and thatoldhose-sets
sho uld not be re u sed.
The maximum number of place settings t obe
washed i s 8.
The maximum permissible inlet water pressure is
1Mp a .
The minimum permissibleinlet w ater pressure is
0.04Mpa.
Children shouldbe supervised to ensure thatthey do
not play with the appliance.
This appliance is not intended for use by persons
(including children with reduced physical, sensory or
mental capabilities, or lack of experience and
knowledge ,unless they have been given supervision
or instruction concerning use of the appliance by a
person responsible for their safety.
)
When using your dishwasher, follow the precaut ions listed below:
The doo r sh ould not be left o pen,
since th is could increase the risk of trippi ng.
Page 5
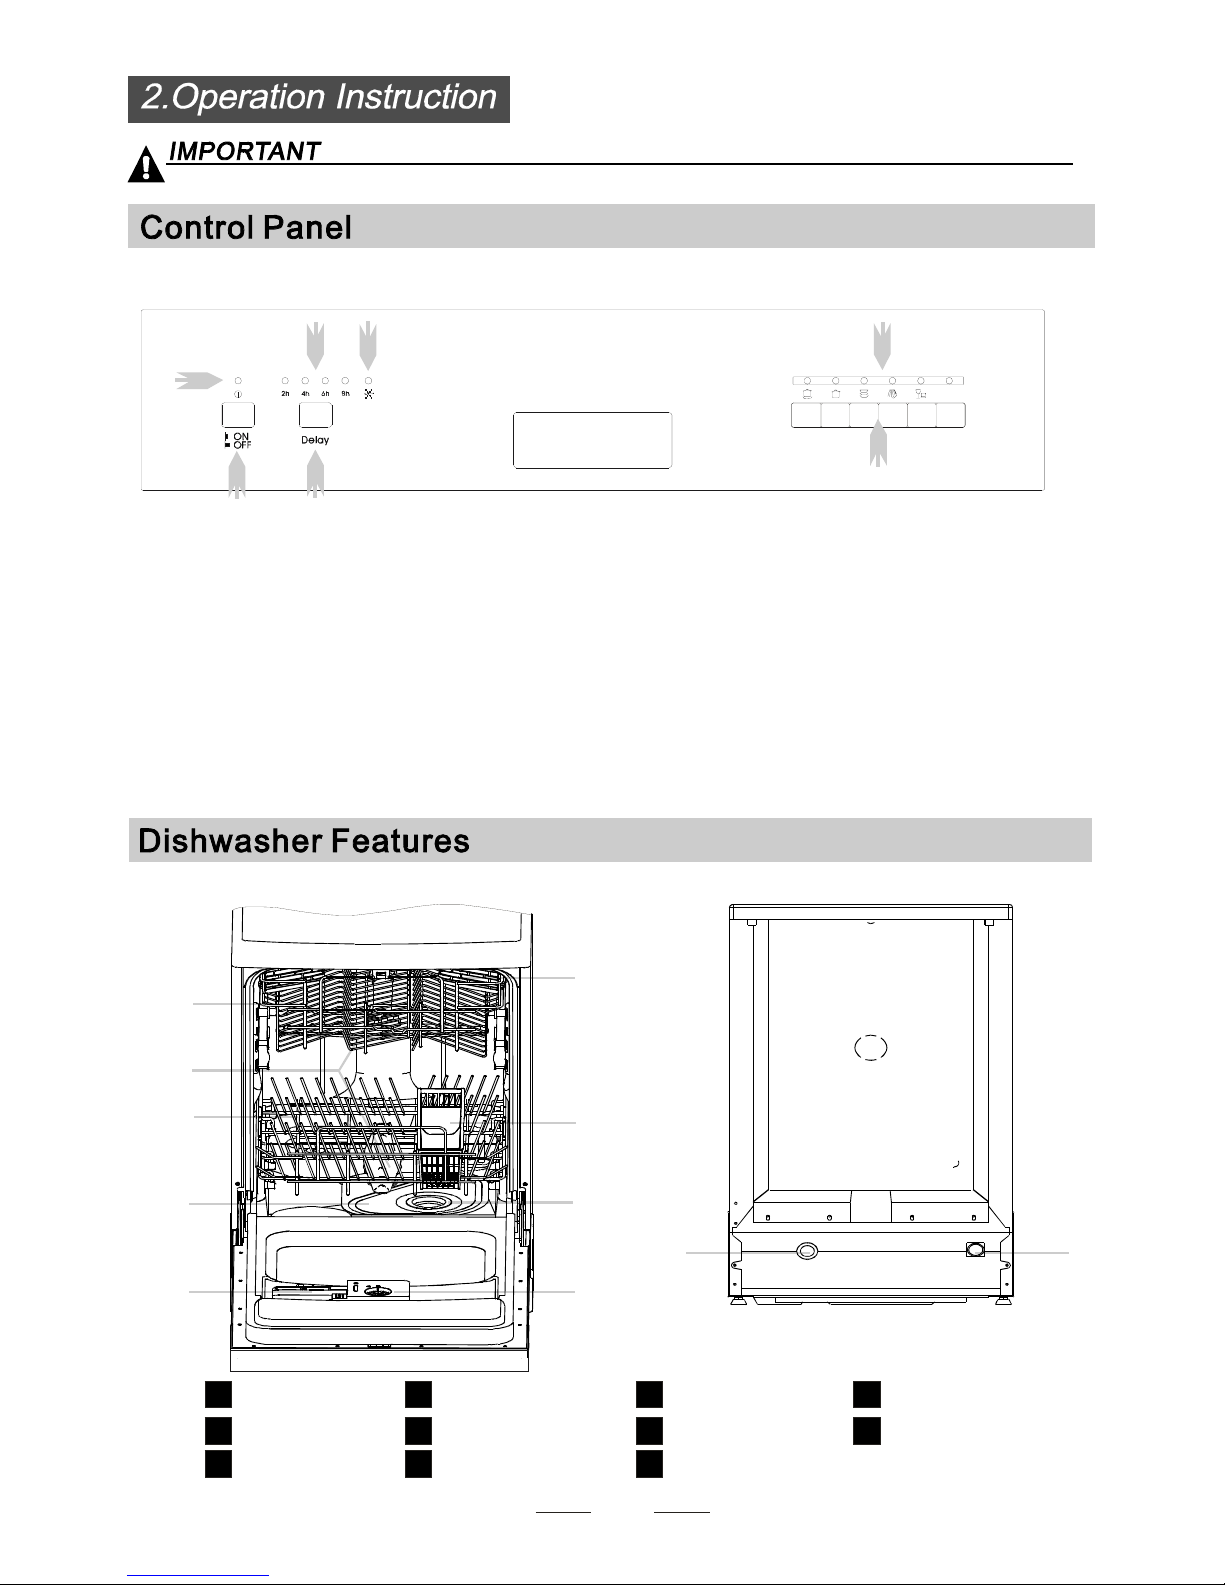
10 11
Back View
Front view
2
before using it for the firsttime.
To get the bestperformancefrom yourdi shwasher, read all o peratinginstructions
Main Filter
Detergent D ispenser
Cup Shelf
Cutlery Basket
CoarseFilter
Ri ns e Ai d Dis p ens er
Inletpipeconnector
Drain pipeconnector
Lower Basket
Spray Ar ms
Upper Baske t
1
5
6
7
8
9
10
11
3
2
4
5 Program B utto n:Tos elect washing progra m
whenpress thebutton.
6 Delayed S tart Button: Press this button to set the
delayed hours forwashing.There are4 choices.
2 Power Lig ht :Tobe onwhen th e ON/OFF Button is
Pressed down.
3 Rin seAid Warning L ight : Tobe onwh en the
rinseaiddispenser needs t oberefilled.
1 ON/ OFF Button: To tu rn on/off the po wer supply.
4 P rogr am indi cato r light .
All in one
1
2
3
4
6
7
7 Delay indicator: d ifferent indicator means different delay
time.
5
1
2
3
4
5
6
7
8
9
Page 6
Be f o r e usi ng you r dishwashe r for t he first t ime :
3
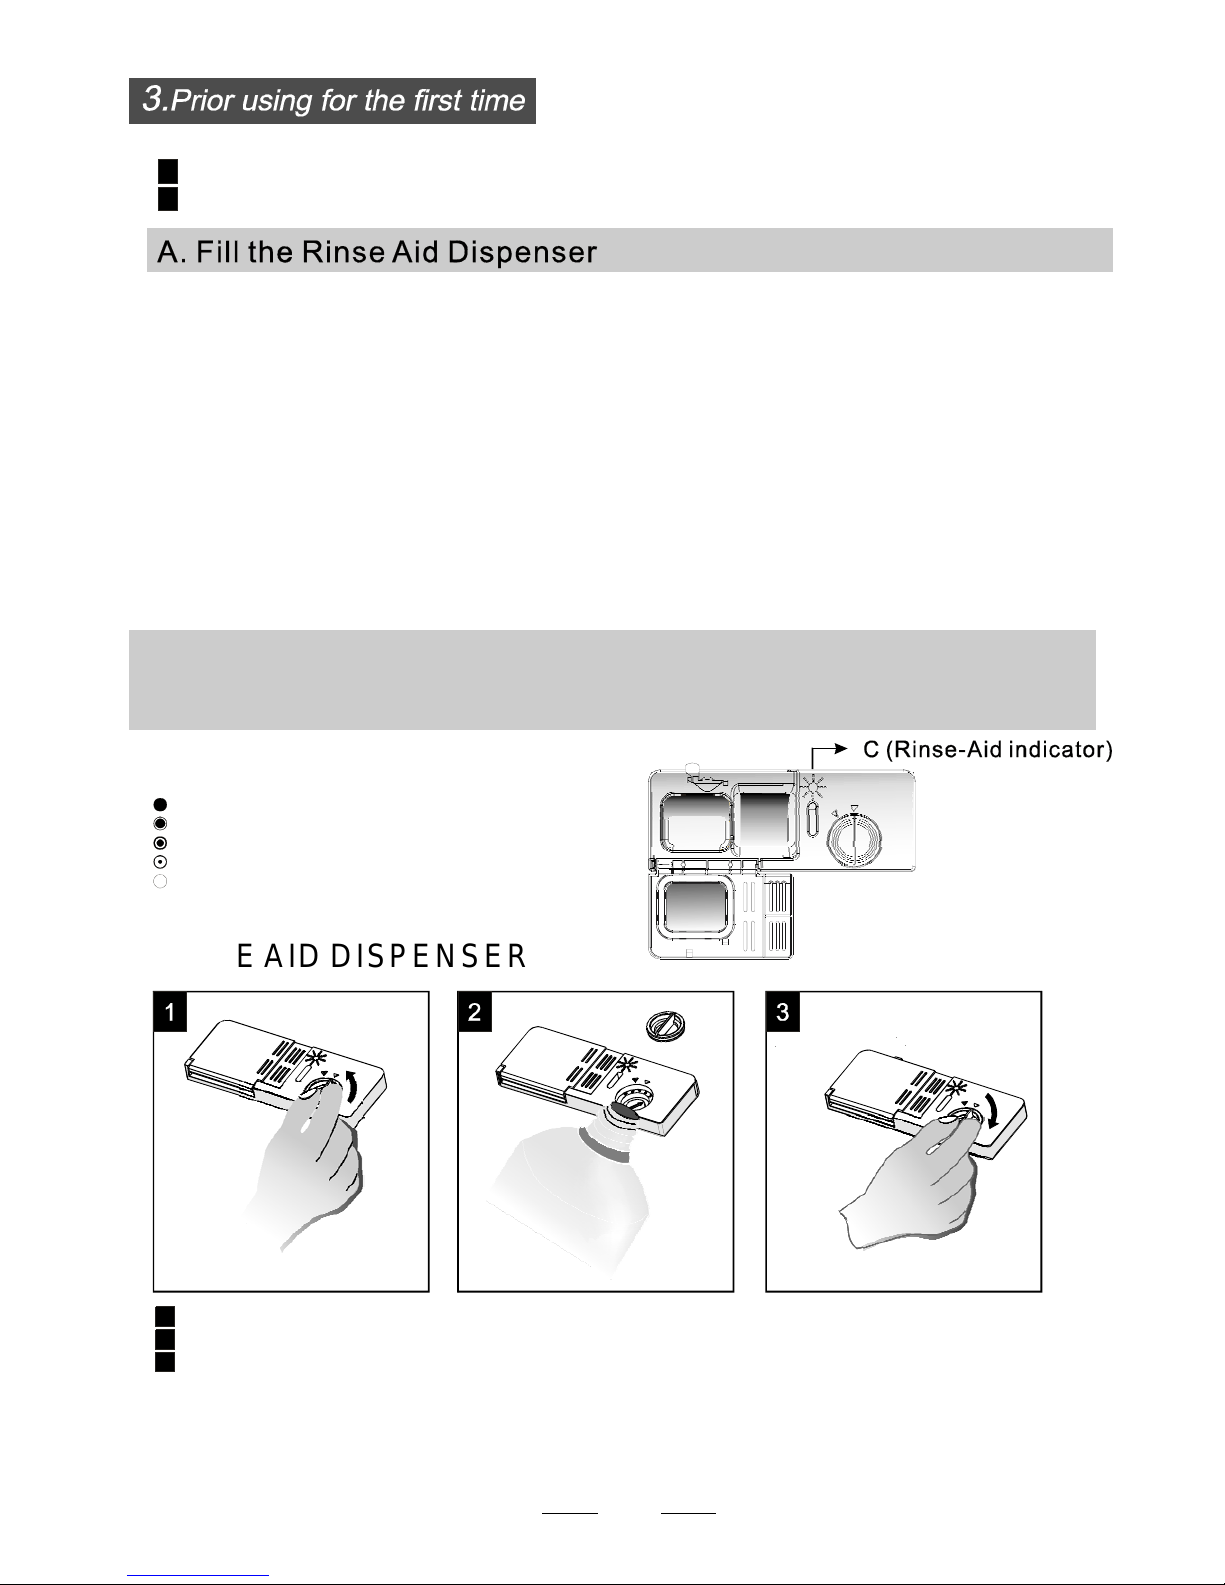
A. Filltherinse aid dispenser
B. Fill in dete rgent
Therinseaid is released during the final rinseto preventwater fromformingdroplets onyourdishes, which can
leavespotsand streaks. It alsoimprovesdryingbyallowing water to roll offthe dishes.Your dishwasheris
designed to use l iquid rinse aids. The rinse a id dispenser is located insid e t he d oor next to the detergent dispen ser.
To fill the dispenser, o pen t he cap and pour the r inse aid into t he dispenser unti l the le vel indicator turns completel y
black.The volume of therinseaidcontainer isabout 110ml.
RinseAid Disp enser
Functionof RinseAid
Rinse aid is automati call y added durin g the last rinse, ensur ing thor ough rin sing, and sp ot and streak free dryi ng.
Attent ion!
Only use branded rin se aid for di shwasher. Never fill the rinse aid disp ense r with any other subs tan ces
(e.g. Dishwa sher clean ing agen t, liquid dete rgen t). This would da mage the applia nce.
Astherinseaid diminishes, thesizeof theblack dot
on t he rinse aid level indicat or change s, as i llustr ated belo w.
Full
3/4full
1/2full
1/ 4 full - Should refillto eliminate spotting
Empty
If ther e is n o rinse-aid war n i ng li ght in the c on tr ol pan el, you can ju dg e the amou nt of rinse- a id by th e col or of the
optical level
indicator "C" locatednext to thecap. Whentherinse-aid container is full,thewholei ndicator will be dark.Asthe
rinse-aid
diminis hes, the size of t he dark dot decreases . You sho uld never let the rinse aid get below 1 / 4 ful l.
When t o Ref ill the Rinse A id D ispe nser
RINSEAID DISPEN SER
To open t he dis penser, turn the cap to the "open" (left) arrow an d lif t it out.
Pourthe rinseaid into the dispenser, beingcareful not to overfill.
Replace thecap by insertingitalignedwith " open"arrowand turning it tothe closed(right) arrow.
Be c a ref ul not to ove rfil l the disp ens er, b eca use th is could c ause o ver sud sing. W ipe away any sp ill s
witha damp cloth.Don'tforgetto replace the capbefore you close dishwasherdoor.
Attention!
Clean up a ny rinse aid split during filling with an absorbent cloth to avoid excess foaming
during the ne xt wash.
1
2
3
Page 7
Adjusti ng R inseA id Disp enser
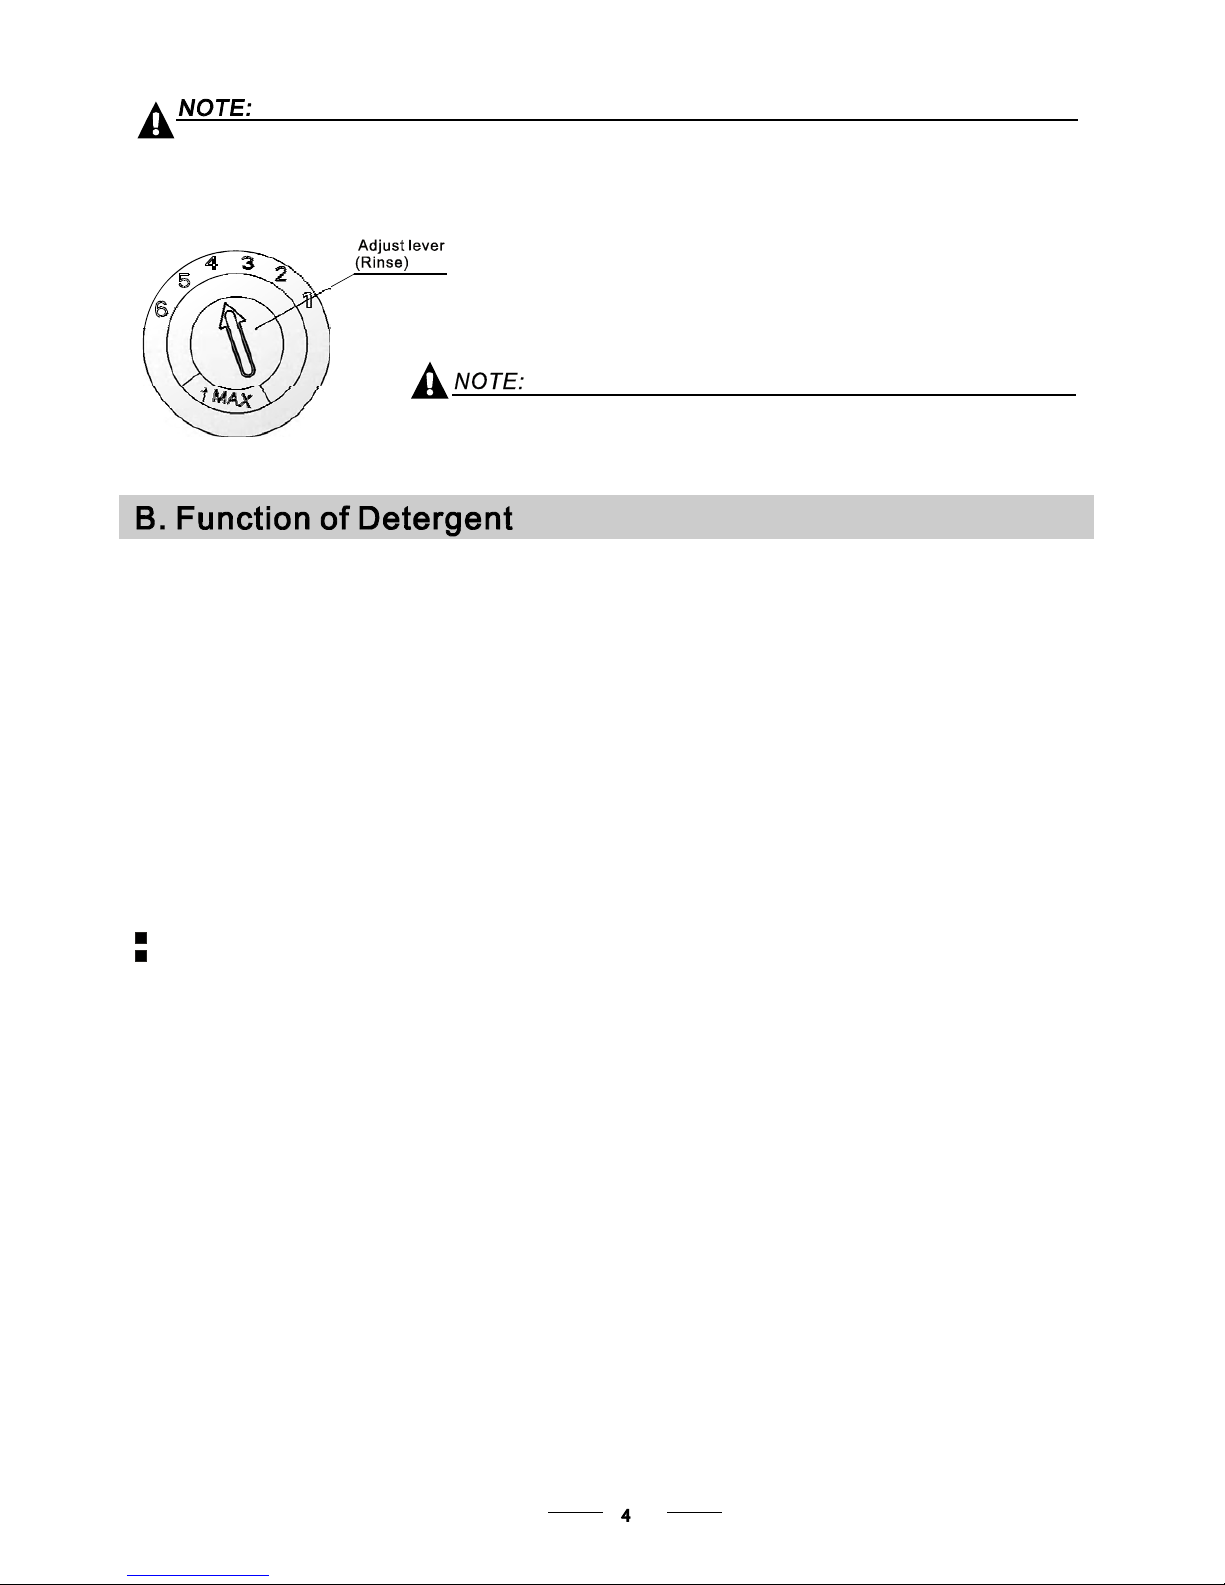
The r inse aid dispenser has six or four settings. Al ways start with the dispens er
set o n "4". If sp ots and poor drying are a p roblem, increa se the amount o f r i nse
aid d ispensed by removing the dispe nser lid and r otating the dial to "5". If the
dishes s till are not drying properly or are show spots, adjust the dial to the n ext
higher lever until your dishes are spot-free. The recommended setti ng is "4".
(Factoryvalue is "4".)
Increasethe doseif there aredropsof watero rlime spotsonthedishes after washing.
Reduce i tif there are stickywhitis h stainson your dishesor a bluishfilmonglassware or
knifeblades.
during the next w ash.
Don't f orget to replace the cap be fore you close dishwa sher d oor.
Cl ean up a n y rins e aid sp il l ed while du rin g fill i ng wi th an abso rbe nt cl ot h to av oid ex cessiv e f oaming
Detergents with its chemic al ingredients a re necessary to remove dirt, crus h dirt an d transport it ou t of t he dishwasher.
Mostof the commercial qu ality d etergentsare suita bleforthis purpose.
Deterg ents
There are 3 sorts of detergen ts
1.With phosphateand with chlorine
2.Withphosphate and without chlorine
3.Withoutphosphate and without chlorine
Based on the ir chemi cal comp o sitio n, deter gen ts can be spli t in two basic typ es:
The use o f normal washing programs in combination with concentrated detergen ts
reduces pollution and is g ood for y our dishes; these wash programs are specifically matched
tothe dirt- dissolving prope rties of the enzymes of the c oncentra ted detergent. For this reason
normal washprograms in whichconce ntrateddetergents are usedc an achieve the same
results that canotherwise only be achievedusing intensive programs.
“”
“”
“”
Detergent tablets ofdifferent brands dissolve at differentspeeds. Forthisreasonsome
detergent tablets cannot dissolve and devel op their f ull cleaning power during short
programs.There fore please uselongprograms when usingdetergenttablets, to
ensure t he complet e r emoval of de terg ent residuals.
The dispenser must be refilled before thes tart of e ach wash cycle f ollowi ng t he instructions
provided in thewash cycle table.Your dishwasher uses lessdetergentandrinseaid than
Conventiona l dishwasher. Genera lly,only one tablespoon of detergent is needed for
a normal wash load. M ore heavily soiled items need more d etergen t. Always add the
detergent just before starting the dishwash er, otherwis e it c ould get damp a nd will not
dissolveproperly.
Conc entrated D etergent
Dete rgentTabl ets
Dete rgent Di spense r
conventional, alkalin e d etergents with caustic componen ts
low alk aline concentrated deter gents with n atural enzymes
Normally new pulverised detergent is without phosphate. Thus the w ater softener function of
phosphate is no t given. In this case we recomme nd to fi ll salt in the salt containe r even w hen
the hardness o f water is only 6 dH. If detergents witho ut phosphate are used in t he case of ha rd water
often white sp ots appear on d ishes and glasses. In this case pl ease add m ore detergent to reach
better r esu lts. D etergents witho ut chlorine do only bleac h a li ttle. Strong and coloured spots will not
be rem oved completely. In this case please choose a program wit ha higher te mperature.
°
Page 8
AmountofDetergenttoUse
Proper U seof Detergent
Us e only deterge nt speci fically made for th e use in dishwash er s. Keep y o ur det erge nt fr esh a n d dry.
Don't put powdered d etergent into the dispenser until you're ready to wash dishes.
Dishwasher detergent is co rrosive! Take care to keep it out of reach of children.
Always add the detergen t j ust before starting each wash cycle.
Only use brande d det ergent aid for d ishwasher.
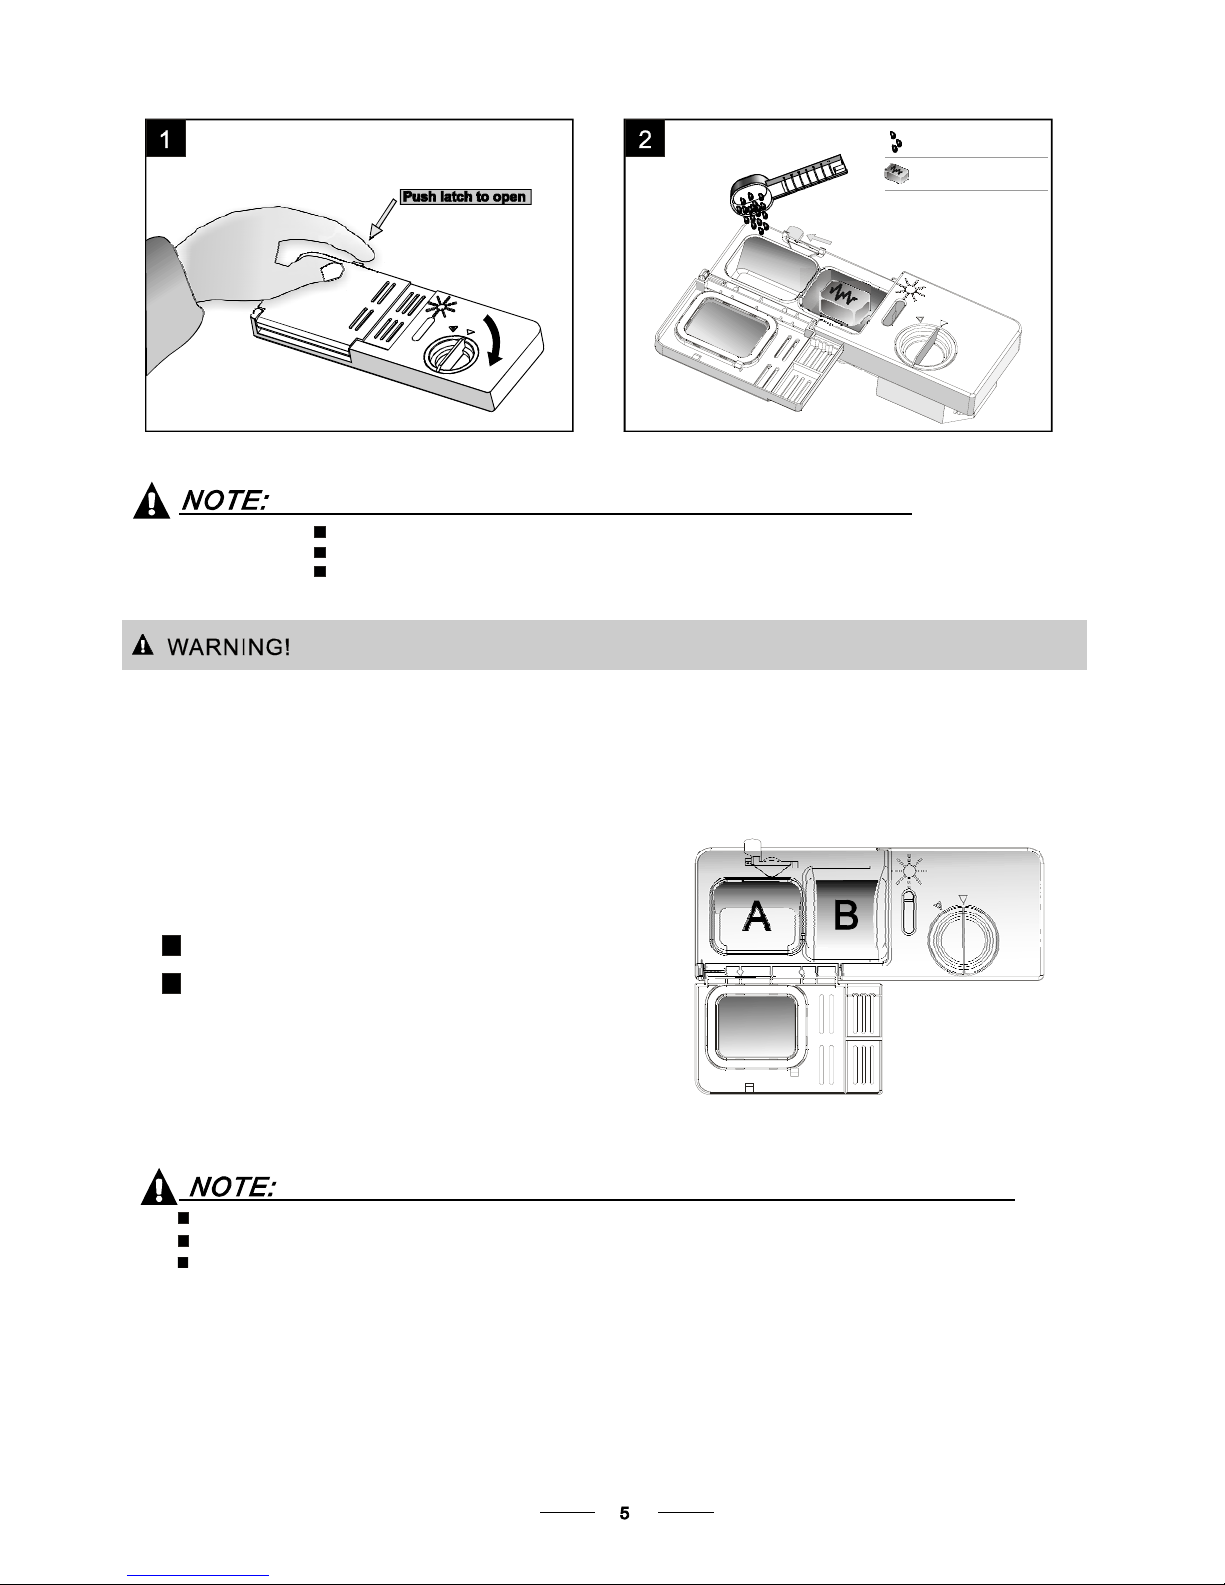
Ifthe lid is cl osed: press release button. The lid will sp ring open.
Detergent tablet
Detergent pow der
Fill t he detergent dispenser with detergen t.
The mar king indicates the dosing levels , as
illustrated on the right:
The pla ce of ma in w ash cycle d eterg ent placed.
The pla ce of pre-wash cy cle detergent placed.
Please observethemanufacturers dosingandstorage
Recommendations as stated on the det ergent packag ing.
Close the li d and press until i t locks in pl ace.
If th e d ishes are heavily soiled , place a n a dditiona l
detergent dose in the pre-w ash detergent chamber. T his detergent will take effect during the pr e-wash phase.
A
B
Fillin Detergent
You find inf ormation about the amount of detergent for th e single programme on the last page.
Please aware, t hat according to the level soiling and the spec ific hardness of water d ifference s ar e possible.
Please observe the m anufactur er's recommendations on the detergent packaging.
Page 9
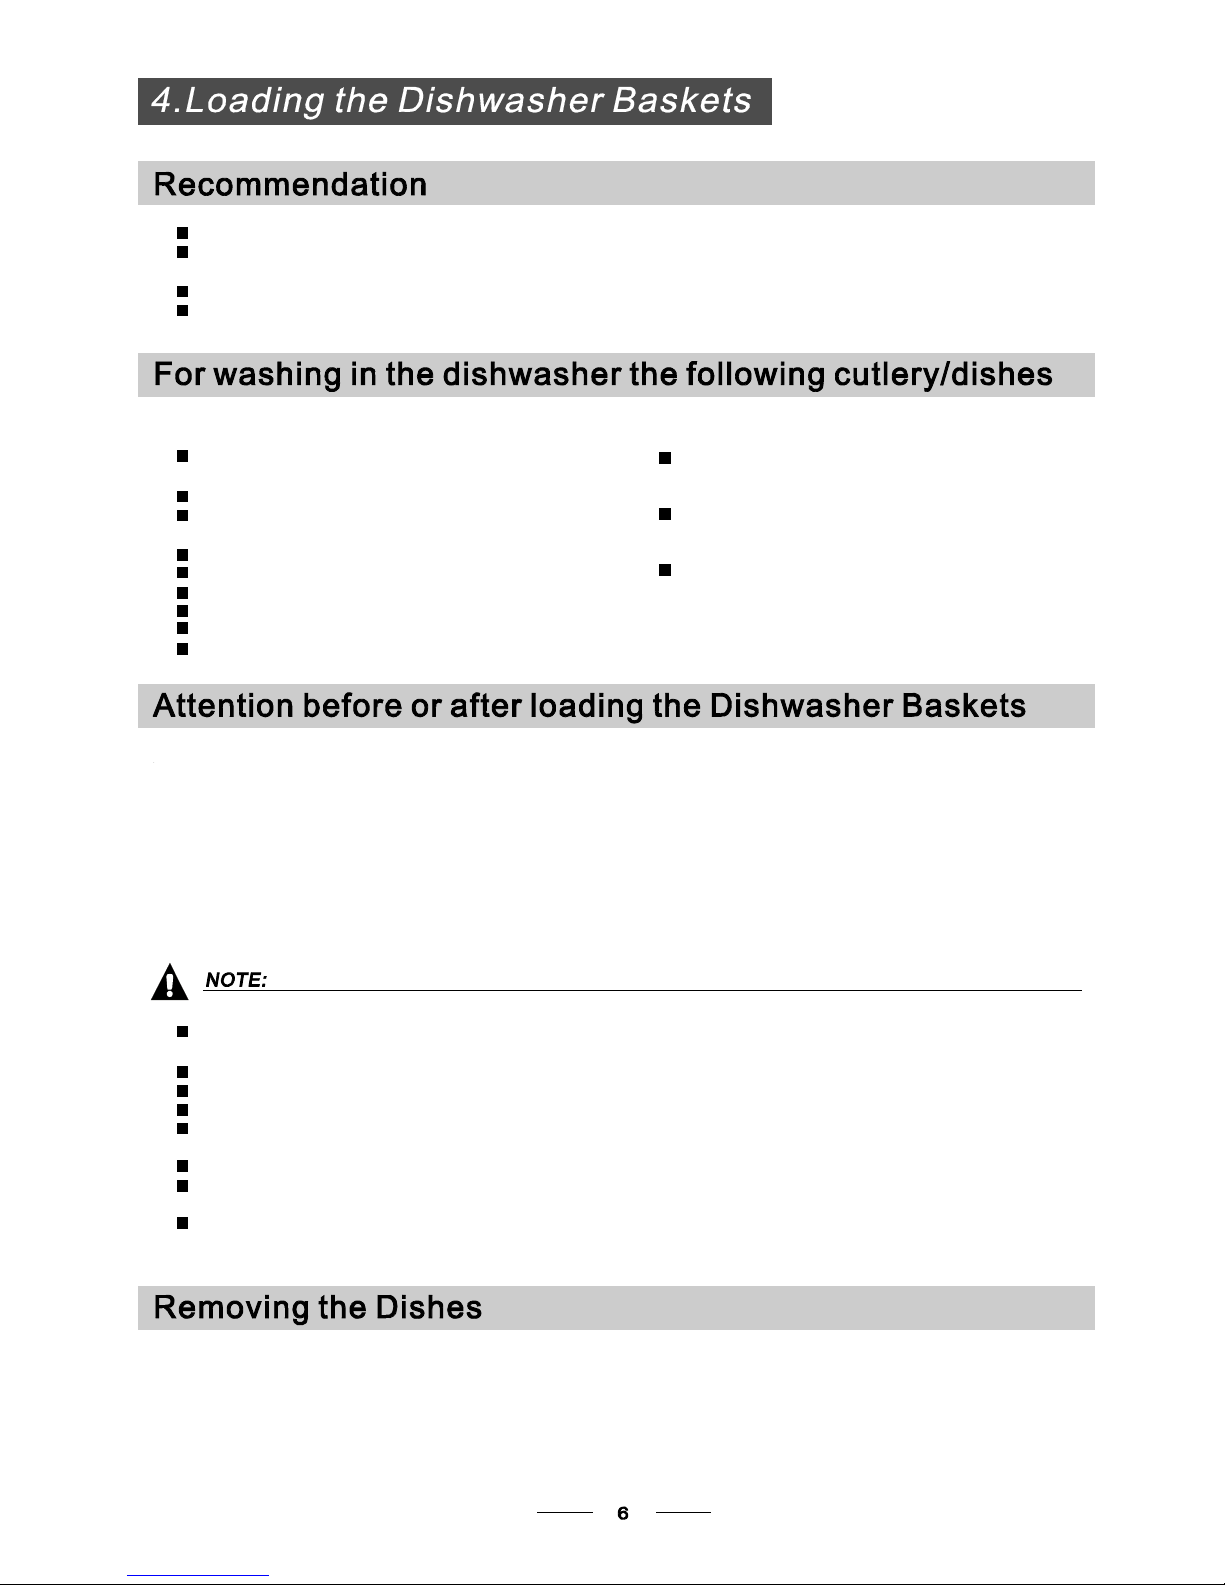
Cutlery withwooden, hornchinaor
mother-of-pearl handle s
Plastic items that are n ot heat resistant
Older cutlery with glued parts t hat are n ot
temperature resistant
Bonded c utlery item s or dishes
Pewter or coop er items
Crystal gl ass
Steel items s ubject to rusting
Wooden pl atters
Items madefromsynthetic fibres
Some ty pes of g lasses can become
dull afte r a la rge number of washes
Silver and alumi num par ts have a
tendency to discolour during washing
Glazed patterns mayfadeifmachine
washed frequently
Are not s uit able
Are of limitedsuitability
Dishes anditems of cutlery mustnotlieinside one another, orcovereachother.
Toavoi d d amage to glasse s, th ey m us t not t ouch.
Load large items w hich are most difficult to c lean into the lower basket.
The u pper basket is designed to hold m ore delicate and lighter d ishwa re such as glasses , coffee
and t eacups
Long bladed knives stored in an upright position are a p otential hazard!
Long and/or sharp items o f cutle ry such as carv ing knives must be p ositione d
horizon tally i n the upper basket.
Please do not overload your dishwashe r. This is important for g ood result s a nd for
reasonab le consumption of energy.
Load h ollow i tems such as cups, glasses, pans etc. With t he opening facing downwards s o that
wat er cannot c o lle c t i n the c onta iner or a de ep ba se.
Use a milddetergentthat is describedas 'kindto dishes'.If necessary, seekfurther
informationfromthedetergent manufacturers.
Forparticular items, select aprogram withas lowa temperatureaspossible.
Topr even t dama ge, take gl ass and cut ler y out of the dis hwas her as soon as poss ible
after the pr ogram has ended.
Consider buying utensilswhichare identified as dishwasher-proof.
(For b est performance of the dishwasher,follow the se load ing guide lines.
Features and ap pearance of baskets and cutlery baskets may v ary from your m odel.)
Scrape off any larg e amo unts of leftover food. Soften remnants of burnt food in pa ns.
It i s not necessary to ri nse the d ishes under running water.
Place objects in t he dishwasher in following way:
1.Itemssuch as cups, gla sses, pots/pans, etc. a re faced downwards.
2.Curveditems, or ones with r ecess es, shoul d be loade d aslant so that w ater can run off.
3.Allutensils are stacked securely and can not tip ov er.
4.Allutensils are placed in the way t hat the s pray arms can r otate freely during washin g.
Very sm all items should n ot be washed i n the dishwasher as they c ould easily fall out of thebasket.
To pre vent water dripping from t he upper basket into the lower basket, we recommend that you
empty the lower ba sket first and t he n the upper bask et.
Page 10
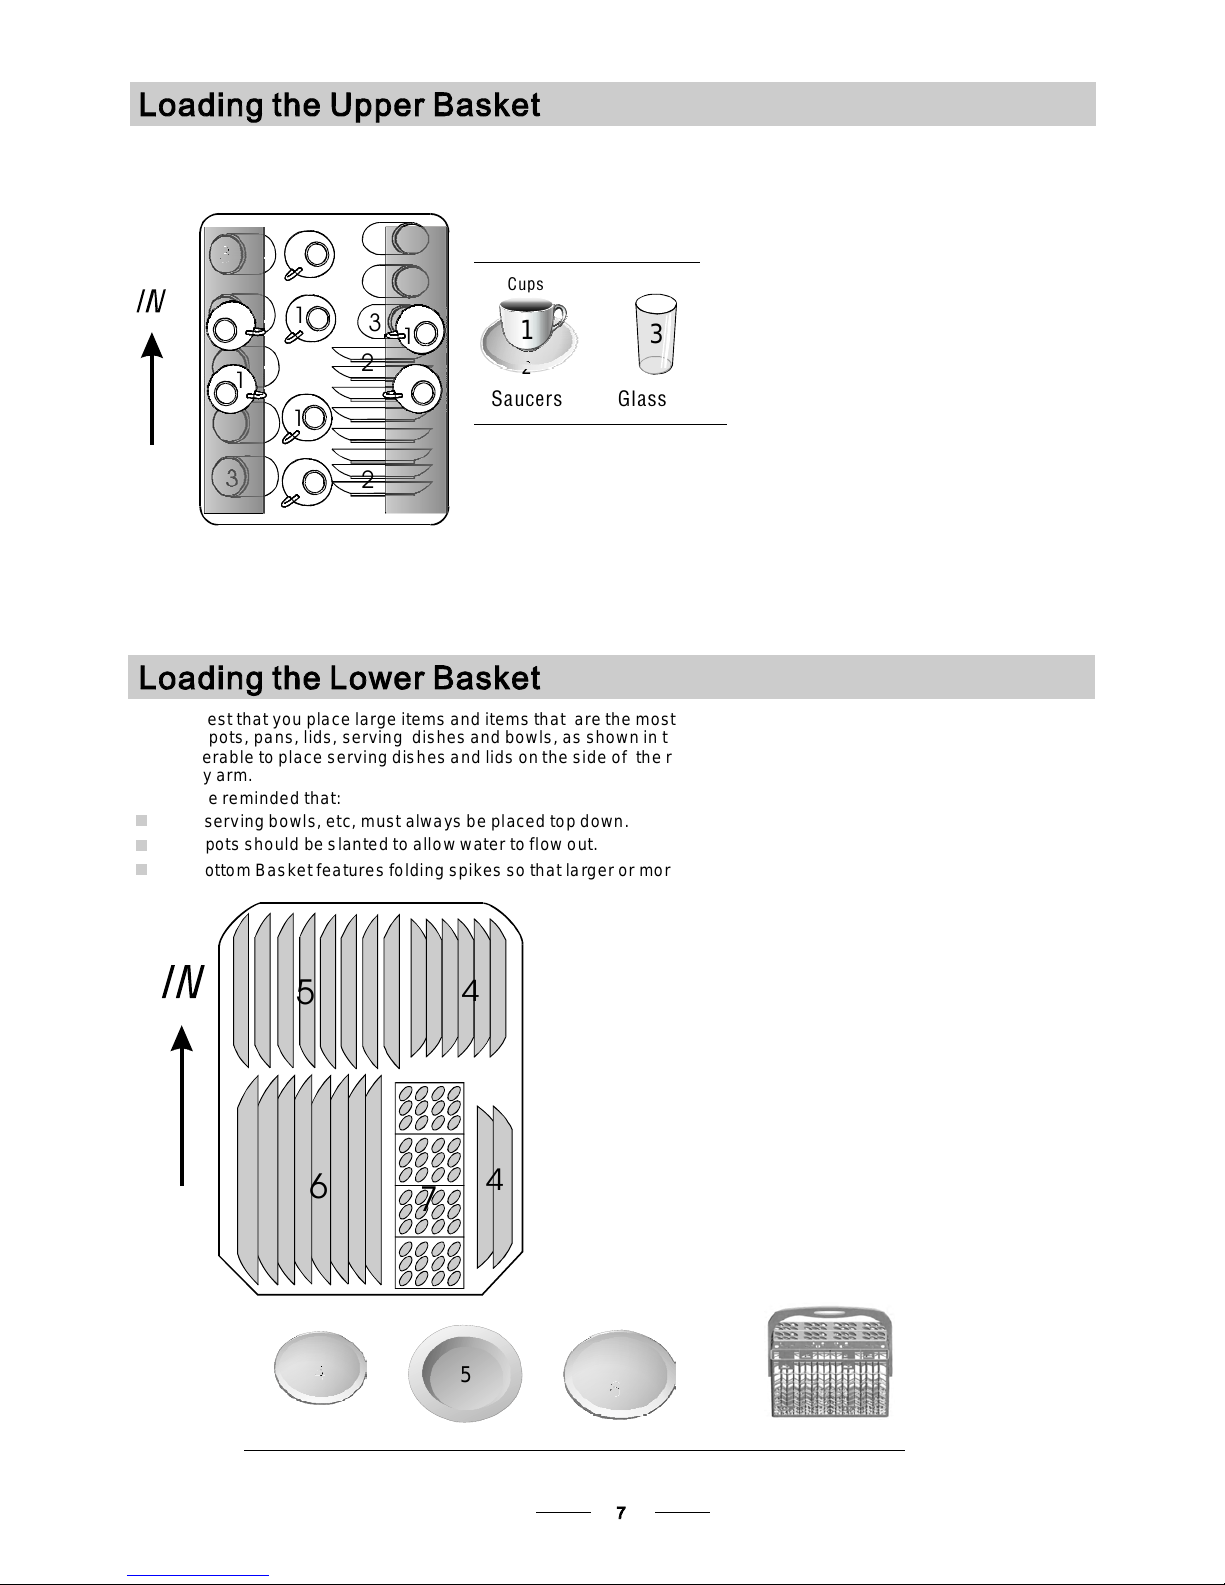
The u pper basket is designed to hold more delicate and lighter dishware such as glasses, coffee
and t ea cups and sau cers, as well as plates, small bowls an d shallow pans (as long as th ey a re
not to o di rty).
Position the dishes and co okware so that they will not be moved by the spray of w ater.
Saucers
3
Glasses
2
1
Cups
2
3
1
1
1
2
3
3
1
3
Wesuggest that you place large items and items th at are t he most difficult to cleaninto the lower basket
such as : pots, pans, lids, serving dishes and bow ls, as shown i n the figure below.
It is preferabl e to place ser ving dishes and lids onthe side of the racks in ord er to a void blocking the rotation of the
top spray ar m.
Pot s , servin g b o wls, e tc, m us t always be pl ac e d top d ow n.
Dee p pot s s h oul d be sl ante d t o allow w at e r to flow o ut .
Please be reminded that:
The B ottom Basket features folding spikes so that larger or mo re pots and pa ns can b e loaded.
4
Dinner plates
5
Soup plates
Dessert dishes
6
Cutlery basket
7
4
4
6
5
7
Page 11
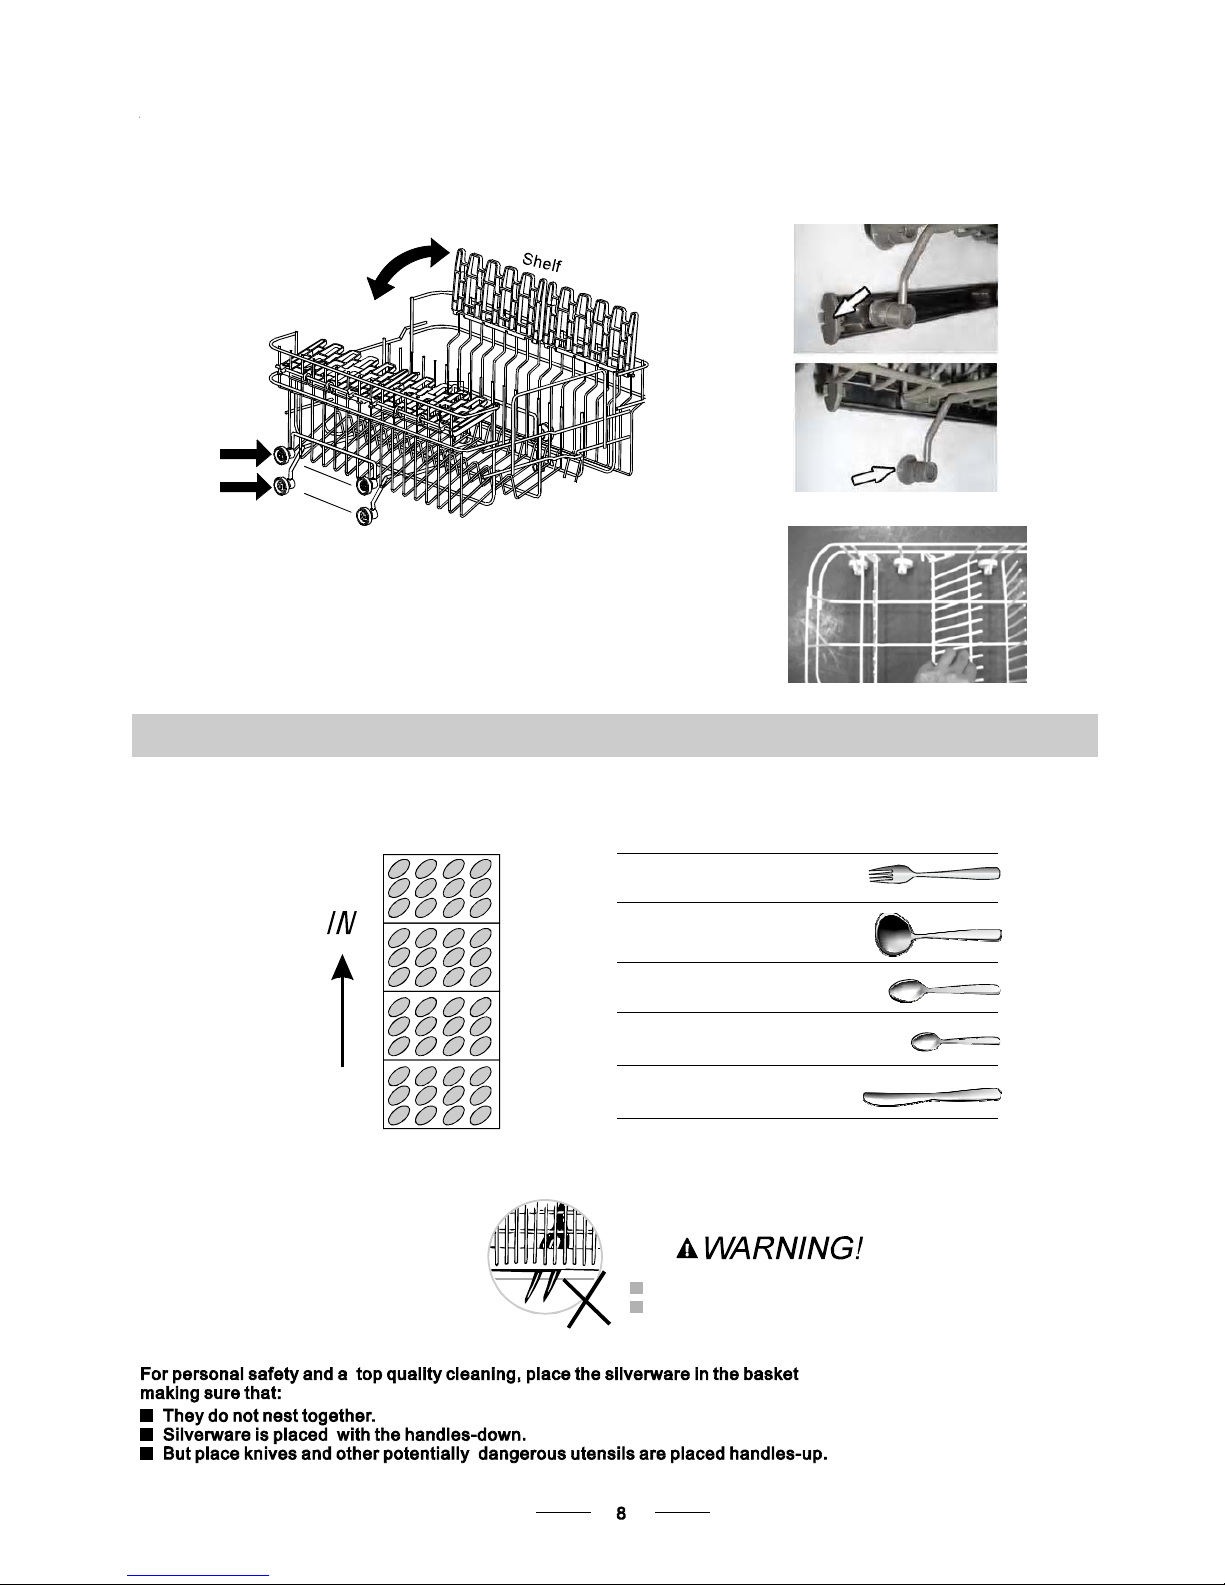
Foldin g Spikes of Low er Basket
For better stacki ng o f po ts and pa ns,
the spikes can be folded down as
show in the p ict u re right.
Adjust ing the Upp er Bask et
The height of the upper basket can be adjus ted in order t o create more space f or large utensils
both for the upper/lowe r basket. The he ight of the u pper basket can be adjusted by placing the
wheels on different height of the rails. L ong items, serving cutlery, salad servers and knives
should b e pl aced on the shelf so that they do not o bstruct the rotati on o f th e spray arms.
The she lf can be folded back or be removed when not requ ired for use.
Upper wheels
Lower wheels
Cutlery Basket
Cutleryshould be placed in the cutlery basket with the handles at the bottom. If the rack has side baskets,the
spoons should be loaded separately into the appropriate slots, especially long utensils should be placed in the
horizontal position at the front of the upper basket as shown in the picture.
Teaspoons
4
Soup spoons
2
Forks
1
Knives
5
3
Dessert spoons
1
225
5
5
5
5
5
5
5
2
2
2
2
2
2
3
3
1
1
1
1
1
1
1
3
3
3
3
3
3
4
4
4
4
4
4
4
4
Dono t let any it em extend through the b ot tom.
Always load sh ar p ute nsil s with the sharp po int d o wn!
Page 12
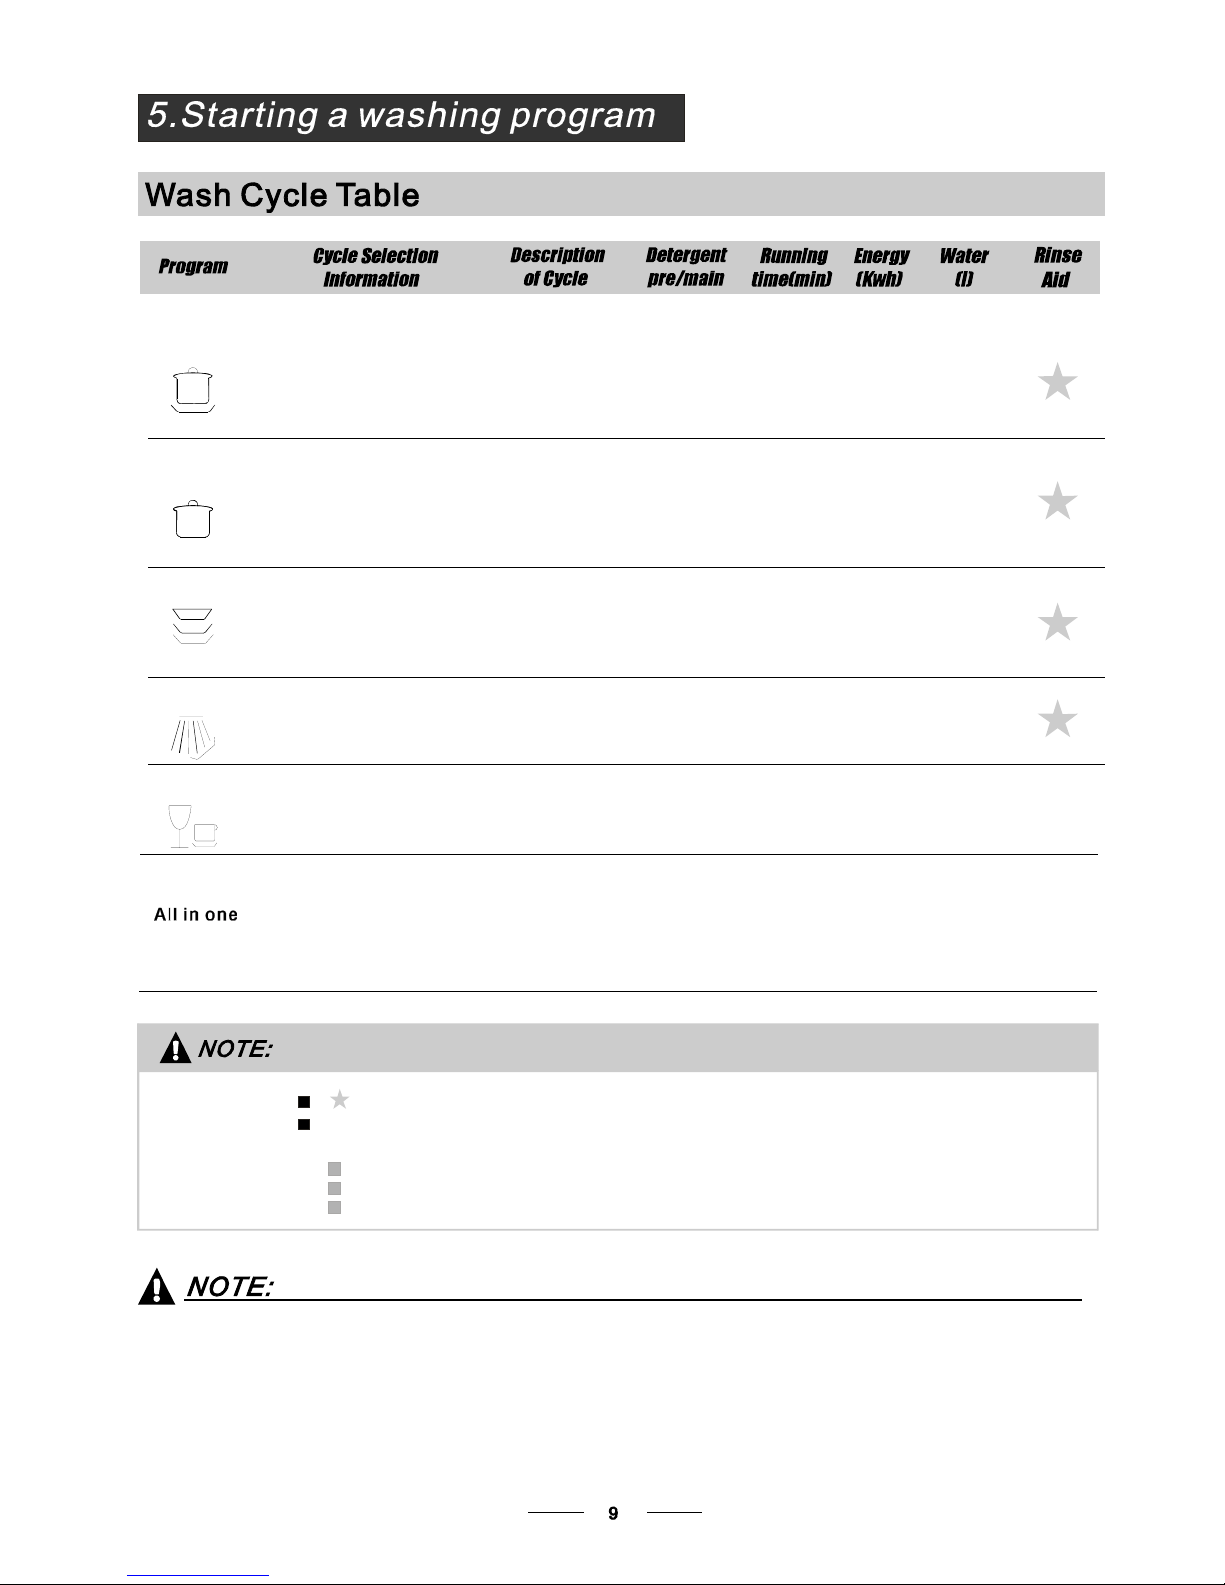
Werecommendyouopen the doorslightly50mmtoassist indryingof the dishes aftereverywash.
*AS/NZS 2007.1: This programme is the test cycle. T he informat ion for co mparabilit y test
in acc ordance with AS/NZS 2007.1 , as follows:
Capacity: 8 se tting
Position Upper basket: upper wheelsonrails
Rinse aidsetting: 6
Meaning: needtofill ri nse intothe Rinse-AidDispenser.
()
For heavily soiled loads,
such as , plates,glasses
and lightly soiled pans.
standard daily cycle.
pots
Sfornormally
soiled loads,such as plates,
glasses,bowls and
soiled pans.
tandard daily cyc le
normally
For the heaviest soiled loads,
such as pots,pans,casserole
dishes and dishes that have
been sitting with dried food
on them for a while.
A shorter wa sh for lightly
soiled loads that do not
need drying.
For dishes that need to be
rinsed and dried only.
-wash( 0℃
Wash (65 ℃)
Rinse
Rinse (55 ℃)
Drying
Pre 5 )
Pre-wash
Rinse
Pre-wash(50℃)
Wash (50 ℃)
Rinse
Rinse (65 ℃)
Drying
Pre-wash
Wash (55 ℃)
Rinse (50 ℃)
Drying
Wash (40 ℃)
Rinse (45 ℃)
Rinse
5/20 g.
5/20 g.
5/20 g.
15 g.
150
120
120
30
60
12
12.2
18
9
Wash(65 )
℃
Rinse (50 ℃)
Drying
For commonly soiled loads,
such as pots, plates,glasses
and lightly soiled pans.
Pre-wash(50℃)
Wash(50℃)
Rinse
Rinse(70℃)
Drying
3in1
150
12
10
1.0
0.64
1.20
0.4
0.6
1.0
Inte nsi ve
Heavy
Normal
(*AS/NZS 2007.1)
Rapi d
Rinse
Pre-wash
15 g.
Page 13
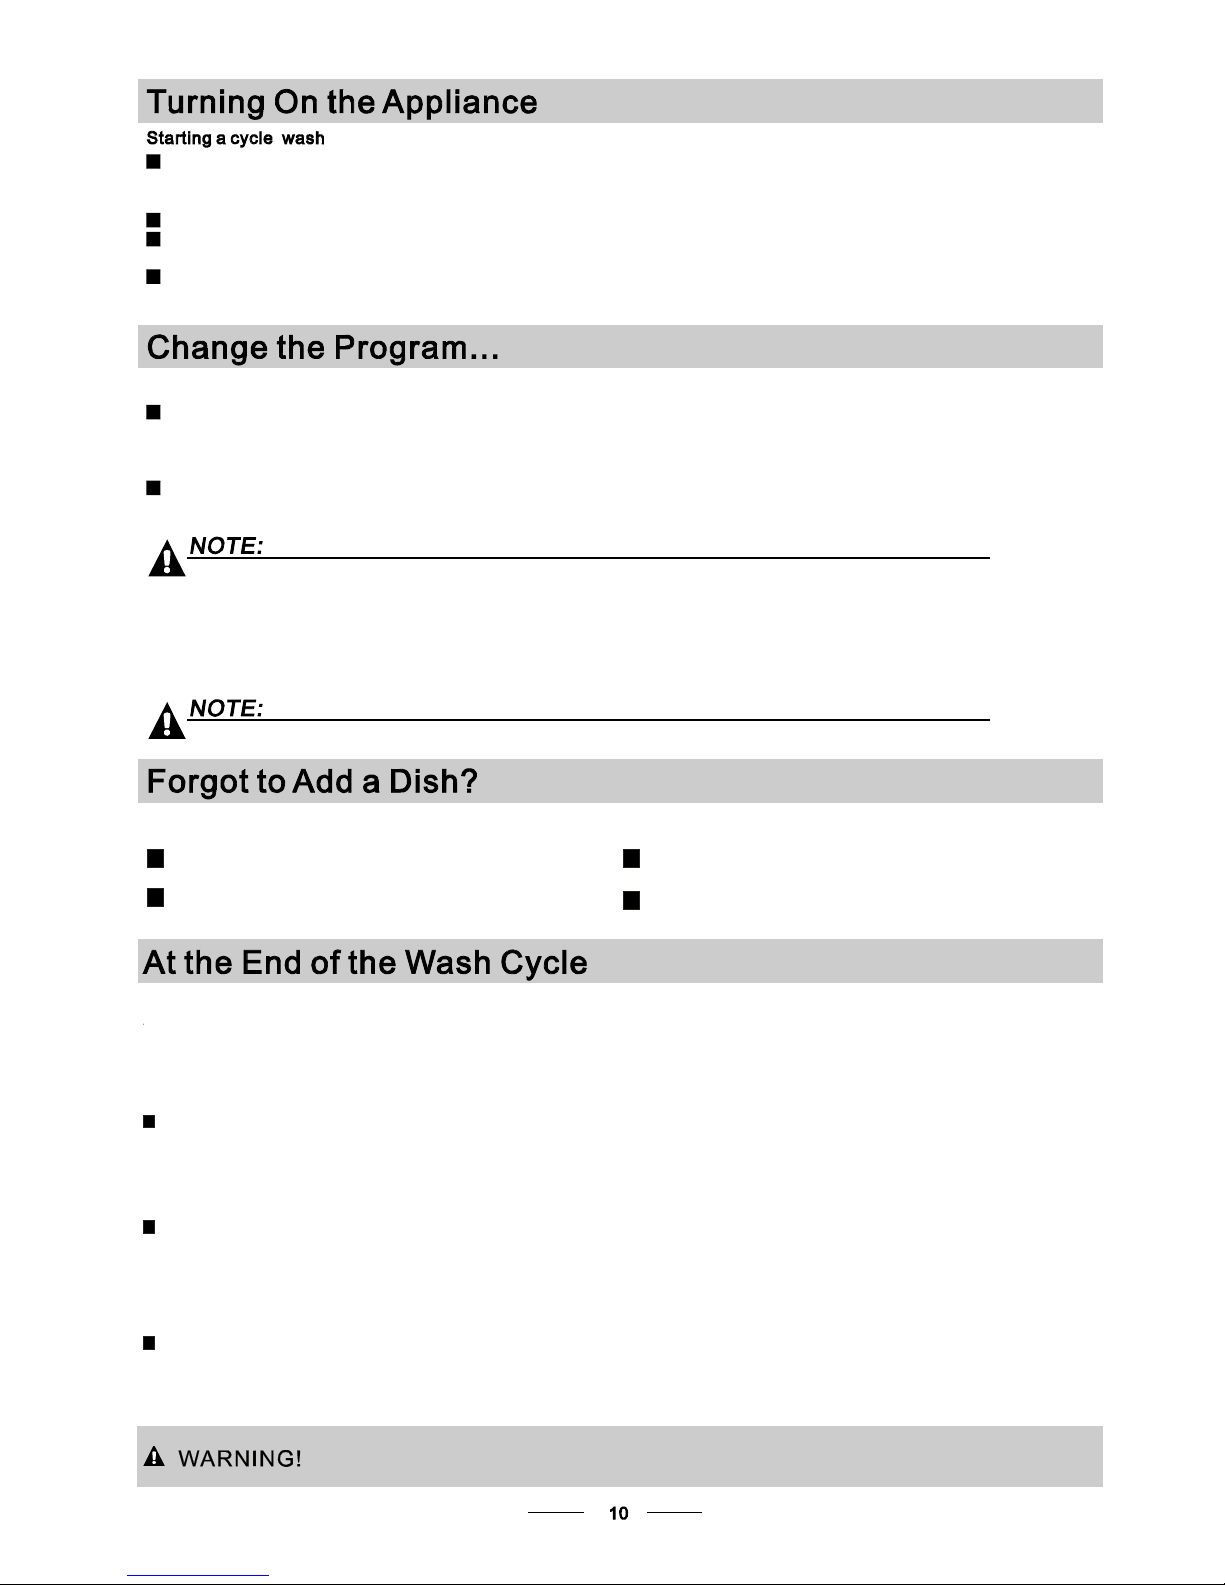
Itis dangerousto open thedoor w hen washing,becausethe hot watermay scald you.
Whenth e working cycle has finished, the buz zer of the dishwasher will sound f or 8 seconds, then stop.Turn off
theappliance using theON/OFF button, shutoff thewatersupply and openthedoorof t hedishwasher.
Wait forafewminutes beforeunloadingthedishwasher to avoidhandl ing the dishesandutensilswhile they
are still hot and more susceptible to b reak age. Theyw ill al so d ry better.
Switch Off the Dishwasher
1.Switch off the dishwasher by pressing the ON/OFF button.
2.Turn off the water tap!
The buzzer of the dishwasher moos for 8 seconds, only in this case the programme has ended.
Openthedoorcarefully.
Hot d ishes are sensitive to knocks. The dishes should t herefore be allowed to cool d own around 15 minutes
bef o re removi ng from the a ppl ianc e .
Ope n the d ishwasher 's do or, leav e it ajar a n d wai t a f e w minute s bef ore remov i n g the dis h es . In this w ay th ey
will be co oler and t he drying will be imp roved.
Unloadingthe dishwasher
It is norm al t hat the dishwashe r is wet insid e.
Empty the lower basketfirstandthen t heupper one. Thiswillavoid waterdripping fromtheupperBasketonto
the dishes in t he l ower one.
the mac hine will keep on wor king after 10 s econds.
off the main po wer and water s upply before callin g a serv ice.
Ifyou open the d oor during washing, the machine will pause. When y ou close the door ,
.
If a ll t he lights begin to glimmer, that indi cates the m achine is out of or der, please turn
.
1 Draw ou t the lowerandupper basket, load thedishesand push themback.
It is commendedto load the lowerbasketfirst, then the upperone ( see the sectionentitled
Loading the Dishwasher ).
2 Pourin thedetergent(see the sectionentitled DetergentandRinseAi d ).
3 Insert the plugintothe s ocket.The powersupplyis 220-240VAC /50HZ, th e specificationof the
socket is 10A 250VAC. Make sure thatthe water supply is turnedon to full pressure.
4 Close the door , and select the desired programme bypressing the corresponding button,then the
dishwas her will start towork in 3 second.
“”
“”
Premise:
You can modify thewashingprogram,Whenthe dishwasher just runs for a short time.
Otherwise, the detergentmay havealreadybeen released, and the appliancemayhave
already dr ainedthe wash water.If this isthe case, the detergentdispenser must be
refilled (see the sectionentitled"LoadingtheDetergent" ).
ntitled "Start ing awa sh cycle. . . " ).
1
2 Pressthe button of desiredprogram more t han3 secondsuntil it's Indicatoris on , after
10secondsthemachine will keepworking.E
Aforgotten dish can be added at any time before the detergent cup opens.
Load the forgotten dishes.
Close the door, the dishwasher will start running again
after 10 seconds.
After the spray arms stop working, you can open the door
completely.
2
Open the door a little to stop the washing.
1
3
4
The programlightsshow the stateof the dishwasher:
a) All programlightsoff---------------stand by
b) O ne of the program ligh ts on---- ----- -pau se
c) One of the program l ig h ts bl ink in g- - --- r un
Page 14
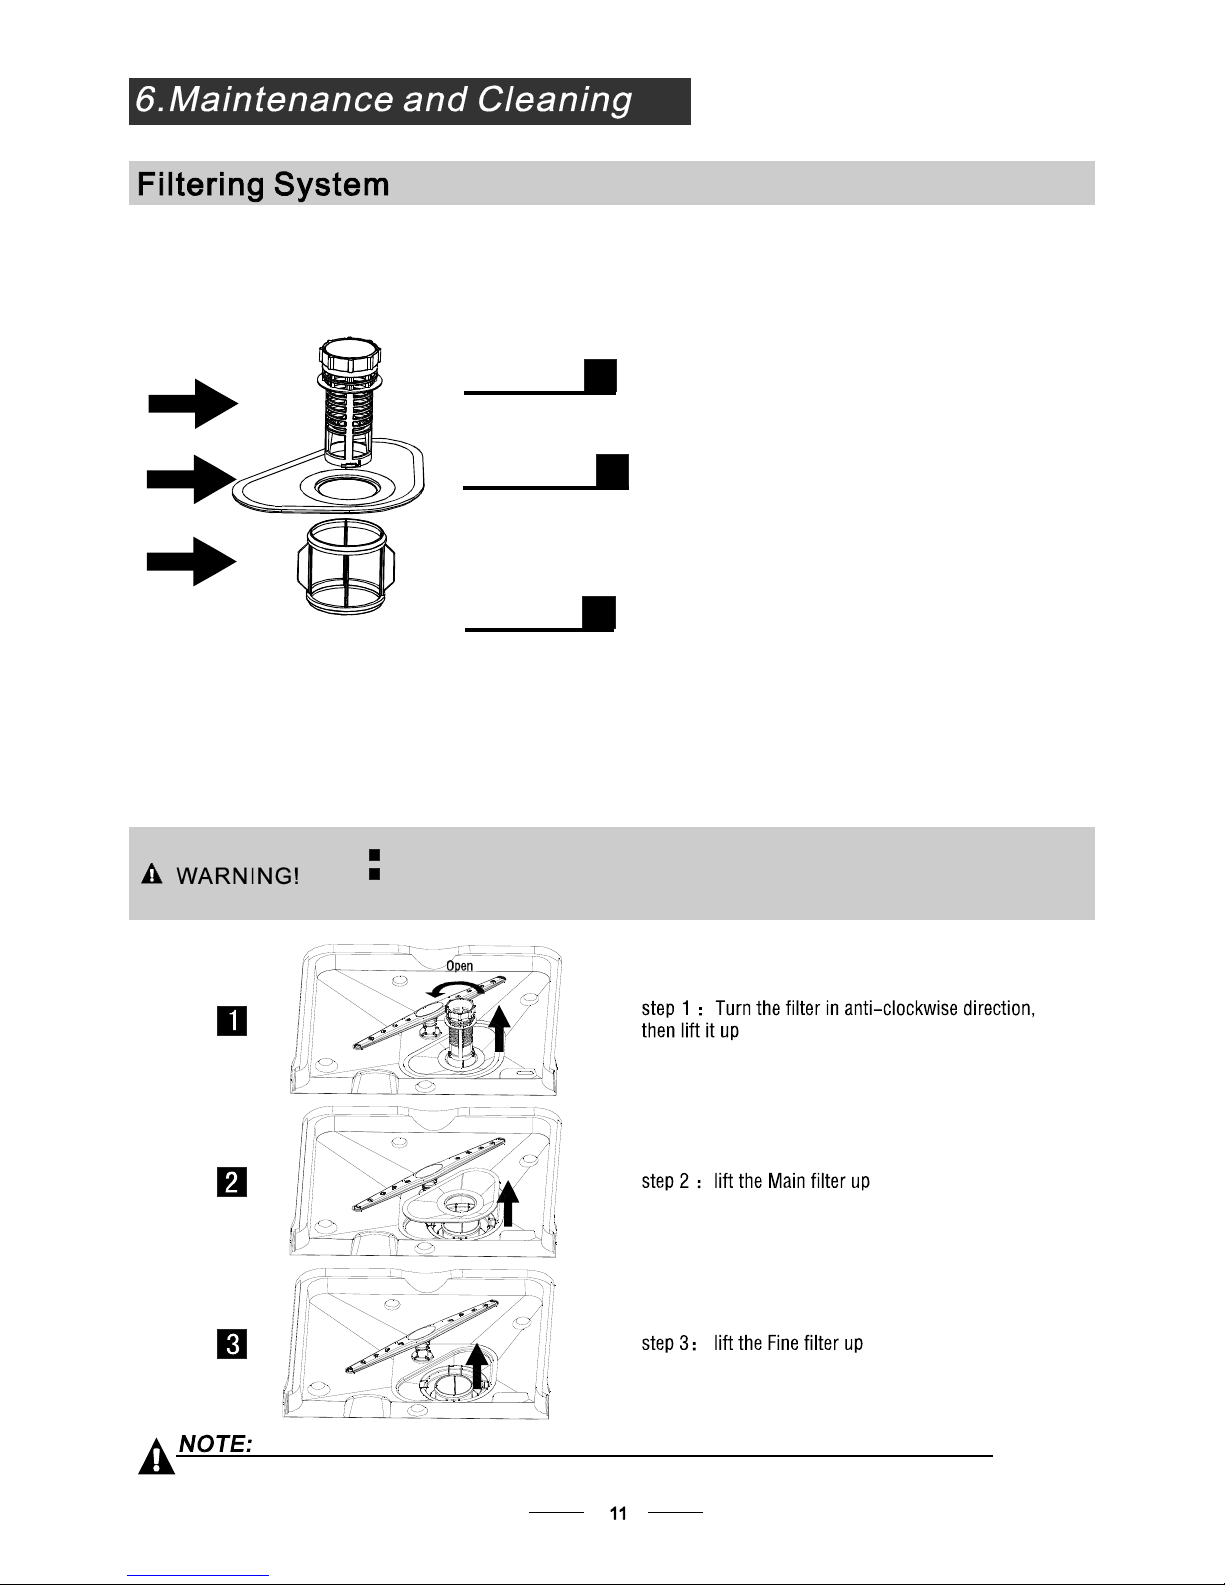
The filter prevents larger remnant s of food or other objects from getting inside the pum.
Theresidues may blockthe filter, inthiscase they mustberemoved.
The fi lter system c onsists of a coarse filter,a flat (Main f ilter)
And a mi c rofilt e r( F i ne f i lter).
Foodandsoil particles trapped inthisfilter arepulverize dby a
special jet ont he l ower spray arm and w ashed down to d rain.
Larger items, such as pi e c es of bo ne s o r gla s s, that cou ld blo c k
the drain are trapped in the coarse filter.To remove theitems
caught by the filter,gently squeeze the tap o n the t op of this
filter andlift out.
This filterholds soilandfood residues in thesump areaand
preve nts it from beingredepositon the dishesduring washcycle.
Main filter
1
Coarse filter
2
Fine filter
3
2
3
1
Filterassembly
Thefilter efficiently
For b est perfo rmance and results, the filter must b e cleaned regular ly. this r easo n, i t is a goodidea to
remove the l arger food particl es tr app ed in thefilter after each wash cycle by rinsing the semicircular filte r an d
cup u nder runnin g wa ter.Tore move the fil ter device , p ull the c up handle in t he upward direction.
removes f ood particle s from th e wa sh water,allowin g it to be recycle d du ring the cycle.
For
The dish was her must nev er be used w i tho ut the f il ters .
Improper replacemen t of thefilter may reduce the performanc e lev el of t he appliance
anddamagedishes andutensils.
When following this procedure from step1 to step 3, the filter system will be removed;
when following it from Step 3 to Step 1, the f ilter systemwill be installed.
Page 15
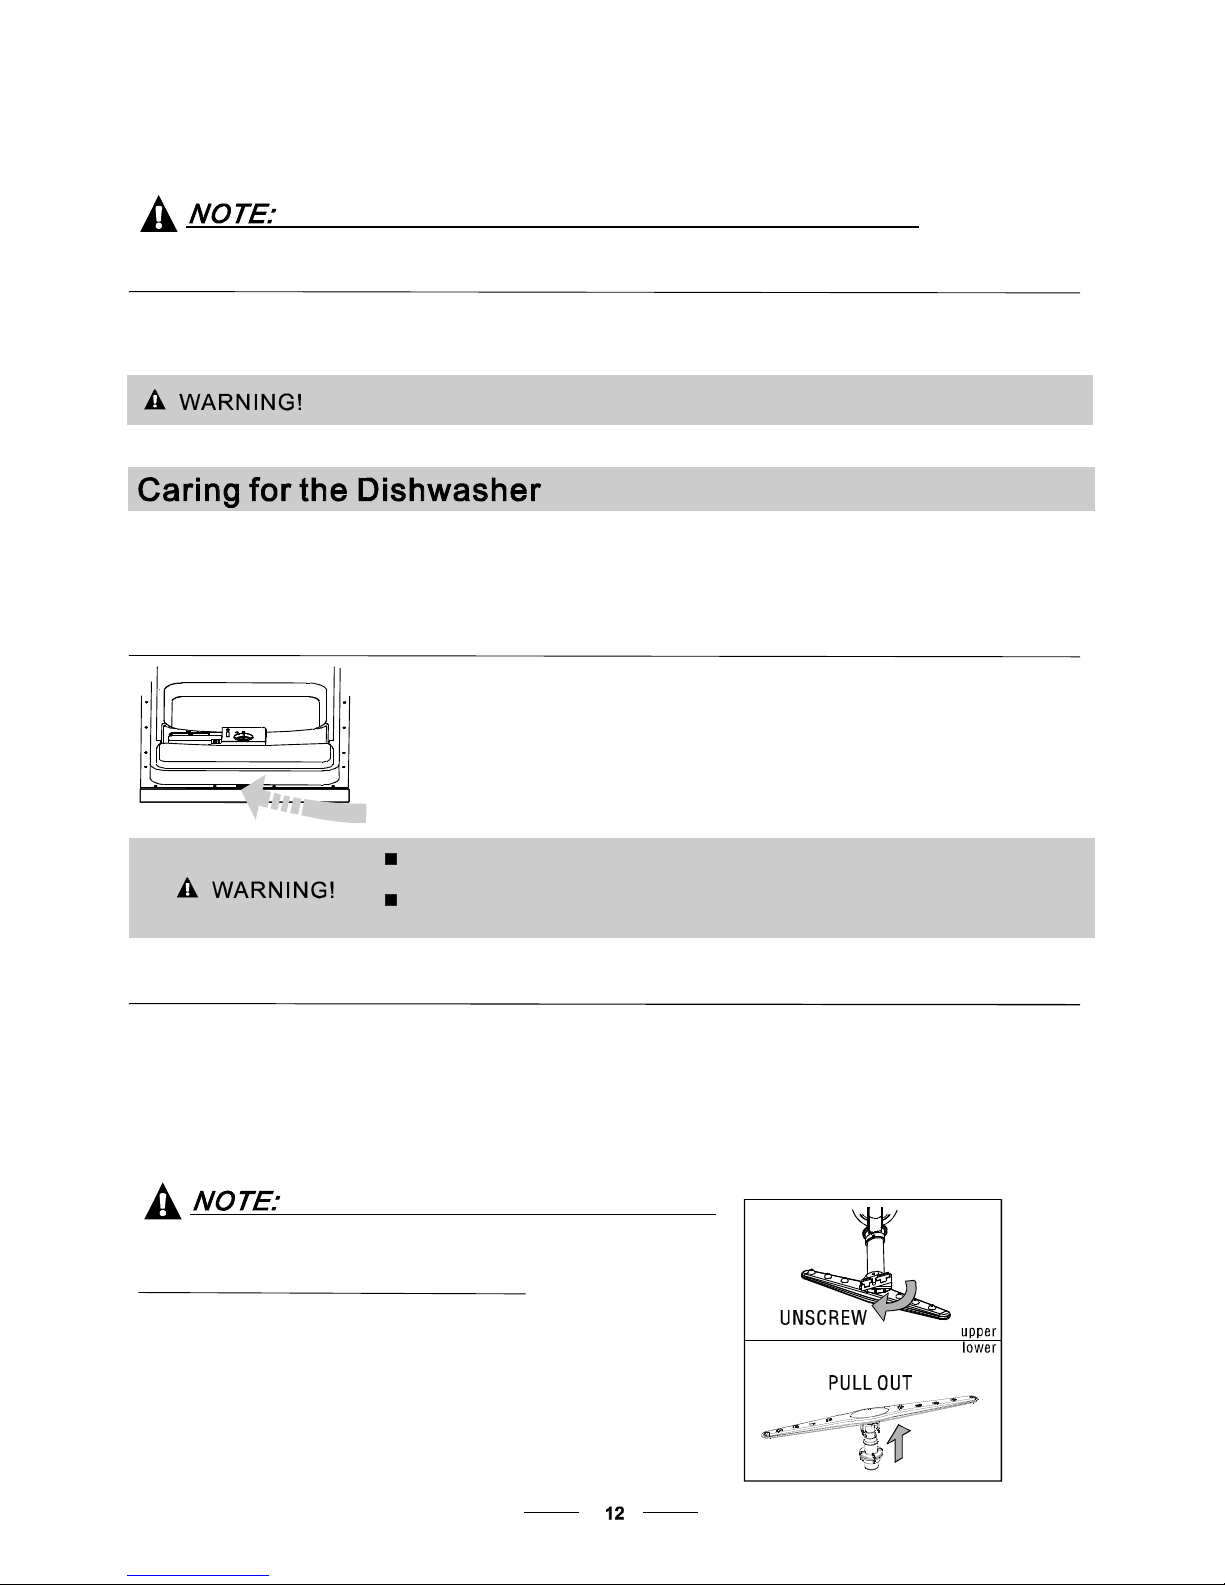
The cont rol panel can be cleaned by u sing a lig htly dampened cloth.
After cle aning, make sure t o dry i t thoroughly.
For t he exte ri or, use a good appl ianc e polish wax.
Neveruse sharp objects, scouring pads or harsh cleaners on a ny part of t he dishwasher.
Protec tA gainst Freezing
1.Cut off the electrical powertothedishwasher.
2.Turnoff th e water supply and d isconnec t the wat er inlet pipe from the w ater valve.
3.Drain thewater fromtheinlet pipeandwater valve.(Use a pan tocatchthewater)
4.Reconnect t he water inlet pipe to the wate r valve.
5.Remove the filter at the bottom o f the tub and use a sponge to soak up wate r in t he sump.
please take frost protection measures on t he dishwasher in winter. Ev ery fter washing c ycles,
please operate as follows
timea
:
- Inspec t the filters fo r blocking after e ver y ti me the dishwasher has been u sed.
- By unscrew ing the c oarse filter, you can remove the filter system . Remove a ny f oo d re mnants and
clean thefilters under runningwater.
Remarks:
Cleaning the Filter
Cleaning The Door
To c le an the co ar s e filter a nd the fine fil t e r, us e a clean i n g bru sh. R e as sem ble t he filter par t s as sho wn in the f igu r es
on th e last pa ge and reins ert the e ntire ass emb ly in the dis hwa sher, positio ning it in it s s eat and pres sing downwards .
Theentirefilter assembly shouldbe cleanedonce a week.
Whencleaning the filters, don't knockon them. Otherwise,thefilters couldbe
contorted and theperformanceofthedishwasher could be decreased.
To clean the e dge around the door, you should use only a soft warm, d amp cloth.
To avoid penetrati on o f water i nto the door lock and el ectrical components, do not
usea spray cleaner of any kind.
Never u se a spr ay cleaner to cl ean the door panel as it may damage the door lock
andelectrical components.
Abrasive ag ents o r some paper towels should not b e u sed because of the ri sk of
scra t ching or l eaving s pots on th e s tain less steel su rface.
Cleani ng the SprayArms
If your dishwasher cannot work because of
the ice, please contact p rofessio nal service persons.
It i s n e ces s ary t o c lean the sp r ay ar ms regul arl y for hard
waterchemicals will clog the spray
arm j ets and bearin gs. Toremove the spray arms, scre w
off t he nu t clockwi se to take out t he
washer on top of the spray arm a nd remove the arm.
Washthearmsinsoapyandwarmwater
and us e a s oft br u sh to clean the jets. Rep lace them a fter
rinsing them thoroughly.
Page 16
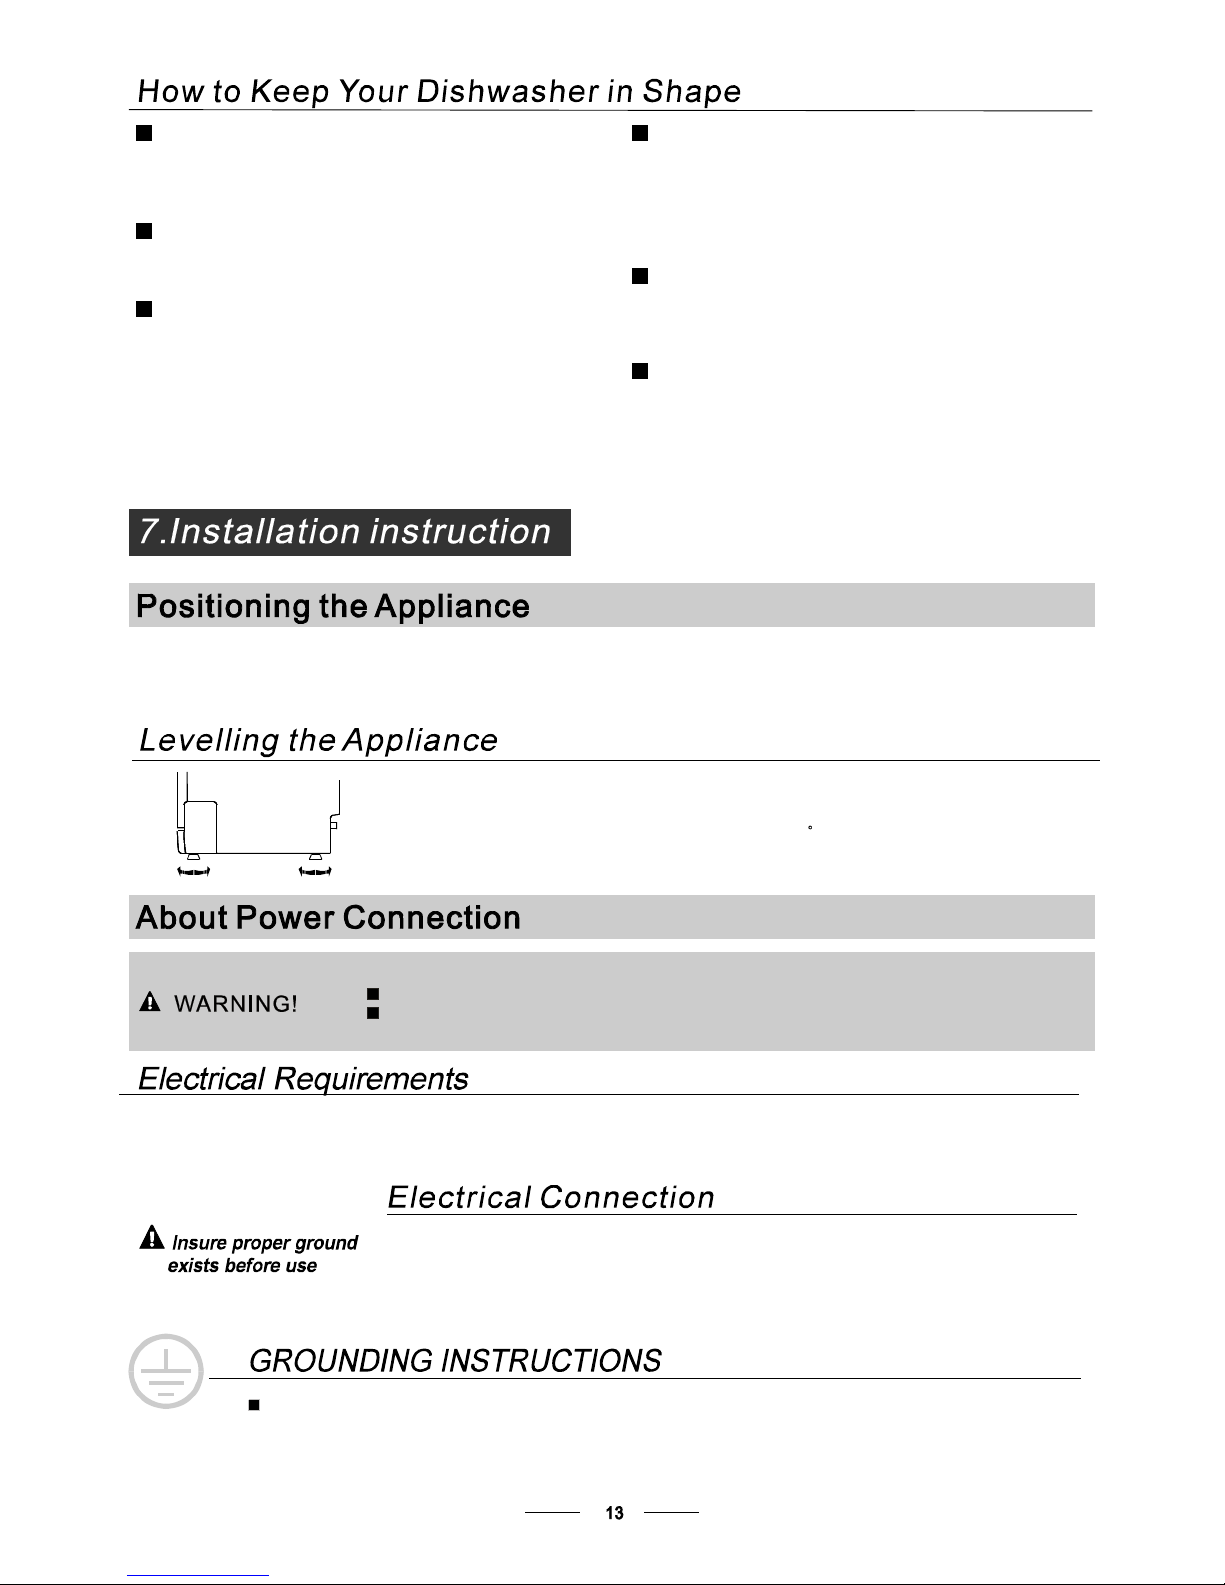
It isrecommend that yourun a wash cycle with the
dishwasher e mpty and the n remove the plug fr om the
socket, t urn offth e wa ter supply and leave the door of
the appl ianc e sli ghtly op en. Th i s wil l hel p the door
sealstolast l onger andprevent odoursfrom forming
withinth e appliance.
If th e appliance must be mo ved, try to keep it in the
vertical position. Ifabsolutely necessary, it can be
positioned on its back .
Oneofthefactorsthatcauseodourstoforminthe
dishwasher is foo d that re mains trappe din the seals .
Periodic cleaning with a damp sponge will p reve nt t his
fro m occurri ng.
Ensure the v oltage and frequency o f the p owe r being cor responds to
those on the rating plate. Only insert the plug into an elect rical socket which is ea rthed
properly.If the el ectrical sock et t o which thea ppliance must be c onnecte d is not
appropriate f or the plug, replace the socket, rather thanusing a adaptors or t helike as
theycouldcause overheatingand burns.
Please look at th e rating label to know t he rating voltage and connect the dishwasher to the appropriate pow er s upply.
Use the r equired fuse 10 amp, time d elay fuse or c ircui t breaker recommended and provide separate circuit servi ng
only this appliance.
This appliance must be earthed. In the event of a malfunction or breakdown, earthing will reduce the risk of
electric shock by providing a path of least resistance for the electric current. This appliance is equipped with a
cord havingan equipm ent-earthingconductor and an earthing plug.The plug mustbe plugged into an
appropriate outlet that is installed and earthed in accordance with all local standards and requirements.
Position the appliance in the desired location. The back should rest ag ainst the wall behind it, and the sides,
along the adjacent cabinets or walls. T he dishwasher is equipped with water supply and drain hoses that can
be pos itioned either to the right or the l eft sides to facilitate proper installati on.
Once the appl iance is positioned for levelling, the height of the di shwashe r
may be alt ered v ia adjustment of the screwing level of the fee t. In any case,
the appl iance should not b e inclined more than 2 .
For personal safety:
DO NOT USE AN EXTENSION CORD OR AN ADAPTER PLUG WITH THIS APPLIANCE.
DONOT, UNDERANY CIRCUMSTANCES,CUTOR REMOVETHE EARTHING
CONNECTION FROM THE POWER CORD.
After every wash, turn offthe water supp ly t o the
appliance and leave t he door slightly open so th at
moisture and odours are n ot trapped inside .
Before cleaning or p erformi ng maintenance, always
remove th e p lug from t he socket.
Toclean the exteriorand rubber parts of the dishwasher,
donotusesolvents or abrasivecleaningproducts.
Only use acloth with w arm soapy wate r.
Tore m ove spots o r stains f rom the sur f ace of the
interior, usea clothdampenedwithwatera na little
vinegar,or a cleaning product made s peci fically for
dishw ashers.
AfterEveryWash
Removethe Plug
No Solvents orAbrasive Cleaning
Moving the Ap plia nce
Seals
Whennot in Use foraLongTime
Page 17
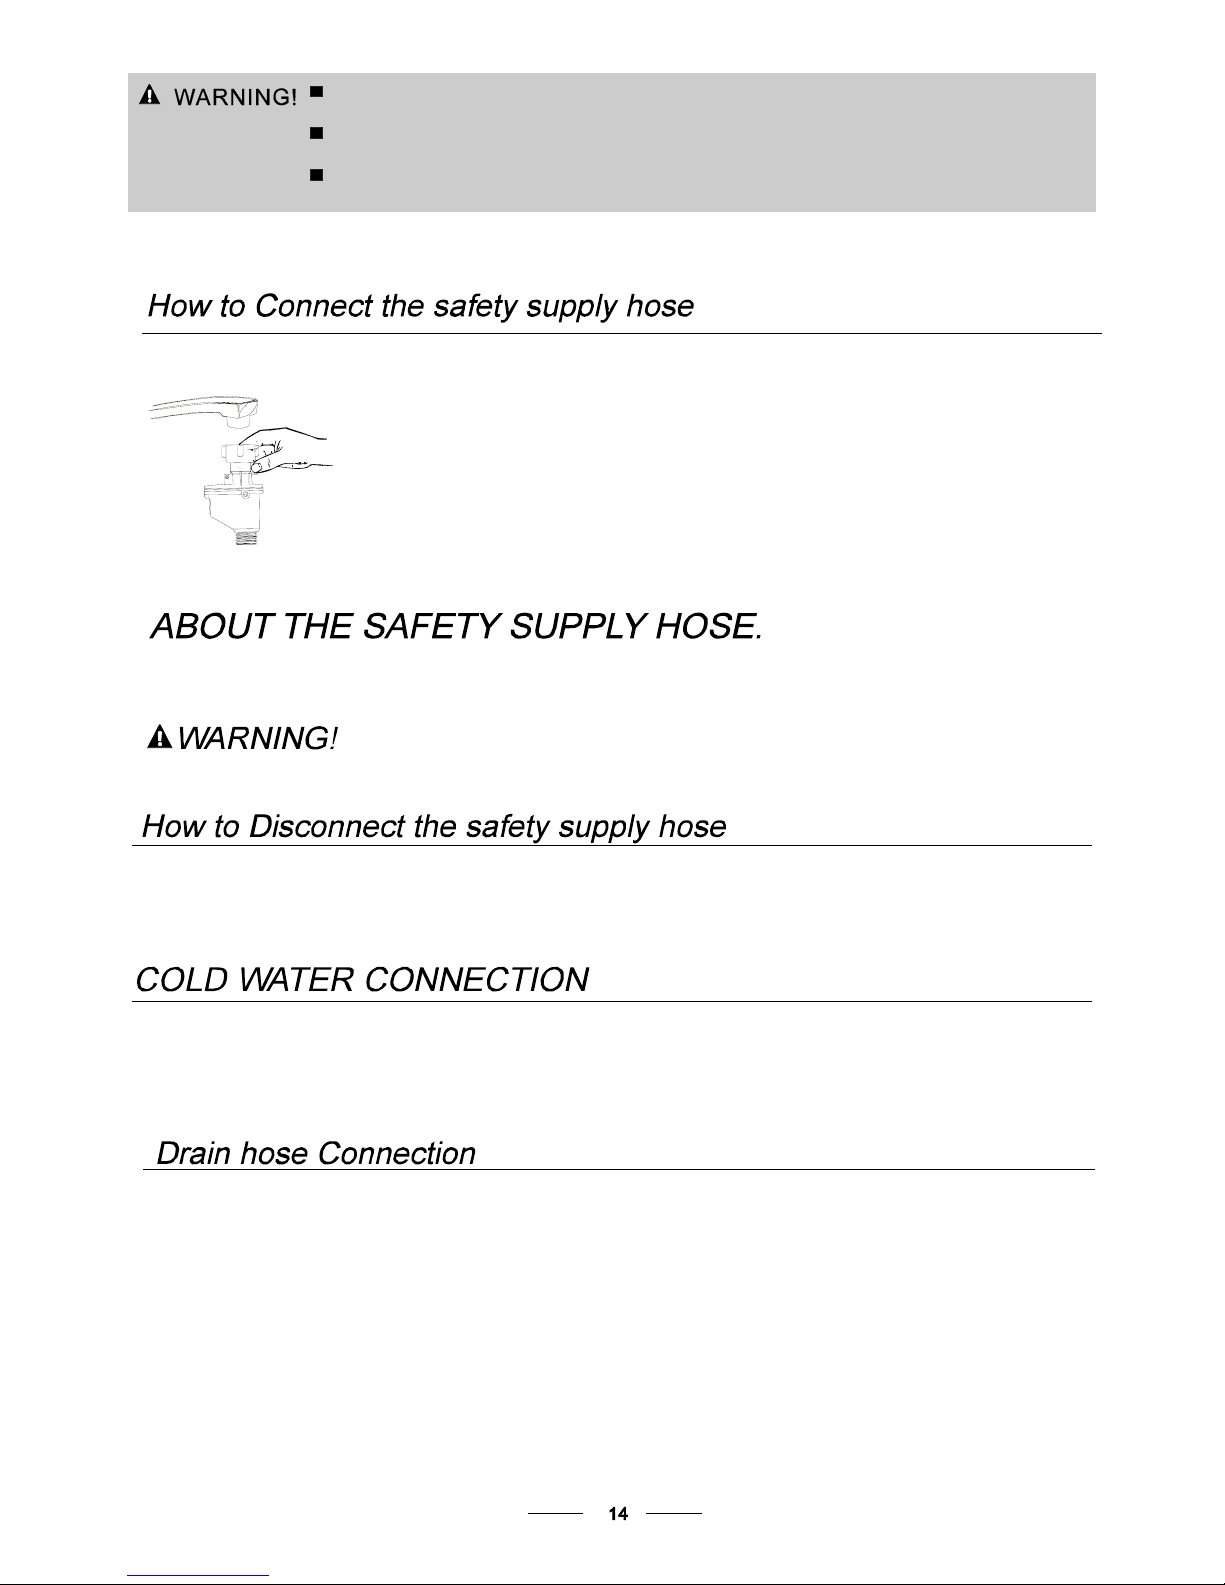
for personal safety:
DO NOT USE AN EXTENSION CORD OR AN ADAPTER PLUG WITH THIS APPLIANCE.
DO NOT, UNDER ANY CIRCUMSTANCES, CUT OR REMOVE THE
FROM THE POWER CORD.
EARTHING
CONNECTION
Improper connection of the equipment earthing conductor can result in the risk of an
electric shock.
Check with a qualified electrician or service representative if you are in doubt whether the
appliance is properly earthed.
Do not modify the plug provided with the appliance. If the plug does not fit properly to the
outlet, please have a qualified electrician to install a proper outlet.
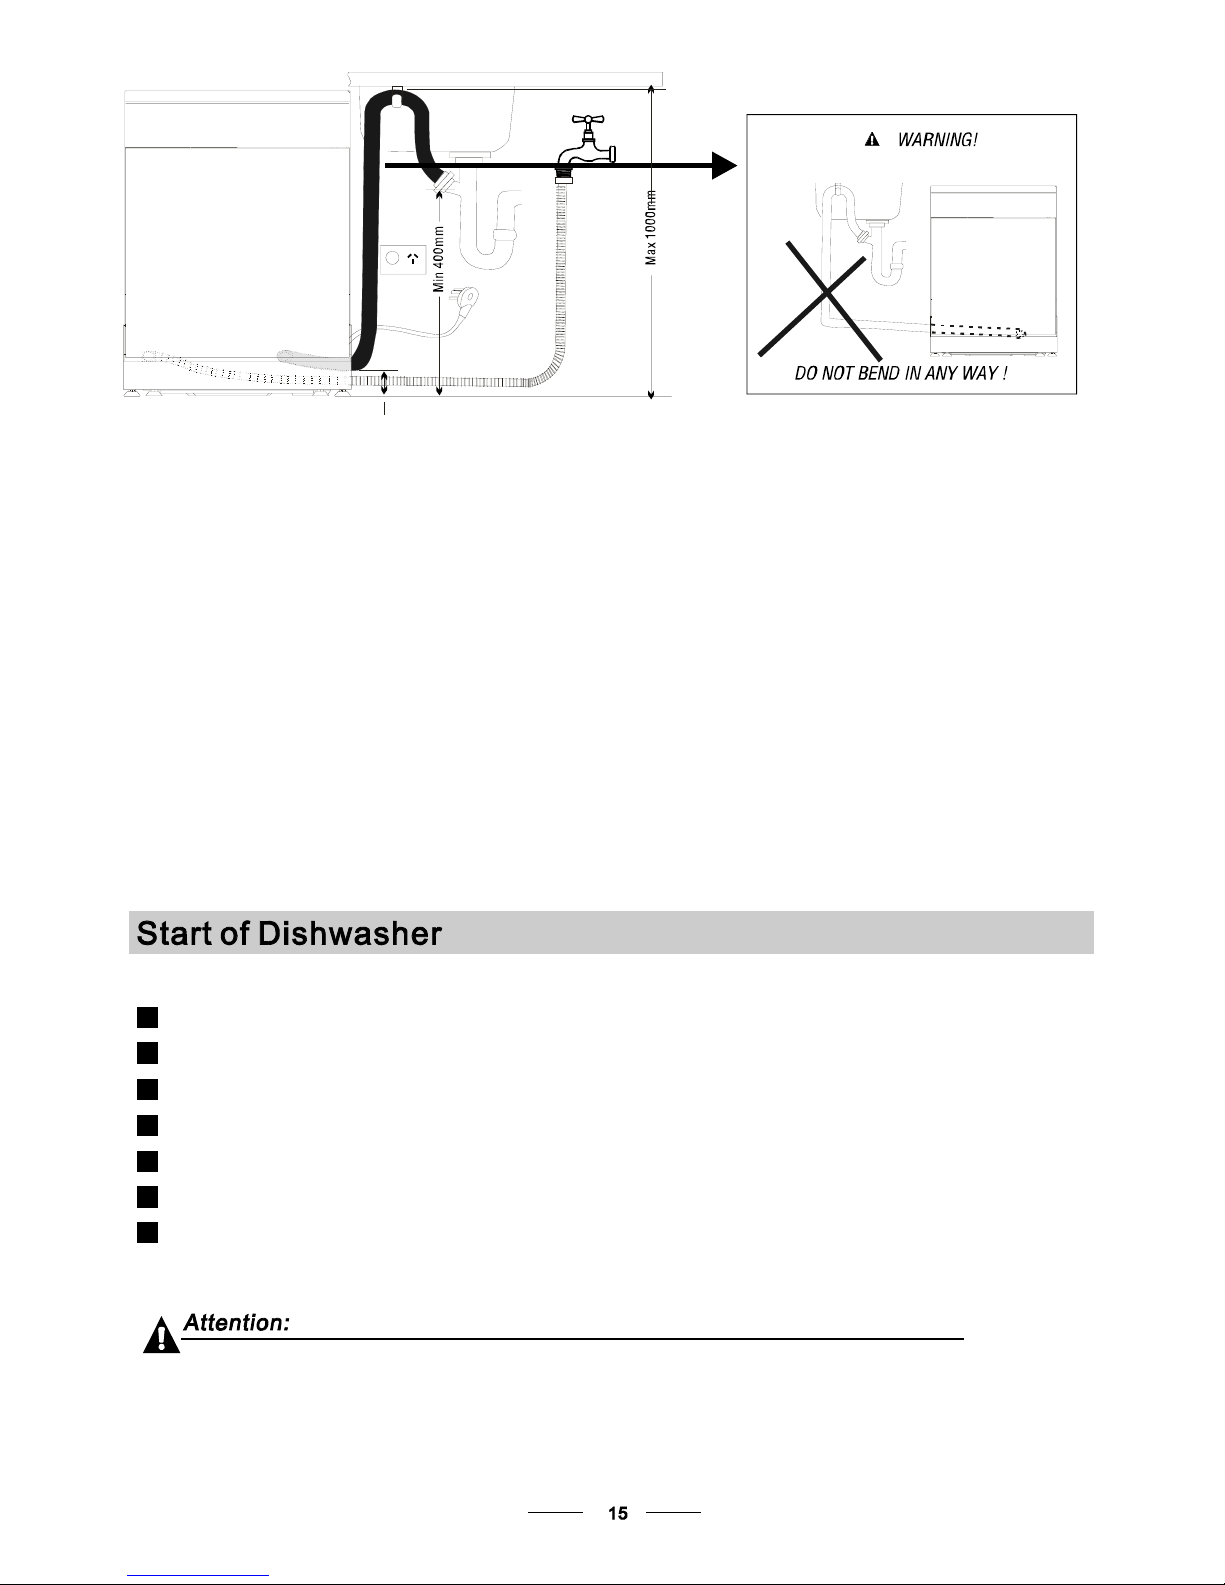
Insert the dr ain hose into adra in pipe with a m inim um diame ter of 4 cm, or let it run int o t h e sink, m aking su re t o
avoid b ending or crimping. Use the special plastic support that comes with the appliance. The top of t he h ose
mustbe at a height b etween 40 and 100cm.The free end of t he hose must no t be immersed in w ater.
Ahos e that att ach es to a s ink sp ray can b ur st if it is i nstalled on the s ame wate r line as th e dishwash er. I f you r sin k
has one , it is recommen ded that the hose be disco nnected an d the hole plugged.
Pull The safety supply hoses completely out from storage compartment locatedat rear of dishwasher.
Turn water fully on before startingthe dishwasher.
1
Tighter the screws of the safety supply hose to the faucet with thread 3/4inch.
Thesa fety supply hose consists of th e double walls. T he hose's s y stem gu arantee s it s intervention by blocking the
flowof wate r in case of the suppl yho se b reak ing and when the air spa ce b etween the supply hose itself and the outer
cor r ug ated ho se is f u ll of water.
Turn off the water.
Release the water pressure by depressing the pressure release button. This relieves water pressure and protects you, and the
room, from severe splashing.
Unscrew the safety supply hose from the faucet.
3
2
1
2
3
The ap pliance must be connected t o the water mains using new h ose-sets .
The old hose -sets should not be reused.
Water pressuremustbebetween0,04 M Paand1MPa. If thepressureis below the
minimum consult our Service Department for advice.
Connect the co ld water supply hose to a thread ed 3/4(inch) connect or an d make sure that it is fastened tigh tly in pl ace.
If th e w ater pipe s are new or have not been use d for an extended period of t ime, let the w ater run to make sure t hat the
water is cl ear and free of im purities. If this precauti on is no t taken, there is a risk that t he water inlet ca n get blocked
and da mage the appliance.
Page 18
Thefollowingthings should be checked before startingthe dishwasher.
The content of this manual is very helpful t o the users.
After installation, please make suretokeep this manual.
1
Thedishwasheris leveland fixed properly
2
The inle t valve is open
3
Thereis a leakage at theconnectionsofthe conducts
4
The wires aretightly connected
5
The power is switchedon
6
The inlet and drain hos es are knotte d
7
Allpackingmaterialsand printingsshould be takenout fromthe dishwasher
Syphon Conn ection
Extension Hose
Ifyouneed a drain hoseextension,make sure to use a similar drainhose.
It must be no longer than 4 met res; otherwise the cleaning effect of the dishw asher could be reduced.
Wat e r O ut l e t
Connect the water d rain hose. Th e drain hose must be correctly fit ted to avoid w ater leaks.
Ensure that the w ater drain hose is not kinked or s quashed .
The wasteconne ctionmust be ata heightof between 40 cm(minim um) and 100 cm (ma ximum)
from the b ottom of the di sh. T h e w a t e r dra i n hos e shou ld be fixe d by a ho se clip. The fre e end of
the h ose mu st not be imme rsed in wat er.
If the sink is 1 000 h igh er from the f l oor, th e excess wa te r in hos e s cannot be draine d directly
into thesink. It willbenecessary todrain excess w ater fromhoses intoabowl or suitable
container that is held outsi de and lower th an t he sink.
How to Drain ExcessWaterFromHoses
FRONT VIEW
Inlet pipe connector Drain pipe connector
POWER OUTLET
SINK
DISHWASHER
Min 100mm
Page 19
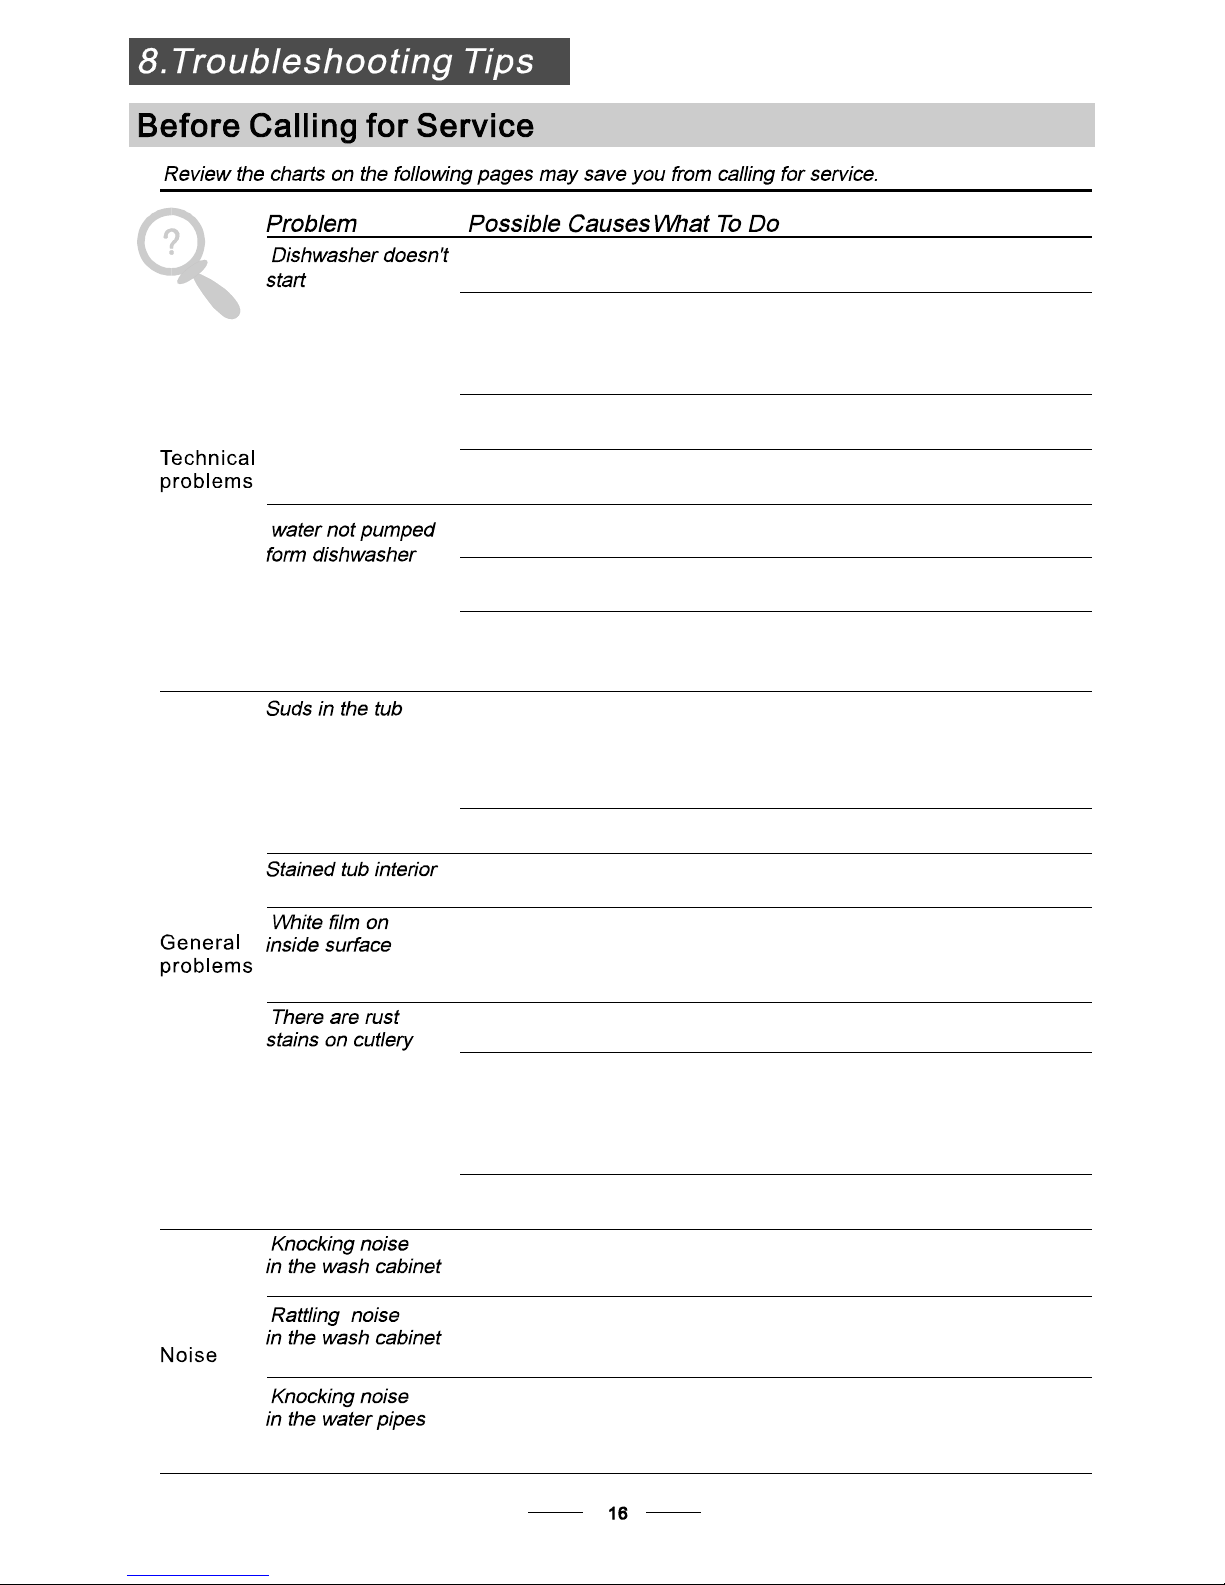
Fuse blown, or the
circuit breaker acted
Replace fuse or reset circuit breaker. Remove any other
appliances sharing the same circuit with the dishwasher
Spilled rinse-aid
Always wipe up rinse-aid spills immediately.
Hard water minerals
The affected items are
notcorrosionresistant.
The lid of the softer
is loose
Aspayarmis
knocking against
an item in a basket
r
Items of crockery
are loose in the
wash cabinet
This m ay becaused
by on-site installation
or the cross-section of
the piping.
A programme was not
run after dishwasher
salt was added.
Traces of salt have
gotten into the wash cycle.
To clean the interior, use a damp sponge with
dishwasher detergent and wear rubber gloves.
Never use any other cleaner than dishwasher
detergent for the risk of foaming or suds.
Always run the quick wash programme .
without any crockery in the dishwasher and
without selecting the Turbo function (if present),
after adding dishwasher salt.
Check the lip .Ensure the fix is fine.
Interrupt the programme, and rearrange the items
which are obstructing the sp ay arm.r
Interrupt the programme,
and rearrange the items of crockery.
This has no influence on the dishwasher function.
if in doubt, contact a suitably qualified plumber.
Detergent with
colourant was used
Make sure that the detergent is the one without
colourant.
Improper detergent
Make sure the dishwasher is turned on and the door is
closed securely.
Check that the water supply is connected properly and
the water is turned on.
Make sure to close the door properly and latch it.
Make sure the power cord is properly plugged into the
wall socket.
Power supply is not
turned on
Error code:E1;
Water pressure is low
Door of dishwasher
not properly closed.
Kink in drain hose
Filter clogged
Kitchen sink clogged
Check drain hose.
Check coarse the filter
(see section titled )" Cleaning The Filter "
Check the kitchen sink to make sure it is draining well.
If the problem is the kitchen sink not draining ,you may
need a plumber rather than a serviceman for dishwashers.
Use only the special dishwasher detergent to avoid
suds. If this occurs, open the dishwasher and let suds
evaporate.Add 1 gallon of cold water to the tub. Close
and latch the dishwasher, then Start the "soak" wash
cycle to drain out the water . Repeat if necessary.
Page 20
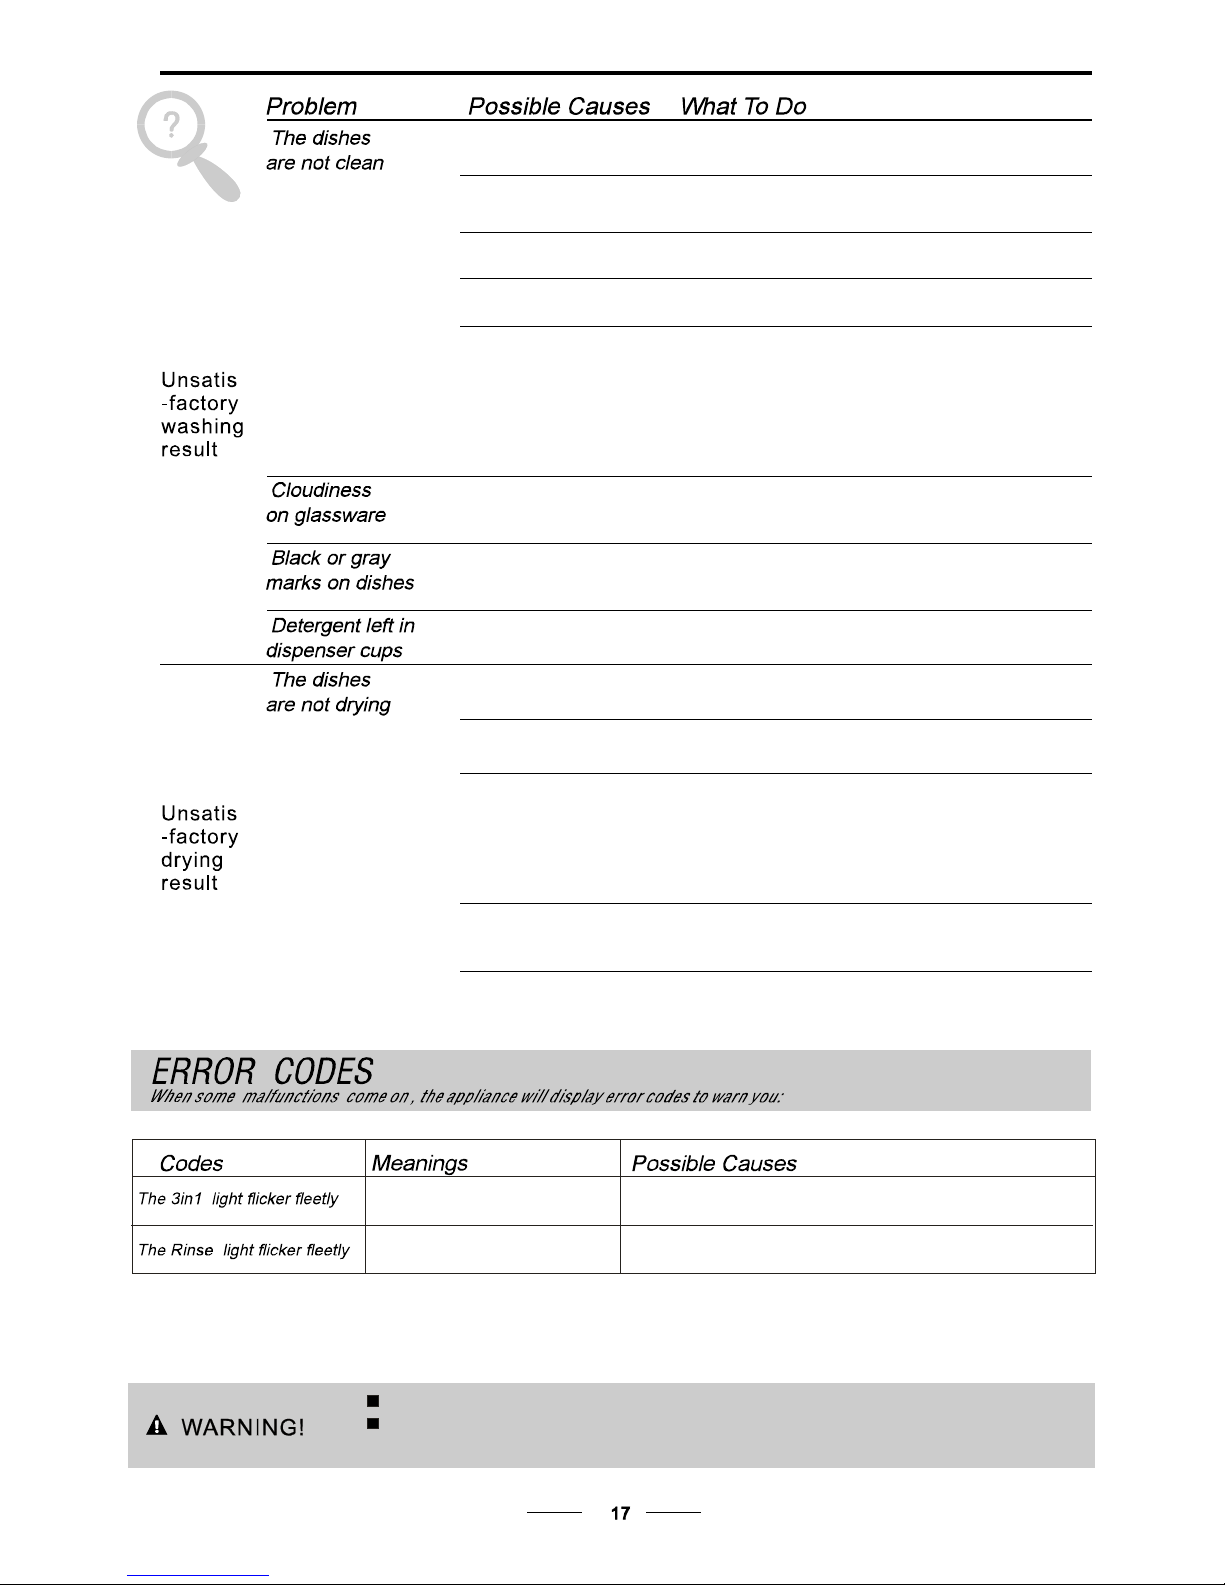
The dishes were not
loaded correctly.
See notes in " Loading the Dishwasher Baskets ".
Select a more intensive programme.
See" Wash Cycle Table ."
Use more detergent, or change your detergent.
Rearrange the items so that the sp ay can rotate freely.r
Clean and/or fit the filter combination correctly.
Clean the sp ay arm jets. See "Cleaning the Spray
Arms".
r
Use less detergent if you have soft water and select
a shortest cycle to wash the glassware and to get
them clean.
Use a mild abrasive cleaner to eliminate those marks.
Re-loading the dishes properly.
Load the dishwasher as suggested in the directions.
Increase the amount of rinse-aid/refill the rinse-aid
dispenser.
Do not empty your dishwasher immediately after
washing. Open the door slightly so that the steam can
escape. Begin unloading the dishwasher only once t
he dishes are barely warm to the touch. Empty the low
basket first.This prevents water form dropping off
dishes in the upper basket.
In short program the washing temperature is lower.
This also lowers cleaning performance. Choose
a program with a long washing time.
Water drainage is more difficult with these items.
Cutlery or dishes of this type are not suitable for
washing in the dishwasher.
Theprogrammewas
notpowerful enough.
Not enough detergent
wasdispensed.
Items are blocking
the path of sp ay arms.r
The filter combination
inthebaseofwash
cabinet is not clean or
is not correctly fitted.
This m ay cause
the sp ay arm jets
to get bl ocked.
r
Combination of soft
water andtoo much
detergent.
Aluminum utensils
have rubbed against
dishes.
Dishes block
detergent cups.
Improper loading
Too little rinse-aid
Dishes are removed
too soon
Wrong program
has been selected
Use of cutlery with
a low-quality coating
If overflow occurs, turn off the main water supply before calling a service.
If there is water in the base pan because of an overfill or small leak,
the water should be removed before restarting the dishwasher.
Longer inlet time.
Faucets is not opened, or water intake is restricted,
or water pressure is too low.
Some element of dishwasher leaks .
Overflow.
Page 21
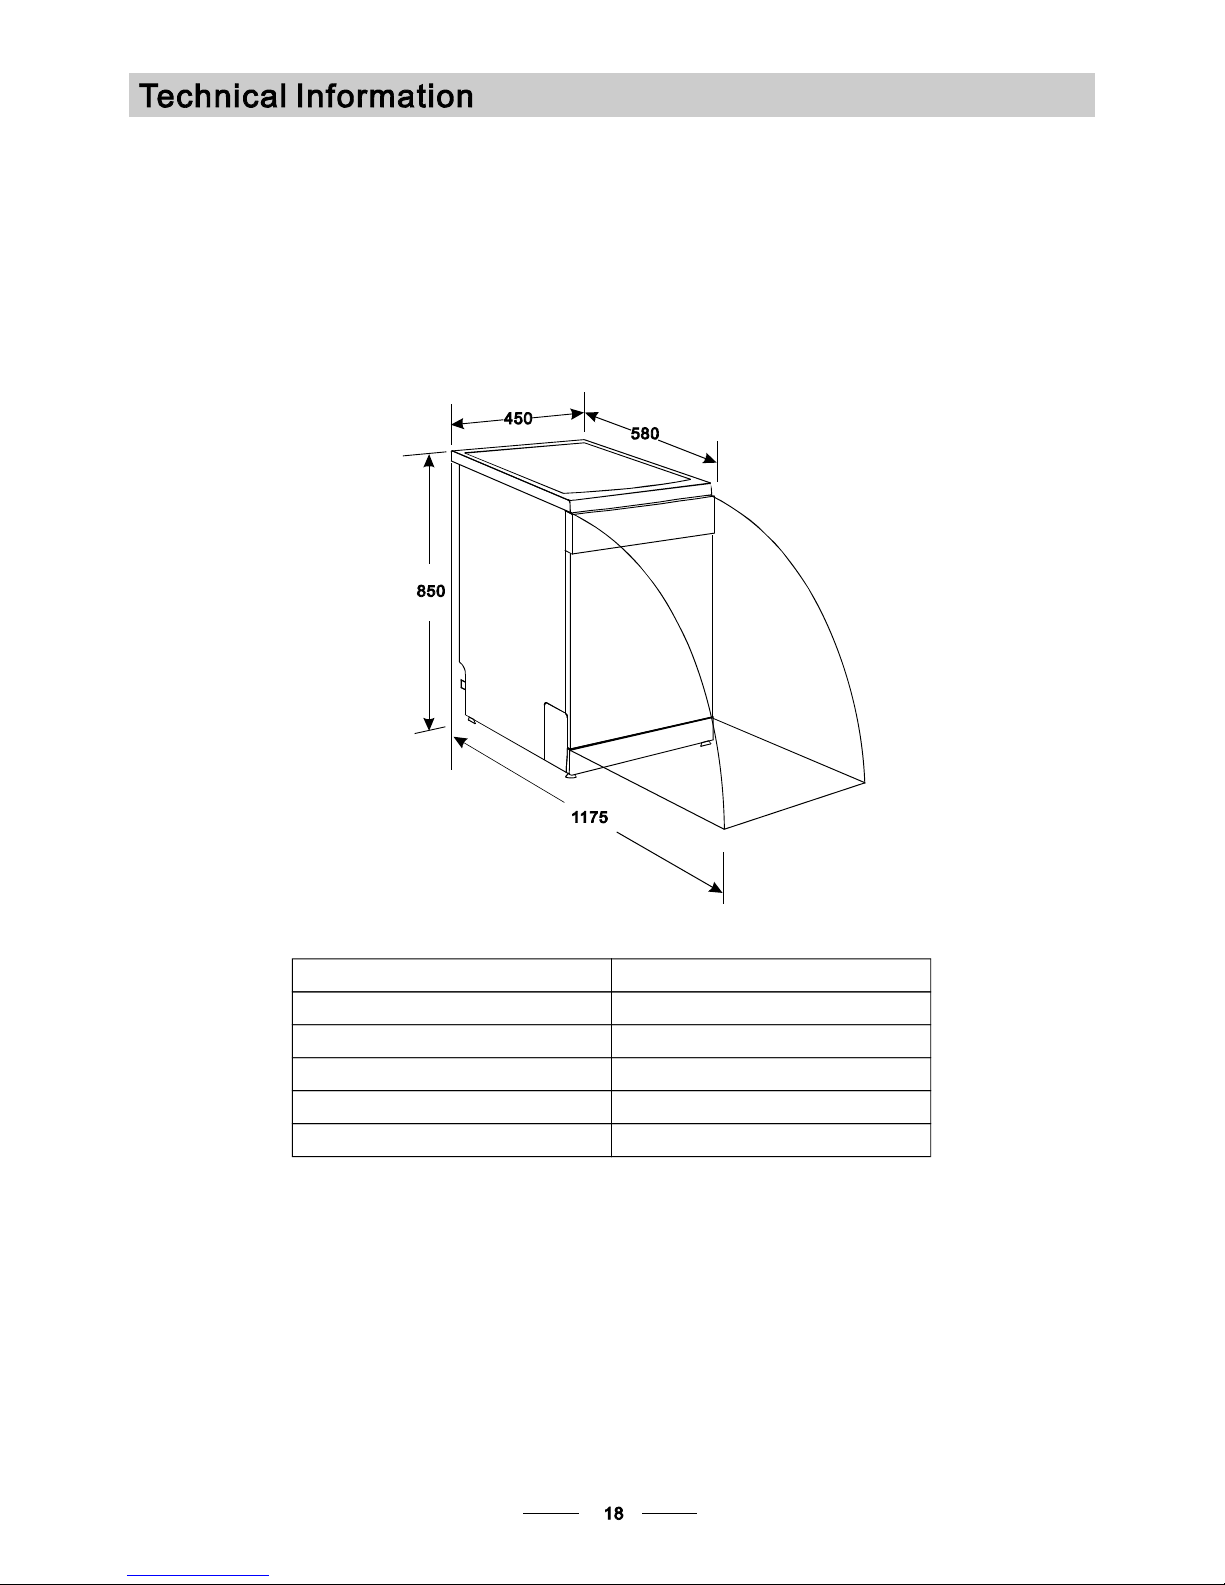
Height : 850mm
Width : 450mm
Dept h : 580mm
Waterpressure: 0.04-1.0MPa
Power supply: see rating label
Capacity: 8pla cesett ings
Page 22

19
WARRANTY
1.1 In this warranty:
1.1.1 Australian Consumer Law means the law as set out in Schedule 2 of the Competition and
Consumer Act 2010;
1.1.2 Company means GSM Sales Pty Ltd ABN 53 007 682 475 of 142-144 Fullarton Road, Rose
Park SA 5067. Telephone 08 8122 2390. Email [email protected]
;
1.1.3 Consumer means a “consumer” as that term is defined in Section 3 of the Australian Consumer
Law as the original purchaser of a Bellini product;
1.1.4 Consumer Guarantees means the guarantees under the Australian Consumer Law;
1.1.5 You means the Consumer.
1.2 Nothing in this warranty affects any person’s rights under the Australian Consumer Law. The benefits to
any Consumer under this warranty are in addition to the rights and remedies available under any
Consumer Guarantees.
1.3 Subject to the other clauses of this warranty, the Company warrants to the Consumer that the Bellini
product will be free of manufacturing defects and will perform to the Company’s specifications.
1.4 The benefit of this warranty extends only to the Consumer as original purchaser of a Bellini product which
is installed in a residential property.
1.5 This warranty commences on the date of purchase of the Bellini product by the Consumer and continues
for the benefit only of the Consumer until the expiry of two (2) years (Warranty Period).
1.6 If within the Warranty Period a manufacturing defect is discovered in the Bellini product or it fai ls to perform
to the Company’s specifications as a result of some defect in materials, components or workmanship
(Defect) then the Company will, at its option, repair the Bellini product or supply a replacement Bellini
product free of charge. A replacement Bellini product may differ from the original product purchased by the
Consumer.
1.7 This warranty will not apply to any Bellini product:
1.7.1 Installed by any person other than a qualified tradesperson; or
1.7.2 Subjected to misuse, neglect, negligence or accidental damage; or
1.7.3 Operated in any way contrary to any operating or maintenance instructions; or
1.7.4 Improperly handled, installed or maintained; or
1.7.5 Altered or modified prior to or after installation; or
1.7.6 Damaged directly or indirectly by power surges, electrical storm damage or connection to incorrect
power supply
IN ORDER TO MAKE A CLAIM UNDER THIS WARRANTY THE
CONSUMER MUST CALL 1300 373 199 (AUSTRALIA) OR 0508 123 108
(NEW ZEALAND) TO CONNECT TO THE NEAREST AUTHORISED CENTRE
TheAustralianConsumerLawrequirestheinclusionofthefollowingstatement
withthiswarranty:
Our goods come with guaranteed that cannot be excluded under the Australian Consumer Law. You are
entitled to a replacement or refund for a major failure and for compensation for any other reasonably
foreseeable loss or damage. You are also entitled to have the goods repaired or replaced if the goods
fail to be of acceptable quality and the failure does not amount to a major failure.
Page 23

20
1.8 You must provide proof of your purchase of the Bellini product and the date of purchase in order to obtain
the benefit of this warranty.
1.9 If you live outside the service area of the Company or one of its service agents, this warranty does not
cover the cost of transport of the Bellini product for service nor the service agent’s traveling co sts to and
from your home.
1.10 If you are required to transport the Bellini product to the Company or its service agent, you must ensure it i s
safely disconnected by a qualified tradesman and securely packed and insured. The Company does not
accept any responsibility for loss or damage of the Bellini product prior to it being received by the Company
or its service agent.
1.11 You will be responsible for all costs of returning a Bellini product to the Company and for redelivery of the
Bellini product by the Company (whether it is the original or a repaired and/or a replacement Bellini product)
and for any other expenses you incur in claiming under this warranty.
1.12 The Company or its service agent will examine any Bellini product and if the Company determines t hat it is
defective through no fault of the Owner and is otherwise undamaged, the Compan y will repair or replace
the Bellini product in accordance with this warranty.
DO NOT SEND IN THIS WARRANTY
Fill out the following details and file with your purchase invoice.
RETAIN & FILE WITH YOUR RECEIPT
Your Purchase Receipt/Invoice is proof of date of purc hase. If you are unable to establish the date of purchase,
or if the fault is not covered by this warranty, or if the product is found to be in working order, you will be required
to bear all service call charges.
GSM Sales Pty Ltd reserves the right to discontinue items, modify designs and change specifications without
incurring obligation.
Whilst every effort is made to ensure that descriptions, specifications and other information in this publication is
correct, no warranty is given in respect thereof and the company shall not be liable for any errors therein.
Purchased from:
Co. Name:
Address:
Date of Purchase:
Serial number:
NOTE: Consistent with our continuing product development policy, improvements may have been made
which render the contents of this packaging sli ghtly different to that shown.
FOR WARRANTY SERVICE CALL 1300 373 199 (AUSTRALIA)
OR 0508 123 108 (NEW ZEALAND) TO CONNECT YOU TO THE NEAREST
AUTHORISED SERVICE CENTRE
 Loading...