

Page 1
Part No 082757203 Date 11.07.2012
Belling 60 - 70 - 90cm
Hob Touch UK
Users Guide & Installation
Handbook
Page 2

CONTENTS & INTRODUCTION
CONTENTS
• SAFETY
• USING THE PRODUCT
• CLEANING
• INSTALLATION INSTRUCTIONS
• TECHNICAL DATA
• CUSTOMER CARE
INTRODUCTION
Thank you for buying this British-
built appliance from us.
This guide book is designed to help you
through each step of owning your new
appliance, from installation to use. Please
read it carefully before you start using
your product, as we have endeavored to
answer as many questions as possible,
and provide you with as much support
as we can.
If, however, you should fi nd something
missing, or not covered, please contact
our Customer Care team. Their number is
located on the back page of this book.
For customers outside the UK and
Northern Ireland, please contact your
local supplier.
When you dial this number you will hear
a recorded message and be given a
number of options. This indicates that
your call has been accepted and is
being held in a queue. Calls are answered
in strict rotation as our Customer care
representatives become available.
Alternatively, general information, spares
and service information is available from
our website. The address is located on
the back page of this book.
WARRANTY
Your new appliance comes with our
12-month guarantee, protecting you
against electrical and mechanical
breakdown. To register your appliance
please call 0844 481 0182, complete
the registration form included or register
online at the web address located on the
back page of this book.
For full terms & conditions of the manufacturer’s guarantee, refer to the website
on the back of this book.
In addition, you may wish to purchase
an extended warranty. A leafl et
explaining how to do this is included
with your appliance.
Our policy is one of constant
development and improvement,
therefore we cannot guarantee the strict
accuracy of all of our illustrations and
specifi cations - changes may have been
made subsequent to publishing.
WARRANTY EXCLUSIONS
Damage or calls resulting from transportation, improper use or the replacement of
removable parts.
Costs incurred for calls to put right an appliance which is improperly installed.
Appliances found to be in use within
a commercial environment, plus those
which are subject to rental agreements.
Before using the hob
Make sure that you have removed all
packaging, wrappings, stickers and fi lms
from the hob surface.
It is recommended that you clean and
wash the hob surface before using for the
fi rst time.
Apply a thin coat of ceramic hob cleaner
to the hob to help maintain and protect it.
See the customer care section for details
of how to obtain all the available cleaning
products.
Page 3

SAFETY
WARNING! -
This appliance and its
accessible parts may
become hot during use.
To avoid burns, children
less than 8 years of age
shall be kept away unless
continuously supervised.
This appliance can be
used by children aged
from 8 years and above
and persons with reduced physical, sensory
or mental capabilities or
lack of experience and
knowledge if they have
been given supervision
or instruction concerning
use of the appliance in a
safe way and understand
the hazards involved.
Children shall not play
with the appliance.
Cleaning and user
maintenance shall not be
made by children without
supervision.
WARNING!-Unattended
cooking on a hob with fat
or oil can be dangerous
and may result in a fi re.
NEVER Try to extinguish
a fi re with water but
switch off the appliance
and then cover fl ame
e.g. with a lid or fi re
blanket.
WARNING! -
Metallic
objects such as knives,
forks, spoons and lids
should not be placed on
the hob surface since
they can get hot.
WARNING! - Danger of
fi re: do not store items
on the cooking surfaces.
Never leave any cook
zone on without a pan
covering it. This causes a
fi re hazard.
WARNING! - If the
surface is cracked, switch
off the appliance to avoid
the possibility of electric
shock.
The appliance is not
intended to be operated
by means of an external
timer or separate control
system.
Page 4

SAFETY
General
Servicing should be carried out only by
authorised personnel.
Do not spray aerosols in the vicinity of
this appliance while it is in operation.
Do not store or use fl ammable liquids or
items in the vicinity of this appliance.
Do not modify this appliance.
• Always ensure that pan bases are
dry, stable and fl at before using them
on the hob.
• Always match the size of pan to the
cook zone – do not use large pans
on small zones or vice versa.
• Always position pans over the centre
of the cook zone, and turn the
handles to a safe position so they
cannot be knocked or grabbed.
• Always lift pans onto and off the
hob, rather than sliding them across
the surface, to avoid marks and
scratches.
• This appliance should only be used
for normal domestic cooking of food.
• Never use the hob for any other
purpose than cooking food.
• Plastic cooking utensils can melt if
they come into contact with a warm
hob. Never leave them close to, or
on top of the hob.
• Never use the hob surface as a
chopping board or food preparation
area, as this may lead to it becoming
damaged.
• Never leave aluminium foil on the
hob top, it refl ects heat back into the
element which leads to damage.
• Never heat up a sealed tin of food on
the hob, as it may explode.
• Never leave pans overhanging the
edge of the hob. The surface of the
hob is smooth. If pans are knocked
they may move on the hob top.
Fire Safety Advice
Most kitchen fi res occur when people are
distracted or leave things unattended, so
remember:
If you’re called away from the hob - by
the phone or someone at the door, either
take pans off the heat, or switch off your
hob.
Don’t let yourself be distracted while
cooking.
If you do have a fi re in the kitchen, don’t
take any risks - get everyone out of your
home and call the Fire Service.
If a pan catches fi re:
• Do not move it - it is likely to be
extremely hot.
• Turn off the heat if it’s safe to do so
- but never lean over a pan to reach
the controls.
• If you have a fi re blanket or a lid, put
it over the pan.
• If you have put the fi re out, leave the
pan to cool completely.
Deep-fat frying presents more dangers in your kitchen.
• Never fi ll a pan (or other deep-fat
fryer) more than one-third full of oil.
• Do not use a fi re extinguisher on a
pan of oil - the force of the extinguisher can spread the fi re and cre-
ate a fi reball.
If you have an electrical fi re in the
kitchen:
• Pull the plug out, or switch off the
power at the fuse box - this may be
enough to stop the fi re immediately
• Smother the fi re with a fi re blanket.
• Remember: never use water on an
electrical or cooking oil fi re.
Page 5

SAFETY
Avoiding damage to the appliance.
The ceramic glass of the hob can be
damaged by objects falling onto it. Be
especially careful with heavy jars of food
being stored in cupboards above the hob,
we recommend storing them away from
the hob area.
The edge of the glass can be damaged by
being knocked by cookware.
Cookware made of cast iron, cast aluminium or with damaged bottoms can
scratch the ceramic glass if pushed across
the surface.
Objects that melt and things that boil
over can burn onto the ceramic glass and
should be removed as soon as possible.
To avoid damage to cookware and the
ceramic glass, do not allow sauce pans or
frying pans to boil dry.
Do not use the cooking zones with empty
cookware or without cookware in place.
DISPOSAL
Packaging Material
The packaging materials used with this
appliance can be recycled.
Please dispose of the packaging materials
in the appropriate container at your local
waste disposal facilities.
Old Appliances
The Symbol
on the product or on
its packaging indicates that this product
may not be treated as household waste.
Instead it should be taken to the applicable collection point for the recycling of
electrical and electronic equipment.
You will by ensuring the appliance is correctly disposed of help prevent potential
negative consequences for the environment and human health.
For additional details regarding the recycling of this product please contact your
local government offi ce, your household
waste disposal service or the retailer
where you purchased the product.
Page 6
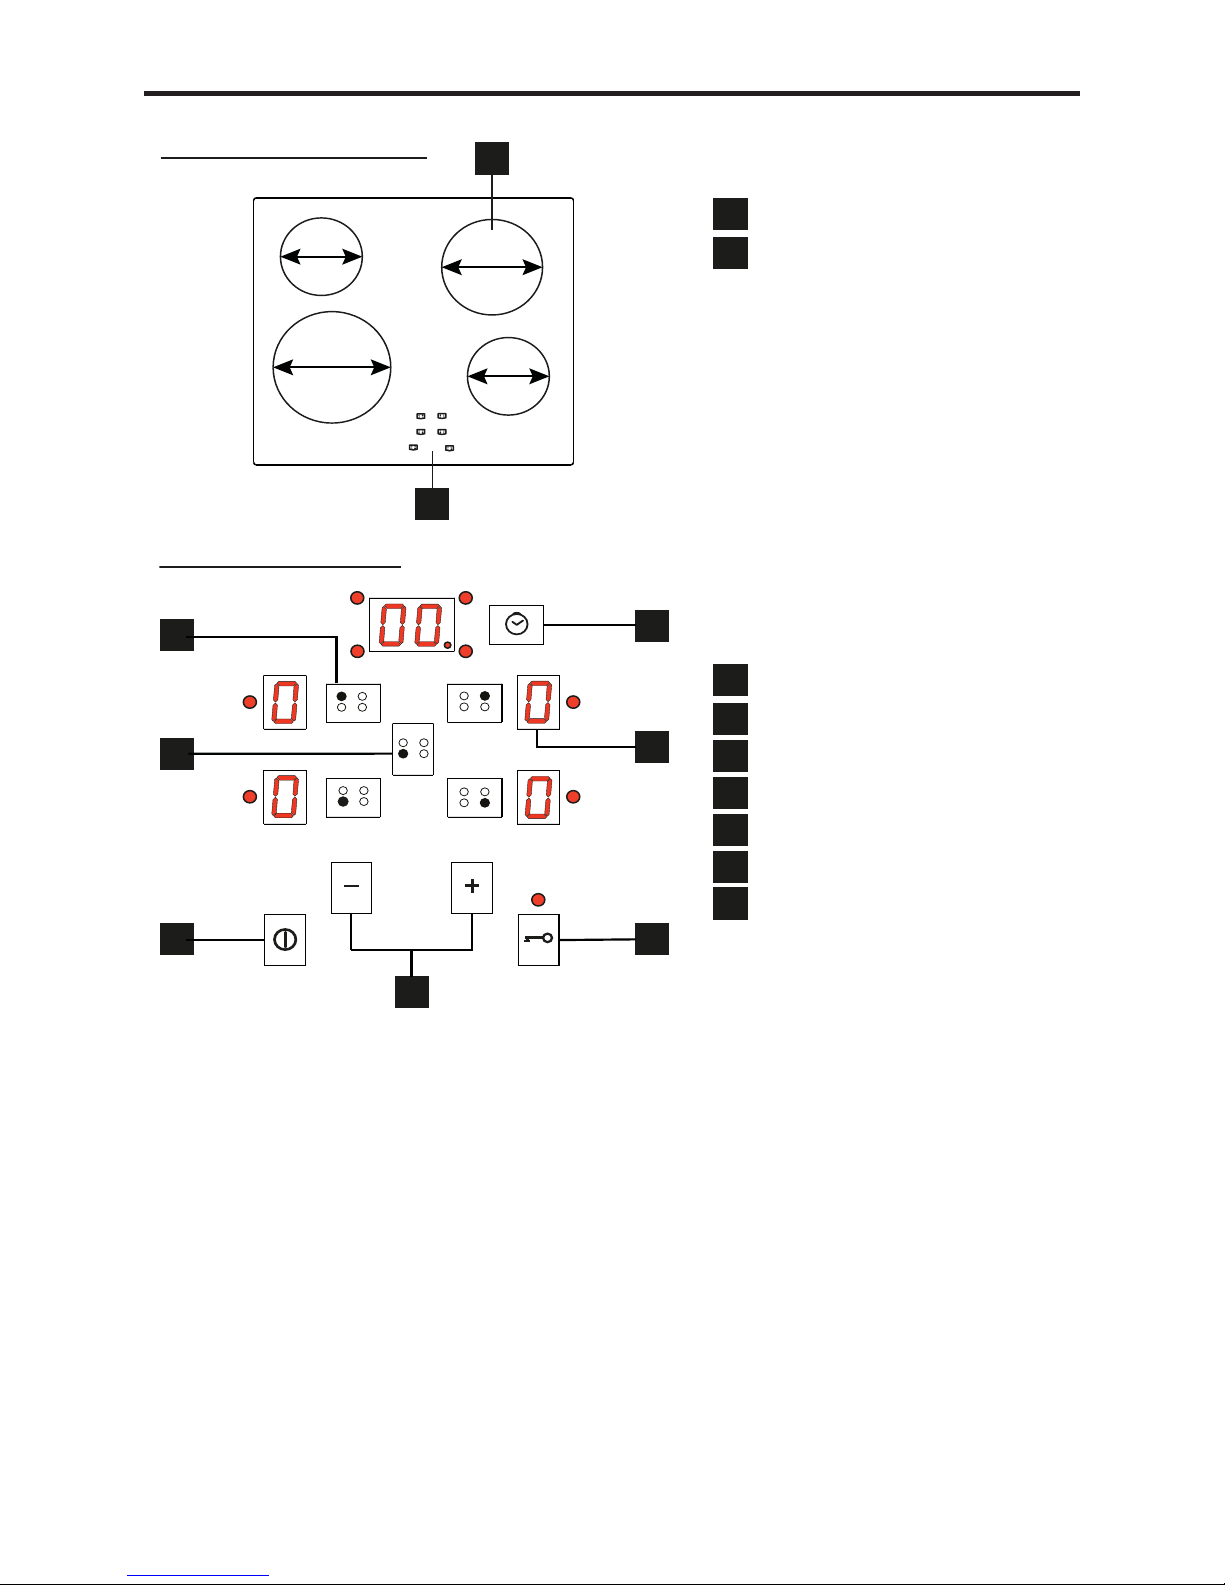
USING THE HOB - ELECTRIC (CERAMIC)
Touch Controls
The touch controls of your hob have been
designed to provide you with fi nger tip
control of your hob, providing accurate
and repeatable power settings for cooking
and an easy clean surface that can be
easily wiped over, When a cook zone is
activated the power setting is displayed
for each zone individually.
Using The Touch Controls
Use the fl at of your fi nger, not the tip, the
controls respond to touch, so you don’t
need to apply any pressure. The touch
control keys take approximately 1 second
to respond to your touch.
Always ensure the touch control area is
clean, dry and free from any objects (e.g.
utensils, tea towels and cloths), spillages
and water may make the controls diffi cult
to operate.
A beeping sound will be activated and will
keep on beeping every 10 seconds, to
attract your attention, please remove any
objects and clean the area as appropriate.
KEY 1
KEY 2 KEY 3
KEY 4
TIMER
DUAL
KEY
Note; Generic illustrations shown above your
appliance may visually differ.
6
3
7
2
1
4
5
CENTRAL ON/OFF KEY
KEYLOCK
5
4
1
2
POWER LEVEL/COOK ZONE DISPLAY
3
COOK ZONE KEYS (1 - 4)
POWER LEVEL ADJUST (+ / -)
6
DUAL ZONE KEY (IF FITTED)
7
TIMER KEY
1
2
1
2
Cooking Surface layout
Touch Control Layout
COOKING ZONES
TOUCH CONTROLS
Page 7
Appyling Power To The Hob
Before switching on the power supply to
the appliance, switch off any bright lights
(Such as a cooker hood) and ensure the
appliance is not in direct sunlight.
This is to enable the electronic controls to
calibrate its sensitivity against the natural
ambient lighting (Approx 30 seconds).
Failure to observe the above will result in
the hob not functioning correctly, (Display
showing “FL”). To rectify remove all strong
lighting sources and re-apply power.
The hob should complete the calibration
procedure satisfactorily and lighting such
as cooker hoods can be used normally.
When power is fi rst switched on the hob
will always start up with the Key Lock
activated.
Key Lock
A Red Led indicates when the key lock is
active, to deactivate/activate, touch the
Key Lock key for 1 second.
The key lock is deactivated when the Red
LED switches off.
If any of the cook zones are ON, the key
lock function locks all the keys except the
ON/OFF key.
If the cook zones are OFF, the key lock
function locks all the keys, including the
ON/OFF key.
Note: The Key Lock is automatically activated every time the electricity supply is
switched off and back on to the hob.
To avoid unintentional switching on of the
appliance, e.g. by small children and pets,
we recommend activation of the key lock
feature.
Central On/Off key
The central on off key activates the cooking zone selection keys and enables all
of the cooking zones to be switched off
simultaneously at a touch of one key.
Switching On (Individual Cook Zone)
1, Ensure the Key lock is deactivated.
2, Touch the On/Off Key for 1 second a
beep sounds and the cook zone displays
become illuminated.
3, Touch the required cook zone key, it will
start to fl ash.
4, Whilst fl ashing adjust the cook zone
power level as required by using the Up+/
down- keys.
5, Then either touch the cook zone key
again to confi rm the setting or after 5-10
seconds the hob will auto set the hob
power and will beep and stop fl ashing.
Note: Quick operation with the power
level at 0 touch the down (-) key will take
the hob straight to power level 9.
6, To adjust the power setting follow steps
3-5 above.
7, Repeat the above as necessary for the
other zones.
Note: During cooking, the elements will
cycle on and off. This is normal.
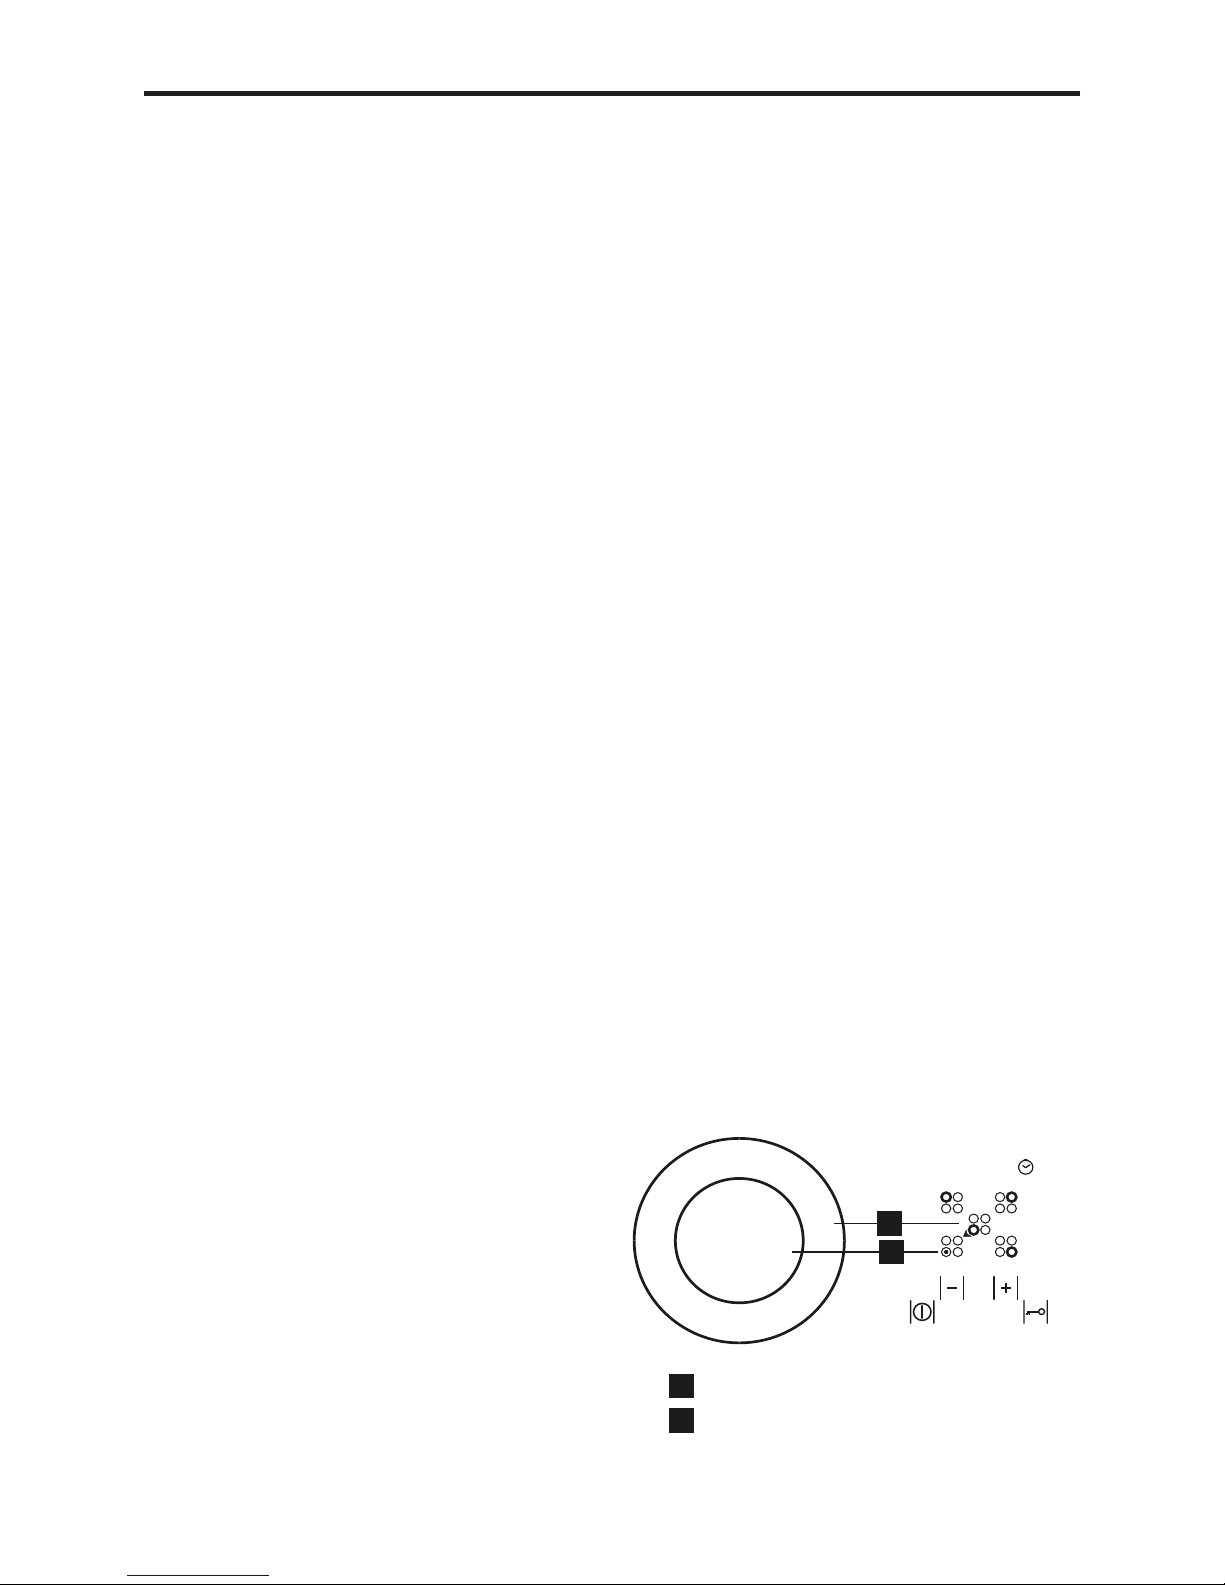
Dual Zone (If fi tted)
Note: The dual zone is only available on
70cm and 90cm appliances, and is where
the inner ring of the heating element can
be controlled separately.
USING THE HOB - ELECTRIC (CERAMIC)
Note; Generic illustration shown above your
appliance may visually dier.
COOK ZONE KEY (INNER ONLY)
CENTRAL DUAL ZONE KEY (INNER & OUTER)
1
2
1
2
Page 8
USING THE HOB - ELECTRIC (CERAMIC)
To operate the dual cook zone
• Select the appropriate cook zone and
set the power level as per the single
zone
• Whilst the heater display is still fl ash-
ing press the central dual zone key,
a red LED will illuminate next to the
cook zone to indicate it has been
activated.
• The power level of the cook zone will
stop fl ashing and the power level is
set.
To de-select the dual cook zone
• Touch the cook zone Key, the power
level display will start fl ashing.
• Whilst the power level display is fl ash-
ing press the centre dual zone key
or return the power level to “0” and
the red led will disappear and the
inner and out elements will be disconnected. i.e. centre element controlled
only.
Note: Only the inner ring can be be operated on its own, the outer ring can only
be operated with the inner ring, match
your pan accordingly.
Switching Off (Individual Cook Zone)
• Touch the required cook zone key
until the zone display fl ashes, now
either return the power level to 0 by
pressing the down(-) key or simultaneously press the down(-) and up
(+) simultaneously and it will jump
straight to the 0 setting.
Residual Heat Indicators (For Each
Cook Zone)
• If the glass surface is hot an “H” will
be displayed in the cook zone display
until the glass has suffi ciently cooled.
Note: “ H” and “0” will fl ash alternatively
if the cook zone is hot and another cook
zone is in use.
Auto Heat Up
• Select appropriate cook zone and
increase to power level 9
• Now press the up (+) key again and
until the Red LED is illuminated next
to the cook zone.
• The power level will still be fl ashing,
so now select the power level you
would like (use the heat up time table
for guidance).
• Once set the Red LED is illuminated
• Once the heat up time as elapsed
a beep will sound and the Red Led
disappears and the heater remains at
the reduced level.
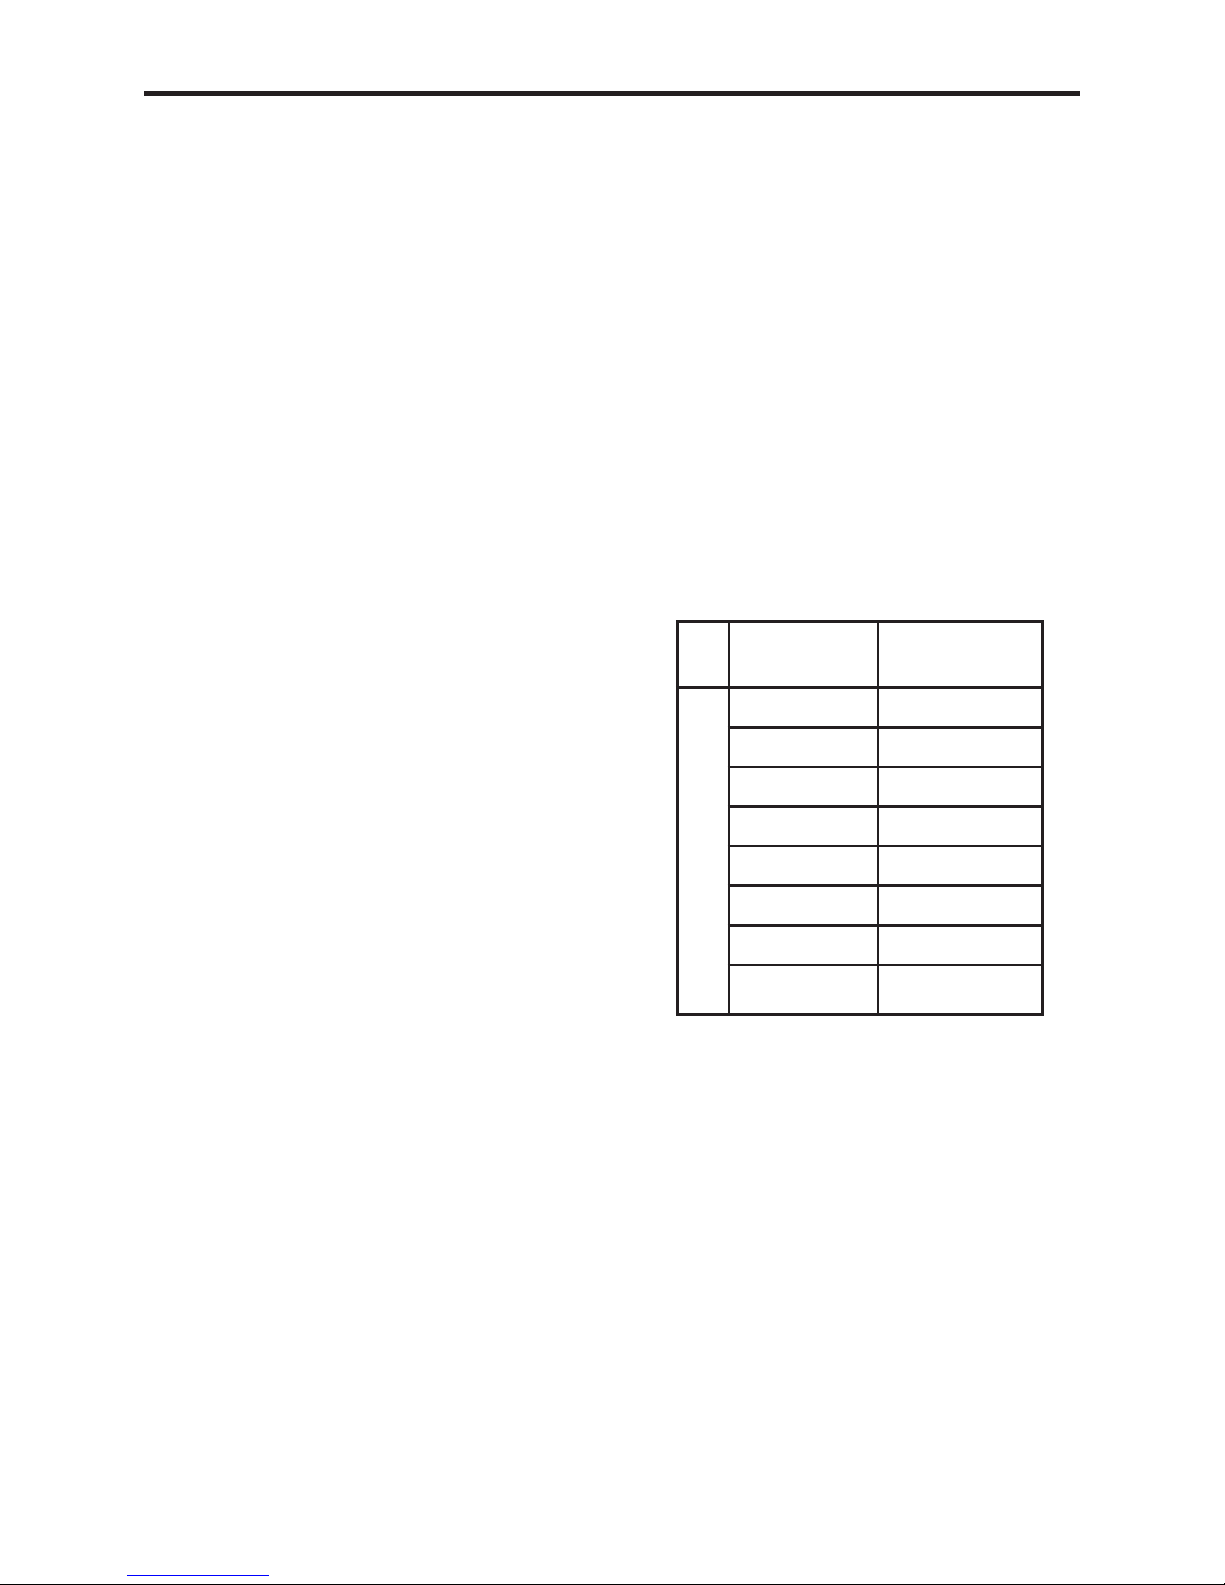
Power
Level
Time
Min/Sec
Heat up Time (Approx)
1 01:11
2 02:44
3 04:47
4 05:28
5 06:29
6 01:11
7 02:44
8 02:44
Note: During the heat up time the power
level is automatically set at full power untill the times detailed above have elapsed.
Cookware
• Cookware made of enamelled steel
or with aluminium or copper bottoms
can leave discolorations on the ceramic glass surface which are diffi cult
or impossible to remove.
• You can recognise good cookware
from the bottoms of the pans. The
bottom should be as thick and fl at as
possible.
Page 9
USING THE HOB - ELECTRIC (CERAMIC)
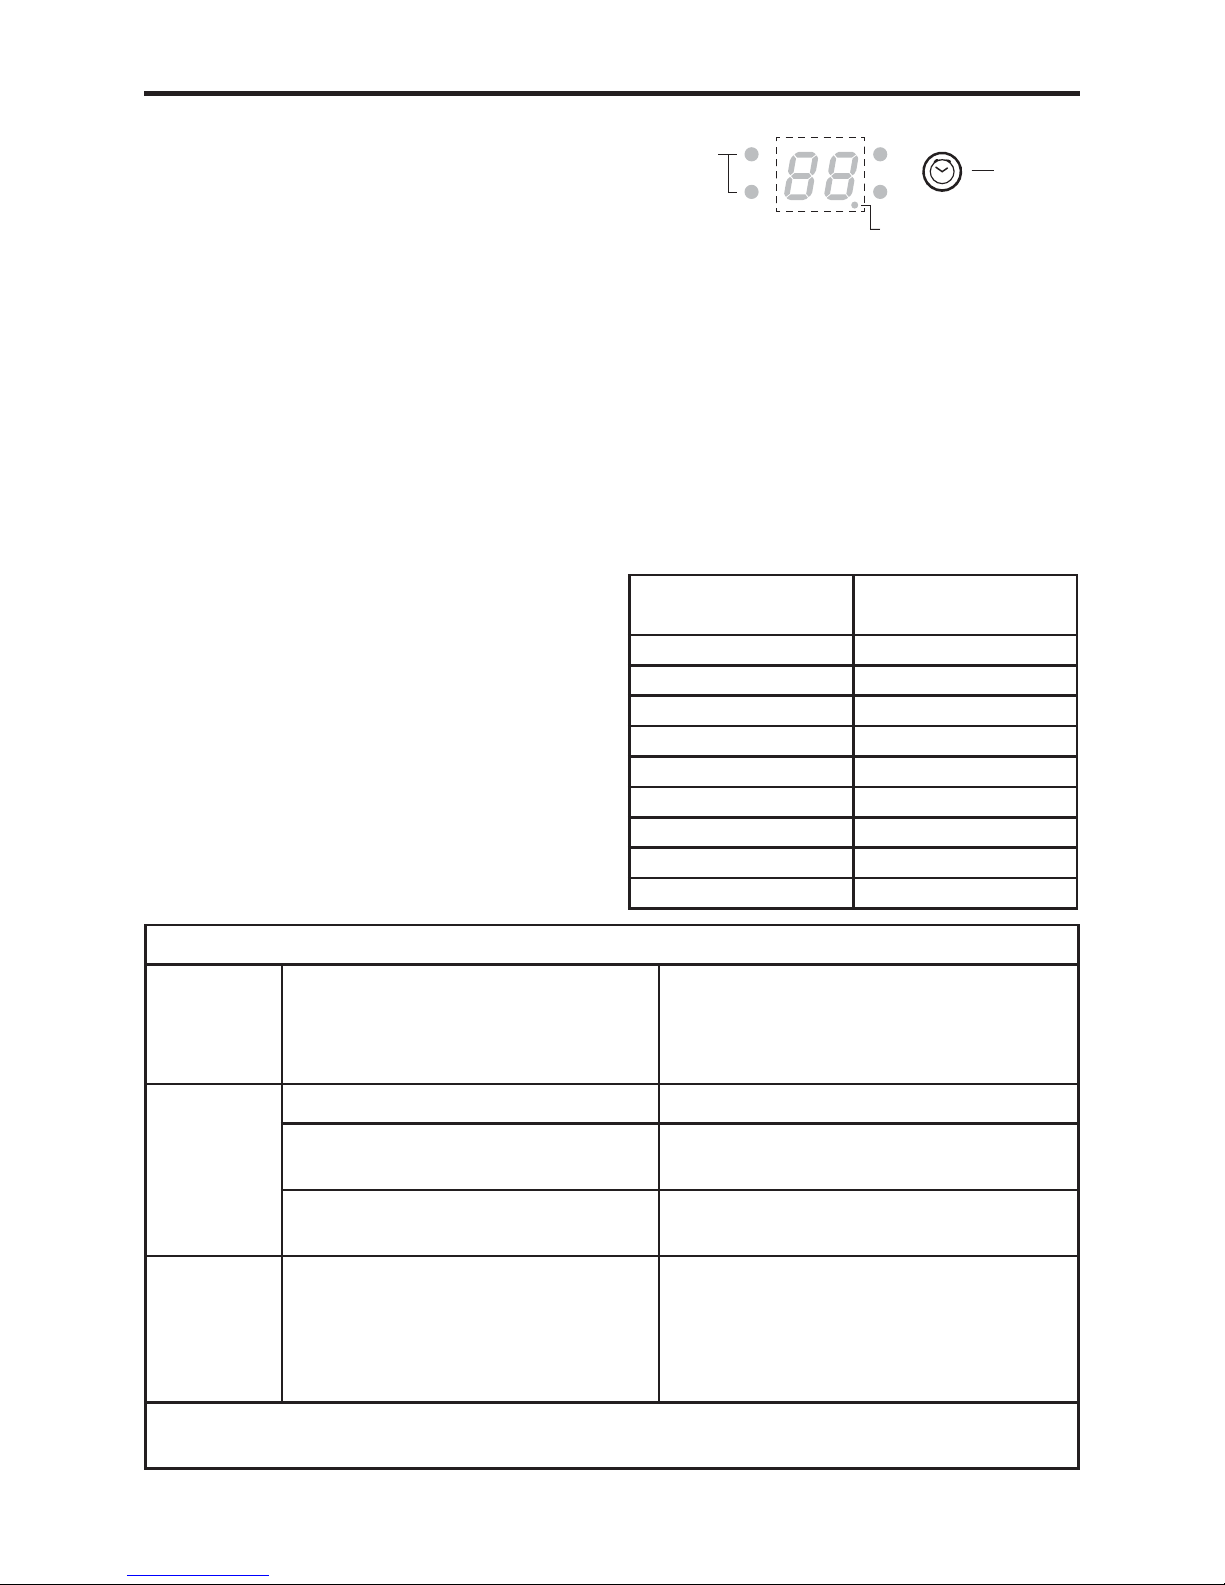
Timer (All Cook Zones)
All 4 cooking zones can be operated under
the timer independently and at the same
time for up to 99 minutes. When the set
time expires the timer will beep and the
cook zone will switch off automatically.
To Set The Timer To A Cook Zone
1, Set the desired power level to the cook
zone.
2, Whilst the cook zone power level is
fl ashing touch the timer key and the timer
will illuminate “00” and two Red Leds will
illuminate the fi rst one will be fl ashing on
the timer to indicate the activated timed
cook zone and the second one “00.” Indicates that the time can be adjusted.
3, Set the required time using the up(+)
and down(-) keys.
4, To adjust the timer whilst in operation
follow steps 2 and 3 above.
Note; Once the time has elapsed, touch
the timer key to cancel the alarm. When
more than one cook zone is being timed,
touch the cook zone key to view the timer.
Trouble Shooting Guide - Ceramic Touch Control Hobs
There is
no power
to the hob
The mains switch is not switched
on
Ensure that the switch to the
appliance is switched on and also
check the fuse/circuit breakers to see
if you are experiencing power failure
The hob
has turned
itself off
The power has been switched off Check switches and fuses as above
The control panel is covered with
a cloth or object
Remove any objects and or cloths
from the control area
The hob has been switched off
accidentally
Switch on the hob again after
completing the above steps
Display
of F and
Letters
If F and letters appear on the
display, your unit has detected a
fault, follow the required actions
in the Error and hob status codes
table.
Follow the directions in the Error
Codes and Hob Status Codes Section
Important Information:- If the appliance has been operated/handled incorrectly,
the engineers visit will be chargeable, even during the warranty period
To cancel the Timer
Either return the time down to zero or
switch off the cook zone.
Safety Shut Down
If the power level is not changed for a
long period of time the cook zone will
automatically turn itself off.
The maximum time a cook zone can stay
on depends on the power level.
Power Level Max Time
(Hours)
110
25
35
44
53
62
72
82
91
Refered
zone
LED’s
Timer
Timer adjust indicator
Page 10
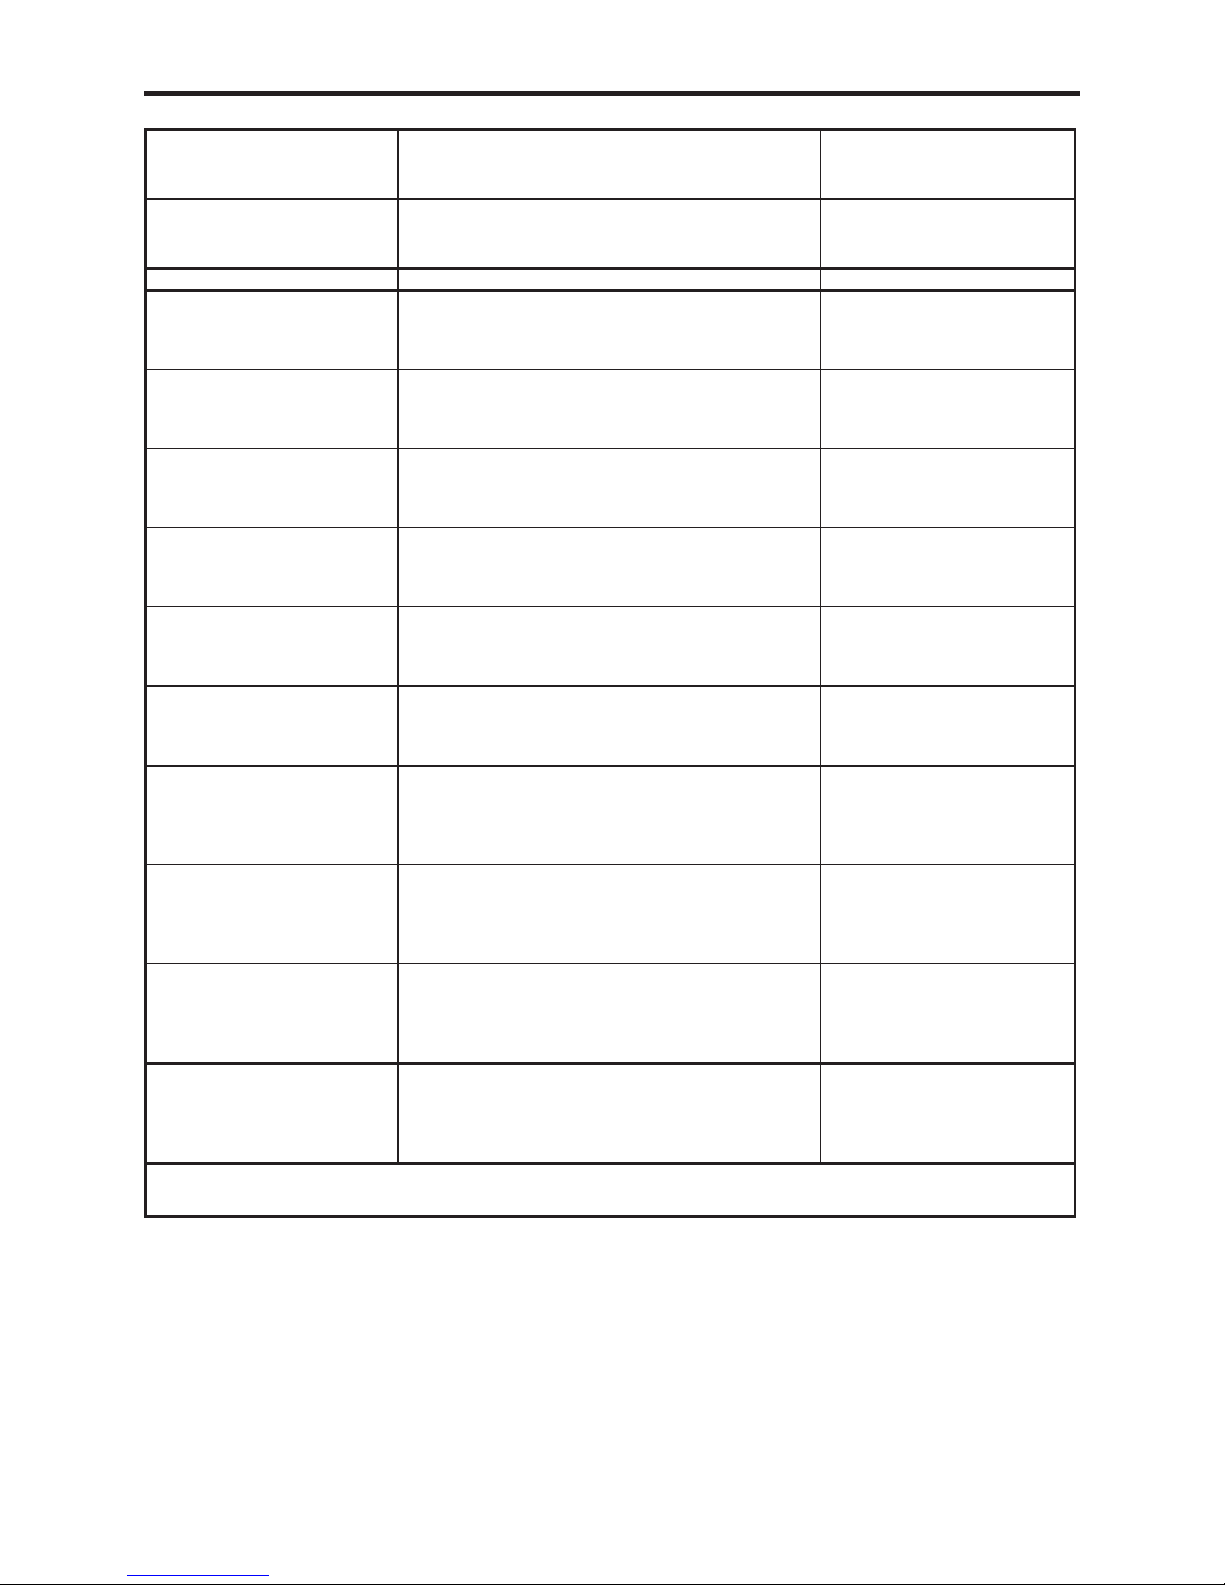
ERROR CODES
Hob Status Codes Fault Description Action
H
Residual Heater
No Fault " H" will switch off when
glass surface drops below 60
o
C
Appliance Errors & Alarms Fault Description Action
F0 Touch Control Error
Switch the power off and on, The
system will reset and the hob
should now be working correctly
FA Touch Control Error
Switch the power off and on,The
system will reset and the hob
should now be working correctly
FU Touch Control Error
Switch the power off and on, The
system will reset and the hob
should now be working correctly
FJ Touch Control Error
Switch the power off and on, The
system will reset and the hob
should now be working correctly
FC Touch Control Error
Switch the power off and on, The
system will reset and the hob
should now be working correctly
Fr Touch Control Error
Switch the power off and on, The
system will reset and the hob
should now be working correctly
Fc or F
Overheat/Temperature Problems
Allow hob to cool then Switch the
power off and on, The system will
reset and the hob should now be
working correctly
FE
Overheat/Temperature Problems
Allow hob to cool then Switch the
power off and on, The system will
reset and the hob should now be
working correctly
Ft Overheat/Temperature Problems
Allow hob to cool then Switch the
power off and on, The system will
reset and the hob should now be
working correctly
FL Poor Ambient Light Conditions
Switch off lighting in area, Clean
hob surface, Switch the power off
and on, The system will reset and
the hob should now be working
correctly
If any of the above problems persist please contact the customer service department for further assistance,
Energy Saving Tips
• Always place cookware on the cooking zone before it is switched on.
• Whenever possible place lids on pans.
• Switch off the cook zones off before the end of the cooking time, taking advantage
of residual heat.
• The bottom of the cookware and the cooking zones should be the same size.
Page 11

CLEANING
ELECTRIC HOB
Ceramic glass hobs
• It is recommended that you clean
and wash the hob surface before
using for the fi rst time. Apply a thin
coat of ceramic hob cleaner to the
hob to help maintain and protect it.
• The ceramic hob top can be cleaned
using a clean, damp cloth or kitchen
paper. Do not use a used dishcloth
or sponge as they can leave a fi lm of
detergent on the surface which can
lead to discoloration. Please ensure
that the elements are cooled fully to
avoid steam burns.
• You can use a specialist ceramic
cleaner to restore the surface, but
use sparingly to avoid coating the
hob top too thickly. Too much cream
cleaner will lead to discolouration.
Use a dry, clean cloth to polish the
surface.
• For stubborn marks, a specialist hob
scraper or cleaner can be used.
• Do not use steam cleaners or highpressure cleaning equipment.
• Regular cleaning will prevent any
salts or minerals from accumulating
on your hob and discolouring the
glass.
• Wipe any spillage as soon as possible.
• Clean the hob top as regularly as
possible, this will prevent any build
up of grease which may be a fi re
hazard.
Notes:
• The edge of the ceramic glass will
always appear to be a different colour
than the top surface due to the
ground safety edge.
• Scratches or dark stains on the
ceramic glass that cannot be removed do not affect the function of
the appliance.
Safety when Cleaning
• For cleaning, the appliance must be
switched off and cooled down.
WARNING! Risk of burns from residual
heat.
Page 12
INSTALLATION
between hob base and appliance must be
maintained.
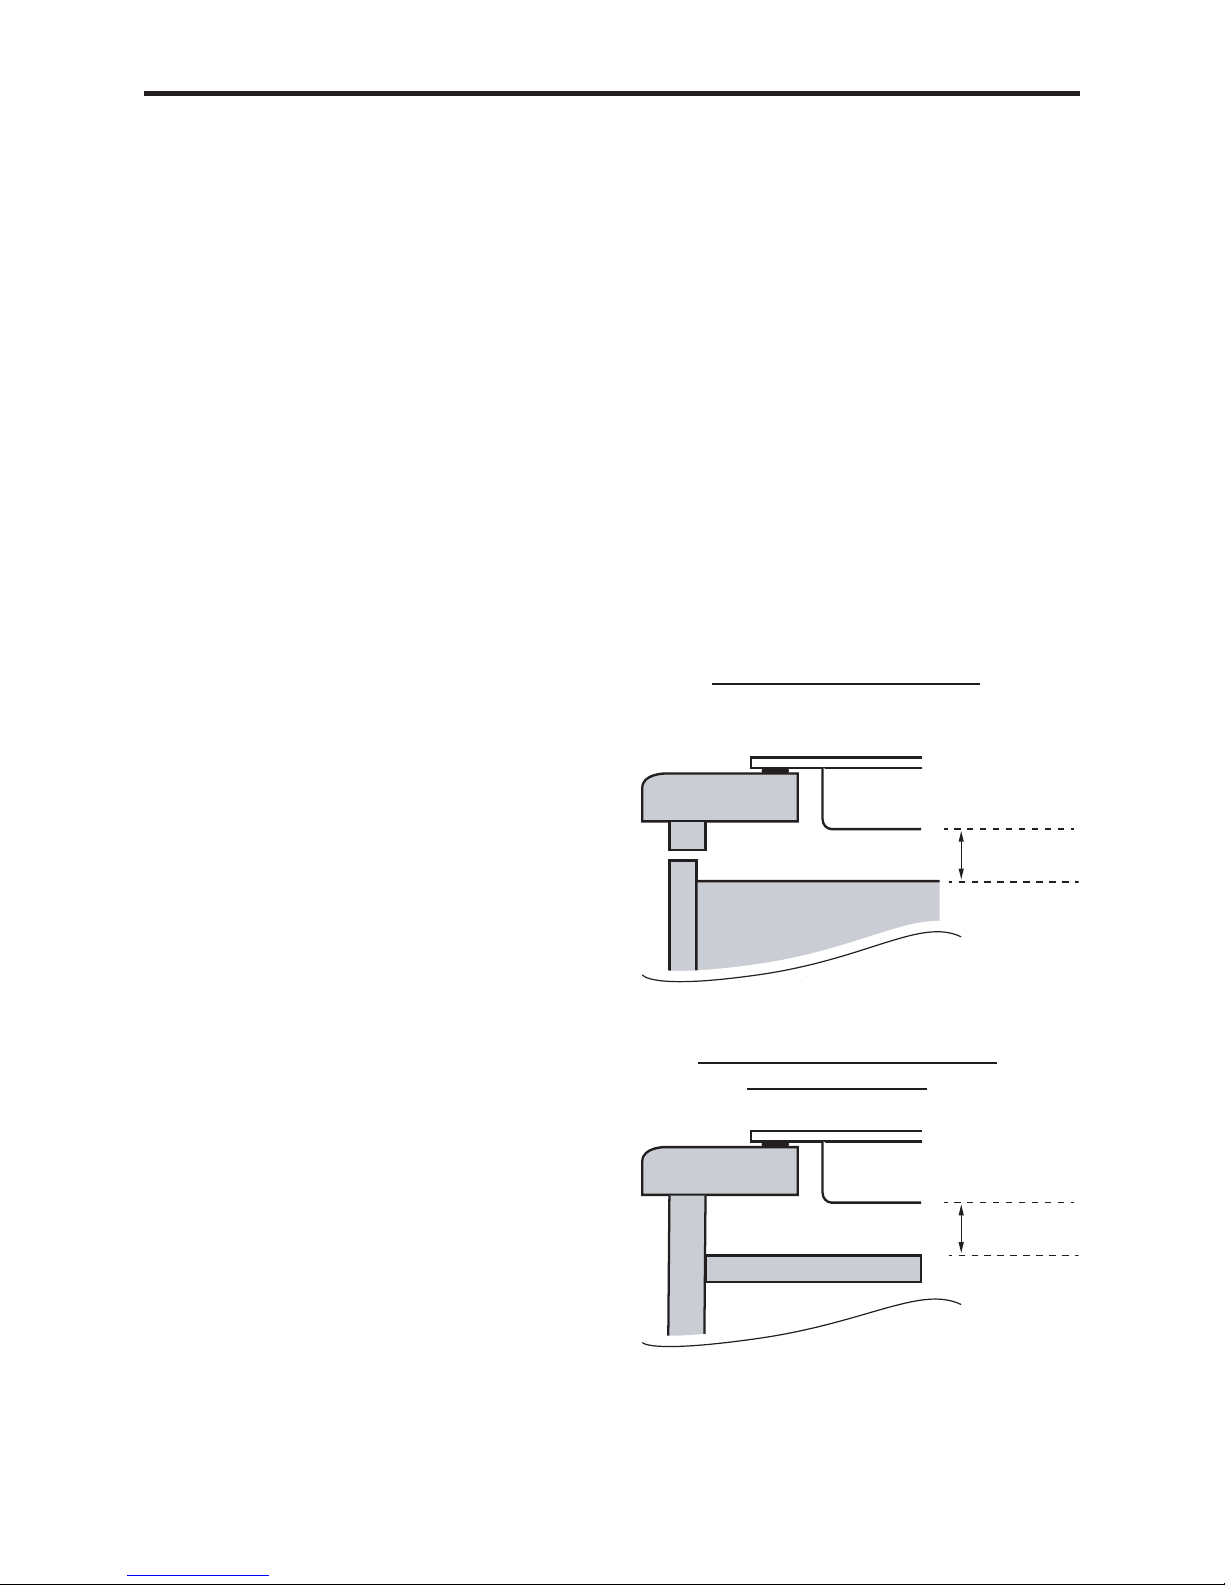
Installation above an oven
Refer to the manufacturer’s instructions
for clearances above the oven.
We recommend a 25mm gap between the
bottom of the hob and appliance.
Installation above a unit with a
drawer or door
The base of the appliance must be protected from damage e.g. draws may only
be installed providing a partition panel is
fi tted to the required dimensions underneath the appliance.
Worktop
25mm
Oven
Hob
INSTALLATION ABOVE AN OVEN
Worktop
25mm
Partician
Hob
Partition
INSTALLATION ABOVE A UNIT WITH
A DRAWER OR DOOR
General information
Installation should only be carried out by
a qualifi ed installer or engineer.
Please keep to the following points most
carefully;
Although every care has been taken to
ensure this appliance has no burrs, or
sharp edges, we recommend that you
wear protective gloves when installing and moving this appliance. This will
prevent injury.
The minimum distances to other appliances and units are to be observed.
Wall surfaces above the work surface and
in the immediate vicinity of the cooking
hob must be heat resistant.
Laminated surfaces and the adhesive
used for fi xing them must be heat resis-
tant in order to avoid any damage.
The space for air circulation, located
underneath and at the back of the hob
improves its reliability by ensuring that it
will cool down, effi ciently .
Installations should be carried out in line
with the National Regulations applicable
with this product type.
Note: Avoid installing the appliance next
to doors and under windows. This will
avoid the potential for hot cookware
being knocked off the hob when doors
and windows are opened (Risk of burns).
Built-in appliances may only be used after
they have been built-into suitable built-in
units and surfaces that meet the required
standards.
CHOOSING YOUR INSTALLATION
We recommend that you install this appliance in a work top which is a minimum
38mm deep.
The hob can be fi tted into a work top
less than 38mm deep, but the 25mm gap
Page 13
INSTALLATION
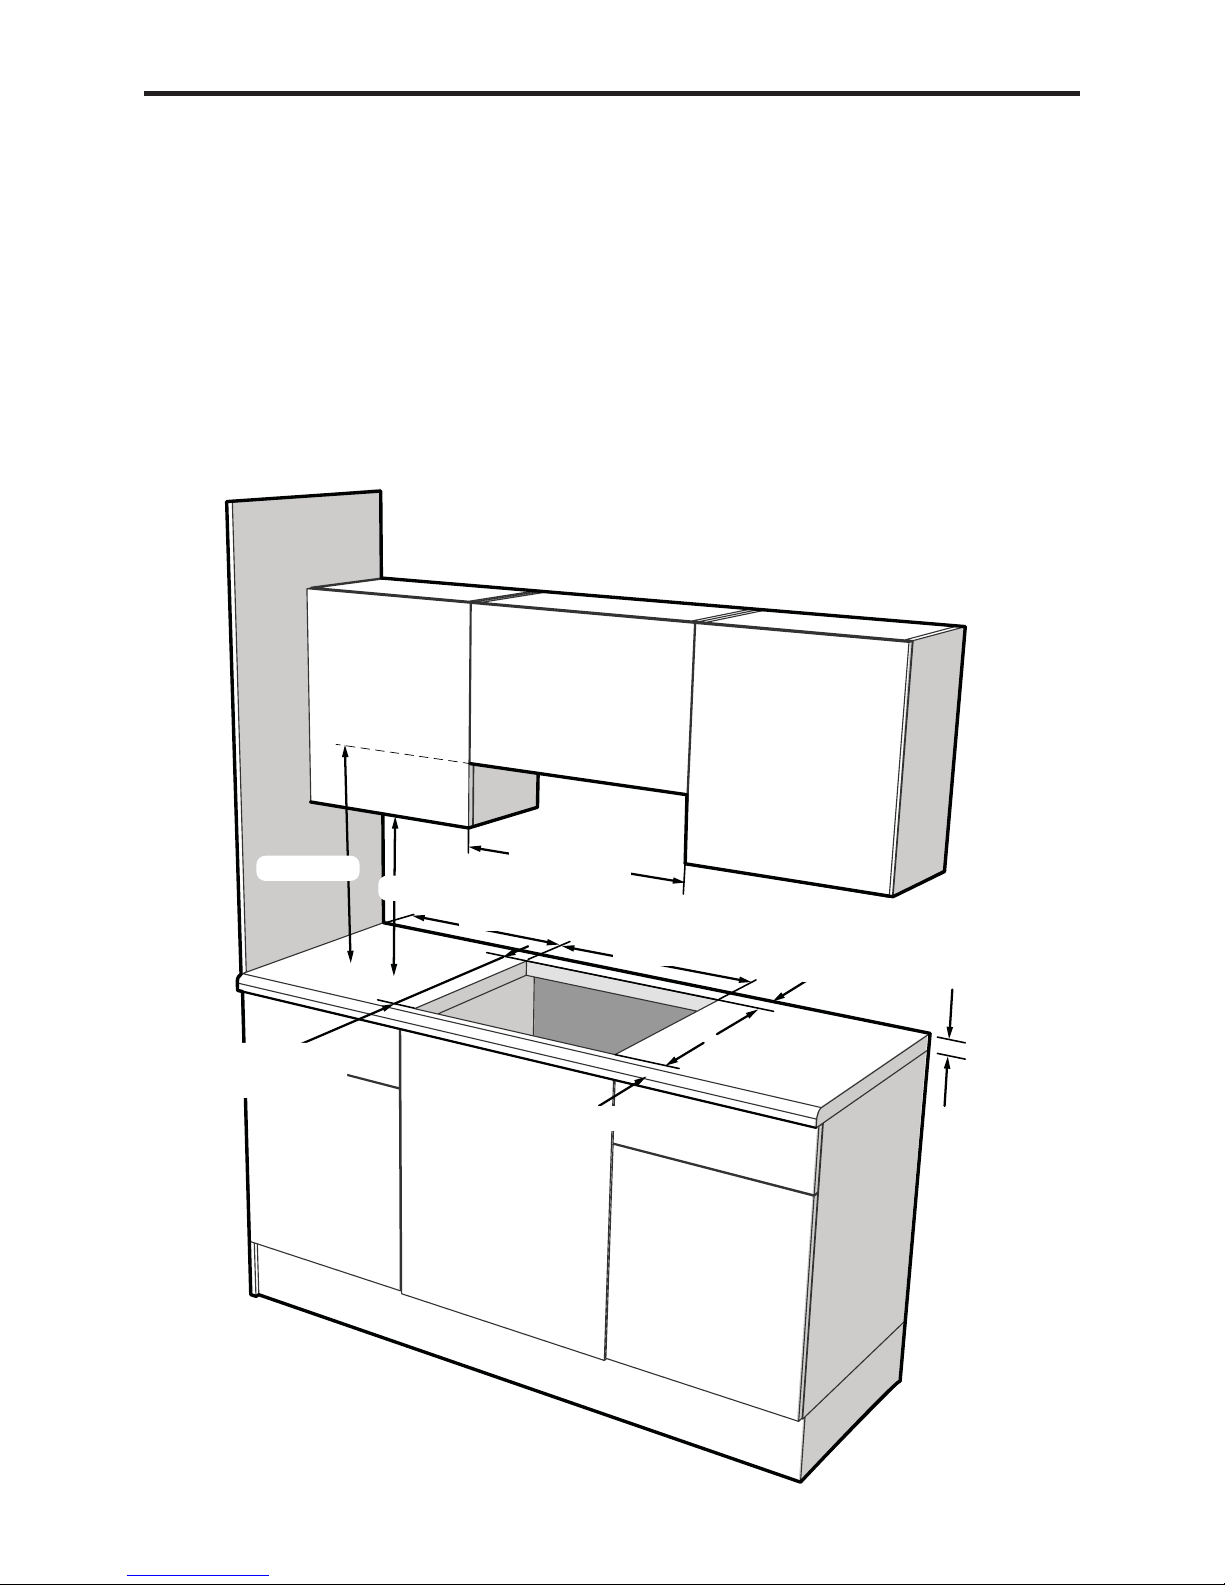
Clearances and dimension – requirements
No shelf or overhang of combustible
material should be closer than 650mm
above the hob.
There must be a minimum clearance of
50mm between the edges of the hob
and any side walls; this clearance must
be maintained up to 420mm above the
worktop.
There must be a minimum clearance of
50mm between the rear edge of the hob
and the rear wall. This clearance must
be maintained up to 650mm above the
worktop.
When installing an extractor hood above
the hob, refer to their Manufacturer’s
instructions.
Minimum height to extractor
as recommend in extractor
instruction manual
*
(
560mm (60cm Hobs)
660mm (70cm Hobs)
860mm (90cm Hobs)
50mm min
50mm Min
50mm min
420mm min
490mm (60 - 70cm Hobs)
370mm (90cm Hobs)
Minimum distance
between carcasses must
be equal to width of hob
*
650mm min
30mm min /
50mm max
Page 14
INSTALLATION
Fitting into worktop
Cut a hole in the work surface to the
required size. The worktop must be of
heat-resistant material or covered with
heat-resistant material.
Protecting the cut-out;
The types of chipboard used for work
surfaces swell relatively quickly in contact
with humidity.
Apply a suitable sealant to the cut edge to
protect it from moisture ingress.
This hob can be installed conventionally
(glass above the work top) or recessed
into the work top for a fl ush fi t.
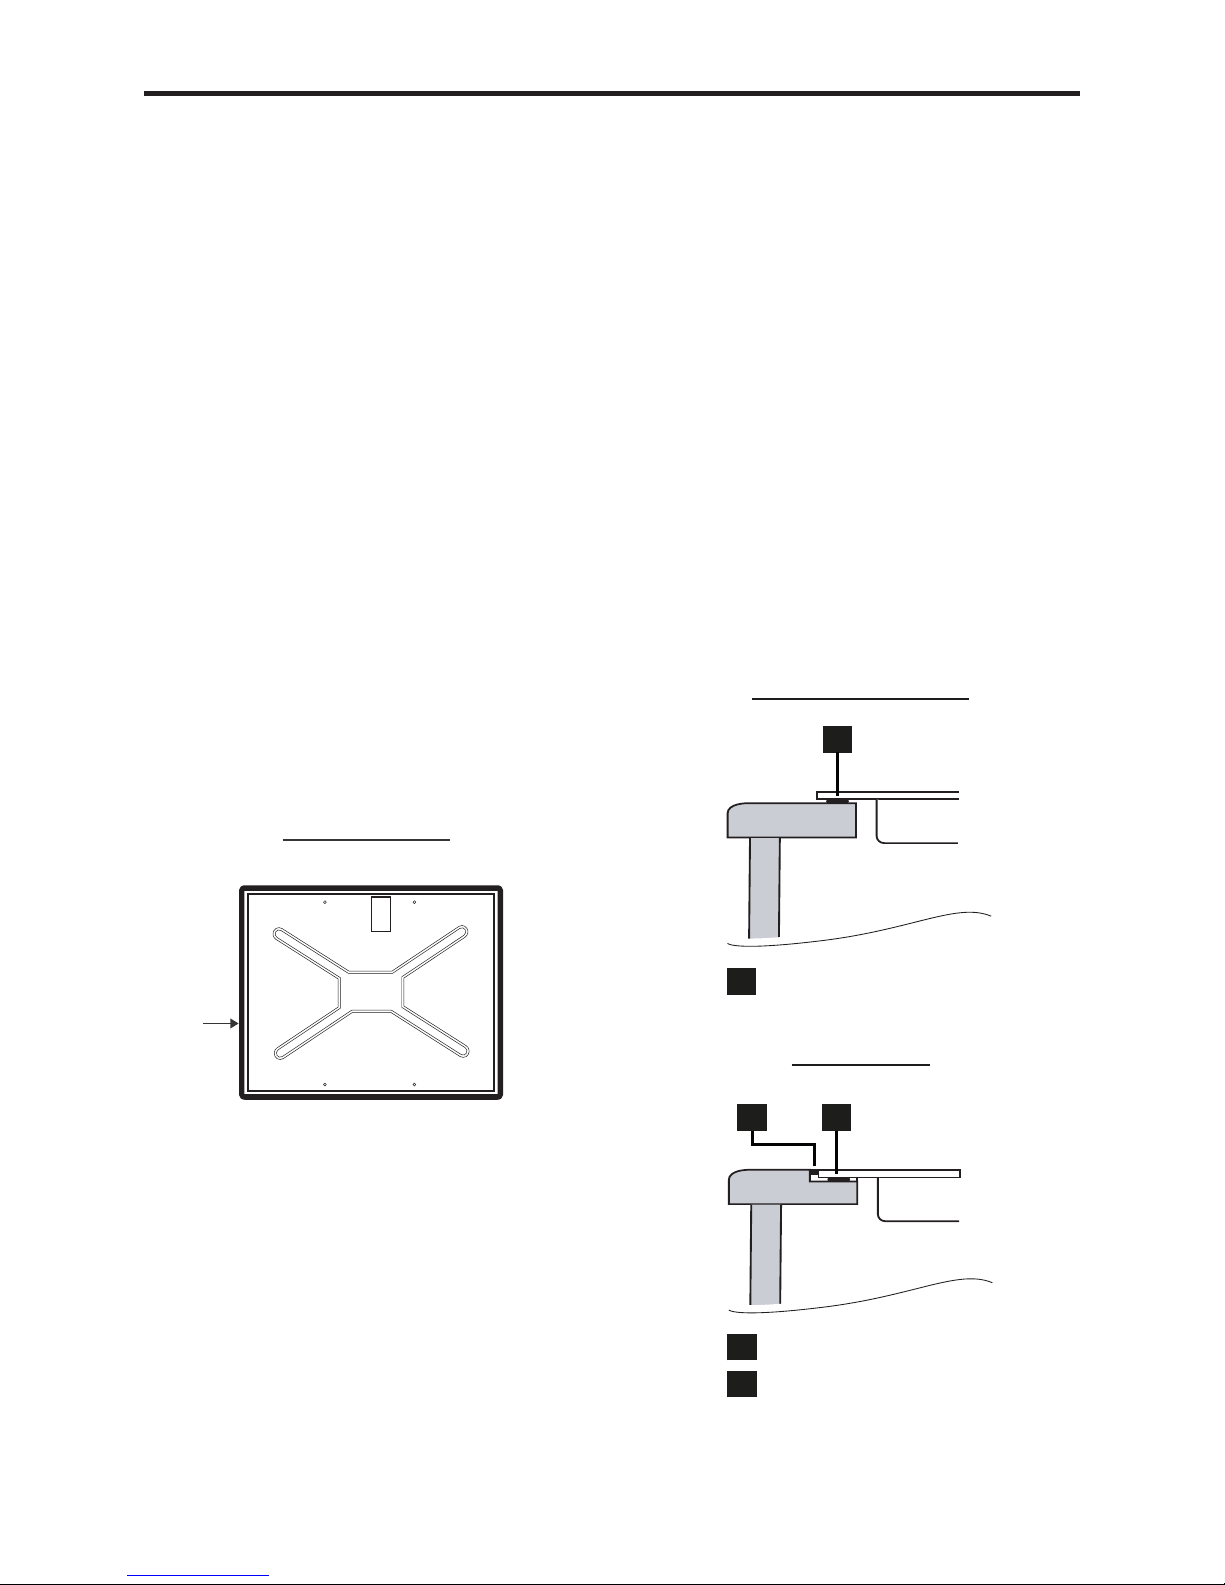
Self adhesive seal
Apply the self adhesive seal to the
underside edges of the hob glass. For best
results, the seal should be adhered along
each side in turn, as close to the edge as
possible, and trimmed at each corner, taking care to ensure a neat join.
SEAL
UNDERSIDE OF HOB
Conventional Installation
Refer to the installation bracket advice
to determine your installation type. Place
the hob in the aperture, checking the hob
glass is covering the work top along all
four sides.
Set the front edge of the appliance parallel with the front of the work top.
Locate and attach the securing clamps
as required, Tighten the screws so that
the hob is pulled down fi rmly against the
worktop, thus ensuring a good seal.
Recessed Method
Recess the work top to the appropriate
depth (Approx 5mm) and shape to fi t the
hob (add 1mm to overall glass size). Refer
to the installation bracket advice to determine your installation type. Insert the hob
into the recess, ensuring that the foam
seal is sitting correctly. Locate and attach
the securing clamps as required, Tighten
the screws so that the hob is pulled down
fi rmly against the worktop, thus ensuring
a good seal.You may want to fi ll any gap
between the hob top glass and the work
top surface with silicone sealant.
DO NOT fi t silicone sealant under the
glass hob instead of the self adhesive seal.
1
SELF ADHESIVE SEAL
Worktop Hob
CONVENTIONAL INSTALLATION
1
Worktop
Hob
RECESSED METHOD
2 1
2
1
SELF ADHESIVE SEAL
SILICONE SEALANT
Page 15
INSTALLATION
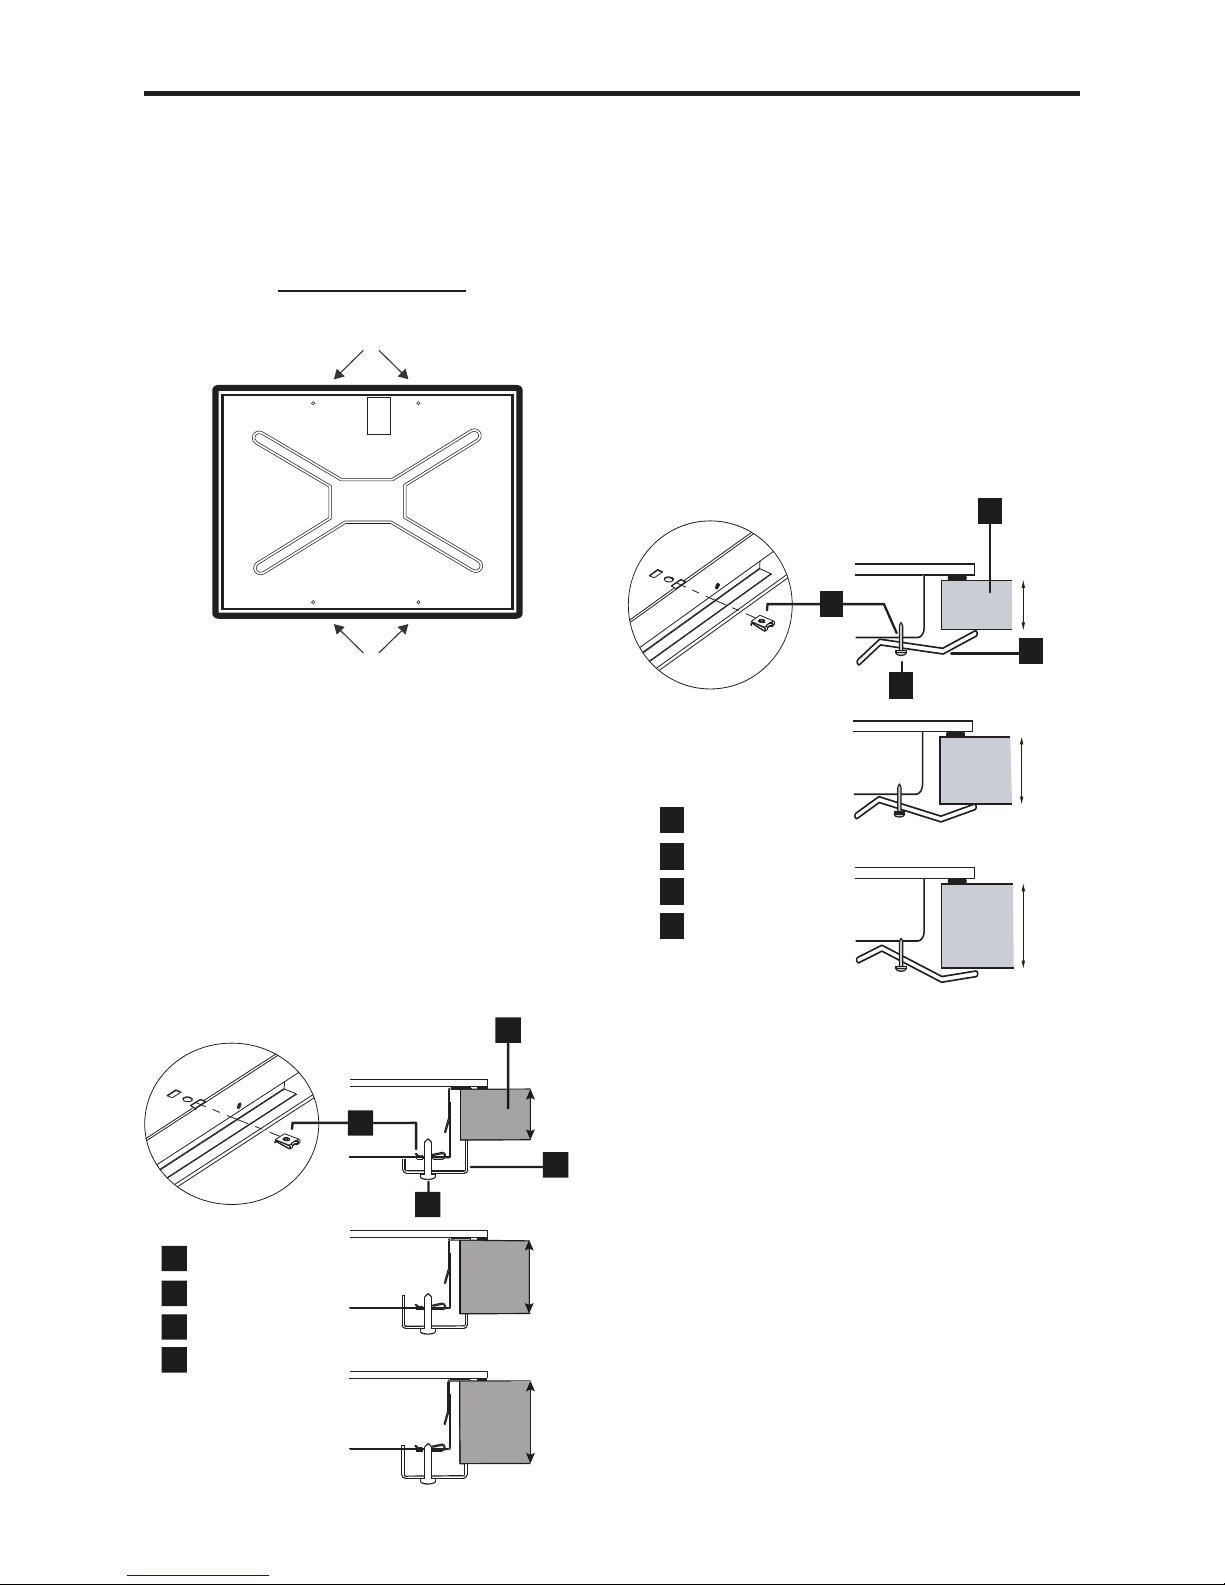
Installation Bracket Advice
Secure the hob to the worktop by means
of the brackets provided, taking the thick-
ness of the worktop into account.
INSTALLATION POSITIONS
INSTALLATION POSITIONS
UNDERSIDE OF HOB
Depending on your appliance it will be
supplied with one of the following
installation packs;
Installation pack 1
4 x “U” shape installation brackets
4 x Spire clips
4 x No8 Screws
The spire clips must be fi tted to the base
of the hob prior to fi tting the installation
brackets.
30mm
40mm
50mm
Worktop
Screw
Bracket
Spire clip
2
3
4
1
2
3
4
1
Installation pack 2
4 x Cranked installation bracket
4 x Spire clips (70/90cm appliances only)
4 x No8 Screws
Depending on your appliance the cranked
bracket may or may not require the spire
clips detailed in pack 1. If your appliance
is not supplied with spire clips, the
installation brackets screw directly into
the base of the hob in the ported holes
provided.
Worktop
Screw
Bracket
Spire clip
1
2
3
4
30mm
40mm
50mm
1
2
3
4
70 & 90cm
Appliances only
Important;
Do not modify this appliance.
Page 16
INSTALLATION
CONNECT TO THE ELECTRICITY
SUPPLY
WARNING: This appliance must be
earthed. Only connect to the electrical
mains terminal with the power switched
off. The electrical mains terminal is live.
Follow the terminal block connection
schematic
Loose and inappropriate connections can
make the terminal overheat.
Ensure the cable clamp is fi tted correctly
and securely.
A device must be provided in the
electrical installation which allows the
appliance to be disconnected from the
mains at all poles with a contact opening
of at least 3mm.
We recommend that the appliance is connected by a competent person who is a
member of a “Competent Person Scheme”
who will comply with the required local
regulations.
Connection should be made with a suitable cable.
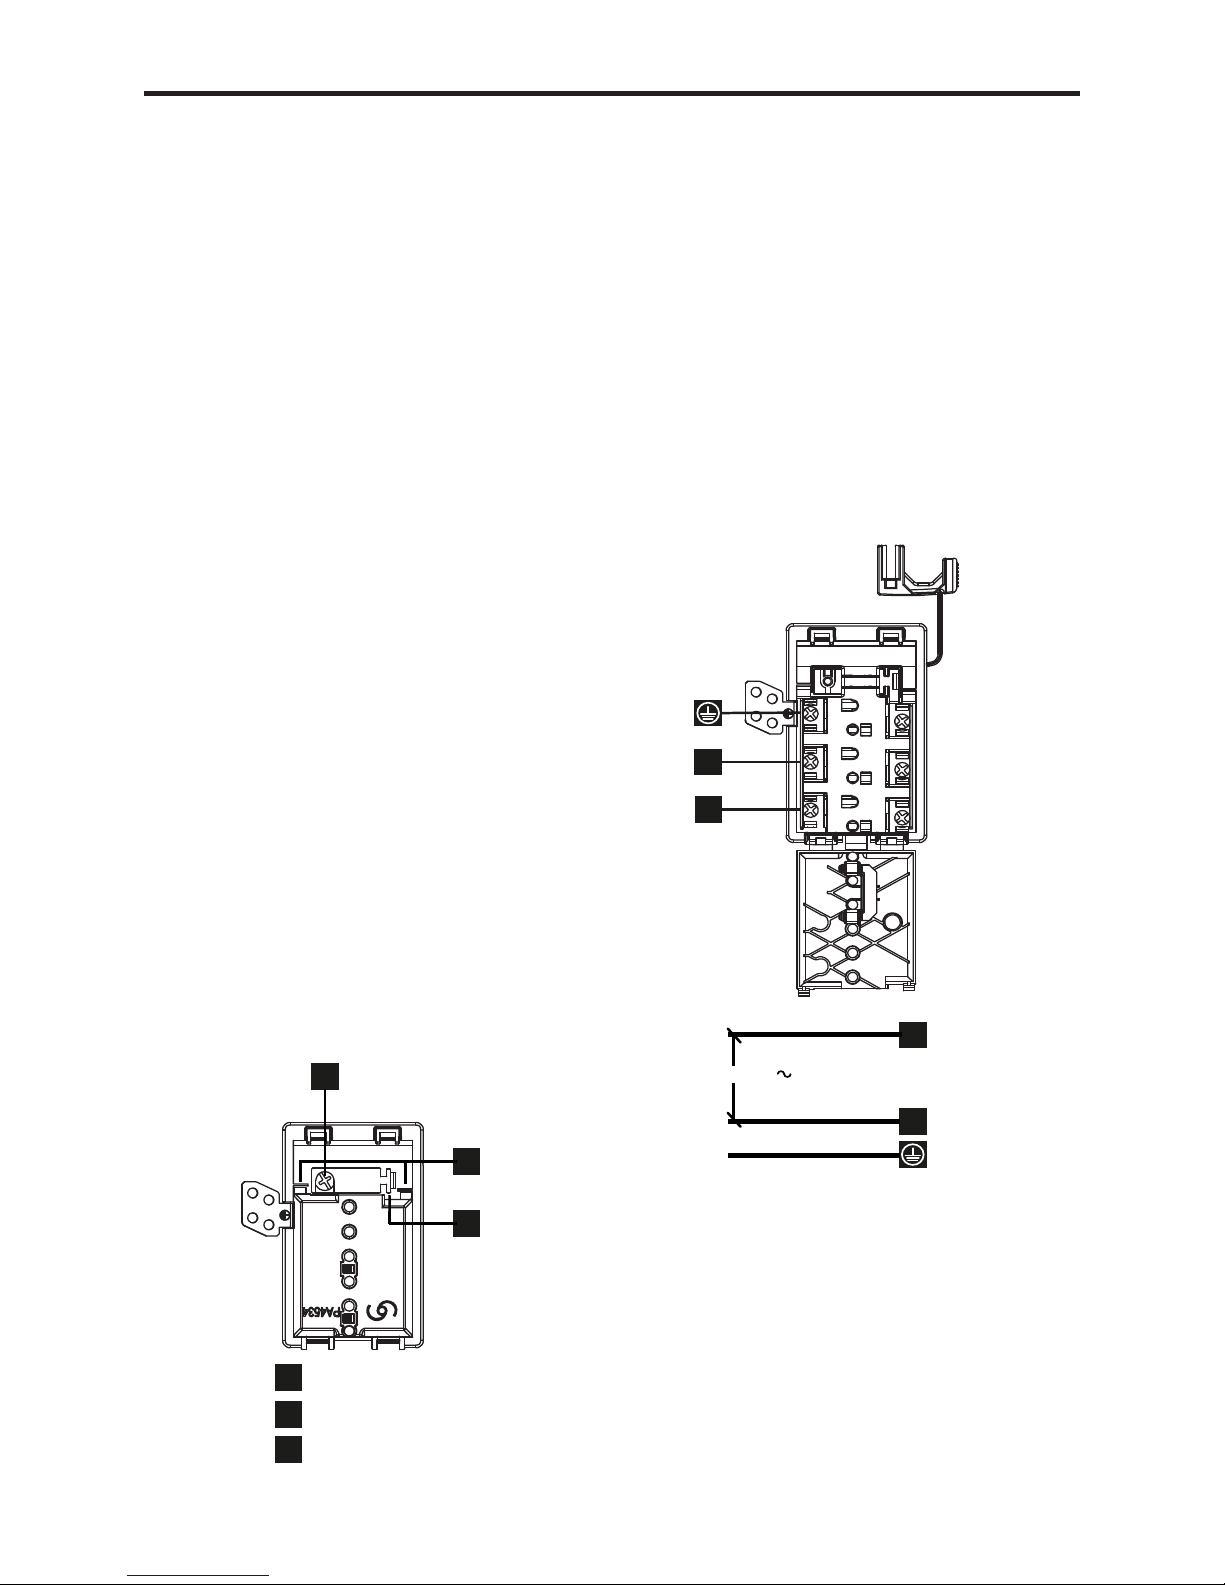
• Firstly open the terminal block cover
using a small fl at bladed screwdriver
in the door release tabs shown below.
Door release tab
Cable clamp screw
Cable clamp ratchet
1
2
3
1
2
3
• Remove the cable clamp screw and
release the cable clamp retaining
arm.
Note;
The cable clamp has a ratchet type
mechanism on the right hand side of the
retaining arm.
• Strip the wires & connect to the
terminal block as appropriate:-
• Fit the cable clamp & secure with the
screw provided.
• Close the terminal box, ensuring that
the cover is closed and all screws are
tight and in place.
Important: Ensure that you route all
mains electrical cables well away from any
adjacent heat source, such as the base of
the hob an oven or grill.
4
5
Live
Neutral
Earth
4
5
BROWN / L1
BLUE / N
GREEN/YELLOW / PE
230V.....240V
Terminal Block Connection
Schematic
Page 17

TECHNICAL DATA
SUPPLY: 220 -240V ~ 50Hz 5.04kW - 6.4kW
Refer to the data badge on the under side of your hob for specifi c power rating of your model
Page 18
CUSTOMER CARE
CUSTOMER CARE WEB SHOP
Having purchased a superior cooker, hob
or hood from us, you’ll naturally want to
keep it looking great. And who better to
help you care for it than the manufacturer?
We offer an extensive range of accessories, components and cleaning products
which, will instantly give your cooker a
good as new look.
In addition to the list of our most popular
products below, we also have an exciting
range of Bake ware and Cookware essentials including Roasting Pans, Cake Tins
and Non-Stick Cooking Liners.
For all enquires, please visit our Web
Shop at www.gdhaonline.co.uk or
call the Spares Sales Team on 0844
815 3745. For countries outside the UK,
please contact your local service agent.
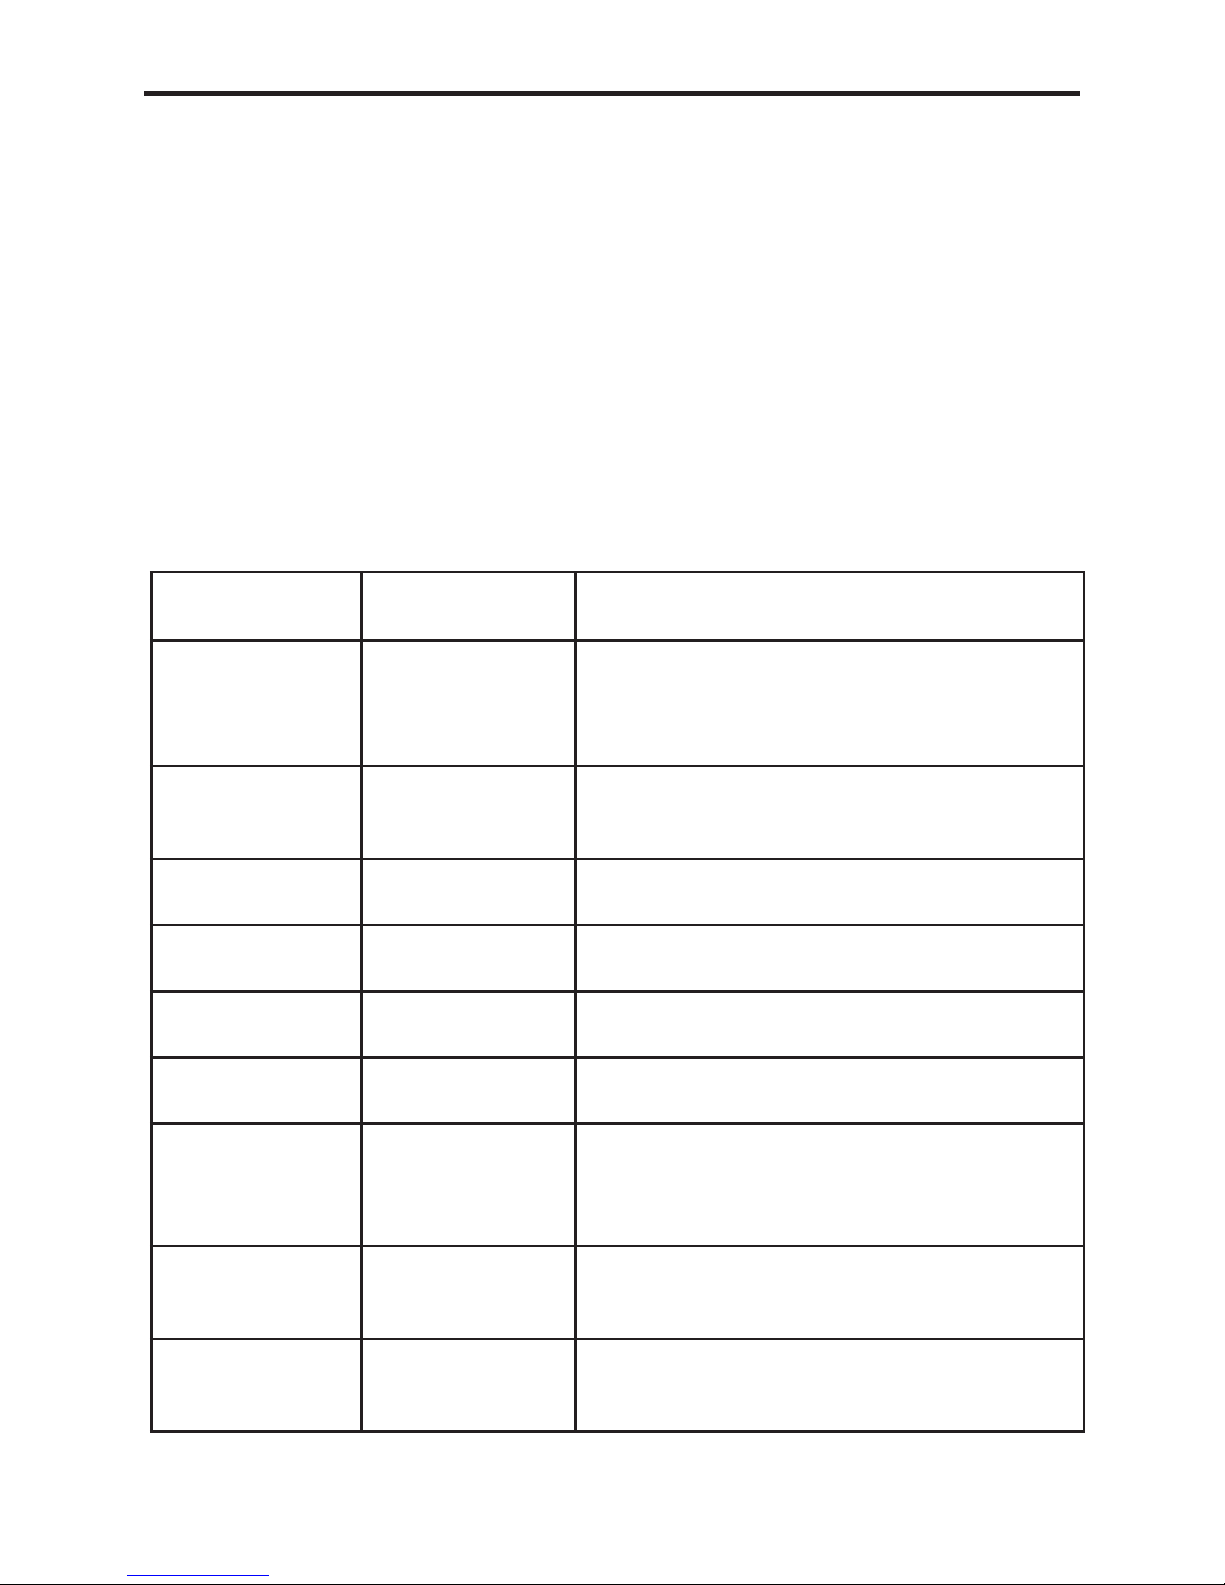
Product Description
Where used Purpose
Ceramic Hob
Cleaner
All Ceramic glass
hobs including
Induction
Enables easier cleaning of your ceramic hob.
Prevents build up of mineral deposits. Best
used with Ceramic Hob Scraper Kit. 300ml
bottle.
Ceramic Hob
Scraper kit
All Ceramic glass
hobs including
Induction
Ideal for removing cooked on marks from
ceramic glass hobs Best used with Ceramic
Hob Cleaner
Sealed Hotplate
Conditioner
All sealed/solid
plate hobs
Restores the sleek matt black fi nish to solid
hotplates
Multipurpose
Kitchen Cleaner
General kitchen
cleaner
Excellent multipurpose cleaner, For use
around the kitchen. 500ml bottle.
Oven Cleaner
All cooking appliances.
Cuts through grease & burnt on grime. 500ml
bottle
Restor-A-Cloth
All cooking appliances.
Chemical free cleaning cloth Ideal for cleaning & polishing glass & stainless steel
Stainless Steel
Cleaner
All stainless steel
parts
Oil based cleaner. Perfect for removing stubborn & greasy marks. 300ml bottle.
Rectangular carbon fi lters
Cooker Hoods
New fi lters, help to maintain effi cient cooker
hood operation and keep your Kitchen odour
free
Round Carbon
Filters
Cooker Hoods
New fi lters, help to maintain effi cient cooker
hood operation and keep your Kitchen odour
free
Page 19

Please keep this handbook for future reference, or for anyone else
who may use the appliance.
Page 20
CUSTOMER CARE
To contact Belling about your appliance, please call
Warranty Registration
0844 481 0182
to register your appliance
Customer Care Helpline
0844 815 3746
in case of diffi culty within the UK
Alternatively general, spares and service information is available from our website at
www.belling.co.uk
Please ensure that you have the product’s model no and serial no available when you
call. These can be found on the silver data label on your product which is located:
Ovens Open the door; adjacent to the oven cavity
High-level grill products Inside the base compartment
Hobs On the underside of the product
Enter appliance numbers here for future reference:
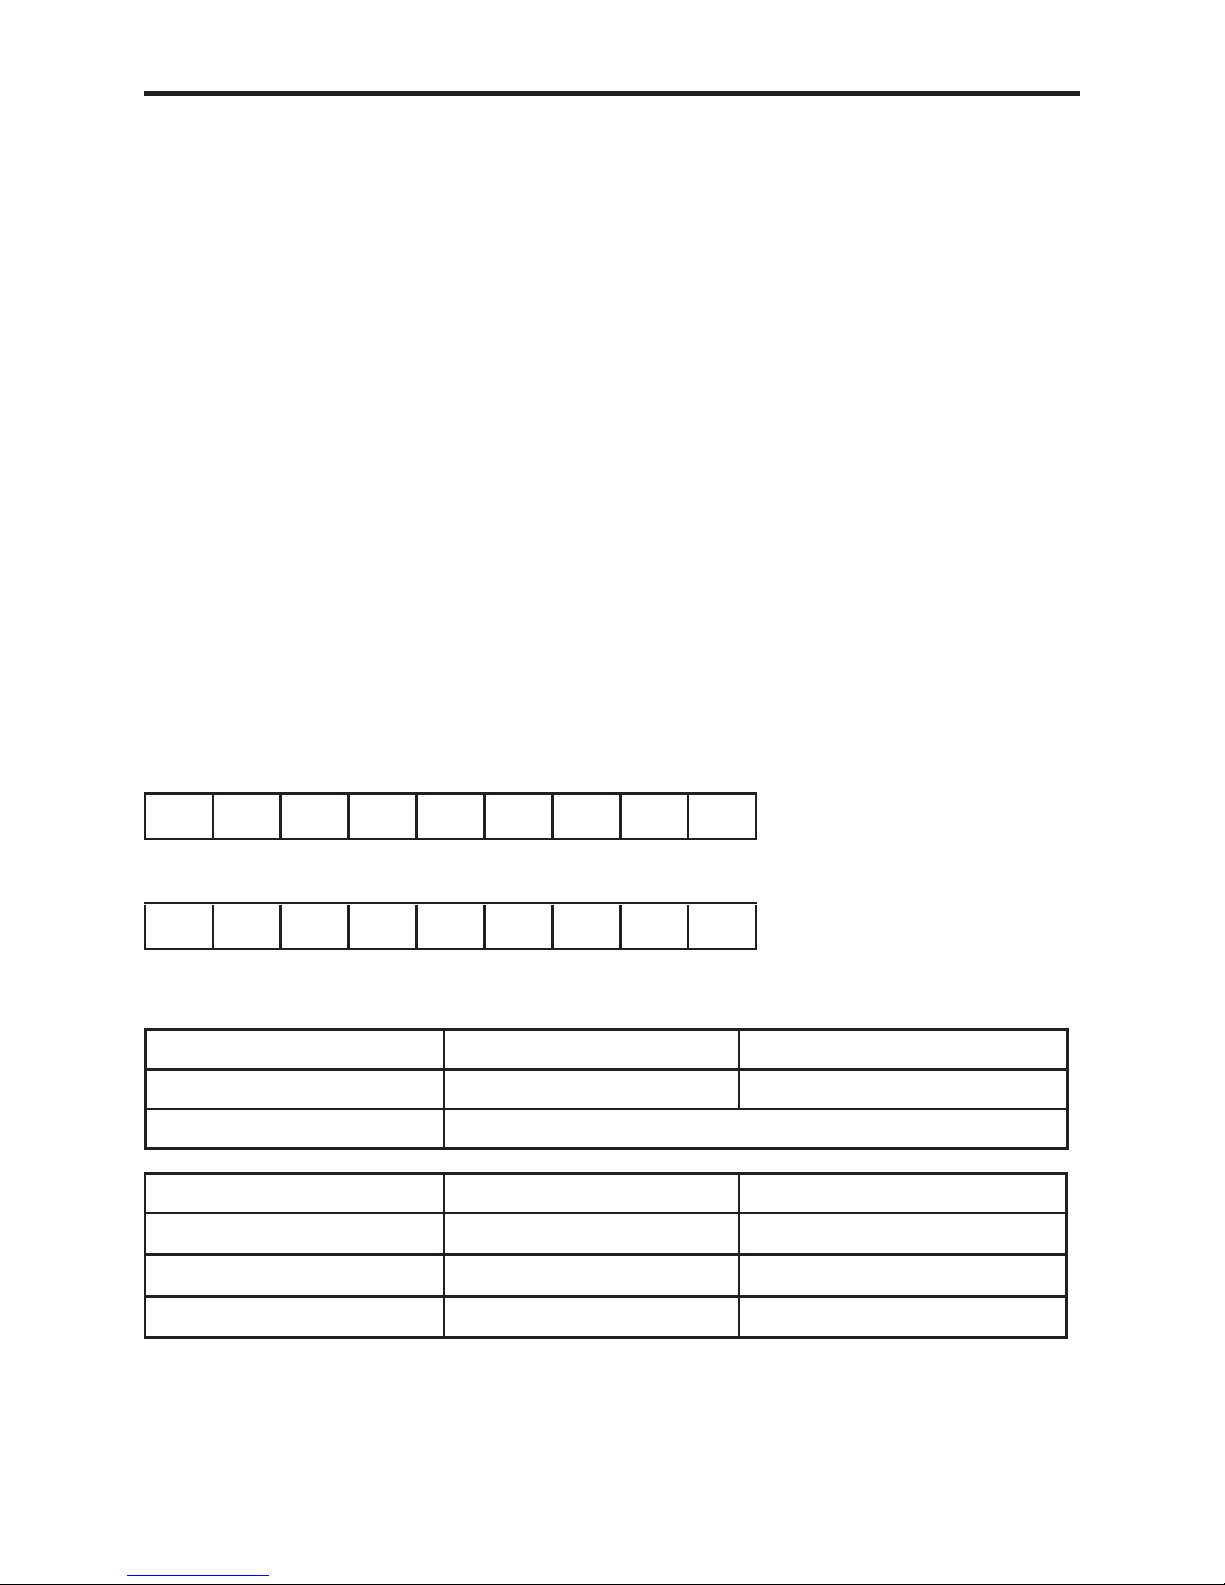
Model No
Serial No
SERVICE RECORD
Date of purchase Installed by Installation Date
Place of purchase:
Date Part(s) replaced Engineer’s name
For customers outside the UK and Northern Ireland, please contact your local supplier.
Glen Dimplex Home Appliances, Stoney Lane, Prescot, Merseyside, L35 2XW
 Loading...