

Page 1

Read this manual carefully before operation
INSTRUCTON MANUAL
COOKER HOOD
Pictures in this manual are for reference only, the product in kind prevail.
BSO60
Page 2

In certain circumstances electrical appliance may be a danger hazard.
Information and advice
A) There shall be adequate ventilation of the room when
the range hood is used at the same time as appliances
burning gas or other fuels.
B) Do not check the status of the filters while the cooker
hood is operating.
C) Do not touch the light bulb within half an hour after
appliance use.
D) Do not flambé under the cooker hood
E) Avoid opening gas tap when there is no pan on the
stove, as it is damaging for the filters and a fire hazard.
F) Constantly check food frying to avoid that the overheated
oil may become a fire hazard
G) Disconnect the electrical plug prior to any
maintenance.
H) If the supply cord is damaged, it must be replaced by
the manufacture, its service agent or qualified
technician in order to avoid a hazard.
I) The socket outlet for the range hood must be located so it is
easily accessible for the user after installation. Ensure the
mains supply voltage corresponds with that of the appliance.
J) There is a fire risk if cleaning is not carried out in
accordance with the instruction.
2
This unit should be installed by a qualified technician, please retain your certificate of
compliance.
Page 3

L)
M)
This appliance can be used by children aged from 8
years and above and persons with reduced physical,
sensory or mental capabilities or lack of experience and
knowledge if they have been given supervision or
instruction concerning use of the appliance in a safe way
and understand the hazards involved.
N)
Children shall not play with the appliance.
O)
Cleaning and user maintenance shall not be made by
children without supervision.
P)
When the hood is in repair,maintenance,replacement of
parts,please pull out the plug,ensure the safety of the people.
Q)
To protect the main body from corrosion from long time
accumulation of dirt,the cooker hood should be cleaned with
hot water with non-corrosive detergent every two months.
K)
3
The air must not be discharged into a flue that is used for
exhausting fumes from appliances burning gas or other
fuels (not applicable to appliances that only discharge
the air back into the room).
Regulations concerning the discharge of air have to be
fulfilled.
When the range hood and appliances supplied with energy
other than electricity are simultaneously in operation, the
negative pressure in the room must not exceed 4 Pa
(4×10
bar).
Regarding the instructions for the method and frequency of
cleaning, refer to the section “Installation”.
Regarding the instructions for the method of fixing and how
the appliance is to be fixed to its support, refer to
the section “Cleaning Instruction”.
Don't put things on the drawer, so as to avoid dropping in
the operation of the drawer.
-5
R)
S)
T)
Page 4
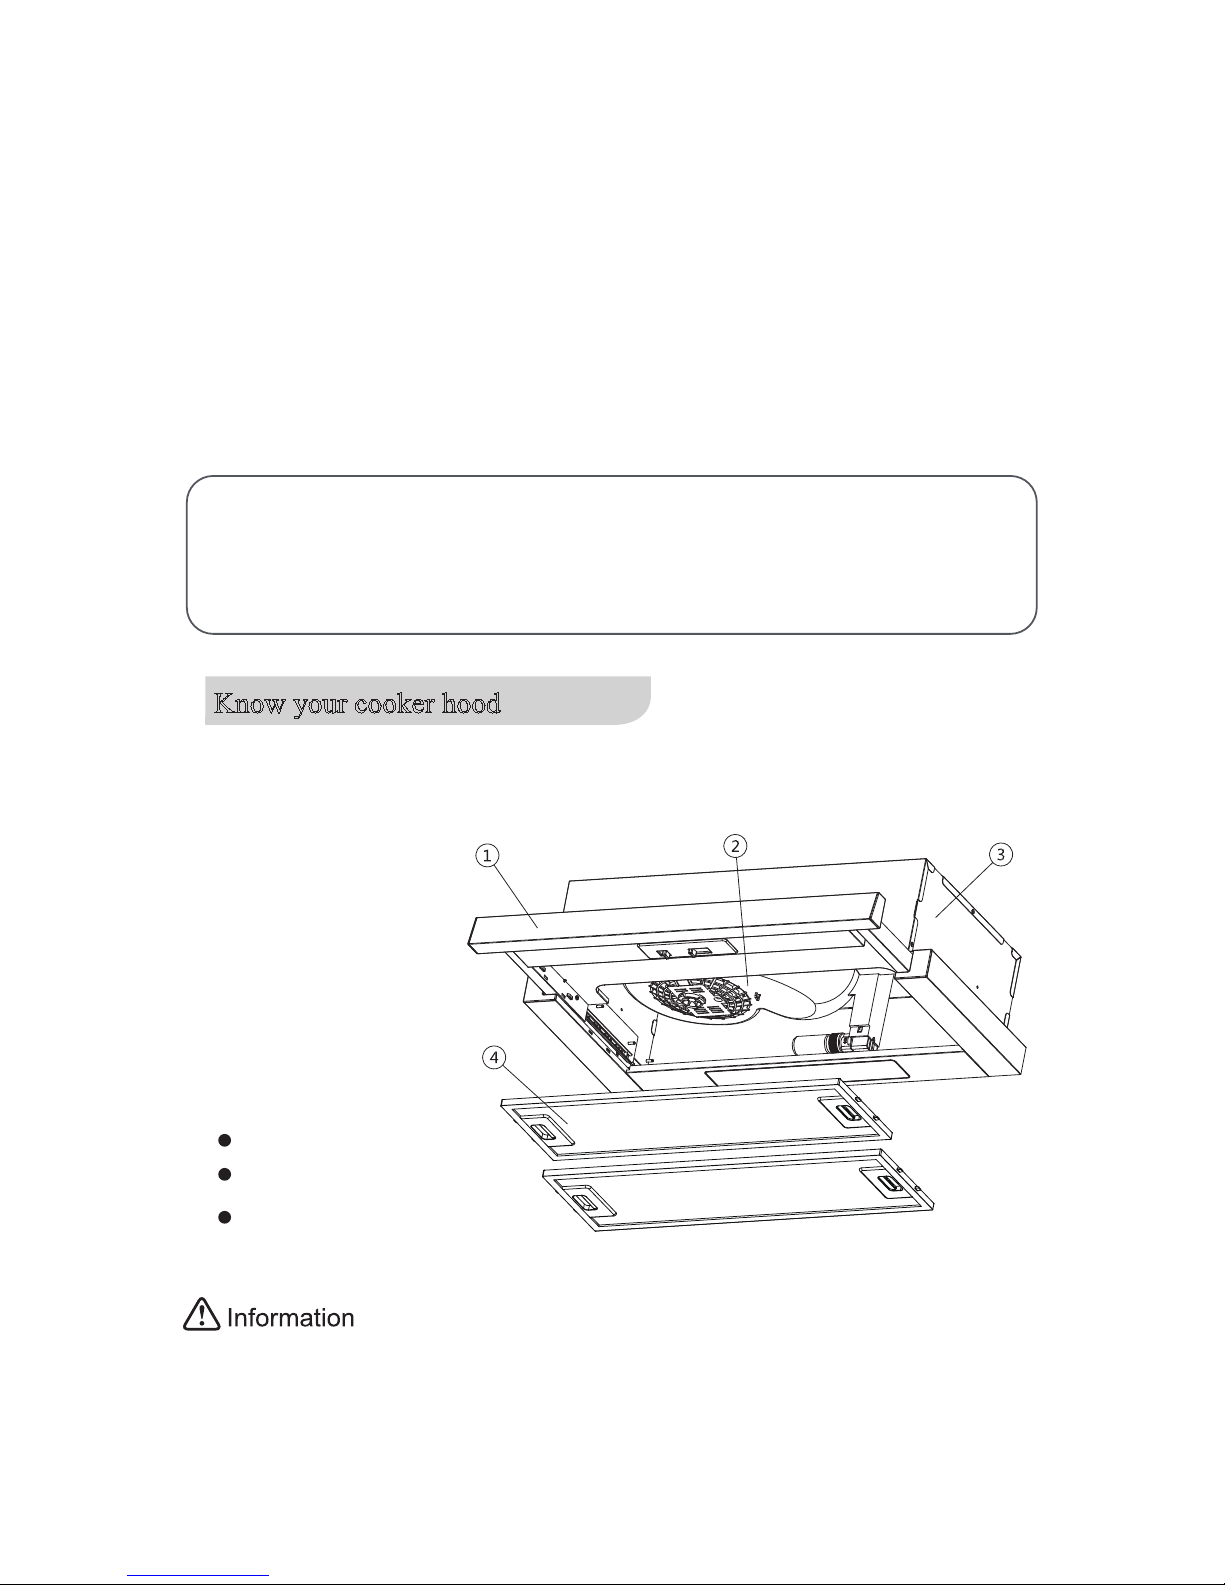
Please read these instructions before using your cooker hood.
Congratulations on the purchase of your cooker hood which is designed to include many
superior features that permit you the fullest expression of your living.
Before installing and/or using the cooker hood carefully read all the instruction.
K
now your cooker hood
1.
2.
3.
Also include:
User instructions
Check valve
Install screws package
Drawer assembly
Air duct assembly
Main body
4. Filer assembly
4
U) Regarding the instructions for the blub replacement, thanks
to refer to the section “Replacing Bulb”.
Failure to install the screws or fixing device in accordance
with these instructions may result in electrical hazards.
V)
W)
CAUTION: Accessible parts may become hot when
used with cooking appliance.
Please keep this instruction booklet in a safe place for future reference.
Please read this instruction manual careful: it contains important information
concerning the safe operation, installation and maintenance of the appliance.
The appliance can only be used over a 4 element hob at most.
Page 5
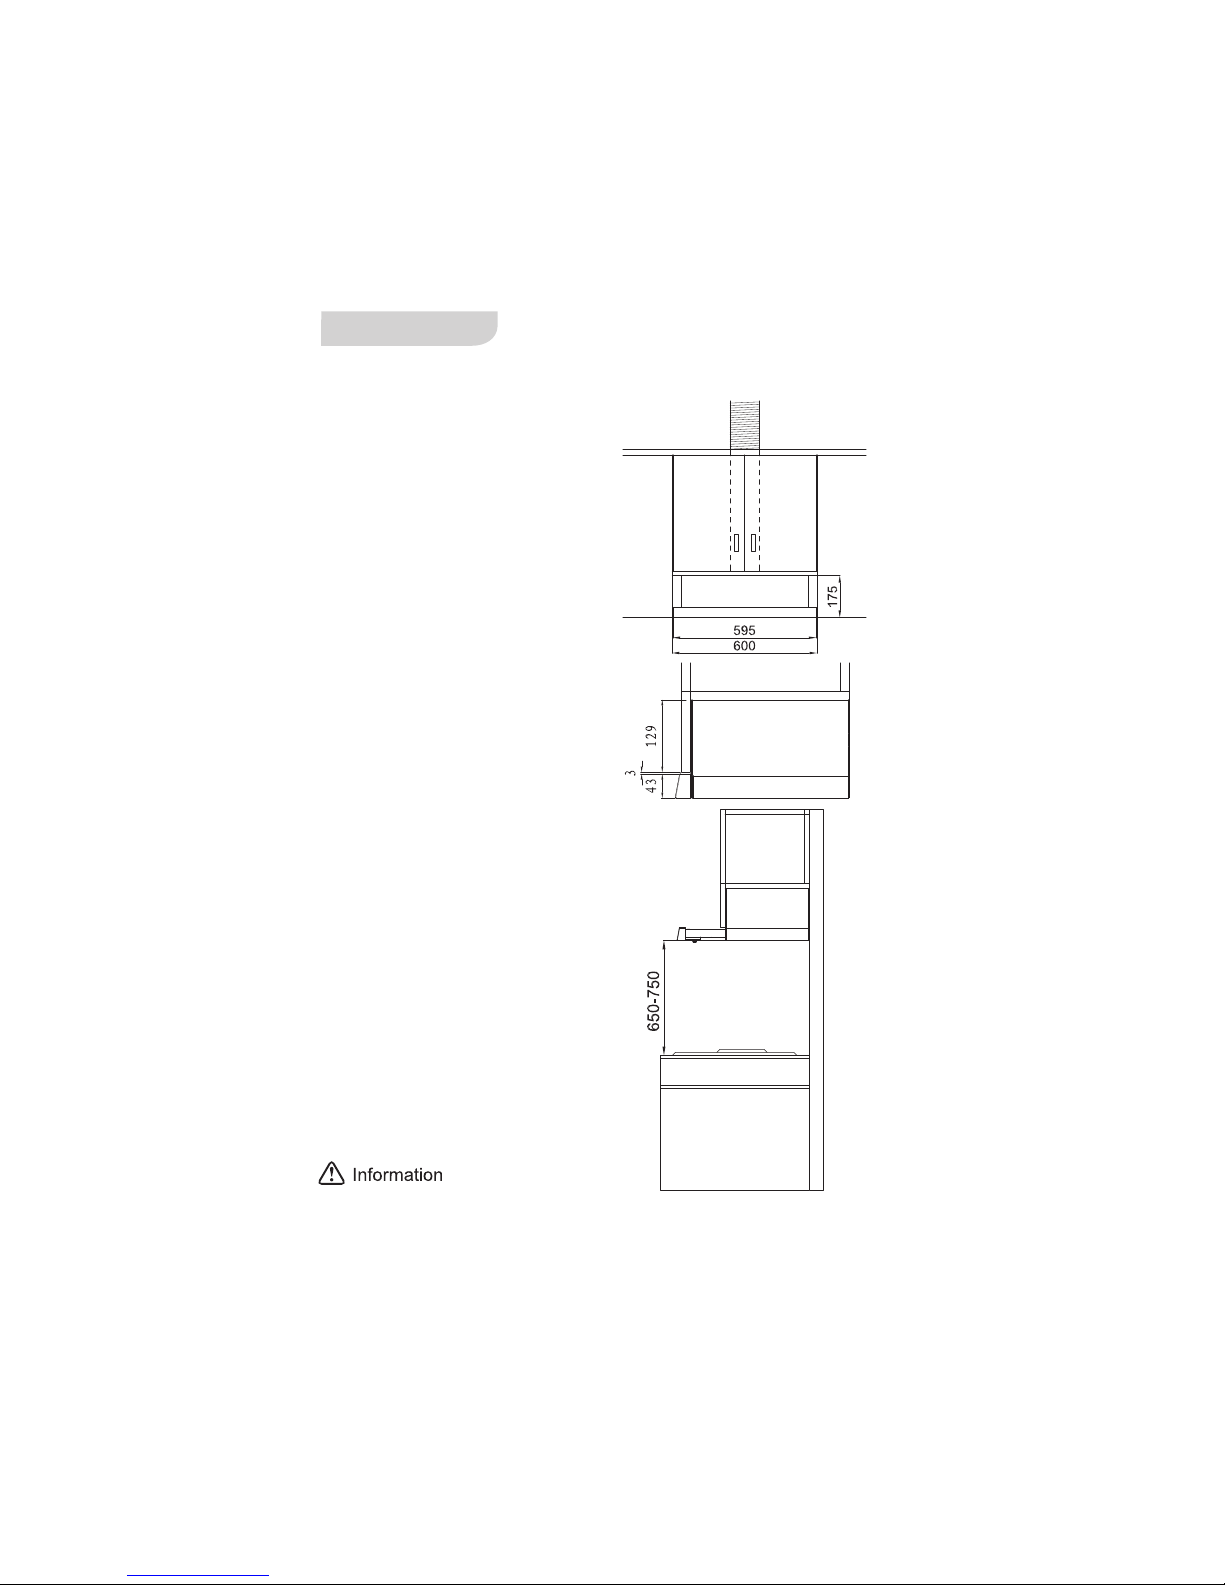
Ensure the power has been turned off before beginning this installation.
Installation work and electrical wiring must be wiring must be done by qualified
technician in accordance with all applicable codes and standards, including fire rated
construction.
Installation
To install this hood you will require two
assistants. You will need the following
tools and material to complete this
installation: *Drill*Flat head screwdriver
*Phillips head screwdriver or cordless
drill and Phillips head bit*Tin snip*
*measuring tape*hand saw or jig saw*
electrical tap*duct tape
1. Remove the range hood from the carton.
2. Lay the hood upside down on a table
covered with cardboard or paper to prevent
scratching of the table or hood.
3.
We recommend that after installation
the bottom of the hood should be no less than
650mm and no more than 750mm above
the stove’s heating elements and burners.
Plug must be
assembled in places easy to drag and insert .
5
Page 6
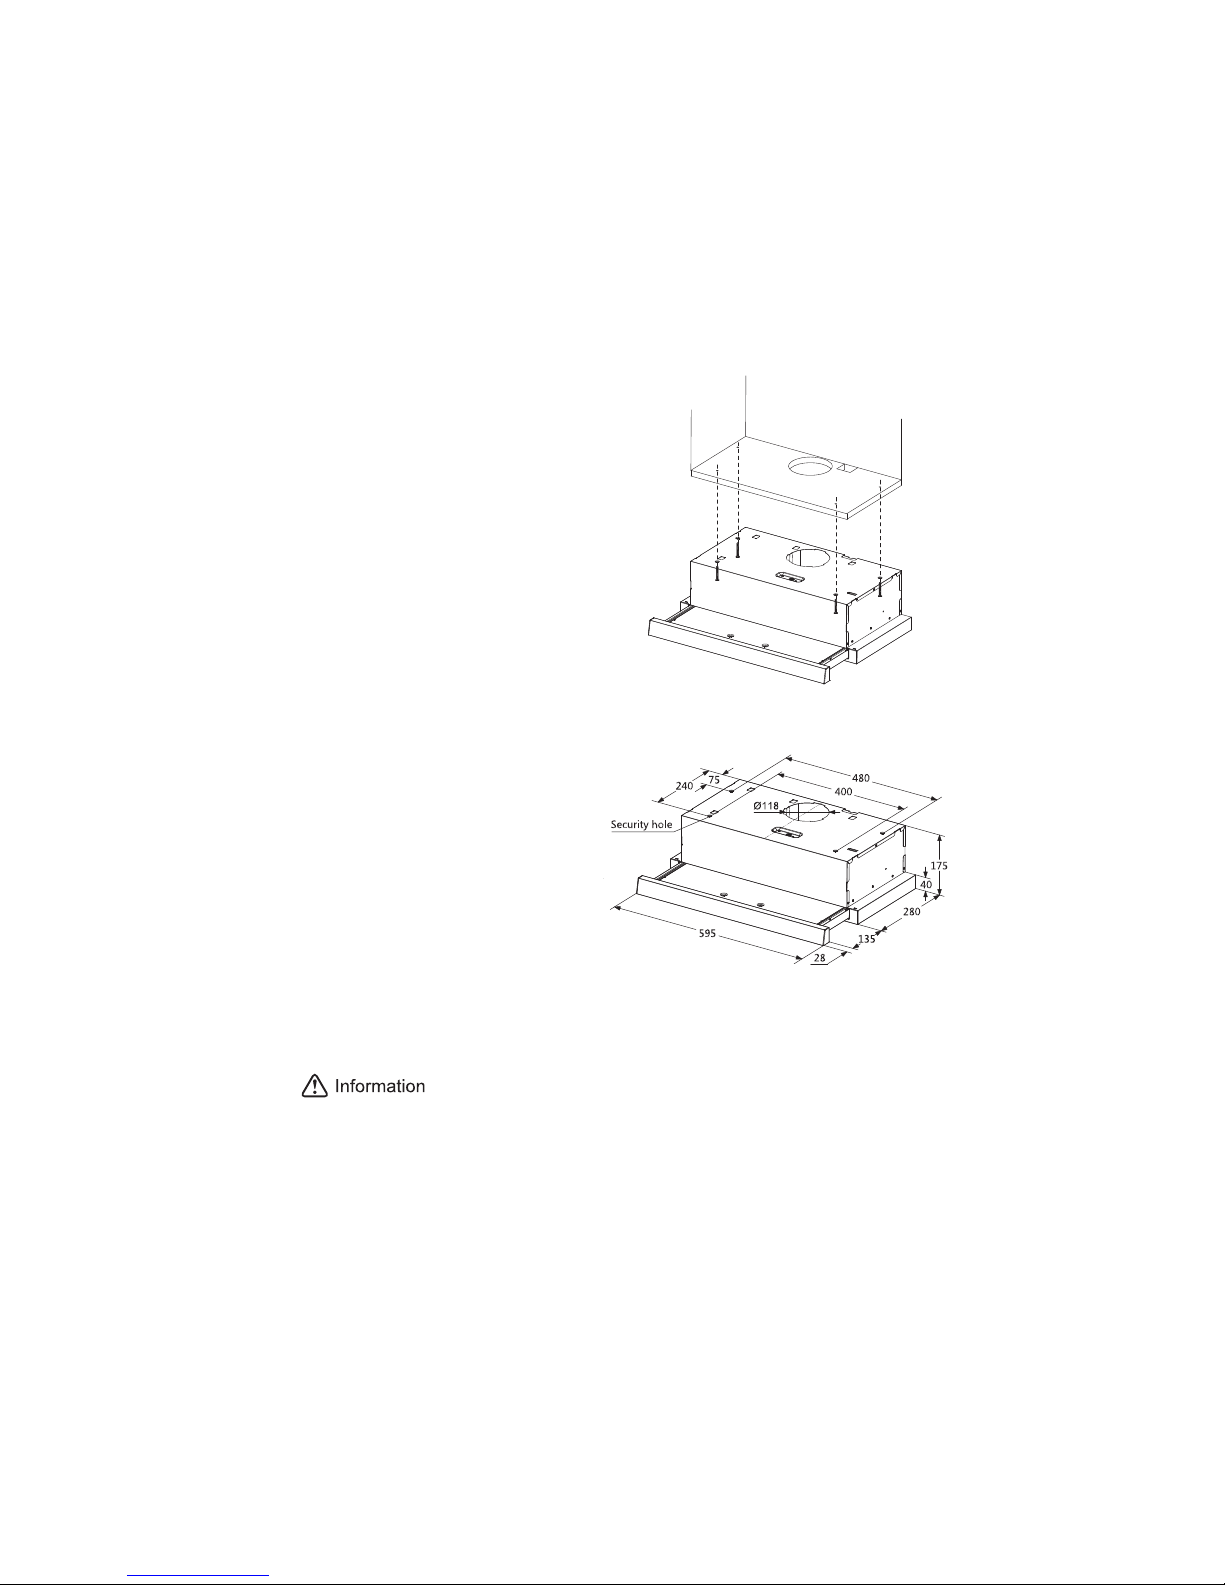
2. Hang the hood and let it’s 4 key holes aim
at screws, the 4 screws should be in the
narrow parts of key holes. Screws should
be fasten firmly, make sure that the
installation between the hood and cabinet is
scurely fastened.
3. Install screws in the security holes, in case
of front and back moving of hood, so that
the unit is safer.
When cutting or drilling into wall or ceiling, do not damage electrical wiring or other
hidden utilities.
1.
According to the figure, make sure the position
of hood in the cabinet. The wood strips should
be line up with the 4 keyholes slots on the top
of the range hood. On the cabinet, install 4
screws (supplied) according to the relative position
of 4 key holes on the bottom of hood.
Method 1
6
Page 7
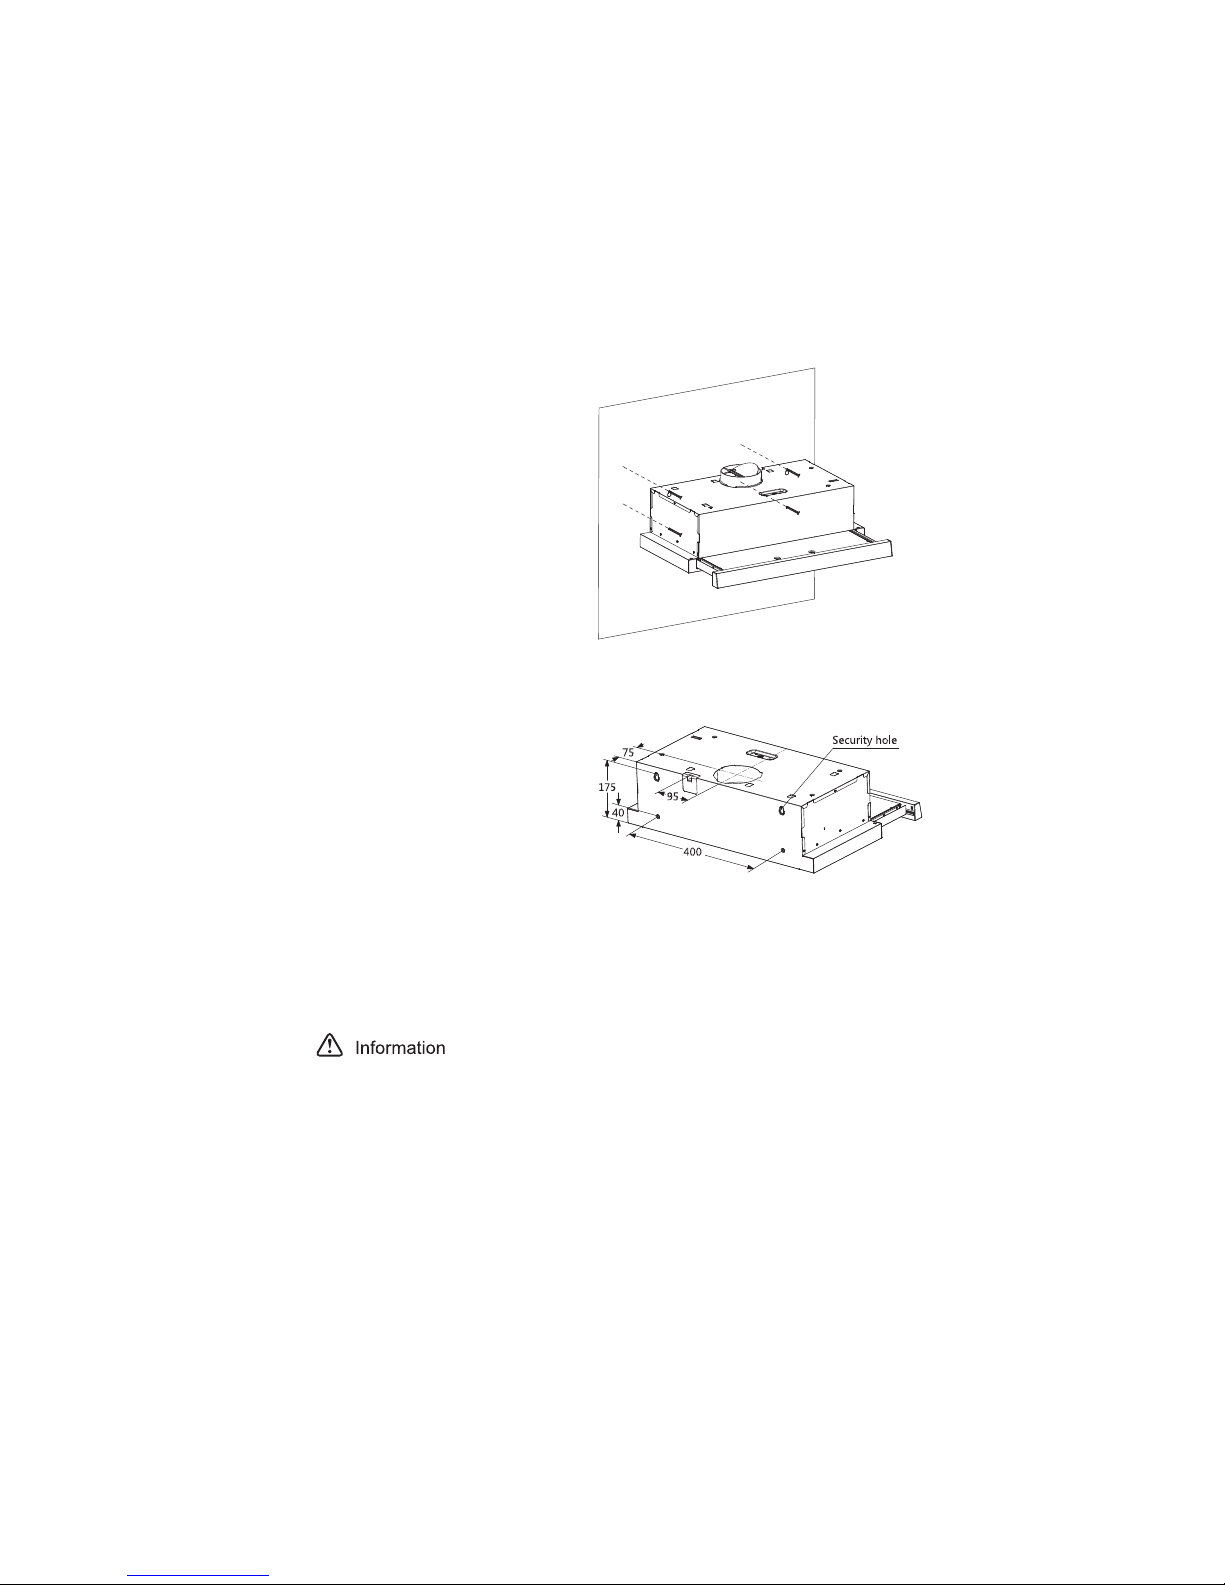
The cooker hood must not be installed and connected to flues where other appliances
are installed and which run off other energy supplied different to electricity(water
heater boiled cookers(range/agas)etc.).
In the installation surface in
cabinet don’t adapt to install
the cooker hood, then as per fig,
fix the position of cooker hood
on the wall. On the wall, install
2 screws(supplied) according to
the relative position of 2 key holes
on the back of hood.
Also install screws in the security
holes, in case of front and back
moving of the hood, so that the
unit is safter
.
Installation of hoods built in combi cabinets is the same as previous method.
Method 2
7
Page 8
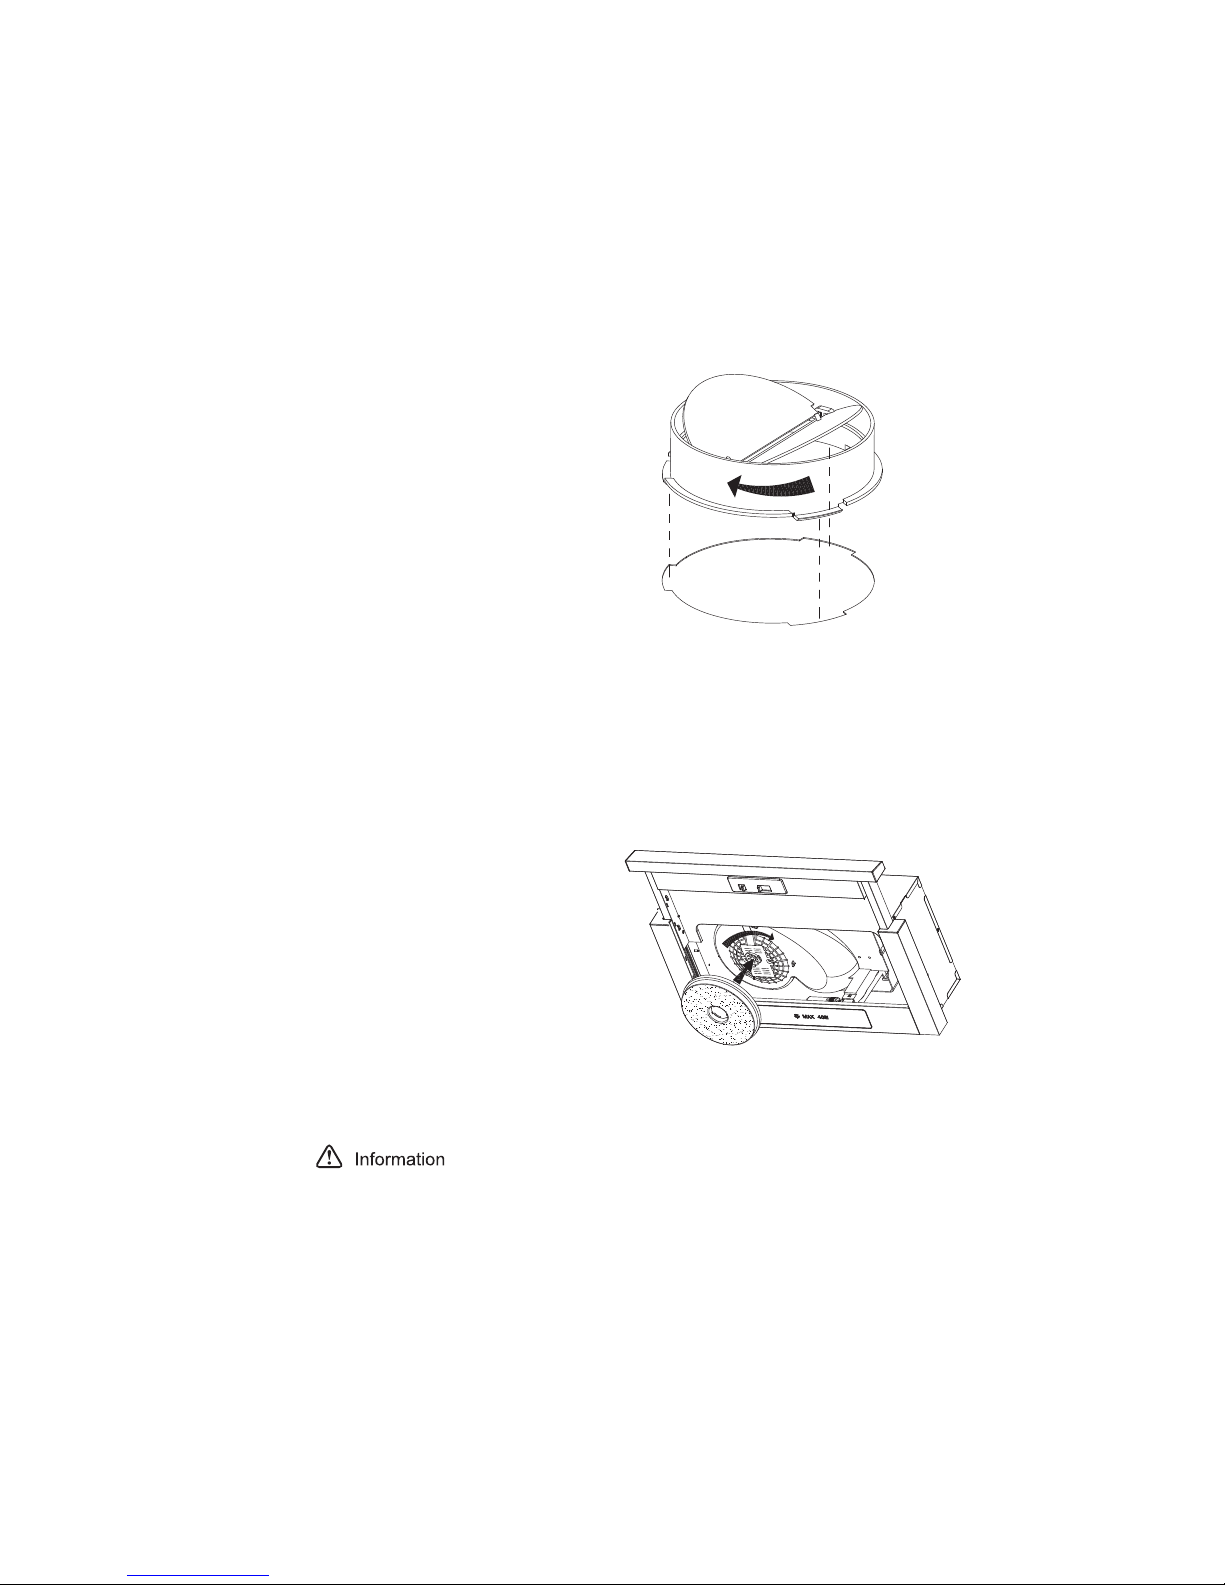
Activated carbon filter can be used to trap odours
Normally the
activated carbon filter
should be changed at three or six month
s
according to your cooking habit.The
installation procedure of
activated carbon
filter is as below.
- Slide the drawer assembly of cooker hood.
- In order to install the activated carbon
filter, the metalli
c
anti-grease filter should be
detached
first.press the lock and
pull it
downward.
- Put the activated carbon filter into the unit
it in anti-
clockwise direction .Repeat the
same
on the other side.Put back
the grease filter in
position.
When activated carbon filter atta
ched,the suction
power will be
lowered.
Check valve Installation
Hold on check valve with your hands, align
the box gap, put in
the
check valve , and
then spin to a certain angle until
three angl
es
of the valve are stuck. Installation is complete.
Carbon Filter
8
Page 9

Replacing Bulb:
Hood Using Method
Replacing Bulb
1.Switch off the extractor hood and isolate the extrator hood by pulling out the mains
plu g or switching off the fuse.
2.Remove the grease filter.
3.Replace the lamp(commercially a vailable filament lamps (max.40watts) or h alogen
lamp ( max.28watts),E14 lampholder).
4.Reconnect the power by inserting the mains plug or by switching on the fuse.
Operation
Check beforehand
Check the safe condition of the appliance
- Check whether there are visible defects.
- Check that all parts of the appliance have been securely fitted.
Switching on/off
- Slide the front part of the cooker hood.
· There are 3 speeds for the motor and on off switch for the lamp.
- Slide the switch for operation.
· Motor Operation
- [0]=Off
- [1]=Low Power Setting
- [2]=Mid Power Setting
- [3]=High Power Setting
· Light Operation
- [OFF]=Off
- [ON]=On
9
Page 10

Disconnect range hood from power supply before cleaning or servicing.
1. Cleaning the surface of hood frequently. Use mild soap or detergent to clean the hood.
2. Do not use harsh alkalis or abrasives
3. Avoid the use of scouring powers or dishwasher compounds.
4. Grease filter may be washed using mild soap or detergent. In normal operation (1 to 2
hours daily), the Grease filter must be cleaned after 2 months. (heavy grease build-up
may not be cleaned easily and the filter may require replacement)
5. Charcoal filter cannot be cleaned. Depending on the frequency of use and the type of
cooking, the expected life of Charcoal filter is from 1 to 6 month. Replacement is required.
When cleaning water must not inter into motor, control switch etc. electrical parts.
Cleaning Instruction
Clean ventilation fans frequently. Grease should not be allowed to accumulate on fan
or filter.
10
Page 11
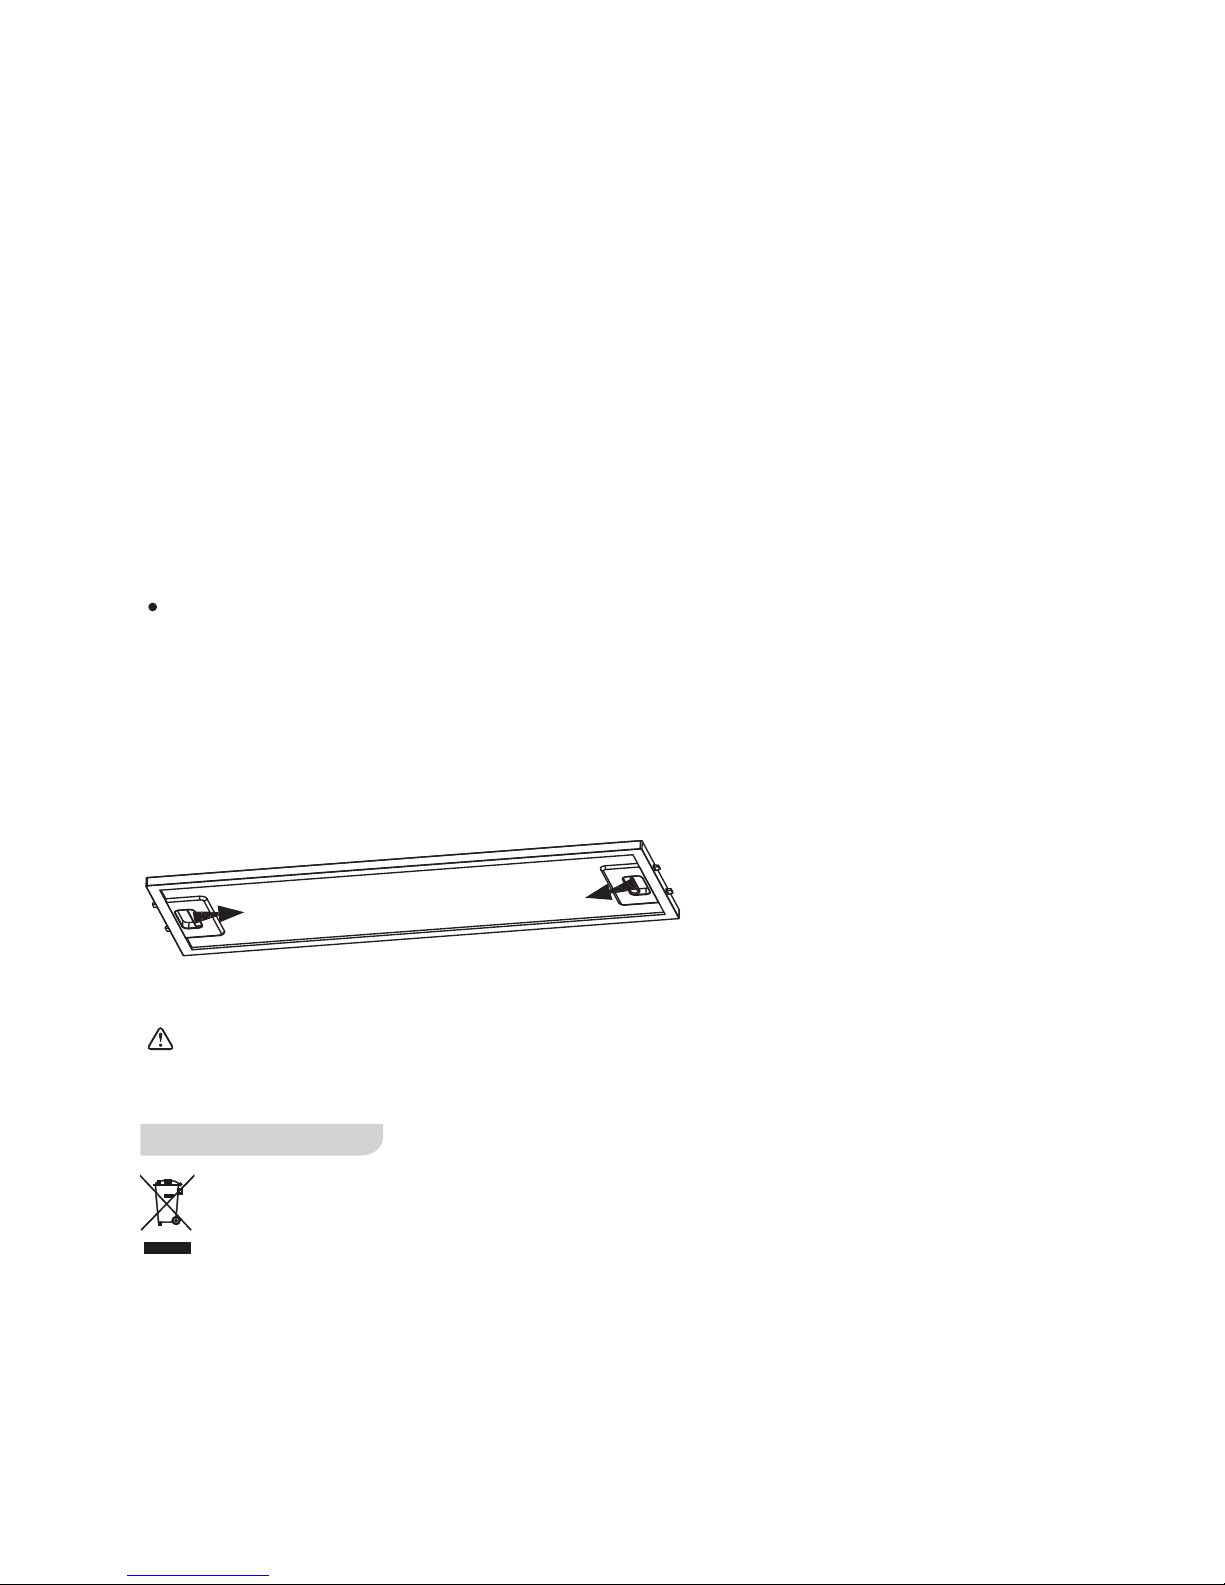
It is recommended to clean the metallic filter every three months by carrying out the
following instruction:
—Remove the metallic filter from the cooker hood and wash it in a solution of water
and neutral liquid detergent, leaving to soak
—Rinse thoroughly with warm water and leave to dry.
—The metallic filter may alter in color after several washes.
This is not cause for customer complaint or replacement of metallic filter.
There is a fire risk if cleaning is not carried out in accordance with the instructions.
Please dispose of it at your local community waste collection / recycling centre
and ensure it presents no danger to children while being stored for disposal.The
plug must be rendered useless and the cable cut off to prevent misuse.
Information
11
Disposal
Page 12

recommendations and instruction regarding installation, maintenance
The manufacturer shall decline all responsibility if the foregoing
and us e are not observed and respected when using the cooker hood.
Glen Dimplex Australia Pty Ltd
1340 Ferntree Gully Road
Scoresby VIC 3179
PH: 1300 556 816
FAX: 1800 058 900
Glen Dimplex New Zealand Ltd
38 Harris Road
Tamaki
Auckland New Zealand
PH: 09 274 2865
FAX: 09 274 8472
 Loading...