

Page 1
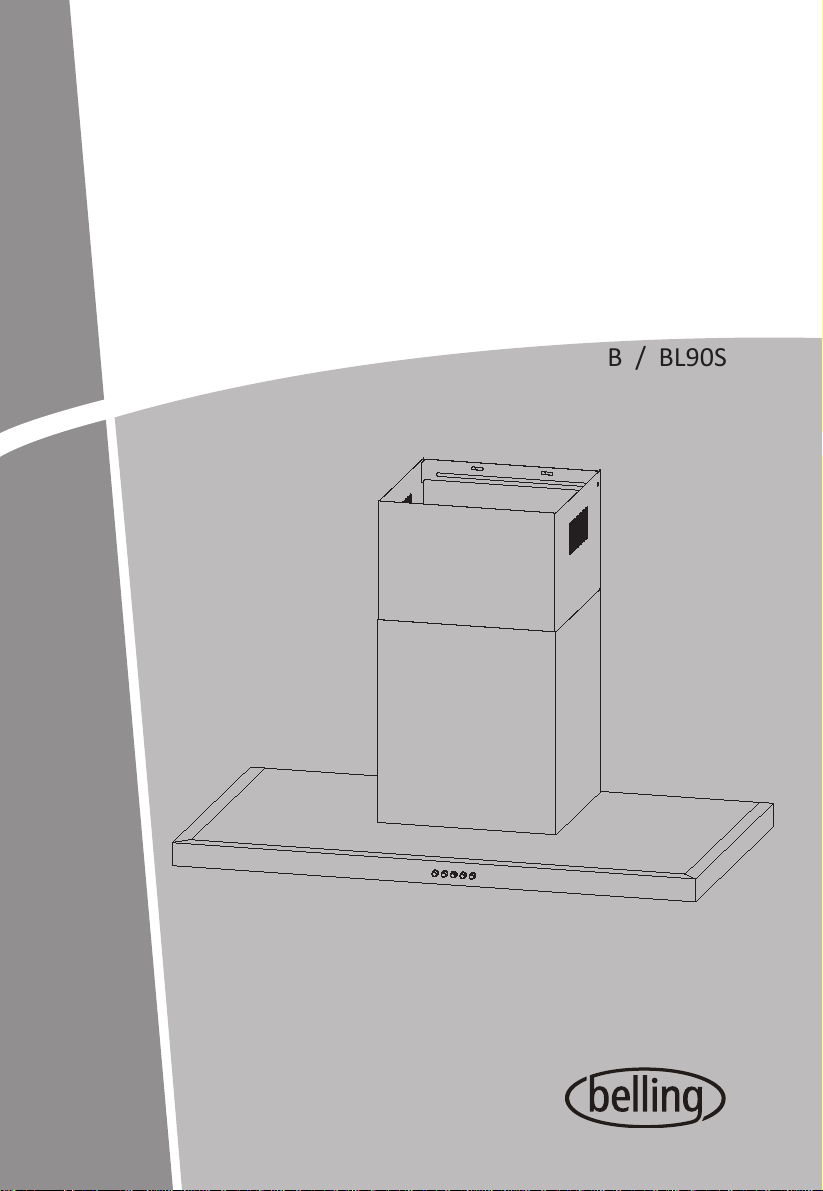
Flat Canopy Rangehood
INSTRUCT ON MANUALI
Read this manual carefully before operation
Pictures in this manual are for reference only.
For Models:
BL90B / BL90S
Page 2

Contents
Contents
01
02
03
04
05
06
07
08
09
Contents.................................................................
Warnings................................................................
Safety Warning.......................................................3
Installation.............................................................. 4
Use...................................................................
Maintenance.........................................................
Trouble Shooting..................................................
Specifications........................................................
Disposal................................................................
8
9
10
10
1
2
7
1
Page 3

Warnings
This appliance can be used by children aged from 8
z
years and above and persons with reduced physical,
sensory or mental capabilities or lack of experience and
knowledge if they have been given supervision or
instruction concerning use of the appliance in a safe
way and understand the hazards involved. Children
shall not play with the appliance. Cleaning and user
maintenance shall not be made by children without
supervision. If the supply cord is damaged, it must be
replaced by the manufacturer, its service agent or
similarly qualified persons in order to avoid a hazard.
There shall be adequate ventilation of the room when
z
the range hood is used at the same time as appliances
burning gas or other fuels.
The filter is made of high density aluminum.
z
z
Please do not use corrosive detergent for cleaning. The
proper function of the unit is conditioned by the
regularity of the maintenance.
To protect the main body from corrosive of the long time
z
accumulation of dirt, the cooker hood should be
cleaned with hot water with non-corrosive detergent
every two months.
There is a fire risk if cleaning is not carried out in
z
accordance with the instructions.
Do not flame under the range hood.
z
z
The air must not be discharged into a flue that is used
for exhausting fumes from appliances burning gas or
other fuels.
The minimum distance between the supporting surface
z
for the cooking vessels on the hob and the lowest part
of the range hood is 650 mm.
Regulations concerning the discharge of air have to be
z
fulfilled.
The appliance uses 4 hob elements at most.
z
z
CAUTION :
used with cooking appliances.
Accessible parts may become hot when
2
Page 4

Safety Warning
The appliance is not intended for use by young children or infirm
persons without supervisions.
Young children should be supervised to ensure they do not play with
the appliance.
Plug the power cord to socket outlet with earthing continuity terminal.
The cooker hood is for home use only, not suitable for barbecue, roast
shop and other commercial purposes.
The cooker hood and its filter should be cleaned regularly
according to the instruction.
Do not use open flame, or allow oil to go beneath the appliance.
If there is any fault occurred with the appliance, please call after-sale
service department.
Please keep the kitchen room ventilated.
Prior to any maintenance, cleaning operation, ensure the power is cut
off.
If the supply cord is damaged, it must be replaced by the manufac
service agent or similarly qualified person in order to avoid a hazard.
The replaced power cord should be provided by manufacturer or seller.
If the plug or cord is damaged, pl
There is a fire risk if cleaning is not carried out in accordance with the
instruction.
In case of damaged connecting wire, please refer to the manufacturer,
after-sale service personnel or other qualified technicians.
Use the unit according to the instructions to avoid any fire hazard.
The exhaust air must not be introduced into a smoke flue or chimney
that is used for exhausting fumes
Follow the local laws applicable for external air evacuation.
ease call after-sale service center.
from appliances burning gas.
3
turer,
Page 5
Notice of Installation
It can not share the same air ventilation tube with other appliance
such as gas tube, warmer tube, and hot wind tube. There will be
hazard of underpressure, combustion impaired and harmful gases
drawn back.
The bending of ventilation tube should be ≥120°,parallel or above the
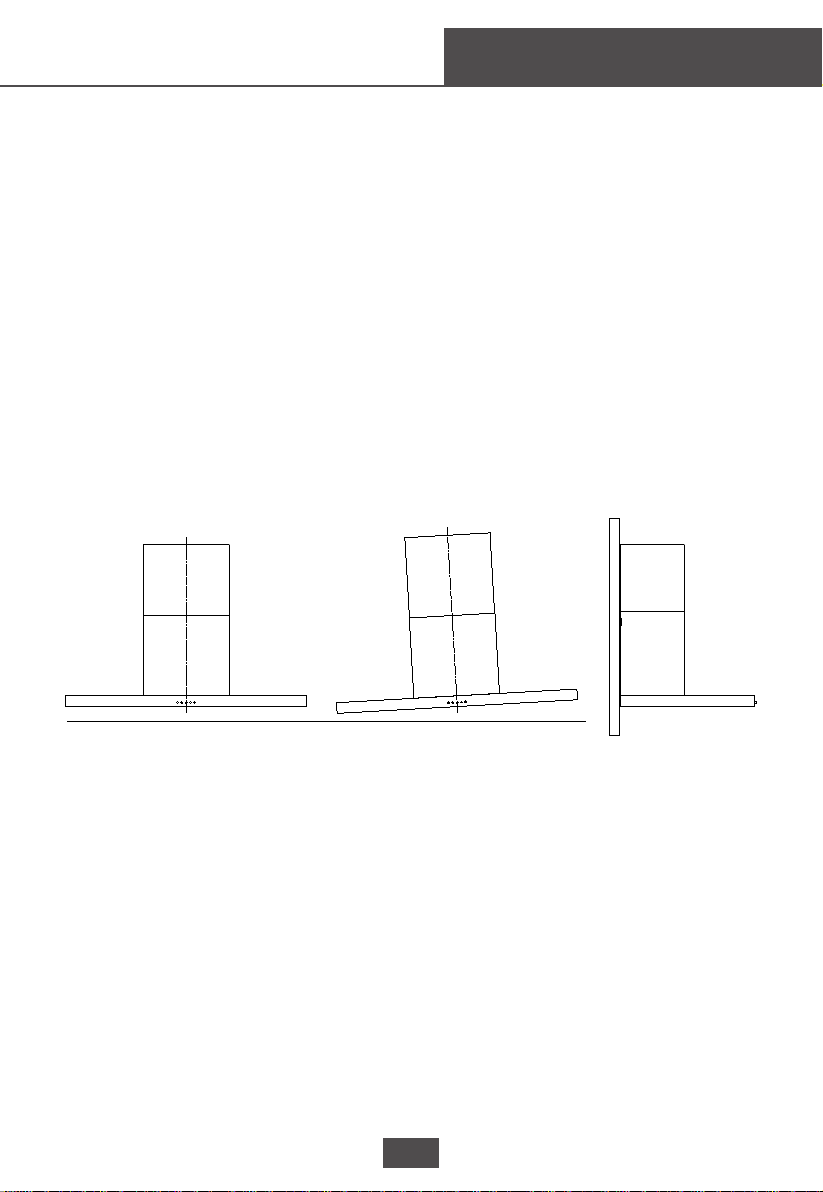
start point/should be connected to the external wall.
placed horizontally to avoid
Please make sure the installation plate is
grease collection at one end. See Fig.1.
Right Wrong
After installation, make sure that plug can be pulled out if necessary.
ed 650~750 mm up from the
T he cooker hood should be plac
cooking plane for safe and a good effect. See Fig.2.
Fig.1
There shall be adequate ventilation of the room when the cooker
hood is working.
4
Page 6
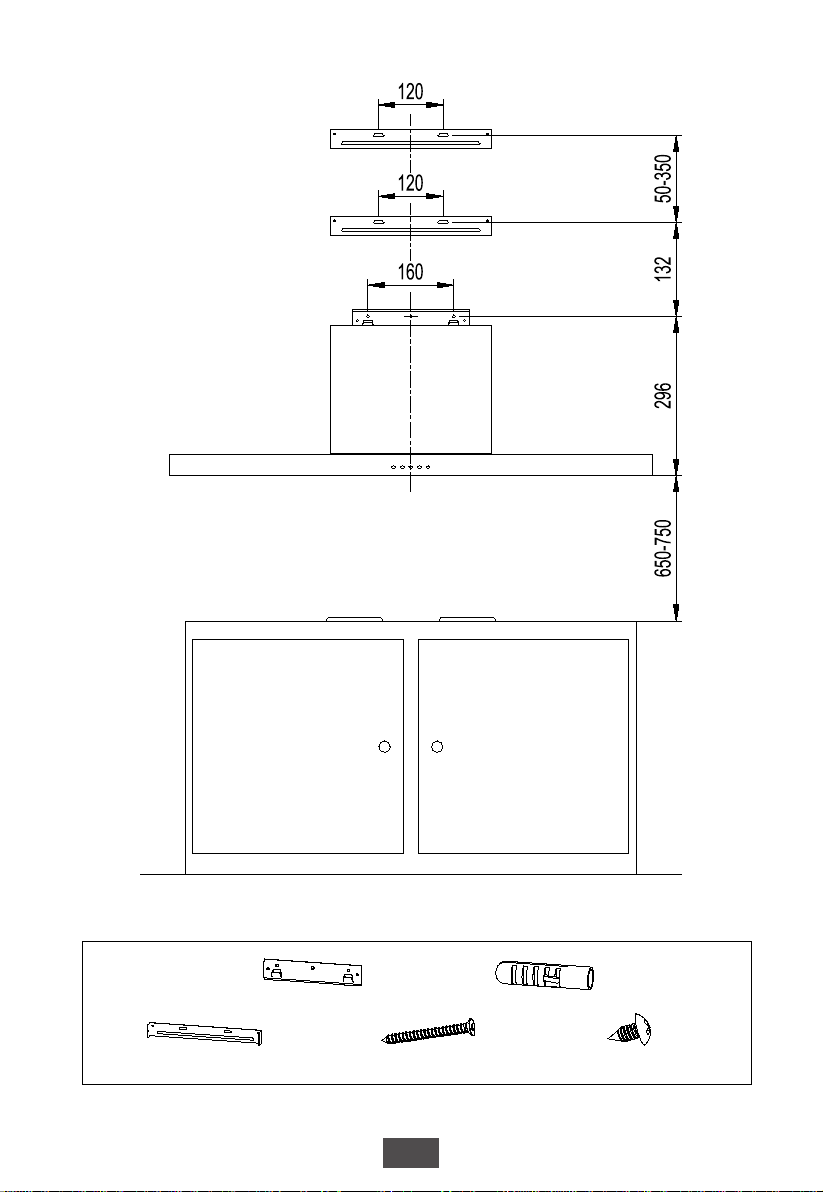
Fig.2
1 x Installation plate
2 x Chimney installation plates
7 x Plastic expansion pipes
7 x Screws(ST5*50)
Fig.3
5
6 x Screws(ST4.2*9.5)
Page 7
Installation
Accessories. See Fig.3. (Type and quantity of accessories is
subject to actual demand.)
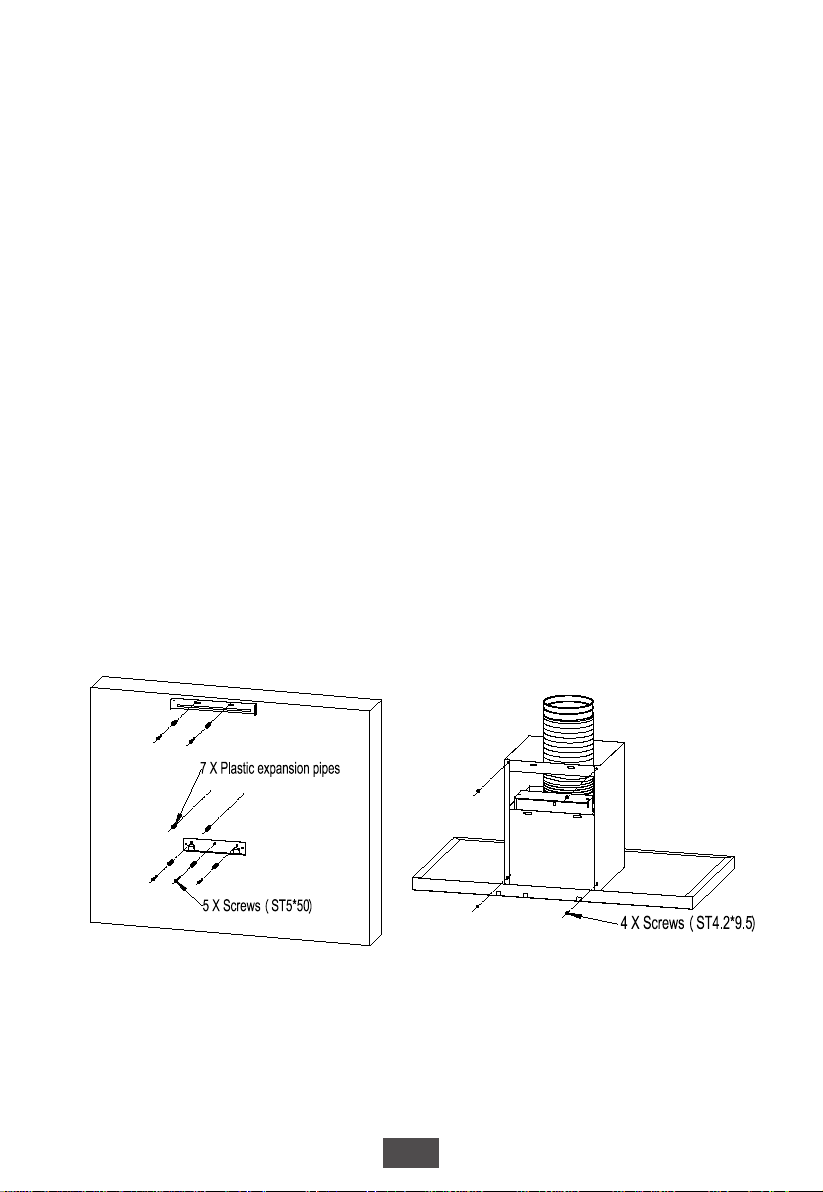
Fix installation plate and extension chim
ney installation plate, install
the plastic expansion pipes of chimney installation plate on wall.
See Fig.4.
Fix the exhaust pipe and chimney on the main body, connect
chimney installation plate and chimney. See Fig.5.
Hang range hood on the installation plate. See Fig.6.
After connecting the exhaust pipe well, fix chimney installation plate
to prevent the range hood from
accidently sliding off the
installation plate. See Fig.7.
Fix extension chimney. See Fig.8.
Fig.4 Fig.5
6
Page 8
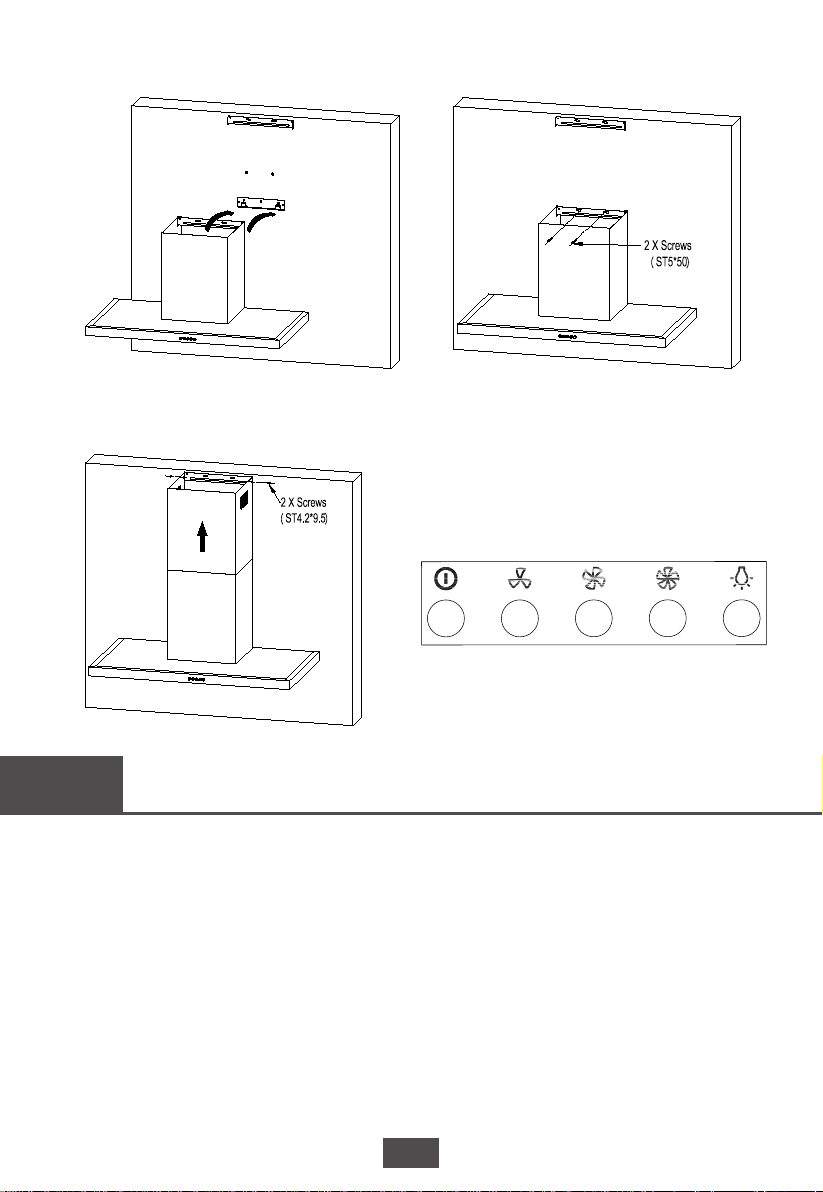
Fig.6 Fig.7
Stop Low Mid High Light
Use
Fig.8
Speed adjustment. See Fig.9.1.
(For some models)
Fig.9.1
Press Stop button, the motor will stop running.
Press the Low (speed) button, the motor runs at low speed.
Press the Mid (speed) button, th
Press the High (speed) button,
e motor runs at mid speed.
the motor runs at high speed.
Press the Light button, the two lighting lamps will come on.
Press it again and the lamps will be turned off.
7 X Screws(M5*50)
7
Page 9
Maintenance
Contents
Cleaning of the filters
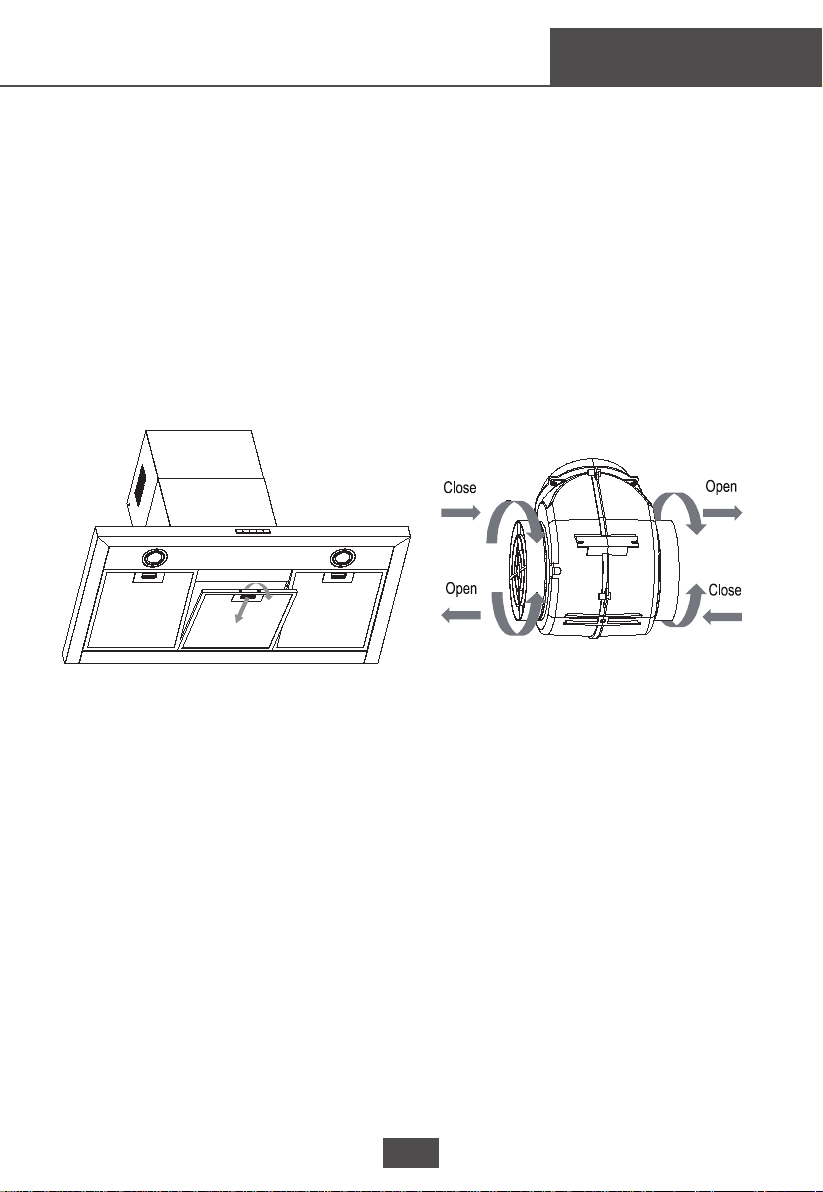
Removing the filters according to Fig.10.
Put into a dishwasher with detergent, set the temperature below
60 degrees.
Please do not use abrasive detergent for it will damage the hood.
Make sure that the hood is shut off before cleaning.
Fig.10 Fig.11
Replacement of the carbon filters ( )
Remove the filters see Fig.10.
The carbon filters are located at both end of the motor.
Apply reverse procedure to
It should be replaced after approximately 2-3 months of use.
The carbon filer cannot be washed or recycled.
Carbon filter is not supplied with your appliance.
remove the carbon filter.
8
Option
al
.11.giF ee S .dekcol era yeht litnu sretlif nobrac eht nruT
222
Page 10
Trouble Shooting
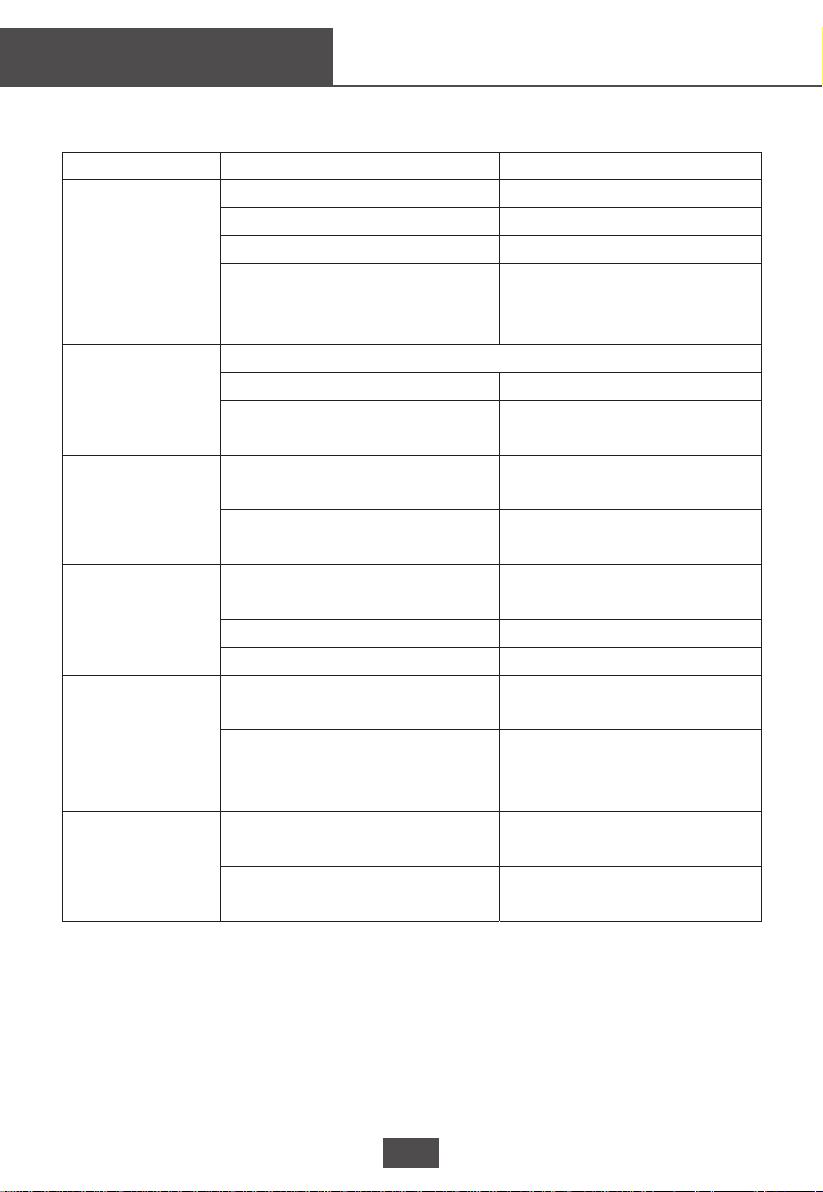
Fault
Light on, but motor
does not work.
Both light and motor
do not work.
Oil leakage.
Vibration.
Insufficient suction.
The machine inclines.
noituloS esuaC
The blades are blocked.
The capacitor is damaged. Replace capacitor.
The motor is damaged. Replace motor.
The internal wiring of motor is cut off /
disconnected. An unpleaseant smell
may be produced.
Apart from the above mentioned, check the following:
Power cord loose.
Outlet and the air ventilation entrance
are not tightly sealed.
Leakage from the connection of
U-shaped section and cover.
The blade, if damaged, can cause
vibrating.
The motor is not tightly fastened. Fasten the motor tightly.
The cooker hood is not tightly fixed. Fixed the cooker hood tightly.
The distance between the cooker
hood and the cooker top is too large.
Too much ventilation from open doors
or windows.
The fixing screws are not tight
enough.
The hanging screws are not tight
.
enough
Replace motor.
Connect the wires as per the
electric diagram.
Take down the outlet and seal with
glue.
Take U-shaped section down and
seal with soap or paint.
Replace the blade.
Readjust the distance.
Choose a new place to install the
appliance or close some doors /
windows.
Tighten the fixing screw and make
it horizontal.
Tighten the hanging screw and
make it horizontal.
.sthgil ecalpeR .degamad thgiL
Electrical Diagram
Electrical diagram see label on main body of the actual product.
9
222
Page 11
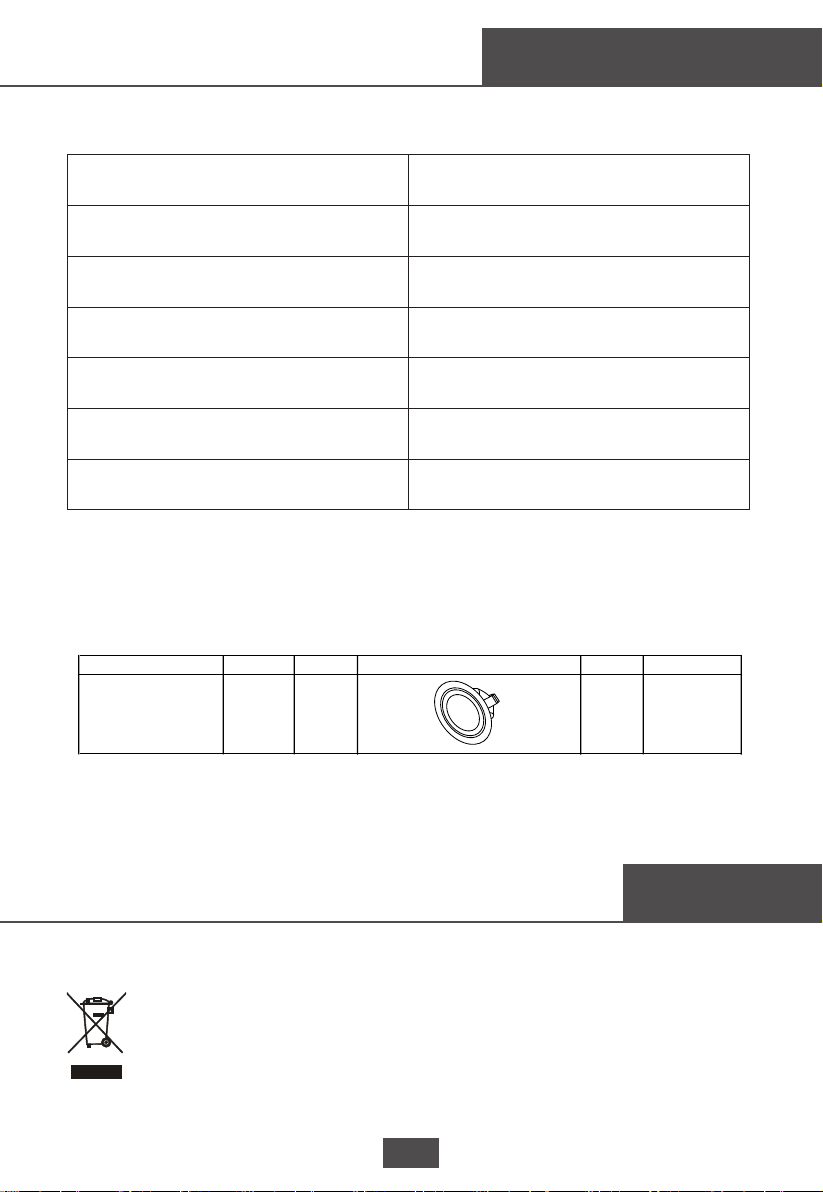
Voltage
Main Parameters
220-240V~50Hz
Rated Power
Lighting Power
Motor Power
Diameter of air tube
Airflow
Noise
The air flow parameter is tested under conditions of 230V 50Hz when the
voltage is 220-240V 50Hz and without carbon filters.
Round/ Diameter
: 70mm
~
Max Power Voltage Picture Lamp Cap ILCOS D code
1.5W DC 12 V
333W
2 X 1.5W
330W
150mm
3
800m /h
≤
74dB
~
——
DSR-1.5-S-70
For servicing the LED light please contact Glen Dimplex Customer Care
Disposal
Please dispose of it at your local community waste collection /
recycling center and ensure it presents no danger to children
while being stored for disposal. The plug must be rendered
useless and the cable cut off to prevent misuse.
10
222
Page 12

Glen Dimplex Australia Pty Ltd
1340 Fertree Gully Road
Scoresby Vic 3179
Customer Care
Ph: 1 800 444 357
Web: www.belling.com.au
Glen Dimplex New Zealand
38 Harris Rd
East Tamaki
Auckland 2013
Customer Care
Ph: 09 274 8265
Web: www.belling.co.nz
No.6 YongAn Road, Beijiao, Shunde, Foshan, Guangdong, China
P/N:16173000A
10236
 Loading...