

Page 1

Cookcenter
Dual Fuel Cooker
Electric ovens & Gas hob
Users & Installation Guide
Model number 152A
This model is supplied for use with Natural gas, and is convertible to
LPG (Propane) with the kit supplied.
Page 2

Page 3

CONTENTS
1
Introduction . . . . . . . . . . . . . . . . . . . . . . . . . . . . . . . . . . . . . . . . . . 2
Installation instructions . . . . . . . . . . . . . . . . . . . . . . . . . . . . . . . . . . 3
For your safety - always . . . . . . . . . . . . . . . . . . . . . . . . . . . . . . . 11
For your safety - never. . . . . . . . . . . . . . . . . . . . . . . . . . . . . . . . . 12
Know your cooker . . . . . . . . . . . . . . . . . . . . . . . . . . . . . . . . . . . . 13
Know your timer . . . . . . . . . . . . . . . . . . . . . . . . . . . . . . . . . . . . . 15
Using your electronic timer . . . . . . . . . . . . . . . . . . . . . . . . . . . . . . 16
Hob . . . . . . . . . . . . . . . . . . . . . . . . . . . . . . . . . . . . . . . . . . . . . . . 23
Griddle . . . . . . . . . . . . . . . . . . . . . . . . . . . . . . . . . . . . . . . . . . . . . 24
Warming zone . . . . . . . . . . . . . . . . . . . . . . . . . . . . . . . . . . . . . . . 25
Oven temperature chart . . . . . . . . . . . . . . . . . . . . . . . . . . . . . . . . 26
Grilling . . . . . . . . . . . . . . . . . . . . . . . . . . . . . . . . . . . . . . . . . . . . . 27
Fan Oven - Cookery notes & charts . . . . . . . . . . . . . . . . . . . . . . . 28
Conventional oven - Cookery notes & charts . . . . . . . . . . . . . . . . 32
Slow cook / Warming oven . . . . . . . . . . . . . . . . . . . . . . . . . . . . . 37
Care & Cleaning . . . . . . . . . . . . . . . . . . . . . . . . . . . . . . . . . . . . . . 39
Is there something wrong? - Troubleshooting . . . . . . . . . . . . . . . . 39
Service information. . . . . . . . . . . . . . . . . . . . . . . . . . . . . . . . . . . . 43
Page 4

INTRODUCTION
2
Thank you for buying this Belling
appliance. We hope that you find it
to be a stylish and attractive addition
to your kitchen, and enjoy cooking
with it.
Your Belling Cooker
There are the following features:
l
a fanned oven,
l
a conventional oven,
l
a slow cook/warming oven,
l
a separate grill,
l
a seven burner gas hob with a
warming area
l
a removable griddle plate.
There is also a clock /timer with a
minute minder and automatic oven
switch on and off.
Getting help
Should you need any help installing,
operating or cooking with this appliance, please check these instructions
thoroughly to make sure you have not
missed anything. If you still require
advice or assistance please contact:
When making a call for advice
please quote the cookers model number and serial number. These numbers can be found on the left hand
side of the oven frame. These numbers can be written in the box provided on this page.
Warning!
For your own safety, please make
sure these instructions on installation,
use and maintenance are followed.
We advise that you keep these
instructions in a safe place for future
reference. If you sell, or transfer
ownership of this appliance, please
pass on these instructions to the new
owner.
Unpacking your appliance
Please make sure that you have
removed all packaging, wrapping,
labels and stickers from the appliance
before use.
Model
Number
Serial
Number
Page 5
INSTALLATION INSTRUCTIONS
3
Gas Safety (Installation & Use)
Regulations.
This appliance must be installed by an
authorised person in accordance with
the manufacturers installation instructions, local gas fitting regulations, the
AGA Gas Installations, the Australian
Gas Installation Code AG601
/AS5601 and any other re l e v a n t
statutory regulations. Particular attention should be given to re l e v a n t
requirements regarding ventilation.
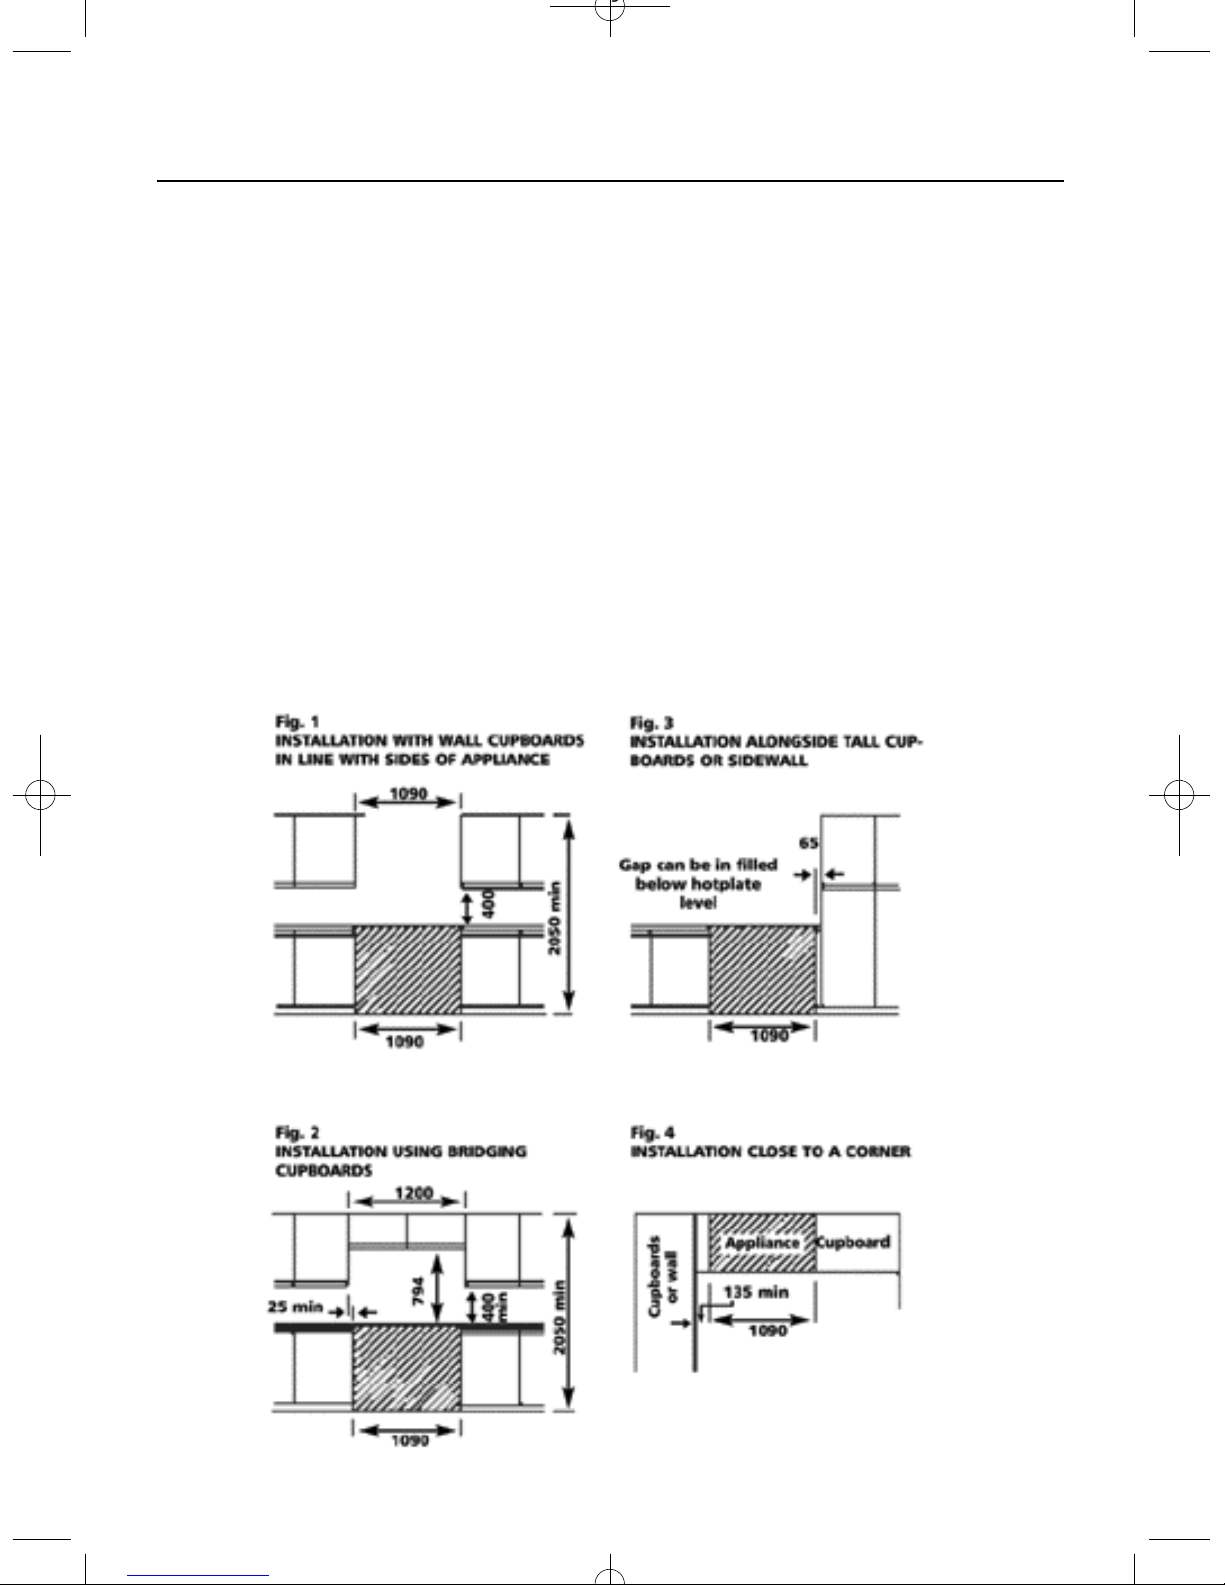
Space for fixing
The cooker can be close fitted below
hotplate level. This requires a mini-
mum distance of 1085mm between
the cupboard units of hotplate height.
The wall behind the cooker between
the hotplate and 450mm above and
across the width of the cooker, must be
an incombustible material such as
ceramic wall tiles.
Follow the diagrams provided for
guidance on fitting. Take note of all
dimensions.
W h e r e this appliance is
installed in Marine craft or caravans - it shall not be used as a
space heater.
Page 6
INSTALLATION INSTRUCTIONS
4
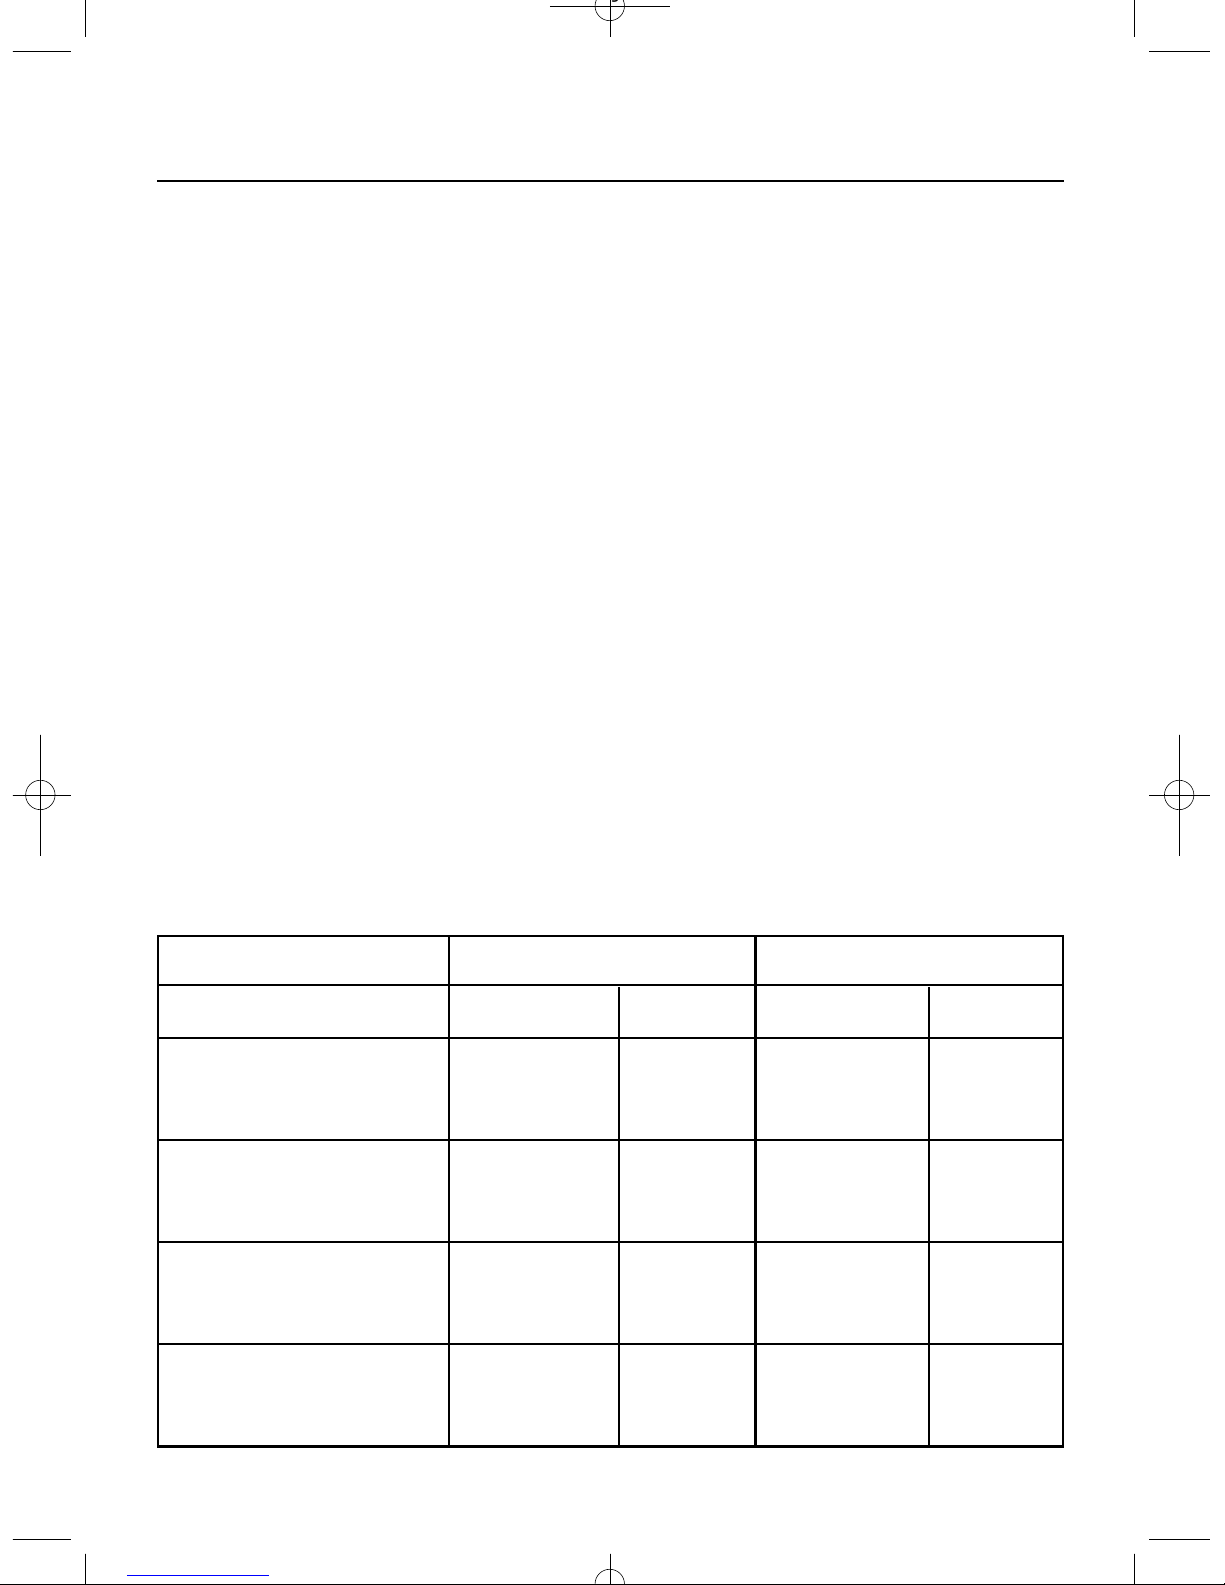
Technical Data
Dimensions
Height 900 - 915mm
Width 1090mm
Depth 600mm (excluding handles)
General
Gas connection:
RP
1/2 (1/2
BSP Female)
Burner pressure:
Natural gas - 1.0kPa
LPG gas (propane) 2.75 kPa
Pressure test point:
Gas regulator or middle rear hob
b u r n e r . (see “Checking Burn e r
Pressure”)
Gas rate adjustment: none
Aeration adjustment: none
Electrical connection: 6mm2cable
230 - 240 v a.c. 50Hz
Total heat Input (Gas):
Natural gas 59.40MJ/h
LPG gas (propane) 55.30 MJ/h
Total heat Input (electric):
7.35 - 8.00 kW
Fan oven bottom left:
2.30 - 2.50kW
Grill top left: 2.38 - 2.60kW
Conventional oven (top right):
2.20 - 2.40kW
Slow cook / Warming oven:
0.20 - 0.22kW
Warming zone: 0.23 - 0.25kW
Natural Gas LPG - Propane
Burner Heat Input Injector Heat Input Injector
Front Middle (Ultra
Rapid)/ Wok.
12.60MJ/h 1.65mm 12.60MJ/h 0.95mm
Rear Left
(Rapid)
11.52MJ/h 1.55mm 10.80MJ/h 0.87mm
Front Left / Rear Middle
(Semi-rapid)
7.74MJ/h 1.25mm 6.66MJ/h 0.69mm
Front & Rear Right
(Auxiliary)
4.14MJ/h 0.90mm 3.89MJ/h 0.53mm
Page 7
INSTALLATION INSTRUCTIONS
5
Unpacking the cooker
Unpack the components from inside
the grill and the oven. Please make
sure that you remove everything from
inside the cavities.
Check that the following are present:
l
Grill pan and grid
l
Pansupports (3)
l
Main oven shelves (4)
l
Meat pan
l
Literature
l
Griddle
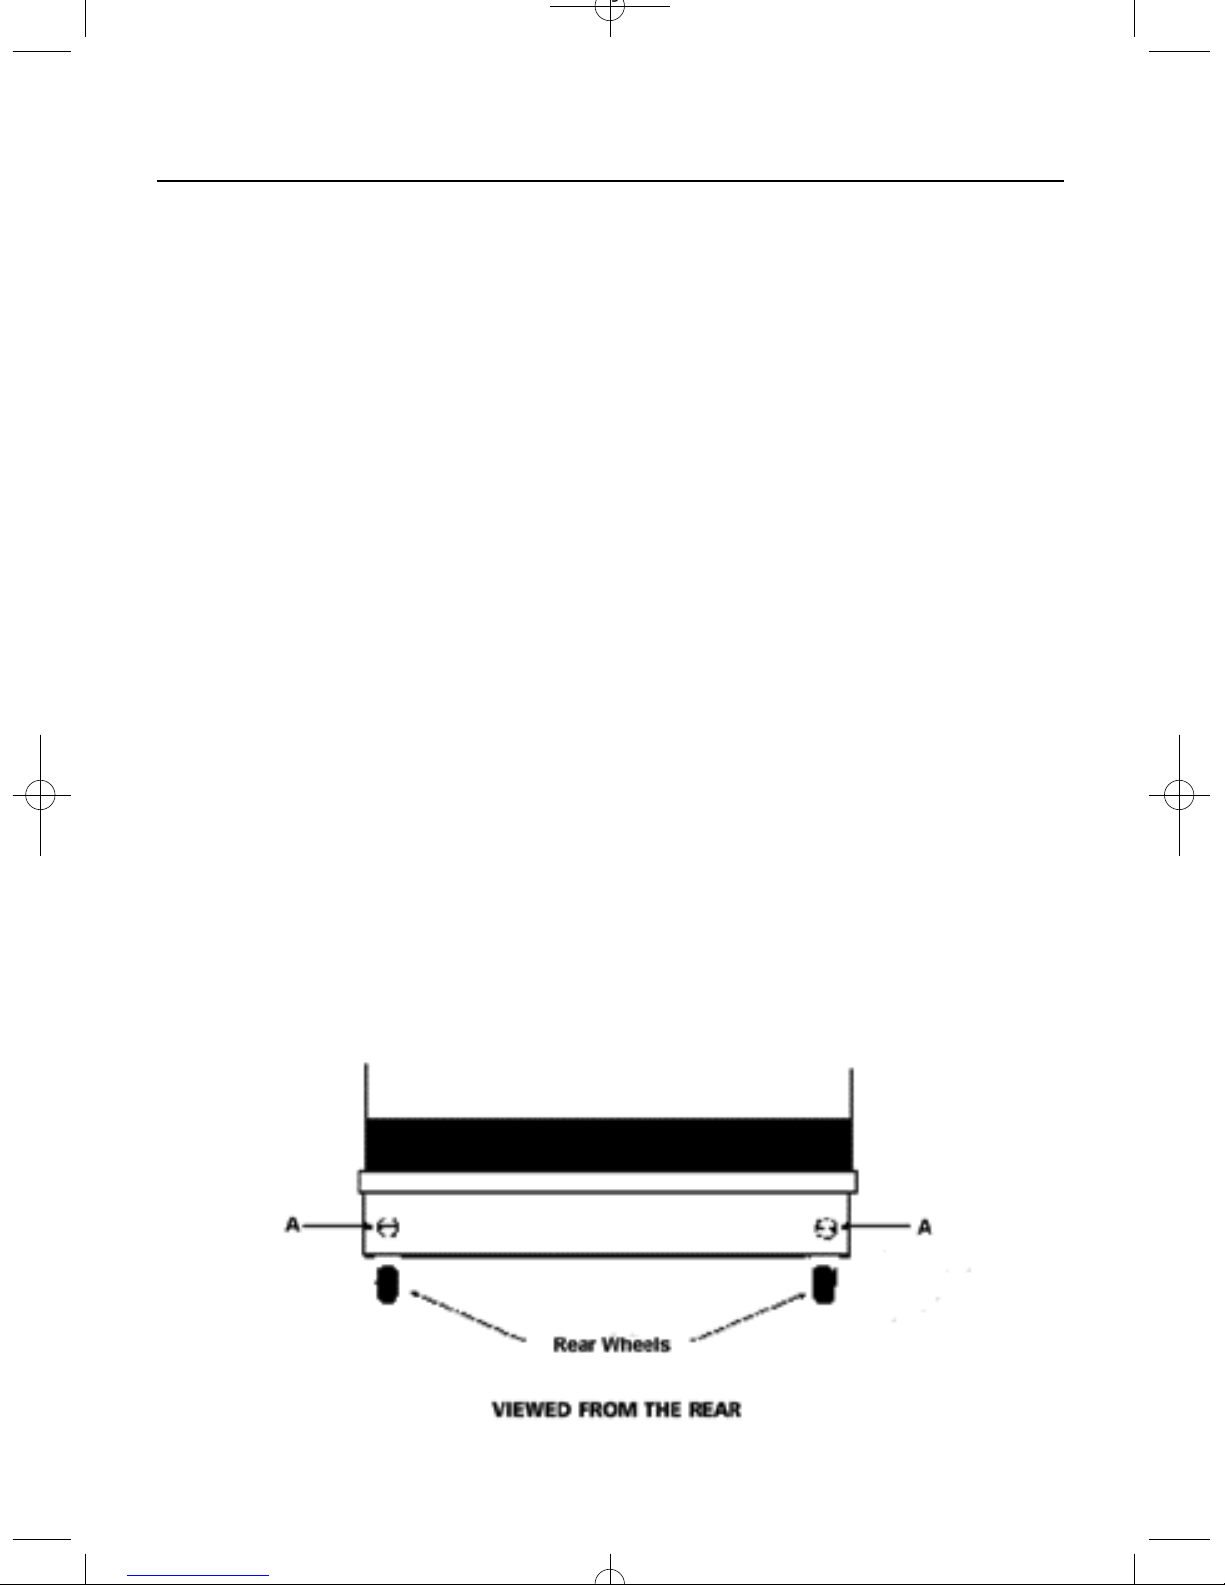
Levelling
Two rear wheels and two front feet are
fitted which can be adjusted up or
down to set the height (900mm 915mm) and level the cooker.
l
The rear wheels can be raised or
lowered from the back of cooker by
adjusting the levelling screws ‘A’ in the
plinth.
l
The front feet can simply be screwed
in or out to lower or raise the front of
the cooker.
Caution:
Some soft floor coverings may get
damaged if the cooker is not moved
carefully.
Page 8
INSTALLATION INSTRUCTIONS
6
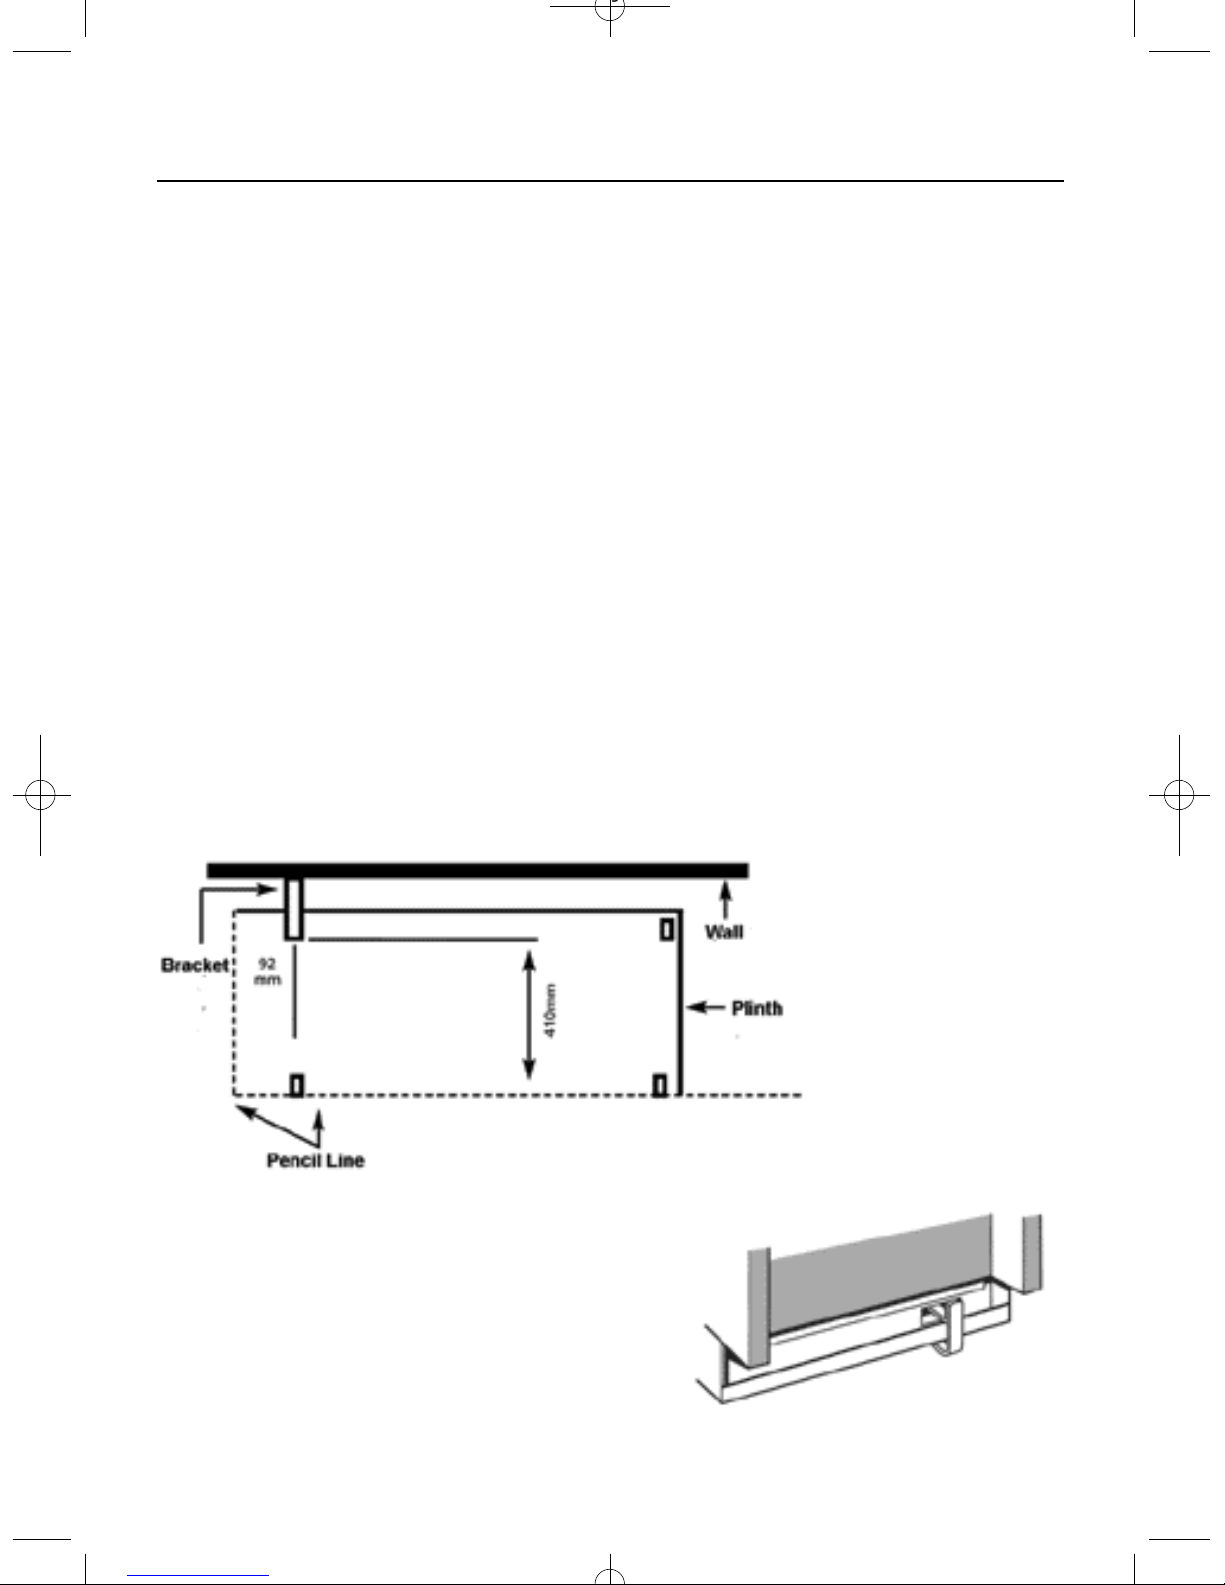
Stability bracket
The cooker must be fitted a stability
device firmly secured to the fabric of
the building. The back of the cooker
has a slot for attaching the stability
bracket, which can be obtained from
your cooker supplier. The leaflet
included with the bracket should be
read in conjunction with the following
instructions:
l
Push the cooker to its intended
position
l
Draw pencil lines on the floor in
line with the front and left side of the
plinth.
l
Remove the cooker.
l
Position the stability bracket in
accordance with the diagram (Fig 1).
l
Measure the height from floor level
to the bottom of the slot in the back of
the cooker.
l
Add 3mm to the dimension and
assemble the stability bracket to that
height (i.e. from the floor level to the
underside of the top member)
Page 9
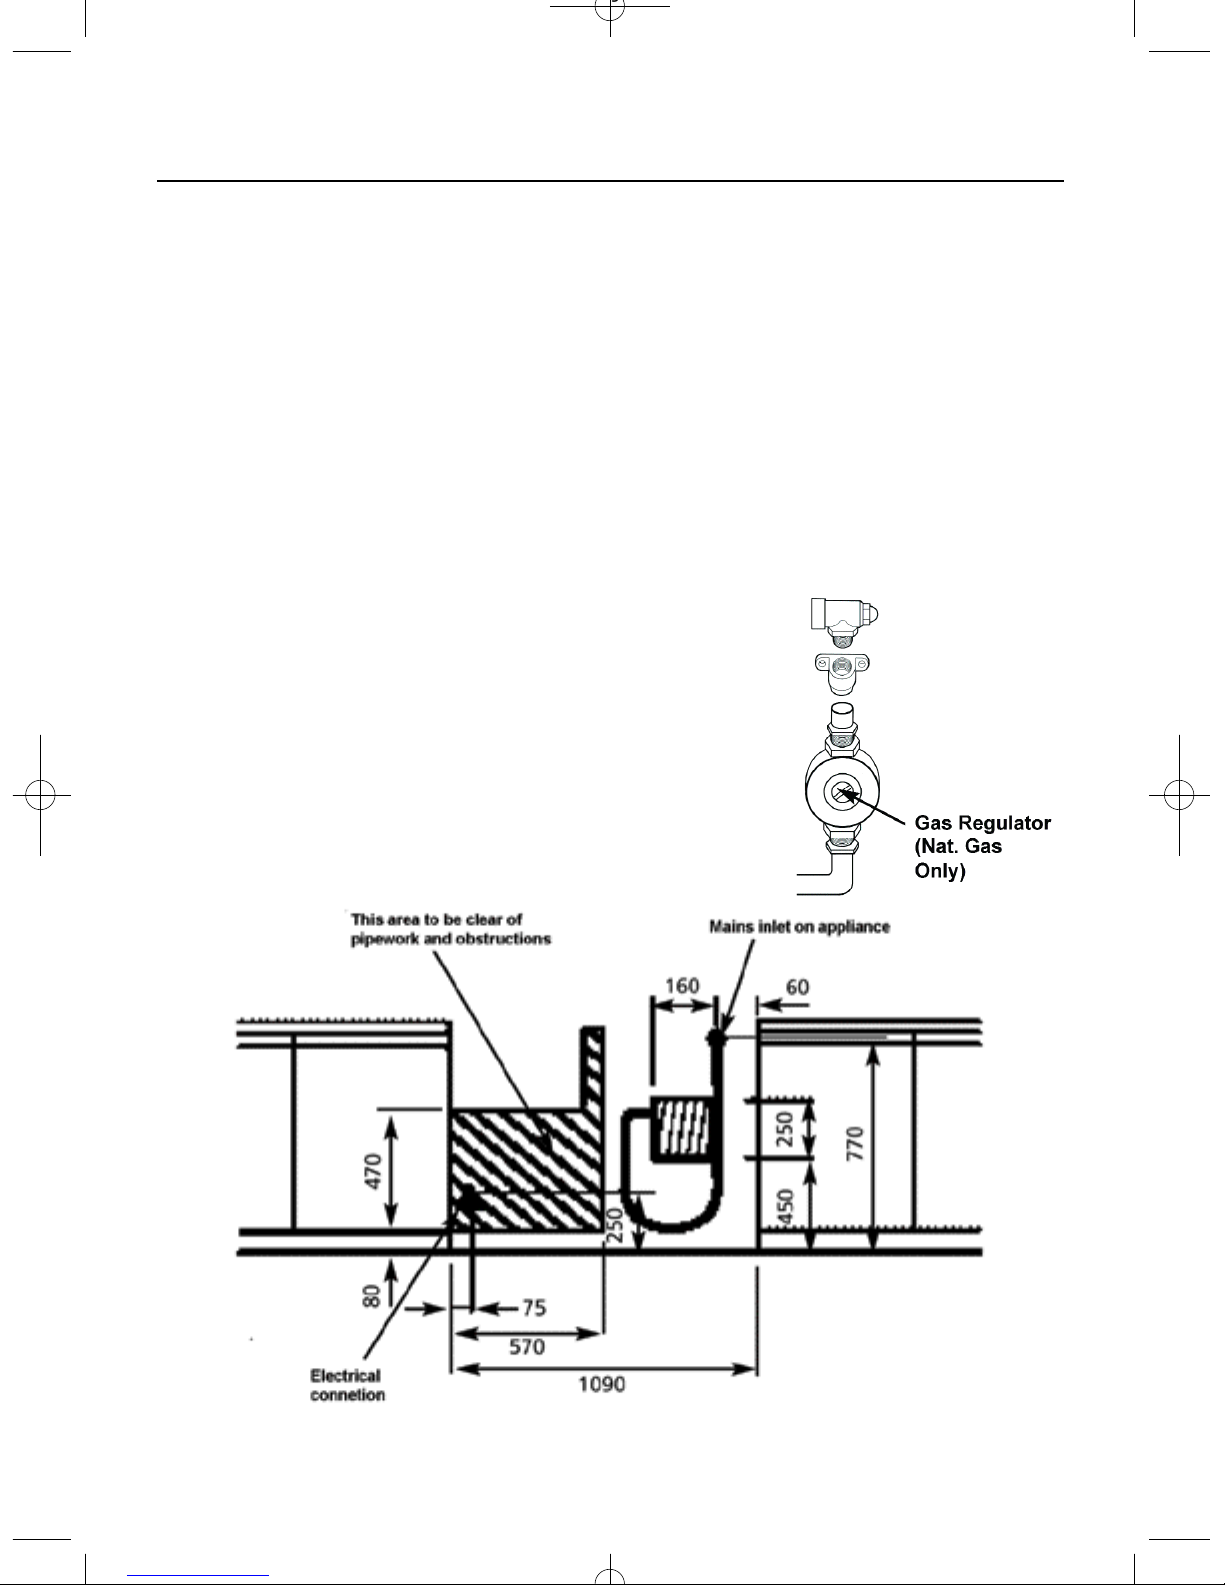
CONNECTING TO THE GAS SUPPLY
7
The cooker is designed to match the
depth of standard 600mm worktops.
An adaptor backplate should, theref o r e, be fitted within the 400 x
250mm shaded area shown to allow
the cooker to be pushed fully to the
wall.
If a forward facing backplate is used,
it must be chased to the wall.
Means of isolation shall be provided
at the shut off point by either an
approved quick connect device or a a
Type 1 manual shut off valve. The outlet of the quick connect device shall be
at, or below, the horizontal position
Connection to the cooker should be
made using an AGA certified hose
assembly and regulator (Natural Gas
only).
Note:
Maximum length of hose = 900mm.
The temperature rise of areas at the
rear of the cooker that are likely to
come into contact with with the flexible
hose do not exceed 70˙C.
Page 10

CONNECTING TO THE GAS SUPPLY
8
A restraining chain or wire of adequate strength is to be fixed to the
appliance and the wall within 50mm
of each connection point. The length
of the chain or wire is not to exceed
80% of the length of the hose assembly. The restraining chain or wire is to
prevent stress being imparted onto the
hose assembly when the cooker is
moved out of its normal operating
position.
After installation check for soundness.
The burner pressure is tested at the
pressure regulator or rear middle hob
burner.
With reference to the users instructions:
l
Check that the hotplate burners
ignite correctly and burn with a steady
flame.
l
Check for a steady flame at the
lowest setting (small flame symbol).
Finally, instruct the user on the operation of the cooker and give them this
book for reference.
Page 11
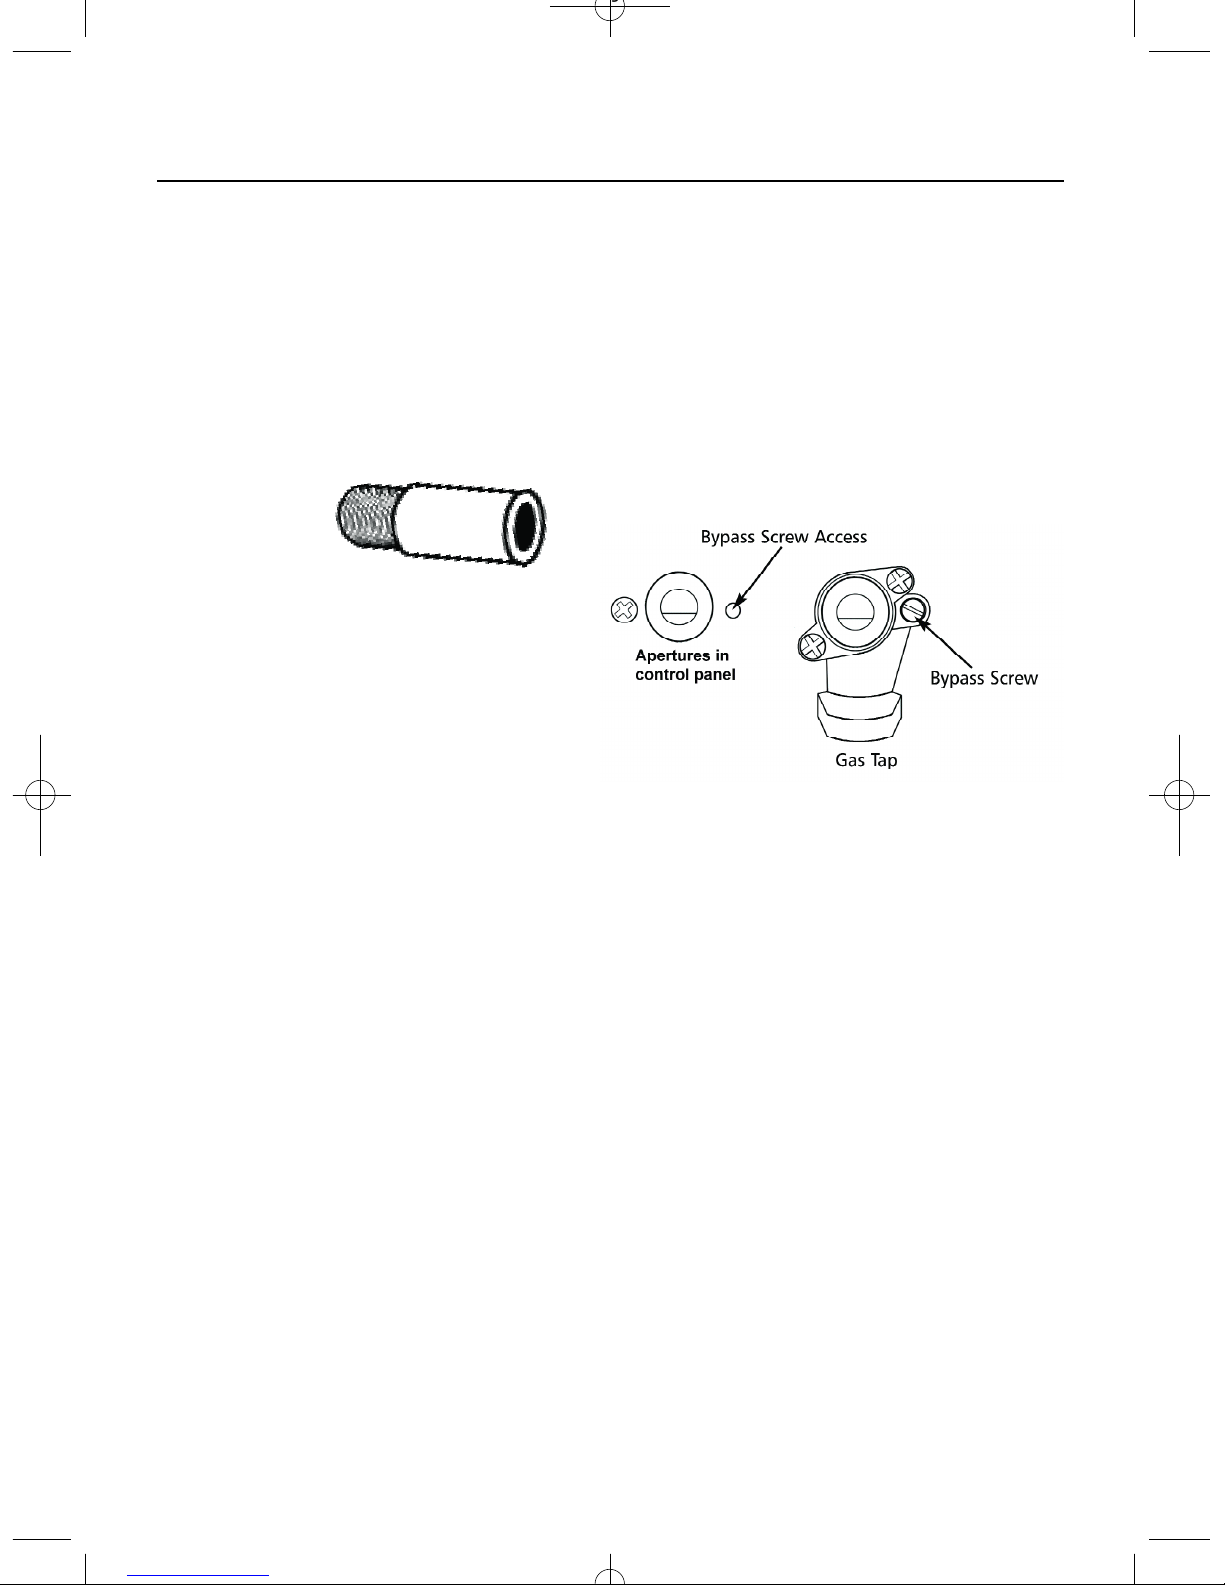
CHECKING BURNER PRESSURE
9
Burner pressure of the appliance can
be checked at the gas re g u l a t o r
(Natural Gas) or middle rear burner
(Semi Rapid) on the appliance hob.
To check the burner pressure of the
appliance at the middle rear hob burner, the adaptor (illustrated) will be
required.
Remove the burner jet from the middle
rear burner (Semi Rapid) and screw in
the adaptor.
Connect the test equipment, and ignite
the rear left burner (Rapid) and operate at its maximum gas rate.
Pressure should be be as stated on the
data badge (adjust the pressure if
required)
Removed the adaptor and replace the
jet in the middle rear burner (Semi
Rapid).
Bypass Screw adjustment
The low rate setting of the individual
gas burners are preset for Natural
Gas and should not require adjustment.
However, if adjustment is required
then the bypass screw, situated on the
gas tap and located through the aperture in the control panel, can be
adjusted with the aid of a thin bladed
flat ended screw driver as follows:
Clockwise adjustment to lower the
flame.
Anticlockwise to increase the flame.
A torch may assist in this operation.
The bypass screw adjustment
Page 12

CONNECTING TO THE ELECTRICAL SUPPLY
10
Connecting The Cooker
For your own safety we recommended
that your cooker be installed by a competent person.
The cooker should be installed in
a c c o r dance with AS/NZS 3000:
2000.
Warning! This cooker must be
earthed.
The cooker must be connected to the
correct electrical supply as stated on
the rating plate, through a suitable
cooker control unit incorporating a
double pole switch having a contact
separation of at least 3mm in all poles,
adjacent to(but not above) the cooker.
We recommend the cooker circuit be
rated to 45 amps with a minimum of
30 amps.
We recommend that 6m2PVC insulated twin and earth cable is used to connect the cooker to the cooker control
unit, the minimum size of cable that
can be used is 6mm2twin and earth
the maximum size is 10mm2twin and
earth.
Important
For access to the mains terminal block,
for supply cable connection, it is necessary to remove the mains terminal
cover, located at the lower right hand
side of the rear panel. No part of the
appliance will operate unless the main
control unit is switched ON.
Allow sufficient cable for the cooker to
be pulled out for cleaning, but do not
let it hang closer than 25mm (1”) to
the floor. The cable can be looped if
necessary, but make sure that it is not
kinked or trapped when the cooker is
in position.
Before Cooking
Before you cook for the first time, we
recommend that you switch on each
element in turn to burn off any odours
remaining from manufacture.
Page 13

FOR YOUR SAFETY
11
Please read the following
pages before using your cooker
4
Always make sure you understand
the controls before using the cooker.
4
Always check the controls of the
cooker are switched off after use.
4
Always stand back when opening
the oven doors to allow heat to disperse.
4
Always use dry, good quality oven
gloves when removing items from the
oven.
4
Always take care when removing
items from the top oven/grill when the
main oven is on, as the contents might
be hot.
4
Always keep the oven and grill
doors closed when the cooker is not in
use.
4
Always place pans centrally over
the hotplate burners and position them
so they cannot be accidentally
knocked, caught or become heated by
other burners.
4
Always keep the cooker clean, as a
build up of grease or fat from cooking
can cause a fire.
4
Always allow the cooker to cool
before cleaning.
4
Always follow the basic practices of
food handling and hygiene to prevent
the possibility of bacterial growths.
4
Always keep ventilation slots clear
of obstructions.
4
Always turn of the electricity before
cleaning or changing a light.
4
Always refer servicing to registered
service engineers.
4
Always ensure that the griddle is fitted correctly to the pansupports and
that the fingers are located within the
slots of the griddle feet.
4
Always remove the griddle handle
while cooking.
4
Always take care when fitting the
griddle handle not to touch any of the
hot surfaces of the griddle or the cooker.
4
Always remove any spillage from
the surface of the lid before opening it.
4
Always allow the hob to cool before
closing the lid.
4
Always during use, the oven
becomes hot. Care should be taken to
avoid touching heating elements
inside the oven.
Page 14

FOR YOUR SAFETY
12
6
Never leave children unattended
where the cooker is installed as all surfaces will get hot during and after use.
6
Never allow anyone to sit or stand
on any part of the appliance.
6
Never store items that children may
attempt to reach above the appliance.
6
Never fill chip pans more than 1/3
full with oil or fat, or use a lid. DO
NOT LEAVE PANS UNATTENDED
WHILE COOKING.
6
Never use propriety spillage wells
on the hotplate, eg. foil spillage
bowls.
6
Never heat up unopened food containers as pressure can build up causing the container to burst.
6
Never store chemicals/ food stuffs,
or pressurised containers in or on the
cooker, or in cabinets immediately
above or next to the cooker.
6
Never place flammable items or
plastics on or near the hotplate.
6
Never use the cooker as a room
heater.
6
Never dry clothes or place other
items over or near the hotplate or the
oven/grill doors eg. tea towels or
oven gloves.
6
Never wear garments with long
flowing sleeves while cooking.
6
Never leave items that could catch
fire near the burners of the flue.
6
Never leave burners lit while not in
use.
6
Never use plastic items in or on the
cooker.
6
Never leave the handles on the
griddle while cooking.
6
Never use steam cleaners on the
cooker.
6
Never spray aerosols in the vicinity
of the cooker while it is in operation.
6
Never store flammable materials in
the storage drawer of the cooker.
Page 15
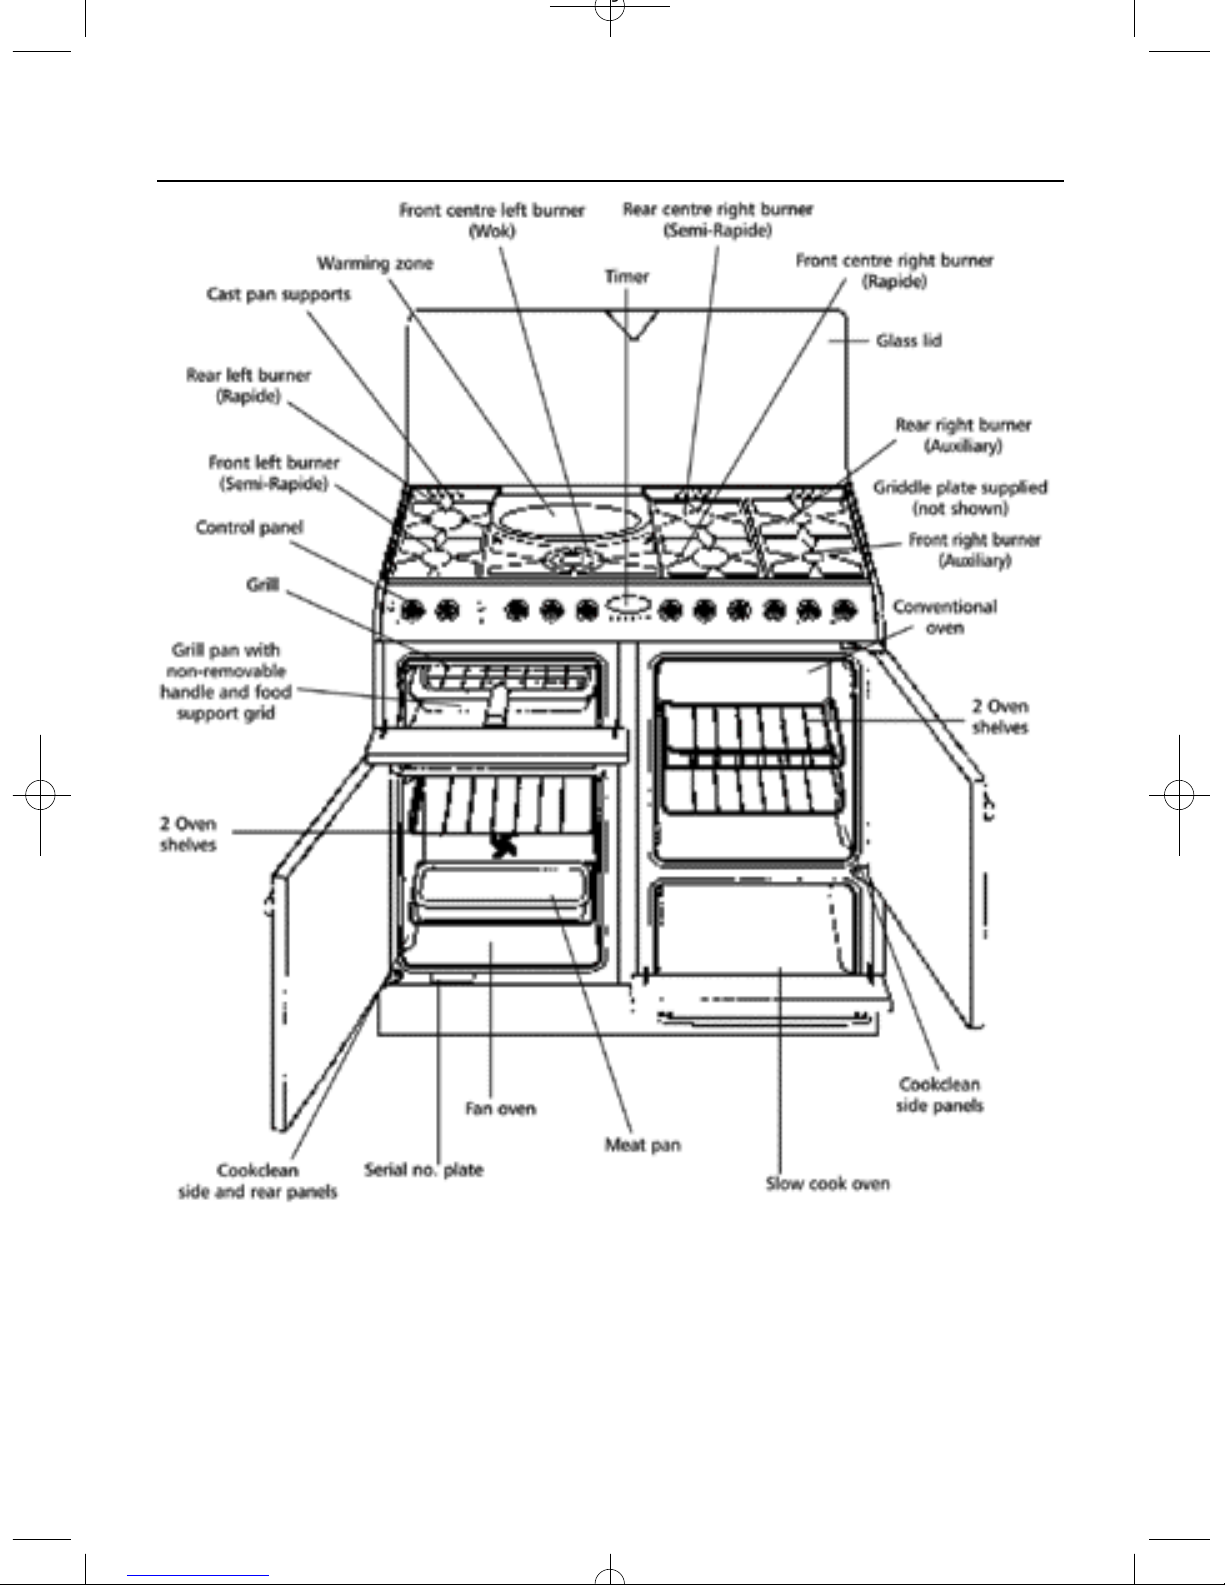
KNOW YOUR COOKER
13
The use of a gas appliance results in
the production of heat and moisture in
the room in which it is installed.
Ensure that the kitchen is well ventilated; keep natural ventilation holes open
or install a mechanical ventilation
device (mechanical extractor hood).
Prolonged intensive use of the appliance may call for additional ventilation, for example opening of a window or more effective ventilation i.e.
increasing the level of mechanical ventilation where present.
Page 16
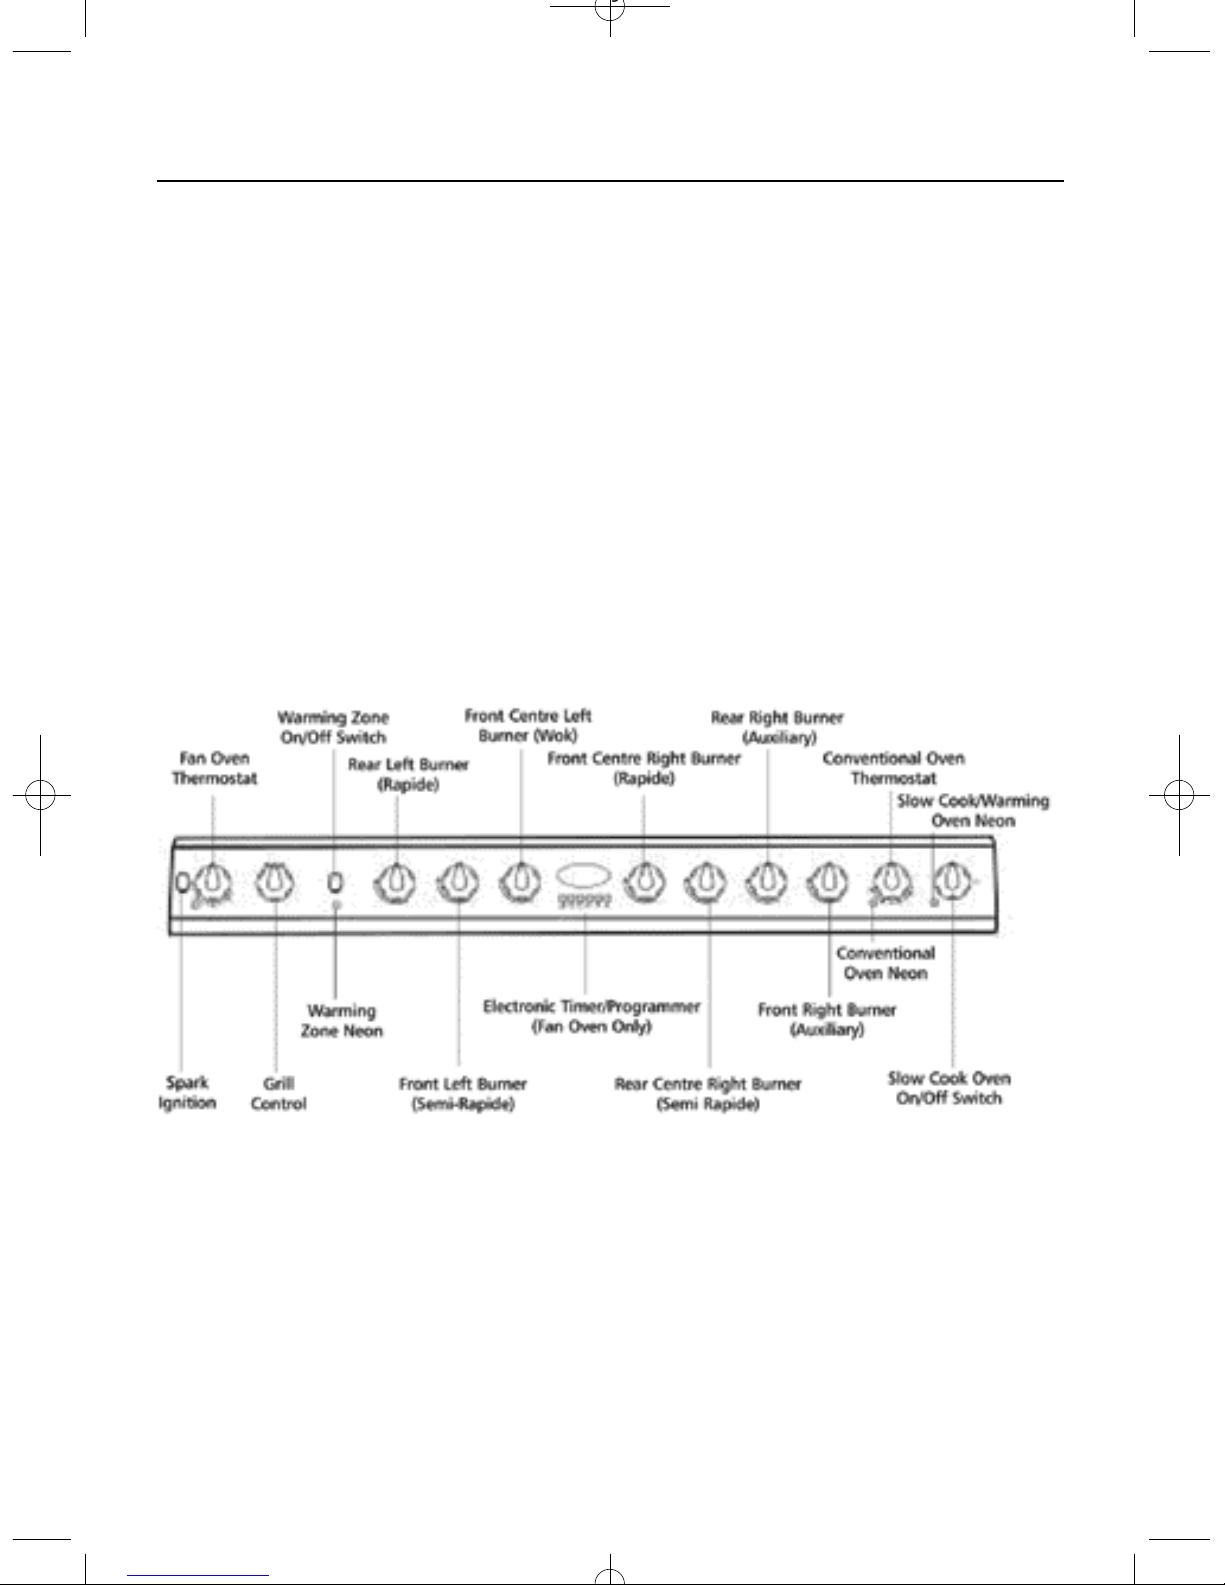
CONTROL PANEL
14
Operating controls when the
grill is in use.
In common with all cookers having
controls sited above the grill compartment, care must be taken when setting
the controls, due to the hot air being
expelled from the grill compartment.
Cooling fan
A gentle flow of air will be blown
below the control panel when the grill
/ oven controls are in use.
Oven light
The oven light will illuminate when the
control panel is operated. The light
will remain on during the cooking period.
Page 17

KNOW YOUR TIMER
15
The oven timer offers you the following
features:
1. Time of day
2. Automatic cooking
3. Minute minder
Automatic cooking
The main fan oven can be controlled
automatically.
Guidance on automatic cooking
l
Select food which will take the same
length of time to cook, and require the
same temperature.
l
Set the oven timer so that food will
have finished cooking, or be about to
finish cooking on your return to the
oven. This will ensure that the food is
hot and will not require re heating.
l
Food should be as cold as possible
when it goes into the oven, ideally
straight from the refrigerator. Frozen
meat and poultry should be thawed
thoroughly before it is put into the
oven.
l
We advise that warm food is never
placed in the oven for automatic cooking. Stews prepared by frying the
meat and vegetables should be
cooked as soon as possible.
l
We advise that dishes containing
left over meat or poultry e.g. Shepards
Pie should not be cooked automatically, if there is a delay period.
l
Stews and joints should be cooked
by the long, slow method, so that the
delay period is kept to a minimum.
l
On warm days, to prevent the
growth of harmful bacteria in certain
foods (i.e. poultry, joints etc.) the delay
period should be kept to a minimum.
l
Wine or beer may ferment and
cream may curdle during the delay
period, so it is best to add these ingredients just before serving.
l
Foods which discolour should be
protected by coating in fat or tossing
in water to which lemon juice has
been added prior to placing in the
oven.
l
Dishes containing liquid should not
be filled too full to prevent boiling
over.
l
Foods should be well sealed (but not
airtight) in a container to prevent the
loss of liquid during cooking.
Aluminium foil gives a good seal.
l
Ensure that the food is cooked
through before serving.
Page 18
ELECTRONIC TIMER OPERATION
16
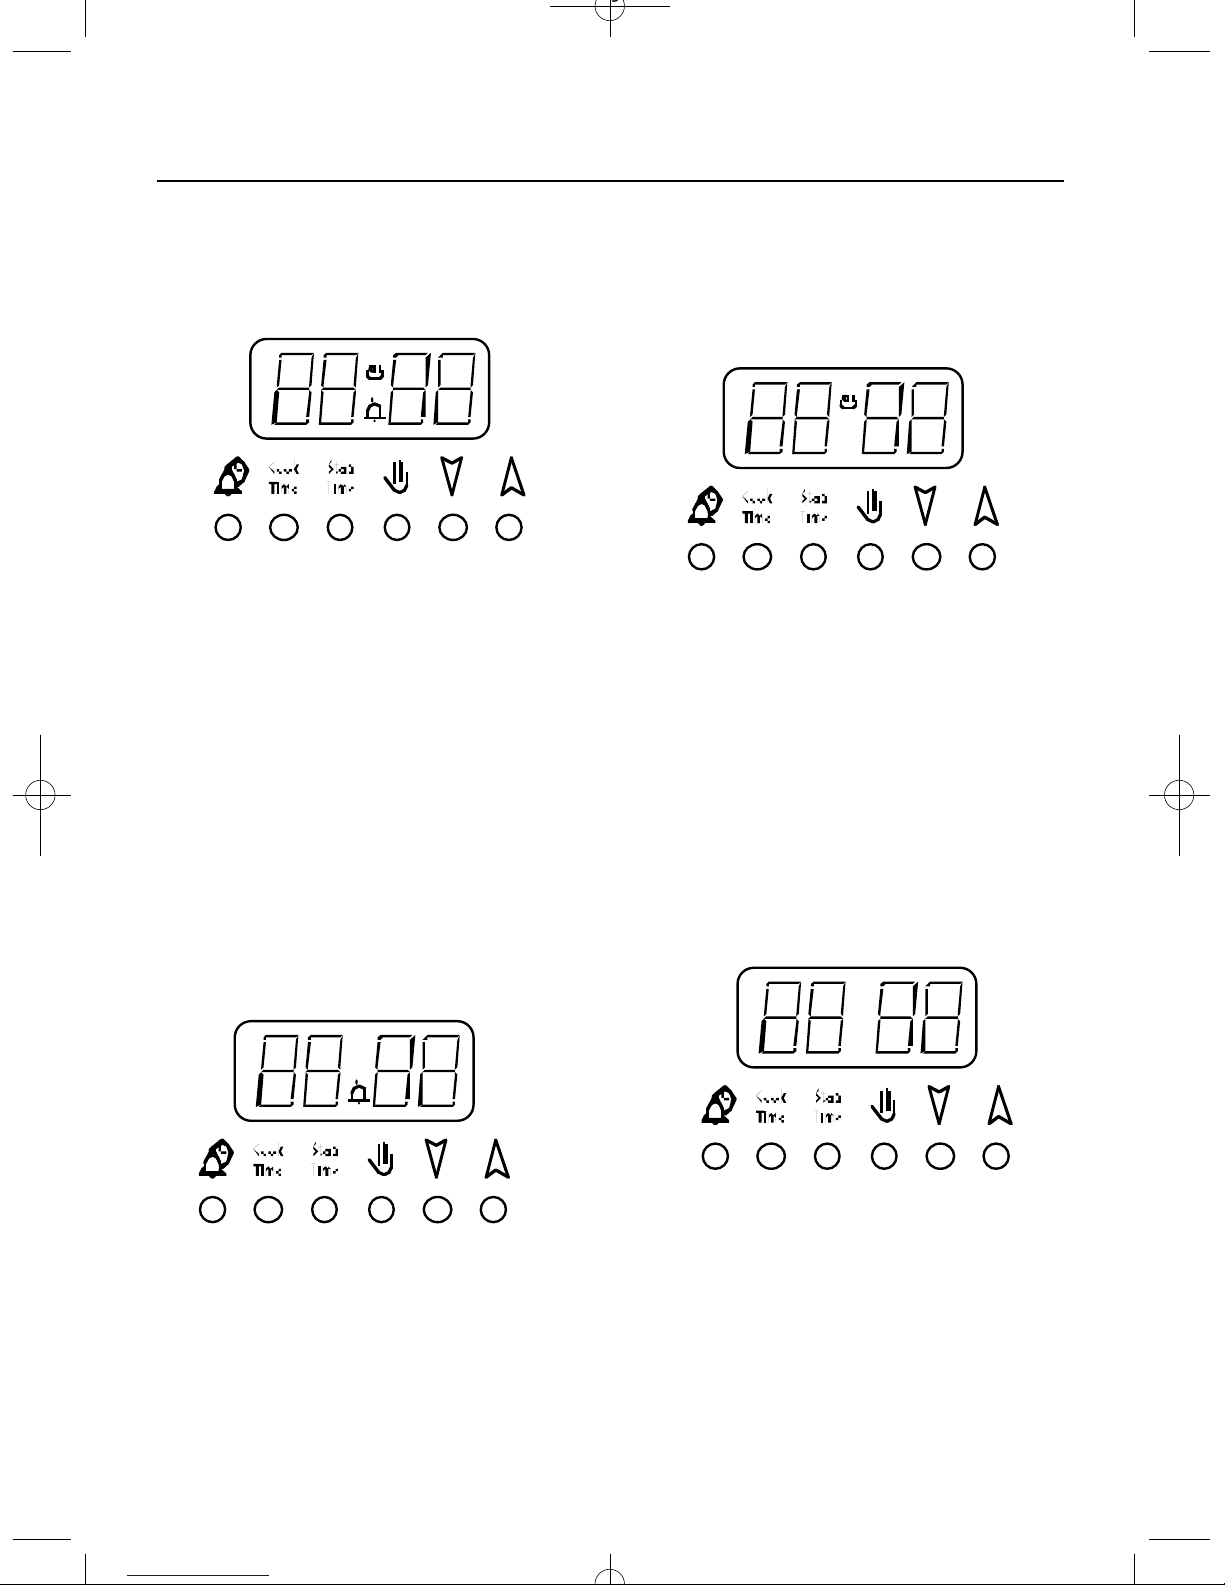
Clockface
The timer incorporates a 24 hour
clock.
Ensure that the clock is set to
the correct time before using
your cooker.
Symbols
A bell symbol will light up when you
select a Minute Minder Period, and
will remain lit for the period set.
At the end of the Minute Minder
Period, the timer will emit an audible
tone and the bell symbol will disappear
The cookpot symbol will light up
either:-
l
When the timer is in manual mode.
l
During the actual Cook Period.
The ‘AUTO’ symbol will light up :-
l
When the timer is first turned on it
will flash. It will go out when a time of
day is set or when the timer is set to
manual.
l
The ‘AUTO’ symbol will flash at the
end of an Auto Cooking programme
to indicate that the programme has finished.
When the ‘AUTO’ symbol is flashing,
to return to the oven to Manual operation, turn all the oven controls off,
ensure the correct time of day is set
and press the ‘MANUAL’ button - the
‘AUTO’ symbol will go out.
A
U
T
O
A
U
T
O
Page 19
ELECTRONIC TIMER OPERATION
17
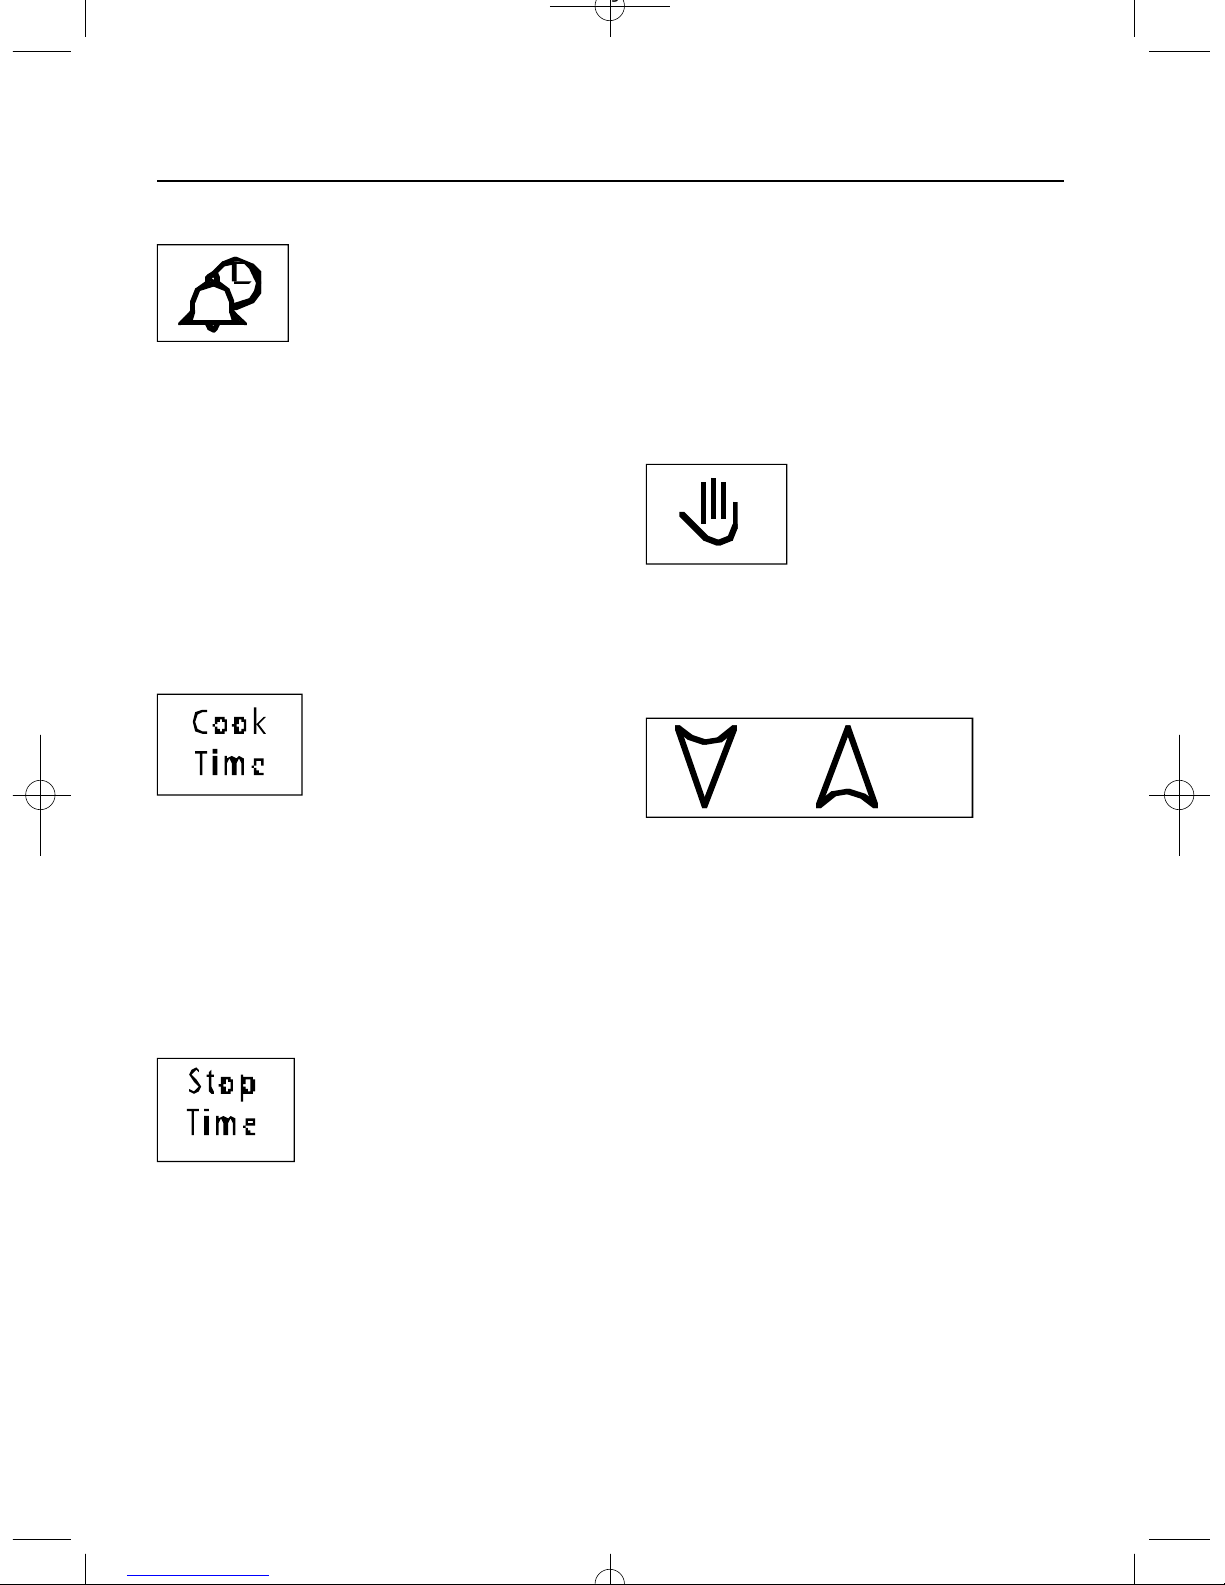
Timer Function Buttons
Minute minder button: Here you
can set a time period of up to 23 hours
and 59 minutes. When the timer
reaches zero, an audible tone will
sound.
Example: If you set 20 minutes, the
tone will sound 20 minutes later.
Auto Cooking Programme.
Cook Period Button: Cook Period
is the actual length of time for which
the timer will switch the ovens on, as
p a r t of the ‘Auto Cooking’ programme.
(e.g. if you set two hours, the food will
be cooked for 2 hours)
End Time Button: The time of day
you would like the Auto Cooking programme to end.
(e.g. If you set a cook period of 2
hours and an end time of 11.00. The
timers will set the oven to come on at
9.00 and turn off at 11.00. You will
hear a tone to signal the end of the
programme.
You will need to set the oven tempera-
ture controls to the required temperature when you set the oven.
The oven will only operate during the
pre selected time when set for automatic - it will not turn on earlier.
Manual Button: Needs to be
pressed to cancel an automatic programme and return the oven to the
manual setting.
Plus and Minus Buttons: These
are used for adding, or reducing time
on the clock. Also for adding or
reducing time to Auto Cooking programmes, and the Minute Minder function.
Page 20
ELECTRONIC TIMER OPERATION
18
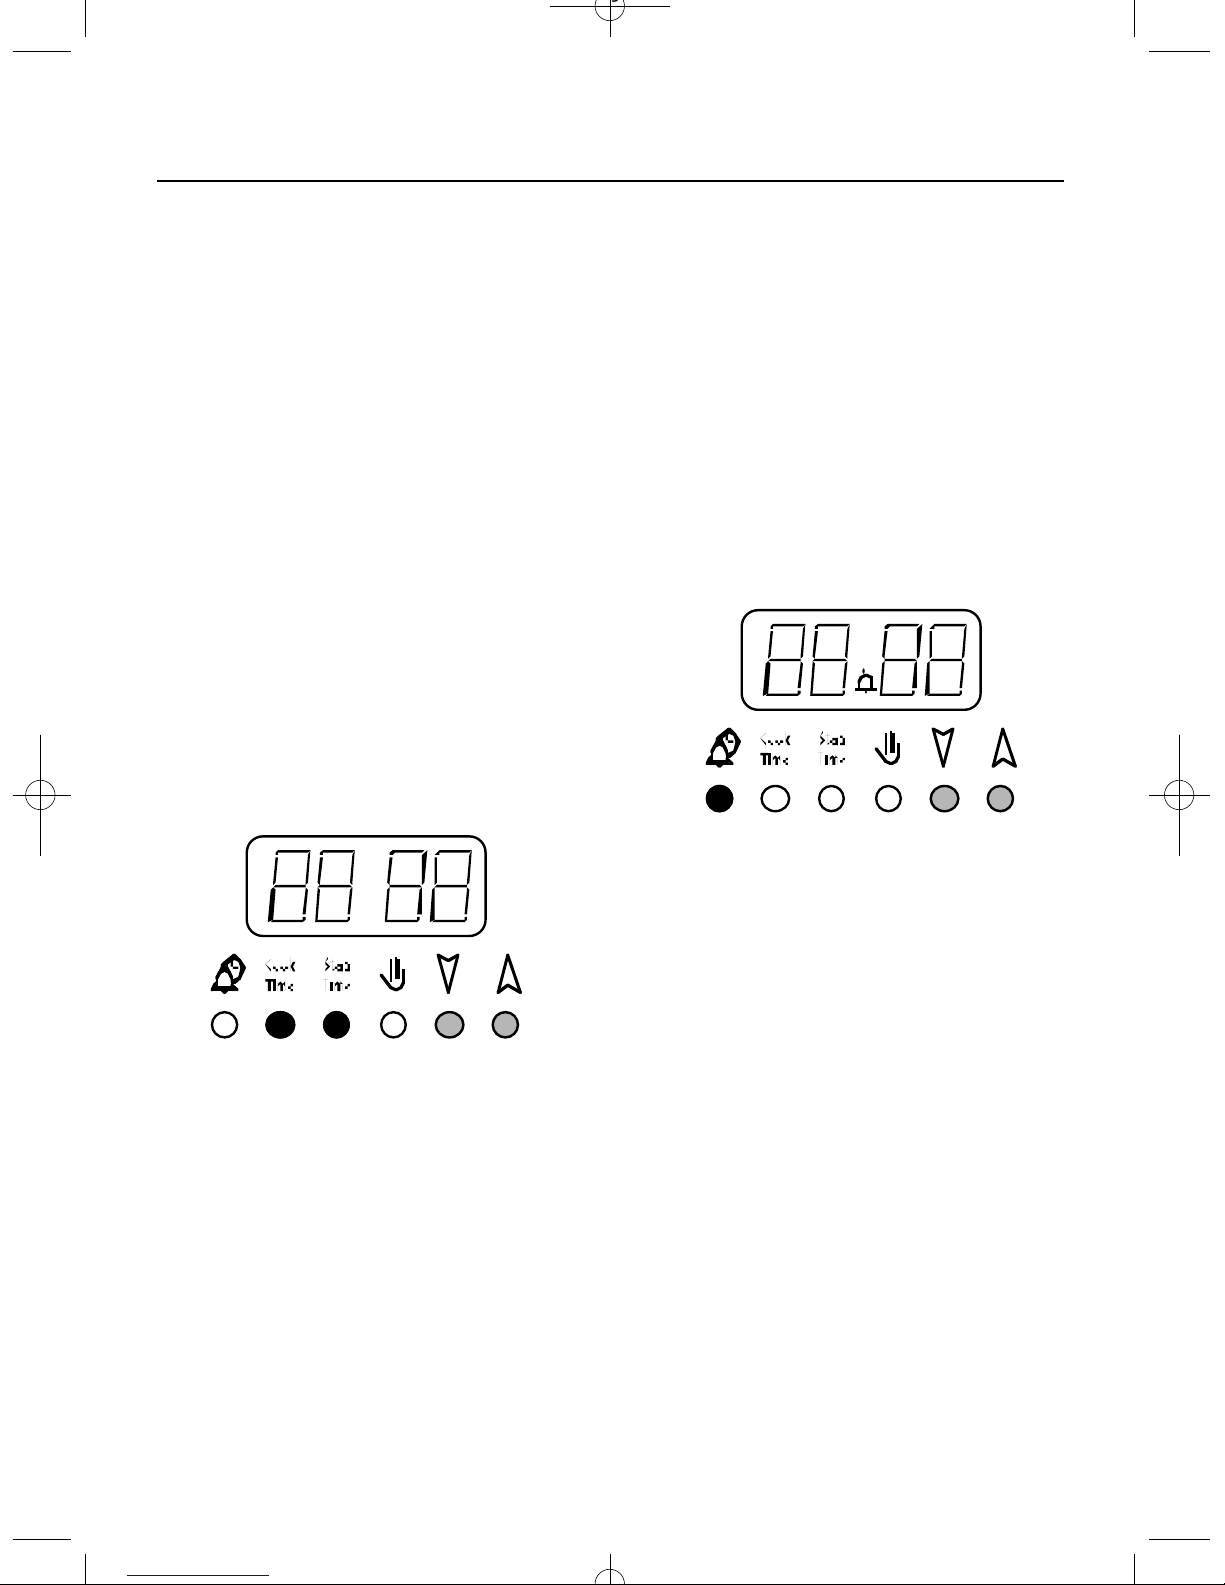
Setting the time of day
Make sure all the oven controls are
turned off.
l
Check the electricity supply to the
cooker is turned of.
l
When switched on the display will
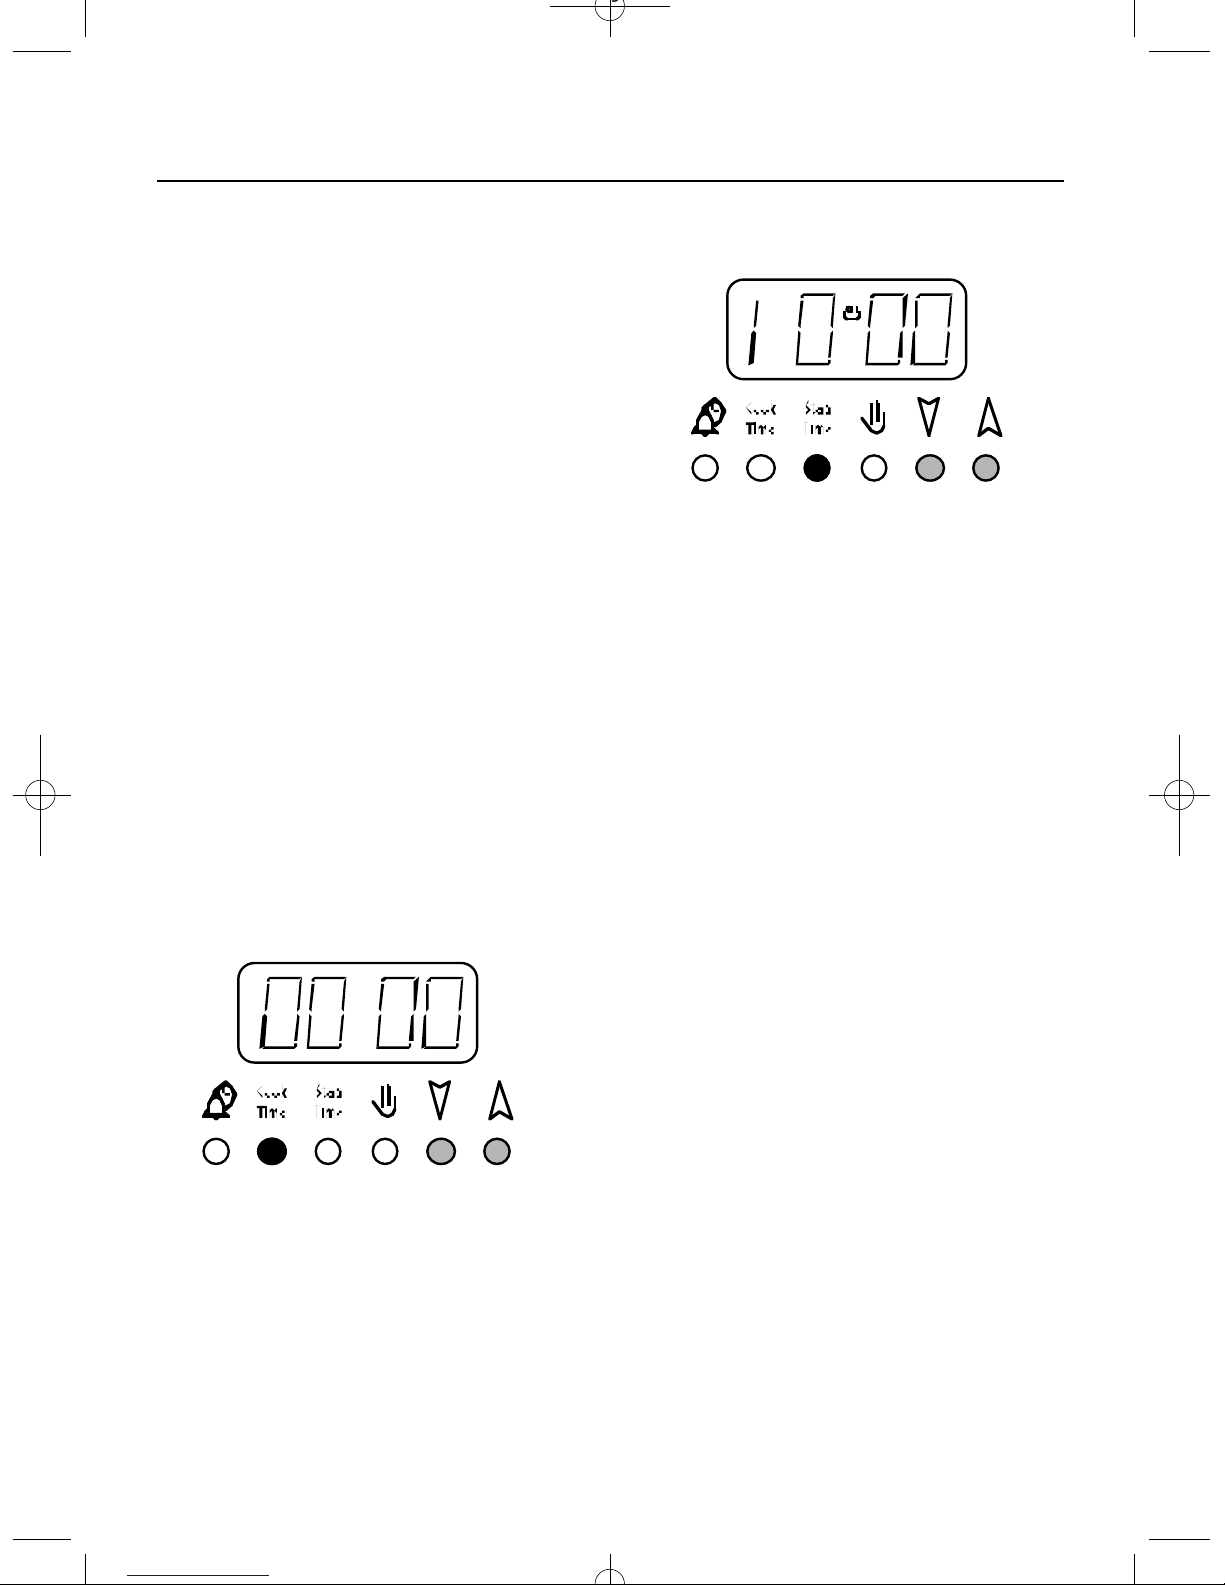
show 00.00 and the ‘AUTO’ symbol
flashing intermittently.
l
Press and hold the Cook Period and
the End Time buttons together. Shown
in black on the diagram below.
l
Use the ‘+’ and ‘-’ buttons to selected the time of day. Shown in grey on
the diagram below.
l
Release all the buttons simultaneous-
ly.
l
The time of day is now set.
To change the time of day repeat steps
4, 5 & 6 above.
Note: You cannot set the time of
day if the oven is set for an
Auto Cooking Programme.
Setting the Minute Minder
l
Ensure the time of day is set correct-
ly.
l
Press and hold the Minute Minder
button. Shown in black on the diagram below.
l
With the Minute Minder button held
in, use the ‘+’ and ‘-’ buttons to set the
required duration. Shown in grey on
the diagram below
l
Release all the buttons and the timer
display will revert back to the time of
day. The bell symbol will remain lit to
signify that a Minute Minder period
has been set.
At the end of the set time an audible
tone will be heard, and the bell symbol will disappear.
To cancel the Minute Minder, and stop
the audible tone press the Minute
Minder button.
Notes:
l
The remaining time can be checked
when the Minute Minder has been set,
by pressing the Minute Minder button.
l
The Minute Minder function can be
cancelled by holding the Minute
Minder button down, and pressing the
‘-’ button until the timer has counted
back to 0.00
A
U
T
O
Page 21
ELECTRONIC TIMER FUNCTION
19
Automatic Cooking
Programmes
There are two automatic cooking programmes that can be selected using
your timer:
l
To set the timer to switch the oven
on and off automatically.
l
To set the timer to switch on imme-
diately and off automatically after a
set Cook Time.
To set the timer to switch the
oven on and off automatically.
This allows you to chose a specific
time for a chosen period before the
oven switches off automatically.
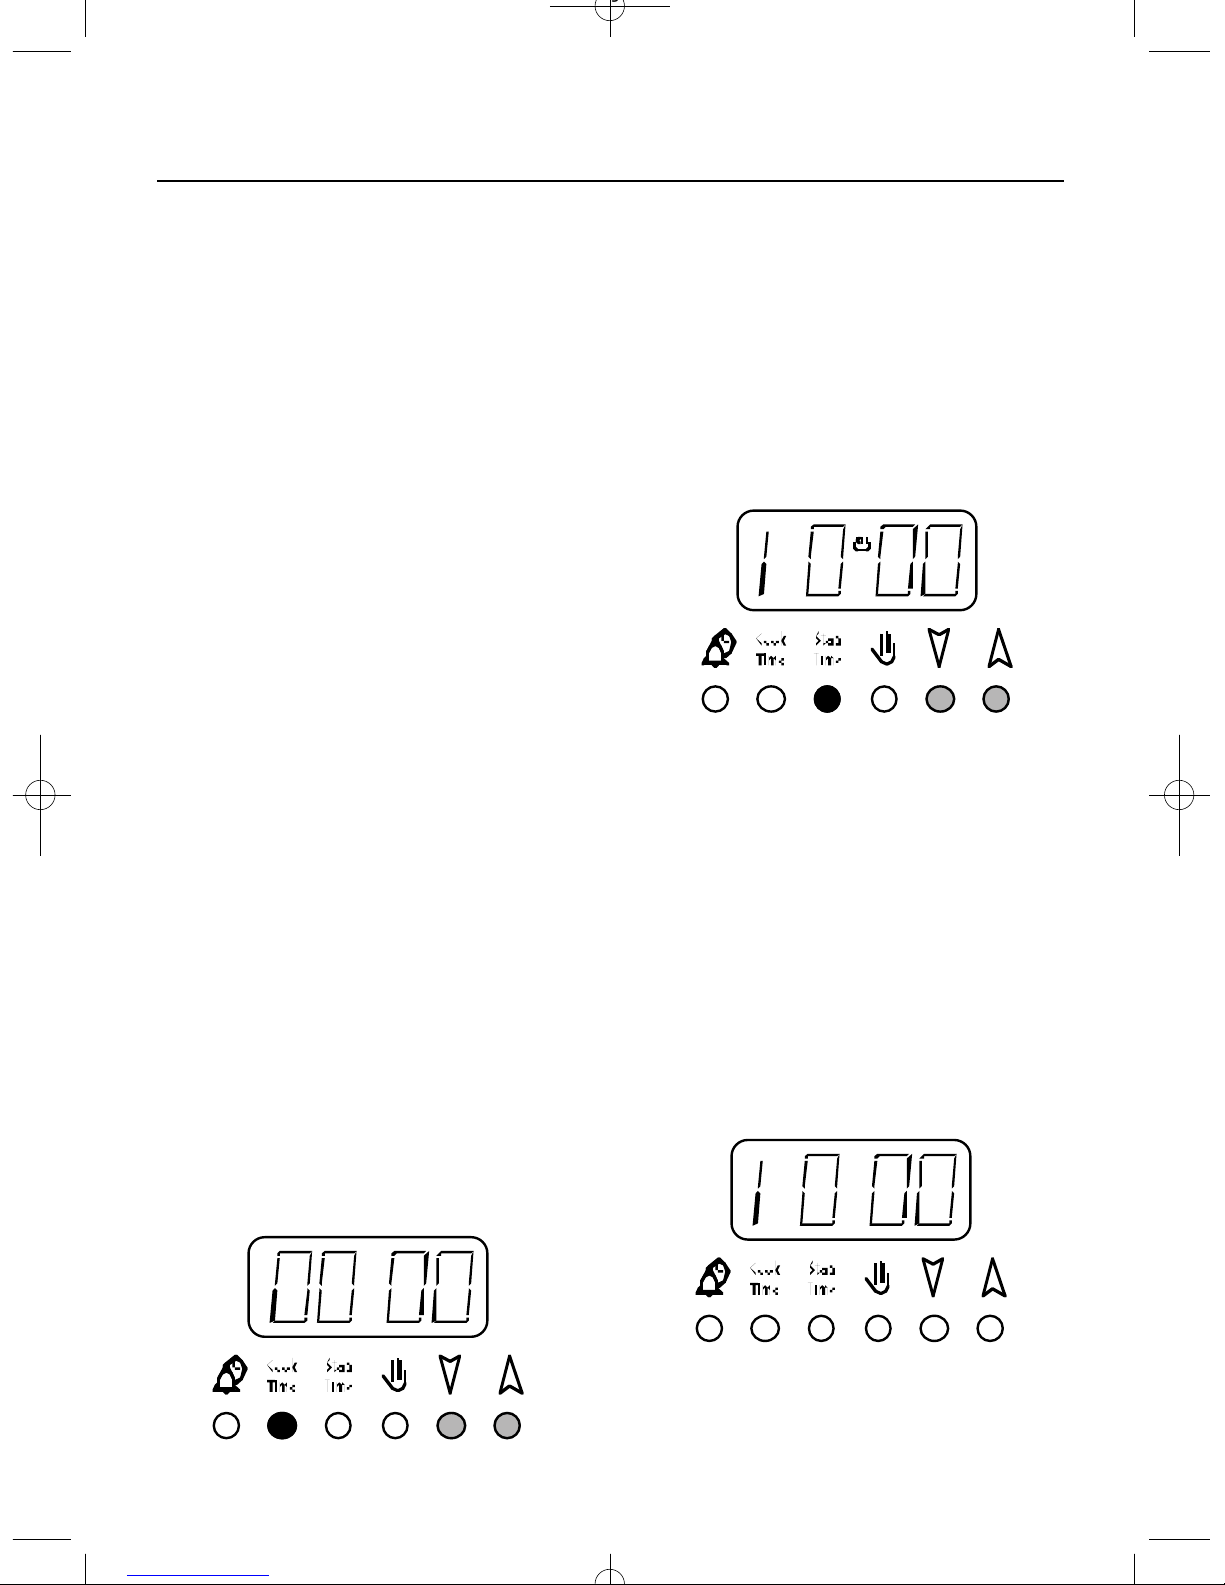
l
Check that the correct time of day is
set. If it is not, please set the clock following the instructions earlier in the
book.
l
Place the food on the correct shelf
position and close the door.
l
Press and hold the Cook Time button, the display will read 0.00 with the
cook pot symbol lit.
l
Still holding in the Cook Time button, set the required cooking period
using the ‘+’ and ‘-’ buttons.
l
Release the buttons and the timer
display will revert to the time of day
with the ‘AUTO’ and cook pot symbols
lit.
l
Press and hold the End Time button.
The display will show the earliest end
time possible for the cook time you
have set. The ‘AUTO’ and cook pot
symbols will be lit.
l
With the End Time button still held
in, use the ‘+’ and ‘-’ buttons to chose
the time you wish the oven to switch
off. This is the ‘End Time’.
l
Release all the timer buttons and the
display will revert back to the time of
day.
l
The ‘AUTO’ symbol will remain lit to
signify that an Auto Cooking
Programme has been set. The cook
pot symbol will go out.
A
U
T
O
A
U
T
O
Page 22

ELECTRONIC TIMER FUNCTION
20
l
Tu r n the oven controls to the
required temperature, and select ant
necessary functions.
l
At the end of the Automatic Cook
Period the ‘AUTO’ symbol will flash
and an intermittent bleeping sound will
be heard.
l
The tone will continue until it is cancelled. The ‘AUTO’ symbol will continue to flash until the timer is returned to
Manual operation.
l
Press the Manual button and the
audible tone will stop, the ovens will
also return to the Manual setting.
When you have finished with
the Automatic Cooking, please
make sure that all the oven
controls are switched to the off
position.
Page 23
ELECTRONIC TIMER OPERATION
21
Automatic Cooking
Programmes.
To set the timer to switch on
immediately and off automatically after a set cook period.
l
Check that the correct time of day is
set.
l
Place the food onto the correct shelf
position in the oven and close the
door.
l
Tu r n the oven controls to the
required temperature, and if necessary select the appropriate function.
l
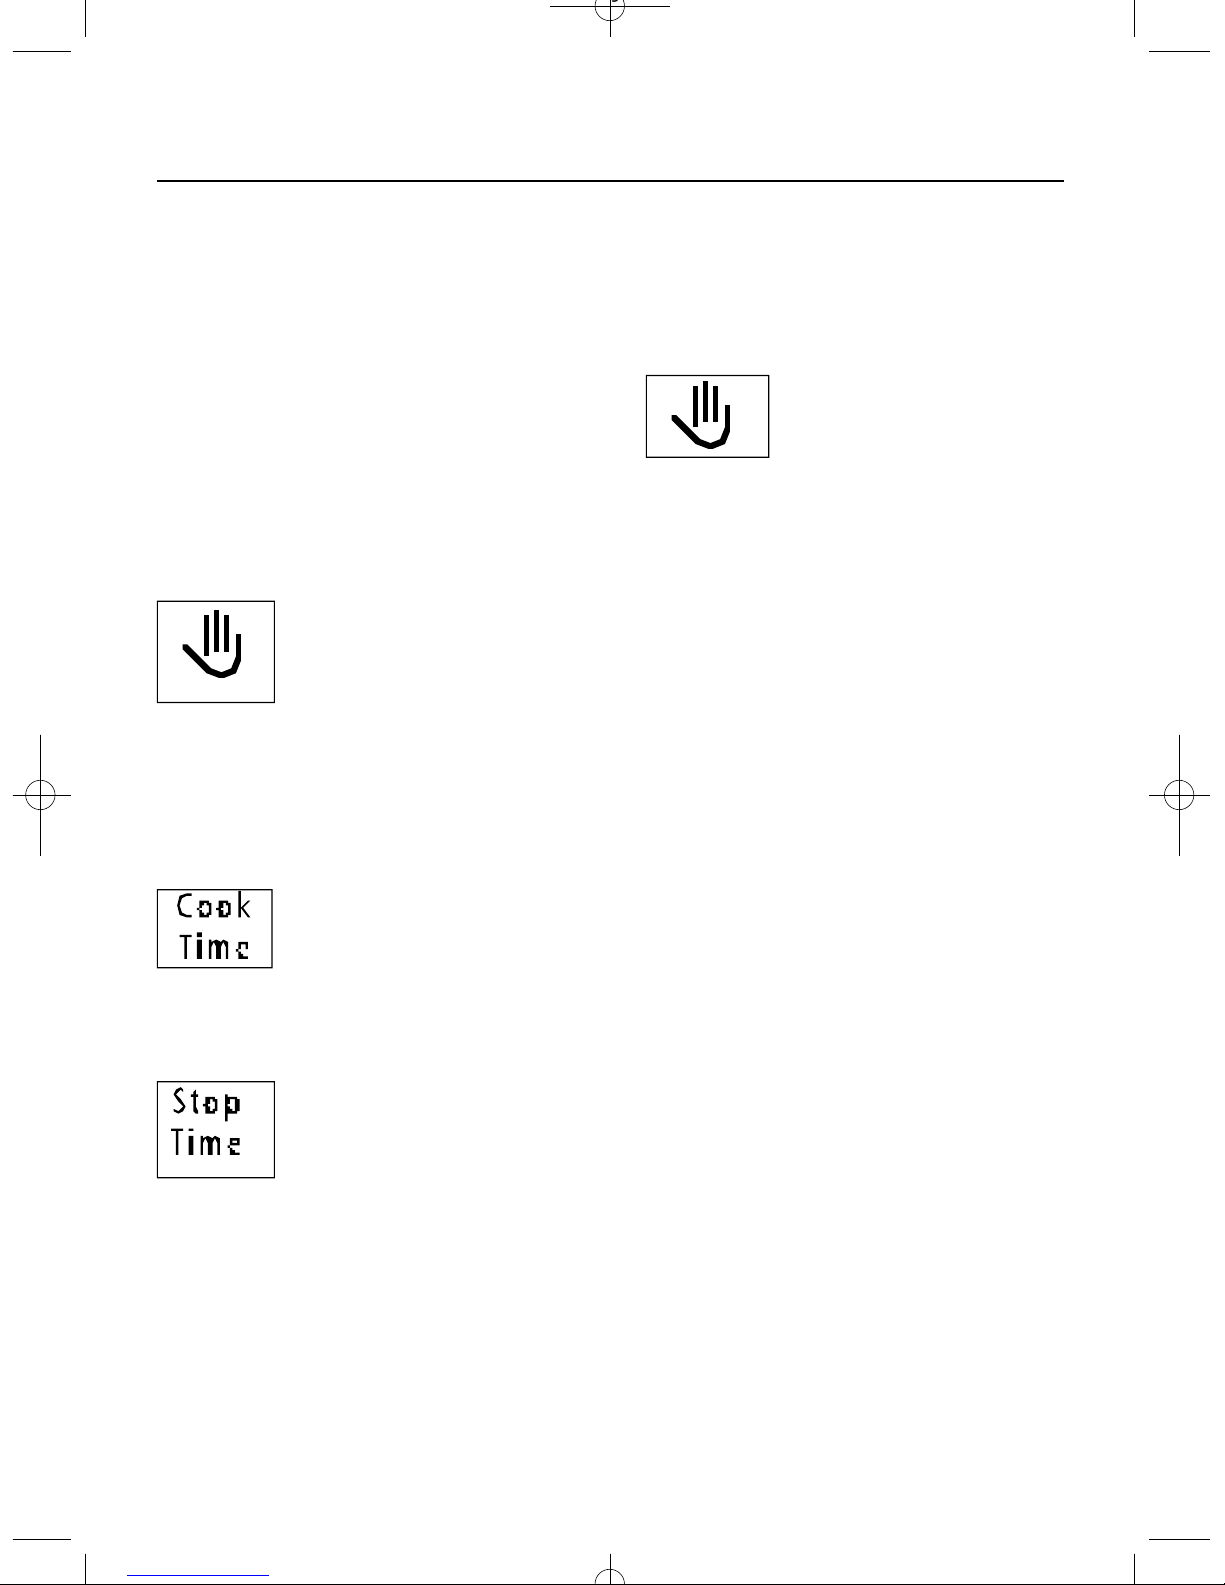
Press and hold the Cook Period button, the display will read 0.00 and the
cook pot symbol will light up.
l
With the Cook Period button held
down set the required Cook Period
using the ‘+’ and ‘-’ buttons.
Please note: the Cook Period is
the length of time the food
requires cooking.
l
Release all buttons.
l
The timer display will revert to the
time of day with the ‘AUTO’ symbol lit
and the cook pot remaining lit.
l
At the end of the Cook Period the
‘AUTO’ symbol will flash and an intermittent audible tone will be heard.
The audible tone will be heard until
cancelled and the ‘AUTO’ symbol will
continue to flash until the timer is
returned to Manual.
l
Press the Manual button to cancel
the tone and re t u r n the oven to
Manual.
When you have finished with
the Automatic Cooking, please
make sure all of the oven controls are switched to the off
position.
Notes:
l
When using either Automatic
Cooking programme, the Cook Period
can be checked at any time by pressing the Cook Period button.
l
The End Time can also be checked
by pressing the End Time button at any
point during the cooking.
A
U
T
O
Page 24
ELECTRONIC TIMER OPERATION
22
Cancelling an Automatic
Cooking programme.
You can cancel the Automatic Cook
Period at any time. You do not have
to let it finish.
To cancel :
l
Turn the oven controls to the off posi-
tion.
l
Press the Manual button to return the
ovens to Manual operation. The
‘AUTO’ symbol will go out.
Notes on timer operation:
l
When cooking automatically, the
Cook Period can be checked at any
time by pressing the Cook Period button.
l
When cooking automatically the
End Time can be checked at any time
by pressing the End Time button.
l
Having set a Cook Period and End
Time an electronic device stores the
information. The device within the
timer will switch the oven on and off at
the required times.
l
If a mistake is made while programming, or you need to change the information you’ve entered, you can clear
the programmer this way:
Press and release the Manual button.
S t a r t re entering the inform a t i o n
again.
Pressing Manual cancels all the
information previously entered.
l
If at any time the display shows
t h r ee zero ’ s flashing (0.00) and
‘AUTO’, it is likely that the power supply has been interrupted. Reset the
timer to the correct time of day. If you
have been cooking, or set an Auto
Cook programme, it may not have
cooked, so please check that any food
is thoroughly heated before serving.
l
To set each function always press
and hold the required function button
and at the same time press the ‘+’ and
‘-’ buttons.
Page 25

HOB
23
Your Hob
The hob lid is fitted with a safety
device which cuts off the gas supply to
the hotplate burners unless the lid is
fully opened and the manual lever to
the right of the hotplate vent is lifted to
the upright position Do not use the
safety device as a means to control the
hotplate burners.
The hob has 1 x ultra rapid wok burner, 2 x rapid burners, 2 x semi-rapid
burners and 2 x auxiliary burners
which will accommodate pans
between 100mm (4”) and 230mm
(9”).
All pans should be placed centrally
over the burners.
To use the hob
Check the electricity supply is switched
on.
l
Push in and turn the control knob of
your chosen burner anti-clockwise to
the large flame symbol.
l
Turn the knob anti-clockwise to the
desired setting. Only turn the knob
between the large flame symbol and
the small flame symbol for adjusting
the setting.
l
To turn off, turn the control knob fully
clockwise.
Do not use mis shapen pans which
may be unstable.
Do not use round base woks directly
on the pan supports.
Do not use the glass lid as a work sur-
face.
Safety for deep fat frying
6
Never fill chip pans more than one
third full of fat or oil.
6
Never leave fat or oil unattended
during the heating or cooling period.
6
Never heat or fry with the lid on.
4
Always dry food thoroughly before
frying and lower it slowly into the hot
oil or fat. Frozen foods in particular
cause frothing and spitting if added
too quickly.
4
Always keep the outside of the pan
clean and free from streaks of oil and
fat.
How to deal with a fat fire
l
Do not move the pan.
l
Turn off the hotplate burners.
l
Smother the flames with a fire blanket or damp cloth. Do not use water
or a fire extinguisher as the force of it
may spread the burning fat or oil over
the edge of the pan.
l
Leave the pan for at least 60 minutes before moving it.
Re-lighting the burner
In the event of the burner flames being
extinguished accidentally, turn off the
burner control and do not attempt to re
ignite the burner for at least one
minute.
If the surface of the glass warming
area becomes cracked, switch off the
cooker to avoid electric shocks. Call
for a engineer and do not use.
Page 26

GRIDDLE
24
Important Note
The griddle must only be used over the
two simmer/auxiliary burners.
A non stick griddle is supplied for use
over the two simmer/auxiliary burners
on the right hand side of the hob. The
griddle must be positioned on the top
of the pan support, with the legs on the
underside engaged on the pan support fingers.
The griddle must not be placed
directly on top of the simmer burners.
To protect the non stick coating never
use metal cooking utensils as they may
scratch. Wooden or heat resistant
plastic utensils may be used. Under
no circumstances must the griddle be
used over any other hot plate.
The griddle may be used with either or
both of the simmer burners on,
depending on the food being cooked.
The griddle can be positioned with the
ridged portion at the front or at the
rear.
Use of the griddle
l
Position the griddle at the top of the
pan support, with the locating legs on
the underside engaged on the pan
s u p p o r t fingers, above the simmer
burners.
l
Push in and turn the control knob(s)
anti-clockwise to the large flame symbol. Press the ignition button until the
burner(s) light.
l
The controls should then be set at
the small flame setting as a gentle heat
is all that is required for griddling.
l
Cook the food for the required,
which will depend on the food being
cooked.
l
To turn off, turn the control knob(s)
fully clockwise to the position ‘O’.
l
Do not remove the griddle from the
cooker whilst hot.
l
Allow the griddle to cool before
removing and cleaning.
l
Clean the griddle with warm soapy
water.
Do not put into a dishwasher.
Caution:
Do not refit the griddle plate to the hob
if the glass lid is to be lowered.
Page 27

WARMING ZONE
25
To the rear of the wok burner is a
warming zone which can be used for
a wide range of non cooking tasks
associated with the preparation of
meals. It provides a gentle heat surface and can achieve a surface temperature of 120˙C and is specially
designed for keeping coffee hot as
well as gravy, custard and other
sauces. The warming zone warning
neon illuminates on the control panel if
the warming zone control is operated.
To warm plates on the warming zone,
simply place your plates on the warming zone and turn the control knob to
the on position.
Page 28
APPROXIMATE OVEN TEMPERATURES
26
GAS MARK CONVENTIONAL OVEN FAN OVEN
(It is not always necessary
to pre heat oven)
˙F ˙C ˙C
1/2 250 120 100
1 275 140 120
2 300 150 130
3 325 160 140
4 350 180 160
5 375 190 170
6 400 200 180
7 425 220 200
8 450 230 210
9 475 240 220
Page 29

GRILLING
27
NEVER allow your children near
the appliance when the grill is
in use as the surfaces get
extremely hot.
Grilling should never be undertaken with the grill door closed.
Do not line the grill pan with
aluminium foil.
The grill control is designed to provide
to provide variable heat control on
either left and right grill elements
together or left hand element only,
depending on which direction the control knob is rotated. With the control
knob rotated clockwise both elements
will come on together, and with the the
knob rotated anti-clockwise only the
left hand element will come on.
Using the grill.
l
Open the grill door.
l
Preheat the grill at setting 5 for
approximately 5 minutes.
l
When toasting/grilling the grill pan
is placed either in the upper or lower
runner and pushed back until it locates
in the stop. This will correctly position
the pan under the grill element.
l
Leave the control at 5 for toast, and
for sealing and fast cooking foods.
l
For thicker foods requiring longer
cooking, turn the switch to a lower set-
ting after the initial sealing on both
sides at 5. The thicker the food the
lower the setting should be set.
After use, always re t u r n
controls to their off position.
Note:
Utensils stored in the grill compartment
will get hot when the fan oven is in
use. Care should be taken when
removing them.
Page 30

FAN OVEN COOKERY NOTES
28
Oven thermostat
When operated the oven neon will
immediately come on, and will go out
when the desired temperature is
reached, subsequently switching on
and off to maintain the temperature.
The fan will operate continuously while
the oven is switched on.
Note: if the neon does not come on
when the control is turned, check that
the timer is in manual operation.
Since a fan oven heats up more quickly, and generally cooks food at a
lower temperature than a conventional
oven, preheating the oven is often
unnecessary. However foods such as
bread, scone and Yorkshire pudding
do benefit from being placed in a preheated oven.
The charts are a guide only, giving
a p p r oximate cooking temperature s
and times. To suit personal tastes and
requirements it may be necessary to
increase or decrease the temperatures
by 10˙C. Because the fan oven cooks
so eff i c i e n t l y, we recommend that
when cooking recipes not designed
for a fan oven, you reduce the temperature by about 25˙C and the time by
about 10 minutes in the hour. If large
quantities are being cooked it will be
necessary to increase the cooking time
to compensate for the extra oven load.
Unless otherwise indicated the food
should be placed into a cold oven i.e.
without preheating. If the oven is
already hot, the suggested cooking
time should be reduced depending on
the quantity and and type of food
being cooked.
It should be noted that at the end of a
cooking period there may be a
momentary puff of steam when the
door is opened, this will disperse in a
few seconds and is a perfectly normal
characteristic of an oven with a good
seal.
Oven positions
Since the distribution of heat in a fan
oven is fairly even, most foods will
cook satisfactorily on any shelf position, but the shelves should be even;y
spaced :
To ensure even circulation do not use
meat tins which are larger than 390 x
300mm (15” x 12”) and baking trays
no larger than 330 x 255mm (13” x
10”), these should be positioned centrally on the oven shelf.
Do not fit shelves upside down.
Never use more than three shelves in
the oven as air circulation will be
restricted.
Food or cooking utensils should not be
placed on the floor of the oven.
To avoid unnecessary cleaning, rod
shelves which are not in use should be
removed from the oven.
Page 31

FAN OVEN COOKERY NOTES
29
Temperature and Time
When all three shelves are used to
cook large quantities of food for home
freezing or parties, it may be necessary to increase the cooking times
given in the charts, by a few minutes,
to allow for the loss of heat due to the
extra time taken to load the oven and
the larger mass of food. Baking trays
should allow an equal gap on all sides
of the oven.
Preparing meat and poultry for
roasting.
l
Wipe the meat or poultry, dry well
and weigh it. Meat which has been
s t o red in a refrigerator should be
allowed to come to room temperature
before cooking, and frozen meat or
poultry should be completely defrosted
before placing in the oven.
l
The weight of any stuffing should be
added to before calculating the cooking time.
l
Place the meat/poultry in the main
oven meat tin supplied with your cooker. Smaller joints weighing less than
1.75kg (3
1/2
lbs) should be roasted in
a smaller roasting tin/pan - or they
may be pot roasted - a small joint in a
large pan causes unnecessary oven
splashing and evaporation of meat
juices.
l
Additional fat should not be added,
except for veal, very lean meat or
poultry which can be either ‘larded’
with fat bacon or brushed very spar-
ingly with cooking oil or melted fat.
l
Beef, lamb, mutton and poultry may
be dusted lightly with seasoned flour
to give a crisp outer surface. The skin
of duck and goose should be pricked
to released excess fat during cooking
and the rind of pork should be scored,
brushed lightly with oil and rubbed
with salt to give crisp crackling.
l
Meat and poultry wrapped in, or
covered with a tent of aluminium foil
will be juicy and tender. Roasting
bags offer the same advantages.
Always follow the manufacture r s
instructions, and remember to reduce
the temperature by 25˙C and the cooking time by 10 minutes per hour.
l
Potatoes for roasting only require
lightly brushing with melted fat or
cooking oil.
l
It is not necessary to baste when
roasting in an electric oven, and stock
or liquid should not be added to the
meat pan since this only causes unnecessary soiling, steam and condensation.
Frozen meat and poultry
Joints of meat and whole birds should
be defrosted slowly, preferably in a
domestic refrigerator (5-6 hrs per
450g) or at room temperature (2-3 hrs
per 450g). Frozen meat must be completely defrosted before placing in the
oven. It is essential to wash thoroughly and cook meat immediately after
defrosting.
Page 32
FAN OVEN TEMPERATURE CHART - BAKING
30
Food Pre-heat Temperature ˙C Time
(approx)
scone Yes 210 - 220 9 - 12 min
Small cakes Yes 170 -180 15 - 20 min
Victoria sandwich Yes 160 - 170 20 - 25 min
Sponge sandwich
(fatless)
Yes 170 - 190 15 - 20 min
Swiss roll Yes 180 - 200 12 - 15 min
Semi-rich fruit cakes Yes 140 - 150 1
1/4
- 1
1/2
hrs
Rich fruit cakes Yes 130 - 140 Depends on size
Shortcrust pastry Yes 190 - 200 Depends on size
Puff pastry Yes 190 - 200 Depends on size
Yorkshire pudding Yes 180 - 190 40 - 50 min
Individual Yorkshire
puddings
Yes 190 - 200 20 - 25 mins
Milk pudding Yes 130 - 140 1
1/2
- 2 hrs
Bread11/2 - 2 hrs Yes 200 - 210 35 - 45 mins
Meringues Yes 70 - 90 3 - 4 hrs
Temperatures recommended in this chart for cakes refer to cakes made with block margarine or butter. For soft tub use the all-in-one method and reduce the temperature by 10˙C
Page 33
FAN OVEN TEMPERATURE CHART - MEAT
31
Meat Pre-heat Temperature ˙C Time
Beef No 160 - 180 20 - 25 mins per
450g + 20 mins
Lamb No 160 - 180 20- 30 mins per 450g
+25 mins
Pork No 160 - 180 25 - 30 mins per
450g + 25 mins
Veal No 160 - 170 25 - 30 mins per
450g + 25 mins
Chicken/Turkey - to
4kg
No 160 - 180 19 - 20 mins per
450g + 20 mins
Turkey 4 - 5.5 kg No 150 - 160 or
150
12 - 14 mins per
450g + 12 mins.
For every 450g over
5.5kg allow 10 mins
per 450g and roast at
150˙C
Casserole, stews No 140 - 150
1
1/2
- 2 hrs
If using aluminium foil, never:
l
Allow the foil to touch the sides of the
oven.
l
Cover the oven interior with foil.
l
Cover the shelves with foil.
The most accurate way of testing the
readiness of joints of meat or whole poultry is to insert a thermometer into the thickest part of the joint, or thigh if poultry during the cooking period.
Beef: Rare 60˙C
Medium 70˙C
Well done 75˙C
Lamb: 80˙C
Pork: 90˙C
Veal: 75˙C
Poultry: 90˙C
Page 34

CONVENTIONAL OVEN COOKERY NOTES
32
The charts are a guide only, giving
a p p r oximate cooking temperature s
and times. To suit personal taste and
requirements, it may be necessary to
increase or decrease temperatures by
10˙C
The oven is fitted with ‘Cookclean’ liners and two rod shelves. The oven is
heated by two tubular sheathed elements located behind re m o v a b l e
sides. The heating of the oven is
achieved by turning the control knob
clockwise to the required temperature
as recommended in the temperature
charts. The oven neon will immediately and will automatically go off and on
during cooking as the oven thermostat
maintains the correct temperature.
It should be noted that at the end of the
cooking period there may be a
momentary puff of steam when the
oven door is opened. This will disperse in a few seconds and is a perfectly normal characteristic of an oven
with a good door seal.
Preparing meat and poultry for
roasting.
l
Wipe the joint, dry well with a clean
cloth, kitchen tissue etc., and weigh it.
Meat which has been stored in a
refrigerator , should be allowed to
come to room temperature for approximately 30 minutes, and similarly
meat stored in a freezer should be
allowed the defrost thoroughly. Beef,
lamb and mutton may be lightly
floured, but pork should have the rind
scored, brushed over lightly with olive
oil, and sprinkled with salt - this gives
crisp crackling.
l
Place the joint in a meat pan (small
joints weighing less than 1.5kg should
be roasted in a small pan/meat tin, or
they may be pot roasted - a small joint
in a large pan causes unnecessary
splashing) Additional fat should not be
used, except for veal, very lean meat,
poultry which can either be ‘larded’
with fat bacon or brushed over very
sparingly with melted fat/cooking oil.
l
When potatoes are to be roasted
around a joint, they only require lightly coating in oil or melted fat. It is not
necessary to baste, when roasting in
an electric oven, and liquid and stock
should not be added to the meat pan.
For optimum cooking perf o rm a n c e ,
there must be clearance between the
meat pan and the oven sides. The
oven pan must be placed length ways
in the oven to allow circulation.
Page 35

CONVENTIONAL OVEN COOKERY NOTES
33
Times and temperatures for
roasting
The secret of succulent, tender meat is
not to roast it too quickly at too high a
temperature. Best results are obtained
when roasting is carried out at a low
temperature. When a lower temperature is used, the joint loses less weight
and is more tender (too high a temperature causes meat to be dry and
tough), the splashing of fat is also
reduced to a minimum. When a complete meal is being cooked in the
oven, cooking time may need to be
increased, and the temperature may
need to be raised for the last 30 minutes or so. (i.e. when cooking
Yorkshire Puddings to be served with a
roast beef).
The suggested times and temperatures
given below should be used as a
guide, but may vary according to:-
l
Whether you prefer meat well done,
rare or medium.
l
The size and shape of your joint:
i
A short thick joint takes longer to
cook than a long thin joint.
i
A small joint under 1.5kg takes
longer per 450g to cook in the time
given for ‘minutes’ per 450g, this is
without the extra minutes added at the
end.
i
Boned, rolled and stuffed joints take
longer to cook through than those with
a bone. The weight of the stuffing
should be added to the oven ready
weight of meat/poultry to calculate the
roasting time.
Page 36
CONVENTIONAL OVEN TEMPERATURE CHART
34
Food Pre-heat Temperature (˙C)
and approx time
Position in
oven
Beef Yes 190/200 - 25 - 30 mins per
450g + 25 mins
In a meat pan
on runner 2
from the bottom
of the oven
Lamb/Mutton Yes 190/200 - 25 - 30 mins per
450g + 25 mins
Pork Yes 190/200 - 30 - 35 mins per
450g + 30 mins
Veal Yes 190/200 - 25 - 35 mins per
450g + 30 mins
Poultry/Game/
Turkey
Yes 190/200 - 20 - 25 mins per
450g + 20 mins
up to 5.5kg allow 22mins per
450g @ 190
over 5.5kg allow 16 mins per
450g @ 180.
Casserole Cooking Yes 140/160 according to quantity Centre of the
oven floor
If using aluminium foil, never:
l
Allow the foil to touch the sides of the
oven.
l
Cover the oven interior with foil.
l
Cover the shelves with foil.
l
Remember to increase the cooking time
by one third.
Page 37
CONVENTIONAL OVEN TEMPERATURE CHART
35
Food Pre-heat Temperature (˙C)
and approx time
Position in
oven
scone & small cakes
Yes
220/230 - 9 - 12 mins
190/200 - 20 - 25 mins
Runners 1 & 4 from
bottom of oven
Victoria
sandwich
Yes
180/190
6
1/2
= 7” tins 20 mins
8 - 8
1/2
” tins 30 mins
Runners 1 & 4 from
bottom of oven
Sponge sandwich
(fatless)
Yes
190/200 7” tins 15 - 20 mins Runner 1 & 4 from
bottom of oven
Semi-rich fruit cake
Yes
170/180 - 6
1/2
- 7” tins 1
1/4
- 1
1/2
hrs.
8 - 9” tins 2-2
1/2
hrs
Runner 3 from
bottom of oven
Christmas cake
Yes
140/150 - depending on the
richness of the mixture & size
Runner 3 from
bottom of oven
Shortcrust pastry
Puff pastry
Yes
210/220 - 40 - 45 mins
220 (for puff pastry)
Runner 2 & 5 from
bottom of oven
Yorkshire puddings
Individual Yorkshire
pudding
Yes
210/220 - 40 - 45 mins
210/220 - 20 mins
Runner 5 from
bottom of oven
Milk pudding
Baked egg custards
Yes
150/160 - 2- 2
1/2
hrs
150/160 - 40 - 50 mins
Runner 2 from
bottom of oven
Bread (full oven)
Bread (single loaf)
Yes
230 - 50 - 60 mins
230 - 45 - 50 mins
reduce to 210 after 10 mins
Runners 1 & 4 from
bottom of oven
Meringues
Yes
100/110 large - 3
1/2
- 4
1/2
hrs
small 2
1/2
- 3 hrs
Runner 1 from
bottom of oven
Page 38

CONVENTIONAL OVEN TEMPERATURE CHART
36
Please note:
When using two shelf positions at the
same time (e.g. to bake two plate
tarts, full oven of bread etc.) tins
should be interchanged half way
through the cooking period. When
baking two trays of scone, small
cakes, at the same time, the lower tray
may require to be baked for a few
minutes longer than the top tray. If soft
tub margarine is used for cake making, temperature recommended by the
m a n u f a c t u r er should be followed.
Temperatures for baking in this book
are for cakes baked with block butter
or margarine.
Page 39

SLOW COOK / WARMING ZONE
37
Using the slow cook/warming
oven
The lower right hand electric oven provides a gentle heat suitable for warming food, warming plates or slow
cooking. It must be preheated if it is to
be used for keeping food warm.
Keeping food warm
Turn the control clockwise to the on
position and allow to preheat for 20
minutes before placing food in the
oven. If food is to be kept moist then
it is important to cover the dishes and
plates to prevent them from drying out.
This can be done using aluminium foil
if the dish doesn’t have a lid. Do not
use cling film as it cannot withstand
the heat in the oven. Some foods are
best left uncovered if you wish to maintain their crispness. Do not add gravy
to plated meals until serving. Carved
meat should be placed on one plate
and covered, adding just a teaspoon
of gravy for moistness. When keeping plated meals warm it is recommended that the food is placed on hot,
rather than cold plates.
Slow cooking
Slow cooking has always been the
best way to prepare a hot meal with
minimum preparation and maximum
time away from the kitchen. Simply
turn the slow cooker control clockwise
to the on position. The neon will illu-
minate and preheat for 20 minutes.
Always put the prepared cooking pot
centrally on the base of the oven.
Warming plates
The slow cook / warming oven can
also be used for warming plates.
Place the plates on the base of the
oven.
China plates and serving dishes
should be placed in the oven before it
is switched on, otherwise the sudden
change in temperature may result in
damage.
Page 40

SLOW COOKING GUIDELINES
38
For best results with Slow cooking:
l
Cooking time will depend on size
and shape of meat or poultry.
l
The maximum capacity of the dish
should be no more than 2.5 litres (4.5
pints). The fuller a dish is - the longer
it will take to cook.
l
Always bring soups, casserole and
liquids to the boil before putting in the
oven and for best results and to give
more colour to meat and poultry, fry
the meat to brown and add to hot
stock.
l
All meat recipes need a minimum of
5 hours to cook.
l
Make sure that all frozen ingredients are well thawed out. Always
ensure that frozen poultry has thawed
completely and all ice crystals have
melted.
l
Cut root vegetables into smaller
pieces as they take longer to cook
than meat. If possible they should be
sauteed for 2-3 minutes before slow
cooking.
l
Ensure that root vegetables are
placed at the bottom of the pan and
immersed in the cooking liquid.
l
A meat thermometer should be used
to when cooking pork joints and poultry. The internal temperature should
reach at least 88˙C.
l
Stuffed meat or stuffed poultry are
unsuitable for slow cooking.
l
Cover casserole with foil or a lid to
prevent loss of moisture.
l
Adjust seasoning and thickening
ingredients at the end of the cooking
time.
l
Egg and fish dishes need only 1-5
hours cooking and should be included
in day cooking sessions when they can
be observed from time to time.
l
Dried red kidney beans must be
boiled for a minimum of 10 minutes
before being included in any dishes.
Page 41

CARE AND CLEANING
39
In the interests of both safety and
hygiene, your Belling Cookcenter
needs to be kept clean. A build up of
grease and fat from cooking could
cause a fire hazard.
Warning! For your own safety
always switch off your cooker
at the mains switch and allow
to cool before cleaning.
Never use excessive amounts of water
to clean your cooker, and remember
that your cooker is heavy. Take care
when pulling it out for access.
Clean the cooker regularly and wipe
spills soon after they occur to prevent
them from becoming dried on. Never
use biological washing powder, caustic cleaners, harsh abrasive, scouring
pads, aerosol cleaners or oven chemical cleaners of any kind. Do not use a
steam cleaner.
To move the cooker forward, open the
door and with both hands positioned
under the roof of the compartment, lift
and pull forward. Replace by pushing
the cooker backwards. Check that the
cooker is level. Take care to ensure
that the floor covering is not damaged.
Replacing an oven light
Disconnect the appliance from the
electricity supply before replacing a
lamp to avoid the possibility of electric
shock.
Open the oven door and remove the
rod shelves.
Use a thick cloth to grip the light glass
dome, unscrew anti-clockwise and lift
out.
Reach into the aperture and with a
thick cloth and unscrew the faulty bulb
anti-clockwise. (15W 300˙C SES).
Fit a replacement bulb, refit the glass
lens.
The oven lamp is not covered by the
guarantee.
Page 42
CARE AND CLEANING
40
Cooker Finish Cleaning Method
Vitreous enamel
Hotplate, pan supports, burner ring discs
meat tine, grill pan, oven base, inside of
oven and grill doors, grill compartment.
Use a cloth wrung out in hot soapy water.
Stubborn stains can be removed with a
cream, paste, liquid cleaner or by rubbing
with fine steel wool, soap pads. Check that
the cleaning agent is approved by the
Vitreous Enamel Development Council.
Paint
Side trims, plinth, fascia trims
Wash with a cloth wrung out with hot soapy
water only. Do not use abrasive.
Aluminium
Burner bodies
Note: care must be taken to prevent cleaning
materials, water and dirt from entering and
blocking the burner ring ports.
Chromium plating
Oven shelves, grill pan grid, grill pan
handle support
Wipe with a cloth wrung out in hot, soapy
water. A fine steel wool soap pad, or stainless steel/chrome cleaner may be used.
Stainless steel
Use a cloth wrung out in warm soapy water,
or a propriety stainless steel cleaner.
Grill and ovens
Shelving and enamel parts of the oven and
grills maybe cleaned with a cream cleaner &
nylon sponge or pad. Heavier soiling my
require a propriety cleaner or or steel wool
pad - do not let either of these come into contact with the Cookclean panels, door seals or
plastic cooker parts. Check that the cleaning agent is approved by the Vitreous Enamel
Development Council.
Cookclean panels
Use a nylon pad/sponge and warm soapy
water, blot dry with kitchen tissue or a dry
sponge - but do not rub dry. Run the ovens
for about 30 minutes following cleaning.
Plastic
Grill pan handle, control knobs
Wipe with a cloth wrung out in hot soapy
water.
Griddle
Wash with a cloth wrung out in hot soapy
water, for stubborn stains use a non stick pad
carefully. Ensure both sides are rinsed and
dried thoroughly. Do not put in a dishwasher
Page 43
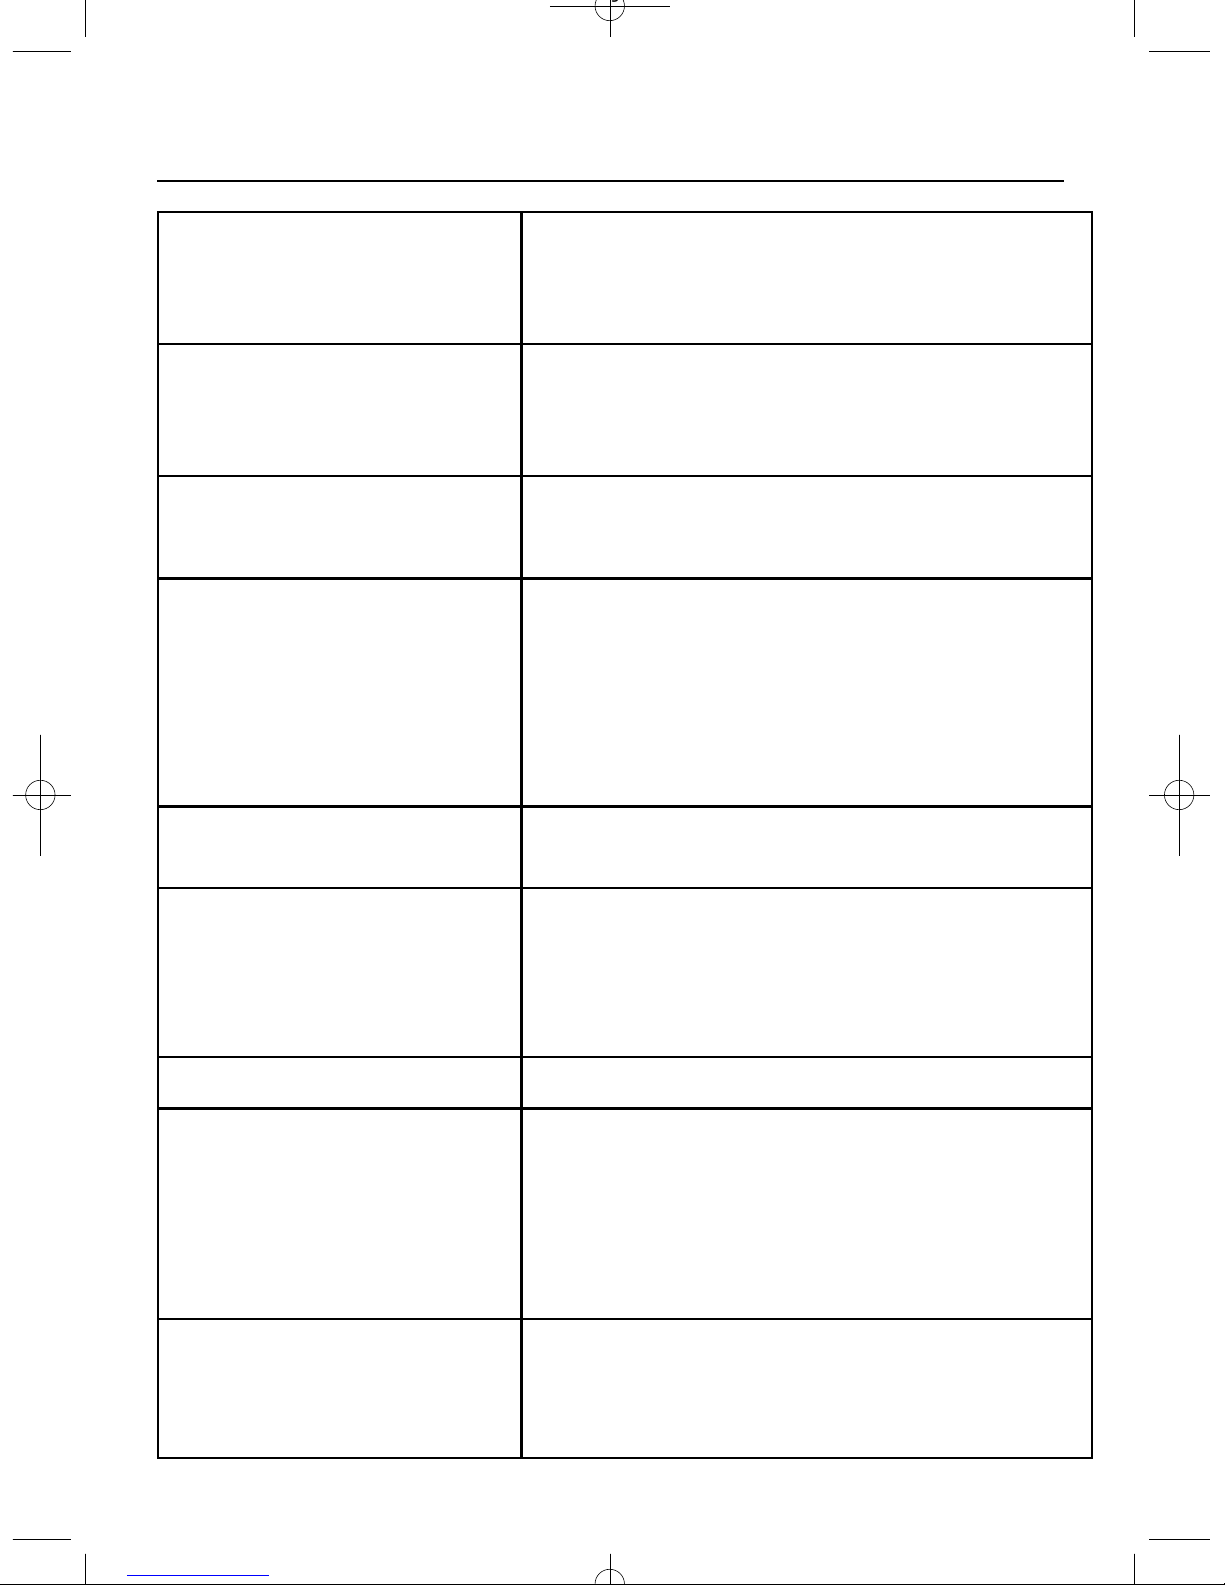
TROUBLESHOOTING
41
Problem Check
Nothing works Is the main cooker wall switch turned on?
Is the timer display blank?
If the timer is not working it is likely there is not
electricity supply to your cooker.
Fan oven does not work,
but Grill and Conventional
oven work
Ensure that the timer is set to manual - refer to the
timer section of this book.
Grill does not work, but
the main oven does
Operating the cooker under the following conditions may cause a safety device to operate:
Grilling with the door shut.
Grilling for an excessively long time at a maximum
setting.
Switch the appliance off for approx 30 minutes and
then check to see if the grill is working.
Grill keeps turning on and
off
When the grill is set to less than ‘5’, this is normal
regulator operation not a fault.
Cannot set an ‘Auto Cook’
programme/ cannot get
the timer to switch the
oven on and off at the
required times
Remember: “Cook Time” is the actual length of time
for which the timer will switch the oven on for as
part of an ‘Auto Cook’ programme.
Timer sounds continually Return the minute minder to ‘off’
Hotplate burner failing to
ignite
Ensure the burner caps/rings are seated correctly.
Ensure the holes in the rings are not blocked.
Ensure there is gas coming from the burner. If not
check the gas is on and the lid is fully up right.
Ensure there is spark at the burner, a clicking noise
should be heard, if not check the cooker is on.
Replacement of lamps See the section on replacing an oven lamp in the
care and cleaning section. This part is not covered
by the guarantee.
Page 44
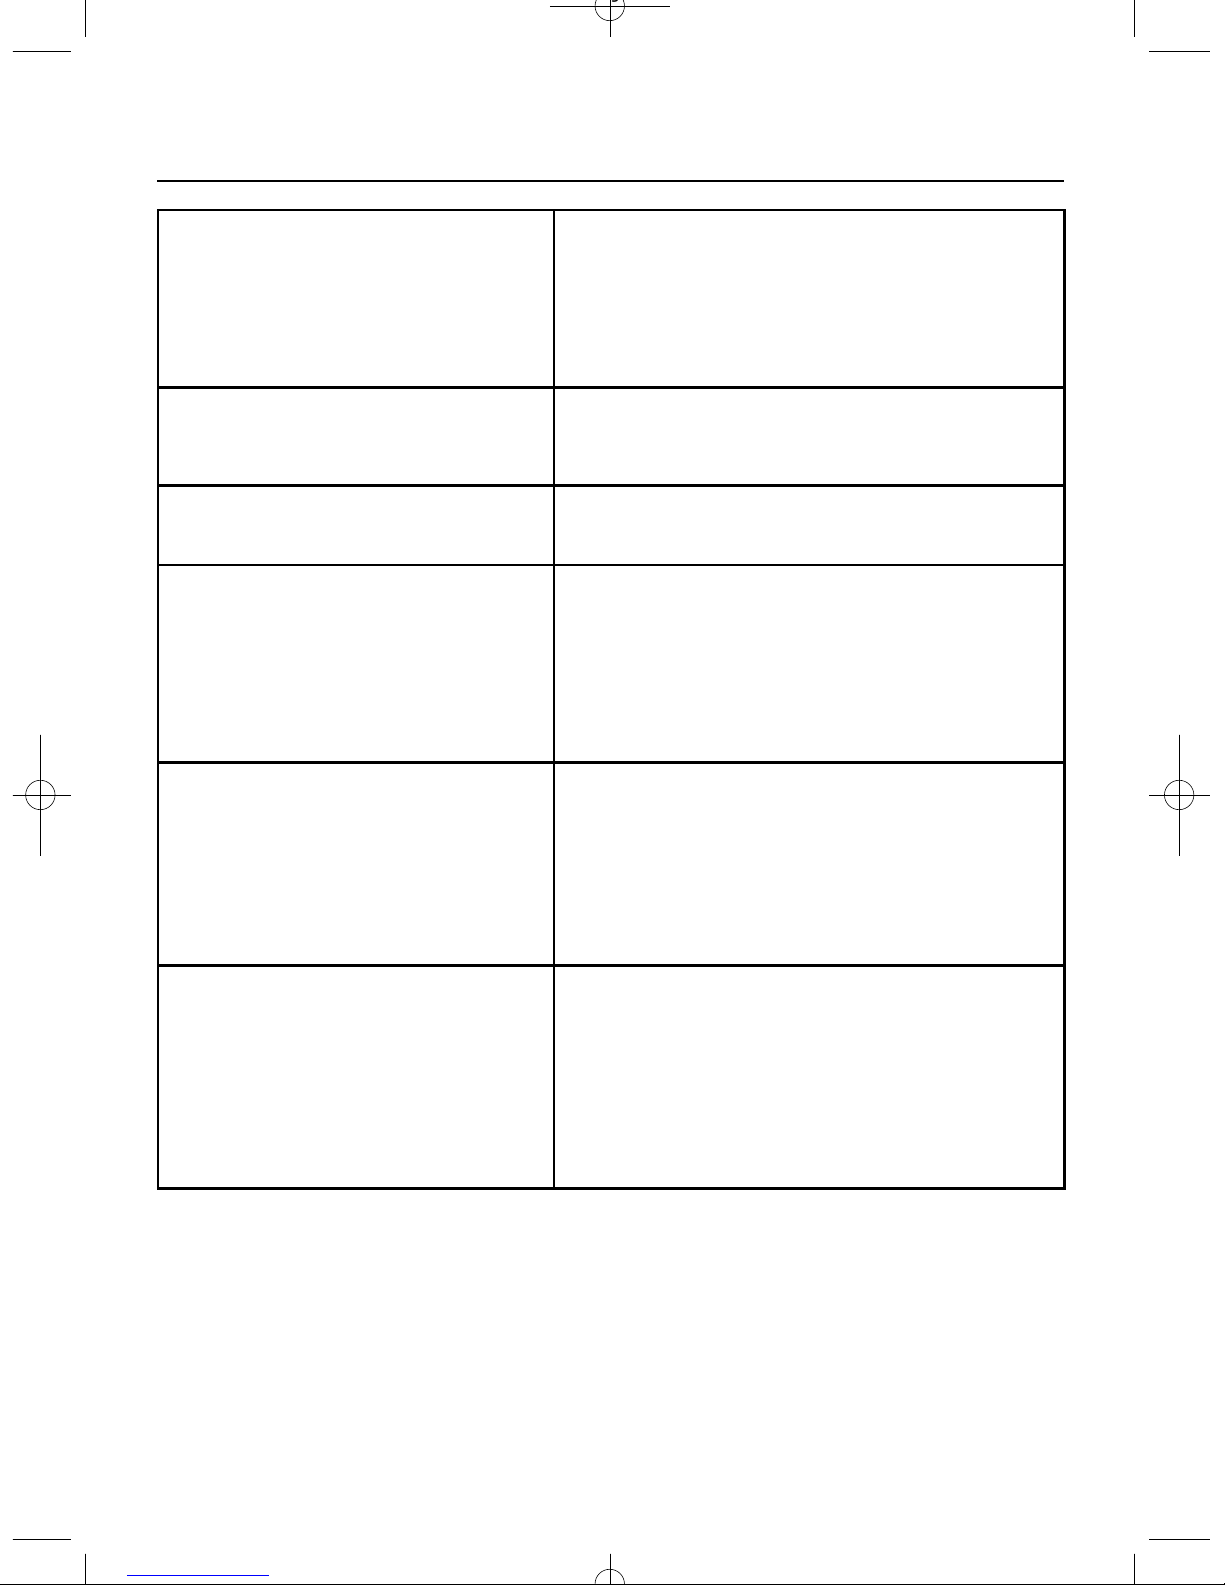
TROUBLESHOOTING - COOKING RESULTS
42
Problem Check
Grilling - Uneven cooking front
and back
Ensure the grill pan is placed centrally under
the grill element
Grilling - Fat splattering Ensure the grill is not set too high
Baking - Uneven rising of cakes Ensure the oven shelves are level by using a
spirit level on the rod shelf and adjusting the
wheels/feet. The oven should be checked
both left to right and back to front
Baking - Cakes sinking The following may cause cakes to sink:
Preheating of fan ovens.
Cooking at too high a temperature.
Using the creaming method with soft margarine.
Baking - Over/Under cooking
Baking - Fast/Slow cooking
Refer to the cooking times in this book, but
bear in mind they are only a guide and may
require increasing or decreasing depending
on personal taste and preference.
Do not use tins higher than 56mm (2
1/4
’)
Page 45
SERVICE
43
Calling for a service
If you should experience any problems
with your cooker please contact your
retailer or place of purchase.
Important Note:
Service work is to be conducted by
authorised persons only. It is also
advisable that your cooker is checked
regularly and maintained in good condition. An annual maintenance is recommended.
Remember that you may be charged
for any visit (even during the guarantee period) if nothing is found to be
wrong with your appliance, of if the
fault lies with incorrect use or installation.
Always check the instruction book
before calling a service agent to make
sure you have not missed anything.
If you require a service agent please
contact:
RHA Australia
PO Box 301
Cardiff
New South Wales 2285
Phone: 02 49569696
Fax: 02 49568215
B e f o re contacting a service agent
make sure you have the following
information:
Model Number:
Serial Number:
Date of Purchase:
Postcode:
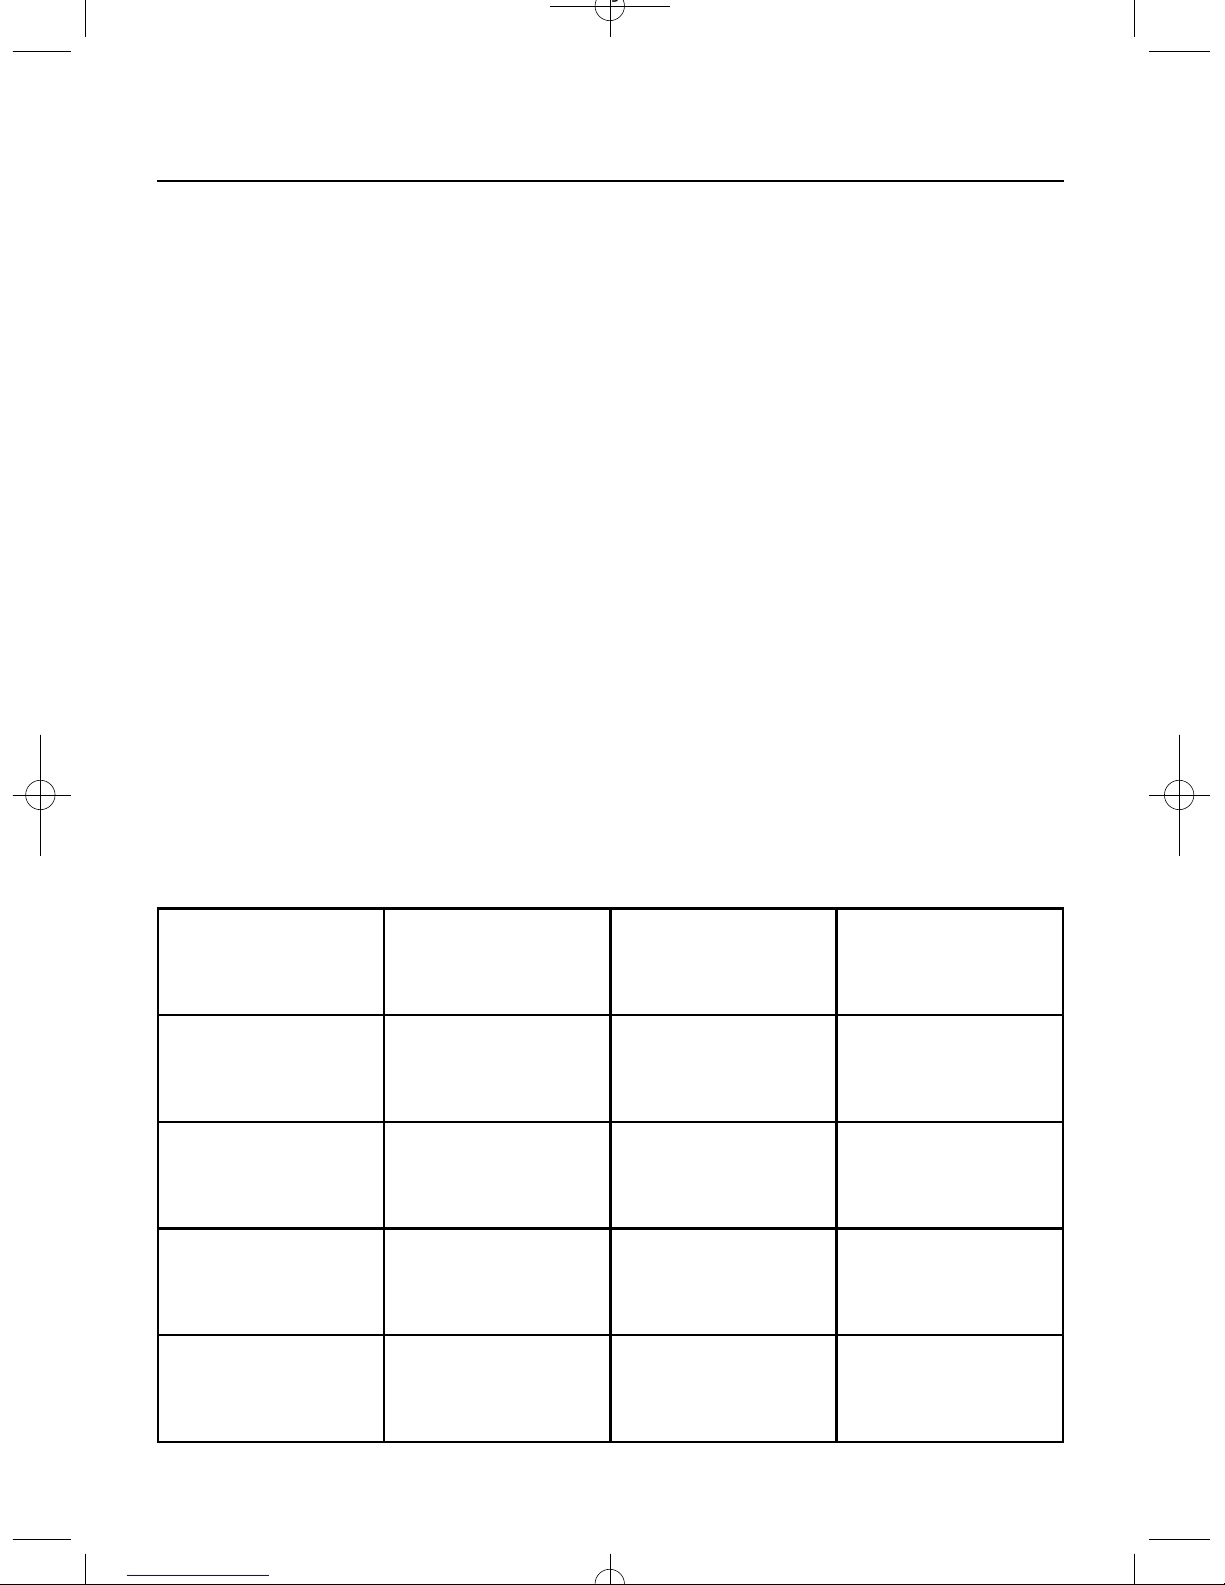
Date Nature of Fault Parts
Replaced/Repaired
Authorised
Stamp/Signature
Page 46

44
Our policy is one of continual improvement in design and development, therefore
strict accuracy of illustrations and descriptions cannot be guaranteed.
This appliance must be installed in accordance with the rules in force, and only used
in a sufficiently ventilated space. Consult instructions before installation and use of
this appliance.
Page 47

NOTES
45
Page 48

08 27095 00 © 04.2004 - Glen Dimplex Cooking Limited
Merseyside UK
 Loading...