

Page 1
WA RNI N G LAB E L PAR T N O. V56 8 73
INSTALLED IN THIS LOCATION (UNDER
BELL & GOSSETT). IF MISSING IT MUST
BE REPLACED.
Circuit Sentry
INSTRUCTION MANUAL
V58044B
™
Automatic Flow-Limiting Valve
INSTALLER: PLEASE LEAVE THIS MANUAL FOR THE OWNER’S USE.
b) Install the unit so that the flow arrow on the body
SAFETY
INSTRUCTION
This safety alert symbol will be used in this manual to draw
attention to safety related instructions. When used, the safety
alert symbol means ATTENTION! BECOME ALERT! YOUR
SAFETY IS INVOLVED! FAILURE TO FOLLOW THESE INSTRUCTIONS MAY RESULT IN A SAFETY HAZARD.
DESCRIPTION
The Bell & Gossett Automatic Flow Limiting Valves (AFLV) are
designed to automatically control the flow in piping system to
selected preset limit. As pressure differential increases, a
cartridge inside the valve body reduces the flow area to
accurately maintain the pre-selected flow rate.
Operational Limits
Maximum Operating Temperature: 250ºF (121ºC)*
Maximum Operating Pressure: 300 psig (206
Differential Pressure Flow Control
2 to 60 psig (14 to 414 kPa) nominal
INSTALLATION INSTRUCTIONS
1. For installing NPT Connections:
a) Install the AFLV in the piping system/circuit where it is
desired to maintain the flow at a preselected value.
Apply pipe joint compound sparingly to the male pipe
threads only.
9 kPa)*
2. For installing Sweat Connections:
* Refer to chart A for solder joints for limitations.
housing points in the direction
c) Supports both sides of the unit with wrenches during
instal lation to prevent putting stress on the joint
joining the two sections.
CAUTION: The generous use of pipe joint com-
pound when installing the AFLV will foul the valve
operating mechanism prevent ing it from functioning
properly. Pipe joint compound must be conservatively
appli ed to ma le threads only. Failure to f oll ow this
instruction can result in moderate personal injury and/or
property damage.
CAUTION: The use of PTFE impregnated pipe
compound and PTFE tape on pipe threads pro-
vides lubricity, which can lead to overtightening and
brea kage. Do n ot ov ertig hten. Fail ure t o fol low this
instruction can result in moderate personal injury and/or
property damage.
a) Clean tube ends and valve connections thoroughly
according to good piping practices with a fine grade
emery cloth or fine grit sandpaper.
of flow.
Page 2
b) For soldering, use 95-5 (Tin-Antimony) solder and a
good grade of flux.
c) Use a torch with a sharp pointed flame.
d) When sweating the j o i n t s , f i r s t adjusting the
Aut o m a tic F l o w -Limiti n g Valv e in t h e fu l l open
position, then wrap the valve with a cool wet rag and
then direct the flame with care to avoid subjecting
AFLV to excessive heat. Allow the valve to cool before
touching or operating.
e) Check the so
ldered connection for leaks.
WARNING: Use of improper procedures to sweat
valve model with union connection into system
can d a m a g e valve. Be f o r e installing sw eat union
connection to valve, remove the union nut and O-ring
from the valve body, the union tailpiece with nut must be
sweate d (soldered) into place. Failure to follow
this
in str uct ion co uld re sul t i n p rop erty damage and/or
moderate personal injury.
HOW TO USE AUTOMATIC FLOW-LIMITING
VALVE PRESSURE TAPS TO DETERMINE
PROPER FUNCTIONING OF VALVE.
1. Using Bell & Gossett Model RP-250 readout probes,
attach a Bell & Gossett differential pressure readout kit to
the readout valves on the Automatic Flow-Limiting Valve.
WARNING: Hot water leakage can occur from
readout valve during probe insertion and during
hookup of readout kit. Follow the instruction manual
supplied with readout probes and readout kits for safe
use. Failure to follow this instruction could result in
serious personal injury and/or property damage.
2. Read the differential pr
Limiting Valve. This can be compared to system pump
head to determine valve function, and system flo w
blockage.
essure across the Automatic Flow-
Chart A
(SOLDER TYPE LIMITS PER ASTM STD. B16.22-1989)
TYPE OF MAXIMUM LIMITATIONS
SOLDER PRESSURE PSIG TEMPERATURE ºF
95-5 300 175
TIN- 250 200
ANTIMONY 175 250
CAUTION: Heat associated with the use of silver
solder may damage an Automatic Flow-Limiting
valve and void the product warranty. Do not use silver
solder. Failure to follow these instructions could result in
property damage and/or moderate personal injury.
OPERATING INSTRUCTIONS
Oper ation of the Automatic Flow-Limiting V alve is fully
automatic and does not require any adjustment. It automatically maintains the selected flow over the designed
differential pressure range.
CAUTION: Hot uninsulated surfaces can cause
burns to the skin. Do not touch hot surfaces.
Fa i lure to fol l ow these in s truc t ions cou ld r esul t in
moderate personal injury.
Before the system start up, remove cartridge from the valve.
Flush the hydronic system and then reassembl
the valve and make sure cap is tightened properly. Start the
system and check for the AFLV leak.
e cartridge into
SERVICE INSTRUCTIONS
Should the Automatic Flow-Limiting Valve require cleaning or
changing the orifice, follow the following instructions.
WARNING: System fluid under pressure and/or at
high temperature can be very hazardous. Before
servicing, reduce system pressure to zero or isolate the
pressure reducing from the system. Leave drain valve
open. Allow system to cool below 100ºF (38ºC). Failure to
follow these instructions could result in serious personal
injury or death and property damage.
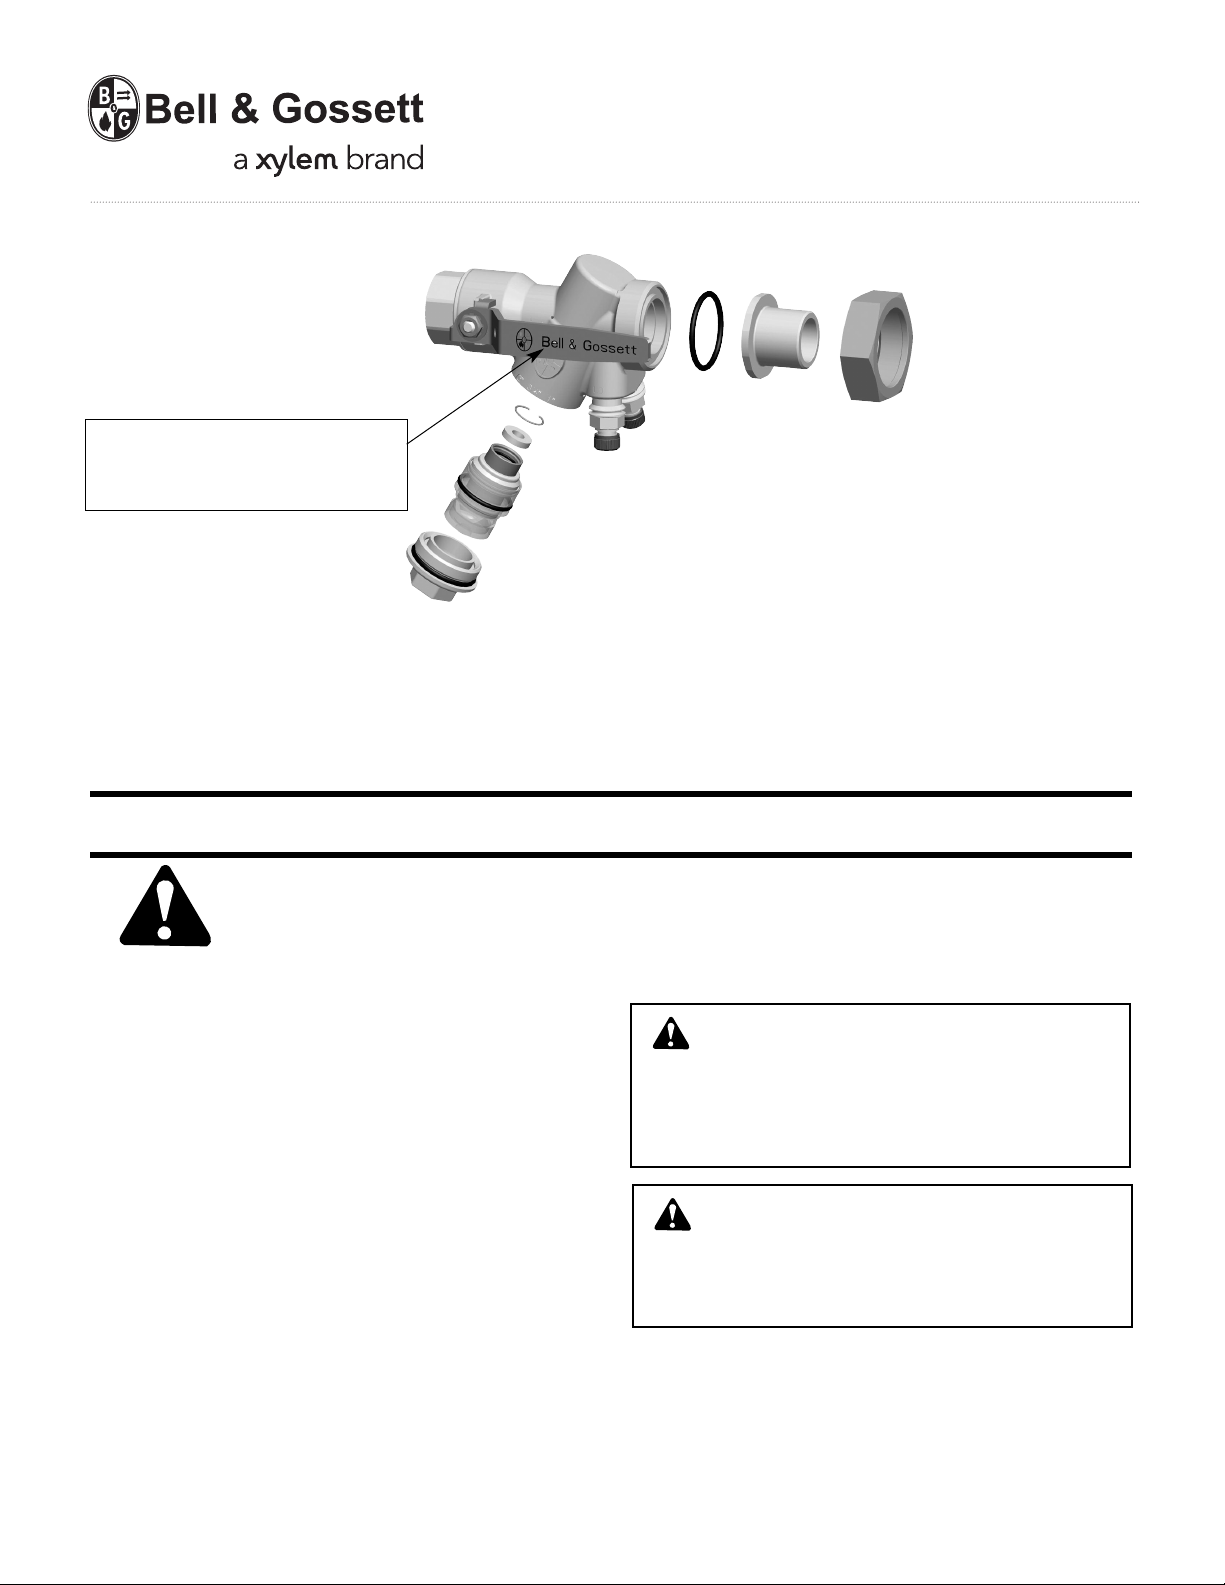
1. Loosen and remove the bonnet (cap) from the valve body.
2. Pull the cartridge assembly from t he valve body for
cleaning or
cartridge by pushing the orifice washer in to the cartridge
housi n g for s e v e r a l times t o make s u r e spring i s
functional.
3. If you design to changing the orifice washer (for more or
less flow rate). With a screwdriver, remove the clip ring
from inside the cartridge housing. Pull the orifice washer
out and re place wi th the n ew orifi ce that you h ave
preferred.
4. Rei
nstall, or replace the clip ring in the cartridge housing
groove and reassemble the bonnet with the O-ring.
about to cause serious damage from leakage or rupture.
It must be periodically inspected and if noted, it must be
replaced. Failure to follow these instructions could result
in serious personal injury or death and property damage.
change the new flow cartridge. Checking the
WARNING: Corrosion or leakages are indications
that the Automatic Flow Control Valve may be
CAUTION: Hot uninsulated surfaces can cause
burns to the skin. Do not touch hot surfaces.
Fa i lure to fol l ow these in s truc t ions cou ld r esul t in
moderate personal injury.
Xylem Inc.
8200 N. Austin Avenue
Morton Grove, Illinois 60053
Phone: (847) 966-3700
Fax: (847) 965-8379
www.xyleminc.com/brands/bellgossett
Bell & Gossett is a trademark of Xylem Inc. or one of its subsidiaries.
© 2012 Xylem Inc. V58044B September 2012
 Loading...