

Page 1
INSTRUCTION MANUAL
HT-50B-SM
B&G Series U Heat Exchangers
Removable Bundle Design
Single Wall, DaimonbackTM Double Wall and Hi-Temperature Units
Series SU/DSU, WU/DWU
and HTWU/DHTWU
Series TCS/DTCS and TCW/DTCW
Page 2
STORAGE
Bell
&
Gossett will not be
NOTE: If the heat exchanger cannot be installed and put into
operation immediately upon receipt at the jobsite, certain precautions are necessary to prevent deterioration during storage. Responsibility for integrity of the heat exchangers must
be assumed by the user.
responsible for damage, corrosion or other deterioration of
heat exchanger equipment during transit and storage.
Good storage practices are important, considering the high
costs of repair or replacement, and the possible delays for
items which require long lead times for manufacture. The following suggested practices are provided solely as a convenience to the user, who shall make his own decision on
whether to use all or any of them.
11. On receipt of the heat exchanger, inspect for shipping
damage to all protective covers. If damage is evident,
inspect for possible contamination and replace protective
covers as required. If damage is extensive, notify the carrier immediately.
12. If the heat exchanger is not to be placed in immediate ser-
vice, take precautions to prevent rusting or contamination.
13. Heat exchangers for oil service, made of ferrous materials,
may be pressure tested with oil at the factory. However,
the residual oil coating on the inside surfaces of the
exchanger does not preclude the possibility of rust formation. Upon receipt, fill these exchangers with appropriate
oil or coat them with a corrosion prevention compound for
storage.
14. The choice of preservation of interior surfaces during stor-
age for other service applications depends upon your system requirements and economics. Only when included in
the original purchase order specifications will specific
preservation be incorporated prior to shipment from the
factory.
15. Remove any accumulations of dirt, water, ice or snow and
wipe dry before moving exchangers into indoor storage. If
unit was not filled with oil or other preservative, open drain
plugs to remove any accumulated moisture, then reseal.
Accumulation of moisture usually indicates rusting has
already started and remedial action should be taken.
16. Store under cover in a heated area, if possible. The ideal
storage environment for heat exchangers and accessories
is indoors, above grade, in a dry, low humidity atmosphere which is sealed to prevent entry of blowing dust,
rain or snow. Maintain temperatures between 70°F and
105°F (wide temperature swings may cause condensation
and “sweating” of steel parts). Cover windows to prevent
temperature variations caused by sunlight. Provide thermometers and humidity indicators at several points, and
maintain atmosphere at 40% relative humidity or lower.
17. In tropical climates, it may be necessary to use trays of
renewable dessicant (such as silica gel), or portable dehumidifiers, to remove moisture from the air in the storage
enclosure. Thermostatically controlled portable heaters
(vented to outdoors) may be required to maintain even air
temperatures inside the enclosure.
18. Inspect heat exchangers and accessories frequently while
they are in storage.
19. If paint deterioration begins, as evidenced by discol-
oration or light rusting, consider touch-up or repainting. If
the unit is painted with our standard shop enamel, areas
of light rust may be wire brushed and touched-up with any
good quality air-drying synthetic enamel. Units painted
with special paints (when specified on customers’ orders)
may require special techniques for touch-up or repair.
Obtain specific information from the paint manufacturer.
Painted steel units should never be permitted to rust or
deteriorate to a point where their strength will be impaired.
A light surface rust, on steel units which can be repainted
after installation, will not generally cause any harm. (See
Items 3 and 4 for internal surface preservation.)
10. If the internal preservation (Items 3 and 4) appears inadequate during storage, consider additional corrosion prevention measures and more frequent inspections. Interiors
coated with rust preventive should be restored to good
condition and recoated promptly if signs of rust occur.
INSTALLATION
11. Provide sufficient clearance at the head of the unit to per-
mit removal of tube bundle from shell.
12. Provide valves and by-passes in the piping so that both
the shell and tube bundle may be by-passed to permit isolation of the unit for inspection or repairs.
13. Provide thermometer wells and pressure gauge connec-
tions in all piping to and from the unit and located as near
the unit as possible.
14. Provide convenient means for frequently cleaning the unit
as suggested under “MAINTENANCE.”
15. Provide necessary air cocks for units so they can be
purged to prevent or relieve vapor binding of either the
tube bundle or the shell.
16. Foundations must be adequate so that exchangers will not
settle and cause piping strains. Foundation bolts should
be set to allow for setting inaccuracies. In concrete footings, pipe sleeves at least one size larger than bolt diameter slipped over the bolt and cast in place are best for this
purpose, as they allow the bolt center to be adjusted after
the foundation has set.
WARNING: All system piping to the heat ex-
changer must be adequately supported. Failure to
do so will result in excessive loads on the heat exchanger
connections causing damage and/or leakage and potential injury to adjacent personnel.
WARNING: When installing a Diamondback™
heat exchanger above a ceiling or workststion where
personnel are present, it may be necessary to install a
drip pan to collect any tell-tale drip due to internal tube
failure. Failure to do so may result in damage to the
ceiling and potential injury to personnel.
17. Loosen foundation bolts at one end of unit to allow free
expansion of shells. Oval holes in foundation brackets are
provided for this purpose.
CAUTION: Provision must be made to isolate the
heat exchanger from any external vibrations that
cause tube failures within the heat exchanger. Result is
internal leakage and mixing of the hot and cold media.
2
Page 3
18. Set exchangers level and square so that pipe connections
may be made without forcing.
CAUTION: It is up to the installer to provide
adequate support for tank heater units (2) two feet or
longer when installing them in a tank. Failure to provide
adequate support may result in premature tube failure
and/or failure of the tube/tubesheet mechanical roll joint.
12. Start operation gradually. Do not admit hot fluid to the unit
suddenly when empty or cold. Do not shock unit with cold
fluid when unit is hot.
CAUTION: Fluids must be gradually introduced to
the unit. Failure to do so can cause damage to the
heat exchanger.
13. Do not operate equipment under conditions in excess of
those specified on nameplate.
WARNING: Failure to operate the heat exchanger
within the design pressure and temperature on the
nameplate may result in damage to the heat exchanger
and potential injury to adjacent personnel.
19. Inspect all openings in exchanger for foreign material.
Remove all wooden plugs and shipping pads just before
installing. Do not expose units to the elements with pads
or other covers removed from nozzles or other openings
since rain water may enter the unit and cause severe damage due to freezing.
10.
Be sure the entire system is clean before starting operation
to prevent plugging of tubes with sand or refuse. The use
of strainers in settling tanks in pipe lines leading to the unit
is recommended.
11.
Drain connections should not be piped to a common
closed manifold.
12.
Steam hammer can cause serious damage to the tubes
of any heat exchanger. A
lowing points before an installation is made can prevent
costly repairs which may be caused by steam hammer.
a. A vacuum breaker and/or vent, should be used in
accordance with the type of steam system installed.
b. The proper trap for the steam system installed should
be used.
c. The trap and condensate return line to the trap should
be properly sized for the total capacity of the convertor.
d. The trap should be sized for the pressure at the trap,
not the inlet pressure to the steam controller.
e. Condensate should be piped and pitched to a conden-
sate receiver, condensate return pump or drain at an
elevation below the heat exchanger.
CAUTION: During times of shutdown, volumetric
expansion can occur. We recommend the installation of a properly sized relief valve on both sides of the
the heat exchanger. Failure to do so can cause damage
to the heat exchanger.
careful consideration of the fol-
OPERATION
11. When placing a unit in operation, open the vent connec-
tions and start to circulate the cold medium only. Be sure
that the passages in the exchanger are entirely filled with
cold fluids before closing the vents. The hot medium
should then be introduced gradually until all passages are
filled with liquid, close vents and slowly bring the unit up to
temperature.
CAUTION: Fluid and/or steam velocities in excess
of design operating conditions on either the shell or
tube side of the heat exchanger can cause damaging
tube erosion and/or vibrations. Result is internal leakage
and mixing of the hot and cold media. Proper setting of
system controls is required.
1
4. In all installations, there should be no pulsation of fluids
since this causes vibration and strain with resulting leaks.
1
5. Retighten bolting on all gasketed joints after the heat
exchanger has reached operation temperatures to prevent
leaks and gasket failures. Retightening should be done
uniformally and in a diametrically staggered pattern as
illustrated in “MAINTENANCE”.
16. On high pressure and high temperature applications where
an “HTWU/DHTWU” heat exchanger is used or any application where spiral wound gaskets are required, it is recommended that the gasketed joints of the heat exchanger
be retightened to the required torque (see “MAINTENANCE”) after 24 hours at operating pressures and temperatures to compensate for any relaxation or creep that
may have occurred.
17. In shutting down, flow of hot medium should be shut off
first. If it is necessary to stop circulation of cooling medium
the circulation of hot medium should also be stopped by
by-passing or otherwise.
18. Drain all fluids when shutting down to eliminate the possi-
bility of freezing and corrosion. To guard against water
hammer, condensate should be drained from steam
heaters and similar apparatus both when starting up and
when shutting down.
19. Heat exchangers that are out of service for extended
periods of time should be protected against corrosion as
described in the storage requirements for new heat
exchangers.
Heat exchangers that are out of service for short periods
and use water as the flowing medium should be thoroughly
drained and blown dry with warm air, if possible. If this is
not practical, the water should be circulated through the
heat exchanger on a daily basis to prevent stagnant water
conditions that can ultimately cause corrosion.
3
Page 4

MAINTENANCE
11. Do not open heads until all pressure is off equipment, the
unit drained of all fluids, and the equipment surfaces
cooled to ambient temperature.
12. Do not blow out heat exchangers with air when operating
fluids are of a flammable or otherwise hazardous nature.
WARNING: Proper precautions must be taken
(special clothing, equipment, etc.) to protect personnel from injury due to escaping fluids or hot heat
exchanger surfaces.1
13. Provide convenient means for frequently cleaning heat
exchangers as suggested below:
a. Circulating hot wash oil or light distillate through tubes
or shell at good velocity will effectually remove sludge
or other similar soft deposits.
b. Soft salt deposits may be washed out by circulating
hot fresh water.
c. Some cleaning compounds on the market, such as
“Oakite” may be used to advantage for removing
sludge or coke, provided hot wash oil or water, as
described above, does not give satisfactory results.
d. If the above methods are ineffective for removal of hard
scale, a mechanical means may be used.
a. Following the procedures previously mentioned for
front head removal, remove the head and replace it with
a companion flange that mates with the shell body
flange. Replace the nuts and bolts/studs.
b. Pressurize the shellside of the heat exchanger with a
cold fluid, preferably water.
c. Observe all tube joints and tube ends for indication of
test fluid leakage.
d. To tighten a leaking tube joint, use a suitable parallel
roller tube expander.
CAUTION: When tightening leaking tube joints:
1. Do not roll tubes beyond the back face of the tubesheet.
Maximum rolling depth should be the tubesheet thickness
minus 1/8".
2. Do not re-roll tubes that are not leaking since this will
thin the tube wall.
The result of either of the above conditions can lead to
failure of the tube and a leaking bundle.
e. If an emergency repair of a tube is required, use suit-
able tube plugs to seal off both ends of the U-bend
tube. Some loss of performance will result until a new
replacement tube bundle is obtained. Consult your local
ITT Bell & Gossett Representative for proper replacement of the bundle.
WARNING: Care must be exercised when handling
certain fluids. Follow manufacturers instructions.
Use eye and skin protection. Wear a respirator when
required.
14.
Do not attempt to clean tubes by blowing steam through
individual tubes. This overheats the tube and results in
tube expansion strains and sometimes leaking tubes.
15. Frequently and at regular intervals, observe interior and
exterior condition of all tubes and keep them clean. Frequency of cleaning should be according to scale build-up.
CAUTION: Neglect in keeping all tubes clean may
result in complete stoppage of flow through some
tubes with consequent overheating of these tubes, resulting in severe expansion strains, leaking tube joints, and
damage to the heat exchanger.
16. Exchangers subject to fouling or scaling should be
cleaned periodically. A light sludge or scale coating on the
tube greatly reduces it effectiveness. A marked increase in
pressure drop and/or reduction in performance usually
indicates cleaning is necessary, if the unit has been
checked for air or vapor binding and this has been found
not to be the cause. Since the difficulty of cleaning
increases rapidly as the scale thickens or deposits
increase, the interval between cleanings should not be
excessive.
17. At times, it may be necessary to locate a ruptured tube or
a leaking joint between the tubes and the tubesheet of a
single wall heat exchanger. The following procedure is
recommended.
CAUTION: Field repair of Diamondback™ double
wall heat exchangers is not recommended. Rerolling of the tube joints may result in the closing of the
leak detector flow paths between the two tube walls preventing the heat exchanger from providing a positive
indication of potential cross contamination.
8. Tube bundle removal:
a. During bundle removal, the dead weight of bundle
should never be supported on individual tubes. Rest the
bundle on the tube sheet, support plates, or wood
blocks cut to fit periphery of the bundle.
b. Tube bundles may be raised using slings formed by
bending light plates into a “U” form and attaching lifting
lugs to the ends of the sheets. Baffles can be easily
bent and damaged if dragged over rough surfaces.
CAUTION: When cleaning a tube bundle, tubes
should not be hammered on with any metallic tool
and, in case it is necessary to use scrapers, care should
be exercised that the scraper is not sharp enough to cut
the metal of the tubes.
4
Page 5

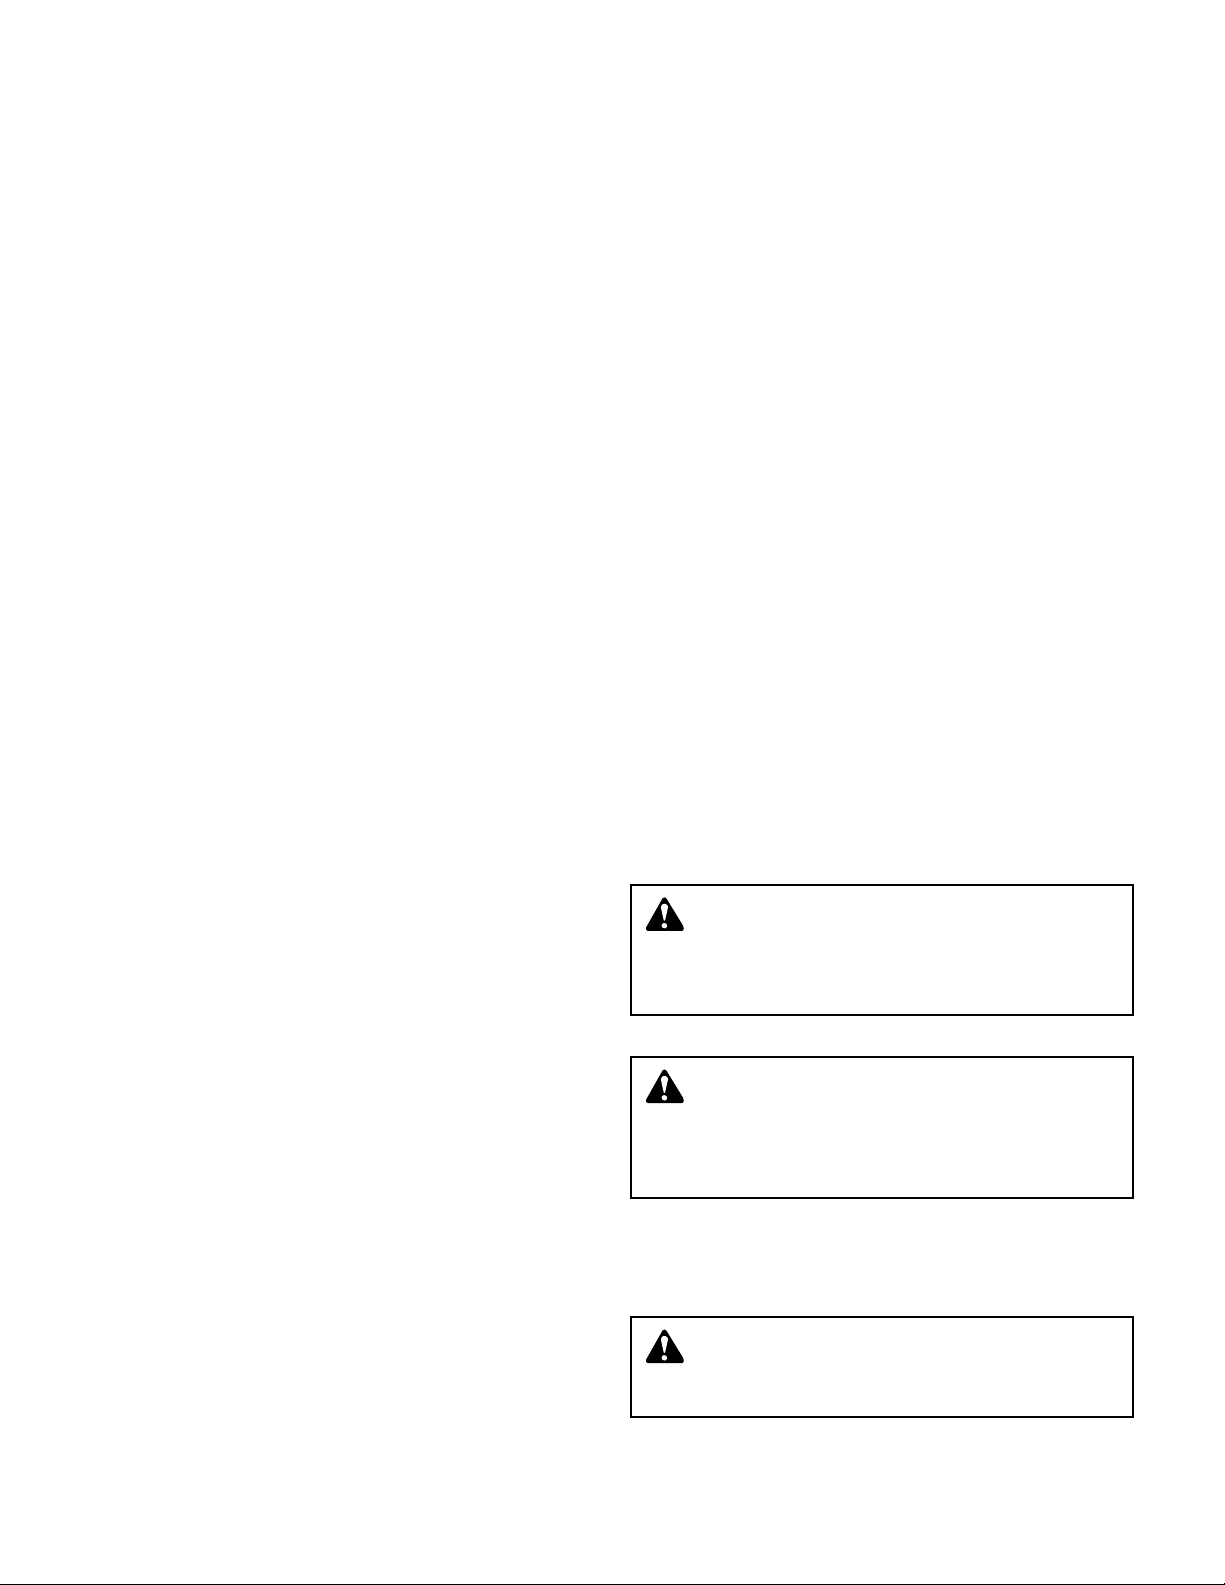
19. Before reinserting the tube bundle into the shell or collar
1
2
3
4
6
9
14
7
15
12
5
10
13
8
11
16
START
of a tank, place the ring/tank gasket over the end of the
tube bundle and bring forward to the backside of the
tubesheet.
TUBE BUNDLE
FRONT
HEAD
(PARTIALLY REMOVED)
HEAD GASKET
TANK GASKET
WARNING: It is extremely important to follow a
proper tightening sequence. If it is not followed, the
flanges can become cocked and a leak will result. When
tightening flanges with spiral wound gaskets, if cocking
occurs, the result can be deformation and non-repairable
damage to the gaskets in addition to a resultant leak.
Any gasket leak can result in potential injury to adjacent
personnel.
TIGHTENING TORQUES
COMPRESSED FIBER GASKETS
Bolt Torque Torque Max.
Dia. ft-lbs Increment Torque
1
/2" 40 5 60
5
/8" 80 5 120
Recommended
10. The tube bundle can be replaced using the tools and
reverse procedure given for bundle removal.
11. When installing a Diamondback™ double-wall tube bundle, make sure the leak path drain hole in the spacer ring
between the two tubesheets is in the lowest position of
the tubesheet circle.
SPACER RING
TUBESIDE
TUBESHEET
MECHANICALLY
ROLLED
TUBE
JOINT
SHELLSIDE
TUBESHEET
CLTUBE
LEAK PATH
DOUBLE-WALL TUBE JOINT
12. When replacing the heads, use a torque wrench to tighten
the bolts/studs and nuts. Use the following chart as
a guide. All torque values apply to well lubricated nut
bearing surfaces.
All bolted joints should be tightened uniformally and in a
diametrically staggered pattern as illustrated below:
SPIRAL WOUND GASKETS
Bolt/Stud Torque Torque Max.
Dia. ft-lbs Increment Torque
1
/2" 140 15 1160
5
/8" 180 15 1120
3
/4" 120 15 1200
7
/
8" 200 10 1320
1"
11/
8" 450 10 1710
11/
4" 600 10 1000
Recommended
300 10 1490
Tightening tip: It is essential that the installer follows the
gasket manufacturer’s installation guidelines when
installing gaskets. Metallic gaskets, such as the spiral
wound gaskets, usually have special installation instructions. One of these instructions includes a special procedure for tightening bolts/studs when installing new gaskets. The procedure recommends that the bolts/studs be
torqued in four stages.
a. Following the staggered tightening pattern, the bolts/
studs should be torqued to 1/3 of the recommended
tightening torque.
b. Same as a, the bolts/studs should be torqued to 2/3 of
the recommended tightening torque.
c. Same as a, the bolts/studs should be torqued to the
recommmended torque valve shown in the above chart.
d. Following the staggered tightening pattern the bolts/
studs torques should be checked for equilibrium since
the tightening of one bolt/stud can relieve the stress on
adjacent bolts/studs.
If after following the gasket manufacturer’s recommended
tightening procedure a leak still occurs, the bolts/studs
should be tightened in the torque increments shown until
the leak stops. The staggered tightening pattern is still
followed.
NOTE: When using spiral wound gaskets, both the head
and the shell/tank gaskets must be spiral wound. You cannot mix one spiral wound and one compressed fiber gasket on a heat exchanger.
13. Refer to “OPERATION” steps 5 and 6 regarding bolt retightening after start-up.
14. Where frequent disassembly of the heat exchanger is
encountered, the use of new bolting in conformance with
dimension and ASTM specifications of the original design
is recommended.
5
Page 6

TYPICAL INSTALLATIONS
FIGURE 1 — T ypical installation of a “SU/DSU” Heat Exchanger when used as a Convertor
FIGURE 2 — T ypical installation of a “SU/DSU” Heat Exchanger when used as an Instantaneous Heater
FIGURE 3 — T ypical installation of a “SU/DSU” Heat Exchanger when used with a storage tank
For proper sizing of Airtrol System consult B&G Representative
FIGURE 4 — T ypical installation of a “WU/DWU” Heat Exchanger when used as a Convertor
NOTE: All valves, pumps, tanks, vents, etc. shown as part of a “TYPICAL INSTALLATION”, are supplied by others.
Contact your Bell & Gossett Representative for these items.
6
Page 7

TYPICAL INSTALLATIONS cont.
When the “WU/DWU” is installed on a hot water boiler as shown, a B&G Flo-Control Valve
When installed on a steam boiler , note that boiler water is pumped into the “WU/DWU” Heater from the bottom of the boiler.
FIGURE 5 — T ypical installation of a “WU/DWU” Heat Exchanger when used as an Instantaneous Heater
Heating with Steam
prevents gravity circulation of boiler water when Booster is not running.
FIGURE 6 — Typical installation of a “TCS/DTCS” Tank Heater
Heating with Boiler Water
FIGURE 7 — Typical installation of a “TCS/DTCS” Tank Heater
NOTE: All valves, pumps, tanks, vents, etc. shown as part of a “TYPICAL INSTALLATION”, are supplied by others.
Contact yourÊBell & Gossett Representative for these items.
7
Page 8

Xylem Inc.
175 Standard Parkway
Cheekowaga, NY 14227
Phone: (800) 281-4111
Fax: (716) 897-1777
www.bellgossett.com
Bell & Gossett is a trademark of Xylem Inc. or one of its subsidiaries.
© 2014 Xylem Inc. HT-50B-SM June 1997
 Loading...