

Page 1
INSTRUCTION MANUAL
Autocirc® Instant Hot Water Pump
Model: ecocirc 23-5 ACT
Save water and time
with one simple under
sink installation.
6-71-075-111
REVISION A
Page 2
Page 3
Preparation for Installation:É
Assemble the parts and tools required:É
1. Open and inspect Autocirc pump package.É
2. AutocircÉpump package includes the pump with a built-in ti¿, a 6ft. cord, ЙЙЙЙЙЙЙЙЙЙЙЙЙЙЙЙЙЙЙЙЙЙЙЙЙЙЙЙЙЙЙЙЙЙЙЙЙЙЙЙÉ
ЙЙЙЙЙand wall mounting bracket.É
3. Two stainless steel flexible hoses (1/2” x 3/8”) - length as required. É
ÉÉÉÉ(sold separately)É
4. Adjustable wrench and screwdriver.É
5. Select the sink under which the AutocircɪÔp is to be locatÉÉed (the sink ЙЙЙЙЙЙЙЙЙЙЙЙЙЙЙЙЙЙЙЙЙЙЙЙЙЙЙÉ
ЙЙЙЙЙwhere hot water takes longest to arrive).É
ÉÉ
InstallationÉ
ÉÉ
Step 1É
If not already available, install a 115 Volt/ 60Hz
outlet within six (6) feet of the installation site (the
faucet/tap farthest from the water heater), as the
Autocirc is supplied with a 6 ft. long, grounded
cord. The Autocirc pump requires only 14 watts
ÉÉ
and 0.3 amps of power (see Fig. 1).É
ÉÉ
Step 2É
Autocirc pump and mounting bracket come
preassembled. Remove mounting bracket from
Autocirc by carefully sliding the mounting bracket
off the (4) supporting pins on the Autocirc pump
body. Fasten the mounting to the wall under the
sink using the wall bracket provided in the Autocirc
kit. Mount AutocircÉpump into position by aligning
and securing mounting bracket to the (4) support
ÉÉ
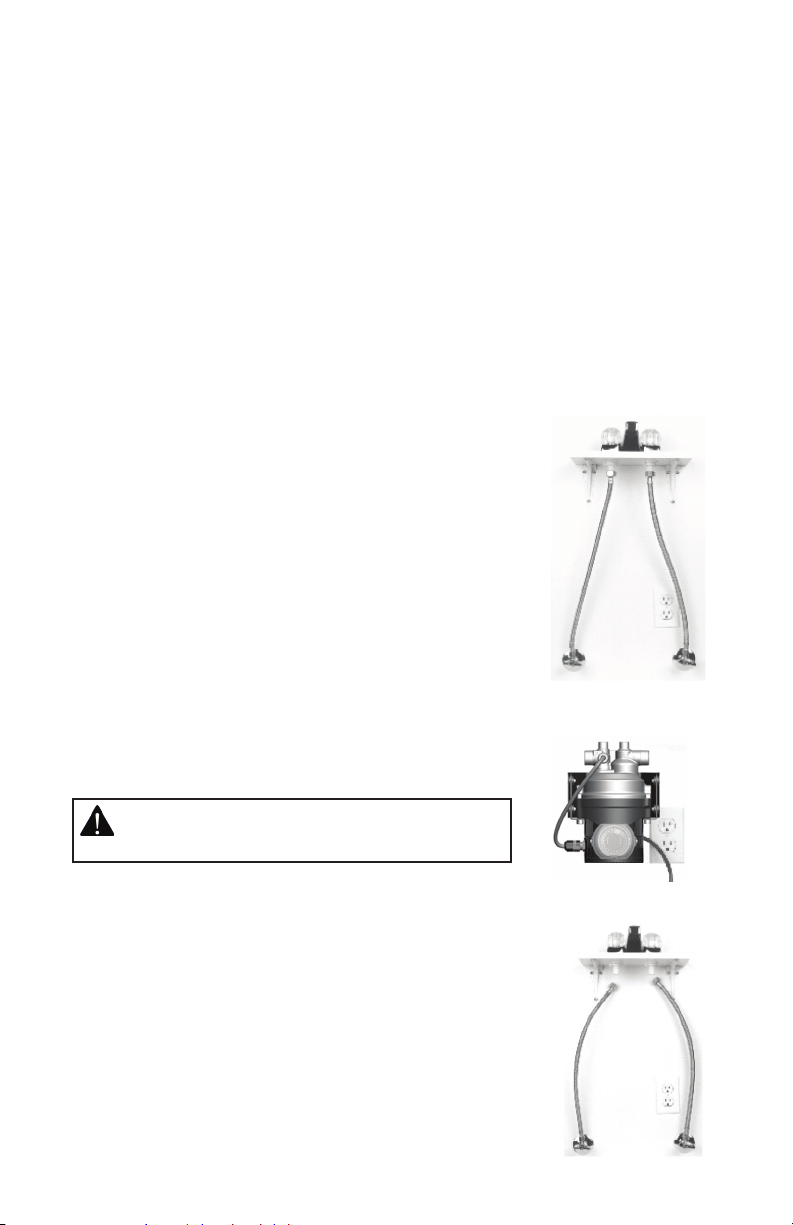
Figure 1É
pins. Be sure the pump timer is turned toward the
front and is accessible for setting and changing the
time (see Fig. 2). The pump must be installed only in
ÉÉ
a vertical position as shown.É
CAUTION: Do Not fasten pump to a thin wood panel
wall as this might create a vibration noise when the
pump is operating.É
ÉÉ
ÉÉ
Step 3É
Close the under sink hot and cold water riser
shut-off valves and open the hot and cold water
faucets/taps to relieve the water pressure. Close the
water faucets/taps after pressure has bled from the
ÉÉ
lines.É
Note: in some older homes, the riser shut-off valves
may be difficult to shut off completely. If this is the
case turn the water off at the main water inlet valve
ÉÉ
to the house.É
Figure 2É
Figure 3É
ÉÉ
3É
Page 4

Remove the existing flexible line connection to the hot and
cold water faucet/tap threaded nipples (see Fig. 3).
(TIP:
Mark the hot and cold water flexible lines to easily
identify them).É
Note: If necessary, replace the existing flexible hosesÉ
with new stainless steel braided flexible hoses in the
lengths required.É
É
Step 4É
Screw on the two existing 1/2” hose connections to the
corresponding hot and cold sides of the pump housing
(see Fig. 4). Be sure not to “kink” these existing hose
lines during bending which may prevent adequate flow
and/or cause the valves to break.É
Note: It is recommended that the rubber washers in
the hose connections be inspected to ensure theyÉ
are in reusable condition. If not, they should be
replaced.É
Step 5É
Screw on the 3/8” end of the purchased flexible hoses
to the 3/8” connections on the pump housing. Screw
on the 1/2” end of these same two hoses to the
underside of the hot and cold water faucets/taps
making sure to match the hot and cold sides marked on
the pump housing with the corresponding faucet/tap.
Be sure the hot side connection hose is attached to the
hot water faucet/tap and the cold water side
connection is attached to the cold water faucet/tap. Be
sure the hoses used are long enough to allow the pump
to be positioned as originally planned. (see Fig. 5)É
Figure 4É
Figure 5É
Step 6É
Be sure the screw ring attaching the motor to the pump housing is securely
hand tightened. Do not over tighten the screw ring. Open the faucet/tap hot
and cold riser shut off valves to insure there are no water leaks at any
connections.É
CAUTION: Fasten screw ring until tight to prevent leakage.É
Step 7É
Plug the pump cord into the wall outlet and start up the pump system (see
next page).É
4
Page 5

Page 6

Page 7

There shall be no other warranty or obligation, expressed or implied, oral or
statutory. B&G, its agents, or employees shall in no event be liable for injury to
any person, or for any claim for damage, however arising.É
B&G shall not be liable for any incidental or consequential damages for breach
of any express or implied warranty, breach of contract, negligence, strict
liability, or any other legal theory related to this product. All consequential
expensesÉincluding loss of use, damages, or contingent liabilities arising out of
any alleged deficiencies of the Autocirc or any ancillary item packaged with the
Autocirc are specifically excluded from this warranty.É
This warranty is the sole and exclusive remedy for defects in materials and
workmanship. All implied warranties of fitness and merchantability are hereby
expressly excluded. There are no warranties that extend beyond the description
on the face hereof.É
Safety Requirements
Mechanical Safety
WARNING: - Excessive System Pressure Hazard - The maximum working pressure of the
pump is listed on the nameplate - Do Not Exceed This Pressure. Failure to follow these
instructions could result in serious personal injury, death and/or property damage.
WARNING: - Excessive Pressure Hazard Volumetric Expansion - The heating of water and
other fluids causes volumetric expansion. The associated forces may cause failure of system
components and the release of high temperature fluids. This can be prevented by installing
properly sized and located compression tanks and pressure relief valves. Failure to follow
these instructions could result in serious personal injury, death and/or property damage.
Thermal Safety
WARNING: - Extreme Temperature Hazard - If the pump, motor or piping are operating at
extremely high or low temperature, guarding or insulation is required. Failure to follow these
instructions could result in serious personal injury, death and/or property damage.
Electrical Safety
WARNING: - Electrical Shock Hazard - Electrical connections are to be made by a qualified
electrician in accordance with all applicable codes, ordinances and good practices. Failure
to follow these instructions could result in serious personal injury, death and/or property
damage.
WARNING: - Electrical Grounding Hazard - Adequate electrical grounding is required for
the safe operation of B&G Pumps. Ground the pump back to the service using a copper
conductor at least the size of the circuit connectors supplying the pump. Connect the ground
wire to the ground terminal in the wiring compartment. Failure to follow these instructions
could result in serious personal injury, death and/or property damage.
WARNING: - Risk of Electric Shock - If this pump is supplied with a grounding conductor
and grounding-type attachment plug, to reduce the risk of electric shock, be certain that it is
connected only to a properly grounded, grounding-type receptacle.
WARNING: - Risk of Electric Shock - Do not install this pump in swimming pool or marine
areas. Failure to follow these instructions could result in serious personal injury, death and/or
property damage.
7
Page 8

Xylem Inc.
8200 N. Austin Avenue
Morton Grove, Illinois 60053
Phone: (847) 966-3700
Fax: (847) 965-8379
www.xyleminc.com/brands/bellgossett
Bell & Gossett is a trademark of Xylem Inc. or one of its subsidiaries.
© 2012 Xylem, Inc. 6-71-075-111A July 2012
 Loading...