


U
User manual
Smart Bell 65/55 MF
Serial number:
Production date:

©
©
Barbas Bellfires BV
This document or parts thereof may not be reproduced, stored in a retrieval system, or transmitted,
in any form or by any means, electronic, mechanical, photocopying, recording, nor otherwise,
without the prior written permission of Barbas Bellfires BV. This document could contain technical
inaccuracies or typographical errors. Barbas Bellfires BV reserves the right to revise this document
from time to time in the contents thereof.
Contact information
Barbas Bellfires BV
Hallenstraat 17, 5531 AB Bladel, The Netherlands
Phone: +31 49 733 9200
E-mail: info@bellfires.com
Introduction
2
Smart Bell 65-55

C
Contents
1 About this document................................................................................
5
1.1 How to work with this document.................................................................................................. 5
1.2 Warnings and cautions used in this document............................................................................ 5
1.3 Related documentation................................................................................................................5
2 Description............................................................................................... 6
2.1 Intended use................................................................................................................................ 6
2.2 Overview of the appliance............................................................................................................6
2.3 Overview of the remote control....................................................................................................7
2.3.1 Overview of the buttons.................................................................................................... 7
2.3.2 Overview of the display.....................................................................................................8
2.4 Operation modes......................................................................................................................... 9
2.4.1 Thermostatic mode........................................................................................................... 9
2.4.2 Program mode.................................................................................................................. 9
2.4.3 Eco mode..........................................................................................................................9
2.4.4 Countdown timer mode.....................................................................................................9
2.5 Overview of the control elements.................................................................................................9
2.5.1 Overview of the receiver................................................................................................... 9
2.5.2 Overview of the fan/light module.....................................................................................10
3 Safety.....................................................................................................12
3.1 Safety devices on the appliance................................................................................................ 12
3.2 Safety instructions for operation................................................................................................ 12
3.3 Safety instructions with regard to the environment....................................................................13
4 Operation............................................................................................... 14
4.1 Preparation before first use........................................................................................................14
4.1.1 Do a check on the appliance...........................................................................................14
4.1.2 Prepare the appliance.....................................................................................................14
4.1.3 Connect the receiver with the remote control..................................................................14
4.1.4 Start the appliance.......................................................................................................... 14
4.2 Set the remote control settings.................................................................................................. 15
4.2.1 Set the one/two-button operation....................................................................................15
4.2.2 Set the temperature scale...............................................................................................15
4.2.3 Set the day and time....................................................................................................... 15
4.3 Operate the appliance with the remote control.......................................................................... 16
4.3.1 Operate the appliance with the remote control............................................................... 16
4.4 Change the settings...................................................................................................................20
4.4.1 Set the temperature for the thermostatic mode...............................................................20
4.4.2 Set the program mode settings.......................................................................................21
4.4.3 Set the countdown timer mode....................................................................................... 21
5 Maintenance.......................................................................................... 23
5.1 Maintenance schedule...............................................................................................................23
5.2 Clean the appliance................................................................................................................... 23
5.3 Clean the glass.......................................................................................................................... 23
Contents
Smart Bell 65-55
3

6
6 Troubleshooting..................................................................................... 24
6.1 Troubleshooting table................................................................................................................ 24
6.2 Troubleshooting procedures...................................................................................................... 24
6.2.1 Replace the batteries of the remote control.................................................................... 24
7 Technical data........................................................................................26
7.1 Technical specification / Product fiche.......................................................................................26
8 Warranty Terms..................................................................................... 28
9 EU-Declaration of Conformity................................................................ 30
Contents
4
Smart Bell 65-55

1
1 About this document
This document shows the necessary information to do these tasks on the Smart Bell
65/55 MF:
• Operate the appliance
• Do basic maintenance
This document refers to the Smart Bell 65/55 MF as 'the appliance'. This document is an
essential part of your appliance. Read it carefully before you do work on the appliance.
Keep it in a safe place.
The original instructions of the document are in English. All other language versions of
the document are translations of the original instructions. It is not always possible to
provide a detailed illustration of every single item of the equipment. The illustrations in
this document show a typical setup. The illustrations are for instructional use only.
1.1 How to work with this document
1. Make yourself familiar with the structure and content of the document.
2. Read the safety chapter in detail.
3. Make sure that you understand all the instructions.
4. Do the procedures completely and in the given sequence.
1.2 Warnings and cautions used in this document
Warning
If you do not obey these instructions, there is a risk that can cause personal injury or
death.
Caution
If you do not obey these instructions, there is a risk of damage to the equipment or to
property.
Note
A note shows more information.
Symbol Description
Visual sign that there is a hazard
Visual sign that there is a notice
1.3 Related documentation
• Preparation manual
• Installation and maintenance manual
• User manual
About this document
Smart Bell 65-55
5

2
2 Description
2.1 Intended use
Only use the appliance to heat the room in which the appliance is installed. Do not use
the appliance for a different purpose.
2.2 Overview of the appliance
Item Description
A Glass The heat resistant glass keeps the flue gas-
ses inside the appliance and closes the combustion chamber off
B Burner bed Top side of the gas burner and grate
C Pilot light burner Provides a pilot light
D Frame (there are different sizes available) A decorative edge around the glass
E Concentric flue connection The connection to the concentric flue system
that provides combustion air and extracts the
flue gases
F Inlet opening convection air An inlet opening in the front of the appliance
which is connected to the convection casing
G Outlet opening convection air An outlet opening in the front of the appliance
which is connected to the convection casing
H Overpressure door Protects the appliance against an overpres-
sure
I Control unit Contains the gas regulator block, receiver and
the fan/light module
Description
6
Smart Bell 65-55

I
Item Description
J Convection casing Collects the heated convection air. The con-
vection air has a natural upward flow and is
extracted by the upper front side openings of
the appliance
K Convection fan set (option) Pushes the heated air of the convection cas-
ing
L Hook For opening the door (including glass)
2.3 Overview of the remote control
Note:
The remote control is not interchangeable with a remote control from a
different model.
You can operate the appliance with the remote control. The remote control communicates
with the receiver.
2.3.1 Overview of the buttons
Item Description
A Display The display of the remote control.
B On/off To start and stop the appliance.
C Countdown timer To set to countdown timer mode.
D Thermostatic mode To set to thermostatic mode.
E Up To set different options.
F Program mode To set to program mode.
G Burner To set the burner mode.
H Eco mode To set to eco mode.
Description
Smart Bell 65-55
7

I
Item Description
I Down To set different options.
J Fan (option) To set to fan mode
K Light To set to light mode
2.3.2 Overview of the display
Item Description
A Child proof To show that the remote control is locked, so children cannot use
it.
B Countdown timer To show that the countdown timer is set.
C Program mode To show that the program mode is set.
D Program number To show that program 1 or 2 is active
E Temperature To show the set temperature.
F AUX function To show that both burners are on.
G Eco mode To show that the eco mode is set.
H Thermostatic mode To show that the thermostatic mode is on.
I Temperature scale To show the temperature in °C or °F.
J Battery status To show the status of the battery.
K Signal indicator To show if the signal is sent to the receiver.
L Time To show the current time.
M Fan (option) symbol To show that the fan is on
N Fan speed symbol To show the fan speed level: one to four bars
O Light symbol To show that the light is on
Description
8
Smart Bell 65-55
2
2.4 Operation modes
2.4.1 Thermostatic mode
In this mode the appliance measures the room temperature and compares this to the set
temperature. The appliance automatically adjusts the flame height to make sure that the
room temperature agrees with the set temperature.
2.4.2 Program mode
In this mode you can set two different programs. You can use these programs to start
and stop the appliance at a set temperature on specific times and days.
2.4.3 Eco mode
In this mode the flame height changes between minimum and maximum height for the
duration of a cycle:
• If the room temperature is lower than the set temperature, the flame height will stay
high for a longer period of time.
• If the room temperature is higher than the set temperature, the flame height will stay
low for a longer period of time.
A cycle in the eco mode continues for approximately 20 minutes.
2.4.4 Countdown timer mode
In this mode you can set a period of time after which the appliance stops. The countdown
timer mode only operates when the appliance is set to the manual, thermostatic or eco
mode.
2.5 Overview of the control elements
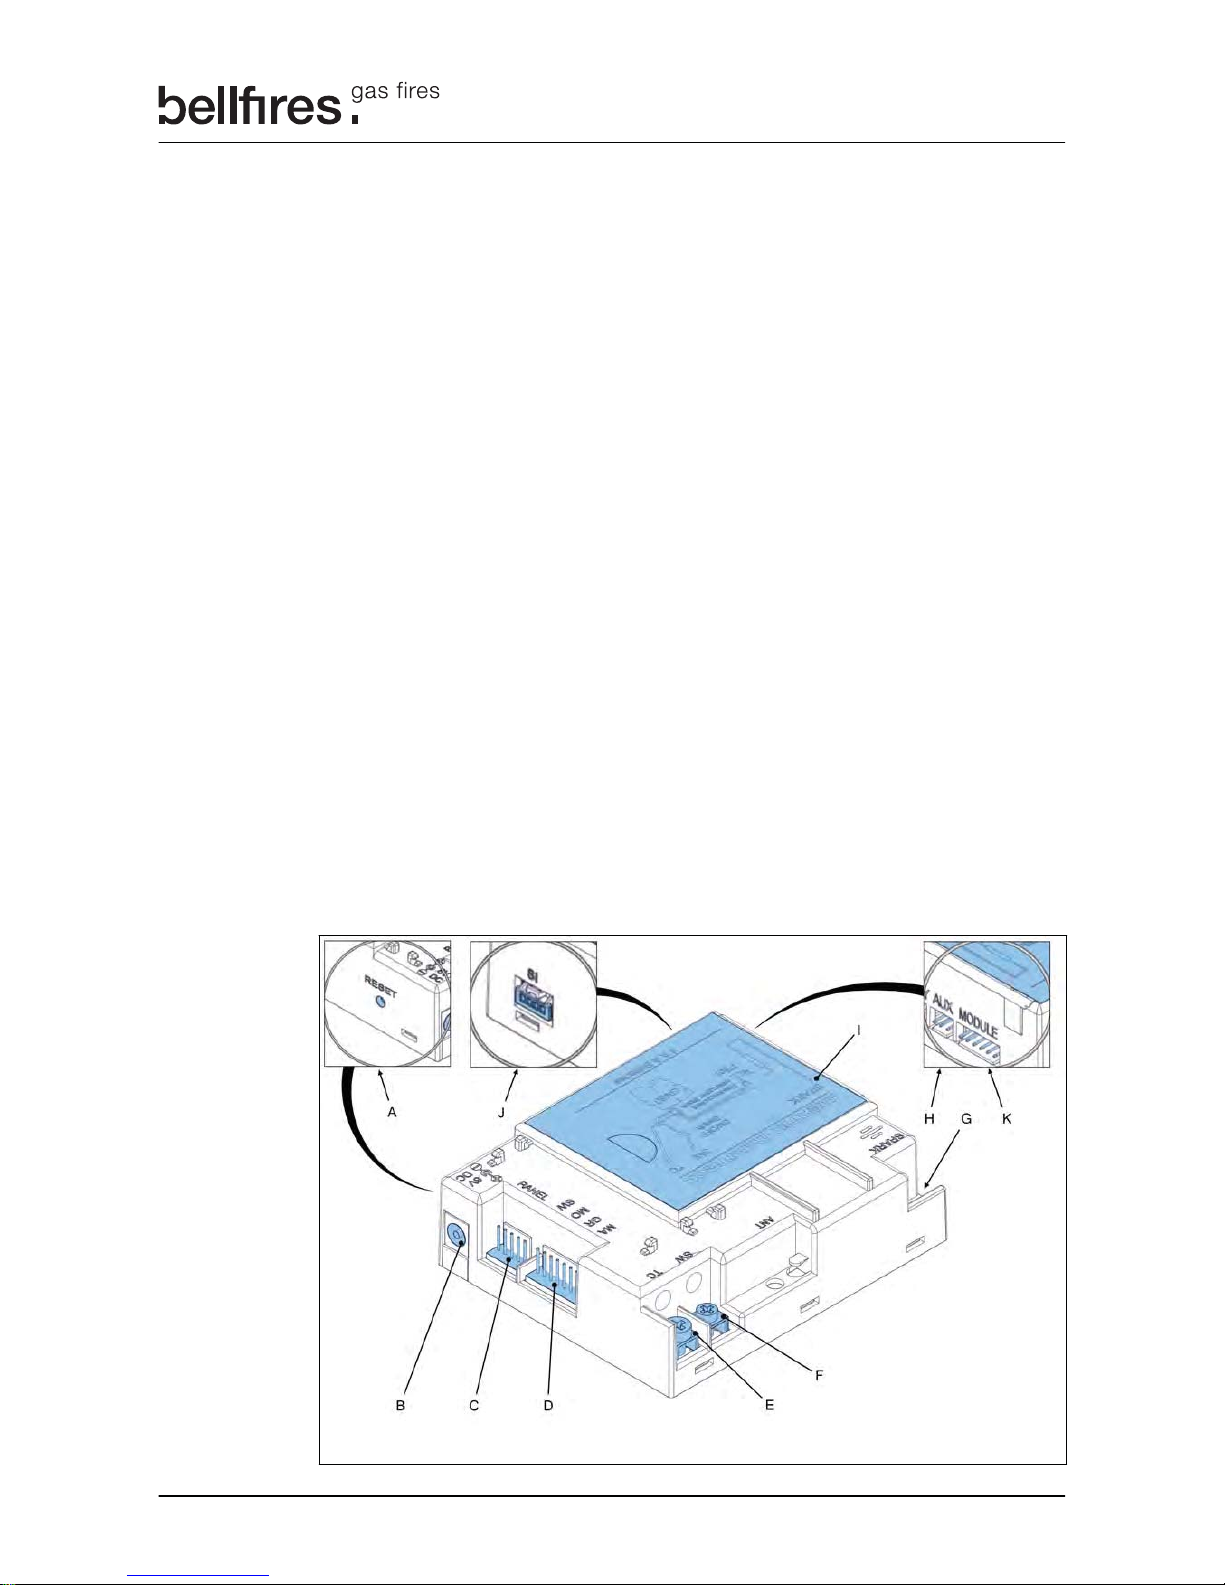
2.5.1 Overview of the receiver
Description
Smart Bell 65-55
9

I
Item Description
A Reset button Reset of the receiver
B Connection for an adapter Optionally, a 6 VDC adapter can supply the
receiver and an optional wifi-box with power
C connection for external operating Optionally, a wall switch or domotica system
can be connected
D 8 wire cable connection Sends signals to the gas regulator block
E Thermocouple voltage / current IN (red con-
nection)
Connection to the thermoelectric pilot light
shut-off wire IN
F Thermocouple voltage / current OUT (yellow
connection)
Connection to the thermoelectric pilot light
shut-off wire OUT
G Piezo cable connection Connection for the piezo cable which is con-
nected to the ignition electrode of the pilot
light
H Connection to the gas valve rear burner
(AUX)
Sends a signal if the rear burner must burn
I Battery compartment cover Batteries are not applicable in the receiver for
this appliance. (Power is supplied by the fan/
light module.)
J Connection for a wifi-box (SI) Optionally, a wifi-box can be connected to the
receiver to control the appliance with a smartphone or tablet with the Bellfires app.
K Connection for the fan/light module (MOD-
ULE)
To control the light function and optionally to
control the fan speed function
2.5.2 Overview of the fan/light module
Description
10
Smart Bell 65-55

I
Item Description
A connection for the power supply Connection for the 230 VAC power cable with
an earthed plug. Connection is also used for
earthing the appliance
B Connection for a convection fan Powers the convection fan. Optional for this
appliance
C Connection for the ambient lights Powers the ambient light bulbs
D Connection for the receiver To control the light function and optional the
convection fan function
Description
Smart Bell 65-55
11

3
3 Safety
3.1 Safety devices on the appliance
Name Description
Thermo-electric pilot light shut off Prevents unforseen discharge of gas from the main
burner.
Overpressure door If an overpressure occurs in the appliance, the door
opens for a short duration. When the door opens, a
loud noise can occur. If an overpressure occurs, the installer must do a thorough check on the appliance.
3.2 Safety instructions for operation
Warning:
• Do not put flammable items within 100 cm of the appliance.
• Do not use the appliance when the glass is removed.
• Do not use flammable fuels on the ceramic logs.
• Make sure that children are supervised when they can reach the
appliance.
• Use a fire screen for heat protection.
• Make sure that there is sufficient ventilation in the room in which the
appliance is installed.
• Do not use the appliance is case of visual glass damage.
• Make sure that the appliance is installed correctly. Refer to the Installation
and Maintenance manual. You can find the manuals on
http://
bellfires.com
.
• Make sure that the appliance is installed and connected as a 'room sealed
system' appliance by a certified and registered gas installation engineer.
Caution:
• Make sure that embers, vermiculite granules, ceramic logs or pebbles do
not touch the pilot light burner.
• Make sure that the pilot light burner is not blocked.
• Do not adjust the position of embers, vermiculite granules, ceramic logs or
pebbles on the main burner.
• Keep the remote control in a dry and cool place away from direct sunlight.
• Clean the glass when it is dirty. If the glass is not cleaned when it is dirty
the glass can become permanently dull.
• Make sure that the yearly maintenance is done.
• Do not use the appliance for 4 weeks after installation. This time is
necessary for the building materials to set.
Note:
• If you do not use the appliance for an extended period of time, close the
gas supply.
• We recommend to set the appliance to stand-by mode (only the pilot light
burns) during winter to prevent condensation in the appliance.
Safety
12
Smart Bell 65-55

3
3.3 Safety instructions with regard to the environment
• Dispose of the packing materials in an environmentally friendly way.
• Dispose of batteries as chemical waste.
• Dispose of ceramic heat-resistant glass as household waste. Do not dispose of
ceramic heat-resistant glass in a glass recycling container.
• Dispose of an obsolete appliance according to instructions of the authorities or the
fitter.
• Obey the local regulations.
Safety
Smart Bell 65-55
13

4
4 Operation
4.1 Preparation before first use
4.1.1 Do a check on the appliance
1. Make sure that the appliance is not damaged.
2. Make sure that the glass is not damaged.
3. Make sure that the pilot light operates correctly.
4.1.2 Prepare the appliance
Warning:
• Do not use the appliance for 4 weeks after installation. This time is
necessary for the building materials to set.
• Make sure that there is sufficient ventilation in the room in which the
appliance is installed.
Note:
The appliance has a heat-resistant coating. When you use the
appliance for the first time, the coating can cause an unpleasant, but harmless
smell.
1. Start the appliance, refer to section
4.3
.
2. Set the flame height to maximum, refer to
4.3
.
3. Keep the flame height to maximum for 10 minutes to make sure the chimney
becomes warm.
4. Use the appliance with maximum flame height for several hours to remove the smell
of the coating.
5. When the appliance is cool, clean the appliance. Refer to
5.2
.
4.1.3 Connect the receiver with the remote control
Note:
• You only have to connect the receiver once. Even when you change the
batteries, the remote control stores the settings.
1. On the receiver, push and hold the reset button until you hear two beeps.
2. Within 20 seconds of the second beep, push and hold the down button on the remote
control until you hear two short beeps. If you hear one long beep the receiver is not
set, try again.
The receiver is connected.
4.1.4 Start the appliance
Warning:
• Keep a minimum distance of 100 cm of the appliance when you start the
pilot light.
• When the pilot light goes out, always wait 5 minutes before you start it
again.
Operation
14
Smart Bell 65-55

N
Note:
• The main burner burns at maximal height after start-up.
• If the pilot light goes out and you start the appliance too early, the remote
control will start but the fire will not burn. Restart the remote control.
• Start the appliance with the on/off button(s). Refer to
4.3
.
4.2 Set the remote control settings
4.2.1 Set the one/two-button operation
• When the display shows '1', the one-button operation mode is selected.
• When the display shows '2', the two-button operation mode is selected. This mode will
prevent accidental start-up of the appliance.
1. Remove the batteries from the remote control.
2. Put the batteries in the remote control. The screen starts
to blink.
3. Push and hold the on/off button for approximately 10
seconds. The current setting of the remote starts to blink
4. When the number changes and stops to blink, release
the button.
• The '1' changes into '2' when the remote control is
set to the two-button operation.
• The '2' changes into '1' when the remote control is
set to the one-button operation.
4.2.2 Set the temperature scale
• If you set the temperature scale to °C, the display shows a 24-hour clock.
• If you set the temperature scale to °F, the display shows a 12-hour clock.
• Push the on/off button and the countdown timer button at the same time to change
the temperature scale between °C and °F.
4.2.3 Set the day and time
1. Push the up and down buttons at the same time. The day flashes in the display.
2. Use the up and down buttons select the day of the week (1 for Monday, 2 for
Tuesday etc.).
3. Push the up and down buttons at the same time. The hour flashes in the display.
4. Use the up and down buttons to select the hour.
5. Push the up and down buttons at the same time. The minutes flash in the display.
6. Use the up and down buttons to select the minutes.
7. Push the up and down buttons at the same time to store the day and time settings.
ON
OFF
1 2
AM
PM
Operation
Smart Bell 65-55
15

4
4.3 Operate the appliance with the remote control
4.3.1 Operate the appliance with the remote control
Table 1: Start and stop the appliance
Action Preconditions Steps Result
Start the appliance
with one-button operation
The remote control is
set to the one-button
operation. Refer to
section
4.2.1
.
Push
• You hear a short
beep.
• You can use the remote control when
the main screen
shows
Start the appliance
with two-button operation
The remote control is
set to the two-button
operation. Refer to
section
4.2.1
.
Push
and
at the same
time
Start the appliance
from stand-by mode
The appliance is set to
stand-by mode.
Push and hold
Stop the appliance
Push
Table 2: Set the appliance to different modes
Action Preconditions Steps Result
Set the appliance to
stand-by mode
Push and hold
until only the pilot light
burns
Start the child proof
mode
Push
and
at the same
time
You can only use the off
function of the remote
control.
Operation
16
Smart Bell 65-55

A
Action Preconditions Steps Result
Stop the child proof
mode
Push
and
at the same
time
Start the thermostatic
mode
Push
Stop the thermostatic
mode
Push
Start the program
mode
Push
ON
OFF
1 2
Stop the program
mode
Push
Start the eco mode
Push
Stop the eco mode
Push
Start the countdown
timer mode
Push
Stop the countdown
timer mode
Push
Operation
Smart Bell 65-55
17

T
Table 3: Start and stop the rear burner
Note:
When you start the appliance the front burner is on and the rear burner is set to
the last setting. The rear burner is always set to the last selected setting, even when
the batteries of the receiver are empty.
Action Preconditions Steps Result
Start the rear burner
Push
Stop the rear burner
Push
Table 4: Adjust the flame height
Note:
When you start the appliance the flame height is automatically set to maximum.
Action Preconditions Steps Result
Decrease the flame
height
Push and hold
until you have the desired flame height
Increase the flame
height
Push and hold
until you have the desired flame height
Set the flame height to
maximum
The background lighting is on.
Tap
twice
Set the flame height to
minimum
The background lighting is on.
Tap
twice
Table 5: Start and stop the light and adjust the brightness
Note:
The Light works independently of the Pilot flame.
Operation
18
Smart Bell 65-55
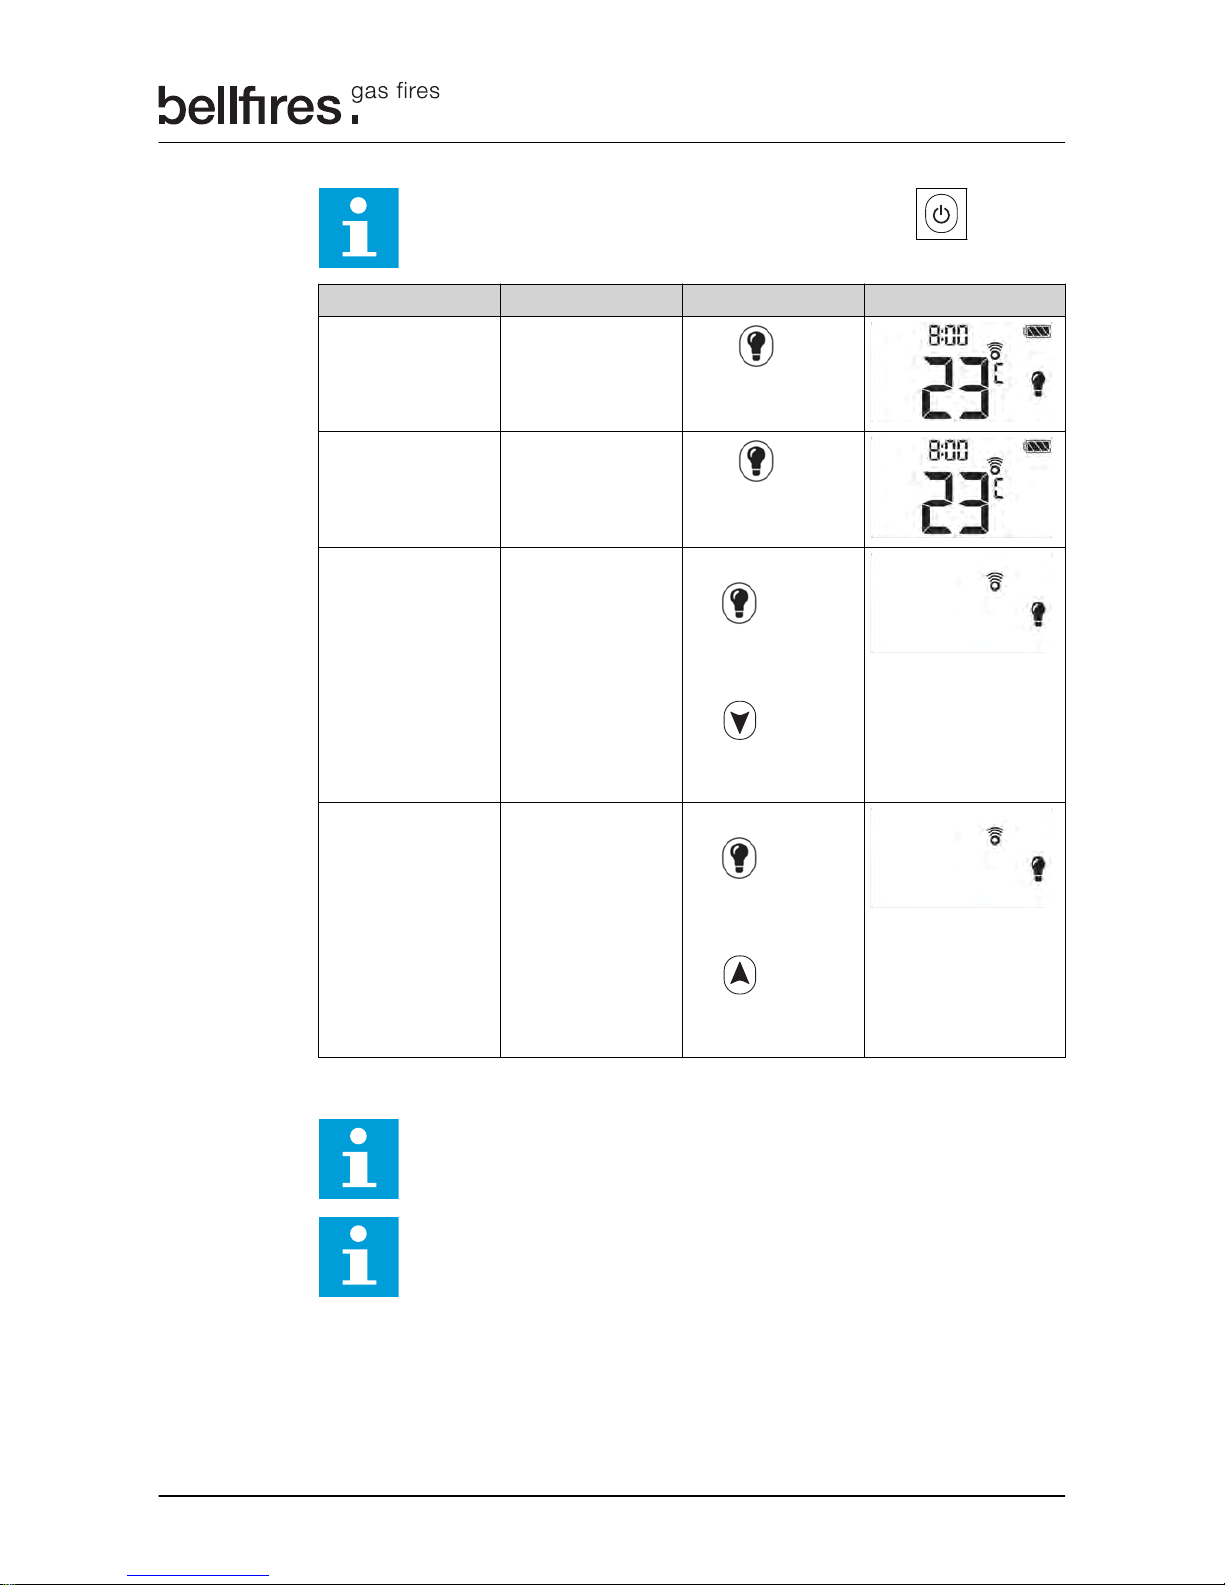
N
Note:
If the main burner and pilot light are switched off, with button , the light will
switch off automatically.
Action Preconditions Steps Result
Start the light Possible when the fire
is on or off.
Push
Stop the light
Push
Decrease the light
brightness
The light symbol is on.
• Push and hold
until the
light symbol flashes
• Push and hold
until you
have the desired
light brightness
Increase the light
brightness
The light symbol is on.
• Push and hold
until the
light symbol flashes
• Push and hold
until you
have the desired
light brightness
Table 6: Set the fan speed (option)
Note:
The convection fan turns automatically ON and OFF and has 4 rotational speeds
which can be adjusted from low (1 bar) to high (4 bars).
Note:
• ON: The convection fan will automatically turn ON about 4 minutes after the main
burner is ignited, on maximum fan speed and after 10 seconds will revert to the set
fan speed.
• OFF: It is not possible to switch the convection fan OFF while the main burner is
on. The convection fan turns OFF automatically about 10 minutes after the main
burner has been turned off. (The microswitch on the gas regulator block is now
switched on!). The pilot light can continue burning or be turned off.
Operation
Smart Bell 65-55
19

C
Caution:
Ensure that the convection fan does not run constantly and never switches off. If the
main burner is not switched off completely, (the microswitch on the gas regulator block
has not come on yet!) the convection fan will continue to run and will NOT switch off!
This can occur if the main burner is extinguished by the thermostat or is not completely
switched off manually.
Action Preconditions Steps Result
Decrease the fan
speed
The fan symbol is on.
• Push and hold
until the fan
symbol flashes
•
Push
until
you have the desired fan speed
Increase the fan
speed
The fan symbol is on.
• Push and hold
until the fan
symbol flashes
•
Push
until
you have the desired fan speed
Note:
Maximum thermostat 60°C.: The receiver in the appliance is fitted with a 60°C
maximum thermostat. When this thermostat is activated, the main burner will
be completely switched off and the pilot light will continue to burn. The
convection fan will then automatically switch to the highest setting and
continue to run for a maximum of 10 minutes. The temperature in the receiver
is measured every minute. The appliance cannot be operated again until the
temperature has returned to below 60°C.
4.4 Change the settings
4.4.1 Set the temperature for the thermostatic mode
1. Push and hold the thermostatic mode button until the
thermostatic mode symbol appears and the temperature
flashes.
2. Use the up and down buttons to set the temperature.
3. Push the thermostatic mode button to store the
temperature or wait until the temperature stops to flash.
Operation
20
Smart Bell 65-55

4
4.4.2 Set the program mode settings
Note:
• The temperature for the starting time in the program mode is the same as
the temperature that is set in the temperature mode.
• The set temperatures for the starting and stopping times of the appliance
are the same for each day.
• When the batteries are removed from the remote control, the set
temperatures, days and times are reset.
Default settings:
• Temperature when the appliance starts: 21 °C (70 °F).
• Temperature when the appliance stops: "--" (pilot light only).
1. Push and hold the program mode button until the
program mode flashes and 'ON' and the set temperature
appears.
2. Tap the program mode button to continue. The display
of the remote control shows 'OFF' and the temperature
flashes.
3. Use the up and down buttons to set the temperature for the stopping time of the
appliance.
4. Push the program mode button to store the temperature and to continue.
5. Use the up and down buttons to set the day(s) the
program is active.
Note:
'ALL' (every day), 'SA:SU' (saterday and
sunday), '1' (monday), '2' (tuesday), '3'
(wednesday), '4' (thursday), '5' (friday), '6'
(saterday) or '7' (sunday).
6. Push the program mode button to store the day.
7. Use the up and down buttons to select the hour on
which the appliance starts up.
8. Push the program mode button to store the hour.
9. Select the minutes on which the appliance starts up and
push the program mode button.
10. Select the hour and minutes for the stop time of the appliance.
11. If you do not want program 2 active in program mode, wait for the blinking to stop to
save the settings.
12. If you want program 2 active, push the program mode button and set the on and off
time for program 2.
13. Wait for the blinking to stop to save the settings.
4.4.3 Set the countdown timer mode
Note:
The maximum period of time you can set for this mode is 9 hours and
50 minutes.
ON
OFF
1 2
ON
1
Operation
Smart Bell 65-55
21

1. Push and hold the countdown timer button until the
display shows the countdown timer symbol and the hour
flashes.
2. Use the up and down buttons to select the number of
hour.
3. Push the countdown timer button to store the hour. The minutes flash on the display.
4. Use the up and down buttons to select the number of minutes.
5. Push the countdown timer button to store the minutes.
6. Push the countdown timer button to confirm the countdown or wait.
Operation
2
22
Smart Bell 65-55
5
5 Maintenance
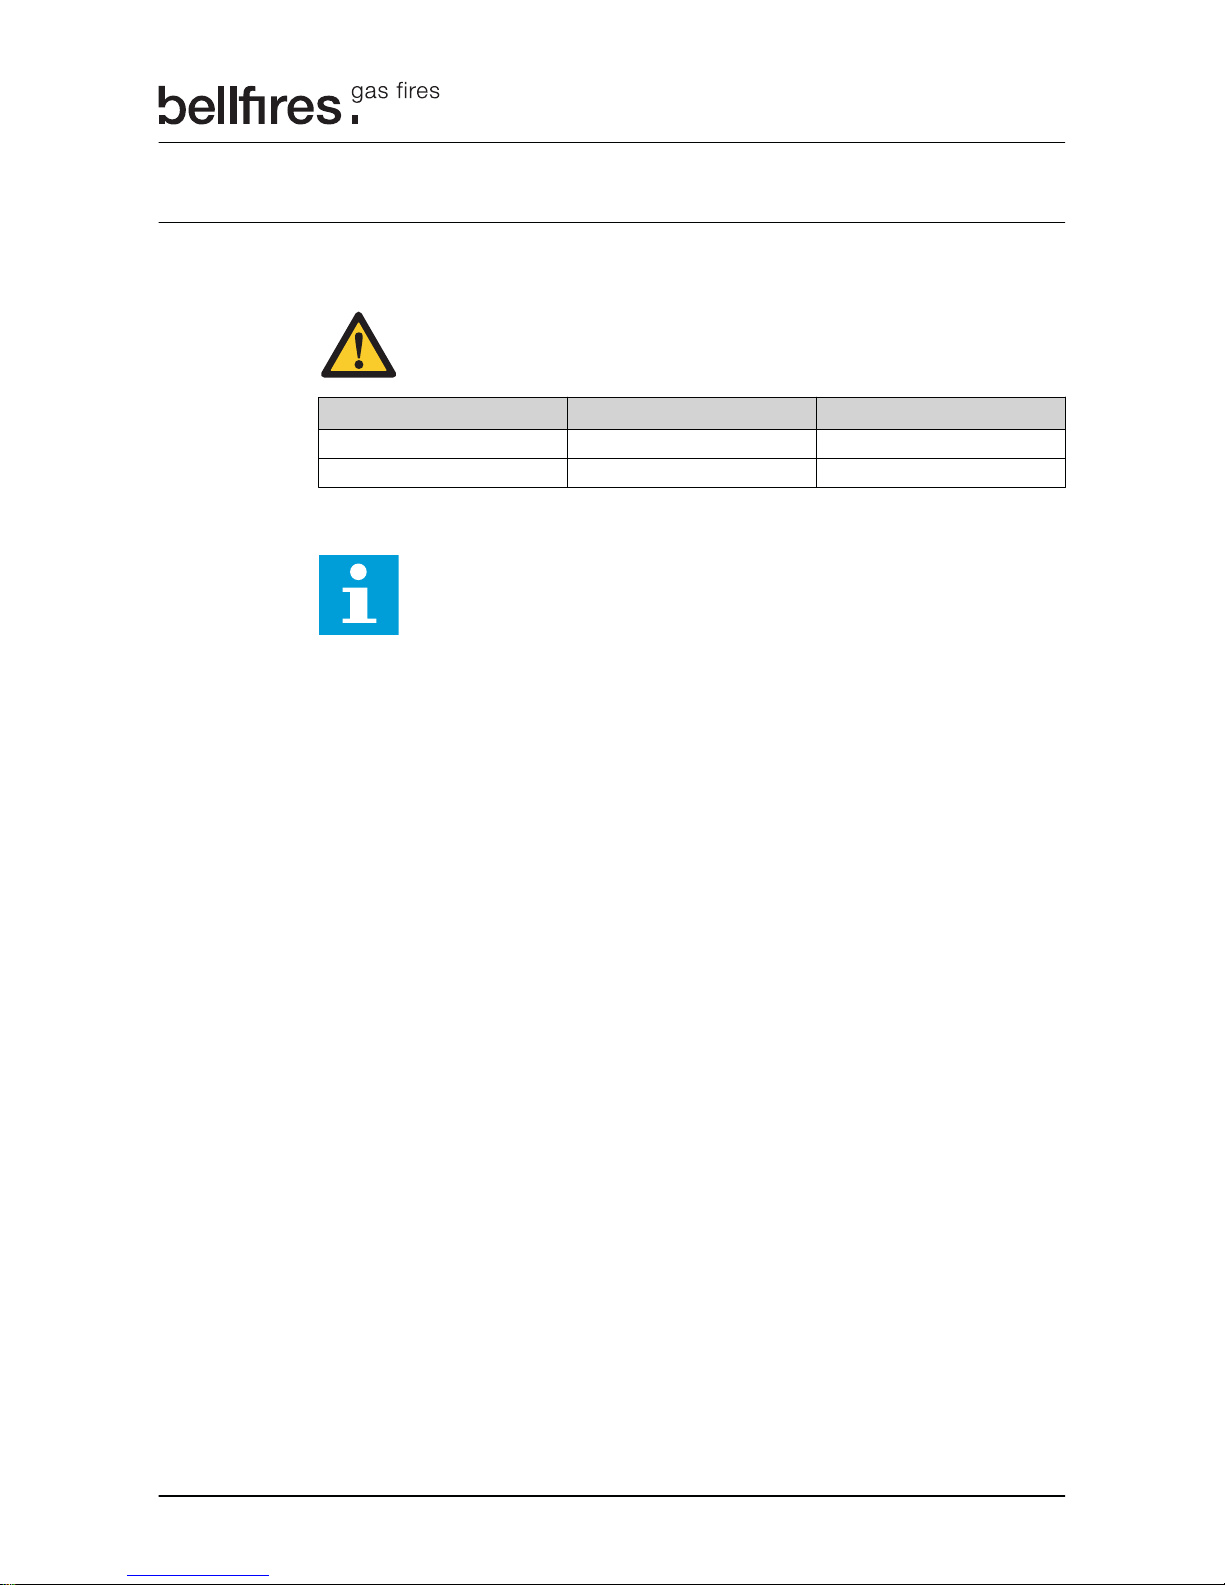
5.1 Maintenance schedule
Caution:
Clean the glass when it is dirty. If the glass is not cleaned when it is dirty the
glass can become permanently dull.
Task Frequency Procedure
Clean the appliance Daily Refer to section
5.2
Maintenance by your fitter Yearly Refer to your fitter/dealer
5.2 Clean the appliance
Note:
• Use gloves to avoid visible fingerprints on the glass.
• If you use a vacuum lifter to remove the glass, make sure that the suction
pads are clean and dry. If the suction pads are not clean or dry, the suction
pads can leave a mark.
1. Make sure that the appliance is off and is cooled down.
2. Remove any dust from the operating unit. Use a vacuum cleaner.
3. Do a check on the glass for damage. If you see damage, replace the glass. Do not
use the appliance before the glass is replaced. For disposal of the glass, refer to
3.3
.
4. Clean the glass.
a) If the inner side is dirty, remove the glass. Refer to the Installation and
maintenance manual.
b) Clean the glass, refer to
5.3
.
c) Install the glass. Refer to the Installation and maintenance manual.
5.3 Clean the glass
1. Clean the glass with a soft cloth, a sponge or paper. Use glass cleaner or ceramic
hob cleaner.
2. Make sure that the glass is dry. Water droplets can leave a mark on the glass.
Maintenance
Smart Bell 65-55
23

6
6 Troubleshooting
6.1 Troubleshooting table
Problem Possible cause Possible solution
The pilot light does not come
on after three attempts.
• Close the gas supply
• Contact your fitter.
The burner does not operate
within 10 seconds of firing the
pilot light.
When the burner starts you
hear a 'boom' sound.
You hear a loud noise when the
overpressure door opens.
You hear a continuous beep for
five seconds.
One of the cables is disconnected.
Contact to your fitter.
The appliance does not start. The gas supply is off. Open the gas supply.
The battery status of the remote control is empty
The batteries of the remote
control are empty.
Replace the batteries of the remote control. Refer to section
6.2.1
.
The appliance does not respond to the remote control.
The batteries of the remote
control are empty.
The system has a failure. On the receiver, push the reset
button.
There is no power supply (230
VAC).
Repair the power supply.
The appliance regularly stops
for no reason.
Contact your fitter.
The glass is broken or cracked Replace the glass. For disposal
of the glass refer to
3.3
.
The lacquer of the appliance is
damaged
Contact your fitter.
6.2 Troubleshooting procedures
6.2.1 Replace the batteries of the remote control
Caution:
• Only replace the batteries when the appliance is off.
• If you put the batteries in an incorrect position, this can cause damage to
the electrical connections.
• Do not use rechargeable batteries.
Note:
We recommend the use of alkaline batteries.
Troubleshooting
24
Smart Bell 65-55

1. Remove the cover of the remote
control.
2. Remove all batteries.
3. Install new batteries. For approved
batteries, refer to section
7
.
4. Close the cover of the remote
control.
1
2
Troubleshooting
Smart Bell 65-55 2
25

7
7 Technical data
7.1 Technical specification / Product fiche
Table 7: Smart Bell 65/55 MF (MagniFire) - GB, IE, ES, IT
Natural gas Butane/ Propane
Name Bellfires Bellfires
Model Smart Bell 65/55 MF Smart Bell 65/55 MF
Country GB, IE, ES, IT GB, IE, ES, IT
Product identification no 0063CM3684 0063CM3684
Indirect heating functionality No No
Type of appliance under CEnorm
C
11
/ C31 / C
91
C11 / C31 / C
91
Category of appliance I2H natural gas G20 I
3B/P
butane/propane G30/G31
Energy efficiency class B B
Energy efficiency index (EEI) 86 87
Nominal heat input
(Gross calorific value)
6.0 kW Butane (G30) : 6.2 kW
Propane (G31) : 5.2 kW
Nominal heat output 4.8 kW Butane (G30) : 5.0 kW
Propane (G31) : 4.2 kW
Minimum heat output (indicative)
2.3 kW Butane (G30) : 2.5 kW
Propane (G31) : 1.9 kW
Useful efficiency (Net Calorific
Value (NCV)) at nominal heat
output
88.3 % 89.9 %
Useful efficiency (Net Calorific
Value (NCV)) at minimum heat
output (indicative)
82.7 % 86.6 %
NO
X
(max.) (Gross Calorific
Value (GCV))
<130 mg/kWh
input
<130 mg/kWh
input
NOX class 4 4
Gas rate (max.) 0.57 m
3
s
/hr. Butane (G30) : 470 gr/hr.
Propane (G31) : 380 gr/hr.
Supply pressure 20.0 mbar Butane (G30) : 37.0 mbar
Propane (G31) : 37.0 mbar
Batteries remote control receiv-erNone None
Batteries remote control hand
transmitter
2x 1.5V AAA 2x 1.5V AAA
Electrical connection 230 VAC / 50 Hz 230 VAC / 50 Hz
Auxiliary electricity consumption at nominal heat output
0.05 kW / 0.09 kW incl. fan 0.05 kW / 0.09 kW incl. fan
Auxiliary electricity consumption at minimum heat output
0 kW 0 kW
Technical data
26
Smart Bell 65-55

N
Natural gas Butane/ Propane
Auxiliary electricity consumption in standby mode
0 kW 0 kW
The specific precautions that
shall be taken when the local
space heater is assembled, installed or maintained, are listed
in the attached documents:
• Preparation manual
• Installation and maintenance manual
• User manual
• Preparation manual
• Installation and maintenance manual
• User manual
Technical data
Smart Bell 65-55
27

8
8 Warranty Terms
Barbas Bellfires Warranty Terms
Barbas Bellfires B.V. guarantees the quality of the supplied Bellfires appliance and the
quality of the materials used. All Bellfires appliances are developed and manufactured
according to the highest possible quality standards. If, despite all this, something should
prove amiss with the Bellfires appliance you have purchased, Barbas Bellfires B.V. offers
the following manufacturer’s warranty.
Article 1: Warranty
1. If Barbas Bellfires B.V. determines that the Bellfires appliance you have purchased is
defective as a result of a flaw in the construction or material, Barbas Bellfires B.V.
guarantees to repair or replace the appliance free of charge, without charging any
costs for labour or spare parts.
2. Repair or replacement of the Bellfires appliance will be undertaken by Barbas
Bellfires B.V. or by a Bellfires dealer as designated by Barbas Bellfires B.V.
3. This warranty is supplementary to the existing legal national warranty of Bellfires
dealers and Barbas Bellfires B.V. in the country of purchase and is not intended to
restrict your rights and claims based on the applicable legal provisions.
Article 2: Warranty conditions
1. Should you wish to claim under the warranty, please contact your Bellfires dealer.
2. Complaints should be reported as quickly as possible after they have manifested
themselves.
3. Complaints will only be accepted if they are reported to the Bellfires dealer, together
with the serial number of the Bellfires appliance which is stated on the front of the
user manual.
4. In addition, the original receipt (invoice, receipt, cash receipt) showing the date of
purchase must also be submitted.
5. Repairs and replacements during the warranty period do not give any entitlement to
an extension of the warranty period. After a repair or replacement of warranty parts,
the warranty period shall be deemed to have started on the date of purchasing the
Bellfires appliance.
6. If a certain part is eligible for the warranty and the original part is no longer available,
Barbas Bellfires B.V. shall ensure that an alternative part of at least the same quality
shall be provided.
Article 3: Warranty exclusions
1. The warranty on the Bellfires appliance ceases to be in effect if:
a. it is not installed according to the supplied installation instructions, and to
national and/or local regulations;
b. it has been installed, connected or repaired by a non-Bellfires dealer;
c. it has not be used or maintained according to the instructions for use;
d. it has been changed, neglected or roughly treated;
e. it has been damaged as a result of external causes (outside the hearth itself), for
example, lightning strike, water damage or fire;
2. In addition, the warranty lapses if the original purchase receipt shows any change,
deletion, removal or if it is illegible.
Warranty Terms
28
Smart Bell 65-55

A
Article 4: Warranty area
1. The warranty is only valid in those countries where Bellfires appliances are sold
through an official dealer network.
Article 5: Warranty period
1. This warranty will only be granted during the warranty period.
2. The body of the Bellfires appliance is guaranteed for a period of 10 years against
construction and/or material faults, starting from the moment of purchase.
3. For other parts of the Bellfires appliance, a similar warranty applies from the moment
of purchase for a period of one year.
4. For user parts such as glass, glass (cord), thermocouple and the interior of the
combustion chamber, a similar guarantee is given until after the first burning.
Article 6: Liability
1. A claim granted by Barbas Bellfires B.V. under this warranty does not automatically
imply that Barbas Bellfires B.V. also accepts liability for any possible damage. The
liability of Barbas Bellfires B.V. never extends further than that stated in these
warranty conditions. Any liability of Barbas Bellfires B.V. for consequential damage is
expressly excluded.
2. That stated in this provision is not valid if and to the extent that is derives from a
mandatory provision.
3. All agreements entered into by Barbas Bellfires B.V. are, unless specifically stated
otherwise in writing and to the extent that they are permitted based on applicable
law, subject to the FME-CWM general sales and delivery conditions for the
technology industry.
Barbas Bellfires B.V.
Hallenstraat 17 5531 AB Bladel
The Netherlands
Tel: +31-497339200
Email: info@Bellfires.com
Carefully retain the user manual; it shows the serial number of the appliance. You will
need this if you wish to claim under the warranty.
Warranty Terms
Smart Bell 65-55
29

9
9 EU-Declaration of Conformity
EU-Declaration of Conformity
30
Smart Bell 65-55

EU-Declaration of Conformity
Smart Bell 65-55 3
31

Y
Your Bellfires dealer
001 - 10.04.2018 -
347173
 Loading...