

Page 1
TRAILBLAZER
I
T
. Manuale Trailblazer do
ppi
a funzione
anu
f
unc
aze
r
F
P
ręc
pr
zyc
zep
S
IT. Manuale Trailblazer doppia funzione
EN. Manual dual function Trailblazer
EN. M
FR. Manuel du Trailblazer double fonction
DE. Handbuch Doppelfunktions-Fahrradanhänger
DE. Handbuch Doppelfunktions-Fahrradanhänger
ES. Manual Trailblazer doble función
ES. Manual Trailblazer doble función
PL. Dwufunkcyjna ręczna przyczepka
SR. Uputstvo za dvosruku upotrebu kolica Trailblazer
al dual
R. Manuel du Trailblazer double fonction
L. Dwufunkcyjna
R. Uputstvo za dvosruku upotrebu kolica Trailblazer
tion Trailbl
zna
ka
1
Page 2
Modello: BT3720 con kit passeggino
0
1
2
Page 3
3
54
6 7 8
11
9
10
Page 4
12 13
14 15
181716
19
20 21
Page 5
IT
EN
FR
DE
ES
PL
SR
06
10
14
18
22
26
30
TRAILBLAZER
Page 6

IT
ATTENZIONE:
Prima di montare e di utilizzare il prodotto
si prega di leggere attentamente le presenti
istruzioni. La mancata osservanza delle istruzioni
contenute in questo manuale può arrecare danni
o lesioni.
Tutte le gure qui sopra sono da intendersi
esclusivamente a titolo di riferimento, si prega di
riferirsi al prodotto reale.
Montaggio e smontaggio del carrello
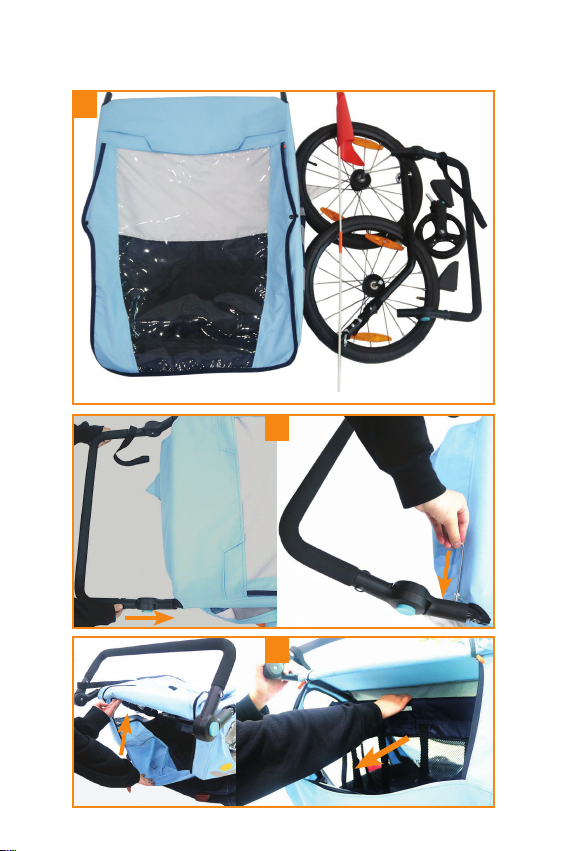
Passaggio 1: Quando si inizia a montare il carrello, prima di tutto montare il manubrio sul telaio.
Fissarlo con le viti esagonali.
Passaggio 2: Il meccanismo pieghevole è all’interno della tasca posteriore. Aprire prima la tasca
posteriore, quindi tirare all’indietro il tubo posteriore.
Passaggio 3: Chiudere le bbie su entrambi i lati. La leva bianca si sserà automaticamente
mettendosi in posizione.
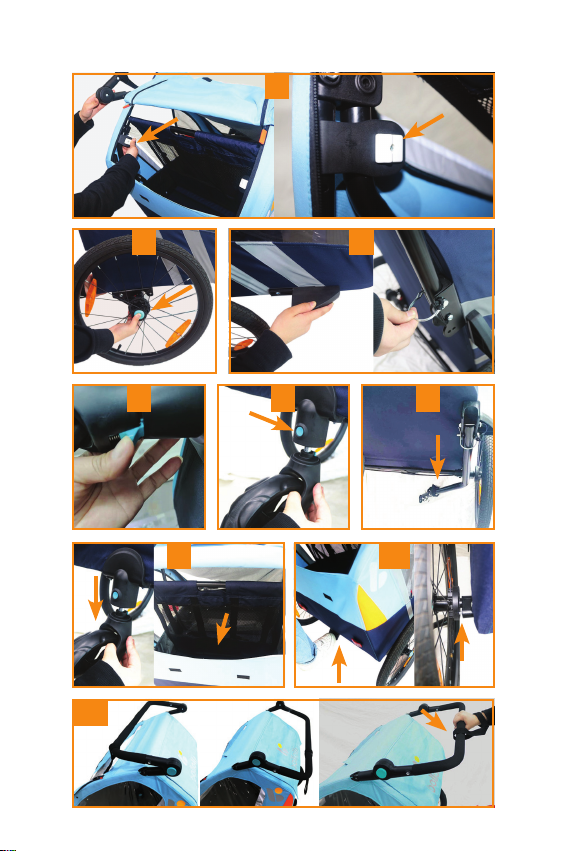
Passaggio 4: Sbloccare il freno di stazionamento. Tenere premuto il pulsante e inserire l’asse
della ruota nella fessura. L’asse si bloccherà automaticamente. Vericare che la ruota sia ssata
in modo sicuro. Per rimuoverla: premere nuovamente il pulsante ed estrarre la ruota dall’asse.
Passaggio 5: Montare l’ala in plastica facendola scivolare dalla parte anteriore verso l’estremità
(su entrambi i lati). Inserire il gancio di traino e farlo scivolare in posizione no ad allineare i fori.
Passaggio 6: Quando si utilizza come passeggino: inserire la ruota Anteriore (7”) nel supporto.
Avviso: assicurarsi sempre che la ruota del passeggino sia ssata in modo completo, appropriato
e che sia bloccata!
Passaggio 7: Premere il pulsante di orientamento per determinare la direzione. Rilasciarlo di
nuovo per farlo girare in tutte le direzioni.
Passaggio 8: Rilasciare il perno di bloccaggio e far scivolare il gancio di traino all’indietro, quindi
bloccarlo quando in posizione (modalità passeggino).
Passaggio 9: Quando si utilizza come carrello da bicicletta: premere il pulsante blu per rimuovere la ruota anteriore. Posizionarla nel contenitore posteriore.
Attenzione: Per bloccare la ruota anteriore impedendo che ruoti quando è ferma premere
il pulsante di orientamento.
Premere il pulsante rotondo blu per sbloccarlo.
Passaggio 10: Per attivare il freno di stazionamento schiacciare il pedale. Risollevarlo prima di
camminare o prima di salire sulla bicicletta.
Attenzione: Si prega di controllare che il freno sia in buono stato d’uso.
Passaggio 11: Manubrio con 8 posizioni per raggiungere la giusta altezza da 78 cm a 115 cm e
venire incontro alle esigenze della maggior parte delle persone.
Attenzione: Quando il carrello viene utilizzato come passeggino per sicurezza si prega di
utilizzare sempre il cinturino da polso.
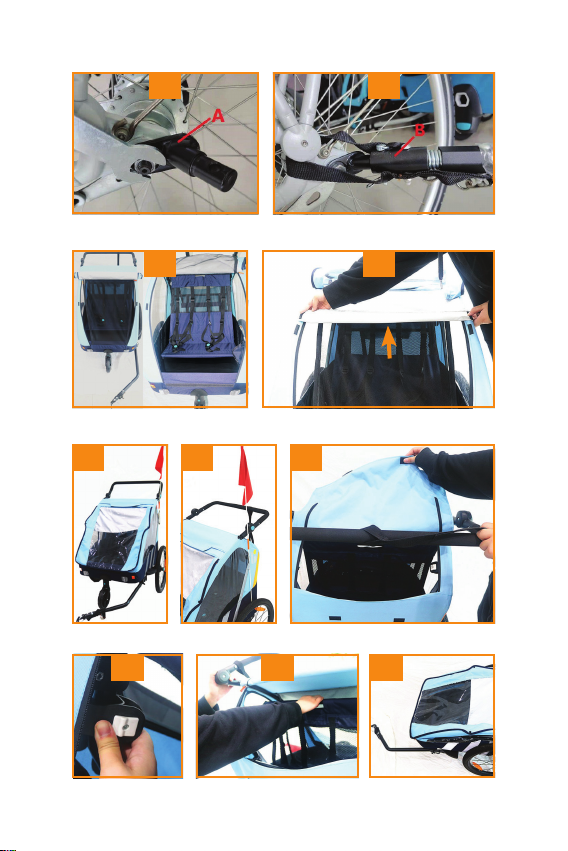
Passaggio 12: Bicicletta: rimuovere il dado e la rondella dall’estremità sinistra dell’asse.
Utilizzare una chiave inglese per ssare l’attacco (A) all’asse della ruota posteriore.
Quindi stringere il dado alla coppia raccomandata dal produttore della bicicletta.
Passaggio 13: Far scivolare il tubo di collegamento (B) sulla coppia (A) e ssarlo con il perno.
Quindi avvolgere il cinturino di sicurezza intorno al telaio della bicicletta e agganciare il morsetto
sul gancio di traino.
6
Modello: BT3720 con kit passeggino
Prima di iniziare il montaggio, si prega
di controllare il contenuto del pacco:
• 1 x carrello ripiegato
• 1 x ruota girevole anteriore da 7”
• 2 x ruote posteriori da 20”
• 1 x gancio di traino
• 1 x manubrio
• 2 x viti M4
• 2 x paraurti
• 1 x bandiera
Page 7
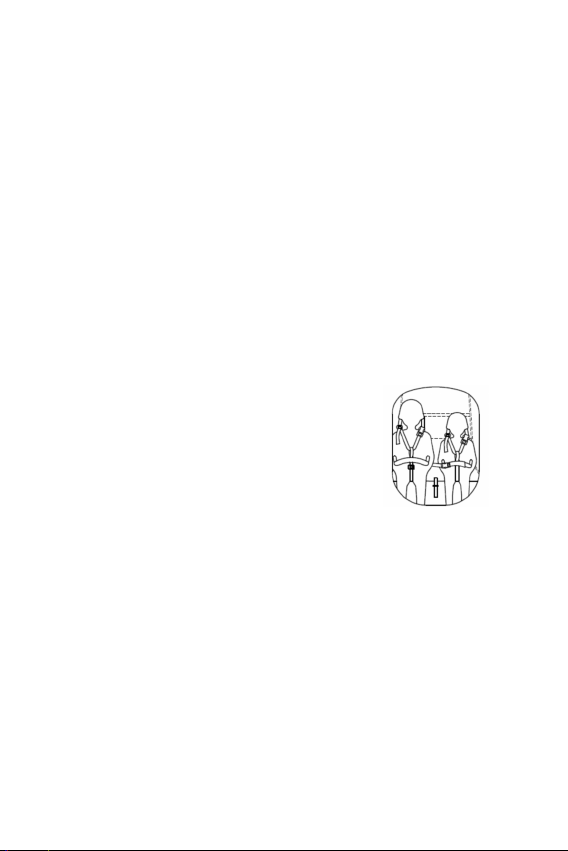
AVVERTENZA! Controllare attentamente che la cintura di sicurezza non vada a interferire
con le parti mobili della bicicletta. Se necessario, avvolgerla più volte intorno al telaio.
Passaggio 14: Quando il bambino è nel carrello, utilizzare e regolare sempre attentamente le
cinture di sicurezza.
Quando un solo bambino è seduto nel carrello, farlo sedere sempre sul lato destro. Il sedile non
è adatto per bambini di età inferiore ai 6 mesi.
Passaggio 15: Il parasole è situato nella tasca superiore. Quando necessario, può essere
estratto dalla tasca utilizzandolo direttamente.
Passaggio 16: La copertura trasparente serve a proteggere i bambini dalla pioggia e dalla
polvere. Generalmente, la copertura per la pioggia è arrotolata. In caso di necessità, tirare giù
la copertura trasparente e legare i ganci in plastica nell’anello situato davanti alla calotta alla
calotta.
Passaggio 17: Prima di utilizzare il carrello, inserire la bandiera di sicurezza nel manicotto in
tessuto posizionato sul lato sinistro. Questa operazione è molto importante, perché il carrello può
passare facilmente inosservato nel trafco.
Passaggio 18: Quando si piega il carrello, rimuovere per prima cosa la bandiera di sicurezza.
Quindi portare il manubrio in posizione orizzontale e aprire la fodera della nestra posteriore.
Passaggio 19: Per rilasciare il dispositivo di bloccaggio far scivolare il pulsante bianco all’indietro. Quindi aprire il morsetto in plastica.
Passaggio 20: Spingere in avanti il tubo posteriore orizzontale.
Passaggio 21: Per piegare il carrello premere la parte superiore di entrambi i lati.
Istruzioni per l’uso della cintura di sicurezza.
Innestare il freno di stazionamento.
Aprire le coperture anteriori.
Allentare le cinture di sicurezza.
AVVERTENZA!
Regolare sempre le bretelle e la cintura inguinale in modo che si
trovino all’altezza della parte inferiore del busto del bambino. Se le
bretelle e le bbie vengono posizionate vicino al collo del bambino
possono provocare gravi danni.
UN BAMBINO
1. Estrarre la cintura a cinque punti dal blocco di sicurezza. (Vedere sotto)
2. Far sedere il bambino su un sedile qualsiasi.
3. Posizionare la cintura inguinale tra le gambe del bambino e regolarla in modo che il gancio
della cintura si trovi al centro nella parte inferiore del busto del bambino.
4. Posizionare le bretelle destra e sinistra e la cintura inguinale. (Il corpo principale della cintura a
5 punti è ssato sempre alla cintura inguinale).
5. Allacciare le bretelle e la cintura inguinale, quindi stringere.
DUE BAMBINI
1. Slacciare la cintura a 5 punti dal blocco di sicurezza per entrambi i lati.
2. Far sedere i bambini nel carrello.
3. Posizionare la cintura inguinale tra le gambe del bambino e regolarla in modo che il gancio
della cintura sia centrale rispetto alla parte inferiore del busto del bambino per entrambi i lati.
4. Fissare le bretelle destra e sinistra e la cintura inguinale su entrambi i lati (i corpi principali dei
blocchi di sicurezza a 5 punti sono ssati sempre alla cintura inguinale).
5. Allacciare le bretelle e la cintura inguinale, quindi stringere.
IT
7
Page 8

IT
ISTRUZIONI GENERALI DI SICUREZZA
1. Conservare le presenti istruzioni per riferimenti futuri. La mancata osservanza di queste
istruzioni può provocare danni al bambino.
2. Non lasciare mai il bambino incustodito nel carrello.
3. Attivare il freno ogni volta che il carrello viene parcheggiato.
4. Questo prodotto può avere due funzioni: carrello della bicicletta e passeggino.
5. Quando viene utilizzato come carrello, la ruota anteriore deve essere bloccata, quindi
conservata nella custodia laterale.
6. Carico massimo: BT3720: 41 kg inclusi passeggeri e carico.
7. Peso totale massimo 59,50kg.
8. Età minima dei passeggeri: 9 mesi o che siano in grado di stare seduti senza aiuto.
9. Altezza massima del passeggero: 71,5cm
10. Numero massimo di passeggeri: 2 bambini.
11. Velocità massima = 25 km/h
12. La pressione massima della ruota è 43 psi.
13. Capacità massima di carico del manubrio: 4,5kg.
14. Non attaccare mai il carrello a una bici da corsa o a una mountain bike.
15. La persona alla guida della bicicletta deve essere un adulto in buone condizioni siche; si
raccomanda maggiore attenzione quando si è alla guida.
16. I bambini nel carrello devono indossare sempre un casco omologato.
17. Le cinture di sicurezza devono essere regolate attentamente e devono essere chiuse.
18. Si prega di montare il carrello esattamente come indicato nelle presenti istruzioni.
19. Non apportare modiche al carrello.
20. Non parcheggiare il carrello vicino a un solco o una strada pericolosa.
21. Non mettere niente vicino al bambino quando è seduto nel carrello in quanto potrebbe essere
pericoloso e provocare lesioni.
22. Prima di usare il prodotto assicurarsi che tutti i dispositivi di bloccaggio/chiusura siano attivati
e che siano ben funzionanti.
23. Per evitare danni, quando il carrello viene piegato/aperto assicurarsi che il bambino sia
distante.
24. Evitare che il bambino giochi con il prodotto.
25. Utilizzare sempre il sistema di ritenuta.
26. Prima dell’uso, controllare regolarmente l’unità sedile; controllare che sia posizionata in modo
corretto
27. Questa unità sedile non è adatta ai bambini di età inferiore ai 6 mesi.
28. Il carrello della bicicletta deve essere sempre coperto e chiuso durante la guida per evitare
che i detriti entrino al suo interno.
29. Quando si utilizza la funzione passeggino non correre e non andare sui pattini.
30. Quando si fa sedere il bambino e quando lo si toglie il freno di stazionamento deve essere
sempre attivato.
31. Quando è attaccato il carrello aumentare la distanza di frenata della bicicletta.
32. Qualsiasi carico attaccato al manubrio e/o ai lati del veicolo avrà effetti sulla stabilità dello
stesso causando seri danni.
33. Non utilizzare accessori non approvati dal produttore.
34. Utilizzare esclusivamente parti di ricambio fornite o raccomandate dal produttore/distributore.
35. Controllare la pressione delle gomme durante il montaggio e prima di ogni tragitto, controllare
periodicamente il prodotto mantenendolo pulito.
36. Quando i bambini sono seduti nel carrello tenere il prodotto lontano dal fuoco o da sorgenti
di calore.
8
Page 9
37. Evitare che parti mobili della bicicletta entrino in contatto con parti del corpo del bambino,
vestiti, lacci delle scarpe o giocattoli.
38. Utilizzare sempre la bandiera di sicurezza.
39. Prima di attaccare il carrello alla bicicletta, se ne raccomanda il controllo da parte di un
meccanico per biciclette qualicato.
Importato da Bellelli srl - Via Meucci, 232 - 45021 Badia Polesine (Ro) Italia
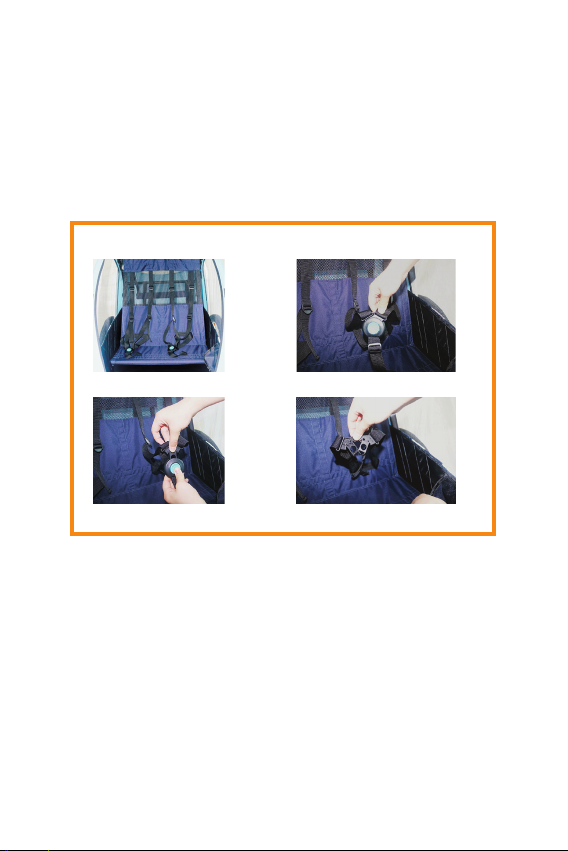
Istruzioni per il secondo blocco di sicurezza
Premere il pulsante blu.
MADE IN CHINA
IT
Estrarre il blocco di sicurezza
Rilasciare
9
Page 10

EN
ATTENTION:
Please read this instruction carefully before
mounting and using.
Disregarding the directions in this manual can
cause damage or injury.
All above pictures are for reference only, please
subject to real product picture.
Trailer assembly & disassembly
Step 1: When starting to assemble the trailer, rst assemble the handle-bar with the frame. Fix it
with the hexagon screws.
Step 2: The folding mechanism is inside the rear pocket. Open the rear pocket rst, then pull the
rear tube backwards.
Step 3: Close the buckles on both sides. The white lever will be xed and set automatically into
position.
Step 4: Disengage the parking brake. Press and hold the soft button and insert the wheel axle
into the socket.
The axle will be locked automatically. Verify the wheel is securely attached. To remover: press
the soft button again and pull the wheel out of the axle.
Step 5: Install the plastic wing sliding it from the front near the end (at both sides).
Insert the tow bar and slide it inwards into position until the front hole aligns with the hole
Step 6: When in using as a stroller: insert the front wheel (7”) into the bracket. Warning: always
make sure the stroller wheel is properly and fully engaged and locked!
Step 7: Press the orientation button for a xed direction. Release it again for all directions
swiveling function.
Step 8: Release the locking pin and slide the tow-bar backwards and lock it when in position
(stroller mode).
Step 9: When in using as a bike trailer: press the blue button to remove the front wheel. Stow the
front wheel on the rear console box.
Attention: Press the orientation button to lock the front wheel to avoid swiveling when in
rest. Press the blue round button to release it.
Step 10: Step on the pedal to activate the parking brake. Release it again before strolling or
riding.
Attention: Please check if the brake is in good working condition when in use.
Step 11: Handle-bar with 8 positions to create a convenient height from 78cm to 115cm and
meeting most people’s operating requirement.
Attention: When the trailer is being used as a stroller, please always use the wrist strap for
security.
Step 12: Bike: remove the nut and washer from the left end of the axle. Use a wrench to x
the coupler (A ) with the rear wheel axle. Then tighten the nut to the bicycle manufacturer’s
recommended torque.
Step 13: Slide the connection tube (B) over the coupler (A) and xed it with the shackle. Then
loop the back-up safety strap around the bicycle frame and hook the clip back on to the tow bar.
NOTE ! Carefully check whether the safety belt cannot come in-between the moving parts
of the bicycle. If required, wind it around the frame several times.
10
Model: BT3720 with stroller kit
Before you start assembly, please check
the contents of the carton:
• 1 x trailer folded
• 1 x 7” front swivel wheel set
• 2 x 20” rear wheels
• 1 x tow bar
• 1 x handle-bar set
• 2 x M4 screws
• 2 x bumpers set
• 1 x ag
Page 11
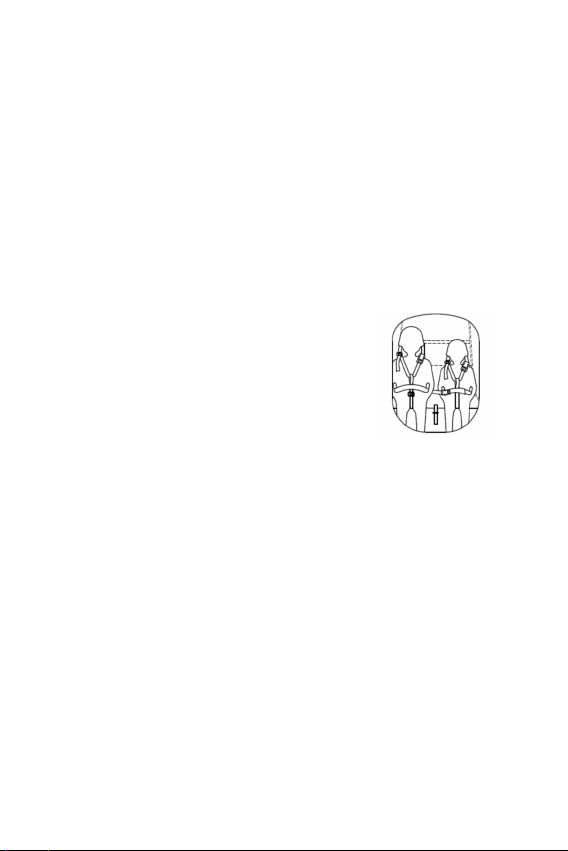
Step 14: When the child is in the trailer, the safety straps should always be used and adjusted
carefully. When seating a single child in the trailer, always seat the child on the right side. The
seat is not suitable for children under 6 months.
Step 15: The sunshade is stored in the top pocket. When needed, it can be pulled out from the
pocket for direct use.
Step 16: The transparent cover is made to protect the kids from rain and dust. Usually, the rain
cover is rolled up. In case you need it, pull the transparent cover down and fasten the plastic
hooks with the loop on the front of the canopy.
Step 17: Before using the trailer, insert the safety ag through the fabric sleeve at the left hand
side of the body. This is very important, because the trailer can be easy overlooked in the trafc.
Step 18: When folding the trailer, rst take away the safety ag. Then fold the handle-bar in the
horizontal position and open the rear window cover.
Step 19: Slide the white button backwards to release the locking device. Then open the plastic
clip.
Step 20: Push the horizontal rear tube forward.
Step 21: Press the top of both sides to fold the trailer.
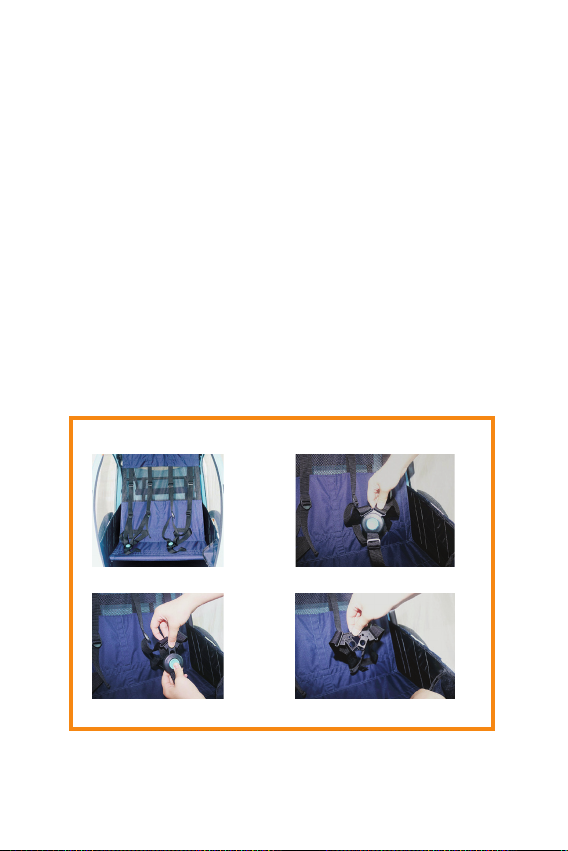
Instruction of the use of the safety belt.
Engage the parking brake.
Open the front cover(s).
Loosen all of the belt adjustments.
WARNING!
Always adjust the shoulder harness and crotch strap so that they
meet at the child’s lower chest.
Adjusting harness and buckles near your child’s neck could cause
serious injury.
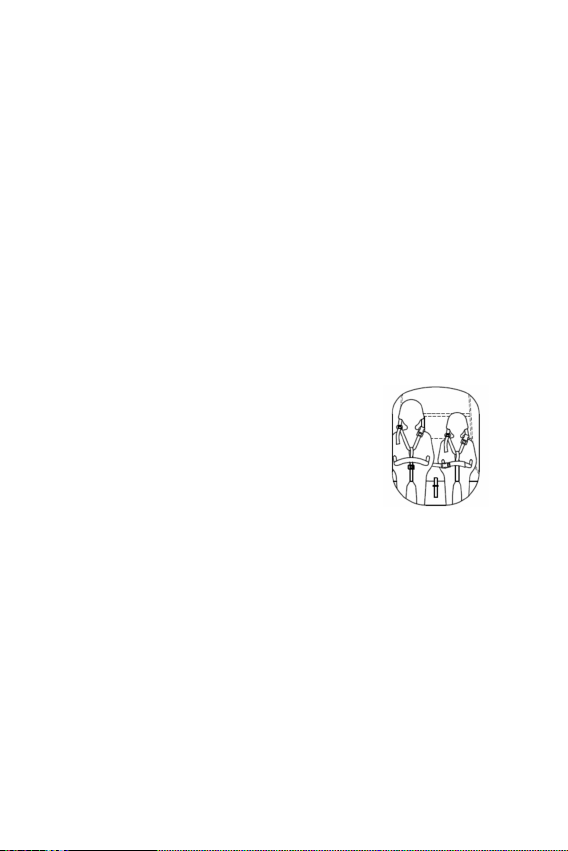
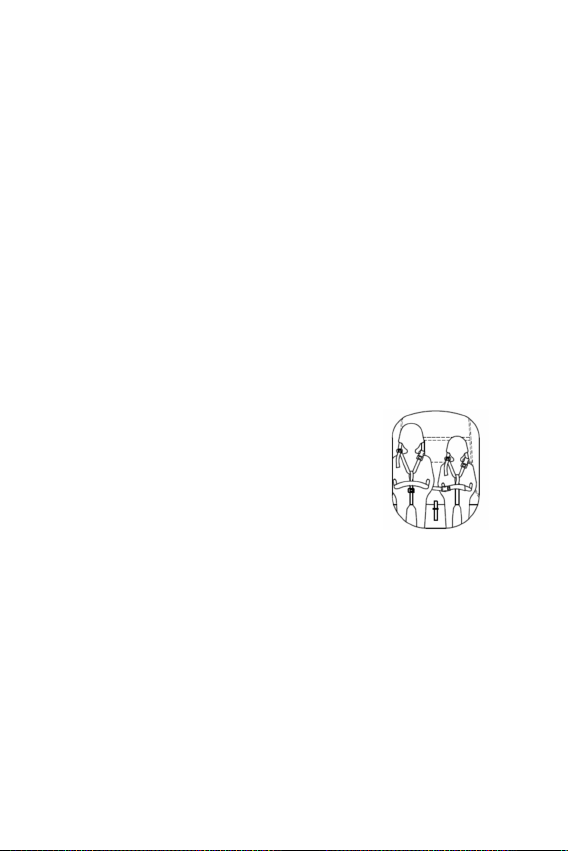
ONE CHILD
1. Unlock the 5-point harness from the safety lock buckle. (see below)
2. Seat the child in any seat.
3. Place the crotch strap between the child’s legs and adjust it so that the strap loop is centered
at the child’s lower chest.
4. Secure the right-hand and left-hand shoulder harness and the crotch harness. (the main body
of the 5-point harness buckle is always xed with the crotch harness).
5. Fasten the shoulder harness and the crotch harness and tighten securely.
TWO CHILDREN
1. Unlock the 5-point harness from the safety lock buckle on both sides .
2. Seat the children in the trailer.
3. Place the crotch strap between the child’s legs and adjust so that the strap loop is centered at
the child’s lower chest in turn for both side.
4. Secure the right-hand and left-hand shoulder harnesses and crotch harness at both sides (the
main bodies of 5-point harness buckles are always xed with crotch harness).
5. Fasten the shoulder harnesses and crotch harnesses and tighten securely,.
GENERAL SATETY INSTRUCTIONS
1. Keep these instructions for future reference. Your child’s safety may be affected if you do not
follow these instructions.
2. Never leave a child unattended in the trailer.
3. Put on the brake whenever you park the trailer.
EN
11
Page 12

EN
4. This product has two functions: one is the bike trailer function, the other is the stroller function.
5. When using as trailer, the front wheel must be locked and stored at the side bumper.
6. Maximum load: BT3720: 41 kgs including passengers and cargo.
7. Maximum total weight: 59.50kg.
8. Minimum age of passengers: 9 months or could be seated without any assistance.
9. Maximum height of passenger : 71.5cm
10. Maximum number of passengers : 2 children.
11. Maximum speed = 25km/h
12. Maximum tire pressure is 43 psi.
13. Maximum tow bar loading capacity: 4.5kg.
14. Never attach the trailer to a racing bike or off-road bike.
15. The rider should be an adult in good physical condition. In addition the rider should pay more
attention when driving.
16. The kids in the trailer should always wear an approved helmet.
17. The safety belts should be adjusted carefully and closed.
18. Please assemble the trailer exactly according this instruction.
19. Do not make any modications to the trailer.
20. Do not park the trailer near a ditch or dangerous road.
21. Don’t put anything next to the children when sitting in the trailer as it could be of danger or
injury.
22. Ensure that all the locking/packing devices are engaged and function well before use.
23. To avoid injury, ensure that your child is kept away on a safe distance when unfolding/folding
the trailer.
24. Do not let your child play with this product.
25. Always use the restraint system.
26. Check the seat unit regularly if it is correctly engaged before use.
27. This seat unit is not suitable for children under 6 months.
28. The bike trailer should always be covered and closed during the drive to prevent debris from
entering.
29. When using in the stroller function, it is not suitable for running or skating.
30. The parking brake device must always be engaged when placing and removing the children.
31. Please note the increased braking distance of the bicycle when the trailer is attached.
32. Any load attached to the handle and/or on the sides of the vehicle will affect the stability of
the vehicle causing serious risk
33. Accessories which are not approved by the manufacturer, shall not be used.
34. Only replacement parts supplied or recommended by the manufacturer/distributor shall be
used.
35. Check the tire pressure during assembly and before each ride, inspect routinely, maintain
cleanly.
36. Keep away from any re or heat sources when kids are sitting in the trailer.
37. Do not allow any of the children’s body, clothing, shoe laces or toys to come into contact with
moving parts.
38. Always use the safety ag.
39. Have your bicycle checked by a qualied bicycle mechanic before attaching it to the trailer.
Imported by Bellelli srl – via Meucci, 232 – 45021 Badia Polesine (Ro) Italia
MADE IN CHINA
12
Page 13
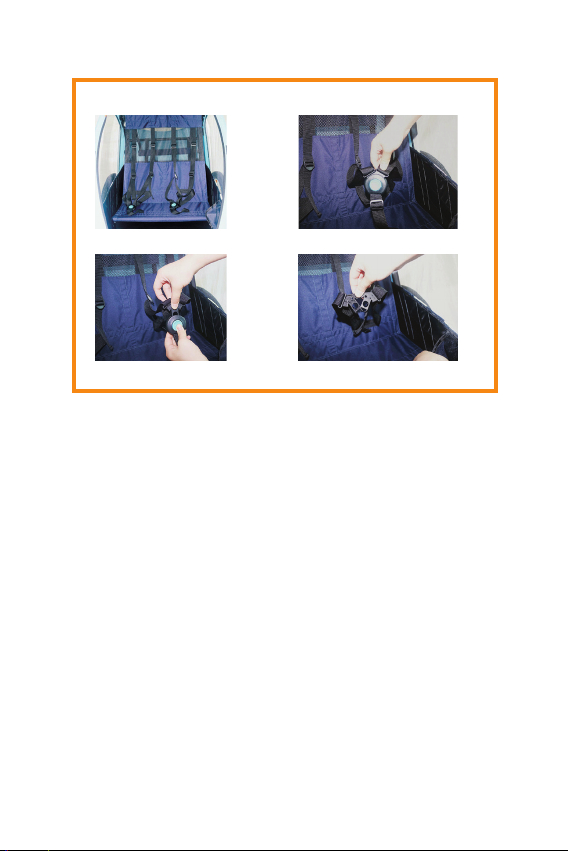
Instructions for the operation of the 2nd lock buckle
Push the blue button.
EN
Pull the buckle out
Release
13
Page 14

FR
ATTENTION:
Merci de lire attentivement ces instructions
avant le montage et l’utilisation.
Le non-respect des instructions de ce
manuel peut entraîner des dommages ou
des blessures.
Toutes les photos ci-dessus ne sont
données qu’à titre indicatif, veuillez-vous
référer à la photo du produit réel.
Montage et démontage de la remorque
Étape 1 : Lorsque l’on commence à assembler la remorque, il faut d’abord assembler le guidon
avec le cadre. Le xer avec les vis 6 pans.
Étape 2 : Le mécanisme de pliage se trouve à l’intérieur de la poche arrière. Ouvrir d’abord la
poche arrière, puis tirer le tube arrière vers l’arrière.
Étape 3 : Fermer les boucles des deux côtés. Le levier blanc sera xé et se mettra automatique-
ment en position.
Étape 4 : Desserrer le frein de stationnement. Appuyer sur le bouton souple et le maintenir
enfoncé puis introduire l’axe de roue dans la douille.
L’axe sera bloqué automatiquement. Vérier que la roue est bien xée. Pour la retirer : appuyer à
nouveau sur le bouton souple et retirer la roue de l’axe.
Étape 5 : Installer l’aile en plastique en la faisant glisser de l’avant vers l’extrémité (des deux
côtés). Insérer la barre d’attelage et la faire glisser vers l’intérieur en position jusqu’à ce que le
trou avant s’aligne avec le trou.
Étape 6 : Pour l’utilisation comme poussette : insérer la roue avant (7”) dans le support. Avertis-
sement : toujours d’assurer que. La roue de poussette est montée correctement et bloquée !
Étape 7 : Appuyer sur le bouton d’orientation pour une direction xe. Le relâcher de nouveau
pour permettre un pivotement dans toutes les directions.
Étape 8 : Libérer la goupille de verrouillage et faire glisser la barre d’attelage vers l’arrière et la
bloquer lorsqu’elle est en position (mode poussette).
Étape 9 : En cas d’utilisation comme remorque pou vélo : appuyer sur le bouton bleu pour retirer
la roue avant. Ranger la roue avant sur le coffre arrière.
Attention : Appuyer sur le bouton d’orientation pour verrouiller la roue avant pour éviter
qu’elle ne pivote à l’arrêt. Appuyer sur le bouton rond bleu pour la libérer.
Étape 10 : Appuyer sur la pédale pour activer le frein de stationnement. La relâcher à nouveau
avant de se promener ou de rouler.
Attention : Vérier que le frein est en bon état de marche lors de chaque utilisation.
Étape 11 : Le guidon à 8 positions permet d’avoir une hauteur pratique de 78 cm à 115 cm pour
répondre aux exigences de la plupart des gens.
Attention : Lorsque la remorque est utilisée comme une poussette, toujours utiliser la
dragonne pour la sécurité.
Étape 12 : Vélo : retirer l’écrou et la rondelle de l’extrémité gauche de l’axe. Utiliser une clé pour
xer le coupleur (A) à l’axe de la roue arrière. Ensuite, serrer l’écrou au couple recommandé par
le fabricant du vélo.
Étape 13 : Faire glisser le tube de connexion (B) sur le coupleur (A) et le xer avec la manille.
Ensuite, faire passer la sangle de sécurité de secours autour du cadre de la bicyclette et
accrocher le clip à la barre d’attelage.
14
Modèle : BT3720 avec kit poussette
Avant de commencer le montage, vérier le
contenu du carton :
• 1 x remorque pliée
• 1 x jeu de roues avant pivotantes de 7 pouces
• 2 x roues arrière de 20 pouces
• 1 x barre d’attelage
• 1 x jeu de guidon
• 2 x vis M4
• 2 x jeu de pare-chocs
• 1 x drapeau
Page 15
REMARQUE ! Vérier soigneusement si la ceinture de sécurité ne peut pas passer entre
les parties mobiles de la bicyclette. Si nécessaire, l’enrouler plusieurs fois autour du
cadre.
Étape 14 : Lorsque l’enfant est dans la remorque, les sangles de sécurité doivent toujours être
utilisées et ajustées avec soin. Lorsqu’un seul enfant est assis dans la remorque, toujours
asseoir l’enfant sur le côté droit. Le siège ne convient pas aux enfants de moins de 6 mois.
Étape 15 : Le parasol est rangé dans la poche supérieure. Au besoin, il peut être sorti de la
poche pour être utilisé directement.
Étape 16 : La bâche transparente est conçue pour protéger les enfants de la pluie et de la
poussière. Habituellement, la bâche anti-pluie est enroulée. Si nécessaire, abaisser la bâche
transparente et xer les crochets en plastique à la boucle située à l’avant de l’auvent.
Étape 17 : Avant d’utiliser la remorque, insérer le drapeau de sécurité dans le manchon en tissu
situé sur le côté gauche de la carrosserie. Il est très important, car la remorque peut facilement
passer inaperçue dans la circulation.
Étape 18 : Lorsque l’on replie la remorque, enlever d’abord le drapeau de sécurité. Ensuite, plier
le guidon en position horizontale et ouvrir la protection de fenêtre arrière.
Étape 19 : Faire glisser le bouton blanc vers l’arrière pour libérer le dispositif de verrouillage.
Ensuite, ouvrir le clip en plastique.
Étape 20 : Pousser le tube arrière horizontal vers l’avant.
Étape 21 : Appuyer sur le haut des deux côtés pour replier la remorque.
Instructions d’utilisation de la ceinture de sécurité.
Serrer le frein de stationnement.
Ouvrir le(s) protection(s) avant.
Desserrer tous les réglages de la ceinture.
AVERTISSEMENT !
Toujours régler le harnais et la sangle d’entrejambe de manière à ce
qu’ils se rejoignent au niveau du bas de la poitrine de l’enfant.
Le réglage du harnais et des boucles près du cou de l’enfant peut
provoquer des blessures graves.
UN SEUL ENFANT
1. Déverrouiller le harnais 5 points de la boucle de la ceinture de sécurité. (Voir ci-dessous)
2. Asseoir l’enfant dans n’importe quel siège.
3. Placer la sangle d’entrejambe entre les jambes de l’enfant et la régler de manière à ce que la
boucle de la sangle est centrée sur le bas de la poitrine de l’enfant.
4. Attacher les bretelles droite et gauche et la sangle d’entrejambe. (le corps principal de la
boucle du harnais à 5 points est toujours xé avec la sangle d’entrejambe).
5. Attacher les bretelles et la sangle d’entrejambe et serrer fermement.
DEUX ENFANTS
1. Déverrouiller le harnais à 5 points de la boucle de verrouillage de sécurité des deux côtés.
2. Asseoir les enfants dans la remorque.
3. Placer la sangle d’entrejambe entre les jambes de l’enfant et la régler de manière à ce que
la boucle de la sangle soit centrée sur le bas de la poitrine de l’enfant, tour à tour pour les deux
côtés.
4. Attacher les bretelles droite et gauche et la sangle d’entrejambe des deux côtés (les corps
principaux des boucles de harnais à 5 points sont toujours xés avec la sangle d’entrejambe).
5. Attacher les bretelles et la sangle d’entrejambe et bien serrer.
FR
15
Page 16

FR
CONSIGNES DE SÉCURITÉ GÉNÉRALES
1. Conserver ces instructions pour référence ultérieure. La sécurité de l’enfant peut être affectée
si l’on ne suit pas ces instructions.
2. Ne jamais laisser un enfant sans surveillance dans la remorque.
3. Serrer le frein chaque fois que l’on gare la remorque.
4. Ce produit a deux fonctions : l’une est la fonction remorque à vélo, l’autre est la fonction
poussette.
5. En cas d’utilisation comme remorque, la roue avant doit être bloquée et rangée au niveau du
pare-chocs latéral.
6. Charge maximale : BT3720 : 41 kg y compris les passagers et charge.
7. Poids total maximum : 59,50kg.
8. Age minimum des passagers ; 9 mois ou pouvant s’asseoir sans aucune aide.
9. Hauteur maximale du passager : 71,5cm
10. Nombre maximal de passagers : 2 enfants.
11. Vitesse maximale = 25km/h
12. La pression maximale des pneus est de 43 psi
13. Capacité de chargement maximale de la barre d’attelage : 4,5kg.
14. Ne jamais attacher la remorque à un vélo de course ou à un vélo tout-terrain.
15. Le conducteur doit être un adulte en bonne condition physique. En outre, le conducteur doit
être plus attentif lorsqu’il conduit.
16. Les enfants dans la remorque doivent toujours porter un casque homologué.
17. Les ceintures de sécurité doivent être ajustées avec soin et fermées.
18. La remorque doit être montée exactement selon les instructions.
19. N’apporter aucune modication à la remorque.
20. Ne pas garer la remorque près d’un fossé ou d’une route dangereuse.
21. Ne pas mettre d’objets à côté des enfants lorsqu’ils sont assis dans la remorque, car cela
pourrait les mettre en danger ou les blesser.
22. S’assurer que tous les dispositifs de verrouillage/emballage sont engagés et fonctionnent
bien avant l’utilisation.
23. Pour éviter toute blessure, veiller à ce que l’enfant soit maintenu à une distance sûre lors du
dépliage/pliage de la remorque.
24. Ne pas laisser l’enfant jouer avec ce produit.
25. Toujours utiliser le système de retenue.
26. Vérier régulièrement que l’unité de siège est correctement engagée avant de l’utiliser.
27. L’unité de siège ne convient pas aux enfants de moins de 6 mois.
28. La remorque à vélo doit toujours être couverte et fermée pendant le trajet pour éviter que des
débris n’y pénètrent.
29. Lorsqu’elle est utilisée en fonction poussette, elle ne convient pas pour la course ou le
patinage.
30. Le frein de stationnement doit toujours être serré quand on place ou on retire l’enfant de la
remorque.
31. Il convient de noter l’augmentation de la distance de freinage de la bicyclette lorsque la
remorque est attelée.
32. Toute charge xée à la poignée et/ou sur les côtés du véhicule compromettra la stabilité du
véhicule et entraînera des risques graves
33. Les accessoires qui ne sont pas approuvés par le fabricant ne doivent pas être utilisés.
34. Seules les pièces de rechange fournies ou recommandées par le fabricant/distributeur
doivent être utilisées.
35. Vérier la pression des pneus pendant le montage et avant chaque trajet, les contrôler
16
Page 17
régulièrement et les entretenir et les maintenir propres.
36. Tenir à l’écart de toute source de feu ou de chaleur lorsque les enfants sont assis dans la
remorque.
37. Ne pas laisser le corps, les vêtements, les lacets de chaussures ou les jouets des enfants
entrer en contact avec les pièces mobiles.
38. Toujours utiliser le drapeau de sécurité.
39. Faire contrôler votre vélo par un mécanicien qualié avant d’atteler la remorque.
Importé par Bellelli srl - via Meucci, 232 - 45021 Badia Polesine (Ro) Italie
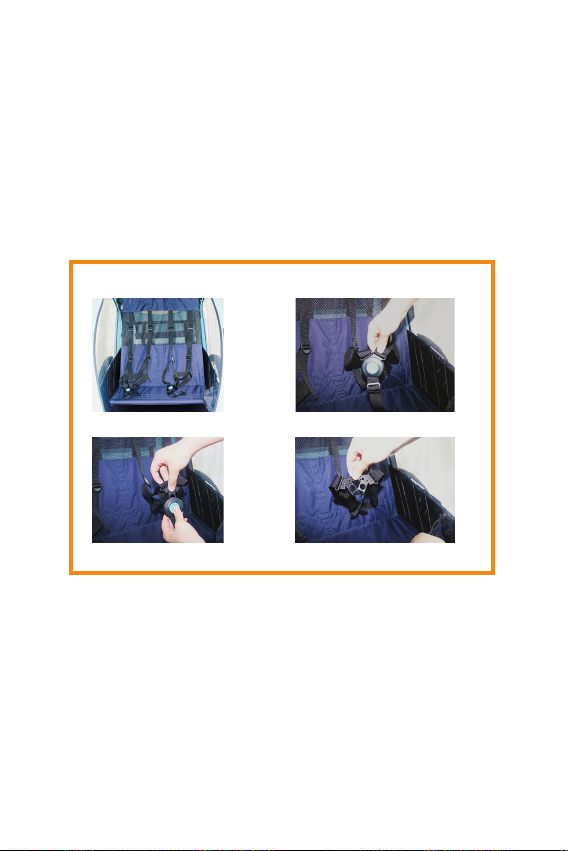
Instructions pour le fonctionnement de la 2e boucle de verrouillage
Appuyer sur le bouton bleu.
Retirer la boucle Relâcher
MADE IN CHINA
FR
17
Page 18

DE
ACHTUNG:
Bitte lesen Sie diese Anleitung sorgfältig
durch, bevor Sie den Fahrradanhänger
zusammenbauen und nutzen.
Eine Nichtbeachtung der Anweisungen in
diesem Handbuch kann zu Schäden oder
Verletzungen führen.
Alle weiter unten aufgeführten Bilder sind nur
zu Referenzzwecken aufgeführt. Bitte richten
Sie sich nach dem originalen Produkt.
Montage & Demontage des Anhängers
Schritt 1: Wenn Sie mit dem Zusammenbau des Anhängers beginnen, montieren Sie zuerst den
Handgriff an den Rahmen. Befestigen Sie ihn mit den Sechskantschrauben.
Schritt 2: Der Faltmechanismus bendet sich in der Innenseite der hinteren Tasche. Öffnen Sie
zuerst die hintere Tasche und ziehen Sie dann die hintere Stange nach hinten.
Schritt 3: Schließen Sie die Verschlüsse auf beiden Seiten. Der weiße Hebel wird befestigt und
rastet automatisch ein.
Schritt 4: Lösen Sie die Parkbremse. Drücken und halten Sie den weichen Knopf und fügen Sie
die Radachse in die Fassung ein.
Die Achse rastet automatisch ein. Kontrollieren Sie, dass das Rad sicher befestigt ist. Um das
Rad zu entfernen, drücken Sie erneut leicht auf den weichen Knopf und ziehen Sie das Rad aus
der Achse heraus.
Schritt 5: Montieren Sie den Kunststoffügel, indem Sie diesen von vorn aufschieben (auf
beiden Seiten). Fügen Sie die Anhängerstange ein und schieben Sie sie nach innen, bis das
vordere Loch mit dem Loch übereinstimmt.
Schritt 6: Bei Nutzung als Kinderwagen: Fügen Sie das Vorderrad (7”) in die Halterung ein.
Warnung: Gehen Sie immer sicher, dass das Rad des Kinderwagens richtig und vollständig
eingerastet und verriegelt ist!
Schritt 7: Drücken Sie den Ausrichtungsknopf und stellen Sie die Richtung des Rades ein.
Lösen Sie ihn erneut, um in alle Richtungen schwenken zu können.
Schritt 8: Lösen Sie den Verriegelungsstift, schieben Sie die Anhängerstange nach hinten und
verriegeln Sie sie, wenn diese in Position ist (Kinderwagen-Modus).
Schritt 9: Bei Nutzung als Fahrradanhänger: Drücken Sie den blauen Knopf, um das vordere
Rad zu entfernen. Verstauen Sie das Vorderrad in der vorderen Konsole.
Achtung: Drücken Sie den Ausrichtungsknopf, um das Vorderrad zu verriegeln und ein
Schwenken in Ruheposition zu verhindern. Drücken Sie den blauen runden Knopf, um es
zu lösen.
Schritt 10: Treten Sie auf das Pedal, um die Parkbremse zu aktivieren. Lösen Sie sie erneut,
bevor Sie mit dem Kinderwagen laufen oder fahren.
Achtung: Kontrollieren Sie, ob sich die Bremse in gutem Zustand bendet.
Schritt 11: Lenker mit 8 Positionen zur Einstellung einer bequemen Höhe von 78 cm bis 115 cm
zur bequemen Nutzung.
Achtung: Wenn der Anhänger als Kinderwagen verwendet wird, verwenden Sie bitte
immer das Handgelenkband zur Sicherheit.
Schritt 12: Fahrrad: Entfernen Sie die Mutter und Unterlegscheibe vom linken Ende der Achse.
Verwenden Sie einen Schraubenschlüssel, um die Kupplung (A) auf der hinteren Radachse
zu befestigen. Ziehen Sie dann die Mutter entsprechend dem empfohlenen Drehmoment des
18
Modell: BT3720 mit Kinderwagenset
Bevor Sie mit dem Zusammenbau beginnen,
kontrollieren Sie den Inhalt des Kartons:
• 1 x gefalteter Fahrradanhänger
• 1 x Set 7” vorderes Drehrad
• 2 x 20” Hinterräder
• 1 x Anhängerstange
• 1 x Lenkerset
• 2 x M4 Schrauben
• 2 x Stoßfängerset
• 1 x Fahne
Page 19
Herstellers fest.
Schritt 13: Schieben Sie das Verbindungsstange (B) über die Kupplung (A) und befestigen Sie
sie mit dem Bügel. Wickeln Sie dann den Sicherheitsgurt um den Fahrradrahmen und hängen
Sie dann die Klammer wieder auf der Anhängerstange ein.
HINWEIS! Kontrollieren Sie sorgfältig, dass der Sicherheitsgurt nicht zwischen bewegliche Teile des Fahrrads kommen kann. Falls nötig, wickeln Sie ihn mehrere Male um den
Rahmen.
Schritt 14: Wenn das Kind im Anhänger ist, muss der Sicherheitsgurt immer verwendet und
sorgfältig angepasst werden.
Wenn Sie ein Kind in den Anhänger setzen, setzen Sie das Kind immer auf die rechte Seite. Der
Sitz ist für Kinder unter 6 Monate nicht geeignet.
Schritt 15: Der Sonnenschutz wird in der oberen Tasche aufbewahrt. Bei Bedarf kann er aus der
Tasche herausgezogen werden.
Schritt 16: Die transparente Abdeckung ist zum Schutz der Kinder vor Regen und Staub
vorgesehen. Normalerweise ist der Regenschutz hoch gerollt. Wenn Sie ihn benötigen, ziehen
Sie die transparente Abdeckung nach unten und die Kunststoffhaken mit der Schleife auf der
Vorderseite des Dachs fest.
Schritt 17: Bevor Sie den Anhänger verwenden, fügen Sie die Sicherheitsfahne durch die
Textilführung an der linken Seite des Anhängers ein. Dies ist sehr wichtig, da der Anhänger im
Straßenverkehr sehr leicht übersehen werden kann.
Schritt 18: Wenn Sie den Anhänger falten, entnehmen Sie zuerst die Sicherheitsfahne. Führen
Sie dann den Lenker in horizontale. Position und öffnen Sie die hintere Fensterabdeckung.
Schritt 19: Schieben Sie den weißen Knopf nach hinten und lösen Sie die Verriegelungsvorrichtung. Öffnen Sie dann den Kunststoffclip.
Schritt 20: Drücken Sie die horizontale hintere Stange nach vorn.
Schritt 21: Drücken Sie auf das Oberteil an beiden Seiten, um den Anhänger zu falten.
Anweisung zur Verwendung des Sicherheitsgurts.
Aktivieren Sie die Parkbremse.
Öffnen Sie die vordere(n) Abdeckung(en).
Lösen Sie alle Gurtjustierungen.
WARNUNG!
Passen Sie den Schultergurt und Schrittgurt immer so an, dass sie
unterhalb des Brustkorbs des Kindes verlaufen.
Die Anpassung der Gurte und Schnallen in der Nähe des Nackens
Ihres Kindes kann zu schwerwiegenden Verletzungen führen.
DE
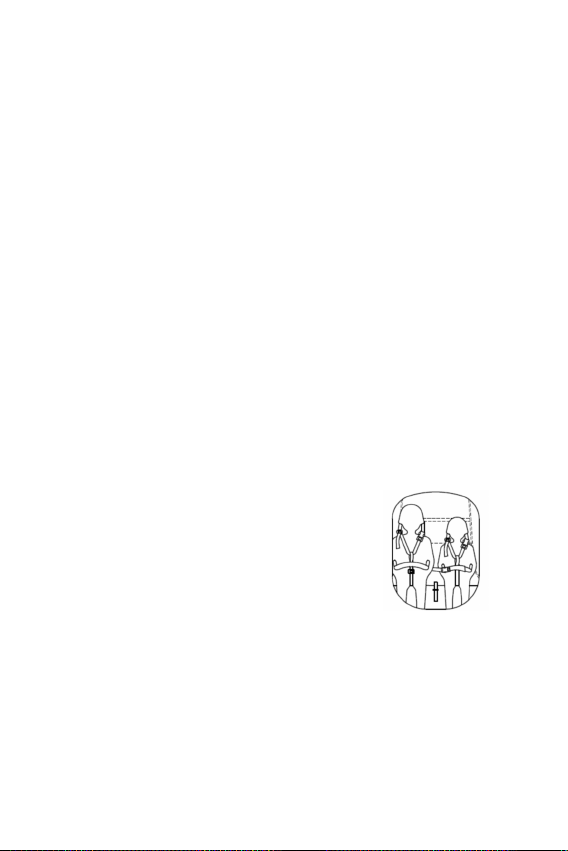
EIN KIND
1. Lösen Sie den 5-Punkte-Gurt von der Sicherheitsschnalle. (siehe unten)
2. Setzen Sie das Kind in einen der Sitze.
3. Platzieren Sie den Schrittgurt zwischen die Beine des Kindes und passen Sie ihn so an, dass
die Schlaufe mittig und im unteren Brustkorbbereich des Kindes verläuft.
4. Sichern Sie den rechten und linken Schultergurt und den Schrittgurt. (die 5-Punkt-Gurtschnalle
wird immer am Schrittgurt befestigt).
5. Schließen Sie den Schultergurt und Schrittgurt und ziehen Sie sie fest an.
19
Page 20

DE
ZWEI KINDER
1. Lösen Sie den 5-Punkte-Gurt von der Sicherheitsschnalle auf beiden Seiten.
2. Setzen Sie die Kinder in den Anhänger.
3. Platzieren Sie den Schrittgurt zwischen die Beine des Kindes und passen Sie ihn so an, dass
die Schlaufe mittig und im unteren Brustkorb des Kindes auf beiden Seiten verläuft.
4. Sichern Sie den rechten und linken Schultergurt und Schrittgurt auf beiden Seiten (die 5-Punkt-Gurtschnallen werden immer mit am Schrittgurt befestigt).
5. Schließen Sie den Schultergurt und Schrittgurt und ziehen Sie sie fest an.
ALLGEMEINE SICHERHEITSANWEISUNGEN
1. Behalten Sie diese Anweisungen für eine spätere Bezugnahme. Die Sicherheit Ihres Kindes
kann in Gefahr sein, wenn Sie diesen Anweisungen nicht folgen.
2. Lassen Sie ein Kind niemals unbeaufsichtigt im Anhänger.
3. Aktivieren Sie die Bremse immer dann, wenn Sie den Anhänger parken.
4. Dieses Produkt hat zwei Funktionen: als Fahrradanhänger und Kinderwagen.
5. Bei Verwendung als Anhänger muss das Vorderrad verriegelt werden und am seitlichen
Stoßfänger verwahrt werden.
6. Maximale Last: BT3720: 41 kg einschließlich Passagiere und Zuladung.
7. Maximales Gesamtgewicht: 59,50 kg.
8. Mindestalter der Passagiere: 9 Monate oder wenn ohne Hilfe sitzfähig.
9. Maximale Höhe des Passagiers: 71,5 cm
10. Maximale Passagieranzahl: 2 Kinder.
11. Maximale Geschwindigkeit = 25 km/h
12. Maximaler Reifendruck 43 psi.
13. Maximale Zuladung an der Anhängerstange: 4,5 kg.
14. Befestigen Sie den Anhänger nie an einem Rennrad oder ein Mountainbike.
15. Der/die Fahrer/-in muss in guter körperlicher Verfassung sein. Zusätzlich dazu muss der/die
Fahrer/-in beim Fahren Acht geben.
16. Die Kinder im Anhänger müssen immer einen Schutzhelm tragen.
17. Die Sicherheitsgurte müssen vorsichtig angepasst und geschlossen werden.
18. Bitte montieren Sie den Anhänger genau nach den Anweisungen.
19. Nehmen Sie keine Veränderungen am Anhänger vor.
20. Parken Sie den Anhänger nicht neben einem Graben oder gefährlichen Straßen.
21. Stellen Sie nichts neben das Kind, wenn es im Anhänger sitzt, da dies eine Gefahr darstellen
oder zu Verletzungen führen kann.
22. Gehen Sie sicher, dass alle Verriegelungs-/Faltvorrichtungen aktiviert sind und funktionieren,
bevor sie verwendet werden.
23. Um Verletzungen zu vermeiden, gehen Sie sicher, dass Ihr Kind sich nicht in der Nähe des
Anhängers bendet, wenn dieser entfaltet/gefaltet wird.
24. Lassen Sie Ihr Kind nicht mit diesem Produkt spielen.
25. Verwenden Sie immer das Rückhaltesystem.
26. Überprüfen Sie die Sitzeinheit regelmäßig auf richtige Ausrichtung vor der Verwendung.
27. Diese Sitzeinheit ist für Kinder unter 6 Monate nicht geeignet.
28. Der Fahrradanhänger muss während des Fahrens immer abgedeckt und verschlossen sein,
um zu verhindern, dass Verschmutzungen eindringen.
29. Wenn er als Kinderwagen verwendet wird, darf damit nicht gerannt oder Inline Skates
gefahren werden.
30. Die Parkbremse muss immer aktiviert sein, wenn Kinder eingesetzt oder herausgenommen
werden.
20
Page 21
31. Bitte beachten Sie den vergrößerten Bremsweg des Fahrrads, wenn der Anhänger
angebracht ist.
32. Jede zusätzliche Last am Handgriff und/oder an den Seiten des Fahrzeugs beeinussen die
Stabilität des Fahrzeugs und führen zu einem hohen Risiko.
33. Zubehörteile, die nicht durch den Hersteller zugelassen wurden, dürfen nicht verwendet
werden.
34. Es dürfen nur Ersatzteile, die vom Hersteller/Händler geliefert oder empfohlen werden,
verwendet werden.
35. Kontrollieren Sie den Reifendruck während der Montage und vor jeder Fahrt, überprüfen Sie
es regelmäßig und sorgen Sie für Sauberkeit.
36. Halten Sie den Anhänger fern von Brand- oder Hitzequellen, wenn Kinder in dem Anhänger
sitzen.
37. Achten Sie darauf, dass Körperteile, Bekleidung, Schnürsenkel oder Spielzeuge von Kindern
nicht in Kontakt mit beweglichen Teilen kommen.
38. Verwenden Sie immer die Sicherheitsfahne.
39. Lassen Sie Ihr Fahrrad von einem qualizierten Fahrradmechaniker vor der Anbringung des
Anhängers prüfen.
Import durch Bellelli srl – via Meucci, 232 – 45021 Badia Polesine (Ro) Italien
Anweisung zur Bedienung der 2. Schnalle
Drücken Sie auf den blauen Knopf.
MADE IN CHINA
DE
Ziehen Sie die Schnalle heraus Losgelöst
21
Page 22

ES
ATENCIÓN:
Por favor, lea atentamente estas instrucciones antes de montarlo y utilizarlo.
El incumplimiento de las instrucciones
de este manual puede causar daños o
lesiones.
Todas las imágenes anteriores son sólo a
titulo ilustrativo, por favor, hacer referencia
al producto real.
Montaje y desmontaje del remolque
Paso 1: Al empezar a montar el remolque, primero hay que ensamblar el manillar con el cuadro.
Fíjelo con los tornillos hexagonales.
Paso 2: El mecanismo de plegado está dentro del bolsillo trasero. Abra primero el bolsillo
trasero y luego tire del tubo posterior hacia atrás.
Paso 3: Cierre los ganchos de ambos lados. La palanca blanca se jará y colocará automátic-
amente en su posición.
Paso 4: Desconecte el freno de estacionamiento. Mantenga pulsado el botón de tipo blando e
inserte el eje de la rueda en la cavidad.
El eje se bloqueará automáticamente. Vericar que la rueda está bien sujeta. Para quitarla: pulse
de nuevo el botón de tipo blando y saque la rueda del eje.
Paso 5: Instale la aleta de plástico deslizándola desde la parte delantera hasta el nal (en ambos lados). Inserte la barra del remolque y deslícela hacia dentro hasta que el oricio delantero
se alinee con el oricio presente
Paso 6: Cuando se utiliza como carrito: introduzca la rueda delantera (7”) en el soporte.
¡Advertencia: asegúrese siempre de que la rueda del carrito esté bien encajada y
bloqueada!
Paso 7: Pulse el botón de orientación para una dirección ja. Suéltelo de nuevo para la función
de giro en todas las direcciones.
Paso 8: Suelte el pasador de bloqueo y deslice la barra del remolque hacia atrás y bloquéela
cuando esté en posición (modo carrito).
Paso 9: Cuando se utiliza como remolque de bicicleta: pulse el botón azul para extraer la rueda
delantera. Coloque la rueda delantera en la cesta trasera.
Atención: Pulse el botón de orientación para bloquear la rueda delantera para evitar que
gire cuando está en reposo. Pulse el botón redondo azul para liberarlo.
Paso 10: Pise el pedal para activar el freno de estacionamiento. Levánte el pié para quitár.
Atención: Por favor, compruebe si el freno está en buenas condiciones de funcionamiento.
Paso 11: Manillar con 8 posiciones para ofrecer diversas alturas de 78cm a 115cm y cumplir la
mayoría de los requisitos operativos de las personas.
Atención: Cuando el remolque se utilice como carrito, utilice siempre la muñequera de
seguridad.
Paso 12: Bicicleta: retire la tuerca y la arandela del extremo izquierdo del eje. Utilice una llave
para jar el acoplado (A ) con el eje de la rueda trasera. A continuación, apriete la tuerca con el
par de apriete recomendado por el fabricante de la bicicleta.
Paso 13: Deslice el tubo de conexión (B) sobre el acoplado (A) y fíjelo con el grillete. A continuación, pase la correa de seguridad de respaldo alrededor del cuadro de la bicicleta y enganche el
22
Modelo: BT3720 con kit para carrito
Antes de comenzar el montaje, compruebe el
contenido de la caja:
• 1 x remolque plegable
• 1 juego de ruedas delanteras giratorias de 7”
• 2 ruedas posteriores de 20”
• 1 barra de remolque
• 1 juego de manillar
• 2 tornillos M4
• 2 juegos de parachoques
• 1 banderín
Page 23
clip en la barra de remolque.
¡NÓTESE! Compruebe cuidadosamente que el cinturón de seguridad no se interponga
entre las partes móviles de la bicicleta. Si es necesario, enróllelo alrededor del cuadro
varias veces.
Paso 14: Cuando el niño está en el remolque, los cinturones de seguridad deben utilizarse
siempre y ajustarse con cuidado.
Cuando se siente un solo niño en el remolque, siempre
sientelo del lado derecho . El asiento no es adecuado para niños menores de 6 meses.
Paso 15: El parasol está guardado en el bolsillo superior. Cuando sea necesario, lo puede sacar
del bolsillo para usarlo directamente.
Paso 16: La cobertura transparente está hecha para proteger a los niños de la lluvia y el polvo.
Normalmente, la cobertura para la lluvia está enrollada. En caso sea necesario, tirar la cobertura
transparente hacia abajo y sujete los ganchos de plástico con el
anillo de la parte delantera de la capota.
Paso 17: Antes de utilizar el remolque, colocar el banderín de seguridad en el lado izquierdo del
remolque pasandolo por la funda de tela. Esto es muy importante, porque el remolque no pase
inadvertido en el tráco.
Paso 18: Al plegar el remolque, primero hay que quitar el banderín de seguridad. A continuación,
doblar el manillar en la posición horizontal y abra la tapa de la ventanilla trasera.
Paso 19: Deslice el botón blanco hacia atrás para liberar el dispositivo de bloqueo. A continuación, abra el clip de plástico.
Paso 20: Empuje el tubo trasero horizontal hacia adelante.
Paso 21: Presione la parte superior de ambos lados para doblar el remolque.
Instrucción de uso del cinturón de seguridad.
Ponga el freno de estacionamiento.
Abra la/s cobertura/s delantera/s.
Aoje todos los ajustes del cinturón.
¡ADVERTENCIA!
Ajuste siempre el arnés de los hombros y de la entrepierna de manera que se encuentren en la parte inferior del pecho del niño.
Ajustar el arnés y las hebillas cerca del cuello del niño podría causar
lesiones graves.
SI HAY UN NIÑO
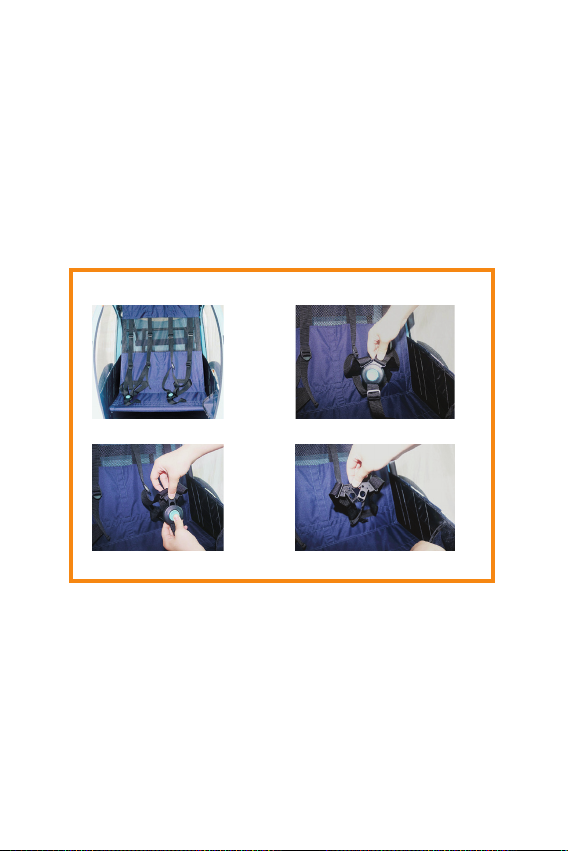
1. Desbloquee, de la hebilla, el bloqueo de seguridad. (ver abajo)
2. Siente al niño.
3. Coloque la correa de la entrepierna entre las piernas del niño y ajústela de manera que el lazo
de la correa quede centrado en la parte inferior del pecho del niño.
4. Asegure el arnés de los hombros y el arnés de la entrepierna. (el cuerpo principal de la hebilla
de bloqueo del arnés de 5 puntos siempre se ja con el arnés de la entrepierna).
5. Abroche el arnés de los hombros y el arnés de la entrepierna y que se enganchen bien.
DOS NIÑOS
1. Desbloquee, de la hebilla, el bloqueo de seguridad en ambos lados .
2. Sienta a los niños en el remolque.
3. Coloque la correa de la entrepierna entre las piernas del niño y ajústela de manera que el lazo
de la correa quede centrado en la parte inferior del pecho del niño, a su vez para ambos lados.
4. Fije los arneses de los hombros y el arnés de la entrepierna en ambos lados (los cuerpos
principales de las hebillas de seguridad de los arneses de 5 puntos siempre se jan con el arnés
de entrepierna).
5. Abroche los arneses de los hombros y de la entrepierna y que se enganchen bien,.
ES
23
Page 24

ES
INSTRUCCIONES GENERALES DE SEGURIDAD
1. Conserve estas instrucciones para referencias futuras. La seguridad de los niño puede verse
afectada si no sigue estas instrucciones.
2. Nunca deje a un niño sin vigilancia en el remolque.
3. Ponga el freno cada vez que estacione el remolque.
4. Este producto tiene dos funciones: una es la función de remolque para bicicletas y la otra es
la función de carrito.
5. Cuando se utiliza como remolque, la rueda delantera debe bloquearse y guardarse en el
parachoques lateral.
6. Carga máxima: BT3720: 41kgs incluyendo pasajeros y carga.
7. Peso total máximo: 59.50 kg
8. Edad mínima de los pasajeros: 9 meses o cuando pueda sentarse sin ayuda.
9. Altura máxima del pasajero : 71.5 cm
10. Número máximo de pasajeros : 2 niños.
11. Velocidad máxima = 25km/h
12. La presión máxima de los neumáticos es de 43 psi.
13. Capacidad máxima de carga de la barra de remolque: 4.5 kg
14. Nunca enganche el remolque a una bicicleta de carreras o a una bicicleta todoterreno.
15. El ciclista debe ser un adulto en buenas condiciones físicas. Además, el ciclista estar más
atento al conducir.
16. Los niños en el remolque deben llevar siempre un casco homologado.
17. Los cinturones de seguridad deben ajustarse con cuidado y bloquearse.
18. Por favor, monte el remolque exactamente como se indica en estas instrucciones.
19. No realice ninguna modicación en el remolque.
20. No estacione el remolque cerca de una zanja o una carretera peligrosa.
21. No ponga nada al lado de los niños cuando estén sentados en el remolque,ya que podría ser
causa de peligro o lesiónes.
22. Asegúrese de que todos los dispositivos de bloqueo/embalaje esten enganchados y
funcionan bien antes de su uso.
23. Para evitar lesiones, asegúrese de que el niño se mantenga alejado a una distancia segura
al desplegar/plegar el remolque.
24. No deje que el niño juegue con este producto.
25. Utilice siempre el sistema de retención.
26. Compruebe regularmente que la sede del asiento está correctamente encajada antes de
utilizarla.
27. La sede del asiento no es adecuada para niños menores de 6 meses.
28. El remolque de la bicicleta debe estar siempre cubierto y cerrado durante el trayecto para
evitar la entrada de residuos.
29. Cuando se utiliza como carrito, esta funciòn no es adecuado para correr o patinar.
30. El dispositivo de freno de estacionamiento debe estar siempre accionado al colocar y sacar
a los niños.
31. Tenga en cuenta el aumento de la distancia de frenado de la bicicleta cuando se engancha
el remolque.
32. Cualquier carga jada en el manillar y/o en los laterales del vehículo afectará a la estabilidad
del vehículo provocando un grave riesgo
33. No utilice accesorios que no estén aprobados por el fabricante.
34. Sólo utilice las piezas de recambio suministradas o recomendadas por el fabricante/distribuidor.
35. Compruebe la presión de los neumáticos durante el montaje y antes de cada viaje, inspec-
24
Page 25
cionar periódicamente, mantenga la limpieza.
36. Manténgase alejado de cualquier fuego o fuente de calor cuando los niños estén sentados
en el remolque.
37. No permita que el cuerpo, la ropa, los cordones de los zapatos o los juguetes de los niños
entren en contacto con las piezas móviles.
38. Utilice siempre el banderín de seguridad.
39. Controle la bicicleta por un bicicletero cualicado antes de jar el remolque.
Importado por Bellelli srl - via Meucci, 232 - 45021 Badia Polesine (Ro) Italia
Instrucciones para el funcionamiento de la 2ª hebilla de seguridad
Presione el botón azul.
Tire de la hebilla de seguridad hacia fuera Sacar
MADE IN CHINA
ES
25
Page 26

PL
UWAGA:
Przed przystąpieniem do montażu i użytkowania należy zapoznać się z niniejszą instrukcją.
Nieprzestrzeganie wskazówek zawartych w
instrukcji może spowodować uszkodzenia
sprzętu lub obrażenia ciała.
Wszystkie zamieszczone zdjęcia mają
charakter poglądowy, prosimy o zapoznanie się
z rzeczywistymi zdjęciami produktu.
Montaż i demontaż przyczepy
Krok 1: Przystępując do montażu przyczepy, należy najpierw zmontować uchwyt z ramką.
Przymocować ją za pomocą śrub z łbem sześciokątnym.
Krok 2: Mechanizm do składania przyczepki znajduje się w tylnej kieszeni. Najpierw otworzyć
tylną kieszeń, a następnie pociągnąć do tyłu tylną rurę.
Krok 3: Zapiąć klamry po obu stronach. Dzięki czemu biała dźwignia zostanie zamocowana i
automatycznie ustawiona we właściwym położeniu.
Krok 4: Zwolnić hamulec postojowy. Wcisnąć i przytrzymać miękki przycisk a następnie włożyć
oś koła w gniazdo.
Oś automatycznie zablokuje się. Sprawdzić czy koło jest należycie przymocowane. Aby zdjąć
koło: należy ponownie nacisnąć miękki przycisk i wyciągnąć koło z osi.
Krok 5: Zamontować plastikowe skrzydło, wsuwając je od przodu blisko końca (po obu
stronach). Włożyć hak holowniczy i wsunąć go do środka, aż przedni otwór znajdzie się w jednej
linii z otworem
Krok 6: Wariant wózka spacerowego: włożyć przednie koło (7”) do wspornika. Ostrzeżenie:
zawsze upewnić się, że koło wózka jest prawidłowo włożone, zatrzaśnięte i zablokowane!
Krok 7: Nacisnąć przycisk nastawczy aby ustawić stały kierunek. Zwolnienie przycisku spowoduje włączenie funkcji obrotu we wszystkich kierunkach.
Krok 8: Zwolnić sworzeń blokujący i przesunąć hak holowniczy do tyłu, a następnie zablokować
go w odpowiednim położeniu (tryb wózka).
Krok 9: Wariant przyczepki rowerowej: wcisnąć niebieski przycisk aby zdjąć przednie koło.
Schować przednie koło do schowka na tylnej półce.
Uwaga: Nacisnąć przycisk nastawczy, aby zablokować przednie koło unikając tym samy
obracania się w stanie spoczynku. Nacisnąć niebieski okrągły przycisk, aby go zwolnić.
Krok 10: Aby włączyć hamulec postojowy, należy nacisnąć pedał. Zwolnić hamulec przed
rozpoczęciem spaceru lub jazdy.
Uwaga: W trakcie używania przyczepki sprawdzać, czy hamulec jest w dobrym stanie.
Krok 11: Kierownica 8-pozycyjna umożliwia ustawienie wygodnej wysokości od 78 cm do 115
cm, spełniając tym samym wymagania większości użytkowników.
Uwaga: Gdy przyczepa jest używana jako wózek, należy zawsze używać paska na nadgarstek w celu zapewnienia większego bezpieczeństwa.
Krok 12: Rower: zdjąć nakrętkę i podkładkę z lewego końca osi. Użyć klucza do zamocowania
łącznika (A ) z osią tylnego koła. Następnie dokręcić nakrętkę momentem zalecanym przez
producenta roweru.
Krok 13: Nasunąć rurę łączącą (B) na łącznik (A) i zamocować ją szeklami. Następnie obwiązać
zapasowy pasek wokół ramy roweru i zaczepić go z powrotem na haku holowniczym.
26
Model: BT3720 z zestawem spacerowym
Przed rozpoczęciem montażu sprawdzić
zawartość opakowania:
• 1 x złożona przyczepa
• 1 x zestaw przednich kół skrętnych 7”
• 2 x koła tylne 20”
• 1 x hak holowniczy
• 1 x zestaw uchwytów
• 2 x śruby M4
• 2 x zestaw zderzaków
• 1 x chorągiewka
Page 27
UWAGA! Dokładnie sprawdzić, czy pasek zabezpieczający nie wchodzi pomiędzy ruchome
części roweru. W razie potrzeby należy go jeszcze dodatkowo kilkakrotnie owinąć wokół
ramy.
Krok 14: Przed umieszczeniem dziecka w przyczepie, należy założyć mu i wyregulować pasy
bezpieczeństwa. Wożąc w przyczepie jedno dziecko, należy zawsze sadzać je po prawej stronie.
Fotelik nie nadaje się dla dzieci poniżej 6 miesiąca życia.
Krok 15: Górna kieszeń służy do przechowywania osłony przeciwsłonecznej. W razie potrzeby
można ją wyciągnąć z kieszeni.
Krok 16: Przezroczysta osłona ma za zadanie chronić dzieci przed deszczem i kurzem. Zazwyczaj osłona przeciwdeszczowa jest zwinięta. W razie potrzeby należy ściągnąć przezroczystą
osłonę w dół i zapiąć plastikowe haczyki na pętelce z przodu daszka.
Krok 17: Przed użyciem przyczepy należy założyć chorągiewkę ostrzegawczą przez rękaw z
tkaniny po lewej stronie nadwozia. Jest to bardzo ważne, ponieważ przyczepę można łatwo
przeoczyć w ruchu drogowym.
Krok 18: Podczas składania przyczepy należy najpierw zdjąć zdemontować chorągiewkę.
Następnie złożyć kierownicę do pozycji poziomej i otworzyć osłonę tylnej szybki.
Krok 19: Przesunąć biały przycisk do tyłu, aby zwolnić blokadę. Następnie otworzyć plastikowy
zatrzask.
Krok 20: Przesunąć poziomą tylną rurkę do przodu.
Krok 21: Nacisnąć górną część obu boków, aby złożyć wózek.
Instrukcja korzystania z pasów bezpieczeństwa
Załączyć hamulec postojowy.
Otwórz przednią pokrywę (pokrywy).
Poluzować wszystkie elementy regulacyjne pasa.
OSTRZEŻENIE!
Zawsze wyregulować szelki barkowe i pas krokowy tak, aby stykały
się w dolnej części klatki piersiowej dziecka.
Pozostawienie szelek i sprzączek w pobliżu szyi dziecka może
spowodować poważne obrażenia.
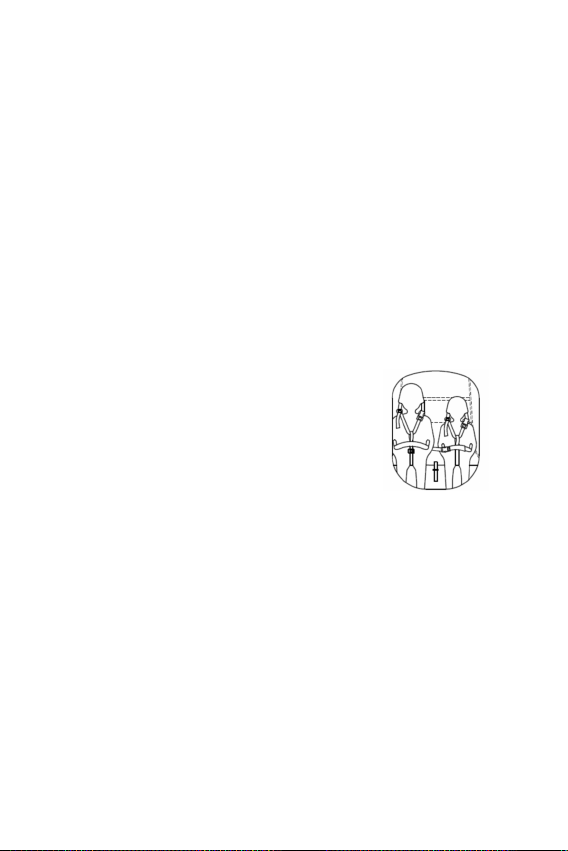
JEDNO DZIECKO
1. Wypiąć 5-punktowe szelki bezpieczeństwa od klamry zamka bezpieczeństwa. (patrz poniżej)
2. Posadź dziecko w dowolnym foteliku.
3. Umieścić pasek krokowy między nogami dziecka i wyregulować go tak, aby pętla paska
znajdowała się po środku dolnej części klatki piersiowej dziecka.
4. Zamocować prawą i lewą uprząż barkową oraz pas krokowy. (główna część klamry szelek
5-punktowych musi być zawsze połączona z pasem krokowymi).
5. Zapiąć szelki naramienne i pas krokowy, a następnie mocno dociągnąć.
DWOJE DZIECI
1. Wypiąć 5-punktowe szelki bezpieczeństwa z klamry blokującej po obu stronach.
2. Posadzić dzieci w wózku.
3. Umieścić pas krokowy między nogami dziecka i wyregulować go tak, aby pętla paska znajdowała się po środku dolnej części klatki piersiowej dziecka, po obu stronach.
4. Zamocować prawą i lewą uprząż barkową oraz pas krokowy po obu stronach (główne części
klamer 5-punktowych szelek bezpieczeństwa są zawsze połączone z pasem krokowym).
5. Zapiąć pasy barkowe i pas krokowy i mocno je docisnąć.
PL
27
Page 28

PL
OGÓLNE INSTRUKCJE BEZPIECZEŃSTWA
1. Przechować instrukcję w bezpiecznym miejscu. Nieprzestrzeganie podanych wskazówek
może mieć wpływ na bezpieczeństwo dziecka.
2. Nigdy nie pozostawiać dziecka w przyczepie bez opieki.
3. Po zaparkowaniu przyczepki należy zawsze zaciągnąć hamulec.
4. Ten pełni dwie funkcje: jedną jest funkcja przyczepki rowerowej, a drugą funkcja wózka
spacerowego.
5. Podczas używania jako przyczepki, przednie koło musi być zablokowane i schowane przy
zderzaku bocznym.
6. Maksymalne obciążenie: BT3720: 41 kg z pasażerem i ładunkiem.
7. Maksymalna waga całkowita: 59.50kg.
8. Minimalny wiek pasażerów: 9 miesięcy lub dziecko samodzielnie siedzące.
9. Maksymalny wzrost pasażera: 71,5cm
10. Maksymalna liczba pasażerów: 2 dzieci.
11. Maksymalna prędkość = 25 km/godz
12. Maksymalne ciśnienie w kołach wynosi 43 psi.
13. Maksymalna obciążenie haka holowniczego: 4.5kg.
14. Nigdy nie należy mocować przyczepy do roweru wyścigowego lub terenowego.
15. Wózek może prowadzić osoba dorosła o dobrej kondycji zycznej. Podczas jazdy, rowerzysta
musi zwracać większą uwagę i zachować większą ostrożność.
16. Dzieci w przyczepie powinny zawsze nosić atestowany kask.
17. Starannie wyregulować i zapiąć pasy bezpieczeństwa.
18. Zmontować przyczepę dokładnie według niniejszej instrukcji.
19. Nie wprowadzać żadnych modykacji w przyczepie.
20. Nie parkować przyczepy w pobliżu rowu lub niebezpiecznej drogi.
21. Nie kłaść niczego obok dzieci siedzących w przyczepie, ponieważ może to stanowić
zagrożenie lub spowodować obrażenia ciała.
22. Przed użyciem upewnić się, że wszystkie urządzenia blokujące są aktywne i działają
prawidłowo.
23. Aby uniknąć dodatkowych obrażeń, należy upewnić się, że dziecko znajduje się w bezpiecznej odległości podczas rozkładania/składania przyczepki.
24. Nie pozwalać dziecku na zabawy z produktem.
25. Zawsze używać systemu zabezpieczającego.
26. Przed posadzeniem dziecka do fotelika należy sprawdzić, czy jest on prawidłowo przymocowany.
27. Fotelik nie jest przeznaczony dla dzieci poniżej 6 miesiąca życia.
28. Podczas jazdy, przyczepka rowerowa powinna być zawsze przykryta i zamknięta, aby
zapobiec przedostawaniu się zanieczyszczeń do środka.
29. W przypadku używania produktu w funkcji wózka pamiętać, że nie nadaje się ona do
biegania ani jazdy na rolkach.
30. Podczas wkładania i wyjmowania dzieci hamulec postojowy musi być zawsze zaciągnięty.
31. Zwrócić uwagę na wydłużoną drogę hamowania roweru po zamontowaniu przyczepki.
32. Pamiętać, że wszelkie ładunki przymocowane do uchwytu i/lub po bokach pojazdu będą
miały wpływ na jego stabilność, powodując poważne zagrożenie.
33. Nie stosować akcesoriów, które nie zostały zatwierdzone przez producenta.
34. Stosować wyłącznie części zamienne dostarczone lub zalecane przez producenta/dystrybu-
tora.
35. Podczas montażu i przed każdym użyciem sprawdzić ciśnienie w oponach; przeprowadzać
rutynowe przeglądy, dbać o czystość urządzenia.
28
Page 29
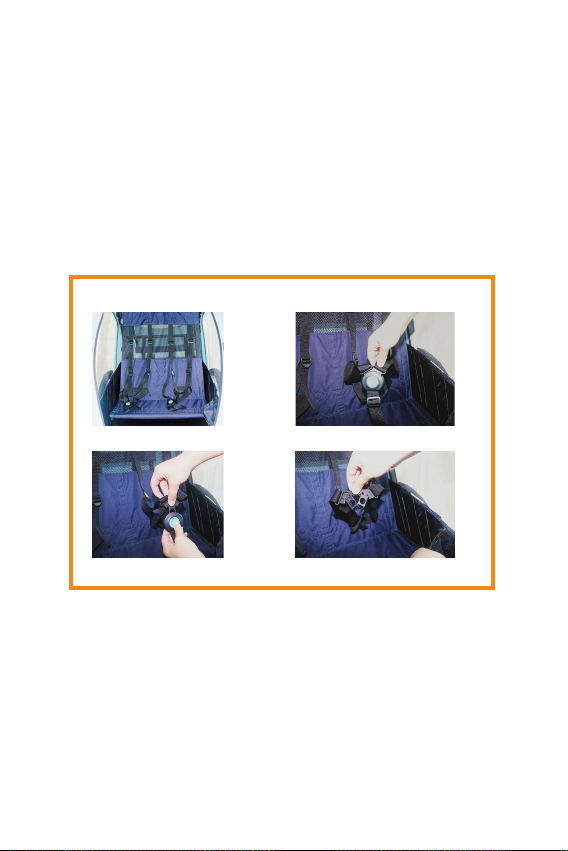
36. Trzymać się z dala od ognia lub źródeł ciepła, gdy dzieci siedzą w przyczepie.
37. Nie należy dopuszczać do kontaktu ciała dziecka, jego odzieży, sznurowadeł ani zabawek z
ruchomymi częściami. wózka.
38. Zawsze używać chorągiewki ostrzegawczej.
39. Przed przymocowaniem roweru do przyczepy należy przeprowadzić fachowy przegląd
roweru.
Importer: Bellelli srl – via Meucci, 232 – 45021 Badia Polesine (Ro) Włochy
Instrukcja obsługi drugiej klamry zamka
Wcisnąć niebieski przycisk
MADE IN CHINA
PL
Wyciągnąć sprzączkę
Zwolnić
29
Page 30

SR
PAŽNJA:
Pažljivo pročitajte ovo uputstvo pre montiranja
i upotrebe.
Nepoštovanje uputstava u ovom priručniku
može prouzrokovati štete ili povrede.
Sve gore navedene slike služe samo za
referencu, molimo pogledajte stvarnu sliku
proizvoda.
Montaža i demontaža prikolice
1. korak: Kada počinjete da sklapate prikolicu, najpre sastavite upravljač sa ramom. Pričvrstite
ga šestougaonim zavrtnjima.
2. korak: Mehanizam za sklapanje se nalazi u zadnjem džepu. Najpre otvorite zadnji džep, a
zatim povucite zadnju cev unazad.
3. korak: Zatvorite kopče sa obe strane. Bela poluga će biti ksirana i automatski postavljena
u položaj.
4. korak: Oslobodite parkirnu kočnicu. Pritisnite i držite mekano dugme i umetnite osovinu točka
u utičnicu. Osovina će se automatski zaključati. Proverite da li je točak dobro pričvršćen. Za
uklanjanje: ponovo pritisnite mekano dugme i izvucite točak iz osovine.
5. korak: Instalirajte plastično krilo klizeći ga sa prednje strane blizu kraja (sa obe strane).
Umetnite polugu za vuču i gurnite je prema unutra dok se prednji otvor ne poravna sa rupom
6. korak: Kada koristite kao kolica: umetnite prednji točak (7”) u držač. Upozorenje: uvek se
uverite da je točak kolica pravilno i dobro postavljen i zaključan!
7. korak: Pritisnite dugme za orijentaciju za ksni smer. Ponovo ga otpustite za funkciju
okretanja u svim pravcima.
8. korak: Otpustite klin za zaključavanje i povucite polugu za vuču unazad i zaključajte je kada je
u položaju (režim kolica).
9. korak: Kada se koristi kao prikolica za bicikl: pritisnite plavo dugme da biste uklonili prednji
točak. Stavite prednjib točak u kutiju zadnje konzole.
Pažnja: Pritisnite dugme za orijentaciju da zaključate prednji točak kako biste izbegli
okretanje kada je u mirovanju. Pritisnite plavo okruglo dugme da biste ga otpustili.
10. korak: Pritisnite pedalu da biste aktivirali parkirnu kočnicu. Ponovo je otpustite pre šetnje ili
vožnje. Pažnja: Proverite da li je kočnica u dobrom radnom stanju kada se koristi.
11. korak: Ručka sa 8 pozicija za podešavanje odgovarajuće visine od 78 cm do 115 cm i
ispunjavanje zahteva većine osoba.
Pažnja: Kada se prikolica koristi kao kolica, uvek koristite traku za zglob zbog sigurnosti.
12. korak: Bicikl: uklonite maticu i podlošku sa levog kraja osovine. Koristite ključ da pričvrstite
spojnicu (A) sa osovinom zadnjeg točka. Zatim zategnite maticu obrtnim momentom koji preporučuje proizvođač bicikla.
13. korak: Gurnite priključnu cev (B) preko spojnice (A) i pričvrstite je okovom. Zatim zamotajte
sigurnosnu traku oko okvira bicikla i ponovo zakačite kopču na polugu za vuču.
NAPOMENA! Pažljivo proverite da sigurnosni pojas ne može da dođe između pokretnih
delova bicikla. Ako je potrebno, namotajte ga oko okvira nekoliko puta.
14. korak: Kada je dete u prikolici, treba uvek koristiti sigurnosne trake i pažljivo ih podesiti.
Kada u prikolici sedi jedno dete, uvek treba da sedi na desnoj strani. Sedište nije pogodno za
decu mlađu od 6 meseci.
30
Model: BT3720 sa kompletom za kolica
Pre nego što počnete sa montažom,
proverite sadržaj pakovanja:
• 1 savijena prikolica
• 1 komplet 7” prednjih okretnih točkova
• 2 zadnja točka od 20”
• 1 vučna šipka
• 1 komplet upravljača
• 2 M4 vijka
• 2 kompleta branika
• 1 zastava
Page 31
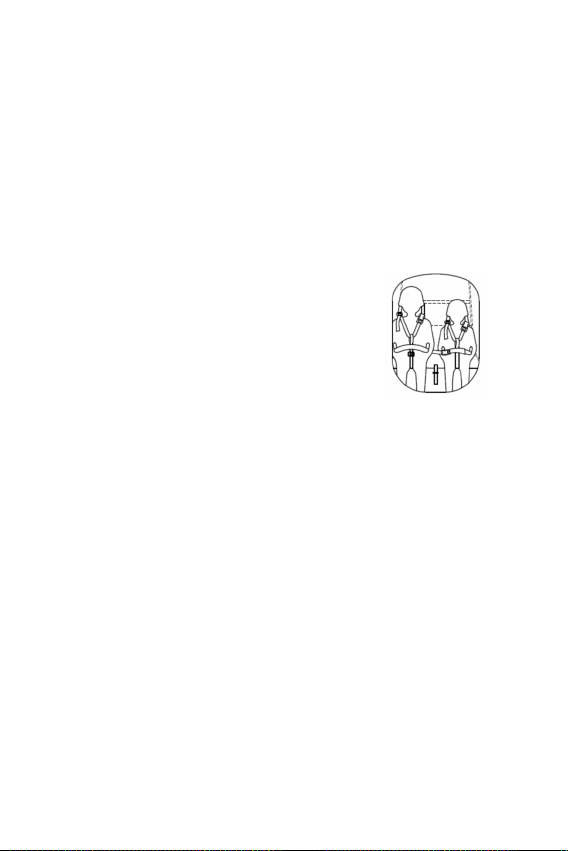
15. korak: Suncobran se čuva u gornjem džepu. Kada je potrebno, može se izvući iz džepa za
direktnu upotrebu.
16. korak: Providni pokrivač je napravljen da zaštiti decu od kiše i prašine. Obično je kišni pokrivač namotan. U slučaju da vam zatreba, povucite providni pokrivač nadole i pričvrstite plastične
kuke omčom na prednjoj strani nadstrešnice.
17. korak: Pre upotrebe prikolice, umetnite sigurnosnu zastavicu kroz rukav od tkanine na levoj
strani karoserije. Ovo je veoma važno, jer se prikolica može lako prevideti u saobraćaju.
18. korak: Prilikom sklapanja prikolice prvo skinite sigurnosnu zastavicu. Zatim preklopite
upravljač u horizontalni položaj i otvorite poklopac zadnjeg stakla.
19. korak: Povucite belo dugme unazad da biste oslobodili uređaj za zaključavanje. Zatim
otvorite plastičnu zakačku.
20. korak: Gurnite zadnju horizontalnu cev napred.
21. korak: Pritisnite vrh obe strane da biste preklopili prikolicu.
Uputstvo za upotrebu sigurnosnog pojasa.
Aktivirajte parkirnu kočnicu.
Otvorite prednji(e) poklopac(ce).
Otpustite sva podešavanja pojaseva.
UPOZORENJE!
Uvek podesite pojas za ramena i prepone tako da se sastaju na
donjem delu grudi deteta.
Podešavanje pojasa i kopči u blizini vrata vašeg deteta može izazvati
ozbiljne povrede.
JEDNO DETE
1. Otključajte pojas sa 5 tačaka sa kopče sigurnosne brave. (vidi dole)
2. Postavite dete u bilo koje sedište.
3. Postavite međunožnu traku između nogu deteta i podesite je tako da omča za kaiš bude
centrirana na donjem delu grudi deteta.
4. Pričvrstite pojas za ramena za desnu i levu ruku i pojas za prepone. (glavni deo kopče pojasa
u 5 tačaka je uvek ksiran sa pojasom za prepone).
5. Pričvrstite pojas za ramena i međunožje i dobro zategnite.
DVOJE DECE
1. Otključajte pojas sa 5 tačaka sa kopče sigurnosne brave sa obe strane.
2. Postavite decu u prikolicu.
3. Postavite međunožnu traku između nogu deteta i podesite je tako da omča za kaiš bude
centrirana na donjem delu grudi deteta sa obe strane.
4. Pričvrstite pojaseve za rame za desnu i levu ruku i remenje za prepone sa obe strane (glavni
delovi kopči pojasa u 5 tačaka su uvek ksirani preponom).
5. Pričvrstite pojas za ramena i međunožje i dobro zategnite.
OPŠTA BEZBEDNOSNA UPUTSTVA
1. Sačuvajte ova uputstva za buduću upotrebu. Bezbednost vašeg deteta može biti ugrožena
ako ne sledite ova uputstva.
2. Nikada ne ostavljajte dete bez nadzora u prikolici.
3. Aktivirajte kočnicu kad god parkirate prikolicu.
4. Ovaj proizvod ima dve funkcije: jedna je funkcija prikolice za bicikl, druga je funkcija kolica.
5. Kada se koristi kao prikolica, prednji točak mora biti zaključan i odložen na bočnom braniku.
6. Maksimalno opterećenje: BT3720: 41 kg uključujući putnike i teret.
SR
31
Page 32

SR
7. Maksimalna ukupna težina: 59,50 kg.
8. Minimalna starost putnika: 9 meseci ili da može da sedi bez ikakve pomoći.
9. Maksimalna visina putnika: 71,5 cm
10. Maksimalni broj putnika: 2 deteta.
11. Maksimalna brzina = 25 km/h
12. Maksimalni pritisak u gumama je 43 psi.
13. Maksimalna nosivost šipke za vuču: 4,5 kg.
14. Nikada ne pričvršćujte prikolicu na trkački ili terenski bicikl.
15. Vozač treba da bude odrasla osoba u dobroj zičkoj kondiciji. Pored toga, vozač treba da
obrati više pažnje tokom vožnje.
16. Deca u prikolici uvek treba da nose odobrene kacige.
17. Treba pažljivo podesiti i zatvoriti sigurnosne pojaseve.
18. Molimo sastavite prikolicu tačno prema ovom uputstvu.
19. Nemojte praviti nikakve modikacije na prikolici.
20. Nemojte parkirati prikolicu blizu jarka ili opasnog puta.
21. Ne stavljajte ništa pored dece kada sede u prikolici, jer to može biti opasno ili može povrediti.
22. Uverite se da su svi uređaji za zaključavanje/pakovanje uključeni i dobro funkcionišu pre
upotrebe.
23. Da biste izbegli povrede, vodite računa da se vaše dete nalazi na bezbednoj udaljenosti kada
rasklapate/sklapate prikolicu.
24. Nemojte dozvoliti detetu da se igra sa ovim proizvodom.
25. Uvek koristite sigurnosni sistem.
26. Pre upotrebe redovno proveravajte jedinicu sedišta da li je pravilno pričvršćena.
27. Sedište ove jedinice nije pogodno za decu mlađu od 6 meseci.
28. Prikolica za bicikl uvek treba da bude pokrivena i zatvorena tokom vožnje kako bi se sprečilo
ulaženje komadića.
29. Kada se koristi u funkciji kolica, nije pogodna za trčanje ili vožnju rolera.
30. Ručna kočnica mora uvek biti aktivirana prilikom postavljanja i uklanjanja dece.
31. Obratite pažnju na povećan put kočenja bicikla kada je prikolica pričvršćena.
32. Bilo koji teret pričvršćen za ručku i/ili na bočne strane vozila će uticati na stabilnost vozila
izazivajući ozbiljan rizik
33. Ne sme koristiti pribor koji nije odobren od strane proizvođača.
34. Koristite samo rezervne delove koje je isporučio ili preporučio proizvođač/distributer.
35. Proverite pritisak u gumama tokom montaže i pre svake vožnje, redovno proveravajte,
održavajte čistoću.
36. Držite dalje od vatre ili izvora toplote kada deca sede u prikolici.
37. Ne dozvolite da dečje telo, odeća, pertle ili igračke dođu u kontakt sa pokretnim delovima.
38. Uvek koristite sigurnosnu zastavicu.
39. Neka vaš bicikl pregleda kvalikovani mehaničar za bicikle pre nego što ga prikačite na
prikolicu.
Uvezeno od strane Bellelli srl – via Meucci, 232 – 45021 Badia Polesine (Ro) Italija
MADE IN CHINA
32
Page 33
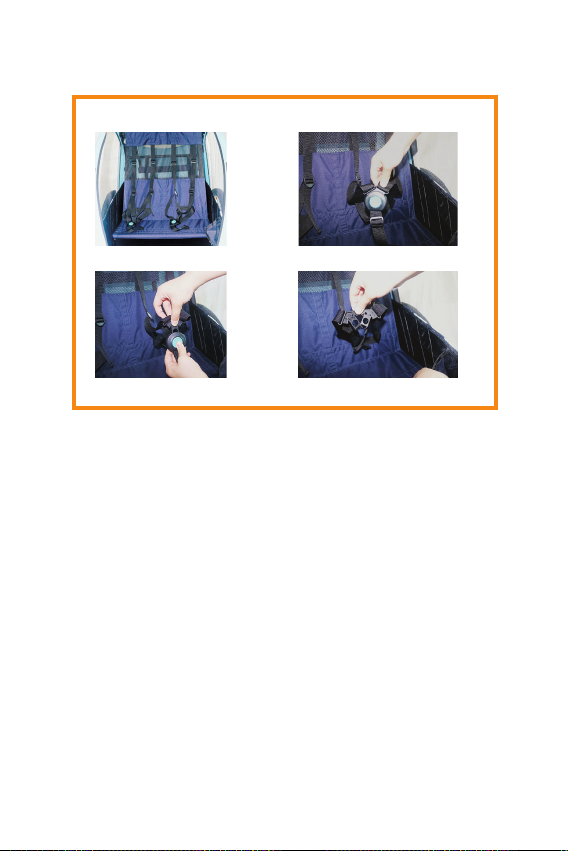
Uputstvo za rukovanje kopčom 2. brave
Pritisnite plavo dugme
SR
Izvucite kopču
Oslobodite
33
Page 34

343536
Page 35

Page 36

...And more about us:
www.bellelli.com
 Loading...