

Page 1

Page 2
Page 3

IMPORTANT SAFEGUARDS
WARNING: When using electrical appliances, basic safety precautions should always
be followed, including the following:
1. Read all instructions before using appliance.
2. Do not touch hot surfaces. Use handles or knobs.
3. To protect against risk of electric shock, do not immerse or partially immerse the
cord, plugs, or the entire unit in water or any other liquid.
4. This appliance is not intended for use by persons (including children) with reduced
physical, sensory or mental capabilities, or lack of experience and knowledge,
unless they have been given supervision or instruction concerning use of the
appliance by a person responsible for their safety.
5. Close supervision is necessary when any appliance is used by or near children.
6. Unplug from wall outlet when not in use and before cleaning. Allow to cool before
cleaning or storing this appliance.
7. Never yank the cord to disconnect the appliance from the outlet. Instead, grasp the
plug and pull to disconnect.
8. Do not operate any appliance with a damaged cord or plug or after the appliance
malfunctions, or has been damaged in any manner. Return appliance to the nearest
authorized service facility for examination, repair or adjustment.
9. The use of accessories attachments not recommended by the appliance
manufacturer may cause fire, electrical shock or injuries.
10. Do not use outdoors. This is for household only.
11. Do not use for commercial purposes.
12. Do not let the electrical cord hang over the edge of the table or counter, or touch
hot surfaces.
13. Do not place on or near a hot gas or electric burner or in a heated oven.
14. Use on a heat-resistant, flat level surface only.
15. Extreme caution must be used when moving an appliance containing hot food, hot
water, hot oil or other hot liquids.
16. The cord to this appliance should be plugged into a 120V AC electrical outlet only.
17. A short power-supply cord is to be provided to reduce the risk resulting from
becoming entangled in or tripping over a longer cord.
18. Longer extension cords are available and may be used if care is exercised
in their use.
19. If an extension cord is used:
a. The marked electrical rating of the detachable power-supply cord or extension cord
should be at least as great as the electrical rating of the appliance,
b. If the appliance is of the grounded type, the extension cord should be a grounding
type 3-wire cord; and
c. The longer cord should be arranged so that it will not drape over the counter top or
table top where it can be pulled on by children or tripped over unintentionally.
20. To disconnect, remove plug from outlet.
21. Always unplug after use. The appliance will remain ON unless unplugged.
22. CAUTION HOT SURFACES: This appliance generates heat during use. Proper
precautions must be taken to prevent the risk of burns, fire or other damage to
persons or property.
23. When using this appliance, provide adequate ventilation above and on all sides for
air circulation. Do not allow this appliance to touch curtains, wall coverings, clothing,
dish towels or other flammable materials during use.
24. Use with wall receptacle only.
25. Do not use appliance for other than intended use.
2
Page 4

FOR HOUSEHOLD USE ONLY
SAVE THESE INSTRUCTIONS
ADDITIONAL
IMPORTANT SAFEGUARDS
CAUTION: This appliance is hot during operation and retains heat for some time
after turning OFF. Always wear oven mitts when handling hot materials and allow
metal parts to cool before cleaning. Do not place anything on top of the appliance
while it is operating or while it is hot.
1. All users of this appliance must read and understand this Instruction Manual
before operating or cleaning this appliance.
2. Do not leave this appliance unattended during use.
NOTES ON ThE PLug
This appliance has a polarized plug (one blade is wider than the other). To reduce the risk
of electric shock, this plug will fit in a polarized outlet only one way. If the plug does
not fit fully into the outlet, reverse the plug. If it still does not fit, contact a qualified
electrician. Do not modify the plug in any way.
NOTES ON ThE COrD
The provided short power-supply cord (or detachable power-supply cord) should be
used to reduce the risk resulting from becoming entangled in or tripping over a
longer cord. Do not use an extension cord with this product.
PLASTICIzEr WArNINg
CAUTION: To prevent Plasticizers from migrating to the finish of the counter top or
table top or other furniture, place NON-PLASTIC coasters or place mats between the
appliance and the finish of the counter top or table top. Failure to do so may cause the
finish to darken; permanent blemishes may occur or stains can appear.
ELECTrIC POWEr
If the electrical circuit is overloaded with other appliances, your appliance may not
operate properly. It should be operated on a separate electrical circuit from
other appliances.
3
Page 5
Page 6

5
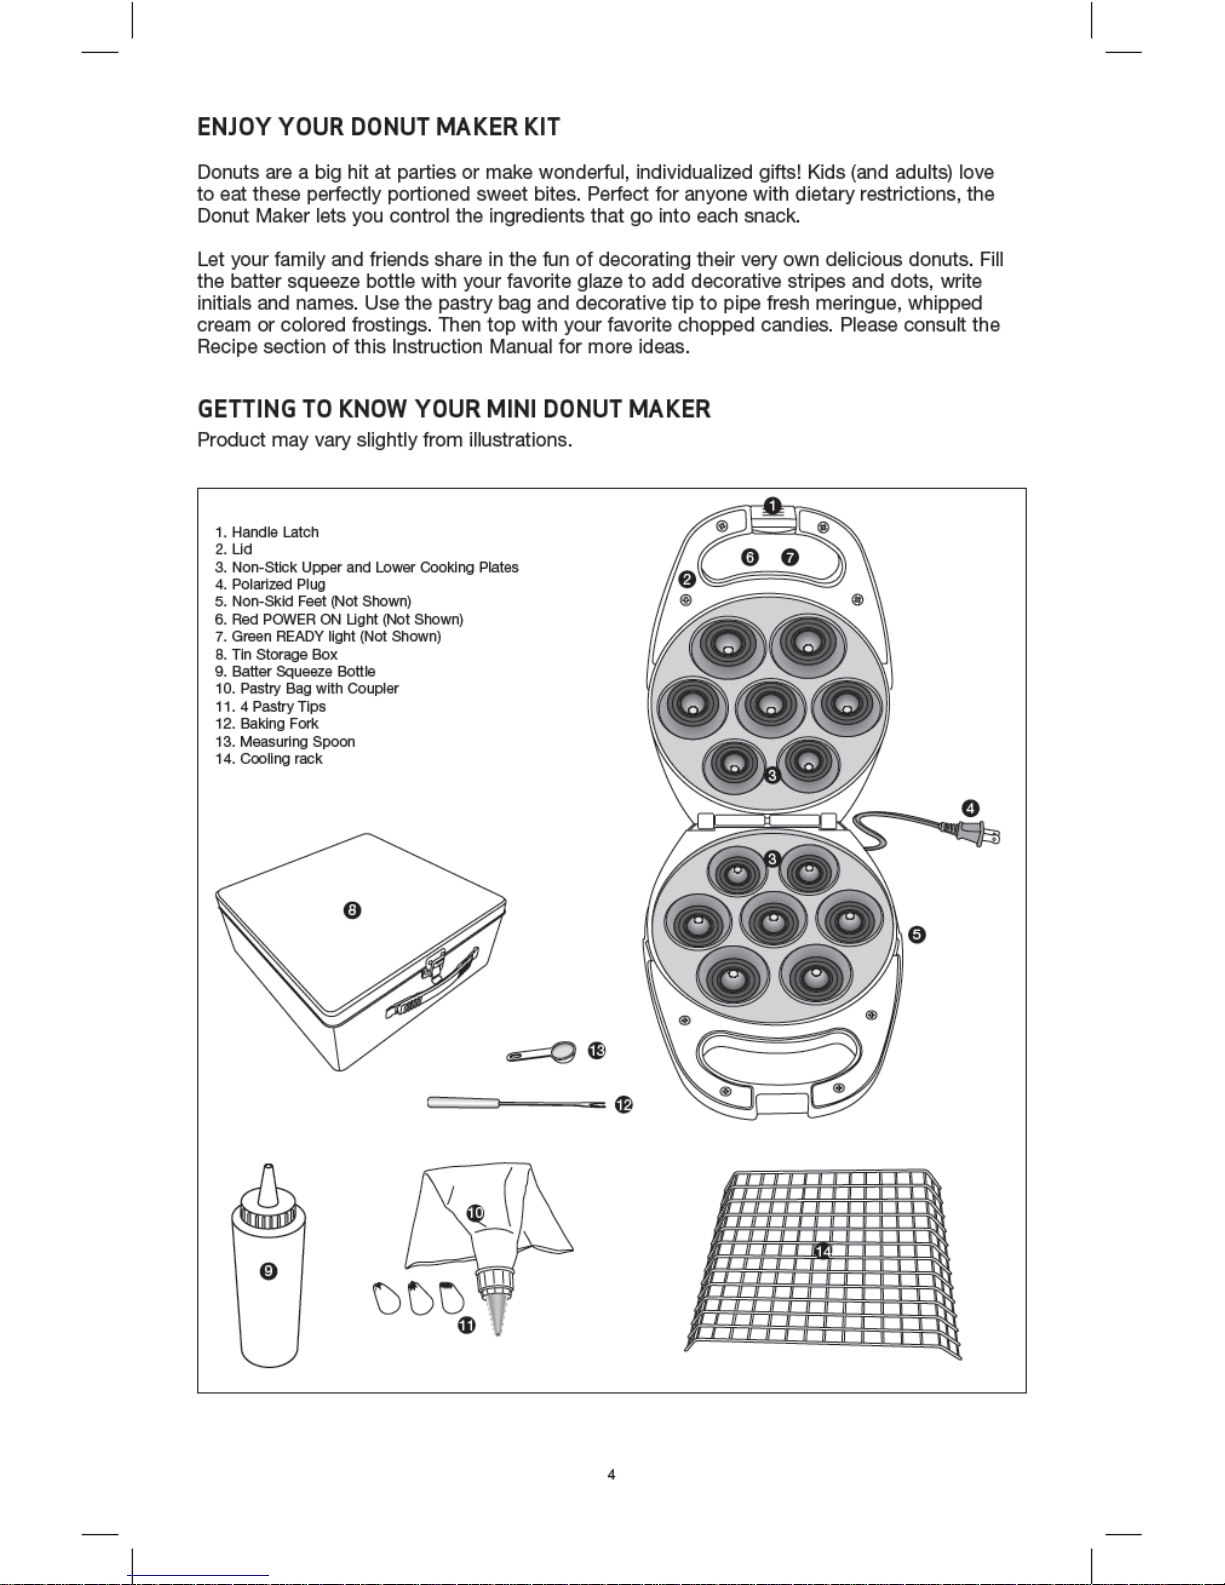
DECOrATINg ACCESSOrIES
Tin Storage Box
• This beautifully decorated tin has a specially fitted insert to store the unit and accessories.
• Keep decorating accessories clean and organized for future use.
Batter Squeeze Bottle
• This squeezable bottle is light, and easily controlled with one hand.
• Fill squeeze bottle with any thin (runny) batter to fill molds.
• Fill squeeze bottle with your favorite glaze. See glaze recipes in the Recipe section of this
Instruction Manual.
Filling the Batter Squeeze Bottle
NOTE: Do not use the batter squeeze bottle for very thick batters. Instead, use the measuring
spoon to scoop batter into molds.
1. Remove the lid from the batter squeeze bottle.
2. Use a funnel or roll a piece of wax (or parchment) paper into a cone. Insert the funnel or
cone into the batter squeeze bottle. Slowly pour the filling (batter or glaze) through the
funnel or cone into the bottle.
or . . .
pour the batter into a plastic storage bag, trim a corner and slowly squeeze the filling into
the bottle.
3. Allow air bubbles to escape from the mixture by tapping the upright batter squeeze bottle
against any hard surface.
WARNING: Do not fill the batter squeeze bottle more than 3/4 full with rising batter, as
batter may expand as it sits. Remove the funnel or cone.
4. Replace the batter squeeze bottle top, twisting it firmly to seal.
5. Wipe any excess filling with a paper towel.
Pastry Bag with Decorative Pastry Tips
• Use to pipe frosting, icing, meringue, or whipped cream filling.
• NOTE: A full pastry bag requires 2 hands — one to guide the pastry tip and the other
to squeeze the pastry bag.
• IMPORTANT: The filling must be the correct consistency — too thin will run out of the tip
and bag, too thick will be difficult, if not impossible, to squeeze through the tip.
• Practice piping using any decorative pastry tip. To make a solid, straight line, move your
hand at a consistent pace, and keep even pressure on the bag.
• Use decorative pastry tips to create fun borders, messages, rosettes, designs, patterns.
Filling the Pastry Bag
1. Use gel to color the filling. Mix well in a small bowl until color is even.
2. Separate the coupler base from the ring and insert the coupler base, narrow end first, into
the pastry bag.
3. Cut a very small corner of the bag and slide the coupler into position.
IMPORTANT: DO NOT cut too much pastry bag. The coupler should fit snuggly in the
pastry bag.
4. Fit the decorative tip onto the outside of the coupler and fasten securely with
the coupler ring.
5. Hold the pastry bag with tip attached in your left hand. Hold the lower 1/3 of the bag in
your hand and roll 2/3 of the pastry bag inside out — forming a cuff around your hand.
Cup the pointed 1/3 of the bag in the palm of your hand.
Page 7

6. Use a spatula to scoop frosting, icing, meringue or whipped cream from the bowl into the
opened pastry bag.
7. For best results, never fill the pastry bag more than 2/3 full.
8. Close the bag by unfolding the cuff and twisting the bag closed. This forces the icing,
meringue, or whipped cream filling down into the pastry bag.
9. Squeeze the first bit of filling out of the tip into the bowl to release any bubbles. Hold
the bag between your thumb and forefinger, and press with your palm as you pipe the
icing, meringue, or whipped cream.
10. Refill the pastry bag as needed.
Baking Fork
• Wearing oven mitts, remove baked treats from the cooking plate using the baking fork.
• Use care to avoid scratching the non-stick surface.
Measuring Spoon
• Use the measuring spoon (1 teaspoon) to fill the molds on the lower cooking plate 2/3 to
almost full – use 2 rounded teaspoon of batter.
Cooling Rack
• Remove baked treats to the wire cooling rack to cool before decorating.
BEFOrE uSINg FOr ThE FIrST TIME
1. Carefully unpack the Donut Maker Kit and remove all packaging and materials.
2. Before using your Mini Donut Maker for the first time, wipe the cooking plates with a
damp cloth to remove all dust, and then dry. Wipe outer surfaces with a slightly damp,
soft cloth or sponge.
CAUTION: Take care to prevent water from running into the appliance.
NEVER IMMERSE MINI DONUT MAKER BODY IN WATER OR ANY OTHER LIQUIDS!
3. Set the appliance on a dry, clean and flat surface. Keep the Mini Donut Maker
closed until use.
4. Wash and rinse all decorating accessories: batter squeeze bottle, baking fork, pastry bag
with coupler, pastry tips, cooling rack, and measuring spoon. Dry before use.
OPErATINg INSTruCTIONS
1. Open the lid latch. Lift the top lid to the open position.
2. Before baking the first mini donuts of the day, pour a teaspoon of vegetable oil
to both the top and bottom mini donut plates. Spread with an absorbent kitchen towel
and wipe off any excess oil.
3. Plug unit into a 120 V AC electrical outlet to preheat. The red POWER ON light
will illuminate. Close the lid.
NOTE: When your Mini Donut Maker is heated for the first time, it may emit slight smoke
or odor. This is normal and should disappear after 1 or 2 uses. This does not affect
the safety of the appliance. However, as it may affect the flavor of the first mini donuts
prepared in the Mini Donut Maker, it is recommended that these be discarded.
4. While preheating, prepare mini donut batter.
5. After approximately 2 to 3 minutes, the green READY light will turn on, indicating the unit
is preheated and is ready for use.
6. For best results, use a non-stick cooking spray to lightly coat the non-stick plates before
cooking. This will assist in the removal of the mini donuts after cooking.
7. Recipes will vary in cook time and brownness; batters with more sugar will brown
quicker. Note the perfect bake times for each batter recipe for future use.
8. Place a scant tablespoon of donut batter into the center of each of the mini donut molds
on the lower cooking plate. Spread slightly to fill the entire shape. Try not to overfill,
batter will expand when cooked.
6
Page 8

9. Lower the top lid, press down so that the latch lock is secured.
10. The green READY light will turn on once the mini donuts are ready; cook 2 to 3 minutes
until brown on outside.
11. Wearing oven mitts, wipe the outside clean with a clean paper towel or cleaning cloth as
necessary.
12. At the end of the cook time, press the handle’s latch lock and lift the top lid gently; if it
pulls, continue cooking for 30 seconds and test again.
NOTE: If the mini donuts need to bake to a darker finish, close the lid and continue
baking for 15 seconds until the desired color is achieved.
NOTE: As the mini donuts use a small amount of batter, and the Mini Donut Maker plates
are very hot, the cooking time is generally shorter rather than longer.
Be careful not to burn mini donuts.
13. Wearing oven mitts, remove donuts from the cooking plate using the baking fork. Use
care to avoid scratching the non-stick surface.
NOTE: If additional mini donuts are to be baked, keep the Mini Donut Maker closed to
retain heat. Always wait until the green READY light turns on before baking
more mini donuts.
NOTE: Mini Donuts made later will bake faster because extra heat has been retained.
It may be necessary to adjust to a shorter cooking time to accommodate.
14. Place on the cooling rack before glazing or decorating.
15. When baking is complete, after mini donuts have been removed, unplug the power cord
from electric outlet. Lift the top lid to expose the cooking plates and allow unit to cool.
16. Do not clean until unit has been fully cooled.
MINI DONuT BAkINg TIPS
• Recipes may be halved or doubled.
• Sift all dry ingredients together. It is not necessary to beat egg yolks and milk separately.
Just add them to the combined flour mixture and use a whisk or mixer to blend the
ingredients well.
• Do not open the Mini Donut Maker during the first minute of baking or the mini donut will
separate. Completely bake the mini donut before removing.
• When a mini donut is done, the top lid should lift easily. Lift gently; if it pulls, continue
cooking for 1 minute and test again.
• When preparing mini donut batter, do not over-mix or mini donuts will be tough. Stir
batter only until large lumps of dry ingredients disappear.
• The optimal amount of batter to produce a full-shaped mini donut, without overflowing,
will vary with different mini donut batters.
• For more evenly shaped mini donuts, spread thick batters to the outer edge of the
cooking plate using a heat-proof rubber spatula or other non-metallic utensil before
closing the lid.
• To retain crispness, move baked mini donuts to a paper napkin or a wire cooling rack
to absorb any condensation. To keep mini donuts hot, place in an ovenproof dish on an
oven rack and warm at about 200-250° F (90-120° C). Mini Donuts will keep for about 20
minutes before they begin to dry out.
• Add fun glazes and toppings to cooled mini donuts. See Mini Donut Glazes and Toppings
section in the Recipe section of this Instruction Manual.
• Baked donuts freeze well. Cool completely on the cooling rack. Store, undecorated, in a
plastic freezer bag or in a covered container.
• Thaw frozen mini donuts in a toaster oven until hot and crisp or place in a microwave
oven for 10 seconds. Do not over-cook.
• Add glazes and toppings to the thawed donuts.
7
Page 9

8
For lower sugar mini donuts:
• Use sugar substitutes.
• Use sugar-free maple syrup.
• Use sugar-free or no sugar added jello, puddings, jellies, jams, etc. for flavorings
and toppings.
For lower fat, lower cholesterol mini donuts:
• Use skim milk.
• Adapt recipes by eliminating the egg yolk. Always use liquid vegetable oils such as
canola, corn or sunflower, instead of butter.
For higher fiber mini donuts:
• Substitute 1⁄2 cup or more of white flour with whole-wheat flour.
• Substitute 1⁄4 cup of white flour with wheat or oat bran.
uSEr MAINTENANCE INSTruCTIONS
This appliance requires little maintenance. It contains no user serviceable parts.
Do not try to repair it yourself. Contact a qualified appliance repair technician
if the product requires servicing.
Page 10

Page 11

Page 12

Page 13

Page 14

Page 15

2
Limited ONE-YEAR Warranty
SENSIO Inc. hereby warrants that for a period of ONE YEAR from the date of purchase,
this product will be free from mechanical defects in material and workmanship, and
for 90 days in respect to non-mechanical parts. At its sole discretion, SENSIO Inc. will
either repair or replace the product found to be defective, or issue a refund on the
product during the warranty period.
The warranty is only valid for the original retail purchaser from the date of initial retail
purchase and is not transferable. Keep the original sales receipt, as proof of purchase is
required to obtain warranty validation. Retail stores selling this product do not have the
right to alter, modify, or in any way revise the terms and conditions of the warranty.
EXCLUSIONS:
The warranty does not cover normal wear of parts or damage resulting from any of the
following: negligent use of the product, use of improper voltage or current, improper
routine maintenance, use contrary to the operating instructions, disassembly, repair,
or alteration by anyone other than qualied SENSIO Inc. personnel. Also, the warranty
does not cover Acts of God such as re, oods, hurricanes, or tornadoes.
SENSIO Inc. shall not be liable for any incidental or consequential damages caused
by the breach of any express or implied warranty. Apart from the extent prohibited
by applicable law, any implied warranty of merchantability or tness for a particular
purpose is limited in time to the duration of the warranty. Some states, provinces or
jurisdictions do not allow the exclusion or limitation of incidental or consequential
damages, or limitations on how long an implied warranty lasts, and therefore, the
above exclusions or limitations may not apply to you. The warranty covers specic
legal rights which may vary by state, province and/or jurisdiction.
HOW TO OBTAIN WARRANTY SERVICE:
You must contact Customer Service at our toll-free number: 1-866-832-4843.
A Customer Service Representative will attempt to resolve warranty issues over the
phone. If the Customer Service Representative is unable to resolve the problem, you will
be provided with a case number and asked to return the product to SENSIO Inc. Attach
a tag to the product that includes: your name, address, daytime contact telephone
number, case number, and description of the problem. Also, include a copy of the
original sales receipt. Carefully package the tagged product with the sales receipt,
and send it (with shipping and insurance prepaid) to SENSIO Inc.’s address. SENSIO
Inc. shall bear no responsibility or liability for the returned product while in transit to
SENSIO Inc.’s Customer Service Center.
Page 16

15
MEDIDAS DE SEGURIDAD
IMPORTANTES
ADVERTENCIA: Al utilizar electrodomésticos, siempre deben cumplirse las precauciones
de seguridad básicas, incluidas las siguientes:
1. Lea todas las instrucciones antes de utilizar el aparato.
2. No toque las superficies calientes. Utilice las asas o manijas.
3. Para protegerse contra riesgos de descarga eléctrica, no sumerja, ni total ni
parcialmente, el cable, el enchufe ni la unidad completa en agua u otros líquidos.
4. Este dispositivo no está diseñado para ser utilizado por personas (incluidos niños)
con capacidades físicas, sensoriales o mentales reducidas, o falta de experiencia
y conocimiento, a menos que una persona responsable de su seguridad los
superviseo instruya en el uso del aparato.
5. Es necesario supervisar atentamente a los niños si usan aparatos o están
cerca de ellos.
6. Desenchufe el aparato del tomacorriente de la pared cuando no lo utilice o antes
de limpiarlo. Deje que se enfríe el aparato antes de limpiarlo o guardarlo.
7. Nunca tire del cable para desconectar el aparato del tomacorriente. En cambio,
tome el enchufe y tire de él para desconectarlo.
8. No utilice ningún aparato si el cable o el enchufe están dañados, o si el aparatono
funciona bien o se ha dañado de alguna forma. Lleve el aparato al servicio técnico
autorizado más cercano para que lo examinen, reparen o ajusten.
9. El uso de accesorios no recomendados por el fabricante del artefacto puede
ocasionar incendios, descargas eléctricas o lesiones.
10. No lo utilice en el exterior. Este aparato es para uso doméstico únicamente.
11. No lo utilice para fines comerciales.
12. No permita que el cable eléctrico cuelgue del borde de la mesa o mesada ni que
toque superficies calientes.
13. No lo coloque encima ni cerca de un quemador eléctrico o de gas calientes,
ni de un horno caliente.
14. Solo utilice el aparato sobre una superficie plana y resistente al calor.
15. Se debe tener sumo cuidado cuando se traslada un aparato con alimento caliente,
o agua, aceite u otros líquidos calientes.
16. El cable del aparato se debe enchufar únicamente a un tomacorriente eléctricode
120 V de CA.
17. Se suministrará un cable de alimentación corto para reducir el riesgo de enredarseo
tropezarse con un cable más largo.
18. Hay cables de extensión más largos disponibles y pueden usarse si
se tiene cuidado.
19. Si usa un cable de extensión:
a. El calibre indicado del cable de alimentación separable o del cable de extensión
debe ser igual al calibre del aparato.
b. Si el aparato tiene conexión a tierra mediante 3 conductores,
el cable de extensión debe ser un cable a tierra de conductores.
c. Por último, el cable más largo debe manipularse de modo que no cuelguepor la
mesada ni la mesa, los niños no puedan jalarlo ni las personas puedan tropezar
con él accidentalmente.
20. Para desconectar la unidad, desenchúfela del tomacorriente.
21. Siempre desenchufe el aparato después de usarlo. El aparato
permanecerá encendido a menos que se desenchufe.
22. PRECAUCIÓN CON LAS SUPERFICIES CALIENTES: Este aparato genera calor
durante el uso. Se deben tomar las medidas necesarias para evitar riesgos de
quemaduras, incendios u otros daños a personas o a la propiedad.
Page 17

23. Cuando utilice este aparato, deje suficiente ventilación por encima y
alrededorde él para la circulación del aire. No permita que este aparato esté en
contactocon cortinas, revestimientos de paredes, ropas, repasadores u otros
materialesinflamables durante su uso.
24. Únicamente enchufe este aparato a un receptáculo montado en la pared.
25. No le dé al aparato otro uso que no sea el indicado.
OTRAS MEDIDAS DE SEGURIDAD
IMPORTANTES
PRECAUCIÓN: Este artefacto está caliente durante el uso y permanece caliente
algún tiempo luego de apagarlo. Siempre use manoplas para horno cuando
manipule materiales calientes y deje enfriar las piezas metálicas antes de
limpiarlas. No coloque ningún objeto sobre el artefacto cuando este está en uso o
mientras está caliente.
1. Todos los usuarios de este artefacto deben leer y comprender este manual de
instrucciones antes de usar o limpiar esta máquina para hacer pizza.
2. No deje este artefacto sin supervisión durante el uso.
NOTAS SOBrE EL ENChuFE
Este aparato tiene un enchufe polarizado (una pata es más ancha que la otra). A fin de
reducir el riesgo de descarga eléctrica, el enchufe entra en un tomacorriente polarizado
en un solo sentido. Si el enchufe no entra completamente en el tomacorriente,
invierta el enchufe. Si aun así no entra, consulte a un electricista autorizado.
No realice ninguna modificación.
NOTAS SOBrE EL CABLE
El cable de alimentación corto (o el cable de alimentación desmontable) suministrado
se debe utilizar para reducir los riesgos de enredarse o tropezar con un cable más largo.
No utilice un cable de extensión con este producto.
ADvErTENCIA SOBrE EL PLASTIFICANTE
PRECAUCIÓN: Para evitar que el plastificante se transfiera sobre el acabado de
la encimera, la superficie de trabajo u otro mueble, coloque posavasos o manteles
individuales NO PLÁSTICOS entre el electrodoméstico y el acabado de la encimera
o la superficie. De lo contrario, el acabado puede oscurecerse o pueden aparecer
manchas o marcas permanentes.
ENErgÍA ELéCTrICA
Si el circuito eléctrico está sobrecargado con otros artefactos, su electrodoméstico
puede dejar de funcionar correctamente. El electrodoméstico debe funcionar en un
circuito eléctrico separado de otros artefactos.
PARA USO DOMÉSTICO
ÚNICAMENTE
GUARDE ESTAS INSTRUCCIONES
16
Page 18

Page 19

18
ACCESORIOS DE DECORACIÓN
Caja de almacenamiento de hojalata
• Esta caja de hojalata decorada a la perfección incluye un inserto acondicionado
especialmente para almacenar la unidad y los accesorios.
• Mantenga los accesorios de decoración limpios y organizados para usarlos en el futuro.
Botella comprimible para masa
• Esta botella comprimible es liviana y puede controlarse fácilmente con una mano.
• Llene la botella comprimible con cualquier masa diluida (líquida) para llenar los moldes.
• Llene la botella comprimible con su glaseado favorito. Consulte las recetas con glaseados
en la sección Recetas de este manual de instrucciones.
Cómo llenar la botella comprimible para masa
NOTA: No use la botella comprimible con masas muy espesas. En cambio, use la cuchara
medidora para agregar la masa en los moldes.
1. Quite la tapa de la botella comprimible para masa.
2. Use un embudo o un rollo de papel de cera (o papel manteca) transformado en un cono.
Introduzca el embudo o cono en la botella comprimible para masa. Vierta lentamente el
relleno (masa o glaseado) a través del embudo o cono dentro de la botella.
o bien...
vierta la masa dentro de una bolsa plástica de almacenamiento, recorte una esquina y
estruja lentamente el relleno de modo que ingrese en la botella.
3. Golpee la botella comprimible para masa en posición vertical contra una superficie
dura para que las burbujas salgan de la mezcla.
ADVERTENCIA: No llene la botella comprimible con masa más de 3/4 de su
capacidad, ya que la masa se expandirá mientras se asienta. Extraiga el
embudo o cono.
4. Vuelva a colocar la tapa de la botella y gírela firmemente para sellarla.
5. Limpie el excedente de relleno con una servilleta de papel.
Manga pastelera con boquillas decorativas
• Úsela para aplicar baños de repostería, glaseados, merengue o rellenos
de crema batida.
• NOTA: Una manga pastelera llena requiere 2 manos: una para guiar la boquilla y la
otra para estrujar la manga.
• IMPORTANTE: El relleno debe tener la consistencia correcta: si está muy aguado
se saldrá por la boquilla y de la manga; si está muy espeso, resultará difícil, si no
imposible, estrujarlo y que salga por la boquilla.
• Practique la decoración con manga con cualquier boquilla decorativa. Para dibujar
presión uniforme sobre la manga.
• Use las boquillas decorativas para crear bordes divertidos, mensajes, escarapelas,
diseños y patrones.
Cómo llenar la manga pastelera
1. Use gel para colorear el relleno. Mézclelo bien en un bol pequeño hasta lograr un
color uniforme.
2. Separe la base con acoplador del aro e introduzca la primera (el extremo angosto
primero) dentro de la manga pastelera.
3. Corte una pequeña esquina de la manga y deslice el acoplador hacia su posición.
IMPORTANTE: NO corte la manga pastelera en demasía. El acoplador debe encajar
de modo ceñido en la manga.
4. Encaje la boquilla decorativa sobre la parte exterior del acoplador y ajústela
firmemente con el aro del acoplador.
5. Sostenga con la mano izquierda la manga pastelera con la boquilla adherida.
Sostenga 1/3 de su parte inferior en la mano y enrolle 2/3 de la manga pastelera de
adentro hacia afuera, formando una pulsera alrededor de la mano. Coloque el tercio
puntiagudo de la manga pastelera en la palma de la mano.
Page 20

19
6. Use una espátula para agregar baño de repostería, glaseado, merengue o crema batida
del bol a la manga pastelera abierta.
7. Para obtener mejores resultados, nunca llene la manga pastelera más de 2/3
de su capacidad.
8. Desenrolle la pulsera que armó con la manga y enrósquela para cerrarla. De este modo,
fuerza el baño de repostería, glaseado, merengue o relleno de crema batida hacia abajo
dentro de la manga pastelera.
9. Estruja el primer trozo de relleno hacia afuera de la boquilla y dentro del bol para dejar
salir las burbujas. Sostenga la manga entre sus dedos pulgar e índice, y presione con la
palma de la mano mientras decora con el glaseado, el merengue o la crema batida.
10. Rellene la manga pastelera según sea necesario.
Tenedor para hornear
• Con manoplas para horno, use este tenedor para retirar los bocaditos horneados de la
placa de cocción.
• Tenga cuidado para evitar rayar la superficie antiadherente.
Cuchara medidora
• Use la cuchara medidora (1 cucharadita) para llenar los moldes en la placa de cocción
inferior hasta 2/3 de su capacidad o hasta casi llenarlos. Use 1 cucharadita casi colmada
de masa.
Rejilla de enfriamiento
• Traslade los bocaditos horneados a la rejilla de enfriamiento de alambre para que se
enfríen antes de decorarlos.
ANTES DE uTILIzAr POr PrIMErA vEz
1. Desempaque cuidadosamente el Kit para hacer rosquillas y extraiga todos los embalajes
y materiales.
2. Antes de utilizar la máquina para hacer mini rosquillas por primera vez, limpie las placas
de cocción con un paño húmedo para quitar el polvo y luego séquelas. Limpie la
superficie exterior con un paño suave o una esponja ligeramente húmeda.
PRECAUCIÓN: Asegúrese de evitar que el agua ingrese en el electrodoméstico.
¡NUNCA SUMERJA LA MÁQUINA PARA HACER MINI ROSQUILLAS EN AGUA O
CUALQUIER OTRO LÍQUIDO!
3. Coloque el electrodoméstico sobre una superficie plana, seca y limpia. Mantenga la
máquina para hacer mini rosquillas cerrada hasta que la utilice.
4. Enjuague todos los accesorios de decoración: botella comprimible para masa, tenedor
para hornear, manga pastelera con acoplador, boquillas para maga pastelera, rejilla de
enfriamiento y cuchara medidora. Séquelos antes de usarlos.
INSTruCCIONES DE FuNCIONAMIENTO
1. Abra el pestillo de la tapa. Levante la tapa hasta abrirla.
2. Antes de hornear las primeras mini rosquillas del día, vierta una cucharada de aceite
vegetal en las placas superior e inferior para mini rosquillas. Esparza con un paño de
cocina absorbente y limpie los excesos de aceite.
3. Enchufe la unidad en un tomacorriente eléctrico de CA de 120 V. La luz rojode POWER/
COOK (Encendido/Cocción) se prenderá mientras se precalienta la máquina para hacer
mini rosquillas.
NOTA: Cuando la máquina para hacer mini rosquillas se calienta por primera vez,puede
emitir un poco de humo u olor. Esto es normal y debería desaparecer despuésde 1 ó
2 usos. Esto no afecta la seguridad del electrodoméstico. Sin embargo, se recomienda
descartar las primeras mini rosquillas preparadas en la máquina para hacer mini
rosquillas ya que su sabor puede verse afectado.
4. Mientras se precalienta, prepare la mezcla para mini rosquillas.
5. Después de aproximadamente 2 a 3 minutos, se encedera la luz verde READY (Listo)
para indicar que la unidad está precalentada y lista para ser utilizada.
Page 21

20
6. Para obtener mejores resultados, utilice un aceite antiadherente en aerosol para cubrir
ligeramente las placas antiadherentes antes de cocinar. Esto ayudará a retirar las mini
rosquillas después de la cocción.
7. El tiempo de cocción y el tostado de las recetas variarán; las mezclas que tienen más
azúcar se dorarán más rápido. Tenga en cuenta los tiempos de horneado ideales para
todas las recetas de mezcla para uso futuro.
8. Coloque una cucharada rasa de mezcla para mini rosquillas en el centro de los moldes
para mini rosquillas en la placa de cocción inferior. Esparza ligeramente para llenar todo
el molde. Trate de no llenarla demasiado, la mezcla se expandirá mientras se cocina.
9. Baje la tapa superior, presiónela para colocar la traba de cierre.
10. La luz verde READY (Listo) se encedera una vez las mini rosquillas están listas; cocine
entre 2 y 3 minutos hasta que se dore el exterior.
11. Usando manoplas, limpie la parte exterior con una servilleta de papel limpia o con un
paño según sea necesario.
12. Al finalizar el tiempo de cocción, presione la traba de cierre del mango y levante
suavemente la tapa superior; si tira hacia abajo, siga cocinando durante 30 segundos y
vuelva a intentar.
NOTA: Si las mini rosquillas deben tener un acabado más oscuro, cierre la tapa y
continúe horneándolas durante 15 segundos hasta lograr el color deseado.
NOTA: Debido a que las mini rosquillas utilizan una pequeña cantidad de mezcla y que
las placas de la máquina para hacer mini rosquillas se calientan mucho, el tiempo de
cocción generalmente es menor en lugar de ser mayor. Procure no quemar las mini
rosquillas.
13. 13. Con manoplas para horno, use el tenedor para hornear a fin de retirar las rosquillas
de la placa de cocción. Tenga cuidado para evitar rayar la superficie antiadherente.
NOTA: Si se hornearán mini rosquillas adicionales, mantenga la máquina para hacer mini
rosquillas cerrada para conservar el calor. Antes de hornear más mini rosquillas, espere
hasta que se encieda la luz verde READY (Listo).
NOTA: Las mini rosquillas que se preparen más tarde se hornearán más rápido porque
se ha mantenido calor extra. Es posible que deba cocinarlas durante menos tiempo.
14. Coloque las rosquillas en una rejilla de enfriamiento antes de glasearlas o decorarlas.
15. Cuando termine de hornear, después de haber retirado las mini rosquillas, desenchufe
el cable de alimentación del tomacorriente. Levante la tapa superior para exponer las
placas de cocción y deje que se enfríe la unidad.
16. No limpie la unidad hasta que se haya enfriado completamente.
Page 22

21
CONSEjOS PArA hOrNEAr MINI rOSquILLAS
• Las recetas se pueden reducir a la mitad o multiplicar.
• Tamice todos los ingredientes secos juntos. No es necesario batir las yemas de huevo
y la leche por separado. Sólo agréguelos a la mezcla de harina y utilice una varilla
mezcladora o una batidora para mezclar bien los ingredientes.
• No abra la máquina para hacer mini rosquillas durante el primer minuto de horneado; de
lo contrario, las mini rosquillas se separarán. Antes de retirar las mini rosquillas, debe
hornearlas completamente.
• Cuando las mini rosquillas estén listas, la tapa superior debería levantarse fácilmente.
Levante suavemente la placa; si tira hacia abajo, siga cocinando durante 1 minuto y
vuelva a intentar.
• Al preparar la mezcla para mini rosquillas no la bata excesivamente; de lo contrario,las
mini rosquillas quedarán duras. Sólo revuelva la mezcla hasta que desaparezcan los
grumos grandes de los ingredientes secos.
• La cantidad óptima de mezcla para obtener una mini rosquilla completa, sin que haya
derrames, variará según las diferentes mezclas para mini rosquillas.
• Para obtener mini rosquillas más uniformes, esparza mezclas espesas hasta el borde
exterior de la placa de cocción utilizando una espátula de goma resistente al calor u otro
utensilio no metálico antes de cerrar la tapa.
• Para que las mini rosquillas horneadas se mantengan crujientes, colóquelas sobre una
servilleta de papel o sobre una rejilla para absorber la condensación. Para que las mini
rosquillas se mantengan calientes, colóquelas en un recipiente refractario sobre una
rejilla del horno y caliéntelas entre 200 y 250 °F (90 y 120 °C) aproximadamente. Las mini
rosquillas se mantendrán frescas durante aproximadamente 20 minutos antes de que
comiencen a secarse.
• Cuando las mini rosquillas se hayan enfriado, agregue glaseados y coberturas divertidas.
Consulte la sección Glaseados y coberturas para mini rosquillas en la sección Recetas de
este manual de instrucciones.
• Las rosquillas horneadas se conservan bien congeladas. Permita que estas se enfríen por
completo en la rejilla de enfriamiento. Almacénelas, sin decorar, en una bolsa plástica
para congelador o en un envase cubierto.
• Descongele las mini rosquillas en un horno tostador hasta que se calienten y estén
crujientes o colóquelas en un horno microondas durante 10 segundos. No las cocine
excesivamente.
• Agregue glaseados y coberturas a las rosquillas descongeladas.
Para obtener mini rosquillas con menos azúcar:
• Utilice sustitutos de azúcar.
• Utilice jarabe de arce sin azúcar.
• Utilice gelatina, cremas, jaleas, dulces, etc. sin azúcar como coberturas y saborizantes.
Para obtener mini rosquillas con menos grasa y menos colesterol:
• Utilice leche descremada.
• Adapte las recetas eliminando las yemas de huevo. Utilice siempre aceites vegetales
líquidos de canola, maíz o girasol en lugar de manteca.
Para obtener mini rosquillas con mayor contenido de fibra:
• Reemplace 1⁄2 taza o más de harina blanca por harina integral.
• Reemplace 1⁄4 taza de harina blanca por salvado de trigo o de avena.
Page 23

22
INSTruCCIONES DE MANTENIMIENTO PArA EL uSuArIO
Este aparato requiere poco mantenimiento. No contiene piezas que puedan ser reparadas por
el usuario. No intente repararlo usted mismo. Si el producto necesita mantenimiento, consulte
a un técnico autorizado para reparar electrodomésticos.
INSTruCCIONES DE LIMPIEzA y CuIDADO
PRECAUCIÓN: Desenchufe el electrodoméstico del tomacorriente y deje que se enfríe
completamente antes de limpiarlo.
1. La máquina para hacer mini rosquillas no se desarma para la limpieza.
2. Nunca sumerja el electrodoméstico en agua o cualquier otro líquido. Nunca coloque la
máquina para hacer mini rosquillas en el lavavajillas.
3. Las placas de cocción de la máquina para hacer mini rosquillas deben estar limpias y
acondicionadas antes de calentarlas.
4. Limpie las placas de cocción con un pincel de repostería o un paño limpio y suave.
Para acondicionar las placas, cubra ligeramente las superficies de cocción con manteca
vegetal sólida o aceite vegetal. Siga cuidadosamente los procedimientos de limpieza que
se mencionan a continuación. Si después de un tiempo, las mini rosquillas comienzan a
pegarse, vuelva a acondicionar la unidad según sea necesario.
5. Para proteger las superficies antiadherentes de primera calidad, sólo utilice utensilios de
plástico, nailon o madera.
6. Para retirar la mezcla adherida a las placas de cocción, vierta una pequeña cantidad de
aceite de cocina en la mezcla endurecida. Deje reposar durante 5 minutos, luego limpie
la mezcla ablandada con una servilleta de papel o un paño suave. Retire las manchas
rebeldes con una esponja plástica o de malla. Para retirar la mezcla adherida a los
moldes, se puede utilizar un cepillo de dientes o un cepillo de cocina redondo limpio.
Para obtener mejores resultados, utilice solamente productos en cuyas instrucciones se
indique que son seguros para limpiar superficies de cocción antiadherentes. No utilice
lana de acero ni esponjas metálicas gruesas.
7. El acabado exterior se debe limpiar con un producto de limpieza no abrasivo y un paño
suave y húmedo. Seque completamente.
8. Los accesorios de decoración no son aptos para lavavajillas y deben limpiarse
minuciosamente luego de cada uso.
9. Mientras sostiene la botella comprimible para masa, agarre el aro metálico de la tapa de
la botella y gírelo hacia la izquierda para extraer la tapa. Llene la botella hasta la mitad
con agua de grifo caliente y agréguele un chorrito de detergente. Vuelva a colocar la tapa
de la botella y gírela firmemente para sellarla. Tape la abertura de la botella con el dedo
y agite la botella que contiene agua y detergente para desprender los residuos del agua
caliente. Quite el dedo de la tapa, apunte la botella al fregadero y vierta el agua
sucia por este.
10. Si permanecen residuos, use un cepillo para botellas a fin de limpiar el interior de
la botella comprimible para masa. Enjuague la botella con agua caliente. Repita el
procedimiento hasta que la botella esté limpia. Enjuague minuciosamente la botella para
eliminar el jabón y déjela boca abajo para que se seque.
11. Enjuague con agua caliente el tenedor para hornear, la cuchara medidora, la manga
pastelera con acoplador, las boquillas para manga pastelera y rejilla de enfriamiento.
Use detergente y un cepillo de limpieza para eliminar los residuos. Enjuáguelos bien y
séquelos antes de almacenarlos.
Page 24

Page 25

Page 26

Page 27

Page 28

Page 29

6
Garantía limitada de UN AÑO
Mediante la presente, SENSIO Inc. garantiza que, durante el plazo de UN AÑO a partir
de la fecha de compra, este producto no presentará defectos mecánicos en el material
ni en la mano de obra, y durante 90 días, no los presentará en las piezas no mecánicas.
A su entera discreción, SENSIO Inc. reparará o reemplazará el producto que resulte
defectuoso, o emitirá un reembolso por el producto durante el plazo de garantía.
Esta garantía es válida únicamente para el comprador minorista original a partir de la
fecha de compra minorista inicial y no es transferible. Conserve el recibo de compra
original, ya que se exige una prueba de compra para obtener la validación de la
garantía. Las tiendas minoristas no tienen derecho a alterar, modicar ni corregir de
ninguna manera los términos y condiciones de la garantía.
EXCLUSIONES:
La garantía no cubre el desgaste normal de las piezas ni el daño ocasionado por
cualquiera de las siguientes causas: uso negligente del producto, uso de un voltaje
o corriente incorrectos, mantenimiento de rutina inadecuado, uso contrario al de
las instrucciones de funcionamiento, desarmado, reparación o alteración a cargo de
personas que no sean miembros del personal calicado de SENSIO Inc. Asimismo, la
garantía no cubre actos de la naturaleza, como incendios, inundaciones, huracanes o
tornados.
SENSIO Inc. no asumirá responsabilidad por daños incidentales o resultantes
ocasionados por la violación de cualquier garantía expresa o implícita. Salvo en
la medida en que lo prohíban las leyes aplicables, cualquier garantía implícita de
comerciabilidad o aptitud para un propósito particular se limita temporalmente a la
duración de la garantía. Algunos estados, provincias o jurisdicciones no permiten la
exclusión ni la limitación de daños incidentales o resultantes, o limitaciones sobre
la duración de una garantía implícita y, por lo tanto, es posible que las exclusiones o
limitaciones mencionadas no le correspondan. La garantía cubre derechos legales
especícos que pueden variar de un estado, una provincia o una jurisdicción a otros.
CÓMO OBTENER EL SERVICIO DE GARANTÍA:
Debe comunicarse con el Servicio de atención al cliente a nuestro número telefónico
gratuito: 1-866-832-4843. Un representante del Servicio de atención al cliente intentará
resolver los problemas referidos a la garantía por teléfono. Si este no puede resolver
el problema, le proporcionarán un número de caso y le solicitarán que devuelva el
producto a SENSIO Inc. Adhiera una etiqueta al producto que incluya: su nombre,
dirección, número telefónico de contacto durante el día, número de caso y descripción
del problema. Además, incluya una copia del recibo de compra original. Envuelva
cuidadosamente el producto etiquetado con el recibo de compra, y envíelo (con el
envío y el seguro prepagados) a la dirección de SENSIO Inc. SENSIO Inc. no asumirá
obligación ni responsabilidad alguna por el producto devuelto que esté en el trayecto
hacia el Centro de servicio al cliente de SENSIO Inc.
 Loading...