

Page 1
2 SLICE TOASTER
GRILLE-PAIN
À DEUX FENTES
TOSTADOR PARA
2 REBANADAS
Instruction Manual
Manuel d’instructions
Manual de instrucciones
Register your product and get support at:
Pour enresistrer votre produit et obtenir de l’aide:
Para registrar y obtener asistencia de su producto ir:
www.bellahousewares.com
SO-312472_12051_KitchenSmith 2-slice toaster IM_2.indd 1 2015-06-08 9:33 AM
Page 2

SO-312472_12051_KitchenSmith 2-slice toaster IM_2.indd 2 2015-06-08 9:33 AM
Page 3

Table of Contents
Important Safeguards ........................................................................................................................................ 2
Additional Important Safeguards .....................................................................................................................3
Notes on the Plug ............................................................................................................................................... 3
Notes on the Cord............................................................................................................................................... 3
Electric Power......................................................................................................................................................3
Getting to Know Your 2-Slice Toaster..............................................................................................................4
Before Using for the First Time ........................................................................................................................ 4
Automatic Centering Guides ............................................................................................................................ 4
Toasting Instructions ........................................................................................................................................ 5
CANCEL Toasting ................................................................................................................................................5
Pastry .................................................................................................................................................................. 5
Non-Frozen Shelf Pastry .................................................................................................................................... 5
Removing Lodged Foods ...................................................................................................................................5
Important Points ................................................................................................................................................. 6
User Maintenance Intructions...........................................................................................................................6
Care & Cleaning Instructions ............................................................................................................................ 6
Storing Instructions ............................................................................................................................................6
Warranty ..............................................................................................................................................................7
Table des matières
Consignes de sécurité importantes ................................................................................................................. 8
Autres consignes de sécurité importantes ..................................................................................................... 9
Remarques sur la che ................................................................................................................................... 10
Remarques sur le cordon ................................................................................................................................ 10
Alimentation électrique ................................................................................................................................... 10
Caractéristiques grille-pain à 2 fentes .......................................................................................................... 10
Avant la première utilisation ........................................................................................................................... 11
Guides de centrage automatiques ................................................................................................................. 11
Instructions d’utilisation du grille-pain ......................................................................................................... 11
CANCEL (Annuler) Toasting ............................................................................................................................ 11
Griller les aliments prêts-à-servir .................................................................................................................. 12
Pâtisseries ........................................................................................................................................................ 12
Retirer les aliments coincés ........................................................................................................................... 12
Points importants ............................................................................................................................................. 12
Instructions pour l’entretien ...........................................................................................................................12
Instructions d’entretien et de nettoyage ....................................................................................................... 12
Instructions de rangement .............................................................................................................................. 13
Garantie.............................................................................................................................................................. 14
Índice
Medidas de seguridad importantes ............................................................................................................... 15
Otras medidas de seguridad importantes .................................................................................................... 16
Notas sobre el enchufe .................................................................................................................................... 17
Notas sobre el cable ......................................................................................................................................... 17
Corriente eléctrica ............................................................................................................................................ 17
Conozca su tostadora para 2 rebanadas ....................................................................................................... 17
Antes de utilizar por primera vez ................................................................................................................... 18
Guías de centrado automático........................................................................................................................18
Instrucciones de tostado ................................................................................................................................. 18
CANCEL (Cancelar) el toastado ...................................................................................................................... 18
Tostado de alimentos de preparación rápida .............................................................................................. 19
Masas .................................................................................................................................................................19
Masas envasadas no congeladas ................................................................................................................... 19
Cómo retirar los alimentos .............................................................................................................................. 19
Información importante ................................................................................................................................... 19
Instrucciones de mantenimiento para el usuario ........................................................................................ 19
Instrucciones de limpieza y cuidado .............................................................................................................. 19
Instrucciones de almacenamiento .................................................................................................................20
Garantía.............................................................................................................................................................. 21
SO-312472_12051_KitchenSmith 2-slice toaster IM_2.indd 3 2015-06-08 9:33 AM
Page 4

2
IMPORTANT SAFEGUARDS
When using electrical appliances, basic safety precautions should always be followed,
including the following:
1. READ ALL INSTRUCTIONS.
2. Do not touch hot surfaces. Use handles or knobs.
3. To protect against electrical shock do not immerse cord, plugs, or appliance in
water or other liquid.
4. This appliance is not intended for use by persons (including children) with reduced
physical, sensory or mental capabilities, or lack of experience and knowledge,
unless they have been given supervision or instruction concerning use of the
appliance by a person responsible for their safety.
5. Close supervision is necessary when any appliance is used by or near children.
6. Unplug from outlet when not in use and before cleaning. Allow to cool before
putting on or taking off parts.
7. Do not operate any appliance with a damaged cord or plug or after the appliance
malfunctions, or has been damaged in any manner. Return appliance to the nearest
store for examination, repair or adjustment.
8. The use of accessory attachments not recommended by the appliance
manufacturer may cause injuries.
9. Do not use outdoors.
10. Do not let cord hang over edge of table or counter, or touch hot surfaces.
11. Do not place on or near a hot gas or electric burner, or in a heated oven.
12. To disconnect, turn the browning selector knob to CANCEL, then remove plug from
wall outlet.
13. Do not use appliance for other than intended use.
14. Oversize foods, metal foil packages, or utensils must not be inserted in a Toaster
as they may involve a risk of re or electric shock.
15. A re may occur if Toasters are covered or touching ammable material, including
curtains, draperies, walls, and the like, when in operation.
16. Extreme caution must be used when moving an appliance containing hot oil or
other hot liquids.
WARNING: ELECTRICAL SHOCK HAZARD. Never attempt to dislodge food inside the
Toaster while the Toaster is plugged in. Doing so could cause an electrical shock
hazard or a risk of re.
FOR HOUSEHOLD USE ONLY
SAVE THESE INSTRUCTIONS
SO-312472_12051_KitchenSmith 2-slice toaster IM_2.indd 2 2015-06-08 9:33 AM
Page 5

3
ADDITIONAL IMPORTANT
SAFEGUARDS
CAUTION, HOT SURFACES: This appliance generates heat and escaping steam during
use. Proper precautions must be taken to prevent the risk of burns, res or other
injury to persons or damage to property.
1. A person who has not read and understood all operating, toasting, and safety
Instructions is not qualied to operate this appliance. All users of this appliance
must read and understand this Instruction Manual before operating or cleaning this
appliance.
2. If this appliance falls or accidentally becomes immersed in water, unplug it from
the wall outlet immediately. Do not reach into the water!
3. When using this appliance, provide adequate air space above and on all sides for
air circulation. Do not operate this appliance while it is touching or near curtains,
wall coverings, clothing, dishtowels or other ammable materials.
4. To reduce the risk of re, do not leave this appliance unattended during use.
5. If this appliance begins to malfunction during use, immediately turn the browning
selector knob to CANCEL and unplug the cord. Do not use or attempt to repair a
malfunctioning appliance!
6. The cord to this appliance should only be plugged directly into a 120 V AC
electrical wall outlet.
7. Do not use this appliance in an unstable position.
8. Use the Toaster on a hard, at surface. Do not place it near a ame or heat or on
a soft surface (such as carpet). Avoid placing it where it may tip over during use.
Dropping the Toaster could cause it to malfunction.
WARNING: ELECTRICAL SHOCK HAZARD. Never attempt to dislodge food inside the
Toaster while the Toaster is plugged in. Doing so could cause an electrical shock
hazard or a risk of re.
CAUTION: This appliance is hot during operation and retains heat for some time after
turning off. Always use oven mitts when handling hot materials and allow metal
parts to cool before cleaning. Do not place anything on top of the Toaster while it is
operating or while it is hot.
CAUTION:
DO NOT toast pastries with runny llings or frosting.
DO NOT toast torn slices of bread.
DO NOT place buttered bread or wrapped food into the Toaster.
DO NOT toast small-size breads, mini-baguettes, breadsticks, etc.
Notes on the Plug
This appliance has a polarized plug (one blade is wider than the other). To reduce
the risk of electric shock, this plug will t in a polarized outlet only one way. If the
plug does not t fully into the outlet, reverse the plug. If it still does not t, contact a
qualied electrician. Do not modify the plug in any way.
Notes on the Cord
The provided short power-supply cord (or detachable power-supply cord) should be
used to reduce the risk resulting from becoming entangled in or tripping over a longer
cord. Do not use an extension cord with this product.
Electric Power
If the electrical circuit is overloaded with other appliances, your appliance may not
operate properly. It should be operated on a separate electrical circuit from other
appliances.
SO-312472_12051_KitchenSmith 2-slice toaster IM_2.indd 3 2015-06-08 9:33 AM
Page 6
4
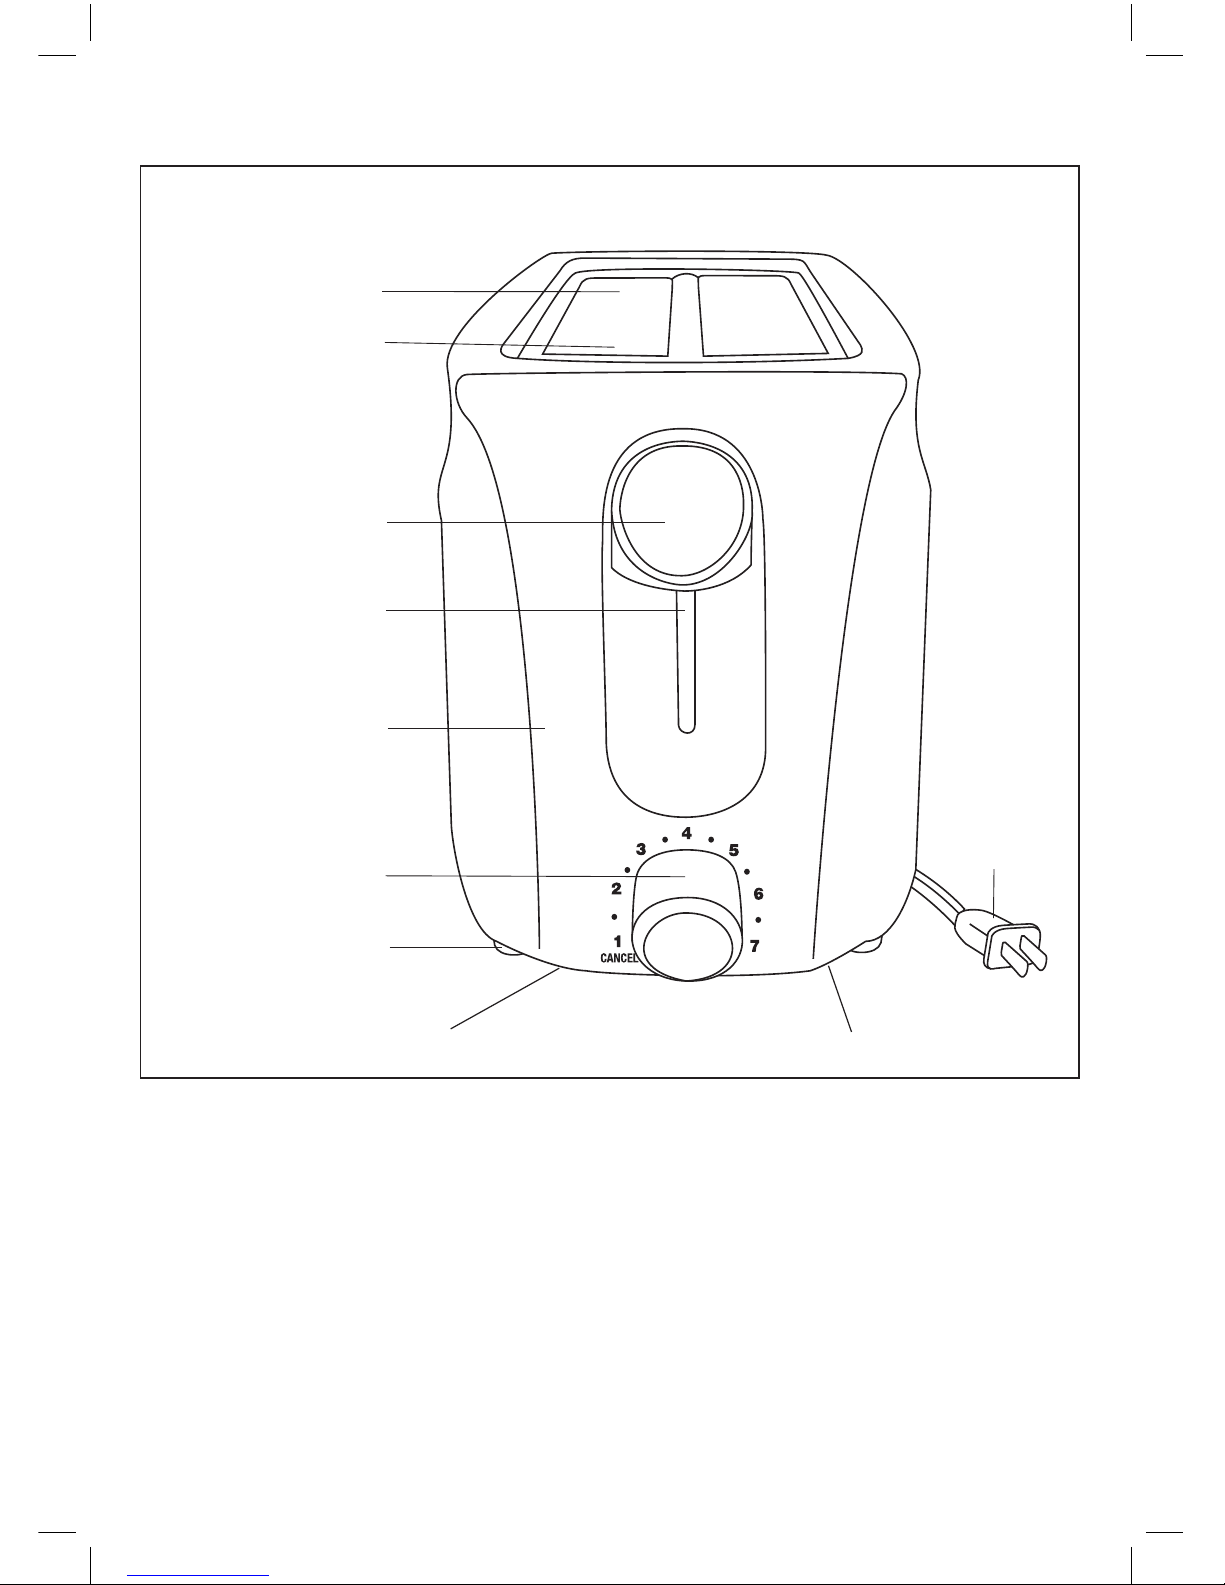
Getting to Know Your 2-Slice Toaster
Product may vary slightly from illustration
Before Using for the First Time
1. Remove all packaging materials including those that may be inside the toasting slots or toasting lever slot.
2. Wipe the exterior with a damp cloth. Dry thoroughly. Do not use abrasive cleaners.
3. Do not put the Toaster, cord or plug in water.
4. Make sure the crumb tray is locked in position on the bottom of the Toaster and the toasting lever is in the
UP position.
5. Unwrap power cord from cord storage area on underside of Toaster and plug into a 120 V AC outlet.
6. Turn the browning selector knob to (1), the lightest setting.
7. Lower the toasting lever until it locks in place. Operate without bread once or twice to burn off any
manufacturing residue. You may notice a slight amount of smoke; this is normal and will stop as the
heating elements continue to heat.
Automatic Centering Guides
Lowering the toasting lever closes the centering guides, and holds the bread or toaster food centrally in the
toasting slots.
NOTE: The toasting lever will not lock down unless the Toaster is plugged into a 120 V AC electrical outlet.
Figure 1
Toasting Slots
Automatic Centering
Guides
(not shown)
High -Lift Lever
Toasting Lever Slot
Body
Non-Marking
Rubber Feet
Browning Selector Knob
Polarized Plug
Cord Storage Wrap
(See Storing Instructions, Figure 2)
Hinged Crumb Tray
(See Storing Instructions, Figure 2)
SO-312472_12051_KitchenSmith 2-slice toaster IM_2.indd 4 2015-06-08 9:33 AM
Page 7

5
Toasting Instructions
1. Make sure the crumb tray is locked in position on the bottom of the Toaster and the toasting lever is in the
UP position.
2. Make sure no bread or other objects are inside the toasting slots. Place Toaster on a at, level, heat
resistant surface.
3. Plug the power cord into a 120V AC electrical outlet.
4. Position the browning selector knob to desired setting. To test toasting times for browning, it is best to
use both toasting slots; position the browning selector knob between (3) and (4) medium; then adjust
each subsequent toasting to your preference.
5. Remove all protective wrappings from food before placing into the toasting slot(s).
IMPORTANT: Avoid toasting torn bread slices or small pieces of toaster food that may get lodged in
toasting slot(s).
6. Insert bread or toaster food into the toasting slot(s). Lower the toasting lever until locked into place.
The automatic centering guides hold food upright for uniform side-to-side toasting. When the bread is
lowered into position, toasting will begin.
NOTE: The toasting lever will not lock into position unless the Toaster is plugged into a 120 V AC electrical
outlet.
NOTE: When toasting a single slice, the bread may be placed in any toasting slot.
NOTE: To prevent a re hazard, never place bread over the opening of the Toaster; always place bread
into the slots.
NOTE: DO NOT change the browning selector knob selection during the toasting cycle. First turn the
browning selector knob to CANCEL; then turn the browning selector knob to adjust the browning level.
Lower the toasting lever and toast until the desired toast color is achieved.
7. When the toast reaches the selected browning level, it will pop up automatically.
8. Use the high-lift lever to make it easier to remove smaller toasted items.
9. Remove bread from toasting slot(s). Use care when removing bread as the bread and the top of the
Toaster will still be hot.
IMPORTANT: Never use a fork or sharp-edged utensil to remove toast, because that may damage the
heating element or cause injury.
10. To interrupt toasting, turn the browning selector knob to CANCEL.
11. Unplug cord from wall outlet when not in use.
CANCEL Toasting
1. When the toasting lever is lowered, toasting will begin.
2. To CANCEL or interrupt any toasting cycle, turn the browning selector knob to CANCEL. The bread will
automatically rise; the Toaster will turn OFF.
3. Unplug cord from wall outlet when not in use.
Convenience Food Toasting
There are many varieties of packaged convenience food available today, both frozen and non-frozen (shelf
pastry). Since toaster foods and individual tastes vary, it is difcult to recommend exact browning selector knob
settings. However, after a little experimentation you will discover the best setting for your needs. You may also
wish to refer to the heating instructions on the convenience food packaging.
Pastry
For best results, follow the instructions printed on the pastry package. If the package does not have instructions,
position the browning selector knob to medium, between (3) and (4). Some pastries may require a second
toasting cycle.
NOTE: Do not use this Toaster for toasting pastry items with runny-type frosting or open llings.
Non-Frozen Shelf Pastry
Turn the browning selector knob to a lighter setting. For thicker convenience foods, it may be necessary to adjust
the browning selector knob to a higher setting and a longer toasting cycle.
Removing Lodged Foods
1. Use the high-lift lever to make it easier to remove smaller toasted items.
2. If, after toasting, a piece of bread or any other toaster food becomes lodged in any of the toasting slots,
unplug the Toaster and allow it to cool.
3. Hold the toasting lever down. Turn the Toaster upside down and shake the food loose.
IMPORTANT: Never use a fork or sharp-edged utensil to remove toast, because that may damage the heating
element or cause injury.
SO-312472_12051_KitchenSmith 2-slice toaster IM_2.indd 5 2015-06-08 9:33 AM
Page 8
6
Important Points
• Remove all protective wrappings from food before placing into the
toasting slot(s).
• For best results, clean the crumb tray frequently.
• Different breads require different color settings. Turn the browning selector knob to CANCEL button at any
time to check toast color.
• Do not block top opening. Do not place any object over the top opening.
• Do not toast buttered bread or buttered pita bread. Melted butter will cause re.
• When toasting more than one slice of bread, use slices of similar size, thickness and freshness.
• Stale bread, thin bread or sweet bread products, such as tea cakes and fruit loaf, brown much more quickly
than ordinary bread, so they should be toasted on the lighter settings.
• Never immerse Toaster, cord or plug in water or other liquid.
• Never use a fork or sharp-edged utensil to remove toast, because that may damage the heating element or
cause injury.
User Maintenance Intructions
This appliance requires little maintenance. It contains no user-serviceable parts. Any servicing requiring
disassembly other than cleaning must be performed by a qualied appliance repair technician.
Care & Cleaning Instructions
CAUTION: Do not immerse Toaster, cord, or plug in water or any other liquid.
CAUTION: Be sure the Toaster is unplugged before cleaning.
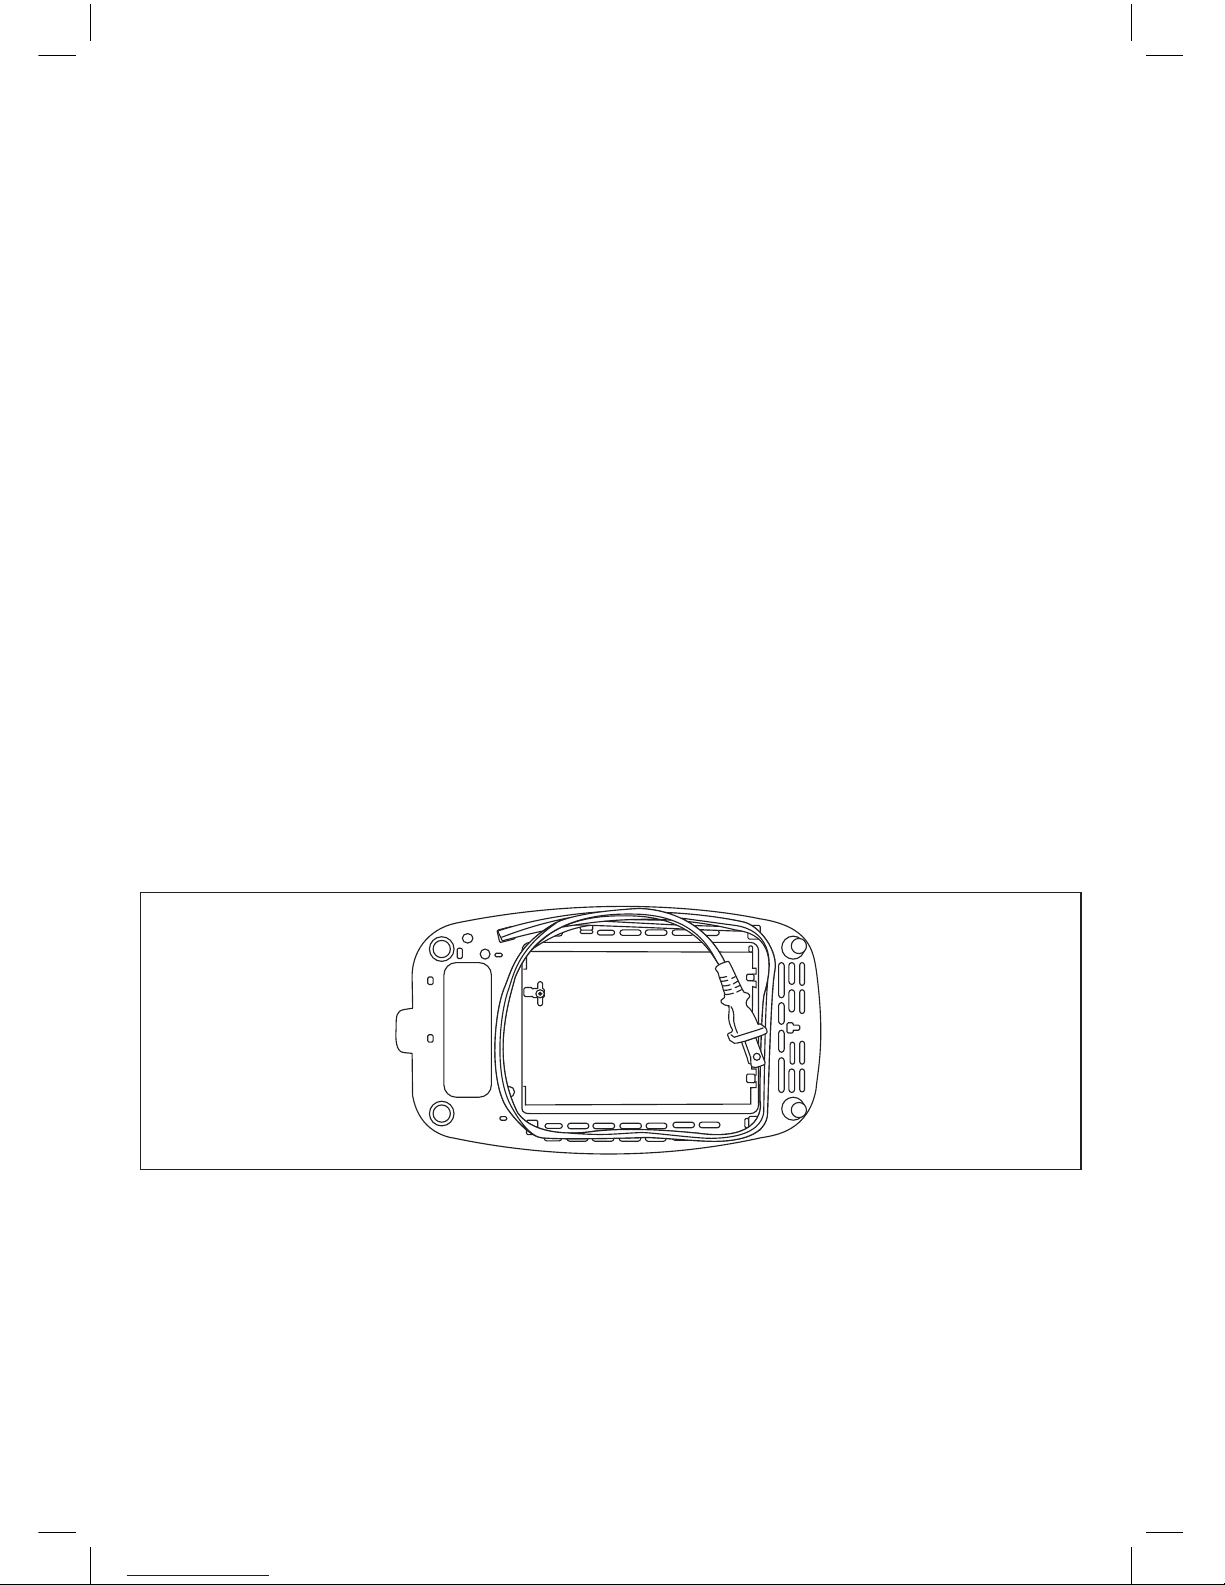
CRUMB TRAY: The hinged crumb tray is located on the bottom of the Toaster. (See Figure 2.) Working over a sink
or garbage receptacle, pull the latch to unlock and release the tray outwards. Wipe the crumb tray with a clean,
damp cloth. Push crumb tray back into position. Make sure it is locked securely into the bottom of the Toaster.
EXTERIOR: Wipe the Toaster exterior with a clean, damp cloth. Do not use abrasive cleaners. Do not put cord, or
plug in water or liquid.
Storing Instructions
1. Unplug unit, allow to cool, and clean before storing.
2. Store Toaster in its box in a clean, dry place.
3. Never store Toaster while it is hot or still plugged in.
4. Never wrap cord tightly around the appliance, wrap the cord around the cord clips located on the bottom of
the Toaster. (See Figure 2.)
5. Do not put any stress on the cord where it enters the unit, as it could cause the cord to fray and break.
Figure 2
SO-312472_12051_KitchenSmith 2-slice toaster IM_2.indd 6 2015-06-08 9:33 AM
Page 9

7
Limited TWO-YEAR Warranty
SENSIO Inc. hereby warrants that for a period of TWO YEARS from the date
of purchase, this product will be free from mechanical defects in material and
workmanship, and for 90 days in respect to non-mechanical parts. At its sole
discretion, SENSIO Inc. will either repair or replace the product found to be defective,
or issue a refund on the product during the warranty period.
The warranty is only valid for the original retail purchaser from the date of initial retail
purchase and is not transferable. Keep the original sales receipt, as proof of purchase is
required to obtain warranty validation. Retail stores selling this product do not have the
right to alter, modify, or in any way revise the terms and conditions of the warranty.
EXCLUSIONS:
The warranty does not cover normal wear of parts or damage resulting from any of the
following: negligent use of the product, use of improper voltage or current, improper
routine maintenance, use contrary to the operating instructions, disassembly, repair,
or alteration by anyone other than qualied SENSIO Inc. personnel. Also, the warranty
does not cover Acts of God such as re, oods, hurricanes, or tornadoes.
SENSIO Inc. shall not be liable for any incidental or consequential damages caused
by the breach of any express or implied warranty. Apart from the extent prohibited
by applicable law, any implied warranty of merchantability or tness for a particular
purpose is limited in time to the duration of the warranty. Some states, provinces or
jurisdictions do not allow the exclusion or limitation of incidental or consequential
damages, or limitations on how long an implied warranty lasts, and therefore, the
above exclusions or limitations may not apply to you. The warranty covers specic
legal rights which may vary by state, province and/or jurisdiction.
HOW TO OBTAIN WARRANTY SERVICE:
You must contact Customer Service at our toll-free number: 1-866-832-4843.
A Customer Service Representative will attempt to resolve warranty issues over the
phone. If the Customer Service Representative is unable to resolve the problem, you will
be provided with a case number and asked to return the product to SENSIO Inc. Attach
a tag to the product that includes: your name, address, daytime contact telephone
number, case number, and description of the problem. Also, include a copy of the
original sales receipt. Carefully package the tagged product with the sales receipt,
and send it (with shipping and insurance prepaid) to SENSIO Inc.’s address. SENSIO
Inc. shall bear no responsibility or liability for the returned product while in transit to
SENSIO Inc.’s Customer Service Center.
SO-312472_12051_KitchenSmith 2-slice toaster IM_2.indd 7 2015-06-08 9:33 AM
Page 10

8
CONSIGNES DE SÉCURITÉ
IMPORTANTES
Respecter les consignes de sécurité de base au moment d’utiliser des appareils
électriques, y compris les suivantes
1. LIRE TOUTES LES INSTRUCTIONS.
2. Ne pas toucher les surfaces chaudes. Utiliser les poignées ou les boutons.
3. An de prévenir tout risque d’électrocution, ne pas immerger le cordon, la che ou
l’appareil dans l’eau ou dans tout autre liquide.
4. Cet appareil n’est pas destiné à être utilisé par des personnes (y compris des
enfants) aux capacités physiques, sensorielles ou mentales réduites ou n’ayant pas
les connaissances et l’expérience nécessaires, sauf si elles sont supervisées ou si
les personnes responsables de leur sécurité leur ont donné des instructions.
5. Une surveillance étroite est requise lorsqu’on utilise l’appareil en présence
d’enfants.
6. Débrancher l’appareil de la prise murale lorsqu’il n’est pas utilisé et avant le
nettoyage. Laisser refroidir l’appareil avant d’installer ou de retirer des pièces.
7. Ne pas utiliser un appareil électrique dont le cordon ou la che est endommagé
ni un appareil défectueux ou endommagé d’une quelconque façon. Retourner
l’appareil au magasin Wal-Mart le plus près pour le faire examiner, réparer ou
ajuster.
8. L’utilisation d’accessoires non recommandés par le fabricant de l’appareil peut
entraîner des blessures.
9. Ne pas utiliser à l’extérieur.
10. Ne pas laisser le cordon pendre d’un bord de table ou d’un comptoir, ni entrer en
contact avec une surface chaude.
11. Ne pas placer sur ou à proximité d’un élément de cuisinière électrique ou à gaz ni
dans un four chaud.
12. Pour débrancher l’appareil, positionner le sélecteur de niveau de grillage à CANCEL
(Annuler) et retirer la che de la prise murale.
13. Ne pas utiliser l’appareil à des ns autres que celles pour lesquelles il a été conçu.
14. Ne pas introduire de morceaux de pain trop grands, du papier d’aluminium ou
des ustensiles dans le grille-pain car cela pourrait provoquer un incendie ou une
électrocution.
15. Un incendie peut survenir si le grille-pain est recouvert ou s’il est en contact avec
des matériaux inammables, comme des rideaux, des draperies, des murs ou
d’autres surfaces similaires, lorsque l’appareil fonctionne.
16. Faire preuve d’une extrême prudence en déplaçant l’appareil s’il contient de l’huile
chaude ou d’autres liquides chauds.
AVERTISSEMENT : RISQUE D’ÉLECTROCUTION. Ne jamais tenter de déloger la
nourriture coincée dans le grille-pain lorsqu’il est branché. Cela pourrait provoquer un
incendie ou une électrocution.
POUR USAGE DOMESTIQUE
SEULEMENT
CONSERVER CES CONSIGNES
SO-312472_12051_KitchenSmith 2-slice toaster IM_2.indd 8 2015-06-08 9:33 AM
Page 11

9
AUTRES CONSIGNES DE
SÉCURITÉ IMPORTANTES
MISE EN GARDE! SURFACES CHAUDES : Cet appareil dégage de la chaleur et de la
vapeur pendant son utilisation. Prendre les précautions nécessaires pour prévenir les
risques de brûlures, d’incendie, de blessures et de dommages matériels.
1. Une personne qui n’a pas lu et compris toutes les instructions d’utilisation, de
grillage et les consignes de sécurité n’est pas apte à utiliser cet appareil. Les
personnes qui utilisent cet appareil doivent lire le mode d’emploi et le comprendre
avant d’utiliser cet appareil ou de le nettoyer.
2. Si cet appareil tombe ou qu’il est accidentellement immergé dans l’eau, débrancher
immédiatement la che de la prise murale. Ne pas tenter de sortir l’appareil de
l’eau!
3. Pour permettre une bonne circulation d’air, prévoir un espace sufsant au-dessus
et autour de l’appareil lorsqu’il est en marche. S’assurer que l’appareil n’entre
pas en contact avec des rideaux, des revêtements muraux, des vêtements, des
torchons ou autre matériel inammable lorsqu’il est en fonction.
4. An de réduire le risque d’incendie, ne pas laisser cet appareil en marche sans
surveillance.
5. Si l’appareil montre des signes de défectuosité durant l’utilisation, positionner
immédiatement le sélecteur de niveau de grillage à CANCEL (Annuler), puis
débrancher le cordon d’alimentation. On ne doit pas utiliser un appareil défectueux
ou tenter de le réparer!
6. Le cordon de cet appareil ne doit être branché que dans une prise murale de 120 V
c.a.
7. Ne pas utiliser cet appareil s’il n’est pas sur une surface stable.
8. Utiliser ce grille-pain sur une surface dure et plane. Ne pas placer le grille-pain près
d’une amme ou d’une source de chaleur ou sur une surface molle (comme un
tapis). Éviter de placer le grille-pain dans une position où il pourrait se renverser
lors de l’utilisation. Si le grille-pain subit une chute, il peut arrêter de fonctionner
correctement.
AVERTISSEMENT : RISQUE D’ÉLECTROCUTION. Ne jamais tenter de déloger la
nourriture coincée dans le grille-pain lorsqu’il est branché. Cela pourrait provoquer un
incendie ou une électrocution.
MISE EN GARDE : Cet appareil devient chaud pendant son utilisation et demeure
chaud pendant quelques temps lorsqu’il est éteint. Toujours utiliser des gants isolants
lorsqu’on manipule des objets chauds et laisser aux parties métalliques le temps de
refroidir avant de nettoyer l’appareil. Ne placer aucun objet sur le dessus du grille-pain
lorsqu’il est en utilisation ou lorsqu’il est chaud.
MISE EN GARDE
NE PAS faire griller des pâtisseries couvertes d’un glaçage ou dont le contenu coule.
NE PAS faire griller de tranches de pain déchirées.
NE PAS placer de tranches de pain beurrées ou de nourriture enveloppée dans le grille-pain.
NE PAS faire griller de petits pains, de mini baguettes, de gressins, etc.
SO-312472_12051_KitchenSmith 2-slice toaster IM_2.indd 9 2015-06-08 9:33 AM
Page 12

10
Remarque sur la che
Cet appareil est doté d’une che polarisée (une broche est plus large que l’autre). Pour
réduire le risque de décharge électrique, la che s’insère d’une seule manière dans une
prise polarisée. Si la che ne s’insère pas complètement dans la prise, la tourner pour
l’insérer de l’autre côté. S’il est toujours impossible de l’insérer complètement dans la
prise, communiquer avec un électricien qualié.
Ne jamais modier la che de quelque façon que ce soit.
Remarque sur le cordon
Utiliser le cordon d’alimentation court (ou cordon d’alimentation amovible) fourni avec
l’appareil an de réduire le risque d’emmêlement ou de trébuchement que présente un
cordon long. Ne pas utiliser de rallonge avec l’appareil.
Alimentation Électrique
Si le circuit électrique est surchargé parce qu’il doit également alimenter d’autres
appareils, cet appareil pourrait ne pas fonctionner correctement. Il doit être alimenté
par un circuit électrique distinct de tout autre appareil.
Caractéristiques grille-pain à 2 fentes
L’appareil peut différer légèrement de l’illustration.
Figure 1
Fentes
Guides de centrage
automatique
(pas montré)
Manette de surélévation
Fente de la manette
Boîtier
Pieds de caoutchouc
anti-marquage
Sélecteur de niveaux
de grillage
Cordon
d’alimentation
avec che
polarisée
Range-cordon
(voir Instructions de rangement, Figure 2)
Tiroir ramasse-miettes avec charnière
(voir Instructions de rangement, Figure 2)
SO-312472_12051_KitchenSmith 2-slice toaster IM_2.indd 10 2015-06-08 9:33 AM
Page 13

11
Avant la première utilisation
1. Retirer tous les matériaux d’emballage, y compris ceux qui peuvent se trouver à l’intérieur des fentes de
grille-pain ou des fentes de manette.
2. Essuyer la surface extérieure de l’appareil avec un chiffon humide. Bien sécher. Ne pas utiliser de
nettoyant abrasif.
3. Ne pas immerger le grille-pain, le cordon d’alimentation ou la che dans l’eau. S’assurer que le tiroir
ramasse-miettes est verrouillé en place dans le bas du grille-pain et que la manette est à la position HAUT.
4. Dérouler le cordon d’alimentation du range-cordon, qui se trouve sous le grille- pain, puis le brancher
dans une prise murale de 120 V c.a.
5. Placer le sélecteur de niveaux de grillage à la position (1), le réglage le plus bas.
6. Abaisser la manette jusqu’à ce qu’elle se verrouille. Faire fonctionner le grille- pain à vide, une ou deux
fois, pour éliminer les résidus de fabrication qui pourraient s’y trouver. Un peu de fumée peut s’échapper
des fentes. Cette fumée est normale et la chaleur produite par les éléments la dissipera après quelques
instants.
Guides de centrage automatiques
Lorsque la manette est abaissée, les guides de centrage se fermeront, maintenant le pain ou l’aliment au centre
des fentes du grille-pain.
REMARQUE : La manette ne se verrouille pas si le grille-pain n’est pas branché dans une prise électrique de 120
V c.a.
Instructions d’utilisation du grille-pain
1. S’assurer que le tiroir ramasse-miettes est verrouillé en place dans le bas du grille-pain et que la manette
est à la position HAUT.
2. S’assurer que des tranches de pain ou d’autres objets ne se trouvent pas dans les fentes du grille-pain.
Installer le grille-pain sur une surface plane, horizontale et résistante à la chaleur.
3. Brancher la che dans une prise murale de 120 V c.a.
4. Sélectionner le niveau de grillage désiré à l’aide du sélecteur de niveau de grillage. Pour tester la durée de
grillage, l’idéal est d’utiliser les deux fentes. Positionner le sélecteur de niveau de grillage entre (3) et (4)
moyen, puis ajuster le niveau à chaque utilisation.
5. Retirer tous les emballages des aliments avant de les insérer dans les fentes du grille-pain.
IMPORTANT : Éviter de griller des tranches de pain déchirées ou de petits morceaux d’aliments allant au
grille-pain, qui pourraient se coincer dans les fentes.
6. Insérer le pain ou l’aliment à griller dans la ou les fente(s). Abaisser la manette jusqu’à ce qu’elle se
verrouille. Le guide de centrage automatique maintient la nourriture en position verticale, ce qui garantit
un grillage uniforme des deux côtés. Le grillage commence quand le pain est abaissé dans les fentes.
REMARQUE : La manette ne se verrouille pas si le grille-pain n’est pas branché dans une prise électrique
de 120 V c.a.
REMARQUE : Lorsqu’on grille une seule tranche, le pain peut être placé dans une fente ou l’autre.
REMARQUE : An d’éviter un incendie, ne jamais placer de pain sur le dessus du grille-pain de manière à
obstruer la fente. Toujours placer le pain à l’intérieur de la fente.
REMARQUE : NE PAS modier le réglage de grillage pendant que le grille-pain est en utilisation.
Positionner tout d’abord le sélecteur de niveau de grillage à CANCEL (Annuler), puis régler le sélecteur
de niveau de grillage. Abaisser la manette et faire griller jusqu’à ce que la couleur de rôti désirée soit
atteinte.
7. Lorsque le grille-pain atteint le niveau de grillage sélectionné, le pain ou l’aliment sera automatiquement
éjecté.
8. Utiliser la manette de surélévation pour retirer plus facilement les petits morceaux de pain.
9. Retirer le pain des fentes. Retirer le pain prudemment, car le dessus du grille- pain et le pain pourraient
être chauds.
IMPORTANT : Ne jamais utiliser de fourchette ou d’ustensile pointu pour retirer un aliment, car cela
pourrait endommager l’élément chauffant ou causer des blessures.
10. Pour interrompre le grillage, positionner le sélecteur de niveau de grillage à CANCEL (Annuler).
11. Toujours débrancher le cordon d’alimentation de la prise murale lorsque l’appareil n’est pas utilisé.
CANCEL (Annuler) Toasting
Quand la manette est abaissée, le grillage commence.
12. Pour arrêter ou interrompre un cycle de grillage, positionner le sélecteur
13. de niveau de grillage à CANCEL (Annuler). Le pain sera automatiquement éjecté et le grille-pain
s’éteindra.
14. Toujours débrancher le cordon d’alimentation de la prise murale lorsque l’appareil n’est pas utilisé.
SO-312472_12051_KitchenSmith 2-slice toaster IM_2.indd 11 2015-06-08 9:33 AM
Page 14

12
Griller les aliments prêts-à-servir
De nombreux types d’aliments prêts-à-servir, tant frais que congelés sont offerts de nos jours. Puisque les
aliments à griller et les goûts varient, il est difcile de recommander un niveau de grillage particulier pour chaque
type d’aliment. Quelques essais sufront pour découvrir le réglage qui correspond aux besoins de chacun. Il
est aussi possible de consulter les instructions de réchauffage ou de grillage qui sont souvent imprimées sur
l’emballage des aliments.
Pâtisseries
Pour obtenir de meilleurs résultats, suivre les instructions imprimées sur l’emballage de la pâtisserie. S’il n’y a
pas d’instructions sur l’emballage, mettre le bouton de sélection à moyen, entre (3) et (4). Certaines pâtisseries
peuvent nécessiter un second cycle de grillage.
REMARQUE : Ne pas utiliser ce grille-pain pour faire griller des pâtisseries couvertes d’un glaçage ou dont le
contenu coule.
Pâtisseries non surgelées
Sélectionner un niveau de grillage plus bas. Dans le cas d’aliments prêts-à-servir épais, il pourrait être nécessaire
d’augmenter le niveau de grillage et de choisir une durée de grillage plus longue.
Retirer les aliments coincés
1. Utiliser la manette de surélévation pour retirer plus facilement les petits morceaux de pain.
2. Si, après le grillage, un morceau de pain ou un autre aliment se coince dans l’une des fentes du grille-pain,
débrancher le grille-pain et le laisser refroidir.
3. Abaisser la manette. Retourner le grille-pain et le secouer an de déloger la nourriture.
IMPORTANT : Ne jamais utiliser de fourchette ou d’ustensile pointu pour retirer un aliment, car cela
pourrait endommager l’élément chauffant ou causer des blessures.
Points importants
• Retirer tous les emballages des aliments avant de les insérer dans les fentes du grille-pain.
• Pour obtenir de meilleurs résultats, nettoyer le tiroir ramasse-miettes fréquemment.
• Des types de pain différents nécessitent des réglages de grillage différents. Positionner le sélecteur de
niveau de grillage à CANCEL (Annuler) en tout temps pour vérier si le pain est sufsamment grillé.
• Ne pas bloquer les fentes sur le dessus de l’appareil. Ne pas placer d’aliments ou d’objets de manière à
bloquer les fentes sur le dessus de l’appareil.
• Ne pas griller de pain beurré ou de pain pita beurré. Le beurre fondu pourrait causer un incendie.
• Lorsque deux tranches de pain sont grillées, utiliser des tranches de dimension, d’épaisseur et de
fraîcheur semblables.
• Le pain sec, le pain tranché très mince et les produits de pain sucré (comme les petits pains briochés et
les tranches de gâteau aux fruits), grillent beaucoup plus rapidement que le pain ordinaire et devraient
être grillés à une intensité plus basse.
• Ne jamais immerger le grille-pain, le cordon d’alimentation ou la che dans l’eau ou dans un autre liquide.
• Ne jamais utiliser de fourchette ou d’ustensile pointu pour retirer un aliment, car cela pourrait
endommager l’élément chauffant ou causer des blessures.
Instructions pour l’entretien
Cet appareil requiert peu d’entretien. Il ne contient pas de pièce réparable par l’utilisateur. Toute réparation qui
nécessite un démontage autre que pour le nettoyage doit être effectuée par un technicien qualié en réparation
d’appareils.
Instructions d’entretien et de nettoyage
MISE EN GARDE : Ne pas immerger le grille-pain, le cordon d’alimentation ou la che dans l’eau ou dans un
autre liquide.
MISE EN GARDE : S’assurer que le grille-pain est débranché avant de le nettoyer.
TIROIR RAMASSE-MIETTES : Le tiroir ramasse-miettes avec charnière est situé au bas du grille-pain.(Voir Figure
2.) En se plaçant au-dessus d’un lavabo ou d’une poubelle, tirer sur le loquet pour déverrouiller et dégager le
tiroir ramasse-miettes vers l’extérieur. Essuyer le tiroir ramasse-miettes à l’aide d’un linge humide et propre.
Remettre le tiroir ramasse-miettes en place en le poussant. S’assurer qu’il est verrouillé en dessous du grille-pain.
EXTÉRIEUR : Essuyer l’extérieur du grille-pain à l’aide d’un linge humide et propre. Ne pas utiliser de nettoyant
abrasif. Ne pas immerger le cordon d’alimentation ou la che dans l’eau ou dans un autre liquide.
SO-312472_12051_KitchenSmith 2-slice toaster IM_2.indd 12 2015-06-08 9:33 AM
Page 15

13
Instructions de rangement
1. Débrancher l’appareil, le laisser refroidir, puis le nettoyer avant de le ranger.
2. Ranger l’appareil dans sa boîte, dans un endroit sec et propre.
3. Ne jamais ranger le grille-pain s’il est encore chaud ou s’il n’est pas débranché. Ne jamais enrouler le cordon
d’alimentation autour de l’appareil en serrant celui-ci. Plutôt, il convient d’utiliser les crochets de rangement
du cordon qui
4. se trouvent en dessous du grille-pain. (Voir Figure 2.)
5. Ne pas tirer, plier ou tordre l’extrémité du cordon qui est xée à l’appareil, car le cordon pourrait s’eflocher
et se briser.
Figure 2
SO-312472_12051_KitchenSmith 2-slice toaster IM_2.indd 13 2015-06-08 9:33 AM
Page 16

14
Garantie limitée de DEUX ANS
SENSIO Inc. assure par la présente que le produit est garanti contre tout défaut de
matériel et de fabrication pendant une période de DEUX ANS à compter de la date
d’achat et contre tout défaut des pièces autres que mécaniques pendant 90 jours. À
son entière discrétion, SENSIO Inc. réparera ou remplacera un produit défectueux, ou
accordera un remboursement pour ce produit, pendant la période de la garantie.
Cette garantie s’applique uniquement à l’acheteur initial du produit, à compter de la
date initiale de l’achat, et est incessible. Pour que la garantie soit valide, l’acheteur doit
conserver le reçu de caisse original. Les magasins de détail qui vendent ce produit
n’ont pas le droit de l’altérer ou de le modier, ni de modier de quelque façon les
modalités de la garantie.
EXCLUSIONS :
La garantie ne couvre pas l’usure normale des pièces ou les dommages causés par
une utilisation négligente du produit, le branchement sur un circuit de tension ou de
courant inapproprié, un entretien de routine inadéquat, une utilisation contraire aux
instructions de fonctionnement, de démontage et de réparation, ou par la modication
du produit par une personne autre qu’un technicien qualié de SENSIO Inc. De plus, la
garantie ne couvre pas les cas de force majeure comme les incendies, les inondations,
les ouragans et les tornades.
SENSIO Inc. ne pourra être tenue responsable de tout dommage indirect ou accessoire
causé par la violation de toute garantie explicite ou implicite. Sauf dans la mesure où
cela est interdit par la loi, toute garantie implicite concernant la valeur commerciale
ou l’adéquation à la n visée se limite à la durée de la garantie. Certains États et
certaines provinces ou compétences administratives ne permettent pas l’exclusion
ou la limitation des dommages indirects ou accessoires, ou les limitations quant
à la durée des garanties implicites; par conséquent, les exclusions ou limitations
mentionnées précédemment peuvent ne pas s’appliquer à vous. La garantie couvre les
droits légaux spéciques qui peuvent varier selon l’état, la province ou la compétence
administrative.
COMMENT OBTENIR UN SERVICE SOUS GARANTIE :
Communiquez avec le service à la clientèle en composant notre numéro sans frais :
1 866 832-4843. Un représentant du service à la clientèle tentera de résoudre par
téléphone les questions relatives à la garantie. Si le représentant du service à la
clientèle est incapable de résoudre le problème, il vous fournira un numéro de
demande et vous informera que vous devez retourner le produit à SENSIO Inc. Apposez
sur le produit une étiquette indiquant votre nom, votre adresse, votre numéro de
téléphone (de jour), le numéro de demande ainsi qu’une description du problème.
Incluez également une copie du reçu de caisse original. Emballez soigneusement
le produit avec son reçu de caisse et faites-le parvenir (port et assurance payés) à
l’adresse de SENSIO Inc. SENSIO Inc. n’assume aucune responsabilité quant au produit
retourné pendant son transport jusqu’au centre de service à la clientèle de SENSIO Inc.
SO-312472_12051_KitchenSmith 2-slice toaster IM_2.indd 14 2015-06-08 9:33 AM
Page 17

15
MEDIDAS DE SEGURIDAD
IMPORTANTES
Cuando se utilizan aparatos eléctricos, se deben seguir precauciones de seguridad
básicas, entre ellas:
1. TODAS LAS INSTRUCCIONES.
2. No toque las supercies calientes. Utilice los mangos o las perillas.
3. Para protegerse del riesgo de descarga eléctrica, no sumerja el cable, el enchufe ni
el electrodoméstico en agua ni en ningún otro líquido.
4. Este electrodoméstico no debe ser utilizado por personas (incluidos niños) con
capacidades físicas, sensoriales o mentales reducidas, o con falta de experiencia
y conocimientos, a menos que una persona responsable de su seguridad les haya
brindado supervisión o instrucciones sobre su uso.
5. Es necesario que haya una supervisión estricta cuando el electrodoméstico sea
utilizado por niños o cerca de ellos.
6. Desenchufe el electrodoméstico del tomacorriente cuando no lo utilice y antes de
limpiarlo. Deje que se enfríe antes de colocarle o retirarle piezas.
7. No utilice ningún electrodoméstico que tenga un cable o enchufe dañado, que
muestre un funcionamiento defectuoso o que se haya dañado de cualquier
manera. Envíe el electrodoméstico a la tienda Walmart más cercana para que lo
examinen, lo reparen o le hagan ajustes.
8. El uso de accesorios no recomendados por el fabricante del electrodoméstico
puede provocar lesiones.
9. No utilice este aparato en exteriores.
10. No permita que el cable cuelgue del borde de una mesa o de una encimera ni que
entre en contacto con supercies calientes.
11. No lo coloque sobre un quemador a gas o eléctrico, ni cerca de él, ni dentro de un
horno caliente.
12. Para desconectar la unidad, coloque la perilla del selector de tostado en la posición
CANCEL (Anular) y retire el enchufe del tomacorriente de pared.
13. No utilice el electrodoméstico para otros nes que no sean para los que fue
diseñado.
14. No introduzca alimentos demasiado grandes, embalajes de papel de aluminio
ni utensilios de metal en una tostadora, ya que pueden provocar un riesgo de
incendio o descarga eléctrica.
15. Si las tostadoras en funcionamiento están cubiertas por materiales inamables,
tales como cortinas, colgaduras, paredes, etc., o bien se encuentran LEA en
contacto con ellos, puede producirse un incendio.
16. Se debe ser sumamente cuidadoso al mover un electrodoméstico que contenga
aceite caliente u otros líquidos calientes
ADVERTENCIA: RIESGO DE DESCARGA ELÉCTRICA. No intente sacar los alimentos
de la tostadora mientras está enchufada. Esto podría provocar un riesgo de descarga
eléctrica o de incendio.
GUARDE ESTAS INSTRUCCIONES
PARA USO DOMÉSTICO
ÚNICAMENTE
SO-312472_12051_KitchenSmith 2-slice toaster IM_2.indd 15 2015-06-08 9:33 AM
Page 18

16
OTRAS MEDIDAS DE
SEGURIDAD IMPORTANTES
PRECAUCIÓN CON LAS SUPERFICIES CALIENTES: Este aparato genera calor y vapor
de escape durante el uso. Se deben tomar las medidas necesarias para evitar riesgos
de quemaduras, incendios u otras lesiones a personas o daño a la propiedad.
1. Las personas que no hayan leído y comprendido todas las instrucciones de
funcionamiento, de tostado y seguridad no deben utilizar este electrodoméstico.
Todos los usuarios de este aparato deben leer y comprender este manual de
instrucciones antes de ponerlo en funcionamiento o limpiarlo.
2. Si el aparato se cae o accidentalmente se sumerge en agua, desenchúfelo del
tomacorriente de pared de inmediato. ¡No introduzca la mano en el agua!
3. Cuando utilice este electrodoméstico, deje espacio suciente por encima y a
los lados de la unidad para que circule el aire. No utilice este electrodoméstico
mientras esté en contacto con cortinas, recubrimientos de pared, ropa, paños de
cocina u otros materiales inamables o mientras se encuentre cerca de ellos.
4. Para evitar el riesgo de incendio, no descuide el electrodoméstico mientras esté en
funcionamiento.
5. Si el electrodoméstico comienza a funcionar mal mientras está en uso, coloque
inmediatamente la perilla del selector de tostado en la posición CANCEL (Anular)
y desenchufe el cable. ¡No utilice ni intente reparar un electrodoméstico que
funcione mal!
6. El cable del electrodoméstico sólo debe enchufarse directamente en un
tomacorriente eléctrico de pared de CA de 120 V.
7. No utilice el electrodoméstico en una posición inestable.
8. Utilice la tostadora sobre una supercie plana y dura. Manténgala alejada de
llamas o del calor y no la coloque sobre supercies blandas (como alfombras).
Evite colocarla en lugares donde pueda caerse mientras está en uso. Si la tostadora
se cae, podría comenzar a funcionar mal.
ADVERTENCIA: RIESGO DE DESCARGA ELÉCTRICA. No intente sacar los alimentos
de la tostadora mientras está enchufada. Esto podría provocar un riesgo de descarga
eléctrica o de incendio.
PRECAUCIÓN: este electrodoméstico se calienta durante el funcionamiento y
mantiene el calor un tiempo después de apagado. Siempre use manoplas al manipular
materiales calientes y deje que las piezas metálicas se enfríen antes de limpiarlas. No
coloque nada sobre la tostadora mientras esté en funcionamiento o esté caliente.
PRECAUCIÓN
NO tueste masas con rellenos líquidos ni con baños.
NO tueste rebanadas de pan rotas.
NO coloque pan untado con manteca ni alimentos con envolturas en la tostadora.
NO tueste panes pequeños, minibaguettes, grisines, etc.
SO-312472_12051_KitchenSmith 2-slice toaster IM_2.indd 16 2015-06-08 9:33 AM
Page 19

17
Notas sobre el enchufe
Este aparato tiene un enchufe polarizado (una clavija es más ancha que la otra).
Para reducir el riesgo de descarga eléctrica, este enchufe se debe colocar en un
tomacorriente polarizado en una sola dirección. Si el enchufe no entra completamente
en el tomacorriente, dé vuelta el enchufe. Si aun así no encaja, llame a un electricista
calicado. No modique el enchufe de ninguna manera.
Notas sobre el cable
Se debe usar el cable de alimentación corto provisto (o cable de alimentación
separable) para reducir el riesgo de enredarse o tropezarse si el cable fuera más largo.
No utilice un cable de extensión con este producto.
Corriente eléctrica
Si se recarga el circuito eléctrico con otros aparatos, es posible que este aparato no funcione
correctamente. Se debe utilizar en un circuito eléctrico separado de los otros aparatos.
Conozca su tostadora para 2 rebanadas
El producto puede diferir levemente de las ilustraciones.
Figure 1
Ranuras de tostado
Guías de centrado
automático
(no mostrado)
Palanca elevadora
de tostado
Ranura de la palanca
de tostado
Cuerpo
Pies de caucho
sin rastro de marca
Perilla del selector
de tostado
Cable de
alimentación
con enchufe
polarizado
Soporte de enrollado para almacenamiento del cable
(Ver Instrucciones de almacenamiento, Figura 2)
Bandeja para migas con bisagra
(Ver Instrucciones de almacenamiento, Figura 2)
SO-312472_12051_KitchenSmith 2-slice toaster IM_2.indd 17 2015-06-08 9:33 AM
Page 20

18
Antes de utilizar por primera vez
1. Retire todos los materiales del embalaje, incluso los que puedan estar dentro de las ranuras de tostado o las
ranuras de las palancas de tostado.
2. Pase un paño húmedo sobre la supercie exterior de la unidad. Seque completamente. No utilice productos
de limpieza abrasivos.
3. No coloque la tostadora, el cable ni el enchufe en el agua.
4. Asegúrese de que la bandeja para migas quede bien trabada en la parte inferior de la tostadora y de que la
palanca de tostado se encuentre en la posición UP (Arriba).
5. Desenvuelva el cable de alimentación del área de almacenamiento que se encuentra en la parte inferior de la
tostadora y enchúfelo en un tomacorriente de CA de 120 V.
6. Gire la perilla del selector de tostado hasta llegar a (1), la opción más clara.
7. Baje la palanca de tostado hasta que quede colocada en su lugar. Utilícela sin pan una o dos veces para
quitar los residuos de fabricación. Puede percibir un poco de humo; esto es normal y dejará de suceder a
medida que los elementos térmicos continúen calentando.
Guías de centrado automático
Al bajar la palanca de tostado, se cierran las guías de centrado y el pan o los alimentos para tostadoras
permanecen centrados en las ranuras de tostado.
NOTA: si la tostadora no está enchufada en un tomacorriente eléctrico de CA de 120 V, la palanca de tostado no
se trabará.
Instrucciones de tostado
1. Asegúrese de que la bandeja para migas quede bien trabada en la parte inferior de la tostadora y de que
la palanca de tostado se encuentre en la posición UP (Arriba).
2. Asegúrese de que no haya pan ni otros objetos dentro de las ranuras de tostado. Coloque la tostadora en
una supercie plana, nivelada y resistente al calor.
3. Enchufe el cable de alimentación en un tomacorriente de CA de 120 V.
4. Gire la perilla del selector de tostado hasta la opción deseada. Para probar los tiempos de tostado, se
recomienda utilizar ambas ranuras de tostado. Gire la perilla del selector de tostado hasta llegar a la
posición entre (3) y (4); y luego, ajuste cada tostado posterior según su preferencia.
5. Antes de colocar los alimentos en las ranuras de tostado, retíreles todos los envoltorios protectores.
6. IMPORTANTE: evite tostar rebanadas de pan rotas o trozos pequeños de alimentos para tostadoras que
puedan quedar depositados en las ranuras de tostado.
7. Coloque el pan o los alimentos para tostadoras en las ranuras de tostado. Baje la palanca de tostado
hasta que quede colocada en su lugar. Las guías de centrado automático sujetan los alimentos
verticalmente para lograr un tostado uniforme en ambos lados. El tostado comienza cuando el pan baja y
queda en su lugar.
8. NOTA: si la tostadora no está enchufada en un tomacorriente eléctrico de CA de 120 V, la palanca de
tostado no quedará bien trabada en su lugar.
9. NOTA: al tostar una sola rebanada, el pan se puede colocar en cualquier ranura de tostado.
10. NOTA: para evitar el riesgo de incendio, nunca coloque el pan en la abertura de la tostadora; siempre
coloque el pan en las ranuras.
11. NOTA: NO cambie la selección de la perilla del selector de tostado durante
12. el ciclo de tostado. Primero, coloque la perilla del selector de tostado en la posición CANCEL (Anular) ;
luego, gire la perilla del selector de tostado para ajustar el nivel de tostado. Puede bajar la palanca de
tostado y tostar hasta alcanzar el color de tostado deseado.
13. Cuando la tostada alcance el nivel de tostado seleccionado, saltará hacia arriba automáticamente.
14. Utilice la palanca elevadora para que resulte más fácil retirar los elementos tostados más pequeños.
15. Retire el pan de las ranuras de tostado. Tenga cuidado cuando retira el pan porque el pan y la parte
superior de la tostadora estarán calientes.
IMPORTANTE: nunca utilice un tenedor ni un utensilio loso para retirar las tostadas porque pueden
dañar el elemento térmico o provocar lesiones.
16. Para cancelar el tostado, coloque la perilla del selector de tostado en la posición CANCEL (Anular).
17. Desenchufe el cable del tomacorriente de pared cuando no utilice el producto.
CANCEL (Cancelar) el toastado
1. El tostado comienza cuando se baja la palanca de tostado.
2. Para cancelar o detener un ciclo de tostado, coloque la perilla del selector de tostado en la posición
CANCEL (Anular). El pan subirá automáticamente y la tostadora se apagará.
3. Desenchufe el cable del tomacorriente de pared cuando no utilice el producto.
SO-312472_12051_KitchenSmith 2-slice toaster IM_2.indd 18 2015-06-08 9:33 AM
Page 21

19
Tostado de alimentos de preparación rápida
Diversas variedades de alimentos de preparación rápida envasados se encuentran disponibles en la actualidad,
tanto congelados como no congelados (masas envasadas). Debido a que los alimentos para tostadoras o los
sabores varían, no se pueden recomendar las conguraciones exactas de la perilla del selector de tostado. Sin
embargo, después de experimentar, podrá hallar la mejor conguración según sus necesidades. Además, puede
consultar las instrucciones para calentar que aparecen en los paquetes de los alimentos de preparación rápida.
Masas
Para obtener mejores resultados, siga las instrucciones impresas en el paquete de las masas. Si el paquete no
tiene instrucciones, coloque la perilla del selector de tostado hasta llegar a medio, entre (3) y (4). Algunas masas
pueden necesitar un segundo ciclo de tostado.
NOTA: No utilice esta tostadora para tostar masas con baños líquidos o rellenos.
Masas envasadas no congeladas
Gire la perilla del selector de tostado hasta llegar a una opción más clara. Para los alimentos de preparación
rápida más gruesos, puede ser necesario ajustar la perilla del selector de tostado hasta llegar a una opción más
oscura y un ciclo de tostado más largo.
Cómo retirar los alimentos
1. Utilice la palanca elevadora para que resulte más fácil retirar los elementos tostados más pequeños.
2. Si, después del tostado, un trozo de pan o cualquier otro alimento para tostadoras se depositan en alguna de
las ranuras de tostado, desenchufe la tostadora y deje que se enfríe.
3. Mantenga presionada la palanca de tostado. Coloque la tostadora al revés y sacuda los alimentos sueltos.
4. IMPORTANTE: nunca utilice un tenedor ni un utensilio loso para retirar las tostadas porque pueden dañar el
elemento térmico o provocar lesiones.
Información importante
• Antes de colocar los alimentos en las ranuras de tostado, retíreles todos los envoltorios protectores.
• Para obtener mejores resultados, limpie la bandeja para migas con frecuencia.
• Los diferentes tipos de pan requieren diferentes conguraciones de color.Para controlar el color del
tostado, coloque la perilla del selector de tostado en la posición CANCEL (Anular) en cualquier momento.
• No bloquee la abertura superior. No coloque ningún objeto en la abertura superior.
• No tueste pan untado con manteca ni pan árabe untado con manteca. La manteca derretida provocará un
incendio.
• Cuando tueste más de una rebanada de pan, utilice rebanadas de igual tamaño, grosor y frescura.
• Los productos de pan duro, pan no o pan dulce, tales como los pasteles con frutas secas y los panes de
frutas, se tuestan más rápido que el pan común; por lo tanto, se deben tostar en las conguraciones más
claras.
• Nunca sumerja la tostadora, el cable ni el enchufe en agua ni en ningún otro líquido.
• Nunca utilice un tenedor ni un utensilio loso para retirar las tostadas porque pueden dañar el elemento
térmico o provocar lesiones.
Instrucciones de mantenimiento para el usuario
Este aparato requiere de poco mantenimiento. No contiene piezas que el usuario pueda reparar. No intente
Este aparato requiere poco mantenimiento. No contiene piezas que puedan ser reparadas por el usuario. Todo
mantenimiento para el que sea necesario desarmar el aparato, aparte de la limpieza, debe ser realizado por
un técnico autorizado para reparar electrodomésticos.
Instrucciones de limpieza y cuidado
PRECAUCIÓN: no sumerja la tostadora, el cable ni el enchufe en agua ni en ningún otro líquido.
PRECAUCIÓN: asegúrese de que la tostadora esté desenchufada antes de limpiarla.
BANDEJAS PARA MIGAS: la bandeja para migas con bisagra se encuentra en la parte inferior de la tostadora.
(Ver Figura 2). Sobre un fregadero o recipiente de residuos, tire la traba para destrabar y liberar la bandeja.
Limpie la bandeja para migas con un paño limpio y húmedo. Empuje la bandeja para migas para que vuelva a
quedar en su lugar. Asegúrese de que quede trabada correctamente en la parte inferior de la tostadora.
EXTERIOR: limpie el exterior de la tostadora con un paño limpio y húmedo.
No utilice productos de limpieza abrasivos. No coloque el cable ni el enchufe en agua ni en ningún otro líquido.
SO-312472_12051_KitchenSmith 2-slice toaster IM_2.indd 19 2015-06-08 9:33 AM
Page 22

20
Instrucciones de almacenamiento
1. Desenchufe la unidad, déjela enfriar y límpiela antes de guardarla.
2. Guarde la tostadora en la caja o en un lugar limpio y seco.
3. Nunca guarde la tostadora mientras está caliente o enchufada.
4. Nunca ajuste el cable alrededor del electrodoméstico; enróllelo alrededor de los soportes para el cable
que se encuentran en la parte inferior de la tostadora. (Ver Figura 2).
5. No ejerza presión sobre el cable donde ingresa en la unidad, ya que el cable podría desgastarse y
romperse.
Figure 2
SO-312472_12051_KitchenSmith 2-slice toaster IM_2.indd 20 2015-06-08 9:33 AM
Page 23

21
Garantía limitada de DOS AÑOS
Mediante la presente, SENSIO Inc. garantiza que, durante el plazo de DOS AÑOS a
partir de la fecha de compra, este producto no presentará defectos mecánicos en el
material ni en la mano de obra, y durante 90 días, no los presentará en las piezas no
mecánicas. A su entera discreción, SENSIO Inc. reparará o reemplazará el producto
que resulte defectuoso, o emitirá un reembolso por el producto durante el plazo de
garantía.
Esta garantía es válida únicamente para el comprador minorista original a partir de la
fecha de compra minorista inicial y no es transferible. Conserve el recibo de compra
original, ya que se exige una prueba de compra para obtener la validación de la
garantía. Las tiendas minoristas no tienen derecho a alterar, modicar ni corregir de
ninguna manera los términos y condiciones de la garantía.
EXCLUSIONES:
La garantía no cubre el desgaste normal de las piezas ni el daño ocasionado por
cualquiera de las siguientes causas: uso negligente del producto, uso de un voltaje
o corriente incorrectos, mantenimiento de rutina inadecuado, uso contrario al de
las instrucciones de funcionamiento, desarmado, reparación o alteración a cargo de
personas que no sean miembros del personal calicado de SENSIO Inc. Asimismo, la
garantía no cubre actos de la naturaleza, como incendios, inundaciones, huracanes o
tornados.
SENSIO Inc. no asumirá responsabilidad por daños incidentales o resultantes
ocasionados por la violación de cualquier garantía expresa o implícita. Salvo en
la medida en que lo prohíban las leyes aplicables, cualquier garantía implícita de
comerciabilidad o aptitud para un propósito particular se limita temporalmente a la
duración de la garantía. Algunos estados, provincias o jurisdicciones no permiten la
exclusión ni la limitación de daños incidentales o resultantes, o limitaciones sobre
la duración de una garantía implícita y, por lo tanto, es posible que las exclusiones o
limitaciones mencionadas no le correspondan. La garantía cubre derechos legales
especícos que pueden variar de un estado, una provincia o una jurisdicción a otros.
CÓMO OBTENER EL SERVICIO DE GARANTÍA:
Debe comunicarse con el Servicio de atención al cliente a nuestro número telefónico
gratuito: 1-866-832-4843. Un representante del Servicio de atención al cliente intentará
resolver los problemas referidos a la garantía por teléfono. Si este no puede resolver
el problema, le proporcionarán un número de caso y le solicitarán que devuelva el
producto a SENSIO Inc. Adhiera una etiqueta al producto que incluya: su nombre,
dirección, número telefónico de contacto durante el día, número de caso y descripción
del problema. Además, incluya una copia del recibo de compra original. Envuelva
cuidadosamente el producto etiquetado con el recibo de compra, y envíelo (con el
envío y el seguro prepagados) a la dirección de SENSIO Inc. SENSIO Inc. no asumirá
obligación ni responsabilidad alguna por el producto devuelto que esté en el trayecto
hacia el Centro de servicio al cliente de SENSIO Inc.
SO-312472_12051_KitchenSmith 2-slice toaster IM_2.indd 21 2015-06-08 9:33 AM
Page 24

For customer service questions or comments
Pour le service à la clientèle, question ou commentaires
Dudas o comentarios contactar el departamento de servicio al cliente
1-866-832-4843
www.sensioinc.com
BELLA is a registered trademark of Sensio Inc., Montréal, Canada H3B 3X9.
All rights reserved.
KitchenSmith is a trademark owned by 8479950 Canada Inc.
All rights reserved.
BELLA est une marque déposée de Sensio Inc., Montréal, Canada H3B 3X9.
Tous droits réservés.
KitchenSmith est une marque détenue par 8479950 Canada Inc.
Tous droits réservés.
BELLA es una marca registrada de Sensio Inc., Montréal, Canada H3B 3X9.
Todos los derechos reservados.
KitchenSmith es una marca propiedad de 8479950 Canada Inc.
Todos los derechos reservados.
SO_312472
SO-312472_12051_KitchenSmith 2-slice toaster IM_2.indd 22 2015-06-08 9:33 AM
 Loading...