

Bella KITCHENSMITH 12028 Instruction Manual
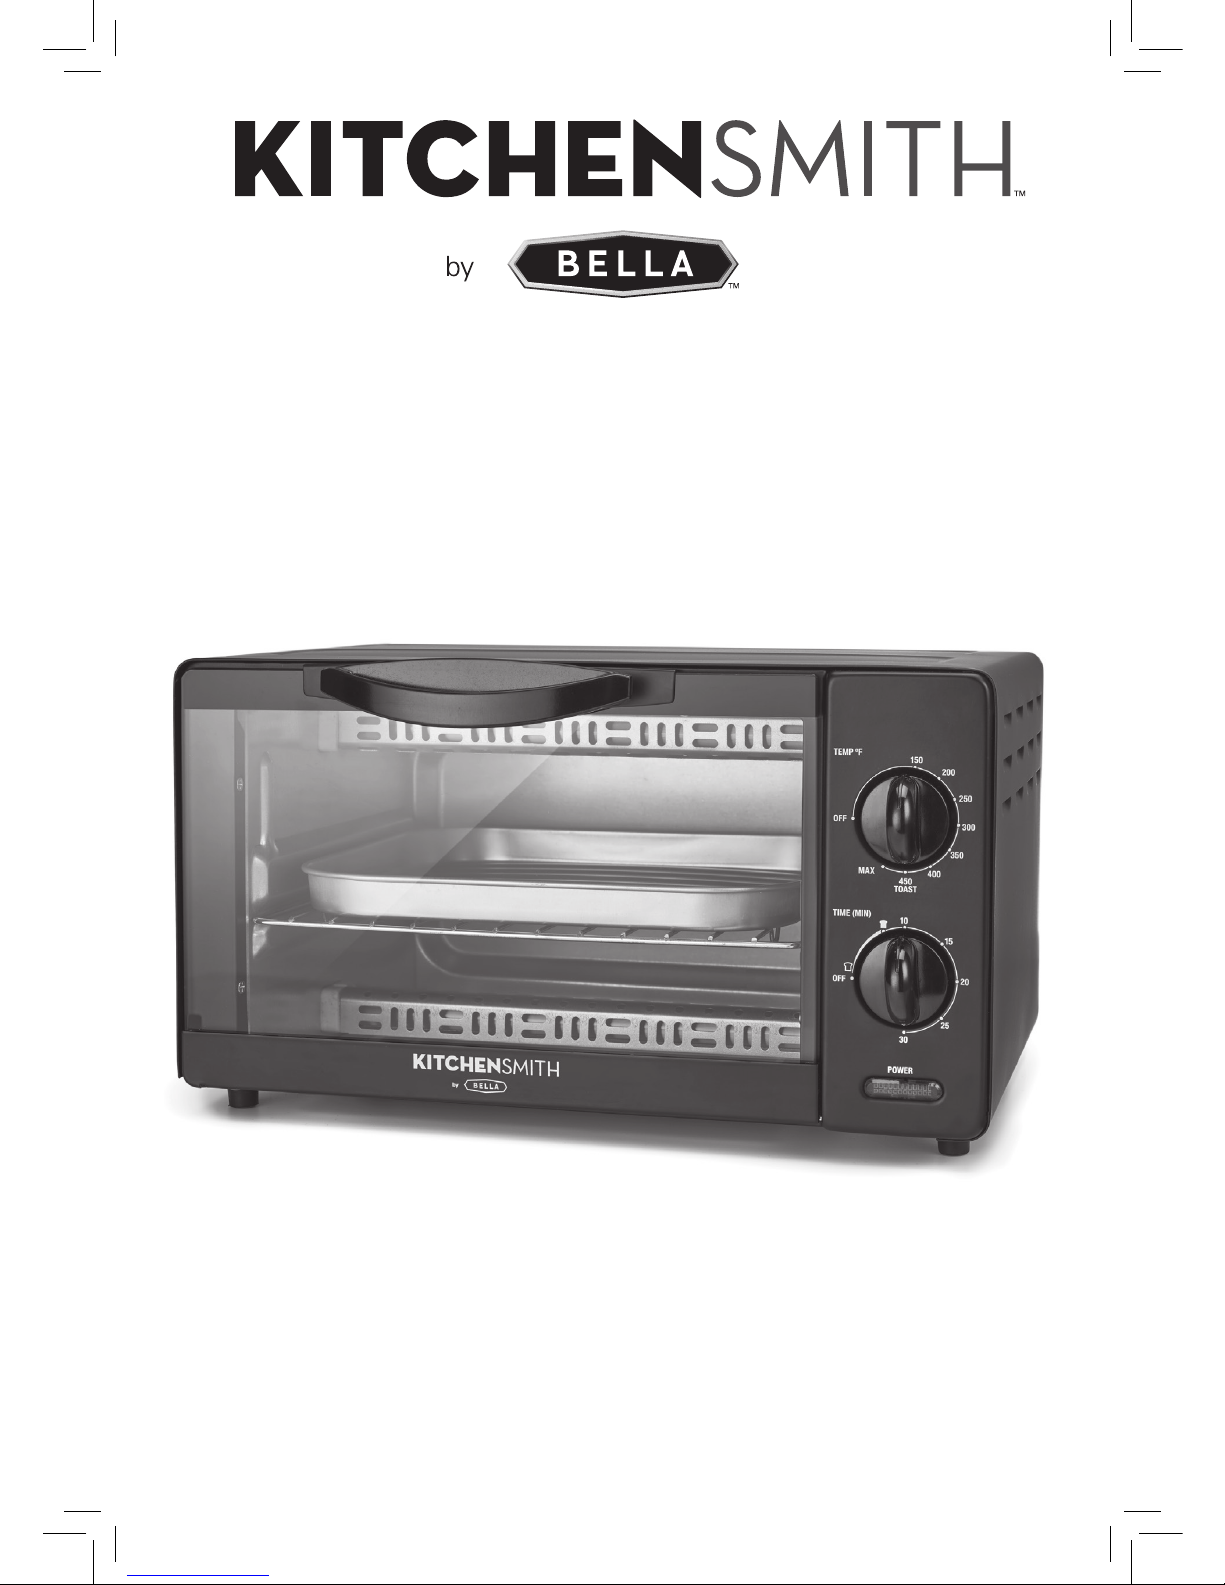
4-SLICE TOASTER OVEN
GRILLE-PAIN
À QUATRE TRANCHES
TOSTADOR
DE 4 REBANADAS
Instruction Manual
Manuel d’instructions
Manual de instrucciones
Register your product and get support at:
Pour vous inscrire et obtenir l’aide de votre produit:
Para registrar y obtener asistencia de su producto ir:
www.bellahousewares.com
SO-314162_12028_Kitchen smith_10L TOV_Target_IM_R3.indd 1 2017-04-03 6:14 PM

Table of Contents
Important Safeguards ................................................................................................................................. 2
Additional Important Safeguards ..............................................................................................................3
Notes on the Plug ........................................................................................................................................ 4
Notes on the Cord .......................................................................................................................................4
Plasticizer Warning ...................................................................................................................................... 4
Electric Power ..............................................................................................................................................4
Getting to Know Your 4-Slice Toaster Oven ............................................................................................ 5
Wire Rack ...................................................................................................................................................... 6
Cooking Containers .....................................................................................................................................6
Before Using for the First Time ................................................................................................................. 6
Operating Instructions ................................................................................................................................ 6
Instructions for Toast .................................................................................................................................. 7
Instructions for Bake ................................................................................................................................... 7
Hints for Bake ............................................................................................................................................... 7
Instructions for Frozen Pizza ...................................................................................................................... 8
Cooking Tempurature Timetable ...............................................................................................................8
USDA Cooking Guidelines ...........................................................................................................................9
Instructions for Reheating Leftovers ......................................................................................................... 9
Instructions for Defrost ..............................................................................................................................9
User Maintenance Instructions .................................................................................................................9
Care & Cleaning Instructions ..................................................................................................................... 9
Storing Instructions ...................................................................................................................................10
Warranty ..................................................................................................................................................... 11
SO-314162_12028_Kitchen smith_10L TOV_Target_IM_R3.indd 2 2017-04-03 6:14 PM

Table des matières
Importantes consignes de sécurité ..........................................................................................................12
Importantes consignes de sécurité supplémentaires ...........................................................................13
Remarques sur la che électrique ............................................................................................................14
Remarques sur le cordon ..........................................................................................................................14
Avertissement de migration de plastiants ............................................................................................14
Alimentation électrique ............................................................................................................................. 14
Caractéristiques du four grille-pain à quatre tranches ......................................................................... 15
Grille ............................................................................................................................................................. 16
Contenants à cuisson ................................................................................................................................. 16
Avant la première utilisation ..................................................................................................................... 16
Mode d’emploi ............................................................................................................................................ 16
Griller ............................................................................................................................................................ 17
Cuire .............................................................................................................................................................17
Conseils de cuisson .................................................................................................................................... 17
Pizza congelée ............................................................................................................................................. 18
Tableau des temps de cuisson ..................................................................................................................18
Directives de cuisson de l’USDA .............................................................................................................. 19
Réchauffer un plat cuisiné .........................................................................................................................19
Décongeler ..................................................................................................................................................19
Instructions d’entretien pour l’utilisateur................................................................................................19
Instructions d’entretien et de nettoyage .................................................................................................20
Rangement ..................................................................................................................................................20
Garantie........................................................................................................................................................21
Índice
Medidas de seguridad importantes .........................................................................................................22
Otras medidas de seguridad importantes ..............................................................................................23
Notas sobre el enchufe .............................................................................................................................. 24
Notas sobre el cable ................................................................................................................................... 24
Advertencia sobre los plasticantes ........................................................................................................24
Corriente eléctrica ......................................................................................................................................24
Conozca su horno tostador de 4 rebanadas ........................................................................................... 25
Rejilla de alambre .......................................................................................................................................26
Recipientes de cocción ..............................................................................................................................26
Antes de utilizar por primera vez .............................................................................................................26
Instrucciones de funcionamiento .............................................................................................................26
Instrucciones para tostar ...........................................................................................................................27
Instrucciones para hornear ....................................................................................................................... 27
Consejos para hornear ............................................................................................................................... 27
Instrucciones para pizza congelada ......................................................................................................... 28
Tabla de tiempos de cocción ....................................................................................................................28
Pautas de cocción del USDA .....................................................................................................................29
Instrucciones para recalentar sobras ......................................................................................................29
Instrucciones para descongelar ...............................................................................................................29
Instrucciones de mantenimiento para el usuario ..................................................................................29
Instrucciones de cuidado y limpieza ........................................................................................................30
Instrucciones de almacenamiento ...........................................................................................................30
Garantía........................................................................................................................................................31
SO-314162_12028_Kitchen smith_10L TOV_Target_IM_R3.indd 3 2017-04-03 6:14 PM

2
IMPORTANT SAFEGUARDS
When using electrical appliances, basic safety precautions should always be
followed including the following:
1. READ ALL INSTRUCTIONS.
2. Do not touch hot surfaces. Use handles or knobs.
3. To protect against electrical shock do not immerse cord, plugs, or appliance
in water or other liquid.
4. Close supervision is necessary when any appliance is used by or near
children. Children should be supervised to ensure that they do not play with
the appliance.
5. This appliance is not intended for use by persons (including children) with
reduced physical, sensory or mental capabilities, or lack of experience and
knowledge unless they have been given supervision or instruction concerning
use of the appliance by a person responsible for their safety.
6. Unplug from outlet when not in use and before cleaning. Allow to cool before
putting on or taking off parts.
7. Do not operate any appliance with a damaged cord or plug or after the
appliance malfunctions, or has been damaged in any manner. Bring it to
a qualied technician for examination, repair or electrical or mechanical
adjustment.
8. The use of accessory attachments not recommended by the appliance
manufacturer may cause injuries.
9. Do not use outdoors.
10. Do not let cord hang over edge of table or counter, or touch hot surfaces.
11. Do not place on or near a hot gas or electric burner, or in a heated oven.
12. Extreme caution must be used when moving an appliance containing hot oil
or other liquids.
13. To disconnect, turn the timer control and the temperature control to OFF; then
remove the plug from the wall outlet.
14. Do not use appliance for other than intended use.
15. Oversized foods or metal utensils must not be inserted in a Toaster Oven as
they may create a re or risk of electric shock.
16. A re may occur if the Toaster Oven is covered or touching ammable
material, including curtains, draperies, walls, and the like, when in operation.
Do not store any item on top of the appliance when in operation.
17. Do not clean with metal scouring pads. Pieces can break off the pad and
touch electrical parts involving a risk of electrical shock.
18. Extreme caution should be exercised when using containers constructed of
other than metal or glass.
19. Do not store any item on top of the Toaster Oven when in operation.
20. Do not store any materials, other than manufacturer’s recommended
accessories, in this Toaster Oven when not in use.
21. Do not place any of the following materials in the Toaster Oven: paper,
cardboard, plastic, and the like.
22. Do not cover crumb tray or any part of the Toaster Oven with metal foil. This
will cause overheating of the Toaster Oven.
23. Use extreme caution when removing the crumb tray or disposing of hot
grease.
SO-314162_12028_Kitchen smith_10L TOV_Target_IM_R3.indd 2 2017-04-03 6:14 PM

3
ADDITIONAL IMPORTANT
SAFEGUARDS
CAUTION HOT SURFACES: This appliance generates heat and escaping steam
during use. Proper precautions must be taken to prevent the risk of burns, res,
or other injury to persons or damage to property.
1. A person who has not read and understood all operating and safety
instructions is not qualied to operate this appliance. All users of this
appliance must read and understand this owner’s manual before operating
or cleaning this appliance.
2. If this appliance falls or accidentally becomes immersed in water, unplug it
from the wall outlet immediately. Do not reach into the water!
3. When using this appliance, provide adequate air space above and on all sides
for air circulation. Do not operate this appliance while it is touching or near
curtains, wall coverings, clothing, dishtowels or other ammable materials.
4. To reduce the risk of re, do not leave this appliance unattended during use.
5. If this appliance begins to malfunction during use, immediately turn the timer
control and temperature control to OFF; remove the plug from the wall outlet.
Do not use or attempt to repair a malfunctioning appliance!
6. The cord to this appliance should only be plugged into a 120V AC electrical
wall outlet.
7. Do not use this appliance in an unstable position.
SAVE THESE INSTRUCTIONS
FOR HOUSEHOLD USE ONLY
SO-314162_12028_Kitchen smith_10L TOV_Target_IM_R3.indd 3 2017-04-03 6:14 PM

4
NOTES ON THE PLUG
This appliance has a polarized plug (one blade is wider than the other). To reduce
the risk of electric shock, this plug will t in a polarized outlet only one way. If the
plug does not t fully into the outlet, reverse the plug. If it still does not t, contact
a qualied electrician. Do not modify the plug in any way.
NOTES ON THE CORD
The provided short power-supply cord (or detachable power-supply cord) should
be used to reduce the risk resulting from becoming entangled in or tripping over a
longer cord. An extension cord is not recommended for use with this product.
PLASTICIZER WARNING
CAUTION: To prevent Plasticizers from migrating to the nish of the counter top or
table top or other furniture, place NON-PLASTIC coasters or place mats between the
appliance and the nish of the counter top or table top. Failure to do so may cause
the nish to darken; permanent blemishes may occur or stains can appear.
ELECTRIC POWER
If the electrical circuit is overloaded with other appliances, your appliance may not
operate properly. It should be operated on a separate electrical circuit from other
appliances.
SO-314162_12028_Kitchen smith_10L TOV_Target_IM_R3.indd 4 2017-04-03 6:14 PM
5
Note: keep illustration
callouts aligned
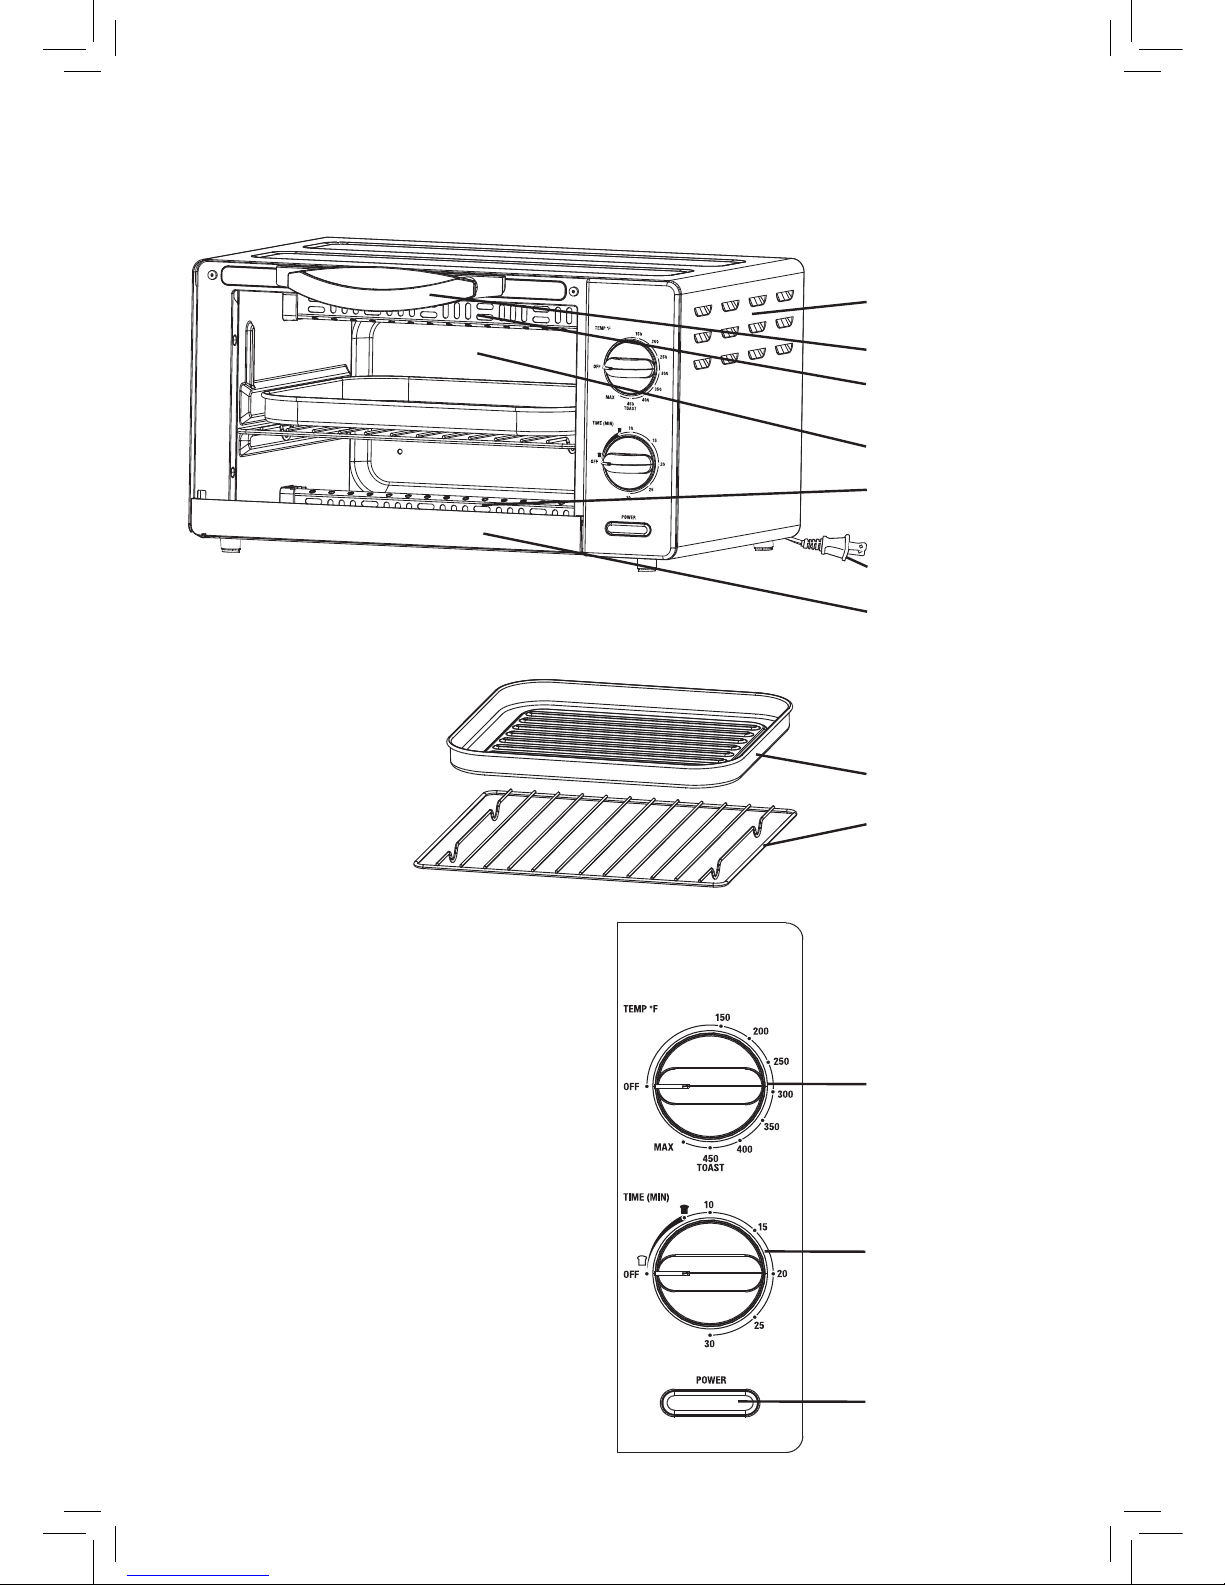
Getting to Know Your Toaster Oven
Product may vary slightly from illustration.
Figure 1
Oven Vents
Glass Door
Door Handle
Upper Heating
Element
Lower Heating
Element
Crumb Tray
(not shown)
Power Cord with
Polarized Plug
Bake/Broil Pan
Wire Rack
Accessories
Temperature
Control
Timer Control
with OFF
Control Panel
Power ON Light
SO-314162_12028_Kitchen smith_10L TOV_Target_IM_R3.indd 5 2017-04-03 6:14 PM

6
Wire Rack
The wire rack must be used for all cooking functions. It must be inserted in the provided shelf in the
toaster oven cavity. (See Figure 1.)
Cooking Containers
• The bake/broil pan included with the Toaster Oven is suitable for items such as cookies, rolls,
biscuits, nachos and meats.
• A variety of standard baking dishes, such as an 8-inch round or 8-inch square cake pan, a 6-cup
mufn pan and 1 quart round, square, or rectangular casserole dishes may be used for other foods.
• Choose bakeware made of either metal or glass/ceramic without lids.
• Dark or dull pans absorb heat faster; foods will bake more rapidly and crust will brown more easily
than in shiny bake pans.
• Check package directions on the container or contact the ovenware manufacturer to determine the
container’s suitability for use in a Toaster Oven.
• Do not use oven roasting bags in this Toaster Oven, as they may come in contact with the heating
elements.
CAUTION: Allow at least 1-inch air space between the top of the container and the upper heating elements.
Never use glass lids on glass or metal bakeware. If a lid is necessary, cover tightly with heavy-duty
aluminum foil.
Before Using for the First Time
CAUTION: To protect against electric shock, do not immerse the Toaster Oven or allow cord to come into
contact with water or other liquids.
1. Carefully unpack the Toaster Oven and accessories, removing all packaging materials. Remove any
labels from the outer surfaces.
2. Use a clean damp cloth to wipe the inside and outside surfaces of the Toaster Oven. Wash the
wire rack and bake/broil pan in warm soapy water, rinse and dry thoroughly. Do not use abrasive
cleaners.
3. To ensure that the Toaster Oven is free from oils used in manufacturing, turn the temperature
control to 400ºF.
4. Set the timer control for 15 minutes. The power ON light will illuminate.
5. At the end of the 15 minutes, a signal will sound and the Toaster Oven will turn OFF automatically.
The Toaster Oven is ready for use.
NOTE: When the Toaster Oven is heated for the rst time, it may emit slight smoke or odor. This is
normal and should disappear after 1 or 2 uses. This does not affect the safety of the appliance.
Operating Instructions
1. Place the Toaster Oven on a at, level surface.
2. Remove all protective wrappings from food before placing in Toaster Oven.
3. Make sure the crumb tray is inserted fully under the lower heating element in the bottom of the
Toaster Oven.
4. Plug Toaster Oven into a 120V AC outlet.
5. The timer control acts as the Toaster Oven’s ON and OFF switch. Turn the timer control clockwise to
select the appropriate cooking time (up to 30 minutes). The power ON light will illuminate.
NOTE: When cooking less than 5 minutes, turn the timer control to 10 minutes and then back to
desired cooking time.
CAUTION: DO NOT LEAVE TOASTER OVEN UNATTENDED DURING USE.
6. When cooking time is complete, a signal will sound and the Toaster Oven will turn OFF
automatically.
7. Unplug the Toaster Oven and allow to cool before cleaning.
SO-314162_12028_Kitchen smith_10L TOV_Target_IM_R3.indd 6 2017-04-03 6:14 PM

7
Instructions for Toast
1. Insert the wire rack into the provided shelf in the Toaster Oven.
2. Your Toaster Oven will accommodate up to 4 slices of bread. Center bread or toaster food onto the
wire rack.
3. Turn temperature control to 450ºF/TOAST.
4. Set the timer control for desired toast color:
Light, Medium or Dark. The power ON light will
illuminate.
NOTE: When toasting, turn the timer control to 10 minutes and then to desired toast color.
5. When cooking time is complete, a signal will sound and the Toaster Oven will turn OFF
automatically. The power light will turn off.
NOTE: Watch toast until desired color is achieved. Shut off manually by turning the timer control to
the OFF position. The power light will turn off.
6. Turn the temperature control to OFF.
NOTE: Follow toaster food package directions.
IMPORTANT: Frozen and heavy breads such as bagels or English Mufns require longer toasting
times. Check frequently to avoid burning.
Instructions for Bake
1. Make sure the crumb tray is inserted fully under the lower heating element in the bottom of the
Toaster Oven.
2. Remove all protective wrappings from food before placing in Toaster Oven.
3. For best results, always preheat the Toaster Oven. Turn the temperature control to the recipe
cooking temperature. Turn the timer control to 10 to 15 minutes. The power ON light will illuminate.
At the end of the preheat time, a signal will sound and the Toaster Oven will turn OFF automatically.
4. Insert the wire rack into the provided shelf in the Toaster Oven.
5. Center food in the bake/broil pan or baking container or center food directly on the wire rack.
6. Close door.
NOTE: Do not cover the wire shelf completely; air ow is necessary for proper operation of your
Toaster Oven.
7. Turn temperature control to the desired temperature.
8. Set the timer control according to package or recipe time. The power ON light will illuminate.
NOTE: If cooking less than 5 minutes, turn timer control to 10 minutes and then back to desired
cooking time.
9. When cooking time is complete, a signal will sound and the Toaster Oven will turn OFF
automatically. The power light will turn off.
10. NOTE: Watch food until desired doneness is achieved. Shut off manually by turning the timer
control to the OFF position. The power light will turn off.
WARNING: Do not use any glass cover on any baking pan. If using a glass or glass-ceramic baking
container, make sure it is at least 1-1/2 inches away from the upper heating element.
Hints for Bake
• To prevent heat loss, avoid opening door excessively.
• Foil may be used to cover top of baking container to reduce over browning. Tuck ends of foil closely
against edge of pan.
• Place food toward the center of the oven for better browning.
• Food may cook faster than recipe or package time. Check for doneness prior to end of cook time.
• Rotate and turn food over (if applicable) for more even cooking halfway through the cooking
process.
SO-314162_12028_Kitchen smith_10L TOV_Target_IM_R3.indd 7 2017-04-03 6:14 PM
8
Instructions for Frozen Pizza
1. Your Toaster Oven will accommodate a 9-inch frozen pizza. Always follow oven temperatures and
cooking times included with your frozen pizza.
2. Make sure the crumb tray is inserted fully under the lower heating element in the bottom of the
Toaster Oven.
3. Remove all protective wrappings from frozen pizza before placing in Toaster Oven.
4. For best results, always preheat the Toaster Oven. Turn the temperature control to 400ºF. Turn the
timer control to 10 to 15 minutes. The power ON light will illuminate. At the end of the preheat time,
a signal will sound and the Toaster Oven will turn OFF automatically.
5. Insert the wire rack into the provided shelf in the Toaster Oven.
6. Set the timer control to the minimum suggested cooking time (up to 30 minutes). The power ON
light will illuminate.
NOTE: Add an additional 4 minutes cooking time when using a cooking stone.
7. When cooking time is complete, a signal will sound and the Toaster Oven will turn OFF
automatically. The power light will turn off.
8. Check to see that the crust is golden brown, and the cheese in the center is melted. If the pizza is not
satisfactorily cooked at this time, reset the timer control for an additional 4 to 5 minutes until it is done.
9. Wearing oven mitts, use a spatula to transfer the cooked pizza onto the round packing cardboard or
a cutting board; cut and serve.
10. Turn the temperature control to OFF.
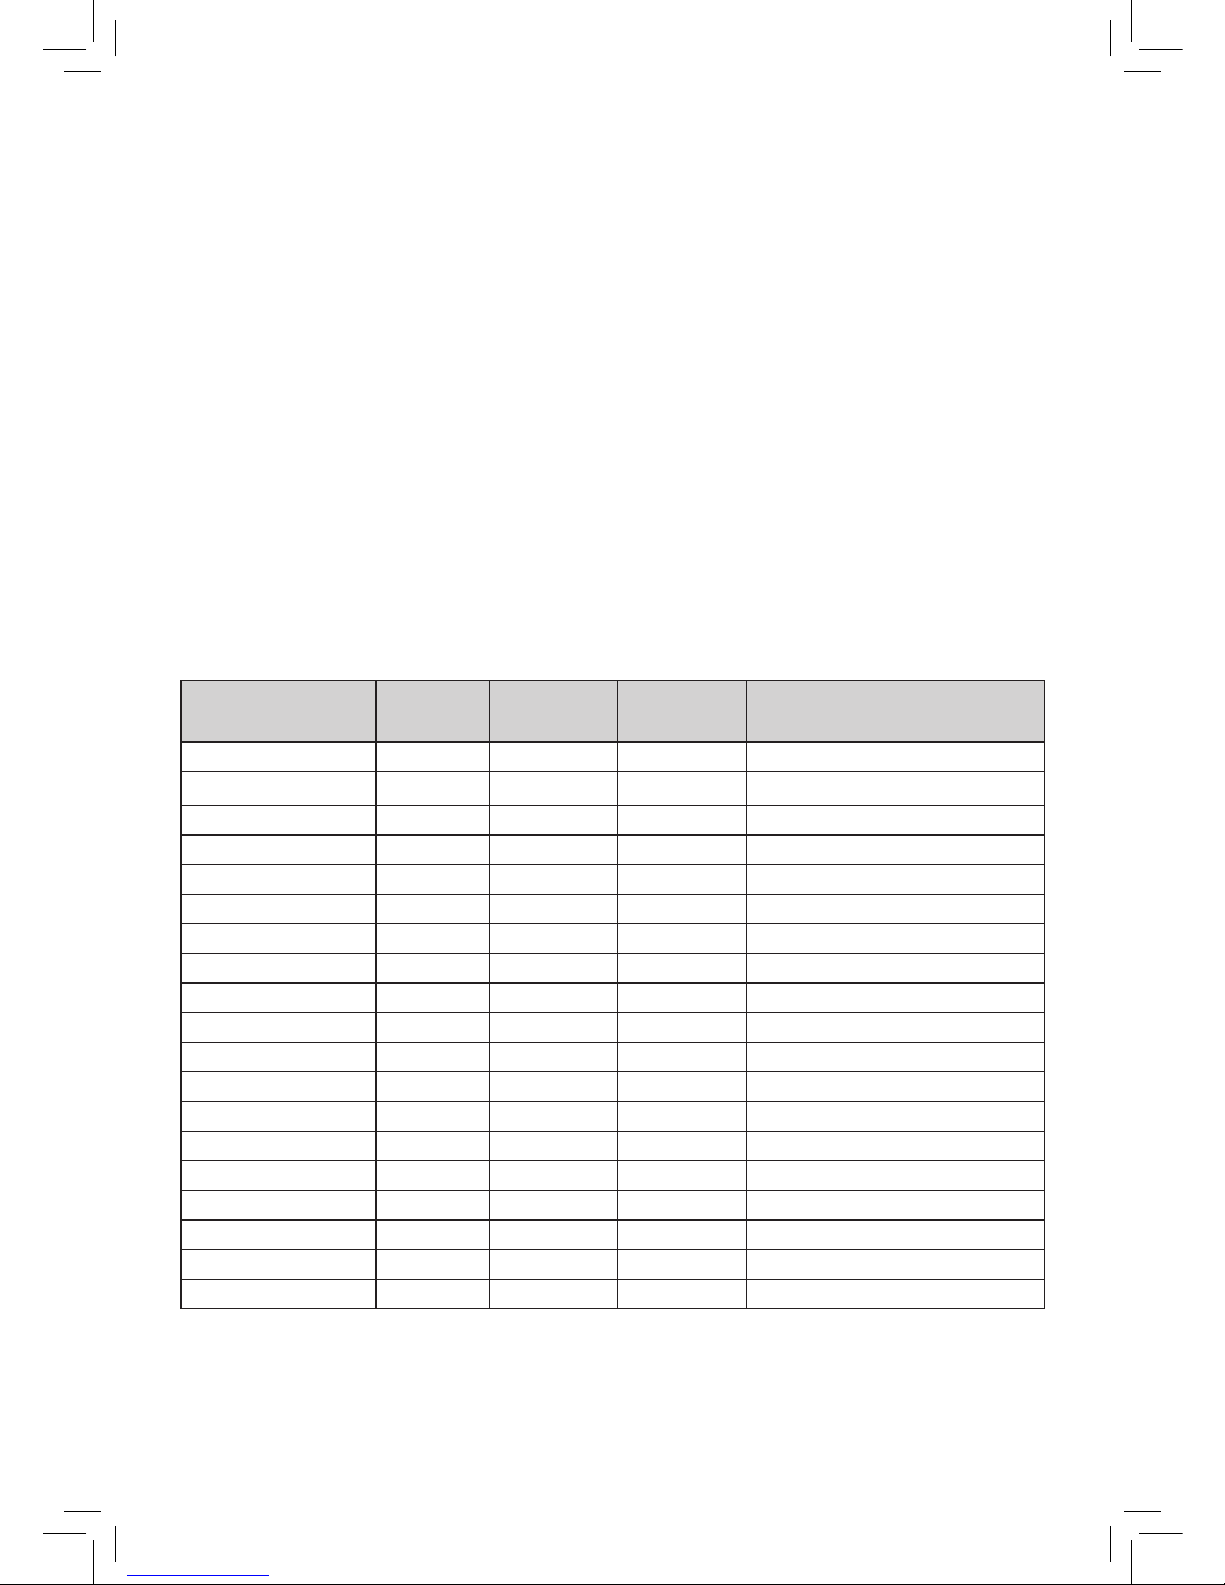
Cooking Temperature Timetable
This COOKING TIME CHART is provided for suggestions only.
Temperatures may vary depending on the size and consistency of the food to be prepared
FOOD
TEMP.
SETTING
APPROX.
AMOUNT
TIME
(MINS.)
COMMENTS
Bacon 450ºF 2-3 strips 5-10 Turn frequently.
Sausage 450ºF 5-6 links 20-25 Turn 1/2 way through cooking.
Steaks, ½” to 1” thick 450ºF 1-2 15-30 Turn 1/2 way through cooking.
Hamburgers 450ºF 1-2 10-25 Turn 1/2 way through cooking.
Hot dogs 450ºF 3-4 10-25 Turn frequently. Cook until done.
Lamb Chops 450ºF 1-4 15-33 Turn 1/2 way through cooking.
Pork Chops 450ºF 1-4 20-25 Turn 1/2 way through cooking.
Chicken:
Whole 350ºF 3 lbs. 1-2 hrs. Cook until done.
On Bone 350ºF 3-4 lbs. 40-55 Cook until done.
Boneless 350ºF 3 lbs. 30-40 Cook until done.
Biscuits/Rolls 400ºF 2-8 12-20 Follow directions on pkg.
French/Garlic Bread 400ºF 8” dia. 20-25 Follow directions on pkg.
Frozen Dinner 400ºF 1-2 25-35 Follow directions on pkg.
Pizza (frozen) 400ºF 9” dia. 15-20 Follow directions on pkg.
Baked Potatoes 400ºF 1-5 60-80 Cook until done.
French Fries (frozen) 400ºF 1-1.5 cups 15-25 Follow directions on pkg.
Cookies 400ºF 5-8 15-20 Follow recipe.
Pastries Warm 2-3 23-30 Follow directions on pkg.
SO-314162_12028_Kitchen smith_10L TOV_Target_IM_R3.indd 8 2017-04-03 6:14 PM

9
USDA Cooking Guidelines
NOTE: The United States Department of Agriculture recommends that meat and poultry be cooked to
the following internal temperatures to be sure any harmful bacteria has been killed. Ground turkey and
chicken should be cooked to an internal temperature of 165˚F/74˚C and ground beef, veal, lamb and pork
be cooked to an internal temperature 160˚F/71˚C. Whole chicken and turkey should be cooked to an internal
temperature of 180˚F/82˚C; 170˚F/77˚C for the breast. Goose and duck should be cooked to an internal
temperature of 180˚F/82˚C. Fresh beef, veal and lamb, etc., should be cooked to an internal temperature of
at least 145˚F/63˚C. Fresh pork should be cooked to an internal temperature of at least 160˚F/71˚C. When
re-heating meat and poultry products, they should also be cooked to an internal temperature of 165˚F/74˚C
Instructions for Reheating Leftovers
1. Your Toaster Oven’s quartz heating elements ensure even, gentle heating, perfect for reheating leftovers.
2. To prevent reheated food from drying out, cover with aluminum foil.
3. Turn temperature control to 350ºF and check every 5 to 10 minutes until heated through.
• Pizza. Place in the bake/broil pan or directly on the wire rack for an extra crispy reheated crust.
Check reheating progress frequently.
• Grilled sandwiches. Reheat leftover Panini or grilled cheese sandwiches quickly and easily.
Sandwiches will be crisp on the outside and warmed through on the inside.
• Crusty breads. Reheat garlic bread, cheese bread for delicious results. Check every 5 minutes.
• Fried or breaded foods. Re-crisp leftovers at 350ºF to 400ºF and check every 5 minutes.
• Baked goods. Pies, mufns, tarts, and even stale cookies. Revive leftover baked goods by heating
at 350ºF to 400ºF for 2 to 3 minutes.
• Cooked meats. Reheat BBQ chicken, and any leftover meats in the Toaster Oven. Tightly cover the
bake/broil pan with aluminum foil. Check every 10 minutes until heated through.
Instructions for Defrost
1. Make sure the crumb tray is inserted fully under the lower heating element in the bottom of the
Toaster Oven.
2. Remove all protective wrappings from food before placing in Toaster Oven.
3. Turn temperature control to 150ºF.
CAUTION: Do not defrost at higher temperatures than recommended. Defrosting at hotter
temperatures may cause incomplete thawing.
4. Set the timer control according to package, or up to 30 minutes. The power ON light will illuminate.
5. When defrosting time is complete, a signal will sound and the Toaster Oven will turn OFF
automatically. The power light will turn off.
NOTE: Watch carefully until food is thawed. Shut off manually by turning the timer control to the
OFF position. The power light will turn off.
6. Turn the temperature control to OFF.
IMPORTANT: To avoid contamination, thawed food should be fully cooked or refrigerated.
User Maintenance Instructions
This appliance requires little maintenance. It contains no user serviceable parts. Do not try to repair it
yourself. Any servicing that requires disassembly other than cleaning must be performed by a qualied
appliance repair technician.
Care & Cleaning Instructions
1. Make sure both the temperature control and the timer control are in the OFF position.
2. Always unplug and allow to cool completely before cleaning or moving.
3. Pull the crumb tray up and out from under the lower heating element in the bottom of the Toaster Oven.
4. Clean the wire rack, bake/broil pan, and crumb tray after each use. Wash with a non-abrasive
cleaner, rinse and dry thoroughly.
IMPORTANT: For best results, clean the crumb tray frequently.
5. Clean the interior of the Toaster Oven with a mild non-abrasive cleaner and a piece of cloth after
each use. Rinse and dry thoroughly. Do not rub too hard as the interior surface of the Toaster Oven
can be scratched. Allow to dry before closing the glass door.
6. Clean the glass oven door and Toaster Oven exterior with glass cleaner or mild detergent and a damp
cloth or plastic scouring pad. Do not use an abrasive cleaner or pad as they might scratch the nish.
SO-314162_12028_Kitchen smith_10L TOV_Target_IM_R3.indd 9 2017-04-03 6:14 PM
 Loading...