

Page 1

CAPSULE COFFEE MAKER
WITH FROTHER
Instruction Manual
90113_BellaPro_Espresso Capsule Maker with Frother_IM_r3.indd 190113_BellaPro_Espresso Capsule Maker with Frother_IM_r3.indd 1 2020-10-09 3:58 PM2020-10-09 3:58 PM
Page 2

Thank You for your purchase
Register & sign up for special
announcements and trendy recipes!
Tell us what you think!
Rate, review or ask us a question.
@bellahousewares.com
#getinspired
BellaLife BellaLifestyle
90113_BellaPro_Espresso Capsule Maker with Frother_IM_r3.indd 290113_BellaPro_Espresso Capsule Maker with Frother_IM_r3.indd 2 2020-10-09 3:58 PM2020-10-09 3:58 PM
Page 3

TABLE OF CONTENTS
Capsule Coffee Maker instruction manual
Important safeguards .......................................................................................................1-3
Notes on the cord ................................................................................................................3
Notes on the plug ................................................................................................................ 4
Plasticizers warning .............................................................................................................4
Electric power.......................................................................................................................4
Getting to know your coffee maker...................................................................................5
Before using for the rst time ........................................................................................... 6
Using your coffee maker .................................................................................................6 -7
Programming the water volume ........................................................................................ 7
Reset to factory settings ..................................................................................................... 7
Cleaning and maintenance ................................................................................................. 8
Descaling ..............................................................................................................................8
Storing ...................................................................................................................................9
Milk Frother instruction manual
Important safety instructions .....................................................................................10-12
Notes on the plug .............................................................................................................. 12
Notes on the cord .............................................................................................................. 13
Getting to know your milk frother ................................................................................... 14
Before the rst use ............................................................................................................ 15
Operation of your milk frother .................................................................................... 15 -17
I. Frothing and heating .......................................................................................... 15 -16
Ii. Only frothing separately, without heating ...........................................................16
Iii. Only heating separately, without frothing. ....................................................16-17
Cleaning and maintenance ............................................................................................... 17
Warranty ....................................................................................................................... 19-20
90113_BellaPro_Espresso Capsule Maker with Frother_IM_r3.indd 390113_BellaPro_Espresso Capsule Maker with Frother_IM_r3.indd 3 2020-10-09 3:58 PM2020-10-09 3:58 PM
Page 4

CAPSULE COFFEE MAKER Instruction Manual
IMPORTANT SAFEGUARDS
When using electrical appliances, basic safety precautions should always
be followed includingthefollowing:
1. READ ALL INSTRUCTIONS.
2. Make sure that your outlet voltage corresponds to the voltage stated
on the rating label of the coffee maker.
3. To protect against re, electric shock and injury to persons do not
immerse cord, plug or unit in water or other liquid.
4. Close supervision is necessary when any appliance is used by or near
children.
5. Unplug from outlet when not in use and before cleaning. Allow unit
to cool before putting on or taking off parts, and before cleaning
theappliance.
6. Do not operate any appliance with a damaged cord or plug or after
the appliance malfunctions or has been damaged in any manner.
Return appliance to an authorized service facility for examination,
repair or adjustment.
7. The use of accessories not recommended by the appliance
manufacturer may result in re, electric shock or injury to persons.
8. Do not let cord hang over edge of table or counter or touch
hotsurface.
1
90113_BellaPro_Espresso Capsule Maker with Frother_IM_r3.indd 190113_BellaPro_Espresso Capsule Maker with Frother_IM_r3.indd 1 2020-10-09 3:58 PM2020-10-09 3:58 PM
Page 5

9. Do not place on or near a hot gas or electric burner,
orinaheatedoven.
11. Only ll the tank with clean and cold water. Never ll the tank with
mineral water, milk or other liquids.
12. Do not let the coffee maker operate without water.
13. There is extremely hot water in the capsule holder during the brew
process. To avoid risk of injury, do not lift the brew handle during
brewing process.
14. Never insert ngers into the capsule holder to avoid burning
orinjuring ngers.
15. To disconnect, remove plug from wall outlet. Always hold the plug.
But never pull from the cord.
16. Some parts of the appliance are hot when operated, so do not touch
with hands. Use handles or knobs only.
17. Do not leave the appliance on unattended.
18. The temperature of operating or storing the unit should be more than
freezing point 32ºF (0°C).
19. Do not leave the appliance exposed to atmospheric agents
(sun,rain,etc)
20. This appliance is not intended for used by persons (including
children) with reduced physical, sensory or mental capabilities,
orlack ofexperience and knowledge, unless they have been
given supervision or instruction concerning use of the appliances
byaperson responsible for their safety.
21. Children should be supervised to ensure that they do not play with
the appliance.
2
90113_BellaPro_Espresso Capsule Maker with Frother_IM_r3.indd 290113_BellaPro_Espresso Capsule Maker with Frother_IM_r3.indd 2 2020-10-09 3:58 PM2020-10-09 3:58 PM
Page 6

22. Scalding may occur if the lid is removed during the brewing cycles
23. Do not use appliance for other than intended use.
24. Do not use for commercial purpose.
25. Do not use outdoors.
FOR HOUSEHOLD USE ONLY
SAVE THESE INSTRUCTIONS
NOTES ON THE CORD
A. A short power-supply cord is provided to reduce the risk resulting
from becoming entangled in or tripping over a longer cord.
B. Longer extension cords are available and may be used if care
isexercised in their use.
C. If an extension cord is used:
1. The marked electrical rating of the cord set or extension cord
should be at least as great as the electrical rating of the appliance;
2. The cord should be arranged so that it will not drape over
thecountertop or tabletop where it can be pulled on by children
ortripped over unintentionally;
3. If the appliance is of the grounded type, the cord set or extension
cord should be a grounding-type 3-wire cord.
3
90113_BellaPro_Espresso Capsule Maker with Frother_IM_r3.indd 390113_BellaPro_Espresso Capsule Maker with Frother_IM_r3.indd 3 2020-10-09 3:58 PM2020-10-09 3:58 PM
Page 7

NOTES ON THE PLUG
This appliance has a polarized plug. To reduce the risk of electric shock,
this plug is intended to t into a polarized outlet only one way. If the
plug does not t fully into the outlet, reverse the plug. If it still does
nott, contact a qualied electrician. Do not attempt to modify the plug
inanyway.
PLASTICIZER WARNING
CAUTION: The feet on the base of unit contain substances in the plastic,
known as plasticizers, that may migrate to the nish of atabletop
orcountertop. To prevent this, place nonplastic coasters or placemats
between the appliance and the countertop or tabletop. Failure
todosomay cause the nish to darken; permanent blemishes or stains
canappear.
ELECTRIC POWER
If the electrical circuit is overloaded with other appliances, your appliance
may not operate properly. It should be operated on a separate electrical
circuit from other appliances.
4
90113_BellaPro_Espresso Capsule Maker with Frother_IM_r3.indd 490113_BellaPro_Espresso Capsule Maker with Frother_IM_r3.indd 4 2020-10-09 3:58 PM2020-10-09 3:58 PM
Page 8
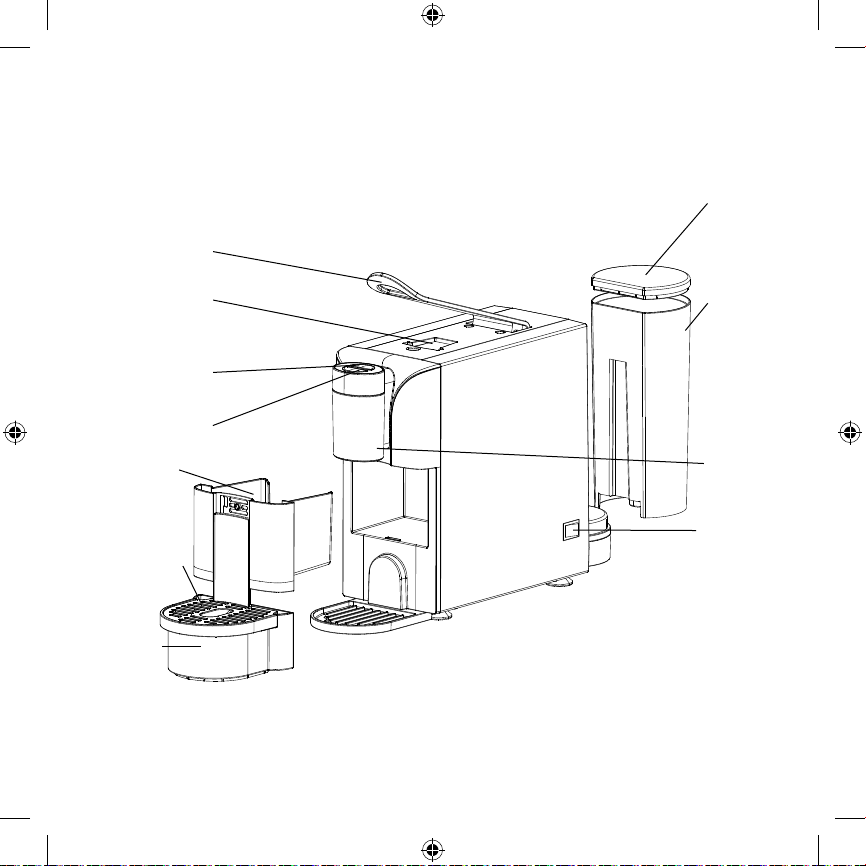
GETTING TO KNOW YOUR COFFEE MAKER
PARTS DEFINED
Product may vary slightly from illustration
FIGURE 1
Handle
Water
tank lid
Capsule
holder
Small cup
coffee button
(with indicator)
Large cup
coffee button
(with indicator)
Capsule
collection
tray
Drip tray
cover
Drip
tray
5
90113_BellaPro_Espresso Capsule Maker with Frother_IM_r3.indd 590113_BellaPro_Espresso Capsule Maker with Frother_IM_r3.indd 5 2020-10-09 3:58 PM2020-10-09 3:58 PM
Water
tank
Coffee
outlet
Power
switch
Page 9

Before Using for the First Time
1. Remove the water tank from the machine, pull the red silicone plug by the tab to remove
and discard. Remove the warning sticker from the water tank. Fill the water t ank with
drinkable water. Do not exceed the MA X line.
2. With the lid on the water tank place the water tank s traight onto the base.
3. You will see water bubbles owing upwards, this is a sign that the water tank has been
inserted correctly.
4. Turn the unit on by ipping the side button. Do not inser t capsule.
5. Place a cup on the drip tray. Press the double cup but ton when both lights are blinking.
The unit will remember the cup size selec tion and water will begin to dispense
inafewseconds.
6. If indicator lights blink rapidly and no water is dispensed, turn unit off, wait 2 minutes,
andre peat step s 2 through 4.
NOTE: While pressing down the large cup or small cup coffe e but tons, the machine may
produce a pumping sound, which means the water is star ting to brew the coffee.
USING YOUR COFFEE MAKER
1. Fill the removable water tank with drinkable water. The wa ter level should not exceed
theMAX level marked on the tank.
2. Open the handle by lif ting it up completely and inser t a coffee capsule. Close the handle
by pushing it down completely.
3. Position a cup on the drip tray cover. Make sure the drip tray is assembled in plac e.
CAUTION: This appliance is d esigned for Nespress o Original St yle Capsules, available at
bestbuy.com and other gro cer y outlets
4. Plug the power c ord into the outlet . Press the power switch to “I” position and then both
the indicator light s of the small cup and large cup buttons start to ash.
5. Press the small cup or large cup but ton. The unit will remember the choice.
CAUTION: Do not open the handle during the brew cycle to avoid spillage
6. The corresponding indicator light will start to ash and cof fee w ill begin to ll the cup.
Once the desired quantity has b een reached, the coffee will stop owing and the lights will
be solidly lit .
NOTE: The unit will enter the standby mode and both the indicator lights will turn off if
there is no operation within 4 minutes.
NOTE: Coffee volume will var y slightly. Small cup average is approximately 1 to 1.5 oz.
(30- 45ml ), while the large cup average is 2 to 3 oz. (70-90 mL).
6
90113_BellaPro_Espresso Capsule Maker with Frother_IM_r3.indd 690113_BellaPro_Espresso Capsule Maker with Frother_IM_r3.indd 6 2020-10-09 3:58 PM2020-10-09 3:58 PM
Page 10

NOTE: While brewing coff ee, you c an interrupt the brewing process by pressing your
selected cof fee button once. To continue brew ing, just press the button again.
7. During the brewing process, b oth the indicator lights of the small and large cup buttons
will as h quickly if there is not enough water in the water tank, indicating that you that you
need to add more water to the tank. Before relling the water tank, r st press the power
switch to the OFF “O” position and then remove the water tank to rell. After relling it,
replace the water t ank and make sure that it is plac ed properly into position. You may now
continue brewing coffee.
8. Once you have nished brewing cof fee, always expel the used cap sule. Capsules are
automatically discarded into the capsule collection tray by simply opening the handle.
CAUTION: Never open the handle during brewing cycles.
NOTE: The appliance will enter into s tandby mode and both the indicator lights will turn
off if there is no operation within 4 minutes. To make another cup, insert a n ew capsule
into the unit.
9. If you want to make another cup of c offee, inser t a new capsule in the unit.
10. Empty the capsule collec tion tray and rinse the capsule collec tion tray, drip tray and water
tank frequently.
11. When not in use, turn the coffee maker off and disconnect the power supply.
PROGRAMMING THE WATER VOLUME
1. Add fresh water to the tank and switch unit to the ON “I” position..
2. Once indicator lights stop as hing, inser t capsule and place a cup on drip tray under
coffee spout.
3. Press and hold either the single or double cup but ton. Release but ton once de sired volume
is reached.
4. New volume is now stored.
NOTE: Maximum volume set ting for either cup is 100 mL or 3.3 oz.
RESET TO FACTORY SETTINGS
1. Press and hold down b oth the small and large cup buttons for 5 second s.
2. The buttons will ash quickly 3 times to conrm the unit has be en reset.
3. Both the small and large cup buttons will c ontinue to ash normally.
4. Solid lights mean the unit is ready to use.
7
90113_BellaPro_Espresso Capsule Maker with Frother_IM_r3.indd 790113_BellaPro_Espresso Capsule Maker with Frother_IM_r3.indd 7 2020-10-09 3:58 PM2020-10-09 3:58 PM
Page 11

CLEANING AND MAINTENANCE
Be sure to unplug this appliance and let it cool down before cleaning. To protect against electrical
shock, do not immerse the cord, plug or unit in water or liquid. After each use, always make
sure plug is removed from the wall outlet. We recommend that the following is performed
onaperiodical basis:
1. Prepare one or more cups to wash the coffee dis tributor.
2. Use a dry cloth to cle an the removable water tank.
3. Empty the capsule colle ction tray and clean it.
4. Clean the capsule holder with a dr y cloth.
5. Use a damp cloth to gently wipe the drip tray cover. Empt y the drip tray and rinse it.
6. Clean the outside of the machine using a damp cloth. Never submerge the machine.
7. Replace all parts.
This appliance requires little maintenance. It contains no user serviceable parts. Any servicing
requiring disassembly other than cleaning must be performed by a qualied appliance
repairtechnician.
DESCALING
To keep the coffee maker operating efciently, clean away the mineral deposits left by water
regularly.
1. Fill the water t ank with water and de scaler to the MAX line (the ratio of water to descaler
is4:1). Only use household desc aler. You can use white vinegar instead of desc aler.
2. Press the Power swi tch to ON “I” position and the indicator lights of the small cup and big
cup button s will star t to ash. Wait until the indicator lights are solidly lit.
3. Position a container on the drip tray cover.
4. Press the large cup b utton and allow the liquid to ow. Once the desired quantity has been
reached, the water will stop owing out .
5. Wait for 20 minutes with the machine turned on.
6. Press the large cup b utton until all of the water is used up.
7. Rinse the tank well and ll with clean water. Press the large cup but ton until all of water
isused up.
8
90113_BellaPro_Espresso Capsule Maker with Frother_IM_r3.indd 890113_BellaPro_Espresso Capsule Maker with Frother_IM_r3.indd 8 2020-10-09 3:58 PM2020-10-09 3:58 PM
Page 12

STORING
1. Never store c offee maker while still plugged in.
2. Unplug coffee maker and allow it to c ool.
3. Store coffee maker fully assembled.
4. Close the handle.
5. Store coffee maker in its box or in a cool, dr y place.
9
90113_BellaPro_Espresso Capsule Maker with Frother_IM_r3.indd 990113_BellaPro_Espresso Capsule Maker with Frother_IM_r3.indd 9 2020-10-09 3:58 PM2020-10-09 3:58 PM
Page 13

MILK FROTHER Instruction Manual
IMPORTANT SAFETY
INSTRUCTIONS
When using electrical appliances, basic safety precautions should always
be followed, including the following:
1. Read all instructions before using.
2. Before connecting the appliance to the power supply, check that
thevoltage indicated on the appliance corresponds with the voltage
inyour home. If this is not the case, contact your dealer and do not
use the kettle.
3. The attached base can not be used for other than intended use.
4. Do not operate the appliance without anything in it to avoid damaging
the heat elements.
5. Unplug from the outlet when not in use and before cleaning. Allow
to cool before putting on or taking off parts, and before cleaning
theappliance.
6. Do not let the cord hang over the edge of a table or counter or touch a
hot surface.
7. Do not place on or near a hot gas or electric burner
orinaheatedoven.
8. Ensure that the appliance is used on a rm and at surface out
ofreach of children, this will prevent the appliance from overturning
and prevent damage or injury.
10
90113_BellaPro_Espresso Capsule Maker with Frother_IM_r3.indd 1090113_BellaPro_Espresso Capsule Maker with Frother_IM_r3.indd 10 2020-10-09 3:58 PM2020-10-09 3:58 PM
Page 14

9. Keep hands and utensils out of container while blending to reduce
therisk of severe injury to persons or damage to the blender.
10. To protect against a re, electric shock or personal injury, do not
immerse cord, electric plugs, jar or base in water or other liquids.
11. Close supervision is necessary when any appliance is used by
or»nearchildren.
12. Do not touch the hot surface. Use the handle or the button.
13. Extreme caution must be used when moving an appliance containing
hot water.
14. Avoid contacting moving parts.
15. The use of attachments not recommended or sold by manufacturer
may cause re, electric shock or injury.
16. Do not operate any appliance with a damaged cord or plug orafter
the appliance malfunctions, or is dropped or damaged in any
manner. Return appliance to the nearest authorized service facility
forexamination, repair or electrical or mechanical adjustment.
17. The appliance only used for frothing and heating milk. Do not use
theappliance for other than intended use.
18. This appliance has been incorporated with a grounded plug. Please
ensure the wall outlet in your house is well earthed.
19. This appliance is not intended for used by persons (including children)
with reduced physical, sensory or mental capabilities, orlack of
experience and knowledge, unless they have been given supervision
or instruction concerning use of the appliances by aperson
responsible for their safety.
20. Always operate the appliance with cover in place. Scalding may occur
if the lid is removed during the brewing cycles.
11
90113_BellaPro_Espresso Capsule Maker with Frother_IM_r3.indd 1190113_BellaPro_Espresso Capsule Maker with Frother_IM_r3.indd 11 2020-10-09 3:58 PM2020-10-09 3:58 PM
Page 15

21. Never place this appliance on or near a hot gas or an electric burner
or where it could touch a heated appliance.
22. This appliance is intended to be used in household and similar
applications
23. Children should be supervised to ensure that they do not play with
the appliance.
24. Do not use outdoors.
25. To disconnect, turn any control to “off”, then remove plug from wall
outlet.
SAVE THESE INSTRUCTIONS.
NOTES ON THE PLUG:
This appliance has a polarized plug (one blade is wider than the
other). Toreduce the risk of electric shock, this plug is intended to t
into apolarized outlet only one way. If the plug does not t fully into
the outlet, reverse the plug. If it still does not t, contact a qualied
electrician. Do not attempt to modify the plug in any way.
12
90113_BellaPro_Espresso Capsule Maker with Frother_IM_r3.indd 1290113_BellaPro_Espresso Capsule Maker with Frother_IM_r3.indd 12 2020-10-09 3:58 PM2020-10-09 3:58 PM
Page 16

NOTES ON THE CORD:
a) A short power-supply cord (or detachable power-supply cord)
isprovided to reduce risks resulting from becoming entangled
inor»tripping over a longer cord.
b) Longer detachable power-supply cords or extension cords are
available and may be used if care is exercised in their use.
c) If a long detachable power-supply cord or extension cord is used:
1) The marked electrical rating of the detachable power-supply cord
orextension cord should be at least as great as the electrical rating
of the appliance;
2) If the appliance is of the grounded type, the extension cord should
be a grounding type 3-wire cord; and
3) The longer cord should be arranged so that it will not drape over
the counter top or table top where it can be pulled on by children or
tripped over.
PLASTICIZER WARNING
CAUTION: The feet on the base of unit contain substances in the plastic,
known as plasticizers, that may migrate to the nish of atabletop
orcountertop. To prevent this, place nonplastic coasters or placemats
between the appliance and the countertop or tabletop. Failure
todosomay cause the nish to darken; permanent blemishes or stains
canappear.
ELECTRIC POWER
If the electrical circuit is overloaded with other appliances, your appliance
may not operate properly. It should be operated on a separate electrical
circuit from other appliances.
13
90113_BellaPro_Espresso Capsule Maker with Frother_IM_r3.indd 1390113_BellaPro_Espresso Capsule Maker with Frother_IM_r3.indd 13 2020-10-09 3:58 PM2020-10-09 3:58 PM
Page 17

Getting to know your milk frother
Product may vary slightly from illustration
Lid
Jar
Handle
Mixing paddle
Power
button
360°
base
14
90113_BellaPro_Espresso Capsule Maker with Frother_IM_r3.indd 1490113_BellaPro_Espresso Capsule Maker with Frother_IM_r3.indd 14 2020-10-09 3:58 PM2020-10-09 3:58 PM
Frothing paddle
Page 18

BEFORE THE FIRST USE
The appliance can be used for nishing the following tasks separately: I. frothing and heating
milk; II. only frothing separately, without heating; III. only heating separately, without frothing.
1. Before using your milk frother, clean all the parts according to the section “CLEANING
AND MAINTEN ANCE”.
2. Important: do not wash any parts in the dishwasher, and do not immerse the jar in water.
This may permanently damage the produc t and void the warrant y.
3. The appliance is equipped with t wo ac cessories of mixing paddle and frothing paddle,
themixing paddle is used for mixing milk during heating to prevent from s ticking.
Thefrothing paddle is used for frothing milk during heating or is used f or frothing
separately, but no heating. Select desired a cce ssory ac cording to your task.
NOTE: the ma x capacit y of the jar is 45 0ml.
OPERATION OF YOUR MILK FROTHER
I. FROTHING AND HEATIN G
1. Place the applianc e on a at surface.
2. Select frothing paddle, then open the lid and insert the frothing paddle onto the shaf t
onthe bottom of jar.
3. Fill the jar with the desired amount of milk , and replace the lid.
NOTE: the ma x milk quantit y per mitted to add is 100ml, to avoid milk overowing af ter
frothing.
4. Place the jar on the power base and connect the plug into a power outlet, the indicator will
not light up.
5. Press the switch button once, the indicator will ash in r ed . Then the appliance will s tar t
to work ,when the temperature of milk has achieve d about 65±10, the heating element will
stop heating and the f rothing paddle will s top rotating automatically; the indicator will
goout.
NOTE: During operation, you can stop operating by pressing the switch but ton once.
15
90113_BellaPro_Espresso Capsule Maker with Frother_IM_r3.indd 1590113_BellaPro_Espresso Capsule Maker with Frother_IM_r3.indd 15 2020-10-09 3:58 PM2020-10-09 3:58 PM
Page 19

6. When the appliance has stopped operating, open the lid, pour out the warme d and frothed
milk to enjoy it.
CAUTION: Minimum 3 minute s res t time must be maintained between t wo continuous
cycles, otherwise, the appliance will enter self-pr otection state automatic ally after working
for 5 cycles continuously, the indicator will be illuminated blue and ash, the switch button
will not be activated, af ter about 5 minutes, the appliance will enter s tandby state and you
can continue operating the appliance.
7. Always turn of f the milk frother and disc onnect the power s upply when not use.
II. ONLY FROTHING SEPARATELY, WITHOUT HEATING
1. According to the 1- 4 steps in the section of “Frothing and heating”.
2. Press the switch button for three times continuously within 2s, the indicator will
illuminate blue , the frothing paddle will rotate for frothing milk separately, but the heating
element will not heat. And the appliance will automatically stop rota ting after operating.
Theindica tor will go out.
NOTE: During operation, you can stop operating by pressing the switch but ton once.
3. When the appliance has stopped operating, open the lid, pour out the frothed milk
andenjoy it.
CAUTION: Minimum 3 minute s res t time must be maintained between t wo continuous
cycles, otherwise, the appliance will enter self-pr otection state automatic ally after working
for 5 cycles continuously, the working indicator will illuminated blue and ash, the sw itch
button will not be activated, after about 5 minutes, the appliance w ill enter standby s tate
and you can continue op erating the appliance.
4. Always turn off the milk frother and disconne ct the power suppl y when not use.
III. ONLY HEATING SEPARATELY, WITHOUT FROTHING.
1. Place the applianc e on a at surface.
2. Select mixing paddle ac cording to your task. Then open the lid, inser t the mixing paddle
onto the shaf t on the bottom of jar.
3. Fill the jar with the desired amount of milk, and replace the lid.
NOTE: the ma x milk quantit y per mitted to add is 200ml, to avoid milk overowing
aftermixing .
4. Place the jar on the power base and connect the plug into a power outlet. The indicator
will not light up.
16
90113_BellaPro_Espresso Capsule Maker with Frother_IM_r3.indd 1690113_BellaPro_Espresso Capsule Maker with Frother_IM_r3.indd 16 2020-10-09 3:58 PM2020-10-09 3:58 PM
Page 20

5. Press the switch button twice continuously within 2s, the indic ator w ill light red.
Thentheappliance will star t to work. when the temperatur e of milk has achieved ab out
65±10, the heating element will s top heating and the mixing paddle will stop rotating
automatically; the indicator will illuminate red again until unplugging the power outlet.
Note: The rot ation of mixing paddle is only used for avoiding sticking. It will not fr oth
themilk.
6. When the appliance has stopped operating, open the lid, pour out the warm milk and enjoy it.
CAUT ION: Minimum 3 minutes rest time must b e maintained bet ween two continuous
cycles, otherwise, the appliance will enter self-pr otection state automatic ally after working
for 5 cycles continuously, the indicator will be illuminated blue and ash, the switch button
will not be activated, af ter about 5 minutes, the appliance will enter s tandby state and you
can continue operating the appliance.
7. Always turn off the milk frother and disconne ct the power suppl y when not use.
CLEANING AND MAINTENANCE
Always disconnect the appliance from the power outlet and allow it cooling down before
cleaning.
CAUTION: Never immerse the jar, power base in water, or allow moisture to contact with
theseparts.
1. Wash lid with wa ter and mild detergent. The lid is not dishwasher safe component.
Rinsethoroughly and dry.
2. Remove the mixing paddle or frothing paddle, and wash them completely in warm water.
3. Wash the inner of jar with a combination of a mild detergent and water and then wipe
clean w ith a soft damp cloth.
4. Wipe the appearance of jar with a soft damp cloth or cleaner, never use a poisonous
cleaner.
NOTE: Do not use chemical, steel, wooden or abrasive cleaners to clean the outside
oftheappliance to prevent the gloss loss.
17
90113_BellaPro_Espresso Capsule Maker with Frother_IM_r3.indd 1790113_BellaPro_Espresso Capsule Maker with Frother_IM_r3.indd 17 2020-10-09 3:58 PM2020-10-09 3:58 PM
Page 21

Limited Two-Year Warranty
SENSIO Inc. hereby warrants that for
a period of TWO YEARS from the date
of purchase, this product will be free
from mechanical defects in material
and workmanship, and for 90 days in
respect to non-mechanical parts. At its
sole discretion, SENSIO Inc. will either
repair or replace the product found to
be defective, or issue a refund on the
product during the warranty period.
The warranty is only valid for the
original retail purchaser from the date
of initial retail purchase and is not
transferable. Keep the original sales
receipt, as proof of purchase isrequired
to obtain warranty validation. Retail
stores selling this product do not have
the right to alter, modify, or in any way
revise the terms and conditions of the
warranty.
Exclusions:
The warranty does not cover normal
wear of parts or damage resulting
from any of thefollowing: negligent
use of the product, use of improper
voltage or current, improper routine
maintenance, use contrary to the
operating instructions, disassembly,
repair, or alteration by anyone other than
qualied SENSIO Inc. personnel. Also,
the warranty does not cover
Acts of God such as re, oods,
hurricanes, or tornadoes.
SENSIO Inc. shall not be liable for any
incidental or consequential damages
caused by the breach of any express
or implied warranty. Apart from the
extent prohibited by applicable law, any
implied warranty of merchantability or
tness for a par ticular purpose is limited
in time to the duration of the warrant y.
Some states, provinces or jurisdictions
do not allow the exclusion or limitation
of incidental or consequential damages,
or limitations on how long an implied
warranty lasts, and therefore, the above
exclusions or limitations may not apply
to you. The warranty covers specic
legal rights which may vary by state,
province and/or jurisdiction.
18
90113_BellaPro_Espresso Capsule Maker with Frother_IM_r3.indd 1890113_BellaPro_Espresso Capsule Maker with Frother_IM_r3.indd 18 2020-10-09 3:58 PM2020-10-09 3:58 PM
Page 22

How To Obtain Warranty Service:
You must contact Customer Service at
our toll-free number: 1-866-832-4843.
A Customer Service Representative
will attempt to resolve warranty issues
over thephone. If the Customer Service
Representative is unable to resolve the
problem, you will be provided with a
case number and asked to return the
product to SENSIOInc. Attach a tag to
the product that includes: your name,
address, daytime contact telephone
number, case number, and description of
the problem.
Also, include a copy of the original sales
receipt. Carefully package the tagged
product with the sales receipt, and send
it (with shipping and insurance prepaid)
to SENSIO Inc.’s address. SENSIO Inc.
shall bear no responsibility or liability
for the returned product while in transit
to SENSIO Inc.’s Customer Service
Center.
19
90113_BellaPro_Espresso Capsule Maker with Frother_IM_r3.indd 1990113_BellaPro_Espresso Capsule Maker with Frother_IM_r3.indd 19 2020-10-09 3:58 PM2020-10-09 3:58 PM
Page 23

90113_BellaPro_Espresso Capsule Maker with Frother_IM_r3.indd 2090113_BellaPro_Espresso Capsule Maker with Frother_IM_r3.indd 20 2020-10-09 3:58 PM2020-10-09 3:58 PM
Page 24

For customer service questions or comments
1-866-832-4843
bellahousewares.com
90113 R 2
Sensio Inc.
New York, NY 10016/USA
90113_BellaPro_Espresso Capsule Maker with Frother_IM_r3.indd 2190113_BellaPro_Espresso Capsule Maker with Frother_IM_r3.indd 21 2020-10-09 3:58 PM2020-10-09 3:58 PM
 Loading...