

Bell SMOOTH SAILER User Manual
SMOOTH SAILER
TM
CHILD TRAILER
REMORQUE DE VÉLO POUR ENFANT
REMOLQUE PARA NIÑO
• Brighter color for high visibility
• Couleur plus vive pour être facilement vu
• Color más brillante para una alta visibilidad
Please keep these instructions for future reference.
Veuillez conserver ces instructions à des fins de références ultérieures.
Por favor, guarde estas instrucciones para referencia futura.
WARNING: Read manual carefully before use, and save to read again regularly.
AVERTISSEMENT : Lisez attentivement ce ma-nuel avant l’utilisation et
conservez-le pour le re-lire de temps en temps.
ADVERTENCIA: Lea el manual con atención antes de usar el remolque y guárdelo
para leerlo otra vez regularmente.
TABLE OF CONTENTS
Warnings 4
Assembling the frame and seat 7
Attaching the wheels 7
Extending the hitch 8
Using the parking brake strap 8
Using the seat Harness system 8
Attaching the canopy 9
Attaching the safety flag 9
Attaching the trailer to bike 10
Conversion kit assembly 10
Before you tow 11
Storage 11
2

TABLE DES MATIÈRES
Avertissements 12
Assemblage du cadre et du siège 15
Pose des roues 15
Rallonge de l’attelage 16
Utilisation de la sangle du frein d’immobilisation 16
Utilisation des harnais de siège 16
Pose de l’auvent 17
Pose du fanion de sécurité 17
Accouplage de la remorque au vélo 18
Montage de l’ensemble de conversion 18
Avant de partir 19
Entreposage 19
ÍNDICE
Advertencias 20
Montaje del cuadro y el asiento 23
Acoplamiento de las ruedas 23
Extensión del gancho 24
Uso de la correa de freno de estacionamiento 24
Uso del sistema de arneses del asiento 24
Acoplamiento de la capota 25
Acoplamiento del banderín de seguridad 25
Acoplamiento del remolque a la bicicleta 26
Montaje del kit de conversión 26
Antes de remolcar 27
Guarda 27
3

WARNINGS
Important! It is your responsibility to use your best discretion while assembling and
using your trailer to ensure the safety of your children, yourself, and those around
you. Failure to comply with the manufacturer’s instructions can lead to serious injury
or death of the passenger/rider.
If you have any questions about the assembly or use of this trailer, call our customer
service department at 1-800-456-BELL.
For the safety of your child, carefully read and follow these instructions and safety
rules before operating your trailer.
Not for use with infants under 12 months of age.
The load limit for storage compartment and/or passengers is 100 lbs (45 kg). More
than 100 lbs (45 kg) may cause excessive wear and stress on the trailer and cause
unstable hazardous conditions. Always position loads as low as possible and as close
to the center of the trailer as feasible — both front to rear and left to right. Do not
use with children that exceed the weight limitations.
Be certain that the bicycle used to tow the trailer is in good working condition.
Make no modifications to the trailer.
When assembling the trailer, be certain the wheels are attached correctly as
described in this manual. If unfamiliar with these types of wheels, have a reputable
bike shop inspect and attach them.
Attach the hitch clamp securely to the bicycle’s frame at the rear wheel. Ensure that
the nut is fastened securely. Always loop the safety strap around the chainstay at the
same point and reattach to the D-Ring on the hitch arm. Check the hitch clamp and
safety strap before each ride or every ten miles, whichever comes first.
Do not install a car seat or any seating device not approved by the manufacturer
inside the trailer.
Do not allow any of the child’s clothing, shoelaces, or toys to come in contact with
moving parts.
Some bicycles are not fit to carry a trailer — if you notice any interference issues
between the hitch arm and wheel, any deformation in the bicycle frame from the
hitch, and/or any contact between the bicycle’s wheel and the trailer do not use it!
4

Always fasten the harnesses to help reduce the chance of serious injury or death.
The child’s seated height should remain below the upper crossbar. Make sure that
under no circumstances can your child touch a moving wheel or the roadway. Also
make sure your child cannot press the trailer fabric against the tire or wheel, which
can cause burns.
Never leave children unattended in or around this product.
We recommend that children always be fitted with a certified bicycle helmet while
a passenger in this trailer. The child must be able to hold his/her head upright.
Check with a pediatrician to confirm that the child’s development level is suitable
for this trailer.
From time to time, check your trailer for loose hardware, worn parts, torn material or
stitching. Repair or replace parts as needed.
Over or under inflation of tires may cause handling issues for the trailer. Replace tires
only with street tread and not with BMX or knobby tread.
The product will become unstable if a parcel bag or rack is used where there is no
provision for one.
Care must be taken when folding and unfolding to prevent finger entrapment.
Safe and proper use of your trailer: Pulling this trailer alters the operation of a
bicycle. Stopping, starting, and turning are affected, depending on the weight of the
cargo. To become familiar with such changes, we recommend loading the trailer to
capacity and practicing in a safe area. Practice stopping, starting, and turning.
Do not use the trailer in traffic or on public paths until you feel comfortable with it.
Always instruct your child not to bounce or lean while a passenger in this trailer;
such movements may cause the trailer to move unexpectedly.
Never exceed a safe speed — we recommend no speed over 15 miles per hour (24
km/h) and slowing to less than 5 mph (9 km/h) when turning. Take sharp turns such
as into or out of a driveway carefully and at slow speeds.
5

Always ride defensively. Never assume you have the right of way.
Do not travel on highways, very busy streets, or in areas unsafe for bicycling.
A reflector that complies with CPSC regulations shall be visible on the rear
of the trailer.
Before each ride ensure the attached trailer does not interfere with the braking,
pedaling, or steering of the bike.
Never ride a bike at night without adequate lighting. Obey all local legal
requirements for lighting.
Avoid pulling over curbs, holes, or other obstructions on the road. They may damage
the wheels or frame of your trailer.
Never put more than two children in the trailer. When used with one occupant, the
occupant should be seated in the center seating position.
Passengers in trailer are susceptible to wind chill due to inactivity. Ensure that
passengers stay warm in cool or cold weather. In warmer temperatures, make sure
passengers have adequate ventilation and hydration.
Remove passengers or cargo carefully, only when trailer and bicycle are in a safe
area away from traffic, and on level ground. Always secure the parking brake before
loading or unloading the trailer. Lift with your legs, not your back.
Remove trailer from bicycle only while on level ground, only after securing the
parking brake, and only in a safe area away from traffic. Start by removing the safety
strap from the chainstay. Then remove the spring clip from the quick release clamp
and remove the trailer. Re-fasten QR clamp to the trailer arm, QR mount may stay on
the bicycle.
When storing trailer, keep it out of sun, with tires inflated. Do not store trailer
near a source of ozone such as an electric motor or heater. Do not store the
trailer in temperatures less than 30 degrees F (-1 degree C) or higher than
100 degrees F (38 degrees C).
Do not use cleaning solvents. Clean only with mild soap and water.
6
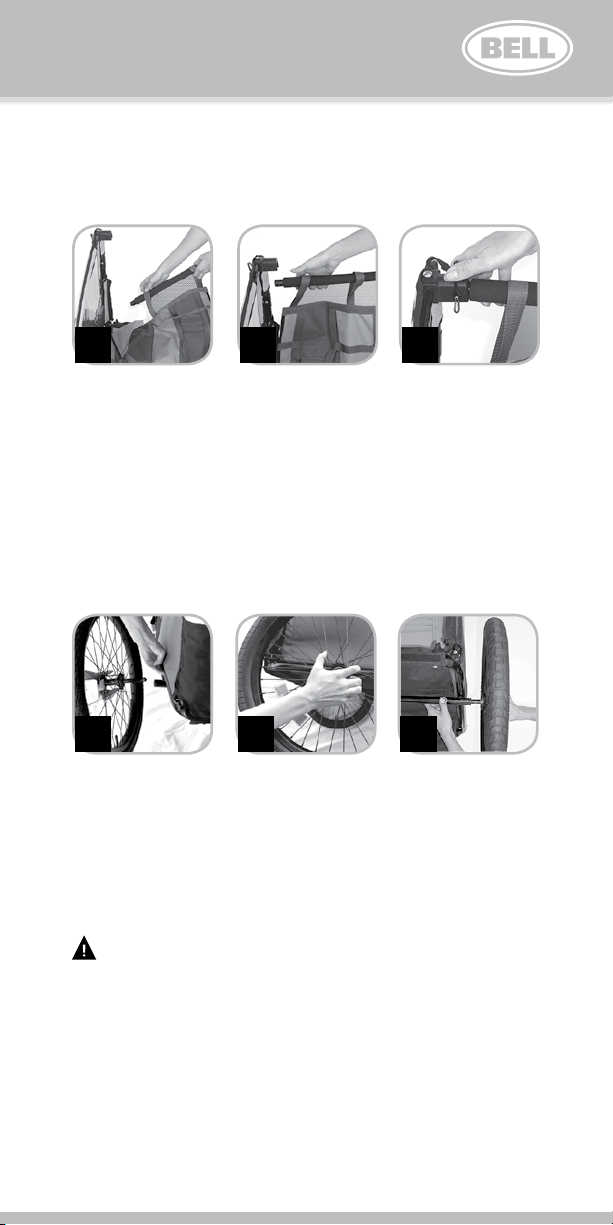
ASSEMBLING THE FRAME & SEAT
1A 1B 1C
Remove packaging and hardware bags from box and sort all contents. Unfold side
panels of trailer to the upright position. There is one crossbar that supports the side
panels and rear of the seat. As you swing this crossbar upward into position across
the top between the side panels, route it through the loops at the top of the seat.
Insert the crossbar into the upper sleeve. Insert grenade pin and lock the spring clip.
Figure 1A, 1B and 1C.
ATTACHING THE WHEELS
2A
Lift the rear of the frame enough to allow you to insert the wheel axle into the hole
in the side of the frame. Figure 2A.
Insert the axle all the way by pushing on the hub until you hear an audible click.
Check that the axle is secure and inserted fully by grabbing the center of the hub and
pulling away from trailer. Figure 2B.
WARNINGS: Do not operate the trailer if the wheel fails to lock into the frame
piece, as loss of control and/or injury to passenger(s) and/or operator may result.
To remove the wheels, reach underneath near the axle tube and push the spring
loaded pin while pulling the wheel away from the trailer. Figure 2C.
2B
2C
7

The tires on the trailer wheels have traditional Schrader pump valves.
We recommend inflating them with a manual pump to the recommended pressure
printed on the side of the tires. Do not exceed the maximum recommended pressure.
For easy towing and safe handling, check tires often for proper inflation and wear.
EXTENDING THE HITCH
Tip the trailer back on its frame so the underside
is fully visible. Remove the grenade pin and rotate
the hitch arm upward until fully extended. Reinsert
the grenade pin and lock the spring clip. Figure 3A.
For folding and storage, reverse the process and
be sure to insert the pin fully and lock it with the
3A
spring clip.
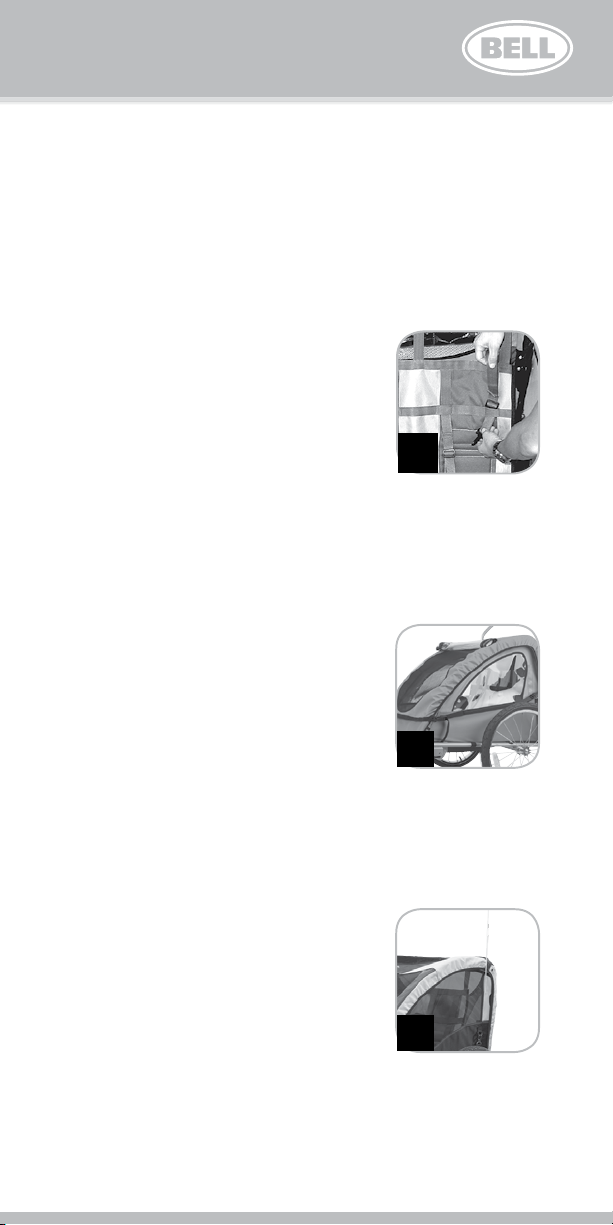
USING THE PARKING BRAKE STRAP
The trailer is equipped with a strap parking brake
that is quick and easy to use while loading or when
the trailer is fully assembled and stored.
To use the strap, unclip it from the D-Ring and wrap
around the wheel at its closest point – hooking it
securely back onto the D-Ring. Figure 4A.
4A
USING THE SAFETY HARNESS SYSTEM
There are two sets of shoulder harnesses positioned
side by side on the seat back. The two sets of
shoulder harnesses are comprised of four separate
shoulder straps (straps A, B, C and D) and three
separate crotch straps (straps 1, 2 and 3). Figure 5A.
For two children passengers, use shoulder straps
A and B with crotch strap 1 and shoulder straps C
and D with crotch strap 2. This will position the two
children side by side. When carrying only one child
passenger, the child may sit in the center using
straps B, C and 3.
8
E
A B
1
5A
C D
2
3
Disconnect the shoulder harness clips and the seat belt buckle. Place the children
side by side on the seat. Place shoulder strap A over the first child’s right shoulder
and shoulder strap B over the first child’s left shoulder. Place shoulder strap C over
the second child’s right shoulder and shoulder strap D over the second child’s
left shoulder.
Each child’s height will determine the position of his/her
respective shoulder straps. The shoulder strap height
may be adjusted by routing the straps above (for taller
children) or through (for smaller children) the horizontal
loops E. Figure 5B. For the first child, secure shoulder
straps A and B to crotch strap 1. For the second child,
secure shoulder straps C and D to crotch strap 2. Adjust
the length of the shoulder straps and crotch straps so
that both children are held snugly in place. The crotch straps should be adjusted so
that the children do not slide too far forward. Make sure that the shoulder straps and
crotch straps are snug and secure for the safety of the children and the stability of the
trailer. Attach the seat belt across both children’s laps.
E
5B
ATTACHING THE CANOPY
Position the cover over the top of the trailer so the
reflectors are to the rear and the mesh screen window is
to the front. Fasten the cover at the bottom rear of the
trailer and work it forward until it is fully covering the
top and front of the trailer. Attach the lower rear clips to
the buckle to hold the rear of the cover in place. In hot
weather the front window can be rolled up and secured
with the loop straps to allow ventilation into the front of the trailer. Never use the
trailer without the front screen in place to protect your child’s face from debris and
spray from the back wheel of the bicycle.
6A
ATTACHING THE SAFETY FLAG
A two piece safety flag is included with the trailer.
It should always be used whenever you tow the trailer.
Insert the ends of each section into the orange
connectors to assemble, and insert into the canopy
sewn sleeve on the rear corner of the trailer.
Figure 7A.
7A
9
 Loading...