

Page 1
COCOON 300™ AND SKIPPER
™
Page 2
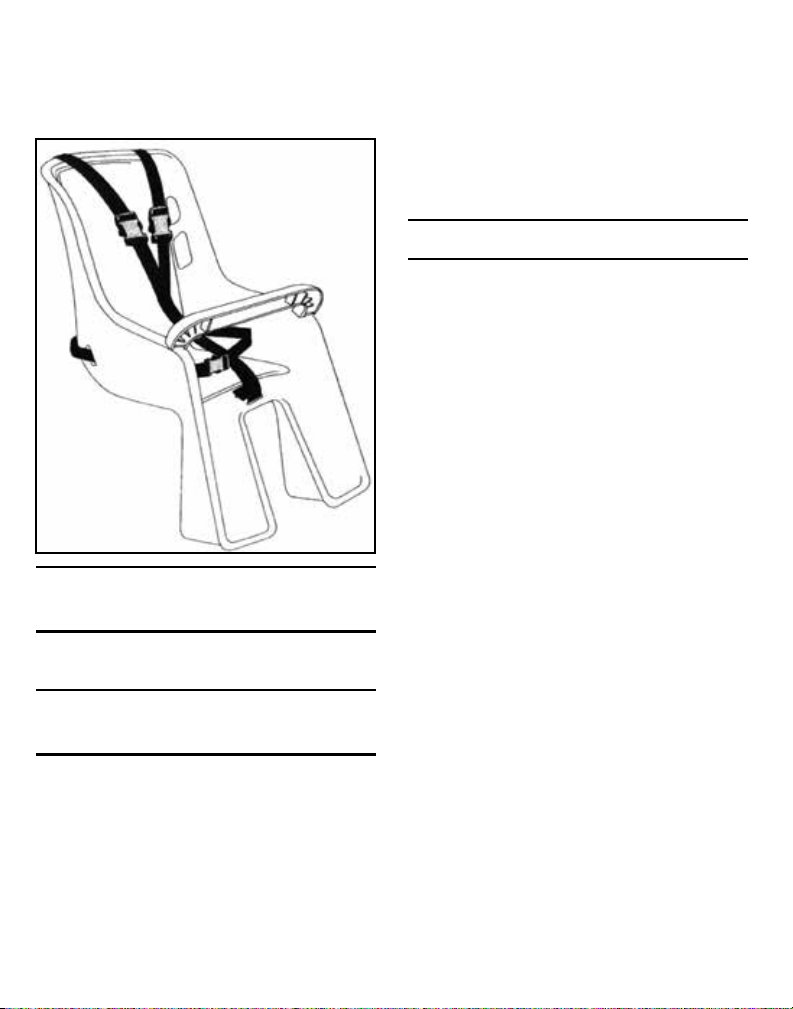
COCOON 300™ AND SKIPPER
BICYCLE CHILD CARRIER
INSTRUCTION MANUAL
TOOLS REQUIRED
FOR ASSEMBLY
Two Adjustable Wrenches
IMPORTANT
SAFETY INFORMATION
WARNING: Failure to follow each of the following
instructions can result in injury to your child.
1. Read all the instructions before assembling or
using the Bicycle Child Carrier.
2. For snug but comfortable t see that the QuickRelease buckles are fastened properly and that
straps are adjusted correctly. Test shoulder slack
by pulling the straps away from child’s chest. They
should not move by more than one inch.
™
3. In the event that the child carrier is involved in an
accident, check to be sure that it functions properly
before it is used again. Check for structural damage
and replace the seat if it is damaged.
CAUTION
1. Only children who are able to hold their head upright while wearing a bicycle helmet (approximately
1 year old) and are not over 40 pounds should be
passengers in a child carrier
2. Make sure bicycle is stable and under control
when loading and unloading child
3. Stability of the bicycle is affected by the weight of
the child in the carrier
4. Child should always wear a bicycle helmet which
complies with the CPSC 1203 standards
5. Never leave child unattended
6. Never leave the child in the carrier with only the
kickstand supporting the bicycle
7. The bicycle rider should avoid busy streets and bad
weather and ride with extra care and reduced speed
8. When walking bicycle, hold carrier with one hand
and handlebar with the other
9. Before each use check to be certain carrier and
hardware are intact and secure
10. Make sure carrier does not interfere with braking
or pedaling
11. Do not use the seat if any component is broken
or if the straps or other components show signs of
signicant wear
12. Do not modify the seat or the restraint system
13. Discard and destroy after ve years of use
Page 3
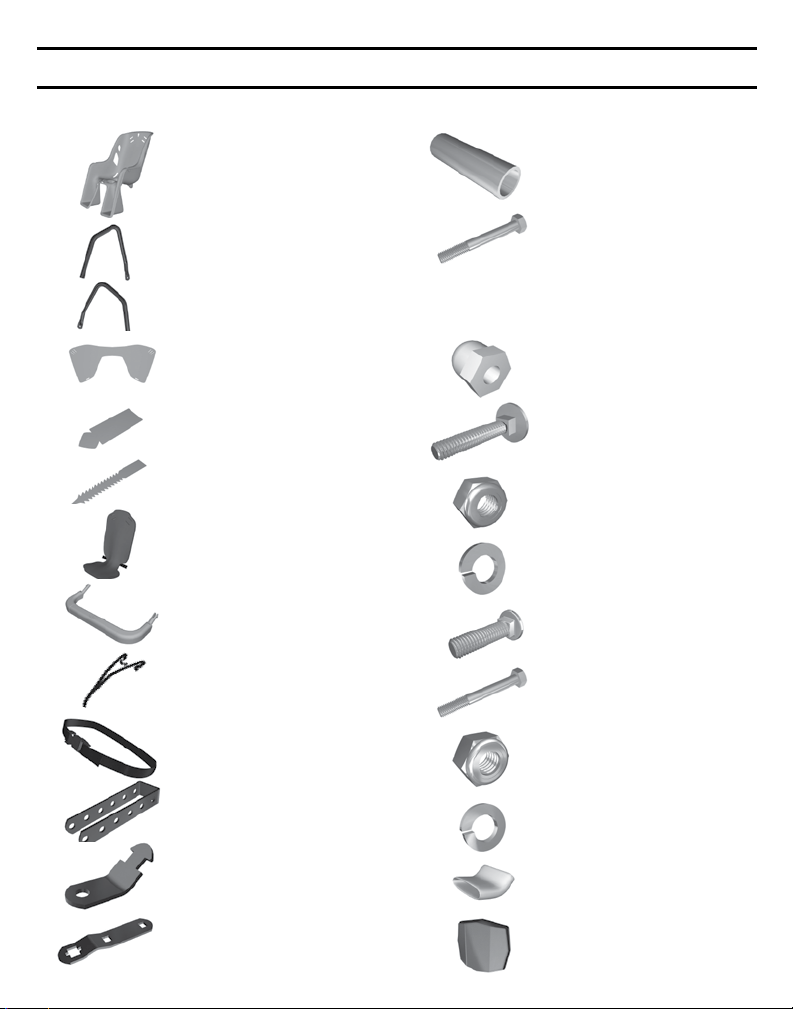
PARTS LIST
ITEM DESCRIPTION QTY
1. Seat 1
2. Right Seat Support 1
3. Left Seat Support 1
4. Foot Guard 1
5. Spring Guard 2
6. Foot Guard Fasteners 3
7. Seat Pad 1
8. Grab Bar 1
9. Shoulder Harness 1
ITEM DESCRIPTION QTY
14. Spacer Tube 1
15.
16.
17.
18. 6mm x 35mm Round Head 4
Square Neck Bolt
19. 6mm Nylock Nut 5
20. 6mm Split Lock Washer 5
21.
22. 8mm x 58mm Hex Bolt 2
6mm x 58mm Hex Bolt
Metal Spacer
6mm (1)/8mm (2) Plastic Thread Protector
8mm x 30mm Bolt
1
2
4
10. Lap Belt 1
11. U-Bracket 1
12. Short Lower Bracket 2
13. Long Lower Bracket 2
23. 8mm Nylock Nut 6
24. 8mm Split Lock Washer 6
25. Vinyl Paint Protector 4
26. Red Reector With Adhesive Tape 1
Page 4

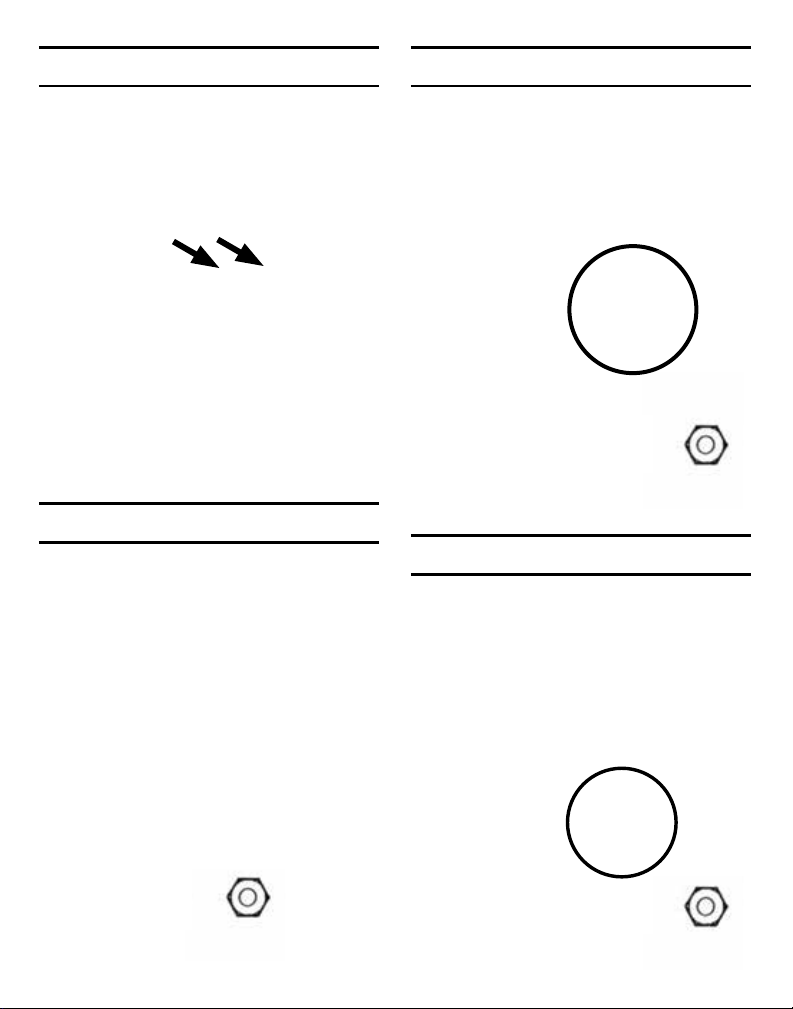
STEP 1 STEP 2
Place the seat on its side. Insert (2) 6mm by 35mm
round head square neck bolts into the (2) holes in the
left side of the bottom of the seat.
While holding the bolts rmly in place fasten the
left seat supports to the bottom of the plastic seat
using (2) 6mm split lock washers and (2) 6mm
Nylock nuts.
Note: You cannot hand tighten Nylock nuts. An
adjustable wrench is required to complete this step.
ITEM #18
6mm x 35mm
ITEM # 20
6mm Split
Lock Washer
ITEM # 19
6mm Nylock
Nut
Page 5
STEP 3
STEP 5
Insert (2) 6mm by 35mm round head square neck
bolts into the right (2) holes in the bottom of the seat.
ITEM #18
6mm x 35mm
STEP 4
While holding the bolts rmly in place, fasten the
right seat supports to the bottom of the plastic
seat using (2) 6mm split lock washers and (2) 6mm
Nylock nuts.
Attach the long lower bracket to the bottom of the
seat support using an 8mm by 30mm round head
square neck bolt, an 8mm split lock washer and an
8mm Nylock nut. Be sure that the bolt head faces
outward and the lock washer is in place.
ITEM #21
8mm x 30mm Round
Hd. Sq. Neck Bolt
ITEM # 24
8mm Split Lock
Washer
ITEM #23
8mm Nylock
Nut
STEP 6
Attach the long lower bracket to the bottom of the
seat support using an 8mm by 30mm round head
square neck bolt, an 8mm split lock washer and an
8mm Nylock nut. Be sure that the bolt head faces
outward and the lock washer is in place
ITEM # 20
6mm Split
Lock Washer
ITEM # 19
6mm Nylock
Nut
ITEM #21 8mm x 30mm
Round Hd. Sq. Neck Bolt
ITEM # 24
8mm Split Lock
Washer
ITEM #23
8mm Nylock
Nut
Page 6
STEP 7
STEP 9
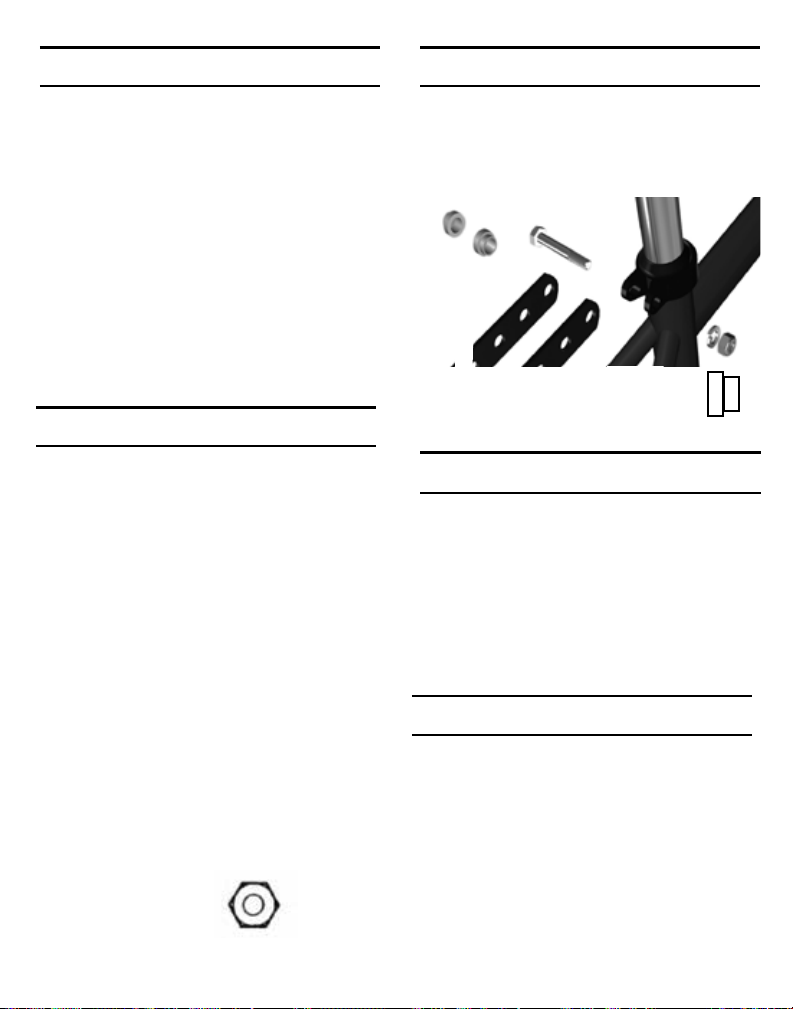
Remove the seat post clamp from your bicycle.
STEP 8
This step is for the 8mm hex bolt. Attach the
U-bracket using an 8mm by 58mm hex bolt, an
8mm split lock washer, and an 8mm Nylock nut.
Note: This step will require (2) adjustable wrenches.
Note: If the 8mm bolt doesn’t t, the following step
will show you how to use the included 6mm bolt
with spacers
This step is for the 6mm hex bolt. Insert the
spacers on the inside of the U-bracket. Attach the
U-bracket using a 6mm hex bolt, a 6mm split lock
washer, and a 6mm Nylock nut.
Note: This step will require (2) adjustable wrenches.
ITEM #15
6mm x 58mm
Hex Bolt
ITEM # 20
6mm Split Lock
Washer
ITEM #19
6mm Nylock Nut
ITEM #16
Metal Spacer
STEP 10
Slide the vinyl paint protectors over the (4) brackets.
ITEM #22
8mm x 58mm
Hex Bolt
ITEM # 24
8mm Split Lock
Washer
ITEM #23
8mm Nylock
Nut
ITEM #17
Plastic Thread
Protector
STEP 11
Position the right and left seat supports on both
sides of the u-bracket.
Page 7
STEP 12
STEP 14
Insert the spacer tube and secure using an 8mm by
58mm hex bolt, an 8mm split lock washer and an
8mm Nylock nut.
Note: Do not completely tighten at this time. This
step will require (2) adjustable wrenches.
ITEM #22
8mm x 58mm
Hex Bolt
ITEM # 24
8mm Split Lock
Washer
ITEM #23
8mm Nylock
Nut
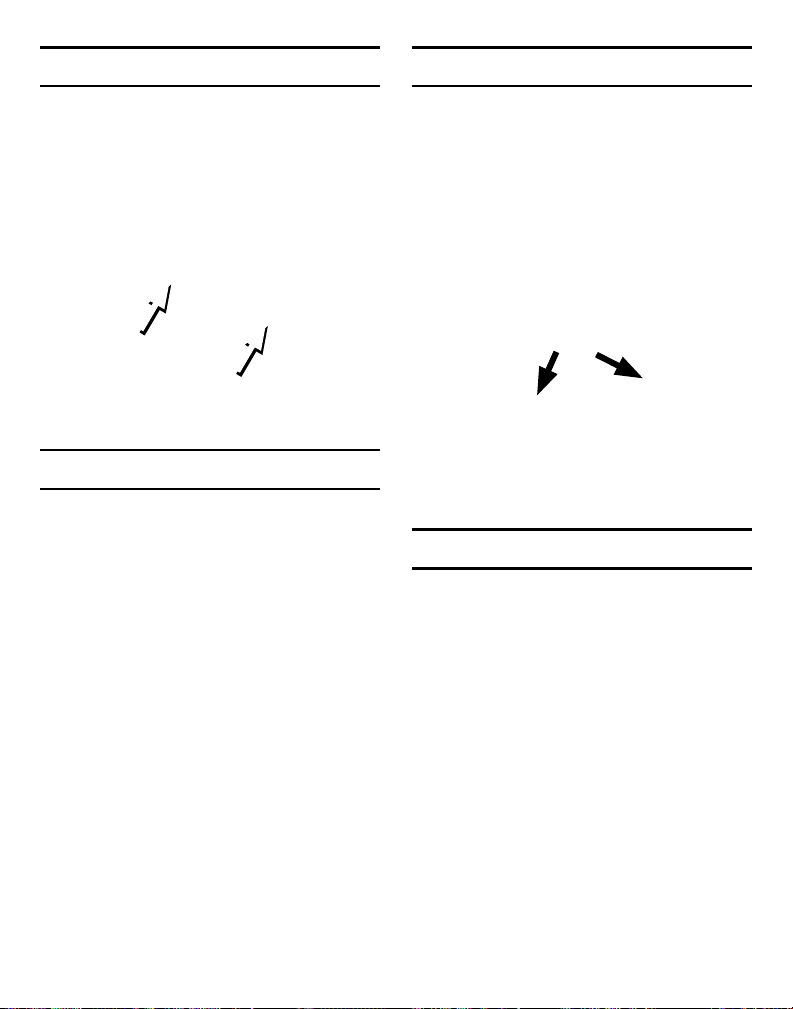
STEP 13
Insert the short lower bracket into the slotted end of
the long lower bracket and twist into position. Insert
the 8mm by 30mm round head square neck bolt and
secure it with an 8mm split lock washer and an 8mm
Nylock nut.
Repeat on other side of wheel by inserting the
short lower bracket into the slotted end of the long
lower bracket and twist into position. Insert the
8mm by 30mm round head square neck bolt and
secure it with an 8mm split lock washer and an
8mm Nylock nut.
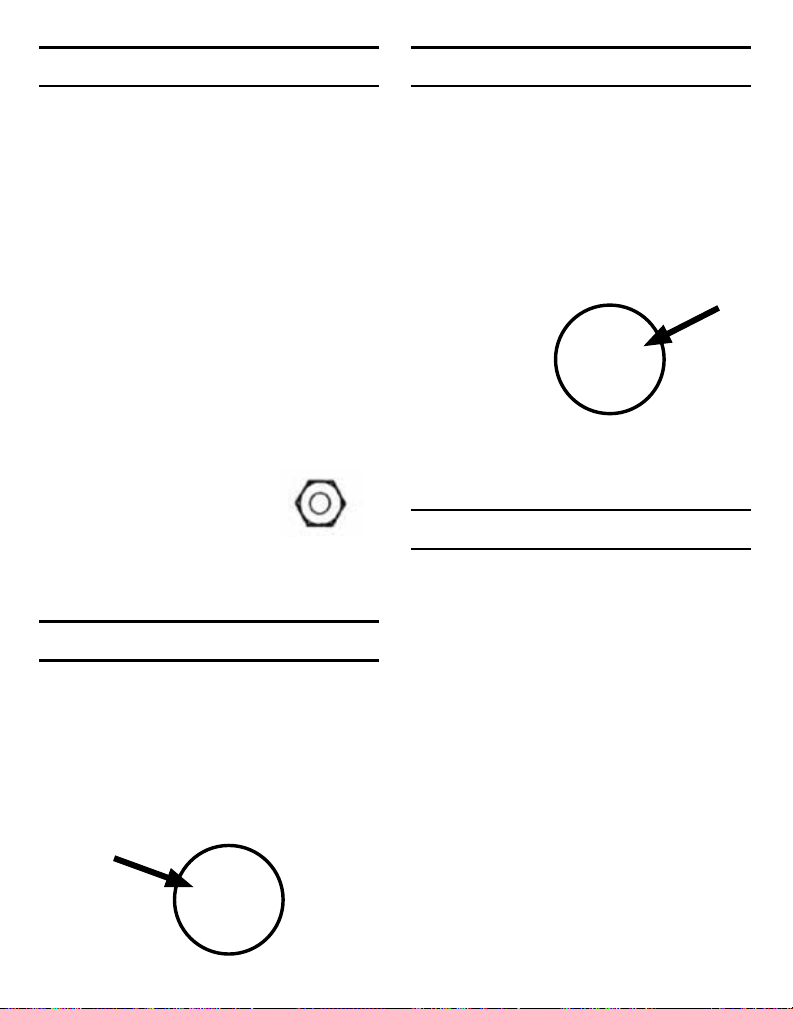
STEP 15
The child carrier must be in a level position when
installed. Several adjustment holes are provided
in the U-bracket which will enable you to clear all
obstructions and level the carrier. When level, tighten
all of the fasteners securely.
Page 8
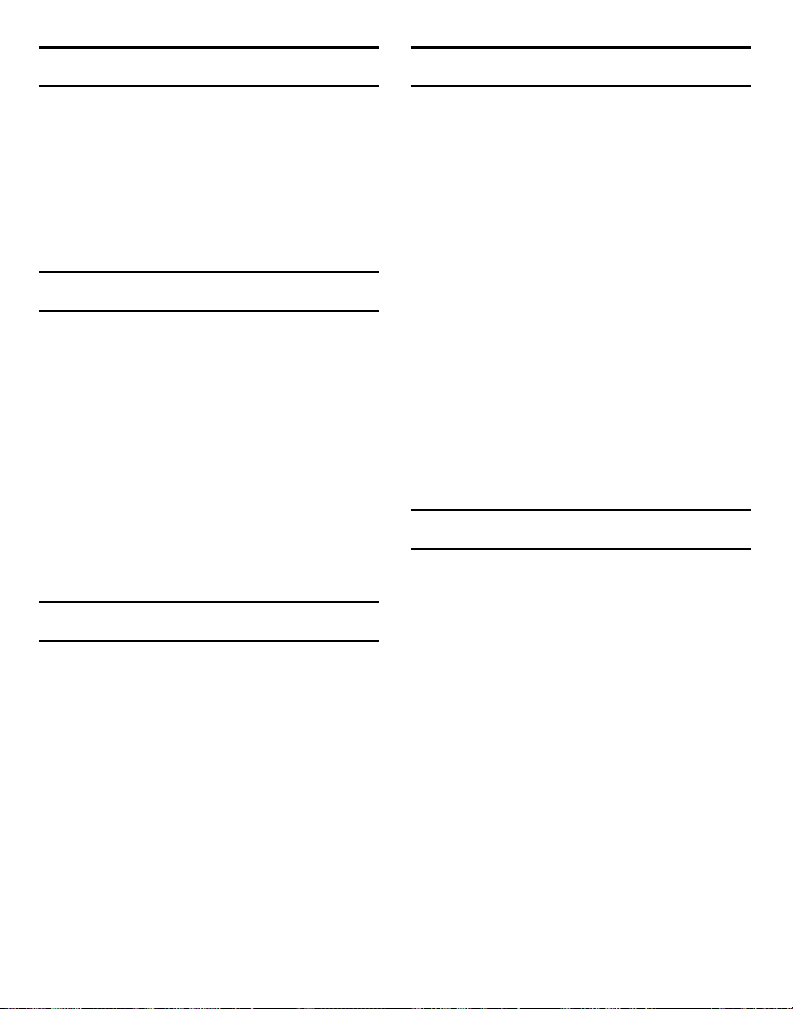
STEP 16
STEP 18
Place the plastic thread protectors onto the ends of
the hex bolts.
Note: If you are using the 6mm bolt, use the thread
protector with the number 6 on the inside.
STEP 17
Remove the foot guard, spring guards and the foot
guard fasteners from the plastic sheet.
Install the foot guard by wrapping it over the top of
the right and left seat supports and tucking it under
the front edge of the seat. Secure foot guard to the
bicycle frame by inserting the fasteners through
the slots in the foot guard and around the bicycle
frame. If bicycle has exposed springs, wrap spring
guards around springs.
STEP 19
Lay the seat pad into the carrier and thread the
hook and loop straps through the lower lap belt
holes. Secure the hook and loop straps behind the
seat.
Page 9
STEP 20
STEP 23
Remove the male end of the quick-release buckle.
STEP 21
Thread the lap belt through the holes in the seat.
STEP 22
Reinstall the male end of the quick-release buckle
and pull on the strap to conrm that the strap locks
in the buckle.
Pass each of the two top buttery ends of the
3-point harness through the holes in the seat and
through the holes in the seat pad.
STEP 24
Attach the bottom end of the 3-point harness
through the center hole in the bottom of the seat.
Page 10

STEP 25
STEP 27
Grab the straps and pull on them to conrm that the
harness is properly anchored to the seat in both the
upper locations as well as the center lower location.
STEP 26
Push the grab bar into the holes in the seat. The grab
bar can be removed by pinching the tabs together
and pushing upward.
Peel the backing off the adhesive tape and adhere
the reector to the untextured area of the back of the
seat. Press rmly in position.
STEP 28
Double check to make sure that all of the fasteners
are securely tightened.
CONGRATULATIONS!
This completes the assembly and installation of the
Child Carrier.
Page 11

Page 12

COCOON 300™ AND SKIPPER
™
SIÈGE DE VELO POUR ENFANTS
MANUEL D’INSTRUCTION
3. Dans le cas où le siège pour enfant est impliqué
dans un accident, assurez-vous qu’il fonctionne
correctement avant d’etre utilisé de nouveau. Vériez
les dommages structurels et remplacez le siège s’il
est endommagé.
MISE EN GARDE
1. Seuls les enfants qui sent en mesure de se tenir la
tête droite tout en portant un casque de vélo (environ
1 an) et pesant un maximum de 18,2 kg (40 lb)
devraient prendre place dans un siège d’enfant.
2. Assurez-vous que la bicyclette est stable et bien
contrôIée en y installant et en y désinstallant l’enfant.
3. Le poids de l’enfant assis dans le siège a une
inci dence sur la stabilité du vélo.
4. L’enfant doit toujours porter un casque de vélo
qui respecte les normes CPSC 1203.
5. Ne JAMAiS laisser un enfant sans surveillance.
6. Ne laissez jamais l’enfant dans le siege alors que
seule la bequille soutient le velo.
OUTILS REQUIS
POUR L’ ASSEMBLAGE
Deux clés réglables
un tournevis à tête cruciforme
IMPORTANTS RENSEIGNEMENTS
SUR LA SÉCURITÉ
AVERTISSEMENT : Le non-respect de chacune
des instructions suivantes peut entrainer des
bles sures pour votre enfant.
1. Lisez toutes les instructions avant d’assembler ou
d’utiliser le siège de vélo pour enfant.
2. Pour un ajustement serré, mais confortable,
assurez-vous que les boucles à dégagement rapide
sent correctement xées et que les courroies sent
bien ajustées. Testez le jeu de l’épaule en tirant sur
les courroies tout en les eloignant de la poitrine de
l'enfant. Elles ne devraient pas bouger de plus de 2,5
cm (1 po).
7. Le cycliste doit éviler les rues occupées et le
mauvais temps, et etre particulièrement vigilant tout en
roulant à une vitesse réduite.
8. En marchant à côté du vélo, maintenez le siège
pour enfant d’une main et le guidon de l’autre.
9. Avant chaque utilisation, vériez le siège pour
enfant et la quincaillerie pour vous assurer que tout
est intact et sécurisé.
10. Assurez-vous que le siège pour enfant
n’interfère pas avec le freinage ou le pédalage.
11. N’utilisez pas le siège si un composant est brisé
ou si les sangles ou autres composants présentent
des signes d’usure importants.
12. Ne modiez pas le siège ou le système
de retenue.
13. Jetez et détruisez après cinq ans d’utilisation.
Page 13

PARTS LIST
ARTICLE DESCRIPTION QTÉ
1. Siége 1
2. Supportdroit de siége 1
3. Support gauche de siége 1
4. Repose-pied 1
5. Protecteur de ressort 2
6. Attache de repose-pied 3
7. Coussin de siége 1
8. Barre d’appui 1
9. Harnais de sécurité 1
ARTICLE DESCRIPTION QTÉ
14. Tube d’espacement 1
15.
de 6mm x 58mm
16.
17.
18.
19. Écrou Nylock de 6 mm 5
20. Rondelle fendue de 6 mm 5
21.
Boulon rond hexagonale
Entretoise métalique
6mm (1)/8mm (2) Fil protecteur en plastique
Boulon rond à tête hexagonale
de
6mm x 35mm
Boulon de
4
8mm x 30mm
1
2
4
10. Ceinture abdominale 1
11. Support en U 1
12. Support Inférieur 2
13. Long Lower inférieur 2
22.
de
23. Écrou Nylock de 8mm 6
24. Rondelle exible de 8mm 6
25.
26.
Boulon de hexagonale
8mm x 58mm
Protecteur de peinture en vinyle
Réecteur rouge avec ruban adhésif
4
2
1
Page 14

ÉTAPE 1 ÉTAPE 2
ARTICLE #18
6mm x 35mm
ARTICLE # 20
Rondelle fendue
de 6 mm
ARTICLE # 19
Écrou Nylock de
6 mm
Page 15

ÉTAPE 3
ARTICLE #18
6mm x 35mm
ÉTAPE 4
ÉTAPE 5
ARTICLE #21
8mm x 30mm Round
Hd. Sq. Neck Bolt
ÉTAPE 6
ARTICLE #24
Rondelle exible
de 8mm
ARTICLE #23
Écrou Nylock
de 8mm
ARTICLE #20
Rondelle fendue
de 6 mm
ARTICLE #19
Écrou Nylock
de 6 mm
ARTICLE #21 Boulon
de 8mm x 30mm
ARTICLE # 24
Rondelle exible
de 8mm
ARTICLE #23
Écrou Nylock
de 8mm
Page 16

ÉTAPE 7
ÉTAPE 9
Retirez la pince du montant du siege de votre velo. Cette étape concerne le boulon hexagonal de 6
mm. Insérez les entretoises à l’intérieur du support
en U. Fixez le support en U à l’aide d’un boulon
hexagonal de 6 mm sur 6 mm, d’une rondelle-frein
fendue de 6 mm et d’un écrou Nylock de 6 mm.
Remarque : Cette étape nécessitera (2) clés ajustables.
ÉTAPE 8
Cette étape concerne le boulon hexagonal de 8
mm. Fixez le support en U à l’aide d’un boulon
hexagonal de 8 mm sur 58 mm, d’une rondelle-frein
fendue de 8 mm et d’un écrou Nylock de 8 mm.
Remarque : Cette étape nécessitera (2) clés ajustables.
Remarque : Si le boulon de 8 mm ne convient pas,
l’étape suivante vous montrera comment utiliser le
boulon de 6 mm inclus avec entretoises
ARTICLE #15
Boulon hexagonal
de 6 mm x 58 mm
ARTICLE # 20
Rondelle fendue
de 6 mm
ARTICLE #19
Écrou Nylock de
6 mm
ARTICLE #16
Entretoise
métalique
ÉTAPE 10
Glissez les protecteurs de peinture en vinyle sur les
(4) supports.
ARTICLE #22
Boulon hexagonal de
8mm x 58mm
ARTICLE # 24
Rondelle exible
de 8mm
ARTICLE #21
Ecrou Nylock
de 8mm
ARTICLE #15
Protecteur de letage
en plastique
ÉTAPE 11
Positionnez les supports de siege droit et gauche
sur les deux cotes du
support en U.
Page 17

ÉTAPE 12
ÉTAPE 14
lnserez le tube d’ecartement et xez-le a l’aide d’un
boulon hexagonal de 8 mm par 58 mm, d’une rondelle exible de 8 mm et d’un ecrou Nylock de 8mm.
Remarque : Ne pas serrer completement pour le moment. Cette etape necessitera (2) cles ajustables.
ARTICLE #22
Boulon hexagonal de
8mm x 58mm
ARTICLE # 24
Rondelle fendue
de 8mm
ARTICLE #23
Ecrou Nylock
de 8mm
ÉTAPE 13
lnsérez le court support inférieur dans l’extrémité
fendue du long support inférieur et tournez-le en
po sition. lnsérez le boulon à collet carré à tête ronde
de 8mm par 30mm et xez avec une rondelle exible
de 8mm et un écrou Nylock de 8mm.
Repetez de l’autre côté de la roue en insérant le
court support inférieur dans l’extrémité fendue
du long support inférieur. puis tournez en position.
lnsérez le boulon à collet carré a tête ronde de
8 mm par 30 mm, puis xez-le avec une rondelle
exible de 8 mm et un écrou Nylock de 8 mm.
ÉTAPE 15
Le siège pour enfant doit être de niveau au moment
de !’installation. Plusieurs trous de réglage sont fournis
dans le support en U qui vous permettront d’enlever
toutes les obstructions et de niveler le support.
Une fois de niveau, serrez ferrnement toutes
les attaches.
Page 18

ÉTAPE 16
ÉTAPE 18
Placez les protecteurs de letage en plastique aux
extrémités des boulons hexagonaux.
Remarque : Si vous utilisez le boulon de 6 mm,
utilisez le protège-l portant le numéro 6 à l’intérieur.
ÉTAPE 17
Retirez le repose-pied, les ressorts et les attaches de
protection repose-pied de la feuille de plastique.
lnstallez le repose-pied en le faisant rouler sur
le dessus des supports de siege de droite et de
gauche, et en le plac;:ant sous le bord avant du
siège. Fixez le repose-pied au cadre du velo en
inserant les éléments de xation à travers les fentes
de la protection des pieds et autour du cadre du
vélo. Si le vélo a des ressorts exposés, enveloppezles protèges ressorts.
ÉTAPE 19
Posez le coussin dans le siège pour enfant et enlez les sangles de crochet et les boucles à travers
les trous de la courroie inférieure. Fixez les sangles
de crochets et de boucles derrière le siège.
Page 19

ÉTAPE 20
ÉTAPE 23
Retirez l’extremité mâle de la boucle à
dégagement rapide.
ÉTAPE 21
Enlez la ceinture sous les trous du siège.
ÉTAPE 22
Réinstallez l’extrémité male de la boucle à dégagement rapide et tirez sur la sangle pour conrmer
qu’elle se verrouille bien dans la boucle.
Passez chacune des deux extremités papillons
supérieures du harnais à trois points à travers les
trous du siège et du coussin du siege.
ÉTAPE 24
Fixez l’extrémite inférieure du harnais à trois points à
travers le trou central situé au bas du siège.
Page 20

ÉTAPE 25
ÉTAPE 27
Prenez les sangles et tirez-les pour conrmer que le
harnais est correctement ancre dans le siège, aux
deux endroits supérieurs ainsi que dans l’endroit
inférieur central.
ÉTAPE 26
Poussez la barre d’appui dans les trous du siège.
La barre d’appui peut être retirée en pinçant les
languettes et en poussant vers le haut.
Decollez la protection du ruban adhésif et collez le
réecteur sur la zone non texturée du dossier du
siege. Appuyez fermement en position.
ÉTAPE 28
Veriez à deux reprises que toutes les attaches sont
bien serrées.
FELICITATIONS!
Ceci complète !’assemblage et !’installation du
siège pour enfant.
Page 21

Page 22

COCOON 300™ AND SKIPPER
™
PORTABEBÉS PARA BICICLETAS
MANUAL DE INSTRUCCIONES
3. En caso de que el portabebés se vea involucrado
en un accidente, compruebe que este funcione correctamente antes de volver a utilizarlo. Compruebe
que el asiento no tenga dañios estructurales y
reemplacelo si esta dañiado.
PRECAUCIÓN
1. Solo para nios que puedan mantener la cabeza
erguida al utilizar un casco para bicicleta (aproximadamente de 1 añio de edad) y que no pesen más de
18 kg (40 lb) debe ser 3.
2. Asegurese de que la bicicleta esté estable y bajo
control cuando cargue y descargue al niño.
3. La estabilidad de la bicicleta se ve afectada por el
peso del niño en el portabebes.
4. El nio debe utilizar siempre un casco para bicicletas que cumpla con los estandares CPSC 1203.
5. Nunca deje al niño solo.
6. Nunca deje al niño en el portabebés si la bicicleta
solo está siendo sostenida por el caballete.
7. El conductor de la bicicleta debe evitar las calles
HERRAMIENTAS REQUERIDAS
PARA EL ENSAMBLAJE
Dos llaves ajustables
Destornillador de cabeza Philips
INFORMACIÓN IMPORTANTE
ADVERTENCIA:
siguientes instrucciones, su hijo puede sufrir lesiones.
1. Lea todas las instrucciones antes de ensamblar o
utilizar el portabebes para bicicletas..
2. Para un ajuste rme, pero cómodo, procure que
las hebillas de liberación rapida estén bien ajustadas
y que las correas estén ajustadas cor rectamente.
DE SEGURIDAD
Si no se siguen cada una las
transitadas y el mal tiempo, y debe conducir con
mucha precauci6n y a baja velocidad.
8. Cuando lleve la bicicleta caminando, sostenga el
portabebés con una mano y el manubrio con la otra.
9. Antes de cada uso, compruebe que el portabe bés
y los herrajes estén intactos y bien asegurados.
10. Asegúrese de que el portabebés no interera
con el frenado o el pedaleo.
11. No utilice el asiento si alguno de sus componentes está roto o si las correas u otros componentes
muestran signos de desgaste importante.
No modique el asiento ni el sistema de su jeción.
12.
13. Descarte y destruya el producto una vez
trans curridos cinco años de uso.
Page 23

LISTA DE PIEZAS
ARTíCULO DESCRIPCIÓN CANT.
1. Asiento 1
2. Soporte del asiento derecho 1
3. Soporte del asiento izquierdo 1
4. Protector para pies 1
5. Protector de resorte 2
6.
7. Almohadilla del asiento 1
8. Barra de agarre 1
9. Arnes para hombres 1
10. Cinturón subabdominal 1
Sujetadores del protector para pies
3
ARTíCULO DESCRIPCIÓN CANT
14. Tuba separador 1
15.
16.
17.
18.
19. Tuerca Nyloc de 6 mm 5
20. Arandela dividida de bloqueo 5
de 6 mm
21.
22.
23. Tuerca Nylock de 8mm 6
Perno hexagonal de 6mm x 58mm 2
Espaciador Metálico
6mm (1)/8mm (2) Protector de rosca de plástico
Pernos de cabeza redonda Philips
de
6mm x 35mm
Perno de
Perno hexagonal de
8mm x 30mm
8mm x 58mm 2
2
4
4
11. Soporte en U 1
12. Soporte inferior corto 2
13. Soporte inferior largo 2
24.
25.
26.
Arandela dividida de bloqueo de 8mm
Protector de pintura vinilica
Reector rojo con cinta adhesiva
6
4
1
Page 24

PAS0 1 PAS0 2
Coloque el asiento de lado. lnserte (2) tornillos de
cabeza redonda de 6 mm x 35 mm en los (2) oricios
en el lado izquierdo de la parte inferior del asiento.
Mientras sujeta los pernos rmemente en su lugar,
sujete los soportes del asiento izquierdo en la parte
inferior del asiento de plastico usando (2) arandelas de bloqueo divididas de 6 mm y (2) tuercas de
Nylock de 6 mm.
Nota: No puede apretar las tuercas de Nylock
manualmente. Se requiere una llave ajustable para
completar este paso.
ARTÍCULO N°18
6mm x 35mm
ARTÍCULO N° 20
Arandela dividida
de bloqueo,
de 6 mm
ARTÍCULO N° 19
Tuerca Nylock
6 mm
Page 25

PAS0 3
lnserte (2) tornillos de cabeza Philips redonda de 6
mm x 35 mm en los (2) oricios en el lado derecho
de la parte inferior del asiento.
ARTÍCULO N°18
6mm x 35mm
PAS0 5
Sujete el soporte inferior largo en la parte inferior
del soporte del asiento usando un perno de cabeza
redonda y cuello cuadrado de 8 mm por 30 mm, una
arandela de bloqueo dividida de 8 mm y una tuerca
Nylock de 8 mm. Asegúrese de que la cabeza
del tornillo este hacia fuera y que la arandela de
seguridad esté en su lugar.
PAS0 4
Mientras sujeta los pernos rmemente en su
lugar, sujete los soportes del asiento derecho en
la parte inferior del asiento de plástico utilizando
(2) arandelas de bloqueo de 6 mm y (2) tuercas
de Nylock de 6 mm.
ARTÍCULO N° 20
Arandela dividida
bloqueo, de 6 mm
ARTÍCULO N° 19
Tuerca Nylock
6 mm
ARTÍCULO N° 21
Pemo de
8mm x 30mm
ARTÍCULO N° 24
Arandela dividida
de 8mm
ARTÍCULO N° 23
Tuerca Nylock,
de 8mm
PAS0 6
Sujete el soporte inferior largo en la parte inferior
del soporte del asiento usando un perno de cabeza
redonda y cuello cuadrado de 8 mm por 30 mm, una
arandela de bloqueo dividida de 8 mm y una tuerca
Nylock de 8 mm. Asegúrese de que la cabeza del
tornillo este hacia fuera y que la arandela de
seguridad esté en su lugar.
ARTÍCULO N° 21
Perno de
8mm x 30mm
ARTÍCULO N° 24
Arandela dividida
de 8mm
ARTÍCULO N° 23
Tuerca Nylock,
de 8mm
Page 26

STEP 7
PAS0 9
Quite la abrazadera del poste del asiento
de su bicicleta.
PAS0 8
Este paso es para el perno hexagonal de 8 mm.
Fije el soporte en forma de "U" usando un perno
hexagonal de 8 mm por 58 mm, una arandela de
seguridad dividida de 8 mm y una tuerca Nyloc
de 8 mm.
Importante. Este paso requerirá (2) llaves ajustables.
Nota: si el perno de 8 mm no calza, el siguiente
paso le mostrará cómo usar el perno de 6 mm
con los espaciadores incluidos.
Este paso es para el perno hexagonal de 6 mm.
Inserte los espaciadores dentro del soporte en
forma de "U". Fije el soporte en forma de "U"
usando un perno hexagonal de 6 mm, una arandela
de seguridad dividida de 6 mm y una tuerca de
seguridad de 6 mm.
Importante. Este paso requerirá (2) llaves ajustables
ITEM #15
6mm x 58mm
Hex Bolt
ITEM # 20
6mm Split Lock
Washer
ITEM #19
6mm Nylock Nut
ITEM #16
Metal Spacer
PAS0 10
Deslice los protectores de pintura de vinilo sobre
los (4) soportes.
ITEM #22
Perno hexagonal
de, 8mm x 58mm
ITEM # 22
Arandela dividida de
bloqueo, de 8mm
ITEM #21
Tuerca Nylock,
de 8mm
ITEM #15
Protector de
rosca pla5tica
PAS0 11
Coloque los soportes
de asiento derecho e
izquierdo en ambos
lados del soporte
en U.
Page 27

PAS0 12
PAS0 14
11 lnserte el tubo espaciador y asegurelo con un
tornillo hexagonal de 8 mm por 58 mm, una arandela
de bloqueo de 8 mm y una tuerca Nylock de 8 mm.
Nota: No apriete completamente en este momento.
Este paso requerira (2) llaves ajustables.
ITEM #22
Perno hexagonal, de
8mm x 58mm
ITEM # 24
Arandela dividida de
bloqueo 8mm Split
ITEM #23
Tuerca Nylock,
8mm
PAS0 13
lnserte el soporte inferior corto en el extremo
ranurado del soporte inferior largo y gfrelo hasta su
posici6n. lnserte el perno cuadrado redondo de 8
mm por 30 mm y asegúrelo con una arandela de
bloqueo de 8 mm y una tuerca Nylock de 8 mm.
Repita en el otro lado de la rueda insertando el
soporte inferior corto en el extremo ranurado del
soporte inferior largo y girandolo hasta su posición.
lnserte el perno de cabeza redonda y cuello
cuadrado de 8 mm por 30 mm y asegúrelo con una
arandela dividida de bloqueo de 8 mm y una tuerca
Nylock de 8 mm.
PAS0 15
El portabbebés debe estar en una posición nivelada
cuando se instale. Hay varios oricios de ajuste en
el soporte en U que le permitirán eliminar todas las
obstrucciones y nivelar el soporte. Cuando este
nivelado, apriete todos los sujetadores rmemente.
Page 28

PAS0 16
PAS0 18
Coloque los protectores de rosca de plástico en los
extremos de los pernos hexagonales.
Importante. Si no está usando el perno de 6 mm, use el
protector de rosca con el número 6 en su cara interna.
PAS0 17
Retire el protector para pie, los protectores de
resorte y los elementos de sujeción del protector
para pies de la hoja de plástico.
lnstale el protector para pies enrollándolo sobre la
parte superior de los soportes del asiento derecho
e izquierdo y colóquelo debajo del borde delantero
del asiento. Asegure el protector para pies en el
cuadro de la bicicleta insertando los sujetadores
a través de las ranuras del protector para pies y
alrededor del cuadro de la bicicleta. Si la bicicleta
tiene resortes expuestos, envuelva los protectores
de resorte alrededor de los resortes.
PAS0 19
Coloque la almohadilla del asiento en el portabebes
y pase las correas de gancho y de lazo a traves de
los agujeros inferiores del cinturón subabdominal.
Asegure las correas de gancho y de lazo detras
del asiento.
Page 29

PAS0 20
PAS0 23
Quite el extremo macho de la hebilla de
liberación rapida.
PAS0 21
Pase el cinturón subabdominal por los oricios
del asiento.
PAS0 22
Vuelva a instalar el extremo macho de la hebilla de
liberación rápida y tire de la correa para conrmar
que la correa se bloquea en la hebilla.
Pase cada uno de los dos extremos superiores
de mariposa del arnés de 3 puntos a través de los
agujeros del asiento y a través de los agujeros en la
almohadilla del asiento.
PAS0 24
Sujete el extremo inferior del arnes de 3 puntos a
través del agujero central de la parte inferior del
asiento.
Page 30

PAS0 25
PAS0 27
Agarre las correas y tire de ellas para conrmar que
el arnés está debidamente anclado al asiento, tanto
en las ubicaciones superiores como en la ubicación
inferior central inferieur central.
PAS0 26
Empuje la barra de agarre hacia los oricios del
asiento. La barra de agarre puede quitarse
apretando las pestañas a la vez y empujando
hacia arriba.
Pele la parte trasera del adhesivo y peque el reector
en el area no texturizada de la parte trasera del
asiento. Presione rrnemente para que se adhiera en
su posición.
PAS0 28
Compruebe que todos los sujetadores estén
rmemente apretados.
¡FELICITACIONES!
Con esto, naliza el ensamblaje y la instalación del
portabebés.
Page 31

Page 32

11.12 INSTRUCTION MANUAL #1000034249
REV DATE: 03/19
WWW.THEBELLGARAGE.COM
© 2019 BELL SPORTS, INC. / 1-800-456-BELL
1001 INNOVATION ROAD 3000 NORTH / RANTOUL, IL 61866 USA
PRINTED IN CHINA / IMPRIMÉ EN CHINE / IMPRESO EN CHINA
7016050 / 7016051 / 7084885
 Loading...