

Bell Folding Hitchbiker2, Folding Hitchbiker4, Hitchbiker2, Hitchbiker4 Instructions Manual
Page 1
BELL
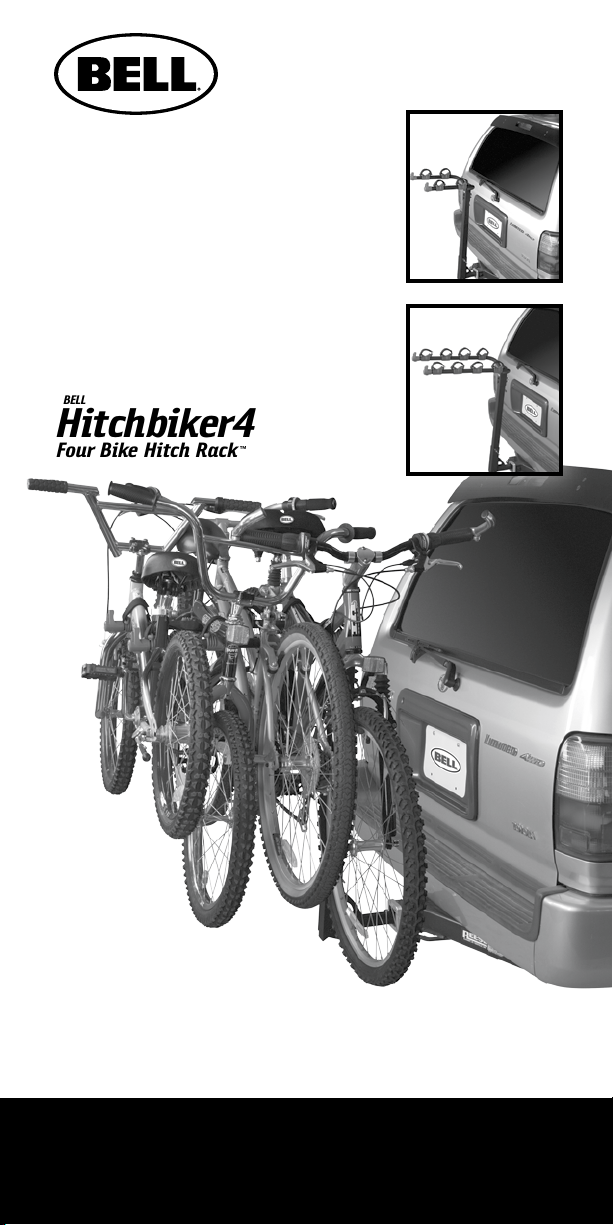
Two Bike Hitch Rack
Four Bike Hitch Rack
Folding Hitchbiker2
™
BELL
Folding Hitchbiker4
™
BELL
Hitchbiker2
Two Bike Hitch Rack
BELL
Hitchbiker4
Four Bike Hitch Rack
™
™
Please keep these instructions for future reference.
Guarde estas instrucciones para consulta futura.
Veuillez conserver ces instructions pour usage ultérieur.
IMPORTANT: Remove only by user!
IMPORTANTE: ¡Sólo debe ser retirado por el usuario!
IMPORTANT : À retirer uniquement par l’utilisateur !
Page 2

Table of Contents
Warnings ......................................................... 1
Mounting Tips ................................................... 3
Installation ...................................................... 5
Using Your Rack ................................................. 6
Advertencias .................................................... 7
Sugerencias para montaje .................................... 9
Instalación ......................................................11
Cómo usar su portabicicletas ................................12
Avertissements ................................................13
Conseils d’installation........................................15
Installation .....................................................17
Utilisation du porte-vélos ...................................18
WARNING
This rack is designed to attach securely to most automobile receiver
hitches. Due to variations in automobile design and manufacturing, we
cannot guarantee that this product will properly fit all cars. It is your
responsibility to ensure the safe and proper use of this product.
Some unique receiver hitches do not permit full insertion of the insert
tube. Do not use the rack if the attachment bolt cannot be threaded
through the hole in the receiver hitch into the threaded insert tube.
Some vehicles cannot safely accept any hitch rack. We recommend that
you check with your receiver hitch manufacturer to ensure that it has
sufficient tongue strength to carry a load of bicycles.
This hitch rack is designed for use on passenger cars, trucks, and SUVs
with appropriate receiver capacity. Do not use this hitch mount on fifth
wheels, RV’s, or tent trailers – these vehicles produce loads that will
exceed the capabilities of the rack and cause it to fail! If you need a rack
for one of these applications, speak to your local RV dealer for advice on
appropriate methods.
Never use any other attachment method than the supplied bolt, butterfly
pin, or cable lock. Using a non-threaded pin or substandard bolt could
result in the loss of your rack and load.
Improper attachment or misuse of this rack may be hazardous and may
result in damage to your bicycles, vehicle, or vehicles driving behind
you as a result of colliding with or trying to avoid the fallen bicycles
and carrier.
2
English
Page 3

Warnings
IMPORTANT
It is your responsibility to use your best discretion while installing this
rack to ensure that you do not damage your vehicle.
1. Although the rack is designed to hold the bicycles away from the
painted surface of your vehicle, use care when installing and loading
your rack to avoid scratching or denting your car.
2. Empty racks are hard to see even with red cradles and reflective end
caps – If you park your vehicle with an empty rack in a high traffic
area, it’s a good idea to attach a flag or other visible soft item to the
end of the rack.
SAFE AND PROPER USE OF YOUR CARRIER
1. Always secure your bicycles to the rack using the cradles and
straps – preferably with additional cable lock (included with some
models), rope, or additional shock cords. The individual cradles
offer solid mounting, but should be supplemented for safety.
2. NEVER drive off pavement with a loaded carrier.
3. Some hitches are mounted low to the ground – especially when your
vehicle is loaded down with gear and people. Use extra caution when
entering or exiting driveways to avoid damaging the bike wheels.
4. DO NOT let bicycle tires hang near he exhaust pipe. Hot exhaust
will melt and destroy tires.
5. If a strap appears worn or frayed, REPLACE IT! Worn straps are
dangerous. Replacement parts are available from our customer
service department at 1 800 456 BELL.
6. Maximum rack load ranges from two bikes/70lbs. to
four bikes/120lbs.
7. Inspect and check your rack’s straps and attachment bolt before
and after loading – the weight of the bicycles may cause the
straps to loosen.
8. Check Straps at regular intervals during use, more frequently on
bumpy roads, and immediately if the bicycles shift position.
9. Always make sure bicycle frames rest ON the support arms.
Never hang bicycles from below the arms on the cradles.
10. Cleaning bicycle support arms helps give the cradles optimum grip.
Clean with soap and water only and rinse/dry thoroughly. Do not
use solvents as they may weaken straps and cradles.
11. Although it’s possible to do so and will cause no damage to the rack.
We recommend that you fold the rack away from the car only when
it is unloaded. A full load of bikes can be unwieldy to lower and lift –
pinched fingers and scratched bicycle paint often result.
12. Never leave unlocked bikes unattended. Thieves are quick!
Secure your bikes to the hitch using a cable lock or other visible
theft deterrent. BELL offers an excellent range of bicycle locks
that are portable, effective, and durable.
13. When your rack is not in use and not mounted to your car, find a safe
place to store it lying down with the end caps facing up. Do not store
it where it can be tripped over or driven into and damaged.
English
3
Page 4
Mounting Tips
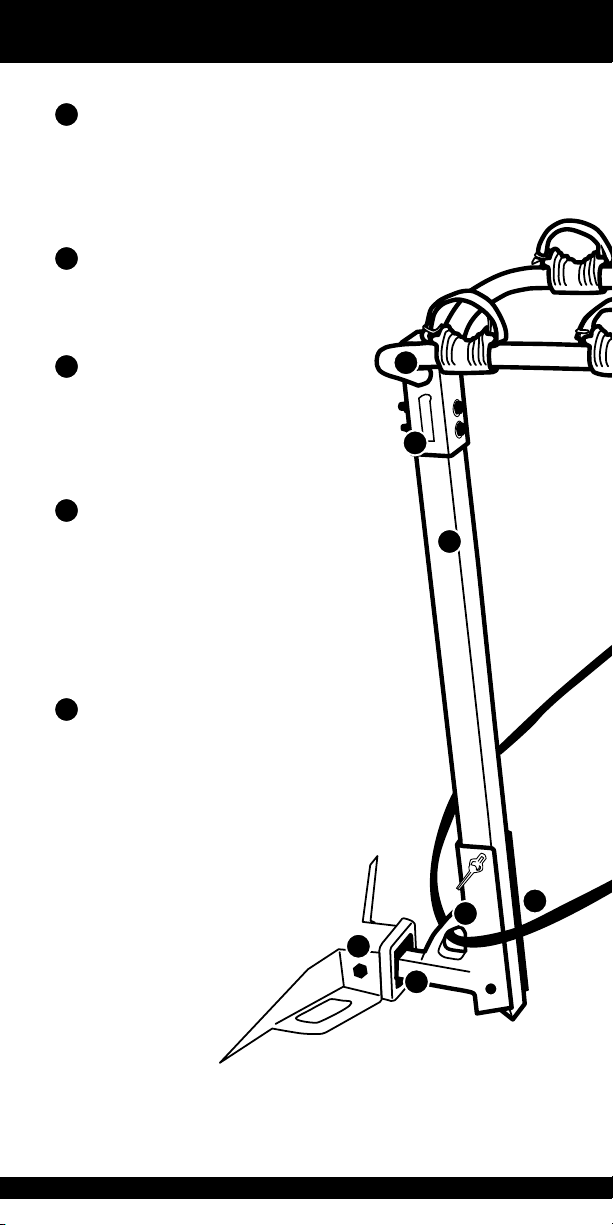
BICYCLE SUPPORT ARMS
1
Support arms should angle upward
from the horizontal. This helps to keep
bicycles secure while traveling and also
away from vehicle surfaces. To obtain
proper angle, hitch-mounting points
on car frame may be adjusted.
SUPPORT ARM ASSEMBLY
2
The support arm assembly is designed
to remain stable once assembled. After
your first trip, check the bolts and snug
them up as needed.
ATTACHMENT BOLT
3
The mounting area for the hitch rack
is under the rear of the vehicle which
makes it a dirty and wet area. Cleaning
and greasing the threads of the bolt
and the insert tube will make for
smoother installation and removal.
RECEIVER INSERT TUBE WITH
4
THREADED NUT AND INSERT C-SHIM
This tube is designed to work well with
both 2" and 11/4" receiver hitches.
Factory and aftermarket hitches can
vary quite a bit within these sizes so
we use a threaded attachment bolt to
reduce the inherent play in this type of
mount to provide more stable transport
of your bikes.
2
9
5
VERTICAL MAST
5
Made from durable powder coated
steel, our mast is the best compromise
of easy loading and safe ground
clearance for fully loaded travel.
4
6
3
4
8
English
Page 5
Mounting Tips
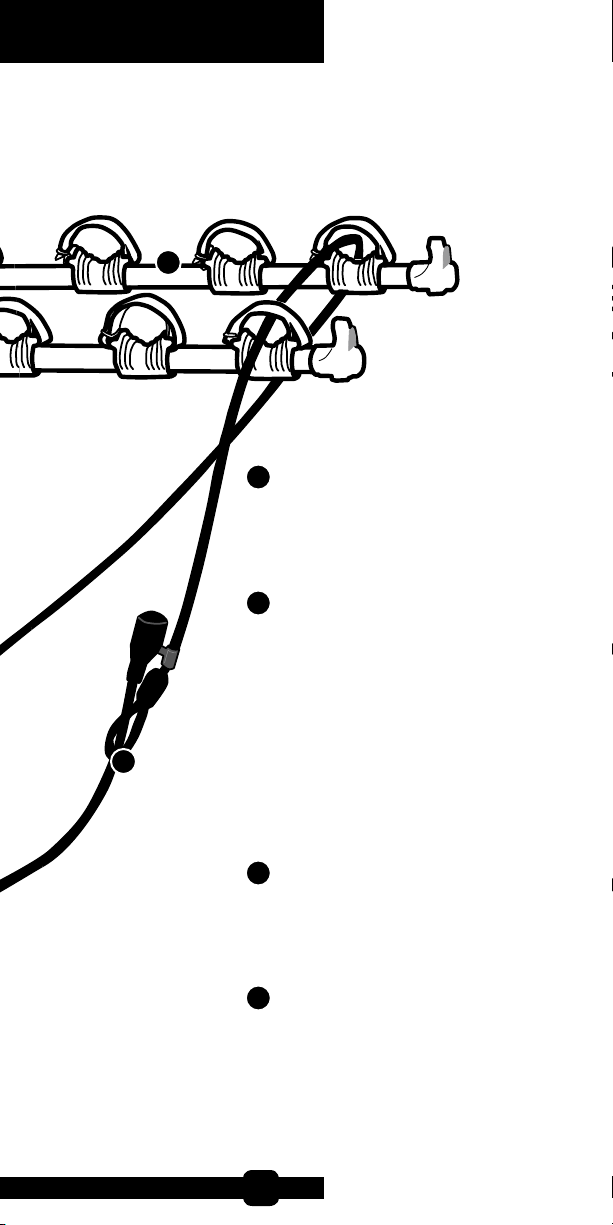
1
LOCKING LOOP
6
Our racks include a reinforcing bracket
that doubles as a lock loop for cables – if
you use an aftermarket cable, loop it
through here to anchor the bikes to the
rack.
LOCKING KEY CABLE
7
(INCLUDED WITH SOME MODELS)
This cable is extra long to make securing
all the bikes quick and easy. It offers
two locking options – you may lock it
back to itself using the sliding bayonet
or lock it to the exposed end of the hitch
bolt for full system security. Always lock
7
your bike, including short trips close
to home – thieves are quick! The keys
we supply should be readily available
wherever keys are sold – so make some
spares and stash them in each vehicle
‘just in case’.
English
TILT PIVOT
8
This simple pivot mechanism will provide
years of quick access to your vehicle
before and after you ride. If play in the
mast develops, simply tighten the bolt
until the wiggle is gone.
LOCKING PIN
9
(Included on Folding Racks ONLY) Pin
allows the user to lower the hitch arms
and stow them when not in use. The pin
is very durable and secure, for peace of
mind while hauling your bikes. It comes
tethered to the mast so it’s hard to lose. It
includes a security pin to keep it in place.
5
Page 6
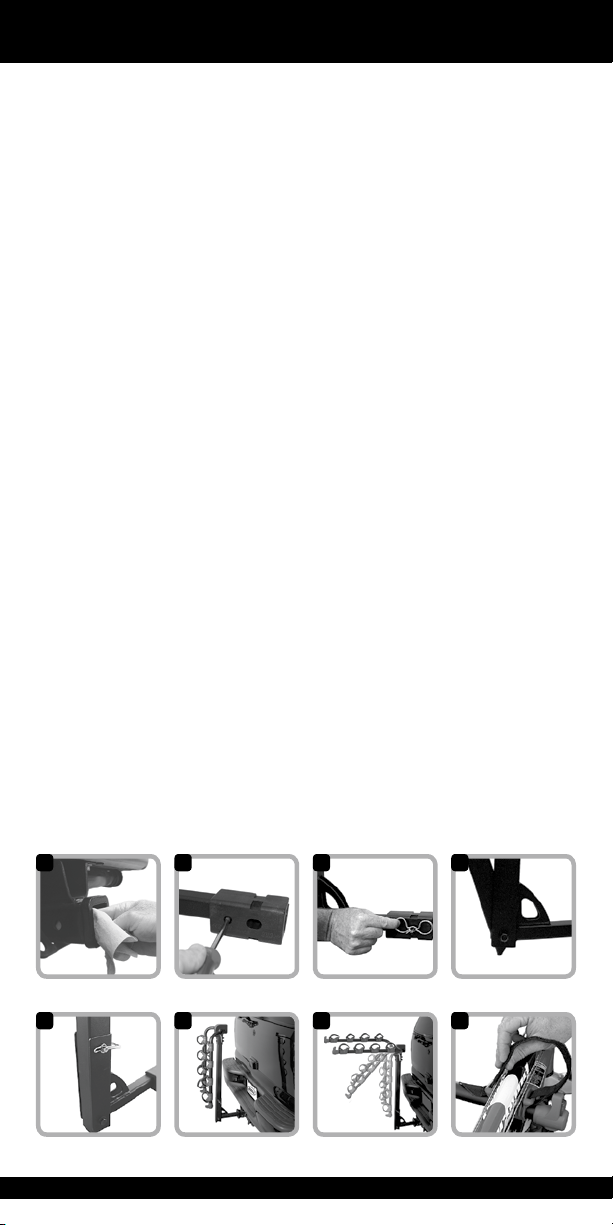
Installation
1. Wipe or brush out the inside of your receiver hitch so it’s free from road
debris. Figure A.
2. Insert the rack until the threaded hole lines up with the hole in the side
of the receiver tube. To accommodate the 1
remove the insert C-shim screw and C-shim. Figure B.
3. Insert the attachment bolt and tighten. ALWAYS insert the bolt from the
drivers side – this will improve the stability of the rack in the hitch. Using
the vertical mast for leverage wiggle the rack back and forth. Check and
tighten the attachment bolt more if needed. Install the butterfly pin into
the hole on the end of the attachment bolt. Figure C.
4. Install the lower hitch post to the vertical mast. Line up the holes, insert
and attach the lower frame bolts, washers and nuts. Tighten. Figure D.
5. Install the support arm assembly. Line up the holes, insert and attach
the upper frame bolts, washers and nuts. Tighten. Figure E.
6. On level ground, check that the support arms are angled up from the
horizontal. If they are angled down from the horizontal away from the
car, do not load the rack. Your hitch should be adjusted by a hitch mount
professional before the rack can be used safely. Figure F.
7.
(Included on Folding Racks ONLY)
pivot pin and folding the rack away from the car. The rack should move
freely down far enough to clear back hatches and tailgates on most cars.
There should only be a minimal amount of play in the pivot bolt – if there
is substantial play check the pivot bolt and nut for tightness. Make note
of the clearance distance between your vehicle door and the mast. Tilt the
mast back into the vertical position and reinstall the pivot pin and retainer
clip. Figure G, H and I. LOAD BIKES ONTO INDIVIDUAL CRADLES. TIGHTEN ALL
STRAPS TO TOP OR SEAT TUBES, USING THE CRADLES. Figures M, N, and O.
8. To raise the rack arms remove security pin from locking clip. Remove
locking clip from the mast. Raise the rack arms and re-insert locking pin
through the mast and attach security pin. Figure J and K.
9. Load the first bike with your chain side facing away from the vehicle.
Alternating the direction of the bikes makes the carrier easier to load and
prevents the handlebars from getting tangled.
1
/4" receiver hitches simply
Check the tilt pivot by removing the
B
J K LI
6
DCA
English
Page 7

Using Your Rack
10. Load each bicycle so the top tube rests on the cradles.
11. Wrap each strap over frame tubes, thread through cradle loop, pull
snug and press hook-and-loop straps together. Wiggle each bike to
ensure the straps are secure. The cradle strap is designed to fit many
sizes of bicycle tubing and hold firmly regardless of temperature or
weather. Figure L and M.
12. Use a BELL cable lock (included with some models), a shock cord,
or rope to secure the frames and wheels of the bicycles to ensure
safe transport.
USING THE QUICK ACCESS TILT FEATURE
13. Remove all the bicycles from the support arms.
14. Hold the vertical mast firmly with one hand. Unfasten the quick
release retainer clip and remove the pin. Figure G.
15. Tilt the rack away from the vehicle until it reaches it’s stop. Avoid
impacting the ground with the reflective endcaps. Figure H.
16. After returning the hitch rack to its upright position, be sure that the
pin is fully inserted into the tilt channel and that the retainer clip is firmly
clipped on the pin.
USING THE LOCKING KEY CABLE
17. Wrap the cables through your bike frames and wheels, routing through
the lock loop at the base of the rack mast. Your cable is configured to
either lock back to itself when looped through the lock loop on the mast
with the sliding bayonet or to the hitch bolt as shown. Figure N and O.
IMPORTANT
Before each use, check to ensure that ALL straps and bolts are tightened
securely, and if you are using a locking cable that it is tightly wrapped and
locked completely.
F
English
GE H
ONM
7
Page 8

Advertencias
ADVERTENCIA
Este portabicicletas ha sido diseñado para sujetarse con seguridad
a la mayoría de los enganches receptores de automóviles. Debido a
variaciones en el diseño y fabricación de los autos, no podemos garantizar
que este producto se adapte correctamente a todos los vehículos. El uso
seguro y correcto de este producto es responsabilidad de usted.
Algunos enganches excepcionales no permiten el acople total del tubo
de ensamble. No use el portabicicletas si el perno sujetador no puede
pasarse por el agujero del enganche receptor para asegurarse en el tubo de
ensamble roscado.
En algunos vehículos, no se puede colocar el portabicicletas de manera
segura. Recomendamos verificar con el fabricante de su enganche
receptor que su enganche tenga suficiente resistencia en el acople para
soportar una carga de bicicletas.
Este portabicicletas de enganche ha sido diseñado para usarse en
automóviles de pasajeros, camiones y vehículos deportivos utilitarios
(SUV) con capacidad receptora adecuada. No use este montaje en
remolques acoplados, vehículos recreativos o remolques de tienda de
campaña. Estos vehículos producen cargas que exceden la capacidad del
portabicicletas y ¡hacen que falle! Si necesita un portabicicletas para
alguno de estos usos, solicite asesoría con su distribuidor local de
vehículos recreativos.
Nunca use otro método de sujeción que no sea el perno, chaveta de
mariposa o seguro de cable suministrados. El uso de un tornillo sin rosca o
perno de calidad inferior podría provocar la pérdida de su portabicicletas
y su carga.
La fijación inadecuada o uso indebido de este portabicicletas podría ser
peligroso y dañar sus bicicletas, su vehículo o los vehículos que vengan
detrás, al chocar o evitar chocar con las bicicletas y/o portabicicletas que
se desprendieran.
IMPORTANTE
Es su responsabilidad ejercer el mayor cuidado al instalar este
portabicicletas para asegurar que no cause daños a su vehículo.
1. Aunque el portabicicletas ha sido diseñado para evitar contacto
de las bicicletas con la superficie pintada de su vehículo, tenga
cuidado al instalar y cargar su portabicicletas, para evitar rayar
o causar abolladuras a su automóvil.
2. Los portabicicletas vacíos son difíciles de ver, aún con cunas rojas
y tapas reflectoras. Si estaciona su vehículo con un portabicicletas
vacío en un área de mucho tránsito, es recomendable colocar una
bandera u otro objeto visible en la punta del portabicicletas.
8
Español
Page 9

Advertencias
IMPORTANTE
SEGURIDAD Y USO CORRECTO DE SU PORTABICICLETAS
1. Siempre asegure sus bicicletas al portabicicletas usando las cunas
y correas, preferiblemente con el seguro de cable adicional (incluido
con algunos modelos), cuerdas o cordones tensores adicionales.
Las cunas individuales brindan montaje estable, pero debe
complementarse por cuestiones de seguridad.
2. NUNCA se baje del pavimento con un portabicicletas cargado.
3. Algunos enganches se montan muy cerca del suelo, sobre todo
cuando el vehículo está cargado con equipo y pasajeros. Tenga
precaución especial al entrar o salir de las cocheras para evitar dañar
las ruedas de las bicicletas.
4. NO deje que los neumáticos de las bicicletas queden cerca del tubo
de escape. El escape caliente derrite y destruye los neumáticos.
5. Si una correa se ve desgastada o raída, ¡CAMBIELA! Las correas
desgastadas son peligrosas. Puede obtener piezas de repuesto en
nuestro departamento de atención al cliente, en el 1-800 456 BELL.
6. La carga máxima del portabicicletas es de dos bicicletas/70 libras
(32 kilogramos) o cuatro bicicletas/120 libras (54 kilogramos).
7. Revise las correas del portabicicletas y el perno sujetador antes
y después de cargarlo. El peso de las bicicletas puede provocar
que las correas se aflojen.
8. Revise las correas periódicamente durante su uso y con mayor
frecuencia en caminos accidentados. Hágalo inmediatamente
si las bicicletas cambian de posición.
9. Cerciórese siempre que los cuadros de las bicicletas descansen EN
los brazos de apoyo. Nunca cuelgue las bicicleta por debajo de los
brazos de apoyo.
10. Mantener limpios los brazos de apoyo de las bicicletas da mejor
agarre a las cunas. Lávelos sólo con agua y jabón; luego, enjuague
y séquelos bien. No use disolventes, ya que podrían debilitar las
correas y cunas.
11. Aunque es posible hacerlo y no provoca daños al portabicicletas,
recomendamos que retire el portabicicletas del auto sólo cuando
esté descargado. Es muy difícil bajar y levantar una carga completa
de bicicletas. Las consecuencias a menudo son dedos pellizcados y
pintura de las bicicletas rayada.
12. Nunca deje sola una bicicleta no asegurada con candado. ¡Los
ladrones actúan con rapidez! Asegure sus bicicletas usando un
cierre de cable, o bien con algún otro dispositivo antirrobo visible.
BELL ofrece una excelente variedad de seguros para bicicletas
portátiles, eficaces y durables.
13. Cuando no se encuentre en uso su portabicicletas y no esté
montado en el vehículo, busque un lugar seguro donde guardarlo
en posición horizontal, con las tapas hacia arriba. No lo guarde
donde alguien pueda tropezar con él y derribarlo o golpearlo
con un vehículo y dañarlo.
Español
9
Page 10

Sugerencias de montaje
BRAZOS DE APOYO DE LAS BICICLETAS
1
Los brazos de apoyo deben inclinarse
hacia arriba del horizontal. Esto ayuda a
mantener seguras las bicicletas durante
el viaje y también alejadas de las
superficies del vehículo. Para obtener
el ángulo adecuado, se deben ajustar
los puntos de montaje del enganche
receptor en el chasís del vehículo.
CONJUNTO DE LOS BRAZOS DE APOYO
2
El conjunto de los brazos de apoyo
se ha diseñado para permanecer
estable una vez instalado. Después
de su primer recorrido, revise los
pernos y ajústelos si es necesario.
PERNO DE SUJECIÓN
3
El área de montaje del portabicicletas
de enganche se encuentra bajo la parte
trasera del vehículo, por lo cual queda
en una zona sucia y húmeda. Limpie y
engrase las roscas del perno y el tubo
de ensamble, para que sea más fácil
instalar y retirar el portabicicletas.
TUBO DE ENSAMBLE DEL RECEPTOR, CON
4
TUERCA ROSCADA Y CALZA C DE AJUSTE
Este tubo ha sido diseñado para
acoplarse a los enganches receptores
de 5,08 cm y 3,17 cm (2” y 1 1/4”).
Los enganches de fábrica y comerciales
pueden variar mucho dentro de estos
tamaños, por lo que usamos un perno
de sujeción roscado para reducir
el juego inherente en este tipo de
montura y así brindar un transporte
más estable para sus bicicletas.
2
9
5
BARRA VERTICAL
5
Nuestra barra, fabricada con acero
con acabado de pintura en polvo,
constituye el mejor método para
cargar fácilmente el portabicicletas
y mantenerlo a suficiente
distancia del suelo durante
viajes con carga completa.
10
6
8
3
4
Español
Page 11

Sugerencias de montaje
1
LAZO DE SEGURIDAD
6
Nuestros portabicicletas incluyen una
abrazadera reforzada que también actúa
como lazo de seguridad para los cables.
Si usa un cable comercial, páselo por aquí
para anclar las bicicletas al portabicicletas.
CABLE DE SEGURIDAD
7
(INCLUIDO CON ALGUNOS MODELOS)
Este cable es extra largo, para que puedan
sujetarse todas las bicicletas rápida y
fácilmente. Ofrece dos opciones de cierre:
puede cerrarlo sobre sí mismo usando
el retenedor deslizable o colocarlo en el
extremo expuesto del perno de enganche,
asegurando por completo el sistema.
7
Siempre asegure su bicicleta, incluso cuando
realice recorridos cortos cerca de casa: ¡los
ladrones actúan con rapidez! Las llaves
que suministramos pueden conseguirse
fácilmente en cualquier cerrajería. Mande
hacer algunas llaves de repuesto y guárdelas
en cada vehículo “por si las dudas”.
Español
PIVOTE DE INCLINACIÓN
8
Este sencillo mecanismo de pivote dará
años de acceso rápido a su vehículo antes y
después de sus recorridos. Si la barra muestra
holgura, simplemente apriete el perno hasta
que desaparezca el movimiento.
PERNO DE CIERRE
9
(SÓLO incluido en portabicicletas plegables).
El perno permite al usuario bajar los brazos del
enganche y guardarlos cuando no en uso. El
perno es muy durable y seguro y da tranquilidad
al transportar sus bicicletas. Ya que viene
sujetado a la barra vertical, es difícil perderlo.
Incluye pasador de seguridad para mantenerlo
en su lugar.
11
Page 12

Instalación
1. Limpie o cepille el interior del enganche receptor para quitar la basura
acumulada en el camino. Figura A.
2. Inserte el portabicicletas hasta que el agujero roscado se alinee con el
agujero en el costado del tubo del enganche receptor. Para adaptarlo a los
enganches receptores de 3,17 cm (1 1/4”) simplemente quite el tornillo y la
calza C de ajuste. Figura B.
3. Inserte el perno de sujeción y apriételo. SIEMPRE inserte el
perno desde el lado del conductor. Esto dará mayor estabilidad al
portabicicletas. Usando la barra vertical como palanca, mueva el
portabicicletas hacia adelante y hacia atrás. Revise y, de ser necesario,
apriete más el perno de sujeción. Instale la chaveta de mariposa en el
agujero ubicado en el extremo del perno sujetador. Figura C.
4. Instale el poste de enganche inferior a la barra vertical. Alinee los
agujeros, coloque y sujete los pernos, arandelas y tuercas del cuadro
inferior. Apriételas. Figura D.
5. Instale el conjunto de los brazos de apoyo. Alinee los agujeros, coloque y
sujete los pernos, arandelas y tuercas del cuadro superior. Apriételas. Figura E.
6. Sobre suelo nivelado, verifique que los brazos de apoyo queden
inclinados hacia arriba de la horizontal. Si están inclinados hacia abajo
y en dirección contraria a la del auto, no cargue el portabicicletas. El
enganche receptor debe ser ajustado por un profesional de montaje para
poder usar el portabicicletas sin ningún riesgo. Figura F.
7.
(SÓLO incluido en portabicicletas plegables)
inclinación, retirando el tornillo del pivote e inclinando el portabicicletas
en dirección contraria a la del vehículo. El portabicicletas debe moverse
libremente hacia abajo, a una distancia suficiente para no entrar en
contacto con la puerta trasera o puerta de descarga del auto. Sólo debe
haber un mínimo de holgura en el perno del pivote; si hay demasiado
juego, verifique que el perno y la tuerca del pivote estén bien apretados.
Tome nota de la distancia entre la puerta de su vehículo y la barra.
Coloque la barra en posición vertical, reinstale el tornillo del pivote y
la grapa de retención. Figuras G, H y I. A LOS TUBOS DE LOS ASIENTOS
MEDIANTE EL USO DE LAS CUNAS. Figuras M, N y O.
8. Para levantar los brazos del portabicicletas, quite el pasador de seguridad
del perno de cierre. Quite el perno de cierre de la barra. Levante los brazos
del portabicicletas, vuelva a insertar el perno de cierre a través de la barra y
coloque el pasador. Figura J y K.
Revise el pivote de
12
B
J K LI
DCA
Español
Page 13

Uso de su portabicicletas
9. Coloque la primera bicicleta con el lado de la cadena alejado del
vehículo. Alternar la dirección de las bicicletas facilita la carga del
portabicicletas y evita que se enreden los manubrios.
10. Coloque cada bicicleta de manera que el tubo superior se apoye en las cunas.
11. Pase las correas sobre los tubos del cuadro y por el lazo de las
cunas. Jálelas para que queden firmes. Luego junte y oprima las tiras
de gancho y lazo. Mueva cada bicicleta para comprobar que las correas
estén firmemente aseguradas. La correa de la cuna se ha diseñado para
adaptarse a diversos tamaños de soportes de bicicletas y mantenerse
firme, sin importar la temperatura o el estado del tiempo. Figura L y M.
12. Use un seguro de cable BELL (incluido con algunos modelos), un
cordón tensor o cuerda para afianzar los cuadros y ruedas de las bicicletas
y asegurar un transporte sin riesgo.
FUNCIÓN DE INCLINACIÓN PARA ACCESO RÁPIDO
13. Retire todas las bicicletas de los brazos de apoyo.
14. Sujete firmemente la barra vertical con una mano. Suelte el seguro de
retención de liberación rápida y quite el pasador. Figura G.
15. Incline el portabicicletas en dirección contraria a la del vehículo hasta
que llegue al tope. Evite golpear el suelo con las tapas reflectoras. Figura H.
16. Después de volver a colocar el portabicicletas de enganche en
posición vertical, asegúrese que el pasador esté insertado por completo
en la ranura de inclinación y que el seguro de retención esté firmemente
sujeto.
USO DEL CABLE DE SEGURIDAD
17. Pase los cables a través de los cuadros y ruedas de sus bicicletas,
canalizándolos hacia el anillo o lazo de seguridad en la base de la barra
del portabicicletas. El cable está configurado para cerrarse sobre sí mismo
cuando se pasa por el anillo de seguridad de la barra, con el retenedor
deslizable o contra el perno de enganche, como se ilustra. Figura N y O.
IMPORTANTE
Antes de cada uso, verifique que TODAS las correas y pernos estén
apretados firmemente y que usted está usando un cable de seguridad bien
apretado y asegurado.
F
Español
GE H
ONM
13
Page 14

Avertissements
AVERTISSEMENTS
Ce porte-vélos est conçu pour être fixé en toute sécurité sur la
plupart des attache-remorque de voiture. Étant données les variations
importantes liées à la conception et à la fabrication des automobiles,
nous ne pouvons garantir que ce produit s’adapte à toutes les voitures.
Vous êtes responsable de l’usage correct du produit et de sa sécurité.
Certaines attache-remorque ne permettent pas l’insertion totale des
tubes d’insertion. Ne pas utiliser le porte-vélos si le boulon de fixation
ne peut pas passer à travers l’orifice de la partie réceptrice de l’attacheremorque et se visser dans l’insert tubulaire fileté.
Sur certains véhicules, la sécurité liée à l’installation d’un porte-vélos
n’est pas suffisante. Nous conseillons de vérifier auprès du fabricant
de l’attache-remorque si la barre est assez résistante pour supporter la
charge des vélos.
Ce porte-vélos est conçu pour les voitures, camions et véhicules
utilitaires sport ayant une capacité de charge suffisante. Ne pas utiliser
ce porte-vélos sur des caravanes, remorques ou véhicules de camping ;
ces véhicules exercent des forces qui dépassent la capacité du porte-vélos
et l’endommageront ! Si vous avez besoin d’un porte-vélos pour ce type
de véhicule, adressez-vous au concessionnaire régional de véhicules
de campings pour toute information sur les méthodes appropriées.
Ne jamais utiliser une méthode de fixation autre de celle fournie
(boulon, goupille à oreilles plates, verrou à câble). L’usage d’une
goupille non filetée ou d’un écrou non normalisé risque d’entraîner
la perte du porte-vélos et de sa charge.
La fixation ou l’usage incorrect de ce porte-vélos peut être dangereux
et risque d’endommager vos vélos, votre véhicule et de provoquer des
accidents avec les véhicules roulant derrière vous (par collision ou en
essayant d’éviter les vélos et le porte-vélos).
IMPORTANT
Vous être responsable d’utiliser votre bon sens lorsque vous installez ce
porte-vélos pour ne pas endommager votre véhicule.
1. Même si le porte-vélos est conçu pour maintenir les vélos à
distance de la carrosserie du véhicule, faire preuve de prudence
pendant l’installation et le chargement du porte-vélos pour éviter
de rayer ou d’abîmer la voiture.
2. Un porte-vélos sans charge est difficilement visible, même avec
les supports rouges et les embouts réfléchissants. Lorsque
le véhicule est stationné dans un endroit à grande circulation,
il est conseillé d’attacher un drapeau de signalisation ou autre
accessoire similaire à l’extrémité du porte-vélos.
14
Français
Page 15

Avertissements
IMPORTANT
UTILISATION CORRECTE ET PRUDENTE DU PORTE-VÉLOS
1. Toujours fixer les vélos au porte-vélos grâce aux supports et
sangles. Il est préférable d’utiliser en plus le verrou à câble
(inclus avec certains modèles), une corde ou un cordon de serrage.
Les supports individuels offrent une fixation solide mais devraient
être renforcés pour plus de sécurité.
2. NE JAMAIS conduire avec une charge en faisant du tout-terrain
ou sur une route sans revêtement.
3. Certaines attaches sont installées très bas et près du sol,
particulièrement si le véhicule est très chargé (personnes et
bagages). Faire tout particulièrement attention à l’entrée ou
à la sortie des voies d’accès pour éviter d’endommager les
roues des vélos.
4. TOUJOURS placer les pneus de bicyclette à distance du pot
d’échappement. Les gaz d’échappement brûlants feraient
fondre et détruiraient les pneus.
5. Si une sangle semble usée ou endommagée, LA REMPLACER !
Les sangles endommagées sont très dangereuses. Des pièces de
rechange sont disponibles auprès de notre service après-vente,
en composant le 1 800 456 BELL.
6. La charge maximale varie de 2 vélos/32 kg (70 livres) à
4 vélos/54 kg (120 livres).
7. Inspecter et vérifier les sangles et le boulon de fixation du
porte-vélos avant et après le chargement ; le poids des vélos
risque de détendre les sangles.
8. Vérifier les sangles régulièrement pendant l’utilisation, surtout
sur des routes accidentées, ou immédiatement si la position des
vélos semble avoir changé.
9. Toujours s’assurer que les cadres de vélo RESTENT sur les bras
de support. Ne jamais suspendre les vélos au-dessous des bras
du supports.
10. Le nettoyage des bras de support optimise l’adhérence. Les nettoyer
avec de l’eau et du savon uniquement, puis les rincer et laisser
sécher complètement. Ne pas utiliser de détergents sous peine
d’endommager les sangles et les supports.
11. Même si cela est possible et n’est pas susceptible d’endommager
le porte-vélos, nous conseillons de plier le porte-vélos en
l’éloignant de la voiture et seulement quand il n’est pas chargé.
Une charge complète de vélos peut être lourde à sortir et à
soulever. Risque de pincement de doigts ou de rayure de la
peinture des vélos.
12. Ne jamais laisser des vélos dépourvus d’anti-vol sans surveillance.
Les vols sont fréquents ! Fixer les vélos au porte-vélos avec l’anti vols à verrou et câble ou toute autre méthode d’anti-vols. BELL offre
une gamme excellente d’anti-vols pour vélos qui sont portables,
efficaces et résistants.
13. Lorsque le support est inutilisé ou démonté de la voiture, le faire
reposer à plat, en lieu sûr, avec les extrémités tournées vers le haut.
Ne pas le placer à un endroit où l’on pourrait trébucher ou rouler
dessus et l’endommager.
Français
15
Page 16

Conseils pour l’installation
BRAS DE SUPPORT DES VÉLOS
1
Les bras de support doivent être
positionnés de façon à faire un angle
supérieur à l’horizontal pour améliorer le
maintien des vélos pendant le transport
et aussi pour les éloigner du véhicule.
Pour obtenir l’angle correct, il faut ajuster
les points du dispositif d’accrochage sur
le châssis de la voiture.
ASSEMBLAGE DU BRAS DE SUPPORT
2
Une fois assemblé, le bras de support est
conçu pour rester stable. Après le premier
voyage, vérifier les boulons et les
serrer au besoin.
3
BOULON DE FIXATION
La zone de montage du porte-vélos se
trouve à l’arrière du véhicule, ce qui la
rend humide et poussiéreuse. Nettoyer
et graisser les filetages du boulon et
du tube d’insertion pour faciliter
l’installation et le retrait.
TUBE D’INSERTION À L’ATTACHE AVEC
4
ÉCROU FILETÉ ET CALE D’INSERTION
Ce tube est conçu pour des attacheremorque de 5,08 et 3,17 cm
(2 et 11/4 pouces). L’attelage d’origine
ou autre peut varier par rapport à
ces tailles et nous avons donc fourni
un boulon de fixation fileté pour
réduire le jeu sur ce type de montage,
afin d’améliorer la stabilité des vélos
pendant le transport.
2
9
5
SYSTÈME DE MONTANT VERTICAL
5
Fabriqué en acier à revêtement
polymérisé résistant, notre montant est
le meilleur compromis entre la facilité de
chargement et une garde au sol suffisante
pour un véhicule pleinement chargé.
BOUCLE DE VERROUILLAGE
6
Nos porte-vélos incluent un support de
renfort qui fait double usage et sert aussi
de boucle de verrouillage pour câbles.
Lorsqu’on dispose d’un câble d’un autre
fabricant, on peut le passer dans
cette boucle pour fixer les vélos
au porte-vélos.
16
8
6
3
4
Français
Page 17

Conseils d’installation
1
CÂBLE DE BLOCAGE À CLÉ
7
(INCLUS AVEC CERTAINS MODÈLES)
Ce câble est très long pour faciliter et
accélérer la fixation de tous les vélos. Il
offre deux options de verrouillage. Pour
sécuriser totalement le système, vous
pouvez verrouiller le câble en l’enroulant
sur lui-même et en utilisant la baïonnette
coulissante ou en le fixant à l’extrémité
visible du boulon d’accroche-remorque.
Toujours verrouiller les vélos y compris lors
de voyages de courte durée. Les vols sont
fréquents ! Les clés fournies devraient être
disponibles en permanence. Faire faire des
doubles et les placer dans chaque véhicule
7
en cas de besoin.
PIVOT INCLINABLE
8
Ce mécanisme d’inclinaison simple
fournira, pendant des années, un accès
rapide au véhicule avant et après une
promenade. S’il y a du jeu dans le système
de montant de support, serrer à fond le
boulon jusqu’à ce que le jeu disparaisse.
Français
GOUPILLE DE BLOCAGE
9
(Compris UNIQUEMENT sur les porte-vélos
pliants) La goupille permet d’abaisser
les bras de support et de les replier
quand on ne les utilise pas. La goupille
est très robuste et sécurisée, ce qui doit
vous rassurer quand vous transportez
vos vélos. Elle est fournie attachée au
montant vertical et difficile à perdre. Elle
comporte une goupille de sécurité qui la
maintient en place.
17
Page 18

Installation
1. Nettoyer ou brosser l’intérieur de l’attache-remorque pour qu’elle ne
comporte aucun débris accumulé pendant la route. Figure A.
2. Insérer le porte-vélos jusqu’à ce que les orifices filetés s’alignent
sur ceux du tube porteur/récepteur de l’attache. Pour installer sur une
attache-remorque de 3,17 cm (1
d’insertion et la vis. Figure B.
3. Insérer le boulon de fixation puis le serrer. TOUJOURS insérer le boulon
en l’enfonçant du côté conducteur ; ceci améliore la stabilité du portevélos dans l’attache. En utilisant le système de montant vertical comme
appui, faire jouer le porte-vélos d’avant en arrière. Vérifier et serrer le
boulon de fixation au besoin. Installer la goupille à oreilles dans l’orifice à
l’extrémité du boulon de fixation. Figure C.
4. Installer le bras inférieur de l’attache au montant vertical. Aligner les
trous, insérer et fixer les boulons, les rondelles et les écrous du cadre
inférieur. Bien serrer. Figura D.
5. Installer l’assemblage du bras de support. Aligner les trous, insérer et fixer
les boulons, les rondelles et les écrous du cadre supérieur. Serrer. Figure E.
6. Sur terrain plat, vérifier que les bras de support sont orientés vers le
haut et font un angle avec le plan horizontal. Si l’angle d’inclinaison est
inférieur à l’horizontal, ne pas charger le porte-vélos. L’attache doit être
réglée par un professionnel spécialiste en installation d’attaches avant
que le porte-vélos puisse être utilisé. Figure F.
7. (Compris UNIQUEMENT sur les porte-vélos pliants) Vérifier le pivot
d’inclinaison en retirant la goupille du pivot puis en pliant le porte-vélos en
l’éloignant de la voiture. Le porte-vélos doit bouger librement vers le bas,
assez pour ne pas obstruer le coffre ou les hayons de la plupart des voitures.
Le boulon de pivot doit avoir un jeu minimal. Dans le cas contraire, vérifier le
serrage du boulon et de l’écrou du pivot. Noter la distance entre la porte du
véhicule et le montant vertical. Faire pivoter ce dernier vers l’arrière en position
verticale puis réinstaller la goupille de pivot et le clip de retenue.
et I.
CHARGER LES VÉLOS DANS LES SUPPORTS INDIVIDUELS. SERRER TOUTES LES
SANGLES AUTOUR DES TUBES DE TIGE DE SELLE OU DE GUIDON, EN UTILISANT LES
SUPPORTS INDIVIDUELS.
8. Pour relever les bras de support, enlever la goupille de sécurité de la
goupille de blocage. Retirer la goupille de blocage du montant vertical.
Relever les bras de support et insérer de nouveau la goupille de blocage à
travers le montant vertical et fixer la goupille de sécurité.
Figures M, N et O.
1
/4 pouces), retirer simplement la cale
Figures G, H
18
B
J K LI
DCA
Français
Page 19

Utilisation du porte-vélos
9. Charger le premier vélo avec le côté chaîne orienté vers l’extérieur
(côté éloigné du véhicule). Alterner l’orientation des vélos pour faciliter
le chargement et éviter que les guidons ne s’emmêlent.
10. Charger chaque vélo de telle manière que le tube supérieur repose sur
les supports.
11. Faire passer chaque sangle au-dessus des tubes de cadre, dans la
boucle de support, tirer dessus puis recouvrir le côté crochets de la sangle
avec le côté velours. Bouger chaque vélo pour s’assurer que les sangles
sont bien fixées. La sangle du support est conçue pour s’adapter à de
nombreuses tailles de cadre et rester opérationnelle avec des températures
et dans des conditions climatiques diverses. Figures L et M.
12. Utiliser un verrou à câble BELL (inclus avec certains modèles), un
cordon de serrage ou une corde pour fixer les cadres et les roues des vélos
pour sécuriser le transport.
UTILISATION DE LA FONCTION DE BASCULEMENT POUR ACCÈS RAPIDE
13. Retirer tous les vélos des bras de support.
14. D’une main, maintenir avec fermeté le montant vertical. Retirer le clip de
retenue du système de libération rapide et retirer la goupille. Figure G.
15. Faire basculer le support en l’éloignant du véhicule jusqu’à ce qu’il
atteigne sa butée. Essayer de ne pas toucher le sol avec les embouts
réfléchissants. Figure H.
16. Après avoir remis le porte-vélos en position verticale, s’assurer que la
goupille est complètement insérée dans la gorge du pivot d’inclinaison et
que le clip de retenue est bien installé sur la goupille.
UTILISATION DU CÂBLE DE VERROUILLAGE À CLÉ
17. Faire passer les câbles dans les cadres et les roues de vélo, en les
acheminant vers la boucle de verrouillage à la base du montant de support
vertical. Le câble est configuré pour passer dans la boucle de verrouillage à
la base du montant vertical et se verrouiller avec la baïonnette coulissante
ou sur le boulon du porte-vélos, comme illustré. Figures N et O.
IMPORTANT
Avant toute utilisation, vérifier que TOUS les boulons et sangles sont
bien serrés et, le cas échéant, que le câble d’anti-vols est bien serré et
verrouillé.
F
Français
GE H
ONM
19
Page 20

If you have questions regarding the installation of your carrier,
you may call us at 1-800-456-BELL, or write to us at
1924 County Road 3000 North, Rantoul, IL 61866-9512.
Si tienes alguna pregunta sobre la instalación de tu portabicicletas,
comunícate con nosotros al 1 800 456 BELL o escríbenos a
1924 County Road 3000 North, Rantoul, Il 61866-9512.
Pour toutes questions concernant l’installation du porte-vélos,
composez le 1 800 456 BELL ou écrivez-nous à l’adresse suivante :
1924 County Road 3000 North Rantoul, Il 61866-9512, États-Unis d’Amérique
©2008 Bell Sports, Inc.
www.bellbikestuff.com
Printed in China. Impreso en China. Imprimé en Chine.
Instruction Manual #5000758300
 Loading...