

Page 1
Bell Wireless speedometer
with calorie counter
™
Page 2
1
2
3
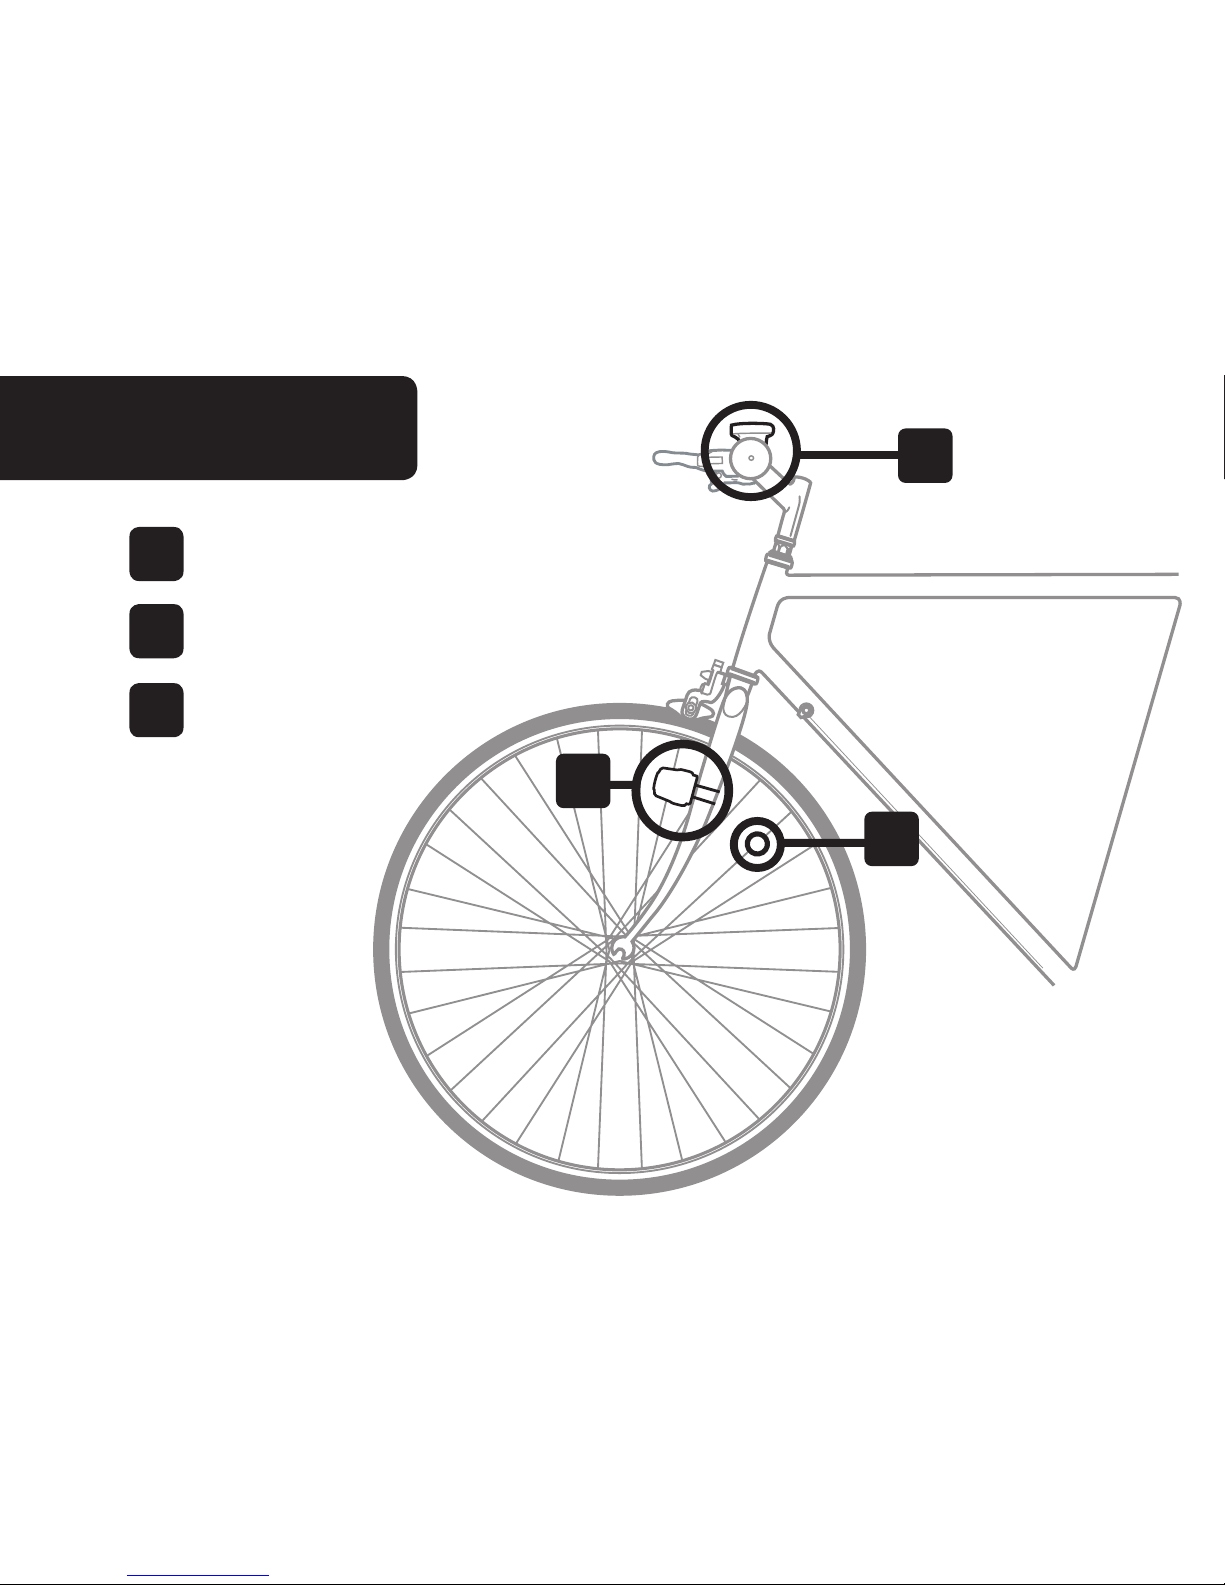
OVERVIEW
1 Computer & Bracket
2 Computer Sensor
3 Magnet
NOTE: Follow
instructions
carefully. Proper
installation and
adjustment may
take up to 30
minutes.
Page 3
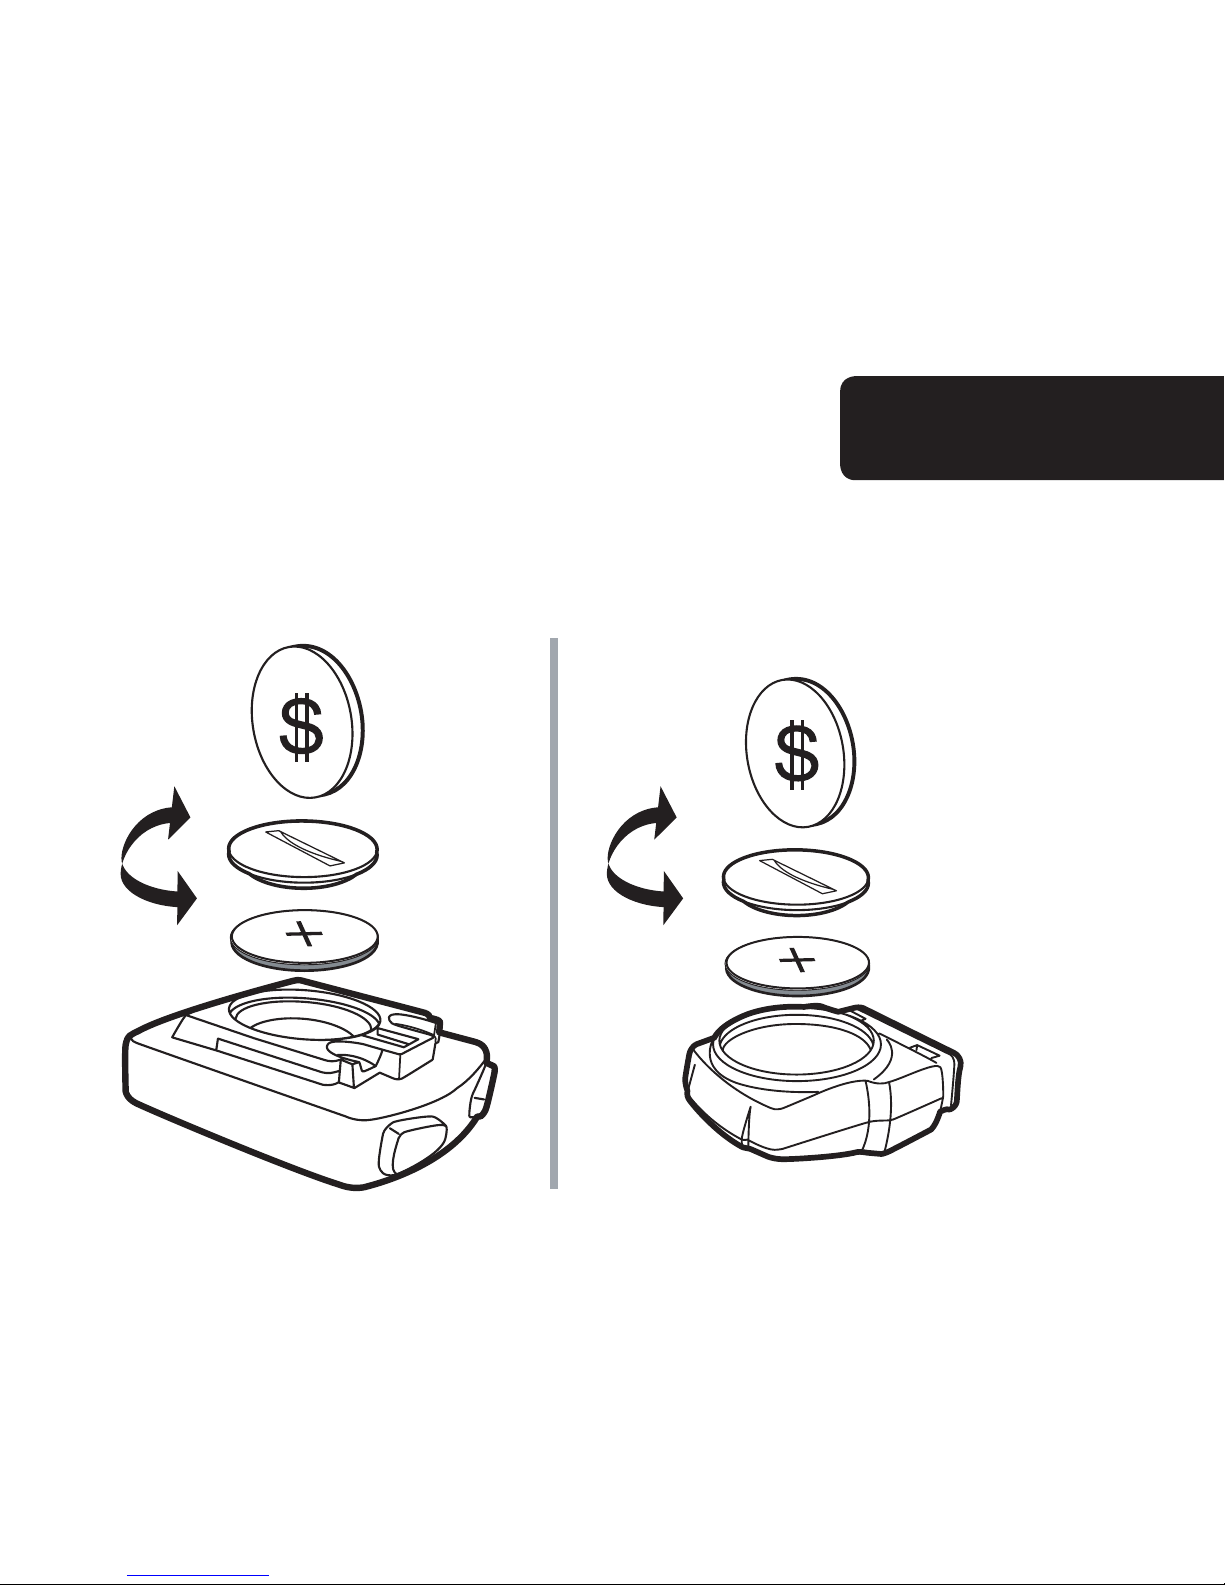
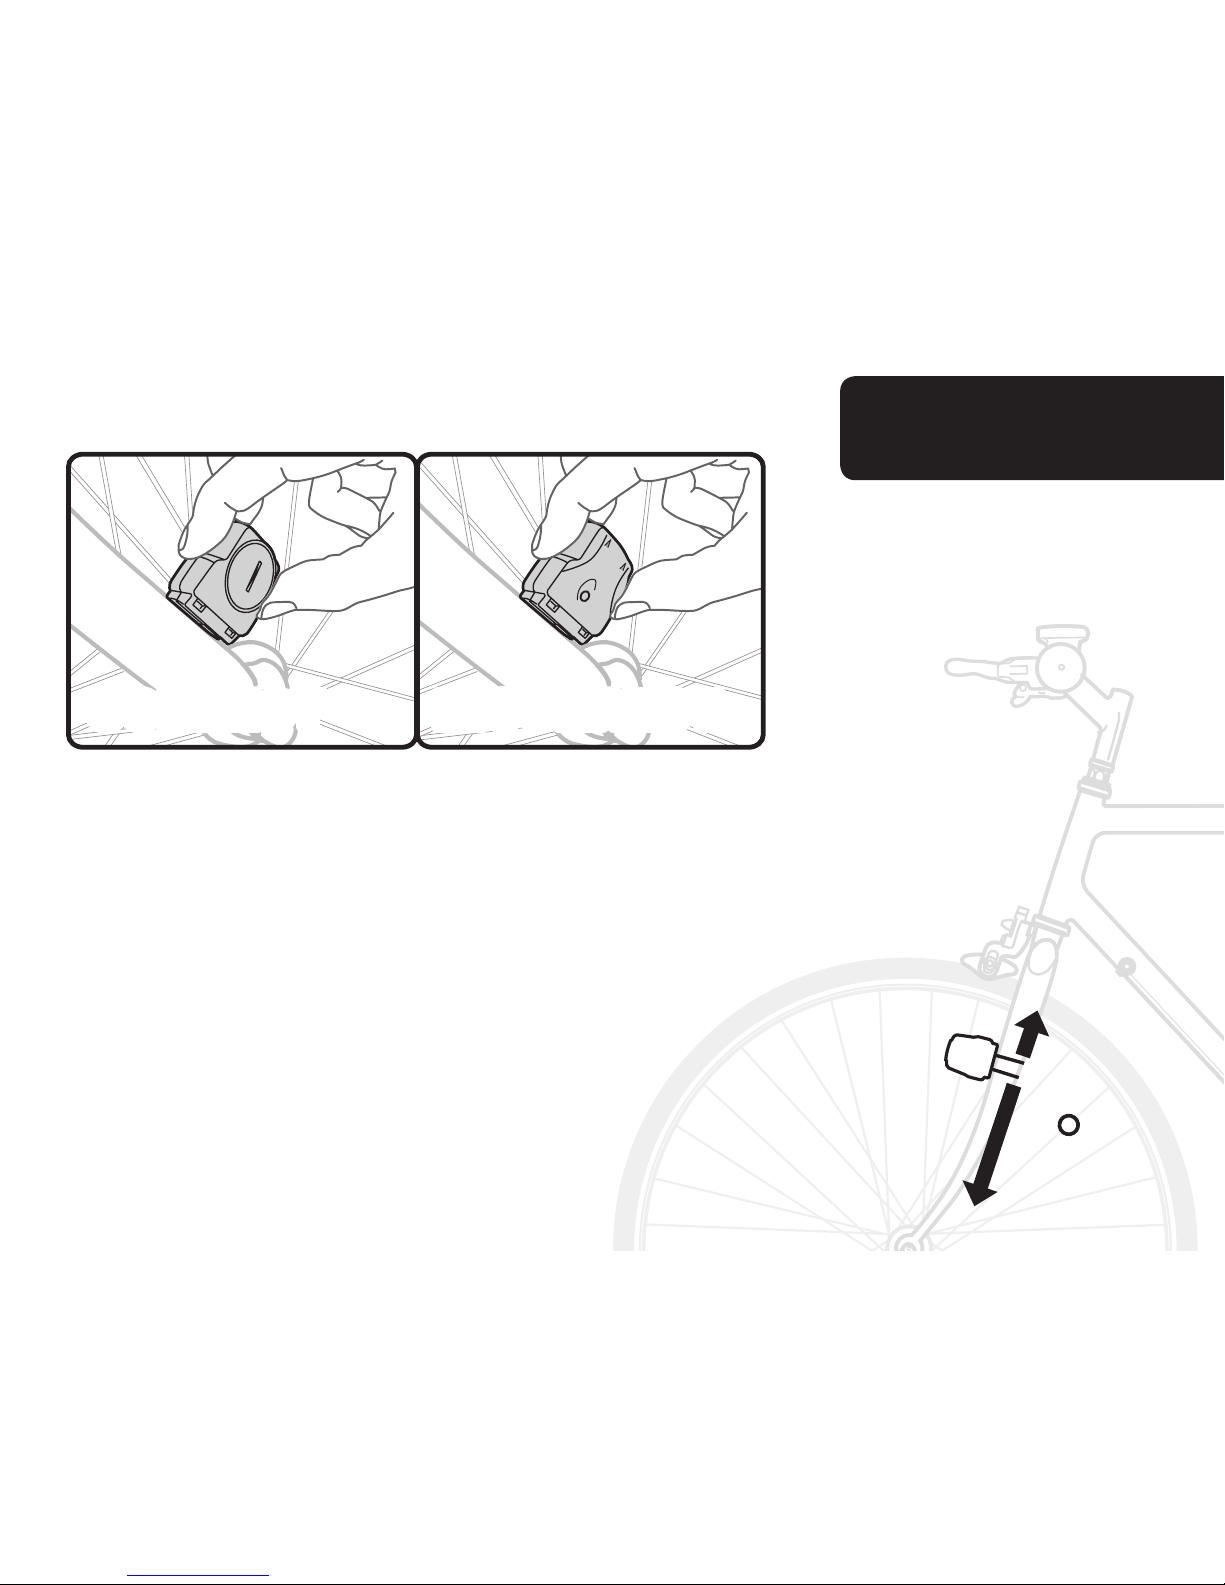
Install Batteries
STEP 1
Computer Sensor
Use a small coin to remove the battery cover from
the computer. Place provided battery (3.0V/CR2032)
in unit with positive side facing up and replace
battery cover. NOTE: Sensor comes with same
type of battery pre-installed. Directions provided for battery replacement.
For optimal performance,
we recommend changing
the sensor battery whenever you change the
speedometer battery.
3.0V/CR2032
3.0V/CR2032
Page 4
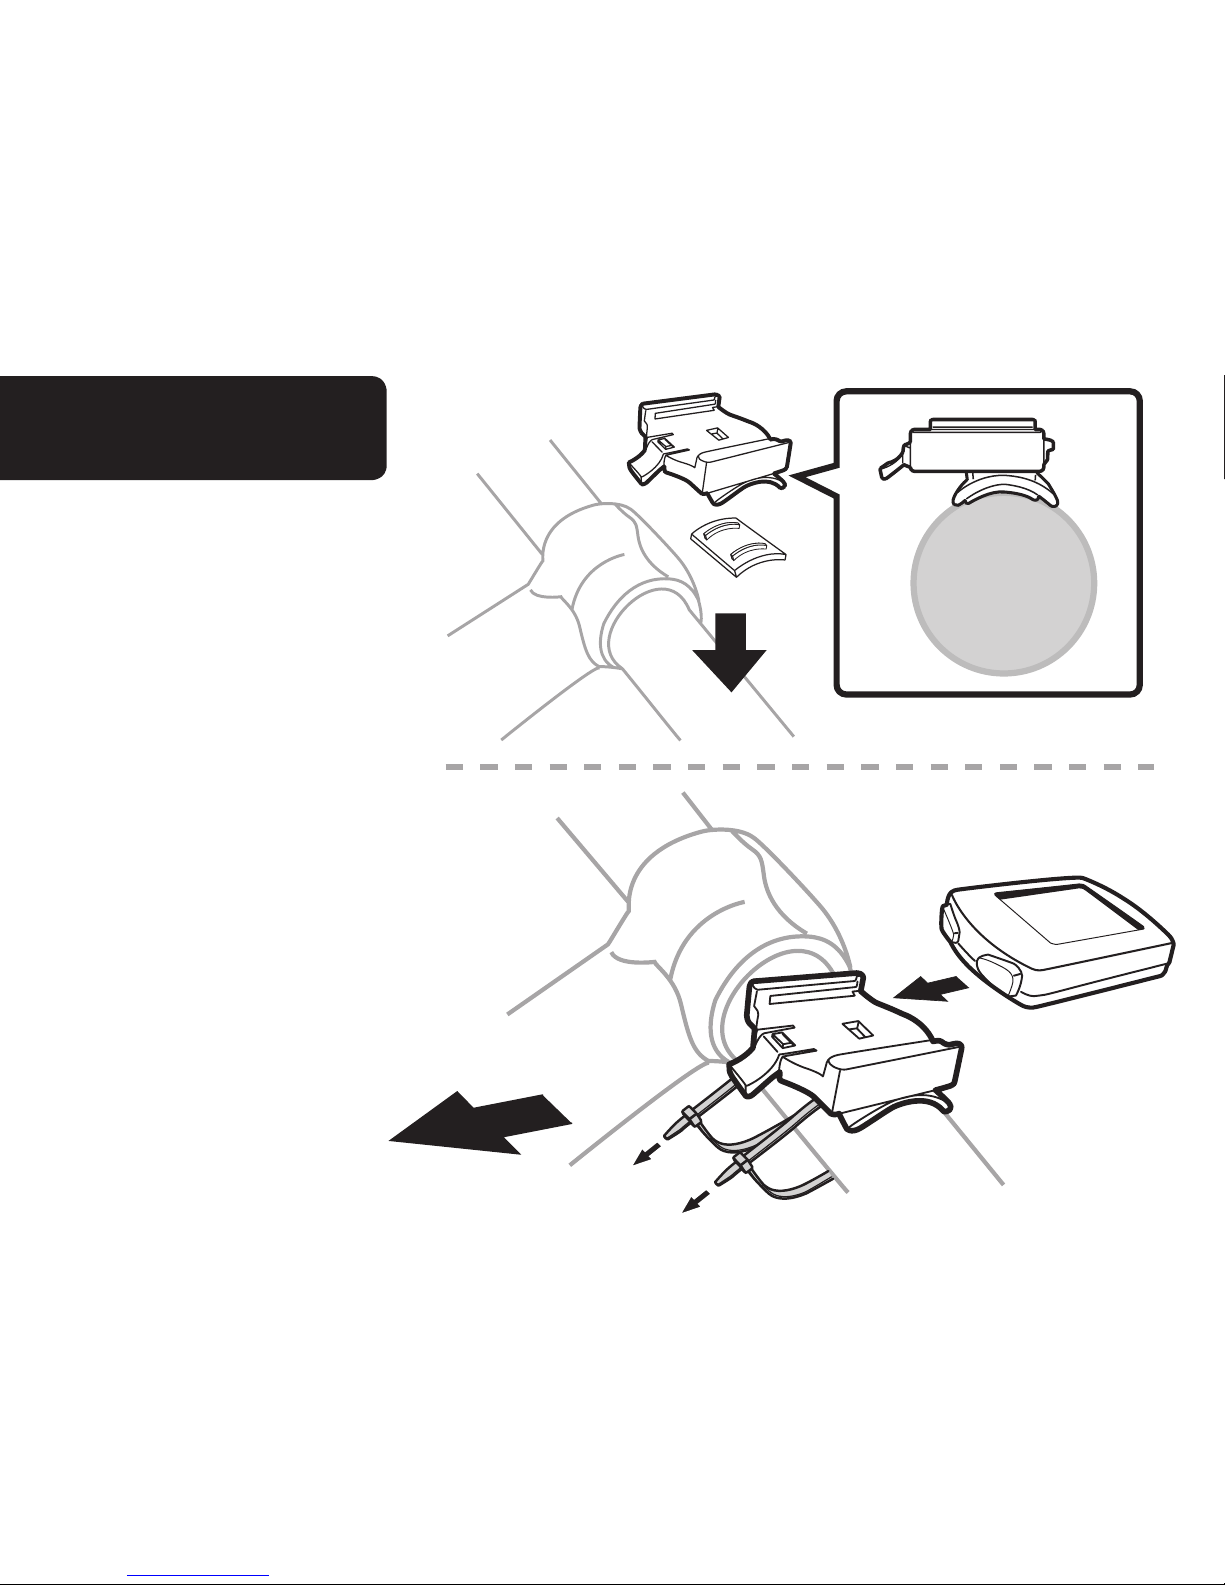
Install Computer
Bracket
STEP 2
Remove the adhesive
tape shield and position
the bracket on the
handle bar. Secure the
bracket using two of
the zip ties provided.
Insert the computer
into the bracket
Make sure bracket tab
is facing toward bike as
shown in illustration.
Page 5
Install Computer
Sensor
STEP 3
Position the computer sensor on the right front fork so that:
A) The battery compartment faces away from the bike.
B) The sensor is as close to the spokes as possible.
You can adjust the positioning up or down the
fork as necessary.
Secure the sensor using 1 zip tie. Do not tighten
completely as further adjustments to the sensor
position will be necessary.
CORRECTCORRECT
INCORRECTINCORRECT
Page 6
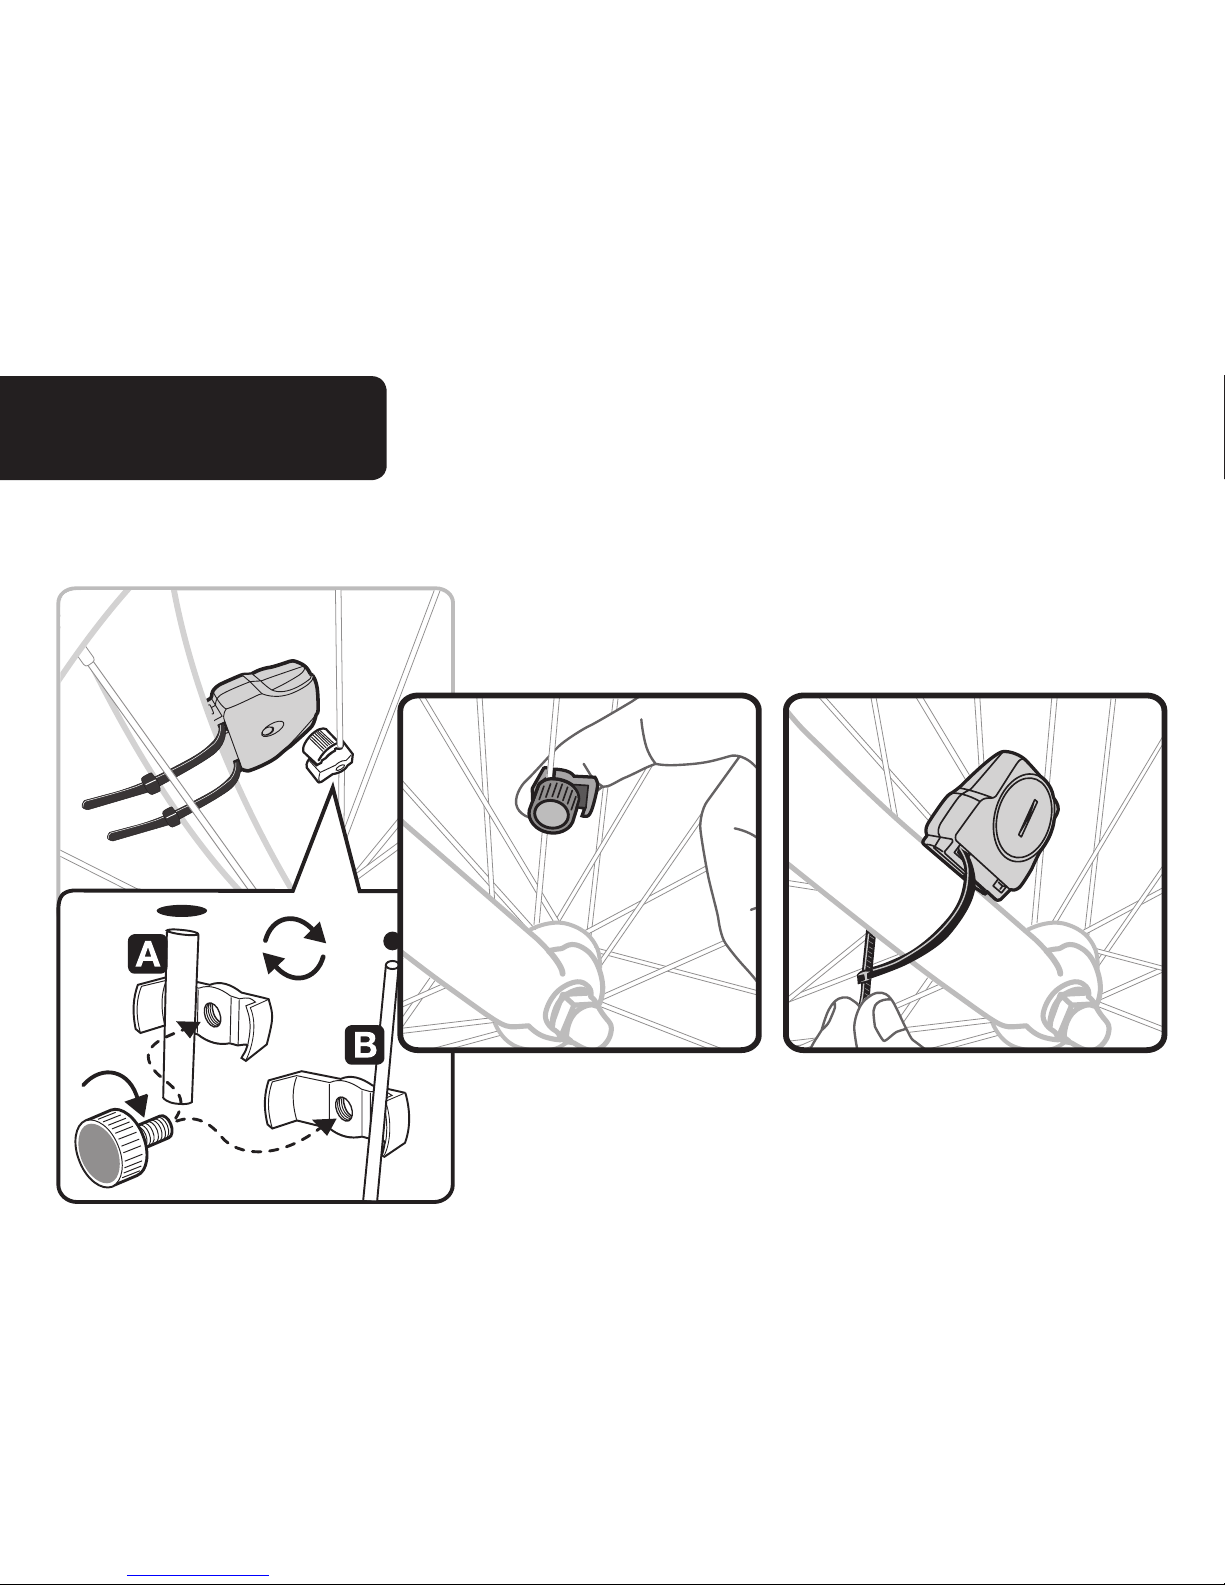
Install Magnet
STEP 4
Secure the magnet to a spoke on the right side of
the front wheel. Clamp will work with both (A) thick
and (B) thin spokes. Screw to tighten. Make sure
magnet faces toward the outside of the wheel.
Page 7
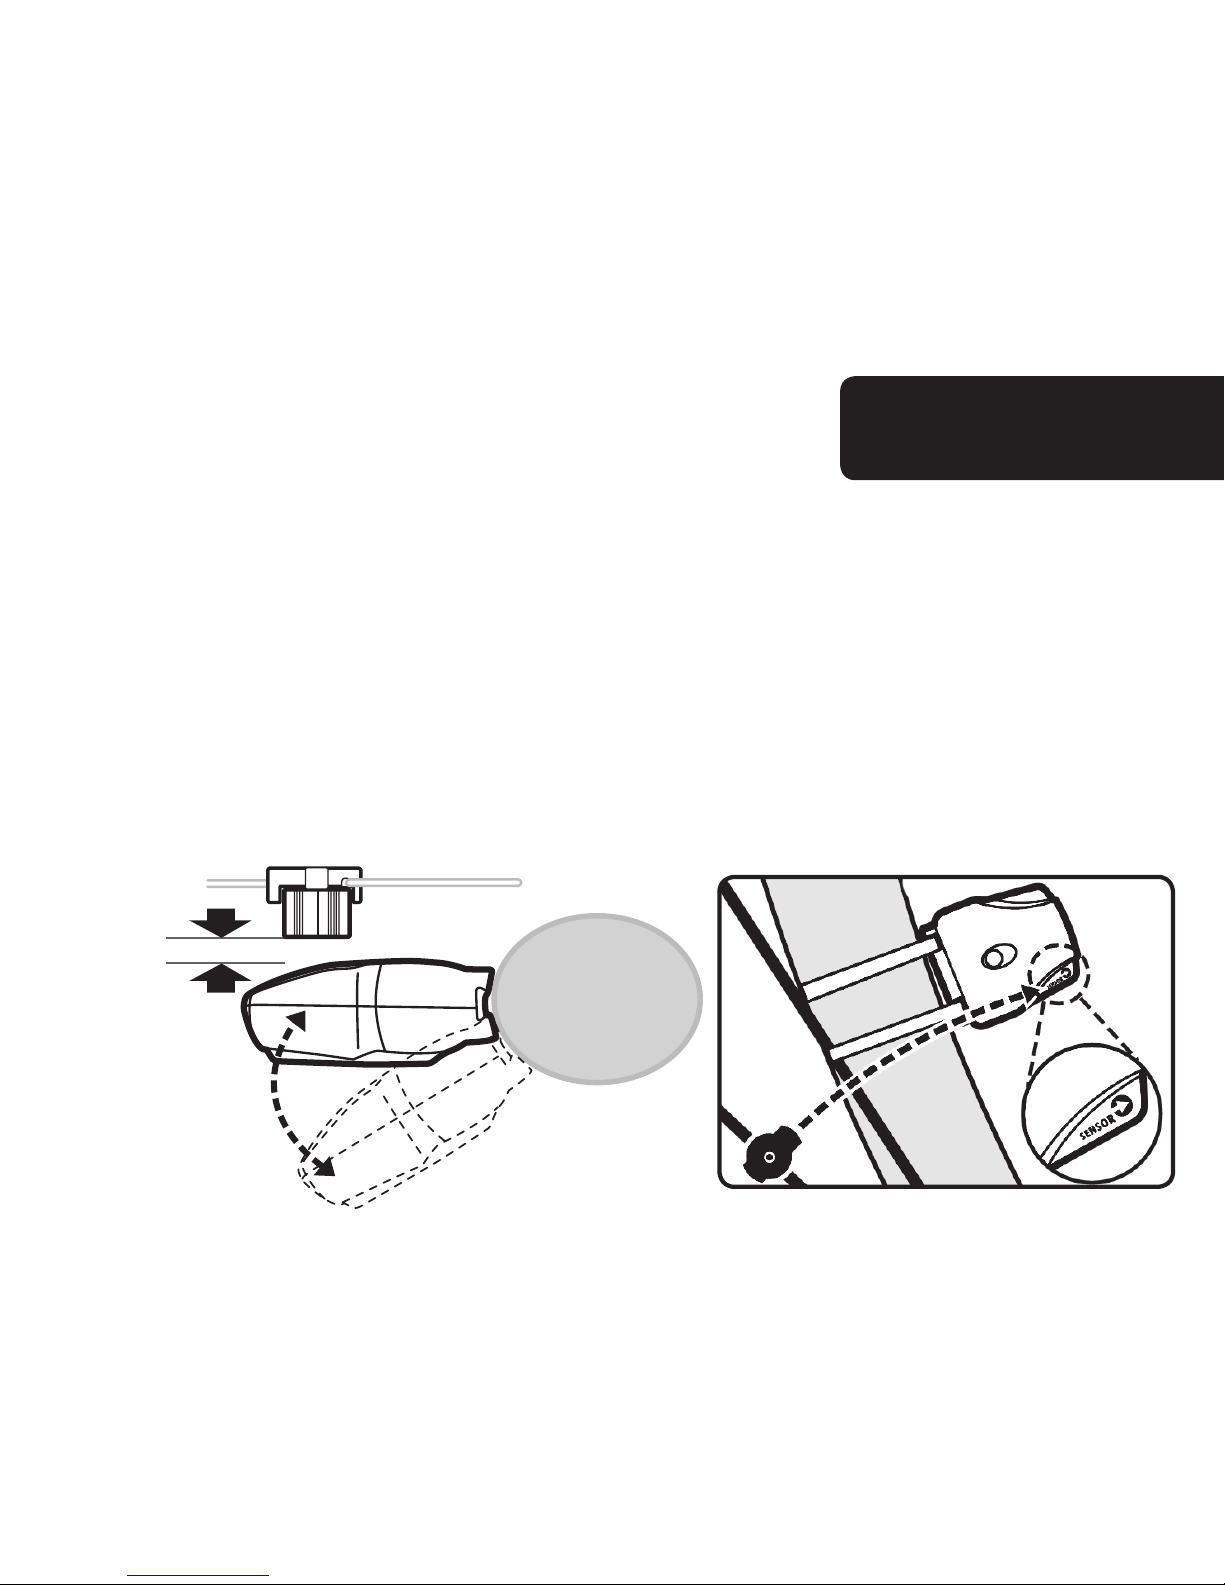
Fine Tune
Magnet/Sensor
Positioning
STEP 5
Adjust the sensor & magnet location so that:
A) The magnet passes by the edge of the sensor
marked with the arrow when the wheel rotates
B) There is no more than 1⁄8"(3 mm) clearance
between the sensor and the magnet
Now lift & spin the front tire. The computer display
will change with the spinning tire, if the sensor
and magnet are installed correctly. If the computer
display remains constant, further adjustment of the
sensor and magnet location is necessary.
(
3 mm
)
1
⁄8
"
MAX
Page 8

STEP 1: Set the Wheel Value– First, using the table provided, determine the correct, 4-digit, wheel value
based on the size of your tire. The wheel value is the distance in millimeters per one revolution of the wheel.
Next, press and hold the left or right MODE button and the SET button for two seconds. The preset value “2124”
should appear with the digit “4” ashing. Press the right or left MODE button to modify the digit to the correct
setting (hold either MODE button down for fast advance). Once correct digit is shown, press the SET button to
move to the next digit. Repeat until all four digits are set to the correct wheel value for your bike.
NOTE: You can return to the wheel size input mode by pressing and holding both the MODE and SET buttons
for 3 seconds. Removing the battery will erase the wheel value.
STEP 2: Set KM or Mile Selection– After
setting the wheel value, the KM/M selection will
appear. Press the left or right MODE button to
choose kilometer or mile selection. Press the SET
button to conrm.
STEP 3: Input Age and Weight– After setting
the KM/M selection two numbers will appear. Enter
your age as the large number above the horizontal
line. Press the left or right MODE button to modify
the “ones” digit to the correct setting. Press the
SET button to conrm. Repeat for the “tens” digit.
Enter your weight as the smaller number below the horizontal line following the same steps.
By entering your actual age and weight, you will get a more accurate calculation of calories and fat burned
NOTE: The computer will default to kilograms (72.6kg) or pounds (160lb) based on your selection of kilometers
or miles respectively.
Road Bike
20" 1596
22" 1759
24" 1916
26" 2073
27"/700c 2124
Mountain Bike
24" 1888
26" 2045
27" 2155
28" 2237
Programming the ComPuter
Page 9

Programming the ComPuter
STEP 4: Set Distance for Maintenance Reminder– After setting age and weight, the preset number of
600 km (or miles) will ash. This is the default distance in KM or Miles for the Maintenance Reminder function.
Press the left or right MODE button to select 200, 400, 600 or 800 km (or mile) maintenance interval, then press
the SET button to conrm. When your odometer (ODO) reaches the selected distance interval, the wrench icon
( ) will ash, reminding you to service your bicycle (check tires and other parts for wear, lubricate chain,
etc…). Press the SET button to stop the wrench icon ( ) from ashing.
STEP 5: Set the Clock– Press and hold the SET button for two seconds. You will see a 12 or 24-hour digital
clock with a ashing colon at the bottom of computer display. To switch between the 12 and 24 hour format
press the left or right MODE button. Press the SET button to conrm. Next, the hour digits will start to ash. Use
the right or left MODE buttons to select the hour and press the SET button to conrm. Repeat for minutes digits.
Press the left or right MODE button to enter Odometer (ODO) mode.
STEP 6: Test to Ensure Proper Installation– Now that the computer is programmed, insert it into the
bracket. Spin the front wheel. The speed tendency icon in the upper left corner of the screen should be turning
as the computer starts recording data (Refer to Troubleshooting in case of problems).
Page 10
additional FunCtion modes
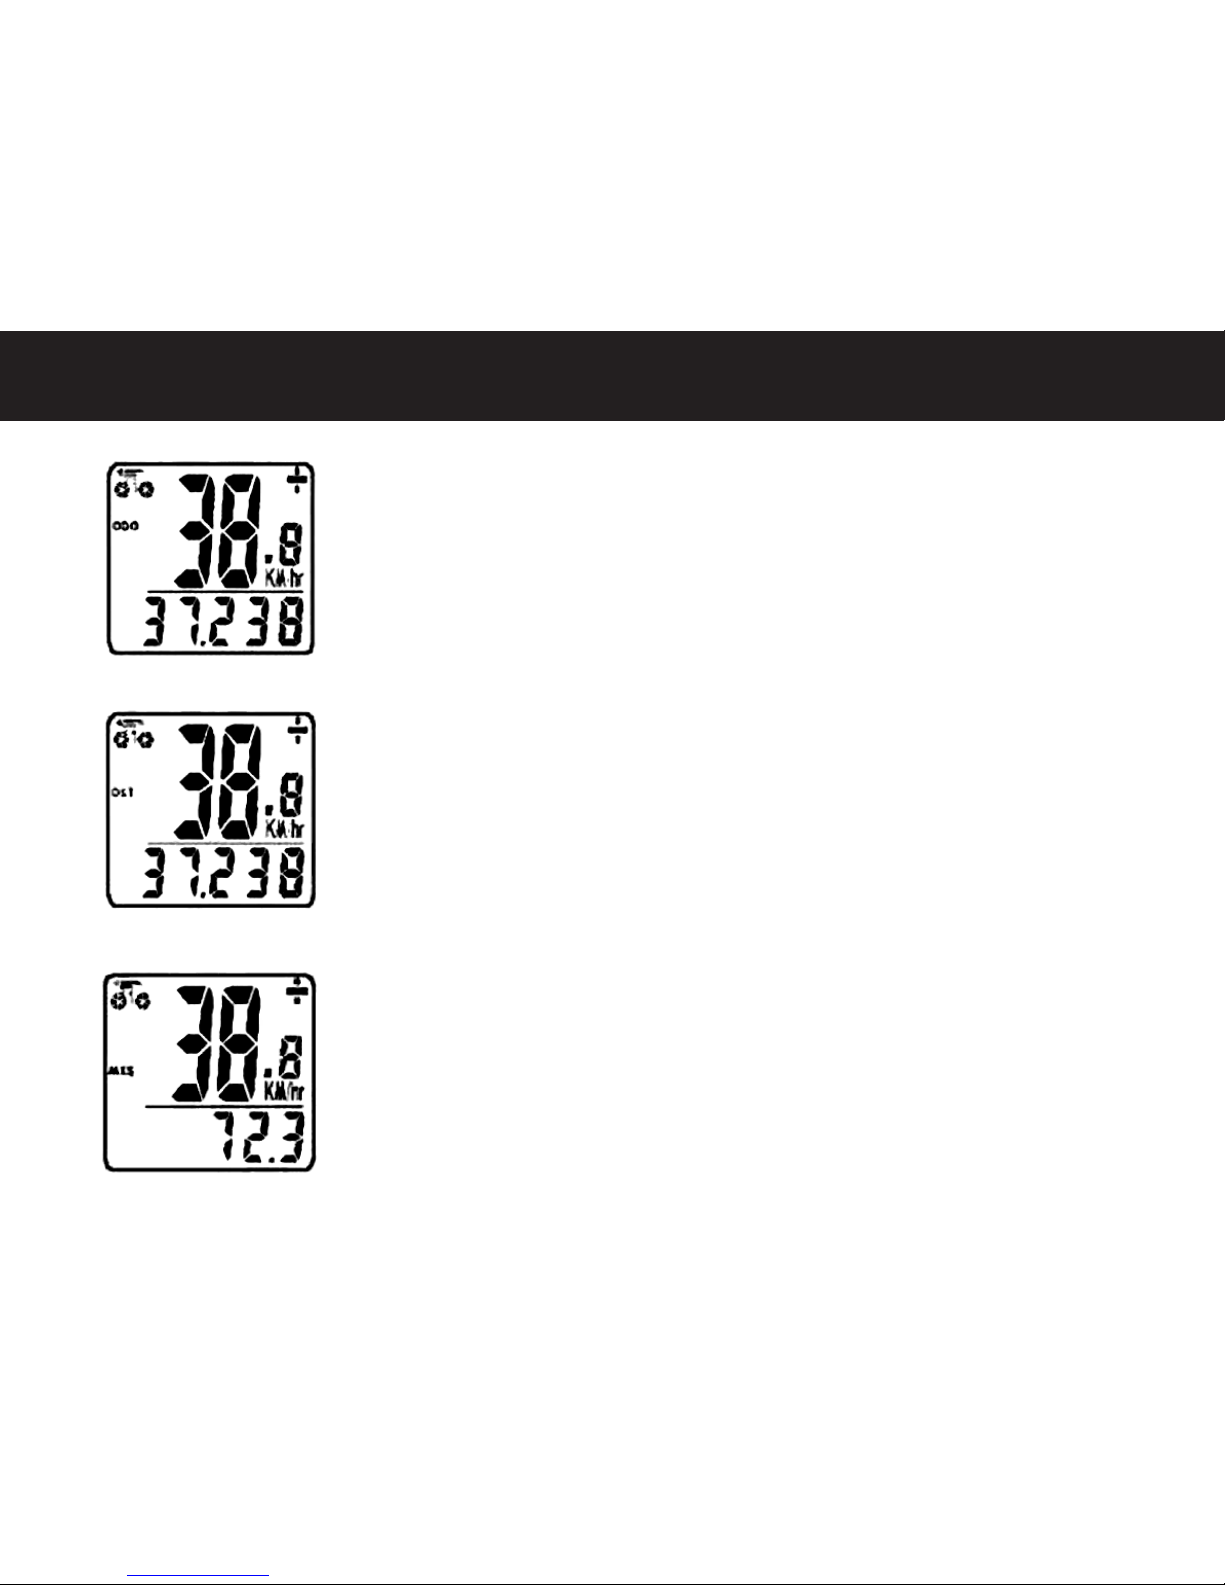
ODOMETER (ODO)– Total distance traveled is indicated by “ODO” and displayed
on the bottom line. To reset ODO, press the SET button for 2 seconds or remove and
replace the battery. Adjust each ashing digit by pressing either the left or right MODE
button and then press SET to conrm. Now press either MODE button to advance to
the DST mode.
TRIP METER (DST)– Trip distance is indicated by DST and is displayed on the
bottom line. The Trip Meter is activated automatically with speedometer input (comes
on automatically when you begin riding, turns off when you stop). To reset DST to zero,
press and hold the SET button for 2 seconds. Note that TM (Trip Time) & AVS (Average
Speed) will also be reset at that time. Now press either MODE button to advance to
the MXS mode.
MAXIMUM SPEED (MXS)– Maximum speed is indicated by MXS and is displayed
on the bottom line. Maximum speed is stored in memory and updates only when a
higher speed is reached. To reset MXS, press and hold the SET button for 2 seconds.
Now press either MODE button to advance to the Average Speed (AVS) mode.
Page 11

additional FunCtion modes
AVERAGE SPEED (AVS)– Average speed is indicated by AVS and is displayed on
the bottom line. AVS works in conjunction with the Trip Timer (TM) to calculate the
average speed for a specic trip. Now press either MODE button to advance to the
(TM) mode.
TRIP TIMER (TM)– Trip Timer is indicated by TM and is displayed on the bottom
line. The Trip Timer is activated automatically with computer input (comes on
automatically when you begin riding, turns off when you stop). It records only the time
actually spent riding. To reset TM to zero, return to DST (Trip Meter) mode and reset to
zero per the instructions above. Return to TM mode and press either MODE button to
advance to the Temperature mode.
TEMPERATURE (TEMP)– Your computer has a thermometer to measure outdoor
temperature. To select between Celsius (C) and Fahrenheit (F) readout, press and hold
the SET button for 2 seconds. Press either MODE button to select between C and F
and press the SET button to conrm. Now press either MODE button to advance to
the (CAL) mode.
Page 12

additional FunCtion modes
CALORIES BURNED (CAL)– This function estimates the number of calories burned
while riding, based on the age and weight inputed by the user. To reset CAL, press
and hold the SET button for 2 seconds. Now press either MODE button to advance to
the (FAT) mode.
FAT BURNED (FAT)– This function estimates the number of fat grams burned while
riding, based on the age and weight inputed by the user. To reset FAT, press and
hold the SET button for 2 seconds. Now press either MODE button to advance to the
(SCAN) mode.
SCAN – The Scan mode conveniently rotates DST, MXS, AVS, and TM readings on
the computer screen without the need to press any buttons. Now press either MODE
button to advance to the Clock mode.
Page 13

additional FunCtion modes
FREEZE FRAME MEMORY– At the end of a ride segment you can press the SET
button to set Freeze Frame Memory. This function locks the computer saving TM,
DST and AVS which will ash. Info can be read at a later time by pressing either
MODE button. To release the memory, press the SET button until the display digit is
static again. This is particularly useful when crossing the nish line of a time trial,
since the TM cannot be stopped manually.
ODOMETER SAVE FUNCTION– The SAVE function allows you to keep the impor-
tant data of total distance (ODO) even after battery replacement by pressing either
MODE button. To set ODO, after battery replacement and wheel size setting, press
right MODE button to ODO mode and then hold the SET button for 2 seconds until
the last digit ashes. To adjust number, press the MODE button and then press the
SET button to conrm and select digit to be input. Repeat this sequence to reach the
desired odometer value. Press the SET button again to return to normal ODO mode.
AUTO STOP/START– To preserve batteries, the cycle computer will automatically
switch off if the unit is left unused for over 5 to 6 minutes. Display will reappear with
a press on either button.
Page 14

additional FunCtion modes
SPEEDOMETER– Instantaneous Speed is indicated on the top line. The range of
measurement is from 0 to 99 KM/hr (0 to 99 M/hr) and accuracy is ±0.5 KM/hr (M/hr).
SPEEDOMETER COMPARATOR– A "+" or "-" sign appears to the right of the
speed. "+" indicates you are travelling faster than your average speed (AVS). A "-"
indicates you are riding slower than your average speed.
SPEED TENDENCY– A cyclist symbol appears to the left of the speed. The wheel turns
forward to indicate acceleration. The wheel turns backward to indicate deceleration.
EL BACKLIGHT– The EL backlight illuminates the computer screen for easier viewing in dark or low light
settings. It can be turned on in two ways:
1) Hold the left or right MODE button for 2 seconds.
2) The EL backlight will illuminate for 8 seconds and the computer will go into Scan mode. After 8 seconds, the
backlight will turn off and the computer will return to the previously set mode.
Page 15

troubleshooting
PROBLEM
No speedometer
display and/or no
data reading
Slow display
response
Display shows
irregular features
Black display
POSSIBLE CAUSE
Possible interference from electrical sources
Improper magnet/sensor alignment
Poor battery contact or low/dead battery
Temperature outside of operational
limits (0-60°C or 32-140°F)
Poor battery contact or low/dead battery
Temperature too hot or display exposed
to sunlight too long
Computer damaged or dropped
RECOMMENDED ACTION
Move computer to different area
Ensure speedometer sensor and magnet are
properly installed and aligned (p.3)
Replace Battery
Only use computer when temperature is
within operational limits
Replace battery
Only use computer when temperature is within
operational limits. Remove from sunlight
Computer is broken
No trip distance
reading
Improper sensor/magnet alignment Ensure proper alignment
Page 16

FCC Warning
This device complies with Part 15 of the FCC Rules. Operation is subject to the following two conditions: (1) This
device may not cause harmful interference, and (2) This device must accept any interference received, including
interference that may cause undesired operation.
WARNING: Changes or modications to this unit not expressly approved by the party responsible for
compliance could void the user's authority to operate the equipment.
NOTE: This equipment has been tested and found to comply with the limits for a Class B digital device,
pursuant to Part 15 of the FCC Rules. These limits are designed to provide reasonable protection against harmful
interference in a residential installation. This equipment generates uses and can radiate radio frequency energy
and, if not installed and used in accordance with the instructions, may cause harmful interference to radio
communications.
However, there is no guarantee that interference will not occur in a particular installation. If this equipment does
cause harmful interference to radio or television reception, which can be determined by turning the equipment
off and on, the user is encouraged to try to correct the interference by one or more of the following measures:
· Reorient or relocate the receiving antenna.
· Increase the separation between the equipment & receiver.
· Connect the equipment into an outlet on a circuit different from that to which the receiver is connected.
· Consult the dealer or an experienced radio/TV technician for help.
Page 17

1
2
3
1 Ordinateur et son support
2 Capteur
3 Aimant
REMARQUE : Suivre les instructions
attentivement. Pour faire l’installation
et l’ajustement correctement on peut
avoir besoin de jusqu’à 30 minutes.
VUE D’ENSEMBLE
Page 18

3.0V/CR2032
3.0V/CR2032
Installation
des piles
ÉTAPE 1
Ordinateur Capteur
En utilisant une petite pièce de monnaie, enlever le couvercle du compartiment des piles. Placer la pile fournie (3.0V/
CR2032) dans l’appareil en orientant le contact positif vers
le haut, puis replacer le couvercle. REMARQUE : le capteur
est fourni avec le même type de pile mais pré-installée. Les
instructions fournies sont pour le remplacement de la pile.
Pour obtenir des performances optimales, nous
recommandons de changer
la pile du capteur à chaque
remplacement de pile du
compteur kilométrique.
Page 19

Installation
du support de
l’ordinateur
ÉTAPE 2
Enlever la protection de
la bande adhésive et
positionner le support sur le
guidon. Assurer le support
en utilisant deux des attaches zip fournies. Insérer
l’ordinateur sur le support.
S’assurer que l’ergot du
support pointe vers la
bicyclette, comme le
montre l’illustration.
Page 20

Placer le capteur sur la branche de droite de la
fourche en s’assurant que :
A) Le compartiment de la pile fait face à l’extérieur.
B) Le capteur est aussi proche que possible des
rayons.
On peut ajuster le placement en remontant/des-
cendant le long de la branche de fourche, selon le
besoin. Fixer le capteur avec une attache zip. Ne
pas serrer à fond, car il y aura peut-être besoin de
réglages supplémentaires.
CORRECTCORRE CT
INCORRECTINCORRECT
ÉTAPE 3
Installation
du capteur de
l’ordinateur
Page 21

Fixer l’aimant sur un rayon sur la droite de la roue
avant. La pince s’accroche aussi bien sur les rayons
épais (A) ou ns (B). Visser pour serrer. S’assurer
que l’aimant fait face vers l’extérieur de la roue.
ÉTAPE 4
Installation de
l’aimant
Page 22

(
3 mm
)
1
⁄8
"
de pouce
MAX
ÉTAPE 5
Ajustement
de position en
vis-à-vis de
l’aimant et du
capteur
Ajuster la position du capteur et de l’aimant pour que :
A) L’aimant passe devant le bord du capteur èché
quand la roue tourne.
B) La distance entre l’aimant et le capteur lorsque
l’aimant passe devant le capteur ne dépasse pas 3mm.
Ensuite, soulever l’avant de la bicyclette et faire tourner la
roue avant. Si le capteur et l’aimant sont bien installés,
l’afchage de l’ordinateur doit varier. Si l’afchage
reste constant, il faut améliorer l’ajustement conjoint du
capteur et de l’aimant.
Page 23

Programmation de l’ordinateur
Bicyclette de randonnée
20" 1596
22" 1759
24" 1916
26" 2073
27"/700c 2124
Bicyclette de montagne
24" 1888
26" 2045
27" 2155
28" 2237
ÉTAPE 1 : Congurer la valeur de référence de la roue – À l’aide du tableau ci-joint, déterminer la
valeur de référence correcte, à quatre chiffres, caractérisant la roue, basée sur la dimension du pneu. La
valeur de référence de la roue est la distance en millimètres parcourue par une révolution de la roue (longueur
de la circonférence). Ensuite, appuyer sur le bouton MODE de gauche ou de droite et sur le bouton CONFIG
(SET) et les maintenir enfoncés pendant deux secondes. La valeur de consigne « 2124 » doit apparaître et son
quatrième chiffre clignoter. Appuyer sur le bouton
MODE de gauche ou de droite pour modier le
chiffre jusqu’à ce qu’il atteigne sa valeur correcte
(pour une avance rapide maintenir enfoncé le
bouton MODE, de droite ou de gauche). Une fois
que le chiffre correct apparaît, appuyer sur le
bouton CONFIG (SET) pour passer au chiffre
suivant. Recommencer l’opération jusqu’à ce
que les quatre chiffres aient la valeur de la
longueur de circonférence correcte de la roue
de la bicyclette.
REMARQUE : Il est possible de retourner au mode de saisie de la dimension de la roue en appuyant sur
les boutons MODE et CONFIG (SET) et en les maintenant enfoncés pendant trois secondes. Si on sort la pile
de son boîtier, cela efface la valeur de référence de la roue.
ÉTAPE 2 : Conguration : Choix entre km ou mille – Après avoir conguré la valeur de référence de
la roue, la sélection KM/M (km/mille) apparaît. Appuyer sur le bouton MODE droite ou gauche pour choisir
les kilomètres ou les milles. Appuyer sur le bouton CONFIG (SET) pour conrmer.
Page 24

Programmation de l’ordinateur
ÉTAPE 3 : Saisie de l’âge et du poids – Après avoir conguré le choix de l’unité km/mille, deux nombres appa-
raissent. On saisit son âge en gros caractères, au-dessus de la ligne horizontale. Saisir l’âge en appuyant sur le bouton
MODE de droite ou de gauche, pour accéder au chiffre des unités et le xer à sa valeur correcte. Appuyer sur le bouton
CONFIG (SET) pour conrmer. Recommencer pour le chiffre des dizaines. Saisir le poids dans le champ du nombre
plus petit, sous la ligne horizontale, en suivant les mêmes étapes que ci-dessus. La saisie de l'âge et du poids exacts
et de l'âge et du poids exacts exacts permet d’obtenir un calcul plus précis des calories et de la graisse « brûlées ».
REMARQUE : L’ordinateur choisira l’unité de poids par défaut en fonction de l’unité de distance choisie : kilogrammes
(par exemple 72,6 kg) si le choix est en kilomètres, livres (par exemple 160 livres) si le choix est en milles.
ÉTAPE 4 : Conguration de la distance comme rappel de l’entretien – Après la conguration de l’âge et du
poids, le nombre préconguré de 600 km (ou milles) apparaît en clignotant. Il s’agit de la distance en kilomètres ou en
milles au bout de laquelle l’ordinateur signalera automatiquement que la bicyclette a besoin d’entretien. Appuyer sur le
bouton MODE de droite ou de gauche pour choisir l’intervalle des interventions d’entretien, soit 200, 400, 600 ou 800 km
(ou milles), puis appuyer sur le bouton CONFIG (SET) pour conrmer. Quand le compteur kilométrique (ODO) atteindra la
distance correspondant à l’intervalle choisi, une icône de clé anglaise ( ) apparaîtra en clignotant pour rappeler qu’il
faut effectuer l’entretien de la bicyclette (vérier les pneus et autres pièces pour le graissage, l’usure, le graissage de la
chaîne, etc.) Pour arrêter le clignotement de l’icône de clé anglaise ( ), appuyer sur le bouton CONFIG (SET).
ÉTAPE 5 : Mise à l’heure – Appuyer sur le bouton CONFIG (SET) et le maintenir enfoncé pendant deux secondes.
Une horloge numérique de 12 ou 24 heures apparaît avec deux points clignotants [:] en bas de l’écran de l’ordinateur.
Pour passer du format 12 heures au format 24 heures, appuyer sur le bouton MODE droite ou gauche. Appuyer sur
le bouton CONFIG (SET) pour conrmer. Ensuite, les chiffres des heures commencent à clignoter. À l'aide des boutons
MODE droite ou gauche, choisir l'heure et appuyer sur le bouton CONFIG (SET) pour conrmer. Recommencer pour les
chiffres des minutes. Appuyer sur le bouton MODE droite ou gauche pour saisir le mode Compteur kilométrique (ODO).
ÉTAPE 6 : Test d’installation correcte – L’ordinateur étant désormais programmé, l’insérer sur son support.
Faire tourner la roue avant. L'icône du comparateur de vitesses dans le coin gauche, en haut de l’écran, devrait
commencer à tourner pendant que l’ordinateur commence à enregistrer les données (consulter la section
Dépannage si un problème survient).
Page 25

FonCtions suPPlémentaires
COMPTEUR KILOMÉTRIQUE (ODO) – La distance totale parcourue est indiquée
par « ODO » et afchée sur la ligne du bas. Pour remettre le compteur ODO à zéro,
appuyer sur le bouton CONFIG (SET) pendant deux secondes ou sortir la pile et la
remettre en place. Ajuster chacun des chiffres clignotants en appuyant sur le bouton
MODE droite ou gauche, puis appuyer sur CONFIG (SET) pour conrmer. Appuyer
maintenant sur l’un ou l’autre des boutons MODE pour avancer jusqu’au mode DST.
TOTALISATEUR PARTIEL (DST) – La distance parcourue pendant une course ou
randonnée est indiquée par DST et est afchée sur la ligne du bas. Le totalisateur
partiel est activé automatiquement par l'entrée d’information dans le compteur
kilométrique (activation automatique quand on commence à rouler et désactivation
quand on s’arrête de rouler). Pour remettre le totalisateur (DST) à zéro, appuyer sur le
bouton CONFIG (SET) et le maintenir enfoncé pendant deux secondes. Il faut noter que
les valeurs de la durée de la course (Trip Timer, TM) et de la vitesse moyenne (Average
Speed, AVS) sont également remises à zéro à ce stade là. Appuyer ensuite sur le
bouton MODE pour passer au mode Vitesse maximum (MXS).
VITESSE MAXIMUM (MXS) – La vitesse maximum est indiquée par le sigle MXS
et est afchée sur la ligne du bas. La vitesse maximum est enregistrée dans la
mémoire et ne s’actualise que si l'on atteint une vitesse supérieure. Pour remettre
la valeur MXS à zéro, appuyer sur le bouton CONFIG (SET) et le maintenir enfoncé
pendant deux secondes. Appuyer ensuite sur l’un ou l’autre des boutons MODE pour
passer au mode Vitesse moyenne (AVS).
Page 26

FonCtions suPPlémentaires
VITESSE MOYENNE (AVS) – La vitesse moyenne est indiquée par le sigle AVS et est
afchée sur la ligne du bas. La vitesse moyenne fonctionne de pair avec le Chronométrage (TM) pour le calcul de la vitesse moyenne d’une course particulière. Appuyer sur
l’un ou l’autre des boutons MODE pour passer au mode Chronométrage (TM).
CHRONOMÉTRAGE (TM) – Le chronométrage de la course est indiqué par TM et
est afché sur la ligne du bas. Le chronométrage est activé automatiquement par
l'entrée d’information dans le compteur kilométrique (activation automatique quand
on commence à rouler et désactivation quand on s’arrête de rouler). Le chronomètre
n’enregistre que la durée effective du pédalage. Pour remettre le chronomètre TM à
zéro, repasser en mode Totalisateur partiel (DST) et remettre à zéro selon les instructions ci-dessus. Repasser en mode TM et appuyer sur l’un ou l’autre des boutons
MODE pour passer au mode Température (TEMP).
TEMPÉRATURE (TEMP) – L’ordinateur comporte un thermomètre mesurant la
température extérieure. Pour choisir entre les unités degré Celsius (°C) ou Fahrenheit
(°F), appuyer sur le bouton CONFIG (SET) et le maintenir enfoncé pendant deux
secondes. Appuyer sur l’un ou l’autre des boutons MODE pour choisir entre C et F et
appuyer sur le bouton CONFIG (SET) pour conrmer. Appuyer ensuite sur l’un ou l’autre
des boutons MODE pour passer au mode Calories brûlées (CAL).
Page 27

FonCtions suPPlémentaires
CALORIES BRÛLÉES (CAL) – Cette fonction estime le nombre de calories brûlées
pendant le pédalage, en fonction de l’âge et du poids congurés par l’utilisateur. Pour
remettre le mode CAL à zéro, appuyer sur le bouton CONFIG (SET) et le maintenir
enfoncé pendant deux secondes. Appuyer ensuite sur l’un ou l’autre des boutons
MODE pour passer au mode Graisse brûlée (FAT).
GRAISSE BRÛLÉE (FAT) – Cette fonction estime le nombre de grammes de
graisse brûlés pendant le pédalage, en fonction de l’âge et du poids congurés par
l’utilisateur. Pour remettre le mode FAT à zéro, appuyer sur le bouton CONFIG (SET)
et le maintenir enfoncé pendant deux secondes. Appuyer ensuite sur l’un ou l’autre
des boutons MODE pour passer au mode Balayage (SCAN).
BALAYAGE (SCAN) – Le mode Balayage fait passer commodément de l’un à
l’autre des écrans DST, MXS, AVS ou TM de l’ordinateur sans besoin d’appuyer sur
aucun bouton. Appuyer ensuite sur l’un ou l’autre des boutons MODE pour passer
au mode Horloge (CLOCK).
Page 28

FonCtions suPPlémentaires
MEMOIRE DES DONNEES INSTANTANEES – À la n d’un segment de course,
on peut appuyer sur le bouton CONFIG (SET), pour utiliser la mémoire des données
instantanées et verrouiller l’afchage. Les informations TM, DST et AVS clignotent alors,
et peuvent être lues plus tard en appuyant sur la touche MODE de droite ou de gauche.
Pour libérer la mémoire, appuyer sur la touche CONFIG (SET) jusqu’à ce que l’afchage
des chiffres redevienne statique. Ceci est particulièrement utile lorsqu’on franchit la
ligne d’arrivée d’une course chronométrée parce que la fonction chronométrage TM
ne peut pas être arrêtée manuellement.
FONCTION D’ENREGISTREMENT DU COMPTEUR KILOMETRIQUE – La fonc-
tion ENREGISTREMENT (SAVE) permet de conserver les données importantes telles
que la distance totale (ODO) même après le remplacement de la pile, en pressant
l’un des deux boutons MODE. Pour congurer la fonction ODO, après remplacement
de la pile et conguration de la valeur de référence (longueur de la circonférence)
de la roue, appuyer sur le bouton MODE de droite, puis maintenir le bouton CONFIG
(SET) enfoncé pendant deux secondes jusqu’à ce que le dernier chiffre clignote. Pour
ajuster le nombre, appuyer sur le bouton MODE puis sur le bouton CONFIG (SET) pour
conrmer et choisir le chiffre à saisir. Recommencer la séquence jusqu’à ce que la
valeur du compteur kilométrique soit saisie. Appuyer de nouveau sur le bouton CONFIG
(SET) pour repasser en mode ODO normal.
ARRÊT/DÉMARRAGE AUTOMATIQUE – Pour conserver la pile, l’ordinateur
compteur de cycles s’éteint automatiquement si l’unité n’est pas utilisée pendant cinq
à six minutes. L’afchage réapparaît si le capteur perçoit un signal ou lorsqu’on appuie
sur un bouton quelconque.
Page 29

installation
COMPTEUR KILOMÉTRIQUE – La vitesse instantanée est indiquée sur la ligne du
haut. La plage des mesures est comprise entre 0 et 99 km/h (0 à 99 M/h) et la
précision est de ± 0,5 km/h (M/h).
COMPARATEUR DE VITESSES – Un signe « + » ou « - » apparaît à droite de la
vitesse. « + » indique que l’on roule plus vite que la vitesse moyenne (AVS). « - »
indique que l’on roule moins vite que la vitesse moyenne.
TENDANCE DE VITESSE – Un symbole de cycliste apparaît à gauche de la vitesse.
La roue tourne en avant pour indiquer l’accélération. Elle tourne en arrière pour
indiquer la décélération.
RÉTROÉCLAIRAGE EL – Le rétroéclairage EL permet d’illuminer l’écran de l’ordinateur de manière à faciliter
la lecture lorsque la lumière est faible ou que l’on se trouve dans l’obscurité. On peut le congurer de deux
façons :
1) Tenir le bouton MODE de droite ou de gauche enfoncé pendant deux secondes.
2) Le rétro-éclairage EL s’activera pendant huit secondes puis l’ordinateur passera en mode Balayage.
Au bout de 8 secondes, le rétro-éclairage s’éteindra, et l’ordinateur reviendra au mode précédent.
Page 30

déPannage
PROBLÉME
Aucun afchage
de l’indicateur
de vitesse et/ou
aucune donnée
afchée
Afchage lent à
apparaître
L’afchage est
irrégulier
Écran noir
CAUSE POSSIBLE
Brouillage possible provenant de diverses
sources électroniques
Mauvais alignement de l’aimant et du
capteur
Mauvais contact de la pile ou pile faible/
déchargéea
Température hors des limites opérationnelles
(0 à 60 degrés C ou 32 à 140 degrés F)
Mauvais contact de la pile ou pile faible/
déchargée
Température trop élevée ou écran exposé
trop longtemps au soleil
Ordinateur endommagé ou ayant subi
une chute
ACTION RECOMMANDÉE
Placer l’ordinateur à un autre endroit
Vérier que le capteur de l’indicateur de vitesse
et l’aimant sont correctement installés et alignés
(voir page 29)
Remplacer la pile
Utiliser l’ordinateur uniquement lorsque la température se trouve dans les limites opérationnelles
Remplacer la pile
Utiliser l’ordinateur uniquement lorsque la température se trouve dans les limites opérationnelles.
Mettre à l’abri du soleil
L’ordinateur est brisé
Aucune lecture de
distance parcourue
pendant la course
Alignement capteur/aimant incorrect Rectier l’alignement
Page 31

avertissement de l' admin. des Comm. des usa (FCC)
Ce dispositif est conforme à la Partie 15 de la réglementation de la FCC. Son fonctionnement est soumis aux
deux conditions suivantes : (1) le dispositif ne doit pas causer de brouillage nuisible, et (2) le dispositif doit
accepter toute interférence reçue, y compris des brouillages pouvant entraîner son mauvais fonctionnement.
AVERTISSEMENT : Des changements ou des modications apportées au dispositif non explicitement
approuvées par la partie responsable de la conformité à la réglementation pourraient annuler la licence
d’utilisation du matériel accordée à l’utilisateur.
REMARQUE : Ce dispositif a subi des tests et a été trouvé conforme aux limites imposées par
la réglementation de la FCC, Partie 15, relative aux dispositifs numériques de Classe B.
Ces limites sont destinées à assurer une protection raisonnable contre les brouillages nuisibles aux installations
résidentielles. Cet équipement génère, utilise et peut rayonner de l’énergie en radiofréquence et, s’il n’est pas
installé ou utilisé conformément aux instructions, il peut causer des brouillages nuisibles aux communications
par radio.
Cependant, il n’existe aucune garantie comme quoi des brouillages ne surviendront pas dans une installation
particulière. Si cet équipement produit des parasites nuisibles à la réception des signaux de radio ou de
télévision, ce que l’on peut déterminer en arrêtant l’équipement et en le remettant en marche, l’utilisateur
est incité à essayer de remédier à ces bruits de l’une des manières suivantes :
· En réorientant ou en déplaçant l’antenne de réception
· En augmentant la distance séparant les équipements et le récepteur
· En connectant l’équipement sur une prise d’un circuit électrique différent
de celui sur lequel le récepteur est connecté
· En consultant le distributeur ou un technicien spécialisé en radio/TV.
Page 32

Printed in China. Imprimé en Chine.
© 2006 Bell Sports, Inc., Rantoul, IL 61866 Tel: 1-800-456-BELL www.bellbikestuff.com
Part# 5000677600 For Item#s 1000849 & 1001618
 Loading...