

Page 1
RK5004ek, RK5006ek Instructions P35755ec
EN
DE
FR
Belkin Tech Support
Europe: 00 800 223 55 460
For other languages: www.belkin.com/support
RK5004ek and RK5006ek INSTRUCTIONS
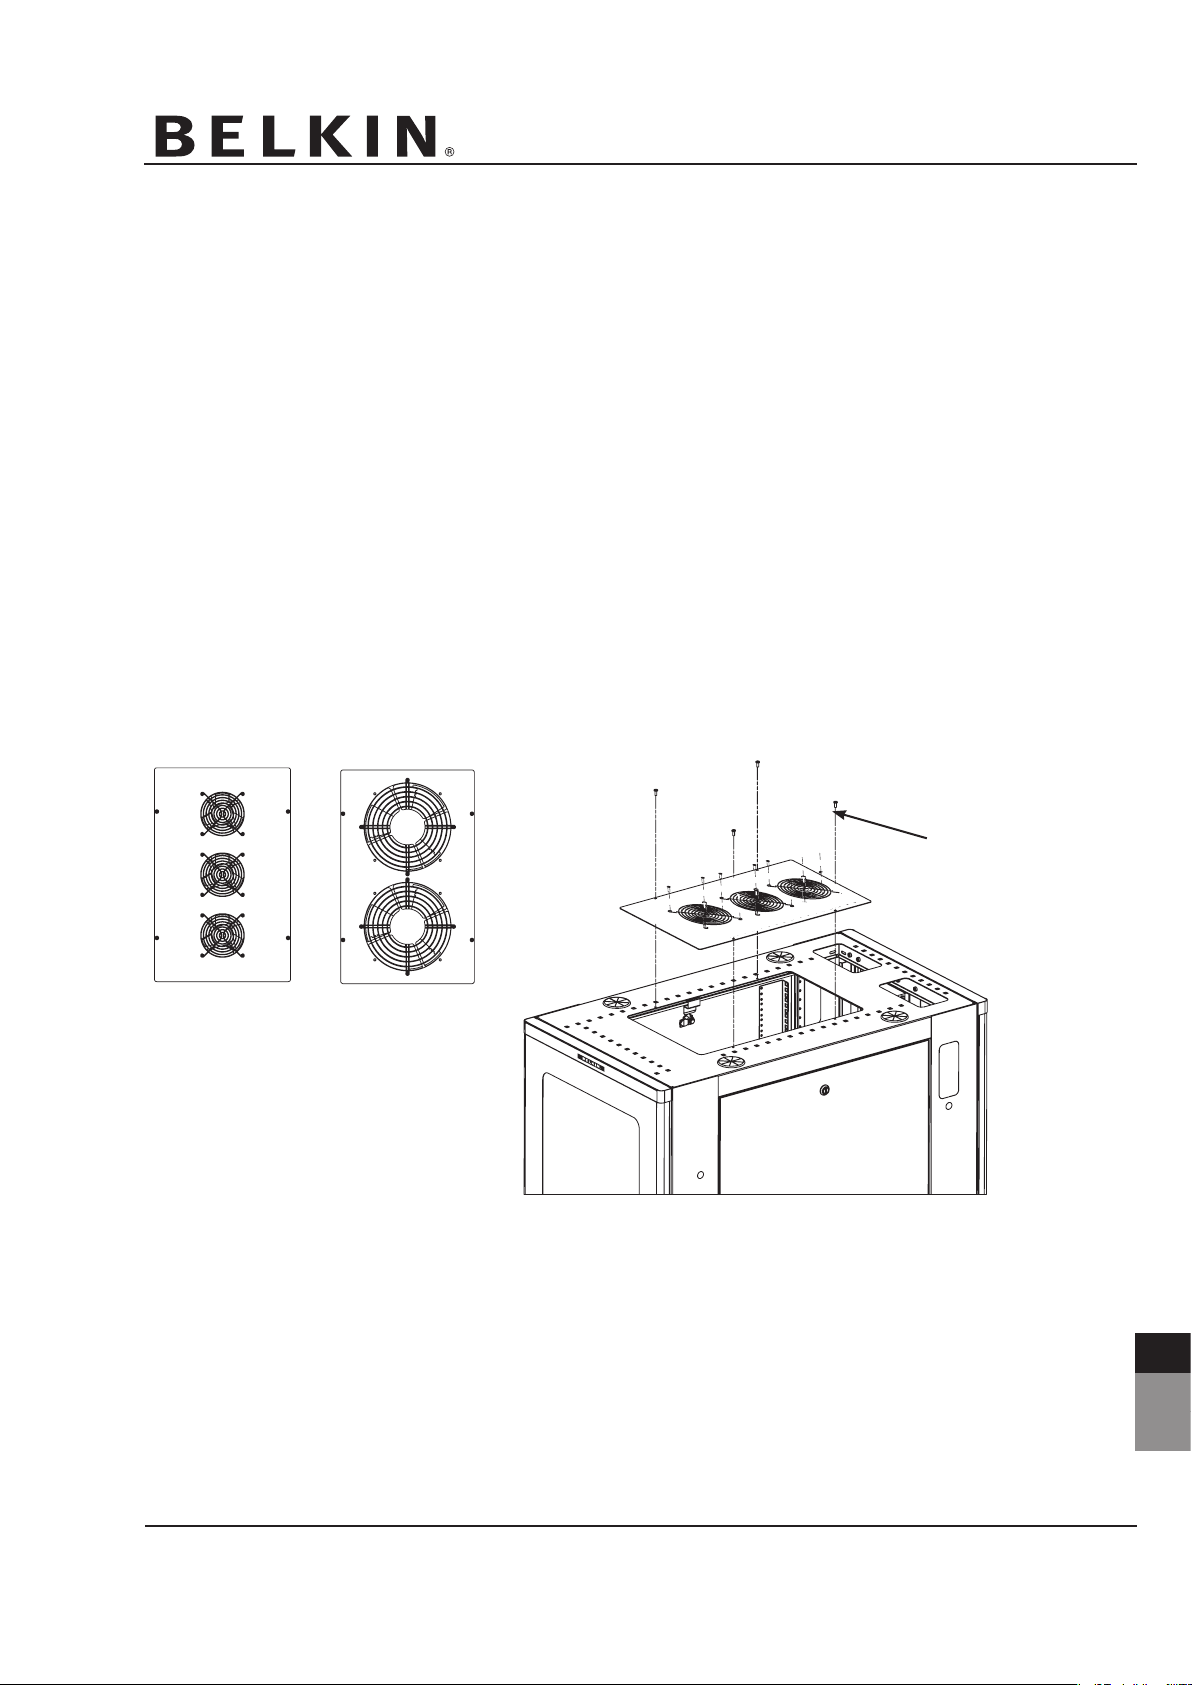
RK5004ek Product Inventory
IEC power supply cable
Three Fan Top Panel (1)
10-32 Screws (4)
RK5006ek Product Inventory
IEC power supply cable
Fan Top Panel - Two 10” (254mm) Fans (1)
10-32 Screws (4)
Installing Your RK5004ek and RK5006ek Top Panel
1. If your Enclosure came with a top panel, remove by loosening the 10-32 screws.
2. Place new top on opening, line up screw holes
3. Start 10-32 screws (4) and tighten.
4. Plug the IEC connector side of your power cord into the fan assembly.
#10-32 Phillips Pan
Head Screw
RK5004ek
RK5006ek
Page 2
RK5004ek, RK5006ek – Anleitung P35755ec
EN
DE
FR
Belkin Technischer Support
Europa: 00 800 223 55 460
Für andere Sprachen: www.belkin.com/support
RK5004ek und RK5006ek – ANLEITUNG
RK5004ek – Teileliste
Netzkabel nach IEC-Standard
Deckenplatte mit drei Lüftern (1)
Schrauben 10-32 (4)
RK5006ek – Teileliste
Netzkabel nach IEC-Standard
Deckenplatte mit zwei 10”-Lüftern (254 mm) (1)
Schrauben 10-32 (4)
Installation der Deckenplatte RK5004ek und RK5006ek
1. Wenn das Einbaugehäuse mit einer Deckenplatte ausgestattet ist, entfernen Sie die Schrauben 10-32, und
nehmen Sie die Deckenplatte ab.
2. Legen Sie die neue Deckenplatte auf die Öffnung, und richten Sie die Schraubenlöcher aufeinander aus.
3. Drehen Sie die 4 Schrauben 10-32 ein, und ziehen Sie sie fest an.
4. Verbinden Sie den IEC-Stecker des Netzkabels mit der Lüftereinheit.
KreuzschlitzFlachkopfschraube #10-32
RK5004ek
RK5006ek
Page 3

Instructions RK5004ek et RK5006ek P35755ec
EN
DE
FR
Assistance technique Belkin
Europe : 00 800 223 55 460
Pour toutes les autres langues : www.belkin.com/support
INSTRUCTIONS RK5004ek et RK5006ek
Inventaire des produits RK5004ek
Câble d’alimentation IEC
Panneau supérieur à trois ventilateurs (1)
Vis 10-32 (4)
Inventaire des produits RK5006ek
Installation de votre panneau supérieur RK5004ek et RK5006ek
1. Si votre enceinte est fournie avec un panneau supérieur, enlevez-le en desserrant les vis 10-32.
2. Placez le nouveau panneau sur louverture, alignez les trous de vis.
3. Amorcez les vis 10-32 (4) et serrez.
4. Branchez le côté du connecteur IEC du cordon dalimentation dans le ventilateur.
Vis Phillips à tête plate 10-32
Panneau supérieur à ventilateur - deux ventilateurs
Câble d’alimentation IEC
10 po (254 mm) (1)
Vis 10-32 (4)
RK5004ek
RK5006ek
Page 4

Belkin Ltd.
Express Business Park
Shipton Way, Rushden
NN10 6GL, United Kingdom
+44 (0) 1933 35 2000
+44 (0) 1933 31 2000 fax
Belkin B.V.
Boeing Avenue 333
1119 PH Schiphol-Rijk,
The Netherlands
+31 (0) 20 654 7300
+31 (0) 20 654 7349 fax
Belkin GmbH
Hanebergstrasse 2
80637 Munich,
Germany
+49 (0) 89 143405 0
+49 (0) 89 143405 100 fax
Belkin SAS
130 rue de Silly
92100 Boulogne Billancourt,
France
+33 (0) 1 41 03 14 40
+33 (0) 1 41 31 01 72 fax
© 2005 Belkin Corporation. All rights reserved.
All trade names are registered trademarks of respective manufacturers listed.
RK5004ek, RK5006ek Instructions P35755ec
 Loading...