

Page 1

Belkin Enclosure
User Manual
Belkin Enclosure - User Manual v 1.0.0 P74789
Page 2

(This page is left intentionally blank.)
Belkin Enclosure - User Manual v 1.0.0 P74789
Page 3

Table of Contents
Product Description and Inventory ..................................................................................4
Product Inventory..............................................................................................................5
Features of the Enclosure ............................................................................................5
Before you Install ..............................................................................................................6
Unpacking your Enclosure................................................................................................7
Unpacking Instructions .................................................................................................7
Installing your Belkin Enclosure........................................................................................8
Leveling you Enclosure ................................................................................................8
Removing your Casters and Levelers ..........................................................................8
Removing and Installing your Side Panels.......................................................................9
Removing and Installing your Top Panel ........................................................................10
Ganging or Networking your Enclosures ........................................................................11
Reversing your Front Door .............................................................................................12
Reversing your Front Door .............................................................................................13
Reversing your Front Door .............................................................................................14
Adjusting your Vertical Mounting Rails ...........................................................................15
Installing your Equipment ...............................................................................................16
Grounding Studs.........................................................................................................16
Cable Management.........................................................................................................17
Cable Access
Specifications
Accessories.....................................................................................................................20
Warranty and Service .....................................................................................................21
LIMITED LIFETIME WARRANTY...............................................................................21
Contact Information.........................................................................................................23
..................................................................................................................18
..................................................................................................................19
Belkin Enclosure - User Manual v 1.0.0 Page ii P74789
Page 4

Product Description and Inventory
he Belkin Enclosure is an industrial-grade, high-performance enclosure for the IT and
T
telecommunication industries. The Enclosure has full compliance with the 19" rack-mount
hardware EIA 310-D industry standard. The Belkin Enclosure is designed for the optimal
performance of applications with servers, voice, data, networking, internetworking,
cable management, power distribution, and power protection equipment.
Belkin Enclosures
Nominal Nominal
Enclosure Enclosure
Part Number RMU Height Height w/Casters Width Description
RK1000 42 80.25" 24" Enclosure with Sides
RK1001 42 80.25" 24"
RK1002 24 48.75" 24" Enclosure with Sides
Side panels are available for those Enclosures ordered without sides.
Side panels are available in pairs with hardware included.
Part Number Description
RK5009 Side Panels for 42U Enclosure
Your Enclosure comes with 50 Metric 6mm Black Screws with Cage Nuts. If you require more, please see part number below:
Part Number Description
RK5034 Metric 6mm Black Screw with Cage Nuts (25)
Enclosure w/o Sides
Belkin Enclosure - User Manual v 1.0.0 Page 1 P74789
Page 5
Product Inventory
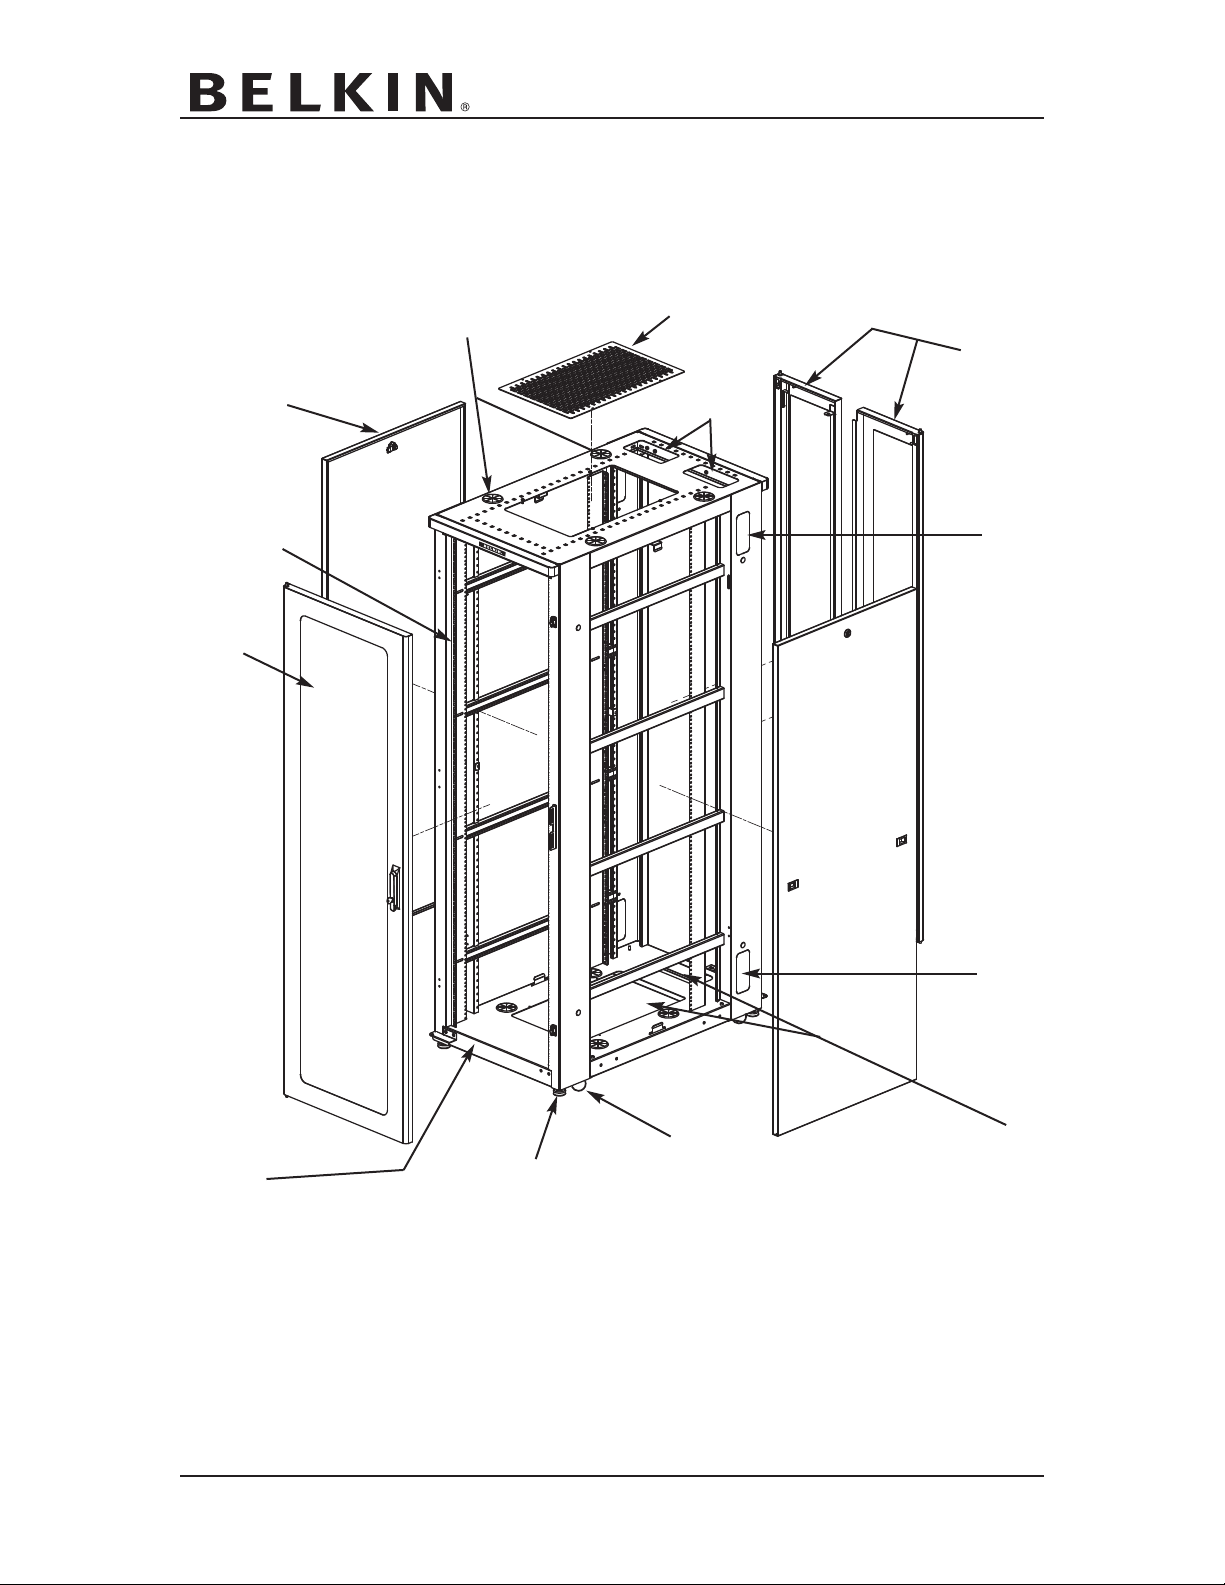
Features of the Enclosure
3
2
1
9
8
7
9
9
9
6
4
Belkin Enclosure - User Manual v 1.0.0 Page 2 P74789
5
Side Panels with Locks
1
2 Vertical Rails (Adjustable)
3 Reversible Front Doors
Fully W
4
5 Leveling Feet (Adjustable)
6 Casters
7 Split Rear Doors
8 Vented Top Panels
9 Cable Access
elded Frame
9
Page 6
Before you Install
nstructions must be read completely before installation.
I
When this caution symbol appears in this User Manual, the information that accompanies
it is critical to your safety and the prevention of damage to product.
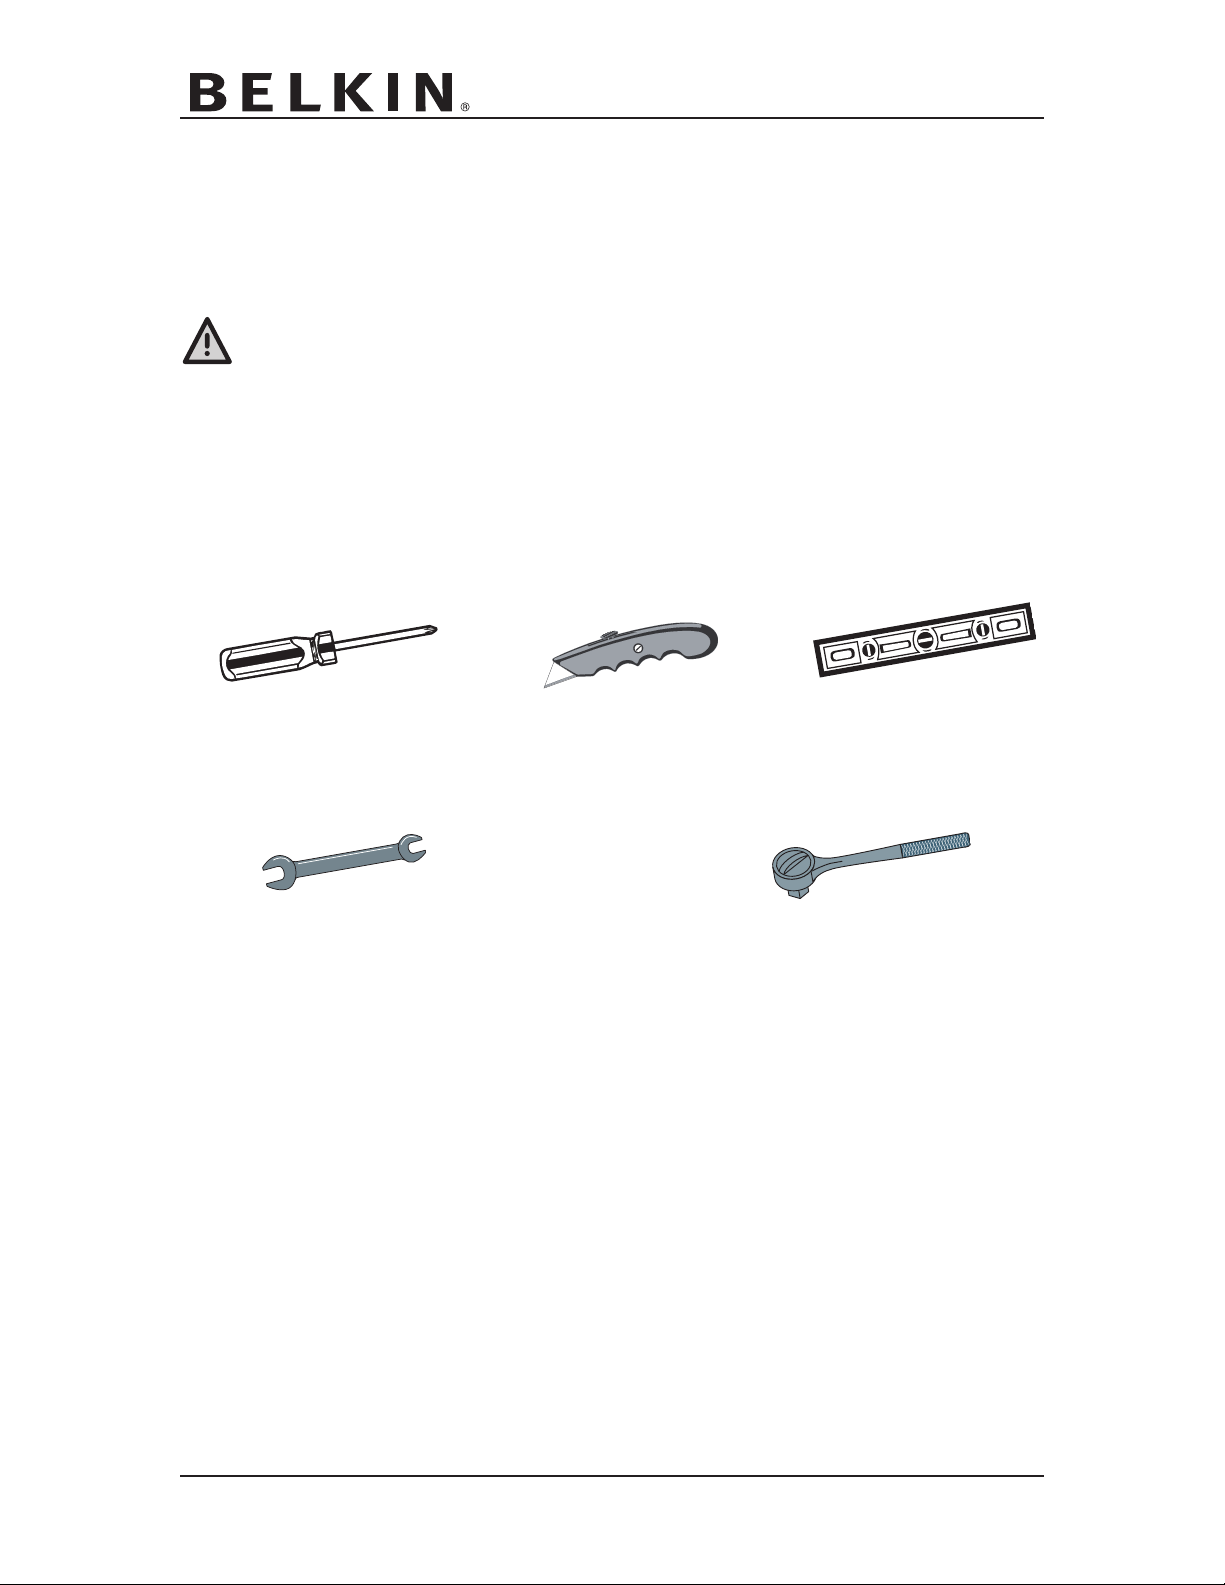
Before unpacking, please make sure you have the following tools:
Phillips Screwdriver Utility Knife Level
3/4" Open Ended Wrench 1/2", 3/8" and 7/16" Hex Sockets
Belkin Enclosure - User Manual v 1.0.0 Page 3 P74789
Page 7
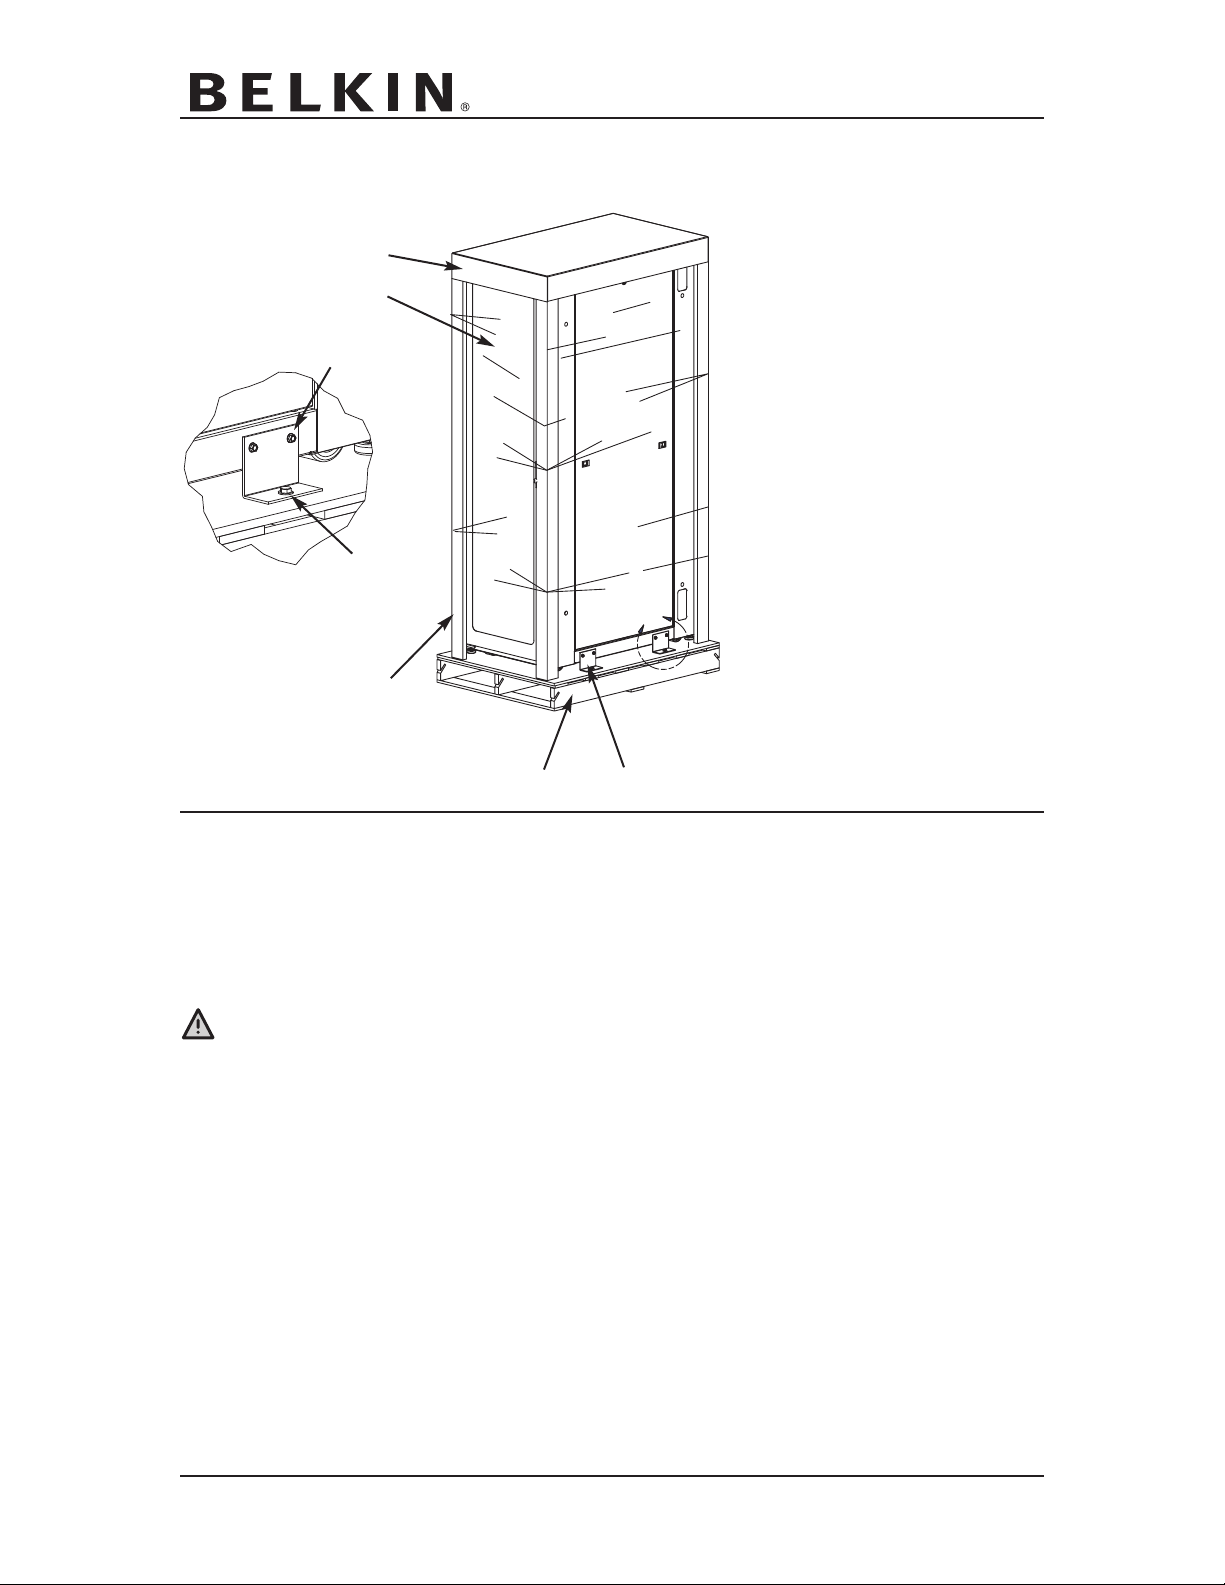
Unpacking your Enclosure
A
DETAIL A
1
2
3
4
5
Unpacking Instructions
1. Removal of the stretch wrap. To prevent damage to the Enclosure, cut the stretch
wrap at one of the corrugated corners using a utility knife.
2. Remove the corrugated top and corners.
3. Remove the skid brackets from the skid, using a 1/2" socket wrench. Remove the
hex from the Enclosure by using the 3/8" socket wrench.
4. This step requires two or more people. W
the Enclosure, slowly roll the Enclosure to the back of the skid. Proceed until all four
casters contact the floor.
erify that you have received all hardware and components with your Belkin
V
5.
Enclosure. Contact Belkin support if you feel items are missing.
6
1 Corrugated top
2 Stretch wrap
3 3/8" hex
4 1/2" hex
5 Corrugated corners
6 Shipping skid
7 Skid brackets
7
ith one person standing on each side of
Mounting hardware and keys can be found in bag attached to one of the vertical mounting rails.
TE:
NO
(Belkin is not responsible for damage caused by re-shipment of this Enclosure).
Please recycle shipping materials whenever possible.
Belkin Enclosure - User Manual v 1.0.0 Page 4 P74789
Skid should be saved if you need to reship the Enclosure.
Page 8
Installing your Belkin Enclosure
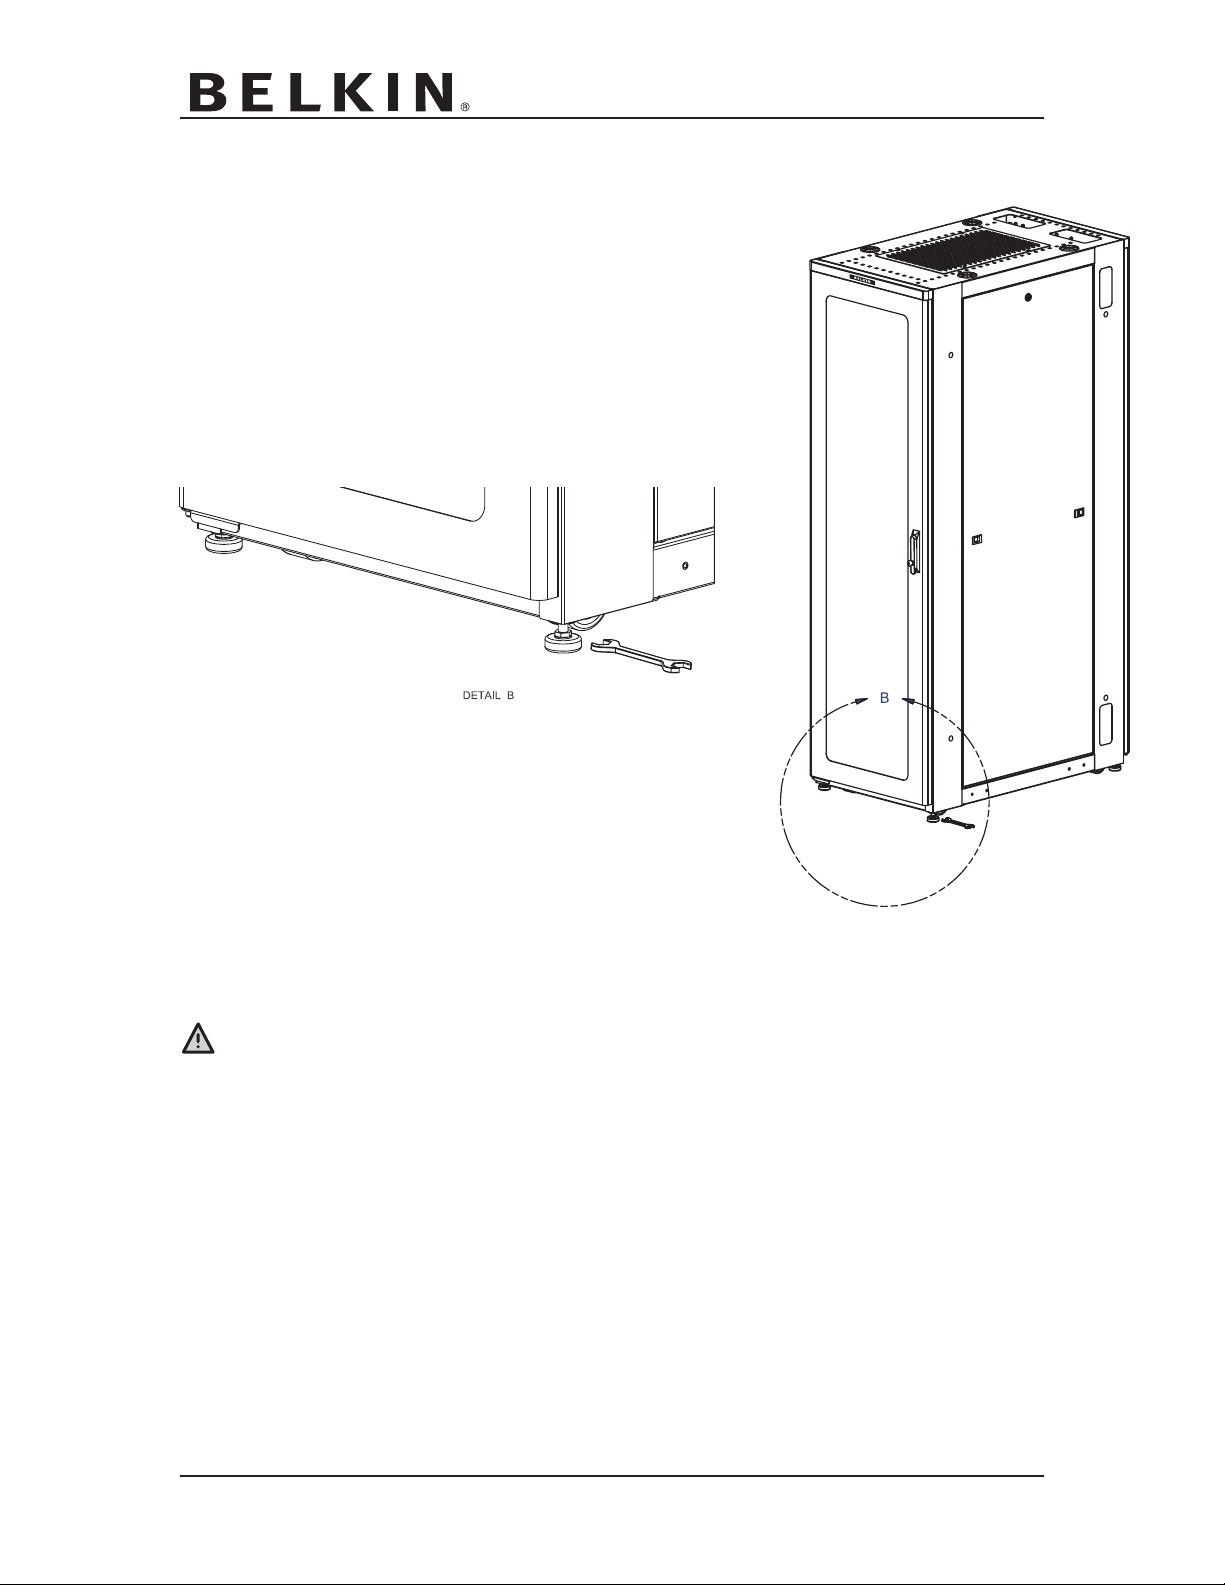
Leveling your Enclosure
1. Move your Enclosure to it's final location.
2. Once in place use your 3/4" wrench to lower the
adjustable levelers so that the weight of the Enclosure
is taken off of the casters.
3. Using a level and your wrench, adjust the levelers so that
your Enclosure is level.
Removing your Casters and Levelers
The following steps require two or more people.
1. Using two or more persons, lay your Enclosure on it's side.
2. Unscrew the levelers
3. Using a 1/2" hex socket, remove the 5/6" nuts holding the casters
4. Return Enclosure to upright position.
Belkin Enclosure - User Manual v 1.0.0 Page 5 P74789
Page 9
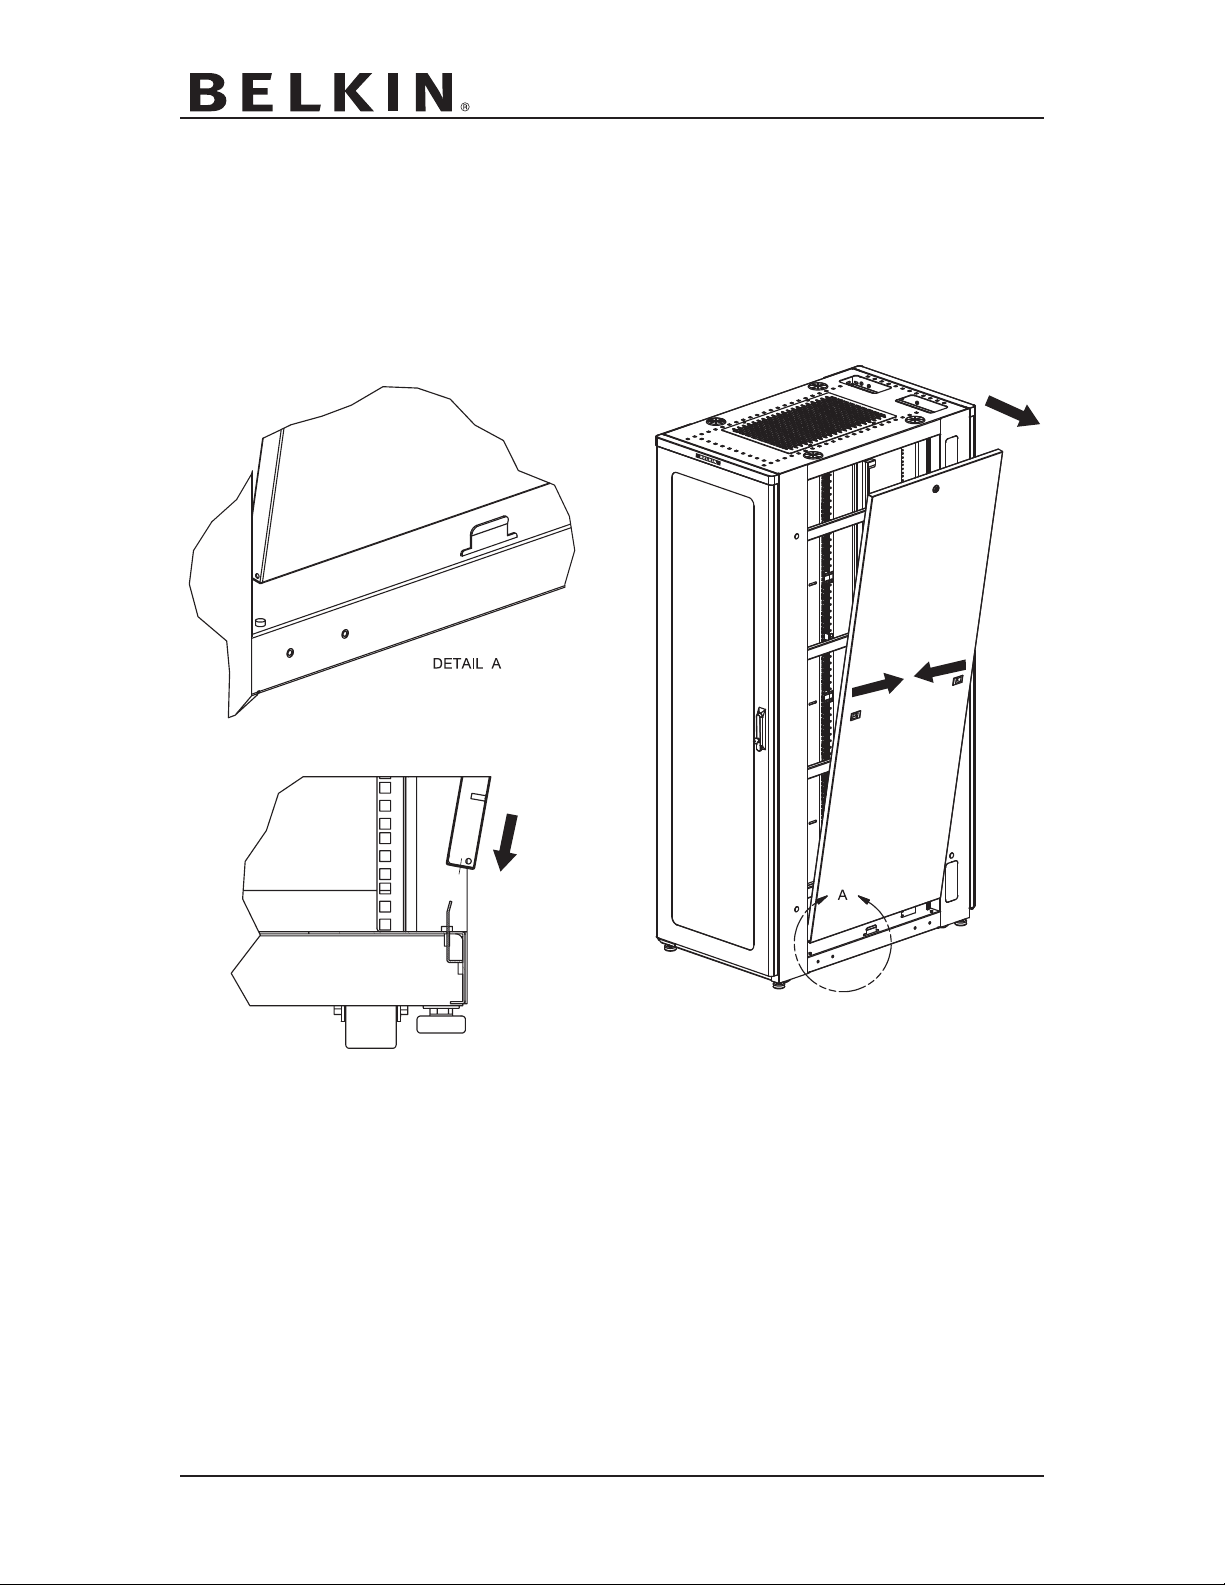
Removing and Installing your Side Panels
1. If side panel is locked, please unlock.
2. Slide both latches toward the center of the side panel, and carefully pull side panel toward you.
. Lift side panel up and remove from Enclosure.
3
4. To re-install, reverse above steps.
Belkin Enclosure - User Manual v 1.0.0 Page 6 P74789
Page 10

Removing and Installing your Top Panel
The center portion of the top of your Enclosure is attached with four #10-32 Phillips pan head
screws. This top panel can be replaced with optional fan tops by removing the four #10-32
screws. Please see chart below.
#10-32 Phillips Pan
Head Screw
Part Number Description
RK5003 Perforated top
RK5004
3 muffin fan top, 225 CFM
RK5005 Single 10" fan top, 500 CFM
RK5006 Double 10" fan top, 1100 CFM
Tools required: Phillips Pan
Head Screw Driver
Belkin Enclosure - User Manual v 1.0.0 Page 7 P74789
Page 11

Ganging or Networking your Enclosures
1. Remove plastic button
Enclosure A
Networking hole
(4 locations)
Use Belkin part number RK5008
(optional enclosure baying kit).
No additional tools required.
nclosure B
E
plugs from enclosure
corner posts (4).
2. Remove at least one side
panel from adjoining
enclosures.
3. Line up enclosures, install
baying hardware.
Belkin Enclosure - User Manual v 1.0.0 Page 8 P74789
Page 12

Reversing your Front Door
1. Open door and reverse handle. See Figure A.
2. Secure door with one hand while you pull down the top hinge pin (Figure B) with the other.
3. Grab door on both sides and lift up to remove door and set it aside.
4. Remove hinge pin brackets using Phillips head screwdriver, turn and reattach hinge pin
brackets to opposite corners (Figure C).
5. Remove button plugs by pushing from the back side and retain for reuse.
6. Remove latch bracket and door stops (2) using Phillips head screwdriver while holding
lock nut in back. Turn and place bracket and door stops (2) on the opposite side (Figure D).
7. Put push buttons back into holes on opposite side.
8. Rehang door.
NOTE: The best time to reverse the door is prior to installing the equipment.
Standard factory door configuration is left-hand hinged.
Figure B
Figure A
Remove handle
and reverse
Belkin Enclosure - User Manual v 1.0.0 Page 9 P74789
Page 13

Reversing your Front Door
Figure C
Belkin Enclosure - User Manual v 1.0.0 Page 10 P74789
Page 14

Reversing your Front Door
Latch Bracket
Door Stops
Figure D
Belkin Enclosure - User Manual v 1.0.0 Page 11 P74789
Page 15

Adjusting your Vertical Mounting Rails
The universal M6 cage nut rails are preset at a 29" depth. This depth allows for the installation
of most rack-mountable equipment. Rails are infinitely adjustable front to back.
The best time to move the rails is before installation of equipment.
To adjust your rails, loosen the rail bolts (4) with a 7/16" hex socket.
Vertical Mounting Rail
Use a 7/16" Hex
Socket to loosen
bolt
Full Depth
Front to Rear
Adjustability
Belkin Enclosure - User Manual v 1.0.0 Page 12 P74789
Page 16
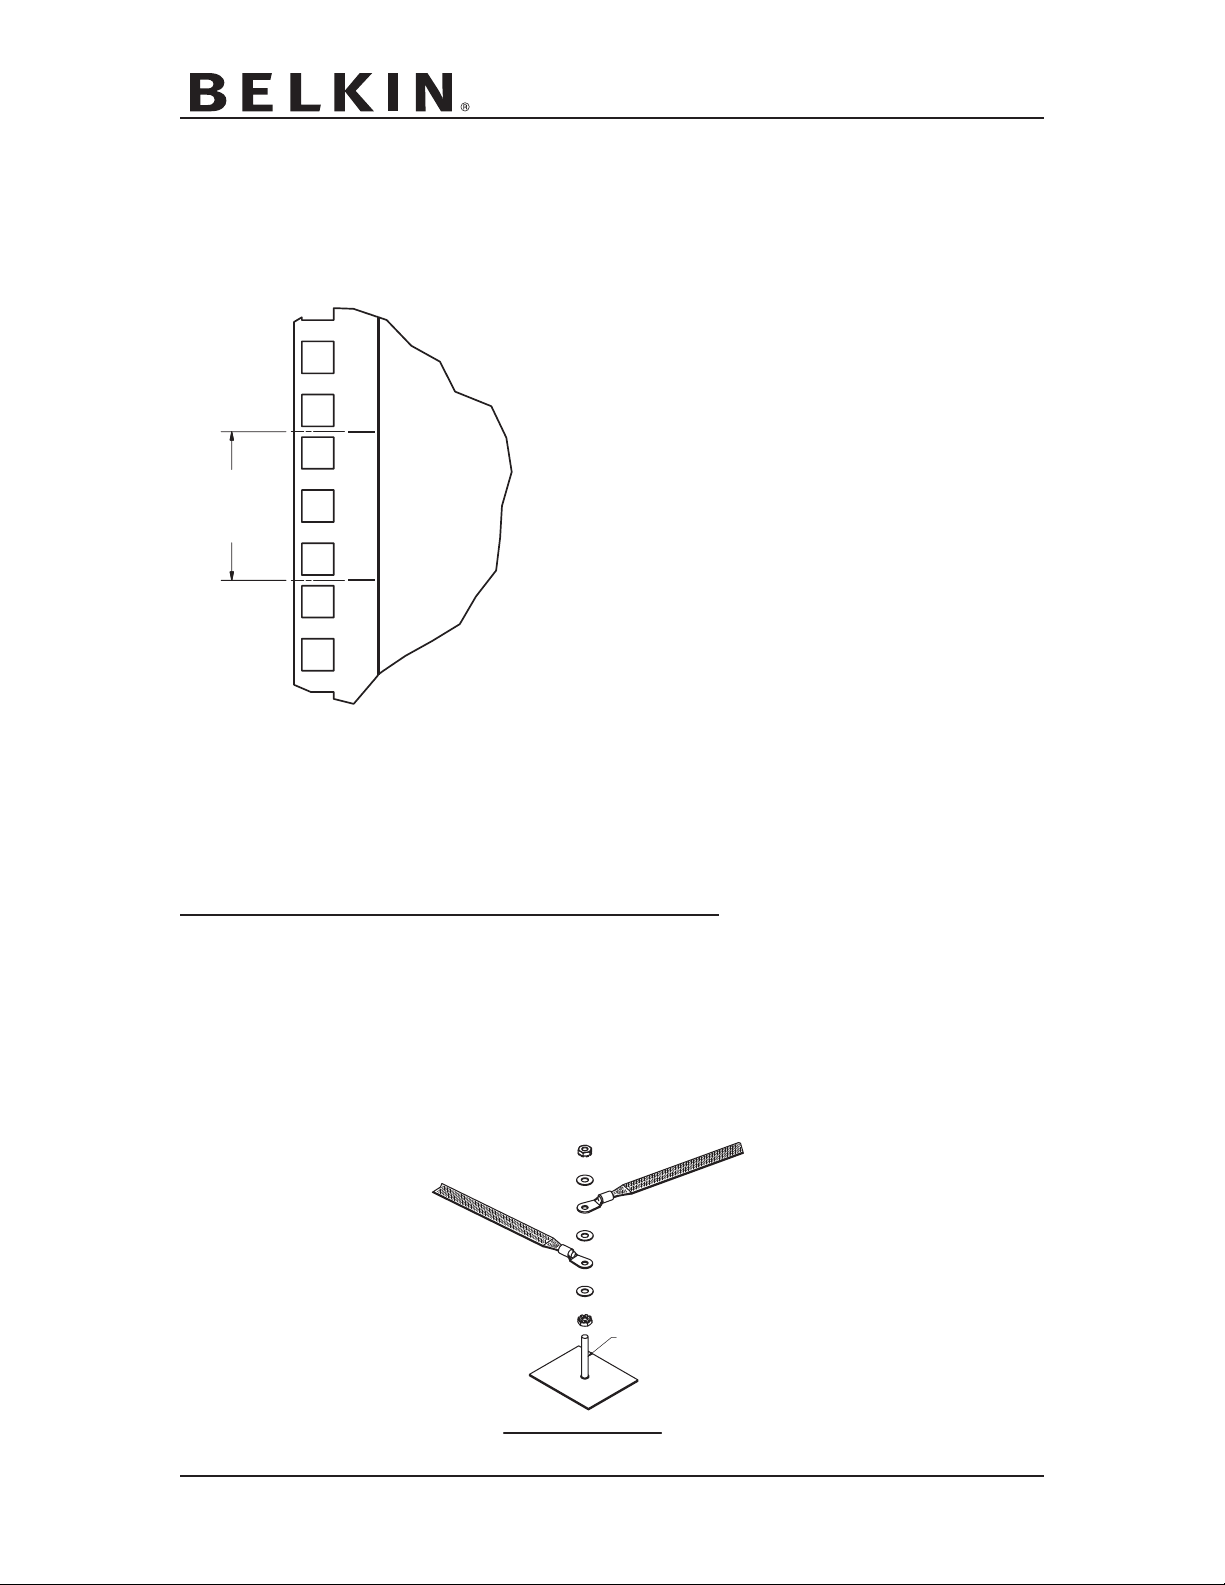
Installing your Equipment
A
1.75(")
1 RMU
30
29
31
C
GROUND STUD : #10-32 x 1-7/8" LG.
MULTIPLE STRAPS
All Belkin Enclosures conform to the 19" EIA 310-D industry standard.
The vertical mounting rail has 42 Rack-Mount Units (RMU). An (RMU) consists of a 1.75"
ertical rack space.
v
• Load your rack from the bottom up, placing the
heaviest components at the lowest position.
• Please follow the individual instructions that are
provided with the components you are installing.
• After installation of your equipment, extend only
one component at a time.
• For proper air flow, please use filler panels
(optional) per component manufacturer
recommendations.
Grounding Studs
The ten grounding studs on the Enclosure are located on the doors, side panels, and frame.
Number of studs Location
2 Base
2 Front door
4 Rear doors (2 each)
2 Side panels (1 each)
Please refer to part number RK5038 for the optional Belkin enclosure grounding kit.
Belkin Enclosure - User Manual v 1.0.0 Page 13 P74789
Page 17
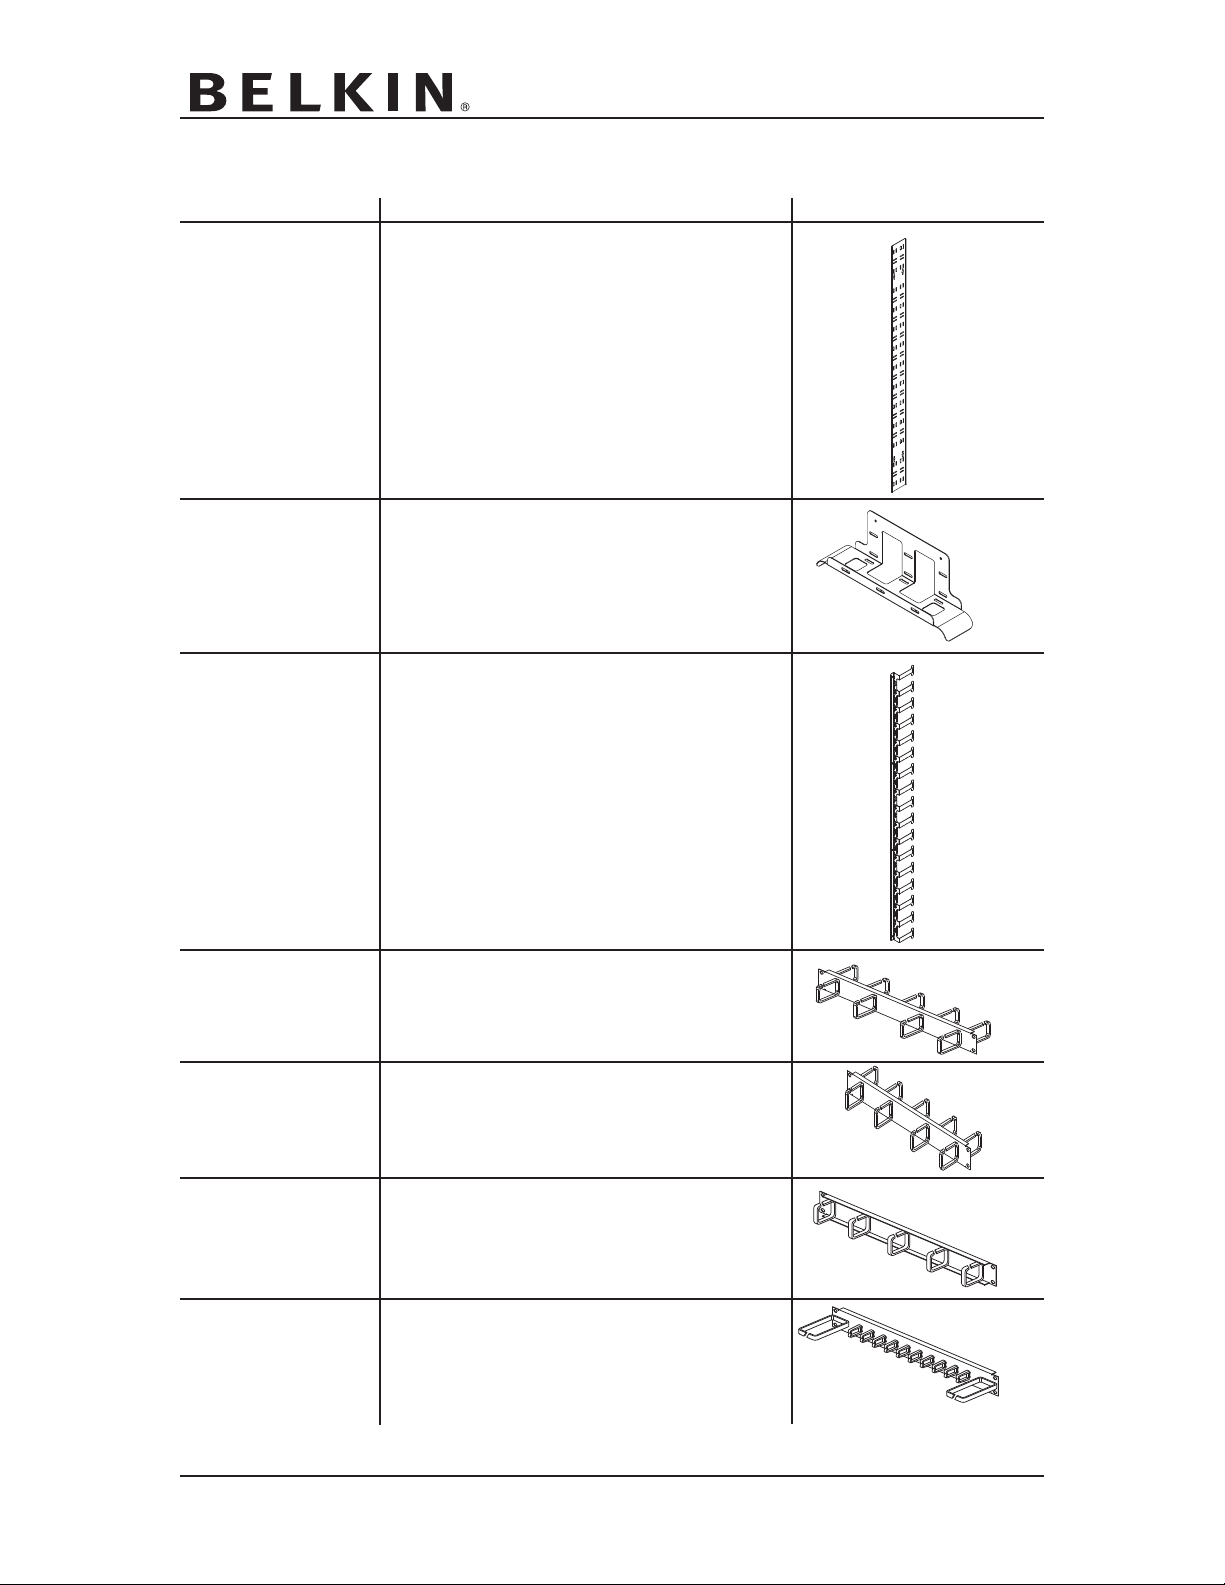
Cable Management
Part Number Description Image
RK5000 Vertical Lacing Bar
RK5001 Waterfall Cable Manager
RK5002 Vertical Finger Cable Manager
RK5012 Double Sided 1U Cable Manager
RK5013 Double Sided 2U Cable Manager
RK5016 Single Sided Cable Manager
RK5017 Low Density Cable Organizer
Belkin Enclosure - User Manual v 1.0.0 Page 14 P74789
Page 18

Cable Access
3 3/4" x 7 1/2" (2x)
2" Diameter (4x)
2 1/2" x 6" (4x)
3 3/4" x 9" (1x)
2" Diameter (4x)
13" x 21" (1x) Bottom
our Belkin Enclosure provides easy cable access.
• Y
• The top has two rectangular and four grommeted access points.
• The rear corner posts have two integrated cable knock-outs.
• These knock-outs can be removed when ganging two or more Enclosures together.
• These knock-outs will still allow you to have cabinet-to-cabinet access with a side panel
in place.
• Access through the bottom is achieved through one large center opening, an additional
rectangular point in the rear and four grommeted access points.
Belkin Enclosure - User Manual v 1.0.0 Page 15 P74789
Page 19

Specifications
RK1000 RK1002
RK1001
Description Measurement
Height with Casters (Standard) 80.25 in (203.8 cm) 48.75 in (123.8 cm)
Width 24 in (60.96 cm) 24 in (60.96 cm)
Depth 42 in (106.7 cm) 42 in (106.7 cm)
Weight 335 lbs. (152 kg) 295 lbs. (133.8 kg)
275 lbs. w/o sides (124.7 kg)
Shipping Weight 375 lbs. (170.1 kg) 335 lbs. (152 kg)
315 lbs. w/o sides (147.9 kg)
Open Area Front Door 861.8 in2(5560 cm2) 484.8 in2(3218 cm2)
Open Area Rear Door 830.2 in2(5356 cm2) 474.3 in2(3060 cm2)
2
Open Front Door Area Measured per U 20.5 in
Open Rear Door Area Measured per U 19.8 in
Wiring Clearance between Vertical Rail & Front Door* 2.5 in (6.35 cm) 2.5 in (6.35 cm)
Static Weight Rating
Dynamic W
* Front rail adjustable for additional clearance
eight Rating
2200 lbs. (997.9 kg)
2000 lbs. (907.2 kg)
(132.3 cm
2
(127.7 cm
2
) 20.2 in
2
) 19.7 in
2
(130.3 cm
2
(127.1 cm
2200 lbs. (997.9 kg)
2000 lbs. (907.2 kg)
2
)
2
)
Belkin Enclosure - User Manual v 1.0.0 Page 16 P74789
Page 20

Accessories
Part No. Description
RK5003 Perforated Top Panel
RK5004 Top Panel with 3 Muffin Fan
RK5005 Top Panel with One 10" 550 CFM Fan
RK5006 Top Panel with Two 10" 1100 CFM Fans
RK5008 Baying kit
RK5009 Pair of Side Panels
RK5010 Mesh Front Door
RK5011 Split Mesh Rear Door
RK5018 26" Deep Sliding Shelf, 110 lb. Capacity
RK5019 32" Deep Sliding Shelf, 110 lb. Capacity
RK5020 29" Deep Sliding Vented Shelf, 250 lb. Capacity
RK5021 28" Deep Front & Rear Mount Stationary Vented Shelf
RK5022 Pivoting Keyboard Tray with Mouse Tray
RK5023 Stationary Shelf - Cantilevered
RK5024 Monitor Shelf & Sliding Keyboard Tray w/Mouse Pad, 220 lb. Capacity
RK5027 Stationary Front Mount Shelf
RK5030 Filler Panel Kit - 2 ea. of 1U/2U/3U
RK5031 1U Filler Panel (set of 2)
RK5032 2U Filler Panel (set of 2)
RK5033 3U Filler Panel (set of 2)
RK5034 Package of 25 M6 Cage Nuts w/Screws
RK5035 Casters, Set of 4, Non-locking
RK5036 Set of Four 2U High Server Brackets
RK5037 Enclosure Blower, 115 Volt, 250 CFM Rating
Please contact your local Belkin representative for ordering information.
Belkin Enclosure - User Manual v 1.0.0 Page 17 P74789
Page 21

Warranty and Service
LIMITED LIFETIME WARRANTY
What this Warranty covers.
Belkin Corporation warrants to the original purchaser of any Belkin enclosure, that the Enclosure
shall be free of defects in design, assembly, material, or workmanship.
What the period of coverage is.
Belkin Corporation warrants the Belkin Enclosure for as long as the original purchaser owns it.
What will we do to correct problems?
Enclosure Warranty.
Belkin will repair or replace, at its option, any defective Enclosure free of charge (except for
shipping charges for the Enclosure).
What is not covered by this Warranty?
All above warranties are null and void if the Belkin Enclosure is not provided to Belkin
Corporation for inspection upon Belkin's request at the sole expense of the purchaser, Belkin
Corporation determines that the Belkin Enclosure has been improperly installed, altered in any
way or tampered with. The Belkin Enclosure Warranty does not protect against acts of God
(other than lightning) such as flood, earthquake, war, vandalism, theft, normal-use wear and
tear, erosion, depletion, obsolescence, abuse, damage due to low-voltage disturbances (i.e.
brownouts or sags), non-authorized program, or system equipment modification or alteration.
How to get service.
To get service for your Belkin Enclosure you must take the following steps:
1. Contact Belkin Corporation at 501 W. Walnut St., Compton, CA 90220, Attn: Customer
Service, or call (800) 223-5546, within 15 days of the Occurrence. Be prepared to provide
the following information:
a. The part number of the Belkin Enclosure.
b. Where you purchased the Enclosure.
c. When you purchased the Enclosure.
d. Copy of original receipt.
2. Your Belkin Customer Service Representative will then instruct you on how to forward your
receipt and Belkin Enclosure and how to proceed with your claim.
Belkin Corporation reserves the right to review the damaged Belkin Enclosure.
ping the Belkin Enclosure to Belkin Corporation for inspection shall be borne solely by the pur
. If Belkin determines, in its sole discretion, that it is impractical to ship the damaged
chaser
equipment to Belkin Corporation, Belkin may designate, in its sole discretion, an equipment
repair facility to inspect and estimate the cost to repair such equipment.
shipping the equipment to and from such repair facility and of such estimate shall be borne solely by the purchaser
finalized. Whenever claims are settled, Belkin Corporation reserves the right to be subrogated
under any existing insurance policies the purchaser may have.
. Damaged equipment must remain available for inspection until the claim is
The cost, if any
All costs of ship-
-
, of
Belkin Enclosure - User Manual v 1.0.0 Page 18 P74789
Page 22

ow state law relates to the Warranty.
H
THIS WARRANTY CONTAINS THE SOLE WARRANTY OF BELKIN CORPORATION, THERE
RE NO OTHER WARRANTIES, EXPRESSED OR, EXCEPT AS REQUIRED BY LAW,
A
IMPLIED, INCLUDING THE IMPLIED WARRANTY OR CONDITION OF QUALITY, MERCHANTABILITY OR FITNESS FOR A PARTICULAR PURPOSE, AND SUCH IMPLIED WARRANTIES, IF ANY, ARE LIMITED IN DURATION TO THE TERM OF THIS WARRANTY. Some
states do not allow limitations on how long an implied warranty lasts, so the above limitations
may not apply to you.
IN NO EVENT SHALL BELKIN CORPORATION BE LIABLE FOR INCIDENTAL, SPECIAL,
DIRECT, INDIRECT, CONSEQUENTIAL OR MULTIPLE DAMAGES SUCH AS, BUT NOT LIMITED TO, LOST BUSINESS OR PROFITS ARISING OUT OF THE SALE OR USE OF ANY
BELKIN ENCLOSURE, EVEN IF ADVISED OF THE POSSIBILITY OF SUCH DAMAGES. This
Warranty gives you specific legal rights, and you may also have other rights, which may vary
from state to state. Some states do not allow the exclusion or limitation of incidental, consequential, or other damages, so the above limitations may not apply to you.
Belkin Enclosure - User Manual v 1.0.0 Page 19 P74789
Page 23

Contact Information
www.belkin.com
Belkin Corporation
501 West Walnut Street
Compton, CA 90220, USA
310-898-1100
310-898-1111 fax
Belkin Ltd.
Express Business Park, Shipton Way
Rushden, NN10 6GL, United Kingdom
+44 (0) 1933 35 2000
+44 (0) 1933 31 2000 fax
Belkin B.V.
Boeing Avenue 333
1119 PH Schiphol-Rijk, The Netherlands
+31 (0) 20 654 7300
+31 (0) 20 654 7349 fax
Belkin Ltd.
7 Bowen Crescent, West Gosford
NSW 2250, Australia
+61 (0) 2 4372 8600
+61 (0) 2 4372 8603 fax
Tech Support
US: 310-898-1100 ext. 2263
800-223-5546 ext. 2263
Europe: 00 800 223 55 460
Australia: 1800 235 546
New Zealand: 0800 235 546
© 2005 Belkin Corporation.
All trade name are registered trademarks of respective manufacturers listed.
All rights reserved.
Belkin Enclosure - User Manual v 1.0.0 Page 20 P74789
Page 24

(This page is left intentionally blank.)
Belkin Enclosure - User Manual v 1.0.0 Page 21 P74789
 Loading...