

Page 1

Wireless G Universal
Range Extender/
Access Point
Belkin Ltd.
Express Business Park, Shipton Way
Rushden, NN10 6GL, United Kingdom
+44 (0) 1933 35 2000
+44 (0) 1933 31 2000 fax
Belkin B.V.
Boeing Avenue 333
1119 PH Schiphol-Rijk, The Netherlands
+31 (0) 20 654 7300
+31 (0) 20 654 7349 fax
Belkin Tech Support
Europe: 00 800 223 55 460
© 2005 Belkin Corporation. All rights reserved. All trade names are registered trademarks of
respective manufacturers listed. Mac, Apple, and AirPort are trademarks of Apple Computer,
Inc., registered in the U.S. and other countries. The mark Wi-Fi is a registered mark of the
Wi-Fi Alliance.
Belkin GmbH
Hanebergstrasse 2
80637 Munich, Germany
+49 (0) 89 143405 0
+49 (0) 89 143405 100 fax
Belkin SAS
130 rue de Silly
92100 Boulogne-Billancourt, France
+33 (0) 1 41 03 14 40
+33 (0) 1 41 31 01 72 fax
P74992uk
Page 2

User Manual
F5D7132
Increase your wireless coverage
Wireless G Universal
Range Extender/
Access Point
Page 3

Table of Contents
1 Introduction. . . . . . . . . . . . . . . . . . . . . . . . . . . . . . . . . . . . . . . . . . . . . . 1
Advantages of a Wireless Network. . . . . . . . . . . . . . . . . . . . . . . . .
Placement of your Wireless Networking Hardware
for Optimal Performance
2 Overview . . . . . . . . . . . . . . . . . . . . . . . . . . . . . . . . . . . . . . . . . . . . . . . .
Package Contents . . . . . . . . . . . . . . . . . . . . . . . . . . . . . . . . . . . . .
System Requirements . . . . . . . . . . . . . . . . . . . . . . . . . . . . . . . . . .
Specifications. . . . . . . . . . . . . . . . . . . . . . . . . . . . . . . . . . . . . . . . . .
3 Configuring the WURE . . . . . . . . . . . . . . . . . . . . . . . . . . . . . . . . . . . . . 8
Configuring as a Wireless Access Point. . . . . . . . . . . . . . . . . . . . .
Configuring as a Wireless G Universal Range Extender . . . . . . . 12
Auto Connect Button. . . . . . . . . . . . . . . . . . . . . . . . . . . . . . . . . . . 12
4 Using the Web-Based Advanced User Interface. . . . . . . . . . . . . . . 14
Understanding the Web-Based Advanced User Interface. . . . . . 16
Wireless > Basic . . . . . . . . . . . . . . . . . . . . . . . . . . . . . . . . . . . . . . 18
Changing the Wireless Network Name (SSID) . . . . . . . . . . . . . . 18
Using the Wireless Mode Switch
Changing the Wireless Channel . . . . . . . . . . . . . . . . . . . . . . . . . . 19
Using the Broadcast SSID Feature. . . . . . . . . . . . . . . . . . . . . . . . 20
Protected Mode
Repeater Mode
Securing your Wi-Fi
WEP Setup
WPA Setup
MAC Address Control
5 Changing System Settings. . . . . . . . . . . . . . . . . . . . . . . . . . . . . . . . . 34
Setting or Changing the Administrator Password
Restoring Factory Default Settings
Saving a Current Configuration
Restoring
Updating Firmware
6 Troubleshooting . . . . . . . . . . . . . . . . . . . . . . . . . . . . . . . . . . . . . . . . . 42
7 Information . . . . . . . . . . . . . . . . . . . . . . . . . . . . . . . . . . . . . . . . . . . . . 52
. . . . . . . . . . . . . . . . . . . . . . . . . . . . . . . . . . . . . . 21
. . . . . . . . . . . . . . . . . . . . . . . . . . . . . . . . . . . . . . . 22
. . . . . . . . . . . . . . . . . . . . . . . . . . . . . . . . . . . . . . . . . . 28
. . . . . . . . . . . . . . . . . . . . . . . . . . . . . . . . . . . . . . . . . . 30
a Previous Configuration . . . . . . . . . . . . . . . . . . . . . . . 37
. . . . . . . . . . . . . . . . . . . . . . . . . . . . . . . . 2
. . . . . . . . . . . . . . . . . . . . . . . . . 19
®
Network . . . . . . . . . . . . . . . . . . . . . . . . . . . 24
. . . . . . . . . . . . . . . . . . . . . . . . . . . . . . . . . 32
. . . . . . . . . . . . . . . . . . . . . . . 34
. . . . . . . . . . . . . . . . . . . . . . . . . . 35
. . . . . . . . . . . . . . . . . . . . . . . . . . . . . . . . . . . . 38
. . . . . . . . . . . . 34
1
5
7
7
7
8
Page 4

Introduction
Thank you fo r purcha sing the Belk in Wirel es s G Univers al Range
Extend er (WURE) a nd welcome to th e w orld of wir eless netw orking.
Now you ca n t ake advant age of this ne w h igh-spe ed wireles s
techno logy and ga in the freedo m t o c onnec t t o y our home or of fi ce
networ k w ithout u si ng cable s. This produ ct acts as a wire less range
extend er and acce ss point. The ea sy insta ll ation an d s etup will hav e
you netwo rking wi re lessl y i n m inutes. Pl ease be sur e t o r ead throug h
this User Ma nual com pletely , a nd pay spec ia l attent ion to the secti on
ent itled “P lacement of yo ur Wirel ess Networking Hardware for Op timal
Perfor mance” on t he next page. By fo llowi ng our simple se tup
instru ctions, yo u w ill be able to us e your Belk in Home Netwo rk to:
• Share one hi gh-sp ee d Intern et connect ion with al l t he compute rs
in your ho me
• Share res ources, su ch as files , a nd hard dri ves among all th e
connec ted comput ers in your ho me
• Share a si ng le print er among the e nt ire fami ly
• Share doc uments, mu sic, vid eo, and digit al pictu re s
• Store, re trieve, an d copy file s f rom one com puter to anot her
• Simult aneousl y p lay game s o nline, che ck Interne t e mail, an d c hat
Advant ages of a Wire less Netwo rk
• Mobili ty – y ou no longe r n eed a dedic ated “comp uter room” —
now you ca n w ork on a netwo rk ed lapto p o r d esktop com puter
anywhe re within y ou r wirele ss range
• Easy inst allatio n – Belkin Eas y I nstalla tion Wizar ds make set up
simple
• Flexib ility – set up an d a ccess pr in ters, co mputers , a nd other
networ king devic es from any where in your ho me
• Easy expa nsion – the wi de range of Be lk in netwo rking prod ucts
let you ex pa nd your net work to inc lu de devic es such as print ers
and gamin g c onsol es
• No cablin g r equir ed – y ou can spare t he expense an d h assle of
retrof itting Eth ernet ca bl ing thro ughout the ho me or offic e
• Widesp read indus try acce pt ance – choo se from a wide ra nge
of intero perable ne twork in g produc ts
sec tio n
1
2
3
4
5
6
7
1
Page 5

Introduction
32
Placement of your Wireless Networking Hardware for Optimal
Performance
Access Point Mode: Your wireless connection will be stronger the closer
your computer is to your wireless Wireless Universal Repeater (WURE)
Typical indoor operating range for your wireless devices is between 100
and 200 feet. In the same way, your wireless connection and performance
will degrade somewhat as the distance between your computer and
the WURE increases. This may or may not be noticeable to you. As you
move farther from your WURE connection speed may decrease. The
signal quality can be greatly affected by obstacles as well as other factors
such as, metal surfaces, electrical appliances, and walls.
Universal repeater Mode: Out of the box the WURE will automatically
connect to the wireless network AP/ Router that has the strongest signal.
It is advisable to initiate the initial connection in close proximity to the
Wireless Access Point /Router that you want the WURE to connect to.
This way, a connection to the wrong Wireless network can be avoided.
Once satisfied the connection to the correct network has been
established, the WURE can be placed in a position approximately half
way between the Router /Access Point and your wireless computer(s).
If you have concerns about your network’s performance that might be
related to range or obstruction factors, try moving the computer to a
position between five and 10 feet from the wireless router (or access
point) in order to see if distance is the problem. If difficulties persist even
at close range, please contact Belkin Technical Support.
Note: While some of the items listed below can affect network
performance, they will not prohibit your wireless network from functioning.
If you are concerned that your network is not operating at its maximum
effectiveness, this checklist may help.
1. Wireless Router (or Access Point) Placement
Place you r w irele ss router (or ac cess poi nt ), the cent ral connec tion
point of y ou r networ k, as close as po ssible to the ce nter of you r
wirele ss network de vices .
To achieve the best wireless network coverage for your “wi reless
cli ents” (i .e., computers enabled by Belkin Wir eless No tebook N etwork
Car ds, Wire less Desktop N etwork C ards, and Wire less USB Adapter s):
• Ensure that your wireless router’s (or access point’s) networking
antennas are parallel to each other, and are positioned vertically (toward
the ceiling). If your wireless router (or access point) itself is positioned
vertically, point the antennas as much as possible in an upward direction.
• In multistory homes, place the wireless router (or access point) on a floor
that is as close to the center of the home as possible. This may mean
placing the wireless router (or access point) on an upper floor.
• Try not to place the wireless router (or access point) near a cordless
2.4GHz phone.
Page 6

3
Introduction
2. Avoid Obstacles and Interference
Avoid pla cing you r w ireless ro uter (or ac ce ss point ) n ear device s t hat
may emit r ad io “nois e,” such as mi cr owave ov ens. Dense ob jects that
can inhib it wirel es s commun ication in clude:
• Refrig erators
• Washer s a nd/or dr ye rs
• Metal cab inets
• Large aqu ariums
• Metall ic-base d, UV-tint ed windo ws
If your wi re less sig nal seems wea k i n some spot s, make sure t ha t
object s s uch as thes e a re not bloc ki ng the sign al’s path (be tween
your comp uters an d w ireless ro uter or acc es s point) .
sec tio n
1
2
3
4
5
6
3. Cordless Phone Placement
If the per fo rmanc e o f y our wirele ss netwo rk is impaire d a fter
attend ing to the abo ve issues, an d y ou have a cord less phone :
• Try movin g c ordle ss phones awa y f rom wire le ss route rs (or
access po ints) an d y our wirele ss-enab led comput ers.
• Unplug an d r emove th e b attery fro m a ny cordl ess phone
that oper ates on the 2. 4GHz band ( ch eck the man ufactur er’s
inform ation). If th is fixes th e p roblem, yo ur phone ma y b e
interf ering.
• If your ph on e suppor ts channel se lection , c hange th e
channe l o n t he phone to th e f arthe st channel fr om your
wirele ss network . F or example , c hange the p ho ne to chann el
1 and move yo ur wireles s r outer (o r a ccess poin t) to channel
11. See yo ur phone’s us er manual f or detaile d i nstruct ions.
• If necess ary, con si der swit ching to a 900 MH z or 5GHz
cordle ss phone.
4. Choose the “quietest” channel for your wireless network
In locati ons wher e h omes or offic es are clos e t ogether , s uch as
apartm ent buildi ngs or offi ce complex es, there m ay be wireles s
networ ks nearby t ha t can confl ict with yo ur s.
Use the Si te Survey cap abiliti es found in th e W ireless LA N U tility
of your wi re less ada pter to locat e a ny other wi reless net works that
are avail able (se e y our wirele ss adapter ’s manua l) , and move you r
3
7
Page 7

Introduction
Introduction
wirele ss router ( or access poi nt) and com pu ters to a chan nel as far
away from ot her netw orks as possi ble.
Experi ment with m or e than one of t he availab le channel s i n o rder to
find the c le arest co nnectio n a nd avoid in te rfere nc e from neig hboring
cordle ss phones o r o ther wirel ess device s. For Belk in wireles s
networ king produ cts, use th e d etailed Si te Surve y a nd wireles s
channe l i nformat ion incl ud ed in your Use r M anual . T hese guide lines
should al low you to cov er the maxi mu m possib le area with you r
wirele ss router ( or access poi nt).
5. Secure Connections, VPNs, and AOL
Secure connections typically require a user name and password, and
are used where security is important. Secure connections include:
• Virtual Private Network (VPN) connections, often used to connect
remotely to an office network
• The “Bring Your Own Access” program from America Online (AOL),
which lets you use AOL through broadband provided by another cable
or DSL service
• Most online banking websites
• Many commercial websites that require a user name and password to
access your account
Secure connections can be interrupted by a computer’s power
management setting, which causes the computer to “go to sleep.”
The simplest solution to avoid this is to simply reconnect by re-running
the VPN or AOL software, or by re-logging into the secure website. A
second alternative is to change your computer’s power management
settings so it does not go to sleep; however, this may not be
appropriate for portable computers. To change your power management
setting under
Windows, see the “Power Options” item in the Control Panel. If you continue
to have difficulty with Secure Connections, VPNs, and AOL, please
review the steps above to be sure you have addressed these issues.
For more information regarding our networking products, visit our website
at ww w.bel ki n.com /n etwor ki ng or call Belkin Technical Support at:
US: 877 -736-57 71
310-8 98-1100 ex t. 2263
Europe : 00 800 22 3 5 5 4 60
Austra lia: 1800 235 5 46
New Zeala nd: 0 80 0 2 35 546
Singap ore: 800 616 17 90
Page 8
Overview
The WURE is designed to be positioned horizontally on a desktop, or
wall-mounted. All of the cables exit from the rear of the WURE for better
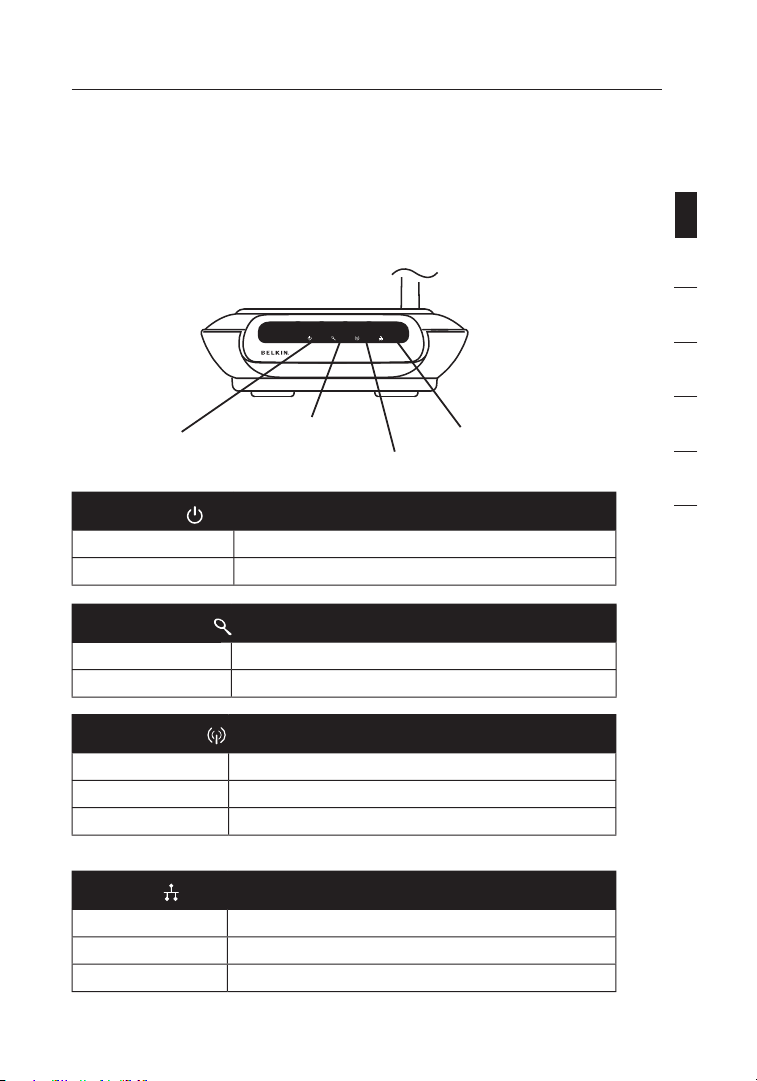
organization and utility. The LED indicators are easily visible on the front of the
WURE to provide you with information about network activity and status.
Front Panel
Power LED
Power LED
OFF WURE powe r o ff
Solid Gre en WURE powe r o n
Searching LED
Solid Red Error
Blinki ng Red Search ing
Wireless LED
OFF No wirele ss conne ct ion avai lable
Blinki ng Green Receiv ing/tra nsmitti ng data
Solid Gre en WURE is re ad y
Searching LED
Wireless LED
LAN LED
1
sec tio n
2
3
4
5
6
7
LAN LED
OFF No netw ork is linked to th e port
Blinki ng Green Rece iv ing/t ra nsmit ti ng data
Solid Gre en Link ed to network
5
5
Page 9

76
Overview
RJ45 Ethernet Jack Reset Button
Antenna
Auto Connect Button
Back Panel
Power Jack
Connec t t he inclu de d 4.5V DC powe r s upply to th is jack.
RJ45 Ethernet Jack
Connec t a n E thern et cable to this so cket, an d c onnect to an o pe n
RJ45 10Ba se-T or 100 Base-Tx po rt on a switch , h ub, or router .
Auto Connect Button
The “Auto Co nnect ” b utton will au tomatic ally con ne ct and set up you r
WURE to a wir eless netw ork. It is as sim ple as pushin g a button.
Reset Button
The “Rese t” button is to be use d i n the un likely eve nt that your WUR E
malfun ctions. Re setting th e WURE rest ores its no rm al opera tion while
mainta ining the p ro gramm ed “settin gs”. You can a ls o restor e t he
factor y d efault s et tings by us ing the “Re se t” butto n. Use the resto re
option if , f or examp le, you have f or gotte n y our passwo rd.
a. Resetting the WURE
Push and r el ease the “R eset” butt on. The lig hts on the WURE
will mome ntarily fl ash. The “P ower/Re ady” light wi ll begin to
blink. Wh en the “Pow er/Read y” light beco mes soli d a gain, the
reset is c om plete .
b. Restoring the Factory Defaults
Pre ss and hold the “Reset” b utton fo r 10 seconds, then release
it. The lights on the WURE will momentarily flash. The “Power/
Ready” l ight wil l b egin to blink . W hen the “Po wer/Rea dy” light
become s s olid aga in , the resto re is compl et e.
Power Jack
Rotatable Dipole Antenna
An omnidi rection al dipol e a ntenna is loc ated on the ba ck of the
WURE. The an tenna s c an rotate 180 de grees . T he antenna sh ould be
orient ed in the vert ical posit ion for bes t p erforma nce.
Page 10

7
Overview
Package Contents
• Belkin Wi reless G Wi reless Uni versal Ran ge Exten de r
• Detach able Anten na
• Power Sup ply
• User Manu al
• Quick Ins tallati on Guide
• Ethern et Cable
• Easy Inst allatio n W izard So ftware CD- ROM
System Requirements
• At lea st one comp uter with an i ns talle d 8 02.11g or 802 .11bcompli ant wirele ss Ether ne t adapte r
• TCP/IP ne tworkin g p rotoc ol install ed on each com pu ter
• CAT5 netw orking c ab le (or bett er)
• Micros oft® I nternet Ex plore r 4 .0 or later, o r N etscape® 4 .0 or later
Specifications
Wireless:
Radio Tec hnology Di rect Seq uence Spre ad Spectru m ( DSSS)
• IEEE 802.3, IEEE 802.3u 10/100Base-Tx, auto-negotiation, auto-MDIX
802.11g:
• Network Standard IEEE 802.11b (Wi-Fi) and IEEE 802.11g compliance
• OFDM; 802.11b: CCK (11Mbps, 5.5Mbps), DQPSK (2Mbps),
DBPSK (1Mbps)
• Op erati ng Frequen cies: 2.41 2–2.497 GHz
• Op erati ng Channel s 8 02.11g: 13 fo r North Ame rica, 13 for E ur ope
(ETSI), 1 4 f or Japan
802.11b:
11 for Nor th America , 1 4 f or Japan , 1 3 f or Europe (ET SI)
Security:
• WE P (64- and 128 -bit key s) Open, Shar ed Authent ication
• WP A-PSK (T KIP, AES)
• WP A2-PS K ( AES)
Management: Browse r-based
Maximum Users: 3 2 ( WLAN)
Ports: 1 10/100B ase-Tx R J4 5 port (LAN )
1 po we r jack
1 re se t button
1 Au to Connect bu tton
LEDs: Power , S earchin g, LAN, Wirel ess
1
sec tio n
2
3
4
5
6
7
7
Page 11
Configuring the WURE
98
Wireless G
Universal Range
Extender
Wireless G
Notebook Card
Wired Router
Wireless G
Desktop Card
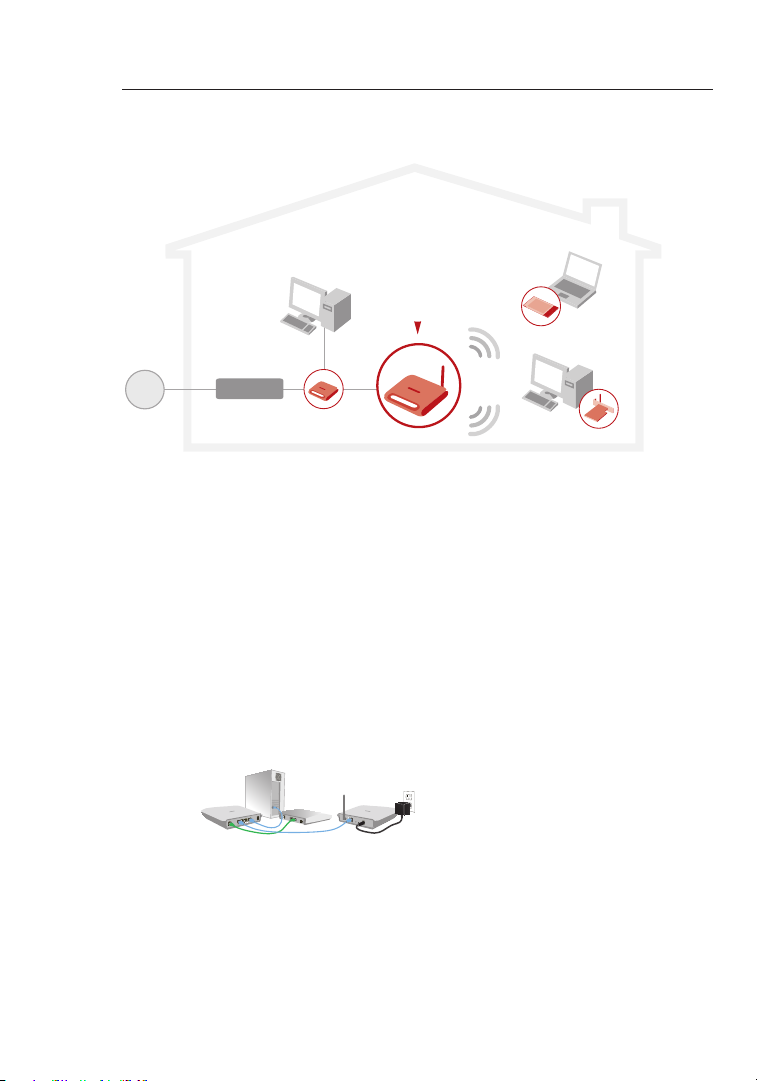
Configuring as a Wireless Access Point
1. Connect
Connecting as a Wireless Access Point
The WU RE can add wir eless-e nabled compute rs to a n exist ing wir ed
networ k. The access point a cts as a bridg e betwe en your existi ng
wired network and yo ur wire less-eq uipped compute rs. Ple ase be sure
to fol low the steps below c arefull y.
1.1 Select a suit able pl ace for your W URE.
1.2 Connec t a CAT 5 cable betwee n the W URE and your r outer’s
LAN po rt, or an Ethe rnet sw itch or hub.
1.3 Con ne ct th e power s upply t o the W URE b y plugg in g the
round DC conn ector i nto the DC jac k on th e WURE. Plug t he
power supply into th e wall. Verify that t he “Pow er” LED and
the “L AN” LED are il luminat ed. If both LE Ds are illumin ated,
the WU RE is c onnecte d prope rly.
Page 12
9
Configuring the WURE
2. Install
Running the Easy Install Wizard Software
2.1
2.2 Insert the Wi reless Range E xtender Manage ment Ut ility
NOTE: If t he Util ity wiz ard doe s not s tart up automa tically , selec t
2.3 Yo u will no w see t he fi rs t of a serie s of pr og ress sc reens
2.4 Onc e insta ll ation i s com pl ete, yo u may r un th e Utili ty pro-
NOTE: Both your P C and W URE mus t be wi red int o your network
Shut d own any progra ms that are ru nning o n your compute r
at thi s time. Turn o ff any firewal l or In ternet- connect ionsharin g softw are on your co mputer.
softwa re CD i nto you r CD-RO M drive . The U tility wizard will
automa tically appear within 15 sec onds.
your C D-ROM d rive fr om “My Compute r” and double- click o n the
file n amed “S etup.ex e” on t he CD-R OM.
that w ill ins tall th e Wirel ess Ran ge Exte nder Ma nagemen t
Utilit y. It i s recom mended to take the de fault s ettings .
gram b y doubl e-click ing the shortc ut icon .
for th is Util ity to work.
1
2
sec tio n
3
4
5
6
7
3. Configure
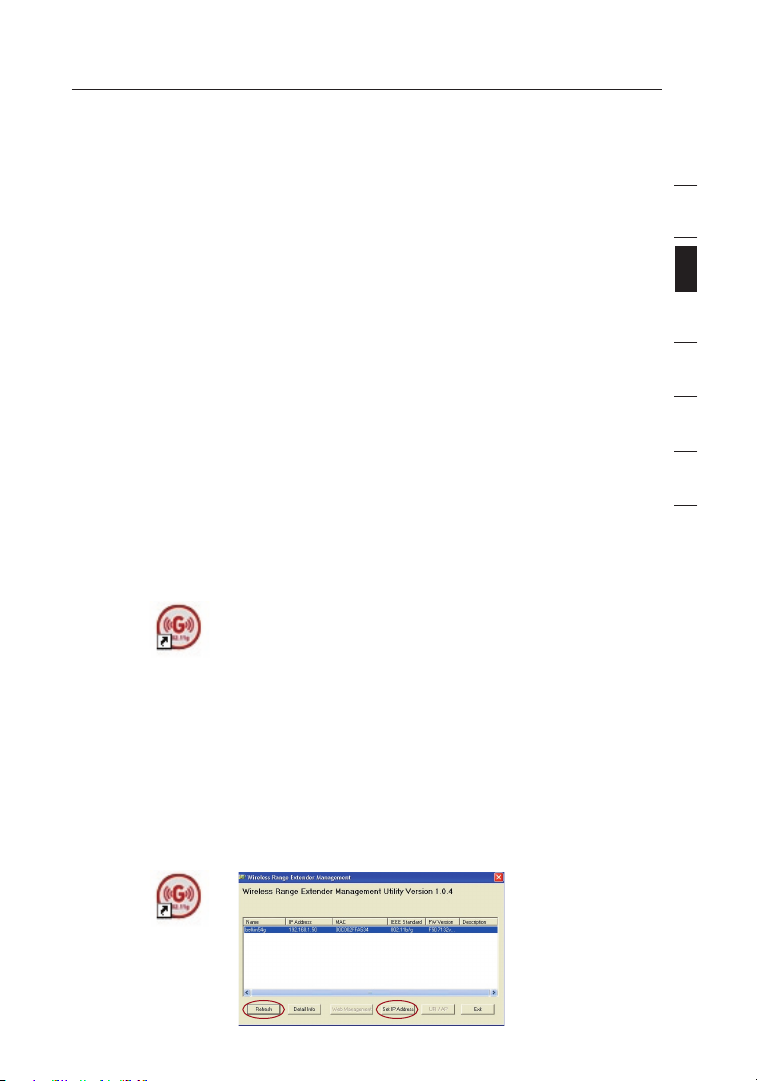
Running the Wireless Range Extender Management Utility
3.1
To sta rt your Wirele ss Rang e Exten der Man agement Utilit y,
double -click the “Be lkin Ra nge Ext ender U tility” icon. You
will s ee the followi ng scre en.
Wirele ss Ra nge E xtend er
9
Page 13
Configuring the WURE
1110
3.2 Cl ic k the “ Refre sh ” but to n. Th e Utili ty will d etect t he
WURE(s ) conne cted to your n etwork. Select the WU RE you
wish t o confi gure.
3.3 If y our W UR E’s I P addre ss is n ot in t he same s ubnet a s you r
networ k, the “Set IP Addres s” butt on will be ena bled. C lick
the “S et IP A ddress” button . A pop -up scr een wil l appea r.
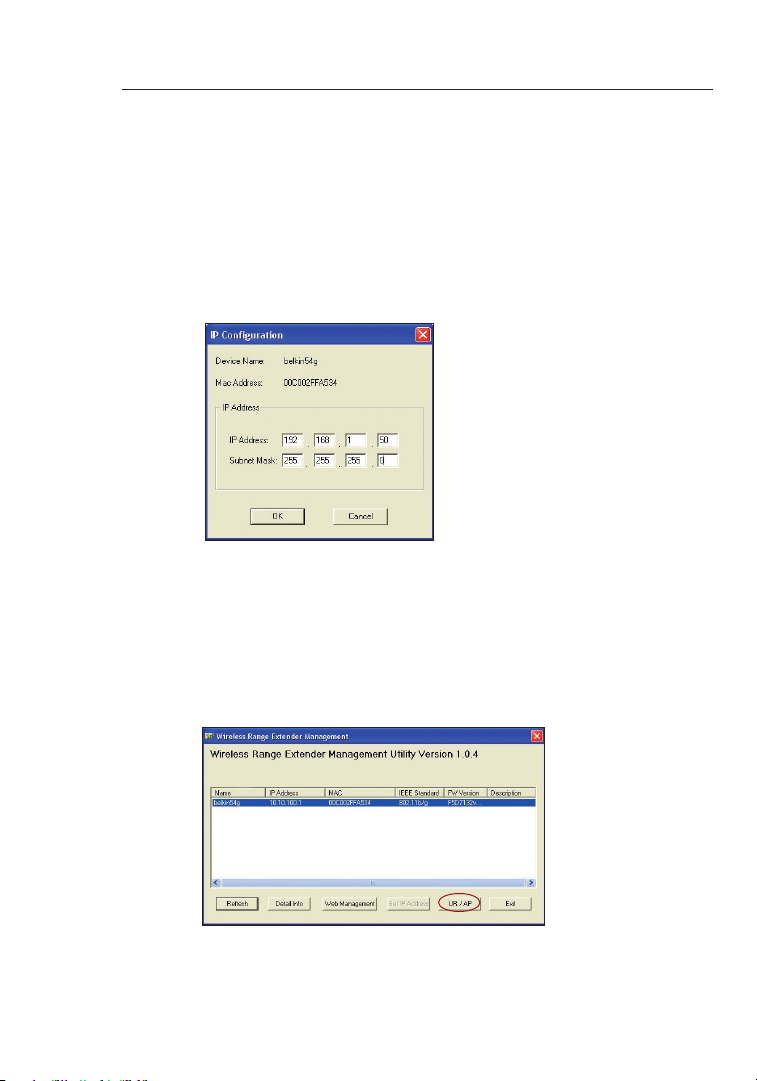
3.4 Se t the I P addre ss of y ou r WUR E to be w ithin t he sa me sub-
net as your n etwork. For ex ample, if your router ’s IP a ddress
is 192 .168.1. 1, set your WU RE to 1 92.168. 1.xx ( xx woul d
be any number betwee n 2–254 ). Be c areful of dupl icate I P
addres ses on your ne twork. Then se t the s ubnet m ask to be
the sa me as y our net work’s subnet mask.
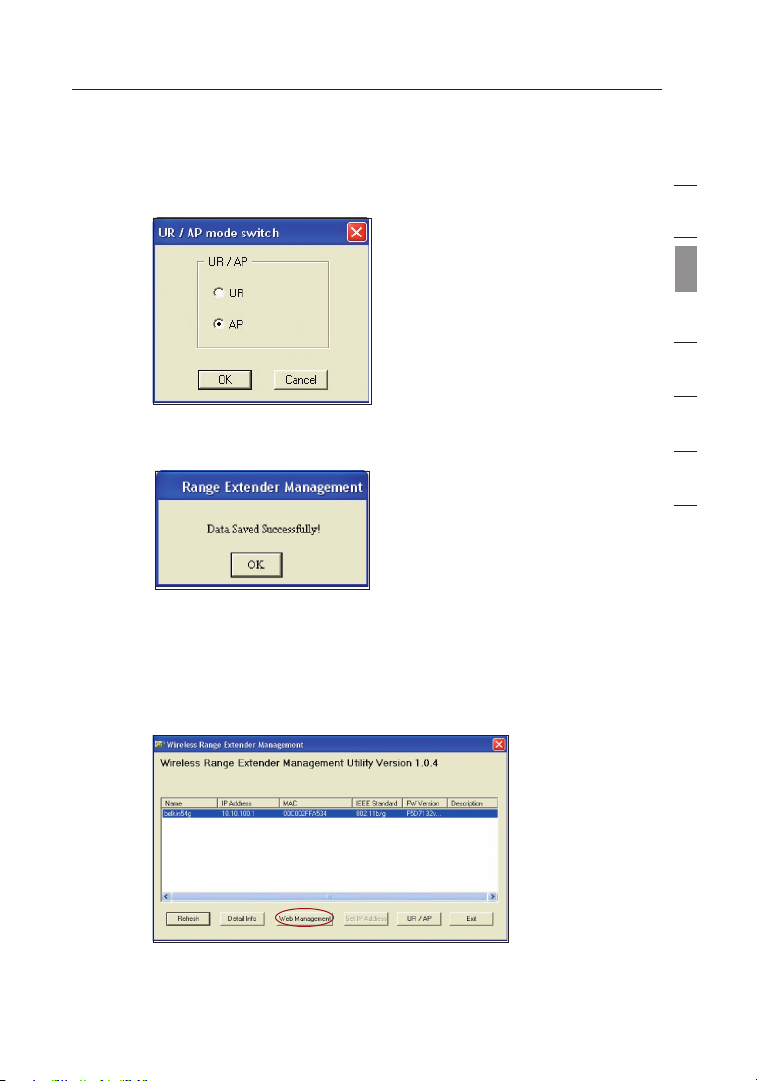
3.5 Cl ic k the “ UR/AP ” butto n.
Wirele ss Ra nge E xtend er
NOTE: If th e “UR /A P” bu tt on is g rayed o ut, c li ck th e
“Refre sh” but ton.
Page 14
11
Configuring the WURE
3.6 Th e “UR/A P mode sw itch” w indow w ill a pp ear. Se lect th e
Congratulations. Your WURE is now set up for access point
AP rad io butt on.
mode.
4. Advanced Configuration
Configuring your WURE through the Web-Based Advanced User Interface
4.1
If you wish t o use t he Web- Based A dvanced User I nterfac e, clic k
the “W eb Mana gement” button .
1
2
sec tio n
3
4
5
6
7
Wirele ss Ra nge E xtend er
4.2 Fo r more de tails , see t he “Und er stand in g the W eb-Ba se d
Advanc ed User Interf ace” se ction.
11
Page 15
Configuring the WURE
1312
Configuring as a Wireless G Universal Range Extender
Auto Connect Button
Auto C onnect is a qu ick and easy m ethod t o autom aticall y set u p your
WURE t o your wireles s netwo rk. It is desi gned to remove the ne ed for
users to set the cor rect SS ID and channel . It is as sim ple as pushing
a butt on.
Note: Auto Connect will w ork onl y if th e wirel ess rou ter (or access
point) has se curity disable d.
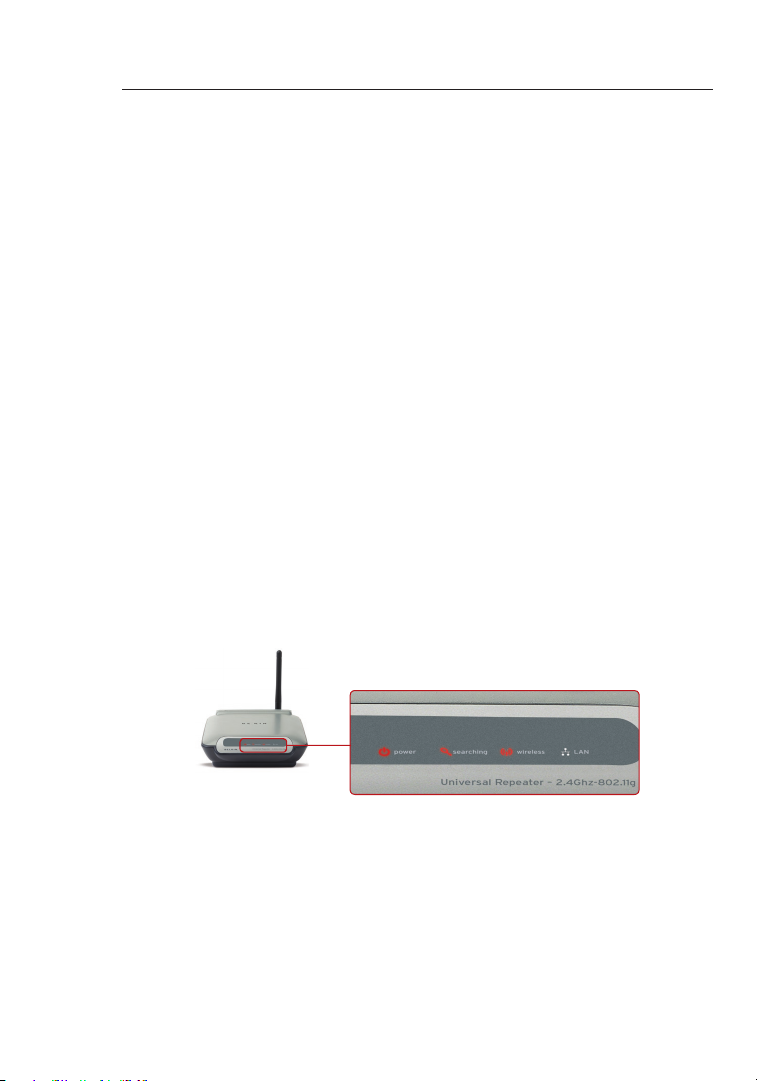
1. Connect
Connecting the WURE
1.1 Locate and po sition the WUR E next to the router to whic h
you wi sh to e xpand t he cove rage ar ea.
1.2 Connec t the p ower su pply to the WU RE. Plu g the p ower
supply into t he wall .
1.3 Verify that t he “Pow er” LED and th e “Wire less” L ED are il-
lumina ted. Th e “Sear ching” LED sho uld be blinkin g (red) .
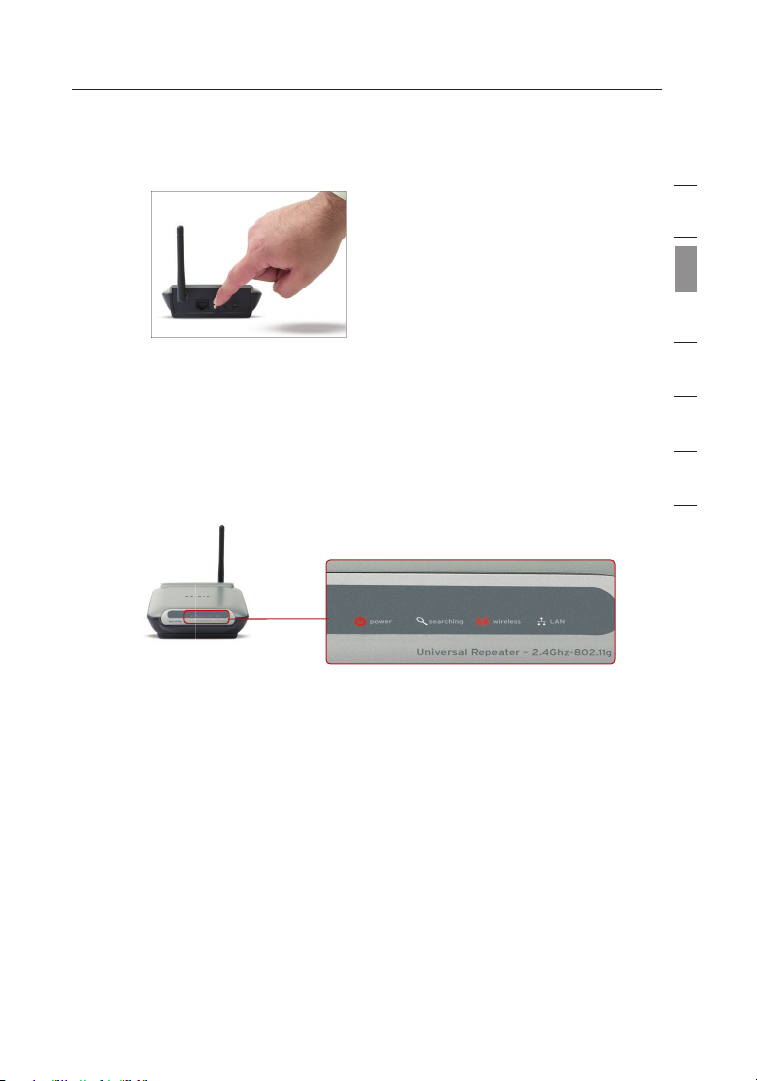
2. Configure
Configuring with One-Touch Setup
2.1 Push a nd hold the “A uto Con nect” b utton f or 10 s econds.
Page 16
13
Configuring the WURE
13
sec tio n
1
2
3
4
5
6
7
2.2 Release the “Auto Connect” button; the WURE will automatically
associ ate to the wir eless r outer ( or acce ss poin t) with the
strong est sig nal. In most c ases, t his wil l be th e route r to
which you pos itioned the WU RE clos est.
2.3 Once t he WURE has as sociate d to yo ur rout er (or access
point) , the “ Searchi ng” lig ht (red ) will not ill uminate .
2.4 The co nfigura tion of your W URE is now com plete. The SSI D
of your WURE will automatically match the SSID of the wireless
router (or ac cess po int) to which it is a ssociat ed.
3. Reposition
Repositioning the WURE in a Weak Signal Area or Dead Spot
3.1 Reposi tion th e WURE between the wi reless router and the
new co verage area.
3.2 Reconn ect the power to the WURE an d it wi ll auto matical ly
reasso ciate i tself w ith the last w ireless router (or ac cess
point) to whi ch you success fully c onnecte d.
Note: Au to Conn ect wil l work only if the wi reless router (or acc ess
point) has se curity disable d.
Page 17
Using the Web-Based Advanced User Interface
1514
The most c on venie nt way to access th e WURE’s We b-Based
Advanc ed User Int er face is to con nect the un it to the wirele ss route r
throug h t he inclu de d cable. On ce you fini sh configu ring the devi ce,
you can di sc onnec t t he cable.
Wireless G
Universal Range
Extender
Wireless G
Notebook Card
Wireless G
Router
Wireless G
Desktop Card
If you wis h t o c onnect a co mp uter dir ectly to the WUR E t o config ure
it, you mu st set your clie nt to match th e s ettings of th e WURE befo re
you can ac ce ss the Web- Based Adva nced Use r I nterfac e. Perform th e
follow ing steps f ro m the compu ter from wh ic h you wish to con figure
your WURE .
Note: Y ou must und o t hese steps on ce you have co mpleted
config uring your WU RE.
Windows 98SE, Me, 2000, and XP
1. Go to th e W indow s C ontrol Pan el and double -click o n t he
“Netwo rk” icon or th e “ Network Co nnectio ns” icon .
2. Right-cli ck on the “Loc al Area Conne ction” for yo ur wirel es s
adapte r a nd selec t “ Propert ies”.
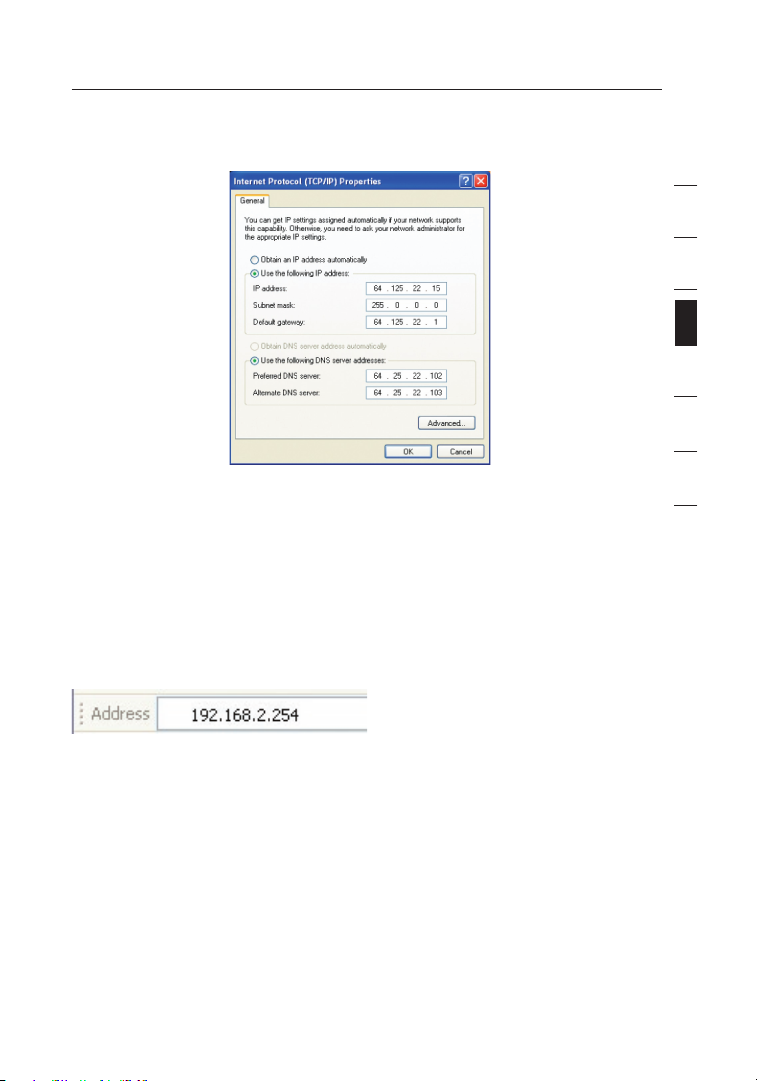
3. In th e “ General ” t ab, sele ct the Intern et Protoco l T CP/IP se ttings
for your w ir eless ad apter and cli ck on the “Pro perties ” b utton.
4. Select the “U se the foll owing IP ad dr ess” rad io button.
5. Enter an IP ad dress in the s am e subnet as th e W URE. For
exampl e, 192.168 .2.200.
6. Enter the f ol lowin g s ubnet mask : 2 55.255. 255.0. T he n click “OK ”.
Page 18
15
Using the Web-Based Advanced User Interface
1
2
3
sec tio n
4
5
6
Note: Onc e y ou have com pleted con figurin g y our WURE , r epeat step s
1 through 3. Then selec t “ Obtain a n I P a utomati cally” or set a v alid IP
for your c om puter on th e s ame subn et as the networ k t o w hich you
are conne cting.
Logging into the WURE
Using you r I ntern et browser , y ou can acce ss the WURE’s We b-Based
Advanc ed User Int er face. In yo ur browser , t ype “192 .168.2. 254” (do
not type i n a nything el se such as “ht tp://” or “ww w”). Then, pr ess the
“Enter ” k ey.
You will s ee the WURE’s ho me page in you r b rowser win dow. The
home page is visible to an y u ser who wan ts to see it. To mak e a ny
change s t o t he WURE’ s s ettings , y ou have to log in . C licking th e
“Login ” b utton or cl icking on any on e of the links on th e home page
will take yo u to the login sc reen. Th e W URE ships wit h n o passwo rd
entere d. In the logi n s creen, lea ve the pass word blank an d c lick the
“Submi t” button t o l og in.
Note: A n I P a ddres s c onflict ca n o ccur if you us e a CA T5 cable to tr y
to manage th e WURE whil e i t a lread y h as a w ireless co nnectio n t o the
same rout er. To reso lve this issu e y ou need to dis connect on e o f the
connec tions to th e W URE (wired or wi reles s) .
1. (Wired) Disc on nect the CAT5 ca ble; manag e the WU RE wireles sly.
2. (Wireless) Reset your WURE; manage the WURE though a CAT5 cable.
15
7
Page 19

Using the Web-Based Advanced User Interface
1716
Logging out of the WURE
One compu ter at a time can lo g into the WUR E i n o rder to mak e
change s t o i ts setti ngs. There ar e t wo ways to log ou t: 1, by click ing
the “Logo ut” butt on ; and 2, autom aticall y, by allow ing a preset tim eout perio d t o e lapse . T he default ti me-out is 10 m in utes; ho we ver, you
can set th e l ogin perio d f rom 1 to 99 minut es.
Understanding the Web-Based Advanced User Interface
The home p ag e is the first pa ge you will se e w hen you acc ess the
Advanc ed User Int er face (UI ). The home pa ge shows you a quic k v iew
of the WUR E’ s status an d s ettings . A ll advan ced setup pag es can be
reache d f rom this pa ge.
(2) (3) (4)
(5)
(1)
(1) Quick Navigation Links
You can go di rectly to any of the WURE’s Ad vanced UI p ag es by
clicki ng directl y o n these lin ks. The lin ks are divide d i nto logica l
catego ries and gr ou ped by tabs to ma ke findi ng a p articul ar setting
easier to fi nd. Clic king on the pu rp le heade r o f e ach tab wil l s how you
a short de sc ripti on of the tab’s f un ction .
(6)
(7)
Page 20

17
Using the Web-Based Advanced User Interface
(2) Home Button
The home b ut ton is avai lable in ev er y page of the UI. Pr essin g t his
button wi ll take you ba ck to the home pa ge.
(3) Help Button
The “Help ” b utton gi ves you acces s t o the WURE’ s h elp pages. He lp
is also av ai lable on ma ny pages by cl icking “mo re info” next to certain
sectio ns of each pag e.
(4) Login/Logout Button
This butt on enabl es you to log in and ou t o f t he WURE wit h t he press
of one but to n. When you ar e l ogged in , t his button wi ll chang e t o
read “Log out”. Lo gg ing into th e W URE will ta ke you to a separ at e
login pag e w here you mu st enter a pas sword. Whe n y ou are logg ed
in, you ca n m ake change s t o t he setti ngs. When you ar e f inish ed
making ch anges, y ou can log out by cl icking the “L ogout” but ton. For
more info rmation ab out logg ing into the WUR E, see the sec tion calle d
“Loggi ng into the WU RE ”.
(5) Version Info
Shows the fi rmwar e v ersion, bo ot-code ve rsion, h ar dware ve rsion,
and seria l n umber of th e W URE
(6) LAN Settings
Shows you th e settin gs of the Loca l A rea Networ k ( LAN) side o f t he
WURE. Cha nges can be ma de to the sett ings by click ing on any one
of the lin ks (IP Addres s, Subnet M as k) or by click ing the “LA N” Quick
Naviga tion link o n t he left side o f t he screen.
(7) Features
Shows the st atus of the WU RE’s wirel ess sett in g. Chang es can be
made to th e s ettings by cl icking o n a ny one of the lin ks or by clickin g
the “Quic k N aviga ti on” link s o n t he left sid e o f t he screen.
Using you r I ntern et browser , y ou can acce ss the WURE’s We b-Based
Advanc ed User Int er face. In yo ur browser , t ype “192 .168.2. 254” (do
not type i n a nything el se such as “ht tp://” or “ww w”). Then p re ss the
“Enter ” k ey.
.
1
2
3
sec tio n
4
5
6
7
17
Page 21

Using the Web-Based Advanced User Interface
1918
Wireless > Basic
The “Wire less > Basi c” page lets y ou make chang es to the wire le ss
networ k s ettings . F rom this pa ge you can mak e c hanges to the
wirele ss setting s.
Changing the Wireless Network Name (SSID)
To identi fy your wir eless netw ork, a name ca lled the SSID (S ervice
Set Ident ifier) i s u sed. The defa ult SSID of th e W URE is “bel ki n54g” .
You can ch an ge this to any thing yo u w ant to or you can le ave it
unchan ged. If the re are other wir eless ne tw orks ope rating in you r
area, you wi ll want to mak e s ure that yo ur SSID is uni qu e (does not
match tha t o f anothe r w ireless ne twork in th e a rea). To chan ge the
SSID, typ e i n the SSID tha t y ou want to use in th e SSID fiel d
click “Ap ply Chan ge s” (2). The chang e i s i mmedi at e. If you make a
change to th e SSID, you r w ireless -equipp ed compu te rs must als o
be reconf igured t o c onnect to you r n ew netwo rk name. Refe r t o t he
docume ntation fo r y our wire less netwo rk adapter fo r inform ation on
making th is chang e.
(1) a nd
Page 22

19
Using the Web-Based Advanced User Interface
Using the Wireless Mode Switch
Your WURE ca n operat e i n t hree dif fe rent wir eless mode s: “54gAuto”, “5 4g-Only ”, and “54g -LRS”. The di fferent mo des are exp lained
next.
54g-Auto Mode
In this mo de , the WURE is com patible wi th 802.1 1b and 802.11 g
wirele ss clients si multa ne ously . T his mode is th e f actory def ault and
ensure s f ull comp at ibili ty with Wi-Fi -compat ible devic es. Set the
WURE to 54 g- Auto mod e i f y ou have a mix of 802 .11b and 80 2.11g
clients in your network. This is the recommended setting for your WURE
and shoul d o nly be chan ged if you hav e a sp ecific rea son to do so.
54g-Only Mode
54g-On ly mode is com patible wi th 802.11g cl ients on ly. Use this
mode only if you do not hav e a ny 802.11b cl ients that ne ed acces s
to the net wo rk. To swit ch modes, s el ect the des ired mode fro m t he
drop-d own box nex t t o “ Wireles s M ode” the n c lick “Appl y C hanges” .
54g-LRS Mode
It is not rec ommende d y ou use this mo de unless you ha ve a very
specif ic reason t o d o s o. This mod e e xists only to so lve uniq ue
proble ms that may oc cur with some 80 2.11b cl ient adapt ers and is
NOT neces sary for in teroper ability of 80 2.11g an d 8 02.11b sta ndards.
When to Use 54g-LRS Mode
In some ca se s, older 80 2.11b clie nts may not be co mpatibl e w ith
802.11 g w ireless . T hese ada pters tend to be of lesser des ign or use
older dri vers or tec hnology . 5 4g-LRS (Li mited Ra te Support ) a llows
these cli ents to be com patible wi th the newe r 8 02.11g tec hnology .
Switch ing to this mo de can solve p ro blems th at sometim es occur
with thes e c lient s. If you suspec t t hat you are us ing a clien t a dapter
that fall s i nto this ca tegory of a da pters , f irst check wi th the adap te r
vendor to se e if there is a dr iver updat e. If there is no dr iver updat e
availa ble, switc hing to 54g -LRS mode may fi x your prob lem.
Please no te that swi tching to 54g -LRS mod e m ay decreas e
802.11 g p erforma nce.
1
2
3
sec tio n
4
5
6
7
Changing the Wireless Channel
There ar e a number of o pe rating ch an ne ls yo u can choose from.
In t he United States, there are 11 channels . In the U nited K in gd om
and mo st of Europe, there are 13 channels. In a s ma ll numb er of
other co un tries, th er e are other channel requirements. Your WURE
is c on fi gu red t o operate on the pr op er chan ne ls for the country yo u
19
Page 23

Using the Web-Based Advanced User Interface
2120
reside i n. The default channel is 11 (unles s you are in a country that
does n ot allow channel 11). The ch an ne l can be changed if ne ed ed . If
there ar e other wireless networks operating in yo ur area , your network
should b e set to operate on a channel that is d if fe re nt th an the other
wireless n etworks. Fo r best performance, use a ch annel t ha t is at least
five c ha nn els a wa y from the other wi re less ne tw or k. For instance, if
another ne twork i s operating on channel 11, t he n set your network to
channel 6 or below. To ch ange th e channel, select the channel fr om
the dr op -d own l is t. Click “Apply Changes”. The ch ange is immediate.
Note: When using the WURE in “Wireless Repeater Mode,” the
channel of your WURE must match th e channel of your p arent a cc es s
point. F or easy configuratio n, set the channel of your WURE to “ Au to”.
Change t he chan ne l of the parent a cc es s poi nt . The channel or th e
WURE w il l autom at ic al ly matc h the parent access p oint.
Using the Broadcast SSID Feature
Note: Thi s a dvanc ed feature sh ould be emp lo yed by adva nced
users onl y.
For secur ity, you ca n c hoose not t o b roadcas t y our networ k’s SSID.
Doing so w il l keep your ne twork na me hidden fro m c omputer s t hat
are scann ing for the pr esence of w ir eless ne tworks. To tu rn off the
broadc ast of the SSI D, remove the ch eck mark fr om the box nex t
Page 24

21
Using the Web-Based Advanced User Interface
to “Broad cast SSI D” , and then cli ck “Appl y C hanges” . T he change
is immedi ate. Eac h c omputer no w m ust be set to con nect to you r
specif ic SSID; an SS ID of “ANY” wi ll no longer be acc epted. R ef er to
the docum entatio n o f your wire less netwo rk adapt er for inform ation
on making th is chang e.
Protected Mode
As part of th e 8 02.11g spe cificat ion, Pro te cted mod e w ill ensure
proper op eration of 802.11g cl ients and a cc ess poin ts when there is
heavy 802 .11b tra ff ic in the oper ating en vi ronme nt . When Prot ected
mode is ON , 8 02.11g wil l s can for oth er wireles s n etwork tra ffic
before it tr ansmi ts data. This me thod of “wa iting” hel ps when there
is very he av y traffi c, but adds un ne cessa ry delays whe n t here is no
heavy tra ffic.
If you are in an en vironme nt where th ere is no other ( or very littl e)
wirele ss network tr affic , b est perfor mance is ac hi eved wit h P rotecte d
mode OFF. If you are opera ting in an env ironmen t w ith HEAVY
802.11 b t raffic o r i nterfer ence, best pe rforman ce may be achi eved
with Prot ected mo de ON.
1
2
3
sec tio n
4
5
6
7
21
Page 25

Using the Web-Based Advanced User Interface
2322
Repeater Mode
Repeat er mode all ow s your WURE to di rectl y c onnect to a wire less
router (o r a ccess po int). You can us e this mode to ex tend the ra nge
of your wi re less net work, or to ad d a n e xtensio n o f y our netw or k,
withou t r unning c ab les. The WU RE is compa ti ble with mo st 802.11b
or 802.11 g w irele ss access poi nts or wire le ss route rs.
1. T o enable Re peater mod e, selec t t he “Wirele ss Repeate r M ode”
radio but ton.
2. Cl ick on the “Si te Survey” bu tton.
The “Site Su rvey” pa ge will allow yo u to see a list of av ailable
wirele ss network s i n your area . U nder the “S elect Netw ork” colum n,
you will b e a ble to select th e wirele ss network to wh ich you wis h t o
connec t. Once you ha ve selecte d t he desir ed wireles s n etwork, cl ick
on the “Co nn ect” but ton.
Page 26

23
Using the Web-Based Advanced User Interface
3. Th e s tatus of yo ur connect ion will sh ow in the “Sta tu s” box.
1
2
3
sec tio n
4
5
6
7
23
Page 27

Using the Web-Based Advanced User Interface
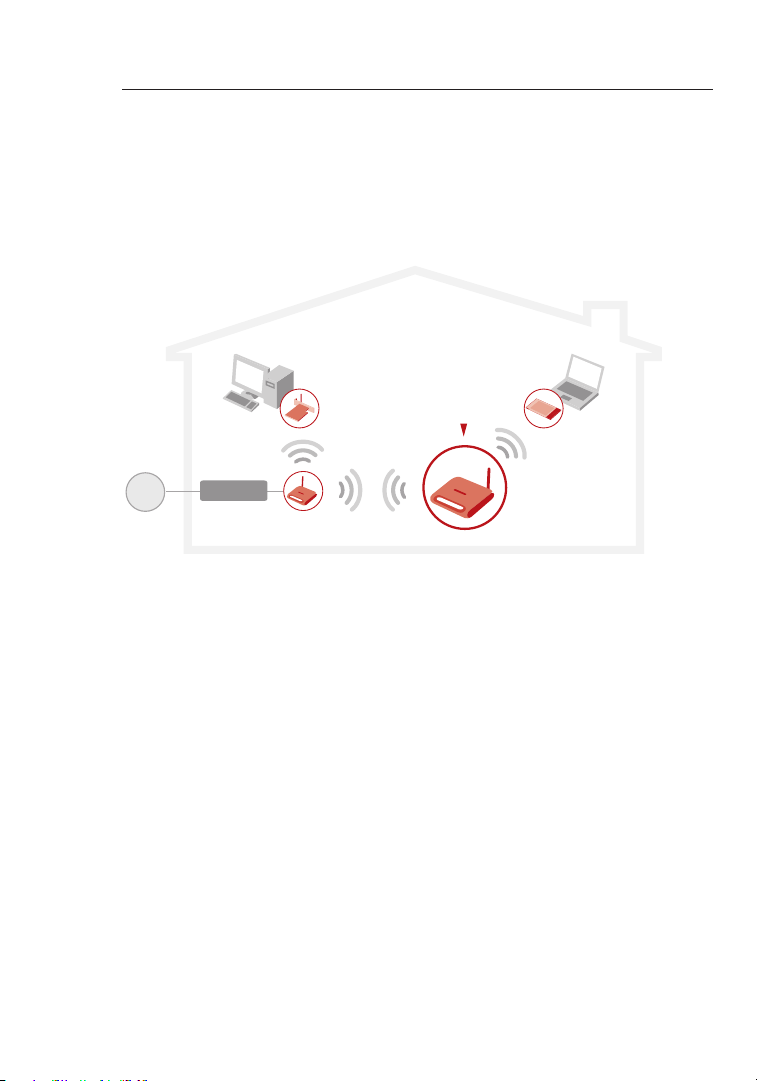
2524
The examp le below il lustrat es using Repe ater mod e t o e xtend the
range of y ou r wirele ss network . I n t his exam ple, the WURE is se t up
to connec t t o the wirel ess router lo cated in an other area .
Wireless G
Universal Range
Extender
Wireless G
Notebook Card
Wireless G
Router
Wireless G
Desktop Card
Note: Lap tops can ro am or move bet we en the two wir eless cove rage
areas if t he SSID and the p ar ent acce ss point’s SS ID match.
Securing your Wi-Fi® Network
Here are a fe w d ifferen t w ays you can ma ximize the se curity o f
your wire less net wo rk and prot ect your da ta from pryin g e yes and
ears. Thi s s ectio n i s i ntended fo r t he home, ho me-offi ce, and small office us er. At the tim e o f t his manu al’s publi cation, th ere are fou r
encryp tion metho ds avail ab le.
Name
64-bit W ir ed
Equivalent
Privacy
128-bit Wi re d
Equivalent Pr iv ac y
Wi-Fi Pr ot ec te d
Access-TKIP
With P ro te ct ed
Access
Acronym
64- bi t WE P 12 8- bi t WEP WPA -T KIP WPA 2- AES
Security
Goo d Bet te r Bes t Bes t
Features
Sta ti c ke ys Sta ti c ke ys
Dyn am ic k ey
enc ry ption
and mut ua l
aut he ntica ti on
Dyn am ic k ey
enc ry ption
and mut ua l
aut he ntica ti on
Enc ry ption
key s ba se d on
RC4 alg or ithm
(ty pi cally
40- bi t ke ys)
Mor e se cu re t han
64- bi t WE P us ing
a key len gt h of
104 bit s pl us 2 4
add it ional bit s of
sys te m-gen er ated
dat a
TKI P (t em poral
key int eg rity
pro to col) added
so that keys
are rot at ed a nd
enc ry ption is
str en gthen ed
AES (Ad va nced
Enc ry ption
Sta nd ard) does
not cau se a ny
thr ou ghput los s
Page 28

25
Using the Web-Based Advanced User Interface
WEP (Wired Equivalent Privacy)
WEP is a comm on protoco l t hat adds se curity to all Wi -Fi-com pliant
wirele ss product s. WEP was des igned to gi ve wireles s n etworks th e
equiva lent level of privacy pr otectio n a s a compara ble wired net work.
64-Bit WEP
64- bit WEP was first introduced with 64-bit encryption, which includes
a key length o f 40 bits p lus 24 additio nal bits of system-gen erated d ata
(64 bits total). Some hardware manufacturers re fer to 64-bit as 40 -bit
enc ryption. Shortly after the tec hnology was in troduced, researchers
fou nd that 64-bit encrypt ion was too easy to decode.
128-Bit WEP
As a resul t o f 6 4-bit WEP’ s p otent ia l securi ty weaknes ses, a more
secure me thod of 128 -bit encry ption was d ev elope d. 128-bit
encryp tion inclu des a key leng th of 104 bits pl us 24 additio nal bits of
system -genera ted data (1 28 bits total ). Some har dw are manu facture rs
refer to 1 28 -bit as 104 -bit encry ption.
Most of th e n ew wireles s e quipmen t i n the marke t t oday suppo rts
both 64-b it and 128- bit WEP encry ption, b ut you might hav e o lder
equipm ent that on ly support s 6 4-bit WEP. Al l Belkin wi reless pro ducts
will supp ort both 64 -bit and 128- bit WEP.
Encryption Keys
After sel ecting e it her the 64- bit or 128- bi t WEP encry ption mode , i t i s
critic al that you ge nerate an enc ryption ke y. If the encr yption key is
not consi stent th ro ughou t t he entire wir eless ne tw ork, you r w ireless
networ king devic es will be una ble to comm un icate wi th one anothe r
on your ne tw ork and you wi ll not be able to su ccessfu lly comm un icate
within yo ur netwo rk .
You can en te r your key by t yp ing in the hex ke y m anual ly , or you can
type in a pas sphrase in th e “ Passp hr ase” fie ld and click “Ge nerate”
to create a k ey. A hex (hex ad ecima l) key is a combina tion of num bers
and letters from A–F and 0–9 . For 64-bit WEP, y ou need to enter 10
hex
characters. For 128-bit WEP, you need to enter 26 hex characters.
1
2
3
sec tio n
4
5
6
7
For insta nce:
AF 0F 4B C3 D4 = 64- bi t WEP key
C3 03 0F AF 0F 4B B2 C3 D4 4B C3 D4 E7 = 1 28-bi t W EP key
25
Page 29

Using the Web-Based Advanced User Interface
2726
The WEP pa ss phras e i s N OT the same as a WEP ke y. Your rou ter
uses this pa ssphr as e to genera te your WEP ke ys, but diffe rent
hardwa re manufac turers m ig ht have dif ferent met hods on gen erating
the keys.
WPA (Wi-Fi Protected Access)
WPA is a new Wi- Fi standar d t hat was des igned to impr ove upon
the secur ity feat ur es of WEP. To u se WPA securi ty, the drive rs and
softwa re of your wir eless equi pment must be upgrade d t o s upport
WPA. Thes e u pdate s w ill be found o n t he wireles s v endor’s we bsite.
There are tw o types of WPA se curit y: WPA-PSK (n o s erver) and WP A
(with rad ius serv er ).
WPA-PS K ( no serve r) uses what is kno wn as a pre-sh ared key as th e
networ k k ey. A netwo rk key is basi ca lly a passw ord that is be tw een
eight and 63 charact ers long. It c an be a c ombinat ion of lett er s,
number s, or chara ct ers. Eac h c lient uses th e same netw ork key to
access th e n etwor k. Typical ly, this is th e m ode that will be us ed in a
home envi ronment .
WPA (with ra dius ser ver) is a system wh ere a radiu s s erver
distri butes the n et work key to th e c lient s a utomati cally. Thi s i s
typica lly found i n a bu siness env ironmen t. (For a list of Be lkin wirel ess
produc ts that sup po rt WPA, ple ase visit o ur website at ww w.belki n.
com/ne tworkin g.)
Sharing the Same Network Keys
Most Wi-F i p roduc ts ship with sec urity tu rn ed off. So onc e y ou have
your netw ork work in g, you need to ac tivat e W EP or WPA and mak e
sure your wi reles s n etworki ng devices ar e s harin g t he same netwo rk
key.
Page 30

27
Using the Web-Based Advanced User Interface
1
2
3
sec tio n
4
5
6
Using a Hexadecimal Key
A hexadec imal key is a com binatio n o f number s a nd letters fr om A–F
and 0–9. 6 4- bit keys ar e f ive two- di git numb ers. 128-b it keys are 13
two-di git number s.
For insta nce: AF 0F 4B C3 D 4 = 64 -bit key; C 3 0 3 0 F A F 0 F 4 B B2
C3 D4 4B C3 D4 E7 = 128 -bit key
In the box es below, cre ate your ke y b y w riting in two ch aract er s
betwee n A –F and 0–9 in eac h b ox. You wil l u se this key to pr ogram
the encry ption se tt ings on you r W URE and you r w ireless co mputers .
27
7
Page 31

Using the Web-Based Advanced User Interface
2928
Note to Ma c® u sers: Or ig inal App le® A irPort® p roducts su pport 64 -
bit encry ption on ly . Apple Air Port 2 prod uc ts can supp ort 64-bit or
128-bi t e ncrypti on. Plea se verify whi ch version yo u are using . I f y ou
cannot co nfigure yo ur netwo rk with 128-b it encry pt ion, try 64 -bit
encryp tion.
WEP Setup
64-Bit WEP Encryption
1. Select “64 -bit WEP ” f rom the drop- down men u.
2. After se lecti ng your WEP encr yption m od e, you can ent er your
key by typ in g in the hex ke y m anually , o r y ou can type in a
passph rase in the “P assphra se” field and cl ick “Gen erate”
to create a k ey. A hex (hex ad ecima l) key is a combina tion of
number s a nd lette rs from A–F and 0 –9 . For 64-bi t W EP, you nee d
to enter 1 0 h ex charact ers.
For insta nce:
AF 0F 4B C3 D4 = 64- bi t WEP key
Page 32

29
Using the Web-Based Advanced User Interface
3. Click “Ap ply Chan ge s” to finis h. Encrypt ion in the WUR E i s n ow
set. Each of your compu ters on you r w ireless ne twork will no w
need to be co nfigure d w ith the sam e s ecurity se ttings.
WARNIN G: If you are con figurin g t he wirel es s WURE (or acc ess point)
from a com pu ter with a wir eless cl ie nt, you wil l n eed to ensu re that
securi ty is turne d O N f or this wir el ess clie nt. If this is no t d one, you
will lose yo ur wirel ess connec tion.
128-Bit WEP Encryption
Note to Ma c u sers: The “Pa ssphras e” option w il l not opera te with
Apple Air Port. To co nfigure en cryptio n f or your Mac co mputer, se t t he
encryp tion using th e manual me thod descr ibed in the ne xt section .
1. Selec t “ 128-b it WEP” from the dr op-do wn menu.
2. After selecting your WEP encryption mode, you can enter your key
manually by typing in the hex key manually, or you can type in a
passphrase in the “Passphrase” field and click “Generate” to create
a key. A hex (hexadecimal) key is a combination of numbers and letters
from A–F and 0–9. For 128-bit WEP, you need to enter 26 hex characters.
For insta nce:
C3 03 0F AF 0F 4B B2 C3 D4 4B C3 D4 E7 = 1 28-bi t W EP key
1
2
3
sec tio n
4
5
6
7
29
Page 33

Using the Web-Based Advanced User Interface
3130
3. Cli ck “Appl y C hanges” to fi nish. En cryptio n i n t he WURE is now
set. Each of your compu ters on you r w ireless ne twork will no w
need to be co nfigure d w ith the sam e s ecurity se ttings.
WARNIN G: If you are con figurin g t he wirel es s WURE (or acc ess point)
from a com pu ter with a wir eless cl ie nt, you wil l n eed to ensu re that
securi ty is turne d O N f or this wir el ess clie nt. If this is no t d one, you
will lose yo ur wirel ess connec tion.
Changing the Wireless Security Settings
Your rout er is equip ped with WPA ( Wi reles s P rotecte d A ccess), th e
latest wi reless s ec urity st andard. It al so suppo rt s the legac y s ecurity
standa rd, WEP (Wi re d Equiva lent Priva cy). By def au lt, wire less
securi ty is disab le d. To enabl e s ecurity , y ou must fir st determi ne
which sta ndard yo u w ant to use. To ac cess the secu rity setti ngs, cli ck
“Secur ity” on the “W ireless ” t ab.
WPA Setup
Note: To u se WPA securi ty, all you r c lients mus t b e u pgraded to
driver s a nd softw ar e that supp ort it. At the ti me of this man ua l’s
public ation, a se cu rity pat ch downloa d i s a vaila bl e, for free , f rom
Micros oft. This p at ch works on ly with the Wi ndows XP oper ating
system . Y ou also nee d t o d ownload th e latest dr iver for your Be lkin
Wirele ss G D eskto p o r N otebook Ne twork Ca rd from the Belk in
suppor t s ite. Oth er operati ng systems ar e n ot suppo rted at this
time. Mic rosoft’ s p atch onl y s upports de vices wi th WPA-ena bled
driver s s uch as Belk in 802.11g pr oducts. Th ere are two ty pes of WPA
securi ty: WPA-PS K ( no serve r) and WPA (wi th radius ser ver). WPAPSK (no se rv er) uses a so- called P re -Shar ed key as the secur ity key.
A Pre-Sha red key is a pass word tha t i s b etween 8 and 6 3 c haracte rs
long. It c an be a c ombinat ion of lett ers, numbe rs, and other
charac ters. Each cl ient use s t he same key to ac cess the netw ork.
Typica lly, this m od e will be used in a h ome enviro nment. WPA (w ith
radius se rver) is a con figurat ion in whic h a ra dius serve r d istribu tes
the keys t o t he clients au tomatic ally. Th is is typical ly used in a
busine ss environ ment.
Setting WPA-Personal (PSK)
1. From t he “Securi ty Mode” drop -down me nu , select “W PA-
Person al (PSK)”.
2. For “E nc rypti on Techniq ue”, selec t “ TKIP” or “A ES”. This set ting
will have to be identic al on the clie nts that you set up .
Page 34

31
Using the Web-Based Advanced User Interface
3. Enter yo ur pre-s hared key. Th is can be from ei ght to 63
charac ters and ca n b e l etters, nu mbers, o r s ymbols. Th is
same key m us t be used on al l o f t he clients th at you set up.
For examp le, your PS K m ight be som et hing lik e: “Smith fam ily
networ k k ey”.
4. Click “A pply Cha nges” to fini sh. You mus t n ow set all cli ents to
match the se setti ng s.
1
2
3
sec tio n
4
5
6
7
31
Page 35

Using the Web-Based Advanced User Interface
3332
Setting WPA2-Personal (AES)
From the “ Se curit y M ode” drop- down menu, se lect
1.
“WPA2- Persona l ( AES)”.
2. F or “Encr yp tion Tec hnique” , s elect “AES ”. This set ting will hav e
to be iden ti cal on the cli ents tha t y ou set up.
3. E nter you r p re-shar ed key. This c an be from eight to 63
charac ters and ca n b e l etters, nu mbers, o r s ymbols. Th is
same key m us t be used on al l o f t he clients th at you set up.
For examp le, your AE S m ight be som et hing lik e: “Smith fam ily
networ k k ey”.
4. C lick “Ap pl y Change s” to finish. Yo u must now set al l client s t o
match the se setti ng s.
Page 36

33
Using the Web-Based Advanced User Interface
MAC Address Control
Setting MAC Address Filtering
The MAC ad dr ess filt er is a p owerf ul securit y f eature tha t a llows
you to spe ci fy which co mputers ar e a llowe d o r d enied acce ss to the
networ k. When set ti ng an “Allo w” list, an y c omputer NO T i ncluded in
the list w il l be denied ac cess to the ne twork. Whe n s etting a “D eny”
list, any co mpute r T HA T IS includ ed in the list wi ll be denie d a ccess
and all ot he rs will be all owed acc es s.
To Enable an “Allow” List
Click the “A llow” ra dio button (1 ).
1.
2. E nter the MA C a ddresse s o f a ll compu ters that you wa nt to allow
access to th e networ k. When finis hed, cli ck “Apply Cha nges”.
1
2
3
sec tio n
4
5
6
7
To Enable a Deny List
Click the “D eny” rad io button (2) .
1.
2. E nter the MA C a ddress of t he compute rs that you wa nt to deny
access to th e networ k. When finis hed, cli ck “Apply Cha nges”.
33
Page 37

Changing System Settings
3534
The “S ystem S ettings ” page is wher e you c an ente r a new admini strator pa ssword.
Setting or Changing the Administrator Password
The WU RE ship s with NO pass word en tered. If you wish to add a
passwo rd for greater securi ty, you can se t a pas sword h ere. Wr ite
down y our pas sword a nd keep it in a safe place, as you will ne ed it i n
order to log into th e WURE in the future.
Restoring Factory Default Settings
This o ption r estores all of the se ttings in the WURE to the fa ctory ( default) settin gs. We recomme nd that you ba ck up y our set tings b efore
you re store a ll of t he defa ults.
1. Click th e “Resto re Default s” button.
2. The followi ng message wi ll appea r. Click “OK” .
Page 38

35
Changing System Settings
3. Th e f ollowin g m essage wil l a ppear . R estorin g t he default s
includ es restart ing the WUR E. It can take up to 60 se conds. I t
is import ant not to tur n t he power of f o n t he WURE dur in g the
restar t.
4. A 60-seco nd countdo wn will app ea r on the scree n. When the
countd own reache s z ero, the WU RE’s defau lts will be re stored.
The WURE h om e page shou ld appear a ut omati ca lly. If it doe s
not, type in the WURE’s ad dress (d ef ault =19 2.168.2 .254) into th e
naviga tion bar of yo ur browser .
Saving a Current Configuration
You can sa ve your curre nt configu ration b y u sing this fea ture. Savi ng
your conf igurati on allow s y ou to restore it later if your se ttings a re
lost or ch an ged. We rec ommend tha t y ou back up you r c urrent
config uration be fore per fo rming a fir mware upda te.
1
2
3
4
sec tio n
5
6
7
1. Click “Save”. A window called “File Download” will open. Click “Save”.
35
Page 39

Changing System Settings
3736
2. A wind ow will open in w hi ch you can sel ect the loc ation wher e
you want t o s ave the confi guratio n f ile. Sel ect a locatio n. You
can name t he file anyth ing you wan t, or use the defau lt name
“Confi g”. Be sure to na me the file so yo u c an locate i t y ourself
later. Wh en you have se lected the lo catio n a nd name of the fi le ,
click “Sa ve”.
3. When t he save is compl ete, you wi ll see the win do w below. Cl ick
“Close ”.
The configuration is now saved!
Page 40

37
Changing System Settings
Restoring a Previous Configuration
This opti on will all ow you to rest or e a previou sly saved con figurat ion.
1. Click “B rowse”. A win dow will op en that allow s y ou to selec t t he
locati on of the conf igurati on file. All c on figur at ion file s e nd with
a “.cfg”. Lo cate the co nfigura tion file y ou want to resto re and
double -click on i t.
1
2
3
4
sec tio n
5
6
7
2. Yo u w ill be aske d i f y ou want to con tinue. C li ck “OK”.
37
Page 41

Changing System Settings
3938
3. A r em inder wi ndow will app ear. It wil l t ake up to 30 seco nds for
the confi guratio n r estor at ion to comp lete. Clic k “ OK”.
4. A 3 0- secon d c ountdow n w ill appear on the screen . W hen the
countd own reache s z ero, the WU RE’s confi guratio n w ill be
restor ed. The WUR E h ome page shou ld appea r a utomati cally. If
not, type in the WURE’s ad dress (d ef ault = 192. 168.2.2 54) into
the navig ation ba r o f y our browse r.
Updating Firmware
From time to time, Belk in may rele as e new versi ons of the WUR E’ s
firmwa re. Firmwa re updat es contain fe ature impr ovement s a nd fixes ,
if any. Wh en Belkin rel eases new f ir mware , y ou can downlo ad it from
the Belki n u pdate we bsite and upd ate your WU RE’s firmw are to the
latest ve rsion.
(1)
Checking for a New Version of Firmware
The “Chec k F irmwa re ” (1) b utton allo ws you to inst antly chec k f or a
new versi on of firmw are. When you cl ick the but ton, a new bro ws er
window wi ll appea r i nformin g y ou that eit he r no new firmw are is
availa ble or that th ere is a new vers ion availa ble. If a new ver sion is
availa ble, you wi ll have the opti on to downl oad it.
Page 42

39
Changing System Settings
Downloading a New Version of Firmware
If you cli ck the “Check Fi rmware” bu tton and a new ve rsion of
firmwa re is avail ab le, you wil l s ee a screen su ch as the foll ow ing.
1. To dow nl oad the new ve rsion of fi rmware, cl ick “Downl oad”.
2. A wi ndow will ope n
that allo ws you to
select th e l ocati on
where you wa nt to
save the f ir mware
file. Sel ect a locat ion.
You can na me the file
anythi ng you want , o r
use the de fa ult name .
Be sure to lo cate the
file in a pla ce where
you can lo ca te it
yourse lf later. W he n
you have s el ected th e
locati on, click “ Sa ve”.
3. Whe n the save is
comple te, you wil l s ee
the follo wing win do w.
Click “Cl ose”. Th e
downlo ad of the
firmwa re is compl et e.
To update the firmware,
follow th e n ext step s
in “Updat ing the
WURE’s Fi rmware” .
1
2
3
4
sec tio n
5
6
7
39
Page 43

Changing System Settings
4140
Updating the WURE’s Firmware
1. In th e “Firmw are Update ” p age, cli ck “Browse ”. A w indow wi ll
open that al lows you to se lect the lo cation of the fi rmware u pd ate
file. All fi rmwar e f iles end with a “ .bin”.
2. B rowse to th e f irmware fi le you down loaded. Se lect the fi le by
double -clicki ng on the file na me.
3. T he “Firm wa re Updat e” box will no w d isplay the lo cation a nd
name of th e f irmware fi le you just se lected. Cl ick “Updat e”.
Page 44

41
Changing System Settings
4. Y ou will be ask ed if you are sur e y ou want to con tinue. Cli ck
“OK”.
5. You will se e o ne more mes sage. This me ssage te ll s you that
the WURE m ay not respon d f or as long as one mi nute as the
firmwa re is loade d a nd the WURE is re booted. Cl ick “OK”.
A 30-seco nd count do wn will app ear on the scr een. When the
countd own reache s z ero, the WU RE firmwar e u pdate wi ll be
comple te. The WUR E h ome page shou ld appea r a utomati cally. If
not, type in the WURE’s ad dress (d ef ault = 192. 168.2.2 54) into
the navig ation ba r o f y our browse r.
1
2
3
4
sec tio n
5
6
7
41
Page 45

Troubleshooting
4342
Troubleshooting
Problem:
Power LED do es not come ON ; W URE is not wor king.
Check you r p hysic al connect ions. If the L ED indicat ors do not light ,
the WURE m ay not be connec ted prop er ly.
Solution:
Verify th at the WURE is pl ugged in to a p ower sourc e. Check to se e
that the c ab les are con nected to t he correct po rts and that t he y are
secure .
Note: Th e W URE can be con figured to ex tend the ra nge of the
Belkin Wi reless R ou ter and is not gu arant ee d to be compat ible with
other man ufactur ers’ dev ic es.
Problem:
I can’t co nn ect to the Int ernet wi re lessl y.
Solution:
If you are un able to conne ct to the Inte rnet from a wi re less
comput er, please ch eck the fol lowing ite ms:
1. Look at the lights on yo ur route r. If you’re u si ng a Belkin Ro uter,
the light s s hould be as fo llows:
• The “Pow er ” light sho uld be on.
• The “Con ne cted” li ght should be on , and not blin king.
• The “WAN ” l ight shoul d b e e ither on or bl inking.
2. Open yo ur wirel ess utilit y s oftware by clickin g o n t he icon in
the syste m t ray at the bot tom righ t- hand cor ner of the scree n.
If you’re us ing a Belki n W ireless Ca rd, the tra y i con should lo ok
like this (t he icon may be re d or green) .
3. The e xa ct windo w t hat opens w il l vary depe nding on th e m odel
of wirele ss card you ha ve; howeve r, any of the uti lities sho uld
have a lis t o f a vailabl e n etworks —those w ir eless ne tworks it can
connec t t o.
Does the name of your wireless network appear in the results?
Yes, my network name is listed
titled “I ca n’t conn ect to the Int er net wire lessly, bu t m y n etwork
name is li st ed”.
– go to the troubl eshooti ng solut io n
Page 46

43
Troubleshooting
Troubleshooting
No, my network name is not listed - g o t o t he troub leshoot ing
soluti on titled “ I c an’t conne ct to the Inte rnet wirel essly, and my
networ k n ame is not lis ted”
Problem:
I can’t co nn ect to the Int ernet wi re lessl y, but my networ k n ame is
listed .
Solution:
If the nam e o f y our networ k i s listed in th e “ Availab le Netwo rk s” list,
please fo llow the st eps below to c on nect wir elessly :
1. Click on the cor rect n etwork name in the “Available Netw orks” list.
2. If th e n etwork has se curity ( en crypt io n) enabl ed, you will n ee d to
enter the ne twork ke y.
3. With in a few secon ds, the tra y i con in the low er left-ha nd
corner of yo ur scree n s hould turn gr een, ind icating a suc cessful
connec tion to the ne twork.
Problem:
I can’t co nn ect to the Int ernet wi re lessl y, and my networ k n ame is
not liste d.
Solution:
If the cor re ct netwo rk name is not li sted under “A vailabl e N etworks ”
in the wir el ess util ity, pleas e a ttempt t he followi ng trouble shootin g
steps:
1. Temp orarily mo ve compu ter, if possi ble, fro m f ive to 10 feet
away from th e router . C lose the wi re less uti lity, and reo pen
it. If the co rrect netw ork name no w a ppears und er “Availa ble
Networ ks”, you ma y h ave a range or in terfere nce proble m.
Please se e t he sugge stions dis cussed in t he section ti tled
“Place ment of you r W ireless Ne tworkin g H ardware fo r Optima l
Perfor mance” in t hi s User Manu al.
2. Usin g a compute r t hat is conn ec ted to the rou ter via a netw ork
cable (as op posed to wi relessl y), ensure th at “Broa dcast
SSID” is e na bled. Th is setting is fo und on the rou ter’s wire less
“Chann el and SSID ” c onfigur ation page . I f y ou are stil l u nable to
access th e I ntern et after comp leting the se steps , p lease cont act
Belkin Te chnical Su pport .
.
1
2
3
4
5
sec tio n
6
7
43
Page 47

Troubleshooting
4544
Troubleshooting
Problem:
My wirele ss netwo rk perform ance is incon sistent .
Data tran sfer is som etimes slo w.
Signal st rength i s p oor.
Diffic ulty estab lishing an d/or mai ntainin g a Vi rtual Pr iv ate Netw ork
(VPN) con nection .
Solution:
Wireless technology is radio-based, which means connectivity and
the throughput performance between devices decreases when the
distance between devices increases. Other factors that will cause signal
degradation (metal is generally the worst culprit) are obstructions such
as walls and metal appliances. As a result, the typical indoor range of
your wireless devices will be between 100 to 200 feet. Note also that
connection speed may decrease as you move farther from the router (or
access point).
In order to determine if wireless issues are related to range, we suggest
temporarily moving the computer, if possible, from five to 10 feet away
from the router.
Changing the wireless channel - Depending on local wireless traffic
and interference, switching the wireless channel of your network can
improve performance and reliability. The default channel the router is
shipped with is channel 11; you may choose from several other channels
depending on your region. See “Changing the Wireless Channel” on
page 19 for instructions on how to choose other channels.
Limiting the wireless transmit rate - Limiting the wireless transmit
rate can help improve the maximum wireless range, and connection
stability. Most wireless cards have the ability to limit the transmission
rate. To change this property, go to the Windows Control Panel, open
“Network Connections”, and double-click on your wireless card’s
connection. In the “Properties” dialog, select the “Configure” button on
the “General” tab (Windows 98 users will have to select the wireless
card in the list box and then click “Properties”), then choose the
“Advanced” tab and select the rate property. Wireless client cards
are usually set to automatically adjust the wireless transmit rate for
you, but doing so can cause periodic disconnects when the wireless
signal is too weak; as a rule, slower transmission rates are more stable.
Experiment with different connection rates until you find the best one
for your environment; note that all available transmission rates should
be acceptable for browsing the Internet. For more assistance, see your
wireless card’s user manual.
Page 48

45
Troubleshooting
Troubleshooting
Problem:
How do I exte nd the range o f m y w ireless ne twork?
Solution:
Belkin re commend s u sing one of th e f ollow in g produc ts to extend
wirele ss network co verag e t hrougho ut large home s o r office s:
• The WURE can do ub le the cove rage area of you r w irele ss network .
The WURE i s t ypicall y p laced in th e a rea not curre ntly cover ed
by your wi re less rou ter, and conn ected to th e r outer usin g e ither
an Ethern et cable , o r t hrough you r h ome’s po wer lines usi ng two
Powerl ine Ethern et adapt er s.
Problem:
I am havin g d ifficul ty setting up Wi red Equi valent Pri vacy (WEP)
securi ty on a Belkin Ro uter (or Be lk in Acces s P oint).
Solution:
1. Log i nt o your Wire less Route r ( or Acces s P oint). Ope n y our
web brows er and type in th e I P addres s o f t he Wireles s R outer
(or Acces s P oint) . ( The Router ’s default is 192.168 .2.1 and the
802.11 g A ccess Po in t’s defa ult is 192.16 8.2.254 ). Log into your
Router by cl ickin g o n t he “Login” bu tton in the to p, right-h and
corner of th e screen . Y ou will be ask ed to enter your pa sswor d.
If you nev er set a passwor d, leave th e p assword fi eld blank a nd
click “Su bmit”.
Cli ck the “Wir el ess” tab on th e l eft of your sc reen. Se le ct the
“En cryption” or “Security” tab to get to the security sett ings pag e.
2. S el ect “128 -bit WEP” fro m t he drop- down menu.
3. Afte r s elect in g your WEP enc ryption mo de, you can ty pe in
your hex W EP key manual ly, or you can ty pe in a p assph ra se
in the “Pa ss phras e” field and cli ck “Gene ra te” to crea te a W EP
key from t he passphr ase. Click “A pply Cha ng es” to fini sh. You
must now s et all of your cl ie nts to matc h t hese setti ngs. A hex
(hexad ecimal) ke y i s a combina tion of num be rs and lett ers
from A–F a nd 0–9. For 128- bit WEP, yo u n eed to enter 2 6 h ex
charac ters.
For example:
C3 03 0F AF 4B B2 C3 D4 4B C3 D4 E7 E4 = 128-bit key
1
2
3
4
5
sec tio n
6
7
45
Page 49

4746
Troubleshooting
Troubleshooting
4. Clic k “ Apply Ch anges” to fin ish. Enc ry ption in th e W ireless
Router is no w set. Each of yo ur compu ters on your wir eless
networ k w ill now nee d t o b e c onfig ur ed with the sa me securit y
settin gs.
WARNING: If you ar e c onfig ur ing the Wir eless Rout er (or Acce ss
Point) fr om a comput er with a wire le ss clien t, you will need to
ensure th at secur it y is turned on fo r this wire less clien t. If this is not
done, you wi ll lose you r w ireless co nnect io n.
Note to Mac users: Origi nal Apple A ir Port pro ducts supp ort 64-bit
encryp tion only. Ap ple AirP ort 2 product s c an suppo rt 64-bit or
128-bi t e ncrypti on. Plea se check your Ap ple AirP or t produc t t o s ee
which ver sion you ar e u sing. If yo u c annot conf igure your ne twork
with 128- bit encr yp tion, tr y 6 4-bit encr yption.
Problem:
I am havin g d ifficul ty setting up Wi red Equi valent Pri vacy (WEP)
securi ty on a Belkin cl ient card.
Solution:
The clien t c ard must us e t he same key as th e w ireless ro uter (or
access po int). Fo r i nstance , i f y our wire le ss route r ( or access poi nt)
uses the k ey 0011223 3445566 778899A ABBCC, the n t he clien t c ard
must be se t t o t he exact sa me key.
1. Doub le-clic k t he “Sign al Indicat or” icon to br ing up the “Wi re less
Networ k” screen. Th e “Advan ced” butto n w ill allo w y ou to view
and confi gure mor e o ptions of you r c ard.
2. The “ Ad vance d” button wil l a llow you to vi ew and conf ig ure more
option s o f t he card.
3. Once th e “Advan ced” butto n i s c licke d, the Belkin Wi reless L AN
Utilit y w ill appe ar . This Util ity will al lo w you to manag e a ll the
advanc ed feature s o f the Belki n w ireless ca rd.
4. Unde r t he “Wire less Netwo rk Propert ies” tab , s elect a
networ k n ame from th e “ Availab le network s” list and cl ick the
“Prope rties” but ton.
5. U nd er “Data En cryptio n” select “ WE P”.
6. Ensu re the chec k b ox “The key is pr ovided for me automat ically”
at the bot to m is unchec ked. If you ar e u sing this com puter to
connec t t o a corpora te network , p lease co ns ult your ne twork
admini strator if th is box need s t o b e checke d.
Page 50

47
Troubleshooting
Troubleshooting
7. Type yo ur WEP key in t he “Networ k k ey” box.
Important: A WE P k ey is a combin ation of nu mb ers and let ters from
A–F and 0– 9. For 128-bi t W EP, you nee d t o e nter 26 cha ra cters .
This netw ork key nee ds to match th e k ey you assign to yo ur
wirele ss router ( or access poi nt).
For example:
C3 03 0F AF 4B B2 C3 D4 4B C3 D4 E7 E4 = 128-bit key
8. Clic k “ OK”, and th en “Apply” to save the sett ings.
If you are
the manuf acturer ’s user man ual for that w ir eless cl ient card.
Problem:
Do Belkin pr oduct s s upport WPA ?
Solution:
To use WPA se curity, al l y our clie nt s must be upgr aded to dri ve rs
and softw are that su pport it. At t he time of this FAQ pu blica ti on, a
securi ty patch do wn load is ava ilable, fo r f ree, fro m M icrosof t. This
patch wor ks only wit h t he Windows XP operati ng system.
Downlo ad the patc h h ere:
http:/ /www.mi crosoft .com/do wnloads /detail s.
aspx?F amilyID =009d84 25-ce2b -47a4-a bec-274 845dc9e 91&disp layl
ang=en
You also n ee d to downlo ad the late st driver for yo ur Belkin W ir eless
G Desktop or Noteboo k N etwork Car d f rom the Bel kin suppor t
site. Oth er opera ti ng syste ms are not sup po rted at thi s t ime. The
Micros oft patch o nl y suppor ts devices wi th WPA-e na bled dri vers
such as Be lk in 802.1 1g product s.
Download the latest driver at http://web.belkin.com/support for
the following products:
F5D7000, F5D7001, F5D7010, F5D7011, F5D7230-4, F5D7231-4, F5D7130
NOT usi ng a B elkin wire less clien t c ard, ple ase consul t
1
2
3
4
5
sec tio n
6
7
Problem:
I am havin g d ifficul ty setting up Wi -Fi Prot ected Acce ss (WPA)
securi ty on a Belkin Wi reless Rou ter or Belk in Access Poi nt for a
home netw ork.
Solution:
1. From the “Security Mode” drop-down menu, select “WPA-PSK (no
server)”.
47
47
Page 51

Troubleshooting
4948
2. For “ En crypt io n Techni que”, sele ct “TKIP” o r “ AES”. This se tting
will have to be identic al on the clie nts that you set up .
3. Ente r y our pre- shared key . T his can be fro m e ight to 63
charac ters and ca n b e l etters, nu mbers, s ym bols, or sp aces.
This same ke y must be used on all of the clien ts that you se t u p.
For examp le, your PS K m ight be som et hing lik e: “Smith fam ily
networ k k ey”.
4. Clic k “ Apply Ch anges” to fin ish. You mu st now set all cl ients to
match the se setti ng s.
Problem:
I am havin g d ifficul ty setting up Wi -Fi Prot ected Acce ss (WPA)
securi ty on a Belkin Wi reless Rou ter or Belk in Access Poi nt for a
busine ss.
Solution:
If your ne tw ork uses a rad ius serv er to distrib ute keys to th e c lients,
use this s et ting. Th is is typical ly used in a busi ness envir onment.
1. From th e “Secur ity Mode” dro p-down m en u, selec t “ WPA (with
server )”.
2. For “ En crypt io n Techni que”, sele ct “TKIP” o r “ AES”. This se tting
will have to be identic al on the clie nts that you set up .
3. Ente r t he IP addre ss of the radi us server int o t he “Radi us Server”
fields .
4. E nt er the radi us key into th e “ Radius Key ” f ield.
5. E nt er the key int erval. Key in terva l i s h ow often th e k eys are
distri buted (in p ac kets) .
6. Clic k “ Apply Ch anges” to fin ish. You mu st now set all cl ients to
match the se setti ng s.
Problem:
I am havin g d ifficul ty setting up Wi -Fi Prot ected Acce ss (WPA)
securi ty on a Belkin wi reless cli ent card fo r a bu siness.
Solution:
1. Doub le-clic k t he “Sign al Indicat or” icon to br ing up the “Wi re less
Networ k” screen. Th e “Advan ced” butto n w ill allo w y ou to view
and confi gure mor e o ptions of you r c ard.
2. Once th e “Advan ced” butto n i s c licke d, the Belkin Wi reless L AN
Page 52

49
Troubleshooting
Utilit y w ill appe ar . This Util ity will al lo w you to manag e a ll the
advanc ed feature s o f the Belki n w ireless ca rd.
3. Unde r t he “Wire less Netwo rk Propert ies” tab , s elect a
networ k n ame from th e “ Availab le network s” list and cl ick the
“Prope rties” but ton.
4. Unde r “ Netwo rk Authent ication ” s elect “WPA ”.
5. In th e “ Authent ication ” t ab, select th e settin gs that are in di cated
by your ne tw ork admi nistrat or.
6. Clic k “ OK, then “A pply” to sa ve the settin gs.
Problem:
I am N OT using a Belkin c lient card and I am havin g diffic ulty setting
up Wi-Fi P ro tecte d A ccess (WPA ) s ecurity fo r a home netwo rk.
Solution:
If you are NOT u sing a Belk in Wireles s D esktop or W ir eless
Notebo ok Network Ca rd and it is no t e quipped wi th WPA-ena bled
softwa re, a file fro m M icrosof t c alled “W in dows XP Sup port Patch
for Wirel ess Prot ec ted Acce ss” is availa ble for fre e d ownload :
www.mi crosoft .com/do wnloads /detail s.aspx? FamilyI D=009d8 425ce2b-4 7a4-abc c-2748d c9e91di playlan g=en
Note: T he file tha t M icrosof t h as made avail able wor ks only with
Window s X P. Other op erating sy stems are n ot support ed at this
time. You al so need to ens ure that th e w ireless ca rd manufac turer
suppor ts WPA and tha t y ou have dow nl oaded an d i nstalle d t he
latest dr iver fro m t heir suppo rt site.
Suppor ted Operat ing Syst em s:
• Windows XP Profess ional
• Windows XP Home Editi on
Enabli ng WPA-PSK (n o server ):
1. Unde r W indow s X P, click “Sta rt > Contro l P anel >
Networ k C onnecti ons”.
2. Righ t-click on the “Wirel ess Networ ks” tab. En sure the “Use
Window s t o c onfig ur e my wirele ss network se tting s” check box
is select ed.
3. Unde r t he “Wire less Netwo rks” tab, c li ck the “Con figure” bu tton.
4. For a ho me or small bu si ness use r, select “WP A-PSK” u nd er
“Netwo rk Adminis tration ”.
1
2
3
4
5
sec tio n
6
7
49
Page 53

Troubleshooting
5150
Note: S elect “WPA (w ith radi us server) ” i f y ou are usin g t his
comput er to conne ct to a c orporat e n etwor k t hat suppor ts an
authen ticatio n s erver su ch as a r adius se rv er. Plea se consult yo ur
networ k a dminist rator fo r f urther inf ormatio n.
5. Sele ct “TKIP ” o r “ AES” under “D ate Encr yption” . T his settin g w ill
have to be id entical to th e w irele ss router (or ac cess point ) t hat
you set up .
6. T yp e in your encr yption k ey in the “Netwo rk Key” box .
Important: E nter your p re -shar ed key. This can be fr om eight to 63
charac ters and ca n b e l etters, nu mbers, o r s ymbols. Th is same key
must be us ed on all of the cli ents that you se t u p.
7. C li ck “OK” to app ly setting s.
What’s the difference between 802.11b, 802.11g, 802.11a, and
802.11n?
Curren tly there a re fo ur level s o f w ireless ne twork in g standa rds, which
transm it data at ver y d ifferen t m aximum s pe eds. Eac h i s b ased on
the desig nation 8 02 .11(x ), so named by th e I EEE, the boar d t hat is
respon sible for c er tifyi ng network ing standa rds. The mo st common
wirele ss network ing stan da rd, 802. 11b, trans mits infor mation a t
11Mbps ; 8 02.11a and 80 2.11g work at 54 Mb ps; and G Plus MIMO an d
Pre-N wor k a t 108Mbp s, which util izes MIM O ( Multipl e I nput Multi ple
Output ) t echnolo gy from the 80 2.11n prop osals, t o e nhance 802 .11g
networ ks. See the fo llowing ch art for mor e d etailed in formati on.
Page 54

51
Troubleshooting
Wireless Comparison Chart
Wireless
Speed
Technology
11M bp s 54M bp s 54M bp s
802.11b
2
1
802.11g
802.11a
Belkin
Pre-N
600 % fa st er t han
sta nd ard 802.1 1g *
3
Com mo n ho useho ld
dev ic es s uch as
cor dl ess phone s
and mic ro wave
ove ns m ay i nt erf er e
wit h th e un li cen se d
Frequency
ban d 2. 4G Hz
Com pa tible
wit h 80 2. 11g
Compatibility
Dep en ds o n
int er feren ce —
typ ic ally
100 –2 00 f t. i ndo or s
Coverage*
Mat ur e—leg ac y
tec hn ology
Advantage
*Di st ance and conne ct ion spe ed s wi ll v ary dep en di ng on y ou r netwo rk ing env ir on men t.
Com mo n ho useho ld
dev ic es s uch as
cor dl ess phone s
and mic ro wave
ove ns m ay i nt erf er e
wit h th e un li cen se d
ban d 2. 4G Hz
Com pa tible
wit h 80 2. 11b
Dep en ds o n
int er feren ce —
typ ic ally
100 –2 00 f t. i ndo or s
Com mo n—
wid es pread use f or
Int er net shari ng
5GH z—
unc ro wded band
Inc om patib le w it h
802 .1 1b
or 802.1 1g
dep en ding on
int er feren ce typ ic ally 50-10 0
fee t in do ors
Les s
int er feren ce —
gre at f or
mul ti media
app li catio n
Com mo n ho useho ld
dev ic es s uch as
cor dl ess phone s an d
mic ro wave ovens
may int er fere with
the unl ic ensed
ban d 2. 4G Hz
Com pa tible wit h
802 .1 1g
or 802.1 1b
Up to 8 00% wid er
cov er age than
sta nd ard 802.1 1g *
Lea di ng e dge— best
cov er age and
thr ou ghput
Technical Support
You can fi nd technic al support in formati on at: http://www.belkin.
com/networking
you want t o c ontact tec hnical sup port by pho ne, please ca ll:
US: 877-73 6-5771 or
310-8 98-1100 ex t. 2263
Euro pe: 00 800 22 3 5 5 460
Austra lia: 1800 235 5 46
New Z ea land: 0 800 235 546
Singap ore: 800 616 17 90
o r www.belkin.com throug h t he tech sup port area. If
51
4
5
sec tio n
6
7
Page 55

Information
5352
FCC Statement
DECLAR ATION OF CO NF ORMIT Y W ITH FCC RULES FO R
ELECTR OMAGNET IC COMPATI BILITY
We, B elkin Corporati on, of 501 West Wa lnu t
Stre et, Compton, CA 9 0220, declare un der our sole
resp onsibility that the product,
F5D7 132
to wh ich this declara tion relates,
comp lies with Part 15 of t he FCC Rules . Op eration is
subj ect to the follow ing two conditio ns: (1) this dev ice
may n ot cause harmful interference, a nd ( 2) this devic e
must accept any inter ference receive d, i ncluding
inte rference that ma y cause undesire d op eration.
Caution: Exposure to Radio Frequency Radiation.
The radiated output power of this device is far below the FCC radio
frequency exposure limits. Nevertheless, the device shall be used in such
manner that the potential for human contact normal operation is minimized.
When connecting an external antenna to the device, the antenna shall be
placed in such a manner to minimize the potential for human contact during
normal operation. In order to avoid the possibility of exceeding the FCC radio
frequency exposure limits, human proximity to the antenna shall not be less
than 20cm (8 inches) during normal operation.
Federal Communications Commission Notice
This equipment has been tested and found to comply with the limits for a
Class B digital device, pursuant to Part 15 of the FCC Rules. These limits are
designed to provide reasonable protection against harmful interference in a
residential installation.
This equipment generates, uses, and can radiate radio frequency energy.
If this equipment does cause harmful interference to radio or television
reception, which can be determined by turning the equipment off and on, the
user is encouraged to try and correct the interference by one or more of the
following measures:
Page 56

53
Information
• Reorient or relocate the receiving antenna.
• Increase the distance between the equipment and the receiver.
• Connect the equipment to an outlet on a circuit
different from that to which the receiver is connected.
• Consult the dealer or an experienced radio/TV
technician for help.
Modifications
The FCC requires the user to be notified that any changes or modifications to
this device that are not expressly approved by Belkin Corporation may void
the user’s authority to operate the equipment.
Canada-Industry Canada (IC)
The wireless radio of this device complies with RSS 139 & RSS 210 Industry
Canada. This Class B digital apparatus complies with Canadian ICES-003.
Cet appareil numérique de la classe B conforme á la norme NMB-003 du Canada.
Europe-European Union Notice
Radio products with the CE 0682 or CE alert marking comply
with the R&TTE Directive (1995/5/EC) issued by the Commission of the
European Community.
Compliance with this directive implies conformity to the following European
Norms (in brackets are the equivalent international standards).
• EN 60950 (IEC60950) – Product Safety
• EN 300 328 Technical requirement for radio equipment
• ETS 300 826 General EMC requirements for radio equipment.
To determine the type of transmitter, check the identification label on your
Belkin product.
Products with the CE marking comply with the EMC Directive (89/336/EEC)
and the Low Voltage Directive (72/23/EEC) issued by the Commission of the
European Community. Compliance with these directives implies conformity
to the following European Norms (in brackets are the equivalent international
standards).
• EN 55022 (CISPR 22) – Electromagnetic Interference
• EN 55024 (IEC61000-4-2,3,4,5,6,8,11) – Electromagnetic Immunity
• EN 61000-3-2 (IEC610000-3-2) – Power Line Harmonics
• EN 61000-3-3 (IEC610000) – Power Line Flicker
• EN 60950 (IEC60950) – Product Safety
Products that contain the radio transmitter are labeled with CE 0682
or CE alert marking and may also carry the CE logo.
1
2
3
4
5
sec tio n
6
7
53
Page 57

Information
Information
Belkin Corporation Limited Lifetime Product Warranty
Belkin Corporation warrants this product against defects in materials and
workmanship for its lifetime. If a defect is discovered, Belkin will, at its
option, repair or replace the product at no charge provided it is returned
during the warranty period, with transportation charges prepaid, to the
authorized Belkin dealer from whom you purchased the product. Proof of
purchase may be required.
This warranty does not apply if the product has been damaged by accident,
abuse, misuse, or misapplication; if the product has been modified without
the written permission of Belkin; or if any Belkin serial number has been
removed or defaced.
THE WARRANTY AND REMEDIES SET FORTH ABOVE ARE EXCLUSIVE
IN LIEU OF ALL OTHERS, WHETHER ORAL OR WRITTEN, EXPRESSED
OR IMPLIED. BELKIN SPECIFICALLY DISCLAIMS ANY AND ALL IMPLIED
WARRANTIES, INCLUDING, WITHOUT LIMITATION, WARRANTIES OF
MERCHANTABILITY AND FITNESS FOR A PARTICULAR PURPOSE.
No Belkin dealer, agent, or employee is authorized to make any modification,
extension, or addition to this warranty.
BELKIN IS NOT RESPONSIBLE FOR SPECIAL, INCIDENTAL, OR
CONSEQUENTIAL DAMAGES RESULTING FROM ANY BREACH OF
WARRANTY, OR UNDER ANY OTHER LEGAL THEORY, INCLUDING BUT
NOT LIMITED TO, LOST PROFITS, DOWNTIME, GOODWILL, DAMAGE TO
OR REPROGRAMMING OR REPRODUCING ANY PROGRAM OR DATA
STORED IN, OR USED WITH, BELKIN PRODUCTS.
Some states do not allow the exclusion or limitation of incidental or
consequential damages or exclusions of implied warranties, so the above
limitations or exclusions may not apply to you. This warranty gives you
specific legal rights, and you may also have other rights that vary from state
to state.
54
 Loading...