

Page 1

F5D8230-4
Share your high-speed connection
without cables
Wireless Pre-N Router
Page 2

Advantages of a Wireless Network
ary 108 M
bps Wireless
Te
. . . . . . . . . . . . . . . . . . . . . . . . . . . . . . . . . .
. . . . . . . . . . . . . . . . . . . . . . . . . . . . . . . . .
. . . . . . . . . .
Viewing the DHCP Client List Page
. . . . . . . . . . . . . . . . . . . . . . . . . . .
. . . . . . . . . . . . . . . . . . . . . . . . .
. . . . . . . . . . . . . . . . . . . . . . . . . . . . . . . . .
Page 3

1
secti o n
Thank yo u for pu rchasi ng the B elkin Wireless Pre-N Router (the
– you’ll no long er need a d edicated “c omputer roo m”— now
– Belkin ’s E asy Install ation Wizard m akes
– set up and acc ess printer s, computer s, and o ther
– the wi de range of Belkin networking pro ducts le t
– you ca n spare the ex pense an d hassle of
Widespread industry ac ceptance
– choose from a wide r ange of
2
3
4
5
6
7
8
9
10
11
Page 4

Introduction
Your Belkin W ire less Pre-N Rou ter uses a new smar t antenna
The elem ent that ma kes Belk in’s Pre-N MIMO techn ology di fferent
Think of convent ion al radio transmissi on as a two-lane hi ghway. The
V.K. Jones showe d that a ch aracteri stic of rad io trans mission cal led
Page 5

Introduction
To exploit th e benefi ts the virt ual wires offer, MI MO uses multiple,
The MIMO re ceiver uses mathema tical algor ithms to un ravel an d
secti o n
1
2
3
4
5
6
7
8
9
10
11
Page 6

Introduction
Your wireless co nnection wi ll be st ron ger the clo ser your co mputer i s
While s ome of t he items li sted below can affect net work
To achieve th e best w ire les s networ k coverage for your “wire less
This may mean placin g the R outer (or Acces s Poi nt) o n an
Page 7

Introduction
Avo id placi ng your Rou ter (or Access Poin t) near dev ices tha t may
secti o n
1
2
3
4
5
6
7
8
9
10
11
Page 8

Introduction
These gu idelines sh ould all ow you to c over the maximum po ssible
A second alternative is to chang e your comp uter’s power
Page 9

Introduction
or call Belkin Techn ical
310-898-1100 ext.2263
secti o n
1
2
3
4
5
6
7
8
9
10
11
Page 10

Computers
The Router supports a variety of networking envi ronmen ts including
95, 98 , Me, NT
TCP/IP ( the stan dard l anguage of the Inte rnet) .
You can set u p the Ro uter’s advanced fu nctions easily through your
Your Router e mploys N etwork Address Translati on (NAT) t o share the
Your Router i s equipp ed with a f ire wall that w ill protect yo ur netwo rk
Page 11

1
secti o n
The Rout er has a bu ilt-in, four-port ne twork switc h to all ow your wired
The Easy In sta ll Wiza rd takes the gue sswork out of setting up yo ur
Easy Inst all Wizard software is comp atible with Windows 98SE,
2
3
4
5
6
7
8
9
10
11
Page 12

Product Overview
Page 13

1
secti o n
9 8SE, Me, 2000, or XP, or a Mac
9 .x or O S X
2
3
4
5
6
7
8
9
10
11
Page 14

Knowing your Router
The Rout er has b een designe d to be pla ced on a desktop. A ll of th e
The Rout er has b een designe d to be pla ced on a desktop. A ll of th e
Page 15
Knowing your Router
This LED lights in GREEN to indicate t hat your modem is
These LE Ds are labeled 1– 4 an d correspond t o the numbe red
AMBER me ans a 10 0Ba se-T dev ice is conn ected. W hen
1
2
3
4
5
6
7
8
9
10
secti o n
11
Page 16

Knowing your Router
These po rts are RJ45, 10/100 a uto-negotia tion, au to- uplinkin g
Page 17

Knowing your Router
This por t is for co nnection to your ca ble or D SL modem. U se the
The “Res et” butt on is used in rare cases when the Ro uter may
1
2
3
4
5
6
7
8
9
10
secti o n
11
Page 18

Verify the contents of your box. You should have the following:
Your cabl e or DSL mode m must be equ ipped with an RJ45 Ethern et port .
Ethernet USB
Page 19

1
secti o n
Run the Easy In sta ll Wizard f rom th e comput er
Run the Easy Install Wizard Software
Shut down any programs that are running on your computer at
Make sure you have the following items at the computer that is now
THE ROUTER AT THIS TIME.
Turn off any firewall or Internet-connection-sharing software on
Insert the Easy Install Wizard software CD into your CD–ROM drive.
The Easy Install Wizard screen will automatically appear on your
Follow the Easy Install Wizard to complete the installation
2
3
4
5
6
7
8
9
10
11
Page 20

Connecting and Configuring your Router
After yo u insert th e CD int o your CD-R OM drive , the Wizard’s welcom e
The Wiza rd will now ex amine yo ur
Page 21

Connecting and Configuring your Router
This screen will appea r ONLY if you have more tha n one netwo rk
Hardware Setup – Connect the Router to your
The Wiza rd will walk y ou through con necting your Router to your
This step instructs you to locate
1
2
3
4
5
6
7
8
9
10
secti o n
11
Page 22

Connecting and Configuring your Router
This step instructs you to locate
This step instructs you to locate
This step instructs you to look at
Page 23

Connecting and Configuring your Router
Checking the Connection
Once you have completed
User Name and Password Needed
Your user name and password is
1
2
3
4
5
6
7
8
9
10
secti o n
11
Page 24

Connecting and Configuring your Router
This Ste p Is Opt ion al. Clic k
Using th is step, yo u can
Configuring the Router
The Wiza rd will now tr ansfer a ll of the c onfigura tio n inform ation to th e
The Wiza rd will now ch eck for
Page 25

Connecting and Configuring your Router
When the Internet connec tion
Your Router i s now co nnected to the Inte rnet. No w you ca n begin
You have fini shed ins talling you r new Be lki n Router.
You are rea dy to se t up the ot her comp uters in yo ur home. You can
1
2
3
4
5
6
7
8
9
10
secti o n
11
Page 26
Connecting your Gateway Router
Turn off the power to your modem by unplugging the power supply
Locate the network cable that is connected between your modem
Plug the loose end of the cable you just unplugged into the port on
Connect a new network cable (not included) from the back of the
Turn your cable or DSL modem on by reconnecting the power
Before plugging the power cord into the Router, plug the cord into
was originally
Page 27

1
secti o n
Verify that your modem is connected to the Router by checking
Verify that your computer is connected properly to the Router
Set your Computer’s Network Settings to Work
Configuring the Router Using the Web-Based
Advanced User In ter face. In your browser, type “192 .168.2.1” ( do
2
3
4
5
6
7
8
9
10
11
Page 28

Alternate Setup Method
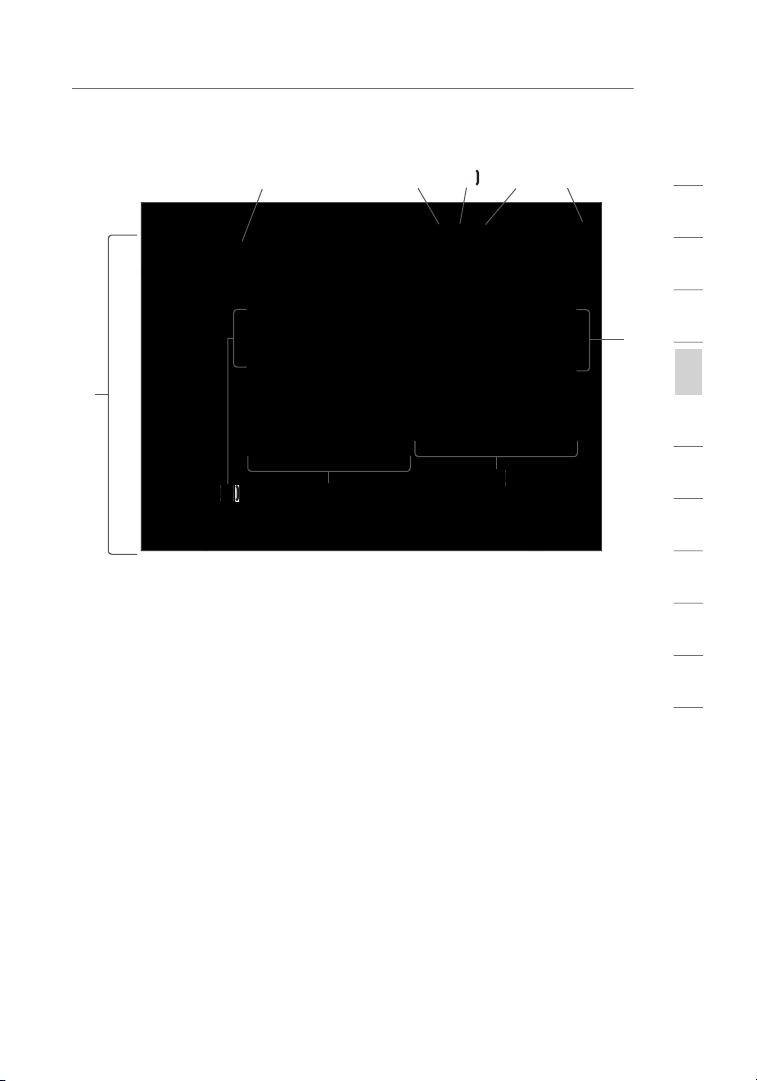
You will see the Rout er’s ho me page in your browse r w indow. Th e
The home page is th e first page you wi ll see w hen you acc ess the
Advanced User In ter face (UI ). The home page sh ows you a q uick vie w
Page 29
Alternate Setup Method
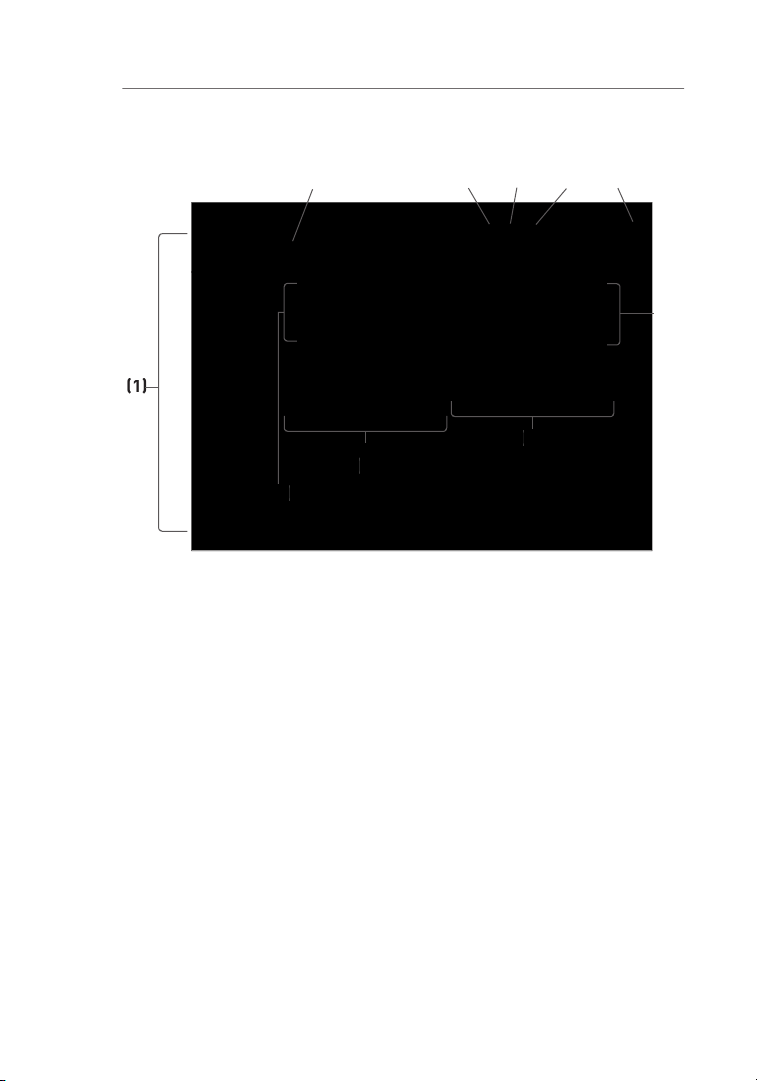
You can go di rec tly to a ny of the R outer’s advance d U I pages by
The home button is availabl e in every page of the UI. Pressi ng this
This ind icator i s v isible i n all pages of the Router, in dicating
1
2
3
4
secti o n
5
6
7
8
9
10
11
Page 30
Alternate Setup Method
This but ton enab les you to log in and out of t he Router w ith the
The “Hel p” butto n g ives you access to the Rout er’s he lp pages.
Page 31

Alternate Setup Method
The page you are on ca n be ide ntified by this nam e. This man ual
1
2
3
4
secti o n
5
6
7
8
9
10
11
Page 32

Alternate Setup Method
Configuring your Router for Connection to your
The “Int ernet /WAN” tab is w here y ou will set up your Router to
Type”
on the left sid e o f the sc ree n. Select t he conne cti on type you
allows you
will le t you cl one your co mputer’s MAC
Page 33

Alternate Setup Method
next to your co nne ction ty pe and then clickin g “Next”
1
2
3
4
secti o n
5
6
7
8
9
10
11
Page 34

Alternate Setup Method
A dynami c connec tio n type i s the most common c onnection t ype
This spa ce is provided to ente r a host na me that nee ds to be
Page 35

Alternate Setup Method
A static IP address co nnection type is le ss commo n t han othe r
1
2
3
4
secti o n
5
6
7
8
9
10
11
Page 36

Alternate Setup Method
Your connection type is PPPoE if:
Your ISP gave you a user name and password which is required to
Your ISP gave you software such as WinPOET or Enternet300 that
You have to double-click on a desktop Icon other than your browser
Page 37

Alternate Setup Method
This spa ce is provided to type in your Us er name tha t was
Type in your password an d re-t ype it i nto the “Re type Passwo rd”
A Servic e name i s r are ly required by an ISP. If you are not sure if
The MTU setting sho uld neve r be change d unless your ISP g ives
The Disc onnect f eat ure is used to automat ically d isc onnect t he
This opt ion shou ld be used if you pay for your Interne t servic e by
1
2
3
4
secti o n
5
6
7
8
9
10
11
Page 38

Alternate Setup Method
Type in your password an d rety pe it in to the “Ret ype Password”
Page 39

Alternate Setup Method
The Disc onnect f eat ure is used to automat ically d isc onnect t he
1
2
3
4
secti o n
5
6
7
8
9
10
11
Page 40

Alternate Setup Method
BigPond User
Your user nam e and pa ssword are provided to you by Telstr a BigPond.
will au tom atically fi ll in yo ur login se rver IP add res s. If your
and typ e in the
Page 41

Alternate Setup Method
Type in your password an d rety pe it in to the “Ret ype Password”
A “Domai n Name S erv er” is a server loc ated on the Internet tha t
should be check ed if your ISP did not give yo u a specifi c DNS
1
2
3
4
secti o n
5
6
7
8
9
10
11
Page 42

Alternate Setup Method
All netw ork comp one nts incl uding cards, a dapters, an d routers, hav e
Page 43

Alternate Setup Method
To clone your MAC add res s, make sure t hat you are us ing the
You can manua lly ente r one in th e “MAC A ddress ” page. Type in a
(2)
and cli ck “Appl y C hanges”
to save the cha nge s. The R outer’s WA N M AC address will now be
1
2
3
4
secti o n
5
6
7
8
9
10
11
Page 44

Advanced User In ter face. In your browser, type “192 .168.2.1” ( do
You will see the Rout er’s ho me page in your browse r w indow.
Viewing the LAN Settings
will ta ke you t o t he LAN t ab’s
To view the s ettings or make cha nges to any of the LAN setting s, click
or to v iew the lis t of con nected comp uters, c lick
Page 45

1
secti o n
All sett ings for th e internal LA N setup of the Rout er can be v iewed and
The “IP address” is th e internal IP ad dre ss of th e R outer. The
The IP a ddress you cho ose shou ld be a non -ro utable IP. E xamples
There is no need to ch ange the subnet mas k. This is a unique ,
2
3
4
5
6
7
8
9
10
11
Page 46

Using the Web-Based Advanced User Interface
The DHCP server fun ction ma kes setting up a ne twork very easy
The rang e of IP add res ses set aside for d ynamic a ssi gnment
The leng th of ti me the DHCP server wil l reserve t he IP address
The defa ult sett ing is “Bel kin”. You can se t a loca l domain na me
You can name the netw ork anythin g you wa nt such as
Page 47

Using the Web-Based Advanced User Interface
You can view a list o f the compu ters (kn own as clie nts), which are
of
(if the compute r h as been assigned
of the computer ’s netw ork interfa ce
button will upd ate the lis t. If
10
1
2
3
4
5
secti o n
6
7
8
9
11
Page 48

Using the Web-Based Advanced User Interface
The “Wirele ss” tab let s you ma ke changes to the w ireles s networ k
To identify y our wireles s n etwork, a name call ed the S SID (Servic e
and cli ck “Appl y C hanges”
Page 49

Using the Web-Based Advanced User Interface
This swi tch allo ws you to s et the Rout er’s wirel ess mode s. There are
This mod e will t urn OFF the Rout er’s Ac cess Point, so no w ireles s
10
1
2
3
4
5
secti o n
6
7
8
9
11
Page 50

Using the Web-Based Advanced User Interface
There are a nu mber of ope rating chan nels you can choose from. In the
Page 51

Using the Web-Based Advanced User Interface
For sec urity, you can choose not to broadcast y our
VoIP on y our network , the Qo S feature shou ld be enabl ed.
10
1
2
3
4
5
secti o n
6
7
8
9
11
Page 52

Using the Web-Based Advanced User Interface
There are two acknowledge ment (ACK) modes th at can be e mployed
Allows y ou to tu rn ON or OFF QoS .
Your Router i s equipp ed with the latest sec urity st andard called WPA
Page 53

Using the Web-Based Advanced User Interface
To use WPA secur ity, yo ur wireless ne twork cards mu st be
Your Router s upports WPA-PSK (no ser ver ). WPA-PSK uses what is
To use WPA secur ity, yo ur wireless ne twork cards mu st be
From the “Security Mode” drop-down menu, select “WPA-PSK
For “Encryption Technique”, select “TKIP” or “AES”. This setting will
Enter your pre-shared key. This can be from eight to 63 characters
Click “Apply Changes” to finish. You must now set all clients to
10
1
2
3
4
5
secti o n
6
7
8
9
11
Page 54

Using the Web-Based Advanced User Interface
The “Pa ssphrase ” o ption wi ll not oper ate with
Apple
AirPort
Select “128-bit WEP” or “64-bit WEP” from the drop-down menu.
After selecting your WEP encryption mode, you can enter you WEP
Encryption in the Router is now set. Each of your computers on
Page 55

Using the Web-Based Advanced User Interface
A hexade cimal ke y i s a mixt ure of numbers and let ter s from A–F
AF 0F 4B C3 D4
Origina l Apple Air Port produc ts support 64-bit
10
1
2
3
4
5
secti o n
6
7
8
9
11
Page 56

Using the Web-Based Advanced User Interface
This ad vanced f eat ure should be employed by adva nce d
Enable the AP mode my selecting “Enable” in the “Use as Access
Set your IP settings to match your network. Click “Apply Changes”.
Connect a cable from the WAN port on the Router to your
The Rout er is no w a cting as an Access Point. To acc ess the Rou ter
Page 57

Using the Web-Based Advanced User Interface
The MAC address filter is a po werful secu rity fea ture t hat allo ws you
This li st appli es only to wireless compu ters. Th is list can be
Select the “Allow” radio button
to begin setting up a list of
Next, in the “MAC Address” field that is blank
Continue to do this until all of the computers you want to add have
Click “Apply Changes”
to finish.
10
1
2
3
4
5
secti o n
6
7
8
9
11
Page 58

Using the Web-Based Advanced User Interface
The “Den y Access ” l ist lets you specif y comput ers that yo u DO NOT
Select the “Deny” radio button
(2)
to begin setting up a list of
Next, in the “MAC Address” field that is blank
Continue to do this until all of the computers you want to deny
Click “Apply Changes”
to finish.
Page 59

Using the Web-Based Advanced User Interface
Your Router i s equipp ed with a f ire wall that w ill protect yo ur netwo rk
The firewal l also mask s common ports that are freq uently u sed to
10
1
2
3
4
5
secti o n
6
7
8
9
11
Page 60

Using the Web-Based Advanced User Interface
The Virtual Servers fu nction w ill allow y ou to route ex terna l (Inter net)
To manually e nter set tings, ente r the IP ad dre ss in th e space provid ed
Page 61

Using the Web-Based Advanced User Interface
The Rout er can b e c onfigured t o rest rict acc ess to the Inter net,
To re strict Inte rnet access to a single com puter fo r example, enter th e
on the
Click “ Apply Ch ang es”. The computer a t
10
1
2
3
4
5
secti o n
6
7
8
9
11
Page 62

Using the Web-Based Advanced User Interface
The DMZ feature allows you to specify one compute r o n your n etwork
The comp uter in the DMZ is NOT protected fro m hacker at tacks.
To put a comp uter in the DMZ, en ter the las t digits of its IP address in
Page 63

Using the Web-Based Advanced User Interface
The Dyna mic DNS ser vice all ows you to alias a dynamic IP address
The Dyna mic DNSS M s ervice i s ideal for a home website, fi le serve r, or
To re gister free fo r your Dyna mic DNS host name, please visi t
You must registe r with D ynD NS.org ’s f ree up date ser vice before
Enter your DynDNS.org user name in the “User Name” field
Enter your DynDNS.org password in the “Password” field
(2).
Enter the DynDNS.org domain name you set up with DynDNS.org in
Click “Update Dynamic DNS” to update your IP address.
10
1
2
3
4
5
secti o n
6
7
8
9
11
Page 64

Using the Web-Based Advanced User Interface
To turn off t he ping res pon se, sele ct “Block I CMP Ping ”
and cli ck
(1)
Page 65

Using the Web-Based Advanced User Interface
The “Uti lities” screen lets yo u manage di ffe ren t p arameter s of the
10
1
2
3
4
5
secti o n
6
7
8
9
11
Page 66

Using the Web-Based Advanced User Interface
delete any of y our configu ration sett ings.
Click the “Restart
The following message
The following message
A 60-second countdown will appear on the screen. When the
Restarting the Router to Restore Normal Operation
Page 67

Using the Web-Based Advanced User Interface
Click the “Restore
The following message
The following message
A 60-second countdown will appear on the screen. When the
10
1
2
3
4
5
secti o n
6
7
8
9
11
Page 68

Using the Web-Based Advanced User Interface
You can save your cur ren t c onfigura tion by usi ng this feature. Savin g
Click “Save”. A window
A window will open
You can name the file
Page 69

Using the Web-Based Advanced User Interface
When the save is
The configuration is
This opt ion will al low you to restore a previou sly saved c onfiguratio n.
Click “Browse”. A window will open that allows you to select the
10
1
2
3
4
5
secti o n
6
7
8
9
11
Page 70

Using the Web-Based Advanced User Interface
You will be asked if you want to continue. Click “OK”.
A reminder window will appear. It will take up to 60 seconds for the
A 60-second countdown will appear on the screen. When the
The Router home page should appear automatically. If not, type in
Page 71

Using the Web-Based Advanced User Interface
The “Che ck Firmw are”
button allows y ou to insta ntly check for a
10
1
2
3
4
5
secti o n
6
7
8
9
11
Page 72

Using the Web-Based Advanced User Interface
To download the new version of firmware, click “Download”.
A window will open that allows you to select the location where you
Page 73

Using the Web-Based Advanced User Interface
In the “Firmware
Browse to the firmware
When the save is complete, you will see the following window.
The down load of the firmware i s complete. To u pdate th e firmware,
10
1
2
3
4
5
secti o n
6
7
8
9
11
Page 74

Using the Web-Based Advanced User Interface
The “Update Firmware”
just selected. Click
You will be asked if you
You will see one more message. This message tells you that the
A 60-second countdown will appear on the screen. When the
Page 75

Using the Web-Based Advanced User Interface
The “Sys tem Sett ing s” page is where you c an enter a new
The Rout er ships wi th NO pa ssword entered. I f you wish to add a
The logi n timeou t o ption al lows you to set the period of time tha t y ou
You will have to log into the Ro uter aga in to make any more chang es.
The logi n timeou t o ption is for securi ty purpo ses and the default is set
Only on e comput er can be l ogged into the Rout er’s ad vanced
1
2
3
4
5
secti o n
6
7
8
9
10
11
Page 76

Using the Web-Based Advanced User Interface
The Rout er keeps ti me by co nnecting to a Simpl e Network T ime
Page 77

Using the Web-Based Advanced User Interface
This ad vanced f eat ure should be employed by adva nce d
ADMINIST RATO R PASSW ORD
This usu ally requires ope ning TCP an d UDP po rts, and in some
1
2
3
4
5
secti o n
6
7
8
9
10
11
Page 78

This inn ovation provid es the R outer with the buil t-i n capabi lity to
Using the Web-Based Advanced User Interface
Page 79

1
secti o n
Pull down the Apple menu. Select “Control Panels” and
You will see the TCP/IP control panel. Select “Ether net Built-In” or
Next to “Configure”
If not already set, at “Configure:”, choose “Using DHCP Server”.
This will tell the computer to obtain an IP address from the Router.
If “Use the following IP address”
is selected, your Router will
2
3
4
5
6
7
8
9
10
11
Page 80

Manually Configuring Network Settings
Click on the “System Preferences” icon.
Select “Network”
from the “System Preferences” menu.
Select “Built-in Ethernet”
next to “Show” in the Network menu.
(1)
(2)
(3)
(4)
Page 81

Manually Configuring Network Settings
Select the “TCP/IP” tab
to make sure that “Connect using PPPoE” is NOT selected. If it
If “Manually” is selected, your Router will need to be set up for a
If not already selected, select “Using DHCP” next to “Configure”
Your ne twork setti ngs are now co nfigured fo r u se with the Router.
1
2
3
4
5
6
secti o n
7
8
9
10
11
Page 82

Manually Configuring Network Settings
Click “Start”, “Settings”, then “Control Panel”.
Double-click on the “Network and dial-up connections” icon
Right-click on the “Local Area Connection” associated with your
In the “Local Area Connection Properties” window, click “Internet
If “Use the following IP address”
is selected, your Router will
If not already selected, select “Obtain an IP address automatically”
and “Obtain DNS server address automatically”
Your ne twork setti ngs are now co nfigured fo r u se with the Router.
(1)
(2)
(3)
Page 83

Manually Configuring Network Settings
Right-click on “My Network Neighborhood” and select “Properties”
Select “TCP/IP Settings” for your installed network adapter. You will
If “Specify and IP address” is selected, your Router will need to
Write the IP address and subnet mask from the “IP Address”
Click the “Gateway” tab
Click the “DNS
If not already selected,
1
2
3
4
5
6
secti o n
7
8
9
10
11
Page 84

Start your web browser. Select “Tools” then “Internet Options”.
In the “Internet Options” screen, there are three selections: “Never
Under the “Internet Options” screen, click on “Connections” and
Page 85

1
secti o n
Make sure there are no check marks next to any of the displayed
Start Netscape. Click on “Edit” then “Preferences”.
In the “Preferences” window, click on “Advanced” then select
2
3
4
5
6
7
8
9
10
11
Page 86

There are two types of AO L connectio ns avail able—either AOL DSL
Access). This is us ed along with an ex isting b roa dba nd conne ction,
C rea te AOL screen n ames for the Router and for each
C onfigure the Route r for AOL fo r Broadb and.
C onfigure your comp ute rs with the new AOL screen names
AOL DSL Users: Creating new AOL screen names
If your Router is currently connected to the network, remove it from
Then, log on to AOL as you normally do.
Log on to your AOL master account.
P erform a keyword search on
Page 87

1
secti o n
I n the “ Keyword”
You will see th e
A w indow will appear
2
3
4
5
6
7
8
9
10
11
Page 88

How to Set Up your Network
T he “Choose a Screen
The “Choos e a
Page 89

How to Set Up your Network
T he “Select a Parental
The “Conf irm y our
1
2
3
4
5
6
7
8
secti o n
9
10
11
Page 90

How to Set Up your Network
The “AOL Screen
Repeat st eps 1 -11
Page 91

How to Set Up your Network
AOL DSL Users: Creating new AOL screen names
Open your web browser.
In the address bar of your browser, type http://192.168.2.1 and
You will see the Router’s login page. Leave the “Password” field
You will now see the PPPoE setup page.
1
2
3
4
5
6
7
8
secti o n
9
10
11
Page 92

How to Set Up your Network
In the “User Name” field, type in the screen name that you created
In the “Password” fields, type in the password you created for the
Leave the “Service Name” field blank. Do not change the
Click on “Apply Changes”.
Click on the “Home” link at the top of the screen. The Internet
Go to AOL DSL Users STEP 3.
Page 93

How to Set Up your Network
just created
This step consi sts o f installing th e AOL s oft ware on ea ch co mputer
AOL’s te chnical suppo rt de partment .
1
2
3
4
5
Network Configuration
6
7
8
secti o n
9
10
11
Page 94

How to Set Up your Network
AOL Cabl e users nee d to fol low these d ire ctions. If you have AOL DSL,
just created.
Creating new AOL screen names
Your AOL conn ections must be set to oper ate o n the T CP/IP
TCP/IP bef ore proceeding .
L og on t o you r AOL
P erform a keyword
In t he “Keyword”
Page 95

How to Set Up your Network
You shou ld se e the
A w indow will appear
T he “Choose a Screen
1
2
3
4
5
6
7
8
secti o n
9
10
11
Page 96

How to Set Up your Network
T he “Choose a
T he “Select a Parental
10.
T he “Confirm your
Page 97

How to Set Up your Network
11.
T he “AOL Screen
Repeat st eps 1 -11 f or
names you just created
This ste p consis ts of insta lling the A OL softw are on each co mputer
1
2
3
4
5
6
7
8
secti o n
9
10
11
Page 98

Problem:
Ne xt, d ouble-cl ick o n the C D-ROM drive that the Easy Inst allation
The Easy Instal l Wiz ard s hou ld start within a few secon ds. I f,
Page 99

1
secti o n
Unp lug power to the Route r for 10 sec onds, and then plug the
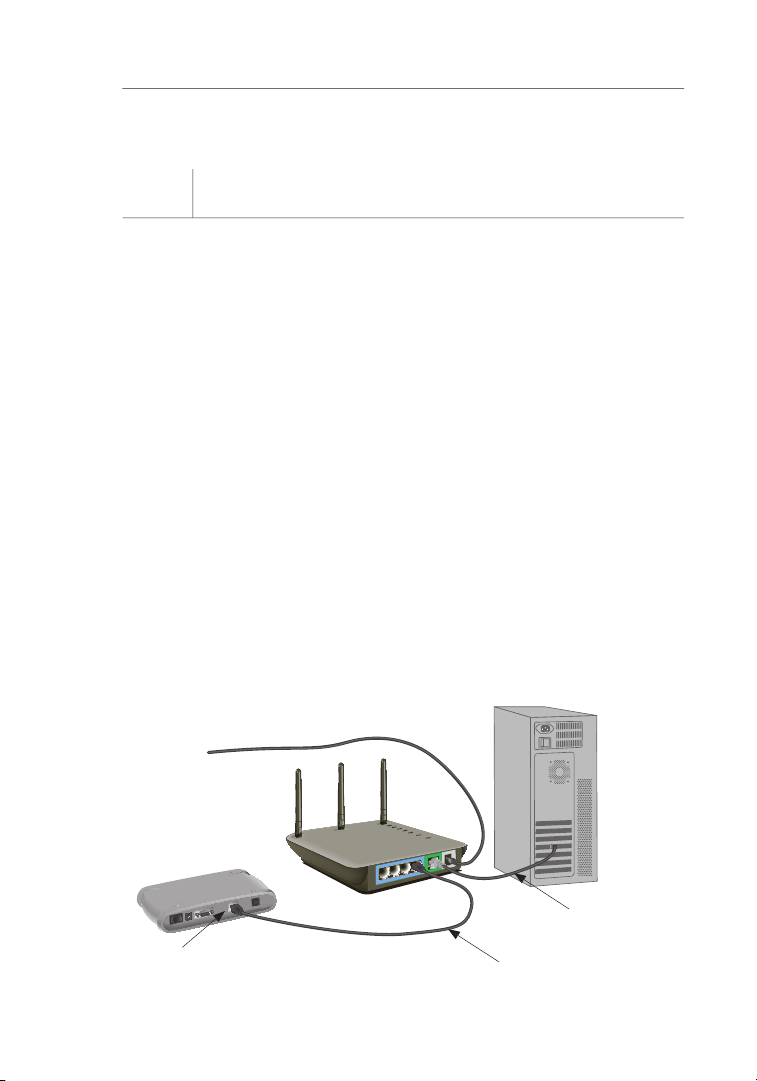
t he network (Ethernet) por t on
o ne of t he LA N ports, labele d
The comput er sh ould NOT be connecte d to th e por t
Try shutting d own a nd resta rting your compute r, t hen reru nning
2
3
4
5
6
7
8
9
10
11
Page 100

Troubleshooting
The Easy Instal l Wiz ard c omp leted install ation, but my web
 Loading...