

Page 1

Belkin Components
G700 Series
Portable PDA Keyboard
User Guide for Palm OS
Handhelds
P74041
Page 2

Page 3

Index
Introduction ..............................................................2
Features and Specifications..................................3
Operating the G700 Keyboard
Opening the Keyboard ........................................4
Closing the Keyboard ..........................................4
On-Keyboard Charging........................................6
Driver and K eyboard Installation
Installing the G700 Keyboard Driver ..................7
Enabling the Driver..............................................9
Connecting and Removing the PDA ....................9
Customizing Keyboard Settings
Configuring the Keyboard..................................10
Combination Keys ..................................................12
Assigning Command Hot Keys ................................15
FCC/CE/Warranty Statement ..................................16
Page 4

Introduction
Congratulations! You have just purchased the definitive tool
to extend your handheld’s capabilities. The Belkin G700
Series Portable PDA Keyboard will give you an easy and
convenient way to add data to your Palm OS handheld.
Designed for the mobile professional, the G700 weighs in
at only seven ounces and closes to a size compact enough
to fit easily into a coat pocket.
For our complete selection of PDA accessories and mobile
enhancements, please visit us at belkin.com.
2
Page 5

Features and Specifications
• Easy connection compatibility with your Palm
OS device
• Standard QWERTY keyboard layout
• Shortcut keys for faster operation
• Ultra-portable design
• Pass-through charging capability
Opened: 6.85" x 9.77" x 2.75"
(174mm x 248mm x 70mm)
Closed: 3.74" x 5.83" x .55"
(95mm x 148mm x 14mm)
Weight: 7 ounces (198.4g)
Temperature Endurance: 70º C
Power Consumption:
In Operation: 1mA
In Sleep Mode: 1 A
3
Page 6
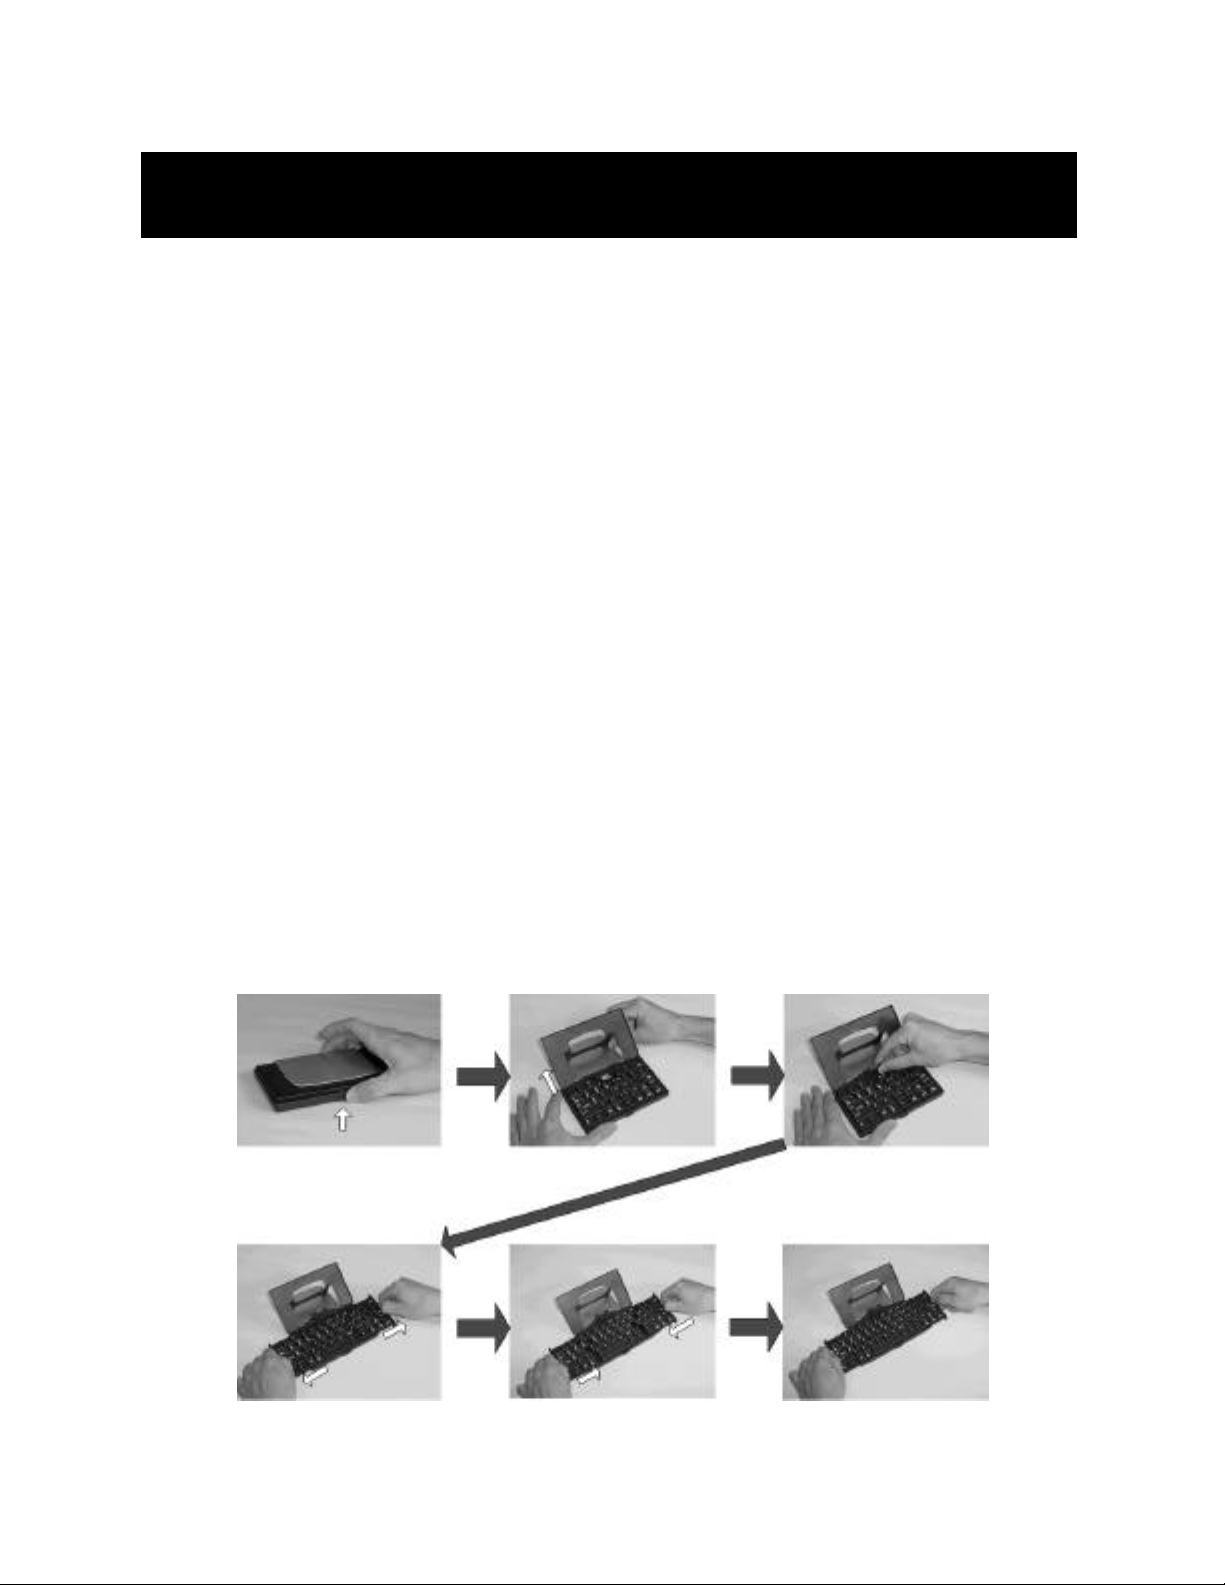
Operating the G700 Keyboard
Opening the K eyboard
1. Open the keyboard by pressing the button.
2. Raise the lid and stand so that they are
fully extended.
3. Flip up the keyboard connector stand to its full
upright position.
4. Pull out the left and right section of the keyboard until
the middle section pops up.
5-6. Push the left, then the right section of the
keyboard together.
(1) (2) (3)
(4) (5) (6)
4
Page 7

Operating the G700 Keyboard (continued)
Closing the K eyboard
1. Gently pull the left and then the right section of the
keyboard apart.
2. Push the left and right section of the keyboard forward
the center of the keyboard. The middle section will
automatically move down and make room for the left
and right sections. DO NOT push down on the
middle section.
3. Flip down the keyboard connector head until it lays flat
within the keyboard.
4. Pull the lid and stand together.
5. Press the lid together with the upper frame.
6. Gently press down on the cover until it snaps in the
closed position.
(1) (2) (3)
(4) (5) (6)
5
Page 8

On-keyboard charging
The G700 keyboard is designed with an electronic circuit that accepts
AC power. The power receptacle located on the side of keyboard.
A plug adapter is included with your G700 keyboard. This adapter
attaches to your PDA’s AC power adapter, allowing you to charge
your PDA directly while using the keyboard.
Note: Your PDA must be equipped with rechargeable batteries as standard
equipment. This feature is not compatible with after-market recharging products.
Page 9

Driver and Keyboard Installation
Installing the G700 Keyboard Driver
Before Installation
1. To prevent potential software conflicts, disable other
keyboard applications or specialized applications
that use the same serial address installed in your
Palm OS device.
2. You must have 100Kb of available memory to install
the driver.
Install the Dri ver
1. Connect the Palm OS PDA to a computer through its
cradle or cable.
2. Insert the driver CD into your CD-ROM drive.
3. If the CD-ROM has been set to auto-run mode, the
install process will proceed automatically. Please follow
on-screen instructions to finish all steps. Otherwise,
please follow steps 4-7 to install driver manually.
7
Page 10

Driver and Keyboard Installation (continued)
4. Tap twice on the “My Computer” icon and then choose
your CD-ROM drive.
5. D o u b l e - c l i ck on the “Belkin G700.prc” file to launch the
installer. The Palm OS “Install Tool” window will appear.
6. Select the file (Belkin G700.prc) by clicking on the file
name once.
7. Click “Done”. The driver file will be installed into your
handheld the next time you perform a HotSync
®
operation.
To complete your installation onto your handheld, simply
perform the HotSync operation. When complete, the icon
for G700 keyboard will appear on the “Applications”
screen of your handheld.
Page 11

Driver and Keyboard Installation (continued)
Enabling the Driver
1. Power on your PDA.
2. Tap on the “Applications”
icon. Your applications
window will appear on-screen.
3. Tap on the “Keyboard” icon.
The configuration screen
will appear.
4. Tap on the “Status” pull-down
menu and select “On”.
5. Tap on the “Status” pull-down
menu to enable or disable
the keyboard.
Connecting and Removing the PDA
Align the PDA’s connector with the keyboard’s connector.
Gently slide the PDA onto the connector until it is firmly
seated on the connector.
To remove, hold the keyboard in place and gently pull the
PDA up from the connector until it is completely removed
from the keyboard.
9
Page 12

Customizing Keyboard Settings
Configuring the Keyboard
You can adjust various keyboard settings to your
personal preference.
Tap on the
“Enable Click
Sound” box to
hear a click
while typing.
Tap in the “Delay until repeat” slide
scale to lengthen or shorten the time
the keyboard will wait before
repeatedly displaying a depressed
key. Tapping further right on the
scale specifies a longer delay time.
10
Page 13

Customizing Keyboard Settings (continued)
Tap in the “Keyboard repeat rate” slide scale to
adjust the rate at which the keyboard will display
a character. Tapping further right on the scale
specifies a faster repeat rate.
Tap in the “Test string here” field to
enter characters from the keyboard.
11
Page 14

Combination Keys
Certain keys on the G700 keyboard can perform additional
functions in the combinations listed below.
Shift + any key Enters uppercase character
Ctrl + C Copy
Ctrl + V Paste
Ctrl + X Cut
Cmd + Left arrow Move cursor to the beginning of
the line
Cmd + Right arrow Move cursor to the end of the line
Tab Tabs forward through edit lines
Shift + Tab Tabs backward through edit lines
Fn + Tab Inserts a tab in a line
Shift + Right arrow Selects right area
Shift + Left arrow Selects left area
Shift + Up arrow Selects up area
Shift + Down arrow Selects down area
Fn + 1 Applications
Fn + 2 Menu
Fn + 3 E-mail
Fn + 4 Find
Page 15

Combination Keys (continued)
Fn + 5 Calendar
Fn + 6 Address Book
Fn + 7 To do list
Fn + 8 Memo Pad
Fn + 9 Calculator
Fn + 0 New
Fn + Q, then release and
type A, E, I, O, U, or Y Acute accent: Á, É, Í, Ó, Ú, ´Y
Fn + W, then release and
type A, E, I, O, or U Grave accent: À, È, Ì, Ò, Ù
Fn + E, then release and
type A, E, I, O, or U Circumflex: Â, Ê, Î, Ô, Û
Fn + R, then release and
type A, N, or O Tilde: Ã, Ñ, Õ
Fn + T, then release and
type A, E, I, O, U, or Y Dieresis (Umlaut): Ä, Ë, Ï, Ö, Ü, Ÿ
Fn + Y, then release and
type A Nordic A-ring: Å
Fn + Done Cancel
Fn + Del Delete Item
Fn + Enter Ok
Page 16

Combination Keys (continued)
Fn + Cmd Q u i ck-access key: For example,
Fn + Cmd, then release and
press D brings the effect
“delete”
Fn + Right arrow Details
Fn + Left arrow Show
Fn + Up arrow Scroll Upward
Fn + Down arrow Scroll Downward
Cmd + 0~9 Programmable Hot Key
14
Page 17

Assigning Command Hot Keys
Tap the screen at the arrow next to “Setting”, and a popdown setting menu allows you to customize your keyboard
set hot key.
Tap the screen at the arrow next to “CmdKeys”, and a popdown menu will allow you to define shortcuts.
15
Page 18

FCC/CE/Warranty Statement
FCC Statement
DECLARATION OF CONFORMITY WITH FCC RULES FOR
ELECTROMAGNETIC COMPATIBILITY
We, Belkin Components, of 501 West Walnut Street, Compton, CA 90220,
declare under our sole responsibility that the products:
F8P3502, F8H1501, F8Y1501
to which this declaration relates:
Comply with Part 15 of the FCC Rules. Operation is subject to the following two
conditions: (1) this device may not cause harmful interference, and (2) this device
must accept any interference received, including interference that may cause
undesired operation.
CE Declaration of Conformity
We, Belkin Components, declare under our sole responsibility that the F8P3502, F8H1501,
and F8Y1501, to which this declaration relates, are in conformity with Generic Emissions
Standard EN55022:1998 and with Generic Immunity Standard EN55024:1998.
ICES Statement
This Class B digital apparatus complies with Canadian ICES-003. Cet appareil numérique de
la classe B est conforme à la norme NMB-003 du Canada.
Belkin Components Limited One-Year
Product Warranty
Belkin Components warrants this product against defects in materials and workmanship for
one year. If a defect is discovered, Belkin will, at its option, repair or replace the product at
no charge provided it is returned during the warranty period, with transportation charges
prepaid, to the authorized Belkin dealer from whom you purchased the product. Proof of
purchase may be required.
This warranty does not apply if the product has been damaged by accident, abuse, misuse,
or misapplication; if the product has been modified without the written permission of Belkin;
or if any Belkin serial number has been removed or defaced.
THE WARRANTY AND REMEDIES SET FORTH ABOVE ARE EXCLUSIVE IN LIEU OF ALL OTHERS,
WHETHER ORAL OR WRITTEN, EXPRESSED OR IMPLIED. BELKIN SPECIFICALLY DISCLAIMS
ANY AND ALL IMPLIED WARRANTIES, INCLUDING, WITHOUT LIMITATION, WARRANTIES OF
M E R C H A N TABILITY AND FITNESS FOR A PA RTICULAR PURPOSE.
No Belkin dealer, agent, or employee is authorized to make any modification, extension, or
addition to this warranty.
BELKIN IS NOT RESPONSIBLE FOR SPECIAL, INCIDENTAL, OR CONSEQUENTIAL
DAMAGES RESULTING FROM ANY BREACH OF WARRANTY, OR UNDER ANY OTHER
LEGAL THEORY, INCLUDING BUT NOT LIMITED TO LOST PROFITS, DOWNTIME,
GOODWILL, DAMAGE TO OR REPROGRAMMING, OR REPRODUCING ANY PROGRAM
OR DATA STORED IN OR USED WITH BELKIN PRODUCTS.
Some states do not allow the exclusion or limitation of incidental or consequential damages or
exclusions of implied warranties, so the above limitations of exclusions may not apply to you.
This warranty gives you specific legal rights, and you may also have other rights that vary from
state to state.
16
Page 19

Belkin Components
501 West Walnut Street
Compton • CA • 90220 • USA
Tel: 310.898.1100
Fax: 310.898.1111
Belkin Components, Ltd.
Express Business Park
Shipton Way • Rushden • NN10 6GL
United Kingdom
Tel: +44 (0) 1933 35 2000
Fax: +44 (0) 1933 31 2000
Belkin Components B.V.
Starparc Building • Boeing Avenue 333
1119 PH Schiphol-Rijk • The Netherlands
Tel: +31 (0) 20 654 7300
Fax: +31 (0) 20 654 7349
Belkin Components, Ltd.
7 Bowen Cresent • West Gosford
NSW 2250 • Australia
Tel: +61 (2) 4372 8600
Fax: +61 (2) 4325 4277
© 2002 Belkin Components. All rights reserved. All trade names are registered
trademarks of respective manufacturers listed.
17
 Loading...