

Page 1

Get online and synchronize anywhere
CellSync
™
Manager
F8V7D006-SS
F8V7D008-SS
User Manual
Web Access
Phone Book
Manage
r
Page 2

TABLE OF CONTENTS
Introduction......................................................................2
Interactive Phone Menu ..........................................................3
LG 5350
CellSync Software Installation for LG 5350............................5
Setup Guide for Windows® 98 & Me ......................................8
Setup Guide for Windows 2000 & XP ..................................17
Sanyo SCP-4900
CellSync Software Installation for Sanyo SCP-4900 ..............19
Setup Guide for Windows 98, Me, 2000 & XP ......................22
Uninstall Instructions
Uninstall Modem for Windows 98 & Me ..............................25
Uninstall Driver for Windows 98 & Me ................................26
Uninstall Modem for Windows 2000 & XP............................29
Uninstall LG Driver for Windows 2000 ................................31
Uninstall LG/Sanyo Driver for Windows XP ..........................33
CellSync Uninstall Guide ....................................................36
Helpful Hints ..................................................................39
Information ....................................................................40
1
Page 3

INTRODUCTION
Congratulations on your purchase of this innovation from Belkin
Mobility. To ensure you get the most out of this great new product,
please read and follow these simple setup instructions carefully.
Check us out at belkin.com for a full sampling of our accessories and
enhancements for your cellular phone and PDA, including a wide
array of cases, power, and connectivity solutions.
Visit www.belkin.com for the latest upgrades, download manuals &
drivers, troubleshooting and more!!!
2
Page 4
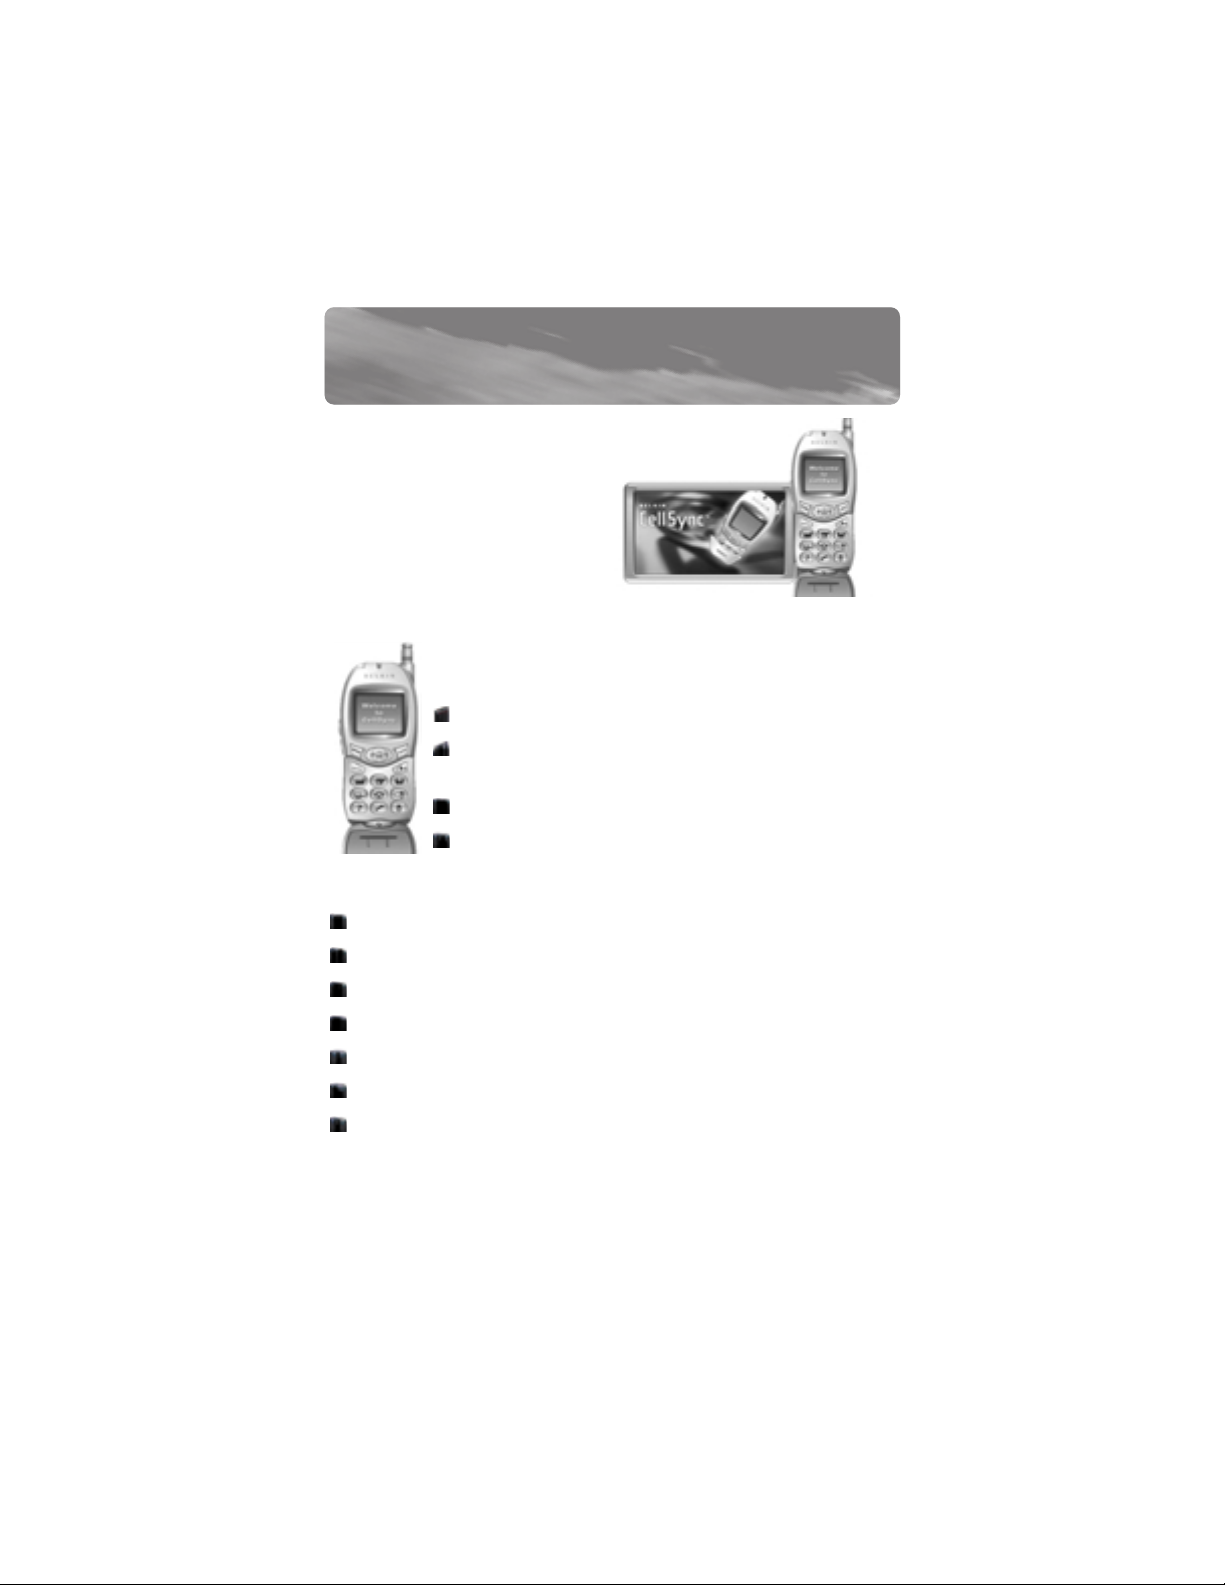
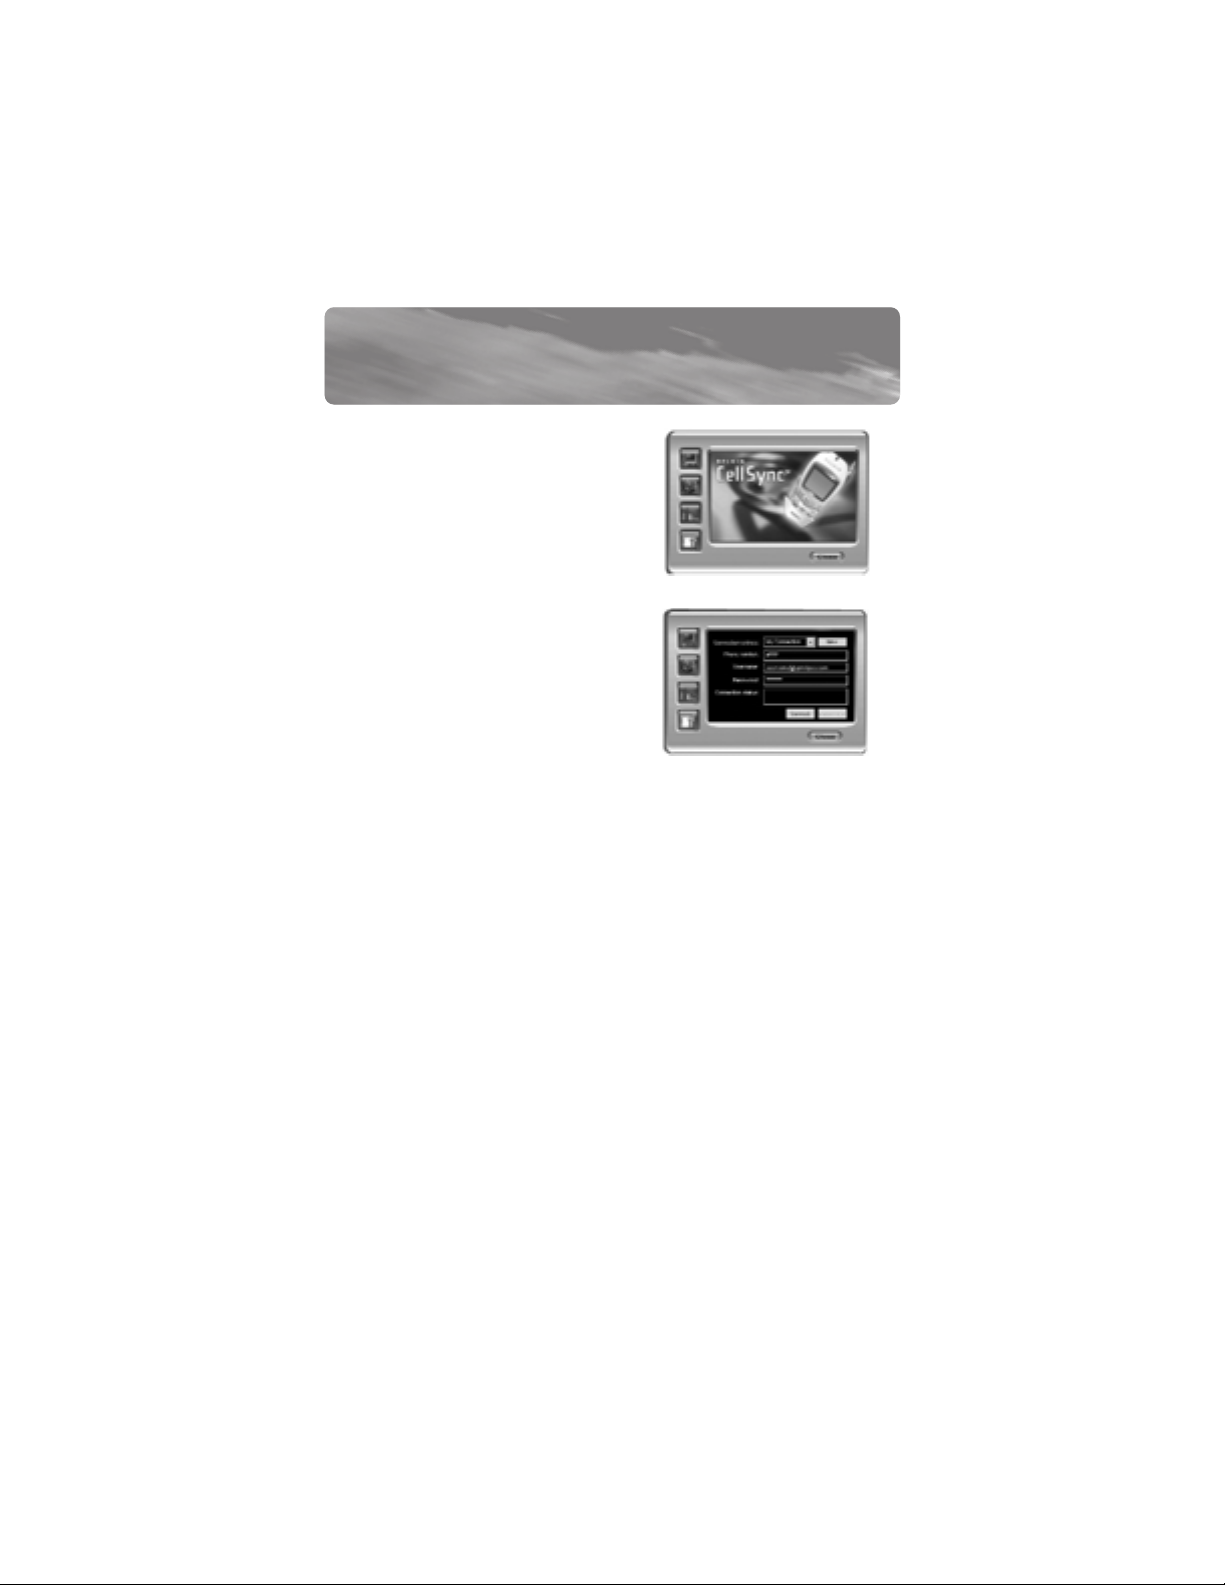
Every time you use CellSync, you
will see this interactive phone
below. The buttons on the phone
allow you to back up, recover,
save, edit, and transfer phone
data to your computer, phone,
and Palm™ desktop computer.
*You can move the interactive phone around your desktop.
Functional Menu Buttons
Exits the program
Dials up to the Internet based on phone model and
mobile service provider
Opens up existing data files on your computer
Edit screen allows you to view, edit, import, add,
and delete your phone numbers from your mobile
phone
Saves files to your computer
Reads phone data from your mobile phone
Connects you to the Belkin home page with Internet access
Writes phone data back to your mobile phone
Help menu and user guide
Settings are used to manually detect a new phone
About CellSync software
3
INTERACTIVE PHONE MENU
3
Page 5
INTERACTIVE PHONE MENU
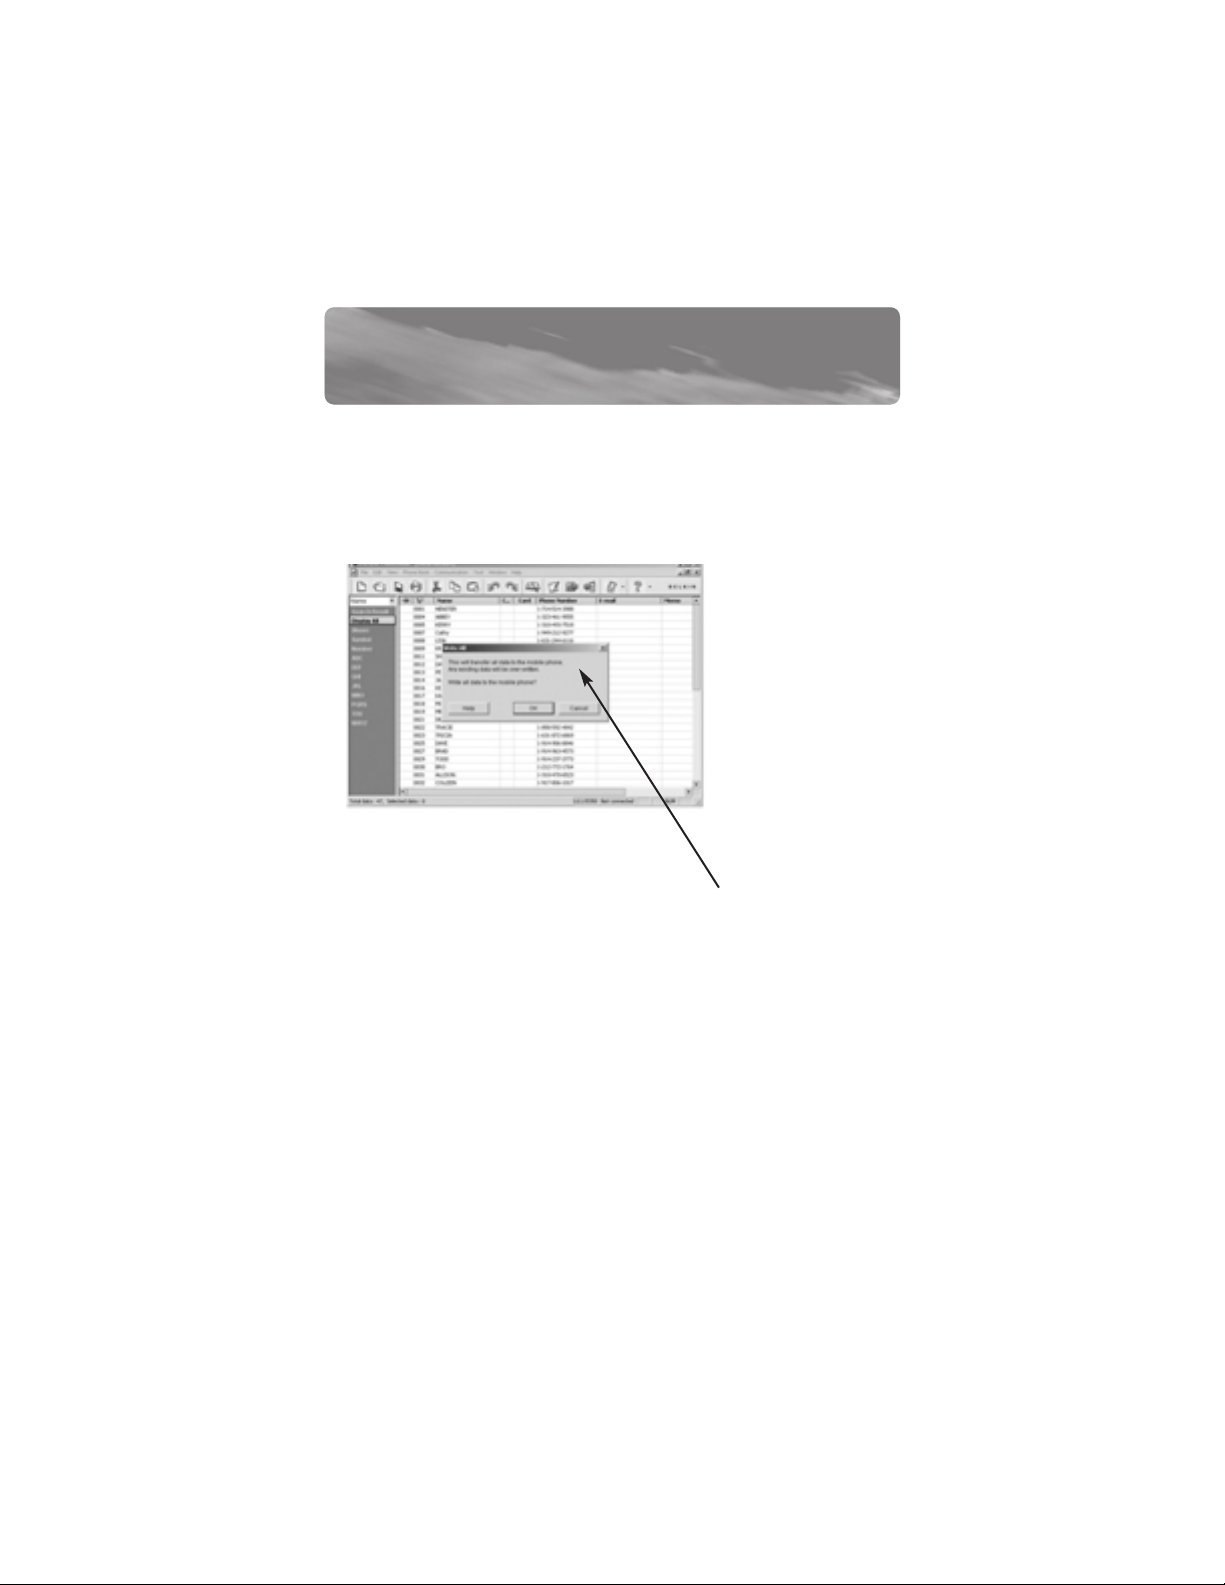
Menu Features
This menu has similar options as your interactive phone. After you
transfer your data from your phone, the CellSync software creates a
screen that looks like
this image to the left.
Here you can add,
edit, delete, and save
all of your changes.
You can then write
the data back to your
phone or to your Palm
desktop computer.
Writes all data back to your phone
4
Page 6
WARNING: DO NOT connect the USB data cable included in the
CellSync Manager to your computer until the software is installed.
For Windows 2000 and XP, please disregard the Windows “digital
signatures” or “Windows Logo Testing” warning that may appear
and continue with the installation.
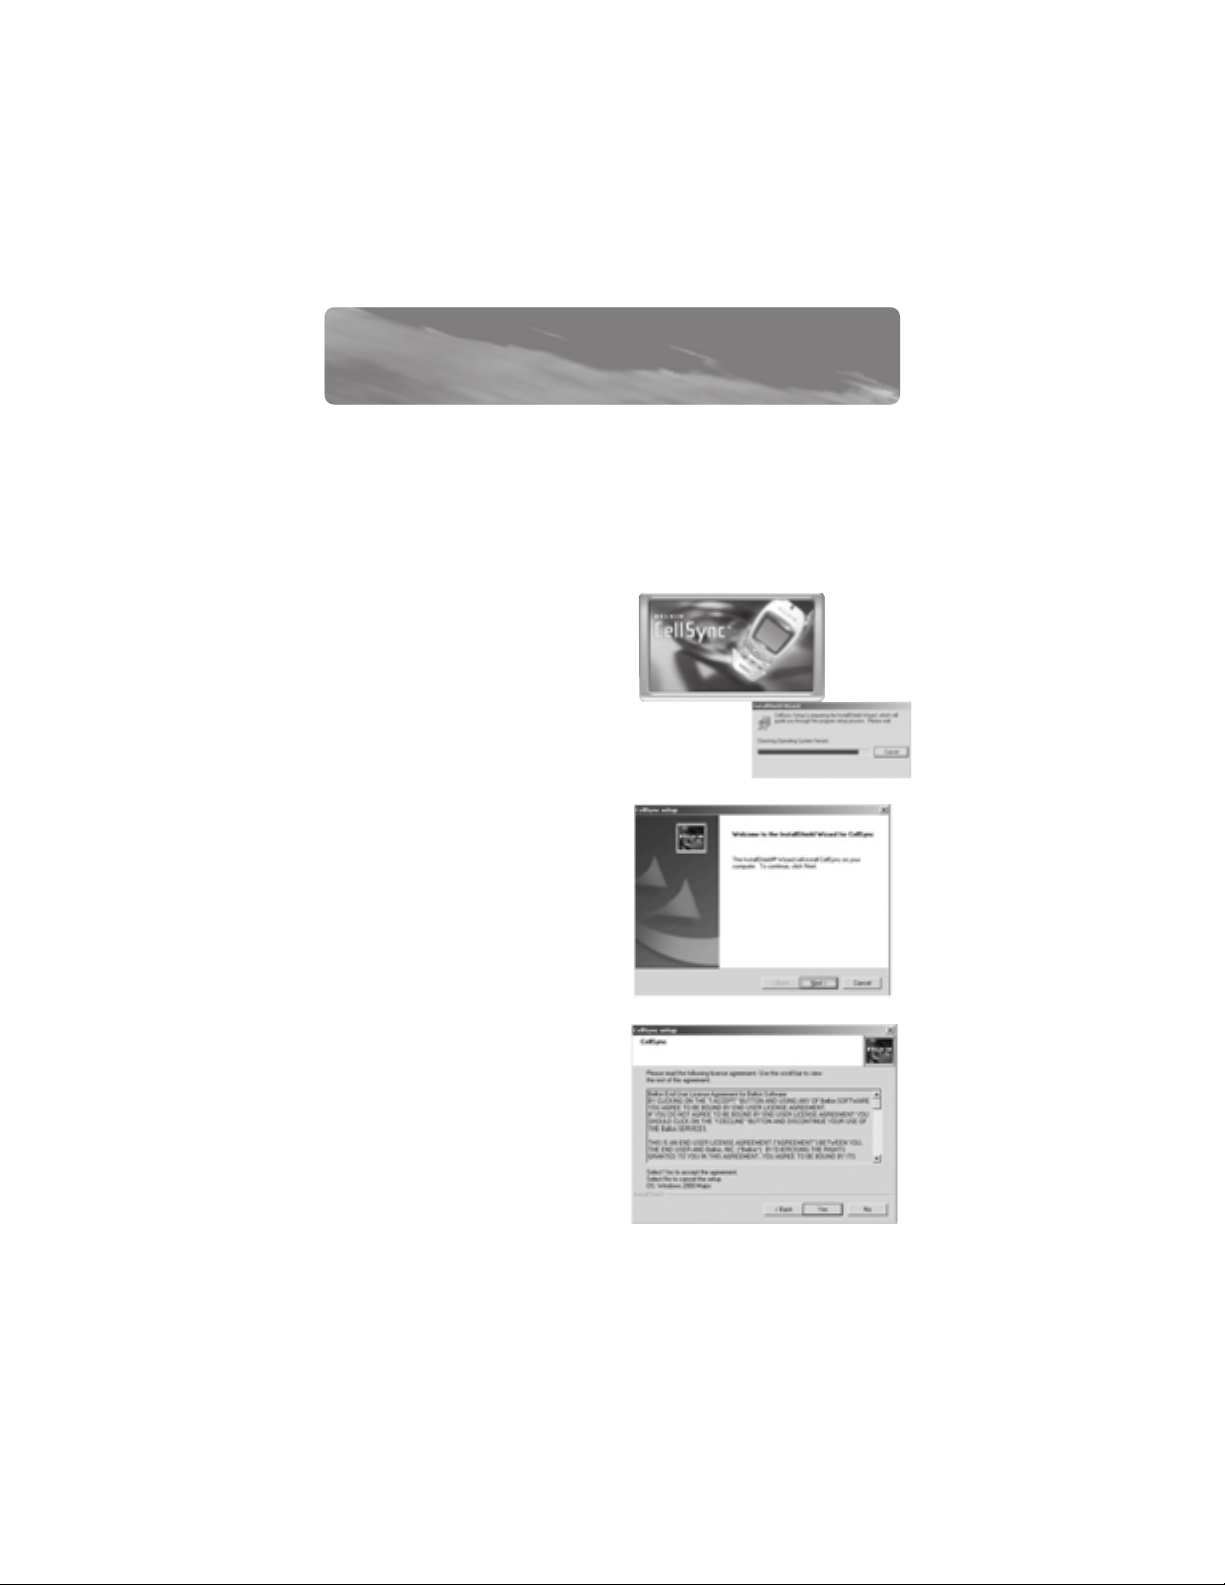
1. Insert the CD-ROM.
CellSync setup will automatically
prepare installation. You will then
see this welcome dialog box. If it
does not automatically start, click
on “My Computer”, select compact disk, and
then double-click on the “Setup.exe” file.
2. You will then see this welcome
dialog box. Click “Next” to
continue.
3. The CellSync License Agreement
dialog box will appear. Read the
license agreement. When you are
done, click “Yes” to continue.
LG 5350
CELLSYNC SOFTWARE INSTALLATION FOR LG 5350
5
Page 7
LG 5350
CELLSYNC SOFTWARE INSTALLATION FOR LG 5350
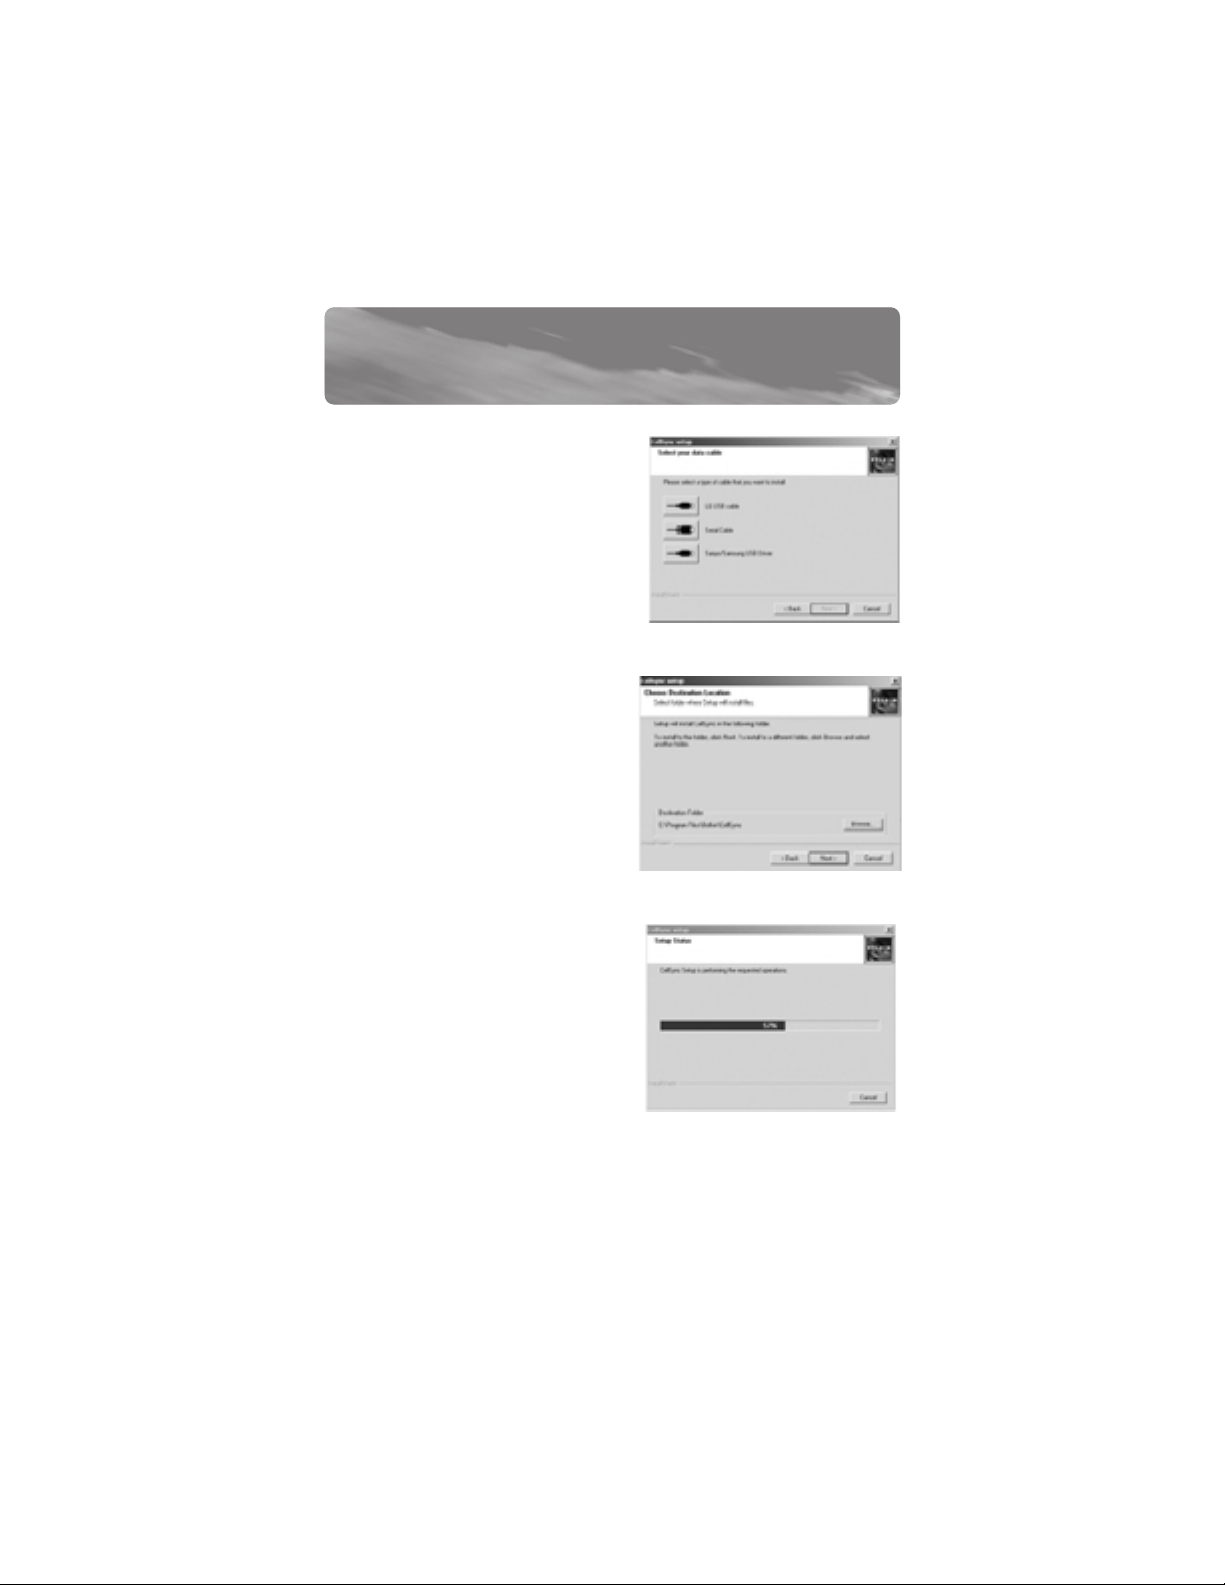
4. The “Select your data cable”
dialog box will appear. You should
have received a cable with your
software based on your phone
model. Select the cable option
that relates to the phone
you’re installing.
5. The “Choose Destination
Location” dialog box will appear.
CellSync will install the files in
the default folder. If you do not
want to use this folder, click
“Browse” to select the folder
where you want to install
CellSync. Click “Next”
to continue.
6. The “Setup Status” dialog box
will appear. CellSync will start to
copy all the necessary files. If
you click “Cancel”, you will STOP
the setup process.
6
Page 8
LG 5350
CELLSYNC SOFTWARE INSTALLATION FOR LG 5350
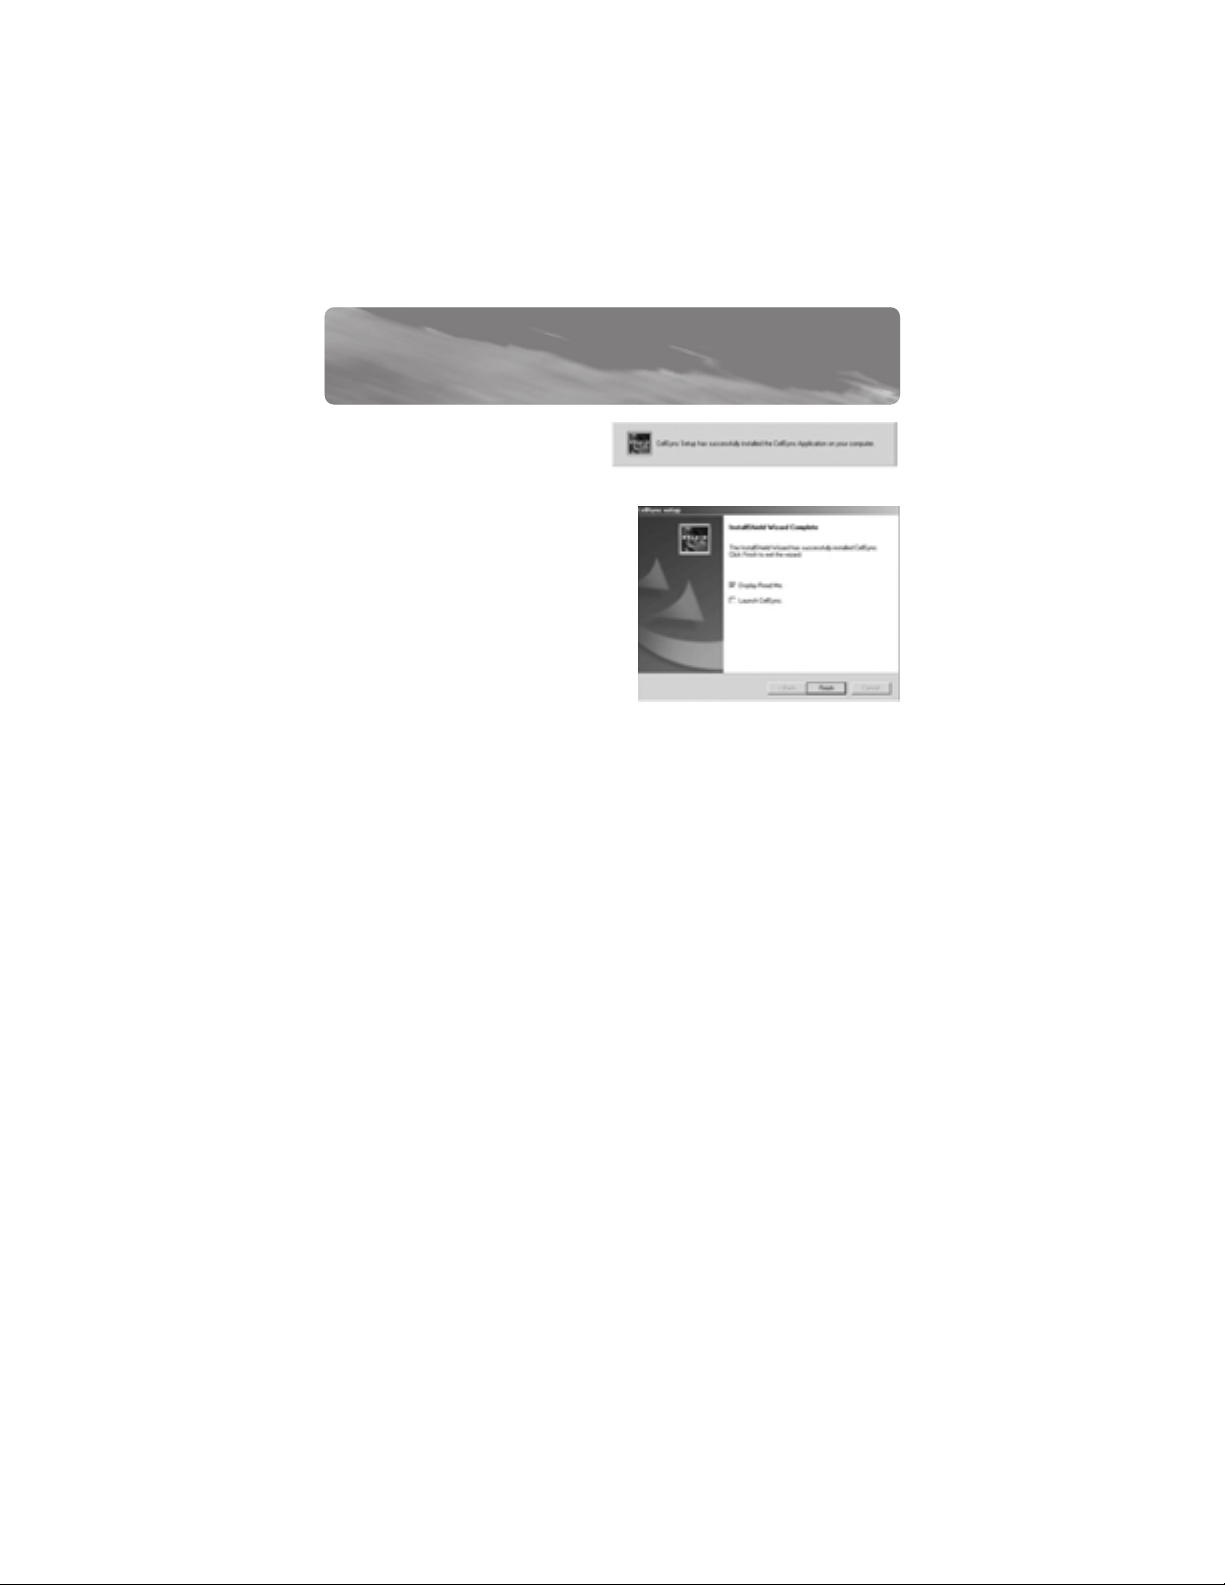
7. The “InstallShield Wizard
Complete” dialog box will
appear. If you want to review the
“Read Me” file immediately after
the installation is complete,
check “Display Read Me”. If you
want to launch the CellSync
application immediately after the
installation is complete, check
“Launch CellSync”. Otherwise,
uncheck both and click “Finish”
to complete the installation.
NOTE: For Windows 98 & Me, you must manually set up the modem.
Refer to the Setup Guide for Windows 98 & Me on page 12.
For Windows 98, you must manually set up the dial-up connection. Refer to
the Setup Guide for Windows 98 & Me on page 8.
For Windows 2000 & XP, refer to the Setup Guide for Windows 2000 & XP
on page 17.
7
Page 9
8
LG 5350
SETUP GUIDE FOR WINDOWS 98 AND ME:
DIAL-UP CONNECTION SETTINGS FOR WINDOWS 98
WARNING: DO NOT connect the USB data cable included in the
CellSync Manager to your computer until the software is installed.
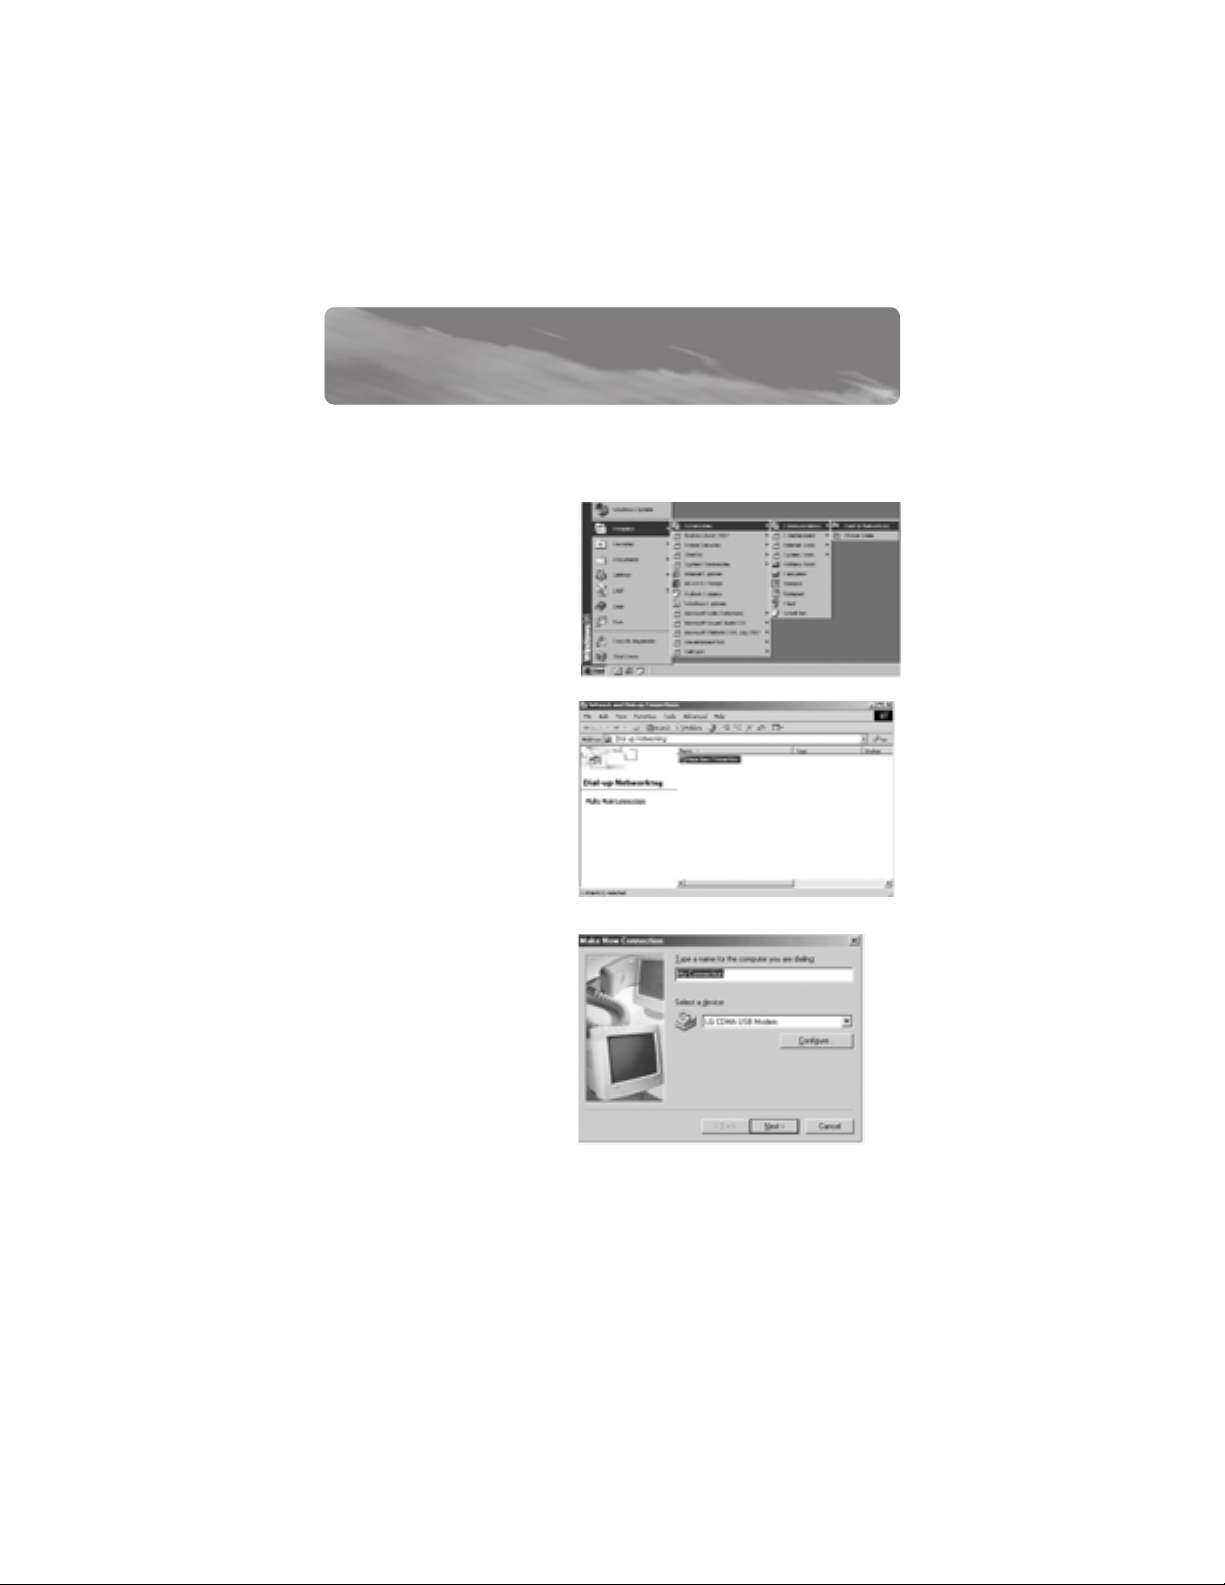
1. Start your dial-up
networking by clicking on
the following: Start,
Programs, Accessories,
Communications, Dial-Up
Networking.
2. In the “Dial-Up
Networking” window,
double-click on
“Make New Connection”.
3. In the “Make New
Connection” window, you
can type a name for the
computer you are dialing
or you can use the default
name of “My Connection”.
“Select a device” should
be the LG CDMA USB
Modem. If it is not
preselected, use the
pull-down menu to select
“LG CDMA USB Modem”
as your device. Select “Next”.
Page 10
LG 5350
SETUP GUIDE FOR WINDOWS 98 AND ME:
DIAL-UP CONNECTION SETTINGS FOR WINDOWS 98
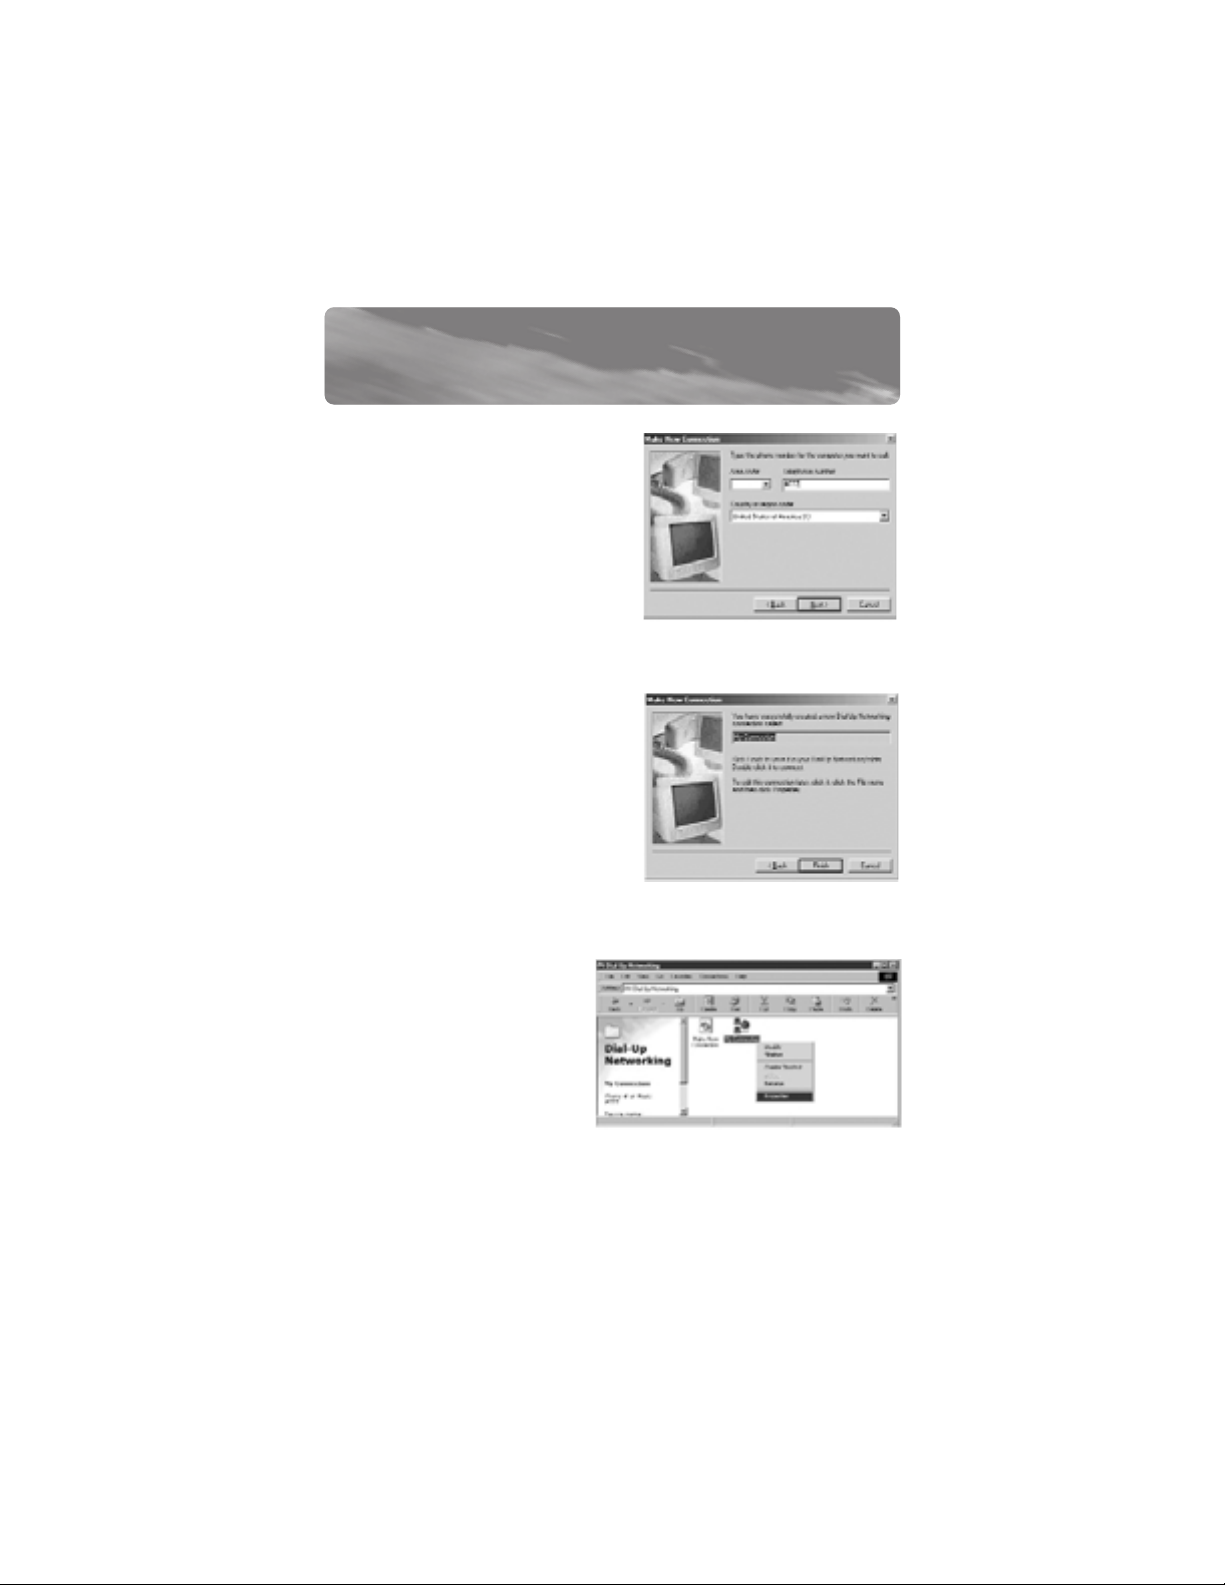
4. In the next “Make New
Connection” window, type in
“#777” in the telephone number
area. You do not need to enter an
area code. The selected country or
region code should be “United
States of America (1)”.
Click “Next”.
5. The last “Make New Connection”
window states that you have
successfully set up your dial-up
connection. Click “Finish”.
6. In the ”Dial-Up Networking”
window, you will see the
new connection that you
made (i.e. My Connection).
Right-click on the new
connection you made and
select “Properties”.
9
Page 11
LG 5350
SETUP GUIDE FOR WINDOWS 98 AND ME:
DIAL-UP CONNECTION SETTINGS FOR WINDOWS 98
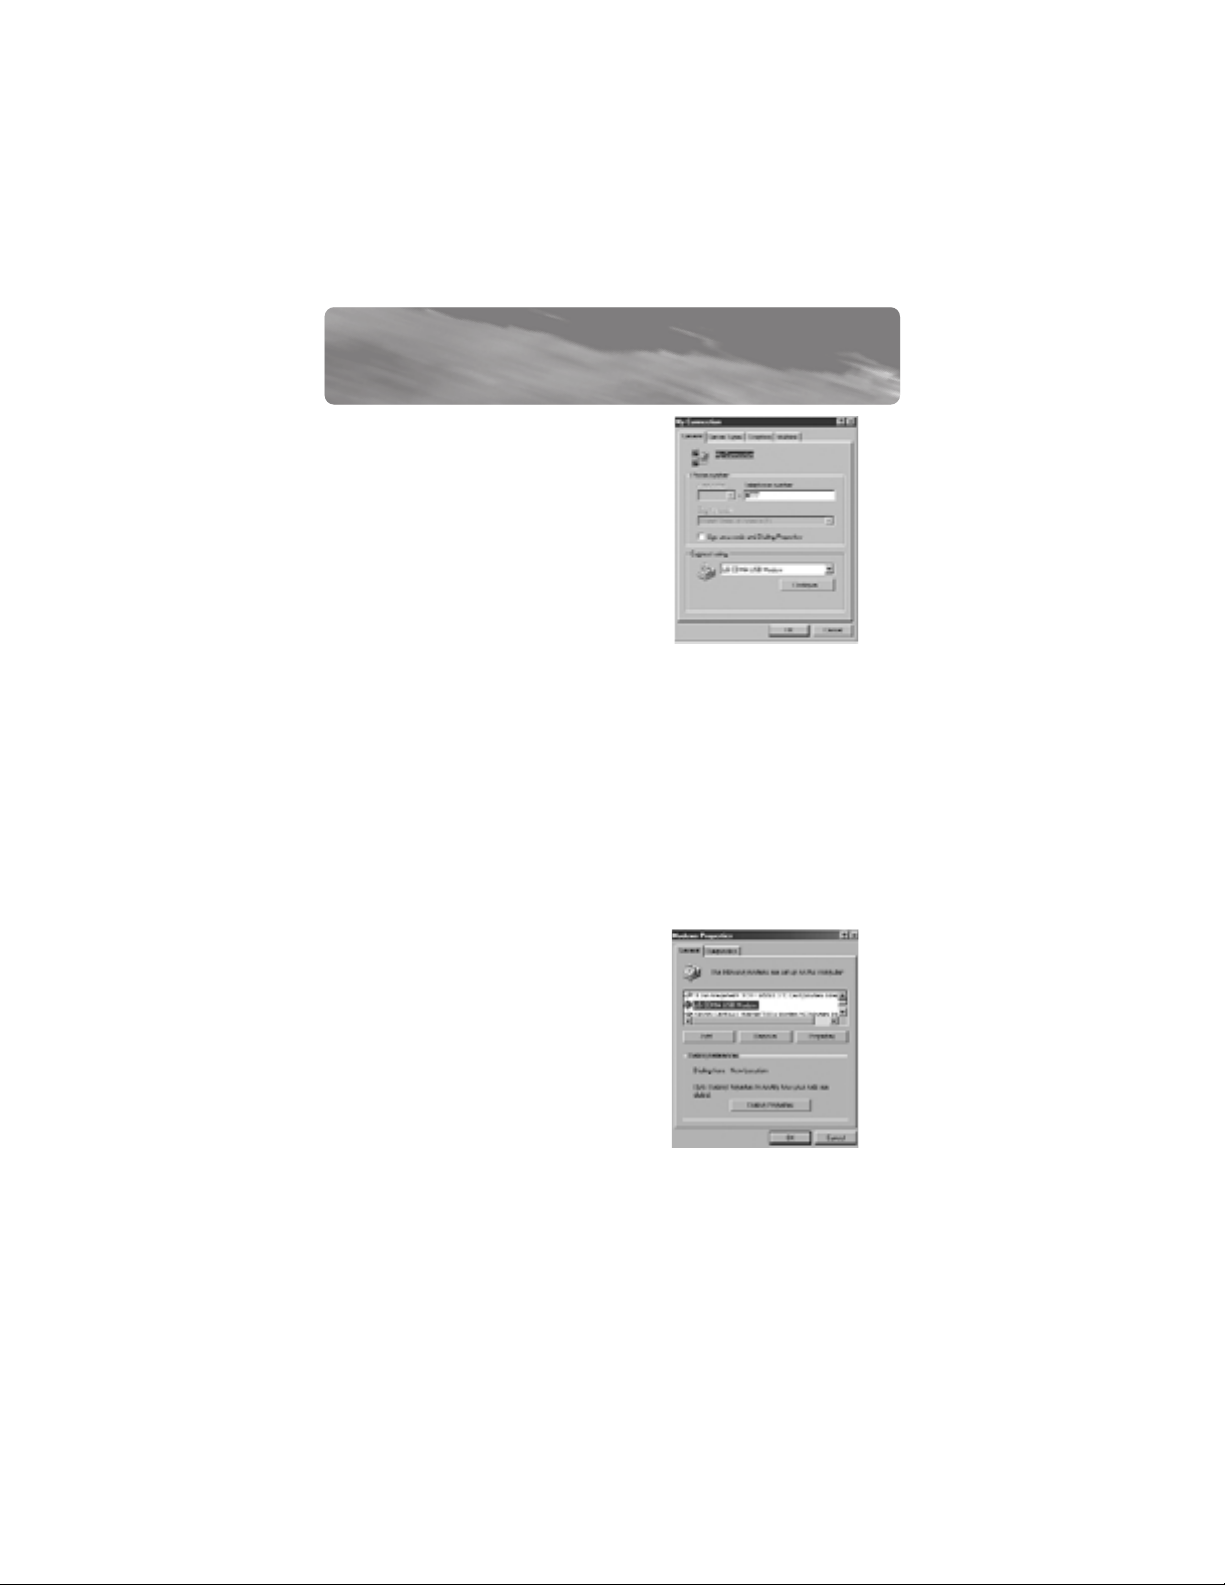
7. In the “Make New Connection”
window, make sure that “Use Area
Code and Dialing Properties” is NOT
selected. Click “OK”.
8. The “Dial-Up Networking” box will appear. Click “Close”.
9. Double-click on the CellSync shortcut icon on the desktop.
10.Select the dial-up button on the interactive phone menu.
11.The CELLCONN window will appear. Click “OK”.
12.Click “OK” on the “Modem Properties”
menu screen.
10
Page 12
LG 5350
SETUP GUIDE FOR WINDOWS 98 AND ME:
DIAL-UP CONNECTION SETTINGS FOR WINDOWS 98
13. In the CellSync menu, choose
“Connect to the Internet”
(globe icon).
14. In the “Connection Entries” field,
you should see the connection
that you set up (i.e. My
Connection). If it is not there, use
the pull-down menu to find your
connection. In the phone number
field, you should see #777. In the
user-name field, enter the user ID
that you received from Sprint (all
user names end with
@sprintpcs.com). Enter the
password that you created online
at www.sprintpcs.com and then click “Connect”.
How to obtain your user name and password:
1. Go to www.sprintpcs.com.
2. Under the “Customer Sign-on” section, click on the
“Sign On” icon.
3. In the customer sign-on window, click “GO” for first-time
signing-on as a PCS Vision customer. Follow the instructions
provided. If you need technical support, call 888-211-4727.
11
Page 13
LG 5350
SETUP GUIDE FOR WINDOWS 98 AND ME:
MODEM SETUP GUIDE FOR WINDOWS ME AND 98
WARNING: DO NOT connect the USB data cable included in
the CellSync Manager to your computer until the software
is installed.
1. Double-click on the CellSync shortcut icon on the desktop.
2. Click the dial-up button on the interactive phone menu.
3. When you select the
dial-up button from the
menu selection screen, the
“CELLCONN” window
appears.
(A “Location Information” menu may appear. Fill in the required
information and close.)
This window informs you that your cell phone is connected to the
COM port and the speed of your phone is 230400bps. (Check the
online setting guide and see below for more information).
12
Page 14

LG 5350
SETUP GUIDE FOR WINDOWS 98 AND ME:
MODEM SETUP GUIDE FOR WINDOWS ME AND 98
Required Settings for LG 5350 Phones
The following settings are required so that your phone operates
properly with the CellSync software. Please make sure the following
settings are made on your LG 5350 phone.
1. Go to “MENU”
2. Select “SETTINGS”
3. Select “SET UP”
4. Select “DATA IN”
5. In the “Data-In” menu, set the following:
Connection: Always
Method: RS-232
Speed: 230400bps
NOTE: You may need to reset the connection to “ALWAYS” after
the phone powers off and on
6. You will then see the
“Phone and Modem
Options” (Modem
Properties) window.
Click “Add” to continue.
(Typically, a list of
modems appears in this
window.)
13
Page 15

LG 5350
SETUP GUIDE FOR WINDOWS 98 AND ME:
MODEM SETUP GUIDE FOR WINDOWS ME AND 98
7. If you are prompted to select
what type of modem you want
to install, select “Other”.
8. You will then see the first
“Install New Modem” window.
Please check the “Don’t detect
my modem” box. Then
click “Next”.
9. You will then see the second
“Install New Modem” window. In
the “Manufacturers” window on
the left, scroll down and select
“LG”. In the “Models” window on
the right, you should see “LG
CDMA USB Modem”. Click “Next”
to continue.
14
Page 16

LG 5350
SETUP GUIDE FOR WINDOWS 98 AND ME:
MODEM SETUP GUIDE FOR WINDOWS ME AND 98
10. You will then see the third
“Install New Modem” window.
After selecting “LG CDMA USB
Modem”, you will have to
select the port that says “USB
to Serial Port” which will be
followed by a COM port
number. (The COM port
number varies based on
your computer.)
11. The fourth “Install New Modem”
window will now indicate that
your modem has been set up
successfully. Click “Finish”.
12. Close the “Modem Properties”
window.
13. Close the “CellSync Dial-Up” menu.
14. A blank phone book edit screen may appear. Close this window.
15. Once you proceed to use the dial-up function, the “Modem
Properties” window may appear. If it does, confirm the LG
modem is present and select “OK”. Proceed to fill in your dial-up
information—you are on your way.
15
Page 17

LG 5350
SETUP GUIDE FOR WINDOWS 98 AND ME:
MODEM SETUP GUIDE FOR WINDOWS ME AND 98
How to obtain your user name and password:
1. Go to www.sprintpcs.com.
2. Under the “Customer Sign-on” section, click on the “Sign On”
icon.
3. In the customer sign-on window, click “GO” for first-time
signing-on as a PCS Vision customer. Follow the instructions
provided. If you need technical support, call 888-211-4727.
NOTE: If you experience problems with Windows Me, refer to the
Dial-Up Connection Settings instructions for Windows 98 and set up
your connection manually.
16
Page 18

LG 5350
SETUP GUIDE FOR WINDOWS 2000 & XP
WARNING: DO NOT connect the USB data cable included in the
CellSync Manager to your computer until the software is installed. For
Windows 2000 and XP, please disregard the Windows “digital
signatures” or “Windows Logo Testing” warning that may appear and
continue with the installation.
1. Connect your mobile phone to your computer with the data cable
provided. Windows will detect new hardware and will
automatically install the Prolific USB-to-serial driver.
NOTE: You may see this dialog box.
If this window appears, type
“C:\Program Files\Belkin\CellSync\
LG USB Drivers 2K” in the “Copy files
from” drop-down box and click “OK”.
If you do not see this window, please
proceed to step 2.
2. Now double-click the CellSync shortcut on your desktop. Click on
the settings (wrench) button on your interactive phone menu.
3. Select your phone model in the
drop-down box next to “Model
Number”. Select “Auto
Configuration” in the drop-down
box next to “COM Port”. Click
“OK”.
*If you don’t know your phone
model number remove the
battery and look at the label on your phone. (By removing the
battery you will not lose phone data.)
17
Page 19

LG 5350
SETUP GUIDE FOR WINDOWS 2000 & XP
You will see this error message
only if your phone is not
connected to your computer.
If you get this message,
connect your phone and then click “OK”.
4. Please be patient. It will take a moment for your computer to
recognize the phone.
5. Click the dial-up button on the phone menu selection screen. If a
Windows logo testing or digital signature notification appears,
ignore it and select “Continue Anyway”.
6. How to obtain your user name and password:
a) Go to www.sprintpcs.com.
b) Under the “Customer Sign-on” section, click on the
“Sign On” icon.
c) In the customer sign-on window, click “GO” for first-time
signing-on as a PCS Vision customer. Follow the instructions
provided. If you need technical support, call 888-211-4727.
7. In the “Connection Entries” field, you need to create a name.
Enter #777 in the phone number field. In the “User Name” field,
enter your user ID that you received from Sprint (all user names
end with @sprintpcs.com). Enter your password that you created
online at www.sprintpcs.com and then click “Connect”.
8. Click on the home button to launch Microsoft Internet Explorer
and surf the Web. If this does not work, double-click on the net
browser shortcut installed on your desktop then try again.
18
Page 20

SANYO SCP-4900
CELLSYNC SOFTWARE INSTALLATION FOR SANYO SCP-4900
WARNING: DO NOT connect the USB data cable included in the
CellSync Manager to your computer until the software is
installed. For Windows 2000 and XP, please disregard the
Windows “digital signatures” or “Windows Logo Testing” warning
that may appear and continue with the installation.
1. Insert the CD-ROM. CellSync setup will automatically prepare
installation. You will then see this welcome dialog box. If it does
not automatically start, click on “My Computer”, select
compact disk, and then
double-click on the “Setup.exe” file.
2. You will then see this welcome dialog box. Click “Next” to
continue.
3. The CellSync License Agreement
dialog box will appear. Read the
license agreement. When you
are done, click “Yes” to
continue.
19
Page 21

SANYO SCP-4900
CELLSYNC SOFTWARE INSTALLATION FOR SANYO SCP-4900
4. The “Select your data cable”
dialog box will appear. You should
have received a cable with your
software based on your phone
model. Select the cable option
that relates to the phone
you’re installing.
5. The “Choose Destination
Location” dialog box will appear.
CellSync will install the files in
the default folder. If you do not
want to use this folder, click
“Browse” to select the folder
where you want to install
CellSync. Click “Next” to continue.
6. The “Setup Status” dialog box
will appear. CellSync will start to
copy all the necessary files. If
you click “Cancel”, you will STOP
the setup process.
NOTE: Digital signature prompts will appear. Please ignore and continue
with installation.
20
Page 22

SANYO SCP-4900
CELLSYNC SOFTWARE INSTALLATION FOR SANYO SCP-4900
7. The “InstallShield Wizard
Complete” dialog box will
appear. If you want to review
the “Read Me” file immediately
after the installation is complete,
check “Display Read Me”. If you
want to launch the CellSync
application immediately after the
installation is complete, check
“Launch CellSync”. Otherwise,
uncheck both and click “Finish” to
complete the installation.
8. For Windows 98 & Me, you will be prompted to restart your
computer. Select “Yes, I want to restart my computer now” and
click “Finish”.
21
Page 23

SANYO SCP-4900
SETUP GUIDE FOR WINDOWS 98, ME, 2000 & XP
WARNING: DO NOT connect the USB data cable included in the
CellSync Manager to your computer until the software is
installed. For Windows 2000 and XP, please disregard the
Windows “digital signatures” or “Windows Logo Testing” warning
that may appear and continue with the installation.
1. Connect your mobile phone to your computer with the data cable
provided. Windows will detect new hardware and will
automatically install the USB-to-serial driver and modem. (In
Windows 2000, a digital signature prompt will appear. Please
ignore and click “Yes” to continue with installation.)
NOTE: You may see this dialog box.
If this window appears, type
“C:\Program Files\Belkin\CellSync\LG
USB Drivers 2K” in the “Copy files
from” drop-down box and click “OK”.
If you do not see this window, please
proceed to step 2.
For Windows 98, Me & 2000, skip to step 4
2. For Windows XP, a “Found New
Hardware Wizard” prompt will
appear. Select “Install the software
automatically (Recommended)” and
click “Next” to continue.
NOTE: A digital signature prompt will appear. Please ignore and click
“Yes” to continue with installation. Please be patient while the
software is installed.
22
Page 24

SANYO SCP-4900
SETUP GUIDE FOR WINDOWS 98, ME, 2000 & XP
3. The “Found New Hardware Wizard” prompt will appear.
Click “Finish”.
NOTE: You will now need to restart your computer in order for the
software to completely install.
4. Now double-click the CellSync
shortcut on your desktop. Click on
the settings (wrench) button on your
interactive phone menu.
5. Select your phone model in the
drop-down box next to “Model
Number”. Select “Auto Configuration”
in the drop-down box next to “COM Port”. Click “OK”.
*If you don’t know your phone model number, remove the battery
and look at the label on your phone. (By removing the battery
you will not lose phone data.)
You will see this error message
only if your phone is not
connected to your computer. If
you get this message, connect
your phone and then click “OK”.
6. Please be patient. It will take a moment for your computer to
recognize the phone.
7. Click the dial-up button on the phone menu selection screen. If a
Windows logo testing or digital signature notification appears,
ignore it and select “Continue Anyway”.
23
Page 25

SANYO SCP-4900
SETUP GUIDE FOR WINDOWS 98, ME, 2000 & XP
8. How to obtain your user name and password:
1. Go to www.sprintpcs.com.
2. Under the “Customer Sign-on” section, click on the
“Sign On” icon.
3. In the customer sign-on window, click “GO” for first-time
signing-on as a PCS Vision customer. Follow the instructions
provided. If you need technical support, call 888-211-4727.
9. In the “Connection Entries” field, you need to create a name.
Enter #777 in the phone number field. In the “User Name” field,
enter the user ID that you received from Sprint (all user names
end with @sprintpcs.com). Enter your password that you created
online at www.sprintpcs.com and then click “Connect”.
10. Click on the home button to launch Microsoft Internet Explorer
and surf the Web. If this does not work, double-click on the net
browser shortcut installed on your desktop then try again.
24
Page 26

UNINSTALL INSTRUCTIONS
UNINSTALL MODEM FOR WINDOWS 98 & ME
NOTE: 1. Uninstall your modem and driver FIRST for your specific OS.
2. Uninstall the CellSync software last.
1. To uninstall the LG or Sanyo
modem on your computer, click
on the “Start” button on the
bottom left-hand corner of the
screen. Select “Settings”,
followed by “Control Panel”.
2. Click on the “Modems” icon in
the Control Panel folder.
3. Select either “LG CDMA USB Modem” or “SANYO USB Phone” and
click on the “Remove” button in the dialog box to remove the
selected modem from your computer.
25
Page 27

The USB cable must be plugged in before trying to uninstall
the driver.
1. Right-click on the “My
Computer” icon on your
Windows desktop and select
the “Properties” option.
2. The “System Properties” dialog
box should pop up.
3. Select the “Device Manager” tab
on the top of the dialog box
and the following screen should
appear.
26
UNINSTALL INSTRUCTIONS
UNINSTALL DRIVER FOR WINDOWS 98 & ME
Page 28

UNINSTALL INSTRUCTIONS
UNINSTALL DRIVER FOR WINDOWS 98 & ME
For Sanyo SCP-4900, skip to step 6.
4. Click on the “+” sign next to the “Ports
(COM & LPT)” description and a list of
devices should appear like the current
screen. Highlight the “USB to Serial”
device listed under the “Ports” option
and click on the “Remove” button.
LG
5. You will receive a confirmation
dialog box like the current screen.
Click “OK” to confirm that you would
like to uninstall the driver.
LG
27
Page 29

UNINSTALL INSTRUCTIONS
UNINSTALL DRIVER FOR WINDOWS 98 & ME
6. In the same window, click on the “+” next to “Universal Serial
Bus controllers” and another list of devices will appear. Highlight
the “Prolific USB-to-Serial” for LG 5350 or “Sanyo Electric Co.
Ltd” for Sanyo 4900. Click on “Remove” to uninstall the driver.
LG Sanyo
7. You will receive another confirmation dialog box asking you if
you would like to remove this device. Click “OK”.
LG Sanyo
28
Page 30

UNINSTALL INSTRUCTIONS
UNINSTALL MODEM FOR WINDOWS 2000 & XP
1. To uninstall the LG or Sanyo
modem on your computer,
click on “Start” at the bottom
left-hand corner of your
screen. Select “Settings”,
followed by “Control Panel”.
2. Click on the “Phone and
Modem Options” icon in the
Control Panel folder.
3. A new dialog box will pop up
with the “Dialog Rules” tab
selected.
29
Page 31

UNINSTALL INSTRUCTIONS
UNINSTALL MODEM FOR WINDOWS 2000 & XP
4. Click on the “Modems” tab in the dialog box and select either the
“LG CDMA USB Modem” or the “SANYO USB Phone”. Once you have
highlighted your choice, click on “Remove” at the bottom of the
dialog box.
5. Click on “Yes” to confirm that
you would like to remove the
selected modem from
your computer.
NOTE: For Sanyo, the driver will be removed along with the modem.
30
Page 32

The USB cable must be plugged in before trying to uninstall
the driver.
1. Right-click on the “My Computer”
icon located on your Windows
desktop. Select “Properties”.
2. The “System Properties” dialog
box should pop up.
3. Click the ”Hardware” tab on the
top of the dialog box. The
following screen should appear.
31
UNINSTALL INSTRUCTIONS
UNINSTALL LG DRIVER FOR WINDOWS 2000
31
Page 33

UNINSTALL INSTRUCTIONS
UNINSTALL LG DRIVER FOR WINDOWS 2000
4. Click on the “Device Manager”
button in the middle of the
dialog box and the following
screen should appear.
5. Right-click on the “+” icon next
to the “Ports (COM & LPT)” text
and a list of devices will appear
under the “Ports” option.
6. Right-click on the “Prolific
USB-to-Serial Comm Port” device
and select “Uninstall”.
7. Once you select “Uninstall”, you
will get the following
confirmation dialog box asking
to confirm that you wish to
uninstall the device. Click “OK”.
32
Page 34

UNINSTALL INSTRUCTIONS
UNINSTALL LG/SANYO DRIVER FOR WINDOWS XP
1. Click on “Start” at the bottom
left-hand corner of your screen.
Select “Control Panel”.
2. This will pop up the “Control
Panel” window. Click on the
“System” icon inside the
window.
3. This will pop up the “System
Properties” dialog box. Now,
click on the “Hardware” tab at
the top of the dialog box.
33
Page 35

UNINSTALL INSTRUCTIONS
UNINSTALL LG/SANYO DRIVER FOR WINDOWS XP
4. Next, click on the “Device
Manager” button in the middle
of the dialog box.
5. This should bring up the
“Device Manager” window.
Click on the “+” icon next to
“Ports (COM & LPT)”. A list of
devices should appear.
6.1. For LG
Right-click on the “Prolific
USB-to-Serial Comm Port”
device and select “Uninstall” to
uninstall the driver.
34
Page 36

UNINSTALL INSTRUCTIONS
UNINSTALL LG/SANYO DRIVER FOR WINDOWS XP
6.2. For Sanyo
Now go back to the “Device
Manager” window and click on
the “+” icon next to the
“Universal Serial Bus controllers”
option and another list of
devices should appear.
Right-click on the “Sanyo USB
Composite Device” and select
“Uninstall” to uninstall
the driver.
7.1. For LG
A confirmation dialog box will
pop up, asking if you would like
to uninstall the driver. Click
“OK” to confirm that you would
like to delete the device.
Right-click on the “Prolific
USB-to-Serial Comm Port”
device and select “Uninstall” to
uninstall the driver.
7.2. For Sanyo
A confirmation dialog box will
pop up, asking if you would like
to uninstall the driver. Click “OK”
to confirm that you would like
to delete the driver.
35
Page 37

UNINSTALL INSTRUCTIONS
CELLSYNC UNINSTALL GUIDE
1. To begin uninstalling of CellSync,
click on the “Start” button on the
bottom left-hand corner of the
screen and select the “Settings”
option, followed by the “Control
Panel” option.
2. Select the “Add/Remove
Programs” option in the
“Control Panel” folder.
3. You will see the InstallShield
Wizard begin loading. Please
wait for the loading process to
finish. This will automatically
guide you to the next screen.
4.1. For Windows 98 and Me
Select “CellSync” and click on
“Add/Remove” at the bottom
of the dialog box.
36
Page 38

UNINSTALL INSTRUCTIONS
CELLSYNC UNINSTALL GUIDE
4.2. For Windows 2000
Select “CellSync” in the pop-up
window and click on the
“Change/Remove” button on
the right side of the
CellSync caption.
5. Select “Remove” on the
bottom of the dialog box and
click “Next”.
6. Click “OK” to confirm that
you would like to uninstall
CellSync from your computer.
7. Wait while CellSync uninstalls
from your computer.
37
Page 39

UNINSTALL INSTRUCTIONS
CELLSYNC UNINSTALL GUIDE
8. Click “Finish” to complete the
uninstallation of CellSync.
38
Page 40

HELPFUL HINTS
1. Make sure the data cable is NOT plugged in until CellSync
software is installed.
2. Disregard any signature screens by clicking “OK”.
3. Make sure your phone has been set up to be Web-enable. If not,
please contact Sprint PCS.
4. LG phones will turn off and on when the read and write function
is being used. For LG 5350 phones, make sure that your phone
settings are correct.
• Connection: Always (This will change every time you power
the phone off and on.)
• Method: RS-232 (com port)
• Port Speed: 230400bps
Refer to the installation guide for Windows 98 and Me for further
instructions.
5. If you get a communication error, check to see if your phone is
connected to the computer with the data cable provided and that
your phone is powered on.
6. You must obtain your user name and password before using the
CellSync Manager.
7. For the Sanyo SCP-4900, a “Service Required” message will appear
on your phone while syncing or connecting to the Internet.
Please ignore.
How to obtain your user name and password:
1. Go to www.sprintpcs.com.
2. Under the “Customer Sign-on” section, click on the
“Sign On” icon.
3. In the “Customer Sign-on” window, click on the “GO” button for
first-time signing-on as a PCS Vision customer. Follow the
instructions provided. If you need help, call 888-211-4727.
39
Page 41

INFORMATION
40
Belkin Corporation Limited Lifetime Product Warranty
Belkin Corporation warrants this product against defects in materials and workmanship for its
lifetime. If a defect is discovered, Belkin will, at its option, repair or replace the product at no
charge provided it is returned during the warranty period, with transportation charges prepaid, to
the authorized Belkin dealer from whom you purchased the product. Proof of purchase may be
required.
This warranty does not apply if the product has been damaged by accident, abuse, misuse, or
misapplication; if the product has been modified without the written permission of Belkin; or if
any Belkin serial number has been removed or defaced.
THE WARRANTY AND REMEDIES SET FORTH ABOVE ARE EXCLUSIVE IN LIEU OF ALL OTHERS,
WHETHER ORAL OR WRITTEN, EXPRESSED OR IMPLIED. BELKIN SPECIFICALLY DISCLAIMS ANY AND
ALL IMPLIED WARRANTIES, INCLUDING, WITHOUT LIMITATION, WARRANTIES OF MERCHANTABILITY
AND FITNESS FOR A PARTICULAR PURPOSE.
No Belkin dealer, agent, or employee is authorized to make any modification, extension, or
addition to this warranty.
BELKIN IS NOT RESPONSIBLE FOR SPECIAL, INCIDENTAL, OR CONSEQUENTIAL DAMAGES RESULTING
FROM ANY BREACH OF WARRANTY, OR UNDER ANY OTHER LEGAL THEORY, INCLUDING BUT NOT
LIMITED TO LOST PROFITS, DOWNTIME, GOODWILL, DAMAGE TO OR REPROGRAMMING, OR
REPRODUCING ANY PROGRAM OR DATA STORED IN OR USED WITH BELKIN PRODUCTS.
Some states do not allow the exclusion or limitation of incidental or consequential damages or
exclusions of implied warranties, so the above limitations of exclusions may not apply to you.This
warranty gives you specific legal rights, and you may also have other rights that vary from state
to state.
Page 42

Belkin Corporation
501 West Walnut Street
Compton • CA • 90220 • USA
Tel: 310.898.1100
Fax: 310.898.1111
Belkin Components, Ltd.
Express Business Park
Shipton Way • Rushden • NN10 6GL
United Kingdom
Tel: +44 (0) 1933 35 2000
Fax: +44 (0) 1933 31 2000
Belkin Components B.V.
Starparc Building • Boeing Avenue 333
1119 PH Schiphol-Rijk • The Netherlands
Tel: +31 (0) 20 654 7300
Fax: +31 (0) 20 654 7349
Belkin Components, Ltd.
7 Bowen Crescent • West Gosford
NSW 2250 • Australia
Tel: +61 (0) 2 4372 8600
Fax: +61 (0) 2 4372 8603
Tech Support
US: 310.898.1100 ext. 2263
800.223.5546 ext. 2263
Europe: 00 800 223 55 460
Australia: 1800 666 040
© 2002 Belkin Corporation. All rights reserved.
Belkin is not an authorized distributor of LG or Sanyo products.
P74196
belkin.com
 Loading...