

Page 1
Belkin Corporation
501 West Walnut Street
Compton • CA • 90220 • USA
Tel: 310.898.1100
Fax: 310.898.1111
Belkin Components,Ltd.
Express Business Park • Shipton Way
Rushden • NN10 6GL • United Kingdom
Tel: +44 (0) 1933 35 2000
Fax: +44 (0) 1933 31 2000
Belkin Components B.V.
Starparc Building • Boeing Avenue 333
1119 PH Schiphol-Rijk • The Netherlands
Tel: +31 (0) 20 654 7300
Fax: +31 (0) 20 654 7349
Belkin, Ltd.
7 Bowen Crescent • West Gosford
NSW 2250 • Australia
Tel: +61 (0) 2 4372 8600
Fax: +61 (0) 2 4372 8603
Tec h Su ppo rt
US: 310.898.1100 ext.2263
800.223.5546 ext. 2263
Europe: 00 800 223 55 460
Australia: 1800 666 040
© 2004 Belkin Corporation. All rights reserved.All trade names are registered
trademarks of
respective manufac turers listed. iTunes is a trademark of Apple Computer, Inc.,
registered in the U.S. and other countries.iPod is a trademark of Apple Computer, Inc.
P74465
belkin.com
Universal Microphone Adapter
Let your iPod™double as a digital recorder
` User Guide
F8E478
Belkin Corporation Limited Lifetime Product Warranty
Belkin Corporation warrants this product against defects in materials and
workmanship for its lifetime. If a defect is discovered, Belkin will, at its
option, repair or replace the product at no charge provided it is returned
during the warranty period, with transportation charges prepaid, to the
authorized Belkin dealer from whom you purchased the product. Proof of
purchase may be required.This warranty does not apply if the product has
been damaged by accident, abuse, misuse,or misapplication; if the product
has been modified without the written permission of Belkin; or if any
Belkin serial number has been removed or defaced.
THE WARRANTY AND REMEDIES SET FORTH ABOVE ARE EXCLUSIVE IN LIEU
OF ALL OTHERS,WHETHER ORAL OR WRITTEN, EXPRESSED OR IMPLIED.
BELKIN SPECIFICALLY DISCLAIMS ANY AND ALL IMPLIED WARRANTIES,
INCLUDING,WITHOUT LIMITATION,WARRANTIES OF MERCHANTABILITY
AND FITNESS FOR A PARTICULAR PURPOSE.
No Belkin dealer, agent, or employee is authorized to make any
modification, extension,or addition to this warranty.
BELKIN IS NOT RESPONSIBLE FOR SPECIAL, INCIDENTAL, OR
CONSE QUENTIAL DAMAGES RESULTING FROM ANY BREACH OF
WAR RAN TY, OR ANY OTHER LEGAL THEORY, INCLUDING BUT NOT LIMITED
TO, LOST PROFITS, DOWNTIME, GOODWILL, DAMAGE TO OR
REPROGRAMMING OR REPRODUCING, ANY PROGRAM OR DATA STORED IN
OR USED WITH BELKIN PRODUCTS.
Some states do not allow the exclusion or limitation of incidental or
consequential damages or exclusion of implied warranties, so the above
limitations or exclusions may not apply to you.This warranty gives you
specific legal rights, and you may also have other rights that vary from
state to state.
FCC Statement
DECLARATION OF CONFORMITY WITH FCC RULES FOR ELECTROMAGNETIC
COMPATIBILITY
We,Belkin Corporation,of 501 West Walnut Street, Compton, CA 90220,
declare under our sole responsibility that the product:
F8E478
to which this declaration relates:
Complies with Part 15 of the FCC Rules. Operation is subject to the following
two conditions: (1) this device may not cause harmful interference, and (2)
this device must accept any interference received,including interference
that may cause undesired operation.
CE Declaration of Conformity
We,Belkin Corporation, declare under our sole responsibility that the
product F8E478, to which this declaration relates, is in conformity with
Emissions Standard EN55022 and with Immunity Standard EN55024, LVP
EN61000-3-2, and EN61000-3-3.
ICES
This Class B digital apparatus complies with Canadian ICES-003. Cet appareil
numérique de la classe B est conforme á la norme NMB-003 du Canada.
Page 2
Congratulations and thank you for purchasing this innovative
product from Belkin mobility. Please review this manual carefully
in order to get the best performance from your Universal
Microphone Adapter.
Setup Instructions
To r e cord:
1. Connect the Microphone Adapter to the iPod and a microphone
to the 3.5mm mono-audio plug on the Adapter.The iPod will
launch the “record”application when you do this. With the
“Record” option highlighted, press “Play/Pause”or press the
“Select” button to begin recording.To pause recording, press
“Play/Pause”again or highlight “Pause”and then press the
“Select” button on the iPod.
2. During recording,there are two options:“Pause” and “Stop and
Save”.To end a recording, either press the “Menu” button or
highlight the “Stop and Save” option,and then press the “Select”
button.This saves your recording and lists it by date and
time recorded.
3. To begi n another recording, go to the top of the “Voice Memos”
menu and select “Record Now”; or, from the iPod menu select
“Extras > Voice Memos > Record Now”.
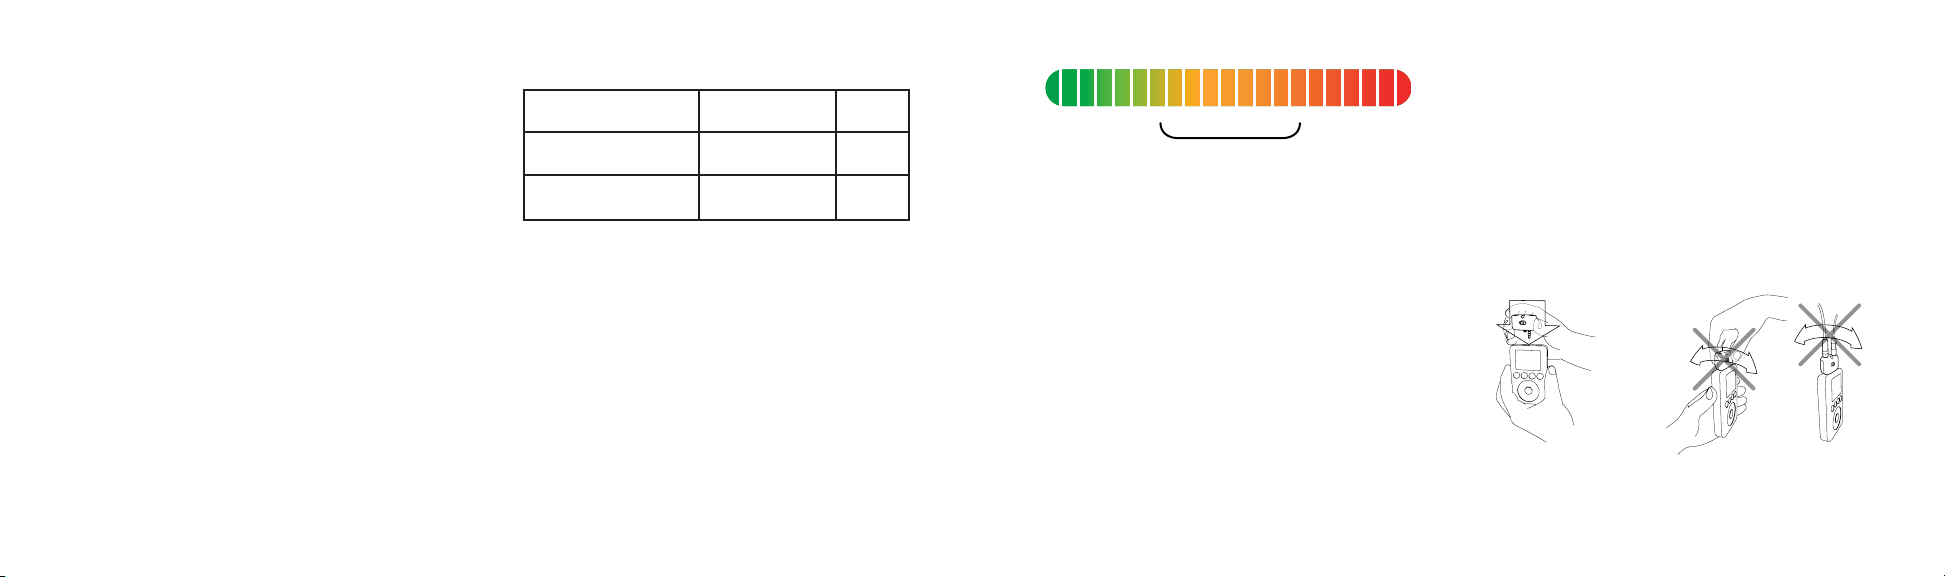
3-Level Gain Switch
The Microphone Adapter includes a three-level gain switch
intended to optimize the quality of your recorded audio.“Low
gain”is activated by moving the switch to the left of the setting
bar.“Medium gain” is activated by moving the switch to the center
setting in the setting bar.“High gain”is activated by moving the
switch to the right of the setting bar.
Please refer to the following to determine the best setting to
select while recording:
2-Color Recording LED Indicator
The Belkin Universal Microphone Adapter features an LED to
help you make the best possible sounding recordings.* You
will need to determine the correct setting for the gain switch,
which is located on the front of the Universal Microphone
Adapter.This LED helps determine if the gain switch is set
correctly in conjunction with your microphone. A green LED
indicates that the iPod is recording.The LED will begin to turn
red as the peaks of the recording increase.The LED will
become bright red when the sound level is exceeding the
normal range of recording.
Audio that is recorded while the LED is red most of the time is
very likely to produce distorted sound on playback. If you see
that the LED is red constantly while you are recording,set the
gain switch to the next lower setting or move the microphone
further away from the source. At the optimum recording level,
the LED
For normal voice Use low gain
dictation or high volume
For conversation Use medium gain
and conference
For lecture hall Use high gain
or low volume
should be mostly green and should start to turn red only during
the peaks of the recording.
It is advisable to perform a quick sound check and playback
before making longer recordings to ensure that you are using the
most appropriate setting.
*Recording quality is dependent on the type of microphone used.
NOTE: iPod creates audio files in mono (true) WAV format.
Records at the iPod rate of 16-bit audio at 8kHz.
To p lay back a recording:
Connect headphones or portable speakers to the 3.5mm audio
out jack on the Adapter.
From the iPod menu, select “Extras > Voice Memos”.Select a
recording from the list and either press the “Play/Pause” button or
select the “Play” option from the user interface.
To t ran sfer recordings to your computer:
You r iPo d must be enabled for use as a hard disk. Connect the iPod
to your computer and open the application you use to listen to
audio.Through the My Computer menu, double-click the
removable drive that represents the iPod.Double-click on the
“Recordings”folder.Double-click on a specific audio (WAV format)
file to listen to the recording.
NOTE:You can play your files directly from the iPod and/or transfer
recordings to your computer by opening this folder and dragging the
audio files to the desktop.
To t ran sfer recordings using iTunes®:
Connect the iPod to your computer.Wait a few seconds while
iTunes recognizes the iPod device. Once the device is recognized,
iTunes will launch (it does this automatically).You will be asked if
you would like to copy your voice memos to your music library.
Select “Yes” or “No” to proceed. If you select “Yes”,all voice memos
will be copied to your iTunes Music Library. A default “Voice
Memos”folder,in which all voice memos will be stored, will be
created in your iPod source list.
To l oca te re cordings on the iPod after syncing with iTunes:
Disconnect the iPod from the computer.
Select “Playlists > Voice Memos”.
Insert the Microphone
Adapter into the iPod’s
remote connector.
To avoid damage to the
connector,do not move the
Microphone Adapter from front
to back in the receptacle.
too low optimum level too high
 Loading...