

Page 1

TuneDok for iPod
™
Take your iPod ex perience on the road
Belkin Corporation
501 West Walnut Street
Compton • CA • 90220 • USA
Tel: 310.898.1100
Fax:310.898.1111
Belkin Components,Ltd.
Express Business Park • Shipton Way
Rushden • NN10 6GL • United Kingdom
Tel: +44 (0) 1933 35 2000
Fax: +44 (0) 1933 31 2000
Belkin Components B.V.
Starparc Building • Boeing Avenue 333
1119 PH Schiphol-Rijk • The Netherlands
Tel: +31 (0) 20 654 7300
Fax: +31 (0) 20 654 7349
Belkin,Ltd.
7 Bowen Crescent • West Gosford
NSW 2250 • Australia
Tel: +61 (0) 2 4372 8600
Fax: +61 (0) 2 4372 8603
Tech Sup port
US:310.898.1100 ext.2263
800.223.5546 ext.2263
Europe:00 800 223 55 460
Australia: 1800 666 040
© 2003 Belkin Corporation.All rights reserved.All trade names are registered trademarks
of respective manufacturers listed.iPod is a trademark of Apple Computer,Inc.
P74388-A
User Guide
F8E467
belkin.com
Belkin Corporation Limited Lifetime Product Warranty
Belkin Corporation warrants this product against defects in materials and workmanship
for its lifetime.If a defect is discovered, B elkin will, at its option,repair or replace the
product at no charge provided it is returned during the warranty period, with
transportation charges prepaid,to the authorized Belkin dealer from whom you
purchased the product.Proof of purchase may be required.This warranty does not apply
if the product has been damaged by accident,abuse,misuse,or misapplication;if the
product has been modified without the written permission of Belkin;or if any Belkin
serial number has been removed or defaced.
THE WARRANTY AND REMEDIES SET FORTH ABOVE ARE EXCLUSIVE IN LIEU OF ALL
OTHERS,WHETHER ORAL OR WRITTEN,EXPRESSED OR IMPLIED.BELKIN SPECIFICALLY
DISCLAIMS ANY AND ALL IMPLIED WARRANTIES,INCLUDING,WITHOUT LIMITATION,
WARRANTIES OF MERCHANTABILITY AND FITNESS FOR A PARTICULAR PURPOSE.
No Belkin dealer, agent, or employee is authorized to make any modification, extension,
or addition to this warranty.
BELKIN IS NOT RESPONSIBLE FOR SPECIAL,INCIDENTAL,OR CONSEQUENTIAL DAMAGES
RESULTING FROM ANY BREACH OF WARRANTY,OR ANY OTHER LEGAL THEORY,
INCLUDING BUT NOT LIMITED TO, LOST PROFITS,DOWNTIME, GOODWILL, DAMAGE TO
OR REPROGRAMMING OR REPRODUCING,ANY PROGRAM OR DATA STORED IN OR USED
WITH BELKIN PRODUCTS
.
Some states do not allow the exclusion or limitation of incidental or consequential
damages or exclusion of implied warranties,so the above limitations or exclusions may
not apply to you.This warranty gives you specific legal rights, and you may also have
other rights that vary from state to state
.
Large Rubber Base
For la r ge-diameter
cup holder
Small Rubber Base
For smaller-diameter
cup holders
Small Rubber Base
with Adapter Cup
For VW Jetta and Golf
expanding cup holders
3 Options:
Page 2
How to Set Up the TuneDok
For VW Jetta and Golf automobiles:
1. Insert the TuneDok’s flexible cup into the small,rigid cup.
2. Push the three snaps through the corresponding holes in the bottom of the flexible
cup.Make sure the two are firmly connected.
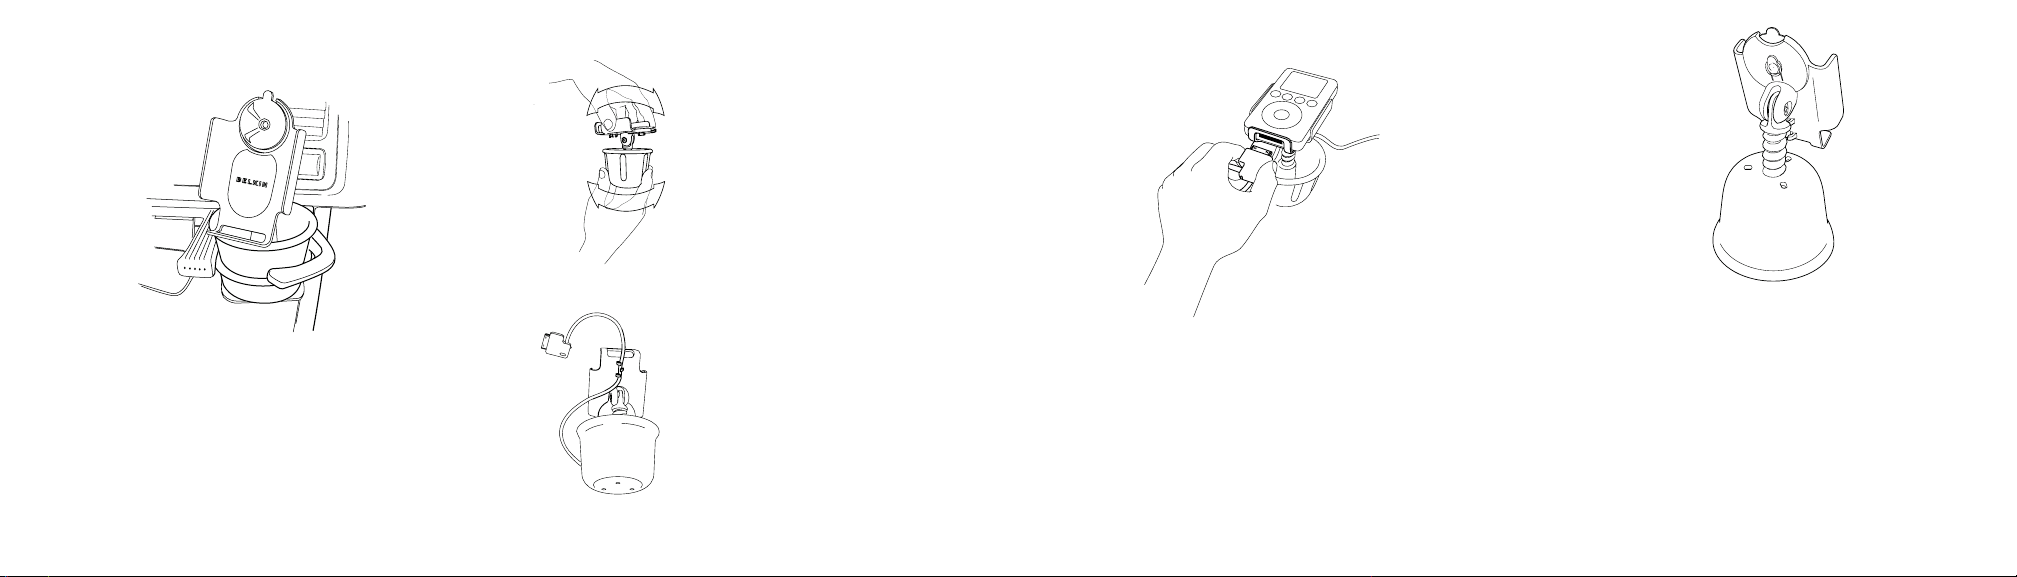
3. Insert the TuneDok cups into your car’s cup holder.Ensure that the arm of the cup
holder rests on top of the smaller cup’s rim (Fig. 1).The smaller cup keeps your
TuneDok fir mly in place.
To adjust the position of the iPod cradle:
1. Hold the TuneDok’s flexible cup in one hand, and
the iPod cradle in the other.
2. Twist the cradle clockwise to lower it,or
counterclockwise to raise it (Fig.2).Do not raise the
cradle above the red line that’s printed on the
TuneDok’s stem,as it will make the TuneDok unstable.
3. Place the TuneDok into your car’s cup holder.
4. Turn the iPod cradle toward you and make sure that
its position allows you to see and reach your iPod
comfortably; adjust if necessary.
To attach the cable of the Belkin Auto Kit:
1. Turn the TuneDok upside down.
2. On the underside,toward the front of the iPod
cradle,you’ll find a cable snap.
3. Thread the Auto Kit cable through here so it stays
in place when you take your iPod out of the
TuneDok (Fig.3).
To insert the iPod into the TuneDok:
1. Make sure the suction cup is clear of dust or dirt.If necessary,wipe it with a damp cloth.
2. Take off anything that may be connected to the dock connector.
3. Lay the dock connector end of the iPod into the bottom of the iPod cradle and gently
push the iPod onto the suction cup.
4. Insert the Auto Kit connector into the dock connector of the iPod through the iPod
cradle’s bottom opening (Fig. 4).
For safety,always make sure that the TuneDok is securely resting inside your car’s
cup holder.
Fig. 1
Fig. 2
Fig. 3
Fig. 4
To use Tu neDok as a desk stand:
1. Hold the cradle firmly in one hand,and the rubber base in the other. Completely
unscrew the Holder from the rubber cup.
2. Flip the base upside down.
3. Insert the screw into the opening on the bottom of the base,and twist clockwise.Make
sure to turn the screw until the red marker is fully inserted into the base.
4. Adjust the height and angle to your liking.
Fig. 5
 Loading...