


Wi-Fi® HD Camera with Night Vision
User Manual
F7D7602V2 • 8820xx01325yy Rev. C00
ENGLISH

TABLE OF CONTENTS
Getting Started ...........................................1
What’s in the Box .............................................1
Initial Setup.................................................. 1
Set Up Your Camera Wirelessly Through Your Mobile Devices ...... 2
GETTING TO KNOW YOUR Wi-Fi CAMERA ..................19
Front Panel .................................................19
Back Panel .................................................20
Technical Details ........................................21
Software Features and Specifications .......................... 21
App on iOS or Android .......................................21
Main Window ...............................................23
Protection ..................................................25
Web Browser ...............................................25
NetCam Cloud + ............................................26
How to activate the Cloud + free trial ...........................26
System Requirements........................................ 32
Resetting the Camera........................................ 32
Troubleshooting, Support, and Warranty ...................33
Belkin International, Inc., Limited 2-Year Product Warranty......... 38
How to get service. ..........................................39
Regulatory Information ...................................41
Technical Support ...........................................41
Declaration of Conformity with electromagnetic compatibility and
electromagnetic interference ..................................42
Europe – EU Declaration of Conformity .........................43
General Safety Information: ...................................43

GETTING STARTED
Congratulations on buying a Belkin NetCam HD.
This device will enable you to easily check in on
your home and your loved ones when you are away.
What’s in the Box
NetCam HD+
Power Supply
Quick Installation Guide
Mounting Kit
Initial Setup
To get started, you will need:
Your wireless router, its network name (SSID), and password.
An Android™ device (Version 2.3 or later) or an iPhone,
iPad, or iPod touch (iOS Version 5.0 or later).
1
GETTING STARTED
Set Up Your Camera Wirelessly
Through Your Mobile Devices
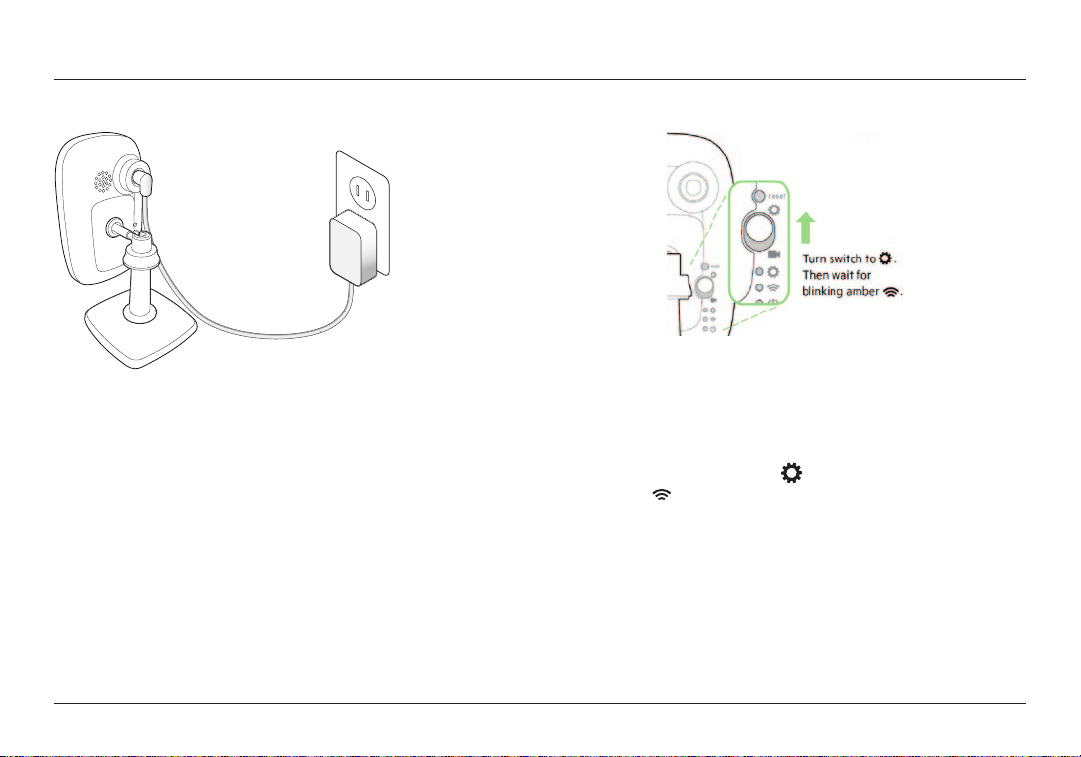
1. Plug the NetCam into a power outlet
2. Switch the NetCam to Setup Mode by flipping
up the switch on the back of the camera
Please make sure the switch is in
mode and the
Wi-Fi light is blinking.
setup
2
GETTING STARTED
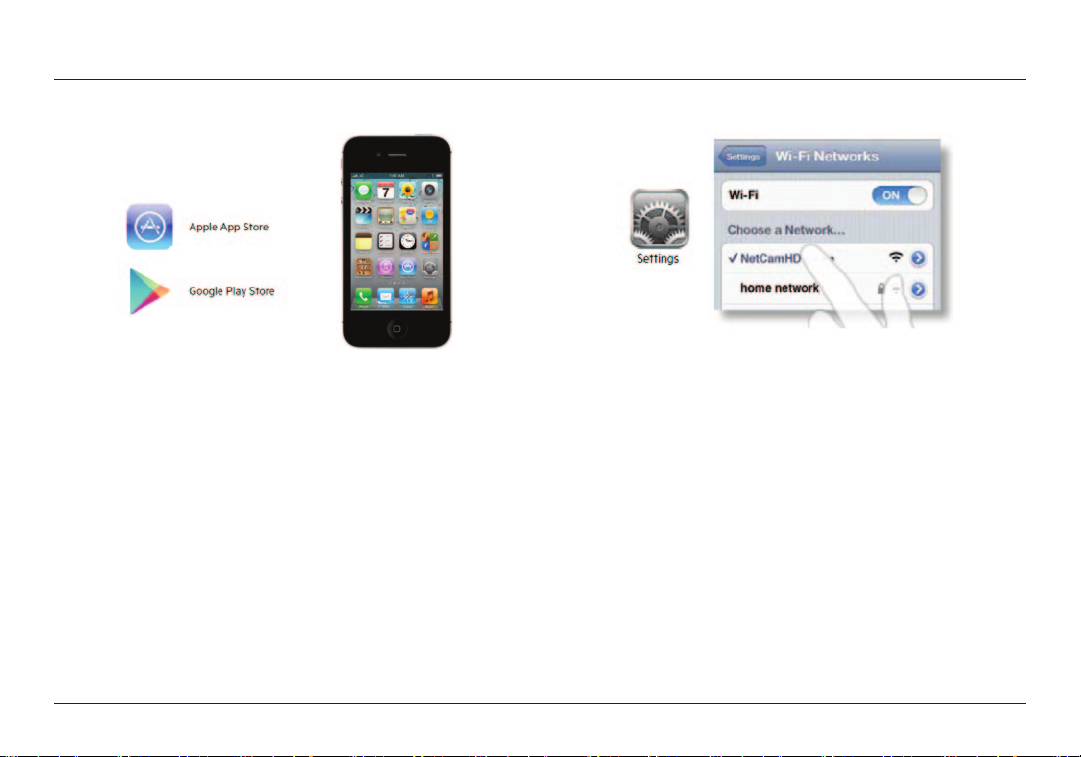
3. Download the latest Belkin NetCam app or update to the latest version.
Note: When download is complete, don’t open the app yet. Please proceed
to step 4.
4. Set Up on iPhone, iPad, or iPod touch
4.1 Connect your mobile device to NetCam Wi-Fi signal
Go to “Settings > Wi-Fi” on your iPhone/iPad/iPod touch and connect
to the camera’s Wi-Fi signal.
Move to next step only after connection is c onfirmed.
3
GETTING STARTED
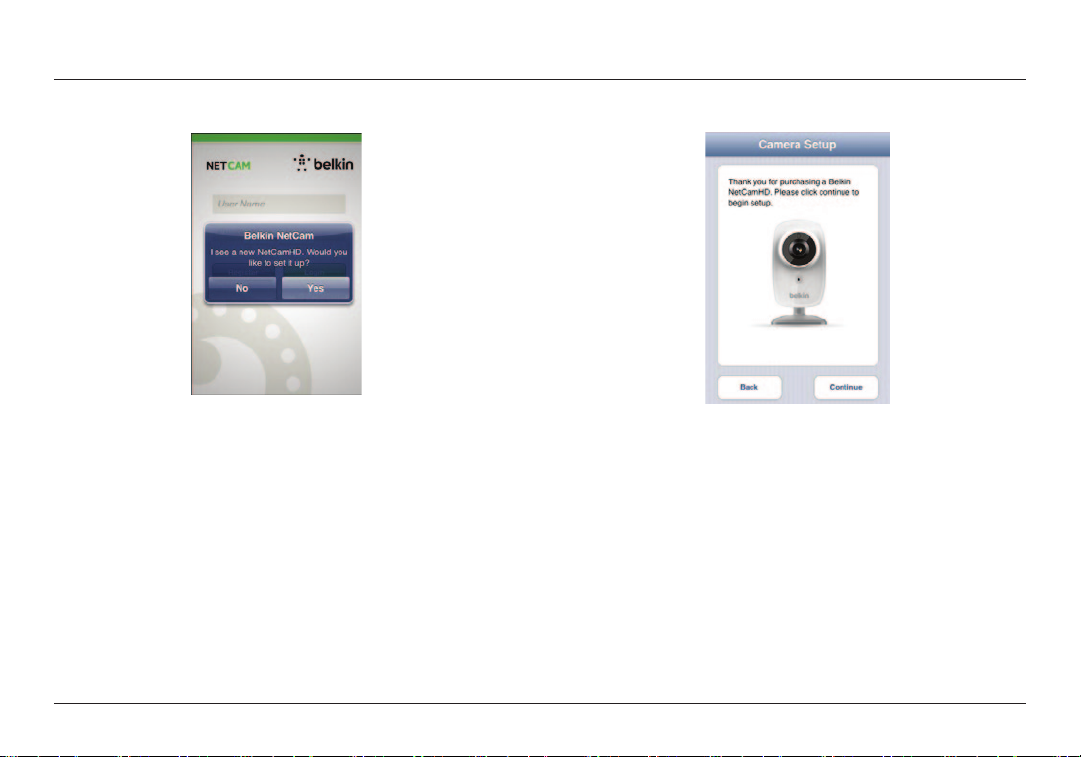
4.2 Launch the NetCam App
Once your device establishes a connection with the camera, launch
the NetCam App. You should see a pop-up message like the one
below. Click “Yes” to set up your camera. If you don’t see the
pop-up, you are not connected to the NetCam HD+ Wi-Fi signal.
Repeat step 4.1 and wait for confirmation of the connection.
4.3 Camera Setup
Click “Continue” to begin setup.
4
GETTING STARTED
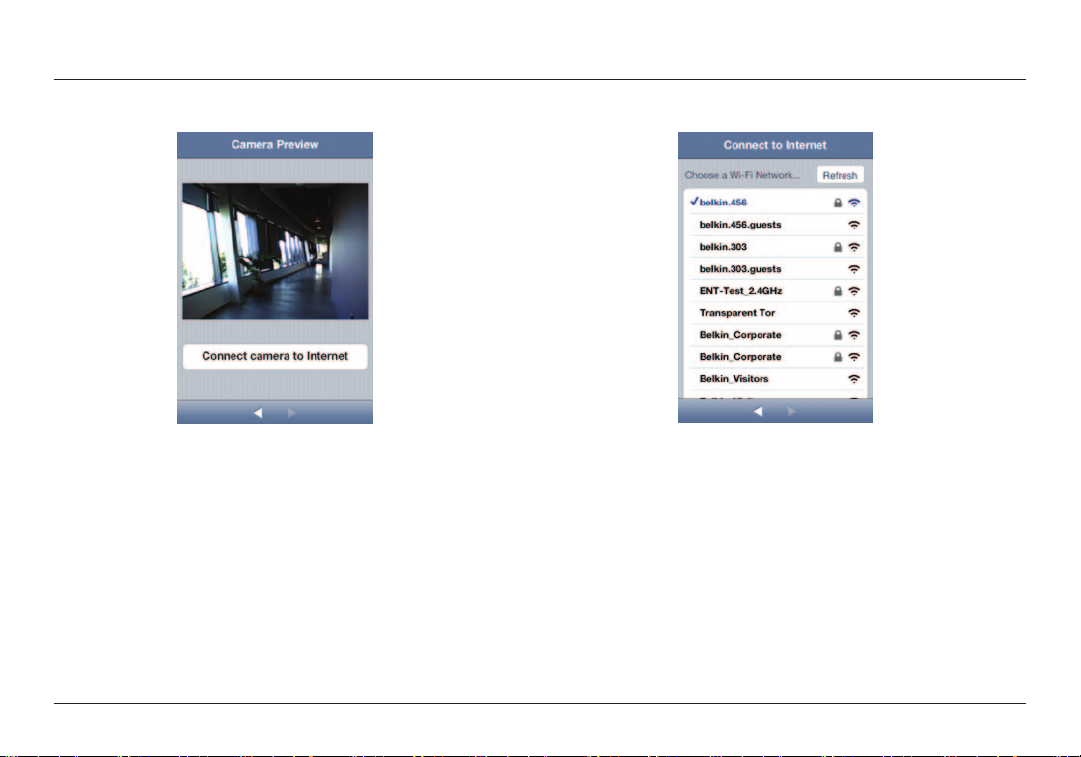
4.4 Camera Preview
The camera will show you a preview after successfully connecting to
your device.
Click “Connect Camera to Internet.”
4.5 Connect to Internet
Choose your Wi-Fi net work to connect to the Internet.
5
GETTING STARTED
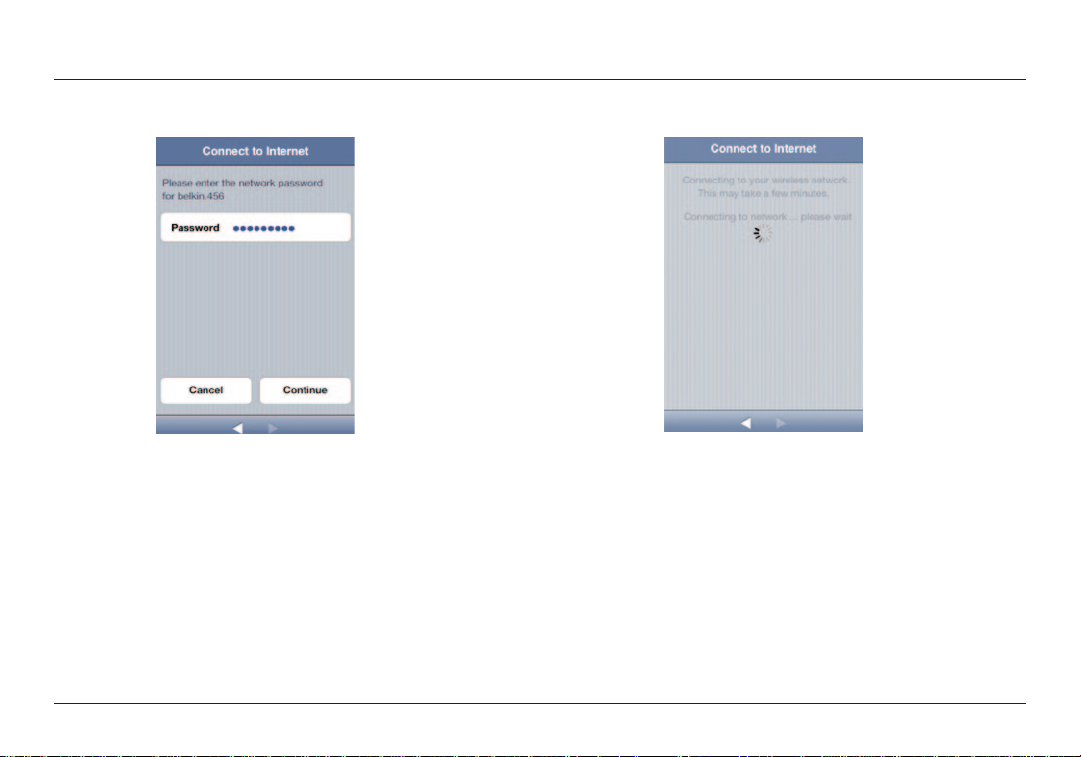
4.6 Connect to Internet
Enter your Wi-Fi password if you have a security-enabled network.
Please wait for the camera to establish connection with the Internet.
6
GETTING STARTED
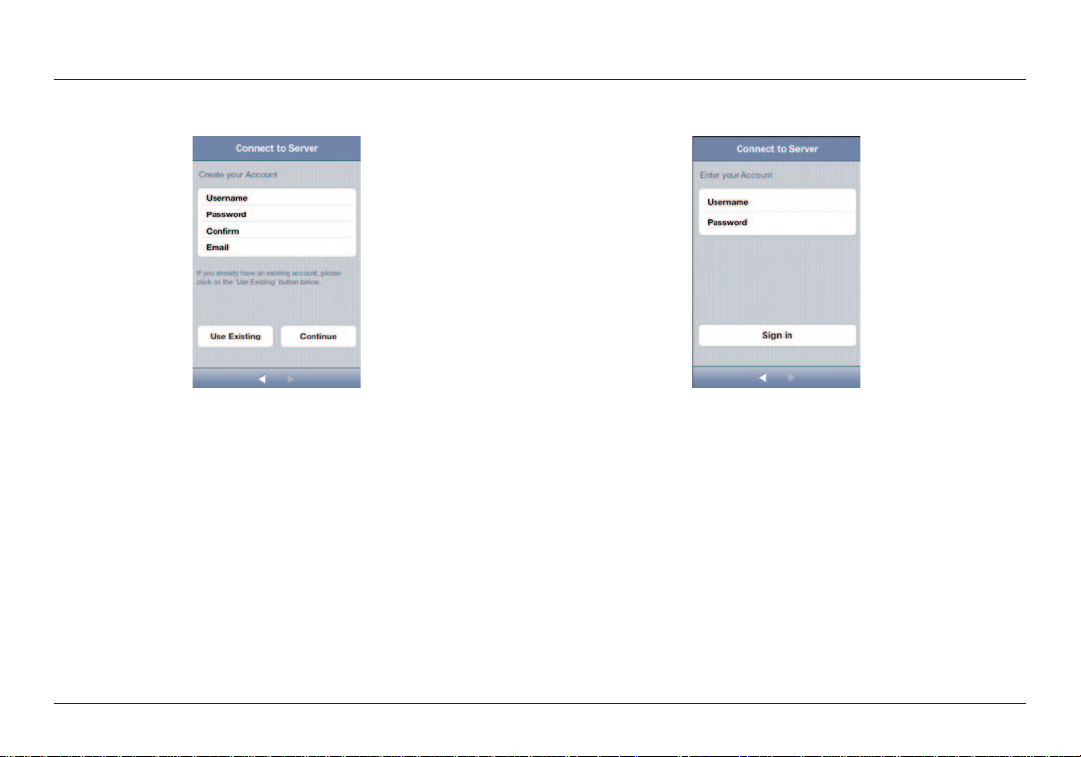
4.7 Create an Account
If this is your first time setting up your camera, you will need to create
an account.
4.8 Use Existing Account
If you have an existing account, select “Use Existing” and then enter
your account information. Click “Sign in.”
7
GETTING STARTED
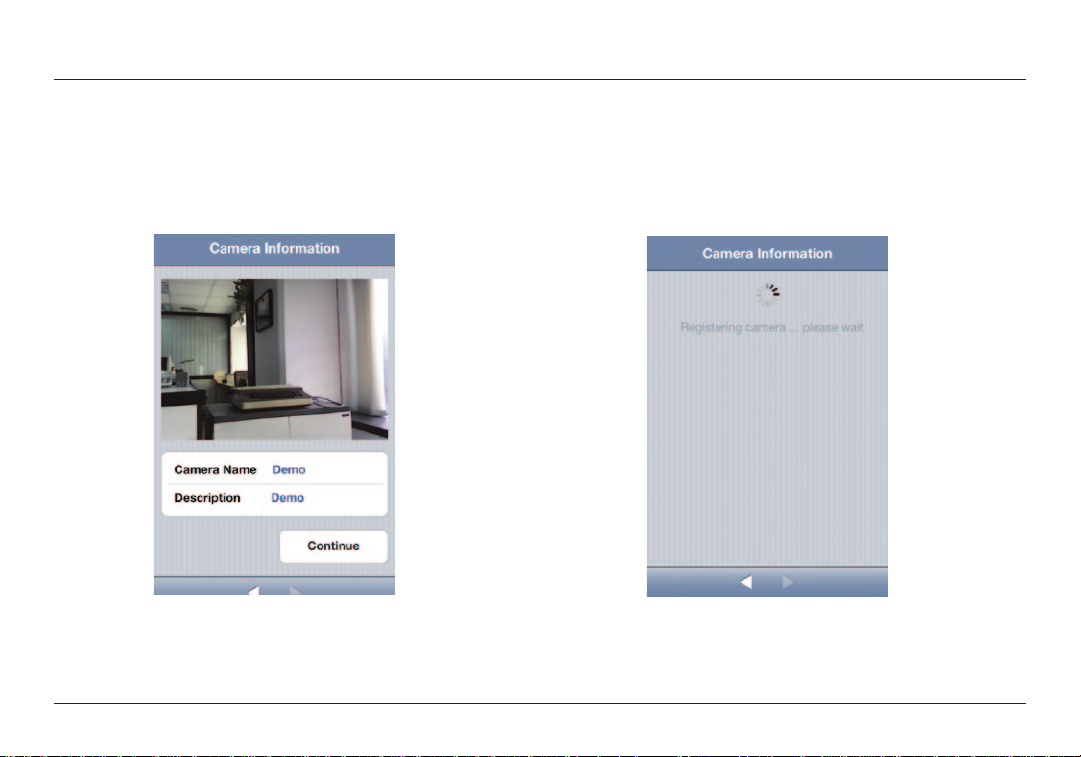
4.9 Set Up Camera Info
Create the camera name and its description.
Click “Continue.” It will take a few seconds to register the
camera with the server.
8
GETTING STARTED
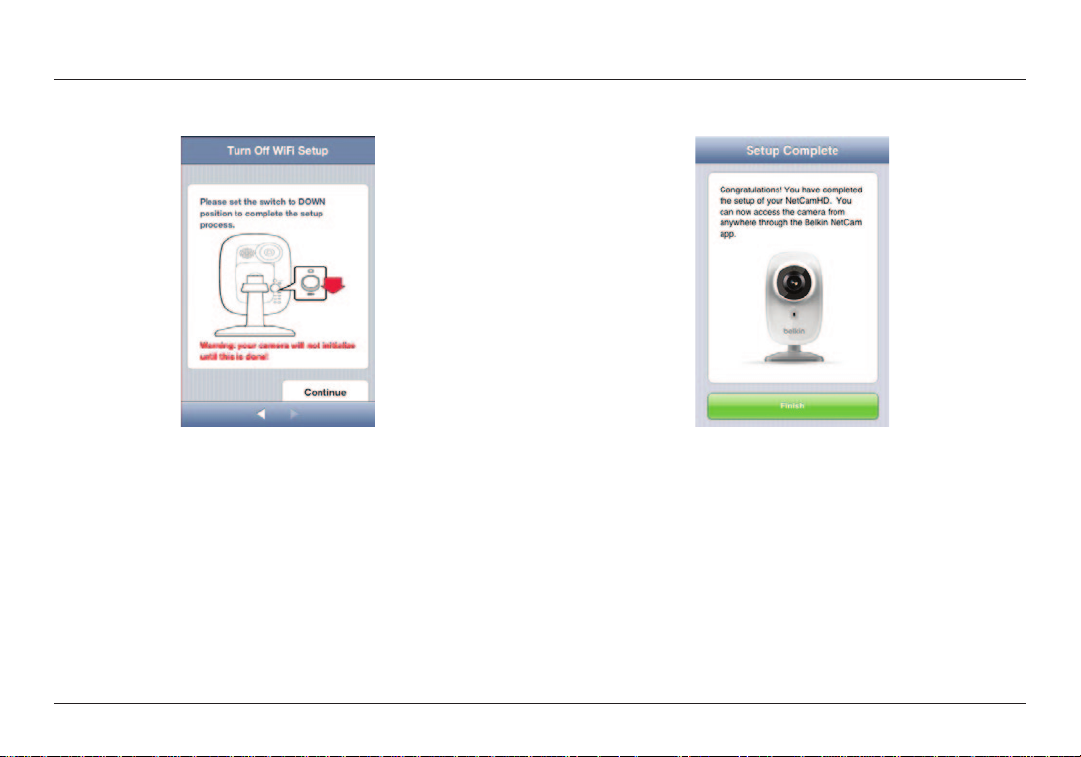
4.10 Setup Complete
Please flip the setup switch down on the back of the NetCam.
Click “Finish” to complete the setup.
Congratulations!
9
GETTING STARTED
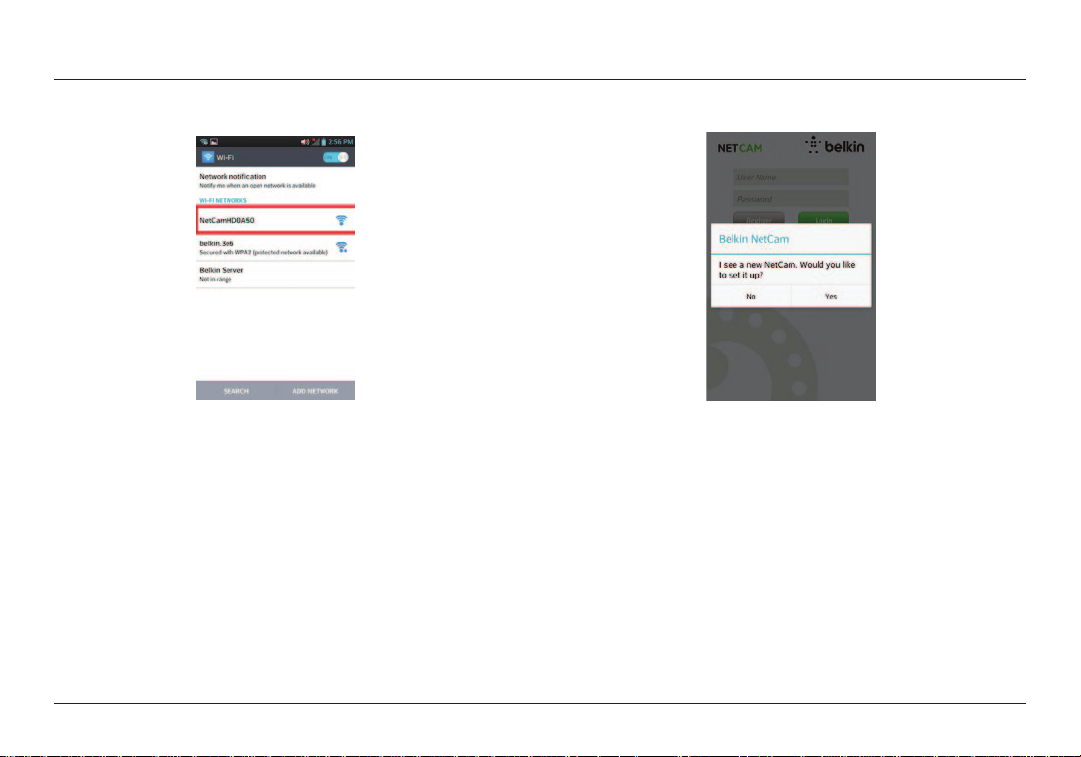
5. Set Up on Android Devices
5.1 Connect your device to NetCam Wi-Fi signal
Go to “Settings > Wireless” and “Network > Wi-Fi settings” and
connect to the camera Wi-Fi signal.
Move to the next step only after the connection is confirmed.
5.2 Launch NetCam App
Once your device establishes a connection with the camera, launch the
NetCam App. You should see a pop-up message like the one below.
Click “Yes” to set up your camera.
If you don’t see the pop-up, you are not connected to the NetCam
HD+ Wi-Fi signal. Repeat step 5.1 and wait for confirmation of the
connection.
10
GETTING STARTED
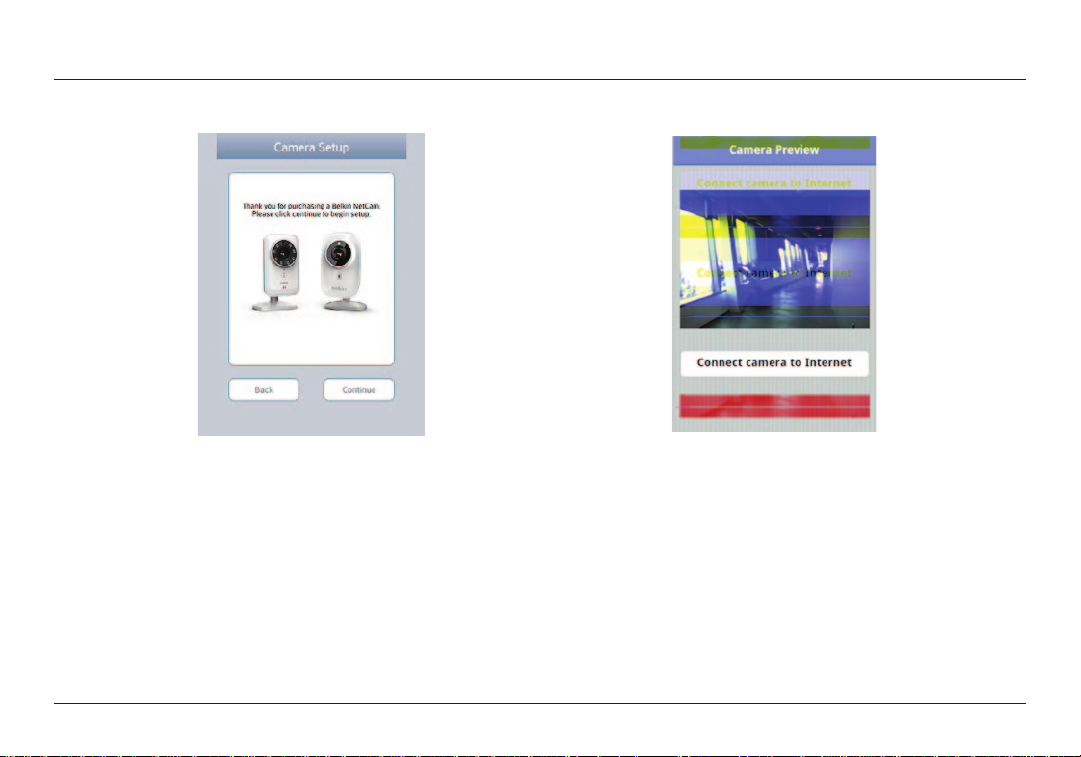
5.3 Camera Setup
Click “Continue” to begin setup.
5.4 Camera Preview
The camera will show you a preview after successfully connecting to
your device. Click “Connect camera to Internet.”
11

GETTING STARTED
5.5 Connect to the Internet
Choose your Wi-Fi net work to connect to the Internet.
5.6 Connect to Internet
Enter your Wi-Fi password if you have a security-enabled network.
12

GETTING STARTED
Please wait for the camera to establish an Internet connection. 5.7 Create an Account
If this is your first time setting up your camera, you will need to create
an account.
13

GETTING STARTED
5.8 Use Existing Accounts
If you have an existing account, select “Use Existing” and then enter
your account information. Click “Sign in.”
5.9 Set Up Camera Info
Create the camera name and its description.
14

GETTING STARTED
Click “Continue.” It will take a few seconds to register the camera with
the server.
5.10 Setup Complete
Please flip the setup switch down on the back of the NetCam. Click
“Finish” to complete the setup.
15

GETTING STARTED
Congratulations!
16

GETTING STARTED
1/8 in or 5.5mm
2.5mm
6. Mounting Your Camera (optional)
Unscrew camera post from the base and remove weight.
Attach screws to wall and hang plate onto screws.
17

GETTING STARTED
Align base with plate and screw on camera post.
18

GETTING TO KNOW YOUR WIFI CAMERA
Front Panel
A: Brightness sensor
B: Camera sensor
C: IR LED
D: Microphone
19

GETTING TO KNOW YOUR WIFI CAMERA
Back Panel
LED Indicators
Setup
A:
Green: Setup up mode on
Amber: Setup mode initializing
Light Of f: Setup mode of
G
B:
Network
Green: Connected to server
Orange: Connected to local area network only
Flashing Amber: Not connected to any network
Flashing Green: Connected to network, ready to set up
C:
Power
Green: Power On
D: Camera Stand
You can adjust the NetCam’s position by adjusting the stand.
E: Reset button
Reset System: Press and hold for 1 second to reset the system.
Factory Default: Press and hold for 20 seconds to restore factory default settings.
F: Setup switch
Flip up to switch to setup mode.
Flip down to switch to camera mode.
G: Speaker
For talk-back functionality.
20
20

TECHNICAL DETAILS
Software Features and Specifications
App on iOS or Android
• Camera setup
• Live camera viewing
• Save snapshot and video from the live stream
• Live two-way audio
• Camera settings
• Enable/disable email alert
• Camera sharing
• Set camera status (online, private)
• IR LED Control
• Auto adjust
• Video stream (Video resolution, quality)
• NetCam Cloud +
• Free Trial
• Purchase Plan
• General settings
• Reset password
• Sign in automatically
• Invite friends to view your camera
• NetCam Cloud + Clips
• View stored clips
21

TECHNICAL DETAILS
Web App
• Live camera viewing
• Live audio on selected PC web browsers (Internet Explorer
• Camera settings
• Camera firmware upgrade
• Delete camera
• Invite friends to view your camera
• Enable/disable email alert
• User account management
• Reset password
• NetCam Cloud + Clips
• View clips
• Download clips
• Delete clips
• Search for clips by time
®
Firefox
, and Google Chrome™)
®
,
22

TECHNICAL DETAILS
Main Window
Camera
Status
Configure
Camera
Camera Configuration
Camera Name
Sharin g
• Shared: Camera is shareable
• Private: Camera isn’t being shared
Audio
• On/Off
Speaker Volume
Infrared Lights
• Auto/On/Off
Screen Rotation
• Right side up
• Upside down
Size
• 320x180
• 640x360
• 1280x720
NetCam Cloud +
• Purchase Plan
• Email alerts
23

TECHNICAL DETAILS
Capture Image Record
24
Video
Enable/
Disable
Audio
Push-to-Talk

TECHNICAL DETAILS
Protection
To protect your security against a hacker, a popup message will alert you if someone else is logged
into your account at the same time as you.
Web Browser
Access this link via Internet Explorer, Netscape, Firefox,
or Google Chrome: http://www.belkin.com/netcam
Then you can view the camera via your PC.
25

TECHNICAL DETAILS
NetCam Cloud +
How to activate the Cloud + free trial
1. Go to the Camera Settings on which you wish to start the free trial.
2. In the Camera Settings screen, select the option for Purchase Plan.
3. Select Free Trial.
4. Confirm you want to activate the free trial by selecting Yes.
How to purchase the Cloud + service
1. Go to the Camera Settings on which you wish to start the service.
2. In the Camera Settings screen, select the option for Purchase Plan.
3. Select the option that suits you and follow the on-screen options.
Choices include:
a. 1 month
b. 3 months
c. 1 year
How to view clips saved on the cloud
From the app:
1. Log into your NetCam account.
2. Select the Clips tab at the bottom of the screen.
3. From the Clips tab, select the camera that
created the clips you wish to view.
4. Select the clip from the list to begin watching it.
26

TECHNICAL DETAILS
From a web browser:
1. Log into your NetCam account by going to
http://www.belkin.com/netcam
2. Once logged in, click on the Clips tab at the top of the video viewer.
3. Find the clip you wish to view by choosing the date and/or time it
was recorded. Once the clip has been selected, it will begin playing.
How to delete a clip saved on the cloud
1. From a web browser only, go to the Clips tab.
2. Select the clip you wish to delete and hover
your cursor over the video feed.
3. In the bottom right corner of the clip, select the downward arrow.
4. Select Delete.
5. Confirm you wish to delete the clip by selecting OK.
27

TECHNICAL DETAILS
How to download a clip saved on the cloud
1. From a web browser only, go to the Clips tab.
2. Select the clip you wish to download and hover
your cursor over the video feed.
3. In the bottom right corner of the clip, select the downward arrow.
4. Select Download.
5. Depending on the web browser you’re using, the clip will either
begin to download or ask where you want to save the clip.
Select a folder on your computer that you will remember when
you wish to view the clip now stored on your computer.
How to enable/disable saving clips to the cloud
1. From the NetCam App, go to the camera settings page of
the NetCam with the cloud storage you wish to disable.
2. Scroll to the bottom of the settings page and
enable/disable the Save clips option.
28

TECHNICAL DETAILS
How enable/disable push notifications and email alerts
Note:
Push notifications and email alerts can only be activated
if you have already enabled the option for saving clips.
1. From the NetCam App, go to the camera settings page of
the NetCam with the cloud storage you wish to disable.
2. Scroll to the bottom of the settings page and
enable the Save clips option if it is disabled.
3. Once Save clips has been enabled, you will see the options
to enable/disable Push Notifications and Email alerts.
29

TECHNICAL DETAILS
Hardware Features and Specifications Camera
Camera
Image Sensor
Lens
View Angle
IR LEDs & IR C ut Filter
IR Mode
Ambient Light Sensor
Video
Codecs
Resolution
Frame Rate
Still Image Capture
Video Features
2MP 1/3. 2 inch CMOS se nsor
Focal length: 3.0mm, F2.0
Diagonal: 91°
4 IR LEDs
8-meter illumination distance
IR Cut Filter
Always on
Always off
Auto mode
• IR turns on when luminance decreases to about 3 lux
• IR turns off whe n luminance inc reases to about 8 lux
RoHS-compliant 560nm luminance detector
H.264
1280x720, 640x360, 320x180
Up to 25 frames
720P still capture
Adjust image size and quality
Audio
Audio In
Audio Compression
Audio Out
Networking
Network Interface
Wireless Connectivity
Radio Specifications
Antenna
30
Built-in mi crophone, -3 8 dB ± 2 dB
G.711, PCM
Built-in speaker
802.11b/g/n WLAN
802.11b/g/n Wireless with WEP/WPA/WPA2 security
RF band: ISM Band 2.4GHz
Channels: Varies by country
RF Power Output
• 802.11n : 14 ± 1 d Bm Average
• 802.11g : 14 ± 1 d Bm Average
• 802.11b : 16 ± 1 d Bm Average
Type: Chip antenna, SMD
Gain: 1 .5 dBm pe ak
Efficiency: above 80%

TECHNICAL DETAILS
General
Processor: RT7620
System
Button
Speed: 580MHz
SDRAM: 128MB
Flash: 16MB
Reset Button
• Reset system: Press less than 1 second to restart the system
• Factory default: Pres s and hold 20
seconds to restore the factory default settings
Switch
LEDs
Power
Setup mo de switch: Turn se tup mode on and off
Setup M ode LED
• Solid Green: Setup Mode on
• Amber : In progre ss to switch to Setup Mo de
• No light: Setup Mode off Network LED
• Solid Amber: Local network ok
• Solid Green: Connection to Internet ok
• Flashin g Amber: N o network y et
• Flashing Green: Global Internet ok System LED
• Solid Green: System on
External AC-to-DC switching power adapter
Input: 100-249V AC, 50/60Hz
Output: 5V DC, 1A
31

TECHNICAL DETAILS
System Requirements
iPhone, iPad, or iPod touch with iOS 5 or above
or
Android devices Version 2.3 or above
PC OS: Windows® XP, Windows Vista®, or Windows
7, or Mac OS® X v10.6.8 Snow Leopard
PC browsers: Internet Explorer 8, Google
Chrome 16, Firefox 11.1, Safari® 5.1
Using the latest Adobe Flash Player
Resetting the Camera
The “Reset” button is used in rare cases. In the unlikely event
that your camera functions improperly, please use a pin to
reset the camera. The Reset button is where the arrow below
points. Reset the camera when the switch is in “OFF” mode.
After the reset, the camera will resume to the default setting.
Reset system: Press and hold for 1 second to reset the system
•
• Reset to factory default: Press and hold for 20
seconds until all of the LEDs blink three times
32

TROUBLESHOOTING, SUPPORT, AND WARRANTY
If I buy more cameras, could I use the same username to connect them?
Unlimited cameras can be added under your own account, but
each one should have a different camera name. The figure below
shows that you can have different cameras under your account.
How can I share my cameras with my friends?
Log into your account. In the My Cam tab, select the camera you
wish to share, and then select the Sharing button. Type in your
friend’s email address to invite him or her to see your camera.
33

TROUBLESHOOTING, SUPPORT, AND WARRANTY
How can I upgrade the firmware?
There are t wo ways to upgrade the firmware on your NetCam HD+.
1. Upgrade the firmware from the NetCam App:
a. Log into your NetCam account from the app
b. Find the camera you wish to upgrade from the list
c. Tap the down arrow to the right of the camera name
d. Tap Show me what’s new
34

TROUBLESHOOTING, SUPPORT, AND WARRANTY
e. Tap Update NetCam FW
2. Upgrade the firmware from a web browser:
a. In a web browser, go to http://www.belkin.com/netcam
b. Log into your NetCam account
c. Find the camera you wish to upgrade from the list and select it
d. Click the Camera Settings button above the feed
e. Click Update Now!
35

TROUBLESHOOTING, SUPPORT, AND WARRANTY
f. Click Update Camera Firmware Now!
Note: Once the camera’s firmware begins to update, please allow 3–5
minutes for the process to complete. During this period your camera may
become unresponsive; this is normal behavior. Do not power the camera
off during the update, or you may render the unit non-operational.
Can I change my username?
Your username is what identifies your account information, and once set, it
cannot be changed. If you later do not like your username, the only recourse is
to create a new account. Please note that any subscription services registered
in the old account (if applicable) cannot be transferred to the new account.
36

TROUBLESHOOTING, SUPPORT, AND WARRANTY
Forgot or lost your password?
The NetCam App login screen has a link labeled “Forgot Sign
In?” that takes you to the account sign-in webpage. Type in
your username and email address, and then click the Reset
button to begin the process of setting up a new password
37

TROUBLESHOOTING, SUPPORT, AND WARRANTY
Belkin International, Inc., Limited
2-Year Product Warranty
What this warranty covers.
Belkin International, Inc. (“Belkin”) warrants to the original
purchaser of this Belkin product that the product shall be free
of defects in design, assembly, material, or workmanship.
What the period of coverage is.
Belkin warrants the Belkin product for two years.
What will we do to correct problems?
Product Warranty.
Belkin will repair or replace, at its option, any defective product free of
charge (except for shipping charges for the product). Belkin reser ves the
right to discontinue any of its products without notice, and disclaims any
limited warranty to repair or replace any such discontinued products.
In the event that Belkin is unable to repair or replace the product (for
example, because it has been discontinued), Belkin will offer either a
refund or a credit toward the purchase of another product from Belkin.
com in an amount equal to the purchase price of the product as evidenced
on the original purchase receipt as discounted by its natural use.
What is not covered by this warranty?
All above warranties are null and void if the Belkin product is not
provided to Belkin for inspection upon Belkin’s request at the sole
expense of the purchaser, or if Belkin determines that the Belkin
product has been improperly installed, altered in any way, or tampered
with. The Belkin Product Warrant y does not protect against acts
of God such as flood, lightning, earthquake, war, vandalism, theft,
normal-use wear and tear, erosion, depletion, obsolescence, abuse,
damage due to low voltage disturbances (i.e. brownouts or sags), nonauthorized program, or system equipment modification or alteration.
38

TROUBLESHOOTING, SUPPORT, AND WARRANTY
How to get service.
To get service for your Belkin product you must take the following steps:
1. Contact Belkin International, Inc., on the phone number
listed on page 41, within 15 days of the Occurrence. Be
prepared to provide the following information:
a. The part number of the Belkin product
b. Where you purchased the product.
c. When you purchased the product.
d. Copy of original receipt
2. Your Belkin Customer Service Representative will then
instruct you on how to forward your receipt and Belkin
product and how to proceed with your claim.
Belkin reserves the right to review the damaged Belkin product. All
costs of shipping the Belkin product to Belkin for inspection shall be
borne solely by the purchaser. If Belkin determines, in its sole discretion,
that it is impractical to ship the damaged equipment to Belkin, Belkin
may designate, in its sole discretion, an equipment repair facility to
inspect and estimate the cost to repair such equipment. The cost, if
any, of shipping the equipment to and from such repair facility and
of such estimate shall be borne solely by the purchaser. Damaged
equipment must remain available for inspection until the claim is finalized.
Whenever claims are settled, Belkin reserves the right to be subrogated
under any existing insurance policies the purchaser may have.
39

TROUBLESHOOTING, SUPPORT, AND WARRANTY
TROUBLESHOOTING, SUPPORT, AND WARRANTY
How state law relates to the warranty.
THIS WARRANTY CONTAINS THE SOLE WARRANTY OF BELKIN.
THERE ARE NO OTHER WARRANTIES, EXPRESSED OR, EXCEPT AS
REQUIRED BY LAW, IMPLIED, INCLUDING THE IMPLIED WARRANTY
OR CONDITION OF QUALITY, MERCHANTABILITY OR FITNESS FOR A
PARTICULAR PURPOSE, AND SUCH IMPLIED WARRANTIES, IF ANY,
ARE LIMITED IN DURATION TO THE TERM OF THIS WARRANTY.
Some states do not allow limitations on how long an implied
warranty lasts, so the above limitations may not apply to you.
IN NO EVENT SHALL BELKIN BE LIABLE FOR INCIDENTAL, SPECIAL,
DIRECT, INDIRECT, CONSEQUENTIAL OR MULTIPLE DAMAGES
SUCH AS, BUT NOT LIMITED TO, LOST BUSINESS OR PROFITS
ARISING OUT OF THE SALE OR USE OF ANY BELKIN PRODUCT,
EVEN IF ADVISED OF THE POSSIBILITY OF SUCH DAMAGES.
This warranty gives you specific legal rights, and you may also have
other rights, which may vary from state to state. Some states do
not allow the exclusion or limitation of incidental, consequential, or
other damages, so the above limitations may not apply to you.
40
40

REGULATORY INFORMATION
Technical Support
US
http://www.belkin.com/support
UK
http://www.belkin.com/uk/support
Australia
http://www.belkin.com/au/support
New Zealand
http://www.belkin.com/au/support
Singapore
1800 622 1130
Europe
http://www.belkin.com/uk/support
You can find technical-support information on our website,
www.belkin.com, by navigating to the tech-support section.
If you want to contact technical support by phone,
please call the number you need from this list*:
*Local rates apply.
Belkin Ltd.
Express Bu siness Park
Shipton Way, Rushde n
NN10 6GL, Un ited Kingdom
Belkin Iberia
Avda de Barajas, 24 , Edific io Gamma,
4ªpta, 2810 8 Alcob endas
Madrid - Spain
Belkin Ltd.
Express Bu siness Park
Shipton Way, Rushde n
NN10 6GL, Un ited Kingdom
Belkin Ital y & Greece
Via Nino Bonn et, 4/6
Milan 2015 4
Italy
Country number Internet adress
AUSTRIA 0820 200766 www.belkin.com/de/networking/
BELGIUM 07 07 00 073
CZECH REPUB LIC 239 000 406 w ww.belkin.com/uk/networking/
DENMARK 701 22 403 www.belkin.com/uk/networking/
FINLAND 0972519123 www.belkin.com/uk /networking/
FRANCE 08 - 25 54 00 26 www.belkin.com/fr/networking/
GERMANY 0180 - 500 57 0 9 www.belkin.com/de/networking/
GREECE 0 0800 - 44 14 23 90 www.belkin.com/uk/networking/
HUNGARY 06 - 17 77 49 06 ww w.belkin.com/uk/networking/
ICELAND 80 0 8534 www.belkin.com/uk/networking/
IRELAND 0818 55 50 06 www.belkin.com/uk/networking/
ITA LY 02 - 69 4 3 02 51 www.belk in.com/it/networking/
LUXEMBOURG 34 20 80 85 60 w ww.belkin.com/uk/networking/
NETHERLANDS 0900 - 040 07 9 0
NORWAY 81 50 0287 www.belkin.com/uk/networking/
POLAND 00800 - 441 17 37 www.belkin.c om/uk/networking/
PORTUGAL 707 200 676 www.belkin.com/uk/networking/
RUSSIA 8-800-555-0231 www.belkin.com/networking/
SLOVA KIA 080 00 04614 www.belkin.com/networking/
SLOVENIA 0800 80510 www.belkin.com/networking/
SOUTH AFRICA 0800 - 99 15 2 1 www.belkin.com/uk/networking/
SPAIN 902 - 02 43 66 www.belkin.com/es/networking/
SWEDEN 07 - 71 40 04 53 w ww.belkin.com/uk/networking/
SWITZERLAND 08 - 48 00 02 19
UNITED KINGDOM
OTHER COUNTRIES +44 - 1933 3 5 20 00
Belkin Gmb H
Otto-Hahn-Straße 20
85609 As chheim
Germany
Belkin B.V.
Tupolevlaan 1
1119 NW Schipho l-Rijk,
Netherlands
0845 - 607 7 7 87 www.belkin.com/uk/networking/
€0.10 per minute www.belkin.com/nl/networking/
www.belkin.com/nl/networking/
www.belkin.com/fr/networking/
www.belkin.com/de/networking/
www.belkin.com/fr/networking/
41

REGULATORY INFORMATION
Declaration of Conformity with electromagnetic
compatibility and electromagnetic interference
We, Belkin International, Inc., of Schiphol-Rijk, Netherlands,
declare under our sole responsibility that the device, F7D7602,
complies with Directives stated in our EU declaration which
can be obtained from our website given below.
Caution: Exposure to Radio Frequency Radiation.
This equipment complies with radiation exposure limits
set forth for an uncontrolled environment. This equipment
should be installed and operated with a minimum distance
of 20cm between the radiator and your body
CISPR 22 Interference Notice
This equipment has been tested and found to comply with the limits
for a Class B digital device, pursuant to the requirements of EN 55022
and EN 55024. These limits are designed to provide reasonable
protection against harmful interference in a residential installation.
This equipment generates, uses, and can radiate radio frequency energy,
and if not installed and used in accordance with the instructions, may
cause harmful interference to radio communications. However, there is no
guarantee that interference will not occur in a particular installation. If this
equipment does cause harmful interference to radio or television reception,
which can be determined by turning the equipment off and on, the user
is encouraged to try and correct the interference by one or more of the
following measures:
• Reorient or relocate the receiving antenna.
• Increase the distance between the equipment and the receiver.
• Connect the equipment to an outlet on a circuit different
from that to which the receiver is connected.
• Consult the dealer or an experienced radio/TV technician for help.
Caution: Any changes or modifications not expressly
approved by the party responsible for compliance could
void the user’s authority to operate this equipment.
This device and its antenna(s) must not be co-located or operating
in conjunction with any other antenna or transmitter.
42

REGULATORY INFORMATION
Europe – EU Declaration of Conformity
This device complies with the essential requirements of the R&TTE Directive 1999/5/EC, the EMC Directive 2004/108/EC, and the low-voltage
Directive 2006/95/EC. A copy of the European Union CE marking “Declaration of Conformity” may be obtained at the website: ww w.belkin.com/doc
For information on product disposal please refer to: http://environmental.belkin.com
General Safety Information:
• For indoor installation only
• For installation with supplied power adapter only
• The supplied power adapter is the product’s switch-off device. The base socket must be near the product and easily accessible.
43

© 2014 Belkin Inte rnational, Inc. All ri ghts reserved. All trad e names are re gistered trademark s of respe ctive manufacturer s listed.
Windows , Windo ws Vista, and Internet Expl orer are either register ed trademarks or tradem arks of Microsoft Corpo ration in the United
States and/or othe r countri es. iPad, iPhone, iPod tou ch, Mac OS, and Safari are trade marks of Apple Inc., regi stered in the U.S. and other
countrie s. App Store is a service mark of Apple Inc . Wi-Fi is a registered trade mark of the Wi-Fi Alliance. An droid, Google Chrome , and
Google Play ar e tradem arks of Google Inc.
Belkin Ltd.
Express Bu siness Park
Shipton Way, Rushde n
NN10 6GL, Un ited Kingdom
Belkin Iberia
Avda de Barajas, 24 , Edific io Gamma,
4ªpta, 2810 8 Alcob endas
Madrid - Spain
Belkin Ltd.
Express Bu siness Park
Shipton Way, Rushde n
NN10 6GL, Un ited Kingdom
Belkin Ital y & Greece
Via Nino Bonn et, 4/6
Milan 2015 4
Italy
Belkin Gmb H
Otto-Hahn-Straße 20
85609 As chheim
Germany
Belkin B.V.
Tupolevlaan 1
1119 NW Schipho l-Rijk,
Netherlands
 Loading...