

Page 1

MIRACAST VIDEO
User Manual
ADAPTER
F7D7501v1 • 8820-01467 Rev. C00
Page 2

TABLE OF CONTENTS
Introduction .............................................. 1
Placement for Optimal Performance ............................. 2
Overview................................................. 4
Product Features ............................................ 4
Product Specifications ........................................ 5
Status LED Behavior ..........................................6
Multipurpose Button ..........................................7
System Requirements......................................... 8
Package Contents ............................................ 8
Installing and Setting Up the Adapter .......................9
Navigating the Miracast Adapter’s Home Screen
with Your Remote ............................................ 19
Miracast Video Adapter’s Interfaces........................20
The Miracast Adapter’s User Interface . . . . . . . . . . . . . . . . . . . . . . . . . . 20
Advanced Web Interface .....................................22
Troubleshooting .........................................31
Information..............................................34
Page 3

INTRODUCTION
Thank you for purchasing the Belkin Miracast Video Adapter. Now you can take advantage of this great new technology that
lets you watch anything and everything from your mobile device or computer on your big, beautiful, HDTV screen.
Benefits of the Miracast Video Adapter
Your Belkin Home Network will allow you to:
• Share pictures that are saved or taken with your smart device with friends and family
• Play games made for your Android™ device directly on your TV and eliminate strained eyes
• Watch movies and videos on your TV that are saved on your smart device directly
• Browse the Internet on your T V without the need for a smart TV
1
Page 4

INTRODUCTION
Placement for Optimal Performance
Your wireless connection will be stronger the closer your smart device is to the Miracast Video Adapter. Typical indoor operating
range for your Miracast Video Adapter is up to 50 feet if no obstructions are in the way. In the same way, your connection and
performance will degrade somewhat as the distance between your Miracast Video Adapter and connected device increases. This
may or may not be noticeable to you. As you move farther from your Miracast Video Adapter, performance may decrease. Factors that
can weaken signals simply by getting in the way of your Adapter’s radio waves are metal appliances or obstructions, and walls.
If you have concerns about your Miracast Video Adapter’s performance that might be related to range or obstruction factors,
try moving the connected device to a position between 5 and 10 feet from the Miracast Video Adapter in order to see if
distance is the problem. If difficulties persist, even at close range, please contact Belkin Technical Support.
Note: While some of the items listed below can affect network performance, they will not prohibit your wireless network from
functioning; if you are concerned that your network is not operating at its maximum effectiveness, this checklist may help.
2
Page 5

INTRODUCTION
1. Placement of your Wireless Router (or Access Point)
Your wireless router may cause interference with the Miracast
Video Adapter, especially if it is a dual-band router.
For optimal performance of the Miracast Adapter, if possible,
try to place it away from your home Wi-Fi® ne twor k.
To achieve the best connection for your smar t
devices with the Miracast Adapter:
• Your router transmits radio waves that may interfere with
the performance of the Miracast Video Adapter. If possible,
ensure that your Miracast Video Adapter is located on
or close to the outskirts of your Wi- Fi network.
• Try not to place the Miracast Video Adapter (or
smart device) near a cordless 2.4GHz phone.
• Disconnecting your smart device from your Wi-Fi network
can also improve the video performance where possible.
2. Cordless Phone Placement
If the performance of your Miracast Video Adapter is impaired after
attending to the above issues, and you have a cordless phone:
• Try moving cordless phones away from the
Miracast Video Adapter (or smart device).
• Unplug and remove the battery from any cordless phone that
operates on the 2.4GHz band (check manufacturer’s information).
If this fixes the problem, your phone may be interfering.
• If necessary, consider switching to a 900MHz cordless phone.
3
Page 6

OVERVIEW
Product Features
The Adapter complies with the Wi-Fi Miracast specification
to communicate with other Wi-Fi Miracast wireless
devices. The Adapter can operate on the 2.4GHz or
5GHz frequency band as 802.11n Wi-Fi products.
• 2.4GHz or 5GHz band operation
• Micro USB 2.0 port to power the Miracast Video Adapter
• WPS™ button for pairing with your smart device
• HDCP 1.0, 2.0 and 2.1
• Easy installation and use
• LED status indicator
4
Page 7
OVERVIEW
Product Specifications
Host Interface: HDMI
Operating Temperature: 32–131 degrees F (0– 40 degrees C)
Storage Temperature: -4–149 degrees F (-20–65 degrees C)
Humidity: Max. 85% (non-condensing)
Maximum Operating Range: Up to 50 ft.*
*Wireless performance may vary depending
on the networking environment.
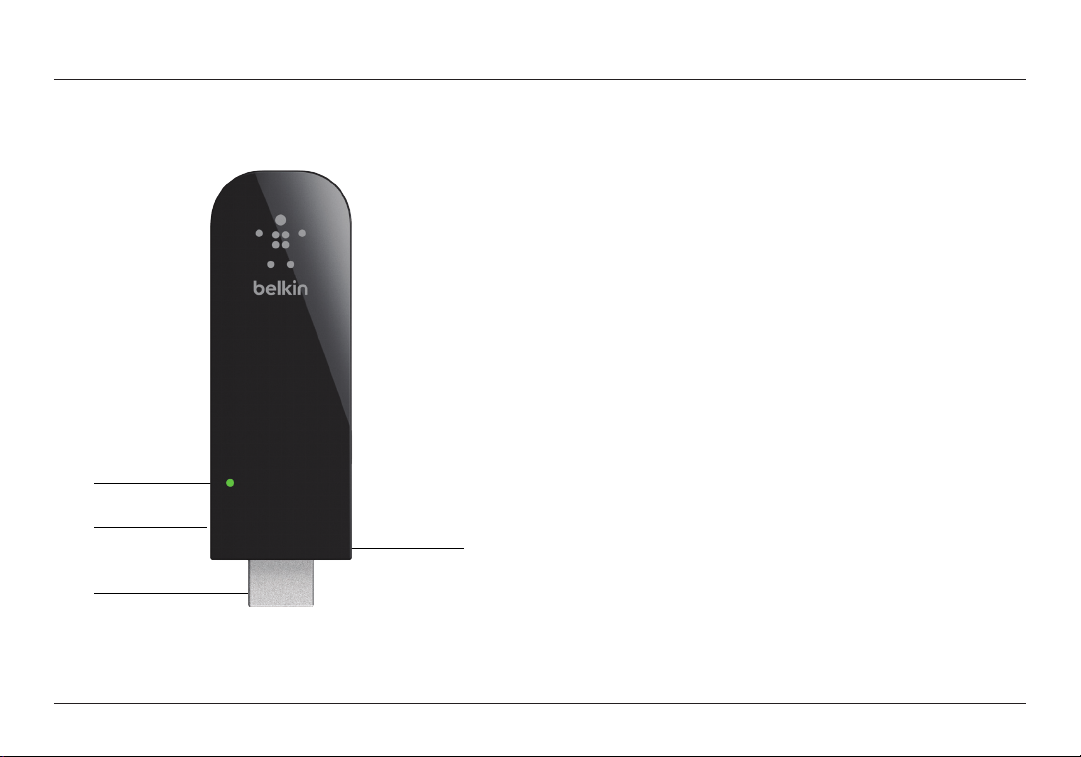
(a) Power/Status LED
Lights when the Adapter is powered on and flashes when it is active.
(b) Multipurpose Button
Used for Wi-Fi Protected Setup™ handshaking with smart devices.
®
(a)
(b)
(d)
(c)
(c) Micro USB Power Connector
Used to supply power to the Miracast Video Adapter.
(d) HDMI Connector
Part of the Adapter that fits into your TV’s HDMI port.
5
Page 8

OVERVIEW
Status LED Behavior
The LED on the Miracast Video Adapter gives you the status on the current state of the Adapter.
Please consult the table below for a guide to what the different LED behaviors indicate:
LED Behavior What’s on the TV Screen Indicates
Blinking Green Loading screen Adapter is starting up
Steady Green Instructions to pair device Ready to pair with a smart device
Blinking Green with pause after 2nd blink Instructions to press button
Blinking Green with pause after 5th blink “Connection in progress” message Attempting to pair with smart device
Steady Green Smart device is being mirrored onto the TV
6
Waiting for user to press Multipurpose
button
Adapter and smart device have
paired successfully
Page 9

OVERVIEW
Multipurpose Button
The only button on the Miracast Video Adapter can be used for a variety of purposes. Please consult the table below for each application:
Adapter State Action Duration of Action Result
Adapter is unpowered
(then powered on)
Adapter is asking user to press
button during pairing
Adapter is on its home screen Press and hold button 10+ seconds
Press and hold button
Press button 0–5 seconds
Until Firmware Update
page appears
7
Access to Advanced
Web Interface
Adapter will attempt to pair with
smart device
Restore factory defaults and
restart Adapter
Page 10

OVERVIEW
System Requirements:
• TV with available HDMI port
USB power available (5V 500mA)
• Device with Miracast, Allshare Cast, Screen
Mirroring, or Android Wireless Display support
• HDMI -CEC compatible TV required to
interact with the User Interface
Package Contents:
Miracast Video Adapter
USB Power Cable
HDMI Extension Cable
Quick Installation Guide
8
Page 11
INSTALLING AND SETTING UP THE ADAPTER
1. Turn your TV on and power up the Miracast Video Adapter by
connecting the USB cable from the Adapter to
a USB port on your TV or other USB power source
that provides at least 5V, 500mA of power.
Or
9
Page 12

INSTALLING AND SETTING UP THE ADAPTER
2. Connect the Miracast Video Adapter directly into an HDMI
port on your TV. If the Adapter can’t fit into the port due to
its size, try using the HDMI Extension Cable provided.
Note: HDMI port 1 is recommended to ensure your TV’s
remote control ability to communicate with the Miracast
Adapter. Remember your port number for the next step.
3. Set your TV’s source/input selector to the HDMI port you
used to connect the Miracast Adapter in step 2.
10
Page 13

INSTALLING AND SETTING UP THE ADAPTER
4. Your Miracast Adapter should now start up and
display instructions on your TV screen.
5. On your smar t device, go to the settings, then
Wireless & Networks and find Miracast. If it isn’t
already, activate Miracast on your smart device.
Note: Miracast may be called Wireless Display,
Screen Mirroring, AllShare Cast, or something else
depending on the manufacturer. Please consult the
manufacturer’s manual. Here are some examples.
11
Page 14

INSTALLING AND SETTING UP THE ADAPTER
Motorola
a. Access your phone’s apps by clicking the
icon indicated in the image below.
b. Scroll through your phone’s
applications and select Settings.
c. In your phone’s settings, select the Display option.
12
Page 15

INSTALLING AND SETTING UP THE ADAPTER
d. Select Wireless display from the list of options. e. Turn Wireless Display to ON and select the
adapter to which you wish to connect.
13
Page 16

INSTALLING AND SETTING UP THE ADAPTER
Samsung Galaxy
a. Access the drop-down menu by swiping your finger
from the top of your phone’s screen to the bottom.
b. Select AllShare Cast or Screen Mirroring from the menu at the top.
LG Miracast-enabled devices
a. Go to Settings.
14
Page 17

INSTALLING AND SETTING UP THE ADAPTER
b. Select “More…” from the list of options under Wireless & Networks. c. Select “Miracast” from the selection.
15
Page 18

INSTALLING AND SETTING UP THE ADAPTER
Google Nexus 4 (Standard Android UI)
a. Access the drop-down menu by swiping your finger from
the top of your phone’s screen to the bottom and tap the
icon in the top right corner of the drop-down menu.
b. Tap the “Wireless Display” option.
16
Page 19

INSTALLING AND SETTING UP THE ADAPTER
6. In the list of available devices now displayed on your smart device,
select the TV that the Miracast Video Adapter is connected to.
7. If prompted to, please press the button on the
Miracast Video Adapter or if requested, enter the
PIN code that appears on the screen.
17
Page 20

INSTALLING AND SETTING UP THE ADAPTER
The Miracast Adapter will attempt to pair with your device at this point.
8. If the image on your smart device is now being
mirrored onto your TV, you are done!
18
Page 21

INSTALLING AND SETTING UP THE ADAPTER
Navigating the Miracast Adapter’s
Home Screen with your Remote
The Miracast Video Adapter’s home screen may be able to
be navigated using your TV’s remote control. In order to use
your TV’s remote control, both the TV and the remote must be
compatible with HDMI CEC and the feature must be enabled
on your TV (usually the option is in the set tings menu). HDMI
CEC may also be referred to as any of the following:
Anynet+ (Samsung)
Aquos Link (Sharp)
BRAVIA Link & BRAVIA Sync (Sony)
E-link (AOC)
Kuro Link (Pioneer)
CE-Link & Regza Link (Toshiba)
RIHD (Onk yo)
RuncoLink (Runco International)
T-Link (ITT)
HDAVI Control (Panasonic)
EZ-Sync (Panasonic)
VIERA Link (Panasonic)
EasyLink (Philips)
NetCommand for HDMI (Mitsubishi)
Note: LG SimpLink is not compatible with HDMI-CEC
and will not work with the Miracast User Interface.
If your brand-name TV was not listed here, please consult your
TV/remote manufacturer to see if it supports HDMI CEC.
Use the directional pad buttons on your remote to
navigate through the menus and select options.
19
Page 22

MIRACAST VIDEO ADAPTER’S INTERFACES
The Miracast Adapter’s User Interface
The User Interface is the first screen that is seen prior to
pairing your smart device with the Miracast Video Adapter.
This screen shows the available smart devices and TVs that
the Adapter can see as well as the status of the Adapter. To
refresh this list, navigate to the Refresh icon located in the
bottom lef t corner of the screen (next to the gear icon).
It also allows for general settings to be changed right from
your TV screen. To access these settings, click on the
gear icon on the bottom left corner of your screen.
20
Page 23

MIRACAST VIDEO ADAPTER’S INTERFACES
Miracast Settings Screen 2. Enable Non-Compliant HDCP
If you’ve made a Miracast connection and your smart
device’s screen content doesn’t show up on the T V using
HDCP settings, turning Enable Non-Compliant HDCP on
may solve the issue (depending on your type of phone). It
will, however, adversely affect the latency of the video.
1
2
3. Require Button-Press to Connect
You have the ability to set an option that requires pushing
the Multipurpose button whenever you try to pair a smart
device to your Miracast Adapter. Having to push the
button on the Adapter is a security measure you may want
to consider. By default, this option is turned off.
3
4
5
1. H DCP
Your smart device has High-Bandwidth Digital Content Protection
(HDCP). Choose the version of HDCP that matches your
phone — 2.0 works for most phones, 2.1 works for newer phones. If
neither of the previous options work for you device, you can turn it off.
4. Remember Prior Connections
This option allows the Miracast Adapter to remember the devices
that have connected to it previously. Enabling this option will
allow your device to pair with the Miracast Video Adapter without
having to push the Multipurpose button. (Some handsets do not
support this function and may require a button push each time.)
5. Wi-Fi Band
The Miracast Video Adapter is capable of broadcasting and receiving
signals on both the 2.4GHz and 5.0GHz band. Select on which
band you would prefer to pair your smart device to the Adapter. The
Miracast Video Adapter will attempt to pair with your smart device
using the band selected. If a connection can’t be made on the
selected band, the Adapter will automatically try the other frequency.
21
Page 24

MIRACAST VIDEO ADAPTER’S INTERFACES
Advanced Web Interface
The web interface can be accessed from a device that has
Wi-Fi. The web interface is only available when the Adapter
is in Advanced Settings Mode. You will know whether your
Adapter is in Advanced Settings Mode if the TV screen reads
“Firmware Update.” To enter Advanced Settings Mode on
the Miracast Video Adapter, please follow these steps:
1. Power the Miracast Video Adapter off by unplugging the attached
USB cable or turn the T V of f if the Adapter is powered by the TV.
2. Press and hold the Multipurpose button located
on the side of the Miracast Video Adapter.
3. While still holding the Multipurpose button, plug the USB cable back
in and continue to hold it until the Firmware Update page appears.
22
Page 25

MIRACAST VIDEO ADAPTER’S INTERFACES
4. Once the Firmware Update page appears, use a laptop or desktop
with Wi-Fi and connect to a network called ”Wi-Fi-Video-Receiver.”
5. Using a browser, navigate to http://192.168.16.1
23
Page 26

MIRACAST VIDEO ADAPTER’S INTERFACES
6. You will be prompted to enter a Username and Password; the
Username is “admin” and the password is also “admin.”
24
Page 27

MIRACAST VIDEO ADAPTER’S INTERFACES
System Info
This screen will list the technical information related to
your Miracast Adapter. Information listed here includes:
Hardware Version, Firmware Version, SSID, Hardware
Address, Discovery Channel, and Operating Channel.
Firmware Upgrade
To update the firmware on the Miracast Video
Adapter, please follow these steps:
1. Download the new firmware file to a desktop or laptop computer that
can connect to a Wi-Fi network in a location you will remember.
2. You must put the Adapter in Advanced Settings Mode. To do this,
power the Miracast Video Adapter off by unplugging the USB cable.
3. Press and hold the Multipurpose button located
on the side of the Miracast Video Adapter.
4. While still holding the Multipurpose button, plug the USB cable back
in and continue to hold it until the Firmware Update page appears.
25
Page 28

MIRACAST VIDEO ADAPTER’S INTERFACES
5. Once the Firmware Update page appears on the T V, use
a laptop or desktop computer with Wi-Fi and connect
to a network called “Wi-Fi-Video-Receiver.”
6. Using a browser, navigate to http://192.168.16.1
26
Page 29

MIRACAST VIDEO ADAPTER’S INTERFACES
7. You will be prompted to enter a Username and Password; the
Username is “admin” and the password is also “admin.”
8. The User Interface should appear in the navigation menu
on the lef t side. Click on the link to Firmware Upgrade.
27
Page 30

MIRACAST VIDEO ADAPTER’S INTERFACES
9. Click on the Choose File button and locate the
firmware file you downloaded in step one.
10. Once the firmware file has been selected,
push the Upgrade button.
11. After pressing the Upgrade button, a bar will appear on the bottom
of your TV screen indicating the progress of the firmware update.
Do not power off your TV or the Miracast Adapter during this time.
28
Page 31

MIRACAST VIDEO ADAPTER’S INTERFACES
12. Once the progress bar is filled, you will need to go back
to your computer and press the Reboot button.
13. After pushing the reboot button, a screen will appear indicating
that the firmware update is in progress. Do not power off your TV
or the Adapter at this time, the Adapter will reboot on its own.
29
Page 32

MIRACAST VIDEO ADAPTER’S INTERFACES
14. Once the Miracast Adapter reboots for the final
time, you will be back at the main screen.
Note: The Miracast Video Adapter may take 5–10 minutes to
complete the update process. During this time please do
not power off your T V or unplug the Adapter from its power
source. During the upgrade process your computer will
disconnect from the Adapter; at that point you can close
your web browser. Once the firmware upgrade has been
completed, the Miracast Video Adapter will reboot on its own.
Channel Selection Priority
To improve your Miracast Video Adapter’s performance in some
environments, you have the choice of allowing your smartphone to
choose which wireless channel to use for communication or you can
allow the Miracast Adapter to choose the channel with the least noise.
30
Page 33

TROUBLESHOOTING
The Adapter won’t fit in my TV due to insufficient room.
Due to the dimensions of the Miracast Video Adapter, some customers
may have difficulty plugging the Video Adapter into an open HDMI
port due to the design of the TV or because it has been mounted to
a wall. To resolve this issue, we have provided an HDMI extension
cable to place between the TV and the video adapter. The cable
will be located in or under the tray inside your product’s box.
My TV doesn’t have a USB port or the
USB por t is too far away to use.
Some TVs may not have come with a built-in USB port to power
the Miracast Video Adapter or the TV may simply be too big
for the 3-foot cable that was provided with your purchase to
reach from where it is plugged into the HDMI port. There are
two options to choose from that can resolve this issue:
You can substitute the provided USB cable with any USB cable,
provided that it is a USB A to Micro USB B cable. Or, if a power
outlet is close enough, you may want to consider using an AC to
USB power adapter capable of supplying 5V and 500mA of power.
Power LED does not come ON; Adapter is not working.
If the LED indicators are not ON, the problem may be that
the Adapter is not connected or installed properly. Verify that
the Adapter is plugged firmly into the USB port and power
supply, keeping in mind all ports on a T V may not provide
power. Finally, ensure the TV is switched on. If this doesn’t
resolve the issue, contact Belkin Technical Support.
Is my smar t device compatible with the Miracast Video Adapter?
We have tested the Miracast Video Adapter with the most popular
Android devices. However, due to the wide range of Android devices
that are available on the market, we weren’t able to test every
single product. For a list of devices that we tested, please go to
http://belk.in/mira1234. If your device does not appear on the list,
consult your device’s manufacturer for compatibility with Miracast.
I’m having problems pairing my smart device with the Adapter.
First, please follow the steps on page 9 to pair your device. You will
want to determine if your smart device is compatible with Miracast.
The following link contains a list of devices that were tested at Belkin:
http://belk.in/mira1234. If your device does not appear on the list,
consult your device’s manufacturer for compatibility with Miracast.
If your device does support Miracast, please ensure that your
Miracast Adapter’s firmware is up to date. You can check the
latest firmware version available here “http://www.belkin.com/
support”. The firmware version that is running on the Adapter can
be found by accessing the Adapter’s Settings page. For instructions
on how to update the firmware on the Adapter, please reference
the “Firmware Upgrade” section on page 24 of this manual.
Try disabling Remember Prior Connections in the Miracast
Settings page (accessed from your TV), or try changing
the Authentication Mode described on page 23.
31
Page 34

TROUBLESHOOTING
Video is not displaying correctly on the screen/no display.
If your device is not mirroring onto your TV properly or there is
no display at all, it could either be caused by interference or
because the HDCP settings on the Adapter are incorrect for
your specific smart device. Try moving your device closer to
the Miracast Adapter to see if this alleviates the problem.
If you aren’t seeing any display at all, try adjusting the HDCP settings
in the Miracast User Interface. Determine which HDCP version
your smart device uses by consulting its manual or contacting
the manufacturer or try turning HDCP off. By default, HDCP 2.0 is
selected. You can also try setting Enable Non-Compliant HDCP to on.
Also try removing sources of Wi-Fi interference like Wi-Fi net works
and other 2.4GHz and 5GHz devices. Try disconnecting your
Miracast device from any Wi-Fi networks before you start Miracast.
I can’t navigate the Miracast Video Adapter ’s
menus using my TV remote.
To be able to use the TV’s remote control, both the T V and
the remote need to be able to control HDMI CEC. HDMI
CEC may also be referred to as any of the following:
Anynet+ (Samsung)
Aquos Link (Sharp)
BRAVIA Link & BRAVIA Sync (Sony)
E-link (AOC)
Kuro Link (Pioneer)
CE-Link & Regza Link (Toshiba)
RIHD (Onk yo)
RuncoLink (Runco International)
T-Link (ITT)
HDAVI Control (Panasonic)
EZ-Sync (Panasonic)
VIERA Link (Panasonic)
EasyLink (Philips)
NetCommand for HDMI (Mitsubishi)
If your brand-name TV was not listed here, please consult
your TV/remote user manual or manufacturer.
Note: LG SimpLink is not compatible with HDMI-CEC
and will not work with the Miracast User Interface.
You will also need to ensure that the Miracast Adapter is
plugged into a CEC-enabled HDMI port on your TV and
that the TV is on the CEC input source channel.
32
Page 35

TROUBLESHOOTING
There is a delay between the smart device and TV.
Wireless technology is radio-based, which means connectivity
and the throughput performance between devices decreases
when the distance between devices increases. Other factors
that will cause signal degradation (metal is generally the worst
culprit) are obstructions such as walls and metal appliances. As
a result, the typical indoor range of your wireless devices will be
between 10 to 50 feet. In order to determine if wireless issues are
related to range, we suggest temporarily moving the smart device,
if possible, to 5 to 10 feet away from Miracast Video Adapter. If
you find that range was the problem, try changing the frequency
band to the option that isn’t selected and see if that resolves any
issues. You may also want to consider taking your smart device
off of your home Wi-Fi network while leaving the Wi-Fi radio on.
Please also ensure that both the Miracast Video Adapter’s firmware
and your smart device’s software are up to date with the latest version.
Technical Support
US
http://www.belkin.com/support
UK
http://www.belkin.com/uk/support
Australia
http://www.belkin.com/au/support
New Zealand
http://www.belkin.com/au/support
Europe
http://www.belkin.com/uk/support
33
Page 36

INFORMATION
FCC Statement
DECLARATION OF CONFORMITY WITH FCC RULES
FOR ELECTROMAGNETIC COMPATIBILITY
We, Belkin International, Inc., of 12045 E. Waterfront Drive, Playa
Vista, CA 90094, declare under our sole responsibility that the
product, F7D7501v1, to which this declaration relates, complies
with Part 15 of the FCC Rules. Operation is subject to the following
two conditions: (1) this device may not cause harmful interference,
and (2) this device must accept any interference received,
including interference that may cause undesired operation.
Caution: Exposure to Radio Frequency Radiation. The radiated
output power of this device is far below the FCC radio frequency
exposure limits. Nevertheless, the device shall be used in such a
manner that the potential for human contact during normal operation
is minimized. In order to avoid the possibility of exceeding the FCC
radio frequency exposure limits, human proximity to the antenna
shall not be less than 20cm (8 inches) during normal operation.
Federal Communications Commission Notice
This equipment has been tested and found to comply with the
limits for a Class B digital device, pursuant to Part 15 of the FCC
Rules. These limits are designed to provide reasonable protection
against harmful interference in a residential installation.
This equipment generates, uses, and can radiate radio frequency
energy and, if not installed and used in accordance with the
instructions, may cause harmful interference to radio communications.
However, there is no guarantee that interference will not occur
in a particular installation. If this equipment does cause harmful
interference to radio or television reception, which can be determined
by turning the equipment off and on, the user is encouraged to try
to correct the interference by one of the following measures:
• Reorient or relocate the receiving antenna.
• Increase the distance between the equipment and the receiver.
• Connect the equipment to an outlet on a circuit different
from that to which the receiver is connected.
• Consult the dealer or an experienced radio/TV technician for help.
FCC Caution: Any changes or modifications not expressly
approved by the party responsible for compliance could
void the user’s authority to operate this equipment.
This device is going to be operated in 5.15~5.25GHz frequency
range; it is restricted to indoor environments only.
Modifications
The FCC requires the user to be notified that any
changes or modifications to this device that are not
expressly approved by Belkin International, Inc., may
void the user’s authority to operate the equipment.
34
Page 37

INFORMATION
Belkin International, Inc., Limited 2-Year Product Warranty
What this warranty covers.
Belkin International, Inc. (“Belkin”) warrants to the original
purchaser of this Belkin product that the product shall be free
of defects in design, assembly, material, or workmanship.
What the period of coverage is.
Belkin warrants the Belkin product for two years.
What will we do to correct problems?
Product Warranty.
Belkin will repair or replace, at its option, any defective product free of
charge (except for shipping charges for the product). Belkin reserves the
right to discontinue any of its products without notice, and disclaims any
limited warranty to repair or replace any such discontinued products.
In the event that Belkin is unable to repair or replace the product (for
example, because it has been discontinued), Belkin will offer either a
refund or a credit toward the purchase of another product from Belkin.
com in an amount equal to the purchase price of the product as evidenced
on the original purchase receipt as discounted by its natural use.
What is not covered by this warrant y?
All above warranties are null and void if the Belkin product is not provided
to Belkin for inspection upon Belkin’s request at the sole expense
of the purchaser, or if Belkin determines that the Belkin product has
been improperly installed, altered in any way, or tampered with. The
Belkin Product Warranty does not protect against acts of God such
as flood, earthquake, lightning, war, vandalism, theft, normal-use
wear and tear, erosion, depletion, obsolescence, abuse, damage due
to low voltage disturbances (i.e. brownouts or sags), non-authorized
program, or system equipment modification or alteration.
35
Page 38

INFORMATION
How to get service.
To get service for your Belkin product you must take the following steps:
1. Contact Belkin International, Inc., at 12045 E. Waterfront Drive,
Playa Vista, CA 90094, Attn: Customer Service within 15 days of
the Occurrence. Be prepared to provide the following information:
a. The part number of the Belkin product.
b. Where you purchased the product.
c. When you purchased the product.
d. Copy of original receipt.
2. Your Belkin Customer Service Representative will then
instruct you on how to forward your receipt and Belkin
product and how to proceed with your claim.
Belkin reserves the right to review the damaged Belkin product. All
costs of shipping the Belkin product to Belkin for inspection shall be
borne solely by the purchaser. If Belkin determines, in its sole discretion,
that it is impractical to ship the damaged equipment to Belkin, Belkin
may designate, in its sole discretion, an equipment repair facility to
inspect and estimate the cost to repair such equipment. The cost, if
any, of shipping the equipment to and from such repair facility and
of such estimate shall be borne solely by the purchaser. Damaged
equipment must remain available for inspection until the claim is finalized.
Whenever claims are settled, Belkin reserves the right to be subrogated
under any existing insurance policies the purchaser may have.
How state law relates to the warranty.
THIS WARRANTY CONTAINS THE SOLE WARRANTY OF BELKIN.
THERE ARE NO OTHER WARRANTIES, EXPRESSED OR, EXCEPT AS
REQUIRED BY LAW, IMPLIED, INCLUDING THE IMPLIED WARRANTY
OR CONDITION OF QUALIT Y, MERCHANTABILIT Y OR FITNESS FOR A
PARTICULAR PURPOSE, AND SUCH IMPLIED WARRANTIES, IF ANY,
ARE LIMITED IN DURATION TO THE TERM OF THIS WARRANTY.
Some states do not allow limitations on how long an implied
warranty lasts, so the above limitations may not apply to you.
IN NO EVENT SHALL BELKIN BE LIABLE FOR INCIDENTAL, SPECIAL,
DIRECT, INDIRECT, CONSEQUENTIAL OR MULTIPLE DAMAGES
SUCH AS, BUT NOT LIMITED TO, LOST BUSINESS OR PROFITS
ARISING OUT OF THE SALE OR USE OF ANY BELKIN PRODUCT,
EVEN IF ADVISED OF THE POSSIBILITY OF SUCH DAMAGES.
This warranty gives you specific legal rights, and you may also have
other rights, which may vary from state to state. Some states do
not allow the exclusion or limitation of incidental, consequential, or
other damages, so the above limitations may not apply to you.
36
Page 39

© 2013 Belkin Inte rnati onal, In c. All righ ts reserved. Al l trade nam es are registere d tradem arks of
respe ctive ma nufacturer s listed. Wi ndows and Windows Vi sta are either registere d tradem arks or
trademarks of Mi crosoft Corp orati on in the United State s and/or other countries .
 Loading...