

Page 1
User Manual
F5U302ea
Wireless USB Hub
EN
FR
DE
NL
ES
IT
Page 2

Page 3

1. Introduction ....................................................................1
Features ........................................................................3
System Requirements ...................................................3
Package Contents .........................................................3
Product Description ......................................................4
2. Installation ................................................................ 5-12
3. Operation .................................................................
13-19
Devices Tab ................................................................
13
Advanced Tab ............................................................. 17
System Tray ................................................................18
Uninstalling the Software ............................................19
4. Maintenance ............................................................
20-24
Troubleshooting .........................................................20-23
Support for USB Classes ............................................... 24
Wireless Link Out of Range ............................................24
Extended or External Wired USB Hub Connections ...... 24
5. Technical Specifications ................................................
25
6. Information ..............................................................26-29
Table of Contents
Page 4

Page 5

EN-1
Introduction
1
2
3
4
5
6
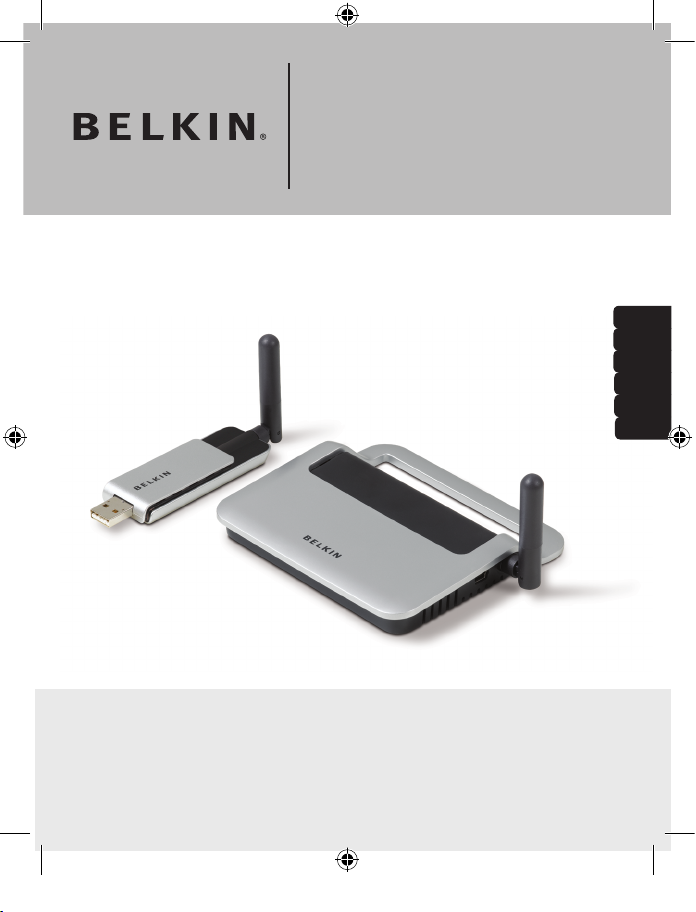
Congratulations and thank you for purchasing the Belkin
Wireless USB Hub. This revolutionary product lets you
connect all your USB devices to your computer—wirelessly.
Now you can print, play music, scan, download photos, and
burn CDs from anywhere within the room, up to 10m (30 feet)
away, without the hassle of connecting cables. The Hub is
easy to use and gives you the freedom to roam—and stay
connected.
Please review this User Manual carefully so that you are sure
to get the most from your Wireless USB Hub.
Page 6
EN-2
Introduction
1
2
3
4
5
6
EN-3
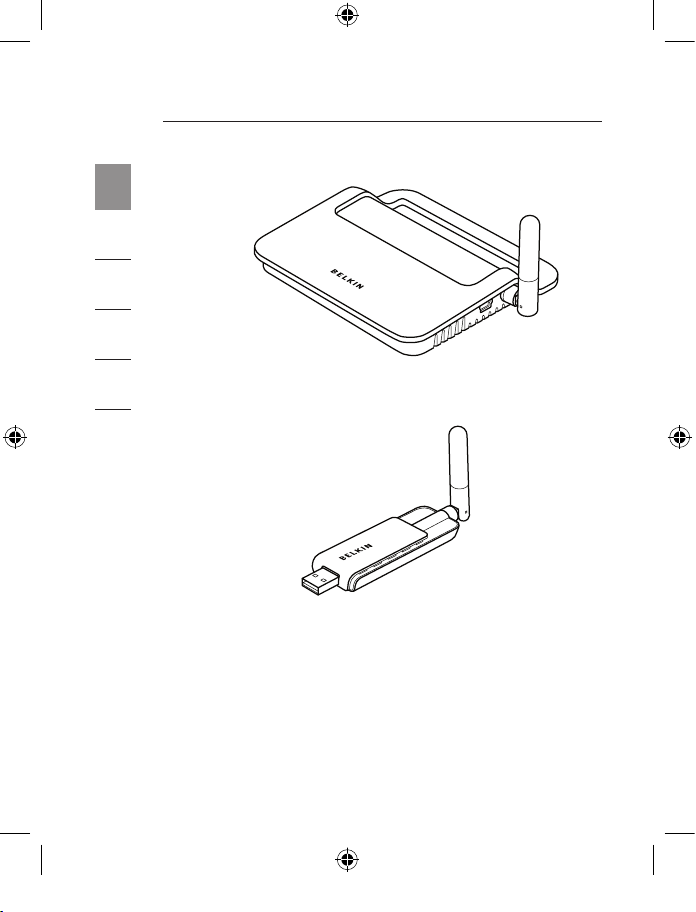
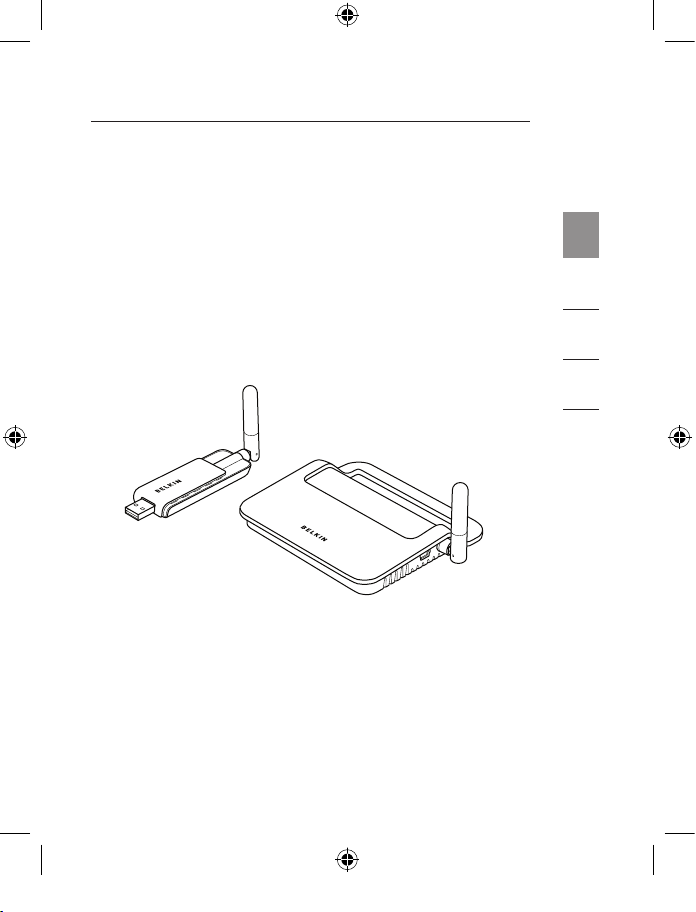
Figure 1: Wireless USB Hub
Figure 2: Wireless USB Adapter
Page 7

EN-3
Introduction
1
2
3
4
5
6
Features
• Wireless connectivity through USB technology for printers,
cameras, scanners, and other devices to your computer,
from up to 10m (30 feet) away
• Reduced cable clutter
• Ports for linking up to 4 high-, full-, and low-speed devices
with your computer
• Belkin Lifetime Warranty
System Requirements
• Pentium® processor-based computer (or equivalent) with
available Hi-Speed USB 2.0 port
• Windows
®
XP with Service Pack 2
or
• Windows Vista™ 32-bit/64-bit
Package Contents
• Wireless USB Hub
• Wireless USB Adapter
• Wireless USB Adapter Dock
• Power Adapter
• USB Cable (A to mini-B)
• Installation CD
• User Manual
• Quick Start Guide
Page 8
EN-4
Introduction
1
2
3
4
5
6
Product Description
Upstream USB Ports: 1
Downstream USB Ports: 4
Per-Port Voltage: 5V
Per-Port Current: 500mA
Power Mode: Self-powered
Power Supply:
Input: 100–240 50/60Hz
Output: 5V DC, 3A
Plug Size: 3.5mm
Plug Polarity: Center-pin positive
LED Indicators
Wireless Status LED (Adapter)
Color: Blue
Status: Blinks when a wireless connection is established
Wireless Status LED (Hub)
Color: Blue
Status: Constant on, when power supply is connected;
blinks to indicate a wireless connection
USB Port Status Indicator LED (Hub Only)
Individual-status LED for each downstream port
Color: Bicolor, green or amber
Status: Off: No USB device plugged in
(or device not enumerated)
Green: USB device enumerated
Amber: Over-current condition
Page 9
Installation
1
2
3
4
5
6
The Wireless USB Hub installation process consists of four
main steps:
Step 1: Initial driver installation
The driver installer places all Hub and Adapter drivers into
their proper folders and creates necessary registry entries.
Step 2: Cable-association procedure
You set up the Wireless USB Hub’s security by connecting
the Hub to the computer via a USB cable.
Step 3: Wireless USB Hub installation
This step completes installation of the Hub.
Step 4: Wireless USB Adapter installation
This final step completes installation of the Adapter.
Page 10

EN-6
1
2
3
4
5
6
Installation
EN-7
Initial Driver Installation
1. Insert the Belkin driver-installation CD into your CD
drive. After a few moments, the setup application should
appear on your computer screen.
Note: If the setup application does not appear, double-click
“My Computer”, and then click your CD-drive icon.
This will load the setup-applications main page.
2. Click the “Install Driver” button.
3. The driver installer will launch. Choose either 32bit or
64bit then click “Next”.
4. Accept the license agreement. Then, click “Next”.
5. Enter a user name, if desired. Then, click “Next”.
6. Click “Next” to accept the default folder location; or
select “Change” to specify an alternate folder location.
7. Click “Install”.
8. Click “Finish” to complete the driver-install process.
9. The Wireless USB Control Center will now be displayed
on your Windows desktop. Leave the Control Center
open on your Windows desktop and proceed to the
“Cable-Association Procedure” below.*
Note for Windows Vista Users: You must open the
Wireless USB Control Center manually. Double-click the
“Wireless USB Control Center” icon found in the Windows
system tray, which is located in the bottom, right-hand
corner of the Windows desktop.
Page 11

EN-7
Installation
1
2
3
4
5
6
Cable-Association Procedure
When you initially install the Hub, you must “associate” it
with the host computer. To do this, connect the Hub to
your computer using the provided USB cable. This “cable
association” procedure allows the computer and Hub to
share information that is used to establish a secure wireless
connection.
1. Plug the power supply into the wall, and then plug the
DC connector into the Hub.
2. Attach the Hub to your computer using a standard USB
cable (mini-B to USB-A connector).
a. Plug the “Mini B” connector into the port next to the
Hub antenna.
b. Plug the “USB A” connector into a USB port on the
host computer.
c. After a few moments, the Windows “Found New
Hardware Wizard” will launch.*
Note for Windows Vista Users
: You will not see the dialog
noted in step 3. Proceed to step 4.
3. There are four separate drivers to install in this step:
a. Belkin Cable Association Device
b. Belkin Cable Association RCI Device
c. Belkin Cable Association DFU Interface
d. Belkin Cable Association Interface
Page 12

EN-8
1
2
3
4
5
6
Installation
EN-9
The Windows “Found New Hardware” Wizard installs each
of these drivers separately, one after the other.
4. After all four drivers have been installed, a pop-up
window displays the prompt, “The security setup for the
device Belkin... is now complete”.*
5. For additional confirmation that the association process
is complete, look in the upper, right-hand corner of the
Wireless USB Control Center for the message, “Cable
attached”.
6. Remove and store the USB cable.
Page 13

EN-9
Installation
1
2
3
4
5
6
Automatic Connect Feature
When the cable-association procedure is completed, the
Hub automatically connects to the host computer whenever
it is within operating range. To associate with another Hub,
follow the instructions for “Cable-Association Procedure”, on
page 7. Multiple Hubs may be associated with a single-host
PC. Likewise, a single Hub may be associated with multiple
hosts.*
*Important Note: Even though it is possible for the Hub
to store association information for more than one host
computer, only one of the hosts can access the Hub at any
given time.
Installing the Wireless USB Adapter
1. Insert the Wireless USB Adapter into an available USB
2.0 port.*
2. There are five separate driver modules to install in this
step:
a. Belkin Wireless USB HWA
b. Belkin HWA Radio Control Interface
c. Belkin HWA DFU Interface
d. Belkin Host Wire Adapter
e. Belkin Wireless USB Hub
Page 14

EN-10
1
2
3
4
5
6
Installation
EN-11
The Windows “Found New Hardware” Wizard installs each of
these drivers separately, one after the other.
3. After the Wireless USB Adapter is installed, the Wireless
USB Control Center will display up to five green bars
under the “Connected Column” (depending upon signal
strength). The blue LEDs on the Adapter and the Hub will
begin to flash. The Hub is now fully operational.
Confirming Proper Installation
To confirm that the Wireless USB Hub is properly installed,
check the Windows Device Manager. In the Device Manager,
you should see: “Belkin Host Wire Adapter”, “Belkin HWA
DFU Interface”, “Belkin HWA Radio Control Interface”, and
“Belkin Wireless USB Hub”.
Page 15
EN-11
Installation
1
2
3
4
5
6
Proper Orientation of Antennas
By design, Ultra-Wideband technology (UWB) radios
transmit at very low power levels. To achieve peak
performance, it is important to properly orient the antennas
on the Hub and Adapter.
As a general rule, the antennas should be positioned in a
vertical orientation relative to the horizontal plane. Please
see drawings below for an explanation. We also recommend
that you place the antennas in a direct line-of-sight
orientation.
Page 16

EN-12
1
2
3
4
5
6
Installation
Remote Adapter Stand
When the Adapter is to be attached to a desktop or tower
computer, you might need to position it in a remote location.
The included Adapter Stand allows you to position the
Adapter up to six feet away from the host computer.
Using the Wireless USB Control Center
The user interface for the Wireless USB Control Center
consists of a window with three tabs. These tabs are:
• Devices
• Advanced
• Administration
Page 17

Operation
1
2
3
4
5
6
Devices Tab
The “Devices” tab shows all Wireless USB devices available
for use on the host computer. From the “Devices” tab, you
can set the connection mode, and view or delete association
information.
Connection Tab
Page 18
EN-14
Operation
1
2
3
4
5
6
EN-15
You can view the device’s connection options by clicking
the connection tab for any device. If the device is available
but currently not connected, you can click the “Connect”
button on this screen to connect it, and click one of the
radio buttons to determine how the device will connect in
the future. Your choices are:
a. Auto connect to this device. The device will always
connect automatically with no prompting from the
user, when it is within range.
b. Prompt before connecting to this device. In this
mode, the device prompts the user to connect
through a tray bubble, when it is within range.
c. Manually connect to this device. The device will
not prompt the user when it is in within range of
the computer. This choice requires you to go to
the connection options and click the “Connect”
button each time you want to link the device to your
computer.
Page 19

EN-15
Operation
1
2
3
4
5
6
Properties Tab
Select the “Properties” tab to change the name of the
Wireless USB device. (The image above shows the
“Properties” section of the “Device” tab.)
Page 20

EN-16
Operation
1
2
3
4
5
6
EN-17
Security Setup Tab
The “Security Setup” option allows the user to remove a
Wireless USB Hub from the list of known devices. To access
the Hub again in the future, follow the steps in the “CableAssociation Procedure” section on page 7.
Page 21
EN-17
Operation
1
2
3
4
5
6
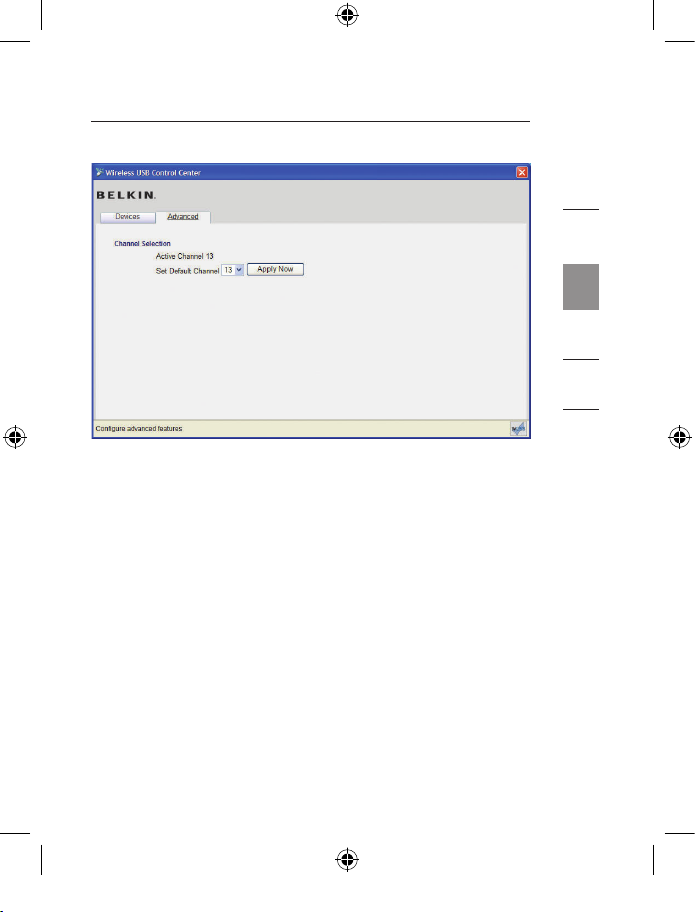
Advanced Tab
The “Advanced” tab displays the active Wireless USB
channel, and provides an option to choose the default
channel:
Clicking the “Apply Now” button will save the selected
default channel, and re-initialize the Hub. This button can be
used without changing any parameters to reset and reload
the Wireless Hub driver.
Page 22
EN-18
Operation
1
2
3
4
5
6
EN-19
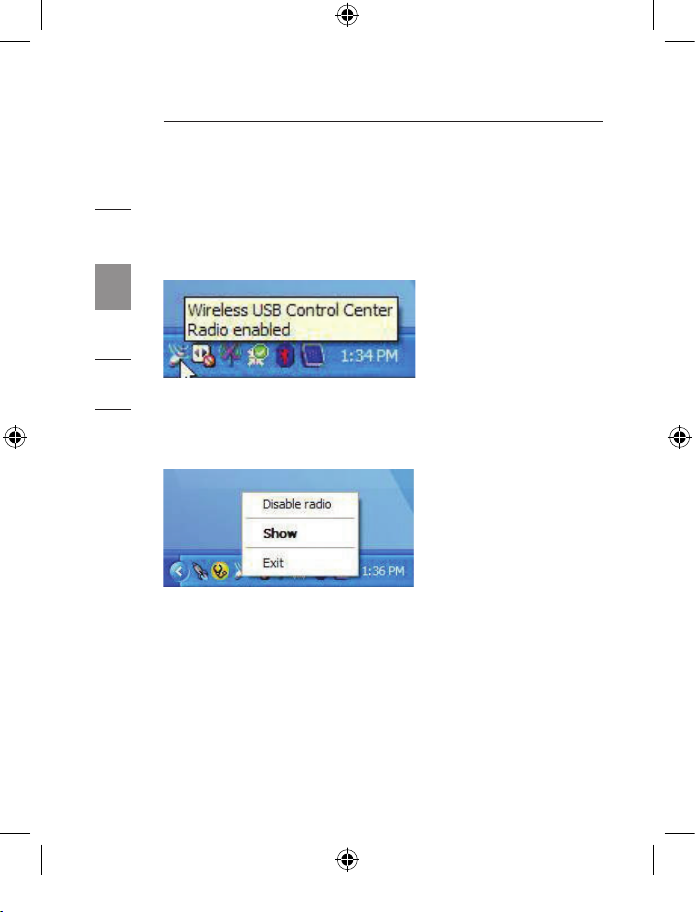
System Tray
When the Wireless USB Control Center is running, the
“Wireless USB Control Center” icon displays in the Windows
System Tray. Place your mouse over the icon to see whether
the radio is enabled or disabled.
Right-clicking this icon gives you the option to exit the
application, hide/show the application window, or disable/
enable the radio.
Double-clicking this icon will bring up the “Wireless USB
Control Center” application window. Alternatively going to
“Start > Programs > Belkin Wireless USB > Wireless USB
Control Center” can be used to launch the application.
Page 23

EN-19
Operation
1
2
3
4
5
6
Uninstalling the Software
If you need to uninstall the software, you can do so by using
the automatic uninstaller or by using the “Windows Control
Panel > Add or Remove Programs” utility.
To uninstall the software:
1. Detach the Adapter from the USB port of the PC.
1.1 Select “Uninstall” from “Start > Programs >
Belkin Wireless USB”.
OR
1.2 Use the “Windows Control Panel > Add or
Remove Programs” utility under “Belkin”.
Page 24
The following sections provide maintenance information and
troubleshooting advice.
Troubleshooting
1. How do I delete a computer that has been previously
set up to work with my Hub?
The Wireless USB Hub maintains a list of computers to
which it can connect securely. To delete one computer
from the list, plug the included USB cable (or one like it)
into the Hub and computer, as you did during the initial
setup. After a few seconds, a new “Administration” tab
will appear in the Wireless USB Control Center. Select
the “Administration tab” and view a list of the computers
that have been set up to communicate with this Hub.
Follow the instructions on the screen to delete one or
more computers from this list.
2. I have gone through the cable-association procedure,
but still cannot connect to the Hub.
Check that the power supply is connected and that the
blue LED on the Hub is lit.
If you are sure there is power to the Hub, open the
Wireless USB Control Center. On the “Devices” tab,
your Hub should be one of the devices listed. If it is not,
perform the cable-association procedure again.
If you see your device listed, make sure that it says
“Connected” and you see green bars indicating that it
is connected. If the software says “Not Available”,
move your Hub closer to the computer to see if that
fixes the problem.
EN-20
Maintenance
1
2
3
4
5
6
Page 25
EN-21
Maintenance
1
2
3
4
5
6
If neither of those steps work, try resetting your Hub by
unplugging the power-supply connector from the back
of the Hub, waiting a few moments, and then plugging it
back in.
Note: After doing this, you must repeat the cable-
security setup.
3. I have a device installed but I still can’t seem to connect
to it. What should I check before contacting Technical
Support?
Have you completed the one-time cable-association
procedure? If so, please verify that the device you set up
appears in the “Devices” page of the Wireless USB Control
Center. If it does
not, try the security-setup process again,
following the instructions carefully. You will be prompted
when the process has completed successfully. Do not
unplug the cable until you receive this message.
Try moving the devices very close together to determine
if a connection can be made. Once the connection has
been made, begin moving them further apart to determine
the maximum operating distance for your environment.
Note that this distance could be reduced by large solid
objects placed between the two devices, such as a wall or
refrigerator. The best setup places the devices in a line-ofsight orientation.
Check the Windows Device Manager and verify that
there are no “Unknown” devices that are related to the
installation of the Wireless USB Hub. If they are related
to the installation of the Wireless USB Hub, please try
reinstalling the drivers or restarting the “Found New
Hardware” Wizard to see if it will install the drivers properly.
If this does not clear up the issue, please contact Technical
Support.
Page 26
Check the blue LED status lights on both the Wireless
USB Adapter and Hub. When there is a good wireless
connection between the two, the blue LEDs flash at a
constant rate.
Open the “Wireless USB Control Center” application,
select the “Advanced” tab, and try changing to a different
channel. Then, see if the devices will connect.
Ascertain that power is being applied to both devices
(you can refer to the power LEDs at this point for
verification). Try resetting the power to both devices, and
then try the connection again.
Verify that the host USB port on your system (the one to
which you have connected the Hub) works properly. Do
this by connecting another USB device to it.
If you are using any additional extension cables for
connection, please remove them, and then retest the
connection.
If possible, try the entire Hub and Adapter installation
process on another PC to determine if there is a problem
with only the current system.
EN-22
Maintenance
1
2
3
4
5
6
Page 27

Verify the following by referring to your computer
manufacturer’s support information:
A. that your system has the latest drivers
(available from the manufacturer) installed for the
system’s chipset;
B. that your system is using the latest BIOS (“basic
input/output system”, software that controls basic
computer functions).
4. What does the status light mean?
The blue LED blinks when an active connection exists
between your computer and the Hub.
5. I have two hubs in my house. I can only get one at a
time to run.
You may have a situation in which both setups are
trying to access the same channel. Open the Wireless
USB Control Center and click on the “Advanced” tab.
By default, both should operate instantly in the same
environment. If both hubs are set to the same channel,
change one of them to a different channel.
8. I keep getting the message, “No Channels Available”,
when I try to use one of my hubs. What does
that mean?
If you have multiple hubs in the same environment, you
may have reached the limit of available channels. Free up
a channel by disconnecting Wireless USB communication
on one of the configured setups.
EN-23
Maintenance
1
2
3
4
5
6
Page 28

Support for USB Classes
Audio devices (“USB Audio” class) and some webcams (“USB
Video” class), which have isochronous end points, are not
supported by the Hub.
Wireless Link Out of Range
If you are experiencing frequent wireless-link breaks, the Hub
may be out of range—the solution is to shorten the range
between the Adapter and Hub.
Extended or External Wired USB Hub Connections
If you are connecting the Adapter to a PC via an external
wired USB hub, we recommend that you:
• Apply external power to the wired USB hub.
• When installing the Hub ensure it is located within easy
reach of a power socket to reduce trailing cables
• Do not connect the external hub during initial connect
and driver installation.
EN-24
Maintenance
1
2
3
4
5
6
Page 29

EN-25
Technical Specifications
1
2
3
4
5
6
Model Number F5U302ea — Wireless USB Adapter
F5U302ea — Wireless USB Hub
UWB Chipset
WiQuest® WQST110 BB/MAC + WQST101
RF IC
Operational Range Up to 10m (30 ft.)
PHY Data Rate Up to 480Mbps (automatically selected)
Frequency Range 4.2GHz to 4.8GHz
RF Modulation Type Multiband OFDM
Max. Output Power 80 μW (-41.25 dBm/MHz max.)
Max. Power Consumption Adapter — 2.1W (420mA max. @ 5VDC from
USB port)
Hub — 15W (3A @ 5VDC from external power
supply)
USB End-Point Types Bulk In/Out, Interrupt, Control
Number of End Points
20
USB Power Drive Powers up to 4 USB external devices (500mA
@ 5VDC each)
USB Association Type Host GUI-based association
LED Indicators Wireless link, Hub port status
PCB Size Adapter — 21mm x 63mm
Hub — 61mm x 94mm
Antenna Adapter — external UWB omnidirectional
antenna
Hub — external UWB omnidirectional antenna
Operating Temperature Range 0° C to 40° C (32° F to 104° F)
Operational Humidity Less than 95%
PHY Compliance Complies with WiMedia
®
PHY spec. rev. 1.0
FCC Compliance Complies with FCC CFR 47 Part 15 subpart F;
UWB intentional radiation and subpart B
CE Compliance Conforms to standard EN 302 065
USB Hub Compliance Complies with USB 2.0/1.1
OS Compliance
Microsoft® Windows XP SP2; Windows Vista;
Windows Vista 32-bit/64-bit; Windows Plug-
and-Play-compliant
Coexistence Coexists with standard WiMedia devices
Coexistence with co-located additional
dongles or Wireless USB systems (FFI, TFI
schemes)
Page 30
EN-26
Information
1
2
3
4
5
6
EN-27
This product complies to the WEEE directive. For recycling
information please follow the following link: www.belkin.com/
environmental
At 3 October 2007 this device may be used in : Germany,
Switzerland, Iceland, Lichtenstein, Poland, Estonia, Czech
Republic, Norway, Finland, Luxembourg, Denmark, Spain,
Portugal, Sweden, United Kingdom, Estonia, Bosnia and
Herzegovina, Ireland and Belgium. Please see national
legislation or Recommendation 70-03 implementation table
for current position http://www.ero.dk/
Belkin International, Inc., Limited Lifetime Product
Warranty
What this warranty covers.
Belkin International, Inc. (“Belkin”) warrants to the original
purchaser of this Belkin product that the product shall
be free of defects in design, assembly, material, or
workmanship.
What the period of coverage is.
Belkin warrants the Belkin product for the lifetime of the
product.
What will we do to correct problems?
Product Warranty.
Belkin will repair or replace, at its option, any defective
product free of charge (except for shipping charges for the
product).
Page 31

EN-27
Information
1
2
3
4
5
6
What is not covered by this warranty?
All above warranties are null and void if the Belkin product is not
provided to Belkin for inspection upon Belkin’s request at the
sole expense of the purchaser, or if Belkin determines that the
Belkin product has been improperly installed, altered in any way,
or tampered with. The Belkin Product Warranty does not protect
against acts of God (other than lightning) such as flood, earthquake,
war, vandalism, theft, normal-use wear and tear, erosion, depletion,
obsolescence, abuse, damage due to low voltage disturbances (i.e.
brownouts or sags), non-authorized program, or system equipment
modification or alteration.
How to get service.
To get service for your Belkin product you must take the
following steps:
1. Contact Belkin Ltd. Express Business Park, Shipton Way,
Rushden, NN10 6GL, United Kingdom, Attn: Customer
Service, or call (800)-223-5546, within 15 days of the
Occurrence. Be prepared to provide the following information:
a. The part number of the Belkin product.
b. Where you purchased the product.
c. When you purchased the product.
d. Copy of original receipt.
2. Your Belkin Customer Service Representative will then instruct
you on how to forward your receipt and Belkin product and
how to proceed with your claim.
Belkin reserves the right to review the damaged Belkin product.
All costs of shipping the Belkin product to Belkin for inspection
shall be borne solely by the purchaser. If Belkin determines,
in its sole discretion, that it is impractical to ship the damaged
equipment to Belkin, Belkin may designate, in its sole discretion,
an equipment repair facility to inspect and estimate the cost
Page 32

EN-28
Information
1
2
3
4
5
6
EN-29
to repair such equipment. The cost, if any, of shipping the
equipment to and from such repair facility and of such
estimate shall be borne solely by the purchaser. Damaged
equipment must remain available for inspection until the
claim is finalized. Whenever claims are settled, Belkin
reserves the right to be subrogated under any existing
insurance policies the purchaser may have.
How state law relates to the warranty.
THIS WARRANTY CONTAINS THE SOLE WARRANTY OF BELKIN.
THERE ARE NO OTHER WARRANTIES, EXPRESSED OR, EXCEPT AS
REQUIRED BY LAW, IMPLIED, INCLUDING THE IMPLIED WARRANTY
OR CONDITION OF QUALITY, MERCHANTABILITY OR FITNESS FOR A
PARTICULAR PURPOSE, AND SUCH IMPLIED WARRANTIES, IF ANY,
ARE LIMITED IN DURATION TO THE TERM OF THIS WARRANTY.
Some states do not allow limitations on how long an implied
warranty lasts, so the above limitations may not apply to
you.
IN NO EVENT SHALL BELKIN BE LIABLE FOR INCIDENTAL, SPECIAL,
DIRECT, INDIRECT, CONSEQUENTIAL OR MULTIPLE DAMAGES SUCH
AS, BUT NOT LIMITED TO, LOST BUSINESS OR PROFITS ARISING
OUT OF THE SALE OR USE OF ANY BELKIN PRODUCT, EVEN IF
ADVISED OF THE POSSIBILITY OF SUCH DAMAGES.
This warranty gives you specific legal rights, and you may
also have other rights, which may vary from state to state.
Some states do not allow the exclusion or limitation of
incidental, consequential, or other damages, so the above
limitations may not apply to you.
Page 33

EN-29
Information
1
2
3
4
5
6
Page 34

Belkin Tech Support
UK: 0845 607 77 87
Europe: www.belkin.com/support
Belkin Ltd.
Express Business Park
Shipton Way, Rushden
NN10 6GL, United Kingdom
+44 (0) 1933 35 2000
+44 (0) 1933 31 2000 fax
Belkin SAS
130 rue de Silly
92100 Boulogne-Billancourt, France
+33 (0) 1 41 03 14 40
+33 (0) 1 41 31 01 72 fax
© 2007 Belkin International, Inc. All rights reserved. All trade names are registered
trademarks of respective manufacturers listed. Windows, Windows Vista, and
Microsoft are either registered trademarks or trademarks of Microsoft Corporation
in the United States and/or other countries. P75427ea
Belkin GmbH
Hanebergstrasse 2
80637 Munich, Germany
+49 (0) 89 14 34 05 0
+49 (0) 89 14 34 05 100 fax
Belkin B.V.
Boeing Avenue 333
1119 PH Schiphol-Rijk, The Netherlands
+31 (0) 20 654 7300
+31 (0) 20 654 7349 fax
Belkin Iberia
Avda. Cerro del Aguila 3
28700 San Sebastián de los Reyes, Spain
+34 91 625 80 00
+34 902 02 00 34 fax
Wireless USB Hub
067 3
Page 35

Manuel de l’utilisateur
F5U302ea
Hub USB Sans Fil
FR
Page 36

Page 37

1. Introduction ....................................................................1
Caractéristiques ............................................................ 3
Configuration requise ....................................................3
Contenu de l’emballage ................................................3
Description du produit .................................................. 4
2. Installation ................................................................ 5-12
3. Fonctionnement .......................................................13-19
Onglet Périphériques .................................................. 13
Onglet Avancé ............................................................. 17
Barre des tâches ......................................................... 18
Désinstallation du logiciel ........................................... 19
4. Entretien ..................................................................20-24
Dépannage ................................................................20-23
Prise en charge des classes USB ..................................24
Liaison sans fil hors de portée ....................................... 24
Connexions USB filaires étendues ou externes ............. 24
5. Caractéristiques techniques .........................................
25
6. Information ..............................................................26-29
Table des matières
Page 38

Page 39

FR-1
Introduction
1
2
3
4
5
6
Félicitations et merci d’avoir choisi le Hub USB sans fil de
Belkin. Ce produit innovant vous permet de connecter tous
vos périphériques USB à votre ordinateur, sans fil. Désormais,
vous pouvez imprimer, écouter de la musique, numériser,
télécharger des photos et graver des CD de partout dans
la même pièce, dans un rayon d 10 mètres, sans devoir
brancher un seul câble. Le hub est simple d’utilisation et vous
permet de vous déplacer tout en restant connecté.
Veuillez lire attentivement ce manuel afin de profiter
pleinement de votre tout nouveau Hub USB sans fil Belkin.
Page 40

FR-2
Introduction
1
2
3
4
5
6
FR-3
Figure 1 : Hub USB sans fil
Figure 2 : Adaptateur USB sans fil
Page 41

FR-3
Introduction
1
2
3
4
5
6
Caractéristiques
• Connectivité USB sans fil pour imprimantes, appareils-
photo, scanneurs et autres périphériques à votre
ordinateur, jusqu’à 10 mètres.
• Réduction de l’encombrement dû aux câbles
• Ports pour la connexion de 4 périphériques à faible, plein
et haut débit sur votre ordinateur
• Garantie à vie de Belkin
Configuration requise
• Ordinateur à base de processeur Pentium® équipé d’un
port USB 2.0 à haut débit
• Windows
®
XP avec Service Pack 2
ou
• Windows Vista™ 32 bits/64 bits
Contenu de l’emballage
• Hub USB sans fil
• Adaptateur USB sans fil
• Adaptateur/station d’accueil USB sans fil
• Bloc d’alimentation
• Câble USB (A vers mini B)
• CD d’installation
• Manuel de l’utilisateur
• Guide de démarrage rapide
Page 42

FR-4
Introduction
1
2
3
4
5
6
Description du produit
Ports USB en voie ascendante : 1
Ports USB en voie descendante : 4
Tension par port : 5 V
Intensité par port : 500 mA
Mode d’alimentation : Autonome
Bloc d’alimentation :
Entrée : 100 – 240, 50/60 Hz
Sortie : 5 VCC, 3 A
Taille de la prise : 3,5 mm
Polarité de la prise : Polarité positive sur
la broche centrale
Voyants lumineux
Voyant d’état sans fil (adaptateur)
Couleur : Bleu
État : Clignote lorsqu’une connexion sans fil est établie
Voyant d’état sans fil (hub)
Couleur : Bleu
État : Allumé en continu, lorsqu’alimenté en courant ;
clignote pour indiquer une connexion sans fil
Voyant des ports USB (hub uniquement)
Voyant individuel pour chaque port en voie descendante
Couleur : Bicolore, vert ou ambré
État : Éteint : Aucun périphérique USB branché
(ou périphérique non reconnu)
Vert : Périphérique USB reconnu
Ambré : Surintensité détectée
Page 43

Installation
1
2
3
4
5
6
Le processus d’installation du Hub USB sans fil consistent
en quatre étapes principales :
Étape 1 : Installation initiale du pilote
Le programma d’installation du pilote installe les pilotes du
hub et de l’adaptateur dans leurs dossiers respectifs et crée
les entrées nécessaires dans le registre.
Étape 2 : Procédure d’association par câble
Pour configurer la sécurité du Hub USB sans fil, connectez
le hub à l’ordinateur à l’aide d’un câble USB.
Étape 3 : Installation du Hub USB sans fil
Cette étape termine l’installation du hub.
Étape 4 : Installation de l’adaptateur USB sans fil
Cette étape termine l’installation de l’adaptateur.
Page 44

FR-6
1
2
3
4
5
6
Installation
FR-7
Installation initiale du pilote
1. Insérez le CD d’installation des pilotes Belkin dans le
lecteur de CD. Après quelques instants, le programme
d’installation apparaît à l’écran.
Remarque : S’il n’apparaît pas, cliquez deux fois sur
« My Computer [Poste de travail] », puis
cliquez sur l’icône du lecteur de CDROM. La page principale du programme
d’installation devrait apparaître.
2. Cliquez sur le bouton « Install Driver [Installer le pilote] ».
3. Le programme d’installation du pilote démarre. Choisissez
32 bits ou 64 bits, puis cliquez sur « Next [Suivant] ».
4. Acceptez les termes du contrat de licence. Ensuite,
cliquez sur « Next [Suivant] ».
5. Entrez un nom d’utilisateur, si désiré. Ensuite, cliquez sur
« Next [Suivant] ».
6. Cliquez « Next [Suivant] » pour accepter l’emplacement
par défaut, ou sélectionnez « Change [Changer] » pour
choisir un autre emplacement.
7. Cliquez « Install [Installer] ».
8. Cliquez sur « Finish [Terminer] » pour terminer l’installation
du pilote.
9. Le « Wireless USB Control Center » apparaît maintenant
sur le bureau de Windows. Laissez le Control Center
ouvert sur votre bureau Windows et passez à la procédure
d’association par câble ci-dessous.*
Page 45

FR-7
Installation
1
2
3
4
5
6
Remarque aux utilisateurs de Windows Vista : Vous devez
ouvrir le Control Center manuellement. Cliquez deux fois sur
l’icône « Wireless USB Control Center » de la barre de tâches
Windows, située à l’angle inférieur droit du bureau Windows.
Procédure d’association par câble
Lors de l’installation initiale du hub, vous devez l’associer
avec l’ordinateur hôte. Pour ce faire, connectez le hub à
votre ordinateur à l’aide du câble USB fourni. La procédure
d’association par câble permet à l’ordinateur et au hub de
partager des informations qui seront utilisées pour établir une
connexion sans fil.
1. Branchez l’adaptateur d’alimentation à la prise murale, et
branchez ensuite le connecteur CC au hub.
2. Connectez le hub à votre ordinateur à l’aide d’un câble USB
standard (connecteurs mini B et USB A).
a. Branchez le connecteur mini B au port situé à côté de
l’antenne du hub.
b. Branchez le connecteur USB A sur un port USB de
l’ordinateur hôte.
c. Après quelques instants, l’assistant Ajout de nouveau
matériel apparaît à l’écran.*
Remarque aux utilisateurs de Windows Vista
: Vous ne
verrez pas la boîte de dialogue mentionnée à l’étape 3. Passez
à l’étape 4.
3. Il y a quatre pilotes à installer au cours de cette étape :
a. Belkin Cable Association Device
b. Belkin Cable Association RCI Device
c. Belkin Cable Association DFU Interface
d. Belkin Cable Association Interface
Page 46

FR-8
1
2
3
4
5
6
Installation
FR-9
L’assistant Ajout de nouveau matériel de Windows installe
ces pilotes séparément, l’un après l’autre.
4. Lorsque les quatre pilotes sont installés, une fenêtre
contextuelle avec le message « The security setup for the
device Belkin... is now complete [La configuration de la
sécurité est terminée] » apparaît.*
5. Pour confirmer que le processus d’association est
terminé, regardez dans l’angle supérieur droit du Wireless
USB Control Center pour la mention « Cable attached
[Câble branché] ».
6. Retirez et rangez le câble USB.
Page 47

FR-9
Installation
1
2
3
4
5
6
Fonction de connexion automatique
Lorsque la procédure d’association par câble est terminée,
le hub se connecte automatiquement à l’ordinateur hôte
lorsque celui-ci se trouve dans la portée de fonctionnement.
Pour l’association avec un autre hub, suivez les instructions
de la procédure d’association par câble en page 7. Il est
possible d’associer plusieurs hubs à un seul PC hôte. De
même, il est possible pour un seul hub d’être associé avec
de multiples hôtes.*
*Remarque importante : Bien qu’il soit possible pour le hub
de stocker des informations d’association pour plus d’un
ordinateur hôte, un seul de ces hôtes ne peut accéder au
hub à la fois.
Installation de l’adaptateur USB sans fil
1. Insérez l’adaptateur USB sans fil dans un port USB 2.0
libre.*
2. Il y a cinq modules de pilotes à installer au cours de cette
étape :
a. Belkin Wireless USB HWA
b. Belkin HWA Radio Control Interface
c. Belkin HWA DFU Interface
d. Belkin Host Wire Adapter
e. Belkin Wireless USB Hub
Page 48

FR-10
1
2
3
4
5
6
Installation
FR-11
L’assistant Ajout de nouveau matériel de Windows installe ces
pilotes séparément, l’un après l’autre.
3. Après l’installation de l’adaptateur USB sans fil,le Wireless
USB Control Center montre jusqu’à cinq traits verts sous la
colonne « Connected [Connecté] » (en fonction de la force
du signal). Le voyant bleu de l’adaptateur et du hub se met
à clignoter. Le hub est maintenant prêt à l’emploi.
Confirmation de l’installation
Pour confirmer l’installation du Hub USB sans fil, vérifiez le
Gestionnaire de périphériques Windows. Dans le Gestionnaire
de périphériques, vous devriez voir : « Belkin Host Wire
Adapter », « Belkin HWA DFU Interface », « Belkin HWA Radio
Control Interface » et « Belkin Wireless USB Hub ».
Page 49

FR-11
Installation
1
2
3
4
5
6
Orientation des antennes
De par leur conception, les antennes radio Ultra-Wideband
technology (UWB) émettent à de très faibles puissances.
Pour obtenir une performance maximale, il importe d’orienter
correctement les antennes du hub et de l’adaptateur.
De manière générale, les antennes devraient être orientées
à la verticale, perpendiculairement au plan horizontal.
Consultez les illustrations ci-dessous pour de plus amples
explications. Nous recommandons également de placer les
antennes en visibilité directe.
Page 50

FR-12
1
2
3
4
5
6
Installation
Socle de l’adaptateur
Lorsque l’adaptateur doit être branché à un ordinateur de
bureau ou à boîtier tour, il est possible que vous deviez le
placer à un endroit éloigné de l’ordinateur. Le socle pour
adaptateur fourni vous permet de placer l’adaptateur jusqu’à
1,8 mètres de l’ordinateur hôte.
Utilisation du Wireless USB Control Center
L’interface utilisateur du Wireless USB Control Center consiste
en une fenêtre avec trois onglets. Ces onglets sont :
• Périphériques
• Avancé
• Administration
Page 51

Fonctionnement
1
2
3
4
5
6
Onglet Périphériques
L’onglet « Devices [Périphériques] » montre tous les
périphériques USB sans fil disponibles pour utilisation avec
l’ordinateur hôte. À partir de l’onglet Périphériques, vous
pouvez définir le mode de connexion, et voir ou supprimer
des informations d’association.
Onglet Connexion
Page 52

FR-14
Fonctionnement
1
2
3
4
5
6
FR-15
Vous pouvez voir les options de connexion du périphérique
en cliquant sur l’onglet Connexion, pour n’importe quel
périphérique. Si le périphérique est disponible mais non
connecté actuellement, vous pouvez cliquer sur le bouton
« Connect [Connexion] » à cet écran pour le connecter,
et cliquer sur l’un des boutons de sélection pour définir
comment la connexion s’effectuera par la suite. Vous aurez
les options suivantes :
a. Connexion automatique à ce périphérique.
Le
périphérique se connectera automatiquement sans
action de l’utilisateur, lorsque le périphérique se
trouve dans la portée de fonctionnement.
b. Notification avant la connexion à ce périphérique.
Dans ce mode, le périphérique invite l’utilisateur à ce
connecter via une info-bulle dans la barre des tâches,
lorsque le périphérique se trouve dans la portée de
fonctionnement.
c. Connexion manuelle à ce périphérique. Le
périphérique n’enverra pas de notification à
l’utilisateur lorsqu’il se trouve dans la portée sans
fil de l’ordinateur. Il est alors nécessaire d’aller aux
options de connexion et de cliquez sur le bouton
« Connect [Connexion] » chaque fois que vous désirez
relier le périphérique à votre ordinateur.
Page 53

FR-15
Fonctionnement
1
2
3
4
5
6
Onglet Propriétés
Sélectionnez l’onglet « Properties » (Propriétés) pour
modifier le nom du dispositif USB sans fil. (L’image
ci-dessus montre la section Propriétés de l’onglet
Périphérique.)
Page 54

FR-16
Fonctionnement
1
2
3
4
5
6
FR-17
Onglet Configuration de la sécurité
L’option « Security Setup » (Configuration de la sécurité)
permet à l’utilisateur de retirer le Hub USB sans fil de la liste
des périphériques connus. Pour accéder au hub de nouveau
par la suite, suivez les étapes à la section concernant la
procédure d’association avec câble, en page 7.
Page 55

FR-17
Fonctionnement
1
2
3
4
5
6
Onglet Avancé
L’onglet « Advanced » (Avancé) affiche le canal USB sans fil
actif et permet également de choisir le canal par défaut :
cliquer sur le bouton « Apply Now [Appliquer maintenant] »
aura pour effet de sélectionner le canal par défaut et
réinitialiser le hub. Ce bouton peut servir à réinitialiser et
recharger le pilote du hub sans fil, sans modifier aucun
paramètre.
Page 56

FR-18
Fonctionnement
1
2
3
4
5
6
FR-19
Barre de tâches
Lorsque le Wireless USB Control Center est en cours
d’exécution, l’icône du Wireless USB Control Center
apparaît dans la barre de tâches Windows. Placez le curseur
de la souris sur l’icône pour savoir si la radio est activée ou
désactivée.
Cliquez avec le bouton droit de votre souris sur l’icône pour
quitter l’application, afficher/masquer la fenêtre d’application
ou activer/désactiver la radio.
Cliquez deux fois sur cette icône pour faire apparaître la
fenêtre d’application du Wireless USB Control Center. Vous
pouvez également aller à « Démarrer > Programmes >
Belkin Wireless USB > Wireless USB Control Center » pour
démarrer l’application.
Page 57

FR-19
Fonctionnement
1
2
3
4
5
6
Désinstallation du logiciel
Si vous devez désinstaller le logiciel, vous pouvez le faire
à l’aide du programme de désinstallation automatique ou
à l’aide de l’utilitaire Ajout/Suppression de programmes du
Panneau de configuration.
Pour désinstaller le logiciel :
1. Débranchez l’adaptateur du port USB de l’ordinateur.
1.1 Sélectionnez « Uninstall [Désinstaller] » sous
« Démarrer > Programmes >
Belkin Wireless USB ».
OU
1.2 Utilisez l’utilitaire Ajout/Suppression de
programmes du Panneau de configuration, sous
« Belkin ».
Page 58

Les sections suivantes présentent des informations d’entretien
et de dépannage.
Dépannage
1. Comment puis-je supprimer un ordinateur qui avait été
configuré de sorte à ce qu’il puisse fonctionner avec
mon hub ?
Le Hub USB sans fil conserve une liste d’ordinateurs auxquels
il peut se connecter de façon sécuritaire. Pour supprimer un
ordinateur de la liste, branchez le câble USB fourni (ou un
câble similaire) au hub et à l’ordinateur, comme vous l’aviez
fait pour l’installation initiale. Après quelques secondes, un
onglet « Administration » apparaît dans l’interface du Wireless
USB Control Center. Sélectionnez l’onglet Administration
pour voir une liste des ordinateurs qui ont été configurés pour
communiquer avec ce hub. Suivez les instructions à l’écran
pour supprimer ou ou plusieurs ordinateur(s) de la liste.
2. J’ai suivi la procédure d’association par câble, mais je ne
peux me connecter au hub.
Assurez-vous que l’adaptateur secteur est bien branché et
que le voyant bleu sur le hub est allumé.
Si vous êtes certain que le hub est sous tension, ouvrez le
Wireless USB Control Center. Sous l’onglet Périphériques,
votre hub devrait apparaître parmi les périphériques
énumérés. Si ce n’est pas le cas, recommencez la procédure
d’association par câble.
Si votre dispositif apparaît dans la liste, assurez-vous que
la mention « Connected [Connecté] » et des tirets verts
apparaissent, indiquant qu’il est connecté. Si le logiciel
indique « Not Available [Indisponible] », rapprochez le hub de
l’ordinateur afin de vérifier si cela résous le problème.
FR-20
Entretien
1
2
3
4
5
6
Page 59

FR-21
Entretien
1
2
3
4
5
6
Si aucune de ces solutions ne parvient à résoudre le problème,
essayez de réinitialiser le hub en débranchant le câble
d’alimentation à l’arrière du hub. Patientez quelques instants,
puis rebranchez-le. Remarque : Après avoir réinitialisé le hub,
vous devez recommencer la procédure de configuration de la
sécurité par câble.
3. Un périphérique est installé, mais je ne peux m’y
connecter. Que puis-je vérifier avant de communiquer avec
l’assistance technique ?
Avez-vous terminé la procédure initiale d’association par câble
? Si c’est le cas, assurez-vous que le périphérique configuré
apparaît à la page Périphériques du Wireless USB Control
Center. Si ce n’est pas le cas, recommencez la procédure de
configuration de la sécurité, en suivant les instructions à la
lettre. Vous recevrez une notification lorsque la procédure a été
complété avec succès. Ne débranchez pas le câble tant que
vous n’avez pas reçu ce message.
Essayez de rapprocher les périphériques afin de vérifier si
une connexion peut être établie. Lorsqu’une connexion est
établie, éloignez-les quelque peu pour déterminer la portée de
fonctionnement maximale pour votre environnement. Prenez note
que cette distance peut être réduite par des objets solides situés
entre les deux périphériques, tels qu’un mur ou un réfrigérateur.
Les dispositifs sans fil offrent de meilleures performances
lorsqu’ils sont placés en visibilité directe.
Vérifiez le Gestionnaire de périphériques Windows et assurezvous qu’aucun périphérique ‘inconnu’ relatif à l’installation du
Hub USB sans fil n’y apparaît. S’ils sont reliés à l’installation
du Hub USB réseau, essayez de réinstaller les pilotes ou de
redémarrer l’assistant Ajout de nouveau matériel, afin de vérifier
si l’assistant installe adéquatement les pilotes. Si le problème
n’est pas résolu, communiquez avec l’assistance technique.
Page 60

Vérifiez les voyants d’état bleus sur l’Adaptateur
USB sans fil et sur le Hub USB sans fil. Lorsqu’une
connexion sans fil adéquate a été établie entre les deux
périphériques, les voyants bleus clignotent régulièrement.
Ouvrez l’application Wireless USB Control Center,
sélectionnez l’onglet Avancé et essayez de modifier le
canal. Ensuite, vérifiez si les périphériques peuvent se
connecter.
Assurez-vous que les deux périphériques sont alimentés
(vous pouvez référer au voyant d’alimentation à
cette étape de vérification). Essayez de réinitialiser
l’alimentation pour les deux périphériques, et réessayez
la connexion.
Assurez-vous que le port USB hôte de votre système
(celui ayant servi à connecter le hub) fonctionne
adéquatement. Pour ce faire, connectez-y un autre
périphérique USB.
Si vous utilisez des câbles de rallonge supplémentaires
pour la connexion, retirez-le et testez de nouveau la
connexion.
Si possible, recommencez le processus d’installation
du hub et de l’adaptateur sur un autre PC, afin de
déterminer s’il y a un problème avec le système actuel.
FR-22
Entretien
1
2
3
4
5
6
Page 61

Vérifiez les éléments suivants en consultant les
informations de dépannage fournies par le fabricant de
votre ordinateur :
A. votre système est doté des pilotes les plus récents
(disponible auprès du fabricant), installés pour le jeu
de puces du système ;
B. votre système est doté du plus récent BIOS (logiciel
« basic input/output system », qui contrôle les
fonctions de base de l’ordinateur).
4. Que signifie le voyant d’état ?
Le voyant bleu clignote lorsqu’une connexion active
existe entre votre ordinateur et le hub.
5. J’ai deux hubs chez moi, mais un seul ne fonctionne à
la fois.
Il est possible que deux configurations essaient
d’accéder au même canal. Ouvrez le Wireless USB
Control Center et cliquez sur l’onglet Avancé. Par défaut,
les deux devraient pouvoir fonctionner immédiatement
dans le même environnement. Si les deux hubs sont
réglés au même canal, modifiez le canal de l’un d’entre
eux.
8. J’obtiens le message « No Channels Available [Aucun
canal disponible] » lorsque je veux utiliser l’un de mes
hubs. Que signifie ce message ?
Si vous avez plusieurs hubs dans le même
environnement, il est possible que vous ayez atteint le
nombre limite de canaux disponibles. Libérez un canal
en déconnectant la communication sans fil USB sur l’une
des configurations installées.
FR-23
Entretien
1
2
3
4
5
6
Page 62

Prise en charge des classes USB
Les dispositifs audio (classe USB Audio) et certaines
cybercaméras (classe USB Vidéo), qui ont des terminaisons
isochrones, ne sont pas pris en charge par le hub.
Liaison sans fil hors de portée
Si vous subissez de fréquentes déconnexions de la liaison
sans fil, il se peut que le hub soit hors de la portée sans fil.
Rapprochez l’adaptateur et le hub.
Connexions USB filaires étendues ou externes
Si vous connectez l’adaptateur à un PC via un hub USB externe,
nous vous recommandons :
• d’appliquer une source d’alimentation externe au hub USB.
• Lors de l’installation du hub, assurez-vous qu’il soit
situé près d’une prise secteur, afin de réduire le câblage
d’alimentation.
• ne ne pas connecter le hub externe au cours de la
connexion initiale et de l’installation initiale du pilote.
FR-24
Entretien
1
2
3
4
5
6
Page 63

FR-25
Caractéristiques techniques
1
2
3
4
5
6
Numéro du modèle
F5U302ea — Adaptateur USB sans fil
F5U302ea — Hub USB sans fil
Jeu de puces UWB
WiQuest® WQST110 BB/MAC + WQST101 RF IC
Portée de fonctionnement Jusqu’à to 10 mètres
Débit de données physique Jusqu’à 480 Mbps (sélection automatique)
Bande de fréquences 4,2 GHz à 4,8 GHz
Type de modulation RF OFDM multibande
Puissance max. en sortie 80 μW (-41,25 dBm/MHz max.)
Consommation électrique
max.
Adaptateur — 2,1 W (420 mA max. @ 5 V c.c à
partir du port USB)
Hub — 15 W (3A @ 5 V c.c à partir d’une source
d’alimentation externe)
Types de terminaisons USB Entrée/sortie en bloc, Interruption, Gestion
Nombre de terminaisons
20
Alimentation USB Alimente jusqu’à 4 périphériques USB externes
(500 mA @ 5 V c.c. chacun)
Type d’association USB Association par interface utilisateur sur l’hôte
Voyants lumineux Liaison sans fil, état de port hub
Format carte circuit imprimé Adaptateur — 21 mm x 63 mm
Hub — 61 mm x 94 mm
Antenne Adaptateur — antenne UWB omnidirectionnelle
externe
Hub — antenne UWB omnidirectionnelle externe
Température de
fonctionnement
0 °C à 45 °C
Humidité de fonctionnement Inférieure à 95 %
Conformité PHY
Conforme à WiMedia® PHY spec.
rev. 1.0
Conformité FCC Conforme à la CFR 47 alinéa 15 sous-partie F de
la FCC, radiation intentionnelle et sous-partie B
de l’UWB
Conformité CE Conforme à la norme EN 302 065
Conformité du hub USB Conforme avec l’USB 2.0/1.1
Conformité systèmes
d’exploitation
Microsoft® Windows XP SP2; Windows Vista;
Windows Vista 32 bits/64 bits; Windows Plug-
and-Play
Coexistence Coexiste avec les dispositifs standard WiMedia
Coexistence avec clés électroniques colocalisées
supplémentaires ou systèmes Wireless USB
(schémas FFI, TFI)
Page 64

FR-26
Informations
1
2
3
4
5
6
FR-27
Ce produit est conforme à la directive relative aux DEEE
Pour de plus amples informations sur le recyclage, veuillez
visiter : www.belkin.com/environmental
Depuis le 3 octobre 2007, ce produit peut être utilisé dans
les pays suivants : Allemagne, Suisse, Islande, Liechtenstein,
Pologne, Estonie, République Tchèque, Norvège, Finlande,
Luxembourg, Danemark, Espagne, Portugal, Suède,
Royaume-Uni, Estonie, Bosnie-Herzégovine, Irlande et
Belgique. Veuillez consulter la législation de votre pays ou le
plan de mise en œuvre de la Recommandation 70-03 pour
connaître la position actuelle http://www.ero.dk/
Garantie à vie limitée du produit de Belkin International, Inc.
Couverture offerte par la garantie.
Belkin International, Inc. (“Belkin”) garantit à l’acheteur initial
de ce produit Belkin que le produit est exempt de défauts de
conception, de montage, de matériau et de fabrication.
Période de garantie.
Belkin garantit le produit Belkin pour toute la durée de vie du
produit.
En cas de problème
Garantie du produit
Belkin s’engage à réparer ou à remplacer gratuitement, à sa
convenance, tout produit défectueux (sans intervention dans
les frais d’expédition du produit).
Page 65

FR-27
Informations
1
2
3
4
5
6
Limites de la couverture offerte par la garantie.
Toutes les garanties précitées sont nulles et non avenues si le
produit Belkin n’est pas retourné à Belkin, à la demande expresse
de celui-ci, l’acheteur étant responsable de l’acquittement des frais
d’expédition, ou si Belkin détermine que le produit Belkin a été
installé de façon inappropriée ou modifié d’une quelconque manière.
La garantie du produit Belkin n’offre pas de couverture contre les
calamités naturelles (autres que la foudre) comme les inondations,
les tremblements de terre, les actes de guerre, le vandalisme, le
vol, l’usure normale, l’érosion, l’épuisement, l’obsolescence, l’abus,
les dommages provoqués par des perturbations de basse tension
(atténuations et baisses soudaines de tension, par exemple), les
programmes non autorisés ou les modifications au matériel du
système.
Pour une demande d’intervention
Procédez comme suit pour obtenir une réparation de votre
produit Belkin :
1. Écrivez à Belkin Ltd. Express Business Park, Shipton Way,
Rushden, NN10 6GL, Royaume-Uni, à l’attention de :
Customer Service (service client) ou appelez le (800)-2235546 15 jours maximum après l’événement. Préparez-vous à
fournir les informations suivantes :
a. Le numéro de référence du produit Belkin.
b. Le lieu de l’achat du produit.
c. La date de l’achat du produit.
d. Une copie du reçu original.
2. Le représentant du service client Belkin vous indiquera
alors comment envoyer votre facture et le produit Belkin, et
comment présenter votre réclamation.
Belkin se réserve le droit d’examiner le produit Belkin endommagé.
Page 66

FR-28
Informations
1
2
3
4
5
6
FR-29
Tous les frais d’expédition du produit Belkin à l’adresse de
Belkin en vue de son inspection seront entièrement à la charge
de l’acheteur. Si Belkin détermine, à sa seule discrétion, qu’il
est peu pratique d’expédier l’équipement endommagé à Belkin
International, Belkin peut désigner, à sa seule discrétion, une
installation de réparation d’équipement pour inspecter et fournir
un estimé des frais de réparation de cet équipement. Les frais
d’expédition de l’équipement entre le domicile de l’acheteur et
ledit service de réparation ainsi que les frais d’établissement du
dit devis sont entièrement à la charge de l’acheteur. L’équipement
endommagé doit demeurer disponible pour inspection jusqu’à ce
que la réclamation soit finalisée. Lorsqu’un règlement intervient,
Belkin se réserve le droit d’un recours en subrogation sous toute
autre police d’assurance détenue par l’acheteur.
Relation entre le Droit national et la garantie
CETTE GARANTIE NE COMPREND QUE LA GARANTIE BELKIN. BELKIN
REJETTE PAR LE PRÉSENT DOCUMENT TOUTES LES AUTRES
GARANTIES, EXPLICITES OU IMPLICITES, SAUF EXCEPTIONS PRÉVUES
PAR LA LOI, Y COMPRIS MAIS SANS S’Y LIMITER, LES GARANTIES
IMPLICITES AFFÉRENTES À LA QUALITÉ LOYALE ET MARCHANDE
ET À L’ADÉQUATION À UNE FINALITÉ DONNÉE. CES GARANTIES
IMPLICITES, LE CAS ÉCHÉANT, SONT D’UNE DURÉE LIMITÉE AUX
CONDITIONS DE LA PRÉSENTE GARANTIE.
Certains pays ne permettent pas d’imposer de limite à la durée de
validité des garanties implicites. Il se peut donc que les limites cidessus ne s’appliquent pas dans votre cas.
BELKIN NE PEUT EN AUCUN CAS ÊTRE TENU RESPONSABLE DE
DOMMAGES ACCESSOIRES, DIRECTS, INDIRECTS OU MULTIPLES, Y
COMPRIS, MAIS SANS S’Y LIMITER, LES PERTES COMMERCIALES OU
DE REVENUS DÉCOULANT DE LA VENTE OU DE L’UTILISATION DE TOUT
PRODUIT BELKIN, MÊME LORSQU’IL A ÉTÉ AVISÉ DE LA PROBABILITÉ
DES DITS DOMMAGES.
Page 67

FR-29
Informations
1
2
3
4
5
6
La garantie vous confère des droits légaux spécifiques. Vous
pouvez également bénéficier d’autres droits qui varient d’un pays
à l’autre. Certains pays ne permettent pas d’imposer de limite à
la durée de validité des garanties implicites. Il se peut donc que
les limites ci-dessus ne s’appliquent pas dans votre cas.
Page 68

Assistance Technique Belkin
Royaume-Uni : 0845 607 77 87
Europe : www.belkin.com/support
Belkin Ltd.
Express Business Park
Shipton Way, Rushden
NN10 6GL, Royaume-Uni
+44 (0) 1933 35 2000
+44 (0) 1933 31 2000 Fax
Belkin SAS
130 rue de Silly
92100 Boulogne-Billancourt, France
+33 (0) 1 41 03 14 40
+33 (0) 1 41 31 01 72 Fax
© 2007 Belkin International, Inc. Tous droits réservés. Toutes les raisons
commerciales sont des marques déposées de leurs fabricants respectifs. Microsoft,
Windows et Windows Vista sont des marques déposées ou des marques de
commerce de Microsoft Corporation aux États-Unis et/ou dans d’autres pays. P75427ea
Belkin GmbH
Hanebergstraße 2
80637 Munich, Allemagne
+49 (0) 89 14 34 05 0
+49 (0) 89 14 34 05 100 Fax
Belkin B.V.
Boeing Avenue 333
1119 PH Schiphol-Rijk, Pays-Bas
+31 (0) 20 654 7300
+31 (0) 20 654 7349 Fax
Belkin Iberia
Avda. Cerro del Aguila 3
28700 San Sebastián de los Reyes,
Espagne
+34 91 625 80 00
+34 902 02 00 34 Fax
Hub USB Sans Fil
067 3
Page 69

Benutzerhandbuch
F5U302ea
Kabelloser
USB-Hub
DE
Page 70

Page 71

1. Einleitung ........................................................................ 1
Merkmale ....................................................................... 3
Systemvoraussetzungen ............................................... 3
Verpackungsinhalt ......................................................... 3
Produktbeschreibung .................................................... 4
2. Installation ................................................................ 5-12
3. Bedienung ................................................................13-19
Registerkarte „Devices” (Geräte) ................................ 13
Registerkarte „Advanced” (Erweitert) ......................... 17
System-Tray ................................................................18
Deinstallieren der Software ......................................... 19
4. Fehlerbehebung .......................................................20-24
Problemlösung ..........................................................20-23
Unterstützung von USB-Typen ...................................... 24
Verbindungsprobleme außerhalb der Funkreichweite ... 24
Erweiterte oder externe USB-Hub-Verbindungen über ....
Steckeranschluss ........................................................... 24
5. Technische Daten ..........................................................
25
6. Informationen ..........................................................26-29
Inhaltsverzeichnis
Page 72

Page 73

DE-1
Einleitung
1
2
3
4
5
6
Wir freuen uns, dass Sie sich für den Kabellosen USB-Hub
von Belkin entschieden haben. Mit diesem bahnbrechenden
Produkt lassen sich all Ihre USB-Geräte über eine
Funkverbindung mit Ihrem Computer verbinden. Jetzt
können Sie aus einer Entfernung von bis zu 10 Metern
drucken, Musik anhören, scannen, Fotos herunterladen, CDs
brennen - egal wo Sie sich in einem Raum befinden. Das
Anschließen von Kabeln bleibt Ihnen dabei erspart. Der Hub
ist benutzerfreundlich und ermöglicht Ihnen Bewegungsfreiheit
— ohne die Verbindung zu verlieren.
Bitte lesen Sie dieses Benutzerhandbuch genau durch, um
sicherzustellen, dass Sie den Kabellosen USB-Hub wirklich
optimal nutzen.
Page 74

DE-2
Einleitung
1
2
3
4
5
6
DE-3
Abbildung 1: Kabelloser USB-Hub
Abbildung 2: Kabelloser USB-Adapter
Page 75

DE-3
Einleitung
1
2
3
4
5
6
Merkmale
• Kabellose Verbindung von Druckern, Kameras, Scannern
und anderen Geräte mit Ihrem Computer aus bis zu 10 m
Entfernung mit USB-Technologie
• Weniger Kabelgewirr
• Anschlüsse zur Verbindung von 4 High-, Full- und Low-
Speed Geräten mit dem Computer
• Lebenslange Garantie von Belkin
Systemvoraussetzungen
• Computer mit Pentium®-Prozessor und freiem Hi-Speed
USB 2.0-Anschluss
• Windows
®
XP mit Service Pack 2
oder
• Windows Vista™ 32-Bit/64-Bit
Verpackungsinhalt
• Kabelloser USB-Hub
• Kabelloser USB-Adapter
• Kabelloser USB-Adapter Docking-Station
• Netzteil
• USB Kabel (A/Mini-B)
• Installations-CD
• Benutzerhandbuch
• Kurzanleitung
Page 76

DE-4
Einleitung
1
2
3
4
5
6
Produktbeschreibung
PC-USB-Anschlüsse (Upstream): 1
Geräte-USB-Anschlüsse (Downstream): 4
Spannung pro Anschluss: 5 V
Stromstärke pro Anschluss: 500 mA
Stromversorgung: Autark
Netzteil:
Eingang: 100–240 50/60 Hz
Ausgang: 5 V DC, 3 A
Steckergröße: 3,5 mm
Steckerpolarität: Mittelkontakt positiv
LED-Anzeigen
Funkstatus-Anzeige (Adapter)
Farbe: Blau
Status: Blinken bei hergestellter Funkverbindung
Funkstatus-Anzeige (Hub)
Farbe: Blau
Status: Daueranzeige, wenn Netzteil angeschlossen ist;
blinkt zur Anzeige der Funkverbindung
USB-Anschluss Status-Anzeige (nur Hub)
Statusanzeige für jeden Geräte-Anschluss (downstream)
Farbe: Zweifarbig, grün oder orange
Status: Aus: Kein USB-Gerät angeschlossen
(oder Gerät wird nicht aufgeführt)
Grün: USB-Gerät wird aufgeführt
Orange: Überspannung
Page 77

Installation
1
2
3
4
5
6
Die Installation des Kabellosen USB-Hubs erfolgt in vier
Hauptschritten:
Schritt 1: Erstinstallation der Treiber
Die Treiberinstallationssoftware speichert alle Hub- und
Adapter-Treiber in den entsprechenden Ordnern und erstellt
die nötigen Registrierungseinträge.
Schritt 2: Kabelzuordnungsvorgang
Sie richten die Sicherheitsfunktion des Kabellosen USB
Hubs ein, indem Sie den Hub über ein USB-Kabel mit dem
Computer verbinden.
Schritt 3: Installation des Kabellosen USB-Hubs
Mit diesem Schritt wird die Installation des Hubs
abgeschlossen.
Schritt 4: Installation des Kabellosen USB-Adapters
Mit diesem letzten Schritt wird die Installation des Adapters
abgeschlossen.
Page 78

DE-6
1
2
3
4
5
6
Installation
DE-7
Erstinstallation der Treiber
1. Legen Sie die CD mit der Treibersoftware von Belkin in
das CD-ROM-Laufwerk ein. Nach wenigen Augenblicken
erscheint das Installationsprogramm auf dem Bildschirm.
Hinweis: Ist dies nicht der Fall, doppelklicken Sie auf
„Arbeitsplatz” (bzw. Computer) und klicken Sie
dann auf das CD-ROM-Symbol. Dadurch wird die
Hauptseite des Installationsprogramms geladen.
2. Klicken Sie auf die Schaltfläche „Install Driver” (Treiber
installieren).
3. Das Treiberinstallationsprogramm wird gestartet. Wählen
Sie entweder 32 Bit oder 64 Bit; klicken Sie dann auf
„Next” (Weiter).
4. Akzeptieren Sie die Lizenzvereinbarung. Klicken Sie dann
auf „Next” (Weiter).
5. Geben Sie bei Bedarf einen Benutzernamen ein. Klicken
Sie dann auf „Next” (Weiter).
6. Klicken Sie auf „Next” (Weiter), um den Standardordner
als Speicherort zu akzeptieren oder wählen Sie „Change”
(Ändern), um einen alternativen Speicherort festzulegen.
7. Klicken Sie auf „Install” (Installieren).
8. Klicken Sie auf „Finish” (Fertig stellen), um die
Treiberinstallation abzuschließen.
9. Das „Wireless USB Control Center” (Kontrollzentrum
des Kabellosen USB-Hubs) wird jetzt auf Ihrem Desktop
angezeigt. Lassen Sie das Kontrollzentrum auf dem
Windows Desktop geöffnet und fahren Sie mit dem
„Kabelzuordnungsvorgang” unten fort.*
Page 79

DE-7
Installation
1
2
3
4
5
6
Hinweis für Benutzer von Windows Vista: Sie müssen das
„Wireless USB Control Center” (Kontrollzentrum des Kabellosen
USB-Hubs) manuell öffnen. Doppelklicken Sie auf das Symbol
„Wireless USB Control Center” (Kontrollzentrum des Kabellosen
USB-Hubs) im Windows System-Tray unten rechts auf dem
Windows Desktop.
Kabelzuordnungsvorgang
Bei der Erstinstallation des Hubs müssen Sie ihn dem
Hostcomputer „zuordnen”. Schließen Sie den Hub hierzu mit
dem enthaltenen USB-Kabel an den Computer an. Durch
diesen „Kabelzuordnungsvorgang” können Computer und Hub
Daten austauschen, die verwendet werden, um eine sichere
Funkverbindung herzustellen.
1.
Schließen Sie das Netzteil an eine Wandsteckdose an und
stecken Sie den DC-Stecker in den Hub.
2.
Schließen Sie den Hub mit einem Standard USB-Kabel (Mini-
B/A-Stecker) an den Computer an.
a. Stecken Sie den „Mini B”-Stecker in den Anschluss neben der
Hub-Antenne.
b. Stecken Sie den „USB A”-Stecker in den USB-Anschluss am
Host-Computer.
c. Nach kurzer Zeit wird der „Found New Hardware Wizard”
(Hardware-Assistent) von Windows gestartet.*
Hinweis für Benutzer von Windows Vista
: Das Dialogfeld in
Schritt 3 erscheint bei Ihnen nicht. Fahren Sie mit Schritt 4 fort.
3. In diesem Schritt müssen vier Treiber installiert werden:
a. Belkin Cable Association Device (Belkin
Kabelzuordnungsgerät)
b. Belkin Cable Association RCI Device (Belkin
Kabelzuordnungs-RCI-Gerät)
Page 80

DE-8
1
2
3
4
5
6
Installation
DE-9
c. Belkin Cable Association DFU Interface (Belkin
Kabelzuordnungs-DFU-Schnittstelle)
d. Belkin Cable Association Interface (Belkin Kabelzuordnung
sschnittstelle)
Der Hardware-Assistent von Windows installiert diese Treiber
nacheinander.
4. Wenn alle vier Treiber installiert worden sind, erscheint
ein Pop-up-Fenster mit der Meldung „The security setup
for the device Belkin... is now complete” (Die Einrichtung
der Sicherheitsfunktion für dieses Gerät von Belkin ... ist
abgeschlossen.)*
5. Eine zusätzliche Bestätigung, dass der Zuordnungsvorgang
abgeschlossen worden ist, finden Sie oben rechts im
„Wireless USB Control Center”(Kontrollzentrum des
Kabellosen USB-Hubs), wo die Meldung „Cable attached”
(Kabel angeschlossen) erscheint.
6. Entfernen Sie das USB-Kabel und verstauen Sie es.
Page 81

DE-9
Installation
1
2
3
4
5
6
Auto-Connect-Funktion
Wenn der Kabelzuordnungsvorgang abgeschlossen ist,
stellt der Hub automatisch eine Verbindung mit dem
Host-Computer her, wenn er sich in dessen Reichweite
befindet. Folgen Sie für die Zuordnung eines anderen
Hubs mit dem Host-Computer den Anweisungen zum
„Kabelzuordnungsvorgang” auf Seite 7. Einem Single-HostPC können mehrere Hubs zugeordnet werden. Ein einziger
Hub kann ebenfalls mehreren Hosts zugeordnet werden.*
*Wichtiger Hinweis: Obwohl es möglich ist, dass der
Hub Zuordnungsdaten für mehr als einen Host-Computer
speichert, kann jeweils nur einer der Hosts auf den Hub
zugreifen.
Installieren des Kabellosen USB-Adapters
1. Stecken Sie den Kabellosen USB-Adapter in einen freien
USB 2.0-Anschluss.*
2. In diesem Schritt müssen fünf Treiber-Komponenten
installiert werden:
a. Belkin Kabelloser USB-HWA
b. Belkin HWA Funksteuerungsschnittstelle
c. Belkin HWA DFU-Schnittstelle
d. Belkin Host-Wire-Adapter
e. Belkin Kabelloser USB-Hub
Page 82

DE-10
1
2
3
4
5
6
Installation
DE-11
Der Hardware-Assistent von Windows installiert diese Treiber
nacheinander.
3. Wenn der Kabellose USB-Adapter installiert ist, zeigt das
Wireless USB Control Center (Kontrollzentrum des Kabellosen
USB-Hubs) in der Spalte „Connected” (Verbunden) abhängig
von der Stärke des Signals bis zu fünf grüne Leisten. Die
blauen Leuchten auf dem Adapter und dem Hub fangen an zu
blinken. Der Hub ist jetzt betriebsbereit.
Bestätigung der ordnungsgemäßen Installation
Um zu überprüfen, ob der USB-Hub richtig installiert worden
ist, gehen Sie zum Geräte-Manager von Windows: Sie sollten
Folgendes im Geräte-Manager sehen: „Belkin Host Wire
Adapter” (Belkin Host-Wire-Adapter), „Belkin HWA DFU
Interface” (Belkin HWA DFU-Schnittstelle), „Belkin HWA Radio
Control Interface” (Belkin HWA Funksteuerungsschnittstelle)
und „Belkin Wireless USB Hub” (Belkin Kabelloser USB-Hub).
Page 83

DE-11
Installation
1
2
3
4
5
6
Ordnungsgemäße Ausrichtung der Antennen
Bei Funkgeräten, die mit Ultrabreitband-Technologie (UltraWideband technology: UWB) ausgestattet sind, erfolgt die
Übertragung mit wenig Energieverbrauch. Um die beste
Leitung zu erzielen, müssen die Antennen an Hub und
Adapter richtig ausgerichtet sein.
In der Regel sollten die Antennen vertikal zur waagerechten
Fläche ausgerichtet sein. Siehe Abb. unten. Wir empfehlen
auch, die Antennen so auszurichten, dass Sie bei
unverdeckter Sicht Signale empfangen können.
Page 84

DE-12
1
2
3
4
5
6
Installation
Adapter-Standfuß
Wenn der Adapter an einen Desktop- oder Tower-Computer
angeschlossen werden soll, müssen Sie ihn möglicherweise
in einem Abstand vom Computer aufstellen. Der enthaltene
Adapter-Standfuß ermöglicht eine Aufstellung des Adapters
in einer Entfernung von bis zu 1,80 m vom Host-Computer.
Verwendung des „Wireless USB Control Center”
(Kontrollzentrum des Kabellosen USB-Hubs)
Die Benutzeroberfläche des Wireless USB Control Center
(Kontrollzentrum des Kabellosen USB-Hubs) besteht aus
einem Fenster mit drei Registerkarten:
• Devices (Geräte)
• Advanced (Erweitert)
• Administration
Page 85

Bedienung
1
2
3
4
5
6
Registerkarte „Devices” (Geräte)
Die Registerkarte Devices (Geräte) zeigt alle kabellosen
USB-Geräte an, die am Hostcomputer verwendet werden
können an. Auf der Registerkarte „Devices” (Geräte)
können Sie den Verbindungsmodus einstellen oder die
Zuordnungsdaten ansehen oder löschen.
Registerkarte „Connection” (Verbindung)
Page 86

DE-14
Bedienung
1
2
3
4
5
6
DE-15
Sie können sich die Verbindungsoptionen des Geräts ansehen,
indem Sie für alle Geräte auf die Registerkarte „Connection”
(Verbindung) klicken. Wenn das Gerät vorhanden ist, aber
zur Zeit keine Verbindung besteht, können Sie in diesem
Fenster auf die Schaltfläche „Connect” (Verbinden) klicken,
um eine Verbindung herzustellen, und dann auf eines der
Optionsfelder, um festzulegen, wie die Verbindung des Geräts
in der Zukunft hergestellt werden soll. Ihnen stehen die
folgenden Optionen zur Verfügung:
a. Auto connect to this device. (Automatische
Herstellung einer Verbindung mit diesem Gerät)
Es wird immer automatisch, ohne Bestätigung
des Benutzers, eine Verbindung mit diesem Gerät
hergestellt, wenn es sich in der entsprechenden
Reichweite befindet.
b. Prompt before connecting to this device.
(Aufforderung vor Herstellung einer Verbindung
mit diesem Gerät) Wenn sich das Gerät in der
entsprechenden Reichweite befindet, wird der Benutzer
in diesem Modus vom Gerät über ein Dialogfenster
aufgefordert, eine Verbindung herzustellen.
c. Manually connect to this device. (Manuelle
Herstellung einer Verbindung mit diesem Gerät) Das
Gerät fordert den Benutzer nicht über ein Dialogfenster
auf, eine Verbindung herzustellen, wenn es sich in
Reichweite des Computers befindet. Wenn Sie diese
Option wählen, gehen Sie zu den Verbindungsoptionen
und klicken Sie jedes Mal auf „Connect” (Verbinden),
wenn Sie eine Verbindung zwischen dem Gerät und
dem Computer herstellen wollen.
Page 87

DE-15
Bedienung
1
2
3
4
5
6
Registerkarte „Properties” (Eigenschaften)
Wählen Sie die Registerkarte „Properties” (Eigenschaften),
um den Namen des kabellosen USB-Geräts zu ändern.
(Auf der Abbildung oben ist der Abschnitt „Properties”
(Eigenschaften) der Registerkarte „Device” (Gerät)
abgebildet.
Page 88

DE-16
Bedienung
1
2
3
4
5
6
DE-17
Registerkarte „Security Setup” (Einrichtung der
Sicherheitsfunktion)
Mit der Option „Security Setup” (Einrichtung der
Sicherheitsfunktion) können Benutzer einen Kabellosen USBHub in der Liste der bekannten Geräte entfernen. Wenn Sie
in der Zukunft auf den Hub zugreifen wollen, folgen Sie den
Schritten im Abschnitt „Kabelzuordnungsvorgang” auf Seite 7.
Page 89

DE-17
Bedienung
1
2
3
4
5
6
Registerkarte „Advanced” (Erweitert)
Die Registerkarte „Advanced” (Erweitert) zeigt den aktiven
Kanal für das USB-Gerät an und enthält eine Option zur
Auswahl des Standard-Kanals.
Durch Klicken der Schaltfläche „Apply Now” (Jetzt
übernehmen) wird der ausgewählte Standard-Kanal
gespeichert und der Hub erneut eingestellt. Diese Schaltfläche
kann verwendet werden, ohne Parameter zurückzusetzen und
den Kabellosen Hub-Treiber erneut zu laden.
Page 90

DE-18
Bedienung
1
2
3
4
5
6
DE-19
System-Tray
Wenn das Wireless USB Control Center (Kontrollzentrum des
Kabellosen USB-Hubs) aktiv ist, wird das Symbol dafür im
System Tray angezeigt. Ziehen Sie die Maus über das Symbol,
um zu sehen, ob die Funkfunktion aktiv oder inaktiv ist.
Wenn Sie das Symbol mit der rechten Maustaste anklicken,
erhalten Sie die Option, die Anwendung zu beenden, das
Anwendungsfenster ein- oder auszublenden oder die
Funkfunktion zu aktivieren oder zu deaktivieren.
Wenn Sie doppelt auf dieses Symbol klicken, wird das Fenster
des „Wireless USB Control Center” (Kontrollzentrum des
Kabellosen USB-Hubs) geöffnet. Sie können auch über „Start
> Programs > Belkin Wireless USB > Wireless USB Control
Center” (Start > Programme > Belkin Kabelloser USB-Hub >
Kontrollzentrum des Kabellosen USB-Hubs) die Anwendung
starten.
Page 91

DE-19
Bedienung
1
2
3
4
5
6
Deinstallieren der Software
Zur Deinstallation der Software können Sie die automatische
Deinstallationsfunktion verwenden oder über „Windows
Control Panel > Add or Remove Programs” (Windows
Systemsteuerung .> Programme) die Software deinstallieren.
Zur Deinstallation der Software:
1. Entfernen Sie den Adapter vom USB-Anschluss des PCs.
1.1 Wählen Sie unter „Start > Programs >
Belkin Wireless USB”.(Start > Programme .> Belkin
Kabelloser USB-Hub).
ODER
1.2 Verwenden Sie unter „Windows Control Panel >
Add or
Remove Programs” (Windows Systemsteuerung >
Programme) das Dienstprogramm unter „Belkin”.
Page 92

Auf den folgenden Seiten finden Sie Informationen zur
Fehlerbehebung.
Fehlerbehebung
1. Wie kann ich einen Computer entfernen, der bereits zum
Arbeiten mit dem Hub eingerichtet worden ist?
Der Kabellose USB-Hub erstellt eine Liste mit Computern,
mit denen eine sichere Verbindung hergestellt werden kann.
Zur Entfernung eines Computers von der Liste, schließen Sie
das enthaltene USB-Kabel (oder ein vergleichbares) wie bei
der Erstinstallation an Hub und Computer an. Nach ein paar
Sekunden wird die Registerkarte „Administration” im Wireless
USB Control Center (Kontrollzentrum des Kabellosen USB-Hubs)
geöffnet. Wählen Sie die Registerkarte „Administration” aus und
sehen Sie sich die Liste der Computer an, die zur Kommunikation
mit diesem Hub eingerichtet worden sind. Folgen Sie zum
Entfernen von Computern in dieser Liste den Anweisungen auf
dem Bildschirm.
2. Ich habe den Kabelzuordnungsvorgang abgeschlossen, aber ich
kann immer noch keine Verbindung mit dem Hub herstellen.
Überprüfen Sie, ob das Netzteil angeschlossen ist und ob die
blaue LED-Anzeige am Hub leuchtet.
Wenn Sie genau wissen, dass der Hub mit Strom versorgt
wird, öffnen Sie das Wireless USB Control Center
((Kontrollzentrum des Kabellosen USB-Hubs). Auf der
Registerkarte „Devices” (Geräte) müsste der Hub als eines der
Geräte aufgeführt sein. Ist dies nicht der Fall, wiederholen Sie
den Kabelzuordnungsvorgang.
Wenn Ihr Gerät aufgeführt wird, stellen Sie sicher, dass
„Connected” (Verbunden) angezeigt wird, und dass die
grünen Balken anzeigen, dass eine Verbindung besteht.
Wenn die Software „Not Available”
DE-20
Fehlerbehebung
1
2
3
4
5
6
Page 93

DE-21
Fehlerbehebung
1
2
3
4
5
6
(Nicht verfügbar) anzeigt, stellen Sie den Hub in der Nähe
des Computers auf, um zu überprüfen, ob das Problem so
gelöst wird.
Wenn Ihnen keiner dieser beiden Schritte hilft, versuchen
Sie den Hub zurückzusetzen, indem Sie den Stecker des
Netzteils an der Rückseite des Hubs entfernen, ein paar
Minuten warten und ihn wieder anschließen.
Hinweis:
Nach diesem Schritt müssen Sie die Einrichtung der
Sicherheitsfunktion wiederholen.
3. Ich habe das Gerät installiert, aber ich kann immer noch
keine Verbindung herstellen. Was soll ich überprüfen,
bevor ich mich an den technischen Support wende?
Haben Sie den einmaligen Kabelzuordnungsvorgang
abgeschlossen? Ist dies der Fall, überprüfen Sie bitte, ob
das Gerät, das Sie installiert haben auf der Seite „Devices”
(Geräte) im „Wireless USB Control Center” (Kontrollzentrum
des Kabellosen USB-Hubs) aufgeführt wird. Ist dies nicht
der Fall, , starten Sie die Einrichtung der Sicherheitsfunktion
erneut, indem Sie die Anweisungen genau befolgen. Durch
eine Meldung wird Ihnen angezeigt, wenn der Vorgang
erfolgreich abgeschlossen ist. Entfernen Sie das Kabel
nicht, bevor diese Meldung angezeigt wird.
Stellen Sie die Geräte nah bei einander auf, um
sicherzustellen, dass eine Verbindung hergestellt werden
kann. Wenn die Verbindung hergestellt worden ist,
vergrößern Sie den Abstand zwischen den Geräten,
um festzustellen, was die maximale Reichweite in Ihrer
Umgebung ist. Dieser Abstand kann dadurch eingeschränkt
werden, dass sich große Gegenstände zwischen zwei
Geräten befinden - z. B. Wände oder Kühlschranke. Am
besten können Sie die Geräte so aufstellen, dass zwischen
Page 94

ihnen unverdeckte Sicht besteht.
Überprüfen Sie im Windows Device Manager (Windows
Gerätemanager), ob der Installation des Kabellosen
USB-Hubs keine „unbekannten” Geräte zugeordnet sind.
Wenn sie der Installation des Kabellosen USB-Hubs
zugeordnet sind, versuchen Sie die Treiber erneut zu
installieren oder den Hardware-Assistenten zu starten,
um zu überprüfen, ob er die Treiber ordnungsgemäß
installiert. Wenn das Problem auf diese Wiese nicht
gelöst werden kann, nehmen Sie bitte Kontakt mit dem
technischen Support auf.
Überprüfen Sie bitte die blauen Status-LED-Anzeigen am
Kabellosen USB-Adapter und am Hub. Wenn eine gute
Verbindung zwischen beiden besteht, blinken die blauen
LED-Anzeigen in regelmäßigen Intervallen.
Öffnen Sie die Anwendung „Wireless USB Control
Center” (Kontrollzentrum des Kabellosen USB-Hubs),
wählen Sie die Registerkarte „Advanced” (Erweitert) und
versuchen Sie, den Kanal zu ändern. Überprüfen Sie
dann, ob die Geräte eine Verbindung herstellen.
Stellen Sie sicher, dass beide Geräte mit Strom versorgt
werden (sehen Sie sich dazu die Betriebsanzeigen an).
Trennen Sie bei beiden Geräten die Stromverbindung
und schließen Sie die Stromkabel danach wieder an.
Versuchen Sie dann erneut, eine Verbindung herzustellen.
Überprüfen Sie, dass der Host-USB-Anschluss Ihres
Systems (an welches Sie den Hub angeschlossen haben)
ordnungsgemäß funktioniert. Sie sollten hierzu ein
anderes USB-Gerät anschließen.
DE-22
Fehlerbehebung
1
2
3
4
5
6
Page 95

Wenn Sie zusätzliche Verlängerungskabel verwenden,
entfernen Sie diese und überprüfen Sie die Verbindung
erneut.
Versuchen Sie nach Möglichkeit den gesamten Hubund Adapterinstallationsvorgang auf einem anderen PC
durchzuführen, um festzustellen, ob das Problem nur am
derzeit verwendeten Computer auftritt.
Überprüfen Sie in den Informationen, die Sie vom
Hersteller des Computers erhalten haben, Folgendes:
A. ob die neuesten Treiber für den Chipsatz des
Computers
(die der Hersteller zur Verfügung stellt) installiert sind.
B. ob Ihr Computer mit der neuesten BIOS-Software
(basic input/output system) ausgestattet ist, die die
Basisfunktionen des Computers steuert.
4. Was bedeutet die Status-Anzeige?
Die blaue LED-Anzeige blinkt, wenn eine aktive Verbindung
zwischen Computer und Hub hergestellt worden ist.
5. Ich habe zu Hause Hubs. Ich kann jeweils immer nur
einen verwenden.
In manchen Situationen versuchen zwei Installationen auf
denselben Kanal zuzugreifen. Öffnen Sie das „Wireless
USB Control Center” (Kontrollzentrum des Kabellosen
USB-Hubs) und klicken Sie auf die Registerkarte
„Advanced” (Erweitert). Die Voreinstellung ermöglicht
beiden normalerweise den Betrieb in derselben
Umgebung. Wenn beide Hubs auf denselben Kanal
eingestellt sind, sollte der Kanal für einen Hub verändert
werden.
DE-23
Fehlerbehebung
1
2
3
4
5
6
Page 96

8. Ich erhalte immer wieder die Meldung „No Channels
Available” (Keine Kanäle verfügbar), wenn ich versuche,
einen der Hubs zu verwenden. Was bedeutet das?
Wenn Sie in derselben Umgebung mit verschiedenen Hubs
arbeiten, sind vielleicht alle verfügbaren Kanäle belegt.
Trennen Sie die Verbindung eines kabellosen USB-Geräts,
damit Ihnen ein freier Kanal zur Verfügung steht.
Unterstützung von USB-Typen
Audiogeräte (USB Audio) und manche Webcams (USB Video),
die mit isochronen Endpunkten ausgestattet sind, werden
durch den Hub nicht unterstützt.
Verbindungsprobleme außerhalb der Funkreichweite
Wenn Ihre Funkverbindung häufig unterbrochen wird, befindet
sich der Hub möglicherweise außerhalb der Funkreichweite.
Um dieses Problem zu beheben, sollten Sie den Abstand
zwischen Adapter und Hub verringern.
Erweiterte oder externe USB-Hub-Verbindungen über
Steckeranschluss
Wenn Sie den Adapter über einen externen über
Steckeranschluss vernetzten USB-Hub an einen PC
anschließen, empfehlen wir Folgendes:
• Den an den angeschlossenen USB-Hub über externe
Stromquelle mit Strom versorgen
• Stellen Sie bei der Installation des Hubs sicher, dass
er sich in der Nähe einer Steckdose befindet, um das
Verlegen von langen Kabeln zu vermeiden.
• Den externen Hub während der Herstellung der ersten
Verbindung und der Treiberinstallation nicht anschließen
DE-24
Fehlerbehebung
1
2
3
4
5
6
Page 97

DE-25
Technische Daten
1
2
3
4
5
6
Modellnummer F5U302ea — Kabelloser USB-Adapter
F5U302ea — Kabelloser USB-Hub
UWB-Chipsatz (Ultrabreitband)
WiQuest® WQST110 BB/MAC + WQST101 RF IC
Reichweite Bis zu 10 m
PHY-Datenrate Von bis zu 480 Mbit/s (automatische Auswahl)
Frequenzbereich 4,2 GHz bis 4,8 GHz
HF-Modulationstyp Multiband OFDM
Max. Ausgangsleistung 80 μW (-41,25 dBm/MHz max.)
Max.Leistungsaufnahme Adapter — 2,1 W (420 mA max. / 5 V DC über
USB-Anschluss)
Hub — 15 W (3 A / 5 V DC über externes Netzteil)
USB-Endpunkt-Typen Bulk In/Out, Interrupt, Control
Anzahl der Endpunkte
20
USB-Stromversorgung Bis zu 4 externe USB-Geräte (je 500 mA / 5 V DC)
USB-Einstellung Graphische Benutzeroberfläche (GUI) am Host
LED-Anzeigen Funkverbindung, Hub-Anschluss-Status
Platinengröße Adapter — 21 mm x 63 mm
Hub — 61 mm x 94 mm
Antenne Adapter — externe omnidirektionale UWB-
Antenne (Ultrabreitband)
Hub — externe omnidirektionale UWB-Antenne
(Ultrabreitband)
Betriebstemperatur 0° bis 40° C
Relative Luftfeuchtigkeit im
Betrieb
Weniger als 95%
PHY-Hinweis Entspricht WiMedia® PHY spec. rev. 1.0
FCC-Hinweis Entspricht FCC CFR 47, Teil 15, Abschnitt F, UWB
absichtliche Strahlung und Abschnitt B
CE-Hinweis Entspricht Standard EN 302 065
USB-Hub-Standard Entspricht den Spezifikationen von USB 2.0/1.1
Kompatible Betriebssysteme
Microsoft® Windows XP SP2; Windows Vista;
Windows Vista 32-Bit/64-Bit; Plug-and-Play-
Fähigkeit bei Windows
Gleichzeitige Verwendung
anderer Geräte
Kann mit anderen Standard WiMedia-Geräten
verwendet werden
Verwendung zusätzlicher Dongles oder kabelloser
USB-Systeme am selben Ort (FFI, TFI) möglich
Page 98

DE-26
Informationen
1
2
3
4
5
6
DE-27
Dieses Produkt entspricht der WEEE-Richtlinie. Informationen
zum Recycling finden Sie unter: www.belkin.com/environmental
Ab dem 3. Oktober 2007 darf dieses Gerät in folgenden
Ländern verwendet werden: Deutschland, Schweiz, Island,
Liechtenstein, Polen, Estland, Tschechien, Norwegen, Finnland,
Luxemburg, Dänemark, Spanien, Portugal, Schweden,
Großbritannien, Bosnien-Herzegowina, Irland und Belgien. Bitte
beachten Sie das Recht des jeweiligen Landes oder die Tabelle,
die Ihnen den aktuellen Stand der Umsetzung der Empfehlung
70-03 anzeigt: http://www.ero.dk/
Eingeschränkte lebenslange Herstellergarantie von Belkin
International, Inc.
Garantieleistung.
Belkin International, Inc. („Belkin”) garantiert dem ursprünglichen
Käufer dieses Belkin-Produkts, dass dieses Produkt frei von
Material-, Verarbeitungs-, und Konstruktionsfehlern ist.
Garantiedauer.
Belkin gewährt für dieses Belkin-Produkt eine lebenslange
Garantie.
Problembehebung.
Herstellergarantie.
Belkin wird das Produkt nach eigenem Ermessen entweder
kostenlos (abgesehen von den Versandkosten) reparieren oder
austauschen.
Page 99

DE-27
Informationen
1
2
3
4
5
6
Garantieausschluss.
Alle oben genannten Garantien verlieren ihre Gültigkeit, wenn das
Belkin-Produkt Belkin auf Anfrage nicht auf Kosten des Käufers zur
Überprüfung zur Verfügung gestellt wird oder wenn Belkin feststellt,
dass das Belkin-Produkt nicht ordnungsgemäß installiert worden
ist, und dass unerlaubte Änderungen daran vorgenommen worden
sind. Die Herstellergarantie von Belkin gilt nicht für (Natur)gewalten
(mit Ausnahme von Blitzeinschlägen) wie Überschwemmungen
und Erdbeben sowie Krieg, Vandalismus, Diebstahl, normalen
Verschleiß, Erosion, Wertminderung, Veralterung, schlechte
Behandlung, Beschädigung durch Störungen aufgrund von
Unterspannung (z. B. Spannungsabfall oder -Senkung) oder nicht
erlaubte Programm- oder Systemänderungen.
Service.
Um Unterstützung von Belkin zu bekommen, gehen Sie nach
folgenden Schritten vor:
1. Nehmen Sie Kontakt mitBelkin Ltd. auf. Express Business
Park, Shipton Way,Rushden, NN10 6GL, Großbritannien, Attn:
Customer Service oder wenden Sie sich innerhalb von 15
Tagen nach dem Vorfall telefonisch unter (800)-223-5546 an
Belkin. Halten Sie folgende Informationen bereit:
a. Die Artikelnummer des Belkin-Produkts.
b. Wo Sie das Produkt erworben haben.
c. Das Kaufdatum.
d. Kopie der Originalquittung.
2. Die entsprechenden Mitarbeiter/innen informieren Sie darüber,
wie Sie Ihre Rechnung und das Belkin-Produkt versenden
müssen und wie Sie fortfahren müssen, um Ihre Ansprüche
geltend zu machen.
Belkin behält sich vor, das beschädigte Belkin-Produkt zu
überprüfen. Alle Kosten, die beim Versand des Belkin-Produkts an
Page 100

DE-28
Informationen
1
2
3
4
5
6
DE-29
Belkin zum Zweck der Überprüfung entstehen, sind vollständig
durch den Käufer zu tragen. Wenn Belkin nach eigenem Ermessen
entscheidet, dass es nicht angebracht ist, das beschädigte Gerät
an Belkin zu schicken, kann Belkin nach eigenem Ermessen
eine Reparaturstelle damit beauftragen, das Gerät zu überprüfen
und einen Kostenvoranschlag für die Reparaturkosten des
Gerätes zu machen. Die Kosten für den Versand zu einer
solchen Reparaturstelle und die eventuellen Kosten für einen
Kostenvoranschlag gehen vollständig zu Lasten des Käufers.
Beschädigte Geräte müssen zur Überprüfung zur Verfügung
stehen, bis das Reklamationsverfahren abgeschlossen ist. Wenn
Ansprüche beglichen werden, behält sich Belkin das Recht vor,
Ersatzansprüche an eine bestehende Versicherung des Käufers zu
übertragen.
Garantiegesetze.
DIESE GARANTIE BILDET DIE ALLEINIGE GARANTIE VON BELKIN. ES GIBT
KEINE ANDERE GARANTIE, EXPLIZIT ERWÄHNT ODER IMPLIZIT, AUSSER
WENN DIES VOM GESETZ VORGESCHRIEBEN IST, EINSCHLIESSLICH
DER IMPLIZITEN GARANTIE ODER DES QUALITÄTSZUSTANDS, DER
ALLGEMEINEN GEBRAUCHSTAUGLICHKEIT ODER EIGNUNG FÜR EINEN
BESTIMMTEN ZWECK, UND SOLCHE IMPLIZITEN GARANTIEN, WENN ES
SOLCHE GIBT, BEZIEHEN SICH AUSSCHLIESSLICH AUF DIE DAUER, DIE IN
DIESER GARANTIE ZUGRUNDE GELEGT WIRD.
In manchen Ländern sind Einschränkungen bezüglich der
Dauer der Garantie nicht zulässig. Die oben erwähnten
Einschränkungen treffen für Sie dementsprechend nicht zu.
UNTER KEINEN UMSTÄNDEN HAFTET BELKIN FÜR ZUFÄLLIGEN,
BESONDEREN, DIREKTEN, INDIREKTEN, MEHRFACHEN SCHADEN ODER
FOLGESCHÄDEN WIE, ABER NICHT AUSSCHLIESSLICH, ENTGANGENES
GESCHÄFT ODER PROFITE, DIE IHNEN DURCH DEN VERKAUF ODER DIE
BENUTZUNG VON EINEM BELKIN-PRODUKT ENTGANGEN SIND, AUCH WENN
SIE AUF DIE MÖGLICHKEIT SOLCHER SCHÄDEN AUFMERKSAM GEMACHT
WORDEN SIND.
Diese Garantie räumt Ihnen spezifische Rechte ein, die von
Land zu Land unterschiedlich ausgestaltet sein können. Da in
manchen Ländern der Ausschluss oder die Beschränkung der
 Loading...