

Page 1
Po
P74080em F5U209
Hi-Speed USB 2.0 External
Drive Enclosure User Manual
Manuel d’utilisation du boîtier
externe USB 2.0 High Speed
Benutzerhandbuch für externes
Laufwerkgehäuse für USB 2.0 Hi-Speed
Gebruikershandleiding voor houder voor
extern Hi-Speed USB 2.0-station
Alojamiento de unidad externa USB 2.0
de alta velocidad Manual del usuario
Hi-Speed USB 2.0 Esterno
Manuale utente del telaio dell'unità
Manual do utilizador da caixa de unidade
externa USB 2.0 de alta velocidade
Fr
De
En
Es
It
Ne
P74080-em-F5U209-man_9-02.qxd 9/19/02 3:05 PM Page a
Page 2

P74080-em-F5U209-man_9-02.qxd 9/19/02 3:05 PM Page b
Page 3
TABLE OF CONTENTS
Introduction . . . . . . . . . . . . . . . . . . . . . . . . . . . . . . . . . . . . . . . . .1
System Requirements . . . . . . . . . . . . . . . . . . . . . . . . . . . . . . . . .2
Assembling Your Drive Enclosure . . . . . . . . . . . . . . . . . . . . . . . . .3
Driver Installation . . . . . . . . . . . . . . . . . . . . . . . . . . . . . . . . . . . .8
Safe Removal of the USB Disk . . . . . . . . . . . . . . . . . . . . . . . . . .10
Format the USB 2.0 External Drive . . . . . . . . . . . . . . . . . . . . . .11
Information . . . . . . . . . . . . . . . . . . . . . . . . . . . . . . . . . . . . . . . .16
En
P74080-em-F5U209-man_9-02.qxd 9/19/02 3:05 PM Page c
Page 4

P74080-em-F5U209-man_9-02.qxd 9/19/02 3:05 PM Page d
Page 5
The Hi-Speed USB 2.0 External Drive Enclosure (the External Drive) is
a portable compact storage drive that incorporates the USB 2.0
(Universal Serial Bus 2.0) high-speed interface. The External Drive
provides a fast and easy way to add more storage space to your
computer. The Plug-and-Play feature gives you great convenience on
the road, the External Drive can be easily connected to your
computer by USB interface, and can even be disconnected and
reconnected while the computer is running.
Note: To enable Hi-Speed USB 2.0 mode (480Mbps), your computer
must be equipped with built-in USB 2.0 ports or a USB 2.0 host
adapter card.
INTRODUCTION
1
En
P74080-em-F5U209-man_9-02.qxd 9/19/02 3:05 PM Page 1
Page 6

SYSTEM REQUIREMENTS
2
Hardware
Notebook and desktop computer with USB 1.0 or USB 2.0 port
Operating System
Windows®98 SE, Me, 2000, or XP
P74080-em-F5U209-man_9-02.qxd 9/19/02 3:05 PM Page 2
Page 7
En
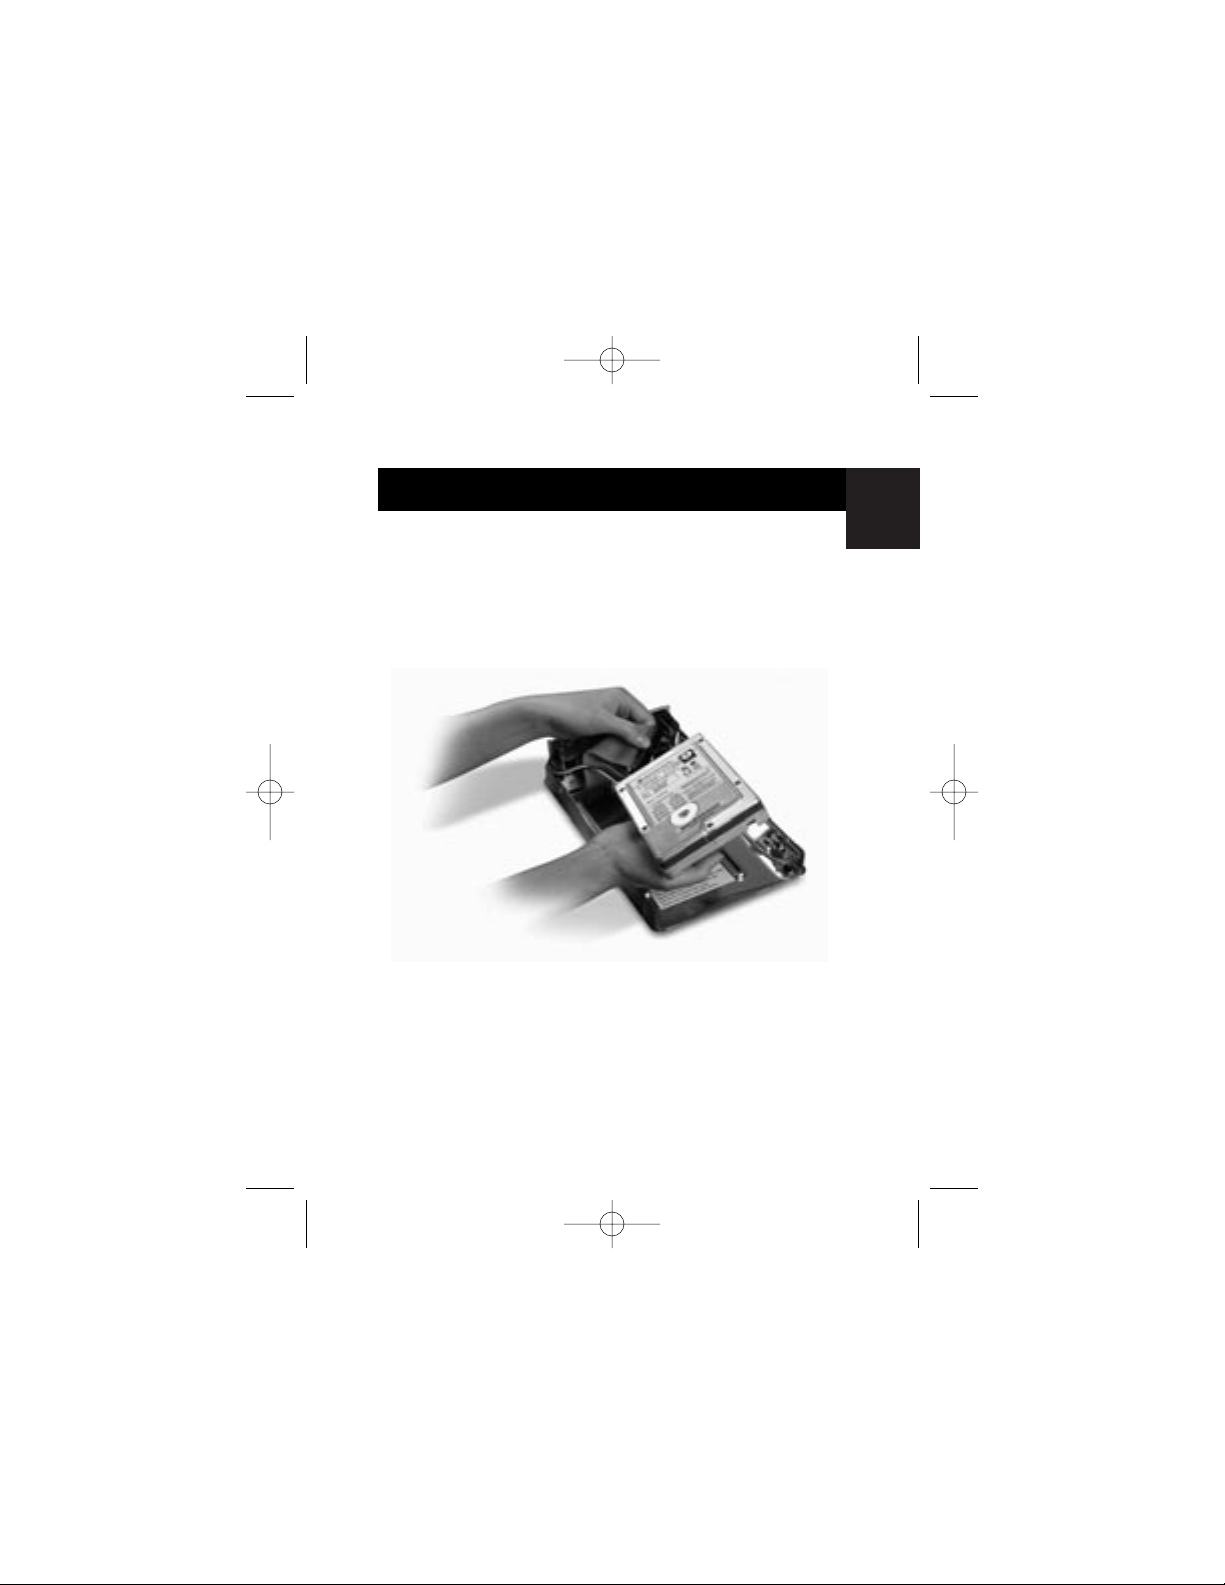
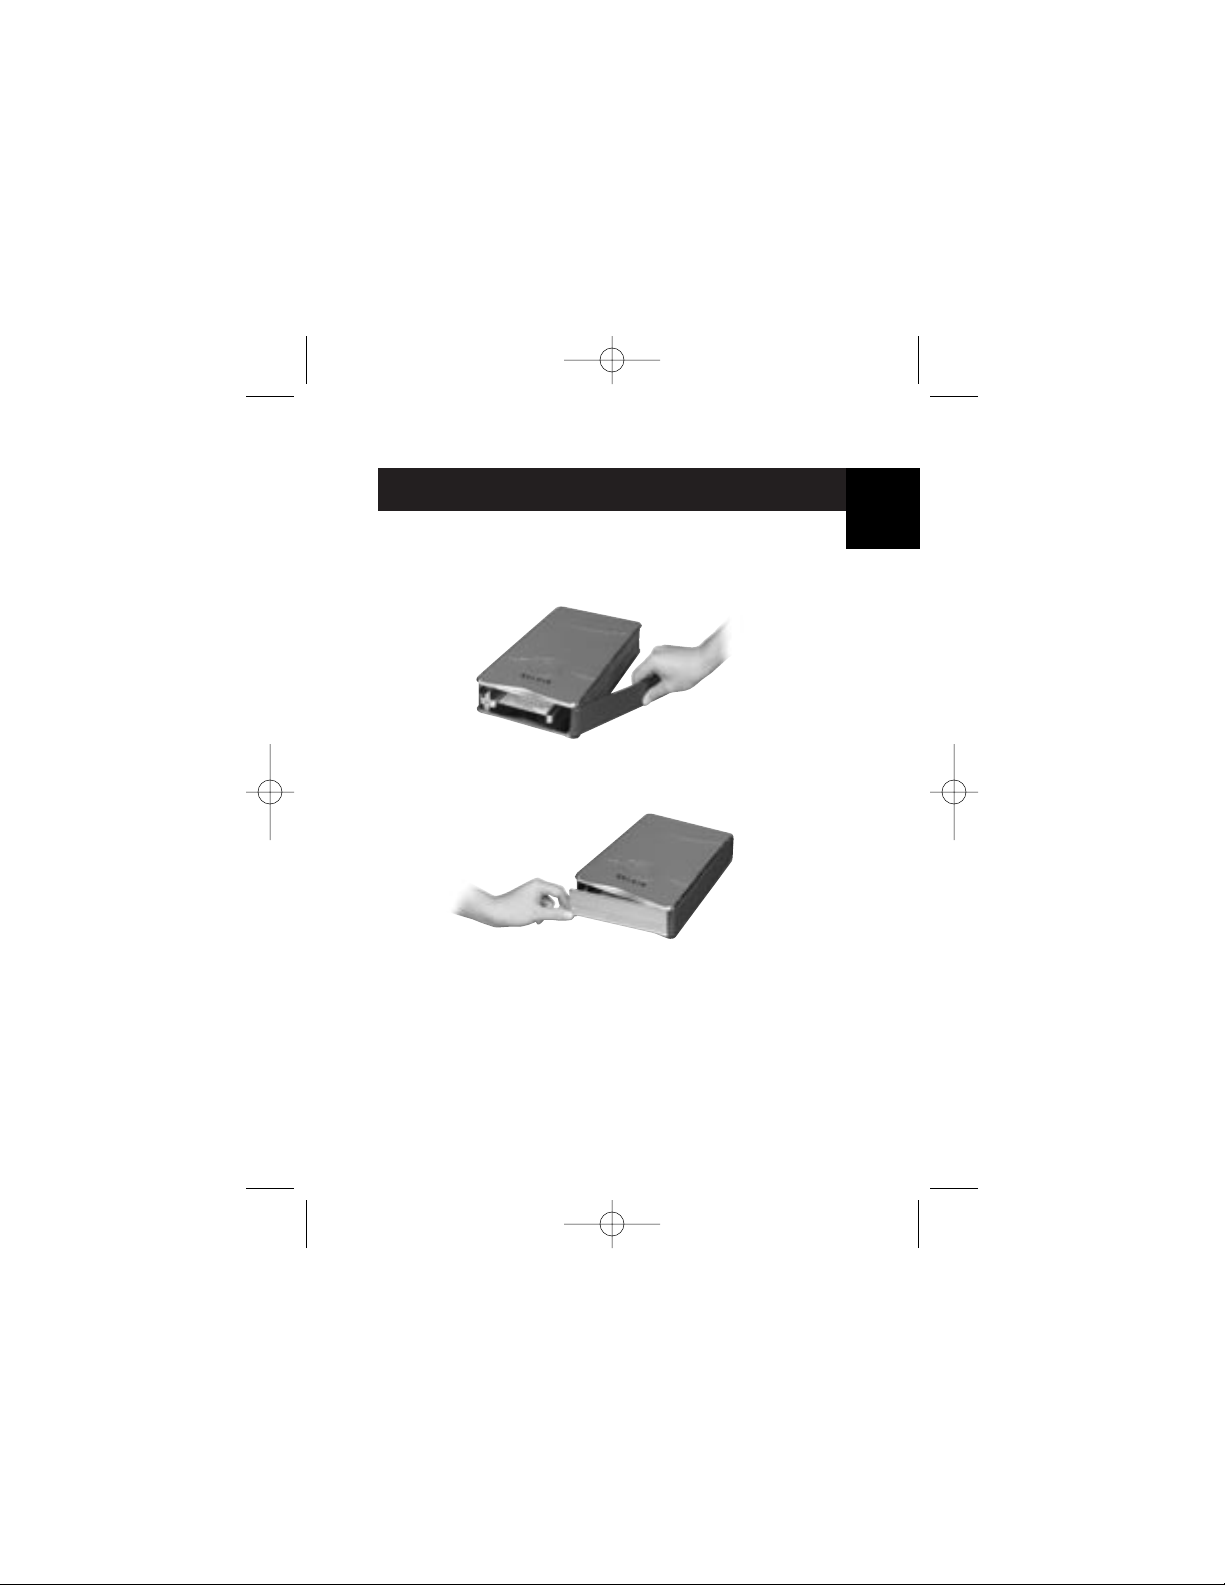
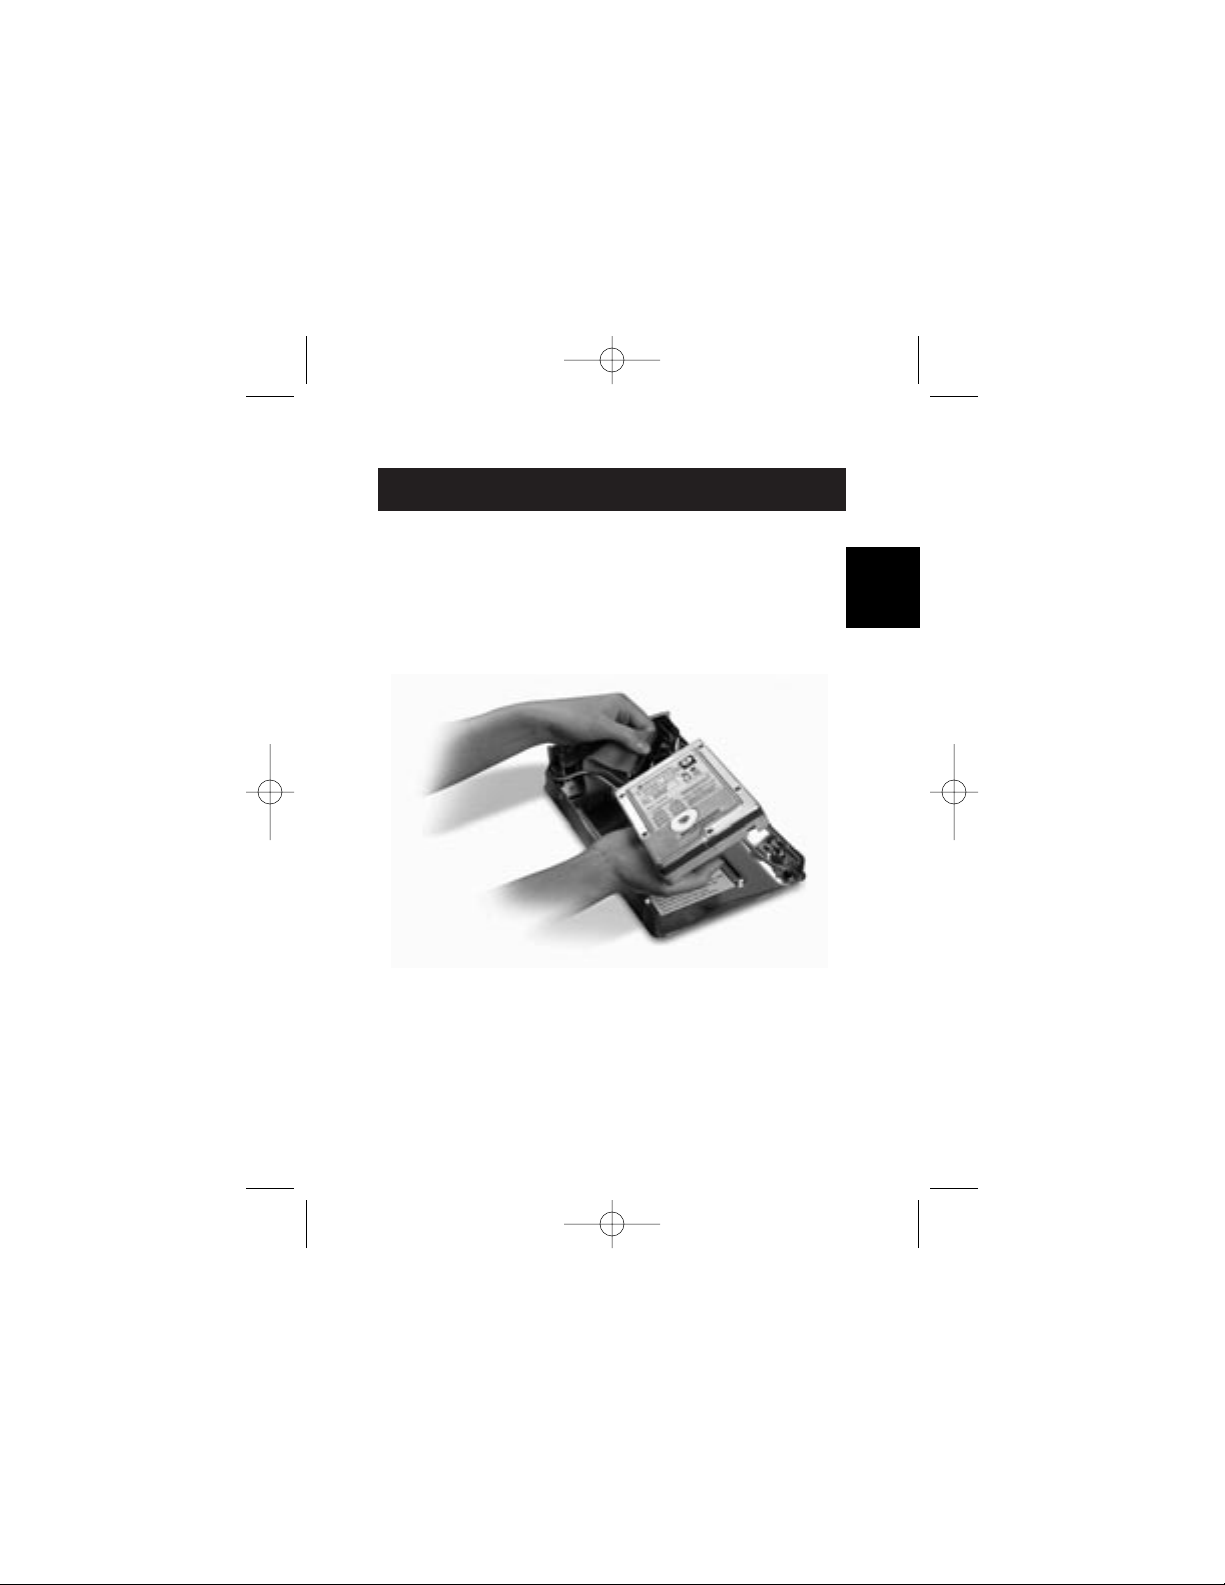
ASSEMBLING YOUR DRIVE ENCLOSURE
1. Remove top of the External Drive.
2. If you are installing a 31/2-inch hard drive, check to make
sure your drive is set to “Master” (see jumper setting
information printed on top of your disk drive), then
connect the 34-position data cable and 4-position
power cable.
3. If you are installing a CD/CD-RW drive, check to make
sure your drive is set to “Master”, then connect the
34-position data cable, 4-position power cable, and
4-position audio cable.
4. Choose the set of mounting holes that match the drive
you intend to use, and install at least four of the provided
mounting screws.
3
P74080-em-F5U209-man_9-02.qxd 9/19/02 3:05 PM Page 3
Page 8

ASSEMBLING YOUR DRIVE ENCLOSURE
4
Note: There are four fine-threaded screws, and four
course-threaded screws included with your Hi-Speed External
Drive Enclosure Kit. Be sure to choose the screws that match
the mounting holes for your drive. Do not try to force a
course-threaded screw into a fine-threaded mounting hole.
5. Replace top cover and make sure it is aligned with
bottom cover.
P74080-em-F5U209-man_9-02.qxd 9/19/02 3:05 PM Page 4
Page 9
ASSEMBLING YOUR DRIVE ENCLOSURE
6. Hook the first side rail around the front edge of the
External Drive and press the rail into the six
rectangular-shaped mounting holes on the side.
7. If you are installing a hard disk, it is necessary to install
the front panel. Insert the tabs on one side of the front
panel into the mounting holes in the installed side rail.
5
En
P74080-em-F5U209-man_9-02.qxd 9/19/02 3:05 PM Page 5
Page 10
ASSEMBLING YOUR DRIVE ENCLOSURE
6
8. Insert the mounting tabs on the free end of the front panel
into the second side rail, and hook the side rail onto the
front of the External Drive.
9. Finish the assembly by pressing the rail into the six
rectangular mounting holes in the side of the External Drive.
Important Note: If you are using Windows 98 or 98 SE, DO
NOT connect the External Drive to your computer until driver
installation is completed.
P74080-em-F5U209-man_9-02.qxd 9/19/02 3:05 PM Page 6
Page 11

En
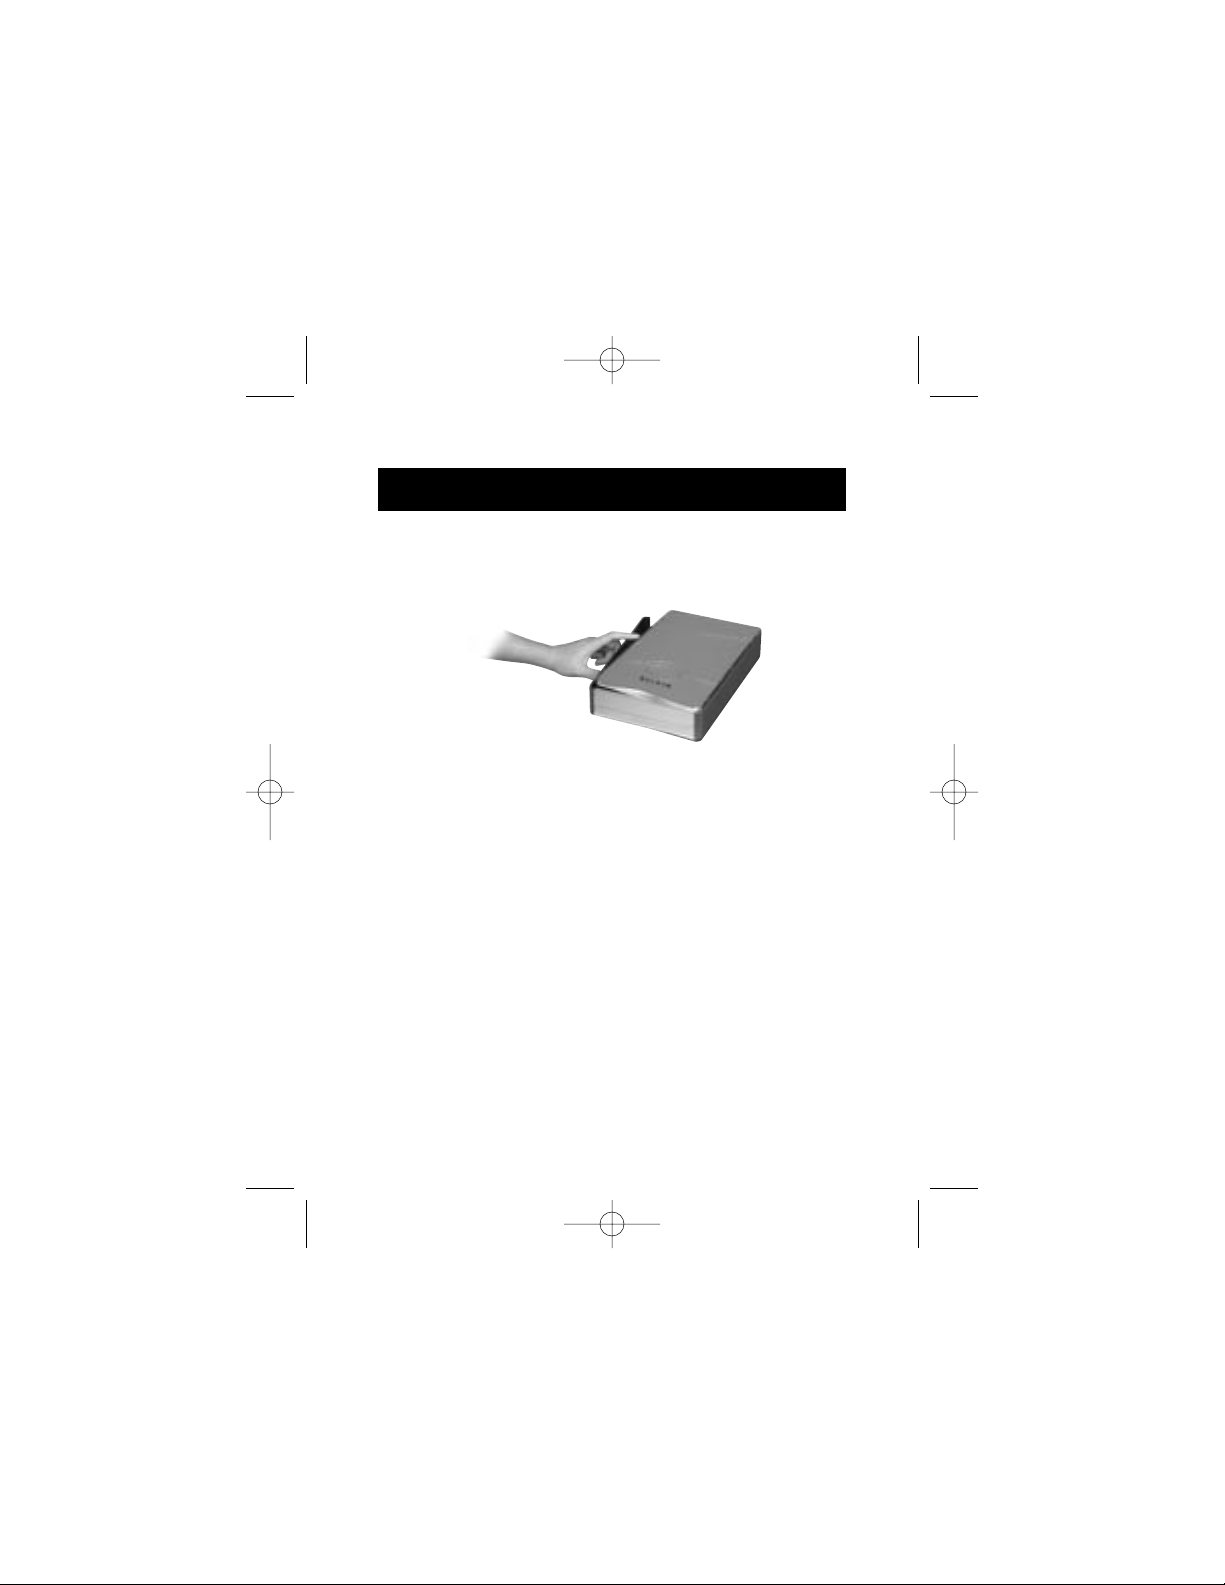
ASSEMBLING YOUR DRIVE ENCLOSURE
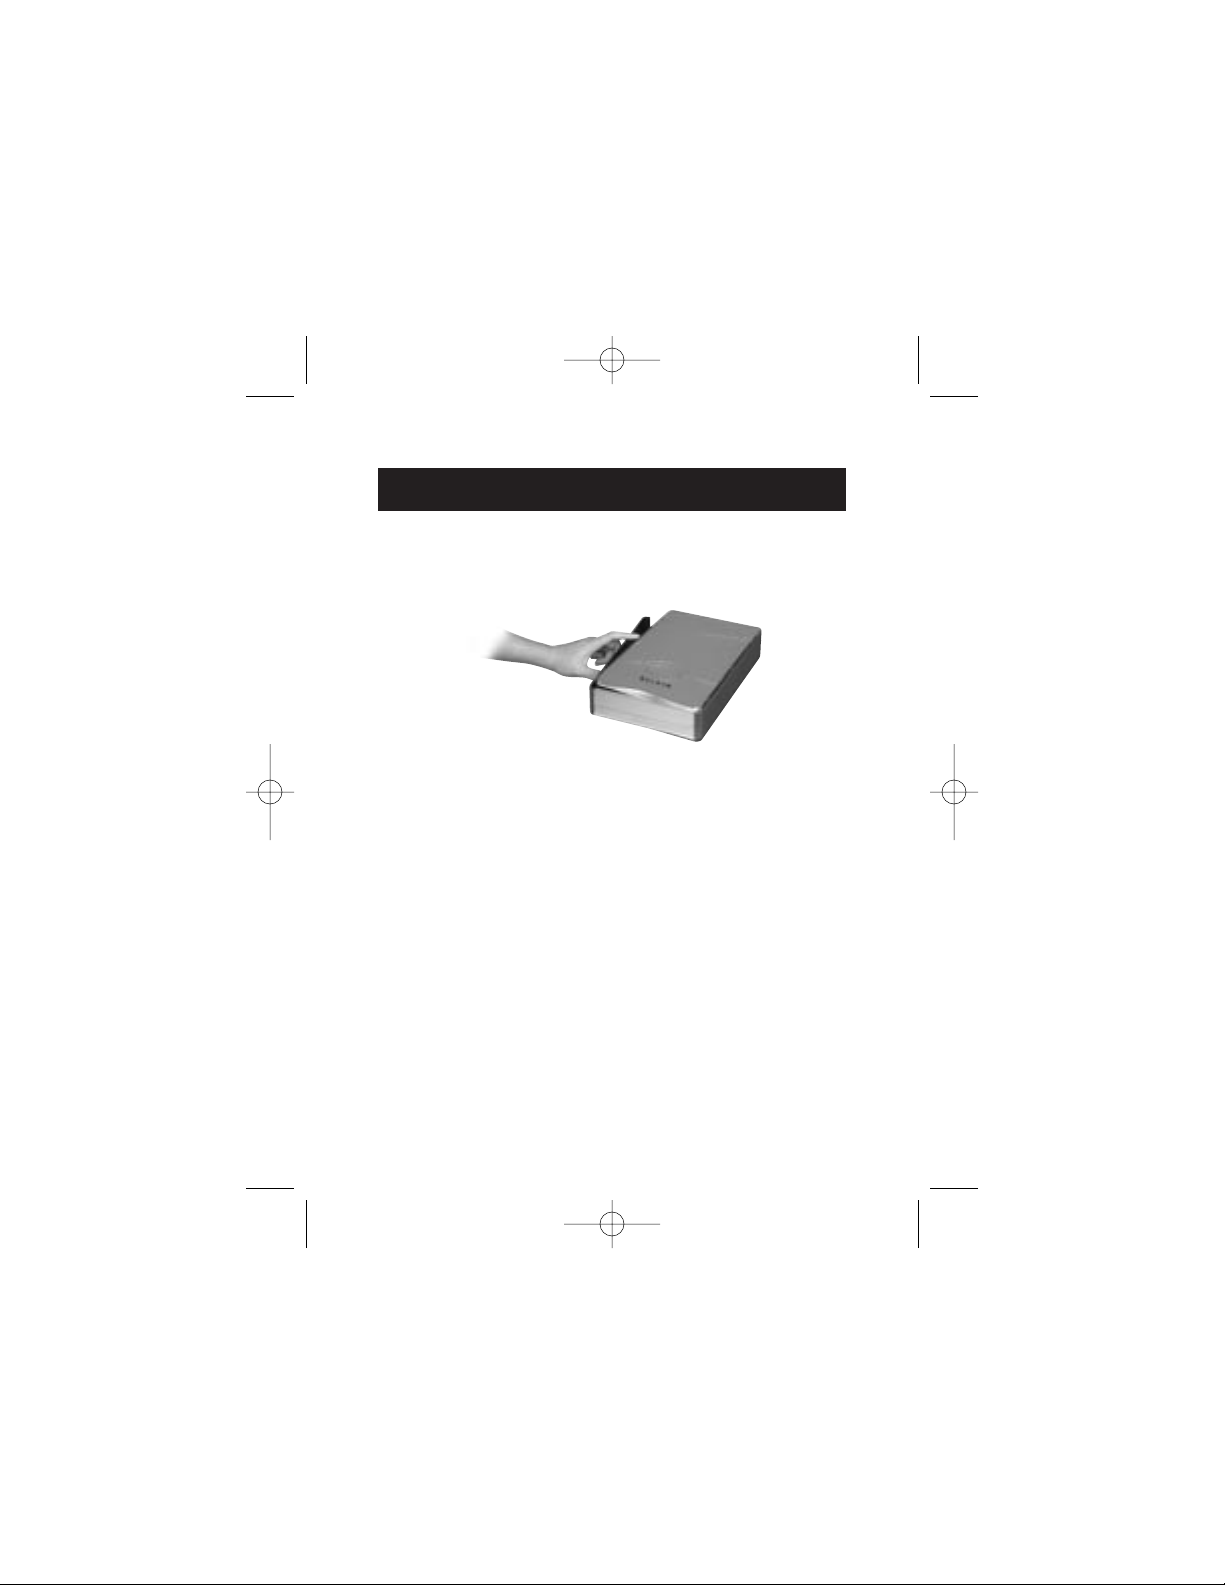
10. Plug the square-shaped connector of the USB cable into
the USB port on the rear panel of the External Drive.
11. Plug the rectangular-shaped connector of the USB
cable into a Hi-Speed USB 2.0 port on your computer or
Hi-Speed USB 2.0 hub. You may also connect the cable to
a full-speed USB 1.1 port on your computer or full-speed
USB 1.1 hub.
Note: When connected to a full-speed USB 1.1 port, the
maximum USB bandwidth will be 12 Mbps.
12. Plug the AC power cord into the power connector on the
rear panel of the External Drive, and into an AC wall outlet.
13. Power on the drive.
14. Proceed to Driver Installation section.
7
P74080-em-F5U209-man_9-02.qxd 9/19/02 3:05 PM Page 7
Page 12
DRIVER INSTALLATION
8
Windows 98 SE
1. Insert the installation CD into your CD-ROM drive.
2. Open the Install CD.
3. Run the “TPPINST.EXE” to install the drivers for your
USB 2.0 External Drive.
4. An installer dialog box appears. Click “Next”.
5. Choose “Complete” and click “Next”.
6. You may now connect the External Drive to your computer.
7. Windows will now detect “USB Storage Adapter”, and finish
installation of the required device drivers.
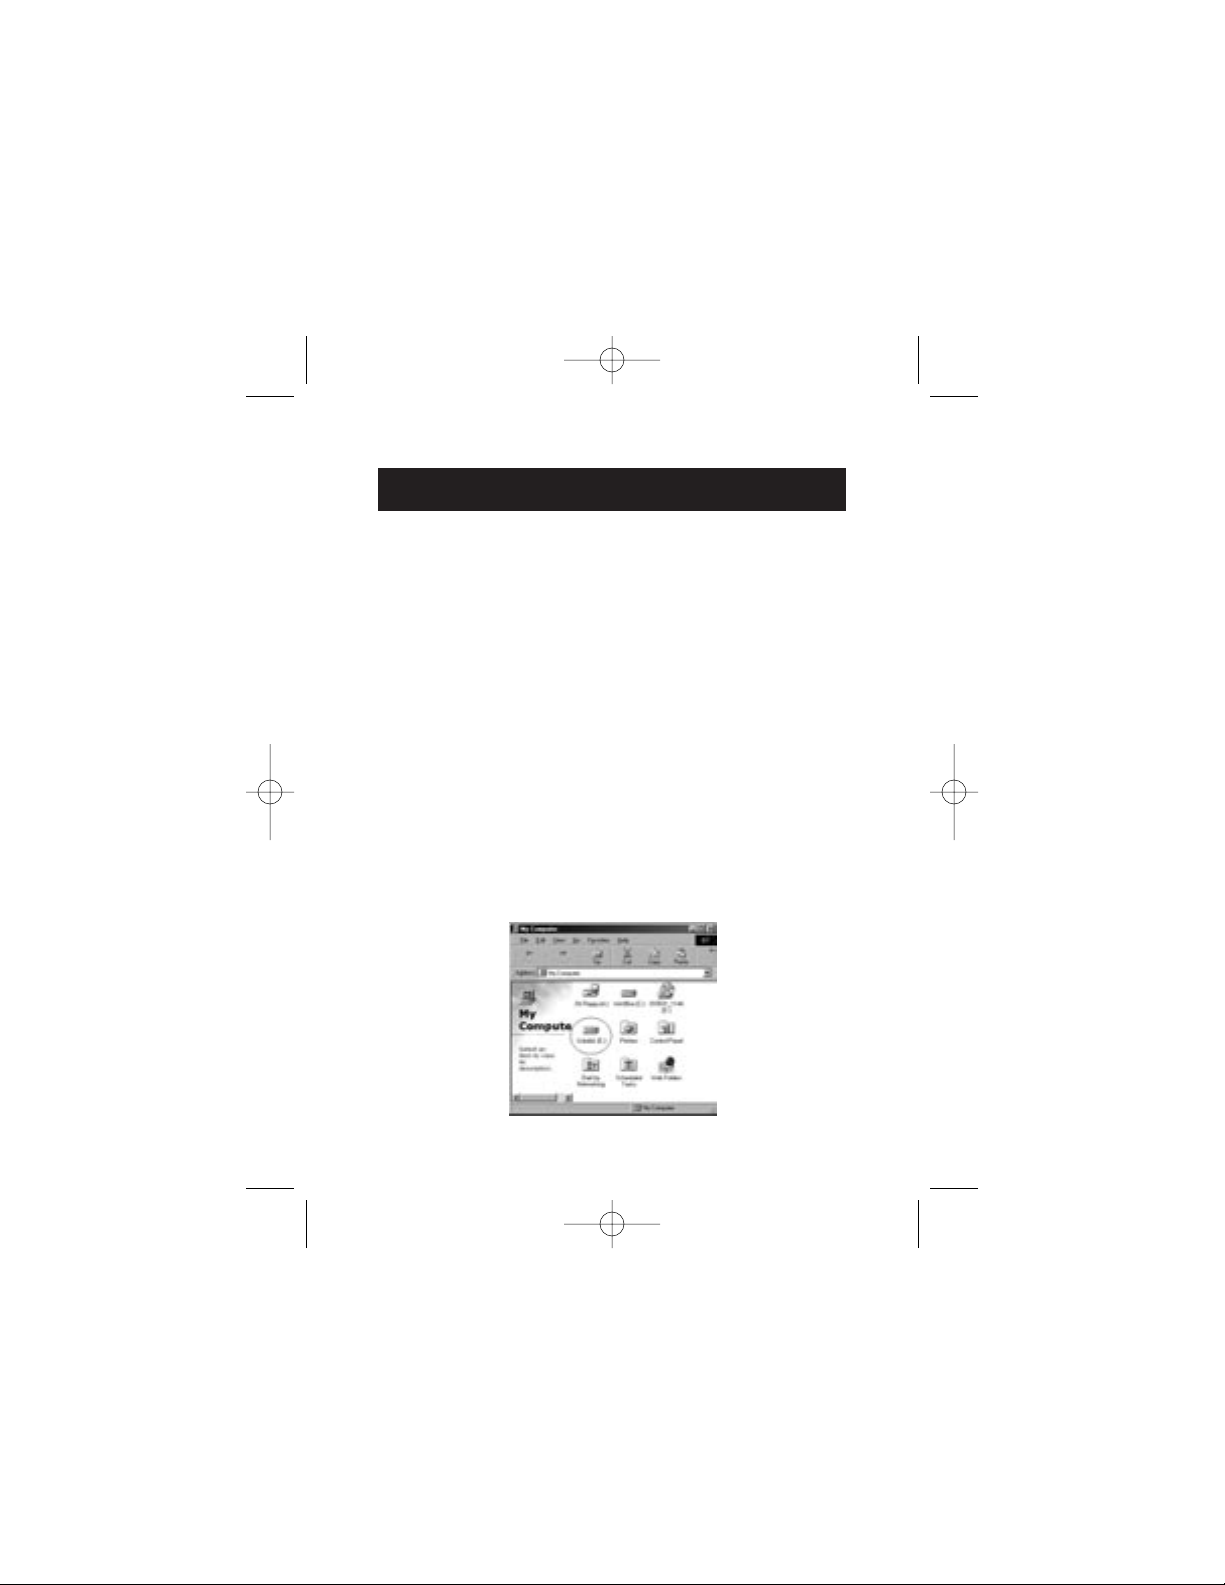
8. If your new drive is already partitioned, it will now appear in
the “My Computer” window as a “Removable Disk”.
Note: If the removable disk option is not selected in the
Device Manager Settings window, your new drive will appear
as a standard Windows fixed disk.
P74080-em-F5U209-man_9-02.qxd 9/19/02 3:05 PM Page 8
Page 13
En
DRIVER INSTALLATION
Note: If the new drive does not appear in My Computer, you
may need to partition and format the drive. Please refer to the
“Format the USB 2.0 External Drive” section to prepare your
USB 2.0 hard disk drive.
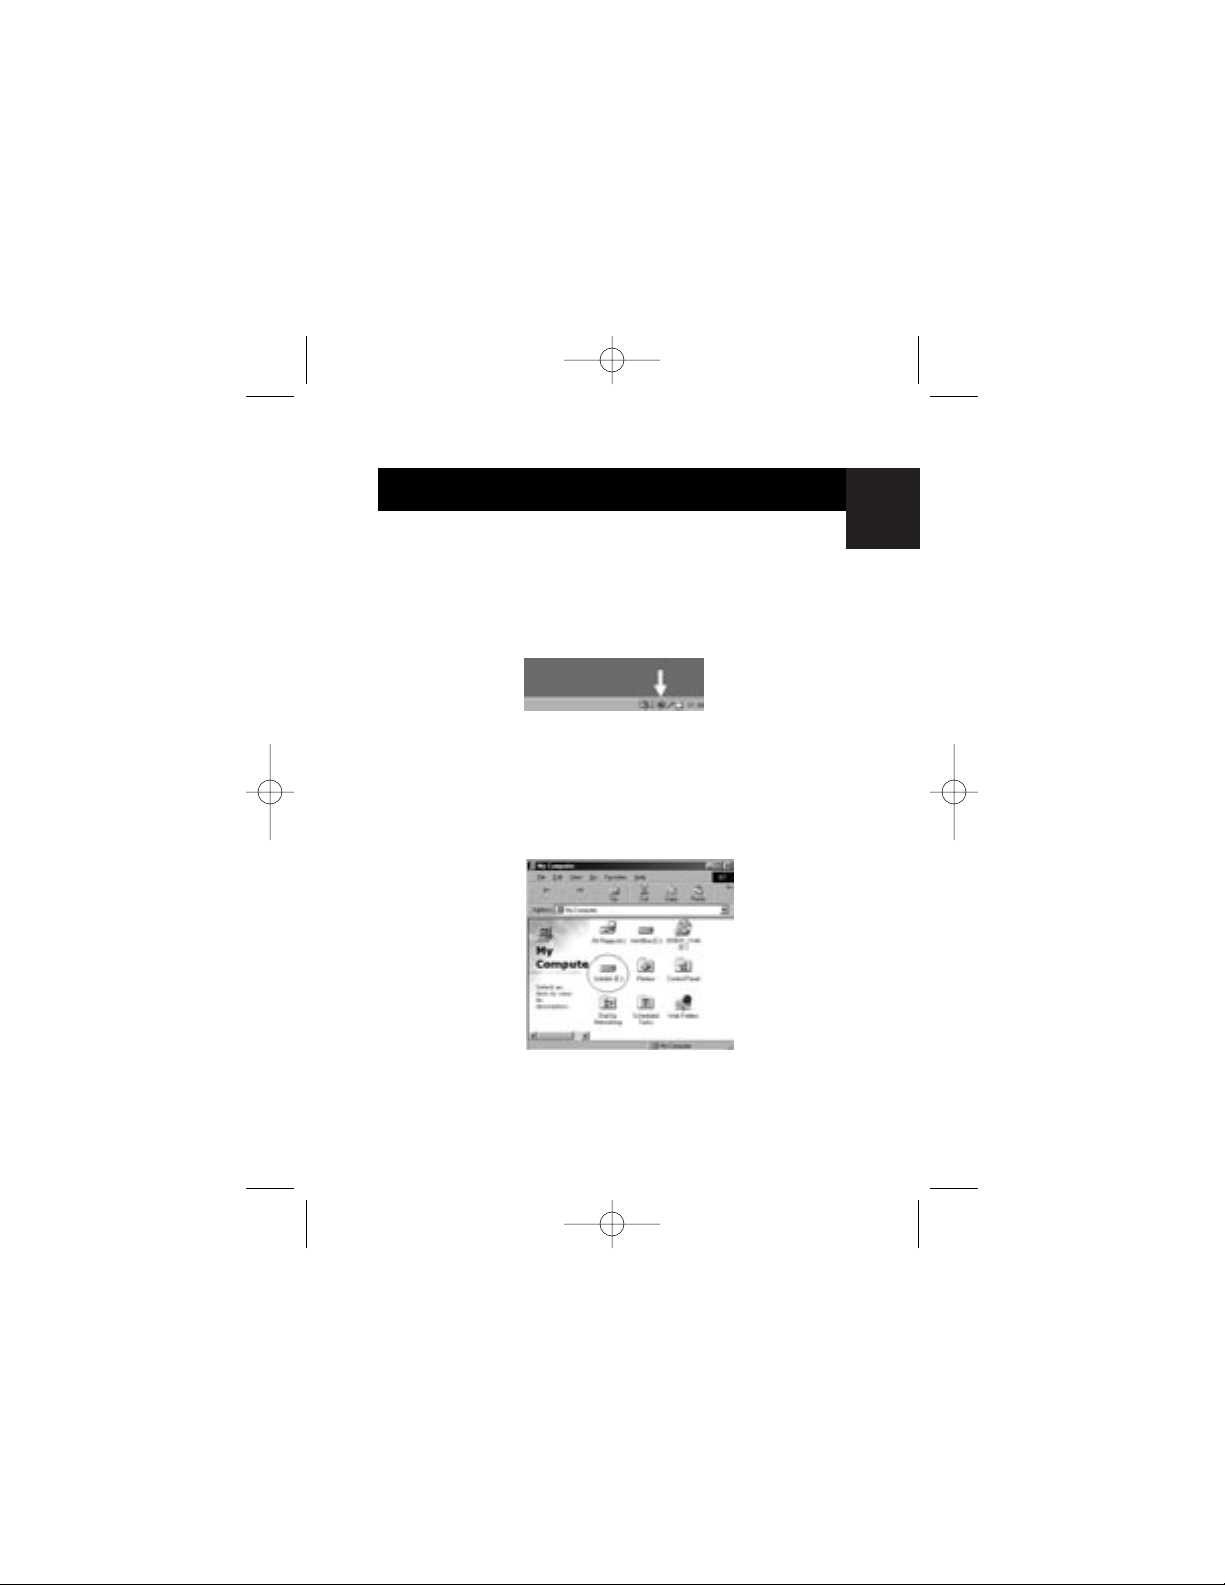
A green “Unplug or Eject Hardware” icon will appear in the
system tray.
Windows Me/2000/XP
1. If you are plugging the External Drive into your computer for
the first time, Windows will detect “USB 2.0 Storage Device”
and install the USB mass storage device class driver, which is
built into Windows.
2. Your new drive will now appear in the “My Computer”
window as a “USB Disk”.
Note: If the new drive does not appear in My Computer, you
may need to partition and format the drive. Please refer to the
“Partition the USB 2.0 External Hard Disk” section to prepare
your USB 2.0 hard disk drive.
9
P74080-em-F5U209-man_9-02.qxd 9/19/02 3:05 PM Page 9
Page 14

SAFE REMOVAL OF THE USB
DISK FROM WINDOWS
10
Windows 98
1. Click the green “Unplug or Eject Hardware” icon in the
system tray and select the device that you want to remove.
2. When the system prompts “You may safely remove this
device”, unplug the USB cable from the USB port of
your computer.
Windows Me/2000/XP
1. Double-click on the “Unplug or Eject Hardware” icon
in the system tray.
2. Select the “USB Mass Storage Device” then click “Stop”.
3. Choose the USB 2.0 External Drive that you want to
disconnect, then click on “Stop” again.
4. When the system prompts “You may safely remove this
device”, unplug the USB cable from the USB port of
your computer.
P74080-em-F5U209-man_9-02.qxd 9/19/02 3:05 PM Page 10
Page 15
En
FORMAT THE USB 2.0 EXTERNAL DRIVE
Format under Windows 98/Me
1. Boot-up the computer into the Windows operating system.
2. Plug in your External Drive.
There are two methods to partition and format your
USB 2.0 hard disk drive.
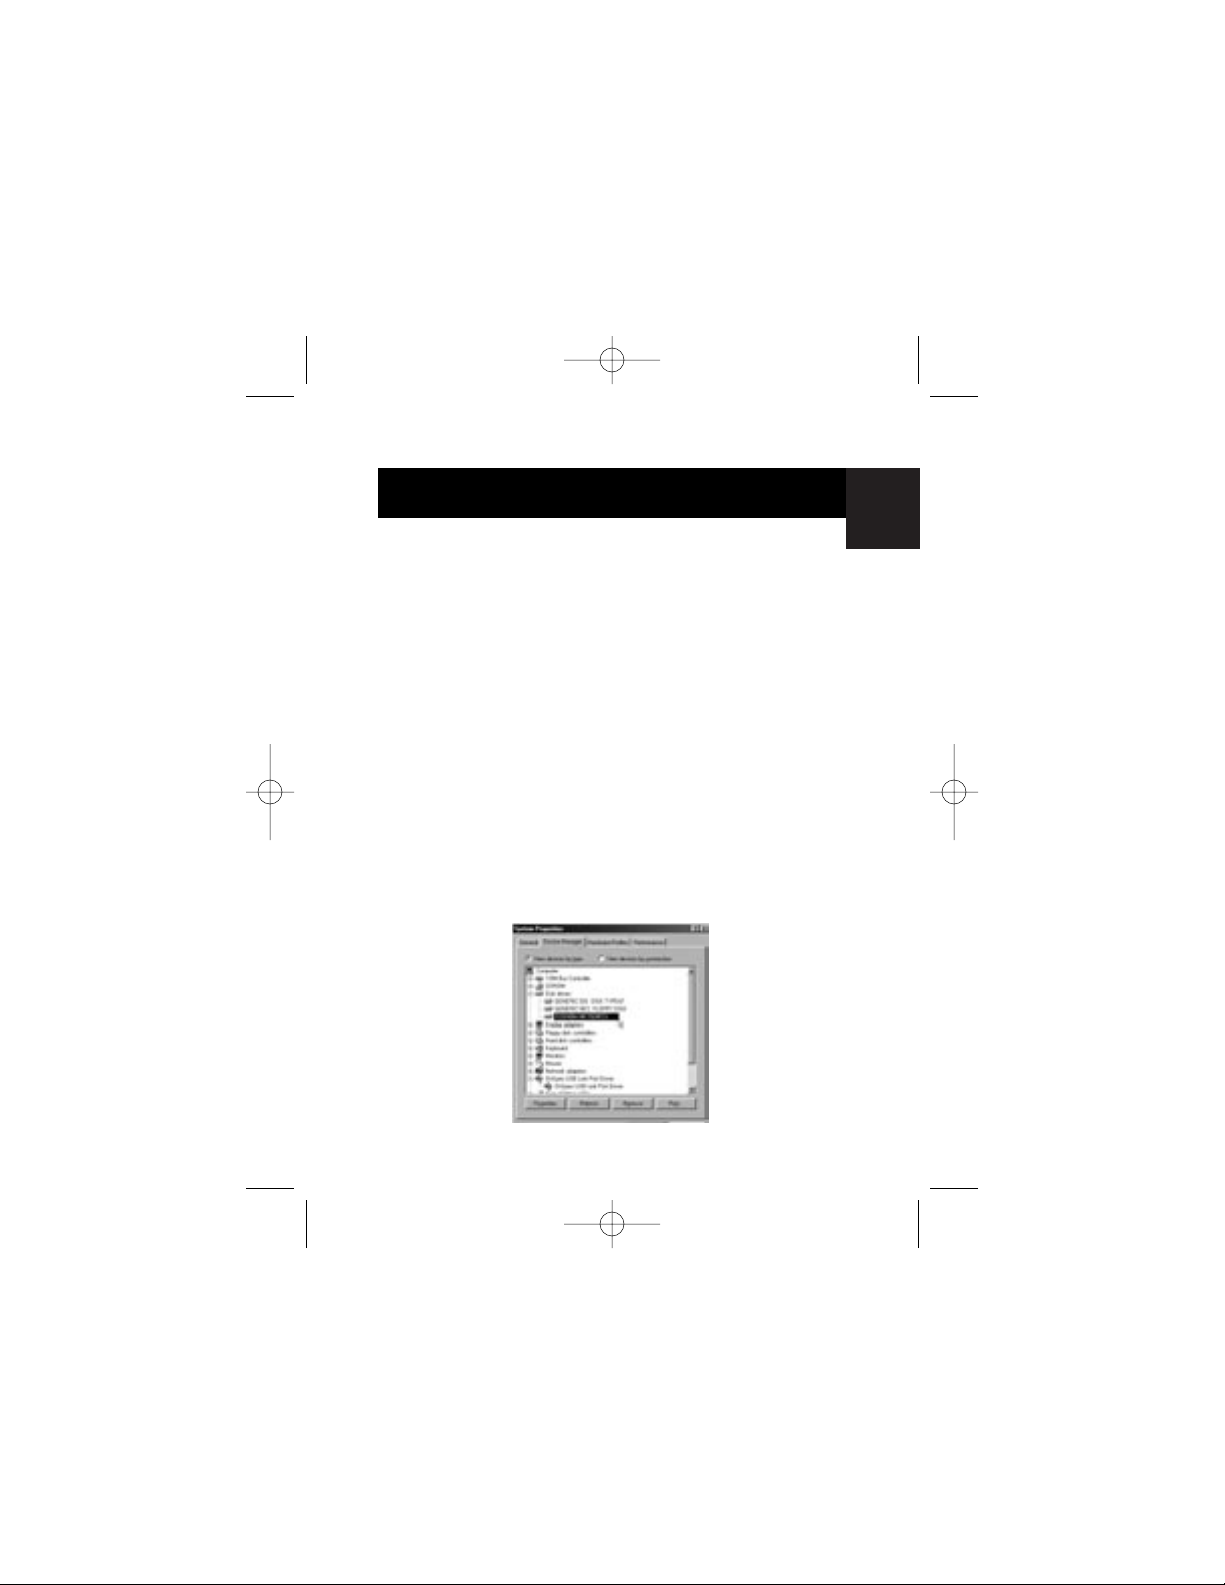
Control Panel Method
1. Click “Start” and choose “Setting”.
2. Choose “Control Panel”.
3. Double-click on “System”, then “Device Manager”.
4. The following screen will appear.
11
P74080-em-F5U209-man_9-02.qxd 9/19/02 3:05 PM Page 11
Page 16
FORMAT THE USB 2.0 EXTERNAL DRIVE
12
5. Select “Disk Drives”. Your new hard disk will appear in the
hard drive list (in this case as “Toshiba 1924FCV”).
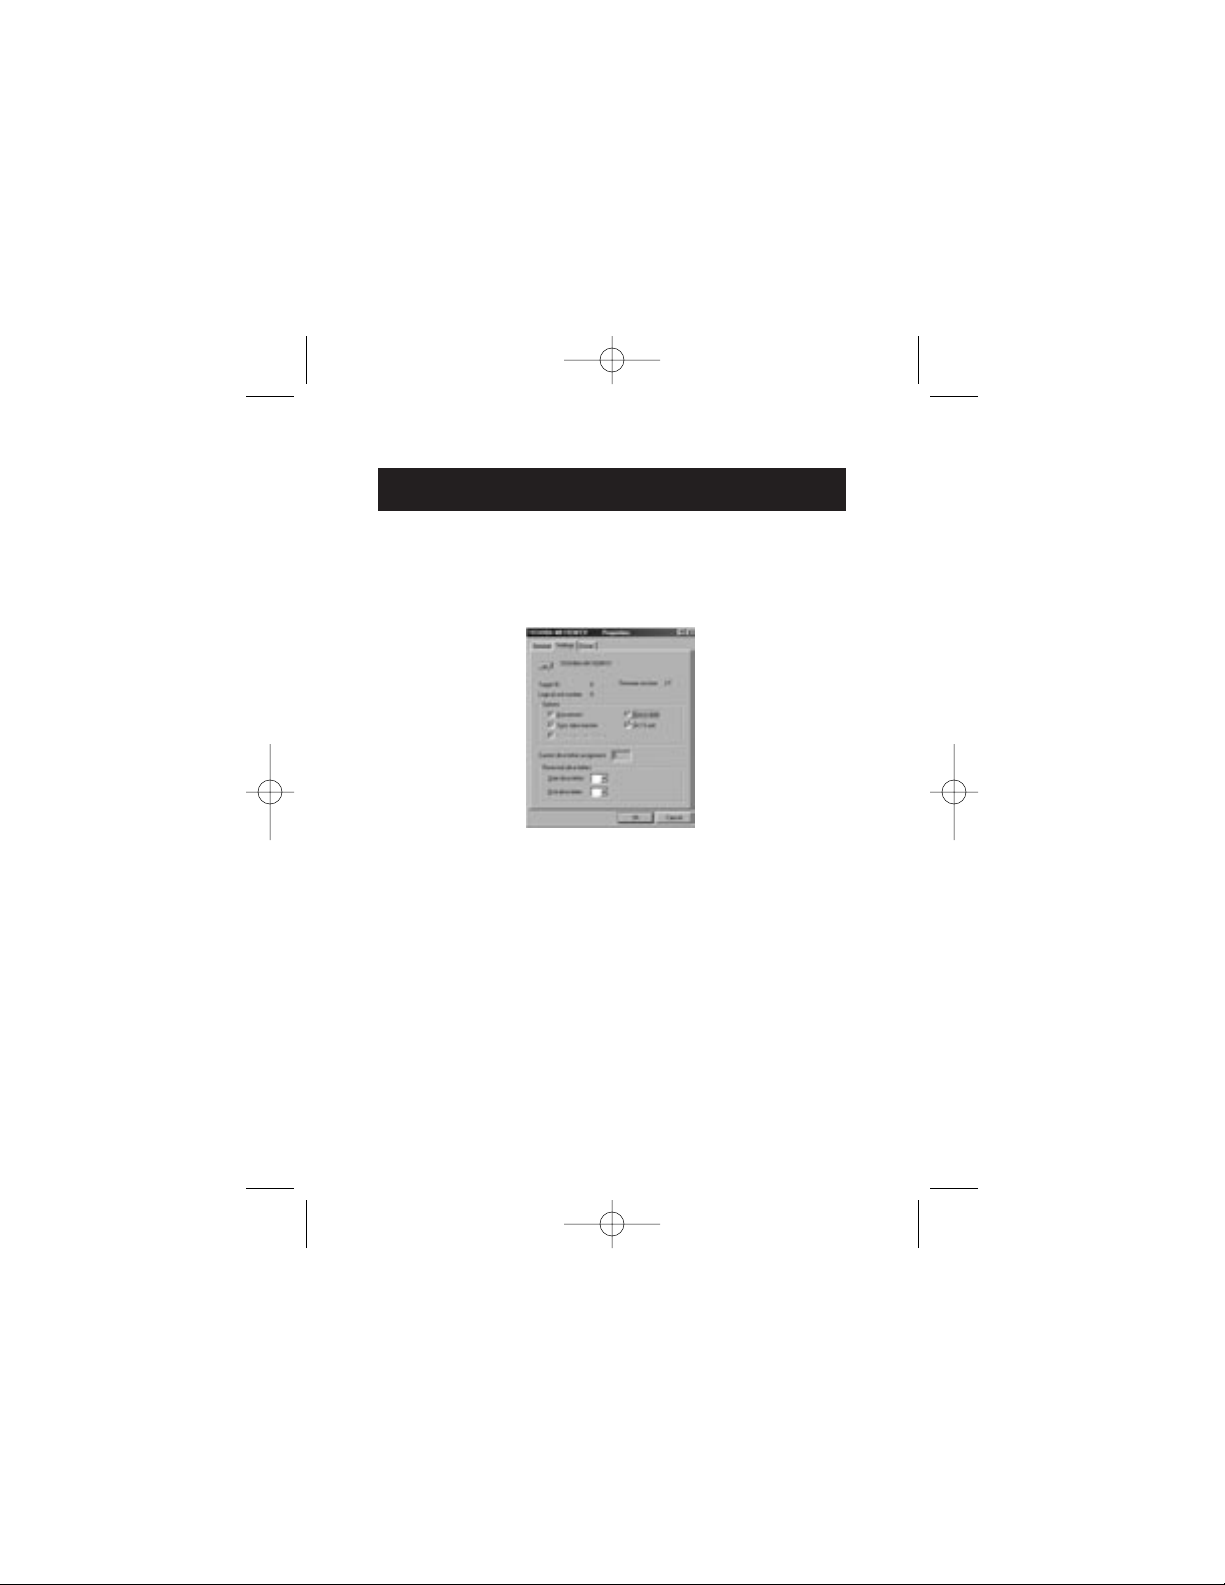
6. Double-click on the entry for your hard drive. Select
“Settings”. The following screen will appear.
7. Make sure there are check marks in the “Disconnect”,
“Sync Data Transfer”, “Removable”, and “Int 13 unit” boxes.
After making these changes, it will be necessary to restart
your computer.
8. After Windows restarts, a “Removable Disk” icon will appear
in the “My Computer” window.
9. Right-click the “Removable Disk” icon and select “Format”
from the drop-down list.
10. Your removable hard drive is now ready for use.
Note: Using this method to format your removable hard drive
will result in a single partition equal in size to the maximum
rated capacity of your hard disk.
P74080-em-F5U209-man_9-02.qxd 9/19/02 3:05 PM Page 12
Page 17
En
FORMAT THE USB 2.0 EXTERNAL DRIVE
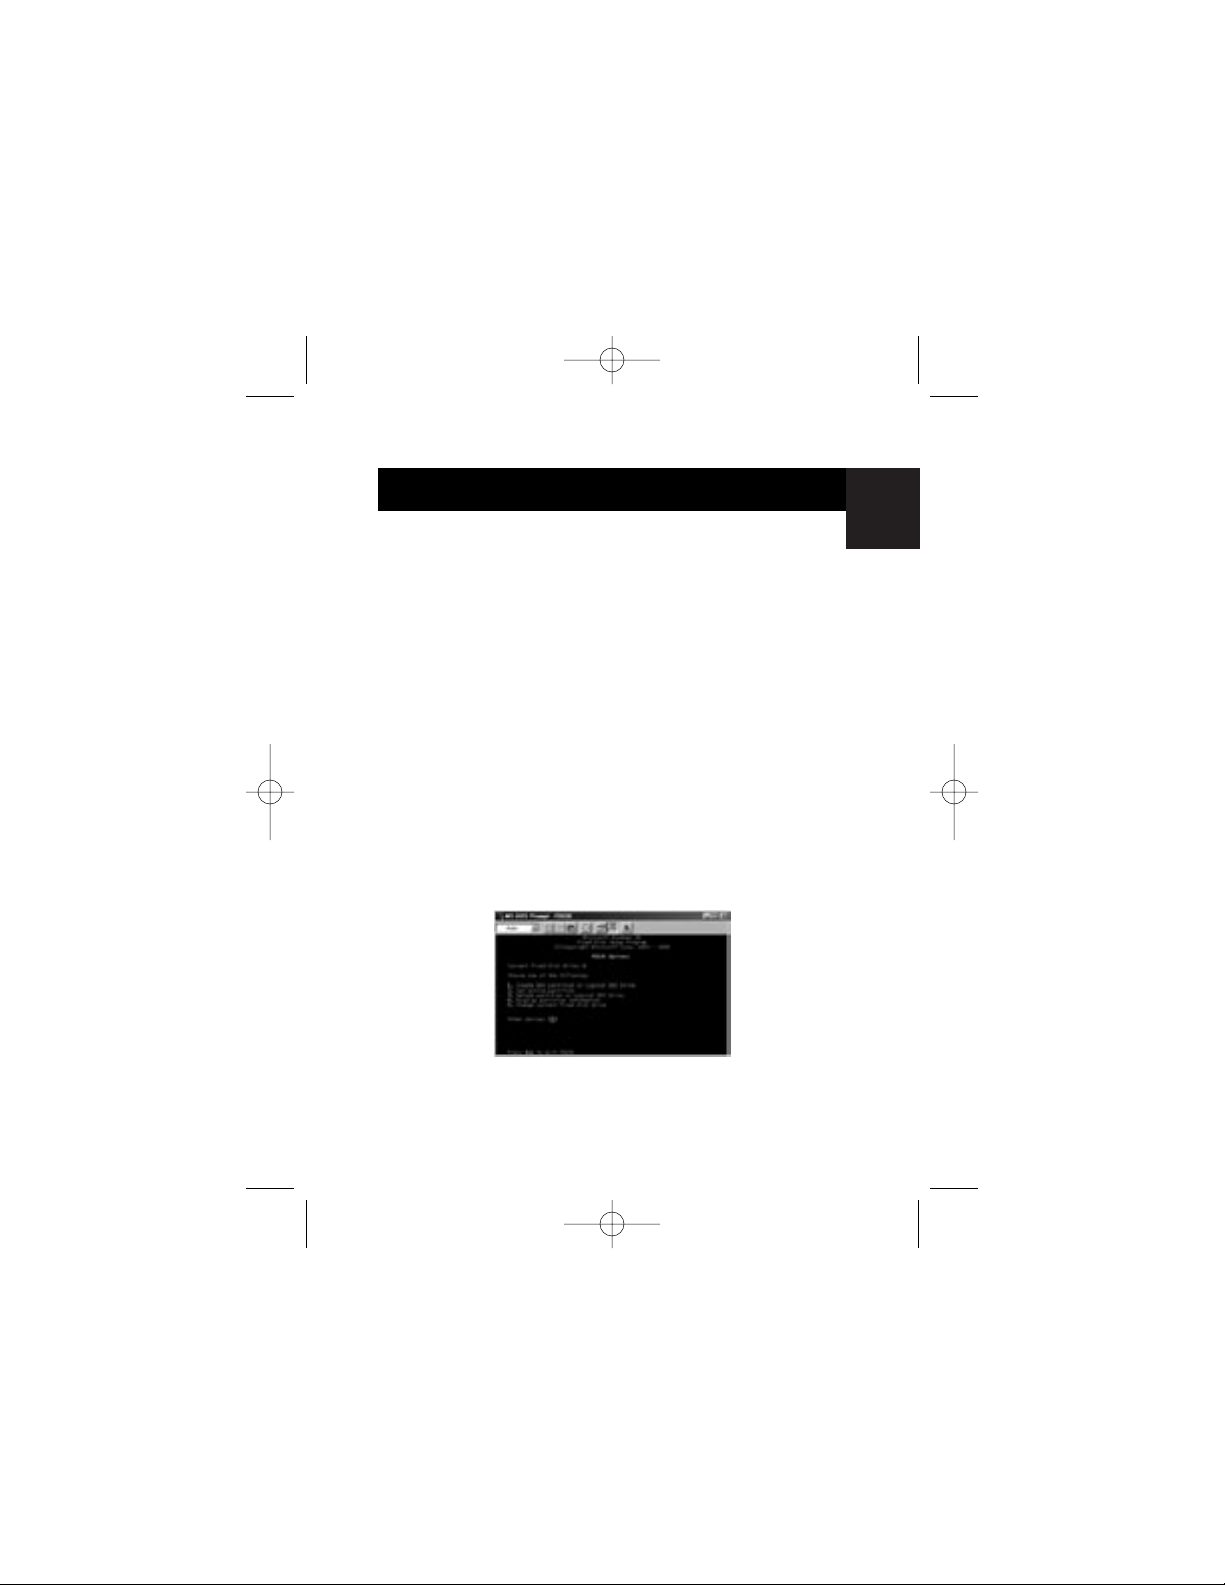
DOS Method (Recommended for Advanced Users Only)
1. Click on “Start”, and choose “Programs”. Select “MSDOS”.
2. At the DOS prompt, type “FDISK” and press “Enter”.
Note: If the FDISK utility terminates without displaying an error
message, exit back to Windows and disconnect the External
Drive. Reboot your computer. When Windows restarts,
reconnect the External Drive and go back to Step 1.
3. In the opening FDISK screen, answer the question: “Do you
want to enable large disk support?” Enter “Y” if you want to
create a partition larger than 2GB. Enter “N” if you want to
create a partition smaller than 2GB.
4. The FDISK “Options” screen will now appear. Select option
5, “Change Current Fixed Disk”. Select your new disk from
the list of available drives.
5. In the “Change Current Fixed Disk Drive” screen, enter the
disk drive number that is assigned to your External Drive.
13
P74080-em-F5U209-man_9-02.qxd 9/19/02 3:05 PM Page 13
Page 18
FORMAT THE USB 2.0 EXTERNAL DRIVE
14
IMPORTANT
Be sure that you select option 5 and change the “Current
Fixed Disk” from “Disk 1” to the disk number assigned to your
External Drive. If your computer is equipped with only one
internal drive, your new External Drive will be identified as
“Disk 2”. If your computer is equipped with two internal disk
drives, your new External Drive will be identified as “Disk 3”.
Failure to follow this step will result in the loss of all data on
your primary internal hard disk.
6. In the steps that follow, you must specify if you want to
create one partition equal to the maximum capacity of
your external disk drive, or if you want to create
multiple partitions.
7. After completing the disk partition procedure, exit FDISK
and restart Windows. Any new drives created through the
disk partition procedure must now be formatted using the
Windows disk format utility.
Partition under Windows 2000/XP
1. To partition the USB 2.0 hard disk drive under Windows
2000, please plug in the USB 2.0 External Drive, then click on
“Start”, choose “Settings”, then choose “Control Panel”.
Double-click the “Administrative Tools” icon, then
double-click the “Computer Management” icon. You will see
the screen on the next page.
Note: In Widows XP, click on “Start”, choose “Control Panel”,
click on the “Performance & Maintenance” icon, click on the
“Administrative Tools” icon, then click on the “Computer
Management” icon.
P74080-em-F5U209-man_9-02.qxd 9/19/02 3:05 PM Page 14
Page 19
En
FORMAT THE USB 2.0 EXTERNAL DRIVE
Note: If you are viewing the Control Panel in classic mode,
proceed directly to “Administrative Tools”.
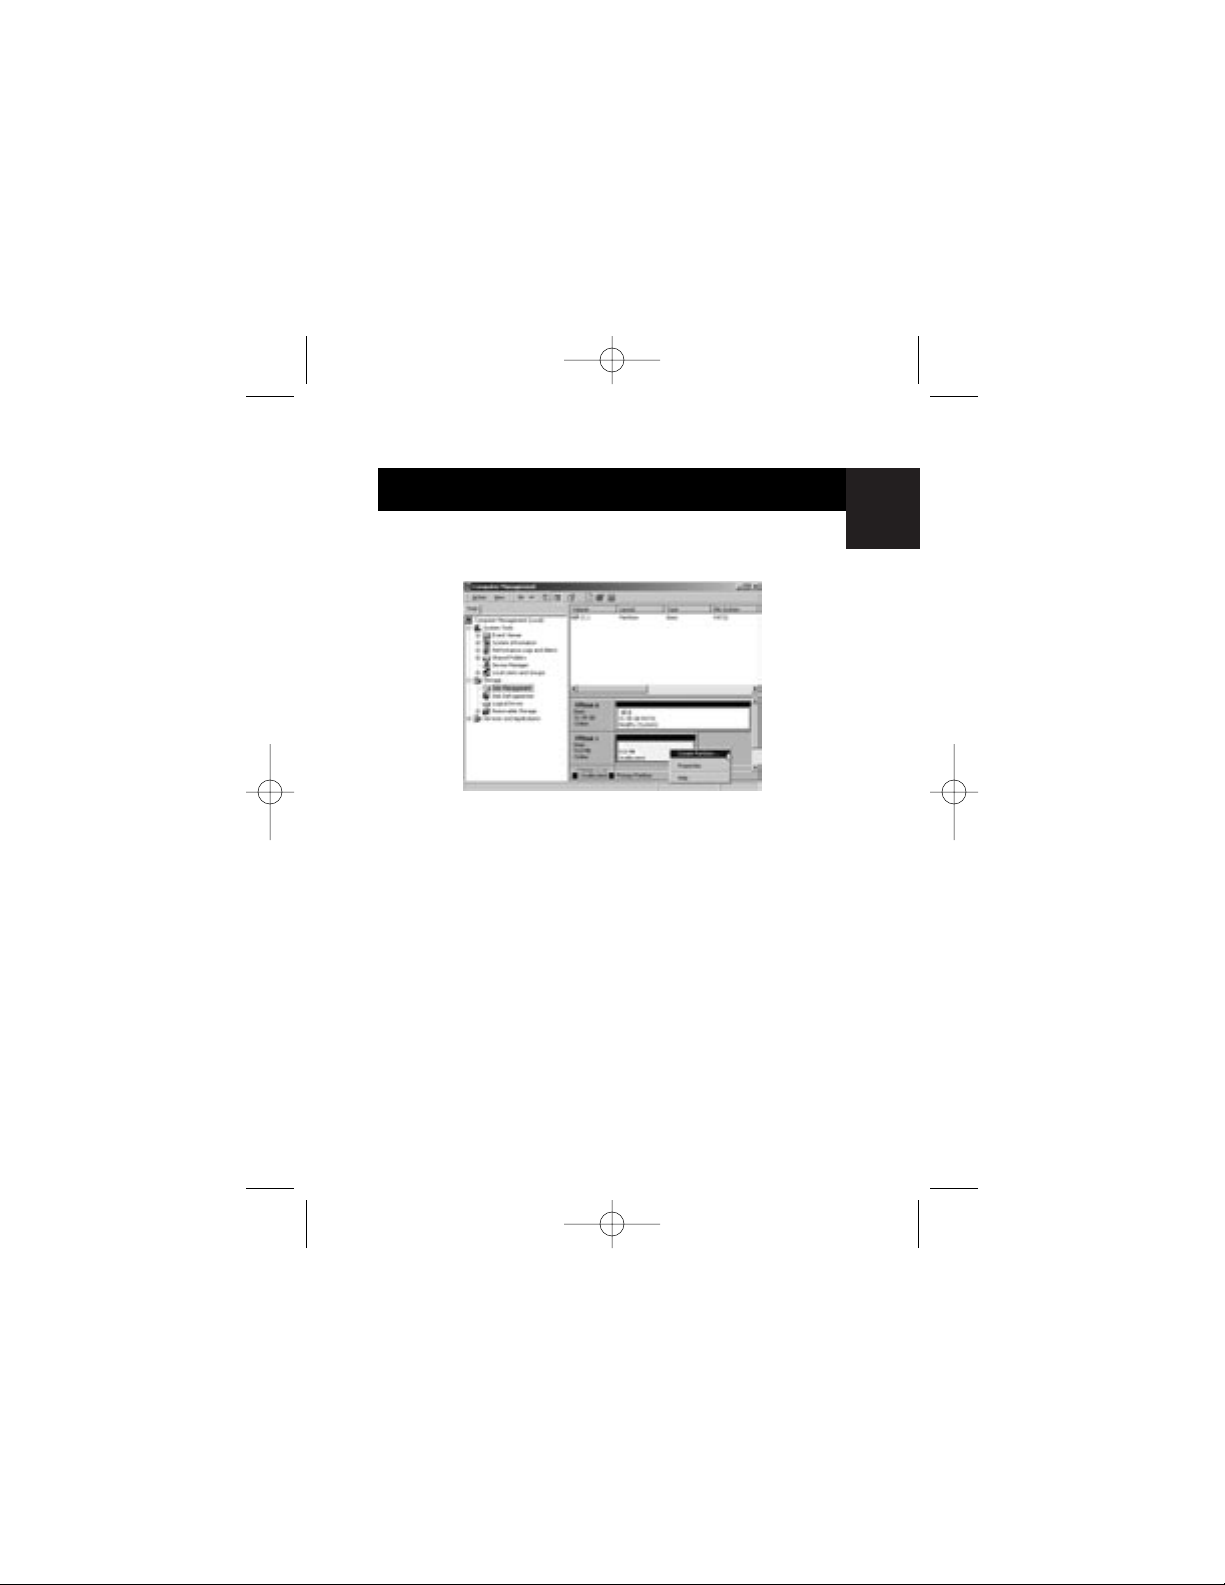
2. Click on “Disk Management”. All connected disk drives will
be displayed in the lower right-hand corner of the
“Computer Management” window. Information regarding
the status of each of your disk drives will be displayed in this
window. Right-click on the status bar for your new external
drive to create or delete new partitions, and/or format an
existing partition.
Note: When creating a new partition, a “New Partition Wizard”
will start and guide you through the setup. This will also format
the drive for you.
3. Once the disk partition and format procedure is completed,
your new External Drive is ready for use.
15
P74080-em-F5U209-man_9-02.qxd 9/19/02 3:05 PM Page 15
Page 20

INFORMATION
FCC Statement
DECLARATION OF CONFORMITY WITH FCC RULES FOR
ELECTROMAGNETIC COMPATIBILITY
We, Belkin Corporation, of 501 West Walnut Street, Compton, CA 90220,
declare under our sole responsibility that the product:
F5U209
to which this declaration relates:
Complies with Part 15 of the FCC Rules. Operation is subject to the following
two conditions: (1) this device may not cause harmful interference, and (2) this
device must accept any interference received, including interference that may
cause undesired operation.
CE Declaration of Conformity
We, Belkin Corporation, declare under our sole responsibility that the F5U209, to which this
declaration relates, is in conformity with Generic Emissions Standard EN55022 1998 and with
Generic Immunity Standard EN55024 1998, LVD61000-2-3, and LVD61000-3-3.
Belkin Corporation Limited Lifetime Product Warranty
Belkin Corporation warrants this product against defects in materials and workmanship for its
lifetime. If a defect is discovered, Belkin will, at its option, repair or replace the product at no
charge provided it is returned during the warranty period, with transportation charges
prepaid, to the authorized Belkin dealer from whom you purchased the product. Proof of
purchase may be required.
This warranty does not apply if the product has been damaged by accident, abuse, misuse,
or misapplication; if the product has been modified without the written permission of Belkin;
or if any Belkin serial number has been removed or defaced.
THE WARRANTY AND REMEDIES SET FORTH ABOVE ARE EXCLUSIVE IN LIEU OF ALL OTHERS,
WHETHER ORAL OR WRITTEN, EXPRESSED OR IMPLIED. BELKIN SPECIFICALLY DISCLAIMS
ANY AND ALL IMPLIED WARRANTIES, INCLUDING, WITHOUT LIMITATION, WARRANTIES OF
MERCHANTABILITY AND FITNESS FOR A PARTICULAR PURPOSE.
No Belkin dealer, agent, or employee is authorized to make any modification, extension, or
addition to this warranty.
BELKIN IS NOT RESPONSIBLE FOR SPECIAL, INCIDENTAL, OR CONSEQUENTIAL
DAMAGES RESULTING FROM ANY BREACH OF WARRANTY, OR UNDER ANY OTHER
LEGAL THEORY, INCLUDING BUT NOT LIMITED TO LOST PROFITS, DOWNTIME,
GOODWILL, DAMAGE TO OR REPROGRAMMING, OR REPRODUCING ANY PROGRAM
OR DATA STORED IN OR USED WITH BELKIN PRODUCTS.
16
P74080-em-F5U209-man_9-02.qxd 9/19/02 3:05 PM Page 16
Page 21
© 2002 Belkin Corporation. All rights reserved.
All trade names are registered trademarks of respective manufacturers listed.
P74080em
Belkin Components B.V.
Starparc Building • Boeing Avenue 333
1119 PH Schiphol-Rijk • The Netherlands
Tel: +31 (0) 20 654 7300
Fax: +31 (0) 20 654 7349
Belkin Components, Ltd.
Express Business Park
Shipton Way • Rushden • NN10 6GL
United Kingdom
Tel: +44 (0) 1933 35 2000
Fax: +44 (0) 1933 31 2000
Belkin Corporation
501 West Walnut Street
Compton • CA • 90220 • USA
Tel: 310.898.1100
Fax: 310.898.1111
Belkin Components Ltd.
7 Bowen Crescent • West Gosford
NSW 2250 • Australia
Tel: +61 (0) 2 4372 8600
Fax: +61 (0) 2 4372 8603
Belkin Tech Support
US: 310.898.1100 ext. 2263
800.223.5546 ext. 2263
Europe: 00 800 223 55 460
Australia: 1800 666 040
En
P74080-em-F5U209-man_9-02.qxd 9/19/02 3:05 PM Page 17
Page 22

P74080-em-F5U209-man_9-02.qxd 9/19/02 3:05 PM Page 18
Page 23
SOMMAIRE
Introduction . . . . . . . . . . . . . . . . . . . . . . . . . . . . . . . . . . . . . . . . .1
Configuration requise . . . . . . . . . . . . . . . . . . . . . . . . . . . . . . . . .2
Montage du boîtier . . . . . . . . . . . . . . . . . . . . . . . . . . . . . . . . . . .3
Installation du pilote . . . . . . . . . . . . . . . . . . . . . . . . . . . . . . . . . .8
Retrait du disque USB . . . . . . . . . . . . . . . . . . . . . . . . . . . . . . . .10
Formatage du lecteur externe USB 2.0 . . . . . . . . . . . . . . . . . . .11
Information . . . . . . . . . . . . . . . . . . . . . . . . . . . . . . . . . . . . . . . .16
Fr
P74080-em-F5U209-man_9-02.qxd 9/19/02 3:05 PM Page 19
Page 24

P74080-em-F5U209-man_9-02.qxd 9/19/02 3:05 PM Page 20
Page 25

Le boîtier externe USB 2.0 High Speed (lecteur externe) est un lecteur
de stockage portable et compact qui incorpore l’interface USB 2.0
(Universal Serial Bus 2.0) High Speed. Le lecteur externe vous permet
d’ajouter rapidement et facilement un espace de stockage
supplémentaire à votre ordinateur. La fonction Plug-and-Play fournit
un grand confort d’utilisation en déplacement ; vous pouvez
connecter facilement le lecteur externe à votre ordinateur via
l’interface USB et pouvez même le déconnecter et reconnecter alors
que l’ordinateur est en marche.
Remarque : pour pouvoir activer le mode USB 2.0 High Speed (480
Mops), il faut que votre ordinateur soit équipé de ports USB 2.0
intégrés ou d’un adaptateur hôte USB 2.0.
INTRODUCTION
1
Fr
P74080-em-F5U209-man_9-02.qxd 9/19/02 3:05 PM Page 1
Page 26
2
CONFIGURATION REQUISE
Matériel
Bloc-notes et ordinateur de bureau équipé d’un port USB 1.0
ou USB 2.0
Système d'exploitation
Windows®98 SE, Me, 2000, ou XP
P74080-em-F5U209-man_9-02.qxd 9/19/02 3:05 PM Page 2
Page 27
MONTAGE DU BOÎTIER
3
1. Enlevez le couvercle du lecteur externe.
2. Si vous installez un disque dur de 3 _ pouces, vérifiez que
le cavalier du disque est positionné sur « Master » (voir
l’information concernant le réglage du cavalier qui figure
sur le couvercle du lecteur). Connectez le câble de
données à 34 broches et le câble d’alimentation à 4
broches.
3. Si vous installez un lecteur de CD/CD-RW, vérifiez que le
cavalier du lecteur est positionné sur « Master ».
Connectez le câble de données à 34 broches, le câble
d’alimentation à 4 broches et le câble audio à 4 broches.
4. Choisissez les trous de montage correspondant au lecteur
que vous installez et fixez celui-ci avec au moins quatre
des vis fournies.
Fr
P74080-em-F5U209-man_9-02.qxd 9/19/02 3:05 PM Page 3
Page 28

Remarque : le kit du boîtier externe High Speed comprend
quatre vis à filetage fin et quatre vis à filetage épais. Choisissez
les vis adaptées aux trous de montage du lecteur. N’essayez
pas de faire rentrer une vis à filetage épais dans un trou à
filetage fin.
5. Remettez le couvercle en place et vérifiez qu’il est aligné sur
le fond.
MONTAGE DU BOÎTIER
4
P74080-em-F5U209-man_9-02.qxd 9/19/02 3:06 PM Page 4
Page 29
MONTAGE DU BOÎTIER
6. Accrochez le premier rail latéral à l’avant du lecteur
externe et enfoncez le rail dans les six trous
rectangulaires situés sur les côtés.
7. En cas d’installation d’un disque dur, il est nécessaire de
poser le cache. Insérez les onglets d’un côté du cache
dans les trous de montage situés sur le rail latéral monté
sur le châssis.
5
Fr
P74080-em-F5U209-man_9-02.qxd 9/19/02 3:06 PM Page 5
Page 30
6
MONTAGE DU BOÎTIER
8. Insérez les onglets de l’extrémité libre du cache dans le
second rail latéral et encliquetez le rail latéral à l’avant
du lecteur externe.
9. Terminez le montage en enfonçant le rail dans les six
trous de montage rectangulaires situés sur le côté du
lecteur externe.
Remarque importante : si vous utilisez Windows 98 ou 98 SE,
connectez le lecteur externe à votre ordinateur APRÈS avoir
fini d’installer le pilote.
P74080-em-F5U209-man_9-02.qxd 9/19/02 3:06 PM Page 6
Page 31

Fr
MONTAGE DU BOÎTIER
10. Branchez le connecteur carré du câble USB sur le port USB
situé à l’arrière du lecteur externe.
11. Branchez le connecteur rectangulaire du câble USB sur le
port USB 2.0 High Speed de l’ordinateur ou le hub USB 2.0
High Speed. Vous pouvez également connecter le câble à
un port USB 1.1 Full Speed de votre ordinateur ou un hub
USB 1.1 Full Speed.
Remarque : en cas de connexion à un port USB 1.1 Full Speed,
la bande passante USB maximum sera de 12 Mops.
12. Branchez le cordon d’alimentation secteur sur le connecteur
situé au dos du lecteur externe d’une part et sur la prise
secteur d’autre part.
13. Mettez le lecteur sous tension.
14. Passez à la section Installation du pilote.
7
P74080-em-F5U209-man_9-02.qxd 9/19/02 3:06 PM Page 7
Page 32

8
INSTALLATION DU PILOTE
Windows 98 SE
1. Insérez le CD d’installation dans votre lecteur de CD-ROM.
2. Ouvrez le CD Install.
3. Exécutez le fichier « TPPINST.EXE » pour installer les pilotes
de votre lecteur externe USB 2.0.
4. Une boîte de dialogue d’installation apparaît.
Cliquez sur « Suite ».
5. Sélectionnez « Terminer » et cliquez sur « Suite ».
6. Vous pouvez maintenant connecter le lecteur externe
à votre ordinateur.
7. Windows détectera un « adaptateur de stockage USB » et
finira d’installer les pilotes de périphérique requis.
8. Si votre nouveau disque est déjà partitionné, il figurera dans
la fenêtre « Poste de travail » en tant que «disque amovible».
Remarque : si l’option de disque amovible n’est pas
sélectionnée dans la fenêtre Paramètres du gestionnaire de
périphériques, votre nouveau lecteur apparaîtra en tant que
disque fixe Windows standard.
P74080-em-F5U209-man_9-02.qxd 9/19/02 3:06 PM Page 8
Page 33

9
Fr
Remarque : si le nouveau lecteur ne s’affiche pas dans le Poste
de travail, cela peut signifier qu’il faut le partitionner et le
formater. Veuillez vous référer à la section « Formatage du
lecteur externe USB 2.0 » pour préparer votre lecteur de disque
dur USB 2.0.
Une icône verte « Débrancher ou éjecter le matériel »
s’affichera dans la barre d’état système.
Windows Me/2000/XP
1. Si vous branchez le lecteur externe dans votre ordinateur
pour la première fois, Windows détectera un « Périphérique
de stockage USB 2.0 » et installera le pilote de classe de
périphérique de stockage de masse USB de Windows.
2. Votre nouveau lecteur s’affichera dans le « Poste du travail »
en tant que « disque USB ».
Remarque : si le nouveau lecteur ne s’affiche pas dans le Poste
de travail, cela peut signifier qu’il faut le partitionner et le
formater. Veuillez vous référer à la section « Partitionnement du
disque dur externe USB 2.0 » pour préparer votre lecteur de
disque dur USB 2.0.
INSTALLATION DU PILOTE
P74080-em-F5U209-man_9-02.qxd 9/19/02 3:06 PM Page 9
Page 34

10
RETRAIT DU DISQUE USB DE WINDOWS
Windows 98
1. Cliquez sur l’icône « Débrancher ou éjecter le matériel » de
la barre d’état système et sélectionnez le périphérique que
vous voulez supprimer.
2. Quand le système affiche le message d’invite « Vous pouvez
enlever ce périphérique », débranchez le câble USB du port
USB de votre ordinateur.
Windows Me/2000/XP
1. Une icône verte « Déconnecter ou éjecter le matériel »
s’affichera dans la barre d’état système.
2. Sélectionnez le « Périphérique de stockage de masse USB »
et cliquez sur « Arrêter ».
3. Choisissez le lecteur externe USB 2.0 que vous voulez
déconnecter et cliquez à nouveau sur « Arrêter ».
4. Quand le système affiche le message « Vous pouvez enlever
ce périphérique », débranchez le câble USB du port USB de
votre ordinateur.
P74080-em-F5U209-man_9-02.qxd 9/19/02 3:06 PM Page 10
Page 35

Fr
FORMATAGE DU LECTEUR EXTERNE USB 2.0
Formatage sous Windows 98/Me
1. Démarrez l’ordinateur sous Windows.
2. Branchez votre lecteur externe.
Il y a deux méthodes possibles de partitionnement et de
formatage du lecteur de disque dur USB 2.0.
Méthode du Panneau de configuration
1. Cliquez sur « Démarrer » et choisissez « Paramètres ».
2. Choisissez « Panneau de configuration ».
3. Cliquez deux fois sur « Système », puis sur « Gestionnaire de
périphériques ».
4. L’écran suivant s’affiche.
11
P74080-em-F5U209-man_9-02.qxd 9/19/02 3:06 PM Page 11
Page 36

12
FORMATAGE DU LECTEUR EXTERNE USB 2.0
5. Sélectionnez « Lecteurs de disques ». Votre nouveau disque
dur s’affichera dans la liste des lecteurs de disques durs (il
s’agit dans ce cas de « Toshiba 1924FCV »).
6. Cliquez deux fois sur le nom du disque dur. Sélectionnez «
Paramètres ». L’écran suivant s’affiche.
7. Vérifiez que les cases « Se déconnecter », « Synchronisation
du transfert de données », « Amovible » et « Unité Int 13 »
sont cochées. Il faut ensuite redémarrer votre ordinateur.
8. Après le redémarrage de Windows, l’icône « Disque
amovible » s’affiche dans le « Poste du travail ».
9. Cliquez avec le bouton droit de la souris sur l’icône « Disque
amovible » et sélectionnez « Formater » dans la liste
déroulante.
10. Votre disque dur amovible est prêt à l’emploi.
Remarque : l’utilisation de cette méthode de formatage du
disque dur amovible entraînera la création d’une partition
unique, d’une taille égale à la capacité maximum du disque dur.
P74080-em-F5U209-man_9-02.qxd 9/19/02 3:06 PM Page 12
Page 37

Fr
FORMATAGE DU LECTEUR EXTERNE USB 2.0
Méthode DOS (recommandée pour les utilisateurs
avancés seulement)
1. Cliquez sur « Démarrer » et choisissez « Programmes ».
Sélectionnez « MSDOS ».
2. À l’invite DOS, tapez « FDISK » et appuyez sur « Entrée ».
Remarque : si l’utilitaire FDISK s’exécute jusqu’à la fin sans
afficher de message d’erreur, revenez à Windows et
déconnectez le lecteur externe. Réamorcez votre ordinateur. Au
redémarrage de Windows, reconnectez le lecteur externe et
revenez à l’étape 1.
3. Sur l’écran FDISK qui s’affiche, répondez à la question : «
Voulez-vous activer la prise en charge des disques de grande
capacité ? » Entrez « O » si vous voulez créer une partition
supérieure à 2 Go. Entrez « N » si vous voulez créer une
partition inférieure à 2 Go.
4. L’écran « Options » de FDISK s’affiche. Sélectionnez l’option
5, « Modifier le lecteur de disque dur en cours ».
Sélectionnez votre nouveau disque dans la liste des lecteurs
disponibles.
5. Sur l’écran « Modifier le lecteur de disque dur en cours »,
entrez le numéro de lecteur de disque affecté à votre lecteur
externe.
13
P74080-em-F5U209-man_9-02.qxd 9/19/02 3:06 PM Page 13
Page 38

14
FORMATAGE DU LECTEUR EXTERNE USB 2.0
IMPORTANT
Veillez à bien sélectionner l’option 5 et à modifier le numéro du
« Disque dur en cours » en remplaçant « Disque 1 » par le
numéro de disque affecté à votre lecteur externe. Si votre
ordinateur est équipé d’un seul disque interne, votre nouveau
lecteur externe sera le « Disque 2 ». Si votre ordinateur est
équipé de deux disques internes, votre nouveau lecteur externe
sera le « Disque 3 ». Une erreur à cette étape entraînera la
perte de toutes les données contenues sur le disque dur
primaire interne.
6. Lors des étapes suivantes, spécifiez si vous voulez créer une
partition égale à la capacité maximum de votre disque dur
externe ou plusieurs partitions.
7. Après avoir terminé le partitionnement du disque, quittez
FDISK et redémarrez Windows. Tout nouveau disque créé
par la procédure de partitionnement de disque doit
dorénavant être formaté avec l’utilitaire de formatage de
disque de Windows.
Partitionnement sous Windows 2000/XP
1. Pour partitionner le lecteur de disque dur USB 2.0 sous
Windows 2000, branchez le lecteur externe USB 2.0 puis
cliquez sur « Démarrer » ; choisissez « Paramètres » puis «
Panneau de configuration ». Faites un double clic sur l'icône
« Outils d’administration » puis sur l'icône « Gestion de
l’ordinateur ». L’écran est en page suivante.
Remarque : dans Windows XP, cliquez sur « Démarrer »,
choisissez « Panneau de configuration », cliquez sur l’icône «
Performances et maintenance », cliquez sur l’icône « Outils
d’administration », puis sur l’icône « Gestion de l’ordinateur ».
P74080-em-F5U209-man_9-02.qxd 9/19/02 3:06 PM Page 14
Page 39

Fr
FORMATAGE DU LECTEUR EXTERNE USB 2.0
Remarque : si vous visualisez le Panneau de configuration en
mode classique, passez directement à l’option « Outils
d’administration ».
2. Cliquez sur « Gestion des disques ». Tous les lecteurs de
disques connectés s’afficheront dans l’angle inférieur droit de
la fenêtre « Gestion de l’ordinateur ». L’information
concernant l’état de chacun de vos lecteurs de disques
s’affichera dans cette fenêtre. Cliquez avec le bouton droit
de la souris sur la barre d’état de votre nouveau lecteur
externe pour créer ou supprimer de nouvelles partitions
et/ou formater une partition existante.
Remarque : lors de la création d’une nouvelle partition, un «
Assistant de nouvelle partition » démarrera et vous guidera tout
au long de l’installation. Le disque sera également formaté.
3. Quand le partitionnement du disque et le formatage sont
terminés, votre nouveau disque externe est prêt à l’emploi.
15
P74080-em-F5U209-man_9-02.qxd 9/19/02 3:06 PM Page 15
Page 40

16
INFORMATION
Déclaration FCC
DÉCLARATION DE CONFORMITÉ AVEC LA RÉGLEMENTATION
FCC CONCERNANT LA COMPATIBILITÉ ÉLECTROMAGNÉTIQUE
Nous, Belkin Corporation, sis à 501 West Walnut Street, Compton, CA 90220,
déclarons sous notre entière responsabilité que le produit :
F5U209
auquel se rapporte cette déclaration :
est conforme à la section 15 de la réglementation FCC. Son fonctionnement est
soumis aux deux conditions suivantes : (1) cet appareil ne doit pas causer
d’interférence et (2) cet appareil doit accepter toutes les interférences reçues,
notamment une interférence pouvant provoquer un fonctionnement indu.
Déclaration de conformité CE
Nous, Belkin Corporation, déclarons sous notre entière responsabilité que le produit F5U209
auquel se rapporte cette déclaration est conforme à la norme générique sur les émissions
EN55022 1998 et à la norme générique d’immunité EN55024 1998, LVD61000-2-3 et
LVD61000-3-3.
Garantie de produit à durée de vie limitée de Belkin Corporation
Belkin Corporation garantit ce produit contre tout défaut de matériau ou de fabrication
pendant sa durée de vie. En cas de découverte d’un défaut, Belkin, à son choix, réparera ou
remplacera le produit gratuitement à condition qu’il soit retourné pendant la période de
garantie, les frais de transport étant prépayés, au revendeur Belkin agréé chez qui vous avez
acheté le produit. Un justificatif d’achat pourra vous être demandé.
Cette garantie ne s’applique pas si le produit a été endommagé par accident, utilisation
abusive, emploi abusif ou détournement d’usage ; si le produit a été modifié sans le
consentement écrit de Belkin ou si le numéro de série de Belkin a disparu ou est illisible.
LA GARANTIE ET LES RECOURS EXPOSÉS CI-DESSUS SONT EXCLUSIFS EN LIEU ET PLACE DE
TOUT AUTRE, ORAL OU ÉCRIT, EXPLICITE OU IMPLICITE. BELKIN REFUSE SPÉCIFIQUEMENT
TOUTE GARANTIE IMPLICITE, INCLUANT SANS LIMITATION LES GARANTIES DE
COMMERCIABILITÉ ET D’APTITUDE À UNE UTILISATION PARTICULIÈRE.
Aucun revendeur, agent ou employé de Belkin n’est autorisé à modifier, étendre ou
compléter cette garantie.
BELKIN N’EST PAS RESPONSABLE DES DOMMAGES SPÉCIAUX, FORTUITS OU INDIRECTS
RÉSULTANT D’UNE RUPTURE DE GARANTIE NI DE TOUTE AUTRE THÉORIE LÉGALE,
INCLUANT (SANS S’Y LIMITER) LA PERTE DE BÉNÉFICES, L’INDISPONIBILITÉ, LA PERTE DE
CLIENTÈLE OU D’ACHALANDAGE, LES DOMMAGES SUBIS PAR LES PROGRAMMES OU
DONNÉES STOCKÉS DANS OU UTILISÉS AVEC LES PRODUITS BELKIN AINSI QUE LEUR
REPROGRAMMATION OU REPRODUCTION.
P74080-em-F5U209-man_9-02.qxd 9/19/02 3:06 PM Page 16
Page 41

Fr
© 2002 Belkin Corporation. Tous droits réservés.
Tous les noms de marques sont des marques commerciales déposées de leur propriétaire désigné.
P74080em
Belkin Components B.V.
Starparc Building • Boeing Avenue 333
1119 PH Schiphol-Rijk • Pays-Bas
Tél. : +31 (0) 20 654 7300
Télécopie : +31 (0) 20 654 7349
Belkin Components, Ltd.
Express Business Park
Shipton Way • Rushden • NN10 6GL
Royaume-Uni
Tél. : +44 (0) 1933 35 2000
Télécopie : +44 (0) 1933 31 2000
Belkin Corporation
501 West Walnut Street
Compton • CA • 90220 • USA
Tél. : 310.898.1100
Télécopie : 310.898.1111
Belkin Components Ltd.
7 Bowen Crescent • West Gosford
NSW 2250 • Australie
Tél. : +61 (0) 2 4372 8600
Télécopie : +61 (0) 2 4372 8603
Support technique de Belkin
US: 310.898.1100 poste 2263
800.223.5546 poste 2263
Europe : 00 800 223 55 460
Australie : 1800 666 040
P74080-em-F5U209-man_9-02.qxd 9/19/02 3:06 PM Page 17
Page 42

P74080-em-F5U209-man_9-02.qxd 9/19/02 3:06 PM Page 18
Page 43

De
INHALTSVERZEICHNIS
Einführung . . . . . . . . . . . . . . . . . . . . . . . . . . . . . . . . . . . . . . . . . .1
Systemanforderungen . . . . . . . . . . . . . . . . . . . . . . . . . . . . . . . . .2
Zusammenbau Ihres Laufwerkgehäuses . . . . . . . . . . . . . . . . . . . .3
Installation des Treibers . . . . . . . . . . . . . . . . . . . . . . . . . . . . . . . .8
Sicherer Ausbau der USB-Disk . . . . . . . . . . . . . . . . . . . . . . . . . .10
Format des externen USB 2.0 Laufwerks . . . . . . . . . . . . . . . . . .11
Information . . . . . . . . . . . . . . . . . . . . . . . . . . . . . . . . . . . . . . . .16
P74080-em-F5U209-man_9-02.qxd 9/19/02 3:06 PM Page 19
Page 44

P74080-em-F5U209-man_9-02.qxd 9/19/02 3:06 PM Page 20
Page 45

De
Das externe Laufwerkgehäuse für USB 2.0 Hi-Speed ist ein tragbares
kompaktes Speicherlaufwerk mit einer Schnittstelle für USB 2.0 HiSpeed. Das externe Laufwerk bietet einen schnellen und einfachen
Weg für zusätzlichen Speicherplatz für Ihren Computer. Die Plug-andPlay-Funktion ist auf Reisen sehr praktisch. Das externe Laufwerk kann
einfach über die USB-Schnittstelle an Ihrem Computer angeschlossen,
abgenommen und erneut angeschlossen werden, während der
Computer läuft.
Hinweis: Für USB 2.0 Hi-Speed-Betrieb (480 Mbps) muss Ihr
Computer mit eingebauten USB 2.0 Anschlüssen oder einer USB 2.0
Hostadapterkarte ausgerüstet sein.
EINFÜHRUNG
1
P74080-em-F5U209-man_9-02.qxd 9/19/02 3:06 PM Page 1
Page 46

2
SYSTEMANFORDERUNGEN
Hardware
Notebook und Desktop-Computer mit USB 1.0 oder
USB 2.0 Anschluss
Betriebssystem
Windows®98 SE, Me, 2000, oder XP
P74080-em-F5U209-man_9-02.qxd 9/19/02 3:06 PM Page 2
Page 47

De
ZUSAMMENBAU IHRES LAUFWERKGEHÄUSES
1. Entfernen Sie die Oberseite des externen Laufwerks.
2. Wenn Sie ein 3,5-Zoll-Laufwerk einbauen, müssen Sie
sicherstellen, dass Ihr Laufwerk auf „Master“ eingestellt ist
(siehe aufgedruckte Jumper-Einstellungsinformation auf
der Oberseite Ihres Laufwerks), und dann das 34-polige
Datenkabel und das 4-polige Netzkabel anschließen.
3. Wenn Sie ein CD/CD-RW-Laufwerk einbauen, müssen Sie
sicherstellen, dass Ihr Laufwerk auf „Master“ eingestellt ist,
und dann das 34-polige Datenkabel, das 4-polige
Netzkabel und das 4-polige Audiokabel anschließen.
4. Wählen Sie die Befestigungsbohrungen, die mit dem zu
verwendenden Laufwerk übereinstimmen und schrauben
Sie die letzten vier der mitgelieferten
Befestigungsschrauben ein.
3
P74080-em-F5U209-man_9-02.qxd 9/19/02 3:06 PM Page 3
Page 48

ZUSAMMENBAU IHRES LAUFWERKGEHÄUSES
Hinweis: Im Bausatz für Ihr externes Hi-Speed-Laufwerkgehäuse
sind vier Feingewindeschrauben und vier
Grobgewindeschrauben enthalten. Stellen Sie sicher, dass Sie
die Schrauben auswählen, die zu den Befestigungsbohrungen
Ihres Laufwerks passen. Versuchen Sie nicht, eine
Grobgewindeschraube gewaltsam in eine Feingewindebohrung
einzuschrauben.
5. Setzen Sie die obere Abdeckung wieder auf und richten Sie
sie mit der Bodenabdeckung aus.
4
P74080-em-F5U209-man_9-02.qxd 9/19/02 3:06 PM Page 4
Page 49

De
ZUSAMMENBAU IHRES LAUFWERKGEHÄUSES
6. Haken Sie zuerst die Seitenstrebe um die Vorderkante
des externen Laufwerks ein und drücken Sie dann die
Strebe in die sechs rechteckigen Befestigungslöcher an
der Seite.
7. Wenn Sie eine Festplatte einbauen, muss die
Frontblende eingebaut werden. Führen Sie die
Kontaktnasen an einer Seite der Frontblende in die
Befestigungslöcher in der eingebauten Seitenstrebe.
5
P74080-em-F5U209-man_9-02.qxd 9/19/02 3:06 PM Page 5
Page 50

6
ZUSAMMENBAU IHRES LAUFWERKGEHÄUSES
8. Führen Sie die Kontaktnasen am losen Ende der Frontblende
in die zweite Seitenstrebe und haken Sie die Seitenstreben
vorn am externen Laufwerk ein.
9. Machen Sie mit dem Zusammenbau weiter, indem Sie die
Strebe in die sechs rechteckigen Befestigungslöcher in der
Seite des externen Laufwerks drücken.
Wichtiger Hinweis: Wenn Sie Windows 98 oder 98 SE
verwenden, dürfen Sie das externe Laufwerk ERST an Ihrem
Computer anschließen, wenn der Treiber installiert ist.
P74080-em-F5U209-man_9-02.qxd 9/19/02 3:06 PM Page 6
Page 51

ZUSAMMENBAU IHRES LAUFWERKGEHÄUSES
7
10. Stecken Sie den quadratischen Stecker des USB-Kabels in
den USB-Anschluss auf der Rückwand des externen
Laufwerks.
11. Stecken Sie den rechteckigen Stecker des USB-Kabels in
den USB-Anschluss für USB 2.0 Hi-Speed an Ihrem
Computer oder an Ihrem Hub für USB 2.0 Hi-Speed. Sie
können das Kabel auch an einem USB-Anschluss für USB
1.1 Full-Speed an Ihrem Computer oder an Ihrem Hub für
USB 1.1 Full-Speed anschließen.
Hinweis: Die maximale USB-Bandbreite im Falle eines
Anschlusses an einem Anschluss für USB 1.1 Full-Speed
ist 12 Mbps.
12. Stecken Sie ein Ende des Wechselstrom-Netzkabels in
das Netzverbindungsstück an der Rückwand des
externen Laufwerks und das andere Ende in eine
Wechselstrom-Wandsteckdose.
13. Schalten Sie den Strom zum Laufwerk ein.
14. Fahren Sie mit dem Abschnitt „Installation des
Treibers“ fort.
De
P74080-em-F5U209-man_9-02.qxd 9/19/02 3:06 PM Page 7
Page 52

8
INSTALLATION DES TREIBERS
Windows 98 SE
1. Legen Sie die Installations-CD in Ihr CD-ROM-Laufwerk.
2. Öffnen Sie die Installations-CD.
3. Führen Sie „TPPINST.EXE“ aus, um die Treiber für Ihr
externes Laufwerk für USB 2.0 zu installieren.
4. Ein Installationsdialogfeld erscheint. Klicken Sie auf „Weiter“.
5. Wählen Sie „Fertig stellen“ und klicken Sie auf „Weiter“.
6. Sie können jetzt das externe Laufwerk an Ihrem
Computer anschließen.
7. Windows erkennt nun den „USB-Speicheradapter“ und stellt
die Installation der erforderlichen Gerätetreiber fertig.
8. Wenn Ihr neues Laufwerk bereits partitioniert ist, erscheint es
jetzt im Fenster „Arbeitsplatz“ als „Wechselplatte“.
Hinweis: Wenn die Wechselplattenoption nicht im Fenster
Einstellungen des Geräte-Managers ausgewählt ist, erscheint Ihr
neues Laufwerk als eine feste Windows Standardfestplatte.
P74080-em-F5U209-man_9-02.qxd 9/19/02 3:06 PM Page 8
Page 53

Hinweis: Wenn das neue Laufwerk nicht unter Arbeitsplatz
erscheint, müssen Sie evtl. die Festplatte partitionieren und
formatieren. Lesen Sie dazu Abschnitt „Formatieren des
externen Laufwerks für USB 2.0“, um Ihre USB 2.0 Festplatte
vorzubereiten.
Ein grünes Symbol „Hardware sicher entfernen“ erscheint
im Infobereich.
Windows Me/2000/XP
1. Wenn Sie ein externes Laufwerk erstmals in Ihren Computer
einstecken, erkennt Windows ein „Speichergerät für USB 2.0)
und installiert die Treiber für USB-Massenspeichergeräte, die
in Windows integriert sind.
2. Ihr neues Laufwerk erscheint jetzt im Fenster „Arbeitsplatz“
als „USB-Disk“.
Hinweis: Wenn das neue Laufwerk nicht unter Arbeitsplatz
erscheint, müssen Sie evtl. die Festplatte partitionieren und
formatieren. Lesen Sie dazu Abschnitt „Partitionieren der
externen Festplatte für USB 2.0“, um Ihre USB 2.0
Festplatte vorzubereiten.
INSTALLATION DES TREIBERS
9
De
P74080-em-F5U209-man_9-02.qxd 9/19/02 3:06 PM Page 9
Page 54

10
SICHERES ENTFERNEN DER USB-DISK
VON WINDOWS
Windows 98
1. Klicken Sie auf das grüne Symbol „Hardware sicher
entfernen“ im Infobereich und wählen Sie das Gerät, das Sie
entfernen wollen.
2. Nach der Systemaufforderung „Hardware kann jetzt entfernt
werden“ ziehen Sie das USB-Kabel vom USB-Anschluss Ihres
Computers ab.
Windows Me/2000/XP
1. Doppelklicken Sie auf dem Symbol „Hardware sicher
entfernen“ im Infobereich.
2. Wählen Sie „USB-Massenspeichergerät“ und klicken Sie
dann auf „Stopp“.
3. Wählen Sie das externe Laufwerk für USB 2.0, das Sie
abtrennen wollen und klicken Sie erneut auf „Stopp“.
4. Nach der Systemaufforderung „Sie können dieses Gerät nun
sicher entfernen“ ziehen Sie das USB-Kabel vom USBAnschluss Ihres Computers ab.
P74080-em-F5U209-man_9-02.qxd 9/19/02 3:06 PM Page 10
Page 55

FORMATIEREN DES EXTERNEN USB 2.0
LAUFWERKS
11
Formatieren unter Windows 98/Me
1. Fahren Sie den Computer im Windows Betriebssystem hoch.
2. Stecken Sie Ihr externen Laufwerk ein.
Sie können Ihre Festplatte für USB 2.0 auf zwei Arten
partitionieren und formatieren.
Methode Systemsteuerung
1. Klicken Sie auf „Start“ und wählen Sie „Einstellungen“.
2. Wählen Sie „Systemsteuerung“.
3. Doppelklicken Sie auf „System“ und dann auf
„Geräte-Manager“.
4. Der folgende Bildschirm erscheint:
De
P74080-em-F5U209-man_9-02.qxd 9/19/02 3:06 PM Page 11
Page 56

12
FORMATIEREN DES EXTERNEN USB 2.0
LAUFWERKS
5. Wählen Sie „Laufwerke“. Ihre neue Festplatte erscheint in
der Festplattenliste (in diesem Fall als „Toshiba 1924FCV“).
6. Doppelklicken Sie auf dem Eintrag für Ihre Festplatte.
Wählen Sie „Einstellungen“. Der folgende
Bildschirm erscheint:
7. Stellen Sie sicher, dass die Kontrollkästchen „Trennen“,
„Synchrondatenübertragung“, „Wechselplatte“ und
„Interrupt 13-Gerät“ abgehakt sind. Nach diesen
Änderungen müssen Sie Ihren Computer neu starten.
8. Nach dem Neustart von Windows erscheint das Symbol
„Wechselplatte“ im Fenster „Arbeitsplatz“.
9. Rechtsklicken Sie auf dem Symbol „Wechselplatte“ und
wählen Sie „Formatieren“ aus der Dropdown-Liste.
10. Ihre Wechselplatte ist jetzt betriebsbereit.
Hinweis: Mit dieser Formatierungsweise wird Ihre
Wechselplatte in einer Einzelpartition formatiert, die der
maximalen Nennspeichergröße Ihrer Wechselplatte entspricht.
P74080-em-F5U209-man_9-02.qxd 9/19/02 3:06 PM Page 12
Page 57

FORMATIEREN DES EXTERNEN USB 2.0
LAUFWERKS
13
DOS-Methode (nur für Fortgeschrittene)
1. Klicken Sie auf „Start“ und wählen Sie „Programme“.
Wählen Sie „MSDOS“.
2. Auf die DOS-Aufforderung tippen Sie „FDISK“ ein und
drücken „Eingabe“.
Hinweis: Wenn das FDISK-Dienstprogramm ohne Anzeige einer
Fehlermeldung fertig wird, kehren Sie in Windows zurück und
ziehen das externe Laufwerk ab. Starten Sie Ihren Computer
neu. Nach dem Neustart von Windows schließen Sie das
externe Laufwerk wieder an und gehen zurück zu Schritt 1.
3. Im FDISK-Einstiegsbildschirm beantworten Sie die Frage:
„Möchten Sie die Unterstützung aktivieren?“ Geben Sie „J“
ein, wenn die Partition größer als 2 GB sein soll. Geben Sie
„N“ ein, wenn die Partition kleiner als 2 GB sein soll.
4. Der FDISK-Bildschirm „Optionen erscheint jetzt. Wählen Sie
Option 5 „Derzeitige Festplatte ändern“. Wählen Sie die
neue Festplatte aus der Liste der vorhandenen Laufwerke.
5. Im Bildschirm „Derzeitiges Festplattenlaufwerk ändern“
geben Sie die Laufwerknummer ein, die Ihrem externen
Laufwerk zugeordnet ist.
De
P74080-em-F5U209-man_9-02.qxd 9/19/02 3:06 PM Page 13
Page 58

14
FORMATIEREN DES EXTERNEN USB 2.0
LAUFWERKS
WICHTIG
Stellen Sie sicher, dass Sie Option 5 wählen und ändern Sie die
„Derzeitiges Festplatte“ von „Festplatte 1“ auf die
Festplattennummer Ihres externen Laufwerks. Wenn Ihr
Computer nur mit einem internen Laufwerk ausgestattet ist, ist
Ihr neues externes Laufwerk als „Festplatte 2“ gekennzeichnet.
Wenn Ihr Computer mit zwei internen Laufwerken ausgestattet
ist, ist Ihr neues externes Laufwerk als „Festplatte 3“
gekennzeichnet. Bei Nichtbeachtung dieses Schrittes gehen
Ihnen alle Daten auf Ihrer internen Hauptfestplatte verloren.
6. In den folgenden Schritten müssen Sie angeben, ob Sie eine
Partition entsprechend der maximalen Speicherkapazität
Ihres externen Laufwerks erstellen wollen oder mehrere
Partitionen erstellen möchten.
7. Nach Abschluss des Festplattenpartitionsverfahrens verlassen
Sie FDISK und starten Windows neu. Jedes anhand des
Festplattenpartitionsverfahrens neu erstellte Laufwerk muss
jetzt mithilfe des Windows Datenträgerformatierungsprogramm formatiert werden.
Partitionieren unter Windows 2000/XP
1. Zum Partitionieren der USB 2.0 Festplatte unter Windows
2000 stecken Sie das externe Laufwerk für USB 2.0 ein und
klicken auf „Start“. Wählen Sie „Einstellungen“ und dann
„Systemsteuerung“. Doppelklicken Sie auf das Symbol
„Verwaltung“ und dann auf das Symbol
„Computerverwaltung“. Der Bildschirm auf der nächsten
Seite erscheint.
Hinweis: In Windows XP klicken Sie auf „Start“, wählen
„Systemsteuerung“, klicken auf das Symbol „Leistung und
Verwaltung“, dann auf das Symbol „Verwaltung“ und schließlich
auf das Symbol „Computerverwaltung“.
P74080-em-F5U209-man_9-02.qxd 9/19/02 3:06 PM Page 14
Page 59

FORMATIEREN DES EXTERNEN USB 2.0
LAUFWERKS
15
Hinweis: In Windows XP klicken Sie auf „Start“, wählen
„Systemsteuerung“, klicken auf das Symbol „Leistung und
Verwaltung“, dann auf das Symbol „Verwaltung“ und schließlich
auf das Symbol „Computerverwaltung“.
Hinweis: Wenn Sie die Systemsteuerung als klassisches
Startmenü anzeigen lassen, klicken Sie direkt auf „Verwaltung“.
2. Klicken Sie auf „Datenträgerverwaltung“. Alle
angeschlossenen Laufwerke werden in der unteren rechten
Ecke des Fensters „Computerverwaltung“ angezeigt.
Informationen zum Status jedes Laufwerks werden in diesem
Fenster angezeigt. Rechtsklicken Sie auf der Statusleiste für
Ihr neues externes Laufwerk, um neue Partitionen zu schaffen
oder zu löschen bzw. vorhandene Partitionen zu formatieren.
Hinweis: Bei der Erstellung einer neuen Partition startet der
„Partitions-Assistenten“, der Sie durch das Setup führt. Damit
wird auch Ihr Laufwerk formatiert.
3. Sobald das Verfahren zur Festplattenpartitionierung und -
formatierung abgeschlossen ist, ist Ihr neues externes
Laufwerk betriebsbereit.
De
P74080-em-F5U209-man_9-02.qxd 9/19/02 3:06 PM Page 15
Page 60

16
INFORMATION
FCC-Erklärung
KONFORMITÄTSERKLÄRUNG MIT FCC-RICHTLINIEN FÜR
ELEKTROMAGNETISCHE KOMPATIBILITÄT
Wir, Belkin Corporation, in 501 West Walnut Street, Compton, CA 90220, USA,
erklären in eigener Verantwortung, dass dieses Produkt:
F5U209
auf das sich diese Erklärung bezieht,
mit Abschnitt 15 der FCC-Richtlinien übereinstimmt. Der Betrieb unterliegt
folgenden beiden Bedingungen: (1) Dieses Gerät darf keine gefährlichen
Störungen verursachen und (2) dieses Gerät muss gegen alle empfangenen
Störungen unempfindlich sein, einschließlich Störungen, die einen
unerwünschten Betrieb zur Folge haben können.
CE-Konformitätserklärung
Wir, Belkin Corporation, erklären in eigener Verantwortung, dass das Gerät F5U209, auf das sich diese
Erklärung bezieht, die Allgemeine Emissionsnorm EN550022 1998 erfüllt sowie die Allgemeinen
Immunitätsnormen EN550024 1998, EN61000-2-3 und EN61000-3-3.
Belkin Corporation eingeschränkte Produktgarantie
Belkin Corporation garantiert, dass dieses Produkt für seine volle Nutzungsdauer frei von Materialund Verarbeitungsfehlern ist. Wenn ein Defekt festgestellt wird, wird Belkin nach eigenem Ermessen
das Produkt kostenlos reparieren oder ersetzen, sofern es während der Garantiezeit eingeschickt wird.
Die Versandkosten an einen zugelassenen Belkin Händler, bei dem Sie das Produkt gekauft haben,
sind von Ihnen zu tragen. Ein Kaufbeleg ist u. U. erforderlich.
Diese Garantie gilt nicht, wenn das Produkt durch einen Unfall, Missbrauch oder falschen Gebrauch
beschädigt wurde oder das Produkt ohne vorherige schriftliche Genehmigung von Belkin modifiziert
bzw. die Belkin Seriennummer entfernt oder unleserlich gemacht wurde.
DIE OBEN GENANNTE GARANTIE UND RECHTSBEHELFE SCHLIESSEN ALLE ANDEREN AUS, OB
SCHRIFTLICH ODER MÜNDLICH, AUSDRÜCKLICH ODER STILLSCHWEIGEND. BELKIN ÜBERNIMMT
AUSDRÜCKLICH KEINE HAFTUNG FÜR STILLSCHWEIGENDE GARANTIEN, EINSCHLIESSLICH UNTER
ANDEREM GARANTIEN ZUR HANDELBARKEIT UND EIGNUNG FÜR EINEN BESTIMMTEN ZWECK.
Kein Belkin Händler, Vertreter oder Mitarbeiter darf irgendwelche Änderungen an, Erweiterungen an
oder Zusätze zu dieser Garantie machen.
BELKIN ÜBERNIMMT KEINE HAFTUNG FÜR BESONDERE, NEBEN- ODER FOLGESCHÄDEN, DIE
DURCH EINEN GARANTIEBRUCH ENTSTEHEN. AUCH ÜBERNIMMT BELKIN KEINE HAFTUNG FÜR
ANDERE RECHTLICHE THEORIEN, EINSCHLIESSLICH UNTER ANDEREM GEWINNEINBUSSEN,
AUSFALLZEITEN, GOODWILL, SCHÄDEN AN BZW. NEUPROGRAMMIERUNG ODER
REKONSTRUKTION VON PROGRAMMEN ODER DATEN, DIE IN BELKIN PRODUKTEN GESPEICHERT
SIND ODER DAMIT BENUTZT WERDEN.
P74080-em-F5U209-man_9-02.qxd 9/19/02 3:06 PM Page 16
Page 61

De
© 2002 Belkin Corporation. Alle Rechte vorbehalten.
Alle Warenzeichen sind eingetragene Warenzeichen ihrer jeweiligen aufgeführten Hersteller.
P74080em
Belkin Components B.V.
Starparc Building • Boeing Avenue 333
1119 PH Schiphol-Rijk • Niederlande
Tel: +31 (0) 20 654 7300
Fax: +31 (0) 20 654 7349
Belkin Components, Ltd.
Express Business Park
Shipton Way • Rushden • NN10 6GL
Großbritannien
Tel: +44 (0) 1933 35 2000
Fax: +44 (0) 1933 31 2000
Belkin Corporation
501 West Walnut Street
Compton • CA • 90220 • USA
Tel: 310.898.1100
Fax: 310.898.1111
Belkin Components Ltd.
7 Bowen Crescent • West Gosford
NSW 2250 • Australien
Tel: +61 (0) 2 4372 8600
Fax: +61 (0) 2 4372 8603
Belkin Technische Unterstützung
USA: 310.898.1100 Durchw. 2263
800.223.5546 Durchw. 2263
Europa: 00 800 223 55 460
Australien:1800 666 040
P74080-em-F5U209-man_9-02.qxd 9/19/02 3:06 PM Page 17
Page 62

P74080-em-F5U209-man_9-02.qxd 9/19/02 3:06 PM Page 18
Page 63

Ne
INHOUDSOPGAVE
Inleiding . . . . . . . . . . . . . . . . . . . . . . . . . . . . . . . . . . . . . . . . . . .1
Systeemvereisten . . . . . . . . . . . . . . . . . . . . . . . . . . . . . . . . . . . . .2
De stationhouder monteren . . . . . . . . . . . . . . . . . . . . . . . . . . . .3
Het stuurprogramma installeren . . . . . . . . . . . . . . . . . . . . . . . . .8
Het USB-station veilig verwijderen . . . . . . . . . . . . . . . . . . . . . . .10
Een extern USB 2.0-station formatteren . . . . . . . . . . . . . . . . . . .11
Informatie . . . . . . . . . . . . . . . . . . . . . . . . . . . . . . . . . . . . . . . . .16
P74080-em-F5U209-man_9-02.qxd 9/19/02 3:06 PM Page 19
Page 64

P74080-em-F5U209-man_9-02.qxd 9/19/02 3:06 PM Page 20
Page 65

Ne
De houder voor externe High-Speed USB 2.0-stations (het Externe
station) is een draagbaar compact opslagstation waarin een HighSpeed interface van het type USB 2.0 (Universal Serial Bus 2.0) is
ingebouwd. Het Externe station biedt een snelle en makkelijke manier
om uw computer van meer opslagruimte te voorzien. De plug-andplay-functie biedt u veel gemak als u wel eens met de computer
onderweg bent. U kunt het Externe station makkelijk via de USBinterface op uw computer aansluiten en het is zelfs mogelijk de
verbinding met de computer aan te brengen en los te koppelen
terwijl de computer actief is.
Opmerking: als u de High-Speed USB 2.0-modus (480Mbps) wilt
inschakelen, dient uw computer te zijn uitgerust met ingebouwde USB
2.0-poorten of een USB 2.0-hostadapterkaart.
INLEIDING
1
P74080-em-F5U209-man_9-02.qxd 9/19/02 3:06 PM Page 1
Page 66

2
SYSTEEMVEREISTEN
Hardware
Notebook- en desktop-computers met USB 1.0- of
USB 2.0-poort
Besturingssysteem
Windows®98 SE, Me, 2000, of XP
P74080-em-F5U209-man_9-02.qxd 9/19/02 3:06 PM Page 2
Page 67

Ne
DE STATIONHOUDER MONTEREN
1. Verwijder de top van het Externe station.
2. Als u een vaste schijf van 3,5-inch installeert, dient u
ervoor te zorgen dat deze schijf als 'Master' is ingesteld
(zie de informatie over jumperinstellingen die boven op de
vaste schijf wordt vermeld). Sluit vervolgens de 34-punts
lintkabel en de 4-punts stroomkabels aan.
3. Als u een cd-station of een cd-rw-station aansluit, dient u
ervoor te zorgen dat het station op 'Master' is ingesteld.
Sluit vervolgens de 34-punts lintkabel, de 4-punts
stroomkabel en de 4-punts audiokabel aan.
4. Kies de set montagegaatjes die overeenkomt met het
station dat u wilt gebruiken en gebruik minimaal 4 van
de meegeleverde montageschroeven om het station
te monteren.
3
P74080-em-F5U209-man_9-02.qxd 9/19/02 3:06 PM Page 3
Page 68

DE STATIONHOUDER MONTEREN
Opmerking: bij uw externe High-Speed stationhouderkit
worden vier schroeven met een fijne schroefdraad en vier
schroeven met een grove schroefdraad meegeleverd. Zorg
ervoor dat u de schroeven gebruikt die bij de montagegaatjes
van uw station passen. Probeer in geen geval een schroef met
een grove schroefdraad in een montagegaatje met een fijne
schroefdraad te wringen.
5. Plaats de bovenste dekplaat terug en zorg ervoor dat deze is
uitgelijnd met de onderste dekplaat.
4
P74080-em-F5U209-man_9-02.qxd 9/19/02 3:06 PM Page 4
Page 69

Ne
DE STATIONHOUDER MONTEREN
6. Haak de eerste zijrail vast rond de voorrand van het
Externe station en druk de rail vast in de zes
rechthoekige montagegaten aan de zijkant.
7. Als u een vaste schijf monteert, is het essentieel dat u
ook het voorpaneel installeert. Plaats de uitsteeksels aan
de ene kant van het voorpaneel in de montagegaatjes in
de geïnstalleerde zijrail.
5
P74080-em-F5U209-man_9-02.qxd 9/19/02 3:06 PM Page 5
Page 70

6
DE STATIONHOUDER MONTEREN
8. Plaats de montage-uitsteeksels aan de vrije kant van het
voorpaneel in de tweede zijrail en haak de zijrail vast aan de
voorkant van het Externe station.
9. Voltooi de montage door de rail vast te drukken in de zes
rechthoekige montagegaatjes aan de zijkant van het Externe
station.
Belangrijke opmerking: als u Windows 98 of 98 SE gebruikt,
moet u het Externe station IN GEEN GEVAL op de computer
aansluiten voordat het stuurprogramma is geïnstalleerd.
P74080-em-F5U209-man_9-02.qxd 9/19/02 3:06 PM Page 6
Page 71

Ne
DE STATIONHOUDER MONTEREN
10. Steek het vierkante verbindingsstuk van de USB-kabel in de
USB-poort aan de achterkant van het Externe station.
11. Sluit het rechthoekige verbindingstuk van de USB-kabel aan
op een High-Speed USB 2.0-poort op de computer of op
een High-Speed USB 2.0-hub. U kunt de kabel desgewenst
ook aansluiten op een full-speed USB 1.1-poort op de
computer of een full-speed USB 1.1-hub.
Opmerking: wanneer u het externe station aansluit op een
full-speed USB 1.1-station, hebt u een maximale
USB-bandbreedte van 12 Mbps.
12. Sluit de stroomkabel aan de ene kant aan op de
stroomconnector op het achterpaneel van het Externe
station en aan de andere kant op een wandstopcontact.
13. Schakel het station in.
14. Ga verder met de sectie over het installeren van
het stuurprogramma.
7
P74080-em-F5U209-man_9-02.qxd 9/19/02 3:06 PM Page 7
Page 72

8
HET STUURPROGRAMMA INSTALLEREN
Windows 98 SE
1. Plaats de installatie-cd in het cd-rom-station.
2. Open de installatie-cd.
3. Voer het programma TPPINST.EXE uit om de
stuurprogramma's voor het externe USB 2.0-station
te installeren.
4. Er wordt een installatievenster weergegeven.
Klik op Volgende.
5. Kies Voltooien en klik op Volgende.
6. U kunt het Externe station nu op de computer aansluiten.
7. Windows detecteert nu een USB-opslagadapter. De
installatie van de vereiste apparaatstuurprogramma's
wordt voltooid.
8. Als uw nieuwe station al van partities is voorzien, wordt deze
nu als verwisselbaar schijfstation weergegeven in het venster
Deze computer.
Opmerking: als de optie voor een verwijderbaar schijfstation
niet is geselecteerd in het venster Instellingen van
Apparaatbeheer, wordt het nieuwe station als een standaard
vast station van Windows weergegeven.
P74080-em-F5U209-man_9-02.qxd 9/19/02 3:06 PM Page 8
Page 73

Ne
Opmerking: als het nieuwe station niet in Deze computer
wordt weergegeven, moet u het station waarschijnlijk eerst van
partities voorzien en formatteren. Zie de sectie 'Een extern USB
2.0-station formatteren' voor meer informatie over het
voorbereiden van een vaste schijf met USB 2.0-aansluiting.
In de taakbalk wordt een groen pictogram 'Hardware
ontkoppelen of uitwerpen' weergegeven.
Windows Me/2000/XP
1. Als u het Externe station voor het eerst op de computer
aansluit, detecteert Windows een USB 2.0-opslagapparaat.
Vervolgens wordt het stuurprogramma voor USBopslagapparaten geïnstalleerd dat in Windows is ingebouwd.
2. Het nieuwe station wordt nu als USB-station in het venster
Deze computer weergegeven.
Opmerking: als het nieuwe station niet in Deze computer
wordt weergegeven, moet u het station waarschijnlijk eerst van
partities voorzien en formatteren. Zie de sectie 'Een extern USB
2.0-station van partities voorzien' voor meer informatie over het
voorbereiden van een vaste schijf met USB 2.0-aansluiting.
HET STUURPROGRAMMA INSTALLEREN
9
P74080-em-F5U209-man_9-02.qxd 9/19/02 3:06 PM Page 9
Page 74

10
HET USB-STATION VEILIG UIT
WINDOWS VERWIJDEREN
Windows 98
1. Klik in de taakbalk op het groene pictogram Hardware
ontkoppelen of uitwerpen en selecteer het apparaat dat u
wilt verwijderen.
2. Wanneer het systeem de melding 'U kunt dit apparaat nu
veilig verwijderen' weergeeft, kunt u de USB-kabel uit de
USB-poort van de computer verwijderen.
Windows Me/2000/XP
1. Dubbelklik op het pictogram 'Hardware ontkoppelen of
uitwerpen' in de taakbalk.
2. Selecteer USB-apparaat voor massaopslag en klik vervolgens
op Stoppen.
3. Selecteer het externe USB 2.0-station dat u wilt loskoppelen
en klik opnieuw op Stoppen.
4. Wanneer het systeem de melding 'U kunt dit apparaat nu
veilig verwijderen' weergeeft, kunt u de USB-kabel uit de
USB-poort van de computer verwijderen.
P74080-em-F5U209-man_9-02.qxd 9/19/02 3:06 PM Page 10
Page 75

Ne
EEN EXTERN USB 2.0-STATION FORMATTEREN
Formatteren onder Windows 98/Me
1. Start de computer op en start het Windows-
besturingssysteem.
2. Sluit het Externe station aan.
Er zijn twee manieren waarop u een vaste schijf met USB
2.0-aansluiting kunt partitioneren en formatteren.
Via het Configuratiescherm
1. Kies achtereenvolgens Start en Instellingen.
2. Kies Configuratiescherm.
3. Dubbelklik op Systeem en klik vervolgens
op Apparaatbeheer.
4. Het volgende scherm wordt weergegeven.
11
P74080-em-F5U209-man_9-02.qxd 9/19/02 3:06 PM Page 11
Page 76

12
EEN EXTERN USB 2.0-STATION FORMATTEREN
5. Selecteer Schijfstations. De nieuwe vast schijf wordt in de lijst
met vaste schijven weergegeven (in dit geval als Toshiba
1924FVC).
6. Dubbelklik op het item dat uw vaste schijf aanduidt. Kies
Instellingen. Het volgende scherm wordt weergegeven.
7. Zorg ervoor dat de selectievakjes Verbinding verbreken,
Synchronisatie van gegevensoverdracht, Verwisselbaar en
Interrupt 13-eenheid zijn ingeschakeld. Nadat u deze
wijzigingen hebt aangebracht, moet de computer opnieuw
worden gestart.
8. Zodra Windows opnieuw is gestart, wordt in het
venster Deze computer een pictogram Verwisselbaar
schijfstation weergegeven.
9. Klik met de rechtermuisknop op Verwisselbaar schijfstation
en selecteer Formatteren in de vervolgkeuzelijst.
10. Het verwisselbare vaste-schijfstation is nu klaar
voor gebruik.
Opmerking: als u deze methode gebruikt om de verwisselbare
vaste schijf te formatteren, resulteert dit in één enkele partitie
die alle beschikbare ruimte op de vaste schijf benut.
P74080-em-F5U209-man_9-02.qxd 9/19/02 3:06 PM Page 12
Page 77

Ne
DOS-methode (alleen aanbevolen voor geavanceerde
gebruikers)
1. Kies achtereenvolgens Start en Programma's. Selecteer
MSDOS.
2. Typ FDISK bij de DOS-prompt en druk op Enter.
Opmerking: als het hulpprogramma FDISK wordt beëindigd
zonder dat er een foutmelding wordt weergegeven, dient u
MS-DOS af te sluiten. Ontkoppel het Externe station vanuit
Windows en start de computer opnieuw op. Zodra Windows
opnieuw is gestart, dient u het Externe station opnieuw aan te
sluiten. Ga vervolgens terug naar Stap 1.
3. Beantwoord de volgende vraag in het openingsscherm van
FDISK: 'Wilt u ondersteuning voor grote schijven
inschakelen?' Typ 'J' als u partities wilt maken die groter zijn
dan 2GB. Typ 'N' als u partities wilt maken die kleiner zijn
dan 2GB.
4. Het optiescherm van FDISK wordt weergegeven.
Selecteer optie 5: 'Het huidige station van de vaste schijf
wijzigen.' Selecteer het nieuwe station in de lijst met
beschikbare stations.
5. Typ het stationsnummer dat aan uw Externe station is
toegewezen in het scherm 'Het huidige station van de
vaste schijf wijzigen'.
EEN EXTERN USB 2.0-STATION FORMATTEREN
13
P74080-em-F5U209-man_9-02.qxd 9/19/02 3:06 PM Page 13
Page 78

14
EEN EXTERN USB 2.0-STATION FORMATTEREN
BELANGRIJK
Zorg ervoor dat u optie 5 selecteert en wijzig de huidige vaste
schijf van 'station 1' in het schijfnummer dat aan het Externe
station is toegewezen. Als de computer maar één intern
schijfstation heeft, wordt het nieuwe Externe station als Station
2 geïdentificeerd. Als de computer twee interne schijfstations
bevat, wordt het nieuwe Externe station als Station 3
geïdentificeerd (enzovoorts). Als u deze stap niet zorgvuldig
uitvoert, kan dit tot gevolg hebben dat alle gegevens op de
primaire vaste schijf worden verwijderd.
6. In de volgende stappen moet u opgeven of u één partitie
wilt maken, die gelijk is aan de maximale capaciteit van de
externe vaste schijf, of meerdere partities.
7. Nadat u de vaste schijf in partities hebt onderverdeeld, dient
u FDISK af te sluiten en Windows opnieuw te starten.
Nieuwe stations die door het partitioneren van de vaste schijf
zijn ontstaan, moeten nu met het formatteringsprogramma
van Windows worden geformatteerd.
Partitie onder Windows 2000/XP
1. Als u de vaste schijf met USB 2.0-aansluiting onder Windows
2000 in partities wilt onderverdelen, dient u het Externe
station aan te sluiten. Kies vervolgens Start, Instellingen en
Configuratiescherm. Dubbelklik op het pictogram
Systeembeheer en dubbelklik vervolgens op het pictogram
Computerbeheer. U ziet nu hetzelfde scherm als op de
volgende pagina wordt weergegeven.
Opmerking: klik in Windows XP achtereenvolgens op Start,
Configuratiescherm, Prestaties en onderhoud, Systeembeheer
en Computerbeheer.
P74080-em-F5U209-man_9-02.qxd 9/19/02 3:06 PM Page 14
Page 79

15
Ne
EEN EXTERN USB 2.0-STATION FORMATTEREN
Opmerking: als u het configuratiescherm in de klassieke modus
weergeeft, kunt u onmiddellijk doorgaan naar Systeembeheer.
2. Klik op Schijfbeheer. Alle aangesloten schijfstations worden
in de rechteronderhoek van het venster Computerbeheer
weergegeven. In dit venster vindt u ook informatie over de
status van elk schijfstation. Klik met de rechtermuisknop op
de statusbalk van uw nieuwe externe schijfstation om
partities te maken of verwijderen en/of een bestaande
partitie te formatteren.
Opmerking: wanneer u een nieuwe partitie maakt, wordt de
Wizard Nieuwe partitie weergegeven, die u door de setup leidt.
Hiermee wordt ook het station voor u geformatteerd.
3. Zodra de schijfpartities en het formatteren voltooid zijn, is
het nieuwe Externe station klaar voor gebruik.
P74080-em-F5U209-man_9-02.qxd 9/19/02 3:06 PM Page 15
Page 80

16
INFORMATIE
FCC-verklaring
VERKLARING VAN CONFORMITEIT MET DE REGELS VAN
DE FCC VOOR ELEKTROMAGNETISCHE COMPATIBILITEIT
Wij, Belkin Corporation, 501 West Walnut Street, Compton, CA 90220, verklaren
de exclusieve verantwoordelijkheid te dragen dat het product F5U209 waarop
deze verklaring betrekking heeft:
F5U209
voldoet aan deel 15 van de FCC-regels. De werking is onderworpen aan de
volgende twee voorwaarden: (1) dit apparaat mag geen schadelijke interferentie
veroorzaken en (2) dit apparaat moet elke ontvangen interferentie accepteren,
waaronder interferentie die ongewenste werking veroorzaakt.
Verklaring van conformiteit CE
Wij, Belkin Corporation, verklaren de exclusieve verantwoordelijkheid te dragen dat de
bovengenoemde F5U209, waarop deze verklaring van toepassing is, voldoet aan Generic Emissions
Standard EN55022 1998 en Generic Immunity Standard EN55024 1998, LVD61000-2-3 en LVD610003-3.
Beperkte garantie voor de levensduur op producten van
Belkin Corporation
Belkin Corporation garandeert dat dit product tijdens de levensduur geen gebreken vertoont wat
betreft materiaal en vakmanschap. Wanneer een defect wordt geconstateerd, zal Belkin naar eigen
keuze het product repareren of kosteloos vervangen, op voorwaarde dat het product tijdens de
garantieperiode wordt geretourneerd, met vooruitbetaalde vervoerskosten, aan de officiële Belkindealer bij wie u het product hebt gekocht. Overlegging van het aankoopbewijs kan noodzakelijk zijn.
Deze garantie is niet van toepassing als het product is beschadigd als gevolg van een ongeluk,
misbruik, verkeerd gebruik of verkeerde toepassing; als het product zonder schriftelijke toestemming
van Belkin is gewijzigd, of als een serienummer dat door Belkin is aangebracht, is verwijderd of
onleesbaar is gemaakt.
DE GARANTIE EN VERHAALSMOGELIJKHEDEN DIE HIERVOOR ZIJN UITEENGEZET SLUITEN ENIGE
ANDERE GARANTIE OF VERHAALSMOGELIJKHEDEN UIT, MONDELING NOCH SCHRIFTELIJK,
UITDRUKKELIJK NOCH IMPLICIET. BELKIN WIJST UITDRUKKELIJK ELKE EN ALLE IMPLICIETE
AANSPRAKELIJKHEID OF GARANTIE AF, WAARONDER, ZONDER ENIGE BEPERKING, GARANTIES
BETREFFENDE DE VERKOOPBAARHEID OF GESCHIKTHEID VOOR EEN BEPAALDE TOEPASSING.
Geen enkele dealer, vertegenwoordiger of werknemer van Belkin is bevoegd tot wijziging, uitbreiding
of aanvulling van deze garantie.
BELKIN IS NIET VERANTWOORDELIJK VOOR SPECIALE, INCIDENTELE OF VOORTVLOEIENDE
SCHADE DIE HET RESULTAAT IS VAN SCHENDING VAN DE GARANTIE, OF ONDER ENIG ANDER
WETTELIJK STELSEL, DAARONDER MEDE BEGREPEN MAAR NIET BEPERKT TOT, WINSTDERVING,
BEDRIJFSONDERBREKING, GOODWILL, SCHADE AAN OF HET HERPROGRAMMEREN VAN OF
REPRODUCEREN VAN PROGRAMMA'S OF GEGEVENS DIE ZIJN OPGESLAGEN IN OF ZIJN
GEBRUIKT MET BELKIN-PRODUCTEN.
P74080-em-F5U209-man_9-02.qxd 9/19/02 3:06 PM Page 16
Page 81

Ne
© 2002 Belkin Corporation. Alle rechten voorbehouden.
Alle handelsnamen zijn gedeponeerde merken van de respectieve fabrikanten die worden vermeld.
P74080em
Belkin Components B.V.
Starparc Building • Boeing Avenue 333
1119 PH Schiphol-Rijk • Nederland
Tel: +31 (0) 20 654 7300
Fax: +31 (0) 20 654 7349
Belkin Components, Ltd.
Express Business Park
Shipton Way • Rushden • NN10 6GL
Verenigd Koninkrijk
Tel: +44 (0) 1933 35 2000
Fax: +44 (0) 1933 31 2000
Belkin Corporation
501 West Walnut Street
Compton • CA • 90220 • Verenigde Staten
Tel: 310.898.1100
Fax: 310.898.1111
Belkin Components Ltd.
7 Bowen Crescent • West Gosford
NSW 2250 • Australië
Tel: +61 (0) 2 4372 8600
Fax: +61 (0) 2 4372 8603
Belkin Tech Support
V.S.: 310.898.1100 toestel 2263
800.223.5546 toestel 2263
Europa: 00 800 223 55 460
Australië: 1800 666 040
P74080-em-F5U209-man_9-02.qxd 9/19/02 3:06 PM Page 17
Page 82

P74080-em-F5U209-man_9-02.qxd 9/19/02 3:06 PM Page 18
Page 83

Es
ÍNDICE
Introducción . . . . . . . . . . . . . . . . . . . . . . . . . . . . . . . . . . . . . . . .1
Requisitos del sistema . . . . . . . . . . . . . . . . . . . . . . . . . . . . . . . . .2
Montaje del alojamiento de la unidad . . . . . . . . . . . . . . . . . . . . .3
Instalación del controlador . . . . . . . . . . . . . . . . . . . . . . . . . . . . .8
Extracción segura del disco USB . . . . . . . . . . . . . . . . . . . . . . . .10
Formato del disco externo USB 2.0 . . . . . . . . . . . . . . . . . . . . . .11
Información . . . . . . . . . . . . . . . . . . . . . . . . . . . . . . . . . . . . . . . .16
P74080-em-F5U209-man_9-02.qxd 9/19/02 3:06 PM Page 19
Page 84

P74080-em-F5U209-man_9-02.qxd 9/19/02 3:06 PM Page 20
Page 85

El Alojamiento de unidad externa USB 2.0 de alta velocidad (la
Unidad externa) es una unidad de almacenamiento, compacta y
portátil que incorpora la interfaz de alta velocidad USB 2.0 (Bus Serie
Universal 2.0). La Unidad externa proporciona una forma fácil y rápida
de añadir más capacidad de almacenaje en su PC. La función de Plugand-Play es ideal para su transporte, la Unidad externa puede
conectarse con facilidad a la interfaz USB del PC, e incluso puede
desconectarse y volver a conectarse mientras el PC está encendido.
Nota: Para activar el modo USB 2.0 de alta velocidad (480 Mbps), su
PC debe estar equipado con puertos USB 2.0 incorporados o una
tarjeta adaptadora USB 2.0.
INTRODUCCIÓN
1
Es
P74080-em-F5U209-man_9-02.qxd 9/19/02 3:06 PM Page 1
Page 86

2
REQUISITOS DEL SISTEMA
Hardware
Ordenadores portátiles y de sobremesa con puerto
USB 1.0 o USB 2.0
Sistema operativo
Windows®98 SE, Me, 2000, o XP
P74080-em-F5U209-man_9-02.qxd 9/19/02 3:06 PM Page 2
Page 87

Es
MONTAJE DEL ALOJAMIENTO DE LA UNIDAD
1. Desmonte la cubierta de la Unidad externa.
2. Si instala un disco duro de 31/2 pulgadas, compruebe que
la unidad está configurada como "Master" (consulte la
información sobre la colocación de los jumper, impresa en
la parte superior de la propia unidad de disco),
posteriormente conecte el cable de datos de 34
posiciones y el cable de alimentación de 4 posiciones.
3. Si instala una unidad CD/CD-RW, compruebe que la
unidad está configurada como "Master", posteriormente
conecte el cable de datos de 34 posiciones, el cable
de alimentación de 4 posiciones y el cable de audio
de 4 posiciones.
4. Elija el conjunto de orificios de montaje que coincida con
la unidad que va a utilizar y coloque al menos 4 de los
tornillos de montaje suministrados.
3
P74080-em-F5U209-man_9-02.qxd 9/19/02 3:06 PM Page 3
Page 88

Nota: En el kit del Alojamiento de la unidad externa de alta
velocidad se incluyen 4 tornillos de rosca fina y cuatro tornillos
de rosca gruesa. Asegúrese de elegir los tornillos que coincidan
con los orificios de montaje de su unidad. No intente forzar los
tornillos de rosca grueso en los orificios de montaje de los
tornillos de rosca fina.
5. Vuelva a colocar la cubierta superior y asegúrese de que
queda alineada con la cubierta inferior.
MONTAJE DEL ALOJAMIENTO DE LA UNIDAD
4
P74080-em-F5U209-man_9-02.qxd 9/19/02 3:06 PM Page 4
Page 89

5
Es
MONTAJE DEL ALOJAMIENTO DE LA UNIDAD
6. Enganche la primera guía lateral en el borde delantero
de la Unidad externa y presione la guía sobre los 6
orificios de montaje rectangulares del lateral.
7. Si se instala un disco duro, será necesario colocar el
panel frontal. Introduzca las lengüetas de una lateral del
panel frontal en los orificios de montaje de la guía
lateral instalada.
P74080-em-F5U209-man_9-02.qxd 9/19/02 3:06 PM Page 5
Page 90

6
MONTAJE DEL ALOJAMIENTO DE LA UNIDAD
8. Introduzca las lengüetas de montaje del extremo libre del
panel frontal en la segunda guía lateral y enganche ésta en la
parte delantera de la Unidad externa.
9. Finalice el montaje presionando la guía sobre los seis
orificios rectangulares de montaje situados en el lateral
de la Unidad externa.
Nota importante: Si utiliza Windows 98 o 98 SE, NO conecte la
Unidad externa al PC hasta que haya finalizado la instalación
del controlador.
P74080-em-F5U209-man_9-02.qxd 9/19/02 3:06 PM Page 6
Page 91

Es
MONTAJE DEL ALOJAMIENTO DE LA UNIDAD
10. Conecte el conector cuadrado del cable USB en el Puerto
USB situado en la parte posterior de la Unidad externa.
11. Conecte el conector rectangular del cable USB en un
puerto USB 2.0 de alta velocidad del PC o en un
concentrador USB 2.0 de alta velocidad. También puede
conectar el cable a un puerto USB 1.1 del PC o a un
concentrador USB 1.1.
Nota: Cuando se conecta a un puerto USB 1.1 el ancho de
banda USB máximo será de 12 Mbps.
12. Conecte el cable de alimentación CA en la toma de
corriente situada en la parte posterior de la Unidad
externa y en una toma mural CA.
13. Encienda la unidad.
14. Continúe con la sección de Instalación del controlador.
7
P74080-em-F5U209-man_9-02.qxd 9/19/02 3:06 PM Page 7
Page 92

8
INSTALACIÓN DEL CONTROLADOR
Windows 98 SE
1. Inserte el CD de instalación en la unidad de CD ROM.
2. Abra el CD de instalación.
3. Ejecute la aplicación “TPPINST.EXE” para instalar los
controladores de la Unidad externa USB 2.0.
4. Aparece un cuadro de diálogo de la aplicación de
instalación. Haga clic en "Siguiente".
5. Seleccione "Finalizar" y haga clic en "Siguiente".
6. Ahora puede conectar la Unidad externa al PC.
7. En ese momento Windows detectará "Adaptador de
almacenamiento USB" y finalizará la instalación de los
controladores de dispositivos necesarios.
8. Si la nueva unidad ya dispone de las particiones necesarias
aparecerá en la ventana "Mi PC" como "Disco extraíble".
Nota: Si no se elige la opción de disco extraíble en la ventana
Configuración de Administrador de dispositivos, la nueva
unidad aparecerá como un disco fijo estándar de Windows.
P74080-em-F5U209-man_9-02.qxd 9/19/02 3:06 PM Page 8
Page 93

INSTALACIÓN DEL CONTROLADOR
Nota: Si la nueva unidad no aparece en Mi PC, quizás sea
necesario realizar una partición y dar formato a la unidad.
Consulte la sección "Formato del disco externo USB 2.0" para
preparar la unidad de disco duro USB 2.0.
En la bandeja del sistema aparecerá un icono de color verde,
"Desconectar o expulsar hardware".
Windows Me/2000/XP
1. Si es la primera vez que conecta la Unidad externa al PC,
Windows detectará un "Dispositivo de almacenamiento USB
2.0" e instalará los controladores de dispositivo de
almacenamiento masivo USB, incluidos con Windows.
2. La nueva unidad aparecerá en la ventana "Mi PC" como
"Disco USB".
Nota: Si la nueva unidad no aparece en Mi PC, quizás sea
necesario realizar una partición y dar formato a la unidad.
Consulte la sección "Partición del disco externo USB 2.0" para
preparar la unidad de disco duro USB 2.0.
9
Es
P74080-em-F5U209-man_9-02.qxd 9/19/02 3:06 PM Page 9
Page 94

10
EXTRACCIÓN SEGURA DEL DISCO USB
DESDE WINDOWS
Windows 98
1. Haga clic en el icono verde "Desconectar o expulsar
hardware" situado en la bandeja del sistema y seleccione el
dispositivo que quiere extraer.
2. Cuando el sistema le indique "Ya puede extraer con
seguridad este dispositivo", desconecte el cable USB del
puerto USB del PC.
Windows Me/2000/XP
1. Haga doble clic en el icono de color verde, "Desconectar o
expulsar hardware" de la bandeja del sistema.
2. Seleccione "Dispositivo de almacenamiento masivo USB" y
haga clic en "Detener".
3. Elija la Unidad externa USB 2.0 que desea desconectar y
haga de Nuevo clic en "Detener".
4. Cuando el sistema le indique "Ya puede extraer con
seguridad este dispositivo", desconecte el cable USB del
puerto USB del PC.
P74080-em-F5U209-man_9-02.qxd 9/19/02 3:06 PM Page 10
Page 95

11
Es
FORMATO DEL DISCO EXTERNO USB 2.0
Dar formato en Windows 98/Me
1. Arranque el PC en el sistema operativo Windows.
2. Conecte la Unidad externa.
Existen dos métodos para realizar la partición y formato de la
unidad de disco duro USB 2.0.
Método del Panel de control
1. Haga clic en "Inicio" y haga clic en "Configuración".
2. Elija “Panel de control”.
3. Haga doble clic en "Sistema", luego en "Administrador de
dispositivos".
4. Aparecerá la siguiente pantalla.
P74080-em-F5U209-man_9-02.qxd 9/19/02 3:06 PM Page 11
Page 96

12
FORMATO DEL DISCO EXTERNO USB 2.0
5. Seleccione "Unidades de disco". El Nuevo disco duro
aparecerá en la lista de discos duros (en este caso como
“Toshiba 1924FCV”).
6. Haga doble clic en la entrada de la unidad de disco duro.
Seleccione “Configuración”. Aparecerá la siguiente pantalla.
7. Asegúrese de que existen marcas de selección en las casillas
de "Desconectar", "Transferencia de datos sincrónica",
"Extraíble" y "Unidad int 13". Después de realizar estos
cambios, será necesario que reinicie el PC.
8. Después de que reinicie Windows, aparecerá un icono de
"Disco extraíble" en la ventana "Mi PC".
9. Haga clic con el botón derecho del ratón en el icono "Disco
extraíble" y seleccione "Formatear" de la lista desplegable
que aparece.
10. El disco duro extraíble ya está listo para su uso.
Nota: Si utiliza este método para realizar el formateado de la
unidad de disco duro extraíble obtendrá una única partición de
igual tamaño a la capacidad nominal máxima del disco duro.
P74080-em-F5U209-man_9-02.qxd 9/19/02 3:06 PM Page 12
Page 97

Es
FORMATO DEL DISCO EXTERNO USB 2.0
Método DOS (Recomendado sólo para usuarios avanzados)
1. Haga clic en "Inicio" y haga clic en "Programas".
Seleccione “MSDOS”.
2. En el símbolo del sistema del DOS, escriba "FDISK"
y pulse Enter.
Nota: Si la utilidad FDISK finaliza sin mostrar un mensaje de
error, vuelva a Windows y desconecte la Unidad externa.
Apague y vuelva a encender el ordenador. Cuando reinicie
Windows, vuelva a conectar la Unidad externa y realice de
nuevo el paso 1.
3. En la pantalla de presentación del comando FDISK responda
a la pregunta: "¿Desea activar el soporte para discos
grandes?" Escriba "Y" si quiere crear una partición mayor
de 2GB. Escriba "N" si quiere crear una partición menor
de 2GB.
4. Ahora aparecerá la pantalla "Opciones" del comando
FDISK. Seleccione la opción 5, "Cambiar el disco fijo
actual". Seleccione el Nuevo disco de la lista de
unidades disponibles.
5. En la pantalla "Cambiar unidad de disco fijo actual", escriba
el número de la unidad de disco que se le asigna a la
Unidad externa.
13
P74080-em-F5U209-man_9-02.qxd 9/19/02 3:06 PM Page 13
Page 98

14
FORMATO DEL DISCO EXTERNO USB 2.0
IMPORTANTE
Asegúrese de que se selecciona la opción 5 y cambie el "Disco
fijo actual" de "Disco 1" al número de disco asignado a la
Unidad externa. Si el PC está equipado únicamente con un
disco interno, el nuevo Disco externo se identificará como
"Disco 2". Si el PC está equipado con dos discos internos, el
nuevo Disco externo se identificará como "Disco 3". Si no sigue
este paso con exactitud puede dar lugar a la pérdida de todos
los datos de su unidad interna principal.
6. En los siguientes pasos debe especificarse si se desea crear
una partición igual a la capacidad máxima de la unidad de
disco externa, o si prefiere crear varias particiones.
7. Una vez finalizado el procedimiento de partición del disco,
salga del comando FDISK y reinicie Windows. Cualquier
unidad nueva creada a través del procedimiento de partición
del disco debe formatearse con la utilidad de formateado de
disco de Windows.
Partición en Windows 2000/XP
1. Para realizar la partición de la unidad de disco duro USB 2.0
bajo Windows 2000, conecte la Unidad externa USB 2.0,
haga clic en "Inicio", elija "Configuración" y posteriormente
elija "Panel de control". Haga doble clic en el icono
"Herramientas administrativas", y posteriormente haga doble
clic en el icono "Administración de equipos". Puede ver la
pantalla en la siguiente página.
Nota: En Windows XP, haga clic en "Inicio", elija "Panel de
control", haga clic en el icono "Rendimiento y mantenimiento",
haga clic en el icono "Herramientas administrativas" y luego
haga clic en el icono "Administración de equipos".
Nota: En Windows XP, haga clic en "Inicio", elija "Panel de
P74080-em-F5U209-man_9-02.qxd 9/19/02 3:06 PM Page 14
Page 99

Es
FORMATO DEL DISCO EXTERNO USB 2.0
control", haga clic en el icono "Rendimiento y mantenimiento",
haga clic en el icono "Herramientas administrativas" y luego
haga clic en el icono "Administración de equipos".
Nota: Si visualiza el Panel de control en modo clásico, vaya
directamente a "Herramientas administrativas".
2. Haga clic en "Administración de disco". Aparecerán todas las
unidades de disco conectadas en la esquina inferior derecha
de la ventana "Administración de equipos". En esta ventana
se mostrará la información sobre el estado de cada una de
las unidades de disco. Haga clic con el botón derecho sobre
la barra de estado de la nueva unidad externa para crear o
borrar nuevas particiones, y/o dar formato a una partición ya
existente.
Nota: Cuando se crea una nueva partición, se iniciará un
"Asistente de partición nueva", el cual le guiará a través de la
configuración de dicha partición. Este proceso además dará
formato a la unidad.
3. Una vez haya finalizado el procedimiento de partición del
disco y de formato del mismo, la nueva Unidad externa
estará lista para su uso.
15
P74080-em-F5U209-man_9-02.qxd 9/19/02 3:06 PM Page 15
Page 100

16
INFORMACIÓN
Declaración de la FCC
DECLARACIÓN DE CONFORMIDAD CON LAS REGLAS DE
LA FCC PARA COMPATIBILIDAD ELECTROMAGNÉTICA
Belkin Corporation, de 501 West Walnut Street, Compton, CA 90220,
declaramos bajo nuestra exclusiva responsabilidad que el producto: F5U209 , al
que se refiere esta declaración:
F5U209
Cumple el Apartado 15 de las reglas de la FCC. La operación está sujeta a las
siguientes dos condiciones: (1) este dispositivo no puede provocar interferencias
dañinas, y (2) este dispositivo debe aceptar toda interferencia recibida, incluidas
las que puedan provocar operaciones no deseadas.
Declaración de conformidad de la CE
Nosotros, Belkin Corporation, declaramos bajo nuestra exclusiva responsabilidad que el
equipo F5U209 al que se refiere esta declaración, está en conformidad con la Norma de
emisiones genérica EN55022 1998 y con la Norma de inmunidad genérica EN55024 1998,
LVD61000-2-3, y LVD61000-3-3.
Garantía ilimitada de los productos de Belkin Corporation Limited
Belkin Corporation garantiza que este producto carece de defectos de materiales y mano de
obra durante toda su vida útil. Si se descubriese un defecto, Belkin podrá, a su elección,
reparar o cambiar el producto sin cargo alguno, siempre que se devuelva durante el periodo
de garantía, con los gastos de transporte prepagados, al distribuidor autorizado de Belkin al
que se le compró el producto. Se podría solicitar una prueba de compra.
Esta garantía no es aplicable si el producto se ha dañado por accidente, abuso, uso
incorrecto o aplicación inapropiada; si el producto se ha modificado sin el permiso escrito de
Belkin; o si se ha suprimido o desfigurado alguno de los números de serie de Belkin.
LA GARANTÍA Y LAS REPARACIONES ESTABLECIDAS PREVIAMENTE SON EXCLUSIVAMENTE
EN LUGAR DE TODAS LAS DEMÁS, YA SEAN ORALES O POR ESCRITO, EXPRESADAS O
IMPLÍCITAS. BELKIN NIEGA ESPECÍFICAMENTE TODA RESPONSABILIDAD RESPECTO A
CUALQUIER GARANTÍA IMPLÍCITA, INCLUIDAS, SIN LIMITACIÓN, LAS GARANTÍAS DE
COMERCIABILIDAD Y ADAPTACIÓN A UN PROPÓSITO DETERMINADO.
Ningún distribuidor, agente o empleado de Belkin está autorizado para realizar
modificaciones, ampliaciones o adiciones a esta garantía.
BELKIN NO ES RESPONSABLE DE DAÑOS ESPECIALES, ACCIDENTALES O
CONSECUENCIA DEL INCUMPLIMIENTO DE LA GARANTÍA, O BAJO CUALQUIER OTRA
TEORÍA LEGAL, INCLUIDO, PERO NO LIMITADO A, PÉRDIDA DE BENEFICIOS, TIEMPO DE
INACTIVIDAD, BUENA VOLUNTAD, DAÑOS O REPROGRAMACIÓN, O REPRODUCCIÓN
DE ALGÚN PROGRAMA O DATOS ALMACENADOS O UTILIZADOS CON PRODUCTOS
BELKIN.
P74080-em-F5U209-man_9-02.qxd 9/19/02 3:06 PM Page 16
 Loading...