

Page 1
USB DockStation
™
User Manual
Manuel de l’utilisateur de
la DockStation
™
USB
USB DockStation
™
Gebrauchsanweisung
Handleiding USB
DockStation
™
Manuale utente
DockStation
™
USB
P73326 F5U120-PC
Fr
De
Ne
It
En
P73326-F5U120-PC-uk-man-qxd 4/6/00 8:19 AM Page 1
Page 2

P73326-F5U120-PC-uk-man-qxd 4/6/00 8:19 AM Page 2
Page 3

English . . . . . . . . . . . . . . . . . . . . . . . . . . . 1
Français (Europe) . . . . . . . . . . . . . . . . . . 25
Deutsch . . . . . . . . . . . . . . . . . . . . . . . . . . 49
Table of Contents
Nederlands . . . . . . . . . . . . . . . . . . . . . . . 73
Italiano . . . . . . . . . . . . . . . . . . . . . . . . . . . 97
Fr
De
Ne
It
En
P73326-F5U120-PC-uk-man-qxd 4/6/00 8:19 AM Page 3
Page 4

P73326-F5U120-PC-uk-man-qxd 4/6/00 8:19 AM Page 4
Page 5

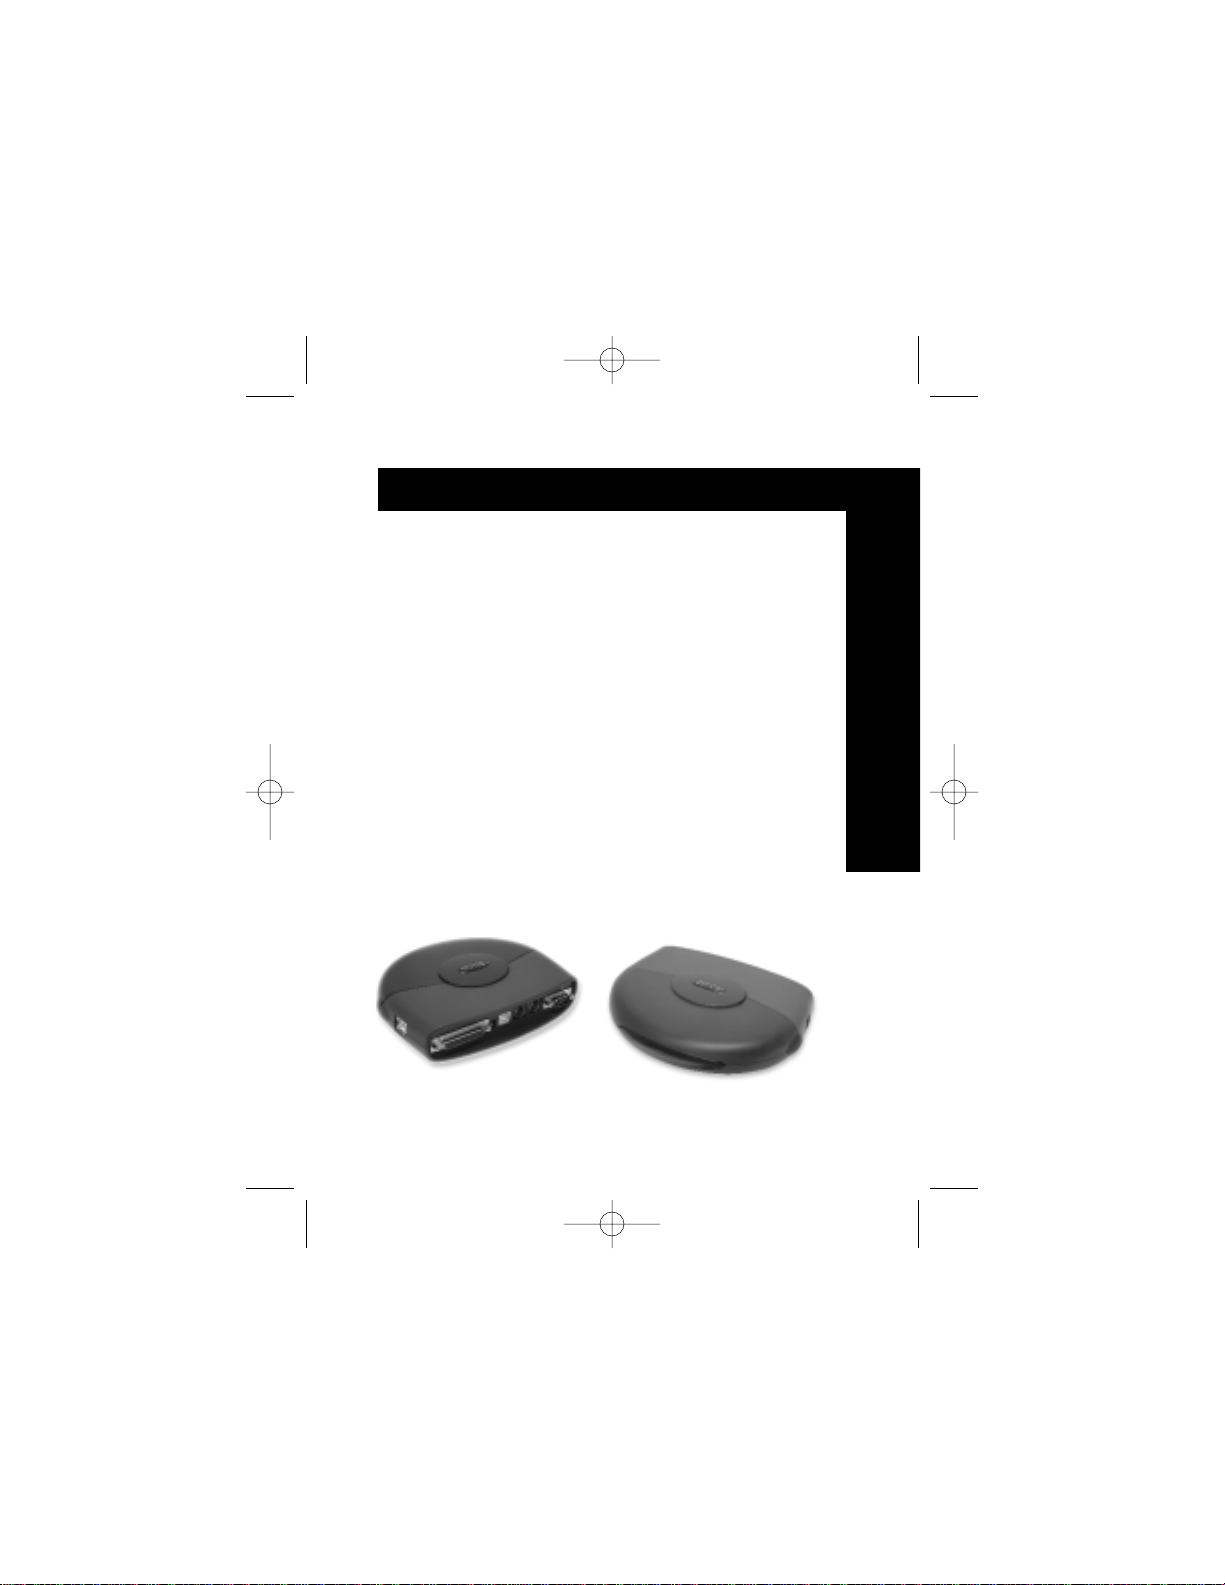
The Belkin DockStation™is the perfect low-cost universal
docking station. It is by far the easiest and most convenient
way to connect devices to your laptop or legacy-free PC.
Leave all of your devices attached to the DockStation
™
, when
you return to the office one cable instantly connects multiple
devices to your laptop or PC with Plug-and-Play ease – you
don’t even need to reboot.
The DockStation
™
provides four USB ports to connect USB
devices, one parallel port to connect your printer, two PS/2
ports to connect keyboards or mice, one serial port to
connect your modem, digital camera, or PDA.
Introduction
1
Please read this manual thoroughly in its entirety.
Failure to follow installation and other recommended
procedures may result in irreversible damage to the
product, your computer and/or connected devices.
En
P73326-F5U120-PC-uk-man-qxd 4/6/00 8:19 AM Page 1
Page 6

Features
• Belkin DockStation
™
• 6 volt, 2.5 Amp power adapter
• USB Device Cable
• Windows®98/Windows®2000 Driver CD
• User guide
• Instantly add another printer port, 1 serial port, two PS/2
ports, and four USB ports to your notebook or PC
• Printer port supports virtually all standard and IEEE 1284
parallel printers
• Serial port supports digital cameras, modems, PDAs,
scanners, graphic tablets and all other serial devices
• Supports serial port speeds at up to 230 Kbps
• Four USB ports for connection to any USB devices, including
other USB hubs
• Connect two PS/2 keyboards, two PS/2 mice or one of each
• Plug-and-Play installation. Hot docking and undocking
capabilities
• Includes a 2.5 Amp power supply to provide true 500mA
downstream current on USB ports
• Compatible with Windows®98 or Windows®2000
• Fully compliant with current USB specifications
Package Contents
2
P73326-F5U120-PC-uk-man-qxd 4/6/00 8:19 AM Page 2
Page 7
3
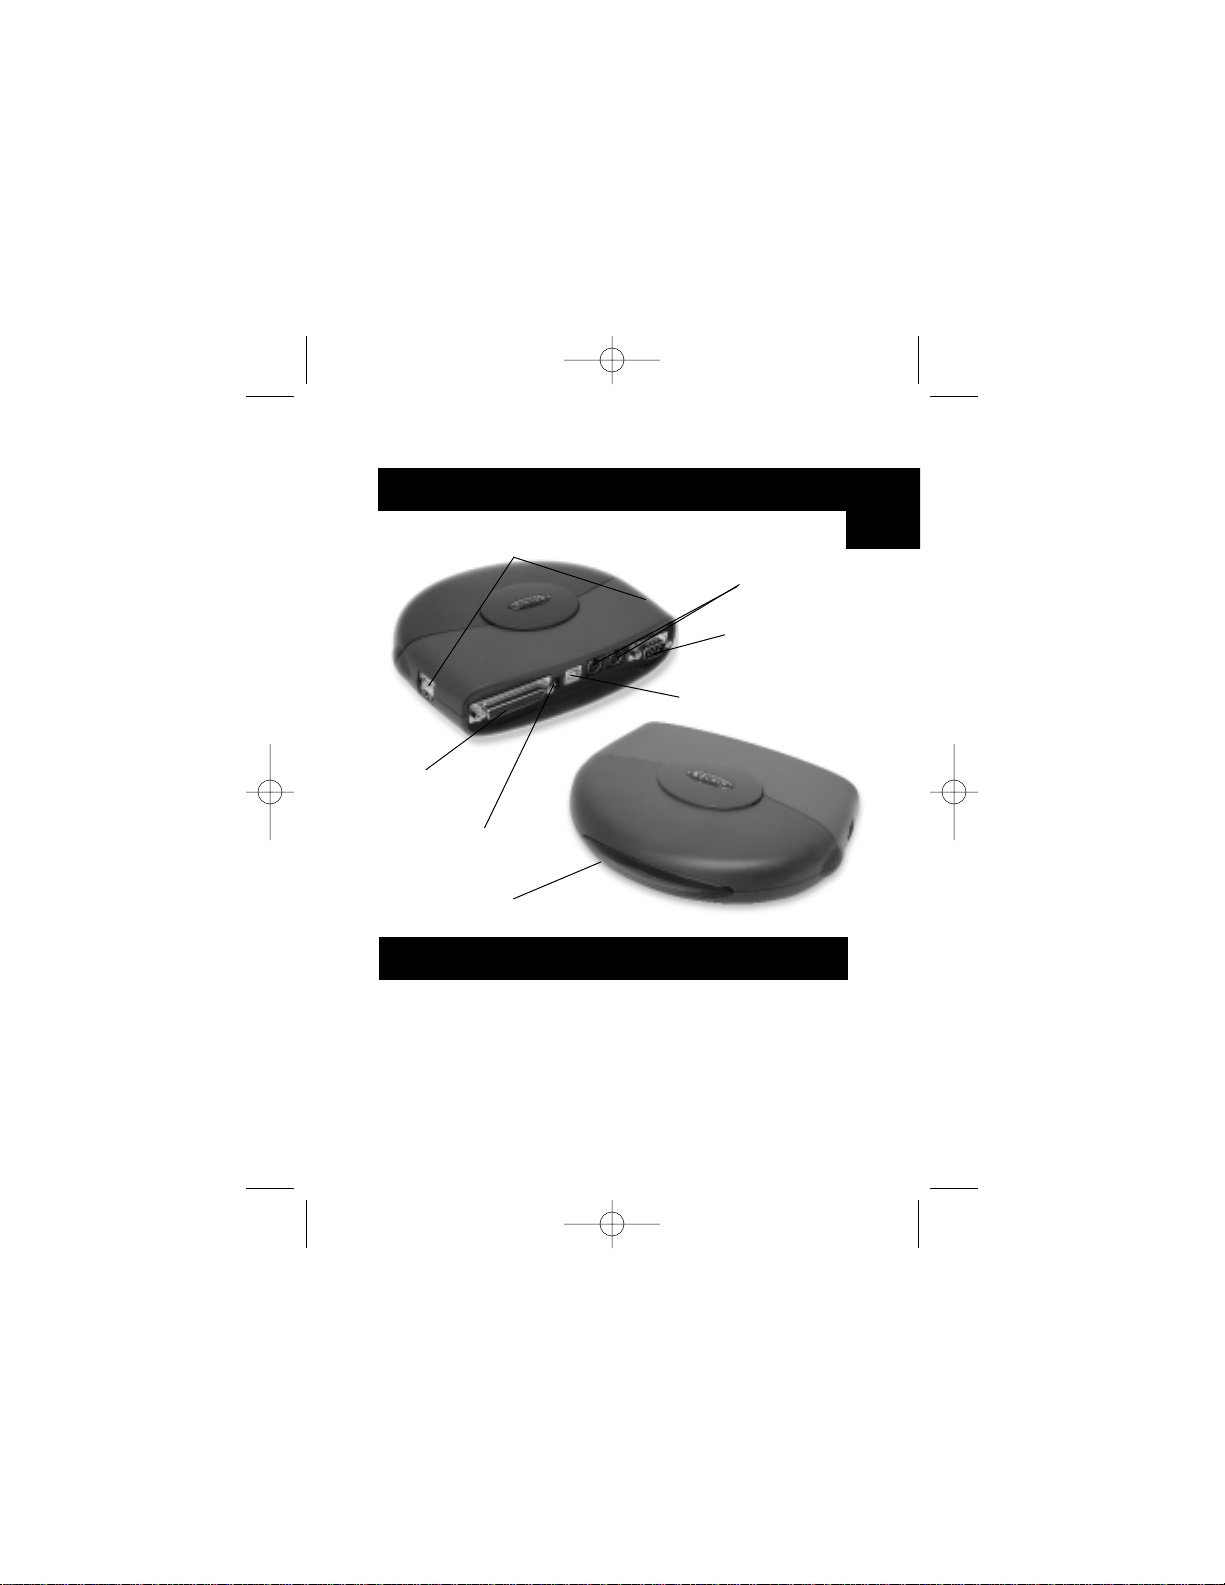
Product Detail
System Requirements
• Notebook or PC with USB capabilities
• Windows®98 or Windows®2000
• CD-ROM drive
2 PS/2 ports
LED indicators
4 downstream USB ports
DB9 RS232
serial port
DC power jack
Upstream USB
port
DB25 parallel
printer port
En
P73326-F5U120-PC-uk-man-qxd 4/6/00 8:19 AM Page 3
Page 8
Hardware Installation
Software Installation
Software Installation for
Windows
®
98
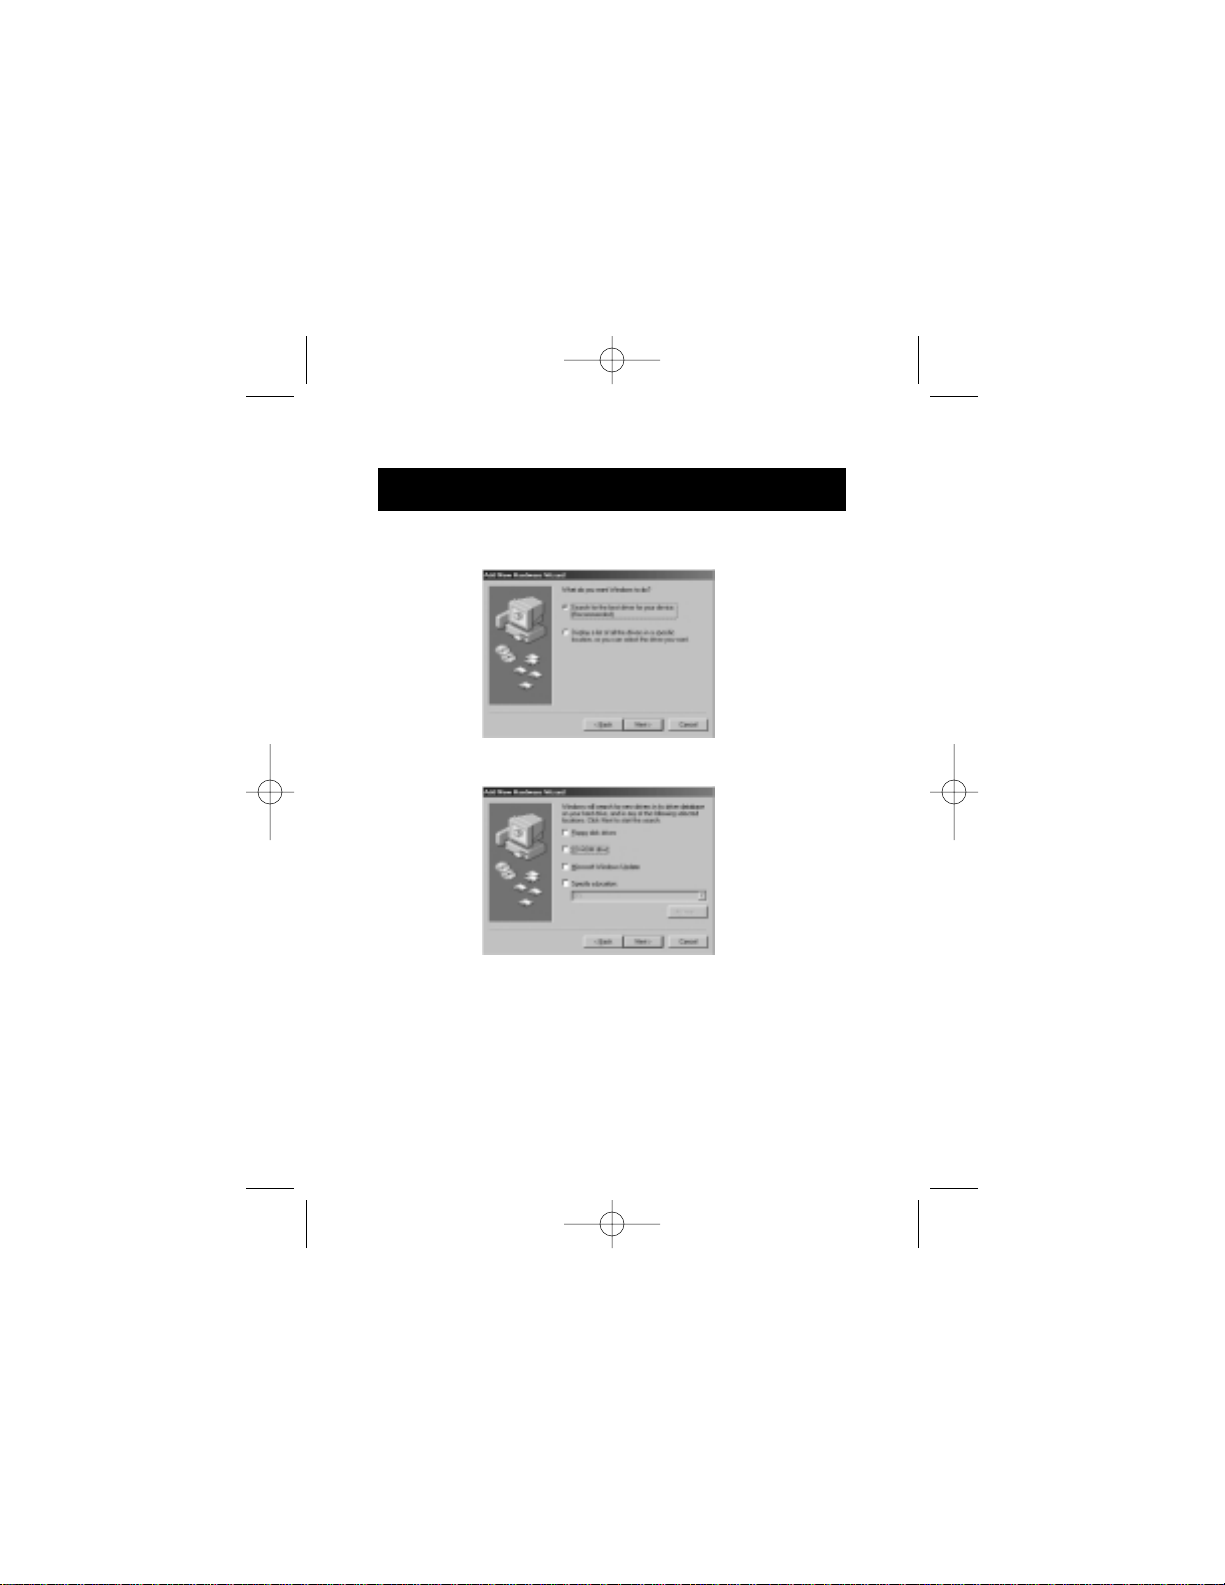
1. Windows®will detect and
install "General Purpose
USB Hub".
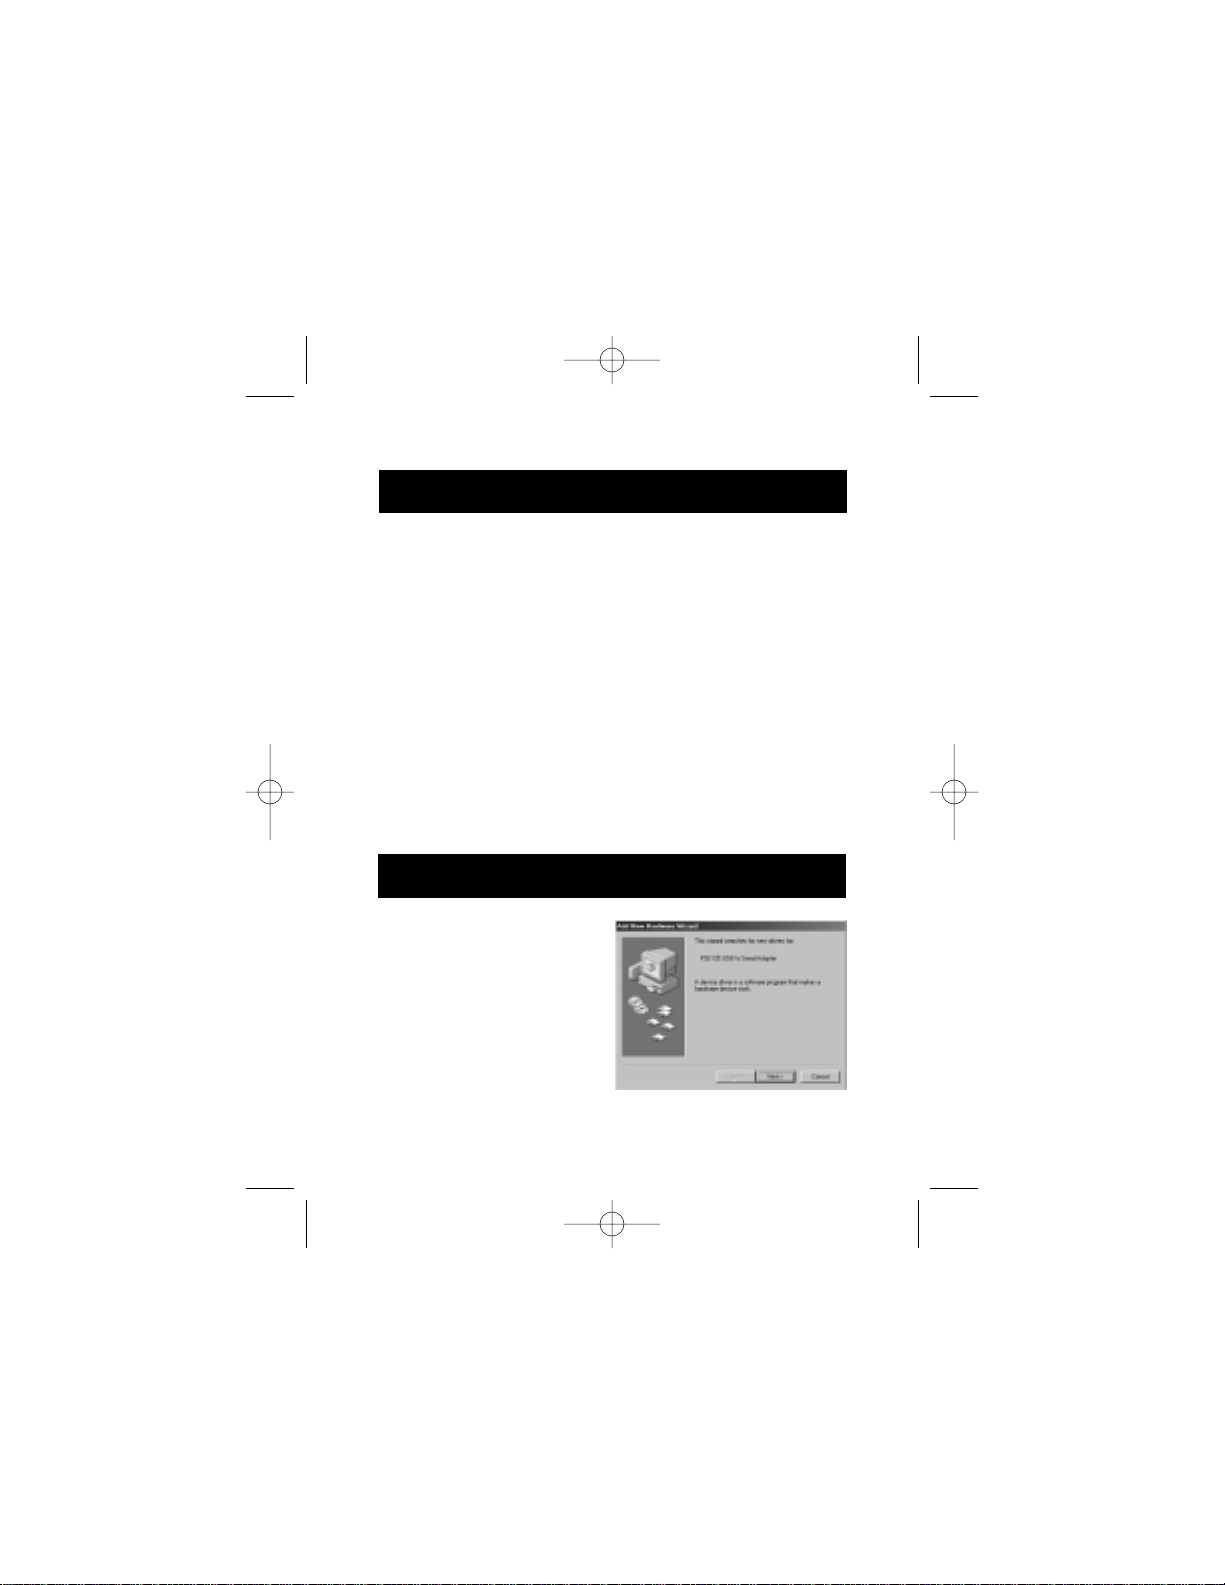
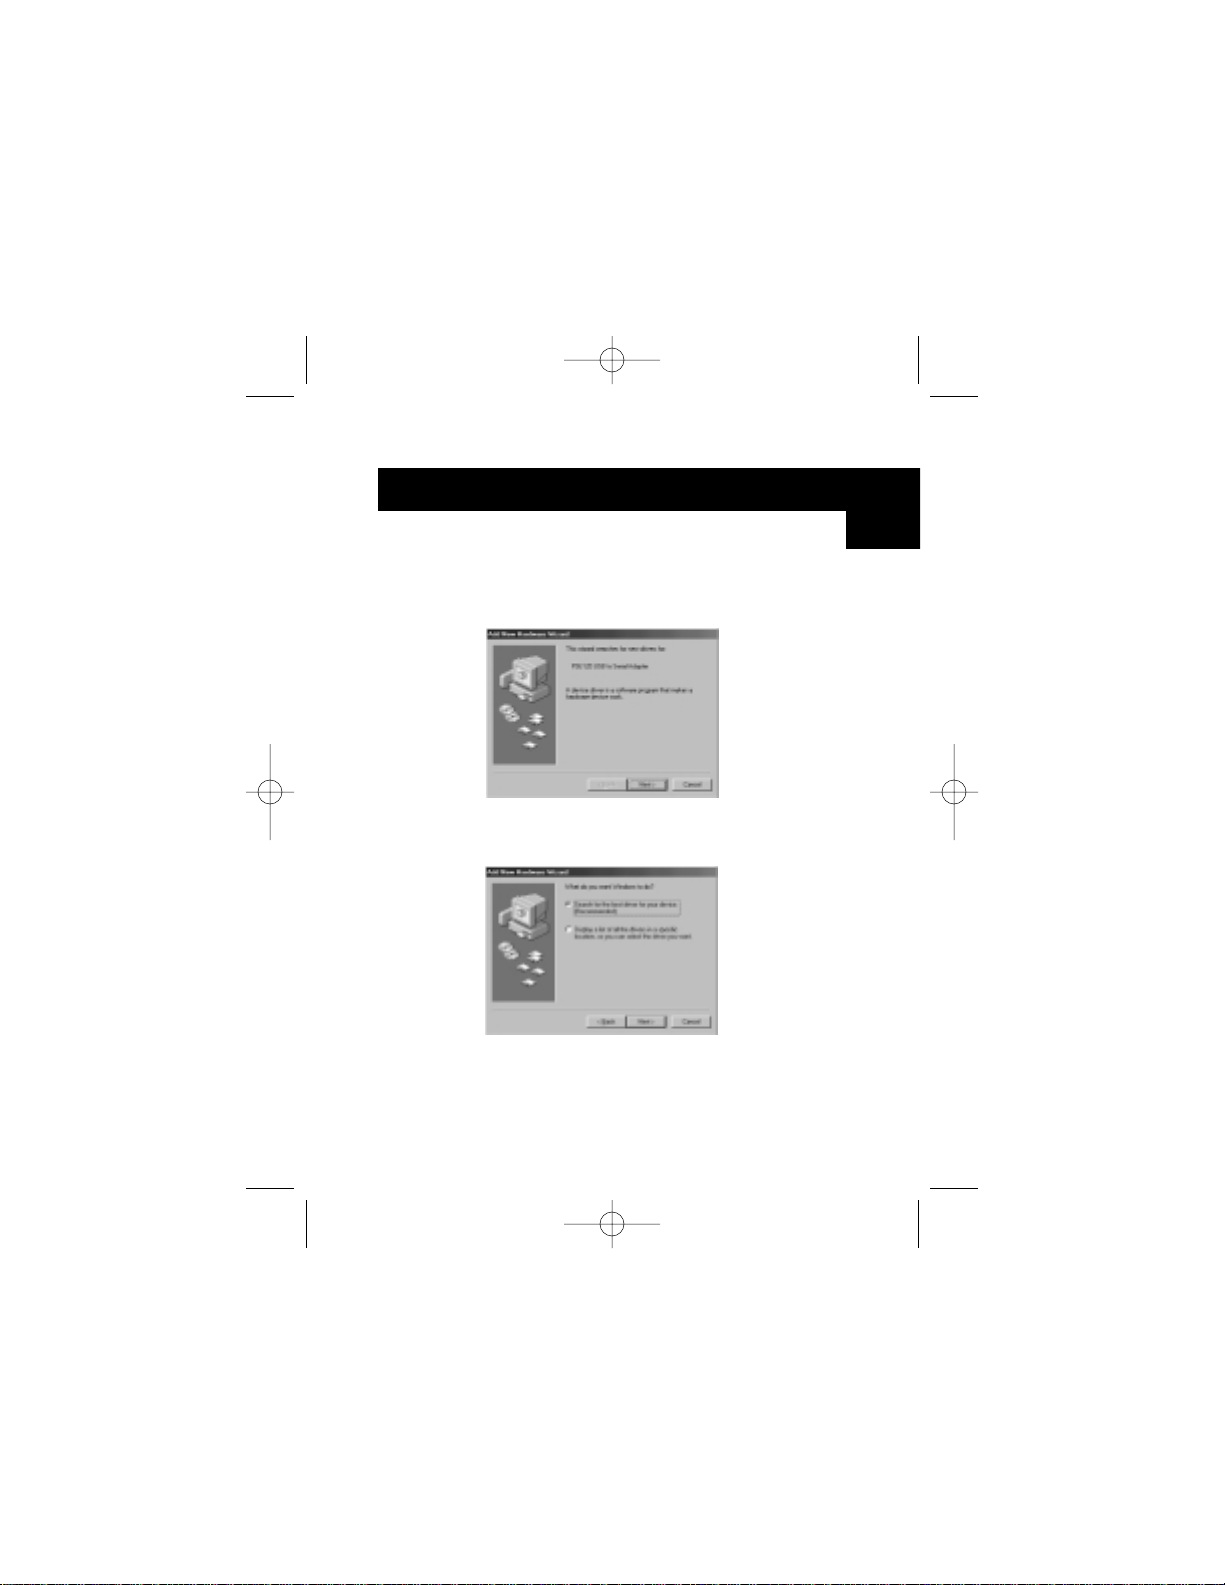
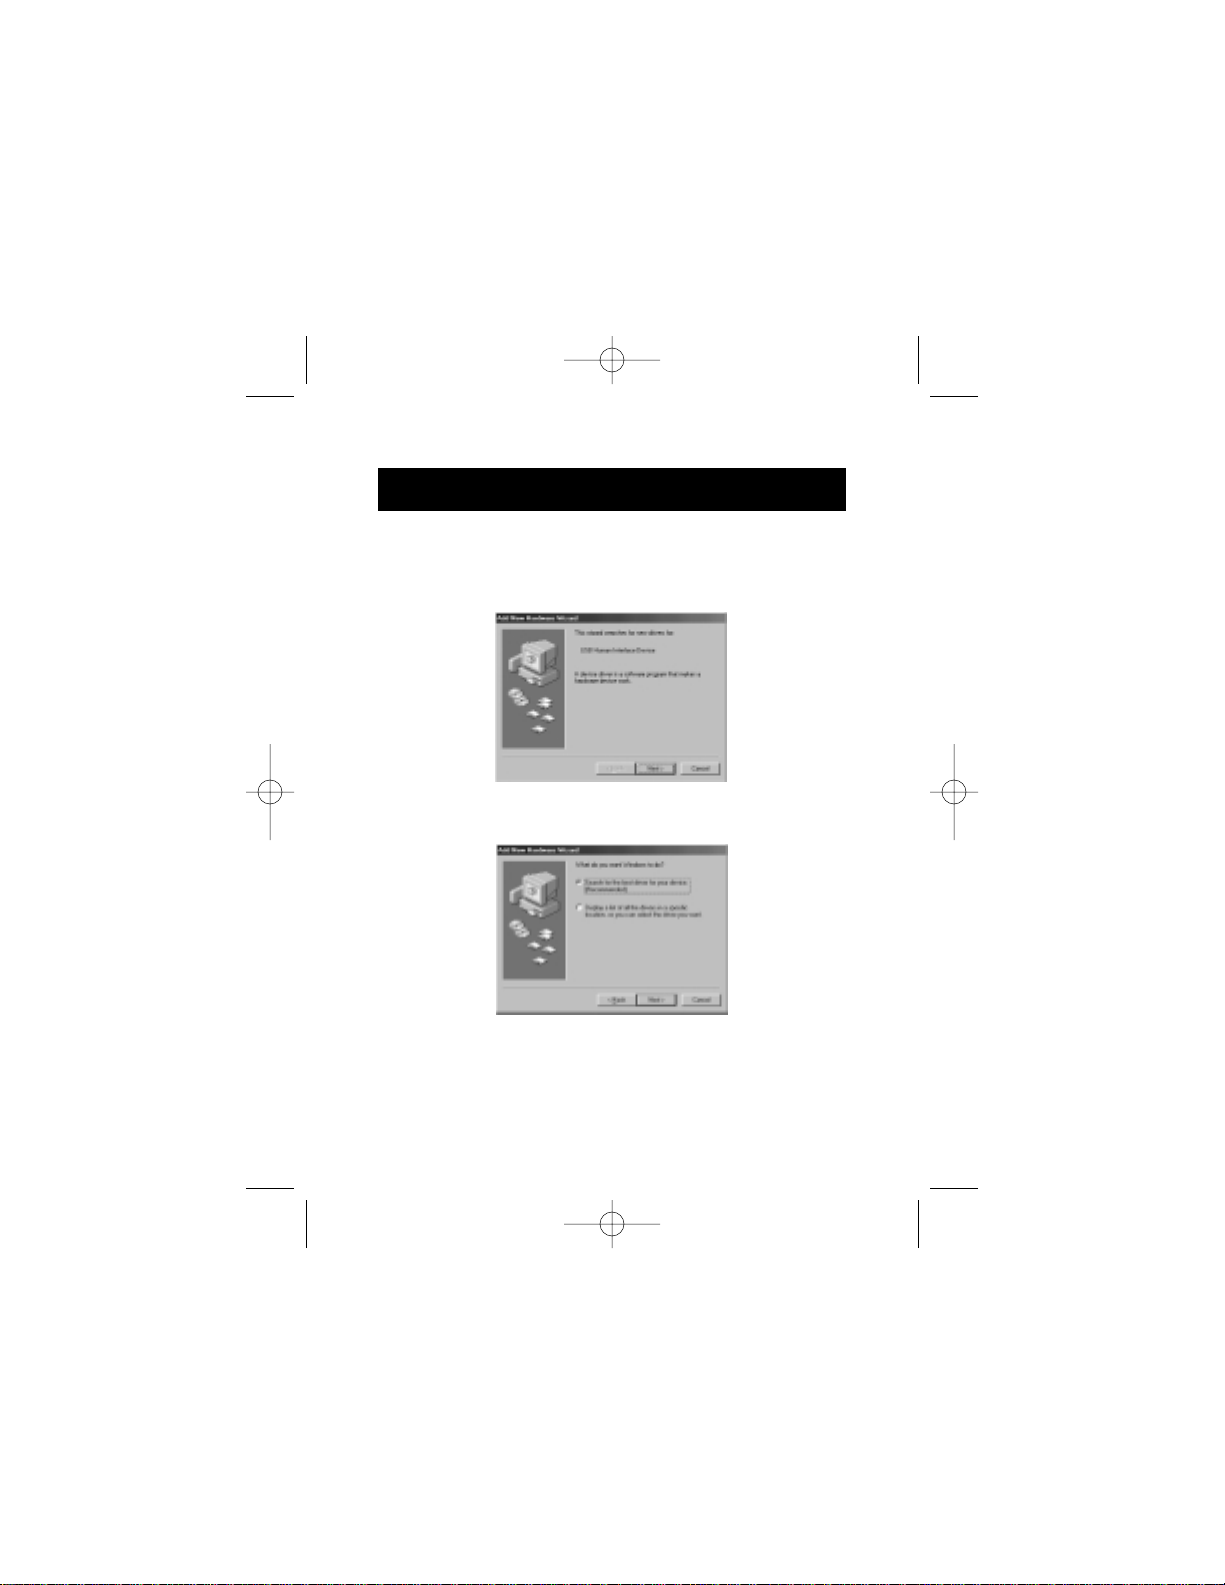
2. Windows®will detect
"F5U120 USB to Serial
Adapter". Click "Next".
4
Because USB is hot-swappable, you need not power down
your PC.
• Connect the jack of the power adapter and plug it into the back
of the DockStation
™
• Find an unused electrical outlet and plug in the power adapter
• Plug the flat end (A plug) of the USB cable into a free USB port
on your PC
• Plug the square end (B plug) of the USB cable into the USB
upstream connector located on the back of the DockStation
™
• At this point, Windows®will automatically find the
DockStation™and start installing its drivers. Windows®will
prompt you for the software. See the next section for details
on how to install the software.
If you are not sure what version of Windows®you are running,
click on "Start", "Settings", "Control Panel", then double-click
on "System". An applet will appear and provide you with your
system’s information.
P73326-F5U120-PC-uk-man-qxd 4/6/00 8:19 AM Page 4
Page 9

Software Installation (continued)
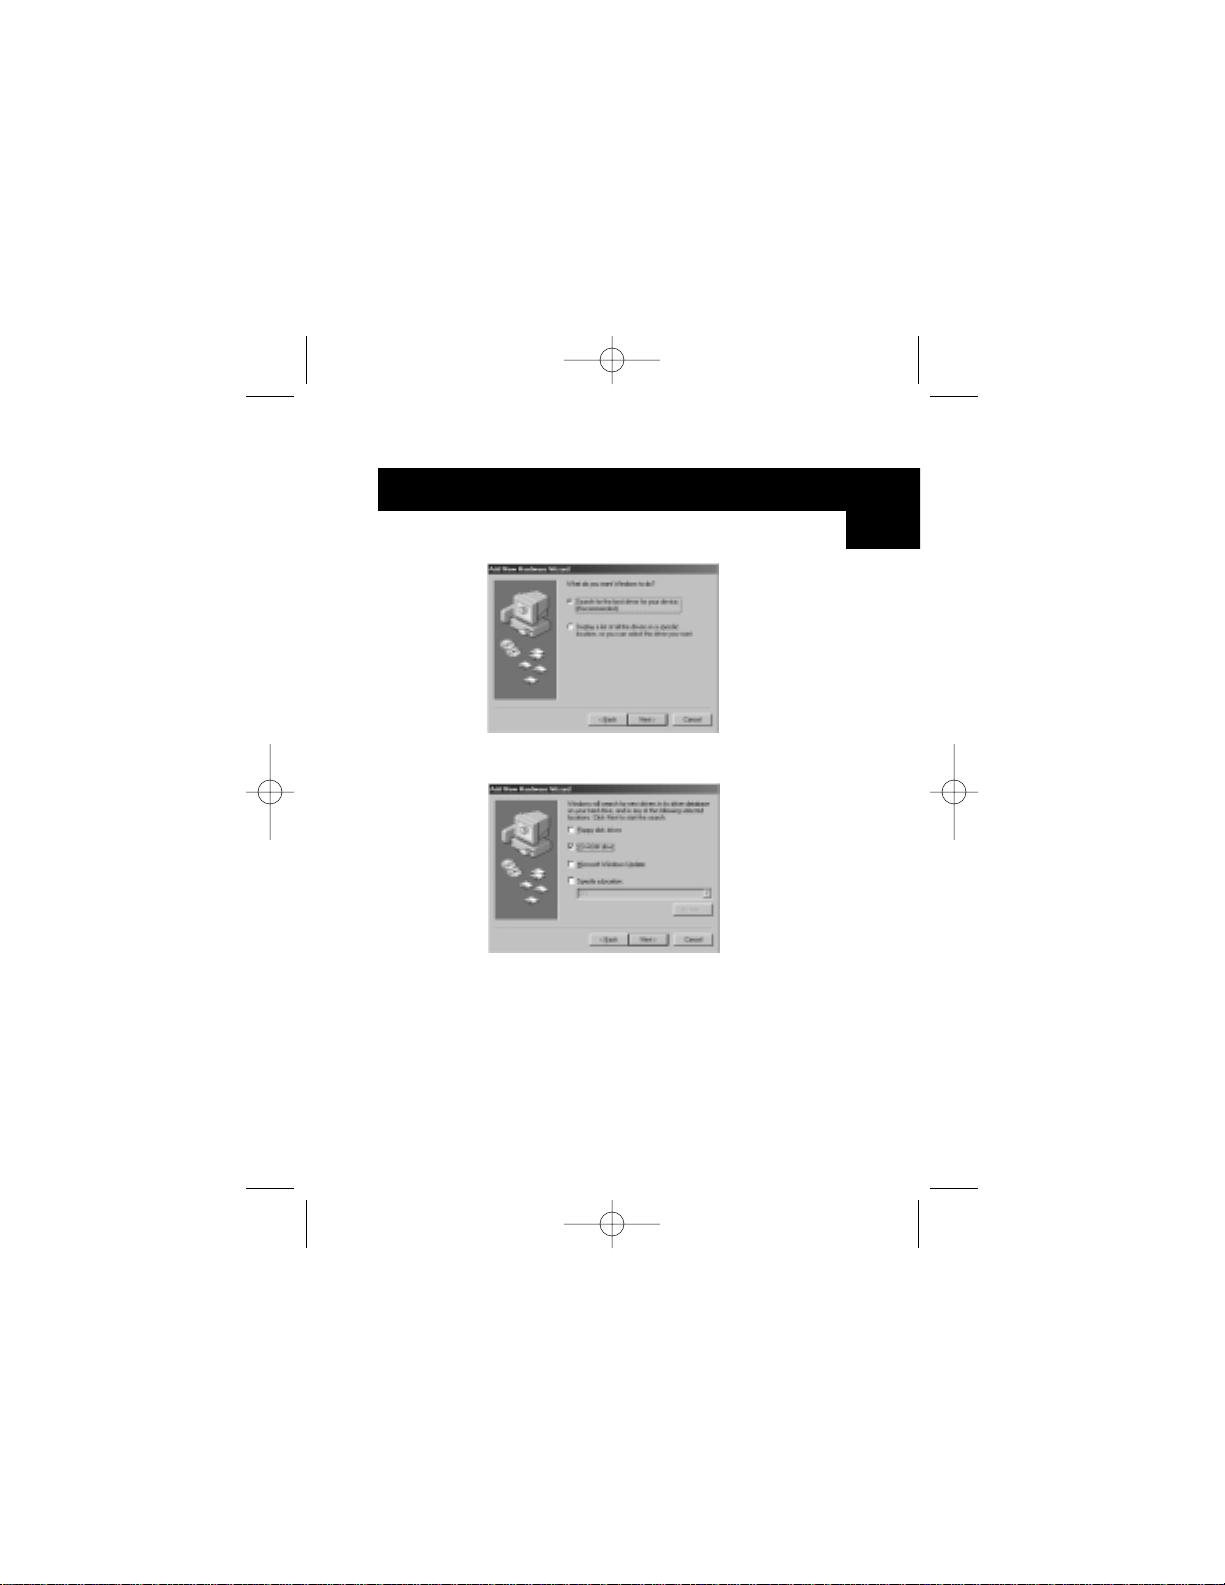
3. On the next prompt click "Next".
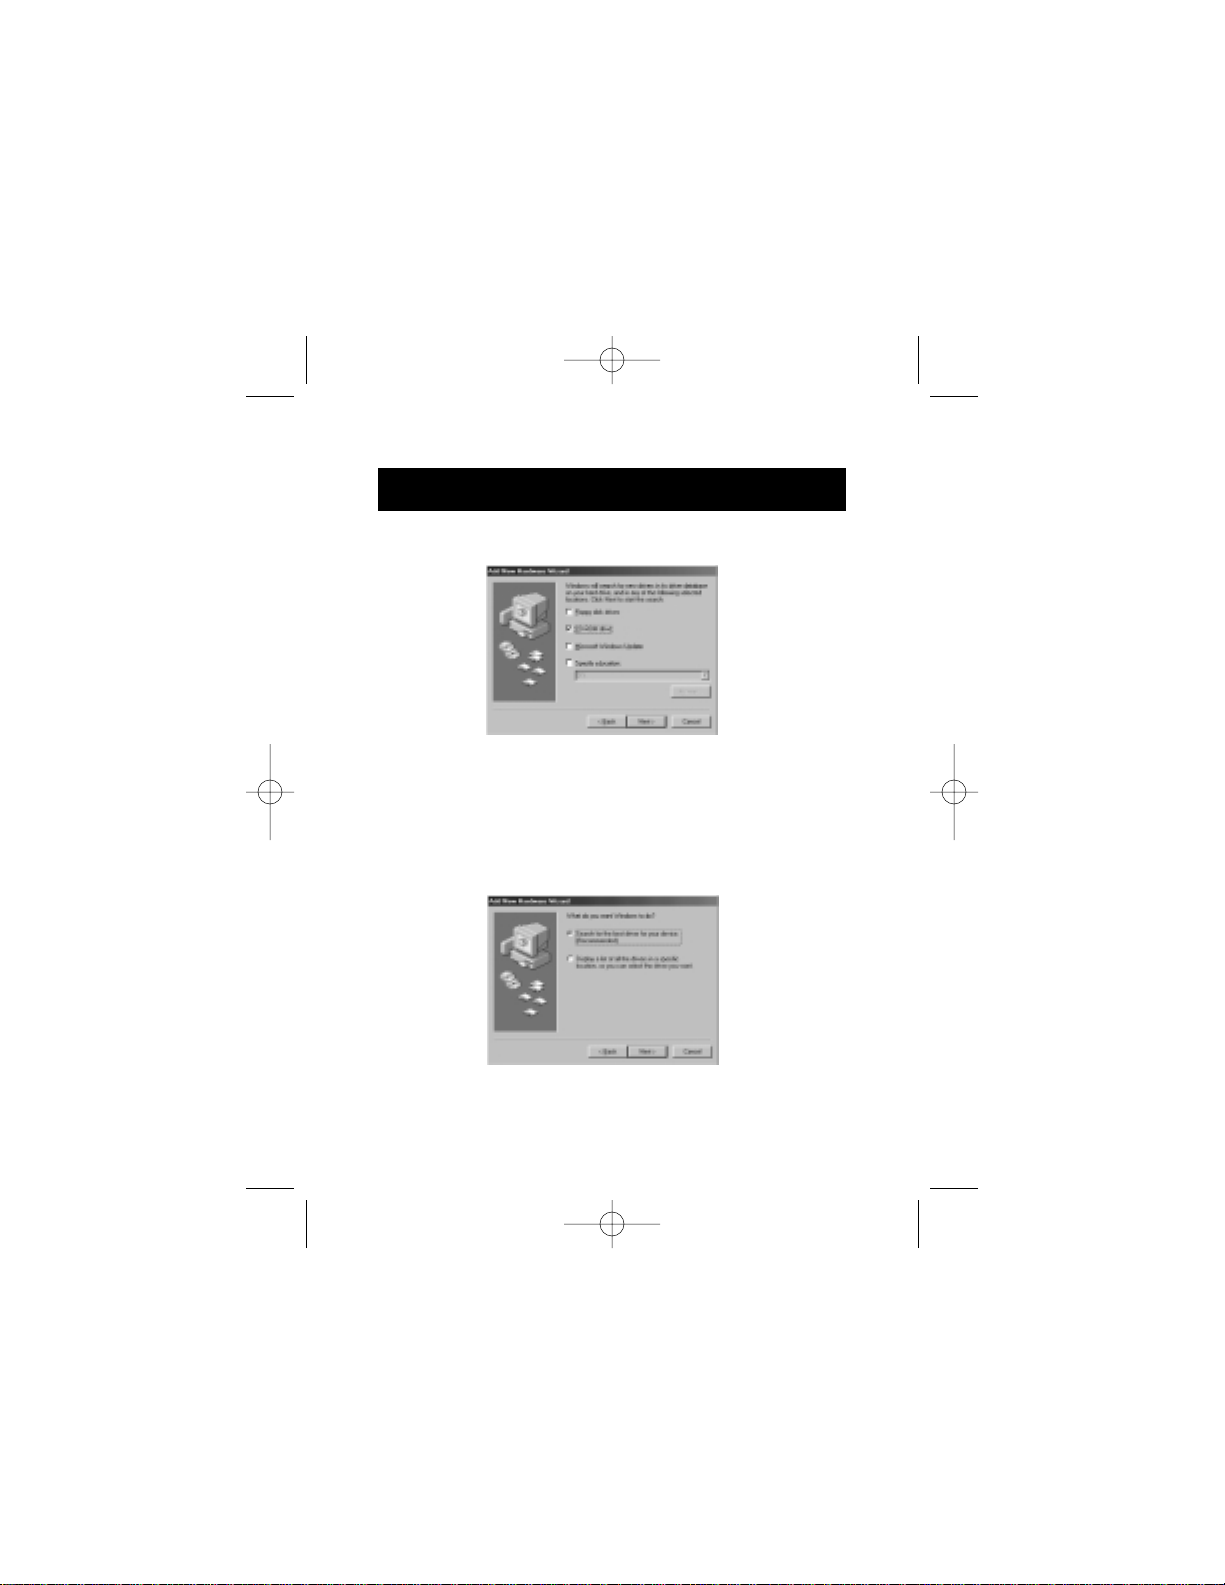
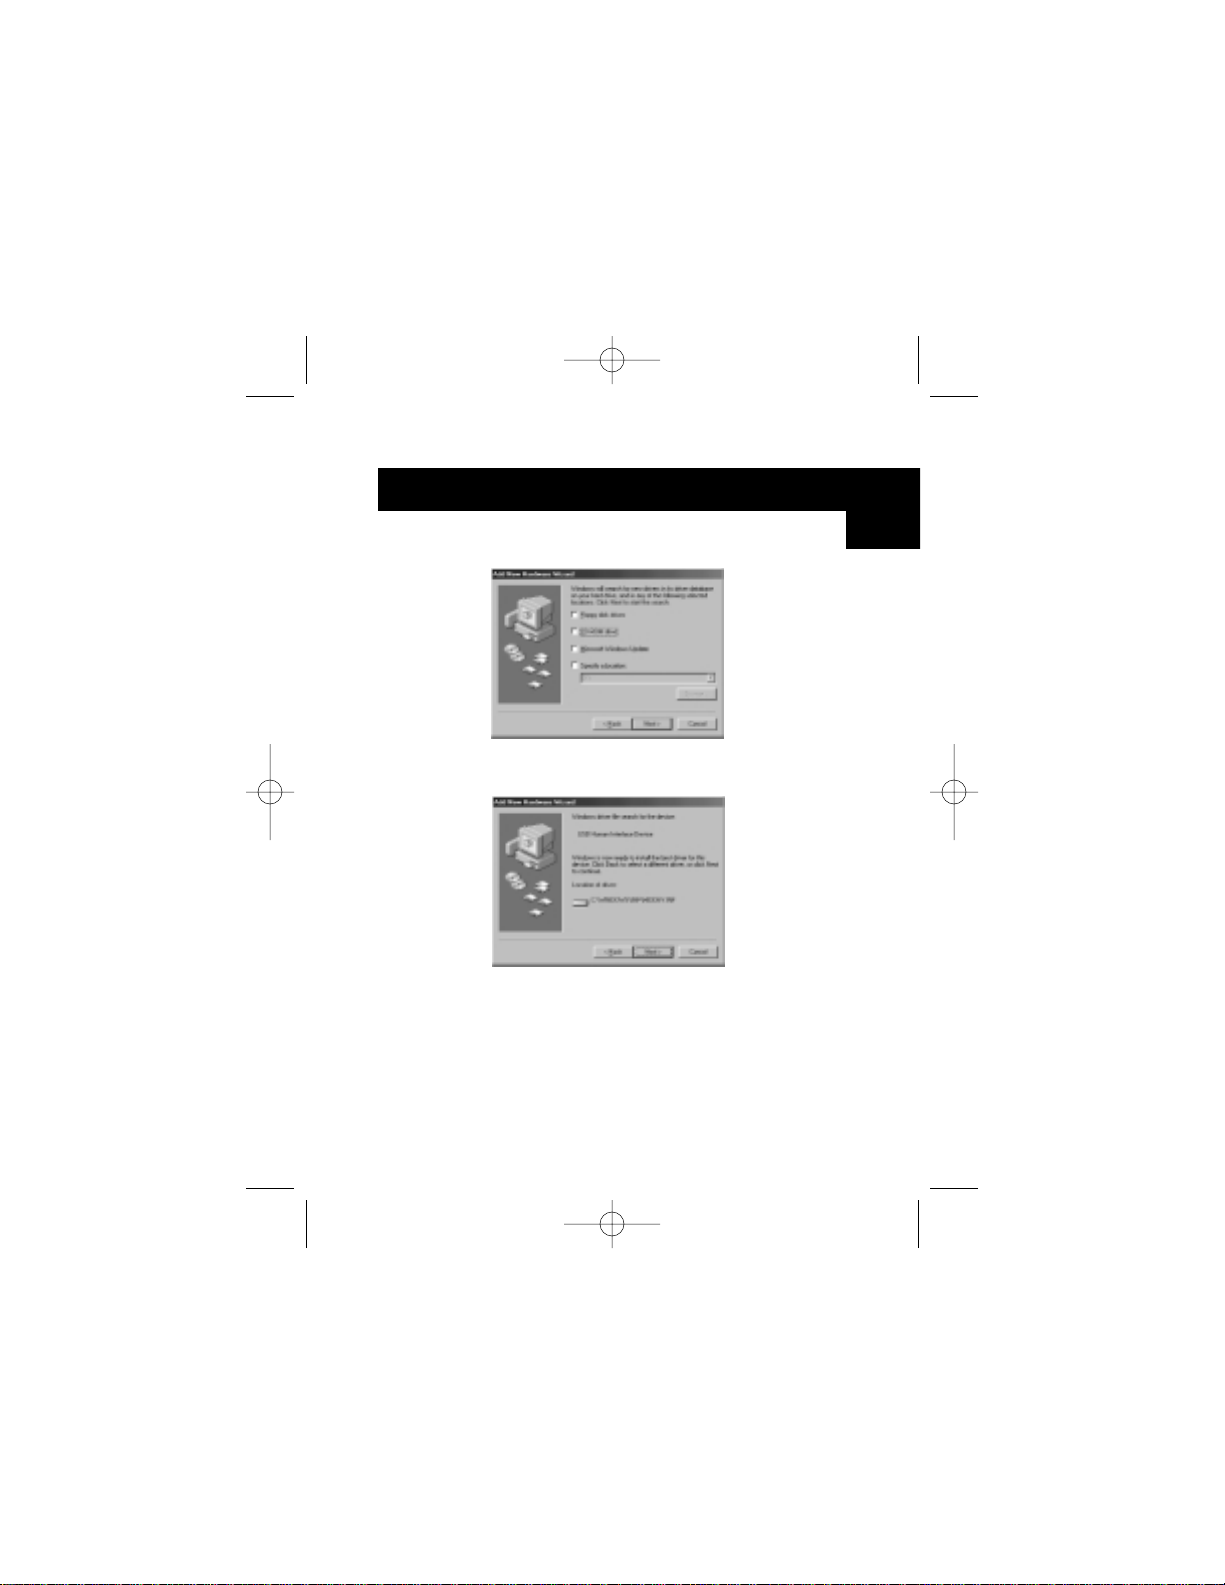
4. Insert CD-ROM. Check "CD-ROM drive" and click "Next".
5. Windows®will read CD-ROM and find drivers. Click "Next".
6. Once files are copied, the installation of the serial converter
is complete. Click "Finish".
7. Windows®will detect the first PS/2 port as "USB Composite
Device". Click "Next".
5
En
P73326-F5U120-PC-uk-man-qxd 4/6/00 8:19 AM Page 5
Page 10

8. Leave "Recommended" selected and click "Next".
9. Uncheck everything and click "Next".
10. Windows®will find the correct drivers. Click "Next".
11. After files are copied, installation is complete.
Click "Finish".
12. Windows®will detect "Unknown Device". Click "Next".
Software Installation (continued)
6
P73326-F5U120-PC-uk-man-qxd 4/6/00 8:19 AM Page 6
Page 11
Software Installation (continued)
7
13. Leave "Recommended" selected and click "Next".
14. Have CD-ROM checked and click "Next".
15. Windows
®
will find the correct drivers. Click "Next".
16. Windows®will copy files and finish installing the "Belkin
F5U120 USB Parallel Printer Adapter". Click "Finish".
17. Windows®will detect "USB Human Interface Device".
Click "Next".
En
P73326-F5U120-PC-uk-man-qxd 4/6/00 8:19 AM Page 7
Page 12
Software Installation (continued)
8
18. Leave "Recommended" selected and click "Next".
19. Uncheck everything and click "Next".
20. Windows
®
will find the correct drivers. Click "Next".
21. After files are copied, installation of "USB Human Interface
Device" is complete. Click "Finish".
22. Repeat previous steps 7-21 for the second "USB Human
Interface Device" found.
23. INSTALLATION IS COMPLETE.
P73326-F5U120-PC-uk-man-qxd 4/6/00 8:19 AM Page 8
Page 13
Software Installation (continued)
9
Software Installation for Windows®98 SE
(Second Edition)
1. Windows®will detect "F5U120 USB to Serial Adapter".
Click "Next".
2. At next prompt, click "Next".
En
P73326-F5U120-PC-uk-man-qxd 4/6/00 8:19 AM Page 9
Page 14
Software Installation (continued)
10
3. Insert CD-ROM. Check "CD-ROM drive" and click "Next".
4. Windows®will read CD-ROM and find drivers. Click "Next".
5. Once files are copied, the installation of serial converter is
complete. Click "Finish".
6. Windows®will then detect the next port as "USB Device".
Click "Next".
7. At next prompt, click "Next".
P73326-F5U120-PC-uk-man-qxd 4/6/00 8:19 AM Page 10
Page 15
Software Installation (continued)
11
8. Make sure "CD-ROM drive" is checked and click "Next".
9. Windows®will read the CD-ROM and find the drivers.
Click "Next".
10. Windows®will now loead the “Belkin F5U120 Parallel
Printer Adapter” drivers. Click "Next".
11. Once Windows®copies the necessary files, setup is
complete. Click "Finish".
12. Windows®will detect "USB Comm Port".
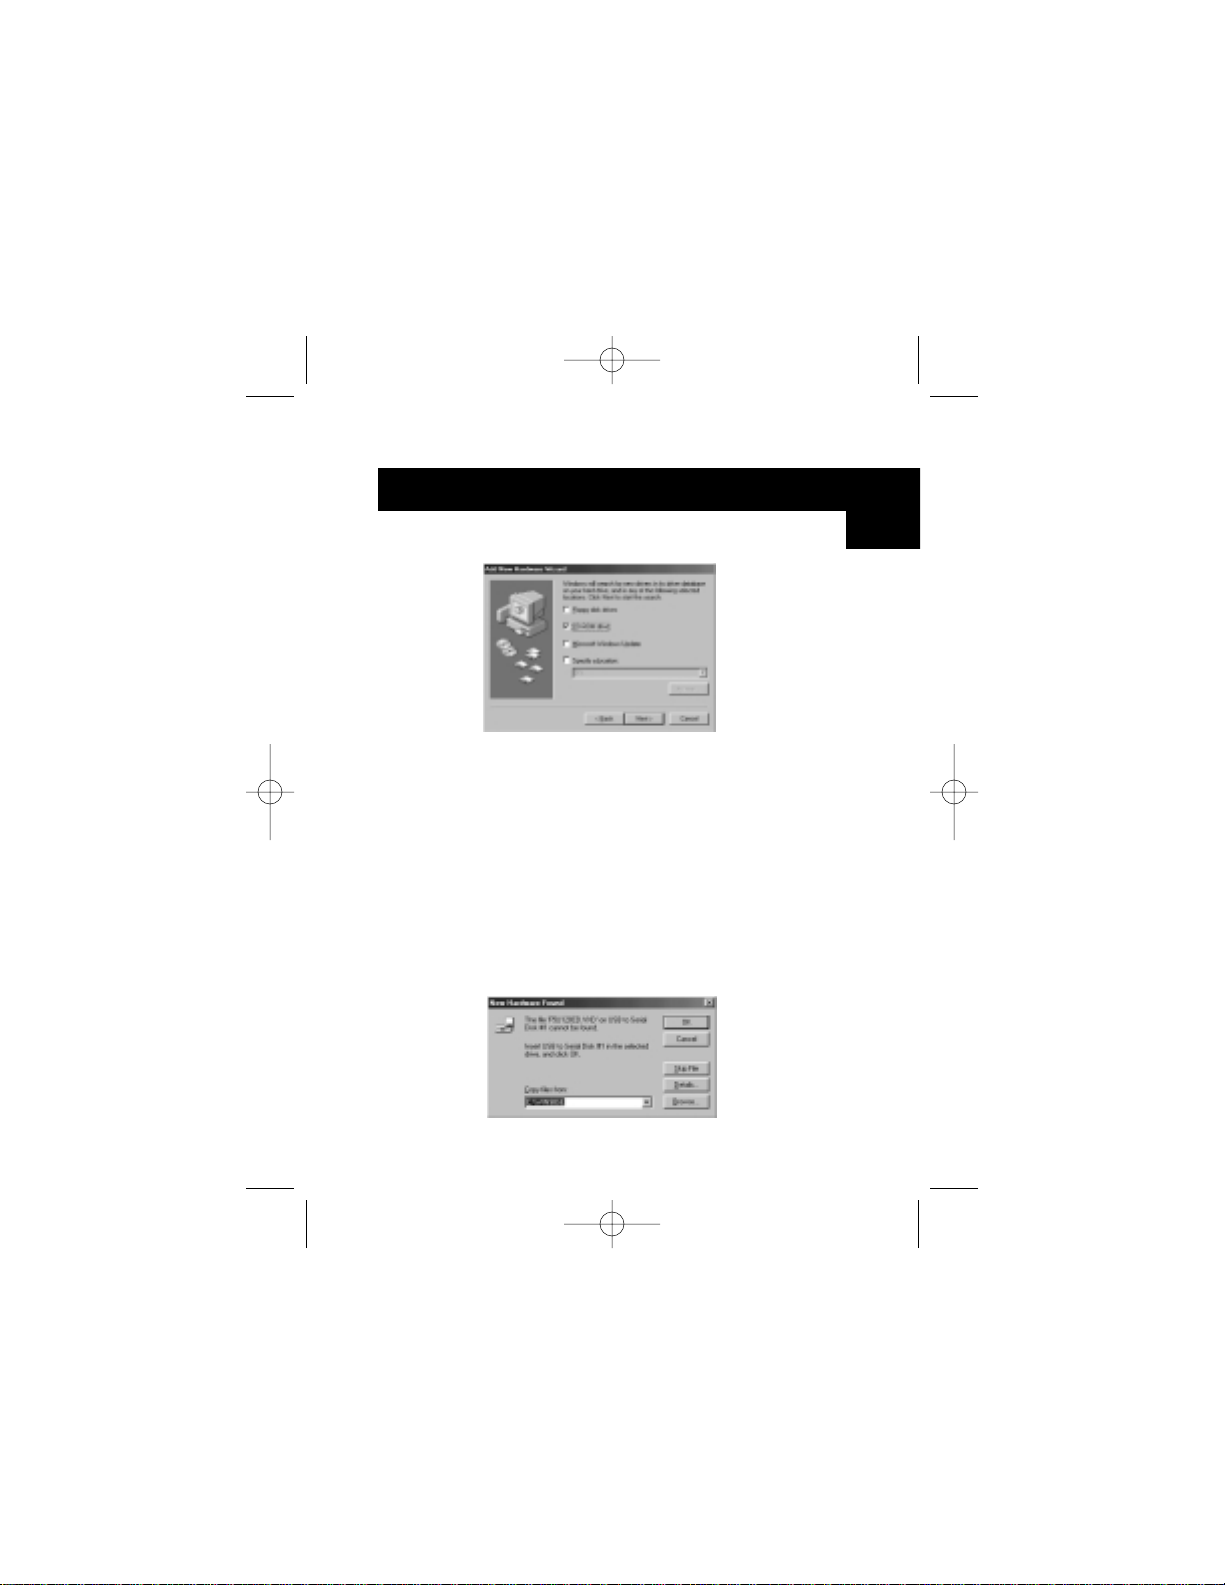
13. Windows®will then prompt you for "USB Serial Disk #1".
Click "OK".
14. In the next dialog box under "Copy files from", type
"D:\" or your corresponding CD-ROM drive letter and
click "OK".
En
P73326-F5U120-PC-uk-man-qxd 4/6/00 8:19 AM Page 11
Page 16
Software Installation (continued)
15. Windows®will load the “USB to Serial Drivers”.
16. Windows
®
will detect the first PS/2 port as "USB Human
Interface Device". Click "Next".
17. Leave "Recommended" selected and click "Next".
12
P73326-F5U120-PC-uk-man-qxd 4/6/00 8:19 AM Page 12
Page 17
18. Uncheck everything and click "Next".
19. Windows®will find the correct drivers. Click "Next".
20. After files are copied, installation is complete.
Click "Finish".
21. Repeat for the Second PS/2 Port.
22. INSTALLATION IS COMPLETE.
Software Installation (continued)
13
En
P73326-F5U120-PC-uk-man-qxd 4/6/00 8:19 AM Page 13
Page 18
Software Installation for Windows®2000
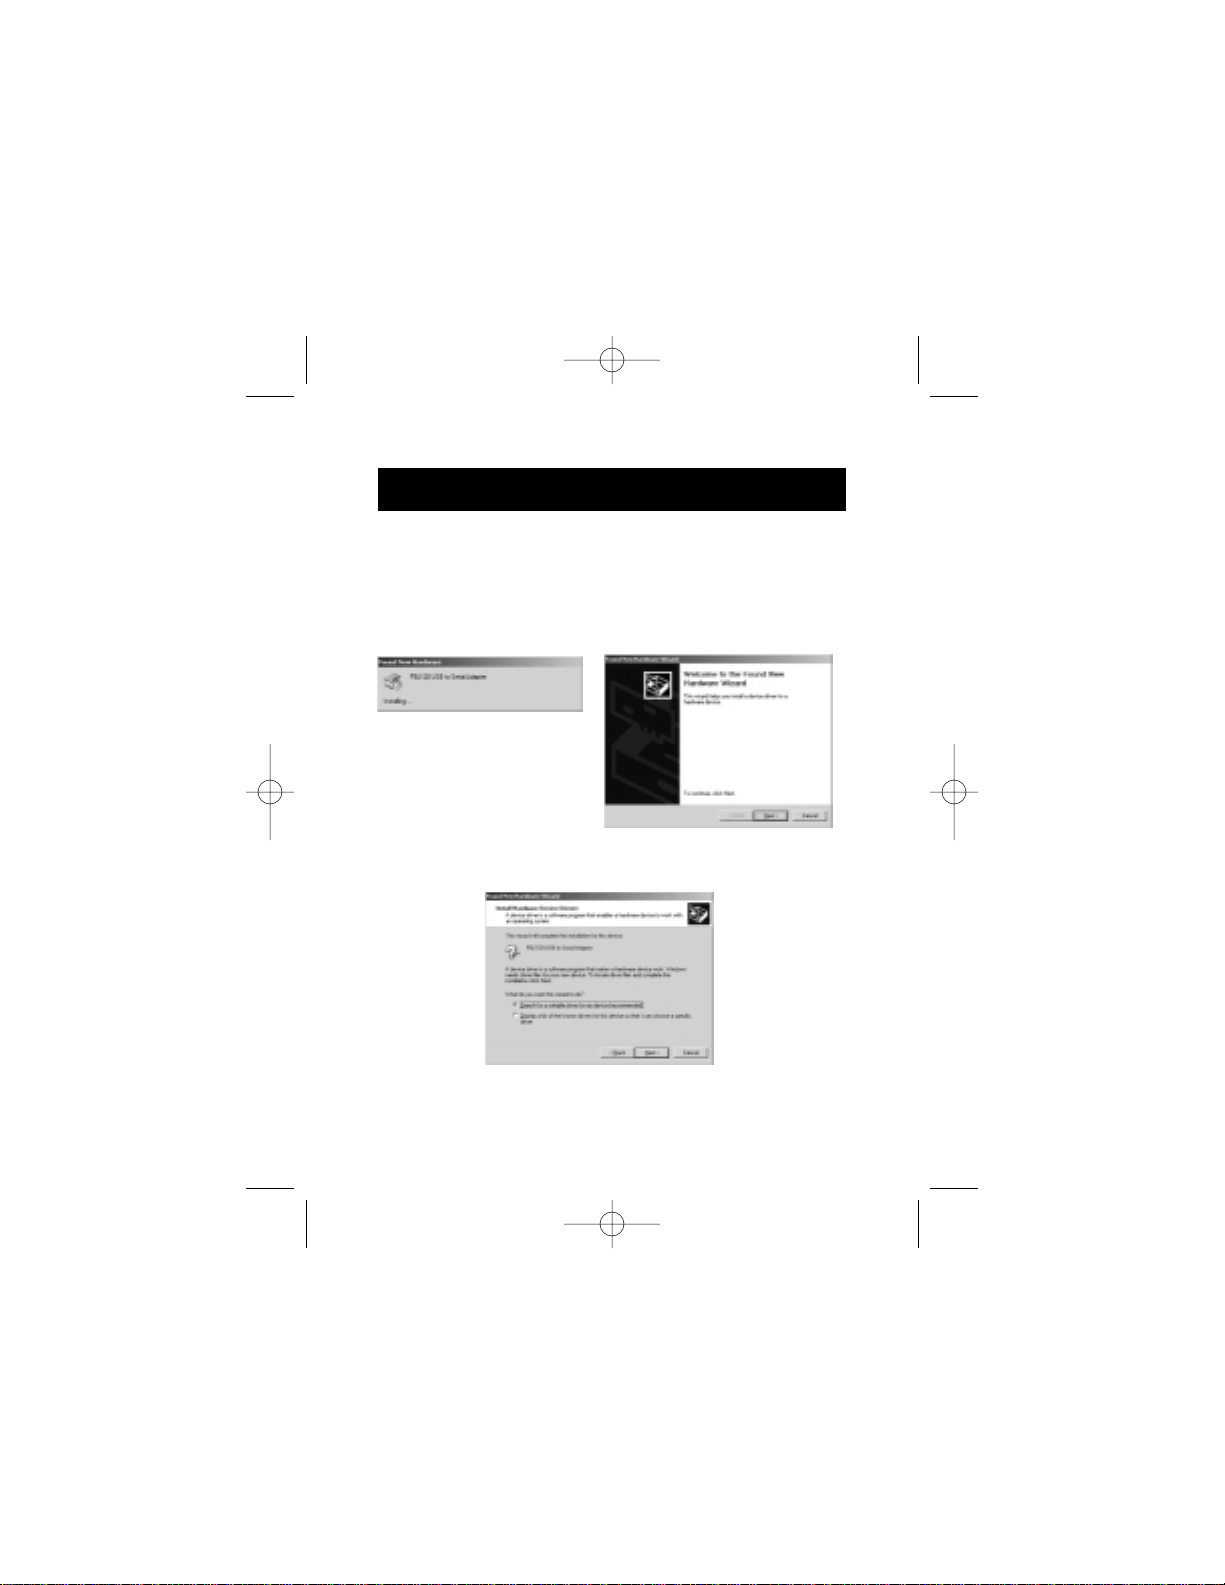
1. Windows®will automatically detect and install the "USB
General Purpose Hub".
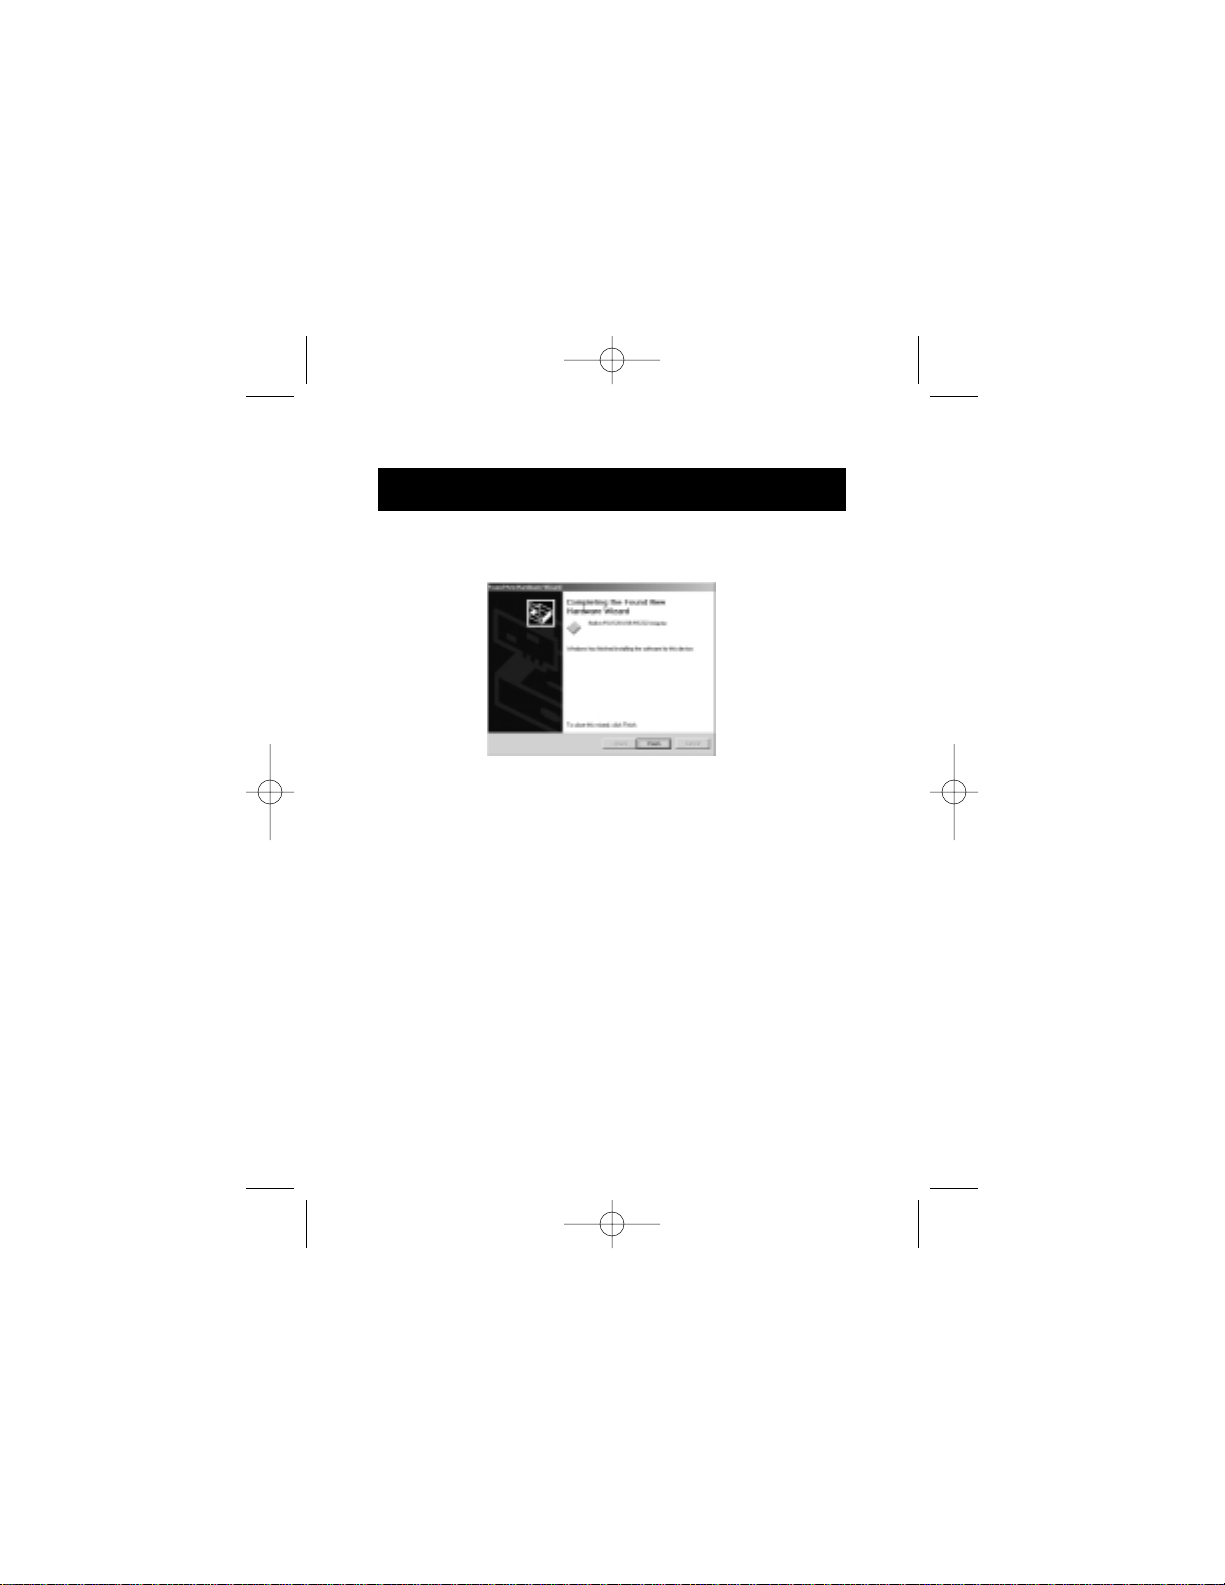
2. Windows®will detect "F5U120 USB to Serial Adapter" and
bring up the "Found New Hardware Wizard".
3. Click "Next".
Software Installation (continued)
14
P73326-F5U120-PC-uk-man-qxd 4/6/00 8:19 AM Page 14
Page 19
Software Installation (continued)
15
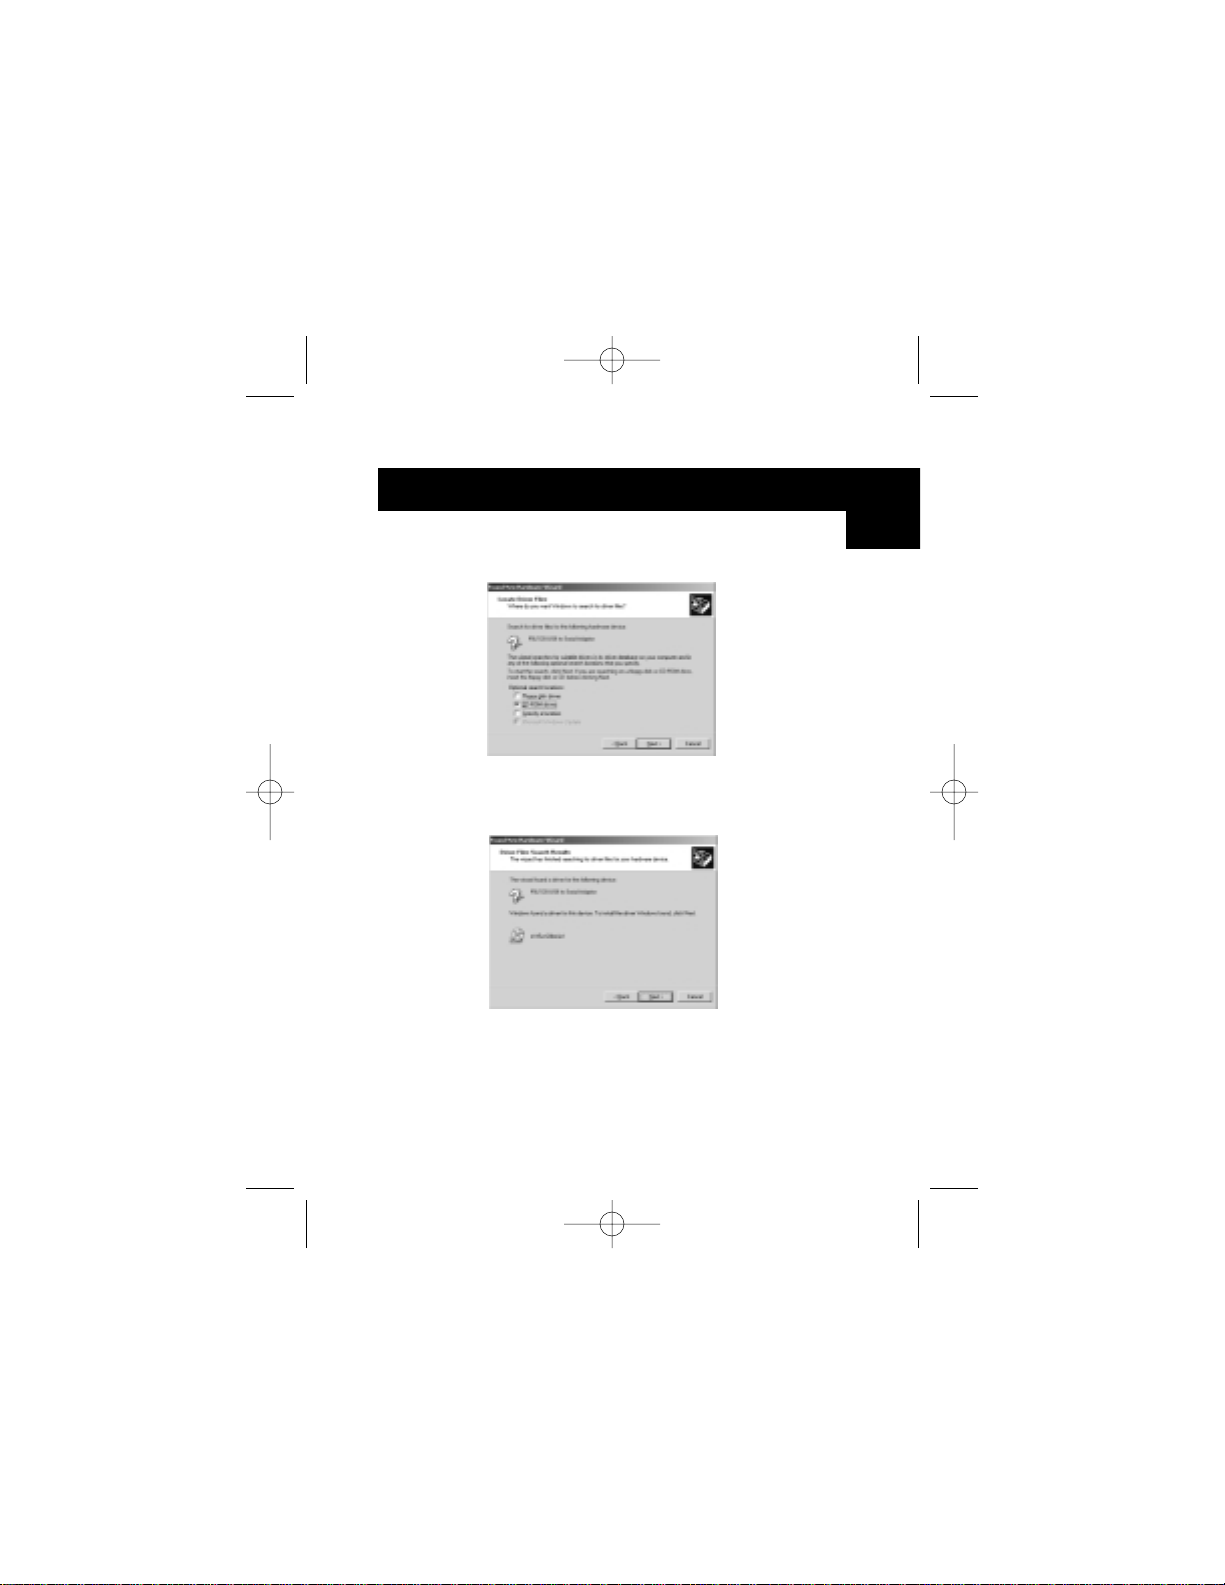
4. Insert Windows
®
2000 Driver CD into CD-ROM drive, and
click "Next".
5. Windows®will now read the Windows®2000 Driver
Installation CD-ROM and find the appropriate drivers.
Click "Next".
En
P73326-F5U120-PC-uk-man-qxd 4/6/00 8:19 AM Page 15
Page 20
6. Once files are copied, the installation of serial adapter is
complete. Click "Finish".
7. Windows®will now detect all other devices automatically.
Installation will then be finished.
Software Installation (continued)
16
P73326-F5U120-PC-uk-man-qxd 4/6/00 8:19 AM Page 16
Page 21
17
Installing a Parallel Printer
First, connect your parallel printer to the DockStation™using
IEEE 1284-compliant cables (Belkin F2A046-XX where "XX" is
the length in feet).
Install your printer’s drivers using the software provided by your
printer manufacturer. Or you can download the latest software
from the printer manufacturer’s web site. When the software
prompts you for the port name, select "LPTUSB1".
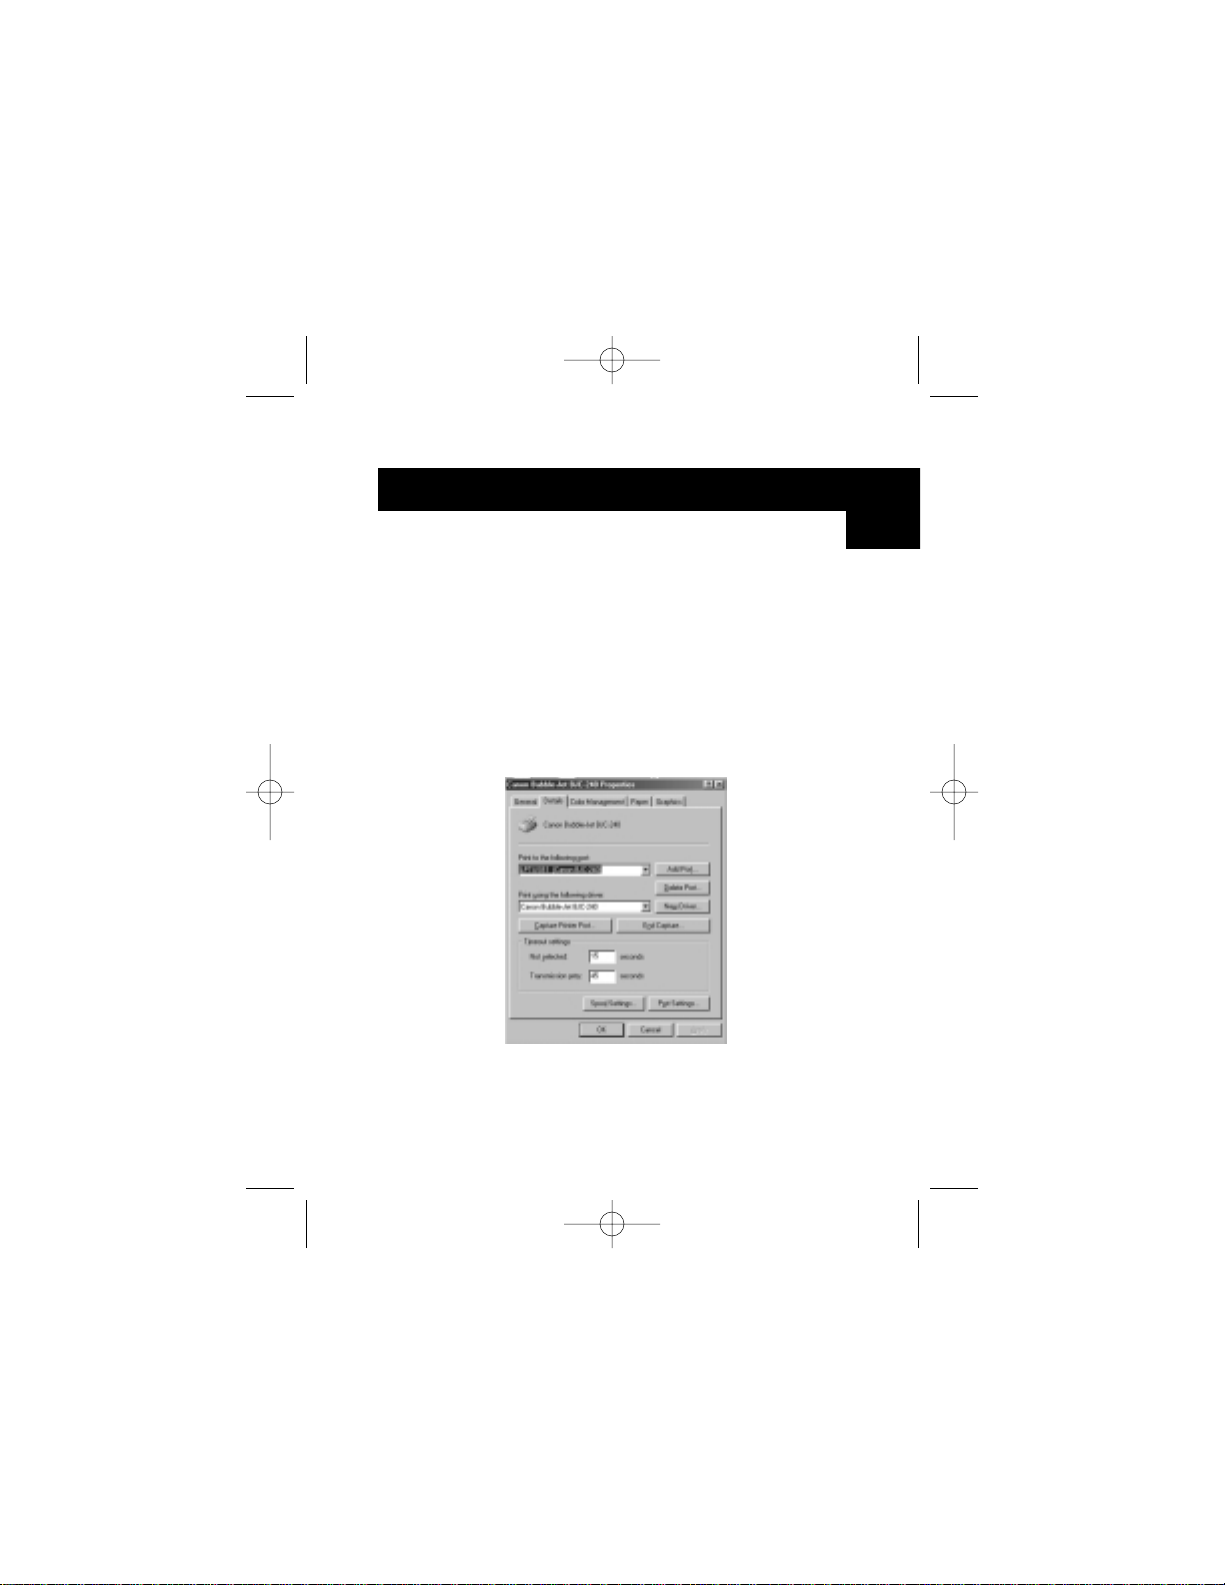
If you are not prompted for the port name, open the “Printers”
folder by clicking on “Start”, then “Settings”. Right-click on
your printer icon, and choose “Properties”. Click on the
“Details” tab. Click on the drop-down menu for "Print to the
following port", and change it to "LPTUSB1". Click on “Apply”:
You’re done! You can now print to your printer from any
Windows
®
application.
En
P73326-F5U120-PC-uk-man-qxd 4/6/00 8:19 AM Page 17
Page 22

Adding Optional DOS Box Support
18
Adding DOS Box Support (Optional)
DOS Box support for the DockStation™is useful if you intend to use
DOS applications, but not necessary for Windows®applications. If
you are using only Windows®applications, it is recommended that
you do not install this feature as it uses resources. Enabling DOS
Box support requires one IRQ and a range of eight memory
locations in order to function. In addition, some DOS applications
require certain IRQ and memory configurations to be associated
with specific COM ports. To enable DOS Box support for the
DockStation™, follow the instructions below.
1. Right-click on the "My Computer" icon on your desktop.
2. Click "Properties" from the menu that appears.
3. Click the "Device Manager" tab on the System
Properties page.
4. Click the "+" next to Ports (COM & LPT).
5. Click "USB Comm Port" (ComX) where X is the port
number of the device to which you’d like to add DOS
Box support.
6. Click the "Properties" button.
7. Click the "DOS Box" tab.
8. Click the box next to “Enable DOS Box 16550
Emulator”. A check mark will appear in the box.
9. Choose a DOS name for the port from the list box next
to “Logical Device Name” (DOS Box). Many DOS
applications will only work with COM1-COM4. If you
don’t want any of these, choose COMX. Click ”OK”.
10. You will be asked for the DockStation
™
installation CD.
Insert the CD into your CD-ROM drive and click ”OK”.
If a dialog pops up stating that a file could not be
found, make sure that the “Copy files from:” edit box
contains “d:\” (be sure you load the correct driver CD
P73326-F5U120-PC-uk-man-qxd 4/6/00 8:19 AM Page 18
Page 23

19
Adding Optional DOS Box Support
(continued)
– Windows®98 or Windows®2000 depending on
your OS) where “d:\” is your CD-ROM drive location.
Once DOS Box support is enabled for a specific USB
DockStation™device, an additional Port entry in the “Device
Manager” will be created, labeled “16550 COM Port Emulator”.
You will also be able to disable and enable this feature.
To disable or re-enable DOS Box support, follow steps 1-6
above. If you are disabling DOS Box support, the check mark
will disappear.
En
P73326-F5U120-PC-uk-man-qxd 4/6/00 8:19 AM Page 19
Page 24

20
Adding Non-Plug-and-Play (Legacy) Devices
Non-Plug-and-Play devices must be added through the “Add
New Hardware Wizard” in the “Control Panel”. Using this
wizard, follow the installation instructions that came with
your device.
Using Non Plug-and-Play Devices
A Plug-and-Play device, such as a modem, can be detected in
one of two ways:
1. Attach the serial device to the DockStation
™
. Unplug
the cable and plug the USB B connector to
the USB DockStation
™
.
Or
1. Attach the serial device to the DockStation
™
.
2. Right-click the “My Computer” icon on your desktop.
3. Click “Properties” from the menu that appears.
4. Click the “Device Manager” tab on the “System
Properties” page.
5. Click “Refresh”.
Your Plug-and-Play device should be detected and you may be
asked for a device driver if it has not been previously installed.
Follow the instructions that came with your serial device to
complete the installation.
Serial Plug-and-Play Device Detection
P73326-F5U120-PC-uk-man-qxd 4/6/00 8:19 AM Page 20
Page 25

21
Using USB with DOS Applications
Troubleshooting
Modem not detected/illegal operation in MODEM.CPL
It is possible that a modem attached to the DockStation™will
not be detected or a problem will occur in MODEM.CPL if
more than one USB hub is between the DockStation™and the
root hub. This is a known problem in MODEM.CPL, a
component of Windows®98. The easiest solution to this
problem is to attach the DockStation™to either the root hub (a
USB port on the back of your PC) or to a hub that is connected
to the root hub.
Belkin Components has made their best effort to ensure
that all the information contained in this document is accurate
and reliable. However, the information is subject to change
without notice. No responsibility is assumed by Belkin
Components for the use of this information, or for
infringements of patents or other rights of third parties.
To enable the DockStation™to work with DOS applications,
follow the instructions in “Adding DOS Box Support”. You can
choose a different name for DOS than what is used for
Windows®. You may need to do this if the DockStation™has
been installed as COM5 or higher, since many DOS applications
will only use COM1-COM4. For instance, if you are adding DOS
Box support to COM7, you can choose to have DOS
applications use the device as COM2 instead, if COM2 is not
already in use. COM7 would still be available for use with
Windows®applications, but both COM2 and COM7 refer to the
same physical device. Therefore, while a DOS application is
using COM2, COM7 will be unavailable to Windows
®
applications and vice-versa.
En
P73326-F5U120-PC-uk-man-qxd 4/6/00 8:19 AM Page 21
Page 26
Information
FCC Statement
DECLARATION OF CONFORMITY WITH FCC RULES FOR
ELECTROMAGNETIC COMPATIBILITY
We, Belkin Components, of 501 West Walnut Street, Compton CA 90220,
declare under our sole responsibility that the product:
F5U120-PC
to which this declaration relates:
Complies with Part 15 of the FCC Rules. Operation is subject to the following
two conditions: (1) this device may not cause harmful interference, and (2) this
device must accept any interference received, including interference that may
cause undesired operation.
CE Declaration of Conformity
We, Belkin Components, declare under our sole responsibility that the F5U120-PC, to which
this declaration relates, is in conformity with Generic Emissions Standard EN50081-1 and
with Generic Immunity Standard EN50082-1 1992.
ICES Statement
This Class B digital apparatus complies with Canadian ICES-003. Cet appareil numérique de
la classe B est conforme à la norme NMB-003 du Canada.
Belkin Components Limited Lifetime Product Warranty
Belkin Components warrants this product against defects in materials and workmanship for
its lifetime. If a defect is discovered, Belkin will, at its option, repair or replace the product at
no charge, provided it is returned during the warranty period, with transportation charges
prepaid, to the authorized Belkin dealer from whom you purchased the product. Proof of
purchase may be required.
This warranty does not apply if the product has been damaged by accident, abuse, misuse,
or misapplication; if the product has been modified without the written permission of Belkin;
or if any Belkin serial number has been removed or defaced.
THE WARRANTY AND REMEDIES SET FORTH ABOVE ARE EXCLUSIVE IN LIEU OF ALL OTHERS,
WHETHER ORAL OR WRITTEN, EXPRESSED OR IMPLIED. BELKIN SPECIFICALLY DISCLAIMS
ANY AND ALL IMPLIED WARRANTIES, INCLUDING, WITHOUT LIMITATION, WARRANTIES OF
MERCHANTABILITY AND FITNESS FOR A PARTICULAR PURPOSE.
No Belkin dealer, agent, or employee is authorized to make any modification, extension, or
addition to this warranty.
BELKIN IS NOT RESPONSIBLE FOR SPECIAL, INCIDENTAL, OR CONSEQUENTIAL
DAMAGES RESULTING FROM ANY BREACH OF WARRANTY, OR UNDER ANY OTHER
LEGAL THEORY, INCLUDING BUT NOT LIMITED TO LOST PROFITS, DOWNTIME,
GOODWILL, DAMAGE TO OR REPROGRAMMING, OR REPRODUCING ANY PROGRAM
OR DATA STORED IN OR USED WITH BELKIN PRODUCTS.
P73326-F5U120-PC-uk-man-qxd 4/6/00 8:19 AM Page 22
Page 27
En
Belkin Components B.V.
Diamantlaan 8 • 2132 WV
Hoofddorp • The Netherlands
Tel: +31 (0) 235698765
Fax: +31 (0) 235612694
Belkin Components, Ltd.
Unit 13 • Gatelodge Close • Round Spinney
Northampton • Northants • NN3 8RX • United Kingdom
Tel: +44 (0) 1604678300
Fax: +44 (0) 1604678330
Belkin Components
501 West Walnut Street
Compton • CA • 90220 • USA
Tel: 310.898.1100
Fax: 310.898.1111
© 2000 Belkin Components. All rights reserved. All trade names are registered trademarks of
respective manufacturers listed.
belkin.com
P73326-F5U120-PC-uk-man-qxd 4/6/00 8:19 AM Page 23
Page 28

P73326-F5U120-PC-uk-man-qxd 4/6/00 8:19 AM Page 24
Page 29
La DockStation™de Belkin est la docking station bon marché
et universelle idéale. C’est de loin la solution la plus pratique
et la plus simple pour raccorder des périphériques à votre
ordinateur portable ou à votre PC. Laissez tous vos
périphériques branchés à la DockStation
™
; lorsque vous
revenez au bureau, il vous suffit de brancher un seul câble
pour que plusieurs périphériques soient directement
raccordés à votre ordinateur portable ou à votre PC en
profitant de la simplicité d’utilisation offerte par la
fonctionnalité plug-and-play. Vous n’avez même pas besoin
de redémarrer le système.
La DockStation
™
fournit quatre ports USB permettant de
raccorder des périphériques USB, un port parallèle pour
raccorder votre imprimante, deux ports PS/2 pour raccorder
claviers ou souris, un port série pour raccorder votre modem,
votre appareil photo numérique ou votre assistant numérique
personnel (PDA).
Introduction
25
Veuillez lire ce manuel attentivement et dans son
intégralité. Si vous ne suivez pas les instructions
d’installation et autres recommandations, vous
pouvez endommager de façon irréversible le produit,
votre ordinateur et/ou les périphériques raccordés.
Fr
P73326-F5U120-PC-f-man-qxd 4/6/00 8:27 AM Page 25
Page 30

Caractéristiques
• DockStation™de Belkin
• Adaptateur de courant 6 volts, 2,5 ampères
• Câble de périphérique USB
• CD-ROM de gestionnaire Windows
®
98/Windows®2000
• Guide de l’utilisateur
• Ajoutez en un instant un autre port imprimante, 1 port série,
deux ports PS/2 et quatre ports USB à votre Notebook ou PC
• Le port imprimante supporte presque toutes les imprimantes
parallèles standard et IEEE 1284
• Le port série supporte les appareils photo numériques,
modems, assistants numériques personnels (PDA), scanners,
tablettes graphiques et tous les autres périphériques série
• Supporte des vitesses sur port série allant jusqu’à 230 Kbps
• Quatre ports USB permettant d’effectuer un raccordement
à n’importe quel périphérique USB, y compris d’autres
hubs USB
• Raccordez deux claviers PS/2, deux souris PS/2 ou un
de chaque
• Installation plug-and-play. Possibilité de branchement et de
débranchement à chaud
• Comprend une alimentation de 2,5 ampères permettant de
fournir un véritable courant en aval de 500 mA sur les ports USB
• Compatible avec Windows®98 ou Windows®2000
• Parfaitement compatible avec les spécifications USB actuelles
Contenu de l’emballage
26
P73326-F5U120-PC-f-man-qxd 4/6/00 8:27 AM Page 26
Page 31

27
Détails relatifs aux produits
Configuration requise
• Notebook ou PC doté de la fonctionnalité USB
• Windows®98 ou Windows®2000
• Lecteur de CD-ROM
2 ports PS/2
Indicateurs lumineux
4 ports USB en aval
Port série DB9
RS232
Prise de courant continu
Port USB en
amont
Port d’imprimante
parallèle DB25
Fr
P73326-F5U120-PC-f-man-qxd 4/6/00 8:27 AM Page 27
Page 32

Installation du matériel
Installation du logiciel
Installation du logiciel
pour Windows
®
98
1. Windows®détectera et
installera le « General
Purpose USB Hub » (hub
USB universel).
2. Windows®détectera
l’adaptateur F5U120 USB –
Série. Cliquez sur
« Next » (Suivant).
28
Comme l’USB permet les branchements et débranchements à
chaud, vous n’avez pas besoin d’éteindre votre PC.
• Raccordez la fiche de l’adaptateur de courant et branchez-la au
dos de la DockStation
™
• Cherchez une prise de courant électrique non utilisée et
branchez l’adaptateur de courant
• Insérez l’extrémité plate (fiche A) du câble USB dans un port
USB libre de votre PC
• Insérez l’extrémité carré (fiche B) du câble USB dans le
connecteur USB en amont situé au dos de la DockStation
™
• A ce stade, Windows®trouvera automatiquement la DockStation
™
et commencera à installer ses pilotes. Windows®vous demandera
ensuite le logiciel. Veuillez vous référer à la section suivante pour
de plus amples détails sur l’installation du logiciel.
Si vous ne savez pas quelle version de Windows®vous utilisez,
cliquez sur « Start » (Démarrer), « Settings » (Paramètres),
« Control Panel » (Panneau de configuration) et double-cliquez
ensuite sur « System » (Système). Un applet apparaît alors à
l’écran et vous fournit des informations relatives à votre système.
P73326-F5U120-PC-f-man-qxd 4/6/00 8:27 AM Page 28
Page 33

Installation du logiciel (suite)
3. A l’invite suivante, cliquez sur « Next » (Suivant).
4. Insérez le CD-ROM. Cliquez sur « CD-ROM drive » (lecteur
de CD-ROM), puis sur « Next » (Suivant).
5. Windows®lira le CD-ROM et trouvera les lecteurs. Cliquez
sur « Next » (Suivant).
6. Une fois les fichiers copiés, l’installation du convertisseur
série est terminée. Cliquez sur « Finish » (Terminer).
7. Windows
®
détectera le premier port PS/2 en tant que «
USB Composite Device » (Périphérique composite USB ».
Cliquez sur « Next » (Suivant).
29
Fr
P73326-F5U120-PC-f-man-qxd 4/6/00 8:27 AM Page 29
Page 34

8. Gardez l’option « Recommended » (Recommandé) et
cliquez sur « Next » (Suivant).
9. Décochez toutes les options et cliquez sur « Next » (Suivant).
10. Windows®trouvera les pilotes appropriés. Cliquez sur «
Next » (Suivant).
11. Une fois les fichiers copiés, l’installation est terminée.
Click "Finish".
12. Windows®détectera un « Unknown Device » (Périphérique
inconnu). Cliquez sur « Next » (Suivant).
Installation du logiciel (suite)
30
P73326-F5U120-PC-f-man-qxd 4/6/00 8:27 AM Page 30
Page 35

Installation du logiciel (suite)
31
13. Gardez l’option « Recommended » (Recommandé) et
cliquez sur « Next » (Suivant).
14. Vérifiez le CD-ROM et cliquez sur « Next » (Suivant).
15. Windows
®
recherchera les pilotes appropriés. Cliquez sur
« Next » (Suivant).
16. Windows®copiera des fichiers et finira d’installer le
« Belkin F5U120 USB Parallel Printer Adapter »
(Adaptateur d’imprimante parallèle USB F5U120 de
Belkin ». Cliquez sur « Finish » (Terminer).
17. Windows®détectera le « USB Human Interface Device »
(Périphérique d’interface humaine USB). Cliquez sur
« Next » (Suivant).
Fr
P73326-F5U120-PC-f-man-qxd 4/6/00 8:27 AM Page 31
Page 36

Installation du logiciel (suite)
32
18. Gardez l’option « Recommended » (Recommandé) et cliquez
sur « Next » (Suivant).
19. Décochez toutes les options et cliquez sur « Next » (Suivant).
20. Windows
®
recherchera les pilotes appropriés. Cliquez sur
« Next » (Suivant).
21. Une fois les fichiers copiés, l’installation de l’« USB Human
Interface Device » (Périphérique d’interface humaine USB »
est terminée. Cliquez sur « Finish » (Terminer).
22. Répétez les étapes 7 à 21 pour le deuxième périphérique
d’interface humaine USB trouvé.
23. L’INSTALLATION EST TERMINEE.
P73326-F5U120-PC-f-man-qxd 4/6/00 8:27 AM Page 32
Page 37

Installation du logiciel (suite)
33
Installation du logiciel pour Windows®98 SE
(Deuxième édition)
1. Windows®98 détectera le « F5U120 USB to Serial
Adapter » (Adaptateur USB – Série F5U120). Cliquez sur
« Next » (Suivant).
2. A l’invite suivante, cliquez sur « Next » (Suivant).
Fr
P73326-F5U120-PC-f-man-qxd 4/6/00 8:27 AM Page 33
Page 38

Installation du logiciel (suite)
34
3. Insérez le CD-ROM. Sélectionnez « CD-ROM drive »
(Lecteur de CD-ROM) et cliquez sur « Next » (Suivant).
4. Windows®lira le CD-ROM et recherchera les pilotes.
Cliquez sur « Next » (Suivant).
5. Une fois les fichiers copiés, l’installation du convertisseur
série est terminée. Cliquez sur « Finish » (Terminer).
6. Windows®détectera alors automatiquement le prochain
port en tant que « USB Device » (Périphérique USB).
Cliquez sur « Next » (Suivant).
7. A l’invite suivante, cliquez sur « Next » (Suivant).
P73326-F5U120-PC-f-man-qxd 4/6/00 8:27 AM Page 34
Page 39

Installation du logiciel (suite)
8. Assurez-vous que l’option « CD-ROM drive » (Lecteur de
CD-ROM) est sélectionnée et cliquez sur « Next » (Suivant).
9. Windows®lira le CD-ROM et recherchera les pilotes.
Cliquez sur « Next » (Suivant).
10. Windows®will now loead the “Belkin F5U120 Parallel
Printer Adapter” drivers. Click "Next".
11. Une fois que Windows®a copié les fichiers nécessaires,
l’installation est terminée. Cliquez sur « Finish » (Terminer).
12. Windows®détectera le « USB Comm Port » (Port
Comm USB).
13. Windows®vous demandera ensuite la « USB Serial Disk
#1 » (disquette série USB n° 1).
14. Dans la boîte de dialogue suivante, sous « Copy files fr om »
(Copier les fichiers à partir de), tapez « D:\ » ou la lettre
correspondant à votre lecteur de CD-ROM et cliquez sur « OK ».
Fr
35
P73326-F5U120-PC-f-man-qxd 4/6/00 8:27 AM Page 35
Page 40

Installation du logiciel (suite)
15. Windows®will load the “USB to Serial Drivers”.
16. Windows
®
détectera le premier port PS/2 en tant que « USB
Human Interface Device » (Périphérique d’interface humaine
USB). Cliquez sur « Next » (Suivant).
17. Gardez l’option « Recommended » (Recommandé) et
cliquez sur « Next » (Suivant).
36
P73326-F5U120-PC-f-man-qxd 4/6/00 8:27 AM Page 36
Page 41

18. Décochez toutes les options et cliquez sur « Next »
(Suivant).
19. Windows®recherchera les pilotes appropriés. Cliquez sur
« Next » (Suivant).
20. Une fois les fichiers copiés, l’installation est terminée.
Cliquez sur « Finish » (Terminer).
21. Répétez l’opération pour le deuxième port PS/2.
22. L’INSTALLATION EST TERMINEE.
Installation du logiciel (suite)
37
Fr
P73326-F5U120-PC-f-man-qxd 4/6/00 8:27 AM Page 37
Page 42

Installation du logiciel pour Windows®2000
1. Windows®détectera et installera automatiquement le « USB
General Purpose Hub » (Hub USB universel).
2. Windows®détectera le « F5U120 USB to Serial Adapter »
(Adaptateur USB-Série F5U120) et fera apparaître le «
Found New Hardware Wizard », l’assistant de détection de
nouveau matériel.
3. Cliquez sur « Next » (Suivant).
Installation du logiciel (suite)
38
P73326-F5U120-PC-f-man-qxd 4/6/00 8:27 AM Page 38
Page 43

Installation du logiciel (suite)
39
4. Insérez le CD-ROM de gestionnaire Windows
®
2000 dans le
lecteur de CD-ROM et cliquez sur « Next » (Suivant).
5. Windows®va maintenant lire le CD-ROM d’installation
de gestionnaire Windows®2000 et trouver les
pilotes appropriés. Cliquez sur « Next » (Suivant).
Fr
P73326-F5U120-PC-f-man-qxd 4/6/00 8:27 AM Page 39
Page 44

6. Une fois les fichiers copiés, l’installation de l’adaptateur
série est terminée. Cliquez sur « Finish » (Terminer).
7. Windows®va maintenant détecter automatiquement tous
les autres périphériques. L’installation sera terminée.
Installation du logiciel (suite)
40
P73326-F5U120-PC-f-man-qxd 4/6/00 8:27 AM Page 40
Page 45

41
Installation d’une imprimante parallèle
Raccordez tout d’abord votre imprimante parallèle à la
DockStation™en utilisant les câbles compatibles IEEE 1284
(Belkin F2A046fXX, où XX indique la longueur du câble en pieds).
Installez les pilotes de votre imprimante en utilisant le logiciel
fourni par le fabricant de votre imprimante. Vous pouvez
également décharger le tout dernier logiciel sur le site Internet
du fabricant de l’imprimante. Lorsque le logiciel vous demande
le nom du port, sélectionnez « LPTUSB1 ».
Si l’on ne vous demande pas le nom du port, ouvrez le dossier
« Printers » (Imprimantes) en cliquant sur « Start » (Démarrer),
puis sur « Settings » (Paramètres). Avec le bouton droit de la
souris, cliquez sur l’icône de l’imprimante et sélectionnez «
Properties » (Propriétés). Cliquez sur l’onglet « Details »
(Détails). Cliquez sur le menu déroulant, sélectionnez « Print to
the following port » (Imprimer sur le port suivant » et
remplacez par « LPTUSB1 ». Cliquez sur « Apply » (Appliquer).
Vous avez terminé ! Vous pouvez désormais imprimer sur votre
imprimante à partir de n’importe quelle application Windows®.
Fr
P73326-F5U120-PC-f-man-qxd 4/6/00 8:27 AM Page 41
Page 46

Ajout de l’« Optional DOS Box Support »
(support facultatif de la boîte DOS)
42
Ajout facultatif du « DOS Box Support » (support de la
boîte DOS)
Le support de la boîte DOS de la DockStation™est utile si vous avez
l’intention d’utiliser des applications DOS mais n’est pas nécessaire
pour les applications Windows®. Si vous n’utilisez que des
applications Windows®, il est conseillé de ne pas installer cette
fonction étant donné qu’elle nécessite des ressources. L’activation
du support de la boîte DOS requiert pour fonctionner une IRQ et
une palette de huit positions mémoire. En outre, certaines
applications DOS nécessitent que des configurations IRQ et
mémoire spécifiques soient associées à des ports COM précis. Pour
activer le support de la boîte DOS pour la DockStation™, veuillez
suivre les instructions ci-dessous.
1. Avec le bouton droit de la souris, cliquez sur l’icône « My
Computer » (Poste de travail) se trouvant sur votre bureau.
2. Lorsque le menu apparaît, cliquez sur « Properties »
(Propriétés).
3. Sur la page « System Properties » (Propriétés
Système), cliquez sur l’onglet « Device Manager »
(Gestionnaire de périphérique).
4. Cliquez sur le signe + se trouvant à côté des ports
(COM & LPT).
5. Cliquez sur « USB Comm Port » (ComX) où X est le
numéro de port du périphérique auquel vous voudriez
ajouter le support de la boîte DOS.
6. Cliquez sur le bouton « Properties » (Propriétés).
7. Cliquez sur l’onglet « DOS Box » (Boîte DOS).
8. Cliquez sur la boîte jouxtant « Enable DOS BOX 16550
Emulator » (Activer l’émulateur de la BOITE DOS 16550).
9. Choisissez un nom DOS pour le port dans la liste
apparaissant à côté de « Logical Device Name » (Nom
du périphérique logique) (DOS Box). Nombre
d’applications DOS ne fonctionneront qu’avec COM1-
P73326-F5U120-PC-f-man-qxd 4/6/00 8:27 AM Page 42
Page 47

43
COM4. Si vous ne voulez aucun de ceux-ci,
sélectionnez COMX. Cliquez sur « OK ».
10. Le système vous demandera le CD-ROM
d’installation de la DockStation™. Insérez le CD-ROM
dans votre lecteur de CD-ROM et cliquez sur
« OK ». Si une boîte de dialogue apparaît et indique
que le fichier est introuvable, assurez-vous que la
boîte « Copy files from : » (Copier les fichiers à partir
de) contient bien l’indication « d:\ » (Assurez-vous
de bien charger le CD-ROM de gestionnaire
approprié - Windows®98 ou Windows®2000, selon
votre système d’exploitation) où « d:\ » correspond
à l’emplacement de votre lecteur de CD-ROM.
Une fois que le support de la boîte DOS est activé pour un
périphérique DockStation™USB donné, une entrée de port
supplémentaire intitulé « 16550 COM Port Emulator» (Emulateur
de port COM 16550) sera créée dans le gestionnaire de
périphériques. Vous pourrez également activer et désactiver
cette fonction.
Pour activer ou réactiver le support de la boîte DOS, veuillez
suivre les étapes 1 à 6 ci-dessous. Si vous désactivez le
support de la boîte DOS, la coche disparaîtra.
Fr
Ajout de l’« Optional DOS Box Support »
(support facultatif de la boîte DOS) (suite)
P73326-F5U120-PC-f-man-qxd 4/6/00 8:27 AM Page 43
Page 48

44
Ajout de périphériques non plug-and-play
Les périphériques non plug-and-play doivent être ajoutés en
recourant au « Add New Hardware Wizard » (Assistant d’ajout de
nouveau matériel) figurant dans le « Control Panel » (Panneau de
configuration). En utilisant cet assistant, veuillez suivre les
instructions d’installation fournies avec votre périphérique.
Utilisation de périphériques
non plug-and-play
Un périphérique plug-and-play tel qu’un modem peut être
détecté de deux façons :
1. Vous pouvez raccorder le périphérique série à la
DockStation™, débrancher le câble et brancher le
connecteur USB B à la DockStation™USB.
Ou
1. Vous pouvez raccorder le périphérique série à
la DockStation™.
2. Avec le bouton droit de la souris, cliquez sur l’icône
« My Computer » (Poste de travail) se trouvant sur
votre bureau.
3. Sur le menu qui apparaît alors à l’écran, cliquez
sur « Properties ».
4. Sur la page « System Properties » (Propriétés
Système), cliquez sur l’onglet « Device Manager »
(Gestionnaire de périphériques).
5. Cliquez sur « Refresh » (Actualiser)
Votre périphérique plug-and-play devrait être détecté et il se
peut que le système vous demande alors un gestionnaire de
périphérique s’il n’a pas été installé précédemment. Veuillez
suivre les instructions accompagnant votre périphérique série
afin de terminer l’installation.
Détection de périphériques
plug-and-play série
P73326-F5U120-PC-f-man-qxd 4/6/00 8:27 AM Page 44
Page 49

45
Utilisation de l’USB avec des
applications DOS
Détection des pannes
Le modem n’est pas détecté/Opération illégale dans
MODEM.CPL
Il est possible que le modem joint à la DockStation™ne soit pas
détecté ou qu’un problème survienne dans MODEM.CPL si
vous avez plus d’un hub (concentrateur) USB entre la
DockStation™et le hub racine. Ce problème est courant dans
MODEM.CPL, composant de Windows®98. La meilleure
solution pour le résoudre est de relier la DockStation™soit au
hub racine (un port USB se trouvant au dos de votre PC) soit à
un hub raccordé au hub racine.
Belkin Components a fait tout son possible pour faire en sorte
que toutes les informations fournies dans ce document soient
précises et fiables. Toutefois, ces informations sont susceptibles
de changer sans préavis. Belkin Components ne sera pas tenu
responsable de l’utilisation de ces informations ni de toute
violation des brevets ou autres droits de tierces parties.
Pour que la DockStation™fonctionne avec des applications
DOS, veuillez suivre les instructions figurant dans la section «
Adding DOS Box Support » (Ajout du support de la boîte
DOS). Vous pouvez choisir pour DOS un autre nom que celui
qui est utilisé pour Windows®. Peut-être sera t-il nécessaire si la
DockStation™a été installée en tant que COM5 ou un COM
supérieur étant donné que nombre d’applications DOS
n’utiliseront que COM1-COM4. Par exemple, si vous ajoutez le
support de la boîte DOS à COM7, vous pouvez faire en sorte
que les applications DOS utilisent à la place le périphérique
comme COM2, si COM2 n’est pas encore utilisé. COM7
pourrait toujours être utilisé avec les applications Windows
®
mais COM2 et COM 7 se réfèrent au même périphérique
physique. Par conséquent, pendant qu’une application DOS
utilise COM2, COM7 ne sera pas disponible pour les
applications Windows®et vice-versa.
Fr
P73326-F5U120-PC-f-man-qxd 4/6/00 8:27 AM Page 45
Page 50

Information
Réglementation FCC
DECLARATION DE CONFORMITE AVEC LES REGLES FCC
POUR LA COMPATIBILITE ELECTROMAGNETIQUE
Nous, Belkin Components, sis au 501 West Walnut Street, Compton CA 90220,
déclarons sous notre seule responsabilité que le produit
F5U120fPC
auquel se réfère la présente déclaration, est conforme à la partie XV des règles
FCC. Le fonctionnement doit remplir les deux conditions suivantes : (1) ce
périphérique ne doit pas causer d’interférences nuisibles et (2) ce périphérique
doit accepter toute interférence reçue, y compris les interférences pouvant
entraîner un fonctionnement non désiré.
Déclaration de conformité CE
Nous, Belkin Components, déclarons sous notre seule responsabilité que le produit
F5U120fPC auquel se réfère la présente déclaration, est conforme à la norme sur les
émissions génériques EN50081-1 et à la norme sur l’immunité générique EN50082-1 1992.
Garantie produit limitée à vie de Belkin Components
Belkin garantit ce produit à vie contre tout défaut de matériau et de fabrication. Si l’appareil
s’avère défectueux, Belkin Components le réparera ou le remplacera gratuitement, à sa
convenance, à condition que le produit soit retourné, port payé, pendant la durée de la
garantie, au distributeur Belkin agréé auquel le produit a été acheté. Une preuve d’achat
peut être exigée.
La présente garantie est caduque si le produit a été endommagé par accident, abus, usage
impropre ou mauvaise application, si le produit a été modifié sans autorisation écrite de
Belkin, ou si un numéro de série Belkin a été supprimé ou rendu illisible.
LA GARANTIE ET LES VOIES DE RECOURS SUSMENTIONNÉES FONT FOI EXCLUSIVEMENT
ET REMPLACENT TOUTES LES AUTRES, ORALES OU ÉCRITES, EXPLICITES OU IMPLICITES.
BELKIN REJETTE EXPRESSÉMENT TOUTES LES GARANTIES IMPLICITES, Y COMPRIS MAIS
SANS RESTRICTION, LES GARANTIES AFFÉRENTES À LA QUALITÉ LOYALE ET
MARCHANDE ET À LA POSSIBILITÉ D’UTILISATION À UNE FIN DONNÉE.
Aucun revendeur, représentant ou employé de Belkin n’est habilité à apporter des
modifications ou adjonctions à la présente garantie, ni à la proroger.
BELKIN N’EST PAS RESPONSABLE DES DOMMAGES SPÉCIAUX, DIRECTS OU INDIRECTS,
DÉCOULANT D’UNE RUPTURE DE GARANTIE, OU EN VERTU DE TOUTE AUTRE THÉORIE
JURIDIQUE, Y COMPRIS MAIS SANS RESTRICTION LES PERTES DE BÉNÉFICES, TEMPS
D’ARRÊT, FONDS DE COMMERCE, REPROGRAMMATION OU REPRODUCTION DE
PROGRAMMES OU DE DONNÉES MÉMORISÉS OU UTILISÉS AVEC DES PRODUITS BELKIN
OU DOMMAGES CAUSÉS À CES PROGRAMMES OU À CES DONNÉES.
P73326-F5U120-PC-f-man-qxd 4/6/00 8:27 AM Page 46
Page 51

Belkin Components B.V.
Diamantlaan 8 • 2132 WV
Hoofddorp • The Netherlands
Tel: +31 (0) 235698765
Fax: +31 (0) 235612694
Belkin Components, Ltd.
Unit 13 • Gatelodge Close • Round Spinney
Northampton • NN3 8RX • United Kingdom
Tel: +44 (0) 1604678300
Fax: +44 (0) 1604678330
Belkin Components
501 West Walnut Street
Compton • CA • 90220 • USA
Tel: 310.898.1100
Fax: 310.898.1111
© 2000 Belkin Components. Tous droits réservés.
Toutes les raisons commerciales sont des marques déposées de leurs fabricants respectifs.
Fr
belkin.com
P73326-F5U120-PC-f-man-qxd 4/6/00 8:27 AM Page 47
Page 52

P73326-F5U120-PC-f-man-qxd 4/6/00 8:27 AM Page 48
Page 53

Die Belkin DockStation™ist die ideale universelle und
preiswerte Andockstation. Die DockStation
™
bietet Ihnen die
weitaus einfachste und komfortabelste Möglichkeit für den
Anschluß von Geräten an Ihren Laptop oder modernen PC:
Sie können alle Ihre Geräte an der DockStation
™
angeschlossen lassen und müssen bei der Rückkehr ins Büro
nur ein einziges Kabel einstecken, um Ihren Laptop oder PC
sofort wieder mit allen Geräten zu verbinden - mit "Plug-andPlay"-Komfort und sogar ohne Neustart!
Die DockStation
™
verfügt über vier USB-Ports zum Anschluß
von USB-Geräten, einen parallelen Anschluß für Ihren Drucker,
zwei PS/2-Anschlüsse für Tastatur bzw. Maus und einen
seriellen Anschluß für Modem, Digitalkamera oder PDA.
Beschreibung
49
Lesen Sie dieses Handbuch, bitte, vollständig durch.
Wenn Sie die Installationsanweisungen oder andere
empfohlene Verfahren nicht befolgen, kann dies zu
irreversiblen Schäden am Produkt, an Ihrem
Computer bzw. an angeschlossenen Geräten führen.
De
P73326-F5U120-PC-g-man-qxd 4/6/00 8:24 AM Page 49
Page 54

Features
• Belkin DockStation
™
• Netzteil (6 Volt, 2,5 Ampere)
• USB-Gerätekabel
• CD mit Treibern für Windows®98/Windows®2000
• Gebrauchsanweisung
• Sofortige Erweiterung Ihres Notebooks oder PCs um einen
Druckeranschluß, einen seriellen Anschluß, zwei PS/2Anschlüsse und vier USB-Ports
• Druckeranschluß unterstützt praktisch alle Standard- und
IEEE 1284-Paralleldrucker
• Serieller Anschluß unterstützt Digitalkameras, Modems, PDAs,
Scanner, Grafiktabletts und alle anderen seriellen Geräte
• Unterstützung serieller Schnittstellengeschwindigkeiten bis
zu 230 kbit/s
• Vier USB-Ports zum Anschluß beliebiger USB-Geräte (auch
anderer USB-Hubs)
• Anschluß von zwei PS/2-Tastaturen, zwei PS/2-Mäusen oder
jeweils einer Tastatur und Maus
• Plug-and-Play-Installation. Andocken und Abnehmen im
laufenden Betrieb
• Mit 2,5-A-Netzteil zur Bereitstellung von 500-mA-Speisestrom
auf den USB-Ports für die nachgeschalteten Geräte
• Kompatibel mit Windows®98 oder Windows®2000
• Hundertprozentige Erfüllung der gültigen USB-Spezifikationen
Packungsinhalt
50
P73326-F5U120-PC-g-man-qxd 4/6/00 8:24 AM Page 50
Page 55

51
Erläuterung der Bestandteile
Systemvoraussetzungen
• Notebook oder PC mit USB
• Windows®98 oder Windows®2000
• CD-ROM-Laufwerk
2 USB-Anschlüsse
LED-Anzeigen
4 USB-Ports für nachgeschaltete Geräte
Serieller RS232
DB9-Anschluß
Gleichstromanschluß
USB-Port zur
Verbindung mit
dem PC
DB25-Anschluß für
Paralleldrucker
De
P73326-F5U120-PC-g-man-qxd 4/6/00 8:25 AM Page 51
Page 56

Hardware-Installation
Software-Installation
Software-Installation unter
Windows
®
98
1. Windows®erkennt und
installiert einen "General
Purpose USB Hub"
("Allgemeiner USB-Hub").
2. Windows®erkennt den
"F5U120 USB to Serial
Adapter" ("USB-SeriellAdapter F5U120"). Klicken
Sie auf "Next" ("Weiter").
52
USB-Geräte können im laufenden Betrieb angeschlossen
und abgenommen werden. Der PC muß daher nicht
heruntergefahren werden.
• Stecken Sie das Netzteil an der Rückseite der DockStation™ein.
• Suchen Sie eine freie Netzsteckdose, und stecken Sie das
Netzteil dort ein.
• Stecken Sie das flache Ende (A-Stecker) des USB-Kabels in
einen freien USB-Port an Ihrem PC ein.
• Stecken Sie das quadratische Ende (B-Stecker) des USBKabels am PC-seitigen USB-Port auf der Rückseite der
DockStation™ein.
• Windows®erkennt die DockStation™an diesem Punkt
automatisch und beginnt mit dem Installieren der Treiber.
Windows®wird Sie nach der Software fragen. Die SoftwareInstallation wird im nächsten Abschnitt erläutert.
Wenn Sie nicht genau wissen, welche Version von Windows®auf
Ihrem PC läuft, so klicken Sie auf "Start", zeigen auf "Settings"
("Einstellungen"), klicken auf "Control Panel" ("Systemsteuerung")
und doppelklicken dann auf "System". Daraufhin erscheint ein
Fenster, in dem Sie Informationen zu Ihrem System ablesen können.
P73326-F5U120-PC-g-man-qxd 4/6/00 8:25 AM Page 52
Page 57

Software-Installation (Fortsetzung)
3. Klicken Sie bei der nächsten Eingabeaufforderung auf
"Next" ("Weiter").
4. Legen Sie die CD-ROM ein. Markieren Sie "CD-ROM drive"
("CD-ROM-Laufwerk"), und klicken Sie auf "Next" ("Weiter").
5. Windows®liest die CD-ROM und sucht die benötigten
Treiber. Klicken Sie auf "Next" ("Weiter").
6. Sobald die Dateien kopiert sind, ist die Installation des
Seriellkonverters abgeschlossen. Klicken Sie auf "Finish"
("Fertigstellen").
7. Windows®erkennt den ersten PS/2-Anschluß als "USB
Composite Device" ("USB-Kombigerät"). Klicken Sie auf
"Next" ("Weiter").
53
De
P73326-F5U120-PC-g-man-qxd 4/6/00 8:25 AM Page 53
Page 58

8. Lassen Sie "Recommended" ("Empfohlen") ausgewählt,
und klicken Sie auf "Next" ("Weiter").
9. Heben Sie alle Markierungen auf, und klicken Sie auf
"Next" ("Weiter").
10. Windows®findet die erforderlichen Treiber. Klicken Sie auf
"Next" ("Weiter").
11. Nach dem Kopieren der Dateien ist die Installation
abgeschlossen. Klicken Sie auf "Finish" ("Fertigstellen").
12. Windows®erkennt "Unknown Device" ("Unbekanntes
Gerät"). Klicken Sie auf "Next" ("Weiter").
Software-Installation (Fortsetzung)
54
P73326-F5U120-PC-g-man-qxd 4/6/00 8:25 AM Page 54
Page 59

Software-Installation (Fortsetzung)
55
13. Lassen Sie "Recommended" ("Empfohlen") ausgewählt,
und klicken Sie auf "Next" ("Weiter").
14. Markieren Sie "CD-ROM", und klicken Sie auf "Next"
("Weiter").
15. Windows
®
findet die erforderlichen Treiber. Klicken Sie
auf "Next" ("Weiter").
16. Windows®kopiert Dateien und schließt die Installation
des "Belkin F5U120 USB Parallel Printer Adapter"
("Belkin USB-Paralleldrucker-Adapter F5U120") ab.
Klicken Sie auf "Finish" ("Fertigstellen").
17. Windows®erkennt "USB Human Interface Device" ("USBMensch-Maschine-Schnittstelle"). Klicken Sie auf "Next"
("Weiter").
De
P73326-F5U120-PC-g-man-qxd 4/6/00 8:25 AM Page 55
Page 60

Software-Installation (Fortsetzung)
18. Lassen Sie "Recommended" ("Empfohlen") ausgewählt, und
klicken Sie auf "Next" ("Weiter").
19. Heben Sie alle Markierungen auf, und klicken Sie auf "Next"
("Weiter").
20. Windows
®
findet die erforderlichen Treiber. Klicken Sie auf
"Next" ("Weiter").
21. Nach dem Kopieren der Dateien ist die Installation des "USB
Human Interface Device" ("USB-Mensch-Maschine-Schnittstelle")
abgeschlossen. Klicken Sie auf "Finish" ("Fertigstellen").
22. Wiederholen Sie die Schritte 7-21 für das zweite festgestellte
"USB Human Interface Device" ("USB-Mensch-MaschineSchnittstelle").
23. DIE INSTALLATION IST ABGESCHLOSSEN.
56
P73326-F5U120-PC-g-man-qxd 4/6/00 8:25 AM Page 56
Page 61

Software-Installation (Fortsetzung)
57
Software-Installation unter Windows®98 SE
(Zweite Ausgabe)
1. Windows®erkennt den "F5U120 USB to Serial Adapter"
("USB-Seriell-Adapter F5U120"). Klicken Sie auf "Next"
("Weiter").
2. Klicken Sie bei der nächsten Eingabeaufforderung auf
"Next" ("Weiter").
De
P73326-F5U120-PC-g-man-qxd 4/6/00 8:25 AM Page 57
Page 62

Software-Installation (Fortsetzung)
58
3. Legen Sie die CD-ROM ein. Markieren Sie "CD-ROM drive"
("CD-ROM-Laufwerk"), und klicken Sie auf "Next" ("Weiter").
4. Windows®liest die CD-ROM und sucht die benötigten
Treiber. Klicken Sie auf "Next" ("Weiter").
5. Sobald die Dateien kopiert sind, ist die Installation des
Seriellkonverters abgeschlossen. Klicken Sie auf "Finish"
("Fertigstellen").
6. Windows®erkennt daraufhin den ersten PS/2-Anschluß als
"USB Device" ("USB-Gerät"). Klicken Sie auf "Next"
("Weiter").
7. Klicken Sie bei der nächsten Eingabeaufforderung auf
"Next" ("Weiter").
P73326-F5U120-PC-g-man-qxd 4/6/00 8:25 AM Page 58
Page 63

Software-Installation (Fortsetzung)
8. Stellen Sie sicher, daß "CD-ROM drive" ("CD-ROM-Laufwerk")
ausgewählt ist, und klicken Sie auf "Next" ("Weiter").
9. Windows®liest die CD-ROM und sucht die Treiber. Klicken
Sie auf "Next" ("Weiter").
10. Windows®will now loead the “Belkin F5U120 Parallel
Printer Adapter” drivers. Click "Next".
11. Sobald Windows®die erforderlichen Dateien kopiert hat,
ist die Einrichtung abgeschlossen. Klicken Sie auf "Finish"
("Fertigstellen").
12. Windows®erkennt "USB Comm Port" ("USB-Anschluß").
13. Windows®fragt Sie anschließend nach der "USB Serial Disk
#1" ("USB-Seriell Diskette #1). Klicken Sie auf "OK".
14. Geben Sie im nächsten Dialogfeld unter "Copy files from"
("Dateien kopieren von") den Laufwerkbuchstaben des
zutreffenden CD-ROM-Laufwerks ein (z.B. "D:\"), und
klicken Sie auf "OK".
59
De
P73326-F5U120-PC-g-man-qxd 4/6/00 8:25 AM Page 59
Page 64

Software-Installation (Fortsetzung)
15. Windows®will load the “USB to Serial Drivers”.
16. Windows®erkennt den ersten PS/2-Anschluß als "USB
Human Interface Device" ("USB-Mensch-MaschineSchnittstelle"). Klicken Sie auf "Next" ("Weiter").
17. Lassen Sie "Recommended" ("Empfohlen") ausgewählt,
und klicken Sie auf "Next" ("Weiter").
60
P73326-F5U120-PC-g-man-qxd 4/6/00 8:25 AM Page 60
Page 65

18. Heben Sie alle Markierungen auf, und klicken Sie auf
"Next" ("Weiter").
19. Windows®findet die erforderlichen Treiber. Klicken Sie auf
"Next" ("Weiter").
20. Nach dem Kopieren der Dateien ist die Installation
abgeschlossen. Klicken Sie auf "Finish" ("Fertigstellen").
21. Wiederholen Sie den Vorgang für den zweiten
PS/2-Anschluß.
22. DIE INSTALLATION IST ABGESCHLOSSEN.
Software-Installation (Fortsetzung)
61
De
P73326-F5U120-PC-g-man-qxd 4/6/00 8:25 AM Page 61
Page 66

Software-Installation unter Windows®2000
1. Windows®erkennt und installiert den "General Purpose
USB Hub" ("Allgemeiner USB-Hub") automatisch.
2. Windows®erkennt den "F5U120 USB to Serial Adapter"
("USB-Seriell-Adapter F5U120") und startet den "Found
New Hardware Wizard" ("Hardware-Assistent").
3. Klicken Sie auf "Next" ("Weiter").
Software-Installation (Fortsetzung)
62
P73326-F5U120-PC-g-man-qxd 4/6/00 8:25 AM Page 62
Page 67

Software-Installation (Fortsetzung)
63
4. Legen Sie die Windows
®
2000 Treiber-CD in das CD-ROM-
Laufwerk ein, und klicken Sie auf "Next" ("Weiter").
5. Windows®liest die Windows®2000 Treiber-CD und sucht
die benötigten Treiber. Klicken Sie auf "Next" ("Weiter").
De
P73326-F5U120-PC-g-man-qxd 4/6/00 8:25 AM Page 63
Page 68

6. Sobald die Dateien kopiert sind, ist die Installation des
Serielladapters abgeschlossen. Klicken Sie auf "Finish"
("Fertigstellen").
7. Windows®erkennt nun automatisch alle anderen Geräte.
Die Installation wird daraufhin abgeschlossen.
Software-Installation (Fortsetzung)
64
P73326-F5U120-PC-g-man-qxd 4/6/00 8:25 AM Page 64
Page 69

65
Schließen Sie den Paralleldrucker zunächst an der DockStation
™
an. Verwenden Sie dazu ein IEEE 1284-Kabel (Belkin F2A046gXX,
wobei "XX" die Kabellänge in Fuß angibt; 1 Fuß = 0,3048 Meter).
Installieren Sie die Treiber für Ihren Drucker anhand der vom
Druckerhersteller bereitgestellten Software. Alternativ dazu
können Sie sich auch von der Website des Druckerherstellers
die neueste Software herunterladen. Fragt die Software Sie
nach dem Anschluß, so wählen Sie "LPTUSB1" aus.
Werden Sie nicht nach dem Anschluß gefragt, so öffnen Sie
den Ordner "Printers" ("Drucker") über "Start" und "Settings"
("Einstellungen"). Klicken Sie mit der rechten Maustaste auf
das Symbol für Ihren Drucker, und wählen Sie "Properties"
("Eigenschaften") aus. Klicken Sie die Registerkarte "Details"
an, öffnen Sie das Dropdown-Menü unter "Print to the
following port" ("Anschluss für die Druckausgabe"), und
ändern Sie den Anschluß in "LPTUSB1". Klicken Sie auf
"Apply" ("Druckeranschluss zuweisen").
Fertig! Sie können Ihren Drucker jetzt aus jeder Windows®Anwendung für Ausdrucke verwenden.
Installation eines Paralleldruckers
De
P73326-F5U120-PC-g-man-qxd 4/6/00 8:25 AM Page 65
Page 70

Einrichten der optionalen DOS-
Fenster-Unterstützung
66
Einrichten der DOS-Fenster-Unterstützung (optional)
Die Unterstützung des DOS-Fensters für die DockStation™ist bei
Windows®-Anwendungen nicht erforderlich, aber zweckmäßig,
wenn Sie mit DOS-Anwendungen arbeiten möchten. Falls Sie nur
Windows®-Anwendungen verwenden, sollten Sie diese Option nicht
installieren, weil sie Ressourcen beansprucht. Bei Aktivierung der
DOS-Fenster-Unterstützung werden zur ordnungsgemäßen Funktion
ein IRQ und ein Bereich von acht Speicherplätzen benötigt. Darüber
hinaus erfordern manche DOS-Anwendungen bestimmte IRQ- und
Speicherkonfigurationen in Verbindung mit bestimmten COMAnschlüssen. Gehen Sie wie folgt vor, um die DOS-FensterUnterstützung für die DockStation™zu aktivieren:
1. Klicken Sie mit der rechten Maustaste auf das Symbol
"My Computer" ("Arbeitsplatz") auf dem Desktop.
2. Klicken Sie im daraufhin angezeigten Menü auf
"Properties" ("Eigenschaften").
3. Klicken Sie im Fenster "System Properties"
("Eigenschaften für System") auf die Registerkarte
"Device Manager" ("Geräte-Manager").
4. Klicken Sie auf das "+" neben "Ports (COM & LPT)"
("Anschlüsse (COM und LPT)").
5. Klicken Sie auf "USB Comm Port" ("USB-Anschluß")
(ComX), wobei X die Anschlußnummer des Geräts ist, für
das Sie DOS-Fenster-Unterstützung einrichten möchten.
6. Klicken Sie auf die Schaltfläche "Properties"
("Eigenschaften").
7. Klicken Sie auf die Registerkarte "DOS Box"
("DOS-Fenster").
8. Klicken Sie auf das Kästchen neben "Enable DOS Box
16550 Emulator" ("DOS-Fenster 16550-Emulator
aktivieren"). Das Kästchen ist daraufhin mit einem
Häkchen gekennzeichnet.
9. Wählen Sie aus dem Listenfeld neben "Logical Device
Name (DOS Box)" ("Logischer Gerätename (DOS-
P73326-F5U120-PC-g-man-qxd 4/6/00 8:25 AM Page 66
Page 71

De
Einrichten der optionalen DOS-
Fenster-Unterstützung (Fortsetzung)
Fenster)") einen DOS-Namen für den Anschluß aus.
Viele DOS-Anwendungen arbeiten nur mit COM1COM4. Wählen Sie "COMX" aus, wenn Sie keinen
dieser Anschlüsse verwenden wollen. Klicken Sie
auf "OK".
10. Sie werden gebeten, die Installations-CD für die
DockStation™einzulegen. Legen Sie die CD ein,
und klicken Sie auf "OK". Weist eine Meldung
darauf hin, daß eine Datei nicht gefunden werden
konnte, so stellen Sie sicher, daß im Eingabefeld
"Copy files from:" ("Dateien kopieren von:") der
Kennbuchstabe Ihres CD-Laufwerks angegeben ist
("d:\"). Achten Sie auch darauf, daß Sie die richtige
Treiber-CD einlegen: für Windows®98 oder für
Windows®2000, je nach Ihrem Betriebssystem.
Nach Aktivierung der DOS-Fenster-Unterstützung für ein
bestimmtes USB-DockStation™-Gerät wird im Geräte-Manager
ein zusätzlicher Anschluß mit der Bezeichnung "16550 COM
Port Emulator" eingetragen. Sie können diese Option auch
deaktivieren und erneut aktivieren.
Zum Deaktivieren oder zum erneuten Aktivieren der DOSFenster-Unterstützung folgen Sie den Schritten 1-6 oben. Bei
Deaktivierung der DOS-Fenster-Unterstützung wird das
Häkchen im Kontrollkästchen ausgeblendet.
67
P73326-F5U120-PC-g-man-qxd 4/6/00 8:25 AM Page 67
Page 72

68
Plug-and-Play-Geräte wie z.B. ein Modem können auf zweierlei
Weise erkannt werden:
1. Verbinden Sie das serielle Gerät mit der DockStation™.
Stecken Sie das Kabel aus, und stecken Sie den USB BStecker in die USB DockStation™ein.
Oder
1. Verbinden Sie das serielle Gerät mit der
DockStation™.
2. Klicken Sie mit der rechten Maustaste auf das Symbol
"My Computer" ("Arbeitsplatz") auf dem Desktop.
3. Klicken Sie im daraufhin angezeigten Menü auf
"Properties" ("Eigenschaften").
4. Klicken Sie im Fenster "System Properties"
("Eigenschaften für System") auf die Registerkarte
"Device Manager" ("Geräte-Manager").
5. Klicken Sie auf "Refresh" ("Aktualisieren").
Daraufhin müßte Ihr Plug-and-Play-Gerät erkannt werden.
Eventuell werden Sie nach einem Gerätetreiber gefragt, wenn
dieser nicht vorher installiert wurde. Gehen Sie gemäß den
Anweisungen für das jeweilige serielle Gerät vor, um die
Installation abzuschließen.
Hinzufügen von herkömmlichen Geräten ohne Plug-and-Play
Geräte ohne Plug-and-Play müssen mit Hilfe des "Add New
Hardware Wizard" ("Hardwareassistent") im "Control Panel"
("Systemsteuerung") hinzugefügt werden. Gehen Sie dabei
gemäß den Installationsanleitungen für das jeweilige Gerät vor.
Verwendung von Geräten ohne
Plug-and-Play
Erkennung serieller Plug-and-Play-Geräte
P73326-F5U120-PC-g-man-qxd 4/6/00 8:25 AM Page 68
Page 73

De
Verwendung von USB in
DOS-Anwendungen
Fehlersuche
Modem nicht erkannt/unzulässiger Betrieb in
MODEM.CPL
Befindet sich mehr als ein USB-Hub zwischen der DockStation
™
und dem "Root Hub" (USB-Anschluß am PC), so wird ein
Modem an der DockStation™unter Umständen nicht erkannt
oder es tritt ein Problem in MODEM.CPL auf. Dies ist ein
bekanntes Problem im Zusammenhang mit der Windows®98Komponente MODEM.CPL. Die einfachste Lösung besteht
darin, die DockStation™entweder direkt an einen USB-Anschluß
auf der PC-Rückseite anzuschließen oder an einen USB-Hub,
der direkt mit dem USB-Anschluß am PC verbunden ist.
Belkin Components hat alle Anstrengungen unternommen, um
sicherzustellen, daß die Angaben in dieser Gebrauchsanweisung
zutreffend und zuverlässig sind. Änderungen bleiben jedoch
vorbehalten. Belkin Components übernimmt keine
Verantwortung für die Nutzung dieser Informationen oder für
die Verletzung von Patenten oder anderer Rechte Dritter.
Folgen Sie den Anleitungen unter "Einrichten der DOSFenster-Unterstützung", um die DockStation™für die
Zusammenarbeit mit DOS-Anwendungen einzurichten. Sie
können für DOS einen anderen Anschlußnamen wählen als für
Windows®. Dies ist unter Umständen erforderlich, wenn die
DockStation™als COM5 oder höher installiert wurde, weil viele
DOS-Anwendungen nur mit COM1-COM4 arbeiten. Wenn Sie
z.B. DOS-Fenster-Unterstützung für COM7 einrichten, können
Sie DOS-Anwendungen das Gerät statt dessen als COM2
nutzen lassen, falls COM2 nicht bereits vergeben ist. COM7
wäre dann immer noch für Windows®-Anwendungen
verfügbar, doch beziehen sich COM2 und COM7 auf das
gleiche physikalische Gerät: Während eine DOS-Anwendung
COM2 nutzt, ist COM7 also für Windows®-Anwendungen nicht
verfügbar und umgekehrt.
69
P73326-F5U120-PC-g-man-qxd 4/6/00 8:25 AM Page 69
Page 74

Information
FCC Behauptung
ERKLÄRUNG DER KONFORMITÄT MIT DEN FCC-VORSCHRIFTEN
ZUR ELEKTROMAGNETISCHEN VERTRÄGLICHKEIT
Wir, Belkin Components, 501 West Walnut Street, Compton CA 90220, USA, erklären hiermit
in alleiniger Verantwortung, daß der Artikel
F5U120gPC
auf den sich diese Erklärung bezieht, in Einklang mit Teil 15 der FCC-Vorschriften steht.
Der Betrieb unterliegt den folgenden beiden Bedingungen: 1.) Dieses Gerät darf keine
Störbeeinflussung verursachen. 2.) Dieses Gerät muß empfangene Störbeeinflussung
akzeptieren, auch Störbeeinflussung, die unerwünschten Betrieb verursachen kann.
CE-Konformitätserklärung
Wir, Belkin Components, erklären hiermit in alleiniger Verantwortung, daß der Artikel
F5U120gPC, auf den sich diese Erklärung bezieht, in Einklang mit der Fachgrundnorm
Störaussendung EN50081-1 und der Fachgrundnorm Störfestigkeit EN50082-1 (1992) steht.
Begrenzte Belkin-Produktgarantie auf Lebenszeit
Belkin Components gewährleistet hiermit, daß dieses Produkt während seiner gesamten
Lebensdauer keine Material- und Verarbeitungsfehler aufweisen wird. Bei Feststellung eines
Fehlers wird Belkin das Produkt nach eigenem Ermessen entweder kostenlos reparieren oder
austauschen, sofern es während des Garantiezeitraums an den autorisierten Belkin-Händler
zurückgegeben wurde, bei dem es gekauft wurde. Die Kosten für den Rücktransport zum
Belkin-Händler sind vom Kunden zu tragen. Ein Kaufnachweis kann verlangt werden.
Diese Gewährleistung erstreckt sich nicht auf die Beschädigung des Produkts durch Unfall,
mißbräuchliche, unsachgemäße oder fehlerhafte Verwendung oder Anwendung. Ebenso ist
die Gewährleistung unwirksam, wenn das Produkt ohne schriftliche Genehmigung durch
Belkin verändert wurde oder wenn eine Belkin-Seriennummer entfernt oder unkenntlich
gemacht wurde.
DIE VORSTEHENDEN GEWÄHRLEISTUNGEN UND RECHTSBEHELFE SCHLIEßEN ALLE
ANDEREN GEWÄHRLEISTUNGEN UND RECHTSBEHELFE - OB MÜNDLICH ODER
SCHRIFTLICH, AUSDRÜCKLICH ODER KONKLUDENT - AUS UND TRETEN AN DEREN
STELLE. BELKIN ÜBERNIMMT INSBESONDERE KEINERLEI KONKLUDENTE
GEWÄHRLEISTUNGEN, U.A. AUCH KEINE GEWÄHRLEISTUNG DER EIGNUNG FÜR EINEN
BESTIMMTEN ZWECK UND DER HANDELSÜBLICHEN QUALITÄT.
Kein Händler, Bevollmächtigter bzw. Vertreter oder Mitarbeiter von Belkin ist befugt, diese
Gewährleistungsregelung in irgendeiner Weise abzuändern oder zu ergänzen.
BELKIN HAFTET NICHT FÜR BESONDERE, DURCH ZUFALL EINGETRETENE ODER
FOLGESCHÄDEN AUFGRUND DER VERLETZUNG EINER GEWÄHRLEISTUNG ODER NACH
MAßGABE EINER ANDEREN RECHTSLEHRE (U.A. FÜR ENTGANGENE GEWINNE,
AUSFALLZEITEN, GESCHÄFTS- ODER FIRMENWERTEINBUßEN BZW. DIE BESCHÄDIGUNG,
NEUPROGRAMMIERUNG ODER WIEDERHERSTELLUNG VON PROGRAMMEN ODER DATEN
NACH SPEICHERUNG IN ODER NUTZUNG IN VERBINDUNG MIT BELKIN-PRODUKTEN).
P73326-F5U120-PC-g-man-qxd 4/6/00 8:25 AM Page 70
Page 75

Belkin Components B.V.
Diamantlaan 8 • 2132 WV
Hoofddorp • The Netherlands
Tel: +31 (0) 235698765
Fax: +31 (0) 235612694
Belkin Components, Ltd.
Unit 13 • Gatelodge Close • Round Spinney
Northampton • NN3 8RX • United Kingdom
Tel: +44 (0) 1604678300
Fax: +44 (0) 1604678330
Belkin Components
501 West Walnut Street
Compton • CA • 90220 • USA
Tel: 310.898.1100
Fax: 310.898.1111
© 2000 Belkin Components. Alle Rechte vorbehalten.
Alle Markennamen sind eingetragene Warenzeichen der angegebenen Hersteller.
De
belkin.com
P73326-F5U120-PC-g-man-qxd 4/6/00 8:25 AM Page 71
Page 76

P73326-F5U120-PC-g-man-qxd 4/6/00 8:25 AM Page 72
Page 77

Het Belkin DockStation™is het ideale docking station voor
minimale kosten. Het is verreweg de gemakkelijkste en
meest praktische manier om diverse randapparaten op uw
laptop of eigentijdse PC aan te sluiten. Uw randapparaten
kunnen permanent op het DockStation
™
aangesloten blijven;
wanneer u op uw kantoor terugkomt, sluit u in een
handomdraai de aangesloten apparaten met één kabel op
uw laptop of PC aan - u hoeft uw computer zelfs niet
opnieuw op te starten.
Het DockStation
™
heeft vier USB-poorten voor het aansluiten
van USB-apparaten: een parallelle poort voor een printer,
twee PS/2-poorten voor een toetsenbord en/of een muis
en een seriële poort voor een modem, digitale camera
of zakcomputer.
Inleiding
73
Lees deze handleiding in zijn geheel zorgvuldig
door. Het niet opvolgen van deze
installatievoorschriften en andere aanbevolen
werkwijzen kan onherstelbare aan het product, uw
computer en/of de aangesloten apparaten tot
gevolg hebben.
Ne
P73326-F5U120-PC-n-man-qxd 4/6/00 8:21 AM Page 73
Page 78

Eigenschappen
• Belkin DockStation
™
• Netvoedingsadapter 6 V 2,5 A
• USB-aansluitkabel
• Cd met stuurprogramma’s voor Windows®98/Windows®2000
• Handleiding
• Uw notebook of PC beschikt meteen over een extra
printerpoort, een seriële poort, twee PS/2-poorten en vier
USB-poorten
• De printerpoort ondersteunt vrijwel alle parallelle printers,
zowel standaard als IEEE 1284
• De seriële poort ondersteunt digitale camera’s, modems,
zakcomputers, scanners, grafische tabletten en alle andere
seriële apparaten
• Ondersteunt de snelheid van seriële poorten tot maximaal
230 Kbps
• Vier USB-poorten voor het aansluiten van USB-apparaten
inclusief andere USB-hubs
• Aansluitmogelijkheid voor twee PS/2-toetsenborden, twee
PS/2-muizen of een van elk
• Plug-and-play installatie. Geschikt voor hot-docking en
undocking
• Inclusief 2,5 A voeding voor echte 500 mA spanning op
afwaartse USB-poorten
• Compatibel met Windows®98 en Windows®2000
• Voldoet volledig aan de geldende USB specificaties
Inhoud verpakking
74
P73326-F5U120-PC-n-man-qxd 4/6/00 8:21 AM Page 74
Page 79

75
Productoverzicht
Systeemeisen
• Notebook of PC met USB-faciliteiten
• Windows®98 of Windows®2000
• Cd-rom station
Twee PS/2-poorten
Led indicatielampjes
Vier afwaartse USB-poorten
Seriële 9-polige
DB9 RS232-poort
Ingang
gelijkstroomvoeding
Opwaartse USB-poort
Parallelle 25-polige
DB25 printerpoort
Ne
P73326-F5U120-PC-n-man-qxd 4/6/00 8:21 AM Page 75
Page 80

Hardware installeren
Software installeren
Software installeren voor
Windows
®
98
1. Windows®detecteert en
installeert ‘General Purpose
USB Hub’.
2. Windows®detecteert
‘F5U120 USB to Serial
Adapter’. Klik op ‘Next’
(Volgende).
76
Omdat u USB ‘warm’ (d.w.z. met draaiende computer) kunt
aansluiten, hoeft u de PC niet uit te schakelen.
• Sluit de verbindingskabel van de voedingsadapter aan en
bevestig deze aan de achterzijde van het DockStation
™
• Zoek een vrij stopcontact en sluit de netvoedingsadapter
hierop aan
• Steek de platte steker (steker A) van de USB-kabel in een vrije
USB-poort op uw PC
• Steek de vierkante steker (steker B) van de USB-kabel in de
opwaartse USB-aansluiting aan de achterzijde van het
DockStation
™
• Windows®zoekt het DockStation™automatisch op en installeert
de bijbehorende stuurprogramma’s. Windows®vraagt u nu naar
de software. Zie het volgende hoofdstuk voor meer informatie
over de installatie van de software.
Wanneer u niet zeker weet welke versie van Windows®u gebruikt,
klik dan op ‘Start’, selecteer ‘Settings’ (Instellingen), klik op ‘Control
Panel’ (Configuratiescherm) en dubbelklik op ‘System’ (Systeem). Er
verschijnt nu een applet met informatie over uw systeem.
P73326-F5U120-PC-n-man-qxd 4/6/00 8:21 AM Page 76
Page 81

3. Klik bij de volgende prompt op ‘Next’ (Volgende).
4. Plaats de cd in het cd-rom-station. Kruis ‘CD-ROM drive’
aan en klik op ‘Next’ (Volgende).
5. Windows®leest de cd-rom en zoekt de stuurprogramma’s
op. Klik op ‘Next’ (Volgende).
6. Nadat de bestanden gekopieerd zijn, is de installatie van
de seriële converter voltooid. Klik op ‘Finish’ (Voltooien).
7. Windows
®
detecteert de eerste PS/2-poort als ‘USB
Composite Device’. Klik op ‘Next’ (Volgende).
77
Ne
Software installeren (vervolg)
P73326-F5U120-PC-n-man-qxd 4/6/00 8:21 AM Page 77
Page 82

8. Laat ‘Recommended’ (Aanbevolen) als geselecteerd staan
en klik op ‘Next’ (Volgende).
9. Verwijder alle aankruisingen en klik op ‘Next’ (Volgende).
10. Windows®zoekt de juiste stuurprogramma’s op. Klik op
‘Next’ (Volgende).
11. Nadat alle bestanden gekopieerd zijn, is de installatie
compleet.
12. Windows®detecteert ‘Unknown Device’ (Onbekend
apparaat). Klik op ‘Next’ (Volgende).
Software installeren (vervolg)
78
P73326-F5U120-PC-n-man-qxd 4/6/00 8:21 AM Page 78
Page 83

Software installeren (vervolg)
79
13. Laat ‘Recommended’ (Aanbevolen) als geselecteerd
staan en klik op ‘Next’ (Volgende).
14. Laat ‘CD-ROM drive’ aangekruist en klik op
‘Next’ (Volgende).
15. Windows
®
zoekt de juiste stuurprogramma’s op. Klik op
‘Next’ (Volgende).
16. Windows®kopieert de bestanden en voltooit de
installatie van de ‘Belkin F5U120 USB Parallel Printer
Adapter’. Klik op ‘Finish’ (Voltooien).
17. Windows®detecteert een ‘USB Human Interface Device’.
Klik op ‘Next’ (Volgende).
Ne
P73326-F5U120-PC-n-man-qxd 4/6/00 8:21 AM Page 79
Page 84

Software installeren (vervolg)
80
18. Laat ‘Recommended’ (Aanbevolen) als geselecteerd staan en
klik op ‘Next’ (Volgende).
19. Verwijder alle aankruisingen en klik op ‘Next’ (Volgende).
20. Windows
®
zoekt de juiste stuurprogramma’s op. Klik op ‘Next’
(Volgende).
21. Nadat alle bestanden gekopieerd zijn, is de installatie van het
‘USB Human Interface Device’ voltooid. Klik op ‘Finish’
(Voltooien).
22. Herhaal de vorige stappen 7 t/m 21 voor het tweede ‘USB
Human Interface Device’ dat gevonden is.
23. DE INSTALLATIE IS VOLTOOID.
P73326-F5U120-PC-n-man-qxd 4/6/00 8:21 AM Page 80
Page 85

Software installeren (vervolg)
81
Software installeren voor Windows®98 SE
(Second Edition)
1. Windows®detecteert ‘F5U120 USB to Serial Adapter’. Klik
op ‘Next’ (Volgende).
2. Klik bij de volgende prompt op ‘Next’ (Volgende).
Ne
P73326-F5U120-PC-n-man-qxd 4/6/00 8:21 AM Page 81
Page 86

Software installeren (vervolg)
82
3. Plaats de cd in het cd-rom-station. Kruis ‘CD-ROM drive’
aan en klik op ‘Next’ (Volgende).
4. Windows®leest de cd-rom om de stuurprogramma’s op te
zoeken. Klik op ‘Next’ (Volgende).
5. Nadat de bestanden gekopieerd zijn, is de installatie van de
seriële converter voltooid. Klik op ‘Finish’ (Voltooien).
6. Windows®detecteert de volgende poort als ‘USB Device’
(USB-apparaat). Klik op ‘Next’ (Volgende).
7. Klik bij de volgende prompt op ‘Next’ (Volgende).
P73326-F5U120-PC-n-man-qxd 4/6/00 8:21 AM Page 82
Page 87

Software installeren (vervolg)
83
8. Controleer of ‘CD-ROM drive’ aangekruist is en klik op
‘Next’ (Volgende).
9. Windows®leest de cd-rom om de juiste stuurprogramma’s
op te zoeken. Klik op ‘Next’ (Volgende).
10. Windows®will now loead the “Belkin F5U120 Parallel
Printer Adapter” drivers. Click "Next".
11. Nadat Windows®de noodzakelijke bestanden gekopieerd
heeft, is de installatie compleet. Klik op ‘Finish’ (Voltooien).
12. Windows®detecteert ‘USB Comm Port’.
13. Windows®vraagt om de ‘USB Serial Disk #1’. Klik op ‘OK’.
14. In het volgende dialoogvenster typt u onder ‘Copy files
from’ vervolgens ‘D:\ \ ‘ (zonder de aanhalingstekens)
of een andere letter die uw cd-rom station heeft en klik
op ‘OK’.
Ne
P73326-F5U120-PC-n-man-qxd 4/6/00 8:21 AM Page 83
Page 88

Software installeren (vervolg)
15. Windows®will load the “USB to Serial Drivers”.
16. Windows
®
detecteert de eerste PS/2-poort als ‘USB Human
Interface Device’. Klik op ‘Next’ (Volgende).
17. Laat ‘Recommended’ (Aanbevolen) als geselecteerd staan
en klik op ‘Next’ (Volgende).
84
P73326-F5U120-PC-n-man-qxd 4/6/00 8:21 AM Page 84
Page 89

18. Verwijder alle aankruisingen en klik op ‘Next’ (Volgende).
19. Windows
®
zoekt de juiste stuurprogramma’s op. Klik op
‘Next’ (Volgende).
20. Nadat alle bestanden gekopieerd zijn, is de installatie
compleet. Klik op ‘Finish’ (Voltooien).
21. Herhaal het bovenstaande voor de tweede PS/2-poort.
22. DE INSTALLATIE IS VOLTOOID.
Software installeren (vervolg)
85
Ne
P73326-F5U120-PC-n-man-qxd 4/6/00 8:21 AM Page 85
Page 90

Software installeren voor Windows®2000
1. Windows®detecteert en installeert zelfstandig de ‘USB
General Purpose Hub’.
2. Windows®detecteert de ‘F5U120 USB to Serial Adapter’ en
toont de ‘Found New Hardware Wizard’.
3. Klik op ‘Next’ (Volgende).
Software installeren (vervolg)
86
P73326-F5U120-PC-n-man-qxd 4/6/00 8:21 AM Page 86
Page 91

Software installeren (vervolg)
87
4. Plaats de cd met de stuurprogramma’s voor Windows
®
2000
in het cd-rom-station en klik op ‘Next’ (Volgende).
5. Windows®leest de cd-rom met installatiestuurprogramma’s
voor Windows®2000 om de juiste stuurprogramma’s op
te zoeken.
Ne
P73326-F5U120-PC-n-man-qxd 4/6/00 8:21 AM Page 87
Page 92

6. Nadat de bestanden gekopieerd zijn, is de installatie van de
seriële adapter voltooid. Klik op ‘Finish’ (Voltooien).
7. Windows®detecteert zelfstandig alle andere apparaten.
Hierna is de installatie voltooid.
Software installeren (vervolg)
88
P73326-F5U120-PC-n-man-qxd 4/6/00 8:21 AM Page 88
Page 93

89
Een parallelle printer installeren
Begin met het aansluiten van uw parallelle printer op het
DockStation™met gebruikmaking van kabels die aan
IEEE 1284 voldoen (Belkin F2A046nXX waarin ‘XX’ de lengte
in voet aangeeft).
Installeer de stuurprogramma’s van uw printer met behulp van
de door de fabrikant van de printer bijgeleverde software. U
kunt ook de nieuwste software ophalen op de website van de
fabrikant van de printer. Selecteer ‘LPTUSB1’ als de software u
om de naam van de poort vraagt.
Als de computer niet naar de naam van de poort vraagt, klik
dan op ‘Start’, selecteer ‘Settings’ (Instellingen) en klik op de
map ‘Printers’. Klik met de rechter muisknop op de icoon van
uw printer en kies ‘Properties’ (Eigenschappen). Klik op het
tabblad ‘Details’ (Bijzonderheden). Klik op het afrolmenu voor
‘Print to the following port’ (Via volgende poort afdrukken) en
wijzig deze in ‘LPTUSB1’. Klik op ‘Apply’ (Toepassen):
U bent nu klaar! U kunt u vanuit elke Windows®applicatie met
uw printer afdrukken maken.
Ne
P73326-F5U120-PC-n-man-qxd 4/6/00 8:21 AM Page 89
Page 94

Optionele DOS Box-ondersteuning
toevoegen
90
DOS Box-ondersteuning toevoegen (Optie)
DOS Box-ondersteuning voor het DockStation™heeft zin als u
van plan bent DOS-applicaties te gebruiken maar is voor
Windows®toepassingen overbodig. Als u uitsluitend Windows®toepassingen gebruikt, kunt u deze mogelijkheid beter niet
installeren omdat u daardoor bronnen in beslag neemt. De
activering van DOS Box-ondersteuning vereist om te
functioneren één IRQ en een reeks van acht geheugenplaatsen.
Bovendien vereisen sommige DOS-applicaties bepaalde IRQ- en
geheugenconfiguraties om met specifieke poorten geassocieerd
te kunnen worden. Ga als volgt te werk om DOS Boxondersteuning voor het DockStation™te activeren.
1. Klik met de rechter muisknop op de icoon ‘My
Computer’ (Mijn Computer) op uw bureaublad.
2. Klik op ‘Properties’ (Eigenschappen) in het menu
dat verschijnt.
3. Klik op de pagina ‘System Properties’
(Systeemeigenschappen) het tabblad ‘Device Manager’
(Apparaatbeheer) aan.
4. Klik op de ‘+’ naast ‘Ports’ (Poorten) (COM & LPT).
5. Klik op ‘USB Comm Port’ (ComX) waarin X het
poortnummer is van het apparaat waarvoor u DOS
Box-ondersteuning wilt toevoegen.
6. Klik op de knop ‘Properties’ (Eigenschappen).
7. Klik op het tabblad ‘DOS Box’.
8. Klik op het vakje naast ‘Enable DOS Box 16550
Emulator’ (DOS Box 16550 Emulator activeren). In het
vakje verschijnt een vinkje.
9. Kies voor de poort een DOS-naam uit de lijst naast
‘Logical Device Name’ (DOS Box). Veel DOStoepassingen werken uitsluitend met COM1-COM4.
Wilt u hiervan geen gebruik maken, kies dan COMX.
Klik op ‘OK’.
P73326-F5U120-PC-n-man-qxd 4/6/00 8:21 AM Page 90
Page 95

91
Optionele DOS Box-ondersteuning
toevoegen (vervolg)
10. De computer vraagt nu naar de installatie-cd voor
het DockStation™. Plaats de installatie-cd in uw cdstation en klik op ‘OK’. Wanneer een dialoogvenster
verschijnt met de mededeling dat een bestand niet
gevonden is, zorg dan dat in het tekstvak de
verwijzing ‘D:\ \ ‘ (zonder de aanhalingstekens)
opgenomen is; zorg ook dat u de cd met de juiste
stuurprogramma’s geladen hebt – Windows®98 of
Windows®2000 afhankelijk van uw
besturingssysteem – waarbij ‘D:\ \ ‘ verwijst naar de
locatie van uw cd-rom-station.
Zodra de DOS Box-ondersteuning voor een specifiek USB
DockStation™apparaat geactiveerd is, wordt in de ‘Device
Manager’ (Apparaatbeheer) een extra poortingang geopend
met de naam ‘16550 COM Port Emulator’. U kunt deze
mogelijkheid in- en uitschakelen.
Volg de bovengenoemde stappen 1 t/m 6 voor het in- en
uitschakelen van DOS Box-ondersteuning. Als u de DOS Boxondersteuning uitschakelt, verdwijnt het controlevinkje.
Ne
P73326-F5U120-PC-n-man-qxd 4/6/00 8:21 AM Page 91
Page 96

92
Toevoegen van (oudere) niet-plug-and-play apparaten
Niet-plug-and-play apparaten moeten worden toegevoegd met
behulp van de wizard ‘Add New Hardware’ (Nieuwe hardware
toevoegen) in het ‘Control Panel’ (Configuratiescherm). Gebruik
deze wizard en volg de installatiehandleiding die bij uw
apparaat geleverd is.
Gebruik van
niet-plug-and-play apparaten
Een plug-and-play apparaat zoals een modem kan op twee
manieren herkend worden:
1. Sluit het seriële apparaat aan op het DockStation™.
Maak de kabel los en steek de USB-B-steker in het
USB DockStation™.
Of
1. Sluit het seriële apparaat aan op het DockStation™.
2. Dubbelklik op de icoon ‘My Computer’ (Mijn
Computer) op uw bureaublad.
3. Klik in het menu dat verschijnt op ‘Properties’
(Eigenschappen).
4. Klik op de pagina ‘System Properties’
(Systeemeigenschappen) het tabblad ‘Device
Manager’ (Apparaatbeheer) aan.
5. Klik op ‘Refresh’ (Vernieuwen).
Uw plug-and-play apparaat moet nu herkend worden en
mogelijk vraagt de computer om een apparaatstuurprogramma
als dit niet vooraf geïnstalleerd is. Volg de instructies die bij uw
seriële apparaat geleverd zijn om de installatie te voltooien.
Serieel plug-and-play
apparaat herkennen
P73326-F5U120-PC-n-man-qxd 4/6/00 8:21 AM Page 92
Page 97

93
USB met
DOS-toepassingen gebruiken
Modem niet herkend/illegale bewerking in MODEM.CPL
De mogelijkheid bestaat dat een op het DockStation
™
aangesloten modem niet herkend wordt of dat een probleem
zich voordoet in MODEM.CPL als er meer dan één hub tussen
het DockStation™en de root-hub aanwezig is. Dit is een bekend
probleem in MODEM.CPL, een van de componenten van
Windows®98. De gemakkelijkste oplossing voor dit probleem
is: het DockStation™aansluiten op de root-hub (een USB-poort
aan de achterzijde van uw PC) of op een hub die aangesloten is
op de root-hub.
Belkin Components heeft zijn uiterste best gedaan om te
zorgen dat alle informatie in dit document juist en betrouwbaar
is. Niettemin kan deze informatie zonder voorafgaand bericht
gewijzigd worden. Belkin Components kan niet aansprakelijk
gesteld worden voor het gebruik van deze informatie of voor
inbreuken op octrooien en andere rechten van derden.
Volg de aanwijzingen in ‘DOS Box Support toevoegen’ om het
DockStation™te activeren voor gebruik met DOS-applicaties. U
kunt voor DOS een andere naam kiezen dan voor Windows®.
Omdat veel DOS-toepassingen uitsluitend COM1 t/m COM4
gebruiken, kan dit nodig zijn als het DockStation™geïnstalleerd
is als COM5 of hoger. Wanneer u bijvoorbeeld DOS Boxondersteuning toevoegt aan COM7, kunt u het apparaat door
de DOS-toepassingen eventueel als COM2 laten gebruiken op
voorwaarde dat COM2 nog niet in gebruik is. In dat geval blijft
COM7 beschikbaar voor Windows®toepassingen hoewel
COM2 en COM7 beide naar hetzelfde fysieke apparaat
verwijzen. Daaruit volgt dat wanneer een DOS-toepassing
COM2 gebruikt, COM7 niet beschikbaar is voor Windows
®
toepassingen en omgekeerd.
Problemen oplossen
Ne
P73326-F5U120-PC-n-man-qxd 4/6/00 8:21 AM Page 93
Page 98

Informatie
FCC* Verklaring *Federal Communications Commission
VERKLARING VAN CONFORMITEIT MET DE FCC VOORSCHRIFTEN
INZAKE ELEKTROMAGNETISCHE COMPATIBILITEIT
Belkin Components, gevestigd 501 West Walnut Street, Compton CA 90220
(USA), verklaart onder haar uitsluitende verantwoordelijkheid dat het product:
F5U120nPC
waarop deze verklaring betrekking heeft:
Voldoet aan paragraaf 15 van de FCC Voorschriften. De werking is onderworpen
aan de volgende twee voorwaarden: (1) dit apparaat mag geen schadelijke storing
veroorzaken en (2) dit apparaat moet elke hierop inwerkende storing accepteren
inclusief storing die de werking mogelijk kan belemmeren.
CE Conformiteitsverklaring
Belkin Components verklaart onder haar uitsluitende verantwoordelijkheid dat het product
waarop deze verklaring betrekking heeft, type F5U120nPC, voldoet aan de Generieke
Emissiestandaard EN50081-1 en aan de Generieke Immuniteitsstandaard EN50082-1 1992.
Beperkte levenslange garantie van Belkin Components
Belkin Components garandeert dit product gedurende zijn gehele gebruiksduur op materiaalen fabricagefouten. In geval van een defect zal Belkin Components het product naar eigen
inzicht repareren of gratis vervangen mits het binnen de garantieperiode en met
vooruitbetaling van verzendkosten wordt geretourneerd aan de geautoriseerde Belkin
leverancier waarvan u het product gekocht hebt. Deze kan u vragen het aankoopbewijs te
tonen.
Deze garantie geldt niet indien de schade aan het product is ontstaan door een ongeval, door
opzettelijk of onopzettelijk onjuist gebruik, door foutieve toepassing of door wijziging van het
product zonder de nadrukkelijke toestemming van Belkin dan wel door verwijdering of
verminking van enig Belkin serienummer.
DE BOVENVERMELDE GARANTIE EN MAATREGELEN SLUITEN ALLE ANDERE UIT,
MONDELING DAN WEL SCHRIFTELIJK, NADRUKKELIJK OF IMPLICIET. BELKIN VERWERPT
MET NAME ALLE EN ALLE IMPLICIETE GARANTIES, ONVERKORT MEEGEREKEND
GARANTIES INZAKE COMMERCIËLE TOEPASSINGEN EN/OF GESCHIKTHEID VOOR EEN
INDIVIDUEEL DOEL.
Geen door Belkin aangestelde wederverkoper, tussenpersoon of werknemer is gemachtigd
deze garantie op welke wijze dan ook te wijzigen, uit te breiden of aan te vullen.
BELKIN IS NIET AANSPRAKELIJK VOOR BIJZONDERE, BIJKOMENDE OF VERVOLGSCHADE
DOOR GARANTIEVERBREKING OF VOORTSPRUITEND UIT ENIG ANDER JURIDISCH
BEGINSEL, MET INBEGRIP VAN, DOCH NIET BEPERKT TOT, VERLIES VAN BATEN EN/OF
GOODWILL, BEDRIJFSSTILSTAND, BESCHADIGING RESPECTIEVELIJK
HERPROGRAMMERING OF REPRODUCTIE VAN ENIG PROGRAMMA OF ENIGE GEGEVENS
OPGESLAGEN IN OF GEBRUIKT MET BELKIN PRODUCTEN.
P73326-F5U120-PC-n-man-qxd 4/6/00 8:21 AM Page 94
Page 99

Belkin Components B.V.
Diamantlaan 8 • 2132 WV
Hoofddorp • The Netherlands
Tel: +31 (0) 235698765
Fax: +31 (0) 235612694
Belkin Components, Ltd.
Unit 13 • Gatelodge Close • Round Spinney
Northampton • NN3 8RX • United Kingdom
Tel: +44 (0) 1604678300
Fax: +44 (0) 1604678330
Belkin Components
501 West Walnut Street
Compton • CA • 90220 • USA
Tel: 310.898.1100
Fax: 310.898.1111
© 2000 Belkin Components. Alle rechten voorbehouden.
Alle handelsnamen zijn geregistreerde handelsmerken van de betreffende rechthebbenden.
Ne
belkin.com
P73326-F5U120-PC-n-man-qxd 4/6/00 8:21 AM Page 95
Page 100

P73326-F5U120-PC-n-man-qxd 4/6/00 8:21 AM Page 96
 Loading...