

Page 1
Belkin Components Product Warranty
Belkin Components warrants this product against defects
in materials and workmanship for the life of the product.
If a defect is discovered, Belkin will, at its option, repair
or replace the product at no charge provided it is
returned during the warranty period, with transportation
charges prepaid, to the authorized Belkin dealer from
whom you purchased the product. Proof of purchase
may be required.
This warranty does not apply if accident, abuse, misuse,
or misapplication has damaged the product; if the
product has been modified without the permission of
Belkin; or if any Belkin serial number has been removed
or defaced.
CE Declaration of
Conformity
We, Belkin Components, declare under our sole responsibility
that the F5U002-BLU, to which this declaration relates, is in
conformity with EUROPEAN STANDARD EN 55022/A1
Class B, and EN 50082-1 (IEC 801-2, IEC 801-3, IEC 801-4).
THE WARRANTYAND REMEDIES SET FORTH ABOVE
ARE EXCLUSIVE AND IN LIEU OF ALL OTHERS,
WHETHER ORAL OR WRITTEN, EXPRESSED OR
IMPLIED. BELKIN SPECIFICALLY DISCLAIMS ANY
AND ALL IMPLIED WARRANTIES, INCLUDING,
WITHOUT LIMITATION, WARRANTIES OF
MERCHANTABILITY AND FITNESS FOR A
PARTICULAR PURPOSE.
No Belkin dealer, agent, or employee is authorized to make
any modification, extension, or addition to this warranty.
BELKIN IS NOT RESPONSIBLE FOR SPECIAL,
INCIDENTAL, OR CONSEQUENTIALDAMAGES
RESULTING FROM ANY BREACH OF WARRANTY, OR
UNDER ANY OTHER LEGALTHEORY, INCLUDING
BUT NOT LIMITED TO LOST PROFIT, DOWNTIME,
GOODWILL, DAMAGE TO OR REPROGRAMMING, OR
REPRODUCING ANY PROGRAM OR DATASTORED IN
OR USED WITH BELKIN PRODUCTS.
Some states do not allow the exclusion or limitation of
incidental or consequential damages or exclusions of
implied warranties, so the above limitations of exclusions
may not apply to you. This warranty gives you specific
legal rights, and you may also have other rights that vary
from state to state.
Guide to Installing and Using the
USB Parallel Printer
Adapter for iMac
®
Packing Checklist
• (1) One Belkin USB Parallel Printer Adapter for iMac
®
with connectors for USB type A port and a Centronics 36
female port.
• MacJET
™
CD-ROM software
• This manual
F5U002-BLU
Belkin Components
501 West Walnut Street • Compton • CA • 90220-5221
800.223.5546 • 310.898.1100 • FAX 310.898.1111 •
www .belkin.com
©1999 Belkin Components. All Rights Reserved. All Trade Names Are Registered Trademarks Of Respective Manufacturers Listed.
P72620
FCC/C E Statement
This equipment has been tested and found to comply with
the limits for a Class A& B digital device, pursuant to
part 15 of the FCC Rules. These limits are designed to
provide reasonable protection against harmful interference
in a residential installation. This equipment generates,
uses and can radiate radio frequency energy and, if not
installed and used in accordance with the instructions,
may cause harmful interference to radio communications.
However, there is no guarantee that interference will not
occur in a particular installation. If this equipment does
cause harmful interference to radio or television reception,
which can be determined by turning the equipment off
and on, the user is encouraged to try to correct the
interference by one or more of the following measures:
• Reorient or relocate the adapter.
• Increase separation between the computer, monitor
and printer.
• Connect the equipment into an outlet or a circuit
different from the one that it is currently connected.
• Consult dealer or technical support for help.
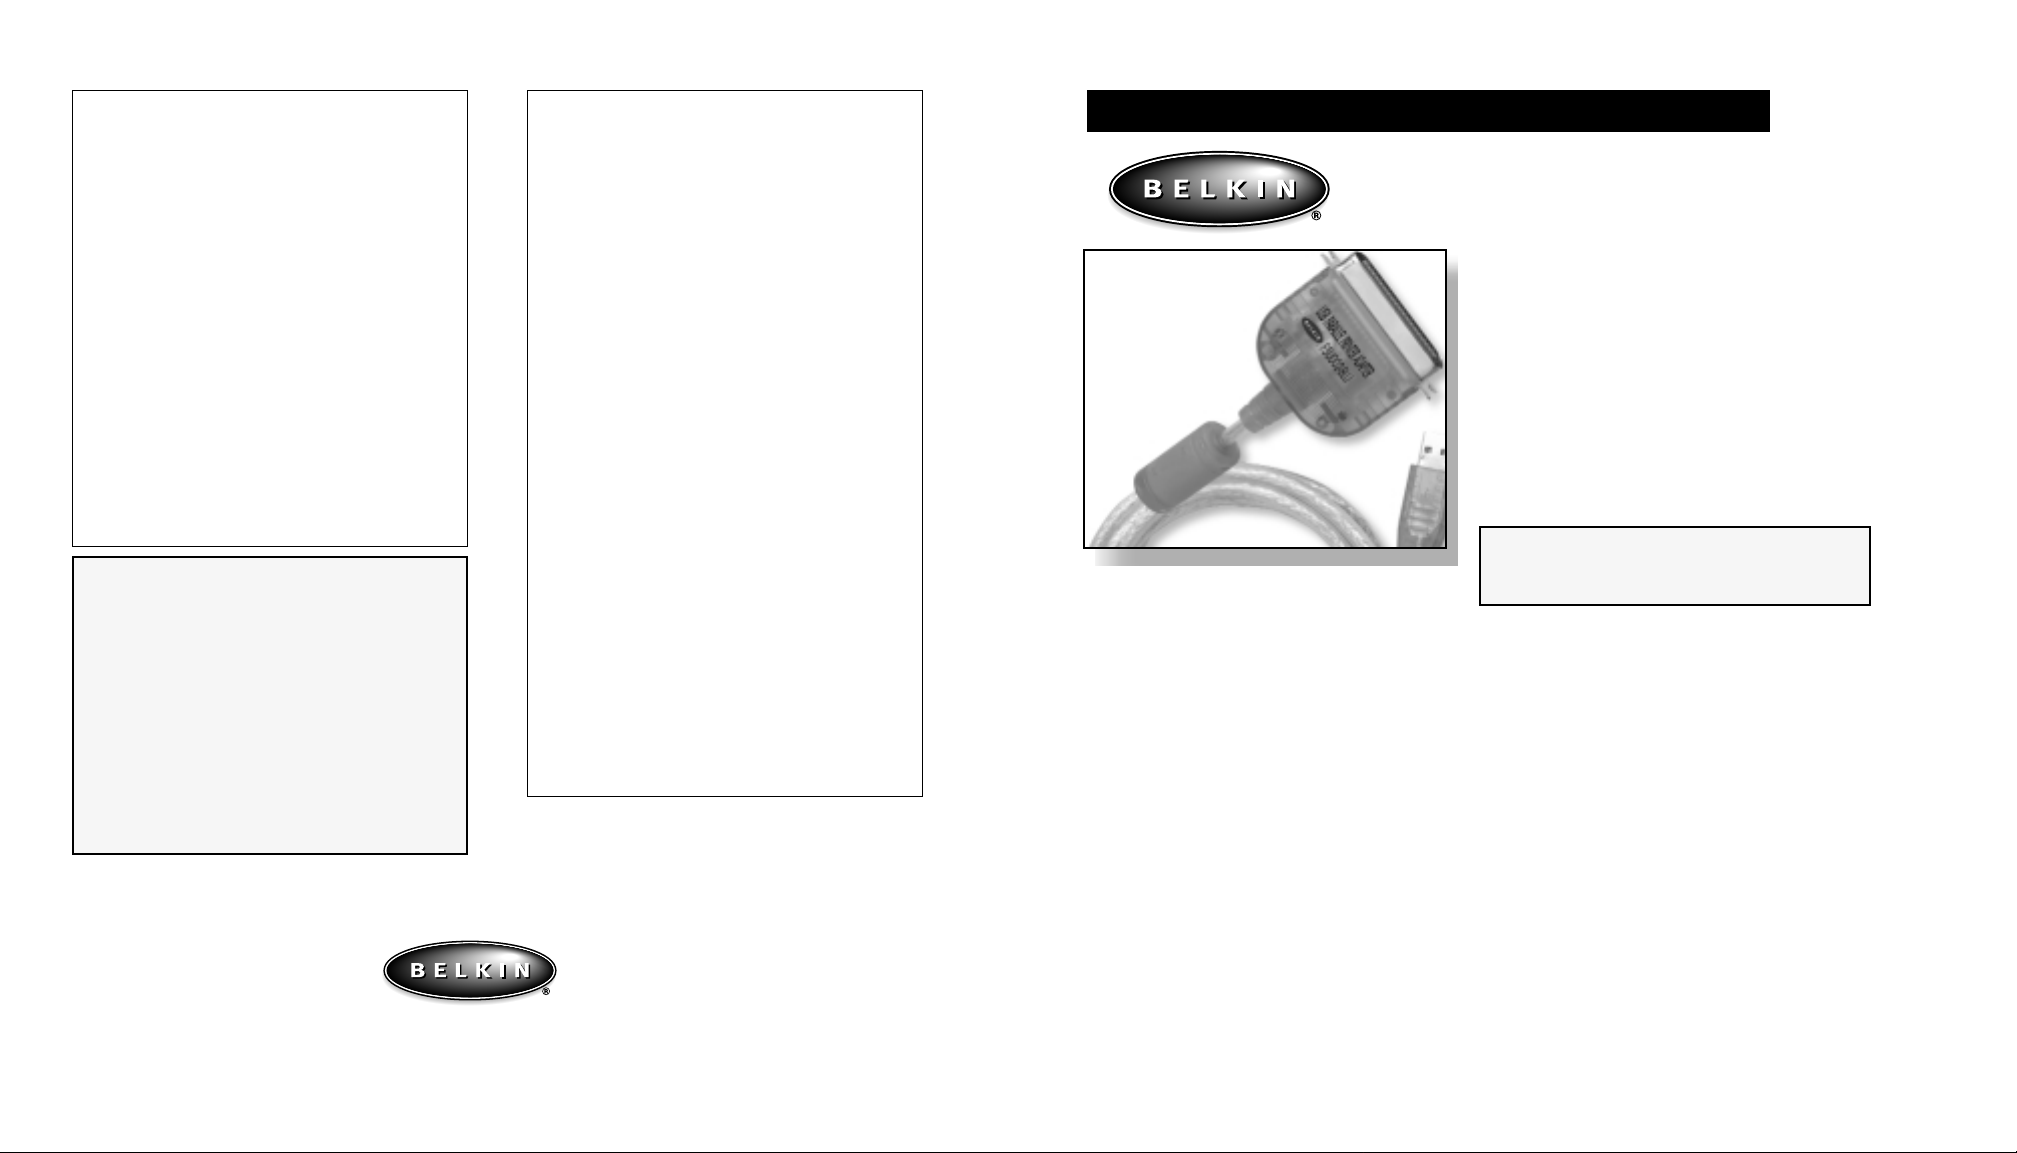
Introduction
The Belkin Components USB Parallel Printer Adapter for iMac®will allow any
iMac®/Macintosh®equipped with a USB port to print to virtually any built-in PCL printer. USB
allows the connection of up to 127 devices to a single PC. Simply plug the USB connector into
the computer’s USB port and the centronics connector into the appropriate printer.
The Belkin USB Parallel Printer Adapter is also supported by a one year warranty and free
technical support should you have any questions about installing or using the USB Parallel
Printer Adapter.
Product Features
Hardware Requirements
iMac®or Macintosh®with USB capabilities
Operating Systems Requirements
Mac®OS 8.1 or higher
Please read this manual thoroughly and follow the procedures to
prevent any damage to the USB Parallel Adapter Printer for
iMac
®
/Mac®and/or to the connected devices.
Belkin Components, Ltd.
Clarke Road • Mount Farm • Bletchley • Milton Keynes • MK1 1LG
Phone +44 (0) 1908367178 • FAX +44 (0) 1908366564
Page 2
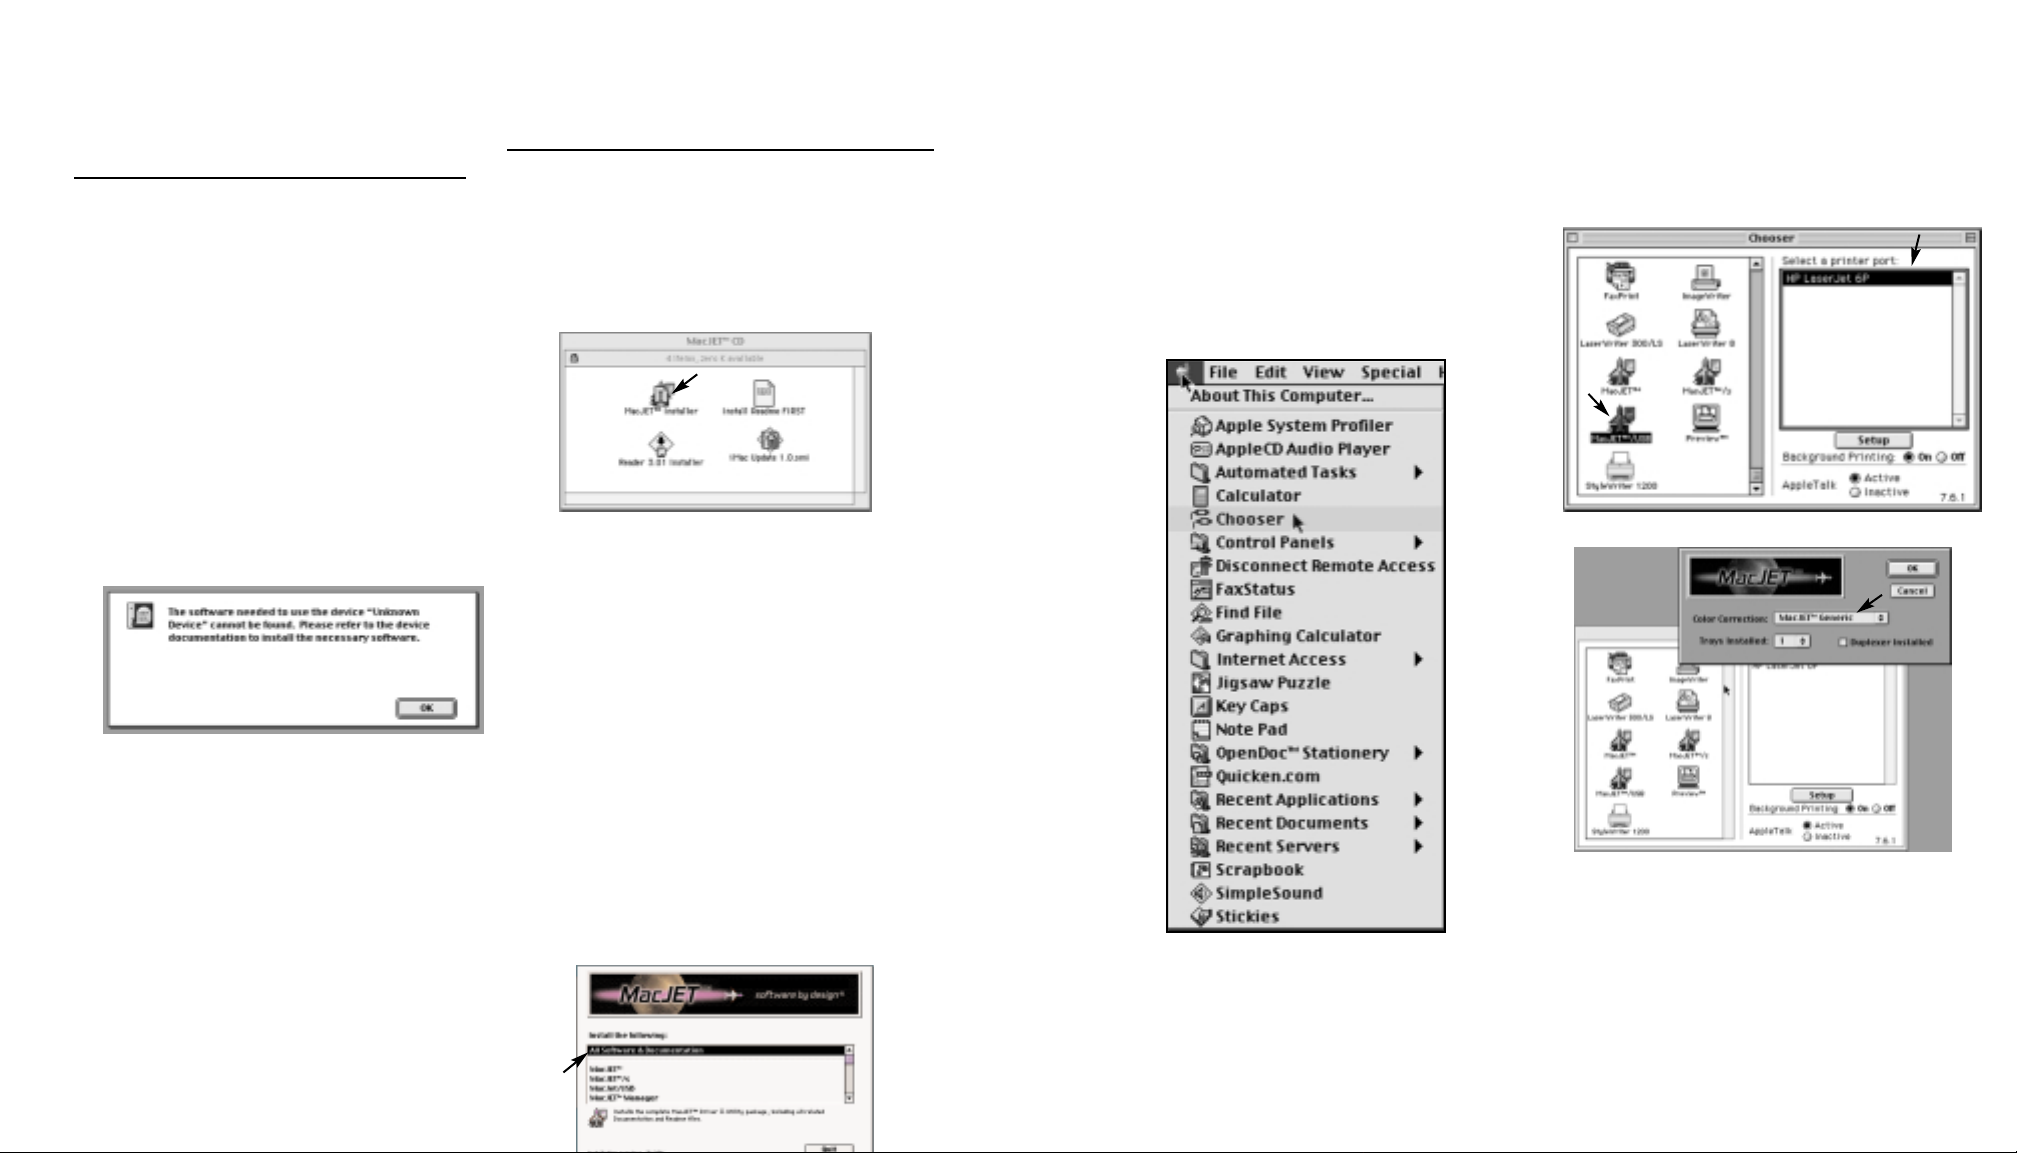
6. MacJET™will prompt you to restart
the computer after installation is
completed. Select Yes and your
Mac
®
/iMac®will restart. You must
restart for correct installation.
7. After your computer has restarted,
click on the Apple menu located in
the top left corner of your screen.
Select Chooser from the Apple menu.
8. Select the MacJET
™
USB printer icon
from the printer icons box on the left
side of the chooser screen. Scroll
down if it does not appear in the box
A) Select the appropriate printer from
the Select a printer port on the top
right side of the chooser screen.
Section 1:
Parallel Printer
Adapter Installation
1. Turn off all equipment and completely
reboot your system before installation
of the Belkin USB Parallel Printer
Adapter for iMac
®
.
2. After the system has completely
rebooted, make sure your printer is on
and connect the Parallel Printer
Adapter centronics connector into
your PCL printer. Then connect the
USB connector into an available USB
port on the iMac
®
/Mac®. You will see
the following message after connecting
the adapter:
Section 2:
MacJET™Software Installation
1. Insert the MacJET™CD-ROM and open
the CD after the icon appears on the
desktop.
2. Open the MacJET
™
CD-ROM and
then open the MacJET™Installer
within the CD-ROM.
This means that your iMac®/Mac®has
automatically detected the adapter.
This does not mean that
there is an error.
Click Ok. The adapter will be
automatically configured.
3. The next screen provides MacJET
™
technical support information. Choose
Continue unless you would like to save
or print the technical support screen. If
you select Cancel but want to continue
with the installation, go back to
instruction #2.
4. Please read the software license. If you
agree to the terms and conditions, click
Continue to complete the installation.
5. The installation screen will ask you to
select the software and documentation you
wish to install. Select “All Software &
Documentation”. MacJET
™
should
automatically choose this. Click Install.
B) Go to the Setup button located at the
right corner of the chooser screen and
make sure that MacJET
™
Generic
appears in the color correction pop-up
box.
Click OK and then close the Chooser by
clicking the top left corner of the chooser
screen. The MacJET
™
printer icon is
created and will appear on your desktop.
Once the MacJET
™
printer icon has
appeared, you can drag documents to the
printer or print from the File menu to print.
You should now be able to print to your
printer. However, if you are printing to an
HP DeskJet printer, it is recommended to
turn on RET (Resolution Enhancement
Page 3

Section 3:
Printing Settings
3.1 MacJET™Manager
The MacJET™Manager controls the
print settings that may need to be
adjusted based on the type of printer
you are using, as in the case of HP
DeskJets. To open MacJET
™
Manager,
click on the Apple pull-down menu,
scroll down to control panels and
select MacJET
™
Manager. MacJET
™
Manager allows you to adjust the
following settings: resolution, printer
memory, installed fonts and
compression.
Resolution
Resolution will adjust the print quality of
your printouts. The higher the resolution,
the better print quality. The resolution
should default to the resolution your
printer supports.
Note: most models of HP DeskJets
support only 300 DPI when printing in
color. If a higher resolution is selected,
color capability will be disabled.
Printer Memory
Printer memory controls how much data
can be stored by your printer. If you are
unsure how much memory your printer
has, please leave this at its default.
Compression
Compressed data will be sent to the
printer at a faster rate than noncompressed data. Check with your printer
manufacturer to determine if your printer
supports compression.
3.2 Print Dialog
The MacJET™print dialog is accessed
from the File menu and is used every time
a document is printed. This dialog
controls the various settings that can be
selected each time you print. Note, for
color printers, go to the Options tab in this
dialog and select millions of colors in the
color tab and check “use RET color.”
Print To
The printer you have connected to the
parallel adapter will be the default printer.
However, this pop-up menu allows you to
send a document to a “PCL File” and
prints the document to disk in PCL format
or “PICT File” and prints each page of the
Resolution
Resolution will change the amount of
detail in the printed document through
DPI. The resolution will default to the
highest DPI your printer supports.
RET
(Resolution Enhancement Technology)
RET will enhance photographic
and color printing. If you are using
a HP DeskJet, check the RET
check box.
Color
This option allows you to select from
black and white, grays and colors. Select
millions of colors if you are using a color
printer. Select number of grays if you
would like to print in grayscale (shades of
gray). Black and white will not allow you
to print in grayscale.
Note: most models of HP DeskJets
®
support only 300 DPI when printing in
color. If a higher resolution is selected,
color capability will be disabled.
Page Range
This allows you to select which pages of a
document to print.
Paper Form
This option allows you to select from
which paper tray to feed the paper
during printing. If “manual” is selected,
each sheet must be inserted manually in
the printer.
Cover In
If this box is checked, you are able to
designate from which tray to pull the first
page of your document. This is useful
when your print job has a cover page
that is to be printed on a different type or
color of paper.
Copies
This allows you to select the number of
copies of the document to print.
3.3 Page Set Up Dialog
The MacJET™page set up dialog is also
accessed from the File menu but is not
used every time a document is printed.
This dialog controls paper related settings
such as page size, page orientation, fonts
and colors. Colors and RET can also be
configured through the options tab in
this dialog.
Page Size
This allows you to select the paper size
you are using in your printer.
Page Orientation
Prints a document portrait (normal vertical
format) or landscape (horizontal format).
Reduce/Enlarge
This option allows you to print a
document at a reduced or enlarged
percentage of the normal print output.
Page 4

Section 4:
Troubleshooting
4.1 Poor Printouts
If your printouts are poor quality try
the following modifications to your
printing settings:
1. Open MacJET
™
Manager and switch to
a lower DPI resolution.
2. Disable or “uncheck” RET in the
print dialog.
3. Open the MacJET
™
Manager and turn
off printer compression.
4.2 Unrecognized Cable
If you do not see the message:
1. Make sure your Parallel Printer Adapter
is properly connected to both the
printer and USB port.
2. Try to shut down and restart.
3. Determine if your Mac
®
/iMac®USB
port is functioning properly.
4. Verify with your printer
manufacturer that your printer is a
built-in PCL printer.
3.4MacJET™Extras
MacJET™Extras includes a
FontMaker™utility that will create HP
downloadable printer fonts from any
currently installed Macintosh®font. The
FontMaker
™
utility can create fonts
from bitmap screen fonts, PostScript
®
Type 1 outline fonts or TrueType
®
outline fonts.
Each download font created with
FontMaker
™
has four attributes:
family, style, orientation and size. To
create a specific download, follow these
simple steps:
1. Open the MacJET
™
CD-ROM and open
the MacJET™Extras folder.
2. Open the FontMaker
™
.
3. Select the font from the font
pop-up menu.
4. Select the type of orientation you
would like; portrait, landscape
or both.
5. Select the desired attributes
(example: italics) for the font you wish
to include.
6. Click on the Add when your font
selection is complete.
7. Click the Build to complete download.
FontMaker
™
will show the build in
progress and then return to the main
window after completion. You can
simply “quit” at this time or elect to
make more download fonts by opening
FontMaker
™
again.
Center Feed
This option is only available when a
custom page size is selected. If your
printer has a manual feed tray that
centers the paper in the tray, such as
label stock, then this option should be
checked to ensure that the image on
the page is positioned properly.
Reverse Landscape
This option is only available when a
custom page size is selected in
landscape orientation. Checking this
option causes the image on the page
to be rotated 180 degrees.
Continuous Forms
Some printers support tractor-feed
(continuous feed) paper. Check
this option of you are using
continuous forms.
Fonts
Selecting “Download” from the
pop-up menu will cause MacJET™to
attempt to download HP fonts to the
printer. These are the fonts that are
made with the FontMaker
™
utility (see
section 3.4 MacJET™Extras).
Color
This option allows you to select from
black and white, grays and colors.
Select colors of you are using a color
printer. Select number of grays if you
would like to print in grayscale
(shades of gray). Black and white will
not allow you to print in grayscale.
Note: most models of HP DeskJets
®
support only 300 DPI when printing
in color. If a higher resolution is
Duplex
This double-sided printing option is only
available when a duplexer or doublesided option is installed in the printer, and
the duplex setting enabled in the Chooser
setup dialog.
Double-Sided
For printers that don’t have a duplexer
installed, this option instructs the printer
to print all the odd numbered pages first.
You are then prompted to reverse the
printer sheets order and place them back
in the paper tray. Then the even numbered
pages are printed to complete doublesided printing.
Quick Objects
This option instructs the printer to use its
own drawing routines to draw any
graphic primitive, such as lines and
boxes, in your document. This option is
normally unavailable. This saves both
printer memory and printing time.
Quick Bitmaps
Quick Bitmaps will send bitmaps directly
to the printer instead of imaging them
with the rest of the document, resulting in
reduced printing time. However, this
feature will only be used on images with
a resolution that is a multiple of 75 DPI.
Background
Checking this option will cause MacJET
™
to utilize Apple®’s background printing.
This can also be selected in the Chooser.
Page 5

Section 6
To Uninstall MacJET
™
Software
6.1 Uninstall
1. Insert the MacJET™CD-ROM and
open the CD after the icon appears
on the desktop.
2. Open the MacJET
™
CD-ROM and
then open the MacJET
™
Installer
within the CD-ROM.
3. The next screen provides MacJET
™
technical support information.
Choose Continue.
4. Agree with the software license
to click Continue to complete
the installation.
5. The installation screen will ask you
to select the software and
documentation you wish to install.
Hold the Option key while
simultaneously clicking on Install.
This will change Install to
Uninstall. Click Uninstall.
6. After MacJET
™
uninstalls, drag the
MacJET™printer icon on your
desktop to the trash. If you are
unable to drag the printer icon to
the trash, you must first select
another printer in the chooser
before trashing the MacJET
™
printer icon. After selection a
different printer, drag the MacJET
™
printer to the trash.
4.3 Nothing Printing
If nothing prints:
1. Make sure your Parallel Printer
Adapter is properly connected to
both the printer and USB port.
2. If you did not shut down after
installation, restart your
iMac
®
/Mac®.
3. Make sure your USB port
is functional.
4. Verify that you selected the correct
printer in the chooser (see section 2
step #8A).
5. Verify with your printer
manufacturer that your printer is a
built-in PCL printer.
Section 5
Switching Printers and Using
Multiple Printers
5.1Switching Printers
If you switched printers after installation,
you should still be able to print as this is
one of the advantages of USB. However,
you will need to re-select the correct
printer in the chooser (see section 2, step
#7 for selecting printer). However, the
chooser may not recognize the name of the
printer if you switched printers without
shutting down. This is not a problem and
does not mean that the printer will not
print. The printer will appear as a generic
USB printer. Select this printer and
continue. Go to the troubleshooting section
if you have trouble printing.
5.2Connecting Multiple Printers
If you have two free USB ports on your
iMac
®
/Mac®, you can print to two PCL
printers simultaneously. Simply connect
each Parallel Printer Adapter into the USB
ports and follow the instructions in this
manual.
You can also print to more than two PCL
printers from your iMac
®
/Mac®if you use
an ExpressBus™4 or 7 Port Hub for iMac®.
Simply connect the Hub into a free USB
port on your iMac
®
/Mac®. Then attach the
Parallel Printer Adapters’USB connector
into the Hub instead of the iMac®/Mac®.
Follow the installation instructions.
 Loading...