

Page 1
Wireless Network Access Point
Point d'accès Réseau sans fil
Kabelloser Netzwerk Access Point
Draadloos netwerk accesspoint
Punto de acceso a la red inalámbrico
Access point di rete wireless
User Manual
Manuel de
l'Utilisateur
Benutzerhandbuch
Handleiding
Manual del usuario
Manuale utente
F5D6130
Page 2

Wireless Network
Access Point
User Manual
F5D6130
Page 3

TABLE OF CONTENTS
Introduction . . . . . . . . . . . . . . . . . . . . . . . . . . . . . . . . . . . . . . . . . . 1
Key Features . . . . . . . . . . . . . . . . . . . . . . . . . . . . . . . . . . . . . . .2
Package Contents . . . . . . . . . . . . . . . . . . . . . . . . . . . . . . . . . . . .3
Optional Management . . . . . . . . . . . . . . . . . . . . . . . . . . . . . . . . .3
Software Requirements . . . . . . . . . . . . . . . . . . . . . . . . . . . . . . . . .3
System Requirements . . . . . . . . . . . . . . . . . . . . . . . . . . . . . . . . . .3
Specifications . . . . . . . . . . . . . . . . . . . . . . . . . . . . . . . . . . . . . .4
Knowing your Access Point . . . . . . . . . . . . . . . . . . . . . . . . . . . . . . . . .5
Placement of your Access Point . . . . . . . . . . . . . . . . . . . . . . . . . . . . . .7
Quick Setup . . . . . . . . . . . . . . . . . . . . . . . . . . . . . . . . . . . . . . . . . . .8
Step 1: Connect the AP to a Router, Ethernet Switch, or Hub . . . . . . . .8
Step 2: Install the Discovery Wizard . . . . . . . . . . . . . . . . . . . . . . . .9
Using the Discovery Wizard to Configure the AP . . . . . . . . . . . . . . . . . .11
Configuring the Wireless Network Settings . . . . . . . . . . . . . . . . . . . . . .15
Troubleshooting . . . . . . . . . . . . . . . . . . . . . . . . . . . . . . . . . . . . . . .29
Information . . . . . . . . . . . . . . . . . . . . . . . . . . . . . . . . . . . . . . . . . .30
Page 4
INTRODUCTION
Thank you for purchasing the Belkin Wireless Network Access Point (AP) and
welcome to the world of wireless networking. Now you can take advantage of
this great new high-speed wireless technology and gain the freedom you need
around the home or office—without using cables. The AP acts as a bridge
between your existing wired network and your wireless-equipped computers.
The easy installation and setup will have you networking wirelessly in
minutes. Please be sure to read through this manual completely to be sure
that you are getting the most out of your AP.
1
Page 5

INTRODUCTION
Key Features
Wide Area Coverage at High Speeds
The Belkin AP provides coverage over an indoor area up to 300 feet in radius,
and outdoor area over 1,500 feet in radius.
Up to 128-Bit Encryption
Your Belkin AP is capable of encrypting (scrambling) the transmitted radio
waves so you can be sure that your data is secure. The optional encryption
feature allows you to encrypt at 64 bits or 128 bits using a key that you
enter yourself.
MAC Address Filtering
For added security, you can set up a list of MAC addresses (unique client
identifiers) that are allowed access to your network. Every computer has its
own MAC address. Simply enter these MAC addresses into a list using the
web-based user interface and you can control access to your network.
Works with Both PCs and Mac® Computers
The Access Point supports a variety of networking environments including Mac
OS® 8.x, 9.x, X v10.x, AppleTalk®, Linux®, Windows® 95, 98, Me, NT®, 2000,
and XP, and others.
Note: The Access Point can be managed through a web browser without the
included software. The software included supports Windows 98 SE, Me, 2000, and
XP only but IS NOT necessary to use the Access Point.
Web-Based Advanced User Interface
You can set up the AP’s advanced functions easily through your web browser,
without having to install additional software onto the computer. There are no
disks to install or keep track of and, best of all, you can make changes and
perform setup functions from any computer on the network quickly and easily.
Applications and Advantages
• Economically connect multiple wireless computers to a network
• SOHO (Small Office/Home Office) networking needs
• Provides the easy and quick small network installation SOHO users need.
2
Page 6

INTRODUCTION
Package Contents
• Belkin Wireless Network Access Point
• Power Supply
• Software CD
• User Manual
• Registration Card
Optional Management Software Requirements
• Windows® 98SE, Me, 2000, or XP
• Minimum 64MB RAM
System Requirements
• At least one computer with TCP/IP networking protocol installed
• CAT5 networking cable (or better)
• Microsoft® Internet Explorer 4.0 or later, or Netscape® 4.0 or later
3
Page 7

INTRODUCTION
Specifications
Standards:
IEEE 802.3 10Base-T Ethernet/100 Base-Tx Ethernet
IEEE 802.11b
Wireless:
Radio Technology: Direct Sequence Spread Spectrum (DSSS)
802.11b: 11, 5.5, 2, 1Mbps
802.11b: CCK, DQPSK, DBPSK
2.412-2.497GHz ISM band
802.11b: 11 for North America, 14 for Japan, 13 for Europe
64/128-bit WEP
Protocol Supported:
CSMA/CD, TCP, IP, UDP, and DHCP (client)
Management:
Browser-Based
Maximum Users:
32 (WLAN)
Ports:
1 10Base-T/100Base-Tx RJ45 port
1 Power jack
1 Reset button
LEDs:
Power
LAN Activity
WLAN Activity
4
Page 8

KNOWING YOUR ACCESS POINT
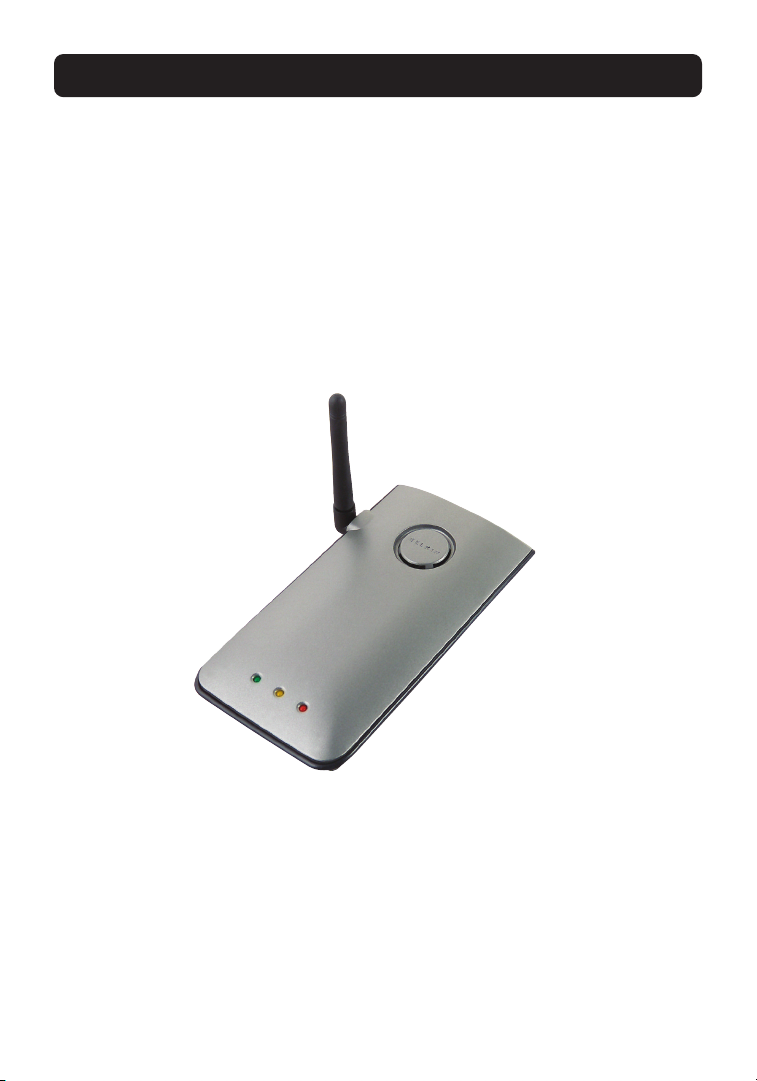
The AP has been designed to be placed on a desktop vertically or horizontally,
or it may be mounted to a wall. The slim design minimizes the desktop space
required when placed vertically. All of the cables exit from the rear of the AP for
better organization and utility. The LED indicators are easily visible on the front
of the AP to provide you with information about network activity and status.
Front Panel
Wireless LAN LED
LAN (Network) LED
Power/Ready LED
Indicates that the AP is receiving power.
Off AP is OFF
Red AP is ready
Wireless LAN LED
Off Wireless network is OFF
Blinking Green Indicates AP is working
Power/Ready LED
LAN (Network) LED
Off No network is linked to the port
Green 10Base-T device connected
Orange 100Base-Tx device connected
Blinking Port activity
(Orange or Green)
Rear Panel
Power Jack
RJ-45 LAN Port
5
Page 9

KNOWING YOUR ACCESS POINT
Power Jack
Connect the included 5V DC power supply to this jack.
RJ45 Ethernet Jack
Connect an Ethernet cable to this socket, and connect to an open RJ45
10Base-T or 100Base-T port on a switch, router, or hub.
Reset Button
The Reset button is used in rare cases when the AP may function improperly.
Resetting the AP will restore the AP’s normal operation while maintaining the
programmed settings. You can also restore the factory default settings by
using the Reset button. Use the restore option in instances where you may
have forgotten your custom password.
a. Resetting the AP
Push and release the Reset button. The lights on the AP will momentarily
flash. The Power/Ready light will begin to blink. When the Power/Ready light
becomes solid again, the reset is complete.
b. Restoring the Factory Defaults
Press and hold the Reset button for five seconds then release it. The lights on
the AP will momentarily flash. The Power/Ready light will begin to blink.
When the Power/Ready light becomes solid again, the restore is complete.
Rotatable Dipole Antenna
One unidirectional dipole antennas is located on the side of the AP. The
antennas can rotate 180 degrees. The antenna should be oriented in the vertical position for best performance.
6
Page 10

PLACEMENT OF YOUR ACCESS POINT
Proper placement of your AP is important to ensure the best performance of
your wireless network. Indoors, your Wireless Access Point can typically provide a circular coverage area of 300 feet or more. However, different types of
construction materials and other obstructions in a building can greatly affect
the wireless signal and decrease the range. If possible, place your AP as close
as possible to the center of the area that you want to cover. In multistory
homes, place the AP on a floor that is as close to the center of the home as
possible; this may mean placing the AP on an upper floor.
Use care when choosing the location of your AP
• Be aware of appliances or large objects such as a refrigerator or
washer/dryer unit that may be on the opposite side of a wall from where
you decide to place your AP.
• Place the AP on top of a desk and away from metal cabinets and
computer cases.
• Do not place objects or components on top of the AP.
• Make sure that the antenna is pointing UP at all times.
• Metallic-based UV window tint can affect wireless performance. Do not
place the AP next to a tinted window.
We realize that in the real world, it may not be possible to place your AP in
the center of your coverage area. In cases where you may experience difficulty
covering the entire area you want, try placing the AP as high as possible.
Wireless devices work best in a line-of-sight situation where there are no
obstacles between the wireless computer and the AP. The AP may also be
mounted to a wall with the antennas facing UP. There are other options for
expanding your wireless coverage area. Visit http://www.belkin.com/networking
for solutions.
The wireless signal can be affected by many things including neighboring
wireless networks, microwave ovens in operation, and 2.4GHz cordless phones.
While these things can affect the network performance, your wireless network
typically will work fine under most conditions where these devices exist.
7
Page 11

QUICK SETUP
The AP is configured at the factory to operate correctly out-of-the-box. Simply
connecting the AP to your existing network will instantly add wireless capabilities to your network with no further configuration required. Belkin ships
software that will allow you to locate and connect to the Access Point on
your network so you can easily change or modify the settings if you wish.
Before you can use the software, you must physically install the Access Point.
Once the AP is installed, you can use the software to modify the settings.
Follow the steps below to install your AP.
Step 1: Connect the AP to a Router, Ethernet Switch, or Hub
Verify the contents of your box. You should have the following:
• Belkin Wireless Network Access Point
• Power Supply
• Software CD
• User Manual
• Registration Card
1. Select a suitable place for your AP as described in the previous section of
this manual.
2. Connect a CAT5 cable between the AP and your router’s LAN port, Ethernet
switch, or hub. Connect the power supply to the AP by plugging the round
DC connector into the DC jack on the AP. Plug the power supply into the
wall. Verify that the Power LED and the Link LED are illuminated. If both
LEDs are illuminated, this indicates that the AP is connected properly.
3. Connection and placement of your AP is now complete.
8
Page 12
QUICK SETUP
Step 2: Install the Discovery Wizard
The Discovery Wizard is a convenient tool for locating and connecting to your
AP. The Discovery Wizard is only necessary if you want to make changes to
the AP’s settings, otherwise, the AP will work out-of-the-box in most cases.
Since the AP is shipped from the factory as a DHCP client, it will obtain an IP
address automatically from the DHCP server on your network. Since this
address is somewhat random, the Discovery Wizard will locate the AP on the
network for you so you don’t have to take extra steps to determine the IP
address of the AP.
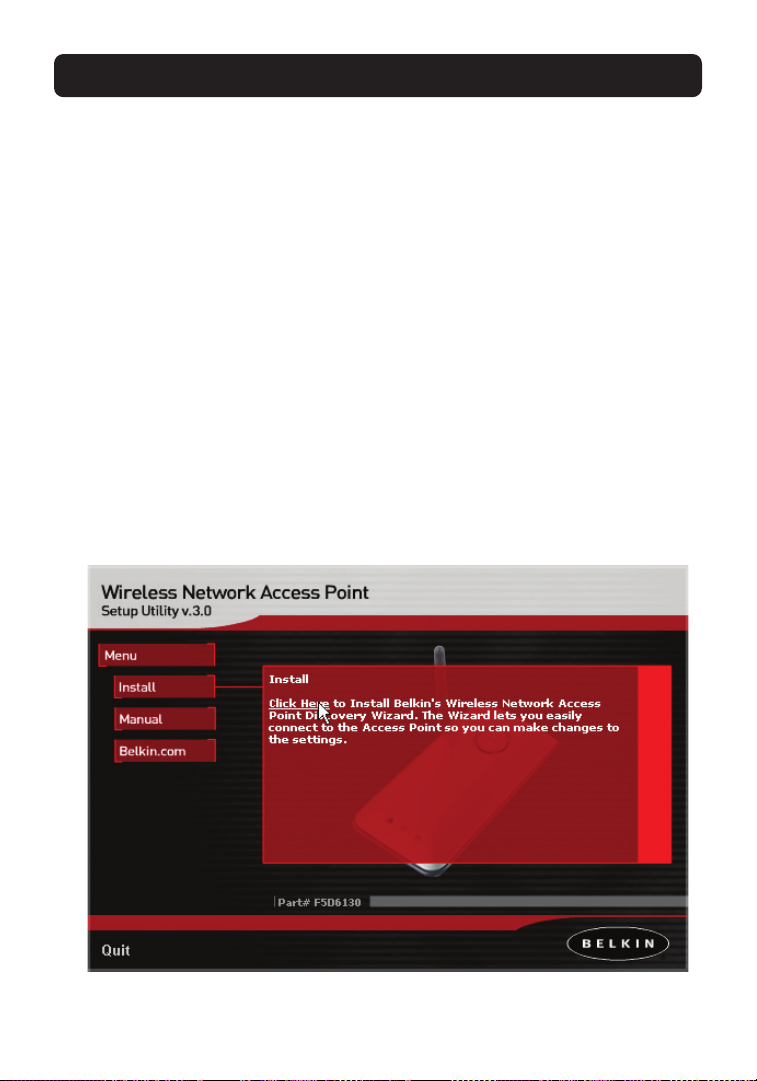
1. Insert the CD into your CD-ROM drive.
2. The Belkin Wireless Network Access Point Setup Utility screen will
automatically appear. If it does not appear within 15-20 seconds, then
select your CD-ROM drive and double-click on the folder named “Files”.
Next double-click on the icon named “start.exe”.
3. In the menu window, drag your mouse over the “Install” button then select
“Click here” to start the software installation program.
9
Page 13
QUICK SETUP
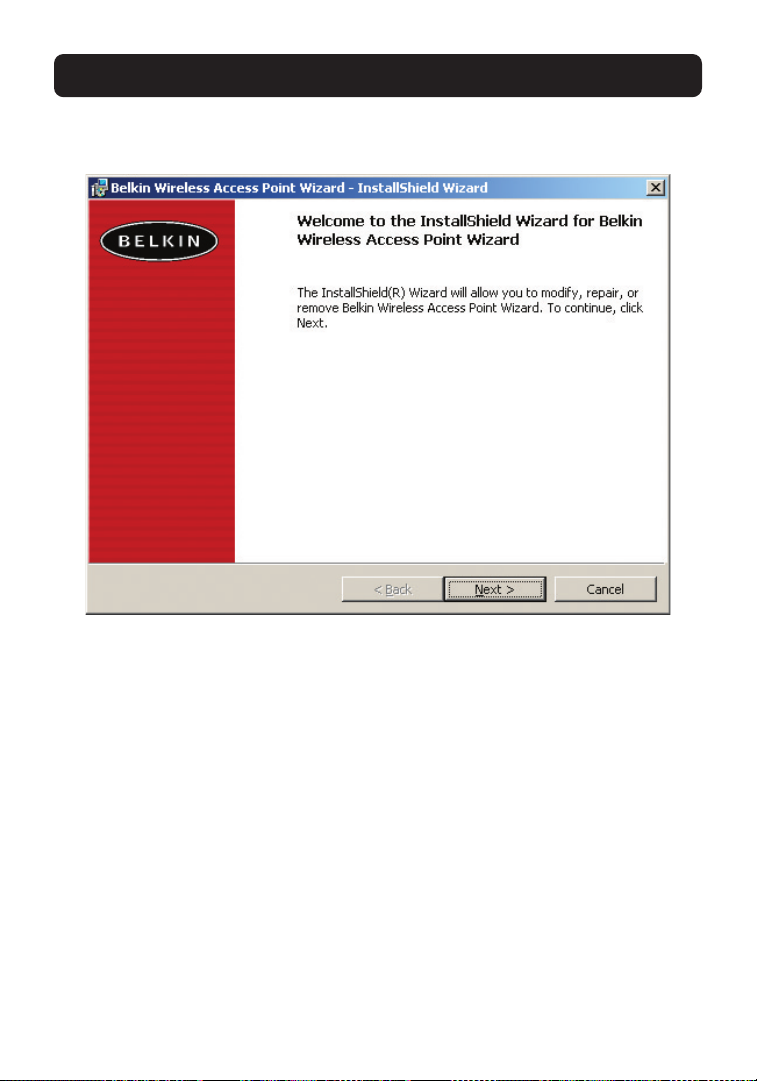
4. The software installation Wizard will start. Click “Next” on the first screen.
5. Accept the user agreement and click “Next” while following the installation
Wizard through its steps. Click “Finish” on the last screen.
6. The Discovery Wizard is now installed. Go to the next section to learn how
to use the Wizard.
10
Page 14
USING THE DISCOVERY WIZARD TO CONFIGURE THE AP
1. After you have installed the Discovery Wizard, you will see an
icon on the desktop. Double-click the icon to start the Wizard.
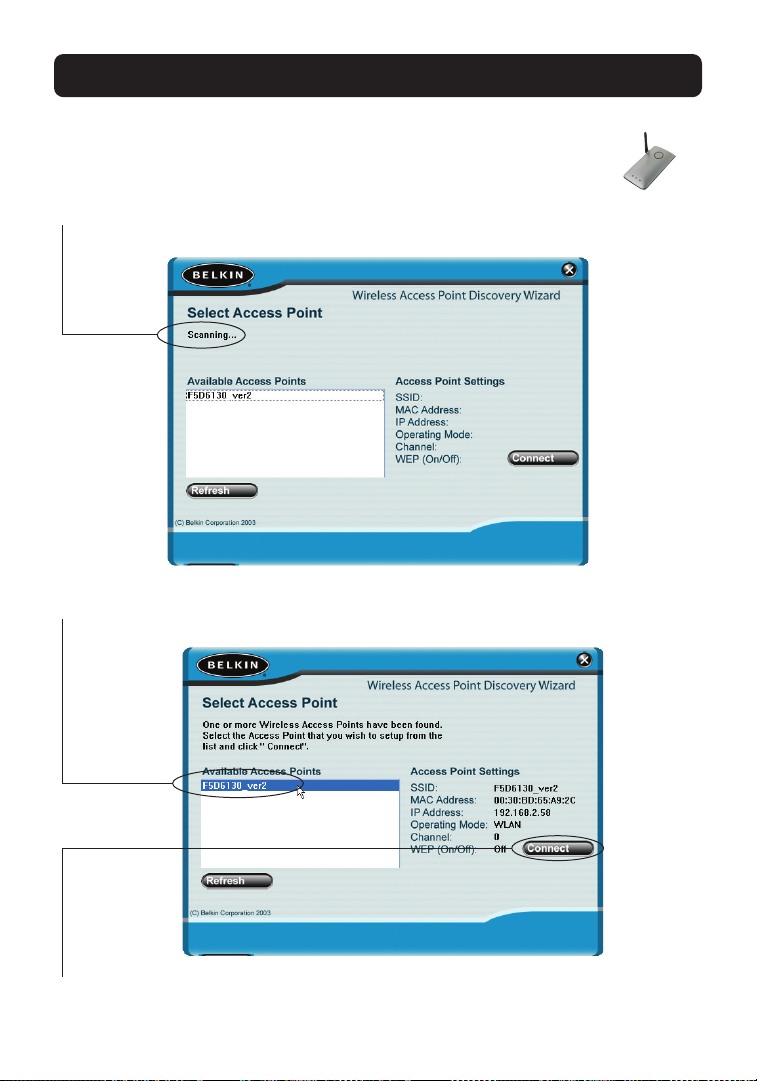
2. When you start the Wizard, you will see the word “Scanning…”.
This means the Wizard is looking for Access Points on your network.
3. When the Wizard finds your Access Point(s), the Access Point’s name will
appear in this window. Click on the Access Point’s name.
4. Click “Connect”. This will launch your web browser.
11
Page 15
USING THE DISCOVERY WIZARD TO CONFIGURE THE AP
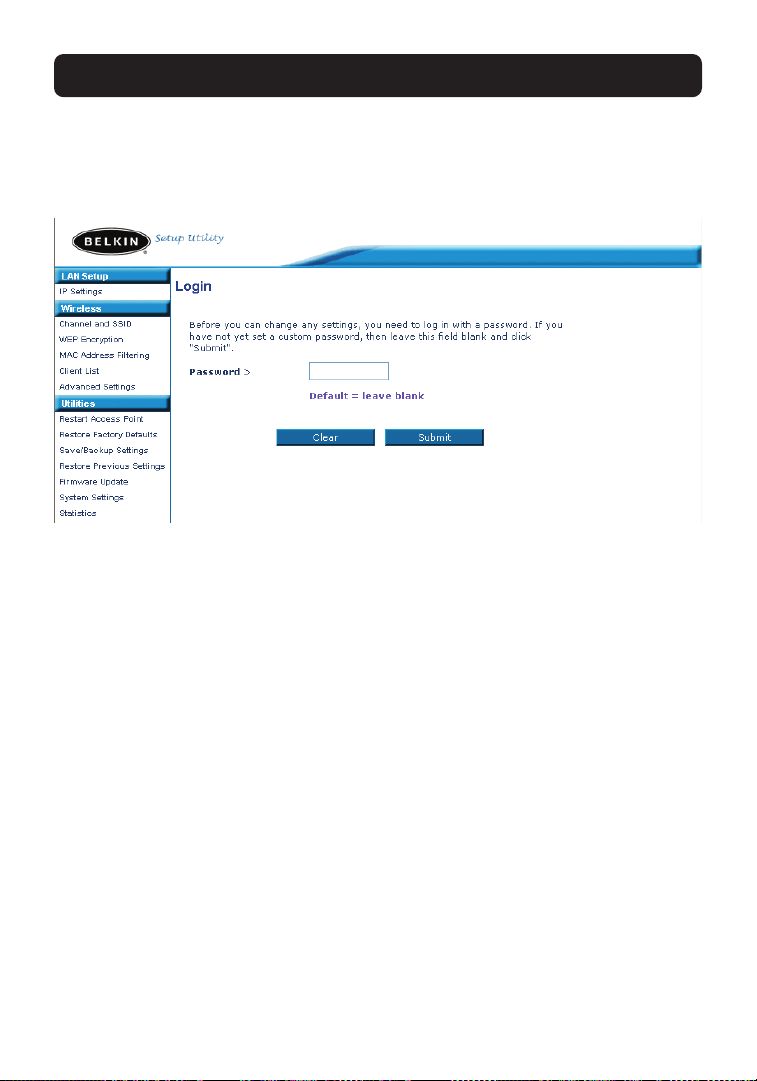
5. You will see the AP’s login page in your browser window. The AP ships with
no password entered. In the login screen, leave the password blank and
click the “Submit” button to log in.
6. You are now connected to the AP and can make any changes you want to.
See the following section of this manual to learn how to use the interface.
Logging Out of the AP
One computer at a time can log into the AP for the purposes of making
changes to the settings of the AP. Once a user has logged in to make
changes, there are two ways that the computer can be logged out. Clicking
the “Logout” button will log the computer out. The second method is automatic. The login will time out after a specified period of time. The default
login time out is 10 minutes. This can be changed from 1 to 99 minutes. For
more information, see the section in this manual titled “Changing the Login
Timeout Setting”.
12
Page 16
USING THE DISCOVERY WIZARD TO CONFIGURE THE AP
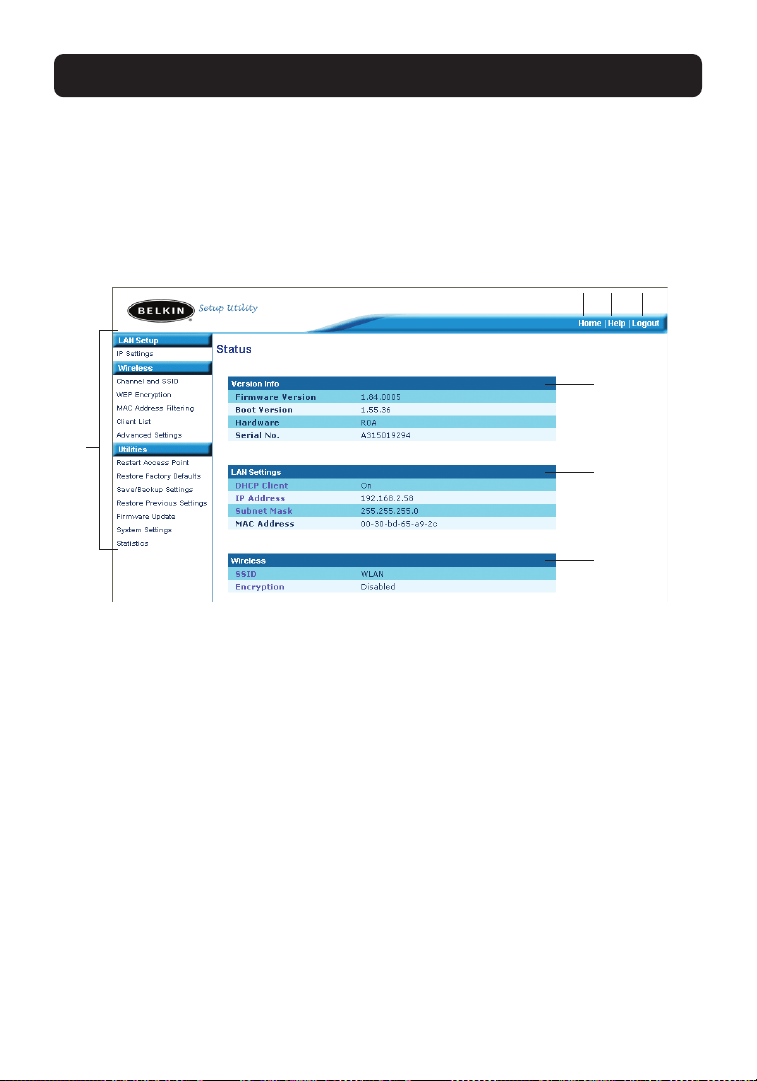
Understanding the Access Point User Interface
The home page is the first page you will see when you access the Advanced
User Interface (UI). The home page shows you a quick view of the AP’s status
and settings. All advanced setup pages can be reached from this page.
(3)
(2) (4)
(5)
(1)
(6)
(7)
(1) Quick-Navigation Links
You can go directly to any of the AP’s advanced UI pages by clicking directly
on these links. The links are divided into logical categories and grouped by
tabs to make finding a particular setting easier to find. Clicking on the purple
header of each tab will show you a short description of the tab’s function.
(2) Home Button
The home button is available in every page of the UI. Pressing this button
will take you back to the home page.
(3) Help Button
The “Help” button gives you access to the AP’s help pages. Help is also available on many pages by clicking “more info” next to certain sections of each
page.
13
Page 17

USING THE DISCOVERY WIZARD TO CONFIGURE THE AP
(4) Login/Logout Button
This button enables you to log in and out of the AP with the press of one
button. When you are logged into the AP, this button will change to read
“Logout”. Logging into the AP will take you to a separate login page where
you will need to enter a password. When you are logged in to the AP, you can
make changes to the settings. When you are finished making changes, you
can log out of the AP by clicking the “Logout” button. For more information
about logging into the AP, see the section called “Logging into the AP”.
(5) Version Info
Shows the firmware version, boot-code version, hardware version, and serial
number of the AP.
(6) LAN Settings
Shows you the settings of the Local Area Network (LAN) side of the AP.
Changes can be made to the settings by clicking on any one of the links (IP
Address, Subnet Mask) or by clicking the “LAN” Quick Navigation link on the
left side of the screen.
(7) Wireless
Shows the status of the AP’s wireless setting. Changes can be made to the
settings by clicking on any one of the links or by clicking the “Quick
Navigation” links on the left side of the screen.
14
Page 18
CONFIGURING THE WIRELESS NETWORK SETTINGS
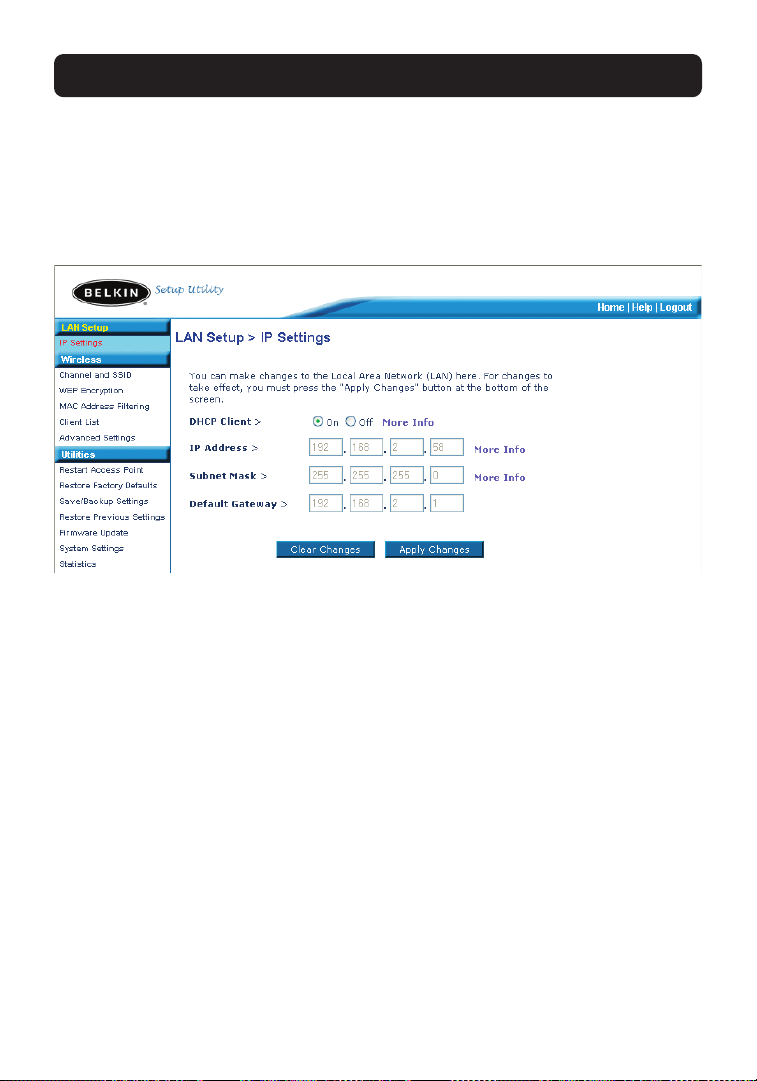
The Wireless tab lets you make changes to the wireless network settings. From
this tab you can make changes to the wireless network name (SSID), operating channel, and encryption security settings.
IP Settings
15
Page 19
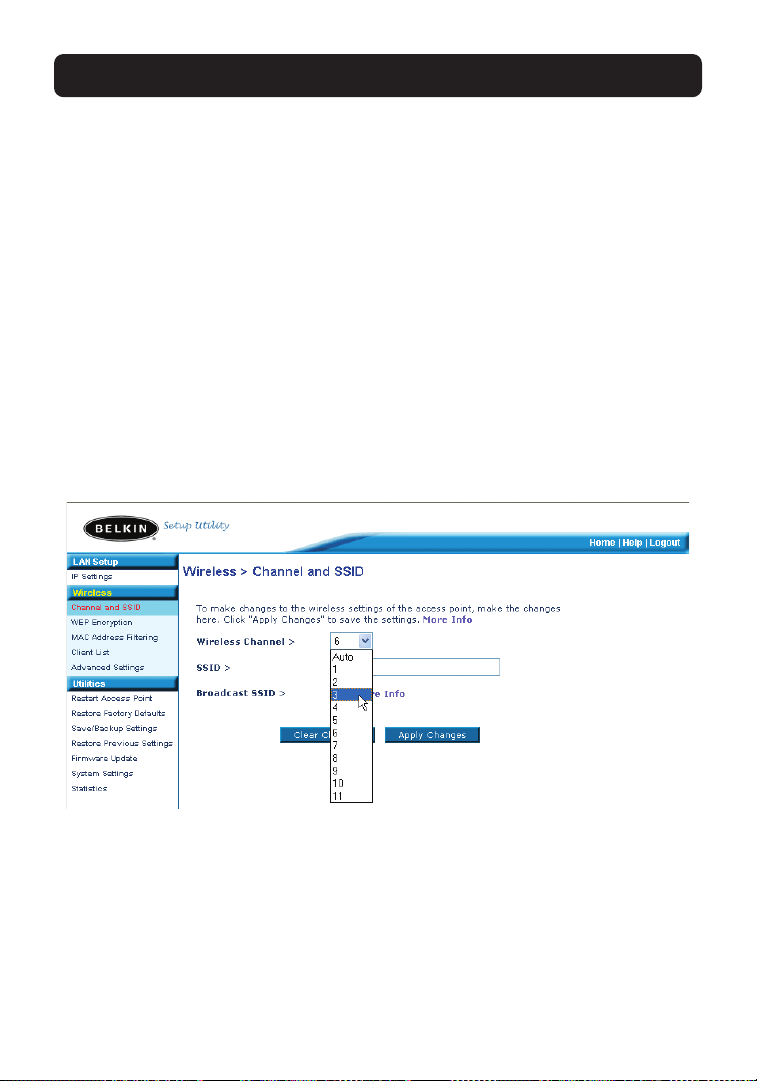
CONFIGURING THE WIRELESS NETWORK SETTINGS
Changing the Wireless Channel
Auto: There are a number of operating channels you can choose from. In the
United States, there are 11 channels. In the United Kingdom and most of
Europe, there are 13 channels. In a small number of other countries, there are
other channel requirements. Your AP is configured to operate on the proper
channels for the country you reside in. The default channel is 11 (unless you
are in a country that does not allow channel 11). The channel can be changed
if needed. If there are other wireless networks operating in your area, your
network should be set to operate on a channel that is different than the
other wireless networks. For best performance, use a channel that is at least
five channels away from the other wireless network. For instance, if another
network is operating on channel 11, then set your network to channel 6 or
below. To change the channel, select the channel from the drop-down list.
Click “Apply Changes”. The change is immediate.
16
Page 20
CONFIGURING THE WIRELESS NETWORK SETTINGS
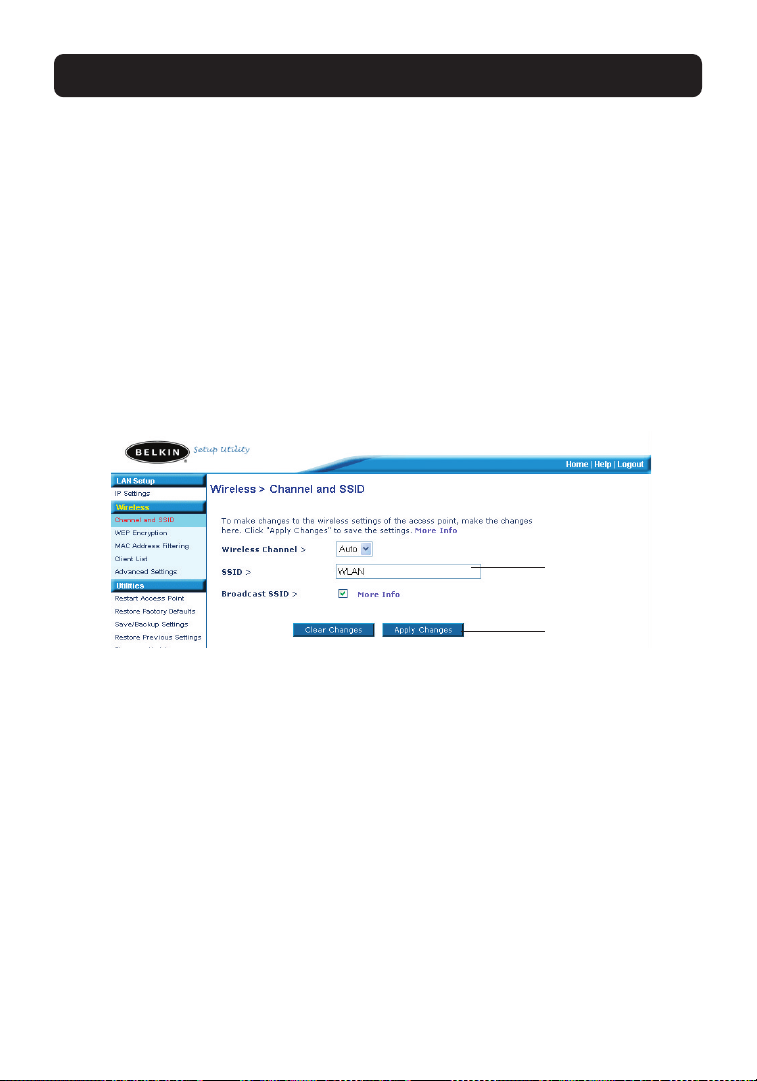
Changing the Wireless Network Name (SSID)
To identify your wireless network, a name called the SSID (Service Set Identifier)
is used. The default SSID of the AP is “WLAN”. You can change this to anything
you want to or you can leave it unchanged. If there are other wireless networks
operating in your area, you will want to make sure that your SSID is unique
(does not match that of another wireless network in the area). To change the
SSID, type in the SSID that you want to use in the SSID field (1) and click
“Apply Changes” (2). The change is immediate. If you make a change to the
SSID, your wireless-equipped computers may also need to be reconfigured to
connect to your new network name. Refer to the documentation of your wireless network adapter for information on making this change.
(1)
(2)
Using the Broadcast SSID Feature
Note: This advanced feature should be employed by advanced users only.
For security, you can choose not to broadcast your network’s SSID. Doing so
will keep your network name hidden from computers that are scanning for the
presence of wireless networks. To turn off the broadcast of the SSID, remove
the check mark from the box next to “Broadcast SSID”, and then click “Apply
Changes”. The change is immediate. Each computer now needs to be set to
connect to your specific SSID; an SSID of “ANY” will no longer be accepted.
Refer to the documentation of your wireless network adapter for information
on making this change.
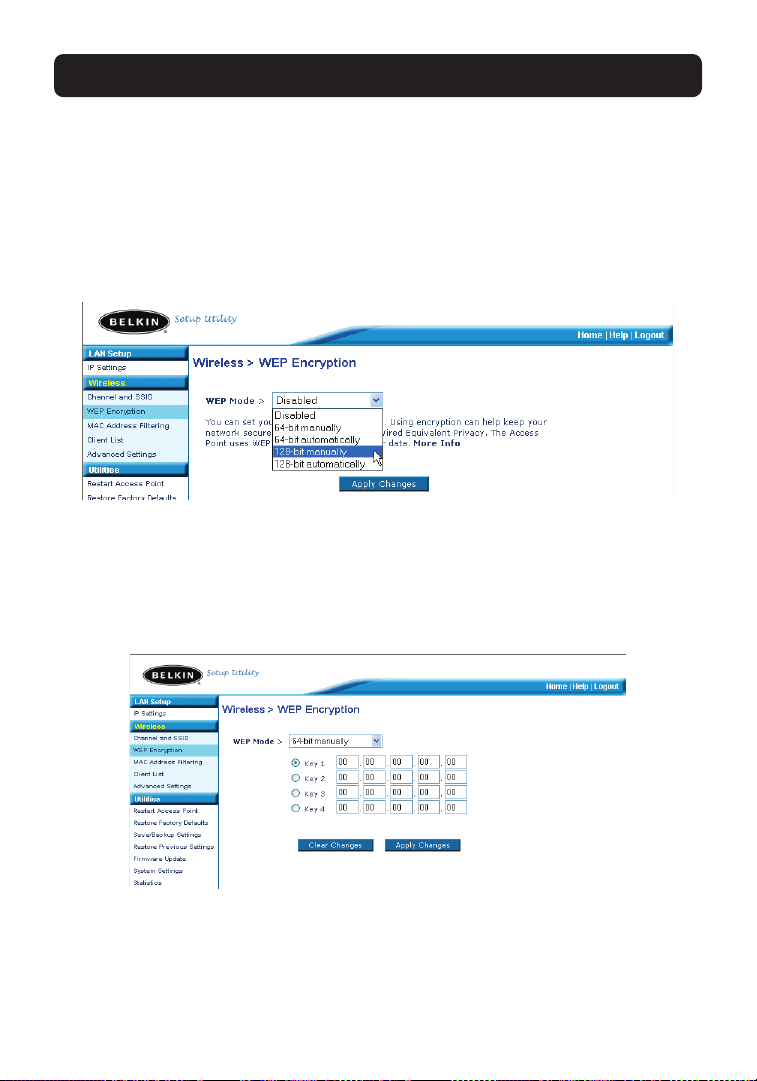
Changing the Wireless Security Settings
Your AP is equipped with the security standard called WEP (Wired Equivalent
Privacy). By default, wireless security is disabled. To enable security, follow
the steps in this section.
17
Page 21
CONFIGURING THE WIRELESS NETWORK SETTINGS
Setting WEP Encryption using a Passphrase
Note to Mac users: The Passphrase option will not operate with Apple® AirPort®.
To configure encryption for your Mac computer, set the encryption using the
manual method described in the next section.
1. Select “128-bit automatically” or “64-bit automatically” from the
drop-down menu.
2. Type in a passphrase. A passphrase is like a password. It can be a mixture
of numbers and letters. After you type in your passphrase, click “Generate”.
When you click “Generate”, the key fields below will become populated.
Note: 64-bit encryption will generate four keys and 128-bit encryption will generate
only one key. Select the key you want to use by clicking the radio button next to
it. Click “Apply Changes”.
3. Encryption in the AP is now set. Each of your computers on your wireless
network will now need to be configured with the same passphrase. Refer to
the documentation of your wireless network adapter for information on
making this change.
18
Page 22
CONFIGURING THE WIRELESS NETWORK SETTINGS
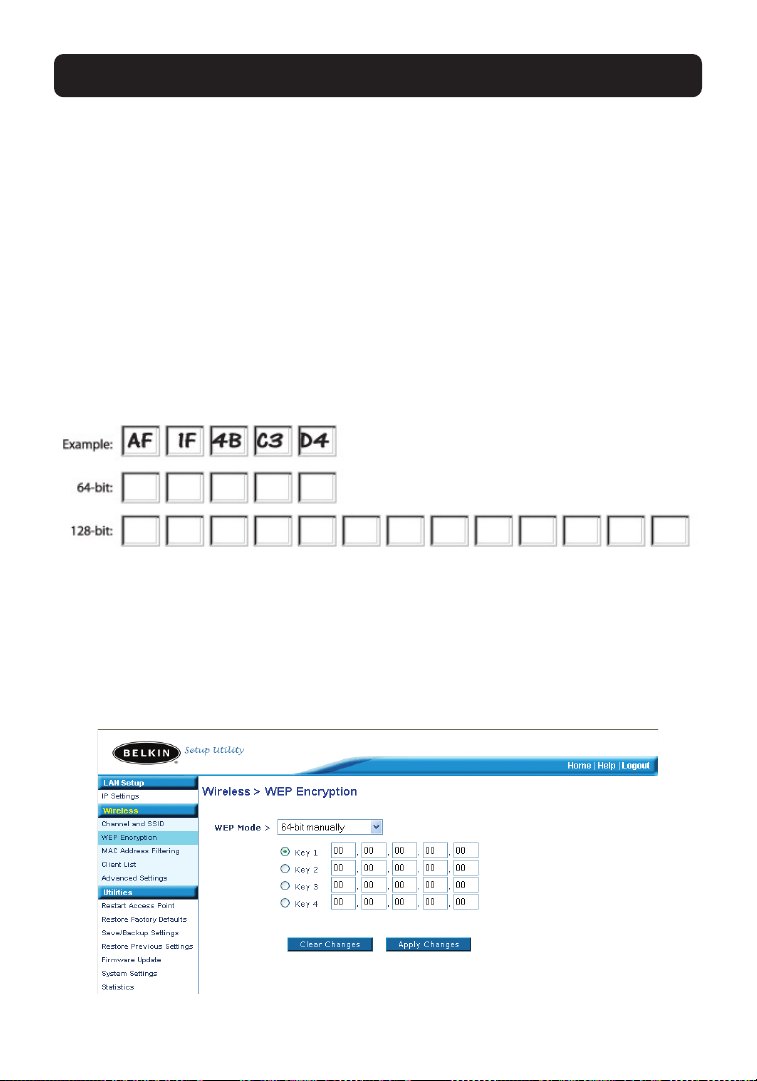
Setting Encryption Manually Using a Hexadecimal Key
A hexadecimal key is a mixture of numbers and letters from A–F and 0–9.
64-bit keys are five 2-digit numbers. 128-bit keys are 13 2-digit numbers.
For instance:
AF 0F 4B C3 D4 = 64-bit key
C3 03 0F AF 0F 4B B2 C3 D4 4B C3 D4 E7 = 128-bit key
In the boxes below, make up your key by writing in two characters between
A–F and 0–9. You will use this key to program the encryption settings on your
AP and your wireless computers.
Note to Mac users: Original Apple AirPort products support 64-bit encryption only.
Apple AirPort 2 products can support 64-bit or 128-bit encryption. Please check
your product to see which version you are using. If you cannot configure your
network with 128-bit encryption, try 64-bit encryption.
1. Select “64-bit manually” or “128-bit manually” from the drop-down menu.
19
Page 23
CONFIGURING THE WIRELESS NETWORK SETTINGS
2. If using 64-bit encryption, there will be four key fields. If using 128-bit
encryption, there will be one key field. In the key field(s), type in the
hexadecimal key(s) that you wish to use. When finished typing in your
keys, select which key you want to use by clicking the radio button next to
it. Click “Apply Changes”.
3. Encryption in the AP is now set. Each of your computers on your wireless
network will now need to be configured with the same hexadecimal key.
Refer to the documentation of your wireless network adapter for
information on making this change.
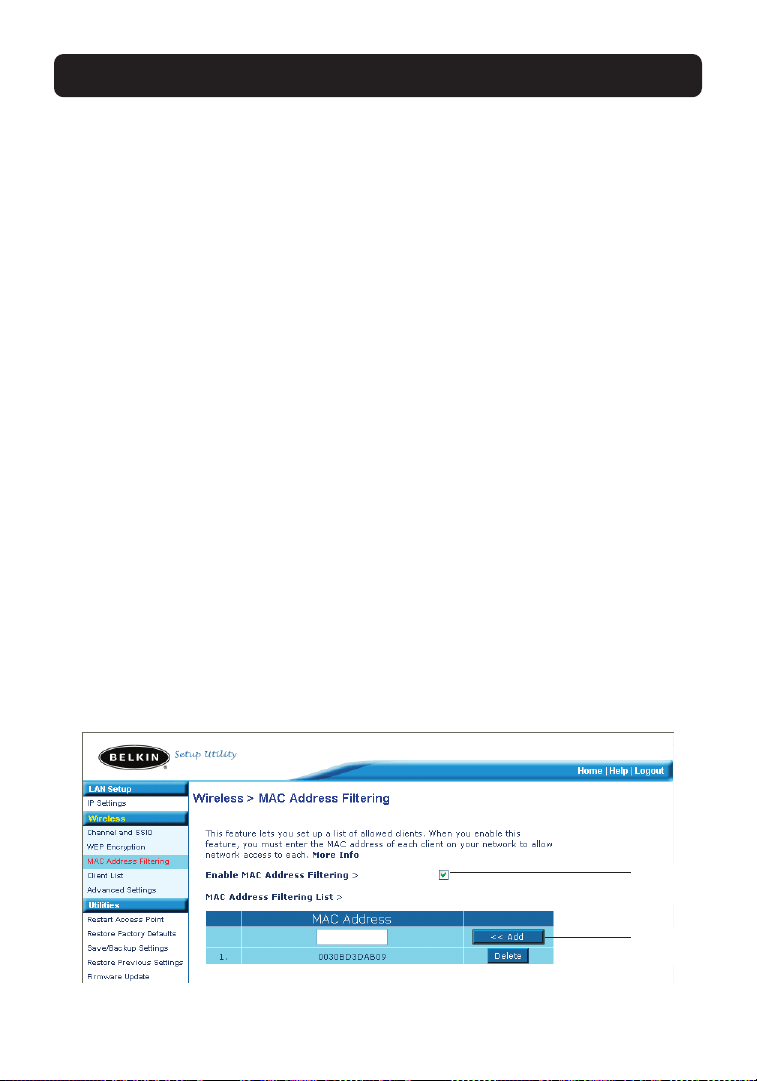
Setting MAC Address Filtering
The MAC address filter is a powerful security feature that allows you to specify
which computers are allowed access to the Access Point. Any computer NOT in
the list will be denied access to the network.
To Enable the MAC Address Filter
1. Place a check mark in the “Enable MAC Address Filtering” box (1).
2. Enter the MAC addresses of a computer that you want to allow access to
the network.
3. Click “Add” (2) to add the address to the list.
4. Repeat for each computer you want to add to the list.
5. Click “Apply Changes” to finish.
20
(1)
(2)
Page 24

CONFIGURING THE WIRELESS NETWORK SETTINGS
Client List
You can view a list of clients that are currently associated with the AP using
the Client List feature. You will be presented with the MAC address of the
client and the speed at which it is connected.
Advanced Settings
Belkin provides a number of advanced functions that you can set. With exception to the AP name, it is recommended that you make no changes to these
settings unless you have a specific reason to do so. From the Advanced
Settings page you can do the following:
• Change the AP name (used to uniquely identify the AP on your network)
• Select the Basic Rate Set (1, 2Mbps or 1, 2, 5.5, 11Mbps)
• Select the Transmit rate (Auto, 11Mbps, 5.5Mbps, 2Mbps, 1Mbps)
• Set the RTS threshold
• Set the Fragmentation threshold
• Select the Preamble Type (Long or Short)
When making changes, be sure to click “Apply Changes” for the changes to
take effect.
Utilities
The Utilities screen lets you manage different parameters of the AP and perform certain administrative functions.
Restarting the AP
Sometimes it may be necessary to restart or reboot the AP if it begins working improperly. Restarting or rebooting the AP will NOT delete any of your
configuration settings.
21
Page 25
CONFIGURING THE WIRELESS NETWORK SETTINGS
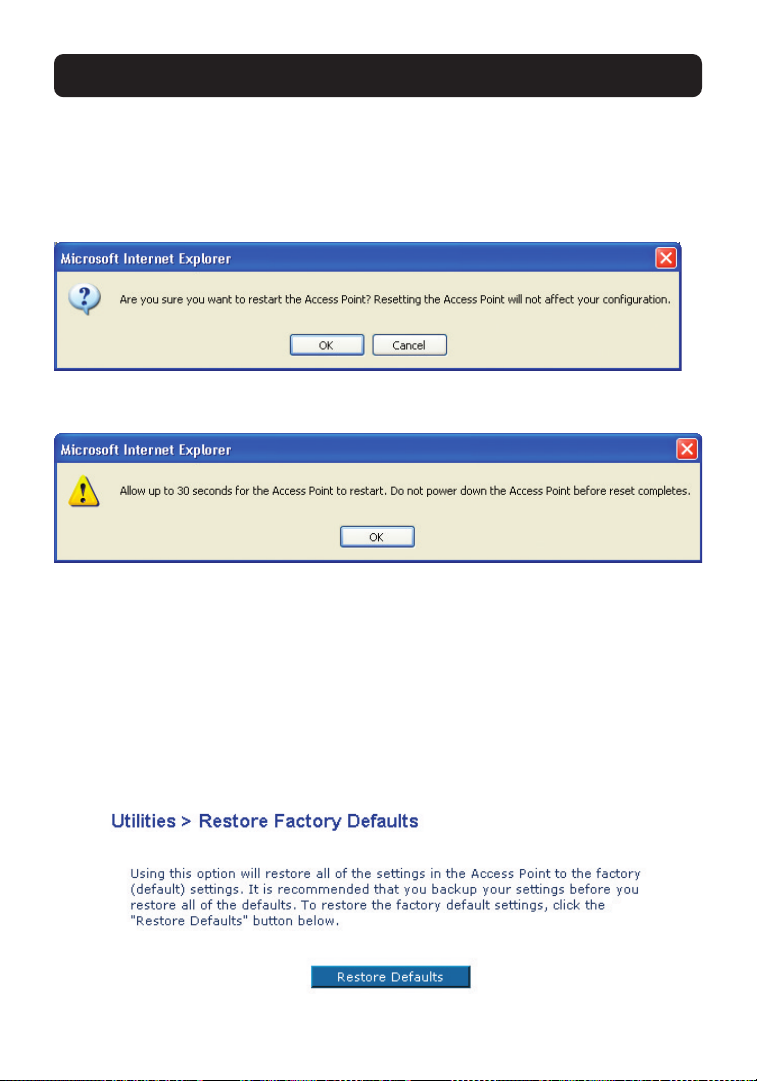
Restarting the AP to Restore Normal Operation
1. Click the “Restart AP” button.
2. The following message will appear. Click “OK”.
3. The following message will appear. Restarting the AP can take up to 60
seconds. It is important not to turn off the power to the AP during the restart.
4. A 30-second countdown will appear on the screen. When the countdown
reaches zero, the AP will be restarted. The AP home page should appear
automatically. If not, type in the AP’s address (default = 192.168.2.254)
into the navigation bar of your browser.
Restoring Factory Default Settings
Using this option will restore all of the settings in the AP to the factory
(default) settings. It is recommended that you back up your settings before
you restore all of the defaults.
22
Page 26
CONFIGURING THE WIRELESS NETWORK SETTINGS
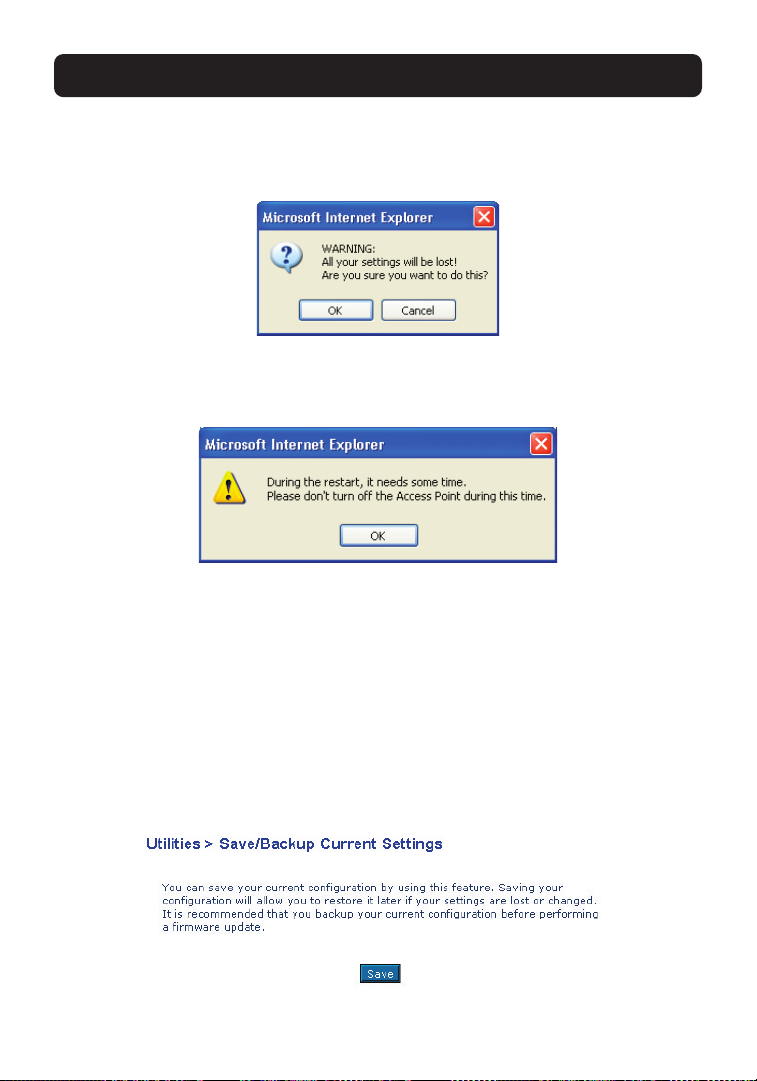
1. Click the “Restore Defaults” button.
2. The following message will appear. Click “OK”.
3. The following message will appear. Restoring the defaults includes
restarting the AP. It can take up to 60 seconds. It is important not to turn
the power to the AP off during the restart.
4. A 30-second countdown will appear on the screen. When the countdown
reaches zero, the AP’s defaults will be restored. The AP home page should
appear automatically. If it does not, type in the AP’s address (default =
192.168.2.1) into the navigation bar of your browser.
Saving a Current Configuration
You can save your current configuration by using this feature. Saving your
configuration will allow you to restore it later if your settings are lost or
changed. It is recommended that you back up your current configuration
before performing a firmware update.
23
Page 27
CONFIGURING THE WIRELESS NETWORK SETTINGS
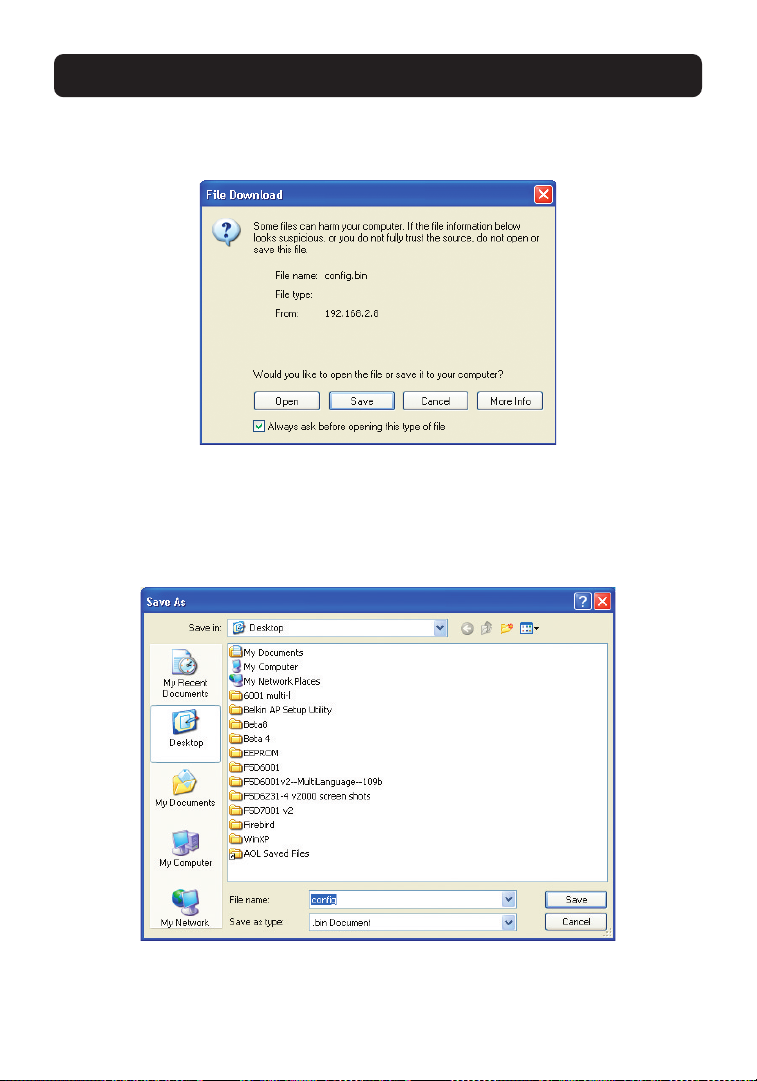
1. Click “Save”. A window called “File Download” will open. Click “Save”.
2. A window will open that allows you to select the location where you want
to save the configuration file. Select a location. You can name the file
anything you want, or use the default name “Config”. Be sure to name the
file so you can locate it yourself later. When you have selected the
location and name of the file, click “Save”.
The configuration is now saved.
24
Page 28
CONFIGURING THE WIRELESS NETWORK SETTINGS
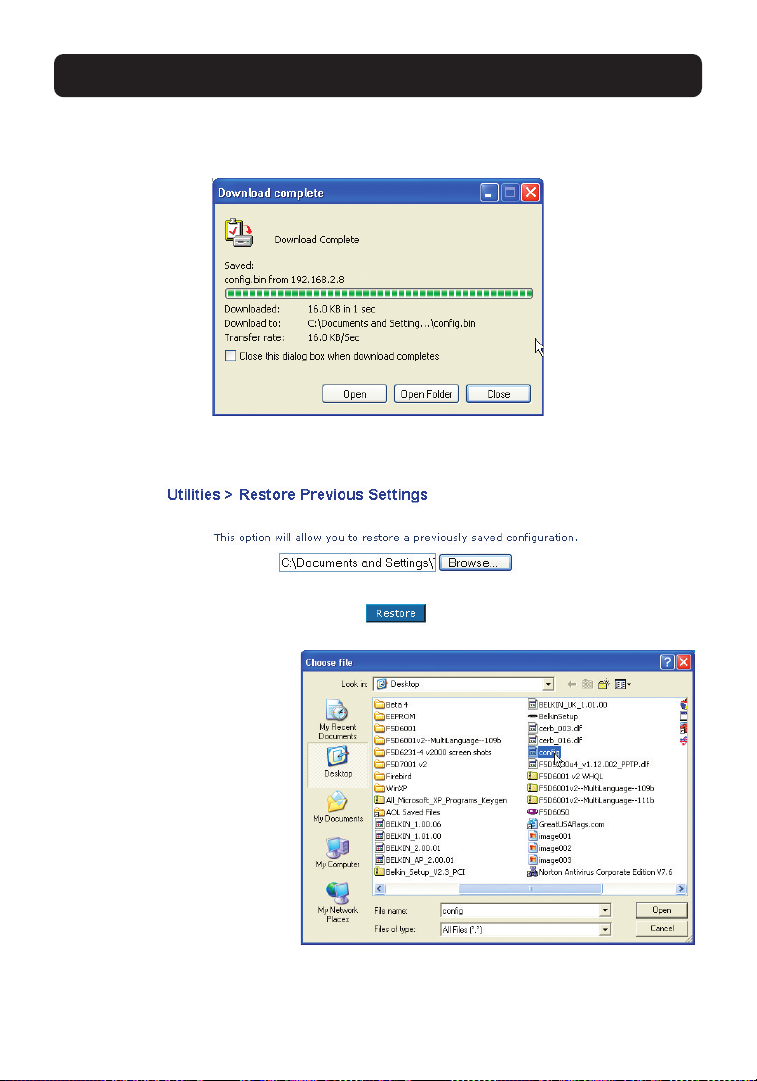
3. When the save is complete, you will see the window below. Click “Close”.
Restoring a Previous Configuration
This option will allow you to restore a previously saved configuration.
1. Click “Browse”. A window
will open that allows you
to select the location of
the configuration file. All
configuration files end
with a “.bin”. Locate the
configuration file you
want to restore and
double-click on it.
25
Page 29

CONFIGURING THE WIRELESS NETWORK SETTINGS
2. You will be asked if you want to continue. Click “OK”.
3. A reminder window will appear. It will take up to 60 seconds for the
configuration restoration to complete. Click “OK”.
4. A 60-second countdown will appear on the screen. When the countdown
reaches zero, the AP’s configuration will be restored. The AP home page
should appear automatically. If not, type in the AP’s address (default =
192.168.2.1) into the navigation bar of your browser.
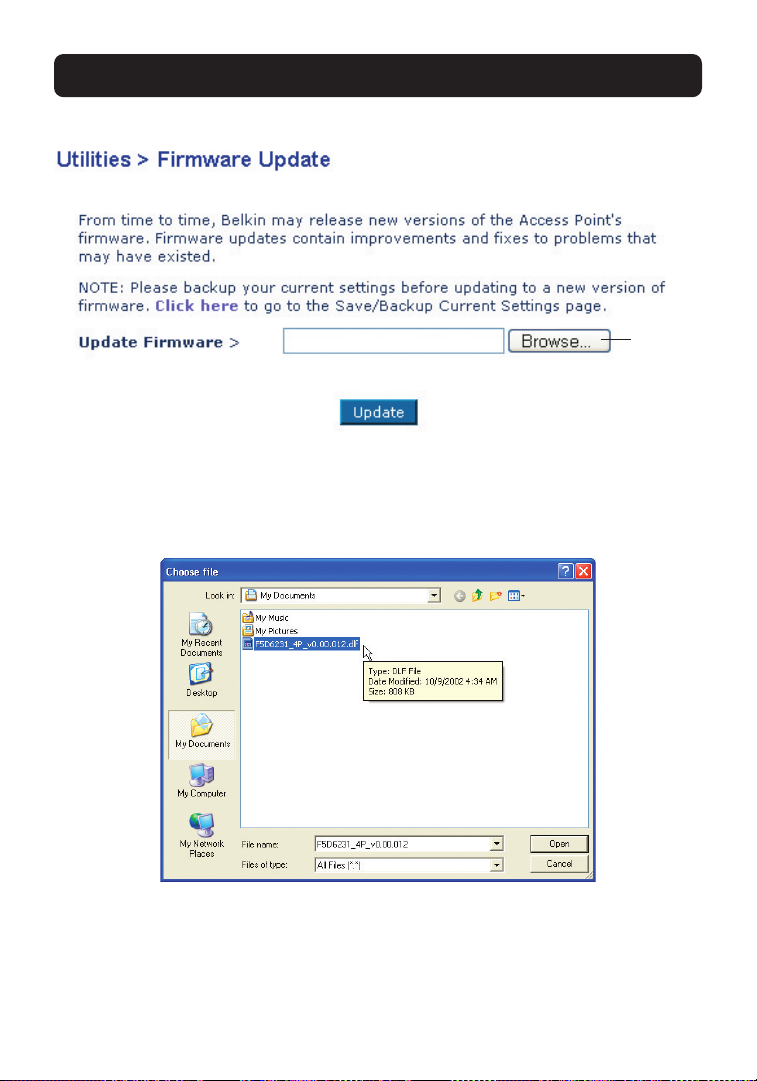
Updating Firmware
From time to time, Belkin may release new versions of the AP’s firmware.
Firmware updates contain feature improvements and fixes to problems that
may have existed. When Belkin releases new firmware, you can download the
firmware from the Belkin update website and update your AP’s firmware to the
latest version.
26
Page 30
CONFIGURING THE WIRELESS NETWORK SETTINGS
(1)
Updating the AP’s Firmware
1. In the “Firmware Update” page, click “Browse” (1). A window will open
that allows you to select the location of the firmware update file. All
firmware files end with a “.dlf”.
2. Browse to the firmware file you downloaded. Select the file by double-
clicking on the file name.
27
Page 31

CONFIGURING THE WIRELESS NETWORK SETTINGS
3. The “Update Firmware” box will now display the location and name of the
firmware file you just selected. Click “Update”.
4. You will be asked if you are sure you want to continue. Click “OK”.
5. You will see one more message. This message tells you that the AP may not
respond for as long as one minute as the firmware is loaded into the AP
and the AP is rebooted. Click “OK”.
A 30-second countdown will appear on the screen. When the countdown
reaches zero, the AP firmware update will be complete. The AP home page
should appear automatically.
Changing System Settings
The “System Settings” page is where you can enter a new administrator
password, set the time zone, enable remote management, and turn on and off
the NAT function of the AP.
28
Page 32

CONFIGURING THE WIRELESS NETWORK SETTINGS
Setting or Changing the Administrator Password
The AP ships with NO password entered. If you wish to add a password for
greater security, you can set a password here. Write down your password and
keep it in a safe place, as you will need it if you need to log into the AP in
the future. It is also recommended that you set a password if you plan to use
the remote management feature of your AP.
29
Page 33

TROUBLESHOOTING
You can find technical support information at www.belkin.com/networking or
www.belkin.com through the tech support area. If you want to contact technical support by phone, please call 00 800 223 55 460.
30
Page 34

INFORMATION
FCC Statement
DECLARATION OF CONFORMITY WITH FCC RULES FOR
ELECTROMAGNETIC COMPATIBILITY
We, Belkin Corporation, of 501 West Walnut Street, Compton, CA 90220, declare under our sole
responsibility that the product,
to which this declaration relates,
complies with Part 15 of the FCC Rules. Operation is subject to the following two conditions: (1) this
device may not cause harmful interference, and (2) this device must accept any interference
received, including interference that may cause undesired operation.
Caution: Exposure to Radio Frequency Radiation.
The radiated output power of this device is far below the FCC radio frequency exposure limits.
Nevertheless, the device shall be used in such manner that the potential for human contact
normal operation is minimized.
When connecting an external antenna to the device, the antenna shall be placed in such a
manner to minimize the potential for human contact during normal operation. In order to avoid
the possibility of exceeding the FCC radio frequency exposure limits, human proximity to the
antenna shall not be less than 20cm (8 inches) during normal operation.
Federal Communications Commission Notice
This equipment has been tested and found to comply with the limits for a Class B digital device,
pursuant to Part 15 of the FCC Rules. These limits are designed to provide reasonable protection
against harmful interference in a residential installation.
This equipment generates, uses, and can radiate radio frequency energy. If not installed and used
in accordance with the instructions, it may cause harmful interference to radio or television
reception, which can be determined by turning the equipment off and on, the user is encouraged
to try and correct the interference by one or more of the following measures:
• Reorient or relocate the receiving antenna.
• Increase the distance between the equipment and the receiver.
• Connect the equipment to an outlet on a circuit different from that to which the receiver
is connected.
• Consult the dealer or an experienced radio/TV technician for help.
Modifications
The FCC requires the user to be notified that any changes or modifications to this device that
are not expressly approved by Belkin Corporation may void the users authority to operate
the equipment.
F5D6130
31
Page 35

INFORMATION
Canada-Industry Canada (IC)
The wireless radio of this device complies with RSS 139 & RSS 210 Industry Canada. This Class B
digital complies with Canadian ICES-003.
Cet appareil numérique de la classe B conforme á la norme NMB-003 du Canada.
Europe-European Union Notice
Radio products with the CE 0682 or CE alert marking comply
with the R&TTE Directive (1995/5/EC) issued by the Commission of the
European Community.
Compliance with this directive implies conformity to the following European Norms (in brackets
are the equivalent international standards).
• EN 60950 (IEC60950) – Product Safety
• EN 300 328 Technical requirement for radio equipment
• ETS 300 826 General EMC requirements for radio equipment.
To determine the type of transmitter, check the identification label on your Belkin product.
Products with the CE marking comply with the EMC Directive (89/336/EEC) and the Low Voltage
Directive (72/23/EEC) issued by the Commission of the European Community. Compliance with
these directives implies
conformity to the following European Norms (in brackets are the
equivalent international standards).
• EN 55022 (CISPR 22) – Electromagnetic Interference
• EN 55024 (IEC61000-4-2,3,4,5,6,8,11)- Electromagnetic Immunity
• EN 61000-3-2 (IEC610000-3-2) - Power Line Harmonics
• EN 61000-3-3 (IEC610000) – Power Line Flicker
• EN 60950 (IEC60950) – Product Safety
Products that contain the radio transmitter are labeled with CE 0682 or CE alert marking and may
also carry the CE logo.
Please refer to http://networking.belkin.com for all networking certificates along with the R&TTE
Directive Statements.
32
Page 36

INFORMATION
Belkin Corporation Limited Lifetime Product Warranty
Belkin Corporation warrants this product against defects in materials and workmanship for its
lifetime. If a defect is discovered, Belkin will, at its option, repair or replace the product at no
charge provided it is returned during the warranty period, with transportation charges prepaid,
to the authorized Belkin dealer from whom you purchased the product. Proof of purchase may
be required.
This warranty does not apply if the product has been damaged by accident, abuse, misuse, or
misapplication; if the product has been modified without the written permission of Belkin; or if
any Belkin serial number has been removed or defaced.
THE WARRANTY AND REMEDIES SET FORTH ABOVE ARE EXCLUSIVE IN LIEU OF ALL OTHERS,
WHETHER ORAL OR WRITTEN, EXPRESSED OR IMPLIED. BELKIN SPECIFICALLY DISCLAIMS ANY AND
ALL IMPLIED WARRANTIES, INCLUDING, WITHOUT LIMITATION, WARRANTIES OF MERCHANTABILITY
AND FITNESS FOR A PARTICULAR PURPOSE.
No Belkin dealer, agent, or employee is authorized to make any modification, extension, or
addition to this warranty.
BELKIN IS NOT RESPONSIBLE FOR SPECIAL, INCIDENTAL, OR CONSEQUENTIAL DAMAGES RESULTING
FROM ANY BREACH OF WARRANTY, OR UNDER ANY OTHER LEGAL THEORY, INCLUDING BUT NOT
LIMITED TO, LOST PROFITS, DOWNTIME, GOODWILL, DAMAGE TO OR REPROGRAMMING OR
REPRODUCING ANY PROGRAM OR DATA STORED IN, OR USED WITH, BELKIN PRODUCTS.
Some states do not allow the exclusion or limitation of incidental or consequential damages or
exclusions of implied warranties, so the above limitations of exclusions may not apply to you.
This warranty gives you specific legal rights, and you may also have other rights that vary from
state to state.
33
Page 37

belkin.com
Belkin Corporation
5501 West Walnut Street
Compton • CA • 90220-5221 • USA
Tel: +1 310 898 1100
Fax: +1 310 898 1111
Belkin Components, Ltd.
Express Business Park • Shipton Way
Rushden • NN10 6GL • United Kingdom
Tel: +44 (0) 1933 35 2000
Fax: +44 (0) 1933 31 2000
Belkin Components B.V.
Boeing Avenue 333
1119 PH Schiphol-Rijk • The Netherlands
Tel: +31 (0) 20 654 7300
Fax: +31 (0) 20 654 7349
Belkin Components GmbH
Hanebergstrasse 2
80637 Munich • Germany
Tel: +49 (0) 89 143405 0
Fax: +49 (0) 89 143405 100
Belkin Components SAS
5 Rue du Petit Robinson • 3ème étage
78350 Jouy en Josas • France
Tel: +33 (0) 1 34 58 14 00
Fax: +33 (0) 1 39 46 62 89
Belkin Ltd
7 Bowen Cresent • West Gosford
NSW 2250 • Australia
Tel: +61 (0) 2 4372 8600
Fax: +61 (0) 2 4372 8603
Belkin Tech Support
Europe: 00 800 223 55 460
US: 877 736 5771
P74341ea
All trade names are registered trademarks of respective manufacturers listed. Mac, Mac OS, AppleTalk, Apple, and
AirPort are trademarks of Apple Computer, Inc., registered in the U.S. and other countries.
© 2004 Belkin Corporation. All rights reserved.
Page 38

Point d'accès
Réseau sans fil
Manuel de l’Utilisateur
F5D6130
Page 39

TABLE DES MATIÈRES
Introduction . . . . . . . . . . . . . . . . . . . . . . . . . . . . . . . . . . . . . . . . . . . . . . . . 1
Fonctions Clés . . . . . . . . . . . . . . . . . . . . . . . . . . . . . . . . . . . . . . . . . . . .2
Contenu de l'emballage . . . . . . . . . . . . . . . . . . . . . . . . . . . . . . . . . . . . . .3
Gestion facultative . . . . . . . . . . . . . . . . . . . . . . . . . . . . . . . . . . . . . . . . .3
Configuration requise - logiciel . . . . . . . . . . . . . . . . . . . . . . . . . . . . . . . . .3
Configuration Requise - Système . . . . . . . . . . . . . . . . . . . . . . . . . . . . . . . .3
Spécifications . . . . . . . . . . . . . . . . . . . . . . . . . . . . . . . . . . . . . . . . . . . .4
Présentation de votre Point d'Accès . . . . . . . . . . . . . . . . . . . . . . . . . . . . . . . . .5
Choix du site d'installation du Point d'Accès . . . . . . . . . . . . . . . . . . . . . . . . . . .7
Installation rapide . . . . . . . . . . . . . . . . . . . . . . . . . . . . . . . . . . . . . . . . . . . .8
Étape 1 : Connectez le PA à un Routeur, un Switch Ethernet ou un Hub . . . . . .8
Étape 2 : Installation de l'Assistant de Recherche (Discovery Wizard) . . . . . . . .9
Configuration du PA à l'aide de l'Assistant de Recherche . . . . . . . . . . . . . . . . . . .11
Configuration des paramètres du réseau sans fil . . . . . . . . . . . . . . . . . . . . . . . .15
Dépannage . . . . . . . . . . . . . . . . . . . . . . . . . . . . . . . . . . . . . . . . . . . . . . . .29
Information . . . . . . . . . . . . . . . . . . . . . . . . . . . . . . . . . . . . . . . . . . . . . . . .30
Page 40

INTRODUCTION
Merci d'avoir choisi le Point d'Accès Sans Fil (PA) de Belkin. Soyez les
bienvenus dans le monde des réseaux sans fil. Vous pouvez désormais profiter
de cette nouvelle technologie incroyable et vous déplacer librement chez vous
ou dans votre bureau — sans vous préoccuper des câbles. Le PA sert de pont
entre le réseau câblé existant et vos ordinateurs équipés d'un dispositif sans
fil. Vous serez prêt à communiquer en réseau en quelques minutes grâce à la
simplicité de l'installation et de la configuration. Lisez attentivement la
totalité de ce manuel afin d'être certain de tirer le meilleur parti de votre PA.
1
Page 41

INTRODUCTION
Fonctions clés
Couverture d'une zone étendue à haut débitLe PA de Belkin permet de couvrir
une zone intérieure dans un rayon de 90 mètres et une zone extérieure dans
un rayon de 548 m.
Cryptage de sécurité jusqu'à 128 bits
Votre PA de Belkin peut crypter (brouiller) les ondes radio émises de manière
à ce que vous soyez assurés de la sécurité de vos données. Cette
fonctionnalité de cryptage facultative vous permet de crypter sur 64 ou 128
bits grâce à une clé que vous entrez vous-même.
Filtrage des adresses MAC
Pour une plus grande sécurité, vous pouvez créer une liste d'adresses MAC. Il
s'agit des identificateurs uniques des clients qui sont autorisés à accéder à
votre réseau sans fil. Chaque ordinateur dispose de sa propre adresse MAC. Il
vous suffit d'entrer ces adresses dans une liste grâce à l'interface utilisateurs
basée sur le Web afin de contrôler l'accès à votre réseau.
Fonctionne avec les ordinateurs PC et Mac®
Le PA prend en charge plusieurs environnements réseau, tels que Mac OS® 8.x,
9.x, X v10.x, AppleTalk®, Linux®, Windows® 95, 98, Me, NT®, 2000, et XP, et
plusieurs autres.
Remarque : Il est possible d'administrer le PA par le biais d'un navigateur Web,
sans avoir recours au logiciel inclus. Le logiciel inclus est compatible avec Windows
98 SE, Me, 2000 et XP seulement, mais N'EST PAS nécessaire pour utiliser le Point
d'Accès.
Interface utilisateur basée sur le Web
Vous pouvez accéder aux fonctions avancées de votre PA par le biais de votre
navigateur Web, sans avoir besoin d'installer un logiciel supplémentaire sur
votre ordinateur. Aucun disque à installer ou surveiller. Vous pouvez même
apporter des modifications et effectuer les fonctions de configuration sur tout
ordinateur du réseau, rapidement et en toute simplicité.
Applications et avantages
• Solution abordable pour relier plusieurs ordinateurs en un réseau sans fil
• Mise en réseau pour particuliers ou petites entreprises
• Permet l'installation simple et rapide d'un petit réseau à usage privé ou pour
les petites entreprises.
2
Page 42

INTRODUCTION
Contenu de l'emballage
• Point d'Accès Réseau Sans Fil de Belkin
• Bloc d'alimentation
• CD-ROM avec logiciel
• Manuel de l'utilisateur
• Carte d'enregistrement
Configuration requise pour le logiciel de gestion facultatif
• Windows® 98SE, Me, 2000, ou XP
• Minimum 64 Mo de mémoire vive
Configuration Requise
• Protocole réseau TCP/IP installé sur au moins un ordinateur
• Câble réseau CAT5 (ou catégorie supérieure)
• Microsoft® Internet Explorer 4.0 ou version ultérieure, ou Netscape® 4.0 ou
version ultérieure.
3
Page 43

INTRODUCTION
Spécifications
Normes :
IEEE 802.3 10Base-T Ethernet/100 Base-Tx Ethernet
IEEE 802.11b
Sans fil :
Technologie radio : DSSS (Direct Sequence Spread Spectrum)
802.11b : 11, 5.5, 2, 1 Mbits/s
802.11b : CCK, DQPSK, DBPSK
bande ISM 2.412-2.497 GHz
802.11b : 11 pour l'Amérique du Nord, 14 pour le Japon et 13 pour l'Europe
WEP à 64 et 128 bits
Protocoles pris en charge :
CSMA/CD, TCP, IP, UDP, et DHCP (client)
Gestion :
basée sur le navigateur
Nombre max. d'utilisateurs :
32 (WLAN)
Ports :
1 port RJ45 10Base-T/100Base-Tx
1 prise d'alimentation
1 bouton de réinitialisation
Voyants lumineux :
Alimentation
Activité LAN
Activité WLAN
4
Page 44

PRÉSENTATION DE VOTRE POINT D'ACCÈS
Le PA a été conçu pour être placé sur un bureau (à l'horizontale ou à la
verticale) ou fixé au mur. Son boîtier compact permet d'économiser l'espace
sur la surface de travail lorsque placé à la verticale. Tous les câbles sont fixés
à l'arrière du PA afin de faciliter l'organisation et l'utilisation. Les voyants
lumineux visibles à l'avant du PA vous fournissent des informations sur
l'activité et l'état du réseau.
Panneau avant
Voyant WLAN
Voyant LAN (Réseau)
Voyant lumineux d'alimentation
Indique que le WAP est alimenté
Éteint Le PA est éteint
Rouge Le PA est prêt
Voyant lumineux WLAN
Éteint Aucune activité réseau sans fil
Vert clignotant Indique que le PA fonctionne
Voyant réseau (LAN)
Éteint Aucune activité réseau au port
Vert Périphérique 10Base-T connecté
Orange Périphérique 10Base-Tx connecté
Clignotant Activité au port
(Orange ou Vert)
Panneau arrière
Voyant Alimentation/Prêt
Prise d’alimentation
Port réseau RJ-45
5
Page 45

PRÉSENTATION DE VOTRE POINT D'ACCÈS
Prise d'alimentation
Branchez le bloc d'alimentation fourni sur cette prise.
Port Ethernet RJ45
Branchez un câble Ethernet sur cette prise et branchez-le à un port RJ45
10BaseT ou 100Base-T ouvert sur un switch, un routeur ou un hub.
Bouton de réinitialisation
Le bouton de réinitialisation est utilisé lorsque le PA fonctionne de façon
incongrue Lorsque vous réinitialisez le PA, celui-ci retrouve un
fonctionnement normal et les paramètres de configuration demeurent
inchangés. Vous pouvez aussi rétablir la configuration par défaut à l'aide du
bouton de réinitialisation. Utilisez cette option lorsque vous avez oublié votre
mot de passe personnalisé, par exemple.
a. Redémarrer le PA
Appuyez et relachez le bouton de réinitialisation. Les voyants lumineux du PA
clignoteront pendant quelques instants. Le voyant d'alimentation clignote.
Lorsque le voyant d'alimentation est allumé en continu, la réinitialisation est
terminée.
b. Rétablissement des paramètres par défaut
Appuyez et maintenez enfoncé le bouton de réinitialisation pendant 5
secondes, puis relâchez-le. Les voyants lumineux du PA clignoteront pendant
quelques instants. Le voyant d'alimentation clignote. Lorsque le voyant
d'alimentation est allumé en continu, le rétablissement des paramètres est
terminé.
Antenne bipolaire rotative
Une antenne bipolaire unidirectionnelle est située sur le côté du PA. Elle peut
pivoter à 180 degrés. Pour un meilleur fonctionnement, elle doit être orientée
en position verticale.
6
Page 46

CHOIX DU SITE D'INSTALLATION
La performance de votre réseau sans fil dépend du choix de l'emplacement de
votre PA. À l'intérieur, votre PA offre de façon générale une zone de
couverture d'un rayon de 90 mètres ou plus. Toutefois, certains matériaux de
construction et autres obstacles se trouvant dans un immeuble peuvent
grandement affecter le signal sans fil et réduire la portée. De manière
générale, le meilleur emplacement pour votre PA est le centre de la zone de
couverture sans fil. Pour les habitations à plusieurs étages, placez votre PA le
plus près possible du centre de la maison; par exemple, il se peut que vous
deviez placer le PA sur un étage supérieur.
Soyez vigilants lors du choix de l'emplacement de votre PA
• N'oubliez pas que des appareils ou des objets volumineux tels que le
réfrigérateur ou les lave-linge/sèche-linge peuvent se trouver de l'autre
côté du mur dans la zone que vous pensez choisir pour l'installation du PA.
• Placez votre PA sur le dessus d'un bureau, loin d'étagères de métal
ou de boîtiers d'ordinateur.
• Ne placez aucun objet ou composant sur votre PA.
• Assurez-vous que l'antenne pointe vers le HAUT en tout temps.
• Les teintures UV pour fenêtres à base de métal peuvent affecter la
performance de votre réseau sans fil. Ne placez pas votre PA près d'une
fenêtre teintée.
Nous comprenons que dans la plupart des cas, il vous sera difficile de placer
votre PA au centre de votre zone de couverture. Si vous éprouvez des
difficultés à obtenir la couverture désirée, placez votre PA le plus haut
possible. Les périphériques sans fil fonctionnent de façon optimale lorsqu'il
n'y a pas d'obstacles entre l'ordinateur et le PA. Le PA peut aussi être fixé au
mur, les antennes pointant toujours vers le HAUT. Il existe d'autres solutions
pour étendre votre zone de couverture sans fil. Visitez le site
www.belkin.com/networking pour les connaître.
Le signal sans fil peut être affecté par différents facteurs, incluant les réseaux
sans fil de vos voisins, les fours à micro-ondes en fonctionnement, et les
téléphones sans fil 2.4 GHz. Même si ces situations peuvent affecter la
performance du réseau, votre réseau sans fil fonctionnera de façon normale
dans la plupart des environnements dans lesquels on retrouve ces appareils.
7
Page 47

INSTALLATION RAPIDE
Le PA est configuré de façon à pouvoir fonctionner sans installation. Vous
n'avez qu'à brancher le PA à votre réseau déjà en place et vous ajoutez
instantanément des fonctionnalités sans fil à votre réseau. Nul besoin de
configuration. Belkin fournit un logiciel qui vous permettra de rechercher et
vous connecter au Point d'Accès afin d'apporter des modifications aux
paramètres. Avant d'utiliser le logiciel, vous devez mettre en route le Point
d'Accès. Après avoir mis en route le PA, vous pouvez utiliser le logiciel afin
d'apporter des modifications aux paramètres. Veuillez suivre les instructions
d'installation ci-dessous.
Étape 1 : Connectez le PA à un Routeur, un Switch Ethernet ou un Hub
Vérifiez le contenu de l'emballage. Vous devriez y trouver les articles suivants:
• Point d'Accès Réseau Sans Fil de Belkin
• Bloc d'alimentation
• CD-ROM avec logiciel
• Manuel de l'utilisateur
• Carte d'enregistrement
1. Choisissez un endroit approprié pour votre PA, tel que décrit dans la
section précédente de ce manuel.
2. Branchez un câble CAT5 entre le PA et le port LAN de votre routeur, switch
Ethernet ou hub. Branchez le bloc d'alimentation sur le PA en insérant le
connecteur CC rond dans la prise d'alimentation CC du PA. Branchez le bloc
d'alimentation sur la prise murale. Vérifiez que les témoins Power et
Liaison sont allumés. S'ils sont tous les deux allumés, cela indique que le
PA est correctement branché.
3. La connexion et l'installation de votre PA est terminée.
8
Page 48

INSTALLATION RAPIDE
Étape 2 : Installation de l'Assistant de Recherche (Discovery Wizard)
L'Assistant de Recherche est un outil pratique vous permettant de rechercher et
vous connecter à votre PA. L'Assistant de Recherche n'est nécessaire que
lorsque vous désirez apporter des changements aux paramètres du PA. Sinon,
de façon générale, le PA fonctionne sans configuration préalable. Puisque le PA
est considéré comme un client DHCP, il obtiendra automatiquement un adresse
IP du serveur DHCP de votre réseau. Puisque cette adresse est plutôt aléatoire,
l'Assistant de Recherche recherche le PA pour vous. Ainsi, vous n'aurez pas à
effectuer plusieurs manipulations afin de déterminer l'adresse IP de votre PA.
1. Insérez le CD dans le lecteur de CD-ROM.
2. L'écran de l'utilitaire d'installation du point d'accès sans fil de Belkin
apparaît automatiquement. S'il n'apparaît pas dans un laps de temps de 15
à 20 secondes, sélectionnez votre lecteur de CD-ROM, puis cliquez deux fois
sur le dossier " Fichiers ". Ensuite, cliquez deux fois sur l'icône " start.exe ".
3. Dans la fenêtre de menu, faites glisser votre souris sur le bouton " Install "
(Installer), puis sélectionnez " Click Here " (Cliquez ici) pour lancer le
programme d'installation du logiciel.
9
Page 49

INSTALLATION RAPIDE
4. L'assistant d'installation du logiciel est lancé. Cliquez sur " Next "
(Suivant) au premier écran.
5. Acceptez les termes d'utilisation, et cliquez sur " Next ", tout en suivant
une à une les étapes de l'Assistant. Cliquez sur " Next " (Suivant) au
dernier écran.
6. L'Assistant de Recherche est maintenant installé. Passez à la section
suivante pour savoir comment utiliser l'Assistant.
10
Page 50

CONFIGURATION DU PA À L'AIDE DE L'ASSISTANT DE RECHERCHE
1
. Après avoir installé l'Assistant, vous trouverez une icône sur votre
bureau. Double-cliquez sur cette icône pour lancer l'Assistant.
2. Lorsque vous lancez l'Assistant, vous verrez le mot “Scanning…”
(Recherche...). Ceci indique que l'Assistant est à la recherche de Point
d'Accès sur votre réseau.
3. Lorsque l'Assistant découvre la présence d'un ou plusieurs Points d'Accès, le
nom de ces Points d'Accès apparaîssent dans cette fenêtre. Cliquez sur le
nom du Point d'Accès.
4. Cliquez sur "Connect" (Connexion). Ceci aura pour effet de lancer votre
navigateur Web.
11
Page 51

CONFIGURATION DU PA À L'AIDE DE L'ASSISTANT DE RECHERCHE
5. Dans la fenêtre de votre navigateur apparaîtra la page de connexion du PA.
Le PA est livré sans mot de passe défini. À l'écran de connexion, laisser le
champ de mot de passe vide, et cliquez sur " Submit " (Envoyer) pour vous
connecter.
6. Vous êtes maintenant connectés au PA. Vous pouvez effectuer les
modifications désirées. Passez à la section suivante afin de connaître
comment utiliser l'interface.
Déconnexion du PA
Seulement un ordinateur à la fois peut se connecter au PA afin d'apporter des
modifications à ses paramètres. Une fois l'utilisateur connecté pour apporter
des modifications, il existe deux méthodes de déconnexion. Vous pouvez par
exemple cliquer sur le bouton "Logout" (Déconnexion). La seconde méthode
est automatique. La connexion expirera après un intervalle de temps
spécifique. L'intervalle de temps par défaut est de 10 minutes. Vous pouvez le
modifier à votre guise, mais il doit être compris entre 1 et 99 minutes. Pour
de plus amples informations, référez-vous à la section intitulée "Modification
du paramètre de temporisation de la connexion".
12
Page 52

CONFIGURATION DU PA À L'AIDE DE L'ASSISTANT DE RECHERCHE
Description de l'interface utilisateur du Point d'Accès
La page d'accueil est la première page que vous verrez lorsque vous accéderez
à l'Interface utilisateur basée sur navigateur web (IU). La page d'accueil vous
montre un aperçu de l'état du PA et de ses paramètres. Vous pouvez accéder
aux pages de configuration avancée à partir de cette page.
(3)
(2) (4)
(5)
(1)
(6)
(7)
(1) Raccourcis de navigation
Vous pouvez accéder à n'importe quelle des pages de l'interface utilisateur
avancée du PA grâce aux raccourcis. Les raccourcis sont classées par
catégories logiques et groupés grâce à des onglets, rendant ainsi la tâche de
trouver un paramètre spécifique beaucoup plus simple. Lorsque vous cliquez
sur le titre de chaque onglet, vous obtiendrez une courte description de la
fonction de cet onglet.
(2) Bouton Accueil
Le bouton Accueil apparaît sur chaque page de l'IU. En appuyant sur ce
bouton, vous serez redirigé vers la page d'accueil.
(3) Bouton Aide
Le bouton “Aide” vous permet d'accéder aux rubriques d'aide de votre PA. Vous
pouvez aussi obtenir de l'aide à partir de plusieurs page, en cliquant simplement
sur le lien "Plus d'infos" situé à côté de certaines sections de ces pages.
13
Page 53

CONFIGURATION DU PA À L'AIDE DE L'ASSISTANT DE RECHERCHE
(4) Bouton Connexion/Déconnexion
Ce bouton vous permet de vous connecter et de vous déconnecter du PA.
Lorsque vous êtes connecté, ce bouton devient le bouton "Déconnexion".
Lorsque vous vous connectez au PA, vous serez redirigé vers une page de
connexion différente, à laquelle vous serez invité à entrer un mot de passe.
Une fois connecté, vous pouvez apporter des modifications aux paramètres.
Lorsque vous avez terminé, vous pouvez vous déconnecter en cliquant sur le
bouton "Déconnexion". Pour de plus amples informations concernant la
connexion au PA, référez-vous à la section intitulée "Connexion au PA".
(5) Information sur la version
Affiche la version du microprogramme, la version du code d'amorce, la version
du matériel et le numéro de série du PA.
(6) Paramètres réseau local (LAN)
Affiche les paramètres du Réseau local (LAN) du côté du PA. Vous pouvez
effectuer des modifications aux paramètres en cliquant sur un des liens
(Adresse IP, Masque de Sous-Réseau) ou en cliq uant sur le raccourci de
navigation "LAN", à la gauche de l'écran.
(7) Sans Fil
Affiche l'état des paramètres sans fil du PA. Vous pouvez effectuer des
modifications aux paramètres en cliquant sur l'un de ces liens ou en cliquant
sur les raccourcis de navigation, à la gauche de l'écran.
14
Page 54

CONFIGURATION DES PARAMÈTRES DU RÉSEAU SANS FIL
L'onglet Sans Fil vous permet d'effectuer des modifications aux paramètres du
réseau sans fil. À partir de cet onglet, vous pouvez apporter des modifications
au nom du réseau sans fil (SSID), le canal de fonctionnement et les
paramètres de sécurité par cryptage.
Paramètres IP
15
Page 55

CONFIGURATION DES PARAMÈTRES DU RÉSEAU SANS FIL
Modification du canal sans fil
Auto: Vous pouvez choisir un canal à partir d'un certain nombre de canaux.
Aux États-Unis, il existe 11 canaux. Au Royaume-Uni et dans la plupart des
pays d'Europe, il existe 13 canaux. Dans un petit nombre de pays, il existe
d'autres réglementations concernant les canaux permis. Votre PA est configuré
de manière à fonctionner sur le canal approprié à votre pays de résidence. Le
canal par défaut est 11 (si du moins vous ne résidez pas dans un pays où le
canal 11 est interdit). Ce canal peut être modifié au besoin. S'il existe
d'autres réseaux sans fil en fonction dans votre zone, assurez-vous que votre
réseau utilise un canal différent de celui des autres réseaux sans fil. Pour des
performances optimales, choisissez un canal distant d'au moins cinq canaux
du canal utilisé par les autres réseaux sans fil. Par exemple, si un autre réseau
utilise le canal 11, vous devriez utiliser le canal 6 ou inférieur pour votre
réseau. Pour modifier le canal, sélectionnez le canal à partir du menu
déroulant. Cliquez sur “Apply Changes” (Enregistrer les Modifications). La
modification est prise en compte immédiatement.
16
Page 56

CONFIGURATION DES PARAMÈTRES DU RÉSEAU SANS FIL
Modification du nom du réseau sans fil (SSID)
Le SSID (Service Set Identifier) correspond au nom du réseau sans fil. Il est parfois
appelé "Nom du Réseau". Le SSID par défaut de votre PA est "WLAN". Vous pouvez
modifier ce nom à votre guise, ou vous pouvez le laisser tel quel. S'il existe d'autres
réseaux sans fil en fonction dans votre zone, assurez-vous que votre SSID soit
unique (n'est pas le même que celui d'un autre réseau sans fil dans votre zone).
Pour modifier le SSID, entrer le SSID désiré dans le champ SSID (1) et cliquez sur
“Apply Changes” (Enregistrer les Modifications) (2). La modification est prise en
compte immédiatement. Si modifiez votre SSID, il est probable que vos ordinateurs
équipés d'adaptateurs sans fil nécessitent aussi une modification de leurs
paramètres, afin qu'ils puissent se connecter au nouveau nom de réseau. Référez-vous
à la documentation accompagnant votre adaptateur réseau sans fil pour de plus
amples informations sur la modification de ce paramètre.
(1)
(2)
Utilisation de la fonction de Diffusion du SSID
Remarque : Cette fonction avancée ne devrait être utilisée que par des utilisateurs aguerris.
Pour plus de sécurité, vous pouvez choisir de ne pas diffuser le SSID de votre réseau.
Cette fonction vous permet de cacher le nom de votre réseau lorsque d'autres
ordinateurs recherchent la présence de réseaux sans fil. Pour désactiver la diffusion
du SSID, enlevez le crochet se trouvant dans la case située à côté de "Diffusion SSID"
et cliquez ensuite sur "Enregistrer les Modifications". La modification est prise en
compte immédiatement. Chaque ordinateur doit maintenant être configuré de façon à
ce qu'il se connecte seulement à votre SSID spécifique; un SSID "TOUT" ne sera plus
accepté. Référez-vous à la documentation accompagnant votre adaptateur réseau
sans fil pour de plus amples informations sur la modification de ce paramètre.
Modifications des paramètres de sécurité
Votre PA est équipé de la norme de sécurité appelée WEP (Wired Equivalent
Privacy). Par défaut, la sécurité sans fil est désactivée. Pour activer la
sécurité, veuillez suivre les instructions suivantes.
17
Page 57

CONFIGURATION DES PARAMÈTRES DU RÉSEAU SANS FIL
Définition du cryptage WEP en utilisant une phrase de passe
Remarque aux utilisateurs d'ordinateurs Mac: L'option de Phrase de passe ne
fonctionne pas avec l'Apple® AirPort®. Pour configurer le mode de cryptage pour votre
ordinateur Mac, configurez-le de façon manuelle, tel que décrit à la section suivante.
1. Choisissez “128 bits automatiquement” ou “64 bits automatiquement”
à partir du menu déroulant.
2. Entrez une phrase de passe. Une phrase de passe, c'est en quelque sorte un
mot de passe. Elle peut être consituée de chiffres et de lettres. Après avoir
entré la phrase de passe, cliquez sur "Générer". Lorsque vous cliquez sur
"Générer", les champs de clés situés au dessus se rempliront.
Remarque : Le cryptage à 64 bits génère quatre clés alors que le cryptage à 128 bits
ne génère qu'une seule clé. Sélectionnez une clé au choix en cliquant le bouton
radio à côté de celle-ci. Cliquez sur “Apply Changes” (Enregistrer les Modifications).
3. Le mode de cryptage de votre PA est maintenant configuré. Vous devez
maintenant configurer tous les ordinateurs de votre réseau sans fil, afin
qu'ils aient tous les mêmes paramètres de cryptage (phrase de passe).
Référez-vous à la documentation accompagnant votre adaptateur réseau sans
fil pour de plus amples informations sur la modification de ce paramètre.
18
Page 58

CONFIGURATION DES PARAMÈTRES DU RÉSEAU SANS FIL
Définition manuelle du cryptage à l'aide d'une clé hexadécimale.
Une clé hexadécimale se compose d'un mélange de chiffres et de lettres
compris entre A et F et entre 0 et 9.
Les clés de 64 bits sont composées de cinq nombres à deux chiffres. Les clés
de 128 bits sont composées de 13 nombres à deux chiffres.
Par exemple:
AF 0F 4B C3 D4 = clé à 64 bits
C3 03 0F AF 0F 4B B2 C3 D4 4B C3 D4 E7 = clé à 128 bits
Composez votre clé dans les cases ci-dessous, en inscrivant deux caractères
compris entre A et F, et entre 0 et 9. Vous utiliserez cette clé pour configurer
les paramètres de cryptage de votre PA et de vos ordinateurs.
Remarque aux utilisateurs d'ordinateurs Mac: Les produits d'origine Apple AirPort
ne prennent en charge que le cryptage à 64 bits. Les produits Apple AirPort 2
peuvent prendre le charge le cryptage à 64 et 128 bits. Veuillez vérifier la version
du produit en votre possession. Si vous ne pouvez configurer votre réseau pour
utilisation du cryptage à 128 bits, essayez le cryptage à 64 bits.
1. Choisissez "64 bits manuellement” ou “128 bits manuellement” à partir du
menu déroulant.
19
Page 59

CONFIGURATION DES PARAMÈTRES DU RÉSEAU SANS FIL
2. Si vous utilisez le cryptage à 64 bits, vous verrez quatre champs. Si vous
utilisez le cryptage à 128 bits, vous verrez un seul champ. Dans le(s)
champ(s), entrez la(les) clé(s) hexadécimale(s) que vous désirez utiliser.
Lorsque vous avez terminé, sélectionnez un clé au choix en cliquant le
bouton radio à côté de celle-ci. Cliquez sur “Apply Changes” (Enregistrer
les Modifications).
3. Le mode de cryptage de votre PA est maintenant configuré. Vous devez
maintenant configurer tous les ordinateurs de votre réseau sans fil, afin
qu'ils aient tous les mêmes paramètres de cryptage (même clé
hexadécimale). Référez-vous à la documentation accompagnant votre
adaptateur réseau sans fil pour de plus amples informations sur la
modification de ce paramètre.
Configuration du Filtrage d'adresses MAC
Le Filtre d'Adresse MAC représente une puissante caractéristique de sécurité, vous
permettant d'autoriser, à des ordinateurs spécifiques, l'accès à votre réseau. Tout
ordinateur non spécifié dans la liste se verra refuser l'accès au réseau.
Pour activer le filtrage d'adresses MAC
1. Cochez la case “Enable MAC Address Filtering” (Activer le Filtrage des
Adresses MAC) (1).
2. Entrez les adresses MAC de tous les ordinateurs auxquels vous désirez
autoriser l'accès à votre réseau.
3. Cliquez sur "Add" (Ajouter) (2) pour ajouter des adresses à la liste.
4. Répétez pour chaque ordinateur que vous souhaitez ajouter à la liste.
5. Cliquez sur “Apply Changes” (Enregistrer les Modifications) pour terminer.
20
(1)
(2)
Page 60

CONFIGURATION DES PARAMÈTRES DU RÉSEAU SANS FIL
Liste de clients
Vous pouvez visualiser une liste de clients présentement reliés au PA grâce à
la fonction Liste de clients. Vous verrez l'adresse MAC du client et sa vitesse
de connexion.
Paramètres avancés
Belkin vous offre plusieurs fonctions avancées pouvant être configurées. À
l'exception du nom du PA, nous vous recommandons de n'apporter aucune
modification à ces paramètres que si vous le devez absolument. À partir de la
page de Paramètres avancés, vous pouvez :
• Modification du nom du PA (permet d'identifier le PA sur votre réseau)
• Sélectionnez le Mode débit de base (1, 2 Mbits/s ou 1, 2, 5.5, 11 Mbits/s)
• Sélectionnez un Taux de transmission (Auto, 11 Mbits/s, 5.5 Mbits/s, 2
Mbits/s, 1 Mbits/s)
• Définition du Seuil RTS
• Définition du Seuil de fragmentation
• Sélectionnez le Type de préambule (Long ou Court)
Lorsque vous apportez des modifications, assurez-vous de cliquer sur "Apply Changes"
(Enregistrer les modifications) afin que les modifications soient prises en compte.
Utilitaires
Cet écran vous permet de gérer plusieurs paramètres de votre PA et accomplir
certaines tâches liées à la gestion.
Redémarrer le PA
Parfois il peut parfois être utile de redémarrer le PA lorsque celui-ci fonctionne
de façon inappropriée. Redémarrer le PA n'affectera en rien vos paramètres de
configuration.
21
Page 61

CONFIGURATION DES PARAMÈTRES DU RÉSEAU SANS FIL
Redémarrage du PA pour rétablir le fonctionnement normal
1. Cliquez sur le bouton "Redémarrer le PA".
2. Le message suivant apparaît. Cliquez sur "OK".
3. Le message suivant apparaît. Le redémarrage du PA peut prendre jusqu'à 60
secondes. Il est important de ne pas mettre le PA hors tension pendant le
redémarrage.
4. Un compte à rebours de 30 secondes apparaît à l'écran. Lorsque le compte
à rebours est à zéro, le redémarrage du PA est terminé. La page d'accueil
du PA devrait apparaître automatiquement. Si ce n'est pas le cas, entrez
son adresse IP (adresse par défaut = 192.168.2.254) dans la barre d'adresse
de votre navigateur.
Rétablissement des paramètres par défaut du constructeur
Cette option rétablira les paramètres du PA vers les paramètres par défaut.
Nous vous recommandons de faire une copie de vos paramètres avant de
rétablir la configuration par défaut.
22
Page 62

CONFIGURATION DES PARAMÈTRES DU RÉSEAU SANS FIL
1. Cliquez sur le bouton "Rétablir les Paramètres par Défaut".
2. Le message suivant apparaît. Cliquez sur "OK".
3. Le message suivant apparaît. Le rétablissement des paramètres par défaut
inclut le redémarrage du PA. Ceci peut prendre jusqu'à 60 secondes. Il est
important de ne pas mettre le PA hors tension pendant le redémarrage.
4. Un compte à rebours de 30 secondes apparaît à l'écran. Lorsque le compte
à rebours est à zéro, le redémarrage du PA est terminé. La page d'accueil
du PA devrait apparaître automatiquement. Si ce n'est pas le cas, entrez
son adresse IP (adresse par défaut = 192.168.2.1) dans la barre d'adresse
de votre navigateur.
Sauvegarde d'une configuration actuelle
Vous pouvez sauvegarder votre configuration actuelle grâce à cette fonction.
La sauvegarde de votre configuration vous permettera de la rétablir
ultérieurement, en cas de perte ou de modification des paramètres. Nous vous
recommandons de faire une copie de vos paramètres avant de mettre à jour le
microprogramme.
23
Page 63

CONFIGURATION DES PARAMÈTRES DU RÉSEAU SANS FIL
1. Cliquez sur "Enregistrer". Une fenêtre appelée "Téléchargement de fichier"
s'ouvrira. Cliquez sur "Enregistrer".
2. Une fenêtre s'ouvrira, vous permettant de choisir un emplacement où
sauvegarder le fichier. Choisissez un emplacement. Vous pouvez nommer le
fichier à votre guise, ou utiliser le nom par défaut, soit "Config". Assurezvous de choisir un nom représentatif, pour facilement retrouver le fichier
plus tard. Lorsque vous avez choisi un emplacement et un nom pour le
fichier, cliquez sur “Sauvegarder”.
Votre configuration est maintenant sauvegardée.
24
Page 64

CONFIGURATION DES PARAMÈTRES DU RÉSEAU SANS FIL
3. Lorsque la sauvegarde est terminée, vous verrez apparaître la fenêtre
suivante. Cliquez sur "Fermer".
Rétablissement d'une Configuration Précédente
Cette option vous permet de rétablir une configuration sauvegardée
précédemment.
1. Cliquez sur "Parcourir".
Une fenêtre s'ouvrira,
vous permettant de
sélectionner
l'emplacement du fichier
de configuration. Tous les
fichiers de configuration
possèdent l'extension
".bin". Repérez le fichier
de configuration que
vous désirez rétablir, et
double-cliquez sur celuici.
25
Page 65

CONFIGURATION DES PARAMÈTRES DU RÉSEAU SANS FIL
2. Le programme vous demandera si vous désirez poursuivre. Cliquez sur "OK".
3. Une fenêtre de rappel apparaîtra. Le rétablissement de la configuration
peut prendre jusqu'à 60 secondes pour être complétée. Cliquez sur "OK".
4. Un compte à rebours de 60 secondes apparaît à l'écran. Lorsque le compte
à rebours est à zéro, la configuration du PA est terminée. La page d'accueil
du PA devrait apparaître automatiquement. Si ce n'est pas le cas, entrez
son adresse IP (adresse par défaut = 192.168.2.1) dans la barre d'adresse
de votre navigateur.
Mise à jour du microprogramme
De temps à autre, Belkin peut lancer une nouvelle version du microprogramme
du PA Ces mises à jour peuvent contenir des améliorations et des solutions
aux problèmes existants. Lorsque Belkin lance un nouveau microprogramme,
vous pouvez le télécharger directement du site web de Belkin, et ainsi mettre
à jour le microprogramme de votre PA avec la toute dernière version.
26
Page 66

CONFIGURATION DES PARAMÈTRES DU RÉSEAU SANS FIL
(1)
Mise à jour du microprogramme du PA
1. Dans la page de "Mise à jour du microprogramme", cliquez sur "Parcourir"
(1). Une fenêtre s'ouvrira, vous permettant de sélectionner l'emplacement
du fichier de mise à jour du microprogramme. Tous les fichiers
microprogrammes possèdent l'extension ".dlf".
2. Recherchez le fichier précédemment téléchargé. Sélectionnez le fichier en
double-cliquant sur le nom du fichier.
27
Page 67

CONFIGURATION DES PARAMÈTRES DU RÉSEAU SANS FIL
3. La boîte de dialogue "Mise à jour du Microprogramme" affichera
maintenant l'emplacement et le nom du fichier sélectionné. Cliquez sur
"Mise à jour".
4. Le programme vous demandera si vous désirez poursuivre. Cliquez sur "OK".
5. Vous verrez apparaître un autre message. Ce message vous indique que
votrePA peut ne pas répondre pendant une période pouvant aller jusqu'à
une minute, pendant laquelle le microprogramme est installé et le PA
redémarre. Cliquez sur "OK".
Un compte à rebours de 30 secondes apparaît à l'écran. Lorsque le compte à
rebours est à zéro, la mise à jour du microprogramme du PA est terminée. La
page d'accueil du PA devrait apparaître automatiquement.
Modification des Paramètres du Système
À la page des Paramètres du Système, vous pouvez entrer un nouveau mot de
passe administrateur, régler le fuseau horaire, activer la gestion à distance, et
activer/désactiver la fonction de NAT du Routeur.
28
Page 68

CONFIGURATION DES PARAMÈTRES DU RÉSEAU SANS FIL
Ajout ou Modification du mot de passe administrateur
Le PA est livré sans mot de passe défini. Si par souci de sécurité vous désirer
ajouter un mot de passe, vous pouvez le configurer ici. Écrivez votre mot de
passe et conservez-le dans un endroit sûr, puisque vous en aurez besoin plus
tard pour vous connecter au PA. Nous recommandons aussi l'ajout d'un mot de
passe si vous prévoyez utiliser la fonction de gestion à distance du PA.
29
Page 69

DÉPANNAGE
Vous trouverez des informations techniques sur le site
www.belkin.com/networking ou www.belkin.com dans la zone d'assistance
technique. Pour contacter l'assistance technique par téléphone,
appelez le 00 800 223 55 460.
30
Page 70

INFORMATIONS
Déclaration FCC
DÉCLARATION DE CONFORMITÉ À LA RÉGLEMENTATION FCC EN
MATIÈRE DE COMPATIBILITÉ ÉLECTROMAGNÉTIQUE.
"Nous, Belkin Components, sis au 501 West Walnut Street , Compton CA, 90220, États-Unis,
déclarons sous notre seule responsabilité que le produit :
auquel se réfère la présente déclaration,
est conforme aux normes énoncées à l'alinéa 15 de la réglementation FCC. Le fonctionnement est
assujetti aux deux conditions suivantes : (1) cet appareil ne peut pas provoquer d'interférence
nuisible et (2) cet appareil doit accepter toute interférence reçue, y compris des interférences
pouvant entraîner un fonctionnement non désiré.
Attention : Exposition aux radiations dues aux fréquences radio.
La puissance d'émission en sortie de cet appareil reste largement en dessous des limites
d'exposition aux fréquences radios de la FCC. Toutefois, il est conseillé d'utiliser l'appareil de
manière à minimiser les risques d'exposition
dans des conditions de fonctionnement normales.
Lorsqu'une antenne extérieure est raccordée à l'appareil, la placer de manière à
minimiser les risques d'exposition dans des conditions de fonctionnement normales. Pour éviter
la possibilité d'excéder les limites d'exposition aux fréquences radio de la FCC, il est conseillé
d'éviter qu'une personne se trouve à moins de 20 cm de l'antenne dans des conditions de
fonctionnement normales.
Avertissement de la Commission Fédérale des Communications (FCC)
L'appareil a été testé et satisfait aux limites de la classe B des appareils numériques, conformément
à la partie 15 de la réglementation de la FCC. Ces limites sont conçues de manière à assurer une
protection raisonnable contre les interférences nuisibles au sein d'une installation domestique.
L'appareil génère, utilise et peut irradier une énergie radio fréquence. S'il n'est pas installé et
utilisé conformément aux instructions, il peut causer des interférences nuisibles sur le plan de
la réception radio ou télévision, pouvant être déterminées en mettant l'appareil sous et hors
tension. L'utilisateur est invité à tester et à corriger l'interférence en prenant une des mesures
suivantes :
• Réorienter ou changer de place l'antenne de réception.
• Augmenter la distance entre l'appareil et le récepteur.
• Connecter l'appareil à une prise située sur un circuit différent de celui sur lequel le récepteur
est connecté.
• Consulter le revendeur ou un technicien en radio/TV pour obtenir de l'aide.
Modifications
La réglementation de la FCC souligne la nécessité d'indiquer à l'utilisateur que toute modification,
de quelque nature que ce soit et non agréée par Belkin Components, lui retire le droit
d'utiliser l'appareil.
F5D6130
31
Page 71

INFORMATIONS
Canada-Industrie Canada (IC)
La radio sans fil de cet appareil est conforme aux normes RSS 139 & RSS 210 d'Industrie Canada.
This Class B digital complies with Canadian ICES-003.
Cet appareil numérique de la classe B est conforme à la norme NMB-003 du Canada.
Europe - Prescription Union européenne
Les produits radio portant le label CE 0682 ou CE alert satisfont
à la directive R&TTE (1995/5/CE) établie par la Commission de la
Communauté européenne.
L'accord avec cette directive implique la conformité aux normes européennes suivantes (le
standard international équivalent est indiqué entre parenthèses).
• EN 60950 (IEC60950) - Sécurité des produits
• EN 300 328 Conditions techniques exigées pour les appareils radio
• ETS 300 826 Conditions générales en matière de compatibilité électromagnétique pour les
appareils radio.
Prière de consulter la plaque d'identification apposée sur votre produit Belkin pour déterminer le
type d'émetteur.
Les produits portant le label CE satisfont à la directive relative à la compatibilité
électromagnétique (89/336/EEC) et la directive sur la basse tension
(72/23/EEC) publiées par la Commission de la Communauté européenne. La
conformité avec ces normes sous-entend la
conformité avec les normes européennes suivantes (le standard international
équivalent est indiqué entre parenthèses).
• EN 55022 (CISPR 22) - Interférences électromagnétiques
• EN 55024 (IEC61000-4-2,3,4,5,6,8,11)- Immunité électromagnétique
• EN 61000-3-2 (IEC610000-3-2) - Émissions de courants harmoniques
• EN 61000-3-3 (IEC610000) - Émissions de courants harmoniques
• EN 60950 (IEC60950) - Sécurité des produits
Les produits équipés de transmetteurs radio portent la marque CE 0682 ou CE alert et peuvent
également afficher le logo CE.
Référez-vous au site http://networking.belkin.com pour connaître la certification réseau et les
directives R&TTE.
32
Page 72

INFORMATIONS
Garantie limitée à vie du produit de Belkin Corporation
Belkin Corporation garantit ce produit contre tout défaut matériel ou de fabrication pendant toute
sa durée de vie. Si l'appareil s'avère défectueux, Belkin le réparera ou le remplacera gratuitement,
à sa convenance, à condition que le produit soit retourné, port payé, pendant la durée de la
garantie, au dépositaire Belkin agréé auprès duquel le produit a été acheté. Une preuve d'achat
peut être exigée.
La présente garantie est caduque si le produit a été endommagé par accident, abus, usage
impropre ou mauvaise application, si le produit a été modifié sans autorisation écrite de Belkin,
ou si un numéro de série Belkin a été supprimé ou rendu illisible.
LA GARANTIE ET LES VOIES DE RECOURS SUSMENTIONNÉES FONT FOI EXCLUSIVEMENT ET
REMPLACENT TOUTES LES AUTRES, ORALES OU ÉCRITES, EXPLICITES OU IMPLICITES. BELKIN
REJETTE EXPRESSÉMENT TOUTES LES GARANTIES IMPLICITES, Y COMPRIS MAIS SANS RESTRICTION,
LES GARANTIES AFFÉRENTES À LA QUALITÉ LOYALE ET MARCHANDE ET À LA POSSIBILITÉ
D'UTILISATION À UNE FIN DONNÉE.
Aucun dépositaire, représentant ou employé de Belkin n'est habilité à apporter des modifications
ou adjonctions à la présente garantie, ni à la proroger.
BELKIN N'EST PAS RESPONSABLE DES DOMMAGES SPÉCIAUX, DIRECTS OU INDIRECTS, DÉCOULANT
D'UNE RUPTURE DE GARANTIE, OU EN VERTU DE TOUTE AUTRE THÉORIE JURIDIQUE, Y COMPRIS
MAIS SANS RESTRICTION LES PERTES DE BÉNÉFICES, TEMPS D'ARRÊT, FONDS DE COMMERCE,
REPROGRAMMATION OU REPRODUCTION DE PROGRAMMES OU DE DONNÉES MÉMORISÉS OU UTILISÉS
AVEC DES PRODUITS BELKIN OU DOMMAGES CAUSÉS À CES PROGRAMMES OU À CES DONNÉES.
Certains pays ne permettent pas d'exclure ou de limiter les dommages accidentels ou consécutifs
ou les exclusions de garanties implicites, de sorte que les limitations d'exclusions ci-dessus ne
s'appliquent pas dans votre cas. La garantie vous confère des droits légaux spécifiques. Vous
pouvez également bénéficier d'autres droits qui varient d'un pays à l'autre.
33
Page 73

belkin.com
Belkin Corporation
501 West Walnut Street
Compton • CA • 90220-5221 • États-Unis
Tél.: +1 310 898 1100
Fax: +1 310 898 1111
Belkin Components, Ltd.
Express Business Park • Shipton Way
Rushden • NN10 6GL • Royaume-Uni
Tél.: +44 (0) 1933 35 2000
Fax: +44 (0) 1933 31 2000
Belkin Components B.V.
Boeing Avenue 333
1119 PH Schiphol-Rijk • Pays-Bas
Tél.: +31 (0) 20 654 7300
Fax: +31 (0) 20 654 7349
Belkin Components GmbH
Hanebergstrasse 2
80637 Munich • Allemagne
Tél.: +49 (0) 89 143405 0
Fax: +49 (0) 89 143405 100
Belkin Components SAS
5 Rue du Petit Robinson • 3ème étage
78350 Jouy en Josas • France
Tél.: +33 (0) 1 34 58 14 00
Fax: +33 (0) 1 39 46 62 89
Belkin Ltd.
7 Bowen Cresent • West Gosford
NSW 2250 • Australie
Tél.: +61 (0) 2 4372 8600
Fax: +61 (0) 2 4372 8603
Assistance technique Belkin
Europe: 00 800 223 55 460
États-Unis: 877 736 5771
P74341ea
© 2004 Belkin Corporation. Tous droits réservés. Toutes les raisons commerciales sont des marques
déposées de leurs fabricants respectifs. Mac, Mac OS, AppleTalk, Apple, et AirPort sont des marques de commerce de
Apple Computer, Inc., enregistrées aux Etats-Unis et dans d’autres pays.
Page 74

Kabelloser Netzwerk
Access Point
Benutzerhandbuch
F5D6130
Page 75

INHALTSVERZEICHNIS
Einführung . . . . . . . . . . . . . . . . . . . . . . . . . . . . . . . . . . . . . . . . . . . . . . . . . 1
Wichtigste Merkmale . . . . . . . . . . . . . . . . . . . . . . . . . . . . . . . . . . . . . . . .2
Verpackungsinhalt . . . . . . . . . . . . . . . . . . . . . . . . . . . . . . . . . . . . . . . . .3
Optionale Verwaltung . . . . . . . . . . . . . . . . . . . . . . . . . . . . . . . . . . . . . . .3
Softwareanforderungen . . . . . . . . . . . . . . . . . . . . . . . . . . . . . . . . . . . . . .3
Systemanforderungen . . . . . . . . . . . . . . . . . . . . . . . . . . . . . . . . . . . . . . .3
Technische Daten . . . . . . . . . . . . . . . . . . . . . . . . . . . . . . . . . . . . . . . . . .4
Komponenten des Access Point . . . . . . . . . . . . . . . . . . . . . . . . . . . . . . . . . . . .5
Aufstellung des Access Point . . . . . . . . . . . . . . . . . . . . . . . . . . . . . . . . . . . . .7
Schnellkonfigurierung . . . . . . . . . . . . . . . . . . . . . . . . . . . . . . . . . . . . . . . . . .8
Schritt 1: Anschließen des Access Point an einen Router,
Ethernet-Switch oder Hub . . . . . . . . . . . . . . . . . . . . . . . . . . . . . . . . . . . .8
Schritt 2: Installieren des Erkennungs-Assistenten ("Discovery Wizard") . . . . . .9
Konfigurieren des Access Point mit dem Erkennungs-Assistenten . . . . . . . . . . . . .11
Konfigurieren der kabellosen Netzwerkeinstellungen . . . . . . . . . . . . . . . . . . . . . .15
Fehlerbehebung . . . . . . . . . . . . . . . . . . . . . . . . . . . . . . . . . . . . . . . . . . . . .29
Rechtliche Hinweise . . . . . . . . . . . . . . . . . . . . . . . . . . . . . . . . . . . . . . . . . .30
Page 76

EINFÜHRUNG
Wir beglückwünschen Sie zum Kauf des kabellosen Netzwerk Access Point von
Belkin und heißen Sie in der Welt der Funknetzwerke willkommen. Die Vorteile
dieser neuen, äußerst schnellen Technologie stehen zu Ihrer Verfügung: Jetzt
können Sie sich im Büro oder zu Hause frei bewegen— und müssen keine
Kabel mehr verlegen. Der Access Point dient als Brücke zwischen Ihrem
vorhandenen, verkabelten Netzwerk und den Computern, die mit einem
kabellosen Netzwerkadapter ausgestattet sind. Installation und Konfigurierung
sind verblüffend einfach. In wenigen Minuten können Sie Ihr Netzwerk
starten. Bitte lesen Sie dieses Handbuch vollständig durch, damit Sie Ihren
Access Point optimal nutzen können.
1
Page 77

EINFÜHRUNG
Wichtigste Merkmale
Große Flächenabdeckung bei hohen Datenraten
Mit dem Access Point von Belkin decken Sie eine Innenraumfläche mit bis zu
100 m Radius oder eine Außenfläche mit mehr als 500 m Radius ab.
Verschlüsselung mit bis zu 128 Bit
Der Belkin Access Point kann die übertragenen Funkwellen verschlüsseln, so
dass die Sicherheit Ihrer Daten gewährleistet bleibt. Mit der fakultativen
Verschlüsselung können Sie wahlweise mit 64 oder 128 Bit verschlüsseln. Den
Schlüssel geben Sie selbst ein.
MAC-Adressfilter
Sie können die Sicherheit erhöhen, indem Sie eine Liste von MAC-Adressen
festlegen (eindeutige Client-Kennungen), die auf Ihr Netzwerk zugreifen
dürfen. Jeder Computer verfügt über eine eigene MAC-Adresse. Sie können
diese MAC-Adressen in eine Liste auf der browsergestützten
Benutzeroberfläche eingeben und dadurch den Zugriff auf das Netzwerk
kontrollieren.
Geeignet für PCs und Macintosh® Computer
Der Access Point unterstützt eine Reihe von Netzwerkumgebungen, darunter
unter anderem Mac OS® 8.x, 9.x, X v10.x, AppleTalk®, Linux®, Windows® 95,
98, ME, NT®, 2000 und XP.
Hinweis: Der Access Point kann ohne die enthaltene Software über einen WebBrowser verwaltet werden. Die enthaltene Software unterstützt Windows 98 SE, ME,
2000 und XP, ist jedoch nicht zur Arbeit mit dem Access Point erforderlich.
Webgestützte Erweiterte Benutzeroberfläche
Sie können die vielseitigen Funktionen des Access Point bedienerfreundlich
mit Ihrem Browser einstellen, ohne zusätzliche Software auf dem Computer zu
installieren. Es müssen also keine Installations-CDs eingelegt werden. Alle
Änderungen und Konfigurierungen können Sie einfach und schnell an einem
beliebigen Computer im Netz vornehmen.
Anwendungsbereiche und Vorzüge
• Kostengünstiges Einbinden von mehreren kabellosen Computern in ein
Netzwerk
• Netzwerke im SoHo-Bereich (Kleinbüros und Privatanwender)
• Schnelle und einfache Installation von Netzwerken für Privatanwender,
2
Page 78

EINFÜHRUNG
Freiberufler und kleine Unternehmen
Verpackungsinhalt
• 1 kabelloser Belkin Netzwerk Access Point
• Netzteil
• Software-CD
• Benutzerhandbuch
• Registrierkarte
Anforderungen für die optionale Verwaltungssoftware
• Windows® 98 SE, ME, 2000 oder XP
• Mindestens 64 MB Arbeitsspeicher
Systemanforderungen
• Mindestens ein Computer mit installiertem TCP/IP-Protokoll
• Netzwerkkabel, mindestens CAT5
• Microsoft® Internet Explorer 4.0 oder höher oder Netscape® 4.0 oder höher
3
Page 79

EINFÜHRUNG
Technische Daten
Standards:
IEEE 802.3 10Base-T Ethernet/100 Base-Tx Ethernet
IEEE 802.11b
Kabelloser Aufbau:
Funk-Technologie: DSSS (Direct Sequence Spread Spectrum)
802.11b: 11 / 5,5 / 2 / 1 Mbit/s
802.11b: CCK, DQPSK, DBPSK
2,412-2,497 GHz ISM Frequenzband
802.11b: 11 für Nordamerika, 14 für Japan, 13 für Europa
64/128 Bit WEP-Verschlüsselung
Unterstütztes Protokoll:
CSMA/CD, TCP, IP, UDP und DHCP (Client)
Verwaltung:
browsergestützt
Max. Benutzeranzahl:
32 (WLAN)
Schnittstellen:
1 x 10Base-T/100Base-Tx RJ45-Schnittstelle
1 Netzbuchse
1 Rücksetztaste
LEDs:
Betrieb
LAN-Aktivität
WLAN-Aktivität
4
Page 80

KOMPONENTEN DES ACCESS POINT
Der Access Point kann vertikal oder horizontal auf dem Schreibtisch platziert
oder an der Wand befestigt werden. Durch seine schmale Bauweise verbraucht
er bei vertikaler Aufstellung besonders wenig Platz auf dem Schreibtisch. Alle
Kabel sind an der Rückseite des Access Point angeschlossen, um eine
ordentliche Installation zu erleichtern. Die LED-Anzeigen sind gut sichtbar an
der Vorderseite des Access Point angebracht, so dass Sie Status und Aktivität
des Netzwerks jederzeit ablesen können.
Bedienfeld
WLAN-Anzeige
Betriebs-/Bereitschaftsanzeige
Zeigt an, dass der Access Point
mit Strom versorgt wird.
Aus Access Point abgeschaltet
Rot Access Point betriebsbereit
WLAN-Anzeige
Aus WLAN abgeschaltet
Blinkanzeige (grün) Access Point funktioniert
LAN-Anzeige
Betriebs-/
Bereitschaftsanzeige
LAN-Anzeige
Aus Kein Netzwerk mit der Schnittstelle verbunden
Grün 10BaseT-Gerät angeschlossen
Orange 100Base-Tx-Gerät angeschlossen
Blinkanzeige Blinkanzeige
(orange oder grün)
Rückseite
Netzteilanschluss
RJ-45 LANSchnittstelle
5
Page 81

KOMPONENTEN DES ACCESS POINT
Netzteilanschluss
Schließen Sie hier das enthaltene 5 V DC Netzteil an.
RJ45 Ethernet-Buchse
An diese Buchse schließen Sie ein Ethernet-Kabel an. Das andere Kabelende
wird an eine freie RJ45 10Base T- oder 100Base-T Schnittstelle eines Switch,
Routers oder Hubs angeschlossen.
Rücksetztaste
Die Taste "Reset" (Rücksetzstaste) wird nur in seltenen Fällen benötigt, wenn
der Access Point nicht mehr korrekt arbeitet. Beim Zurücksetzen wird der
Access Point in den Normalbetrieb versetzt. Die programmierten Einstellungen
bleiben erhalten. Mit der Rücksetztaste können Sie auch die
Werkseinstellungen wiederherstellen. Dies ist zum Beispiel nützlich, wenn Sie
das von Ihnen eingestellte Kennwort vergessen haben.
a) Zurücksetzten des Access Point
Drücken Sie kurz die Rücksetztaste. Die Anzeigen am Access Point blinken kurz
auf. Die Betriebs-/Bereitschaftsanzeige beginnt zu blinken. Wenn die Betriebs/Bereitschaftsanzeige wieder Dauerlicht anzeigt, ist das Zurücksetzen
abgeschlossen.
b) Wiederherstellen der Werkseinstellungen
Halten Sie die Rücksetztaste fünf Sekunden lang gedrückt. Die Anzeigen am
Access Point blinken kurz auf. Die Betriebs-/Bereitschaftsanzeige beginnt zu
blinken. Wenn die Betriebs-/Bereitschaftsanzeige wieder Dauerlicht anzeigt,
ist die Wiederherstellung abgeschlossen.
Drehbare Dipolantenne
Eine Dipolrichtantenne, die seitlich am Access Point angebracht ist. Die
Antennen sind um 180° drehbar. Die Antenne sollte für eine optimale
Leistung möglichst vertikal positioniert werden.
6
Page 82

AUFSTELLUNG DES ACCESS POINT
Die richtige Positionierung des Access Point ist für eine optimale Leistung des
kabellosen Netzwerks wichtig. Normalerweise kann der kabellose Access Point in
Innenräumen eine Kreisfläche mit mindestens 90 m abdecken. Allerdings können
sich die verwendeten Baustoffe und andere Hindernisse in einem Gebäude
beträchtlich auf das Funksignal auswirken und die Reichweite verringern. Der
Access Point sollte weitmöglichst in der Mitte der Fläche aufgestellt werden, die
vom Funknetz abgedeckt werden soll. In Gebäuden mit mehreren Stockwerken
sollte der Access Point jedoch möglichst in der Gebäudemitte platziert werden.
Oft empfiehlt sich daher die Aufstellung in einem der oberen Stockwerke.
Wählen Sie den Standort des Access Point sorgfältig aus:
• Achten Sie auf Geräte und große Gegenstände wie Kühlschränke,
Waschmaschinen oder Trockner, die sich auf der anderen Seite der Wand
befinden, an der Sie den Access Point aufstellen möchten.
• Platzieren Sie den Access Point auf einem Schreibtisch und halten Sie
Abstand zu Metallschränken und Computergehäusen.
• Stellen Sie keine Gegenstände oder Bauteile auf dem Access Point ab.
• Sorgen Sie dafür, dass die Antenne jederzeit nach oben ausgerichtet ist.
• Fensterscheiben mit UV-Schutz auf Metallbasis können die Funkleistung
beeinträchtigen. Stellen Sie den Access Point nicht an einer getönten
Fensterscheibe auf.
Es ist wünschenswert, aber nicht immer möglich, den Access Point in der
Mitte des Funkbereichs aufzustellen. Wenn Sie Schwierigkeiten haben, den
gesamten gewünschten Funkbereich abzudecken, sollten Sie den Access Point
so hoch wie möglich positionieren. Die Verbindung funktioniert am besten,
wenn die Sicht zwischen dem kabellosen Computer und dem Access Point
unverdeckt ist, also keine Hindernisse im Weg sind. Der Access Point kann
auch an einer Wand montiert werden, wobei die Antenne(n) nach oben
auszurichten sind. Es gibt weitere Möglichkeiten für eine Vergrößerung des
Funkbereichs. Lösungsvorschläge finden Sie unter
http://www.belkin.com/networking for solutions.
Das Funksignal kann durch benachbarte kabellose Netzwerke,
Mikrowellengeräte und schnurlose Telefone, die im 2,4 GHz Bereich senden,
beeinträchtigt werden. Meistens funktioniert das kabellose Netzwerk jedoch
auch in diesen Fällen problemlos.
7
Page 83

SCHNELLKONFIGURIERUNG
Der Access Point ist werkseitig so eingestellt, dass er sofort nach der
Aufstellung in Betrieb genommen werden kann. Wenn Sie den Access Point an
das vorhandene Netzwerk anschließen, erweitern Sie es um ein Funknetz, ohne
dass eine weitere Konfiguration erforderlich ist. Im Paket enthalten ist eine
Software, mit der Sie den Access Point gezielt in das Netzwerk einbinden können, so dass Sie die Einstellungen ohne großen Aufwand ändern oder
anpassen können. Vor Gebrauch der Software müssen Sie den Access Point an
das Netzwerk anschließen. Danach können Sie die Einstellungen mit der
Software verändern. Folgen Sie den nachstehenden Schritten, um den Access
Point zu installieren:
Schritt 1: Anschließen des Access Point an einen Router, Ethernet-Switch
oder Hub
Überprüfen Sie den Inhalt der Packung. Die Packung müsste Folgendes enthalten:
• 1 kabelloser Belkin Access Point
• Netzteil
• Software-CD
• Benutzerhandbuch
• Registrierkarte
1. Wählen Sie einen geeigneten Aufstellungsort für den Access Point aus, wie
weiter oben beschrieben.
2. Verbinden Sie den Access Point und den Router, Ethernet-Switch oder Hub
mit einem CAT5-Kabel. Schließen Sie das Netzteil an die Netzbuchse des
Access Point an. Stecken Sie das Netzteil in eine ordnungsgemäß geerdete
Steckdose. Überprüfen Sie, ob die Betriebsanzeige und die
Verbindungsanzeige aufleuchten. Leuchten beide LEDs auf, ist der Access
Point korrekt angeschlossen.
3. Sie haben den Access Point angeschlossen und aufgestellt.
8
Page 84

SCHNELLKONFIGURIERUNG
Schritt 2: Installieren des Erkennungs-Assistenten ("Discovery Wizard")
Der Erkennungs-Assistent hilft Ihnen dabei, den Access Point korrekt
aufzustellen und anzuschließen. Sie benötigen ihn nur dann, wenn Sie die
Einstellungen des Access Point verändern möchten. Andernfalls kann der Access
Point normalerweise ohne jede Konfigurierung in Betrieb genommen werden.
Da der Access Point werkseitig als DHCP-Client konfiguriert ist, bezieht er seine
IP-Adresse automatisch vom DHCP-Server in Ihrem Netzwerk. Da diese Adresse
willkürlich festgelegt wird, sucht der Erkennungs-Assistent den Access Point im
Netzwerk, damit Sie die IP-Adressse nicht selbst bestimmen müssen.
1. Legen Sie die CD in das CD-ROM-Laufwerk ein.
2. Das Installationsprogramm für den Belkin Access Point wird automatisch
geöffnet. Erscheint das entsprechende Fenster nicht innerhalb von 15 bis 20
Sekunden, wählen Sie das CD-ROM-Laufwerk aus, und doppelklicken Sie auf den
Ordner "Files" (Dateien). Doppelklicken Sie dann auf das Symbol "start.exe".
3. Ziehen Sie im Menüfenster den Mauszeiger auf die Schaltfläche "Install"
(Installieren), und wählen Sie "Click here" (Hier klicken) aus, um das
Installationsprogramm zu starten.
9
Page 85

SCHNELLKONFIGURIERUNG
4. Der Softwareinstallations-Assistent wird gestartet. Klicken Sie im folgenden
Bildschirm auf “Next” (Weiter):
5. Bestätigen Sie die Annahme der Benutzervereinbarung, und klicken Sie auf
"Weiter". Folgen Sie den Schritten des Installations-Assistenten. Klicken
Sie im letzten Bildschirm auf “Finish” (Fertig stellen).
6. Der Erkennungs-Assistent ist jetzt installiert. Im nächsten Abschnitt wird
die Bedienung des Assistenten beschrieben.
10
Page 86

KONFIGURIEREN DES ACCESS POINT MIT DEM ERKENNUNGS-ASSISTENTEN
1. Nach der Installation des Erkennungs-Assistenten wird auf dem
Desktop ein Symbol angezeigt. Doppelklicken Sie auf das Symbol,
um den Assistenten zu starten.
2. Beim Starten des Assistenten wird die Meldung "Scanning..." angezeigt. Das
bedeutet, dass der Assistent nach Access Points in Ihrem Netzwerk sucht.
3. Wenn der Assistent Ihre(n) Access Point(s) gefunden hat, wird der jeweilige Name
in diesem Fenster angezeigt. Klicken Sie auf den Namen des Access Points.
4.Klicken Sie auf "Connect" (Verbinden). Dadurch starten Sie Ihren Browser.
11
Page 87

KONFIGURIEREN DES ACCESS POINT MIT DEM ERKENNUNGS-ASSISTENTEN
5. Im Browser wird die Anmeldeseite des Access Point angezeigt. Der Access
Point wird ohne festgelegtes Kennwort ausgeliefert. Lassen Sie die
Kennwortzeile auf dem Anmeldefenster leer, und klicken Sie auf "Submit"
(Absenden), um sich anzumelden.
6. Jetzt sind Sie mit dem Access Point verbunden und können die
gewünschten Änderungen vornehmen. Im folgenden Abschnitt des
Handbuchs wird die Bedienung der Benutzeroberfläche gezeigt.
Abmelden vom Access Point
Es kann stets nur ein Computer am Access Point angemeldet sein, um dessen
Einstellungen zu ändern. Wenn sich ein Benutzer angemeldet hat, um
Änderungen vorzunehmen, gibt es zwei Möglichkeiten, um den Computer
wieder abzumelden. Durch Klicken auf "Logout" (Abmelden) wird der Computer
abgemeldet. Die Abmeldung kann auch automatisch erfolgen. Nach einer
bestimmten Zeitspanne läuft die Abmeldung ab. Die Standard-Anmeldezeit
beträgt 10 Minuten. Sie können eine Frist zwischen 1 und 99 Minuten
einstellen. Weitere Informationen hierzu finden Sie im Abschnitt "Ändern des
Anmeldezeitlimits".
12
Page 88

KONFIGURIEREN DES ACCESS POINT MIT DEM ERKENNUNGS-ASSISTENTEN
Arbeiten mit der Benutzeroberfläche des Access Point
Wenn Sie die Erweiterte Benutzeroberfläche öffnen, sehen Sie zunächst die
Homepage. Sie gibt einen Überblick über den Status und die Einstellungen des
Access Point. Alle weiteren Konfigurationsseiten können von dieser Seite aus
abgerufen werden.
(3)
(2) (4)
(5)
(1)
(6)
(7)
(1) Navigationslinks
Wenn Sie auf einen dieser Links klicken, gelangen Sie direkt auf eine
Einstellungsseite der Benutzeroberfläche. Die Links sind in mehrere Rubriken
gegliedert und auf Registerkarten angeordnet, damit Sie die gesuchten
Einstellungen leichter finden. Wenn Sie auf den roten Reiter einer Registerkarte
klicken, wird eine kurze Beschreibung der Registerfunktion angezeigt.
(2) Home-Schaltfläche
Die Home-Schaltfläche finden Sie auf jeder Seite der Erweiterten
Benutzeroberfläche. Mit ihr gelangen Sie zurück auf die Homepage.
(3) Schaltfläche "Help" (Hilfe)
Mit der Schaltfläche "Help" (Hilfe) öffnen Sie die Hilfeseiten des Access Point.
Die Hilfe kann auf vielen Seiten mit der Option "more info" (Weitere
Informationen) aufgerufen werden, die neben vielen Abschnitten angezeigt
wird.
13
Page 89

KONFIGURIEREN DES ACCESS POINT MIT DEM ERKENNUNGS-ASSISTENTEN
(4) Schaltfläche "Login/Logout" (Anmelden/Abmelden)
Mit dieser Schaltfläche melden Sie sich am Access Point an oder ab. Wenn Sie
am Access Point angemeldet sind, heißt die Schaltfläche "Logout"
(Abmelden). Beim Anmelden gelangen Sie auf eine eigene Anmeldeseite, auf
der Sie ein Kennwort eingeben müssen. Wenn Sie am Access Point angemeldet
sind, können Sie seine Einstellungen verändern. Wenn Sie mit den Änderungen
fertig sind, können Sie sich mit der Schaltfläche "Logout" (Abmelden) wieder
vom Access Point abmelden. Weitere Hinweise zur Anmeldung finden Sie unter
"Anmelden an den Access Point".
(5) Version Info (Version)
Ruft die Firmware-Version, Bootcode-Version, Hardwareversion und die
Seriennummer des Access Point ab.
(6) LAN Settings (LAN-Einstellungen)
Ruft die LAN-seitigen Einstellungen des Access Point ab. Sie können die
Einstellungen ändern, indem Sie auf einen der Links (IP Address, Subnet Mask)
oder auf den Navigationslink "LAN" links auf dem Bildschirm klicken.
(7) Wireless (Funk)
Zeigt den Funkstatus des Access Point an. Sie können die Einstellungen
ändern, indem Sie auf einen dieser Links oder auf einen der Navigationslinks
links auf dem Bildschirm klicken.
14
Page 90

KONFIGURIEREN DES KABELLOSEN NETZWERKS
Auf der Registerkarte "Wireless" (Funk) können Sie die Einstellungen des
kabellosen Netzwerks ändern. Sie können Änderungen am Namen des
kabellosen Netzwerks (SSID), am Betriebskanal und an der
Sicherheitsverschlüsselung vornehmen.
IP-Einstellungen
15
Page 91

KONFIGURIEREN DES KABELLOSEN NETZWERKS
Wechseln des Funkkanals
Autom. Sie können einen von mehreren Betriebskanälen auswählen. In den
USA stehen 11 Kanäle zur Auswahl, in Großbritannien und den meisten
anderen europäischen Ländern 13 Kanäle. Bestimmte Länder haben
abweichende Funkvorschriften. Der Access Point ist für den zulässigen Betrieb
Ihres Landes konfiguriert. Der Standardkanal ist Kanal 11, es sei denn, Sie
befinden sich einem Land, in dem Kanal 11 nicht zugelassen ist. Bei Bedarf
können Sie den Kanal wechseln. Sind im Funkgebiet weitere kabellose
Netzwerke in Betrieb, sollten Sie für Ihr Netzwerk einen Kanal wählen, der von
diesen nicht genutzt wird. Wählen Sie am besten einen Kanal aus, der sich um
mindestens fünf Kanalstufen von den anderen Netzwerken unterscheidet. Wenn
zum Beispiel ein Netzwerk auf Kanal 11 betrieben wird, stellen Sie Ihr
Netzwerk auf Kanal 6 oder einen niedrigeren Kanal ein. Sie wechseln den
Kanal, indem Sie den Kanal aus der Dropdown-Liste wählen. Klicken Sie auf
"Apply Changes" (Änderungen übernehmen). Die Änderung wird unmittelbar
wirksam.
16
Page 92

KONFIGURIEREN DES KABELLOSEN NETZWERKS
Ändern des Netzwerknamens (SSID)
Zur Kennzeichnung Ihres kabellosen Netzwerks dient die sogenannte SSID, der
Netzwerkname. Die Standard-SSID des Access Point lautet "WLAN". Sie können
sie beliebig verändern oder die Vorgabe beibehalten. Werden weitere kabellose
Netzwerke im Funkbereich betrieben, sollten Sie eine eindeutige SSID festlegen,
also eine SSID, die von keinem anderen Netzwerk in der Nähe genutzt wird. Sie
können die SSID ändern, indem Sie im Feld "SSID" die gewünschte SSID
eingeben (1) und auf "Apply Changes" (Änderungen übernehmen) klicken(2).
Die Änderung wird unmittelbar wirksam. Wenn Sie die SSID ändern, müssen
Ihre kabellos vernetzten Computer ggf. an den neuen Netzwerknamen angepasst
werden. Informationen zur Vornahme dieser Änderung finden Sie in der
Dokumentation Ihres kabellosen Netzwerkadapters.
(1)
(2)
Verwenden der Funktion "Broadcast SSID" (SSID rundsenden)
Hinweis: Diese weiterführende Funktion sollte nur von erfahrenen Benutzern
bedient werden.
Aus Sicherheitsgründen können Sie festlegen, dass die SSID Ihres Netzwerks
nicht gesendet wird. Dadurch bleibt der Netzwerkname Computern verborgen, die
in der Umgebung nach kabellosen Netzwerken suchen. Sie stellen das Senden der
SSID ab, indem Sie das Kontrollkästchen "Broadcast SSID" (SSID rundsenden)
deaktivieren und dann auf "Apply Changes" (Änderungen übernehmen) klicken.
Die Änderung wird unmittelbar wirksam. Jeder Computer muss jetzt genau auf die
SSID Ihres Netzwerks eingestellt werden. Die SSID-Einstellung "Any" (Beliebig)
wird nicht mehr akzeptiert. Informationen zur Vornahme dieser Änderung finden
Sie in der Dokumentation Ihres kabellosen Netzwerkadapters.
Ändern der Sicherheitsseinstellungen
Ihr Access Point ist mit dem Sicherheitsstandard WEP (Wired Equivalent Privacy)
ausgestattet. In der Voreinstellung ist die kabellose Sicherheitseinstellung
deaktiviert. Zur Aktivierung gehen Sie vor wie im Folgenden beschrieben.
17
Page 93

KONFIGURIEREN DES KABELLOSEN NETZWERKS
Einstellen der WEP-Verschlüsselung mit einer Kennfolge
Hinweis an Mac-Benutzer: Die Kennfolgenoption eignet sich nicht für Apple®
AirPort®. Wenn Sie die Verschlüsselung für Ihren Mac-Computer nutzen möchten,
müssen Sie sie manuell festlegen wie im nächsten Abschnitt beschrieben.
1. Wählen Sie die Option "128 Bit automatically" oder "64 Bit automatically"
aus dem Dropdown-Menü.
2. Geben Sie eine Kennfolge ein. Eine Kennfolge ist eine Art Kennwort. Sie
kann aus Ziffern und Buchstaben bestehen. Klicken Sie nach der Eingabe
der Kennfolge auf "Generate" (Erzeugen). Wenn Sie auf "Generate" klicken,
werden die Schlüsselfelder darunter ausgefüllt.
Hinweis: Bei der 64-Bit-Verschlüsselung werden vier Schlüssel, bei der 128-BitVerschlüsselung nur ein Schlüssel erzeugt. Wählen Sie den gewünschten Schlüssel,
indem Sie auf das entsprechende Optionsfeld klicken. Klicken Sie auf "Apply
Changes" (Änderungen übernehmen).
3. Jetzt ist die Verschlüsselung im Access Point eingestellt. Jeder der
Computer im kabellosen Netzwerk muss jetzt auf die gleiche Kennfolge
eingestellt werden. Informationen zur Vornahme dieser Änderung finden Sie
in der Dokumentation Ihres kabellosen Netzwerkadapters.
18
Page 94

KONFIGURIEREN DES KABELLOSEN NETZWERKS
Manuelles Einstellen der Verschlüsselung mit einem Hexadezimalschlüssel
Ein Hexadezimalschlüssel besteht aus Ziffern (0-9) und den Buchstaben A-F.
64-Bit-Schlüssel bestehen aus fünf zweistelligen Zahlen. 128-Bit-Schlüssel
bestehen aus dreizehn zweistelligen Zahlen.
Beispiel:
AF 0F 4B C3 D4 = 64-Bit-Schlüssel
C3 03 0F AF 0F 4B B2 C3 D4 4B C3 D4 E7 = 128-Bit-Schlüssel
Legen Sie in den Feldern unten Ihren Schlüssel fest, indem Sie zwei Zeichen
zwischen A-F und 0-9 eingeben. Mit diesem Schlüssel programmieren Sie später die
Verschlüsselungseinstellungen in Ihrem Access Point und den kabellosen Computern.
Hinweis an Mac-Benutzer:Produkte mit dem ursprünglichen Apple AirPort
unterstützen nur die 64-Bit-Verschlüsselung. Produkte mit Apple AirPort 2
unterstützen sowohl 64-Bit- als auch 128-Bit-Verschlüsselung. Bitte prüfen Sie,
welche Version Ihr Produkt nutzt. Wenn Sie Ihr Netzwerk nicht mit 128
verschlüsseln können, sollten Sie es mit der 64-Bit-Verschlüsselung probieren.
1. Wählen Sie die Option "64 Bit manually" (64 Bit manuell) oder "128 Bit
automatically" (128 Bit manuell) aus dem Dropdown-Menü.
19
Page 95

KONFIGURIEREN DES KABELLOSEN NETZWERKS
2. Wenn Sie mit 64-Bit-Verschlüsselung arbeiten, werden vier Schlüsselfelder
angezeigt. Wenn Sie mit 128-Bit-Verschlüsselung arbeiten, wird nur ein
Schlüsselfeld angezeigt. Geben Sie in das/die Feld(er) den/die
gewünschten Hexadezimalschlüssel ein. Wählen Sie nach der Eingabe den
gewünschten Schlüssel aus, indem Sie das entsprechende Optionsfeld
markieren. Klicken Sie auf "Apply Changes" (Änderungen übernehmen).
3. Jetzt ist die Verschlüsselung im Access Point eingestellt. Jeder der Computer
im kabellosen Netzwerk muss jetzt auf denselben Hexadezimalschlüssel
eingestellt werden. Informationen zur Vornahme dieser Änderung finden Sie
in der Dokumentation Ihres kabellosen Netzwerkadapters.
Einstellen des MAC-Adressfilters
Der MAC-Adressfilter ist eine leistungsstarke Sicherheitsfunktion, mit der Sie
festlegen können, welche Computer auf den Access Point zugreifen dürfen.
Allen Computern, die nicht in der Liste stehen, wird der Zugriff auf das
Netzwerk verweigert.
So aktivieren Sie den MAC-Adressfilter
1. Markieren Sie die Option "Enable MAC Address Filtering" (MAC-Adressfilter
aktivieren) (1).
2. Geben Sie die MAC-Adresse eines Computers ein, dem Sie Zugriff auf das
Netzwerk einräumen möchten.
3. Klicken Sie auf "Hinzufügen" (2), um die Adresse in die Liste einzutragen.
4. Wiederholen Sie diese Schritte für jeden weiteren Computer, den Sie in die
Liste aufnehmen möchten.
(1)
(2)
5. Klicken Sie auf "Apply Changes" (Änderungen übernehmen), um den
Vorgang abzuschließen.
20
Page 96

KONFIGURIEREN DES KABELLOSEN NETZWERKS
Client-Liste
Mit der Funktion "Client List" (Client-Liste) können Sie alle Clients auflisten
lassen, die derzeit mit dem Access Point verbunden sind. Angegeben werden
die MAC-Adresse des jeweiligen Clients und seine Verbindungsgeschwindigkeit.
Erweiterte Einstellungen
Belkin bietet eine Reihe zusätzlicher Funktionen. Mit Ausnahme des Namens
des Access Point wird jedoch empfohlen, dass Sie diese Einstellungen
unverändert lassen, wenn nicht ein besonderer Grund für eine Änderung
vorliegt. In den Erweiterten Einstellungen können Sie Folgendes durchführen:
• Ändern des AP-Namens (mit dem der Access Point im Netzwerk eindeutig
identifiziert wird)
• Auswählen des Basisratensatzes (1, 2 Mbit/s oder 1, 2, 5,5, 11 Mbit/s)
• Auswählen der Übertragungsrate (Autom., 11 Mbit/s, 5,5 Mbit/s, 2 Mbit/s,
1 Mbit/s)
• Einstellen des RTS-Grenzwerts
• Einstellen der Fragmentierungsgrenze
• Auswählen des Präambeltyps (lang oder kurz)
Wenn Sie Änderungen vornehmen, müssen Sie auf "Apply changes" (Änderung
übernehmen) klicken, damit sie wirksam werden.
Dienstprogramme
Auf dieser Seite können Sie verschiedene Parameter des Access Point
verwalten und Verwaltungsfunktionen durchführen.
Neustarten des Access Point
Wenn der Access Point nicht mehr fehlerfrei funktioniert, kann oft ein
Neustart Abhilfe schaffen. Bei einem Neustart bleiben die
Konfigurationseinstellungen erhalten.
21
Page 97

KONFIGURIEREN DES KABELLOSEN NETZWERKS
Wiederherstellen des Normalbetriebs durch einen Neustart
1. Klicken Sie auf die Schaltfläche "Restart AP" (Access Point neu starten).
2. Das folgende Meldungsfenster wird geöffnet. Klicken Sie auf "OK".
3. Das folgende Meldungsfenster wird geöffnet. Der Neustart des Access Point
nimmt bis zu 60 Sekunden in Anspruch. Während des Neustarts darf der
Access Point keinesfalls abgeschaltet werden.
4. Auf dem Bildschirm erscheint ein Countdown von 30 Sekunden. Wenn der
Countdown Null erreicht, wird der Access Point neu gestartet. Jetzt müsste
die Access Point-Homepage automatisch geöffnet werden. Geben Sie
andernfalls die Adresse des Access Point (standardmäßig 192.168.2.254) in
die Adresszeile des Browsers ein.
Wiederherstellen der Werkseinstellungen
Mit dieser Option setzen Sie alle Einstellungen des Access Point auf die
Werkseinstellungen zurück. Es wird empfohlen, die aktuellen Einstellungen zu
sichern, bevor Sie die Werkseinstellungen wiederherstellen.
22
Page 98

KONFIGURIEREN DES KABELLOSEN NETZWERKS
1. Klicken Sie auf die Schaltfläche "Restore Defaults" (Vorgaben wiederherstellen).
2. Das folgende Meldungsfenster wird geöffnet. Klicken Sie auf "OK".
3. Das folgende Meldungsfenster wird geöffnet. Beim Wiederherstellen der
Werkseinstellungen wird der Access Point neu gestartet. Das kann bis zu 60
Sekunden dauern. Während des Neustarts darf der Access Point keinesfalls
abgeschaltet werden.
4. Auf dem Bildschirm erscheint ein Countdown von 30 Sekunden. Wenn der
Countdown Null erreicht, werden die Werkseinstellungen des Access Point
wiederhergestellt. Jetzt müsste die Access Point-Homepage automatisch
geöffnet werden. Geben Sie andernfalls die Access Point-Adresse
(standardmäßig 192.168.2.1) in die Adresszeile des Browsers ein.
Sichern der aktuellen Konfiguration
Mit dieser Funktion können Sie die aktuelle Konfiguration sichern. Dadurch
können Sie Ihre Einstellungen später wiederherstellen, wenn sie
zwischenzeitlich verloren gehen oder geändert werden. Sie sollten die aktuelle
Konfiguration sichern, bevor Sie ein Firmware-Upgrade durchführen.
23
Page 99

KONFIGURIEREN DES KABELLOSEN NETZWERKS
1. Klicken Sie auf "Save" (Sichern). Das Fenster "File Download" (Datei
herunterladen) wird geöffnet. Klicken Sie auf "Save" (Sichern).
2.Es wird ein Fenster geöffnet, in dem Sie den Pfad für die
Konfigurationsdatei festlegen können. Legen Sie den Pfad fest. Sie können
einen beliebigen Dateinamen festlegen oder die Vorgabe "Config"
übernehmen. Geben Sie der Datei einen einprägsamen Namen, damit Sie sie
später wiederfinden. Wenn Sie Pfad und Namen der Datei festgelegt haben,
klicken Sie auf "Save" (Sichern).
Die Konfiguration ist jetzt gesichert.
24
Page 100

KONFIGURIEREN DES KABELLOSEN NETZWERKS
3. Nach dem Sichern erscheint das folgende Fenster. Klicken Sie auf "Close "
(Schließen).
Wiederherstellen einer früheren Konfiguration
Mit dieser Funktion können Sie eine gesicherte Konfiguration wieder
aktivieren.
1. Klicken Sie auf "Browse"
(Durchsuchen). Es wird
ein Fenster geöffnet, in
dem Sie den Pfad der
Konfigurationsdatei
festlegen können. Alle
Konfigurationsdateien
haben die Dateinamenerweiterung ".bin".
Doppelklicken Sie auf die
Konfigurationsdatei, die
Sie wiederherstellen
möchten.
25
 Loading...