


Alternate Setup Method
2928
Setting your Connection Type if you are a Telstra® BigPond User
[Austral ia Only ] Your user name and p as sword are pro vided t o y ou
by Telst ra Bi gP ond. Enter t his i nformation below. Choosing your state
fro m t he drop-dow n menu (6) will automatical ly fill in your login server
IP addre ss. I f you r log in serv er ad dress is diff eren t tha n the one
pro vided here, yo u may manual ly ente r the login serve r IP address by
placing a c heck in th e box next to “ User decide login s erver m anually”
(4) a nd ty pe in the address next to “ Lo gin S erver” (5). W he n you
have entered al l o f you r infor ma tion, c lick “Apply Changes” (7).
After you apply the c hanges, the “Intern et St at us ” i nd icator will read
“connect io n OK” if your Router is set up proper ly.
(1)
(2)
(3)
(4)
(5)
(1) Select your State
Select your state from th e drop-down menu (6). The “Login Server”
box will automatical ly be filled in with an I P a dd ress . If for some
rea son t his a dd re ss does not match the address t hat Tel st ra ha s
given you, you can ma nually enter the login s erver a ddre ss. S ee “U se r
decide login server manuall y” (4).
(6)
(7)
(2) User Name
Pro vided by y ou r I SP. Type in your user name here .
(3) Password
Type i n you r passw ord and ret ype i t i nt o the “Retyp e Pas sw ord” box
to confirm it.
(4) User decide login server manually
If your l ogin server IP ad dres s is not availabl e in the “Select Your
State” drop-down menu
IP addre ss by plac in g a check in the box next to “U se r dec id e l og in
server manually ” and type in the addres s n ex t t o “Logi n Ser ve r”
(6), you m ay ma nu ally en ter t he lo gi n s er ver
(5).
29
Alternate Setup Method
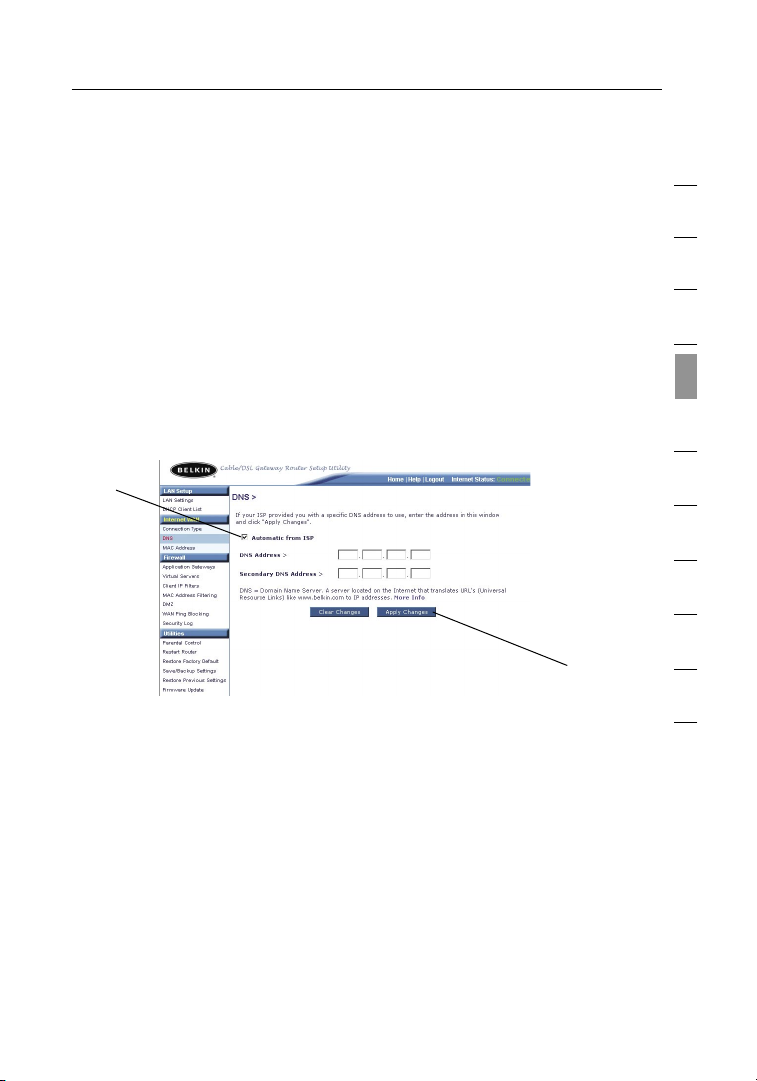
Setting Custom Domain Name Server (DNS) Settings
DNS is an ac ronym for Domain Name Server. A Domain Name Server
is a se rv er lo cated o n t he In te rnet that translates URLs (Univer sa l
Resource Links) like www.belkin.com to IP addres ses. Many IS Ps
do not requ ire you to e nter th is in formation into the Router. The
“Automat ic from ISP” check box
did not g ive y ou a speci fi c D NS address. If you are using a static IP
connecti on type , the n you may need to enter a sp ec if ic DN S a dd ress
and secondary DNS address f or yo ur co nn ection to wo rk proper ly.
If your c onnection type is dynamic or PPPoE, it is like ly th at you do
not have to en ter a DNS address. Leave the “Automatic from ISP”
check box checked. To e nt er th e DNS address settings, unchec k the
“Automat ic from ISP” check box a nd en te r y ou r D NS entr ie s i n the
spaces provided. Click “Apply Changes”
(1)
(1) s hould b e c he cked if yo ur IS P
(2) t o s av e the sett in gs .
(2)
1
2
3
4
sect ion
5
6
7
8
9
10
11
29
Alternate Setup Method
3130
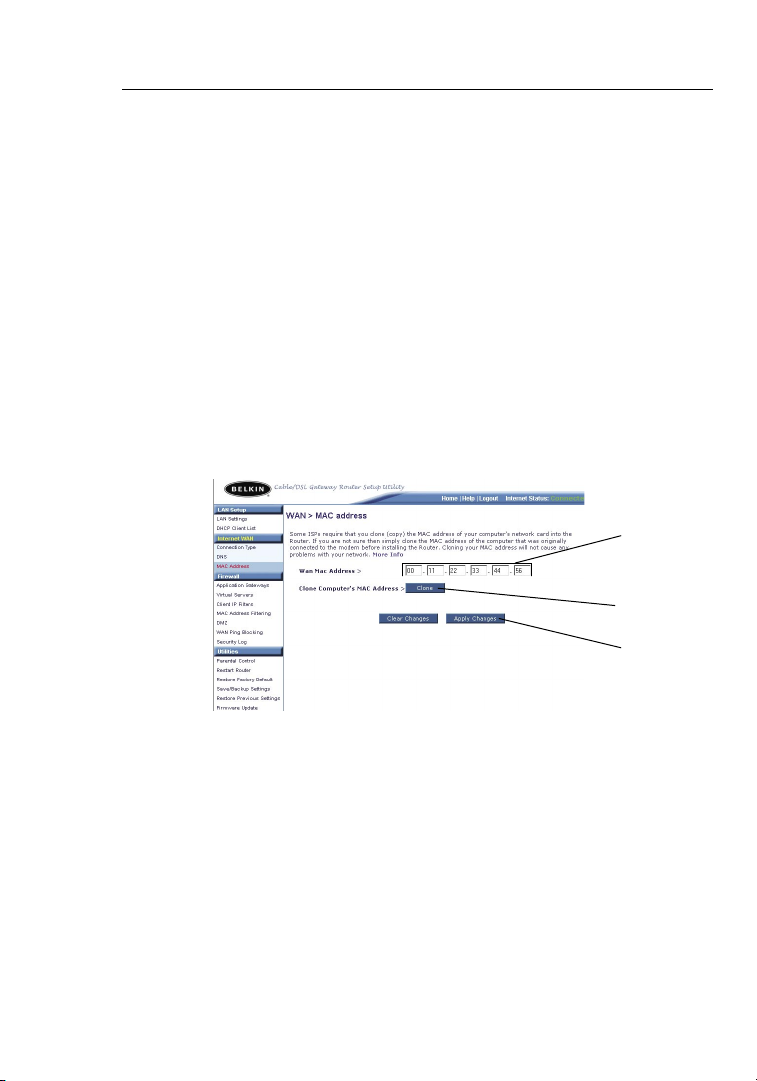
Configuring your WAN Media Access Controller (MAC) Address
All network componen ts incl ud ing c ards , adapt er s, an d routers,
have a un ique “serial number” called a MAC ad dres s. Your ISP may
rec ord the MAC address o f y ou r c om pu ter’s adap te r and only let that
particul ar comp ut er co nn ect t o t he Inte rnet service. When you install
the Router, its own M AC ad dres s wil l be “seen” by the ISP an d m ay
cause the connection not to work. Belkin has prov id ed th e a bi li ty to
clone (copy) the MAC addres s o f the comput er in to the Route r. This
MAC address, in tu rn, will be s ee n b y the ISP’s s ys tem a s t he orig in al
MAC address a nd wi ll al lo w the conn ec ti on to wo rk . If you are no t
sure w he ther yo ur IS P n ee ds to see the original MAC address, simply
clone the MAC addres s o f the comput er that was origina ll y c on ne cted
to the mo dem. Cloning the addres s w il l not caus e any problems with
your network.
(3)
(1)
(2)

31
Alternate Setup Method
Cloning your MAC Address
To clo ne yo ur MAC address, make sure th at yo u are using the
computer that was ORIGINALLY CONNECTED to your modem before
the Router was installed. Click the “Clone” button (1). Click “Apply
Changes” (2). Your MA C add ress is now cloned to th e R ou te r.
Entering a Specific MAC Address
In certain circ umstances you may need a sp ec ific WAN MAC addre ss.
You ca n man ua ll y e nt er on e in the “MAC Address” page. Type in a
MAC address i n the spac es provided
(2) to save the changes . The Router ’s WAN MAC address will now b e
changed to the MAC ad dres s you spec if ie d.
(3) a nd cl ic k “ Ap ply C ha nges”
1
2
3
4
sect ion
5
6
7
8
9
10
11
31

Using the Web-Based Advanced User Interface
3332
Using your Inter ne t b rowser, you can access the Router’s Web -B ased
Advanced User Interf ac e. In your browser, type “192.168.2 .1 ” ( do
not type in an ything else such as “h tt p://” o r “ ww w” ) t he n p ress the
“Enter” key.
You wi ll se e the Router ’s home pa ge in yo ur browser window.
LAN Setup
Clicking on the header of the L AN ta b (1) will take you t o t he LAN
tab’s hea de r p ag e. A quick descri pt ion o f the func ti on s c an be
found here. To view the settings or make c hanges to an y o f the LAN
settings , click on “LAN Settings ”
computer s, clic k on “DHCP Client List”
(1)
(2)
(3)
(2) o r t o view the list of connected
(3).
33
Using the Web-Based Advanced User Interface
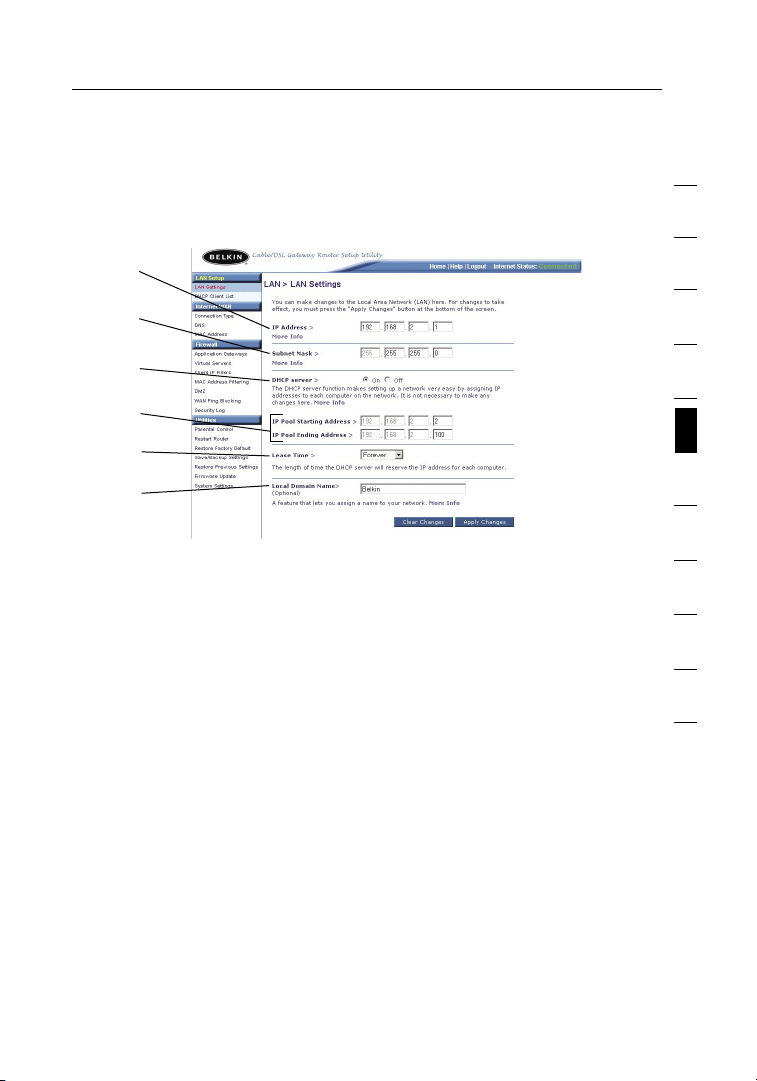
Changing LAN Settings
All settings for the interna l LAN setup of the Router can be vi ewed
and changed here.
(1)
(2)
(3)
(4)
(5)
(6)
(1) IP Address
The “IP a ddre ss ” i s the internal IP ad dres s of the Router. The default
IP addre ss is “192 .1 68.2.1”. To acce ss th e advan ce d s et up in te rface,
type this IP a ddre ss in to the address bar of yo ur browse r. Th is
address can b e cha ng ed if need ed . To change the IP a dd re ss , typ e in
the new I P a dd ress and click “Apply Change s” . T he IP address you
choose should be a no n-ro ut able IP. E xa mples of a non- routab le
IP are :
192.168. x. x (wh ere x is a ny thing between 0 a nd 25 5)
10.x.x.x (where x is an yt hi ng be tween 0 an d 255 )
1
2
3
4
5
sect ion
6
7
8
9
10
11
(2) Subnet Mask
ADVANCED FEATU RE ! T he re is no n eed t o cha ng e t he subn et ma sk .
It is p os sible to c ha nge t he su bn et ma sk if nece ss ar y. Only make
changes to the subnet mask if y ou sp ec ifically have a reaso n to do
so. The d efault setting is “255.255.255 .0 ”.
(3) DHCP Server
The DHCP ser ve r function makes se tt ing up a network very ea sy
by assigning I P addres ses to each com pu te r on the network
automat ic al ly. The def au lt setting is “ON”. The DH CP server can be
turned O FF if n ecessary. Turning off the DHCP ser ve r will require you
to manually set a static IP address for each c omputer on your network.
To turn off the DHCP se rv er, select “Off” and clic k “Apply Changes”.
33

Using the Web-Based Advanced User Interface
3534
(4) IP Pool
The range of I P a dd ress es set aside for dynamic assign me nt to the
computer s on your network. The default is 2–100 (99 computers). If
you want to ch ange th is nu mber, y ou ca n b y enter in g a new startin g
and ending IP addres s a nd clic ki ng on “App ly Ch an ge s”. T he DH CP
server can assign 100 IP a ddre ss es au to matically. T hi s m ea ns th at
you cannot specify an IP a ddre ss po ol larger than 1 00 co mputers. For
instance , start in g a t 50 means you have to en d a t 150 or lower so as
not to ex ceed the 1 00 -client limit. The starting IP address m us t b e
lower in number than the e nding I P a dd ress .
(5) Lease Time
The length of time th e D HC P s er ve r w il l reserve the IP address f or
each computer. The default setti ng is forever, meaning that any time
a computer is assigned an IP ad dres s by the DHCP server, the IP
address will no t c ha nge f or th at pa rt ic ular computer. Setting lease
times for shorter intervals such as one day o r o ne hour frees IP
addresses after the specified period of time. This also means t hat a
particul ar comp ut er’s IP address m ay ch an ge ov er ti me . I f you have
set any o f t he ot he r adv an ced f ea ture s of the Router such as DMZ or
client IP filters, these are d ep endent on th e I P address. You w il l n ot
want these to change. We recommen d for this reason that y ou le ave
the lease time set to “F orever ”.
(6) Local Domain Name
You ca n set a local domain name (network name) for your network.
There is no need to change this setting unless you have a sp ecific
advanced need to do s o. You can name the network anything you
want such as “ MY NE TW ORK”. The de fault setting is “B elkin”.

35
Using the Web-Based Advanced User Interface
Viewing the DHCP Client List Page
You ca n vie w a list of t he co mputers (known as c lients), which are
connecte d to your network. You a re able to view the IP ad dress
the computer, the host name
one), and the MAC a dd re ss (3) of t he co mputer’s net wo rk in te rface
card ( NI C). P ress in g the “Ref resh”
there ha ve be en an y cha ng es , t he li st will be updated.
(1)
(2) ( if th e com pu ter h as be en as si gn ed
(4) b utton w ill u pdate t he li st. I f
(1) o f
(2)
(3)
(4)
1
2
3
4
5
sect ion
6
7
8
9
10
11
35

Using the Web-Based Advanced User Interface
3736
Configuring the Firewall
Your R ou ter i s equ ip ped w it h a firewall that will pro tect yo ur ne twork
fro m a wide array of common hacker attacks incl ud in g:
• IP Spoofing
• Land Attack
• Ping of D eath (PoD)
• Denial of Service (DoS)
• IP with z ero lengt h
• Smurf Attack
• TCP Null Scan
• SYN flood
• UDP flooding
• Tear D rop Attack
• ICMP defect
• RIP defect
• Fragment floodi ng
The firewall also ma sk s common ports th at are fre qu ently used to
attack networks. These ports appear to be “Stealth” me an ing that for
all intents an d purposes, they do not ex ist to a would-be hacker. You
can turn the firewal l function off if n ee ded; howev er, it is recommended
that you lea ve the fi rewall enabled. Di sa bling the firewa ll pro te ct ion will
not leave yo ur network completely v ulnerable to hacker a ttacks, bu t it
is recommende d that yo u leave the firewall en ab led.
37
Using the Web-Based Advanced User Interface
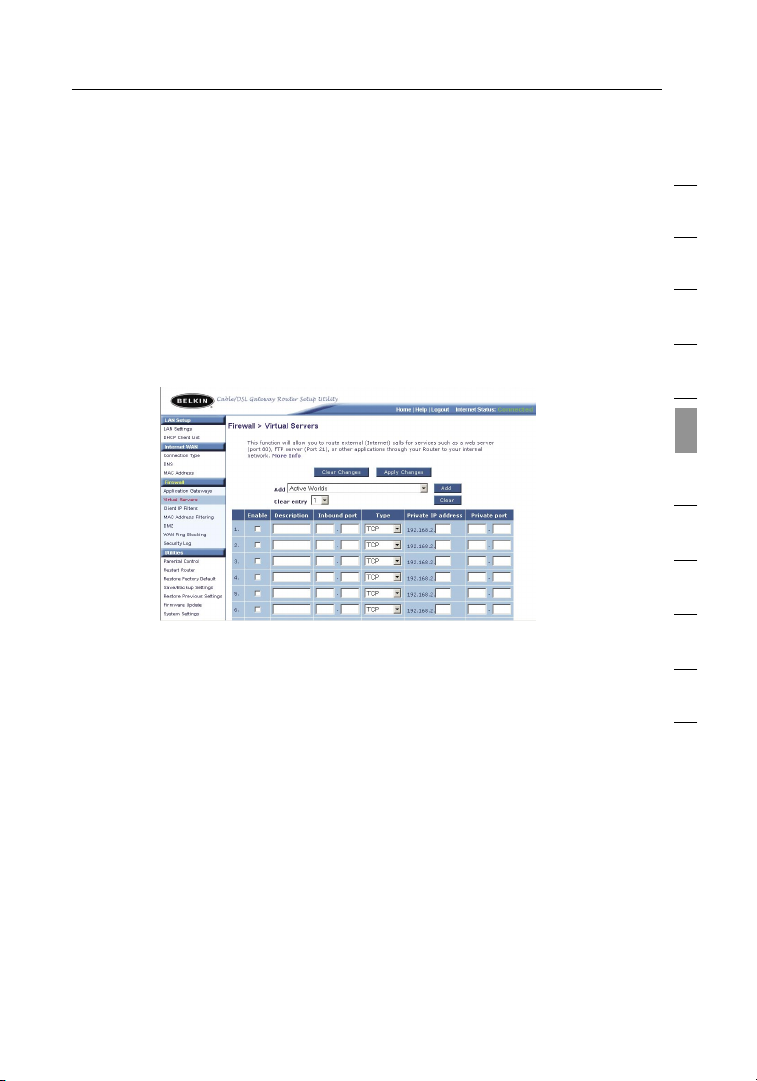
Configuring Virtual Servers
The “Vir tu al Se rv ers” fu nction will al lo w y ou to rou te ex te rnal (Internet)
calls for services such as a we b ser ve r ( po rt 80 ), FTP serve r (Port 21),
or other application s through your Router to your i ntern al netw or k.
Since your inter na l c om pu ters are protected by a fi re wa ll , m ac hines
fro m t he In te rnet cannot get to t hem b ecause they ca nnot be “s ee n”.
If you ne ed to co nf ig ure the “Virtual Servers” functi on for a specific
applicat io n, a list of common applicati on s h as been provided. If your
applicat io n is not listed, you will need to c ontact the a pplication
vendor to find out wh ich p ort s et tings you ne ed.
Choosing an Application
Select your applicat io n from the dro p- down li st. C lick “A dd”. The
settings will be transferred to the n ex t a va ilable space in t he sc reen.
Click “Apply Changes ” to save the setting for that a pplication. To
rem ove a n a pp li cation, select the number of the row that you want to
rem ove, then cl ick “ Clear”.
1
2
3
4
5
sect ion
6
7
8
9
10
11
Manually Entering Settings into the Virtual Server
To man ua lly e nt er se ttings, enter the I P a dd ress in the space pro vided
for the i ntern al (ser ve r) ma ch ine a nd th e por t( s) required to p ass ( use
a comma b etween multiple ports). Then select the port type (TCP
or UDP) a nd cl ick “ Ap ply C hanges”. You can only pass one port
per inter na l I P address. Opening ports in your fire wall can p os e a
security risk. You c an en ab le an d d is ab le se ttings very quickly. It is
rec ommended that you disable the settings when you are not using a
specific applic at ion.
37
Using the Web-Based Advanced User Interface
3938
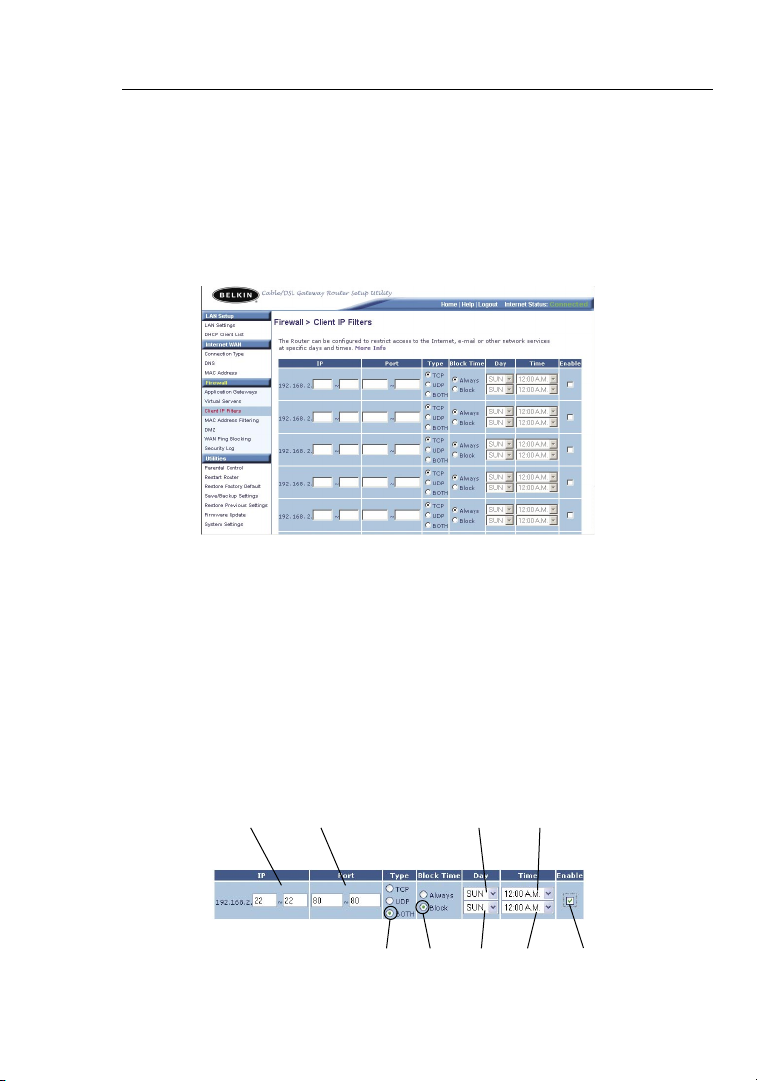
Setting Client IP Filters
The Router can be c on figure d t o restrict access to the Intern et ,
email, or other network services at specific days and times.
Restrict io n can be set for a si ng le co mputer, a ra nge o f com pu ters,
or multiple computer s.
To restric t Inter net access to a si ng le co mp uter fo r e xa mple, e nter
the IP ad dres s of the computer you wish to re st rict ac cess to in
the IP fi elds
Select “Both”
to block access all o f t he ti me . Sel ec t t he day to start on t op
the time to st art o n top (6), the day to en d on the bottom (7), and
the time to st op
Changes” . The comput er at the IP addres s y ou sp ec if ied w ill n ow be
blocked from In terne t acces s at the times you specified. Note: Be
sure y ou ha ve sele ct ed th e cor rect time zone under “Utilitie s> Sy st em
Settings > Time Zone” .
(1). Next, e nter “80” an d “ 80 ” in the “Port” fields (2).
(3). Select “Block” (4). You can also select “Always”
(5),
(8) o n t he bott om . S el ec t “ En able” (9). Cl ic k “Ap pl y
(1) (2) (5) (6)
(3) (4) (7) (8) (9)
39
Using the Web-Based Advanced User Interface
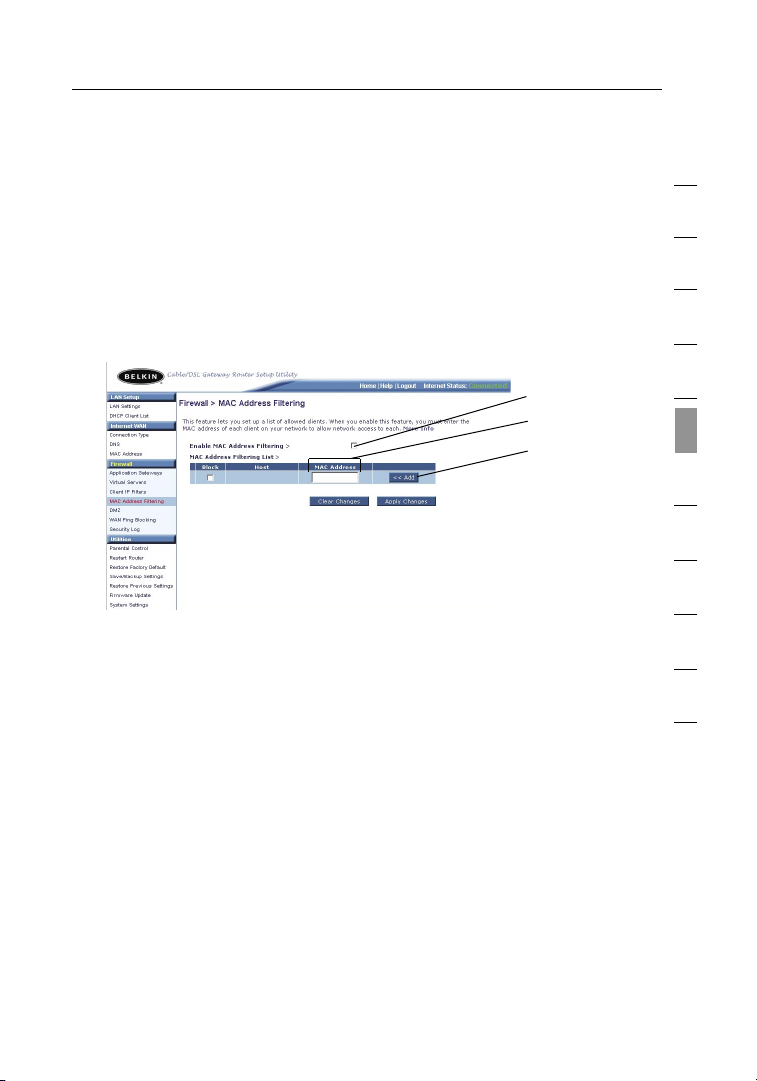
Setting MAC Address Filtering
The MAC a ddre ss fi lt er is a powerfu l secur it y f ea tu re that allows
you to sp ecify which computers are al lo wed o n t he netw or k. An y
computer attemp ti ng to acce ss th e netwo rk th at is not specified in
the filter list will be de nied ac cess. When y ou en ab le th is fe at ure, yo u
must enter the MAC ad dres s of each client on your network to allow
network access to each. The “Block” feature lets yo u t ur n on a nd off
access to the network easily for any c omputer without having to add
and re mo ve th e com pu ter’s MAC address f ro m the list.
(1)
(2)
(3)
To ena bl e t hi s fea tu re, selec t “Enab le MA C Address Filterin g”
Next, enter the MAC a ddre ss of each comput er on your networ k by
clicking in the space pro vi ded (2) and enteri ng the MAC address of
the computer you want to a dd to the list. Click “Add”
Changes” to save the settings. To d el et e a MAC address fro m the list ,
simply click “Delete ” next to the MAC addres s y ou wish to delete.
Click “Apply Changes ” to save the settings.
(3), then “Appl y
(1).
1
2
3
4
5
sect ion
6
7
8
9
10
11
Note: You w il l not be able to delete the MAC a dd re ss of the computer
you are usi ng to access the Router’s a dministrative func ti on s ( th e
computer you are u si ng no w) .
39
Using the Web-Based Advanced User Interface
4140
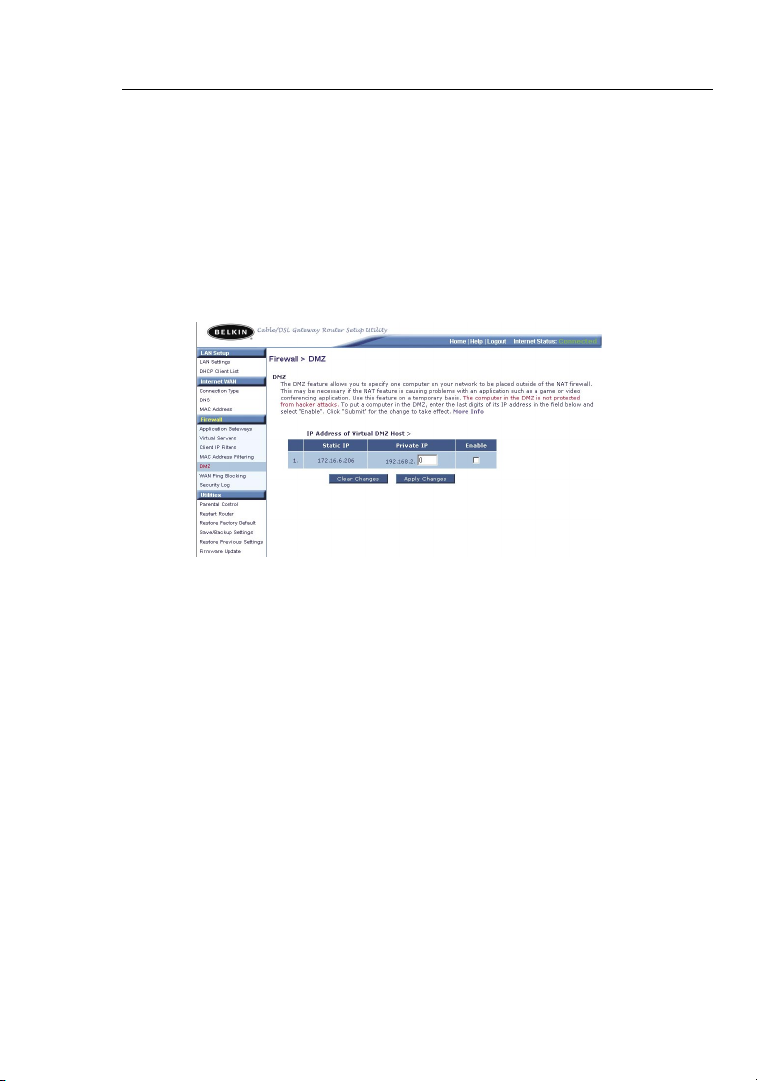
Enabling the Demilitarized Zone (DMZ)
The DMZ f eature al lo ws yo u to speci fy one compu te r on your network
to be p la ced o utside of th e f irewal l. This may be necessary if the
firewall is c au sing prob le ms wi th an appl ic at ion s uch a s a game or
video conferencing applica ti on . U se th is feat ure on a t em porary basis.
The computer in the D MZ is NO T protected from h acker a ttacks.
To put a computer in the DMZ, enter the l ast d ig its o f i ts IP address in
the IP fi eld a nd se le ct “E nable”. Click “Apply Changes” for the change
to take e ff ec t. If you are u si ng mu ltiple static WAN IP addresses, it
is possible to select which WAN IP address t he DM Z h os t wil l be
directed to. Type in the WA N IP address you wi sh th e D MZ host to
direct t o, en te r t he la st two digit s of the IP a ddre ss of the DMZ host
computer, selec t “En ab le ” a nd cl ic k “Ap pl y C ha ng es”.

41
Using the Web-Based Advanced User Interface
WAN Ping Blocking
Computer hacker s use what is known as “pinging” to f ind p otential
victims on the Intern et . By pingi ng a specifi c IP address and rece iv ing
a resp on se from the IP addres s, a hacke r can determ in e t ha t
somethin g of interest might be t here . The Router can be set up s o it
will not re sp on d t o an ICMP ping from th e out si de. T hi s h ei ghtens the
level of security of your Router.
(1)
To tur n o ff the ping re sponse, select “Block ICMP Ping”
“Apply Changes” . The Router will not re spond to a n ICM P pin g.
(1) a nd cl ic k
1
2
3
4
5
sect ion
6
7
8
9
10
11
41

Using the Web-Based Advanced User Interface
4342
Utilities Tab
This screen l et s y ou ma na ge di fferent parameter s of the Router and
perform certain admi ni st rative functions.
Restarting the Router
Sometime s it may be n ecessary to re st ar t o r reboot the Router if i t
begins working improperly. Re starting or rebo ot ing t he Ro ut er wi ll
NOT delete any of y ou r c on figuration setting s.
43
Using the Web-Based Advanced User Interface
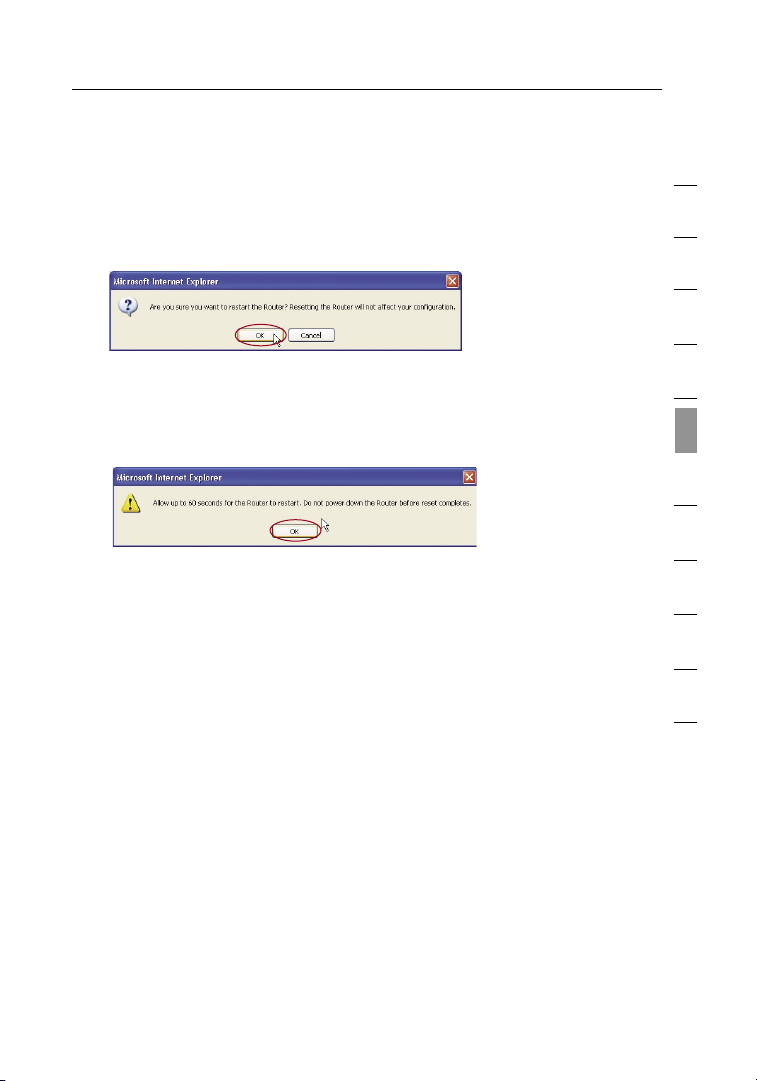
Restarting the Router to Restore Normal Operation
1. Click the “Restart Router” butto n.
2. The follo wi ng me ss age w il l a pp ear. Click “ OK”.
3. The follo wi ng me ss age w il l a pp ear. Restarting the Router can
take up t o 6 0 sec on ds . I t is importa nt no t to tur n off the po wer t o
the Router during the res ta rt. C lick “O K”.
4. A 60-seco nd coun td own w il l a pp ear o n the screen. When the
countdow n reaches zero, th e R ou te r w il l b e restarted. The Router
home page should appear automati ca ll y. If not, type in th e
Router’s ad dres s (de fa ul t = 192. 16 8. 2.1) into th e n av ig ation bar of
your bro wser.
1
2
3
4
5
sect ion
6
7
8
9
10
11
43

Using the Web-Based Advanced User Interface
4544
Restoring Factory Default Settings
Using this option will re st ore all of the settings in the R outer t o t he
factory (defaul t) se tt in gs. I t i s recommended that you back up your
settings before you rest ore all of t he de faults.
1. Clic k the “Resto re Defaults ” but to n.
2. The follo wi ng me ss age w il l a pp ear. Click “ OK”.
3. The follo wi ng me ss age w il l a pp ear. Restoring the defaults
includes restarting the Router. It can take up to 60 second s.
It is i mp ortant not t o t ur n the po wer t o t he Rout er off during
the re st art o r the router could be damaged.
4. A 60-seco nd coun td own w il l a pp ear o n the screen. When the
countdow n reaches zero, th e R ou te r’s defaults will be restore d.
The Router’s h om e pag e sho ul d app ea r a ut om atically. If it does
not, type in t he Ro ut er’s address (default = 192.168.2.1 ) into the
navigati on bar of your brow ser.
45
Using the Web-Based Advanced User Interface
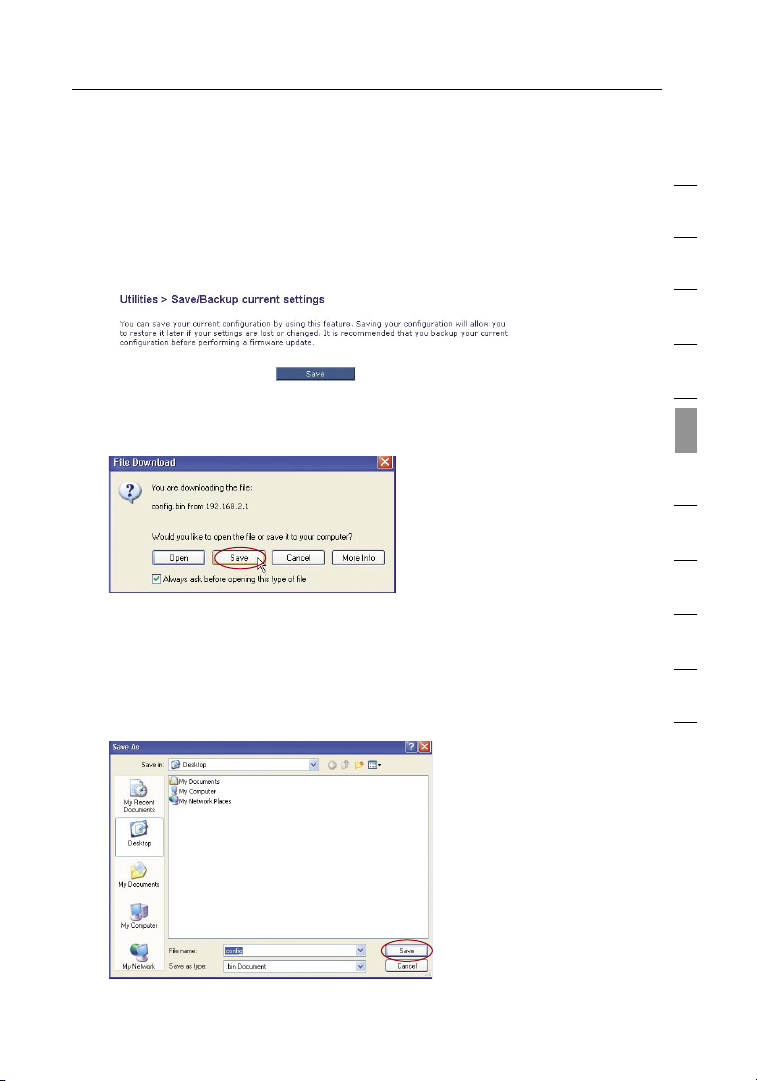
Saving a Current Configuration
You ca n sav e your current configurat io n b y using this feature. Saving
your configurat io n w il l all ow yo u to re store it later if your settings are
lost or c hanged. It i s recomme nd ed th at yo u bac k up your current
configur at io n b ef ore perfo rm in g a firm wa re update.
1. Clic k “Sa ve ”. A windo w calle d “Fi le Down lo ad” w il l o pe n.
Click “Save”.
2. A window will open that allows you to s elect t he lo cation where
you want to sa ve th e con fi guration file. Select a lo cation. You
can name the f ile a ny thing you wa nt, o r u se the default name
“Config” . Be sure to na me the file so you can lo cate it yo ur self
later. When you have selected the location and name of th e f il e,
click “Save”.
1
2
3
4
5
sect ion
6
7
8
9
10
11
45
 Loading...