

Belkin F5D5230-4 User Manual
Share your files and Internet connection
4-Port Cable/DSL
network
F5D5230-4
Gateway Router

Table of Contents
Introduction . . . . . . . . . . . . . . . . . . . . . . . . . . . . . . . . . . . . . . . .1-2
Product Description . . . . . . . . . . . . . . . . . . . . . . . . . . . . . . . . . . .3-4
Belkin Docking Options . . . . . . . . . . . . . . . . . . . . . . . . . . . . . . . . .5
Sharing Your Internet Connection Is Done In 4 Easy Steps . . . . . .6-38
Step 1 . . . . . . . . . . . . . . . . . . . . . . . . . . . . . . . . . . . . . . . . . .6-10
Step 2 . . . . . . . . . . . . . . . . . . . . . . . . . . . . . . . . . . . . . . . . .11-13
Step 3 . . . . . . . . . . . . . . . . . . . . . . . . . . . . . . . . . . . . . . . . .14-21
Step 4 . . . . . . . . . . . . . . . . . . . . . . . . . . . . . . . . . . . . . . . . .22-38
Troubleshooting . . . . . . . . . . . . . . . . . . . . . . . . . . . . . . . . . . . .39-42
Glossary of Terms . . . . . . . . . . . . . . . . . . . . . . . . . . . . . . . . . .43-44
Product Specifications . . . . . . . . . . . . . . . . . . . . . . . . . . . . . . . . . .45
Warranty, FCC, CE Statements . . . . . . . . . . . . . . . . . . . . . . . . . . . .46

Thank You for purchasing the Belkin 4-Port Cable/DSL Gateway
Router. In minutes you will be able to network your computers
together and share your Internet connection. The following is a list
of features that make your new Router an ideal solution for your
home or small office.
Key Features:
NAT Firewall Security
Your Belkin 4-Port Cable/DSL Gateway Router employs Network
Address Translation (NAT) to protect your network from the outside
world by isolating it from the Internet. NAT monitors all of the
data coming in from the Internet and will only let through the
information you want.
Integrated 10/100 4-Port Switch
The Belkin 4-Port Cable/DSL Gateway Router has a built-in
4-Port network switch to allow your computers to share
printers, data and MP3 files, digital photos, and much more.
The switch features automatic detection so it will adjust to
the speed of connected devices. The switch will transfer data
between computers and the Internet simultaneously without
interrupting or consuming resources.
Built-in DHCP
Dynamic Host Configuration Protocol (DHCP) on-board
makes for the easiest possible connection of a network. The
DHCP server will assign IP addresses to each computer
automatically so there is no need for a complicated
networking setup.
Introduction
1

Introduction
2
Web-Based User Interface
Setting up the Router’s functions is done through your web
browser. You can do this easily without having to install
additional software onto the computer. There are no disks to
install or keep track of and, best of all, you can make changes
and perform setup functions from any computer on the
network quickly and easily
Package Contents
• Belkin 4-Port Cable/DSL Gateway Router
• Power Supply
• Belkin SOHO Networking Software CD
• User Manual
System Requirements
• Broadband Internet connection such as a Cable or DSL modem
with RJ45 (Ethernet) connection
• At least one PC with an installed network interface card (NIC)
or alternative (USB Ethernet adapter or PCMCIA/CardBus card
for laptops)
• TCP/IP networking protocol installed on each computer
• High-quality networking cable*
• Microsoft Internet Explorer 4.0 or later, or Netscape Navigator 4.0
or later
We recommend top quality Belkin CAT6 Networking Cables, part
number A3L980-XX-S
Product Descriptions
3
ready
B E L K I N
DC
input
1
2
3
4
WAN
reset
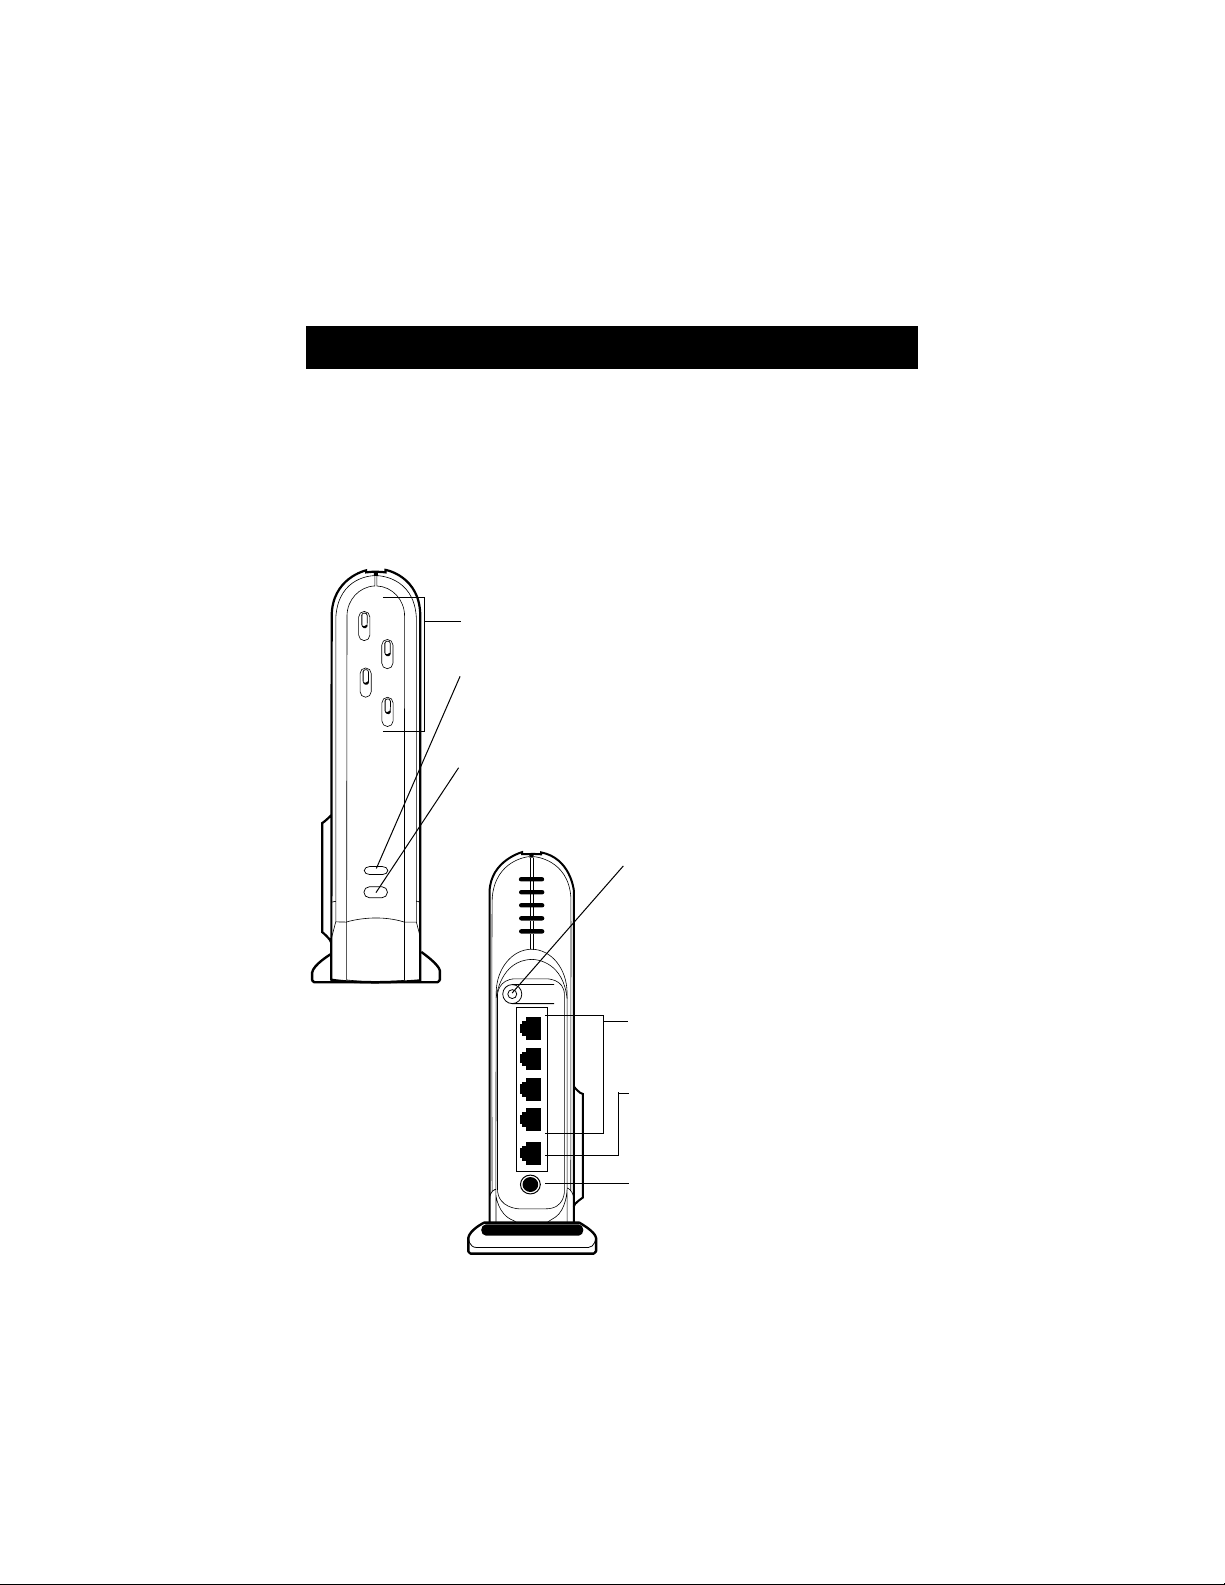
Port Activity/Status Lights
Provide information about the network
Power Light
Indicates the power is on or off
RESET Button
Powers ON/OFF the router
without losing your settings.
LAN Ports
Connect your PCs to these ports
WAN Port
Connect your Cable or DSL
modem to this port
DC Power Jack
Connect the included power
supply to this jack
Front Panel
F5D5230-4
4-Port Cable/DSL Gateway Router
Rear Panel
WAN Link Status Light
Provides information about the connection to
the Cable or DSL modem

Product Descriptions
Front Panel
Power LED–When lit, this light indicates that the unit is
receiving power
WAN Link Status
• GREEN - indicates that there is an active connection with the
Cable or DSL modem. If this light is off, the link is not established.
• FLASHING GREEN – When the WAN link status light is flashing
green, data is flowing between the Router and the Cable or
DSL modem.
Port Activity/Status Lights
• AMBER-Solid amber indicates that there is a 100Mbps
(100Base-TX) link between the Router and the computer
connected to that port.
• GREEN-Solid green indicates that there is a 10Mbps (10Base-TX)
link between the Router and the computer connected to that port.
• FLASHING–When a port status light is flashing either amber or
green, data is flowing between the Router and the computer
connected to that port.
Rear Panel
Power Input Jack–Connect the DC power supply
WAN Port–Connect the network cable from the Cable or DSL modem
to the WAN port
LAN Ports–Numbered 1 – 4. Connect the network cable from your
PCs to these ports. Note: they do not need to be connected
sequentially. For example, in a two-computer network you can
connect one computer to Port 4 and another to Port 1.
Reset Button–If the Router stops functioning properly, you can power
off and on the Router, without losing your settings. Press and hold the
RESET button for 2 seconds. The power light will begin blinking and
the port lights may blink. When the lights stop blinking, the Gateway
Router has been reset.
4

Belkin Docking Options
5
The Belkin Docking Ring
Belkin has designed the Router to link together with other Belkin
networking products through the unique docking ring on the side of
module. It will fit into the mating ring of another Belkin network
product such as the 5- or 8-Port Switch. Simply place the modules
side by side and push them together.
Wall Mounting the Belkin Gateway Router
Belkin provides an adapter that will allow the unit to be mounted to
the wall. The adapter is available at belkin.com
. To install the wall
mount follow these steps.
1. Use the wall mount as a template and mark the screw holes on
your wall with a pencil.
2. Drill holes in the wall and insert screw anchors (not included) into
the wall.
3. Insert screws into the anchors and turn them in just far enough so
when the wall mount is placed on the screws that it is snug but
still able to slide.
4. Snap the wall mount into the docking ring on the Router.
5. Line up the wall mount’s holes with the screw heads and push the
wall mount over them. Slide the Router and wall mount down
over the screw heads to secure it to the wall.

Sharing Your Internet Connection Is Done In 4 Easy Steps
6
Step 1: Obtain information about your Internet Service Provider (ISP)
and your network
Step 2: Connect your computers to the Belkin 4-Port Cable/DSL
Gateway Router (the Router)
Step 3: Set up your computers for networking
Step 4: Configure the Router
STEP 1: Obtain information about your Internet Service Provider
(ISP) and your network
Setting up your Router is a simple procedure, even if you are not
familiar with networking. This guide will take you step by step
through the things that you need to do to successfully share your
Internet connection. There are a few pieces of information that you
will need to obtain about your Cable or DSL provider as well as
some network information. Most of the time, information is available
on-line from your provider. You may have to call your provider.
Answer the following questions either by checking with your ISP’s
online technical support or by calling your ISP’s technical support
hotline. A worksheet has been provided in this manual to record your
information for use later.
Is my IP address Static or Dynamic?
Your IP address is either Static or Dynamic. You will need to determine
whether your provider assigns you a new IP address every time you log
on (Dynamic) or they assign you an IP address that never changes
(Static). For more about what an IP address is, see the Glossary of
Networking Terms in the appendix of this manual.

Step 1
7
Does my Internet service provider use PPPoE?
It either does or does not. If you have a DSL modem, your service
provider may use PPPoE (for Point to Point Protocol over Ethernet) as
the communication language between your DSL modem and the
provider’s network. PPPoE is a secure way of connecting your network
to the Internet. Your Router supports PPPoE, so all you have to do is set
it up to utilize PPPoE. This will be covered later in the manual. For
more about PPPoE, see the Glossary of Networking term is the appendix
of this manual.
Is my connection bound to a MAC address?
It either is or is not. All network cards or adapters have a unique "serial
number", called a MAC address. Your service provider can "see" your
network adapter’s MAC address over the Internet. In some cases, the
provider will record the MAC address of your adapter and only let that
adapter connect to the Internet. This is done for several reasons, one of
which is security. It also enables your provider to keep track of how
many computers you have connected to your modem. You will need to
find out whether your provider requires the same network card to
connect to the modem all of the time. In the event that your provider
does bind your MAC address, your Router has a feature that will copy
the MAC address of your card. This will be covered later in the setup
procedure. For more about what a MAC address is, see the Glossary of
Networking Terms in the appendix of this manual.
Does my connection have an assigned host name?
It either does or does not. You will need to know if your provider assigns
you host name that is required for connection. If it does, then you will
need to know the host name. If your computer was assigned a host
name by your provider, the next section describes how you can obtain
your host name.

Step 1
8
Setup Worksheet
My IP Address is: Static Dynamic
If your IP address is static, you need the following information:
Static IP address:
Assigned by your provider
Subnet Mask:
Assigned by your provider
Gateway:
Assigned by your provider
My provider binds my Yes No
connection to a MAC address
My provider has assigned Yes No
me a Host Name
If Yes, My Host Name is:
My provider uses PPPoE Yes No
If your provider uses PPPoE, you need the following information:
User Name:
Assigned by your ISP
Password:
Assigned by your ISP
Service Name:
Assigned by your ISP

Step 1
IMPORTANT:
IF YOU HAVE A CABLE OR DSL MODEM CONNECTED TO A PC
AND ARE NOW ADDING THE ROUTER TO YOUR NETWORK,
FOLLOW THESE STEPS TO OBTAIN INFORMATION Y OU WILL
NEED LATER. If you are not connecting the Router to an existing
Cable or DSL modem, skip to the next section called "Connecting the
Belkin 4-Port Cable/DSL Gateway Router".
1. Turn on your computer and connect to the Internet through your
Cable or DSL Modem.
2. In Windows 95, 98, and Millennium Edition, Click "Start" then
click on "Run".
3. In the Run dialog box,
type "winipcfg" then
click "OK".
4. The IP Configuration
window will appear.
5. In the drop-down
menu, select your
current Ethernet
adapter by clicking
once on the downfacing arrow and
highlighting your
adapter’s name by
clicking once on it.
6. The IP configuration
window will appear.
Click on "More Info".
9

Step 1
10
7. This window will provide you with the Adapter Address (known
as the MAC address), the IP Address, host name (if any), and other
network settings. Carefully write this information in the table
below, as you may need it later for setting up the Gateway Router.
For further explanation of what these setting are, see the Glossary
of Network Terms in the Appendix of this manual.
Write your IP Configuration settings here:
Host name (If any):
Adapter Address:
IP Address:
Subnet Mask:
Default Gateway:

Step 2
11
STEP 2: Connect your computers to the Belkin 4-Port Cable/DSL
Gateway Router (the Router)
In order for you to be able to connect your computers to the
Router, each must be equipped with a network interface card (NIC)
such as an internal PCI card (for desktop computers), a PC card
(for laptop computers), or a USB Ethernet adapter (an alternative for
USB-equipped computers only). Each computer connects to the
Router via a network cable. You will need one network cable for
each PC. The Belkin Gateway Router also connects to your Cable or
DSL modem via a network cable. Be sure you have the proper parts
before starting. NOTE: Some Cable or DSL modems connect to your
computer using USB. Your Cable or DSL modem must have an
Ethernet connector on it to connect the Belkin Gateway Router. If
your modem does not have an Ethernet connection, you must use a
Belkin Switch rather than the Router.
Basic Parts Required for Each Computer on Your List:
2 networking cables * for each computer, one for the Modem-toRouter connection; and one for the PC-to-Router connection.
1 each–Network Interface Card (NIC)—an internal PCI card for each
PC and a PC card for each laptop
* We recommend top-quality Belkin CAT6 Networking Cables, part
number A3L980-XX-S
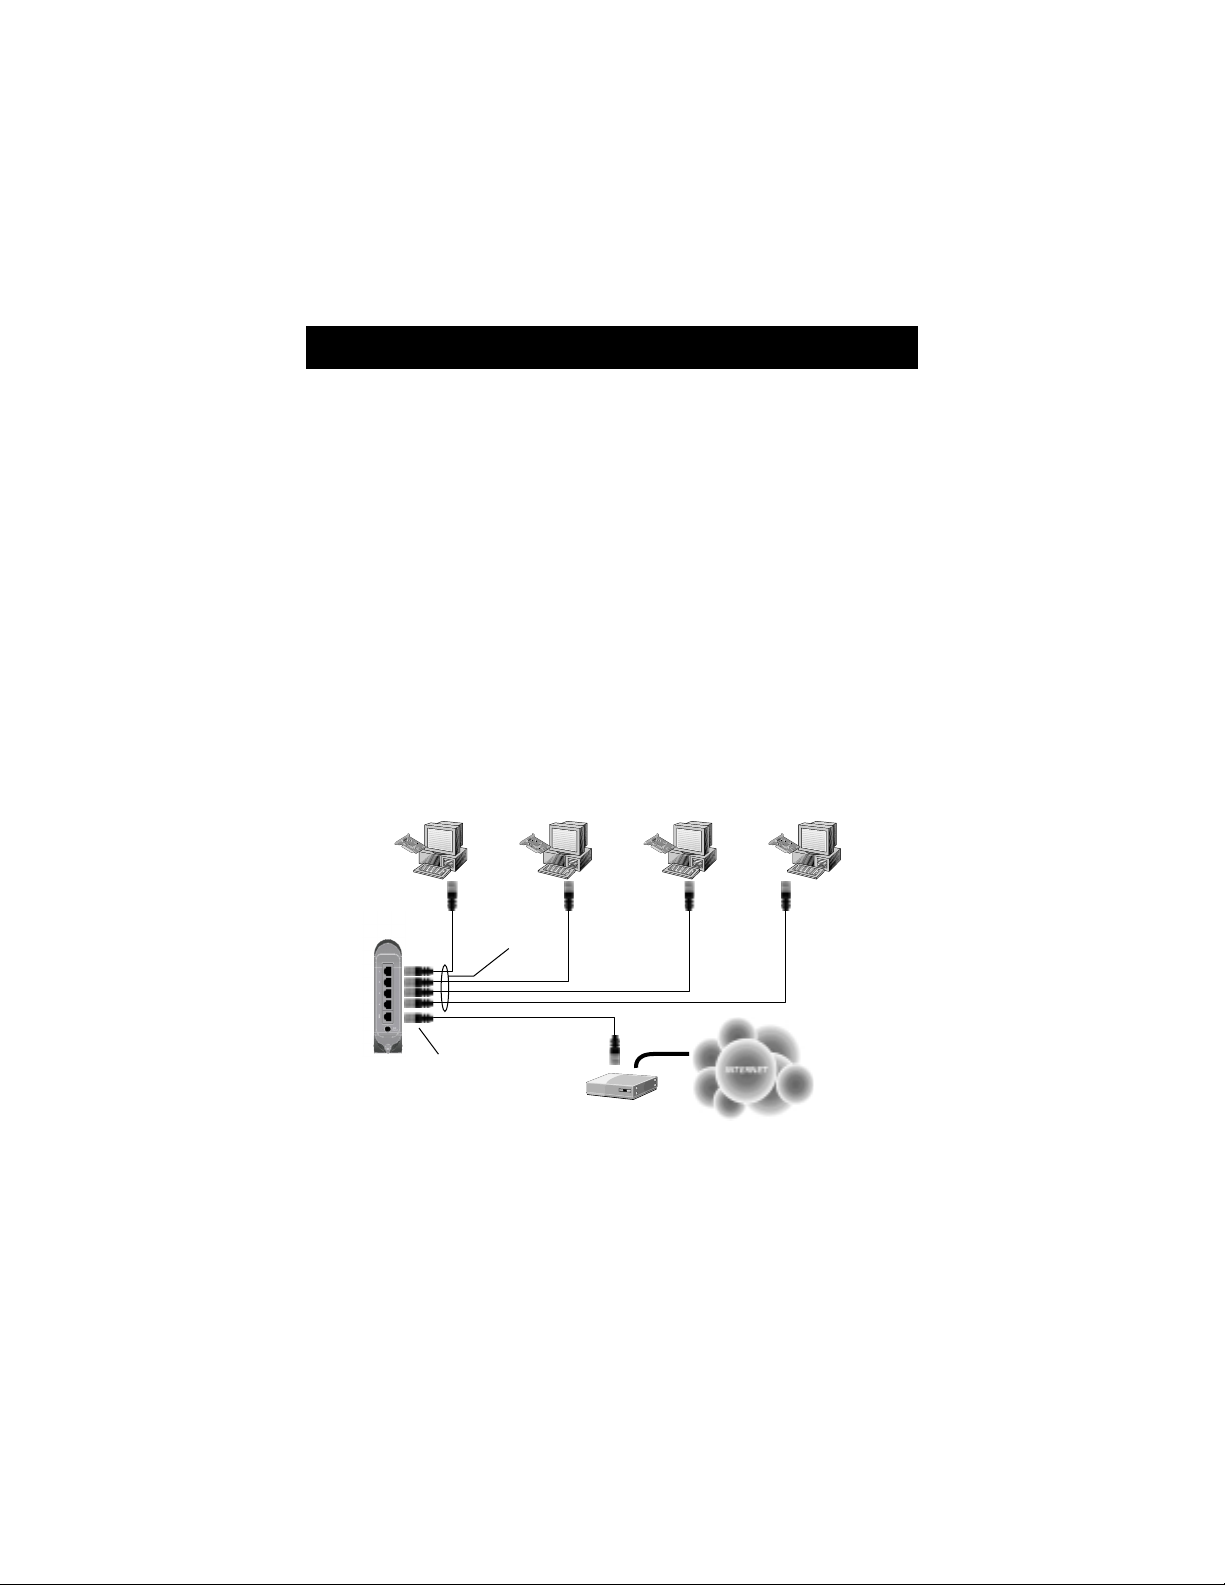
Connect Your Equipment
Refer to the diagram below to aid in the connection process.
1. Power down your equipment.
Make sure that you have followed the steps to find your network
configuration settings before you begin connecting your equipment.
Be sure that the power to the Router, your modem, and all of your
PCs has been turned OFF.
Step 2
12
2. Connect a network cable between each of your PCs and the
Gateway Router
Plug a Network cable into the Ethernet port on each of the other PCs
and then to one of the ports on the rear of the Gateway Router
labeled LAN.
Note: It does not matter which LAN ports you connect your other
PCs to, but be sure that you are not connecting any of the PCs
to the port labeled WAN.
3. Connect a Network Cable between the Router and your Cable or
DSL modem.
Plug a cable into the port labeled WAN on the Belkin Gateway
Router and connect the other end of the cable to the Cable or DSL
modem’s Ethernet port.
NICNIC NICNIC NICNIC NICNIC
BELKIN
ROUTER
CONNECT TO
LAN PORTS
CONNECT TO
WAN PORT
CABLE OR DSL
MODEM

Step 2
13
4. Power on the Cable or DSL modem.
5. Connect the power adapter to the Router.
6. After the Cable or DSL modem and the Router are turned on, the
Router’s WAN link light should be on. This indicates that the
modem and the Belkin Gateway Router are connected together.
7. Turn on the rest of your computers and let them boot up. After
your computers boot up, the LAN link lights on the front of the
Router should be on for each port that a computer is attached to.
Verify that your computers are connected by checking these lights.
Connection of your Belkin 4-Port Cable/DSL Gateway Router is now
is complete. The next step is to set up each of your computers to be
able to communicate with your Router.
 Loading...