

Page 1
Share your files and Internet connection
5-and 8-Port 10/100
network
F5D5130-5
F5D5130-8
Network Switch
Page 2

Table of Contents
Introduction . . . . . . . . . . . . . . . . . . . . . . . . . . . . . . . . . . . . . . . . . .1
Product Description . . . . . . . . . . . . . . . . . . . . . . . . . . . . . . . . . . .2-5
Belkin Docking Options . . . . . . . . . . . . . . . . . . . . . . . . . . . . . . . . .6
Connecting a Simple Network . . . . . . . . . . . . . . . . . . . . . . . . . . .7-9
Installing the Network Card Drivers . . . . . . . . . . . . . . . . . . . . . . . .10
Installing Software to All PCs on Your Network . . . . . . . . . . . . . . . .11
Configuring Your Computer Using Belkin NetSetup . . . . . . . . . .12-16
Configuring Additional Computers
Using Belkin NetSetup Software . . . . . . . . . . . . . . . . . . . . .17-19
Sharing Files and Peripherals . . . . . . . . . . . . . . . . . . . . . . . . . .20-24
Accessing Resources on Other Computers . . . . . . . . . . . . . . . .25-26
Software Internet Connection Sharing with Multiple PCs . . . . . .27-44
Product Specifications . . . . . . . . . . . . . . . . . . . . . . . . . . . . . . . . . .45
Warranty, FCC, CE Statements . . . . . . . . . . . . . . . . . . . . . . . . . . . .46
Page 3

Congratulations on your purchase of this quality Belkin product.
You can now enjoy the benefits of sharing printers and
peripherals, sharing one Internet account*, exchanging data
quickly between connected computers, and communication
via-e-mail and the Internet. The Network Switch can be used to
connect PCs, additional switches, Gateway Routers, and other
networking components. This guide explains how to install and
use the Belkin 5- and 8-Port 10/100Mbps Network Switch.
Features:
• Conforms to the Ethernet IEEE 802.3 and 802.3u standards
• Provides LED indicators for monitoring network traffic
• Provides 5 or 8 10/100Mbps auto-sensing RJ45 ports for easy
migration from 10Base-T to 100Base-T networks
• Shared RJ45 uplink port allows you to easily add computers to
your network at any time
• Dedicated bandwidth provided for each port provides for an
efficient and error-free network
Contents of Package:
• One Belkin 5- or 8-Port 10/100Mbps Network Switch
• One Power Supply
• One CD-ROM
• User Guide
*Requires Windows 98 SE, ME, or 2000
Introduction
1
Page 4
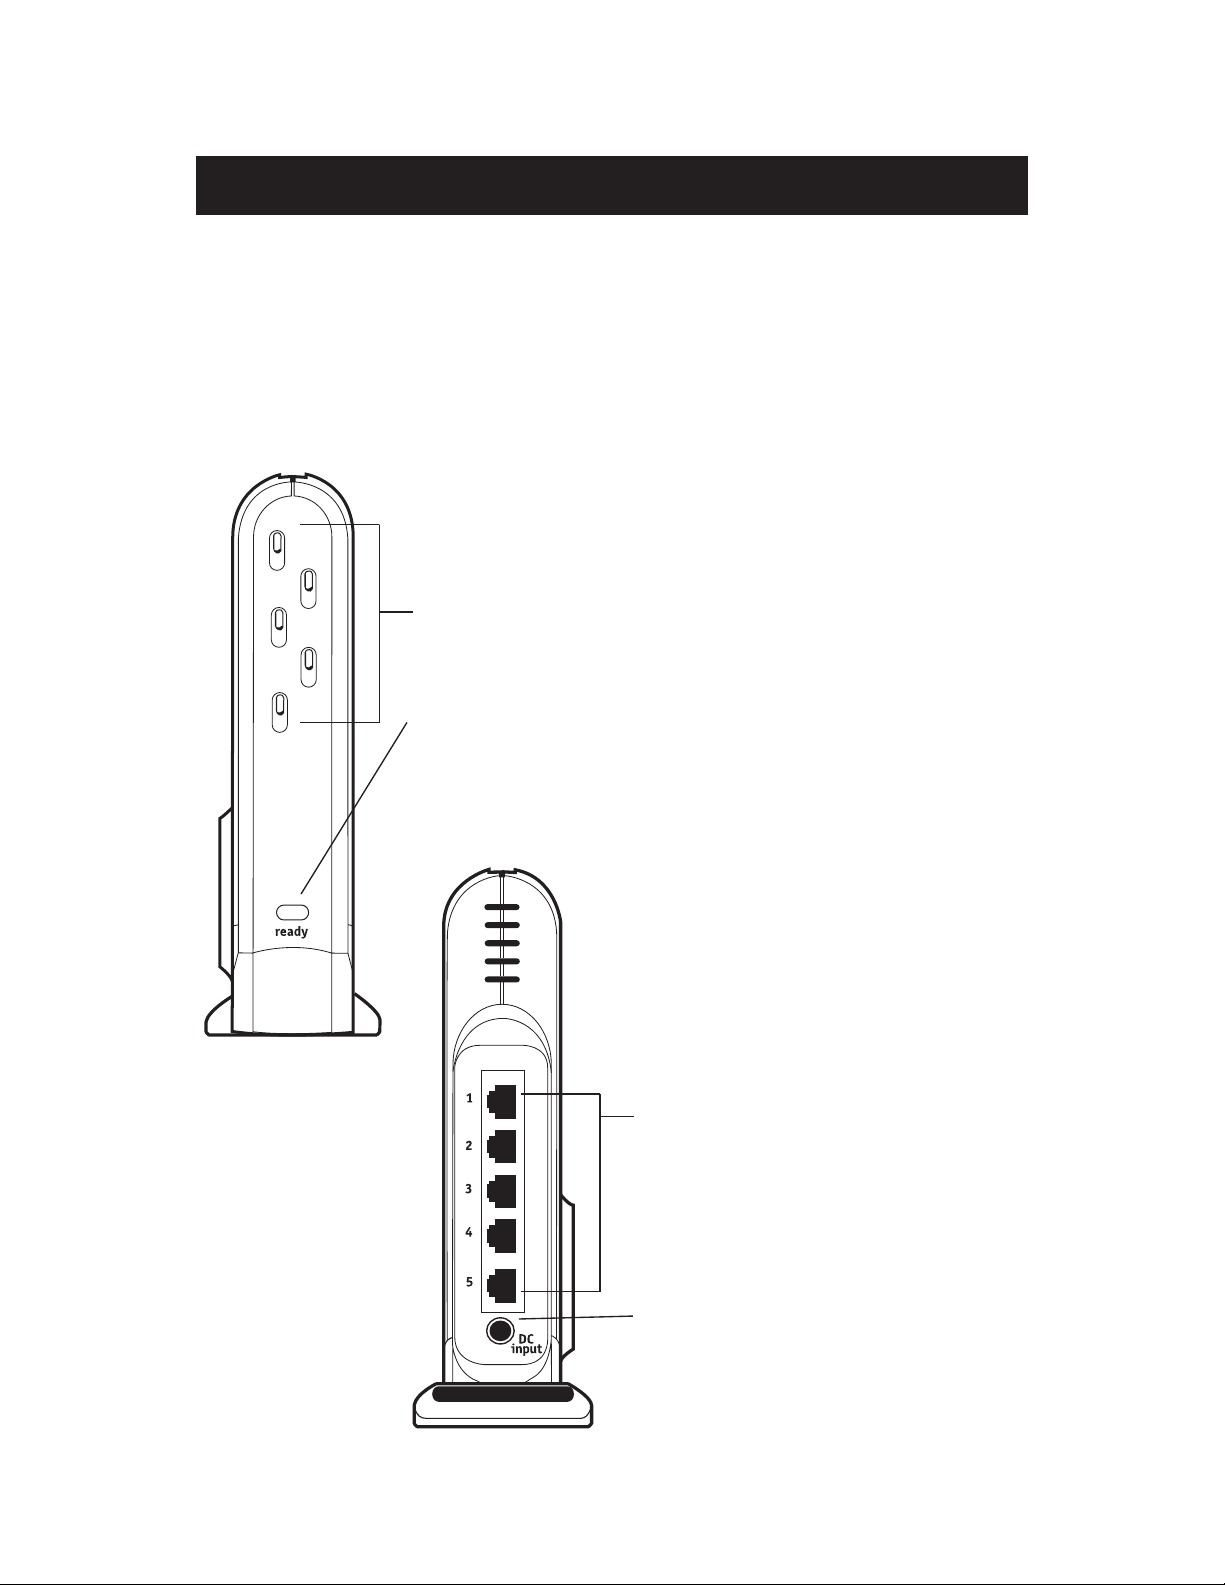
Product Descriptions
2
Port Activity/Status Lights
Provide information about the network
Power Light
Indicates the power is on or off
LAN Ports
Connect your PCs to these ports
DC Power Jack
Connect the included power
supply to this jack
Front Panel
F5D5130-5
5-Port 10/100 Network Switch Product Description
Rear Panel
Page 5

Product Descriptions
3
Front Panel
Power Light–When lit, indicates that the 5-Port Switch is
receiving power
Port Activity/Status Lights
Amber–A steady amber light indicates that there is a 100Mbps
(100Base-TX) link between the 5-Port Switch and the
computer connected to that port.
Green–A steady green light indicates that there is a 10Mbps
(10Base-T) link between the 5-Port Switch and the computer
connected to that port.
Flashing–A flashing port-status (either amber or green), indicates that
data is flowing between the Belkin 5-Port Network Switch
and the computer connected to that port.
Rear Panel
Power Input Jack–Connect 6V DC power supply
LAN Ports–Numbered 1-5. Connect the network cable from your
PC’s network interface card/adapter to these ports. It is not
important which LAN ports you use. For example, in a twocomputer network you can connect one computer to Port 4
and the other to Port 1.
Page 6
Product Descriptions
4
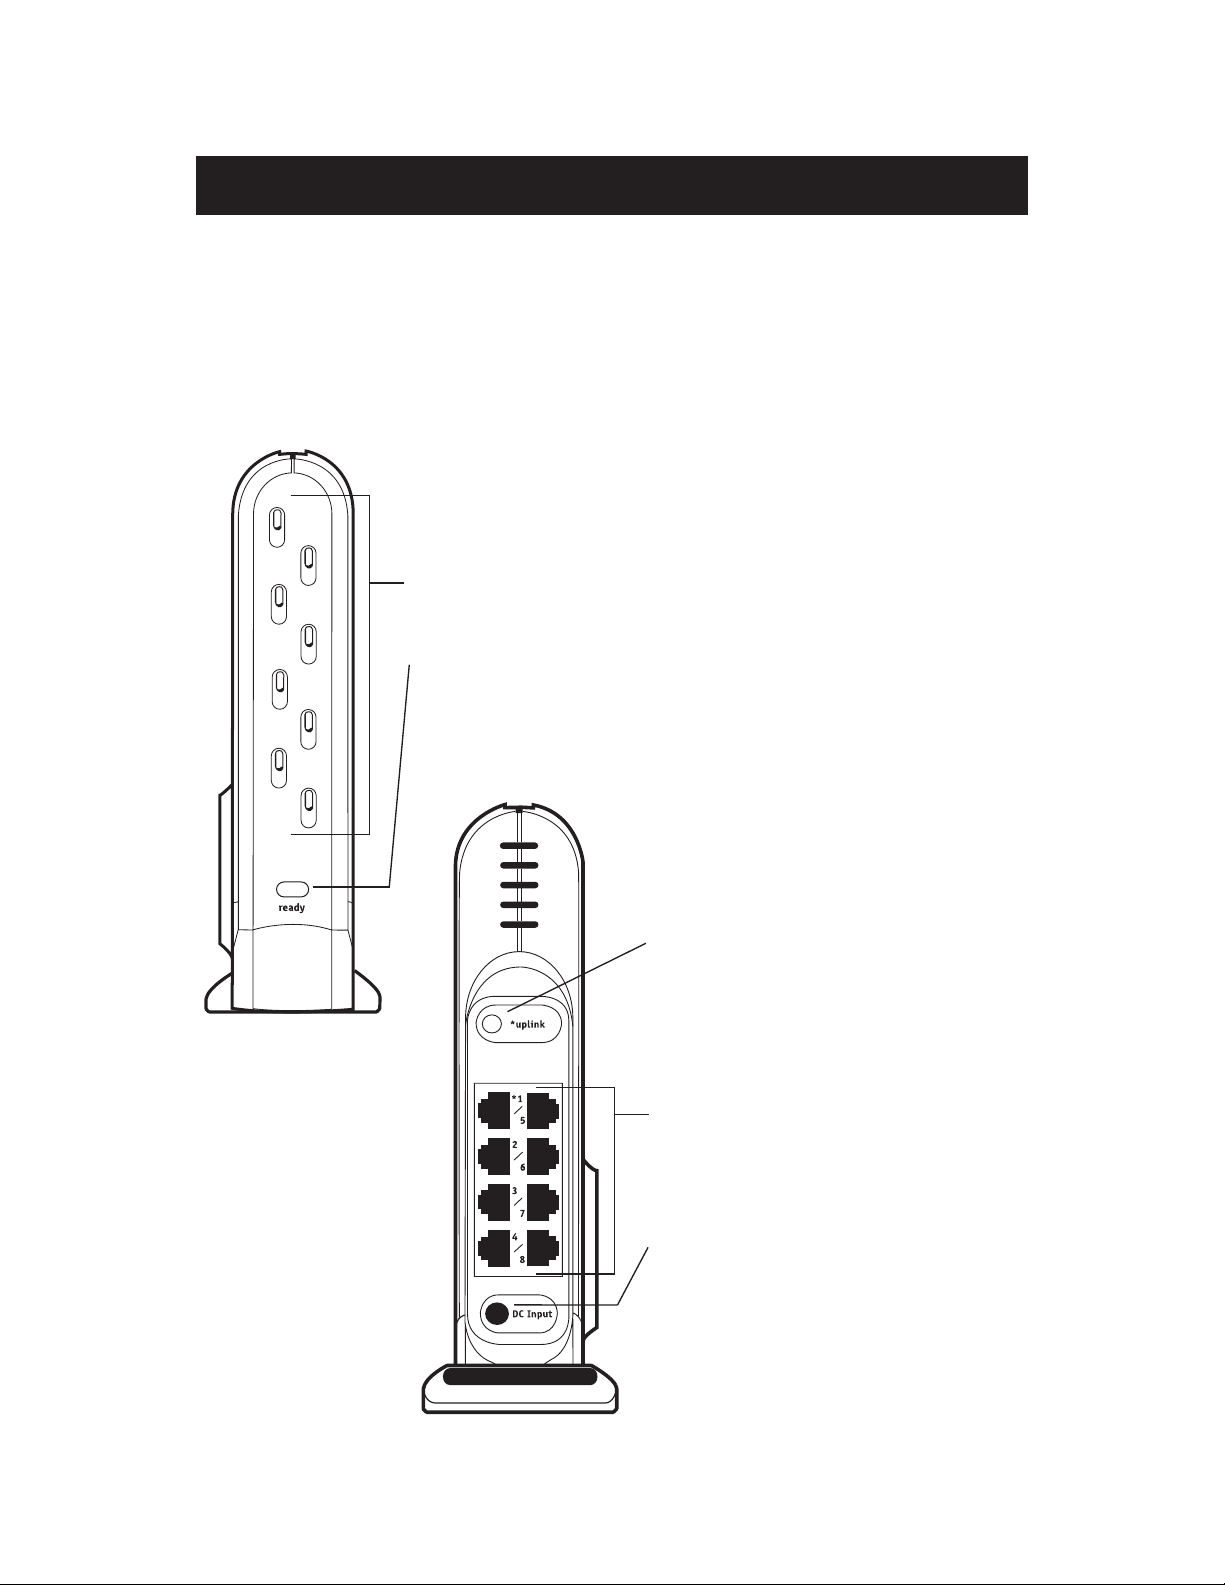
F5D5130-8
8-Port 10/100 Network Switch Product Description
Port Activity/Status Lights
Provide information about the network
Power Light
Indicates the power is on or off
Uplink Button
Allows you to easily add additional
ports to your network
LAN Ports
Connect your PCs to these ports
DC Power Jack
Connect the included power
supply to this jack
Front Panel
Rear Panel
Page 7

Product Descriptions
5
Front Panel
Power Light–When lit, indicates that the 8-Port Switch is receiving
power
Port Activity/Status Lights
Amber–A steady amber light indicates that there is a 100Mbps
(100Base-TX) link between the 8-Port Switch and the
computer connected to that port.
Green–A steady green light indicates that there is a 10Mbps
(10Base-T) link between the 8-Port Switch and the computer
connected to that port.
Flashing–a flashing port status light (either amber or green),
indicates that data is flowing between the Belkin 8-Port
Network Switch and the computer connected to that port.
Rear Panel
Power Input Jack–Connect 6V DC power supply
LAN Ports–Numbered 1-8. Connect the network cable from your PCs
network interface card/adapter to these ports. It is not
important which LAN ports you use. For example, in twocomputer network you can connect one computer to Port
4 and the other to Port 1.
Uplink button–Push the uplink button to make port 1 an uplink port
to which you can add switches, routers, and other
networking components.
Page 8

Belkin Docking Options
6
Belkin Docking Options
The Belkin Docking Ring
Belkin has designed the SOHO switches to link together with other
Belkin networking products through the docking ring on the side of the
module. The ring will fit into the mating ring of another Belkin network
product such as a gateway router, a wireless access point. Simply place
modules side by side and push them together.
The Belkin Wall Mount
Belkin provides an adapter that will allow the Switch to be mounted
to the wall. The adapter is available at belkin.com. To install the wall
mount follow these steps.
1. Use the wall mount as a template and mark the screw holes on
your wall with a pencil.
2. Drill holes in the wall and insert screw anchors (not included)
into the wall.
3. Insert screws into the anchors and turn them in just far enough that
when the wall mount is placed on the screws it will be snug but still
able to slide.
4. Snap the wall mount into the docking ring on the Belkin Switch.
5. Align the wall mount’s holes with the screw heads and push the wall
mount over screws. Slide the Belkin Switch and wall mount down
over the screw heads to secure it to the wall.
Page 9

Connecting a Simple Network
7
Connecting a Simple Network
Connecting multiple computers in your home or office via a network
switch lets you cooperate, collaborate, and make the most of your
hardware. You can share files and printers and even access the
Internet from every computer in your network.
While networking was once a complicated matter, Windows 95, 98
and later versions, along with hardware and software like Belkin
networking products have made networking very easy to do. The
following section of this manual will help you set up a simple
network in your home or office. If you are connecting to a larger
existing network, it is recommended that you consult your network
administrator (the person who originally set up the network) for
instruction on how to connect additional computers to the network.
Connecting three or more computers
To connect your network you will need a network switch or hub with
enough ports for the number of computers you intend to connect
immediately or in the near future. (The F5D5130-5 provides five ports
and the F5D5130-8 provides eight ports.) Although hubs and
switches perform the same function, they do so at different rates of
performance, efficiency, and speed.
While a hub transmits information to all PCs on your network, a
switch is a "Smart Hub" that features a store-and-forward function.
This function retains the originator’s IP address and transmits
information to the specified PC rather than over the entire network.
Less network traffic and the elimination of the time needed to process
information sent to unintended recipients means minimal data
collisions and data loss.
Page 10

To connect your computers to the Belkin Switch, each computer must
be equipped with a network interface card/adapter such as an
internal PCI card (for desktop computers), a PC card (for notebook
computers), or a USB Ethernet adapter (an alternative to opening up
your PC; for USB-equipped computers only). Each computer connects
to the Belkin Switch via a CAT5 networking cable. You will need one
networking cable for each PC.
1. Be sure that the power to the Belkin Switch, your modem, and
all of your PCs has been turned OFF or disconnected from the
power supply.
2. Install the Network Cards into each PC (skip this step if this
is already done).
3. Connect each computer’s installed Network Card to the Network
Switch port using a straight through unshielded twisted pair (UTP)
Ethernet Cat5e patch cable (A3L850-XX-S) or for higher
performance use Belkin Cat6 patch cables (A3L980-XX-S).
4. Plug one end of the power-supply adapter into the power
socket found at the rear of the switch and the other end into
the power outlet.
5. If the LED power indicator is green, there is power going to the
switch.
6. Turn on the rest of your computers and let them boot up. After
your computers boot up, the LAN link lights on the front of the
Belkin Switch should be ON for each port to which a computer is
attached. Verify that your computers are connected by checking
these lights.
Connecting a Simple Network
8
Page 11

9
Connecting a Simple Network
Page 12

Installing the Network Card Drivers
Installing the Network Card Drivers
If you are installing a network interface card/adapter for the first time
and it is properly connected to the network, you are now ready to
configure the software to allow your computers to work together
efficiently. (Please see your network interface card/adapter for
hardware installation instructions.)
Note: If you have a previously installed network interface
card/adapter, you can skip to page 11.
1. When you restart your PC, Windows will automatically detect that
a new device has been installed.
2. The "Add New Hardware Wizard" will start. Click Next.
Note: In Windows 2000 and Me, Windows will automatically
detect drivers and will not prompt you for Belkin drivers.
Skip to page 11.
3. When asked, "What do you want Windows to do?" select the first
option- "Search for the best driver for your device.
(Recommended)" and click Next.
4. Select the CD-ROM drive box. Now place the CD-ROM supplied
with the card in your CD-ROM drive and click Next.
5. Windows will install the network card drivers and prompt you to
restart your computer. If so, allow the system to restart.
6. Repeat steps 1-5 for all installed network interface cards/adapters
in your network.
10
Page 13

Installing Software to All PCs on Your Network
Installing Belkin SOHO Networking Software to All PCs
on Y our Network
Now that your network is connected and the network card/adapter drivers
have been installed, we can configure the network. For each computer
you connect to the network switch, you must assign a network address to
be used by the other computers. Belkin has simplified this process by
providing you with the Belkin SOHO Networking Software to configure
your computers.
1. Insert the SOHO Networking Software that came with your Belkin
Network Switch into your CD-ROM.
2. From your desktop, double-click on My Computer, then double-click
on the D: drive (“D” is usually the default drive letter for the CD-ROM).
3. Double-click on the Install.exe icon and Windows will begin to install
the program onto your PC. After the program is installed, Windows may
ask you to restart your computer. Please do so.
4. Repeat steps 1-4 for each computer that you are connecting to
your network.
5. Once you have installed the Belkin SOHO Networking Software on all
of your computers, continue on to the next section.
11
Page 14
Configuring Your Computer Using Belkin NetSetup
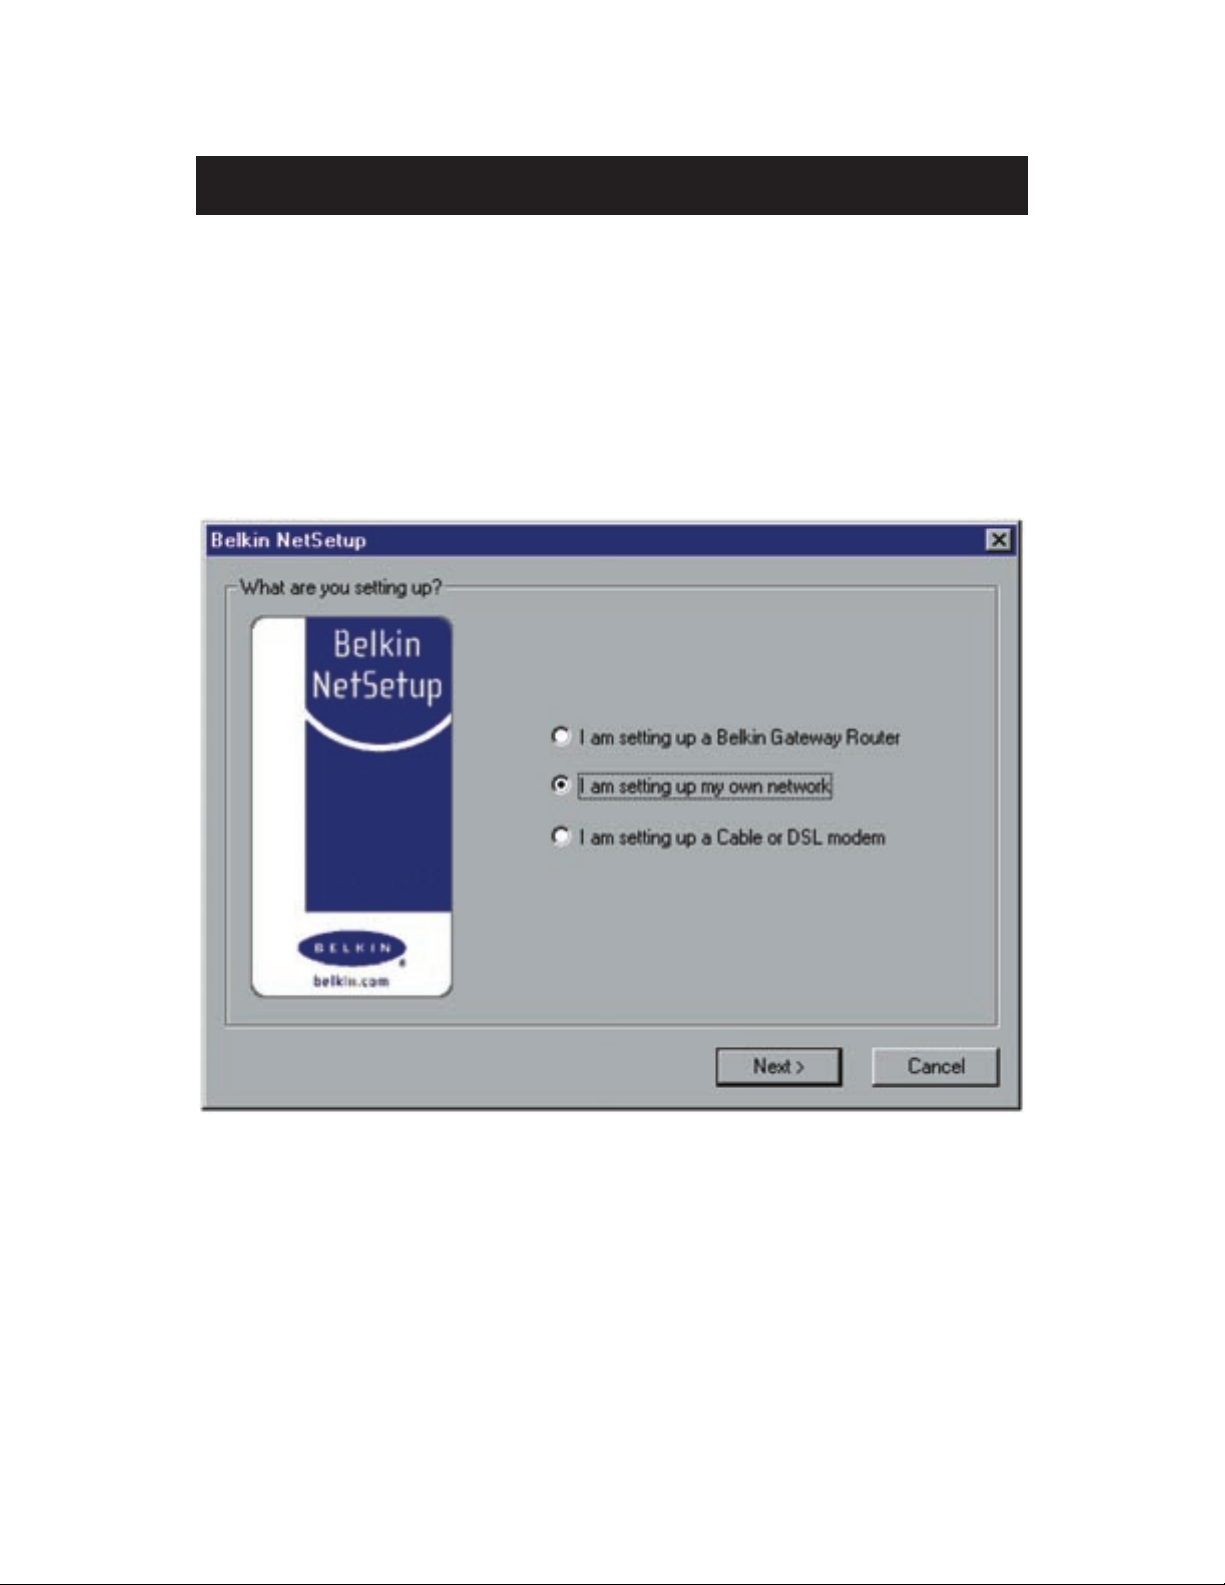
Configuring Your Computer Using Belkin NetSetup
1. Once your computer has restarted, click Start, click Programs, highlight
Belkin SOHO Networking and select Belkin NetSetup to launch this
easy-to-use computer configurator. The following screen will appear:
12
Page 15
13
Configuring Your Computer Using Belkin NetSetup
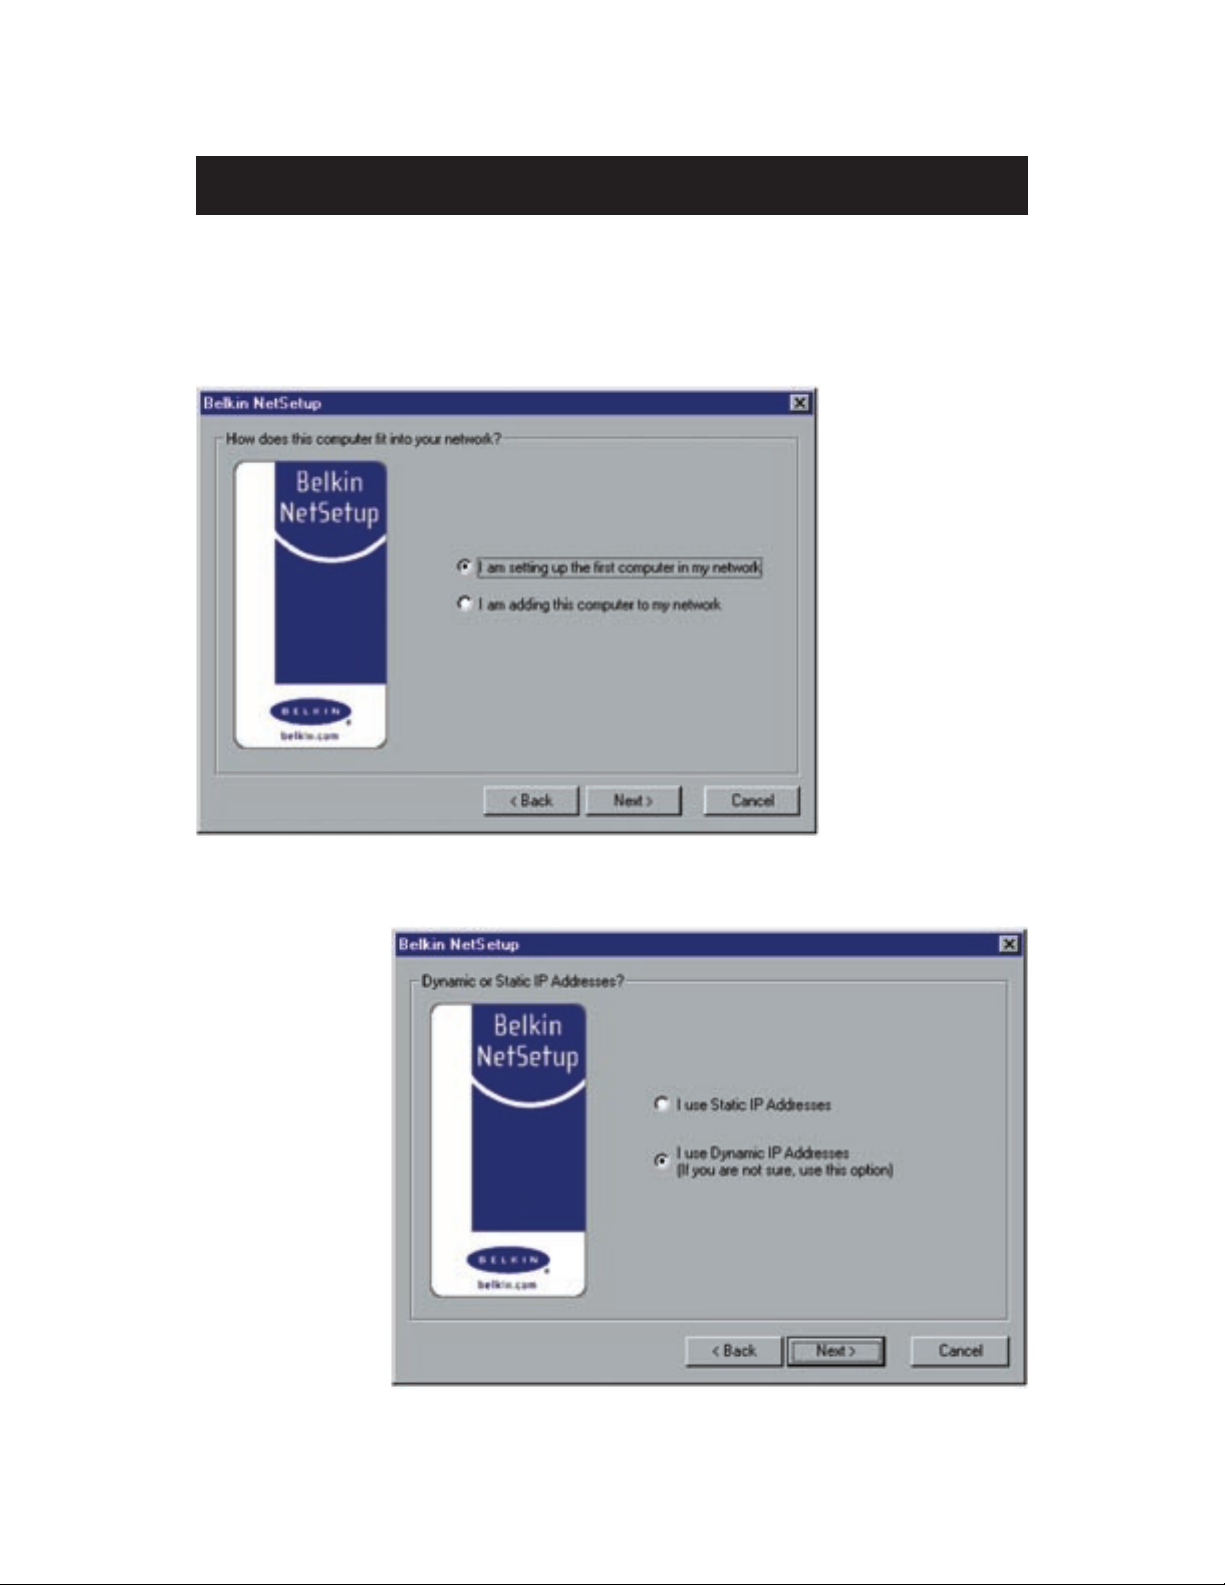
2. Select "I am setting up my own network" and click Next. The following
screen will appear:
3. Select "I am setting up the first computer in my network" and click Next.
Page 16

4. After you have determined the static or dynamic addressing
scheme, the following screen will appear:
5. In the "Computer Name" field, type a name for the computer such
as "Computer 1". The name must be different for each computer
that belongs to the same network/workgroup.
6. In the "Workgroup" field, type a workgroup name such as "My
Network". The workgroup name must be same for each network or
workgroup.
7. Use description field to further identify the computer. Type in a
description such as "Windows 98". This can be anything you want
and does not have to be different from or the same as the
Configuring Your Computer Using Belkin NetSetup
14
Page 17

Configuring Your Computer Using Belkin NetSetup
15
description of any other computer on the network. You may
also leave this field blank. Click Next and the following screen
will appear:
8. If you want to share files and printers on this computer, select "I
want to share files and printers on my computer" and click "Finish."
The following screen will appear:
Page 18

9. NetSetup now needs to know if you want to create a client setup
floppy disk. If you have more computers that you need to set up
to work with the Belkin Switch, click Yes. This will save some
setup files to disk, simplifying setup of subsequent computers. If
you are not going to set up any more computers, click No and
skip to page 17.
10. If you clicked Yes, you will be prompted to insert a floppy disk
into the PC’s floppy disk drive. Label a floppy disk "Belkin
Networking" and insert it into the floppy disk drive. Click OK.
11. After the client setup disk has been created, you will be prompted
to restart your computer. Remove the floppy from the floppy disk
drive and allow your computer to re-start.
Configuring Your Computer Using Belkin NetSetup
16
Page 19

Configuring Additional Computers Using Belkin NetSetup
17
Configuring Additional Computers Using Belkin NetSetup Software
Now that the first computer has been configured we are ready to
configure the other PCs on your network.
1. You should now be working with the next computer. Click Start,
Programs, Belkin SOHO Networking, and then Belkin NetSetup to
launch the easy-to-use computer configurator the following screen
will appear:
2. Select "I am adding this computer to my network". Click Next.
Page 20

Configuring Additional Computers Using Belkin NetSetup
18
4. In the "Computer Name" field, type a name for the computer such
as "Computer 2". Remember, the name must be different from that
of the other computers on the network.
5. The "Workgroup" field should be filled in with the workgroup name
you entered on the previous computer. Do not change this setting.
6. Type in a description such as "Windows 98". This can be anything
you want and does not have to be different from or the same as the
description of any other computer on the network. You may also
leave this field blank.
3. Windows will now prompt you to insert the newly created client
setup disk into the PC’s floppy drive. Insert the disk you labeled
"Belkin Networking" into the floppy drive and click OK. The
following screen will appear:
Page 21

Configuring Additional Computers Using Belkin NetSetup
19
8. If you want to share files and printers on this computer, select "I
want to share files and printers on my computer" and click Finish.
If not, select "I do not want to share files and printers on my
computer" and click Finish.
9. The computer will now need to be restarted.
10. Your PC is now configured. Repeat these steps for the rest of the
computers on your network.
7. When finished filling in the fields, click Next. The following screen
will appear:
Page 22

Sharing Files and Peripherals
20
Sharing Files and Peripherals
To enable file sharing and access between network computers to hard
drives, floppy drives, or CD-ROM drives, you must set sharing settings
for each PC in the network.
Belkin has simplified the sharing of files, peripherals, and internet
connections by providing you with the Belkin NetShare Utility to set
up your sharing options.
1. From the Start menu, click Programs and select Belkin NetShare
Utility to set up your sharing options. The following screen
will appear:
Page 23

Sharing Files and Peripherals
21
2. The Network Info tab allows you to change the name of the
computer and the workgroup by clicking on the change buttons.
Verify that the computer name and workgroup match what you
entered in the Belkin NetSetup Software.
3. If you press the File Sharing tab the following screen will appear:
Page 24

Sharing Files and Peripherals
22
4. This screen will show you all the PC drives available for sharing
with the entire network. To make a drive accessible to all PCs in
your network, highlight the drive in the left-hand column and
select Share.
5. To stop sharing highlight the drive in the right hand column
and click Stop Sharing. The drive(s) will appear in the left
hand column.
6. For advanced sharing options, highlight the shared drive you’d like
to set sharing options to and click on the Properties button and the
following screen will appear:
Page 25

Sharing Files and Peripherals
23
7. On this screen you can share files on your computer as Read Only
or Read/Write files. In addition, you can set passwords so only
authorized users can change these settings.
8. Click on the Printers tab and the following screen will appear:
Page 26

Sharing Files and Peripherals
24
10. Select the preferred sharing option for this printer and click OK.
11. Clicking on Connect to Network Printers will allow you to locate
shared printers on your network. Once you have located the
printer you want to share over the network, NetShare will
automatically install printers from the host computer.
9. This screen will list all printers connected to your PC. Highlighting
the printer you would like to share (or not share) and select the
Sharing button the following screen will appear:
Page 27

Accessing Resources on Other Computers
25
Accessing Resources on Other Computers:
1. From the Start menu, go to Programs and select Belkin NetShare
Utility. The following screen will appear:
2. Select Browse Your Network. The following screen will appear:
Page 28

Accessing Resources on Other Computers
26
3. Double-click on the Entire Network icon and your workgroup will
appear. Click on your workgroup and all resources available to you
will be listed.
OR
1. To access resources available on other computers, click on
the Network Neighborhood or My Network Places icon on
your desktop.
2. Double-click on the computer that you wish to access.
3. You can now access all network files that are available to you.
Page 29

Software Internet Connection Sharing with Multiple PCs
27
Software Internet Connection Sharing with Multiple PCs
Sharing a single Internet account is one of the most useful advantages
of networking your computers. It eliminates the need for separate
modems, phone lines and Internet accounts for each of your
computers. By running Internet -sharing software on a network
computer with a working Internet connection, you can share that
connection with your entire network.
Software Internet sharing is appropriate for dial-up (normal phone
line) Internet connections, as well as for modems that connect to the
computer’s USB port. Software Internet sharing can be done through
the Windows operating system if the computer that has the Internet
connection is running Windows 98 SE, Me or 2000. If the computer
with the Internet connection is running another operating system,
third-party proxy server software is required. On the computer which
has the Internet connection follow these steps:
Page 30

Software Internet Connection Sharing with Multiple PCs
28
Software Internet sharing
If you have a working Internet connection on a computer running
Windows 98 SE, Me, or 2000, you can use the built-in Internet
Connection Sharing capabilities of your operating system. On the
computer which has the Internet connection follow these steps.
Windows 98 SE host configuration
1. Open the My Computer window.
2. Double-click on the Control Panel
and then double-click on
Add/Remove Programs and press
the Windows Setup tab and the
following window will appear:
3. Double-click on Internet Tools.
4. Select the check box on the
Internet Connection Sharing
and click OK.
Page 31

29
Software Internet Connection Sharing with Multiple PCs
5. Click Next and the following screen will appear:
6. Click Next and the following screen will appear:
7. Click Next again.
Page 32

30
Software Internet Connection Sharing with Multiple PCs
8. When asked, "What type of connection do you use to access the
Internet?" select the first option, "Dial Up Connection", and
click Next.
9. Internet Connection Sharing will now create a Client
Configuration Disk to configure the browsers on the other
computers on your home network to use Internet
Connection Sharing.
Page 33

31
Software Internet Connection Sharing with Multiple PCs
10. Click the Next button and the following window will appear:
11. Insert a floppy disk into drive A and click OK.
12. You have now successfully created the Client Configuration
Disk to configure the browser on the other computers of your
home network.
Windows 98 SE host configuration check
1. From the Start Menu go to
setting and select Control Panel
2. Double-click on Network and
the following screen will appear:
Note: There are now a lot more
entries in the Network
configuration.
3. Change the Primary Network
Logon to "Windows Logon".
4. The Internet Connection Sharing
setup made a modification to
the binding of the TCP/IP
protocol, the IP address has
been changed to 192.168.0.1.
This will need to be changed to
"Obtain an IP address
automatically."
Page 34

32
Software Internet Connection Sharing with Multiple PCs
5. Double-click on TCP/IP- Internet Connection Sharing and the
following screen will appear:
6. Click on "Obtain an IP address automatically" and click OK.
Configuring client computers
Now that you have successfully configured the host computer, we can
set up other computers on your network to access a remote modem.
1. Insert the Client Configuration disk into the A drive of the
client computer.
2. From the Start menu go to Run and enter A:\icsclset.exe and
click OK.
Page 35

Software Internet Connection Sharing with Multiple PCs
3. The Browser Setup Wizard screen will appear. Click Next.
4. The Wizard will now check the browser settings. Click Next.
Page 36

5. You have now completed the Browser Setup Wizard. Click Finish.
Client configuration check
To access the Internet using a Connection Sharing Computer, ensure
that the TCP/IP settings for your
network adapter are set
correctly by carrying out the
following steps:
1. In the Control Panel, double
click on the Network icon.
2. In the list of network
components, click TCP/IP
associated with the
network adapter, and then
click Properties.
Software Internet Connection Sharing with Multiple PCs
Page 37

35
Software Internet Connection Sharing with Multiple PCs
3. The following screen will appear. Select the "Obtain an IP address
automatically" check box.
4. Click the WINS
Configuration tab, and
then select the check box
next to "Use DHCP for
WINS resolution".
Page 38

36
Software Internet Connection Sharing with Multiple PCs
5. The following screen will appear. Select the "Obtain an IP address
automatically" check box.
6. Click the WINS
Configuration tab, and
then select the check box
next to "Use DHCP for
WINS resolution".
Page 39

37
Software Internet Connection Sharing with Multiple PCs
7. Click the Gateway tab, and
then remove any installed
gateways if any are listed.
8. Click the DNS Configuration
tab, and then select the check
box next to "Disable DNS".
9. Click OK to accept the new
TCP/IP settings.
10.Click OK again to
update your new
network configuration.
11.Any changes to the network
configuration will require a
restart of the system.
Page 40

38
Software Internet Connection Sharing with Multiple PCs
Windows Me host configuration
1. From the desktop, double-click on My Network Places and the
following screen will appear:
2. Double-click on the Home Networking Wizard and the following
screen will appear. Click Next.
Page 41

39
Software Internet Connection Sharing with Multiple PCs
3. The following screen will appear. Select Yes, if you use the Internet
on this computer and select, "A direct connection to my ISP using
the following device:" and select the device that you use to sign
on to the Internet.
4. You will now be asked if, "you want other computers on your
home network to use the Internet connection on this computer."
Select yes and the device that connects the host computer to your
home network if you want to enable Internet Connection Sharing.
Click Next.
Page 42

Software Internet Connection Sharing with Multiple PCs
40
5. The following screen will appear, enter a computer name and a
workgroup name and click Next.
6. The following screen will appear. Select the check boxes if you
want to share your files and printers with other computers on the
network. Click Next.
Note: To allow access to
other resources on the
computer that cannot
be found in the screen
above, double-click
on My Computer.
Right-click on the
resources that you
want shared and
select sharing
from the menu
that appears.
Page 43

Software Internet Connection Sharing with Multiple PCs
41
7. You will now be prompted to create a setup disk to enable the
use of Home Networking in Windows 98 and Windows 95
operating systems. To create a setup disk, select the first option
and click Next.
8. Insert a disk in the floppy drive and click Next.
9. This completed the Home Networking Wizard, click Finish to have
the Wizard make any of the changes.
Page 44

Software Internet Connection Sharing with Multiple PCs
42
Configuring client computers
1. Insert the Setup disk in the floppy drive of the client computer.
From the Start menu go to Run and type, "A:\setup.exe" and click
OK. The screen will look something like this:
2. This will bring you to the Welcome screen of the Home
Networking Wizard. Click Next and the following window
will appear:
Page 45

Software Internet Connection Sharing with Multiple PCs
43
3. Select Yes, if you use the Internet on this computer and select, "A
connection to another computer on my home network that
provides direct access to my Internet Service Provider" and click
Next. The following screen will appear:
4. Be sure to change the Computer Name, but use the same
Workgroup Name. Click Next. The following screen will appear:
Page 46

Software Internet Connection Sharing with Multiple PCs
44
5. Select the check boxes to the corresponding resources you want to
share with other computers on the network. Click Next.
Note: To allow access to
other resources on the
computer that cannot be
found in the screen above,
double-click on My
Computer. Right-click on
the resources that you want
shared and select sharing
from the menu that appears
and set the level of access
that you want to allow and
click OK.
6. The following screen will
appear:
7. Select, "No" because we have
already created a Home
Networking Setup disk on the
host computer. Click Next and
this completes the client
network configurations.
Page 47

Product Specifications
45
5- or 8-Port 10/100 Network Switch
F5D5130-5, F5D5130-8
Network Standards: IEEE802.3, 802.3u 10Base-T Ethernet,
100Base-Tx Fast Ethernet
Protocol: CSMA/CD
Ports: 5 x or 8 x 10/100Base-T Auto sensing
RJ45 ports,and an auto uplink RJ45 port(s)
(F5D5130-5) and a shared uplink RJ45
port (F5D5130-8)
MAC Address: 1024 Unicast MAC Addresses Limits
Unlimited Multicast MAC Addresses
Max Frame Size: 1522 Bytes (F5D5130-5), 1536 Bytes (F5D5130-8)
Buffer Memory: 1Mb
Speed Per Port: 10 or 100 (Mbps in Half Duplex)
20 or 200 (Mbps in Full Duplex)
LEDs: Link/Activity (Per port), 10/100Mbps (Per port)
and power
Page 48

46
FCC Statement
DECLARATION OF CONFORMITY WITH FCC RULES FOR
ELECTROMAGNETIC COMPATIBILITY
We, Belkin Components, of 501 West Walnut Street, Compton CA 90220, declare
under our sole responsibility that the product:
F5D5130-5
F5D5130-8
to which this declaration relates:
Complies with Part 15 of the FCC Rules. Operation is subject to the following two
conditions: (1) this device may not cause harmful interference, and (2) this device
must accept any interference received, including interference that may cause
undesired operation.
CE Declaration of Conformity
We, Belkin Components, declare under our sole responsibility that the F5D5130-5 and
F5D5130-8, to which this declaration relates, is in conformity with EN55022, EN61000-3-2,
EN61000-3-3 and EN55024.
Belkin Components Limited Lifetime Product Warranty
Belkin Components warrants this product against defects in materials and workmanship for its
lifetime. If a defect is discovered, Belkin will, at its option, repair or replace the product at no
charge provided it is returned during the warranty period, with transportation charges prepaid, to
the authorized Belkin dealer from whom you purchased the product. Proof of purchase may be
required.
This warranty does not apply if the product has been damaged by accident, abuse, misuse, or
misapplication; if the product has been modified without the written permission of Belkin; or if
any Belkin serial number has been removed or defaced.
THE WARRANTY AND REMEDIES SET FORTH ABOVE ARE EXCLUSIVE IN LIEU OF ALL O THERS,
WHETHER ORAL OR WRITTEN, EXPRESSED OR IMPLIED. BELKIN SPECIFICALLY DISCLAIMS ANY
AND ALL IMPLIED WARRANTIES, INCLUDING, WITHOUT LIMITATION, WARRANTIES OF
MERCHANTABILITY AND FITNESS FOR A PARTICULAR PURPOSE.
No Belkin dealer, agent, or employee is authorized to make any modification, extension, or
addition to this warranty.
BELKIN IS NOT RESPONSIBLE FOR SPECIAL, INCIDENTAL, OR CONSEQUENTIAL DAMAGES
RESULTING FROM ANY BREACH OF WARRANTY, OR UNDER ANY OTHER LEGAL THEORY,
INCLUDING BUT NOT LIMITED TO LOST PROFITS, DOWNTIME, GOODWILL, DAMAGE TO
OR REPROGRAMMING, OR REPRODUCING ANY PROGRAM OR DATA STORED IN OR
USED WITH BELKIN PRODUCTS.
Some states do not allow the exclusion or limitation of incidental or consequential damages or
exclusions of implied warranties, so the above limitations of exclusions may not apply to you.
This warranty gives you specific legal rights, and you may also have other rights that vary from
state to state.
Page 49

47
Page 50

Belkin Components B.V.
Diamantlaan 8 • 2132 WV
Hoofddorp • The Netherlands
Tel: +31 (0) 235698765
Fax: +31 (0) 235612694
Belkin Components, Ltd.
Unit 13 • Gatelodge Close • Round Spinney
Northampton • Northants • NN3 8RX • United Kingdom
Tel: +44 (0) 1604678300
Fax: +44 (0) 1604678330
Belkin Components
501 West Walnut Street
Compton • CA • 90220 • USA
Tel: 310.898.1100
Fax: 310.898.1111
© 2001 Belkin Components. All rights reserved. All trade names are registered trademarks of respective
manufacturers listed.
Belkin Components, Ltd.
7 Bowen Crescent • West Gosford
NSW 2250 • Australia
Tel: +61 (2) 43254666
Fax: +61 (2) 43254277
P73793
 Loading...