

Page 1

2.4GHz • Wireless
802.11b
Ethernet
E
Wired
Mbps
10/100
Ethernet
2.4GHz • Wireless
High-
Speed
Mode
802.11g
Mbps
2.4GHz • Wireless802.11g
Mbps
2-Port
USB Print Server
Share your USB printers with your
networked computers
User Manual
F1UP0301
Page 2

1
2
1
3
4
5
6
7
sec tio n
8
9
10
Table of Contents
1 Introduction . . . . . . . . . . . . . . . . . . . . . . . . . . . . . . . . . . . 1
Home Networking Overview . . . . . . . . . . . . . . . . . . . . . . . . . . . . . .
2 Overview . . . . . . . . . . . . . . . . . . . . . . . . . . . . . . . . . . . . .
Product Features . . . . . . . . . . . . . . . . . . . . . . . . . . . . . . . . . . . . . .
Applications and Advantages . . . . . . . . . . . . . . . . . . . . . . . . . . . . .
System Requirements . . . . . . . . . . . . . . . . . . . . . . . . . . . . . . . . . .
Package Contents . . . . . . . . . . . . . . . . . . . . . . . . . . . . . . . . . . . . .
Knowing your Print Server . . . . . . . . . . . . . . . . . . . . . . . . . . . . . . .
3 Connecting the Print Server Using the Setup Wizard . . . . . .
4 Setup for Advanced Users . . . . . . . . . . . . . . . . . . . . . . . . 11
5 Web Configuration . . . . . . . . . . . . . . . . . . . . . . . . . . . . . 15
Accessing Web Configuration Menus . . . . . . . . . . . . . . . . . . . . . 15
Home Page . . . . . . . . . . . . . . . . . . . . . . . . . . . . . . . . . . . . . . . . . . 16
Login Screen . . . . . . . . . . . . . . . . . . . . . . . . . . . . . . . . . . . . . . . . . 17
IP Address . . . . . . . . . . . . . . . . . . . . . . . . . . . . . . . . . . . . . . . . . . . 17
Print Server Configuration . . . . . . . . . . . . . . . . . . . . . . . . . . . . . . 18
Upgrade Firmware . . . . . . . . . . . . . . . . . . . . . . . . . . . . . . . . . . . . 18
System Settings (Change Password) . . . . . . . . . . . . . . . . . . . . . . 19
6 Printing to Multiple Servers . . . . . . . . . . . . . . . . . . . . . . 20
Adding a Belkin Port Monitor (Advanced Menu) . . . . . . . . . . . . . 20
7 Belkin Port Monitor Advanced Menu
Opening the Belkin Port Monitor Advanced Menu . . . . . . . . . . . 23
Adding a Second Belkin Port Monitor and
configuring it for a Specific Print Server . . . . . . . . . . . . . . . . . . . 24
8 Using the Print Server for FTP Printing . . . . . . . . . . . . . . 26
Sending Print Jobs to Printers Connected
to the Print Server using FTP . . . . . . . . . . . . . . . . . . . . . . . . . . . . 27
9 Troubleshooting . . . . . . . . . . . . . . . . . . . . . . . . . . . . . . . 30
10 Information . . . . . . . . . . . . . . . . . . . . . . . . . . . . . . . . . . 41
. . . . . . . . . . . . . . . . 2 3
1
6
6
6
6
6
7
9
Page 3

Introduction
Thank y ou for purcha sing the Belki n U SB Print Server. No w you
can sha re yo ur USB-e quipp ed print ers with your wired ne twork .
The Bel kin USB Pri nt Ser ver allo ws you to co nnect up to two USB
printe rs directl y to your ne twork , elimin ating th e need to ha ve a
dedica ted PC fo r p rinti ng. It offe rs an easy i nstalla tion a nd setup th at
has you sh aring pr inter s in minu tes. Ple ase read throug h this ma nual
comple tely to b e s ure that yo u a re getting the most from your new
Belkin USB Prin t S erver.
Belkin home net worki ng lets you easily e njoy the se
additi onal adv antag es
• Share one hi gh-sp eed Inte rne t c onnec tion wit h a ll the co mpute rs
in your ho me
• Share resources , such as fi les, a nd hard drive s a mong a ll the
connec ted comp uters in your hom e
• Share a sing le print er with t he entire fam ily
• Share doc uments, music, v ideo, an d digita l pictures
• Store, retrie ve, an d c opy file s fro m one com puter to another
• Simult aneou sly play games on line, ch eck Inte rne t e -mail ,
and cha t
What types of connections are used to create a home network?
The two co mmon way s to set u p a home net work are with wireless
and wired te chnol ogies.
sec tio n
1
2
3
4
5
6
7
8
9
10
Advantages of a wireless network:
• Mobili ty – you’ ll no lon ger need a d edicate d “com puter room ”—
now you ca n work on a n etwor ked lapt op or deskt op com puter
anywhe re within y our wirele ss range
• Easy in stall at ion – Bel kin Easy Install ation Wi zard makes
setup s imple
• Flexib ility – s et up and ac cess pri nters , c omput ers, and other
networ king dev ices f rom a nywhe re in yo ur home
• Easy Ex pansi on – t he wid e r ange of B elkin ne twork ing products
let you ex pand you r netw ork to incl ude devi ces su ch as print ers
and gam ing cons oles
• No cabl ing required – y ou can spare t he expen se and hass le of
ret ro fitti ng Ether net ca bling th ro ughou t t he hom e o r off ice
• Widesp re ad indus try ac ce ptanc e – choos e f ro m a wide ran ge
of inte ro perable network ing produc ts
1
Page 4

Introduction
Introduction
3
2
1
3
4
5
6
7
sec tio n
8
9
10
Wireless Networking Speed
Currentl y there are three lev els of wi re less net working stand ards ,
which t ransmit data at v ery different m aximum s peeds . E ach is ba sed
on the des ignat ion 802. 11x, so n amed by the IEEE, th e board tha t i s
res ponsi ble for c ertifyi ng net wo rking standards . The mos t c ommon
wireless network ing stan dard, 802. 11b, tra nsmit s inform ation at
11Mbps ; 802.11 a and 802 .11g wor k at 54Mb ps See th e f ollow ing
chart f or more detai led info rmati on.
Wireless Comparison
Wireless
Technology
Speed 11Mbps 54Mbps 54Mbps
Fre qu en cy Common
Compatibility Compatible w it h
Range De pe nd s on
Adoption Mature - widely
Price Inexpensive More exp en si ve M os t exp en si ve
802.11b 802.11g 802.11a
household
devices su ch as
cordl es s p ho ne s
and mi cr ow av e
ovens. M ay
interfere wi th
the 2. 4G Hz
unlicensed b an d
802.11g
interfere nc e -
typically 50 -3 00
ft. in do or s
adopted
Common
household
devices su ch as
cordl es s p ho ne s
and mi cr ow av e
ovens. M ay
interfere wi th
the 2. 4G Hz
unlicensed b an d
Compatible w it h
802.11b
Depends on
interfere nc e -
typically 50 –3 00
ft. in do or s
Expected t o
continue t o g row
in p op ul ar it y
5GHz -
uncro wd ed ba nd
Incompatible
with 8 02 .1 1b or
802.11g
Less i nt er fe re nc e
- ra ng e is
typically 50 -1 00
feet
Slow a do pt io n
for co ns um er s -
more pop ul ar in
business
2
Page 5

Introduction
Advantages of a wired network:
• Low cos t – on avera ge, wired net worki ng devic es are less
expens ive than wireless n etwor ki ng dev ices
• Faster speed s – co mmon s peed is 100 Mbps wit h recent
techno logy provi ding up t o 1 000Mb ps
• Flexib ility – s et up and ac cess pri nters , c omput ers, and other
networ king dev ices f rom a nywhe re in yo ur home
• Better range – wired Ether net te chnolog y provides distanc e
of up to 32 8 f eet (w it hout a repe ater) , w hile wirel ess rang e is
typica lly 150 t o 2 00 fee t
• Existi ng wired in frast ru cture – bec ause of the matur ity of wired
techno logy, some new homes are bui lt with a n E thernet cab ling
infras truct ure
• Widesp re ad indus try ac ce ptanc e – a w ide ra nge of
interope rable ne twork ing produc ts
Combining wired and wireless technologies.
Since wired t echnolo gy ha s bee n around longe r, you might a lready
own so me wi re d netwo rking products . In this case, c onsid er
combin ing t he tw o techn ologi es to c re ate a super-e ff icien t, cost
eff ectiv e hom e netwo rk.
sec tio n
1
2
3
4
5
6
7
8
9
10
3
Page 6

Introduction
Introduction
5
2
1
3
4
5
6
7
sec tio n
8
9
10
Placement of your Wireless Networking Hardware
Please note that to ens ure the perfor mance of you r wirel ess n et work,
you mu st ca re fully p lan t he po sitioni ng of your w ireless
networ king hardware.
Exampl es of Wirel ess Netw orkin g H ardware:
• Wireless Router
• Wireless Range Ex tender/ Acces s P oint
• Wireless Noteboo k Networ k Card
• Wireless Desktop Network Card
• Wireless USB Netw ork Adap ter
• Wireless USB Prin t S erver
• Wireless Ether net Ad apter
Wireless technol ogy is ra dio-b as ed, wh ich mean s c onnec tivit y
and throu ghput pe rforman ce bet we en dev ices dec re ases whe n
the dis tance be tween de vices in creases . O ther fac tors tha t will
cause s ignal de grada tion (me tal is gene rally th e wors t c ulpri t) are
obstru ction s s uch as wa lls and a pplianc es. As a resul t, the ty pical
indoor range of yo ur Wireles s devi ces will be between
100–20 0 feet.
The Wirel ess Rout er is the ce ntral co nnect ion poin t o f the net work,
with al l w ireless cl ients (i .e. wi rele ss noteb ook ne twork ca rd s,
wireless desktop network card, and wirel ess USB a dapters ) atta ched
to it. In o rd er to achie ve the be st wireles s n etwor k covera ge for
your co nnected compu ters, yo ur Route r s hould be place d a s close
as poss ible to the cente r o f the area tha t your wa nt to cover with
antenn as point ing UP. I n m ultis tory hom es, plac e t he Rou ter on a flo or
that is as close to th e cent er of the ho me as pos si ble; t his may mea n
placin g the Rou ter on an up per floo r. Wireles s d evice s w ork be st in
a line- of-sigh t situ ation wh ere t here are no obst acles be tween th e
wireless client a nd the Rout er.
4
Page 7

Introduction
Try to avo id place ment of w irel ess de vices ne ar:
• 2.4GHz cordless p hones
• Microwav e Ovens
• Refrig erato rs
• Washe r/Dry er
• Metal C abinets
• Metall ic-ba sed UV ti nted win dows
sec tio n
1
2
3
4
Note: W hile the ab ove it ems can affec t networ k perfor mance , y our
wireless network still wi ll funct ion, alt hough prob ably not at its
maximu m effectiv eness .
For more inf ormat ion regarding o ur netwo rking prod ucts vis it our
websit e at www.b elkin.c om/ne twork in g or call us at 877-7 36-57 71.
5
6
7
8
9
10
5
Page 8

Overview
7
2
1
3
4
5
6
7
sec tio n
8
9
10
Overview
Product Features
• Integrated, easy-to-use Print Server Setup Easy Installation Wizard
• Ethernet interface, for operation in virtually all Ethernet networks
• Easy installation and use
• LEDs: Power, Ethernet link, Status, and Error
Applications and Advantages
• Temporary LANs for special projects or peak time Sets up temporary
networks such as at trade shows, exhibitions, and construction sites,
which need networks on a short-term basis; also companies that need
additional printers for a peak activity period.
• SOHO (Small Office/Home Office) networking needs Provides easy
and quick small network installations that SOHO users need
Product Specifications
Standard: 802.3 IEEE, 802.3u IEEE
Network Interface: 1 LAN, 2 USB
Power Consumption: Input: 100-110v~0.4A, 50-60Hz
Output: 5v, 2.0A
Operating Temperature: 0 – 55 degrees C
Storage temperature: -25 – 70 degrees C
Humidity: Max. 95% (non-condensing)
System Requirements
• Printe r compat ible w ith USB 1.1
• USB cab le for each print er
• PC with Wi ndows® 9 8SE, Me, 2000, XP
Package Contents
• Belkin USB Prin t S erver
• Instal latio n S oftwa re CD
• User Ma nual
• Quick I nstalla tion G uide
• Ethernet C able
6
Page 9
Overview
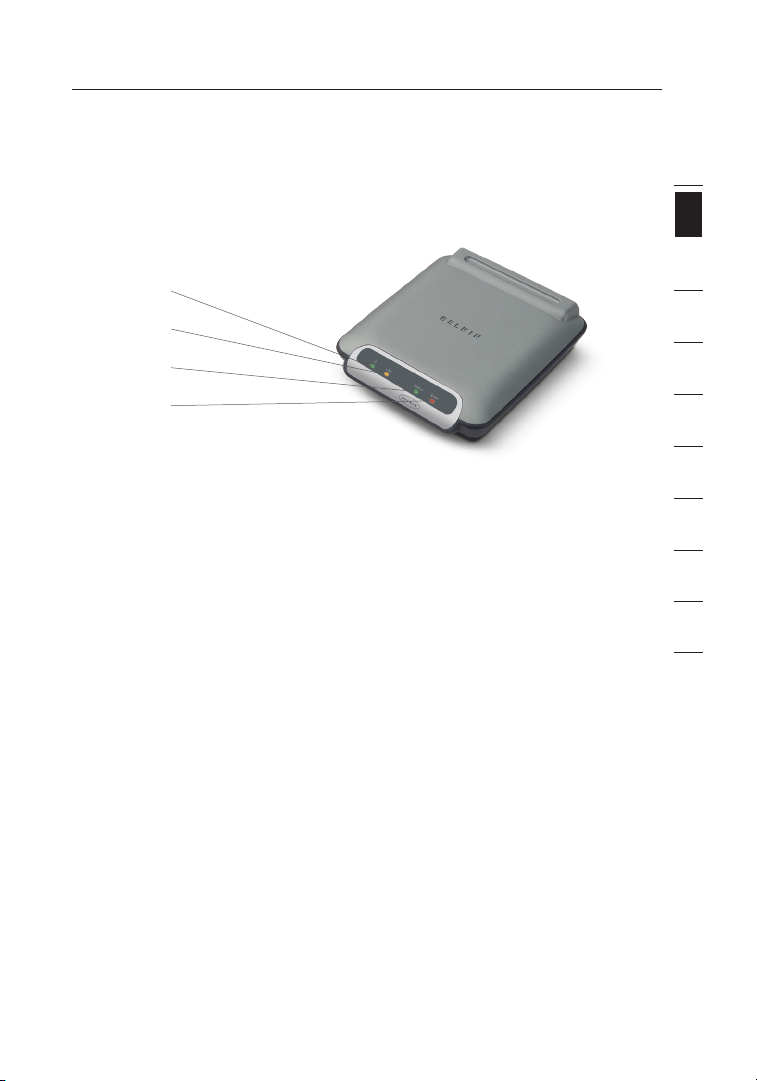
Knowing your Print Server
(a)
(b)
(c)
(d)
(a) PowerLED
Solid: Server is ON
Off : Server is OFF
(b) LAN LED
Solid: Connec ted to Et her net
Off : Ethernet d is conne cted
Blinki ng: Transf erring d ata
Gre en: 10Mbps device c onnec ted
Amber: 10 0Mbps de vice con necte d
1
sec tio n
2
3
4
5
6
7
8
9
10
(c) Status LED
Solid: OK
Blinki ng: Attemp ting to o btain IP address wh ile boot ing, or pri nting
in progress
(d) Error
Solid ( Red): Printer mi ssing or print er error
Off : OK
7
Page 10
Overview
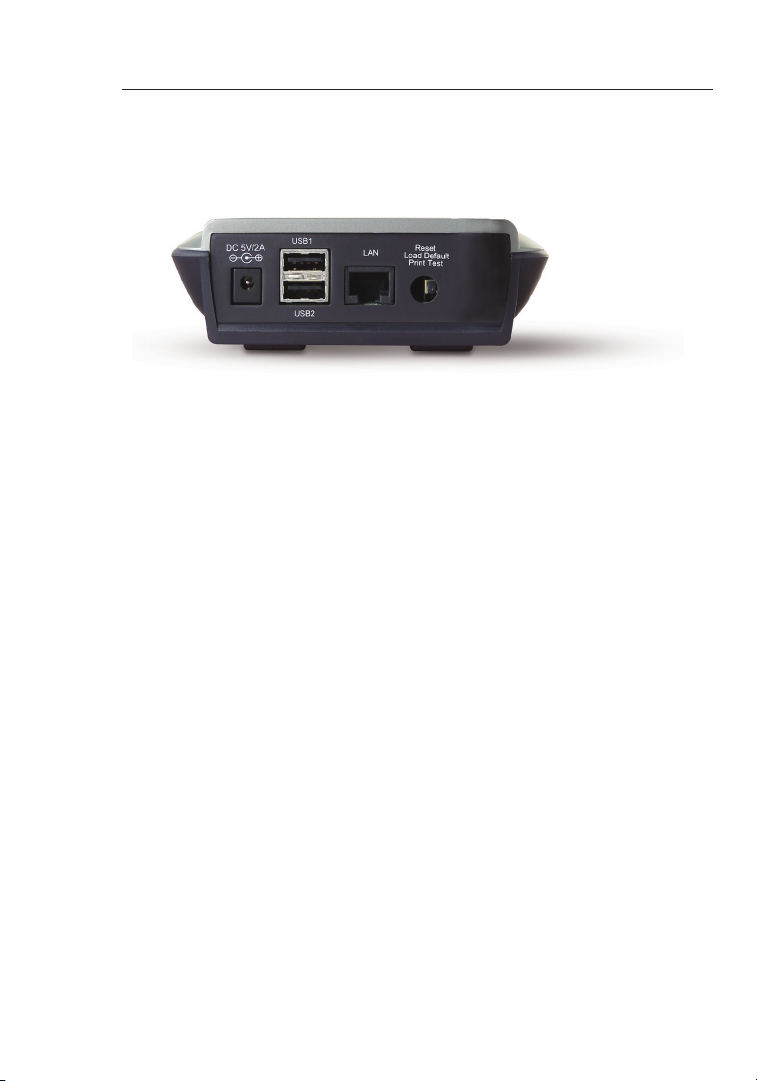
(a) Printer 1/Printer 2
These p orts are used to conne ct one or tw o USB pri nters.
Note: These po rts ca nnot be exp anded us ing a USB hub.
(b) E thernet Por t
This po rt is used t o c onnec t the Pri nt Serve r t o an Ethe rne t n etwor k
via CAT5 c able.
(c) Reset/Test Button (3 functions)
Print Page: For most pri nters, t his func tion resul ts in a test page
to be prin ted. The test pag e will in clude Pr int Serv er setti ngs
includ ing the I P a ddress and other in forma tion tha t m ight b e h andy
for troub leshoot ing the P rint Ser ver. To print te st page, depress th e
Reset/ Test butto n m oment arily.
WARNING: Some printers do not support this function.
Reset: To reset or rebo ot the Pr int Serv er to exi sting se tting s,
depress t he Reset /Test b utton for five or more secon ds.
Restore Factory Defaults: To rest ore t he Print Server t o f actor y
defaul ts, depres s the Res et/Test butt on for 10 se conds while
poweri ng up the Pr int Se rver.
8
Page 11

Connecting the Print Server Using the Setup Wizard
Make sure that each computer can print to the USB printer before
installing the USB Print Server.
1. Con nect you r p rinte r directly to each com puter on the netw ork
and ins tall USB pr inter drivers (see you r p rinte r docume ntati on
for det ailed in struc tions). The Prin t S erver requ ires that t he
correct d rivers a re lo aded and working (printi ng) be fore the Prin t
Server is insta lled.
When in stallin g prin ter driv ers, ins tall as:
• Local p rinter, no t netw ork prin ter
• USB por t
• Not to be s hared
• Defaul t printe r for all printin g (if des ired)
Note: Veri fy fun ctional ity on ea ch compu ter by pr inting a te st
page pr ior to movi ng to the next ins tallati on ste p.
2. Ins ert the Pri nt Ser ver Setu p W izard CD in to your CD- ROM dr iv e
on the fir st PC.
Note: I f t he Print Serve r S etup Wiz ard does no t s tart up
automa tical ly, se lect you r C D-ROM drive from “M y Comput er”
and dou ble-cli ck on the file nam ed “Setu p” on the CD -ROM.
3. The Wi zard will s tart.
Note: T he Wizard wil l remind in staller that ste p 1 needs to be
done be fore conti nuing. I f s tep 1 is c omplete , click “ Next” to
pro ceed. If not, ple ase stop Wizard and co mplet e s tep 1 for
all com puters.
1
2
sec tio n
3
4
5
6
7
8
9
10
9
Page 12
Connecting the Print Server Using the Setup Wizard
Setup for Advanced Users
11
sec tio n
2
1
3
4
5
6
7
8
9
10
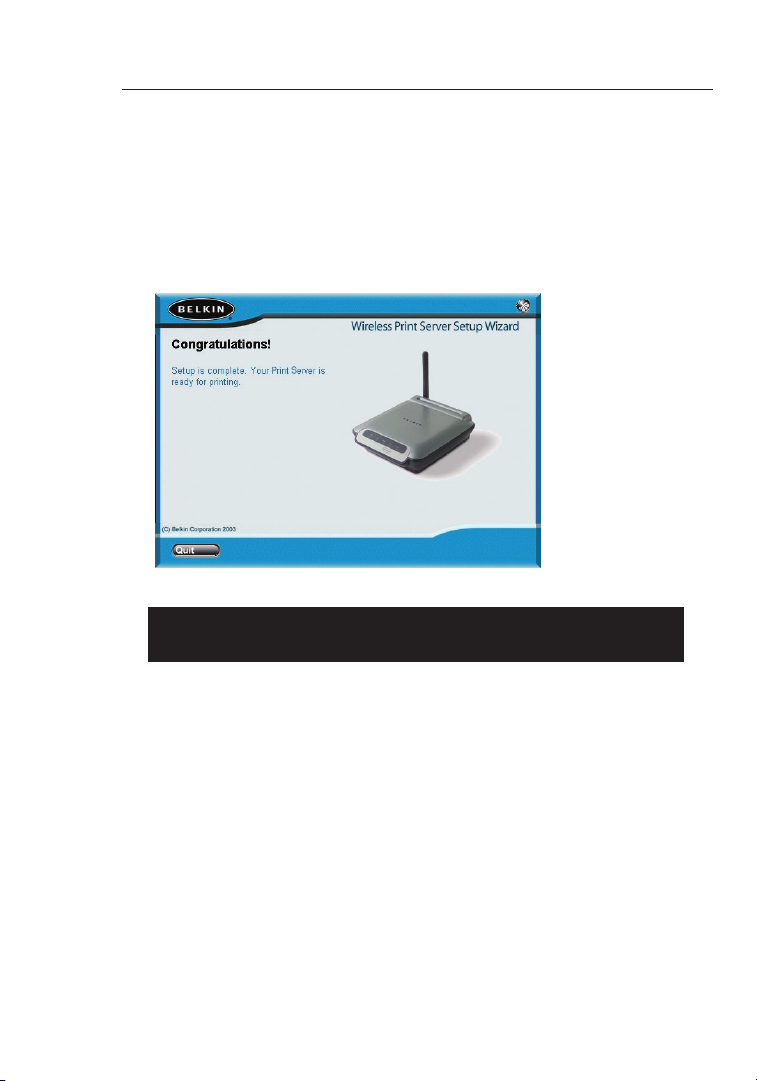
4. Follo w i nstru ctions f ro m e ach screen of the Prin t Serv er
Setup W izard.
5. Wh en you se e t he follo wing scree n, insta llati on is com plete fo r
that PC . C lick “Qu it” an d rem ove the C D f ro m y our co mputer.
Important: Repeat steps 2-5 for each additional PC you would like
to print from.
6. Enj oy your P ri nt Ser ver!
10
Page 13

Setup for Advanced Users
Install Print Drivers
Be sure to in stall th e n ecess ary prin t driver s on each co mpute r t hat
will be ac cessi ng the Pr int Serv er.
Set Up Print Server
1. Plug your pri nter’s USB cab le (powe r on) int o t he
Print S erver.
2. Conn ect the i nclud ed Ether net ca ble into the Prin t S erver and to
an avai lable Et her net port on your route r o r swit ch.
3. Powe r up the p ri nt ser ver. Allow approxima tely one minut e f or
the Pri nt Serve r t o boot .
4. Verif y t hat th e S tatus li ght is il lumin ated and th at the Er ro r l ight is
not ill uminate d.
5. Dete rmine th e Prin t S erver ’s IP add re ss, usin g one of the
follow ing meth ods:
a) New Print Servers are configured to receive IP addresses
dynamically. If your network has a DHCP server, the Print
Server will obtain an IP address from your network. If the DHCP
server supports a client list, the client list will list the IP address
assigned to the Print Server. If a DHCP server is not available,
after 1.5 minutes the Print Server will revert to 192.168.2.253.
b) If the Print Server has been configured previously, then it will
have been set to a static IP address that could be different for
every network.
Note: Resto ring fac tory def aults on the Prin t Server by
holdin g in the reset button f or 10 sec onds whi le re power ing
the Pri nt Serve r w ill restore t he IP address to dynam ic.
c) Run the program “PSF.exe” from the Installation CD. This will
find the IP address and link automatically to the web-based
management interface.
d) Go to the last step of the Print Server Installation Wizard, which
has an Advanced button that finds the IP address and links
automatically to the web-based management interface.
1
2
3
sec tio n
4
5
6
7
8
9
10
11
Page 14

Setup for Advanced Users
13
sec tio n
2
1
3
4
5
6
7
9
10
8
6. Verif y t hat th e c omput er is in the sa me sub net as the P rint Ser ver
(The fi rst three oct ets of th e I P addresse s are the same ).
7. Type the Pri nt Serve r’s IP ad dress into yo ur Inter net brow se r fro m
any com puter. F or examp le, if your IP address is 192.168 .2.22 5,
type “1 92.168. 2.225 ” (do not ty pe in any thing el se such a s
“http: //” or “w ww”). Th en press th e “ Enter ” k ey.
8. Clic king the “Logi n” butto n o r clicki ng on any one of the l inks on
the hom e p age will take you to the logi n screen. T he Print Se rver
ships w ith no pass word entered . In the log in screen, leave th e
passwo rd blank an d c lick “Su bmit” to log in.
9. Set the IP address fo r t he Print Server b y c licki ng “IP Ad dres s”
(see “Web I nterf ac e – IP Add ress ” for more inf o).
10. Cycle power on th e Prin t S erver to rebo ot it to t he
new con figurat ions.
12
Page 15

Setup for Advanced Users
Configure Computers to Print to the Print Server
1. Install Port Mon itor sof tware on each compu ter by runn ing
“instp ort.e xe” from the C D.
2. Configu re th e Belk in Port Mon itor on e ach comp uter pri nter dri ver
to poin t t o the cor re ct Print Se rver a s f ollow s:
a) In W indow s, selec t t he pri nter’s pro perti es for th e p rinte r
connec ted to th e P rint S erver an d s elect th e “Por t” tab,
select the Belk in port, and clic k “ Confi gure Port. ..”.
b) On the “Belkin Port: Properties” window, click “Locate Servers”.
1
2
3
sec tio n
4
5
6
7
8
9
10
c) On the “Ava ilabl e S erver s” windo w, s elect th e Print S erver
you wan t t o print t o.
13
Page 16

15
sec tio n
2
1
3
4
5
6
7
8
9
10
Setup for Advanced Users
d) Click “O K” to clo se. On th e “ Belki n P ort: Prope rties ” w indow,
the nam e o f the Pri nt Serve r you sel ected wi ll appea r. Click
“OK” to cl ose.
e) On the Ports ta b, disab le bidirec tiona l s uppor t i f currentl y
enable d. Click “Appl y”.
f) Click “ OK” to clos e.
g) If the re is a s econd pr inter co nnect ed to the Pr int Serv er,
select the proper ties for th at pri nter and cl ick the “ Ports ”
tab; se lect the Be lkin p ort that wa s just co nfigu red.
Note: If more tha n o ne Print Serve r i s availa ble on yo ur netwo rk,
ref er to the section “Printi ng to Mul tiple Pr int Serv ers”.
14
Page 17

Web Configuration
Accessing the Web Configuration Menus
1. Connect the incl uded Eth ern et cable in to the Pr int Serv er and to
an avai lable Et her net port on your route r o r swit ch.
2. Power up th e Print S erver. A llow app ro xi matel y one min ute for
the Pri nt Serve r t o boot an d obtain an IP address .
3. Determi ne the Pr int Serv er’s I P a ddress, us ing one o f t he
follow ing meth ods:
a) Ne w P rint S ervers a re co nfigu re d t o rec eive IP a ddresses
dynami cally. If your network has a DHC P s erver, t he Print Se rver
will ob tain an IP a ddress from you r networ k. If the DHCP ser ver
suppor ts a clie nt list, the clie nt list wil l list th e IP addres s
assign ed to the Pr int Se rver. If a DHC P server is not av ailable ,
after 1 .5 minut es the Pr int Serv er will rever t to 192. 168.2 .2 53.
b) If th e Prin t S erver ha s been co nfigu red p re viously, then it will
have be en set to a s ta tic IP ad dress that could be di ff erent for
every n etwork.
Note: Resto ring fac tory def aults on the Prin t Server by holdi ng in
the reset bu tton for 10 secon ds while repo werin g t he Pri nt Serve r
will rest ore t he IP add ress to dynam ic.
c) Run the progra m “ PSF.exe” from th e Instal latio n CD. Thi s
will fi nd the IP ad dress and lin k auto matical ly to the we b-bas ed
manage ment int erfac e.
d) Go t o t he las t s tep of th e P rint Ser ver In stallat ion Wiza rd ,
which h as an Advan ced bu tton tha t f inds the IP address an d link s
automa tical ly to the we b-bas ed manag ement in terfa ce.
1
2
3
4
sec tio n
5
6
7
8
9
10
15
Page 18

Web Configuration
Web Configuration
17
sec tio n
2
1
3
4
5
6
7
8
9
10
4. Type th e Print S erver ’s IP add re ss into you r Inte rnet b ro wser from
any com puter. F or examp le, if your IP address is 192.168 .2.22 5,
type “1 92.168. 2.225 ” (do not ty pe in any thing el se such a s “ http: //”
or “www ”). Then pres s the “En ter” key. P743 90-A pag e 1 2
Web Interface – Home Page
After entering the IP address of the Print Server, you will see the screen
illustrated below. This page shows most critical configuration information for
the Print Server. To modify settings, choose a topic from the menu on the left
of the screen.
16
Page 19

Web Configuration
Web Interface – Login Screen
Clicking on any menu item will cause a login prompt to appear. If a password
has been set previously, enter it here. New Print Servers ship without
passwords; if this is the case, click “Submit” to continue.
Web Interface – IP Address
This menu allows the user to set a Static IP address, or to set the Print
Server to obtain an IP address automatically as a DHCP client. Although
Belkin designs the Print Server to obtain an IP address automatically, running
the Wizard will change the IP address to static. Static is the recommended
method of operation, since the computer will be configured to print to
a specific IP address which, if changed, would make the Print Server
inoperable.
Note: When choosing an IP address manually, be sure to choose a unique
IP address in the same domain (first three sets of digits the same) as the
gateway of your network.
1
2
3
4
sec tio n
5
6
7
8
9
10
17
Page 20

Web Configuration
Web Configuration
19
sec tio n
2
1
3
4
5
6
7
8
9
10
Web Interface – Print Server Configuration
This menu allows the user to modify the following parameters:
• Print S erver Na me: This field id entifie s the Pri nt Serve r by name ,
and eac h P rint Ser ver ha s a unique n ame. Uni que name s are
critic al in a netw ork wi th more than o ne Print Se rver. If th e user
wishes to chang e t he nam e, make sure t o u se uniqu e names.
• Raw Pri nting: T his feat ure a llows clients to print to the Prin t
Server using th e s tanda rd TC P/IP p rinter p ort buil t i nto Wi nd ows
XP and 200 0 instea d of the B elkin Po rt Monit or. Usin g R aw
Printi ng requires t he user to c onfigure a ll port par amete rs
manual ly and is no t recommen ded fo r u sers unf amili ar with T CP /
IP prin ting.
• FTP Pri nting: T his feat ure e nable s the pri nter to recei ve print jobs
sent by FT P (see FT P P rinti ng for de tailed i nstru ctions) . Disabl ing
this fe ature will prev ent FTP j obs.
Web Interface – Upgrade Firmware
This menu allows the user to upgrade the Print Server’s firmware. Before
running this application, download the new firmware from the Belkin website at
www.bel kin.c om. Be careful to take note of the location of the downloaded
file on your computer’s hard disk. After downloading, click “Browse” on the
18
Page 21

Web Configuration
screen shown below, select the file name of the downloaded firmware, then
click “Apply Changes”. The firmware upgrade will take a few minutes.
Note: D o n ot inter rupt t he process by remo ving p ow er from the Pr int
Server or you coul d caus e p erman ent dama ge to the de vice.
Web Interface – System Settings (Changing Password)
The Pri nt Serve r s hips w ith NO preset password. If you wish to set
a passw ord f or greater securit y, be s ure t o c hoose a p asswo rd th at
you wil l rem ember, a nd make a no te of it. Th is utili ty will req uire you
to ente r t he new pa ssword twi ce. If yo u a re en terin g a passw ord f or
the fir st time, le ave th e “ current ” p asswo rd fi eld blan k. Press “A pply
Change s” when d one.
The Web pag e a uto-ref re sh inter val sett ing can b e c hange d i n this
menu. I f y ou want a sl ower o r f aster in terva l, choos e a numbe r i n the
range a nd press “App ly Chang es”.
1
2
3
4
sec tio n
5
6
7
8
9
10
19
Page 22

Printing to Multiple Print Servers
21
sec tio n
2
1
3
4
5
6
7
8
9
10
If more than one Prin t S erver is avail able on you r networ k, and so me
comput ers need to be abl e t o print t o m ore than on e P rint Ser ver, you
will ne ed to insta ll the in clude d B elkin Po rt Mon itor (a vir tual pri nter
port) s oftware on yo ur PC. Th e B elkin Port Mon itor can th en be
config ured to sel ect different P rint Ser vers on y our netw ork to ha ndle
specif ic print jobs.
Adding a Belkin Port Monitor and Configuring It for a Specific
Print Server
1. In Windows, select the printer’s properties and select the “Ports” tab.
2. Cli ck “Add P or t”.
A window showing the printer ports installed on the PC will open.
Select “Belkin Port” and, in the “Printer Ports” window, click
“New Port”.
20
Page 23

Printing to Multiple Print Servers
3. In t he “Ente r New Por t” windo w, e nter a un ique nam e f or the po rt
and cli ck “OK”.
4. Cli ck “Cl ose” on the “Printe r Port s” windo w.
5. On the “Ports” tab, select the newly created port; click “Configure Port”.
1
2
3
4
5
sec tio n
6
7
8
9
10
6. On t he next w indow (B elkin Po rt 2: Propert ies), cl ick th e “ Locat e
Server s” butto n.
21
Page 24

Belkin Port Monitor Advanced Menu
23
sec tio n
2
1
3
4
5
6
7
8
9
10
Printing to Multiple Print Servers
7. On the “Availabl e Server s” win do w, select the Prin t S erver to
which y ou want to p rint.
8. Cli ck “OK” to c lose. In the “Bel kin Port 2: Propertie s” win do w,
the nam e o f the Pri nt Serve r you sel ected wi ll appea r in
the win dow.
9. Cli ck “OK” t o c lose.
10. Repeat these st eps for e ach addi tional P rint Ser ver on
your ne twork.
War ning: Wh en con figurin g the Por t M onito r to send jo bs to a
specif ic Print Serve r, make sure tha t the cor re ct port is s elected
for the pr inter dr iver i n W indow s a nd that t he corresp ondin g
printe r is actu ally con necte d t o the Pri nt Serve r that th e p ort is
indica ting. Mi smatc hing pri nter dri vers, po rts, a nd Print Se rvers
will resu lt in faile d print j obs or er ror p rints of multipl e pages o f
indisc ern ible cha racte rs.
22
Page 25

Belkin Port Monitor Advanced Menu
In most ca ses, the Belki n P ort Moni tor (a vi rtual pr inter po rt) soft ware
will be au tomat icall y i nstal led and con figured by the Prin t S erver
Setup W izard. Som e a dvanc ed users may choo se to manua lly
config ure the Bel kin Port Mo nitor software. Th is can be achieve d by
using t he Belki n P ort Mo nitor’s Advan ced Menu , which a llows th e
user to en ter a spe cific Pr int Serv er’s I P address a nd to desig nate
a speci fic prin ter or “q ueue” fo r p rint job s conn ected to th at Print
Server. T he Adv an ced Me nu featu re s h elp when there is more th an
one Pri nt Serve r a vaila ble on yo ur netwo rk, and w hen prin t j obs fail
becaus e the Por t M onito r cannot determi ne the na me of the pr inter.
Opening the Belkin Port Monitor Advanced Menu
1. On the “Availabl e Server s” win do w, select the Prin t S erver to
which y ou want to p rint.
1
2
3
4
5
6
sec tio n
7
8
9
10
2. In the “Belk in Port: Prop ertie s” windo w, c lick the “Advanc ed” tab.
23
Page 26

Belkin Port Monitor Advanced Menu
Belkin Port Monitor Advanced Menu
25
sec tio n
2
1
3
4
5
6
7
8
9
10
3. The Adva nced Men u has fie lds to en ter the Pri nt Ser ve r’s IP
address a nd the queu e name an d t he por t n umber.
Note: T he port num ber fi eld by defa ult is 51 5. In mos t c ases, th e
port nu mber sho uld not b e c hange d.
Adding a Second Belkin Port Monitor and Configuring It for a
Specific Print Server
1. In Windows, select the printer’s properties and select the “Ports” tab.
24
Page 27

Belkin Port Monitor Advanced Menu
2. Cli ck “Add Por t”. A win dow show ing the p rinte r p orts ins talle d o n
the PC wil l open. S elect “B elkin Po rt” and c lick “Ne w Port”.
3. On the “N ew Port” wi ndow, ent er a uniq ue name f or the port and
click “ OK”.
4. Click “C lose” on the “Pri nter Por ts” wind ow.
5. On the ‘P orts” ta b, selec t the new ly created po rt and cl ick
“Confi gure Port” .
1
2
3
4
5
6
sec tio n
7
8
9
10
6. Click th e “Advan ced” t ab .
25
Page 28

Using the Print Server for FTP Printing
Using the Print Server for FTP Printing
27
sec tio n
2
1
3
4
5
6
7
8
9
10
7. Add th e P rint S er ver’s IP add ress and the q ue ue nam e o f the
printe r you wan t t o sele ct for the p ort. The qu eue na me “lp1” wi ll
point t he port to t he print er conne cted to t he print er 1 USB por t
on the Pri nt Serve r. The qu eue name “l p2” will point th e port to
the pri nter con necte d t o the pri nter 2 USB p ort on th e
Print S erver.
8. Click “OK” to c lo se.
War ning: Wh en man ually co nfiguri ng the Po rt Monit or to sen d
jobs to a s pecific print er, make su re th at the co rrect prin ter driv er
is sele cted and th at the Po rt Monit or’s q ueue nam e correspo nds
to the USB port tha t t he pri nter is con necte d t o on the P rint
Server. M ismat ching th e driver s or queu e n ames w ill result in
failed print jo bs or error pr ints of m ultiple pages of
indisc ern ible cha racte rs.
26
Page 29

Using the Print Server for FTP Printing
Sending Print Jobs to Printers Connected to the Print Server
Using FTP
1. In Windo ws, sele ct the pr in ter’s propert ies.
2. Set the pri nter por t to “Fil e”, clic k “Apply ”.
1
2
3
4
5
6
7
sec tio n
8
9
10
27
Page 30

Using the Print Server for FTP Printing
Using the Print Server for FTP Printing
29
sec tio n
2
1
3
4
5
6
7
8
12
9
10
3. Print th e d ocume nt using th e prin ter that yo u config ured. A
dialog ue box wi ll open p romp ting y ou to name t he print fi le.
After n aming th e f ile, c lick “OK ”. A file wi ll be sav ed to the us er’s
defaul t Window s director y (typ ic ally “ C:\” or “C: \Docu ments an d
Settin gs\<u ser’s name>”) .
4. On the Wind ows desk top, cli ck “Star t>Run ” a nd type in “ cmd” for
Window s XP and 200 0 or “com mand” fo r Window s 98SE an d Me;
click “ OK” to open a “ Comma nd/MS -DOS Promp t” windo w.
5. At the prompt , t ype “f tp” foll owed by the IP address of the Prin t
Server ; press the “E nter” ke y to create an FTP conn ectio n w ith
the Pri nt Serve r.
28
Page 31

Using the Print Server for FTP Printing
6. When the co nnect ion is ma de , the use r will be prom pted to
enter a us er name a nd a pass word . The use r name fo r t he Print
Server is “anon ymous ”; the pass word shoul d be left bl ank. A ft er
a succe ssful lo gin, a li st of the pr inters c onnec ted to the P rint
Server will app ear, fol lowed by si mple usa ge ins tructio ns for ho w
to prin t t he file.
7. At the prompt , t ype “p ut”, fol lowed by th e file pa th and fi le name,
followed by the printer number (for example, put c:\example printer1).
1
2
3
4
5
6
7
sec tio n
8
9
10
12
8. The file wi ll be sen t t o the Pri nt Serve r. When the trans fe r is
comple te, anot her prompt will app ear. If fin ished , t ype “q ui t” and
pre ss “En ter” to end the FTP ses sion. Then, cl ose the “Co mmand
Pro mpt” w indow.
Note: FTP Prin ting b y d efaul t i s enable d in the P rint Ser ver. It
can be dis abled us ing th e P rint Ser ver’s Web-Base d
Setup I nterfac e.
29
Page 32

Troubleshooting
31
2
1
3
4
5
6
7
10
Troubleshooting
8
9
sec tio n
Cannot find Print Server
If the Wiz ard cannot find you r P rint S erver ev en thoug h i t appe ar s
to be func tioni ng properl y, the prob lem may b e t hat the E thernet
cable c onnecte d to the P rint Ser ver and Rou ter ma y b e loose.
Check t o s ee that t he Ether net ca ble is co nnect ed properl y a nd
try repow ering th e P rint Ser ver an d y our Rout er.
Note: W hen conn ectin g y our Prin t Server to your n etwork, or
when yo u d iscon nect and reco nnect or re place th e rou ter to
which y our Prin t S erver is conne cted, be su re to re store fact ory
defaul ts on the Pr int Se rver by hol ding in t he re set butt on for 10
second s while rep owering the Prin t Server. T his will re store the
IP addres s t o dynami c to esta blish a n ew IP address to be used
with th e n ew netwo rk or route r.
• It co uld be th at the co mputer i s s et to pri nt to the wron g
printe r. Verify th at the pr inter co nnect ed to the Pr int Serv er
is set as t he “defa ult prin ter”.
• Wh en trouble shoot in g a print ing proble m, try to de termi ne
whethe r any of the compu ters on the network can acce ss
the Pri nt Serve r. If some c omputer s can pri nt, and s ome
cannot , then th e p ro blem is m ost like ly not th e P rint Ser ver
or the pri nter, bu t t he pri nter dri ver sett ings on t he speci fic
comput er. In th is case, ru n the Pri nt Serve r S etup W izard
again t o rec onfig ure t he compu ter. If thi s stil l d oesn’t cor re ct
the probl em, dele te the prin ter dr iver from you r c omput er.
Reinst all it us ing the m anufact urer’s C D t hat ca me with you r
printe r (it sho uld direct yo u to chec k the man ufacturer ’s
websit e for upd ated dri vers) ; t hen run t he Setup Wizard
again. In some cas es, dr ivers from a p rinter m anufact urer
might s upport P rint Ser vers in W indows X P o r 2000 , b ut
not Win dows 98. Ch eck th e B elkin we bsite fo r comp atibili ty
issues at http: //web .belkin .com/ support /F1UP 0301.
• If no ne of the compute rs can ac cess the Print Se rver,
then ei ther:
1. The Print Server has not been configured correctly (in this
case, rerun the Setup Wizard);
2. Or, the printer you have connected to the Print Server does
not support a print-server connection. Check the Belkin
website for printer compatibility issues at:
http://web.belkin.com/support/F1UP0301.
30
Page 33

Troubleshooting
If the Pri nt Serve r has bee n config ured before, an d the IP
address has already be en set to anot her subn et, the b est solu tion
is to restore fac tory d efaults on the Prin t Serv er. Do this by
holdin g down th e res et butto n whil e rep owering the Prin t Server.
After a rese t, the Pr int Serv er will g enerall y rec eive a n I P address
in the cor re ct subne t.
“No pri nter” er ro r s creen appe ars duri ng setup . In most cases,
this er ro r o ccurs wh en the pr inter is not powe re d o n, or it is n ot
enable d (or onl ine). Af ter you h ave chec ked this , make su re th at
it is not o ut of pap er or jamme d. Some p rinters “slee p” after
period s of inac tivit y. In any of these ca ses, resto re th e prin ter to
functi onali ty, th en, if nece ssary, reboot th e Print S erver. S ome
USB pri nters are not compati ble wi th Print Se rvers . To che ck the
Belkin website for comp atibi lity inf ormat io n, go to:
http:/ /web. belki n.com/s uppor t/F1UP0 301.
1
2
3
4
5
6
7
8
sec tio n
9
10
31
Page 34

33
2
1
3
4
5
6
7
12
10
Troubleshooting
sec tio n
8
9
Troubleshooting
“Cannot communicate with printer” or “printer not
found” error message appears in Printer Driver
Status Monitor
Again, this may resu lt from:
If thos e i ssues are a ddressed a nd the proble m still e xists, B elkin
rec ommen ds that t he user dis able t he Print er Drive r S tatus
Monito r on the com puter. T he statu s monito r, a conv enient
checkp oint for the user, u suall y req uires a direct c onnecti on
betwee n the com puter an d the pri nter. It ma y n ot com municat e
with th e p rinte r w hen co nnected to a print s erver on a n etwor k.
Instea d, use th e W indow s “Print er Statu s” win do w to chec k
printi ng statu s.
32
Page 35

Troubleshooting
Installation CD-ROM does not start Setup Utility
If the CD- ROM does not star t the Set up Utili ty autom atica lly, i t
could b e t hat the c omput er is runni ng other appli cations that are
interf ering wi th the CD drive.
If the Set up Utili ty screen d oes not a ppear wi thin 15- 20 secon ds,
open up yo ur CD-RO M driv e b y double -clic king on t he “My
Comput er” icon . Next , d ouble -click o n t he CD- RO M driv e t hat the
Instal latio n C D has bee n placed in to start the inst allat ion. The n,
double -clic k o n the ico n named “ Setup.e xe”.
1
2
3
4
5
6
7
8
sec tio n
9
10
12
33
Page 36

35
2
1
3
4
5
6
7
8
Information
9
10
sec tio n
Troubleshooting
Technical Support
You ca n find te chnic al suppo rt infor matio n a t www.belkin.com
or www.belkin.com/networking. If you w ant to co ntact te chnical
suppor t by phon e, pleas e call:
US: 877-736-5771
Europe: 00 800 223 55 460
Australia: 1800 666 040
34
Page 37

Information
FCC Statement
DECLARATION OF CONFORMITY WITH FCC RULES FOR
ELECTRO MAG NET IC C OMPATIBILITY
We, Be lki n Co rpo ration, of 501 West Walnut Street,
Compton , CA 90220, declare under our sole
responsibility that the product,
F1UP030 1
to which this declaration relates,
complie s wi th Part 15 of the FCC Rules. Operation is
subject to the following two conditions: (1) this device
may not cause harmful interfe rence, and (2) this device
must accept any interference received, including
interfe rence that may cause undesired operation.
Caution: Exposure to Radio Frequency Radiation.
The radiated output power of this device is far below the FCC radio
frequency exposure limits. Nevertheless, the device shall be used in such
manner that the potential for human contact normal operation is minimized.
When connecting an external antenna to the device, the antenna shall be
placed in such a manner to minimize the potential for human contact during
normal operation. In order to avoid the possibility of exceeding the FCC radio
frequency exposure limits, human proximity to the antenna shall not be less
than 20cm (8 inches) during normal operation.
Federal Communications Commission Notice
This equipment has been tested and found to comply with the limits for a
Class B digital device, pursuant to Part 15 of the FCC Rules. These limits are
designed to provide reasonable protection against harmful interference in a
residential installation.
1
2
3
4
5
6
7
8
9
sec tio n
10
This equipment generates, uses, and can radiate radio frequency energy.
If not installed and used in accordance with the instructions, it may cause
harmful interference to radio or television reception, which can be determined
by turning the equipment off and on, the user is encouraged to try and
correct the interference by one or more of the following measures:
• Reorient or relocate the receiving antenna.
• Increase the distance between the equipment and the receiver.
• Connect the equipment to an outlet on a circuit
• Consult the dealer or an experienced radio/TV technician for help.
different from that to which the receiver is connected.
35
Page 38

Information
37
2
1
3
4
5
6
7
8
9
Information
sec tio n
10
Modifications
The FCC requires the user to be notified that any changes or modifications to
this device that are not expressly approved by Belkin Corporation may void
the users authority to operate the equipment.
Canada-Industry Canada (IC)
The wireless radio of this device complies with RSS 139 & RSS 210 Industry
Canada. This Class B digital complies with Canadian ICES-003.
Cet appareil numérique de la classe B conforme á la norme NMB-003 du Canada.
Europe-European Union Notice
Radio products with the CE 0682 or CE alert marking
comply with the R&TTE Directive (1995/5/EC) issued by the
Commission of the European Community.
Compliance with this directive implies conformity to the following European
Norms (in brackets are the equivalent international standards).
• EN 60950 (IEC60950) – Product Safety
• EN 300 328 Technical requirement for radio equipment
• ETS 300 826 General EMC requirements for radio equipment.
To determine the type of transmitter, check the identification label
on your Belkin product.
Products with the CE marking comply with the EMC Directive (89/336/EEC)
and the Low Voltage Directive (72/23/EEC) issued by the Commission of the
European Community. Compliance with these directives implies conformity
to the following European Norms (in brackets are the equivalent international
standards).
• EN 55022 (CISPR 22) – Electromagnetic Interference
• EN 55024 (IEC61000-4-2,3,4,5,6,8,11) – Electromagnetic Immunity
• EN 61000-3-2 (IEC610000-3-2) – Power Line Harmonics
• EN 61000-3-3 (IEC610000) – Power Line Flicker
• EN 60950 (IEC60950) – Product Safety
Products that contain the radio transmitter are labeled with CE 0682 or CE
alert marking and may also carry the CE logo.
Belkin Corporation Limited Lifetime Product Warranty
Belkin Corporation warrants this product against defects in materials and
workmanship for its lifetime. If a defect is discovered, Belkin will, at its
option, repair or replace the product at no charge provided it is returned
during the warranty period, with transportation charges prepaid, to the
authorized Belkin dealer from whom you purchased the product. Proof of
purchase may be required.
36
Page 39

Information
This warranty does not apply if the product has been damaged by accident,
abuse, misuse, or misapplication; if the product has been modified without
the written permission of Belkin; or if any Belkin serial number has been
removed or defaced.
THE WARRANTY AND REMEDIES SET FORTH ABOVE ARE EXCLUSIVE
IN LIEU OF ALL OTHERS, WHETHER ORAL OR WRITTEN, EXPRESSED
OR IMPLIED. BELKIN SPECIFICALLY DISCLAIMS ANY AND ALL IMPLIED
WARRANTIES, INCLUDING, WITHOUT LIMITATION, WARRANTIES OF
MERCHANTABILITY AND FITNESS FOR A PARTICULAR PURPOSE.
No Belkin dealer, agent, or employee is authorized to make any modification,
extension, or addition to this warranty.
BELKIN IS NOT RESPONSIBLE FOR SPECIAL, INCIDENTAL, OR
CONSEQUENTIAL DAMAGES RESULTING FROM ANY BREACH OF
WARRANTY, OR UNDER ANY OTHER LEGAL THEORY, INCLUDING BUT
NOT LIMITED TO, LOST PROFITS, DOWNTIME, GOODWILL, DAMAGE TO
OR REPROGRAMMING OR REPRODUCING ANY PROGRAM OR DATA
STORED IN, OR USED WITH, BELKIN PRODUCTS.
Some states do not allow the exclusion or limitation of incidental or
consequential damages or exclusions of implied warranties, so the above
limitations of exclusions may not apply to you. This warranty gives you
specific legal rights, and you may also have other rights that vary from state
to state.
1
2
3
4
5
6
7
8
9
sec tio n
10
37
Page 40

2-Port
USB Print Server
Belkin Tech Support
US: 877.736.5771
310.898.1100 ext. 2263
Europe: 00 800 223 55 460
Australia: 1800 666 040
Belkin Corporation
501 West Walnut Street
Compton • CA • 90220 • USA
Tel: 310.898.1100
Fax: 310.898.1111
Belkin, Ltd.
Express Business Park • Shipton Way
Rushden • NN10 6GL • United Kingdom
Tel: +44 (0) 1933 35 2000
Fax: +44 (0) 1933 31 2000
© 2004 Belkin Corporation. All rights reserved. All trade names are registered trademarks of
respective manufacturers listed.
Belkin, Ltd.
7 Bowen Crescent • West Gosford
NSW 2250 • Australia
Tel: +61 (0) 2 4372 8600
Fax: +61 (0) 2 4372 8603
Belkin, B.V.
Starparc Building • Boeing Avenue 333
1119 PH Schiphol-Rijk • The Netherlands
Tel: +31 (0) 20 654 7300
Fax: +31 (0) 20 654 7349
P74393
 Loading...