

Page 1
2-Port KVM Switch with Audio
Support and Built-In Cabling
Control two computers using one video monitor,
and a PS/2 keyboard and mouse
Quick Installation Guide
F1DL102P
En
Fr
De
Nl
Es
It
P74416ea_F1DL102P_QIG.qxd 2/24/04 2:51 PM Page 1
Page 2
2-Port KVM Switch with Audio
Support and Built-In Cabling
Quick Installation Guide
F1DL102P
Control two computers using one video monitor,
and a PS/2 keyboard and mouse
En
P74416ea_F1DL102P_QIG.qxd 2/24/04 2:51 PM Page 2
Page 3
This sheet will guide you through the basic steps needed to install the 2Port KVM Switch with Audio Support and Built-In Cabling (the Switch). If
you have any problems during installation, please refer to the User Manual.
Introduction
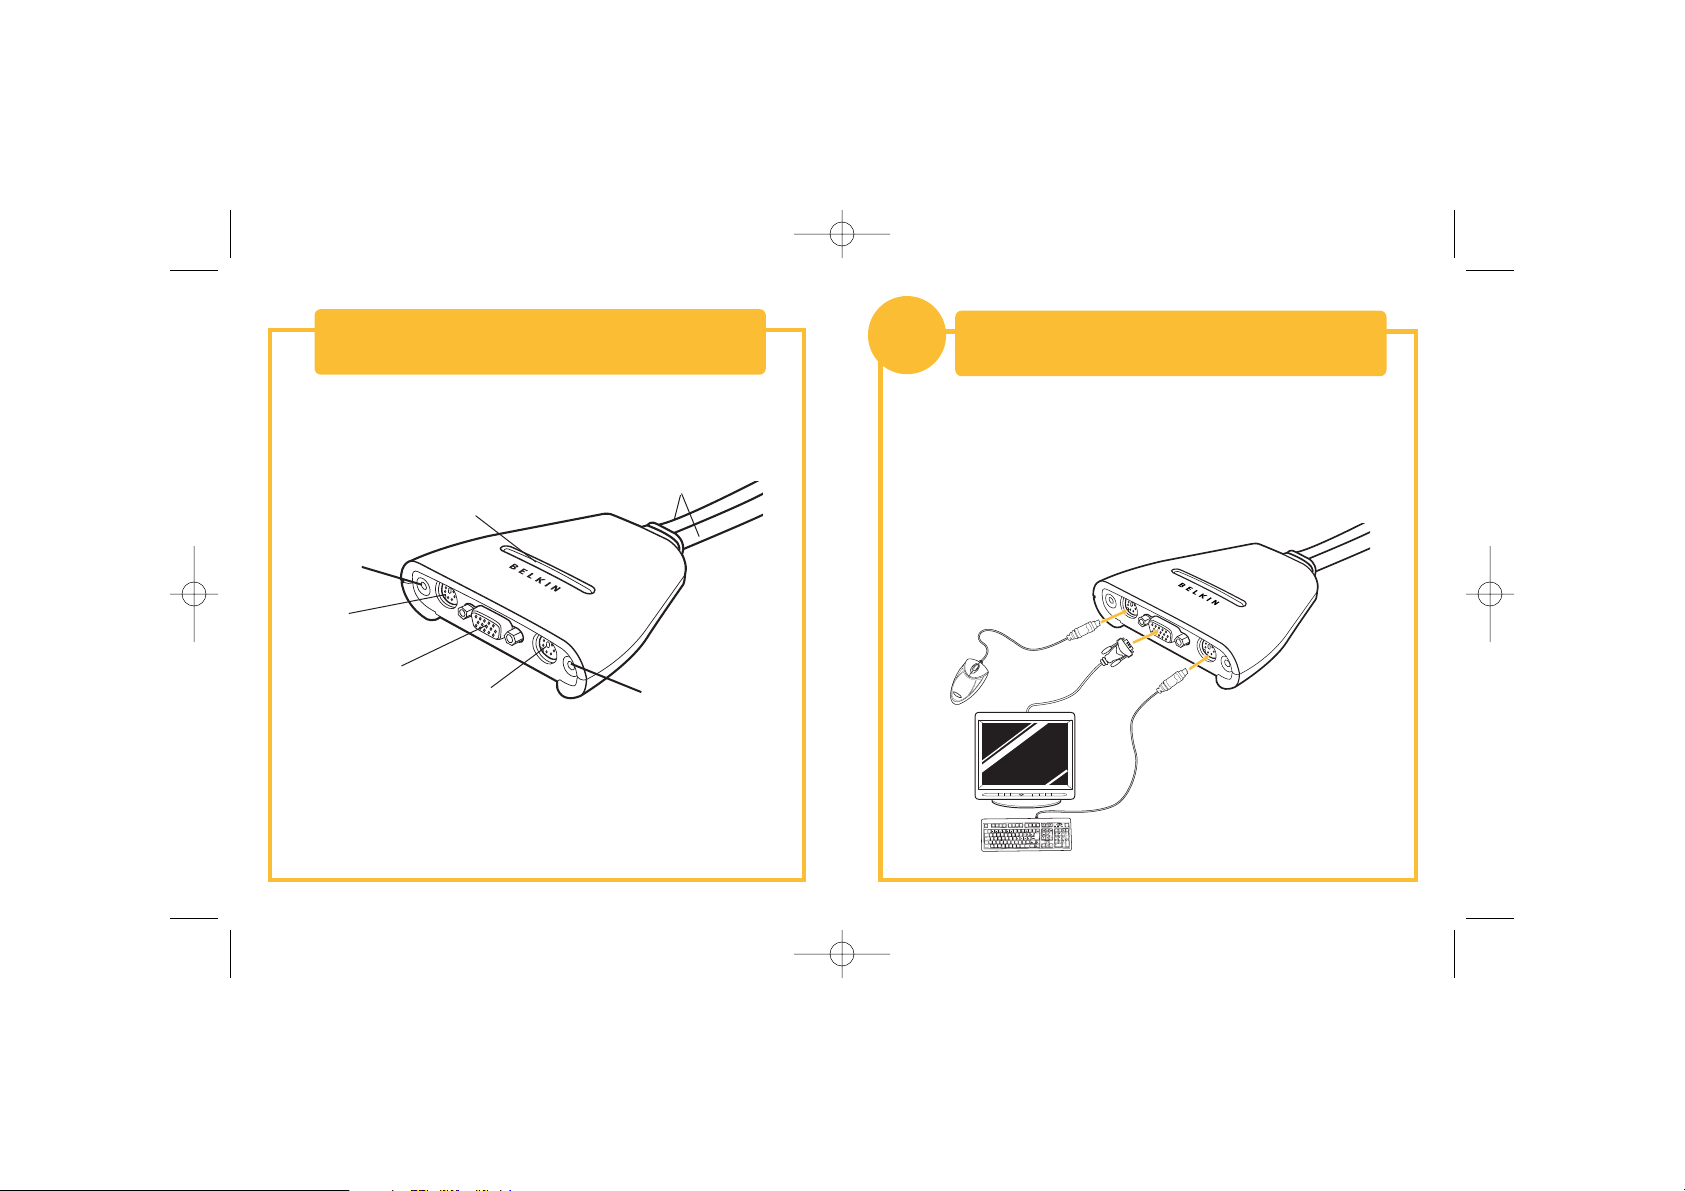
Connecting the Keyboard, Video, and
Mouse to the Console Ports on the Switch
1
1. Power down all computers.
2. Connect your PS/2-type keyboard and mouse to the purple keyboard
and green mouse ports located on the front panel of your Switch.
3. Take the video cable that is attached to your monitor and connect it to
the VGA port on the front panel of your Switch.
You will need the following items to install the Switch:
• 2-Port KVM Switch with Audio Support and Built-In Cabling
• One (each) keyboard, monitor, and mouse
• Speakers and mic (optional)
Port Status
Indicator LEDs
Console
Mouse Port
Built-In Cables
Console
Keyboard Port
Console VGA
Monitor Port
Console
Speaker Jack
Console
Mic Jack
P74416ea_F1DL102P_QIG.qxd 2/24/04 2:51 PM Page 2
Page 4

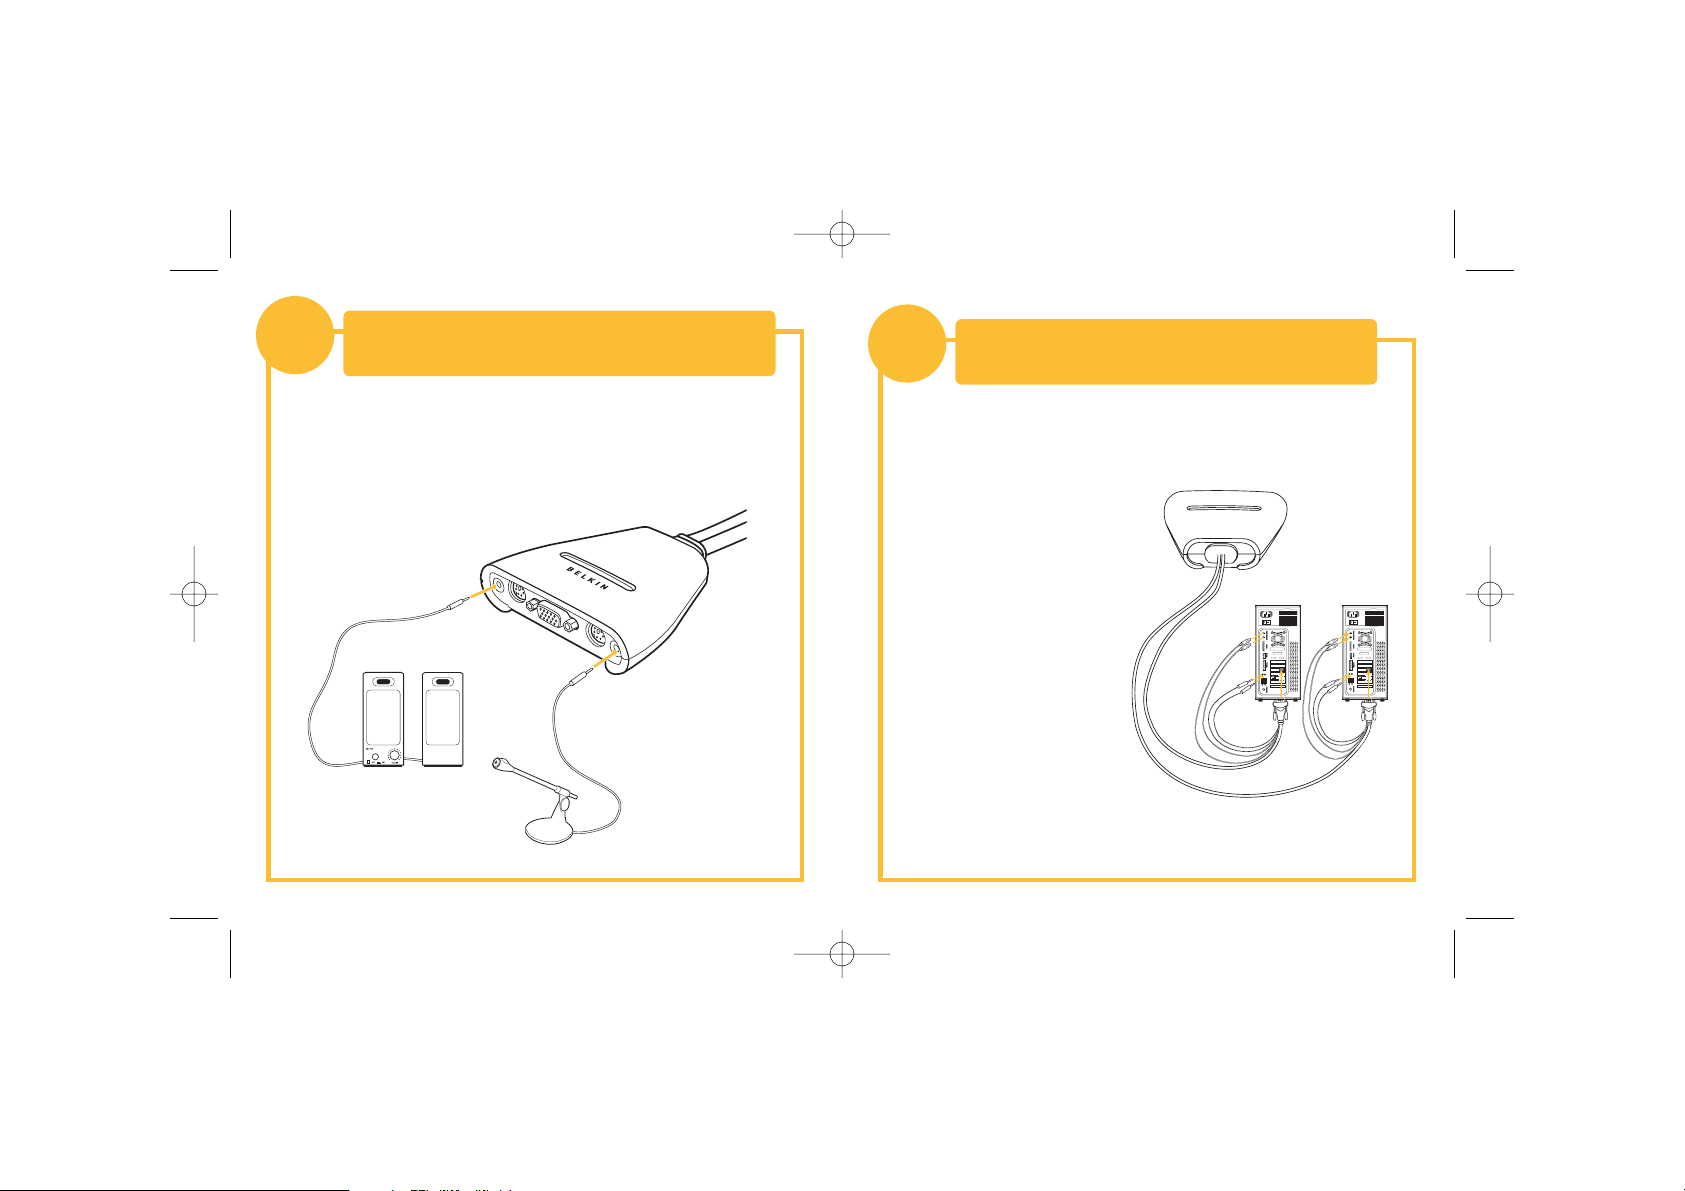
Connecting the Speakers and
Mic to the Switch
2
1. Connect your speaker cable to the green
speaker jack on the front panel of your Switch.
2. Connect your mic cable to the pink
mic jack on the front panel of your Switch.
Connecting Computers to the Switch
3
1. Using the attached cables, take the VGA cable and connect it to
the VGA port on the first computer.
2. Connect the PS/2 keyboard KVM cable to the keyboard port on
the computer.
3. Connect the PS/2 mouse KVM
cable to the mouse port on
the computer.
4. Connect the green speaker
KVM cable to the speaker jack
on the computer.
5. Connect the pink mic KVM
cable to the mic jack on the
computer.
6. Repeat steps 1 through 5 for
the additional computer to
be connected to the Switch.
Power up your computers.
You are now ready to use your Switch.
Please refer to your User Manual for additional information.
P74416ea_F1DL102P_QIG.qxd 2/24/04 2:51 PM Page 4
Page 5
Switch KVM à 2 Ports avec
Audio et Câblage intégré
Guide d’Installation Rapide
F1DL102P
Contrôlez deux ordinateurs grâce à un moniteur,
ainsi qu’un clavier et une souris PS/2
Fr
Belkin Corporation
5501 West Walnut Street
Compton • CA • 90220-5221 • USA
Tel: +1 310 898 1100
Fax: +1 310 898 1111
Belkin Ltd.
Express Business Park • Shipton Way
Rushden • NN10 6GL • United Kingdom
Tel: +44 (0) 1933 35 2000
Fax: +44 (0) 1933 31 2000
Belkin B.V.
Boeing Avenue 333
1119 PH Schiphol-Rijk • The Netherlands
Tel: +31 (0) 20 654 7300
Fax: +31 (0) 20 654 7349
Belkin GmbH
Hanebergstrasse 2
80637 München • Germany
Tel: +49 (0) 89 143405 0
Fax: +49 (0) 89 143405 100
Belkin Components SAS
5 Rue du Petit Robinson • 3ème étage
78350 Jouy en Josas • France
Tel: +33 (0) 1 34 58 14 00
Fax: +33 (0) 1 39 46 62 89
Belkin Ltd
7 Bowen Cresent • West Gosford
NSW 2250 • Australia
Tel: +61 (0) 2 4372 8600
Fax: +61 (0) 2 4372 8603
Belkin Tech Support
Europe: 00 800 223 55 460
US: 877 736 5771
P74416
© 2004 Belkin Corporation. All rights reserved. All trade names are
registered trademarks of respective manufacturers listed.
P74416ea_F1DL102P_QIG.qxd 2/24/04 2:51 PM Page 6
Page 6

Branchement du clavier, du moniteur et de la
souris sur les ports de la console du Switch
1
1. Mettez tous les ordinateurs hors tension.
2. Branchez votre clavier et votre souris PS/2 dans le port de clavier violet
et le port de souris vert, situés à l’avant du Switch.
3. Saisissez le câble vidéo relié au moniteur et branchez-le sur le port
vidéo VGA, situé à l’avant de votre Switch.
Ce document vous guidera à travers les étapes élémentaires nécessaires
à l’installation du switch KVM 2 Ports avec Audio et Câblage intégré
(le Switch). Si vous rencontrez des problèmes lors de l’installation,
reportez-vous au manuel de l’utilisateur.
Introduction
Les éléments suivants sont nécessaires
pour pouvoir installer le Switch :
• Switch KVM à 2 Ports avec Audio et Câblage intégré
• Un clavier, un moniteur et une souris
• Haut-parleurs et microphone (facultatifs)
Témoins de l’état
des ports
Console
Port pour
souris
Câbles intégrés
Console
Port pour clavier
Port VGA de
la console
Console
Prise pour
haut-parleur
Console
Prise pour microphone
P74416ea_F1DL102P_QIG.qxd 2/24/04 2:51 PM Page 2
Page 7
Branchement des ordinateurs sur le Switch
3
1. En utilisant les câbles intégrés, branchez l’extrémité mâle du câble
VGA sur le port VGA du premier ordinateur.
2. Branchez le connecteur pour clavier PS/2 du câble KVM sur le
port clavier de l’ordinateur.
3. Branchez le câble KVM pour
souris PS/2 sur le port souris
de l’ordinateur.
4. Branchez le câble KVM vert
pour haut-parleurs dans la
prise pour haut-parleurs de
l’ordinateur.
5. Branchez le câble KVM rose
pour microphone dans la
prise pour microphone de
l’ordinateur.
6. Répétez les étapes 1 à 5 pour
chaque ordinateur
supplémentaire que vous
souhaitez relier au Switch.
Mettez vos ordinateurs sous tension.
Vous êtes maintenant prêt à utiliser votre Switch KVM.
Pour de plus amples informations, reportez-vous au manuel de l’utilisateur.
Branchement des haut-parleurs
et du microphone sur le Switch
2
1. Branchez le câble des haut-parleurs dans la prise pour haut-parleurs
verte située à l’avant de votre Switch.
2. Branchez le câble du microphone dans la prise pour microphone rose
située à l’avant de votre Switch.
P74416ea_F1DL102P_QIG.qxd 2/24/04 2:51 PM Page 4
Page 8

2-Port KVM-Switch mit
Audiounterstützung und
eingebauter Verkabelung
Installationsanleitung
F1DL102P
Steuern Sie zwei Computer und
benutzen Sie einen Monitor und eine
PS/2-Tastatur und -Maus
De
Belkin Corporation
5501 West Walnut Street
Compton • CA • 90220-5221 • États-Unis
Tél : +1 310 898 1100
Fax : +1 310 898 1111
Belkin Ltd.
Express Business Park • Shipton Way
Rushden • NN10 6GL • Royaume Uni
Tél : +44 (0) 1933 35 2000
Fax : +44 (0) 1933 31 2000
Belkin B.V.
Boeing Avenue 333
1119 PH Schiphol-Rijk • Pays-Bas
Tél : +31 (0) 20 654 7300
Fax : +31 (0) 20 654 7349
Belkin GmbH
Hanebergstrasse 2
80637 Munich • Allemagne
Tél : +49 (0) 89 143405 0
Fax : +49 (0) 89 143405 100
Belkin Components SAS
5 Rue du Petit Robinson • 3ème étage
78350 Jouy en Josas • France
Tél : +33 (0) 1 34 58 14 00
Fax : +33 (0) 1 39 46 62 89
Belkin Ltd
7 Bowen Cresent • West Gosford
NSW 2250 • Australie
Tél : +61 (0) 2 4372 8600
Fax: +61 (0) 2 4372 8603
Assistance Technique Belkin
Europe : 00 800 223 55 460
US: 877 736 5771
P74416
© 2004 Belkin Corporation. Tous droits réservés. Toutes les marques de commerce
sont des marques déposées de leurs fabricants respectifs.
P74416ea_F1DL102P_QIG.qxd 2/24/04 2:51 PM Page 6
Page 9

Anschließen von Tastatur, Monitor und
Maus an die Konsolenanschlüsse am Switch
1
1. Schalten Sie alle Computer aus.
2. Schließen Sie Ihre PS/2-Tastatur und -Maus an dem lila Tastatur- und
dem grünen Mausanschluss an der Vorderseite Ihres Switch an.
3. Nehmen Sie das Monitorkabel, das an Ihrem Monitor angeschlossen ist, und
schließen Sie es am VGA-Anschluss an der Vorderseite Ihres Switch an.
Dieses Informationsblatt wird Sie bei den Grundschritten
begleiten, die erforderlich sind, um den 2-Port KVM-Switch mit
Audiounterstützung und eingebauter Verkabelung zu installieren.
Wenn Sie Probleme bei der Installation haben, benutzen Sie bitte
das Benutzerhandbuch.
Einführung
Sie brauchen Folgendes, um den Switch zu installieren:
• 2-Port KVM-Switch mit Audiounterstützung
und eingebauter Verkabelung
• Eine Tastatur, einen Monitor und eine Maus
• Lautsprecher und Mikrophon (wahlweise)
Statusanzeige-LEDs für
die Schnittstellen
Mausanschluss
Eingebaute
Kabel
Tastaturanschluss
VGAMonitoranschluss
Lautsprecherbuchse
Mikrophonbuchse
P74416ea_F1DL102P_QIG.qxd 2/24/04 2:51 PM Page 2
Page 10

Anschließen von Computern an den Switch
3
1. Benutzen Sie die beigefügten Kabel. Nehmen Sie das VGA-Kabel und
schließen Sie es am VGA-Anschluss an Ihrem ersten Computer an.
2. Schließen Sie das PS/2-Tastatur KVM-Kabel am Tastaturanschluss
des Computers an.
3. Schließen Sie das PS/2-Maus
KVM-Kabel am Mausanschluss
Ihres Computers an.
4. Schließen Sie das grüne
Lautsprecher KVM-Kabel an
der Lautsprecherbuchse Ihres
Computers an.
5. Schließen Sie das rosa
Mikrophon KVM-Kabel an der
Mikrophonbuchse Ihres
Computers an.
6. Wiederholen Sie die Schritte
1 bis 5 für zusätzliche
Computer, die an den Switch
angeschlossen werden sollen.
Schalten Sie jetzt Ihre Computer ein.
Jetzt können Sie mit Ihrem Switch arbeiten.
Benutzen Sie das Benutzerhandbuch für weitere Informationen.
Verbindung der Lautsprecher und
des Mikrophons mit dem Switch
2
1. Schließen Sie Ihr Lautsprecherkabel an der grünen
Lautsprecherbuchse an der Vorderseite Ihres Switch an.
2. Schließen Sie Ihr Mikrophonkabel an der rosa
Mikrophonbuchse an der Vorderseite Ihres Switch an
P74416ea_F1DL102P_QIG.qxd 2/24/04 2:51 PM Page 4
Page 11

2-poorts KVM-switch met
audio-ondersteuning en
ingebouwde bekabeling
Beknopte installatiehandleiding
F1DL102P
Bestuur twee computers met één monitor
en een PS/2-toetsenbord en -muis
Nl
Belkin Corporation
5501 West Walnut Street
Compton • CA • 90220-5221 • USA
Tel: +1 310 898 1100
Fax: +1 310 898 1111
Belkin Ltd.
Express Business Park • Shipton Way
Rushden • NN10 6GL • Großbritannien
Tel: +44 (0) 1933 35 2000
Fax: +44 (0) 1933 31 2000
Belkin B.V.
Boeing Avenue 333
1119 PH Schiphol-Rijk • Niederlande
Tel: +31 (0) 20 654 7300
Fax: +31 (0) 20 654 7349
Belkin GmbH
Hanebergstrasse 2
80637 München • Deutschland
Tel: +49 (0) 89 143405 0
Fax: +49 (0) 89 143405 100
Belkin Components SAS
5 Rue du Petit Robinson • 3ème étage
78350 Jouy en Josas • Frankreich
Tel: +33 (0) 1 34 58 14 00
Fax: +33 (0) 1 39 46 62 89
Belkin Ltd
7 Bowen Cresent • West Gosford
NSW 2250 • Australien
Tel: +61 (0) 2 4372 8600
Fax: +61 (0) 2 4372 8603
Belkin Tech Support
Europa: 00 800 223 55 460
US: 877 736 5771
P74416
© 2004 Belkin Corporation. Alle Rechte vorbehalten. Alle Produktbezeichnungen
sind eingetragene Warenzeichen der jeweiligen Hersteller.
P74416ea_F1DL102P_QIG.qxd 2/24/04 2:51 PM Page 6
Page 12

Toetsenbord, monitor en muis
aansluiten op de consolepoorten van de switch
1
1. Schakel alle computers uit.
2. Sluit uw PS/2-toetsenbord en -muis aan op respectievelijk de paarse
toetsenbord- en de groene muispoort aan de voorzijde van uw switch.
3. Neem de monitorkabel die aan uw monitor is bevestigd en sluit deze
aan op de VGA-poort aan de voorzijde van uw switch.
Deze documentatie begeleidt u bij de belangrijkste stappen die genomen
moeten worden bij de installatie van de 2-poorts KVM-switch met audioondersteuning en ingebouwde bekabeling (de switch). Mocht u tijdens
de installatie toch op problemen stuiten, raadpleeg dan de handleiding.
Inleiding
Voor de installatie van de switch hebt u het volgende nodig:
• 2-poorts KVM-switch audio-ondersteuning
en ingebouwde bekabeling
• Een toetsenbord, monitor en muis
• Luidsprekers en microfoon (optioneel)
LED's voor poortstatus
Muispoort
console
Ingebouwde
kabels
Toetsenbordpoort
console
VGA-monitorpoort
console
Luidsprekeraa
nsluiting
console
Microfoonaansluiting
console
P74416ea_F1DL102P_QIG.qxd 2/24/04 2:51 PM Page 2
Page 13

Computers aansluiten op de switch
3
1. Maak gebruik van de aangesloten kabels. Neem de VGA-kabel en sluit
deze aan op de VGA-poort van de eerste computer
2. Sluit de KVM-kabel van het PS/2-toetsenbord aan op de
toetsenbordpoort van de computer.
3. Sluit de KVM-kabel van de
PS/2-muis aan op de
muispoort van de computer.
4. Sluit de groene luidsprekerKVM-kabel aan op de
luidsprekeraansluiting op de
computer.
5. Sluit de roze microfoon-KVMkabel aan op de
microfoonaansluiting op de
computer.
6. Herhaal stap 1 t/m 5 voor
het aansluiten van een
tweede computer op de
switch.
Zet uw computers aan.
De switch is nu klaar voor gebruik.
Meer informatie vindt u in de handleiding.
De luidsprekers en
microfoon aansluiten op de switch
2
1. Sluit uw luidsprekerkabel aan op de luidsprekeraansluiting
die zich bevindt aan de voorzijde van uw switch.
2. Sluit uw microfoonkabel aan op de roze microfoonaansluiting
die zich bevindt aan de voorzijde van uw switch.
P74416ea_F1DL102P_QIG.qxd 2/24/04 2:51 PM Page 4
Page 14

Conmutador KVM (teclado/pantalla/
ratón) de 2 puertos con soporte
de audio y cableado incorporado
Guía de instalación rápida
F1DK102P
Controla dos ordenadores usando un
monitor, un teclado PS/2 y un ratón
Es
Belkin Corporation
5501 West Walnut Street
Compton • CA • 90220-5221 • USA
Tel: +1 310 898 1100
Fax: +1 310 898 1111
Belkin Ltd.
Express Business Park • Shipton Way
Rushden • NN10 6GL • Verenigd Koninkrijk
Tel: +44 (0) 1933 35 2000
Fax: +44 (0) 1933 31 2000
Belkin B.V.
Boeing Avenue 333
1119 PH Schiphol-Rijk • Nederland
Tel: +31 (0) 20 654 7300
Fax: +31 (0) 20 654 7349
Belkin GmbH
Hanebergstrasse 2
80637 München • Duitsland
Tel: +49 (0) 89 143405 0
Fax: +49 (0) 89 143405 100
Belkin Components SAS
5 Rue du Petit Robinson • 3ème étage
78350 Jouy en Josas • Frankrijk
Tel: +33 (0) 1 34 58 14 00
Fax: +33 (0) 1 39 46 62 89
Belkin Ltd
7 Bowen Cresent • West Gosford
NSW 2250 • Australië
Tel: +61 (0) 2 4372 8600
Fax: +61 (0) 2 4372 8603
Belkin Tech Support
Europa: 00 800 223 55 460
US: 877 736 5771
P74416
© 2004 Belkin Corporation. Alle rechten voorbehouden. Alle handelsnamen zijn
geregistreerde handelsmerken van de betreffende rechthebbenden.
P74416ea_F1DL102P_QIG.qxd 2/24/04 2:52 PM Page 6
Page 15

Cómo conectar el teclado, el vídeo y el ratón
a los puertos de la consola del conmutador.
1
1. Apague todos los ordenadores.
2. Conecte su teclado y ratón tipo PS/2 al puerto morado que corresponde
al teclado y al puerto verde que corresponde al ratón. Estos puertos
están ubicados en el panel frontal de su conmutador.
3. Conecte el cable de vídeo que se encuentra enchufado
a su monitor al puerto VGA del panel frontal del conmutador.
Este folleto le guiará a través de los pasos básicos necesarios para instalar
el conmutador KVM (teclado/pantalla/ratón) de 2 puertos con soporte de
audio y cableado incorporado (el conmutador). Si se presentase algún
problema durante la instalación, consulte el manual del usuario.
Introducción
Precisará de los siguientes elementos para instalar el conmutador:
• Conmutador KVM (teclado/pantalla/ratón) de 2 puertos
con soporte de audio y cableado incorporado
• Un teclado, un monitor y un ratón
• Altavoces y micro (opcional)
Indicadores LED del
estado del puerto
Puerto del
ratón de la
consola
Cables incorporados
de la consola
Puerto del teclado
Puerto del
monitor VGA
Enchufe del
altavoz de la
consola
de la consola
Enchufe del micro
P74416ea_F1DL102P_QIG.qxd 2/24/04 2:52 PM Page 2
Page 16

Cómo conectar los
ordenadores al conmutador
3
1. Utilizando los cables conectados, conecte el cable VGA
al puerto VGA del primer ordenador.
2. Conecte el cable KVM del teclado PS/2 al puerto del teclado de
su ordenador.
3. Conecte el cable KVM del
teclado PS/2 al puerto del
teclado de su ordenador.
4. Conecte el cable verde KVM
del altavoz al enchufe del
altavoz del ordenador.
5. Conecte el cable rosa KVM del
micro al enchufe del altavoz
del ordenador.
6. Repita los pasos del 1 al 5
para el ordenador adicional
que vaya a conectar al
conmutador.
Encienda los ordenadores.
Ahora estará listo para utilizar su conmutador.
Consulte su manual del usuario para obtener información adicional.
Cómo conectar los altavoces y
el micro al conmutador
2
1. Conecte el cable del altavoz al enchufe
verde del panel frontal del conmutador.
2. Conecte el cable al enchufe rosa del micro
del panel frontal del conmutador.
P74416ea_F1DL102P_QIG.qxd 2/24/04 2:52 PM Page 4
Page 17

SwitchKVMa2 porte con
supporto audio e cablaggio
incorporato
Guida di installazione rapida
F1DL102P
Per controllare due computer usando un
monitor, una tastiera PS/2 e un mouse
It
Belkin Corporation
5501 West Walnut Street
Compton • CA • 90220-5221 • EE.UU
Tel: +1 310 898 1100
Fax: +1 310 898 1111
Belkin Ltd.
Express Business Park • Shipton Way
Rushden • NN10 6GL • Reino Unido
Tel: +44 (0) 1933 35 2000
Fax: +44 (0) 1933 31 2000
Belkin B.V.
Boeing Avenue 333
1119 PH Schiphol-Rijk • Países Bajos
Tel: +31 (0) 20 654 7300
Fax: +31 (0) 20 654 7349
Belkin GmbH
Hanebergstrasse 2
80637 Munich • Alemania
Tel: +49 (0) 89 143405 0
Fax: +49 (0) 89 143405 100
Belkin Components SAS
5 Rue du Petit Robinson • 3ème étage
78350 Jouy en Josas • Francia
Tel: +33 (0) 1 34 58 14 00
Fax: +33 (0) 1 39 46 62 89
Belkin Ltd
7 Bowen Cresent • West Gosford
NSW 2250 • Australia
Tel: +61 (0) 2 4372 8600
Fax: +61 (0) 2 4372 8603
Asistencia técnica de Belkin
en Europa: 00 800 223 55 460
EE.UU: 877 736 5771
P74416
© 2004 Belkin Corporation. Todos los derechos reservados.
Todos los nombres comerciales son
marcas registradas de los respectivos fabricantes enumerados.
P74416ea_F1DL102P_QIG.qxd 2/24/04 2:52 PM Page 6
Page 18

Collegamento della tastiera, del monitor e
del mouse alle porte della console dello switch
1
1. Spegnere tutti i computer.
2. Collegare la tastiera di tipo PS/2 alla porta tastiera di colore viola e il
mouse di tipo PS/2 alla porta mouse verde, entrambe situate nel
pannello anteriore dello switch.
3. Prendere il cavo del video che è collegato al monitor e collegarlo alla
porta VGA situata nel pannello anteriore dello switch.
Le informazioni contenute in questa pagina vi guideranno passo
passo all’installazione dello switch KVM a 2 porte con supporto
audio e cablaggio incorporato. Per qualsiasi problema nel corso
dell’installazione, consultare il Manuale Utente.
Introduzione
Per l’installazione dello switch assicurarsi di avere quanto segue:
• Switch KVM a 2 porte con supporto audio e cablaggio incorporato
• Una tastiera, un monitor e un mouse
• Speaker e microfono (opzionale)
Indicatori LED per
lo stato della porta
Console
Porta mouse
Cavi incorporati
Console
Porta tastiera
Porta monitor
console VGA
Console
Jack speaker
Console
Jack microfono
P74416ea_F1DL102P_QIG.qxd 2/24/04 2:52 PM Page 2
Page 19

Collegamento dei computer allo switch
3
1. Usando i cavi già collegati, prendere il cavo VGA e collegarlo alla
porta VGA del primo computer.
2. Collegare il cavo per la tastiera PS/2 KVM alla rispettiva porta
sul computer.
3. Collegare il cavo per il mouse
PS/2 KVM alla rispettiva
porta situata sul computer.
4. Collegare il cavo KVM verde
per lo speaker al rispettivo
jack situato sul computer.
5.Collegare il cavo KVM rosa per
il microfono al rispettivo jack
situato sul computer.
6. Ripetere i passi da 1 a 5 per
collegare l’altro computer allo
switch.
Accendere i computer.
Ora lo switch è pronto per essere usato.
Per maggiori informazioni consultare il manuale utente.
Collegare gli speaker
e il microfono allo switch
2
1. Collegare il cavo per lo speaker al rispettivo jack verde,
situato nel pannello anteriore dello switch.
2. Collegare il cavo del microfono al rispettivo jack rosa,
situato nel pannello anteriore dello switch.
P74416ea_F1DL102P_QIG.qxd 2/24/04 2:52 PM Page 4
Page 20

Belkin Corporation
5501 West Walnut Street
Compton • CA • 90220-5221 • USA
Tel: +1 310 898 1100
Fax: +1 310 898 1111
Belkin Ltd.
Express Business Park • Shipton Way
Rushden • NN10 6GL • Regno Unito
Tel: +44 (0) 1933 35 2000
Fax: +44 (0) 1933 31 2000
Belkin B.V.
Boeing Avenue 333
1119 PH Schiphol-Rijk • Paesi Bassi
Tel: +31 (0) 20 654 7300
Fax: +31 (0) 20 654 7349
Belkin GmbH
Hanebergstrasse 2
80637 Monaco di Baviera • Germania
Tel: +49 (0) 89 143405 0
Fax: +49 (0) 89 143405 100
Belkin Components SAS
5 Rue du Petit Robinson • 3ème étage
78350 Jouy en Josas • Francia
Tel: +33 (0) 1 34 58 14 00
Fax: +33 (0) 1 39 46 62 89
Belkin Ltd
7 Bowen Cresent • West Gosford
NSW 2250 • Australia
Tel: +61 (0) 2 4372 8600
Fax: +61 (0) 2 4372 8603
Assistenza Tecnica Belkin
Europa: 00 800 223 55 460
US: 877 736 5771
P74416
© 2004 Belkin Corporation. Tutti i diritti riservati. Tutti i nomi
delle aziende menzionate sono marchi registrati dai rispettivi proprietari.
P74416ea_F1DL102P_QIG.qxd 2/24/04 2:52 PM Page 6
Page 21

Belkin Corporation
5501 West Walnut Street
Compton • CA • 90220-5221 • USA
Tel: +1 310 898 1100
Fax: +1 310 898 1111
Belkin Ltd.
Express Business Park • Shipton Way
Rushden • NN10 6GL • United Kingdom
Tel: +44 (0) 1933 35 2000
Fax: +44 (0) 1933 31 2000
Belkin B.V.
Boeing Avenue 333
1119 PH Schiphol-Rijk • The Netherlands
Tel: +31 (0) 20 654 7300
Fax: +31 (0) 20 654 7349
Belkin GmbH
Hanebergstrasse 2
80637 München • Germany
Tel: +49 (0) 89 143405 0
Fax: +49 (0) 89 143405 100
Belkin Components SAS
5 Rue du Petit Robinson • 3ème étage
78350 Jouy en Josas • France
Tel: +33 (0) 1 34 58 14 00
Fax: +33 (0) 1 39 46 62 89
Belkin Ltd
7 Bowen Cresent • West Gosford
NSW 2250 • Australia
Tel: +61 (0) 2 4372 8600
Fax: +61 (0) 2 4372 8603
Belkin Tech Support
Europe: 00 800 223 55 460
US: 877 736 5771
P74416ea
© 2004 Belkin Corporation. All rights reserved. All trade names are
registered trademarks of respective manufacturers listed.
P74416ea_F1DL102P_QIG.qxd 2/24/04 2:52 PM Page 8
 Loading...