

Page 1

En
Fr
De
Nl
Es
It
F1DJ102P-B
F1DJ104P-B
User Manual
Manuel de l’utilisateur
Benutzerhandbuch
Handleiding
Manual del usuario
Manuale utente
Control up to four PS/2 computers
using one monitor, keyboard and mouse
Contrôlez jusqu’à quatre ordinateurs PS/2
en utilisant un écran, un clavier et une souris
Steuern Sie bis zu vier PS/2-Computer mit
einem Monitor, einer Tastatur und Maus
Beheer tot wel vier PS/2-computers met
slechts één monitor, toetsenbord en muis
Controla hasta cuatro ordenadores PS/2
utilizando un monitor, un teclado y un ratón
Per controllare fino a quattro computer PS/2 mediante
un singolo insieme di monitor, tastiera e mouse
KVM Switch
Page 2

En
F1DJ102P-B
F1DJ104P-B
User Manual
Control up to four PS/2 computers
using one monitor, keyboard and mouse
KVM Switch
P74711ea_F1DJ10x_man.indd 2-3 12/11/04 11:35:35 am
Page 3

Congratulations on your purchase of this Belkin KVM Switch (the Switch).
The diverse line of market-leading KVM solutions from Belkin exemplifies our
commitment to delivering high-quality, durable products at a competitive price.
Engineered to give you control over multiple computers and/or servers from
one console, Belkin KVM switches come in a variety of capacities suitable for all
configurations, large or small. This Switch is backed by a Belkin Three-Year Warranty
and free technical support.
This manual will provide you details about your new Switch, from installation
and operation, to troubleshooting—in the unlikely event of a problem.
For easy installation, please refer to the Quick Installation Guide included with
your Switch.
Thank you for purchasing the Belkin KVM Switch. We appreciate your business.
Package Contents
• KVM Switch
• User Manual
• Quick Installation Guide
• OmniView KVM Cable kits
INTRODUCTION
1
Introduction
Package Contents . . . . . . . . . . . . . . . . . . . . . . . . . . . . . . . . . . . . . . . .
1
Overview
Feature Overview . . . . . . . . . . . . . . . . . . . . . . . . . . . . . . . . . . . . . . . .
2
Equipment Requirements . . . . . . . . . . . . . . . . . . . . . . . . . . . . . . . . . . .
3
Operating Systems . . . . . . . . . . . . . . . . . . . . . . . . . . . . . . . . . . . . . . .
4
Unit Display Diagrams . . . . . . . . . . . . . . . . . . . . . . . . . . . . . . . . . . . . .
5
Specifications
. . . . . . . . . . . . . . . . . . . . . . . . . . . . . . . . . . . . . . . . . . .7
Installation
Pre-Configuration . . . . . . . . . . . . . . . . . . . . . . . . . . . . . . . . . . . . . . . .
8
Step-By-Step Installation Guide . . . . . . . . . . . . . . . . . . . . . . . . . . . . . .
9
Using Your Switch
Powering Up the Systems
. . . . . . . . . . . . . . . . . . . . . . . . . . . . . . . . . . 14
AutoScan Mode
. . . . . . . . . . . . . . . . . . . . . . . . . . . . . . . . . . . . . . . . . 15
FAQs
. . . . . . . . . . . . . . . . . . . . . . . . . . . . . . . . . . . . . . . . . . . . . . . . . . . 16
Troubleshooting . . . . . . . . . . . . . . . . . . . . . . . . . . . . . . . . . . . . . . . . . .
19
Information . . . . . . . . . . . . . . . . . . . . . . . . . . . . . . . . . . . . . . . . . . . . .
23
TABLE OF CONTENTS
P74711ea_F1DJ10x_man.indd 4-1 12/11/04 11:35:35 am
Page 4

Equipment Requirements
Cables
For each PS/2 computer you plan to connect to the Switch, you will need one
VGA cable, one PS/2 keyboard cable, and one PS/2 mouse cable. Keyboard and
mouse cables must have PS/2 male-to-PS/2 male connectors.
To support resolutions of up to 1920x1440@65Hz and to preserve signal
integrity, use of a 75-Ohm coaxial VGA cable is required. Cables must have
HDDB15 female-to-HDDB15 male connectors.
Belkin OmniView KVM Cables offer the highest quality possible to ensure
that your data is optimally transmitted. KVM Cables include PC99 color-coded
connectors for easier identification and connection. Double-shielded,
strain-relief, ferrite-bead, E Series Cables include an industry-standard, 14-pin,
coaxial VGA cable and nickel-plated connectors for high-resolution applications.
The following cable kit is included and recommended for your KVM Switch:
F1D9000-XX OmniView E Series KVM Cable kit (PS/2 Style)
(-XX denotes the length in feet)
OVERVIEW
3
The Belkin KVM Switch allows you to control multiple computers with one keyboard,
monitor, and mouse. The Switch supports PS/2 input devices (keyboard and mouse),
VGA, SVGA, XGA, and PS/2 computers.
Feature Overview
Hot Keys
Hot keys allow you to select ports using designated key commands. Control multiple
computers using a simple hot key sequence on your keyboard.
AutoScan
The AutoScan feature allows you to automatically scan and monitor the activities
of all operating computers connected to your Switch one by one.
Video Resolution
With a 200MHz bandwidth, the Switch is able to support video resolutions of up
to 1920x1440@65Hz. To preserve signal integrity at high resolutions, 75-Ohm
coaxial VGA cabling is required.
Front-Panel Push Button
A push button conveniently located on the face of the Switch allows for simple,
manual port selection.
Light-Emitting Diode Display
LEDs on the front of the Switch function as status monitors. Positioned on either
side of the front-panel push button, the LEDs light to indicate which corresponding
monitor port is currently active.
OVERVIEW
2
P74711ea_F1DJ10x_man.indd 2-3 12/11/04 11:35:35 am
Page 5
5
Operating Systems
Your Switch is for use on CPUs using:
Platforms
• Windows® 95, 98, 2000, Me, NT®, XP
• DOS
• Linux®
• Novell® NetWare® 4.x/5.x
Keyboards
• Supports 101-, 102-, and 104-key keyboards
Mice
• Microsoft® system-compatible PS/2 mice with 2, 3, 4, or 5 buttons
Monitors
• VGA
• SVGA
• MultiSync®
Optional Power Supply
An optional 9V, 600mA power supply is available. Visit belkin.com for
ordering information.
OVERVIEW
4
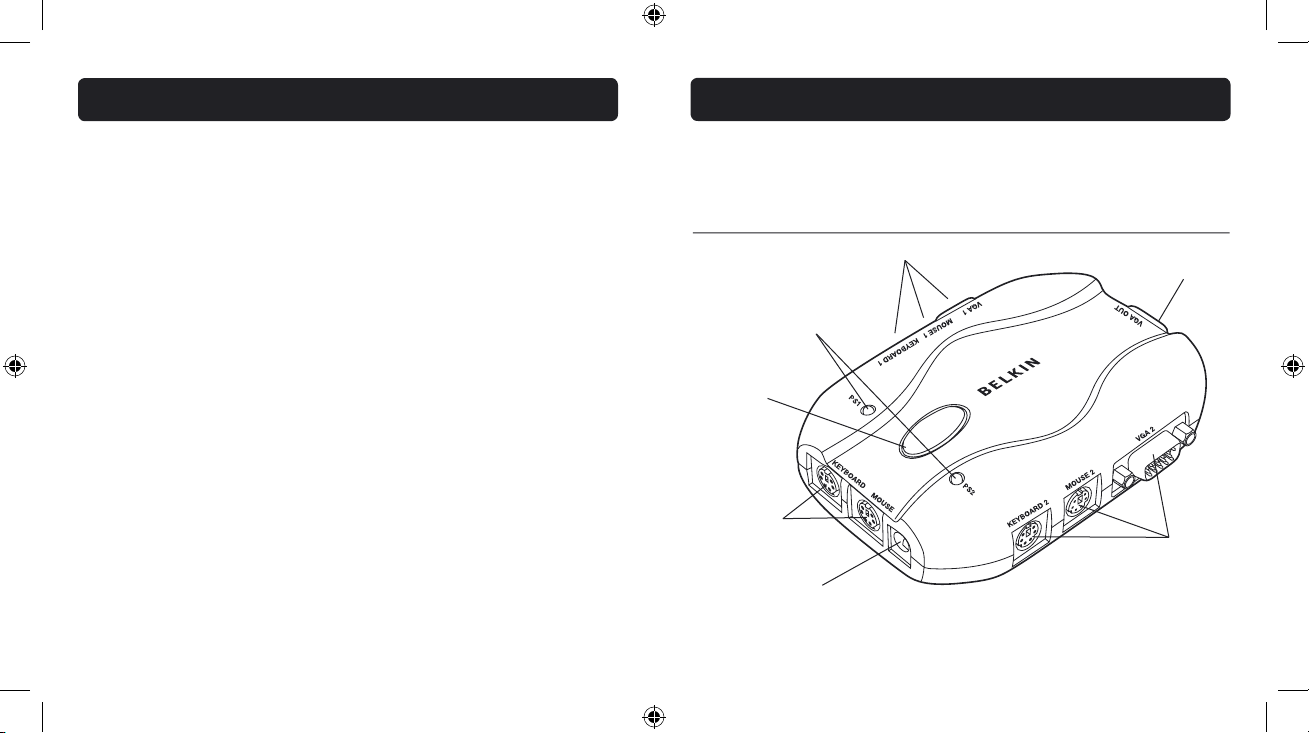
OVERVIEW
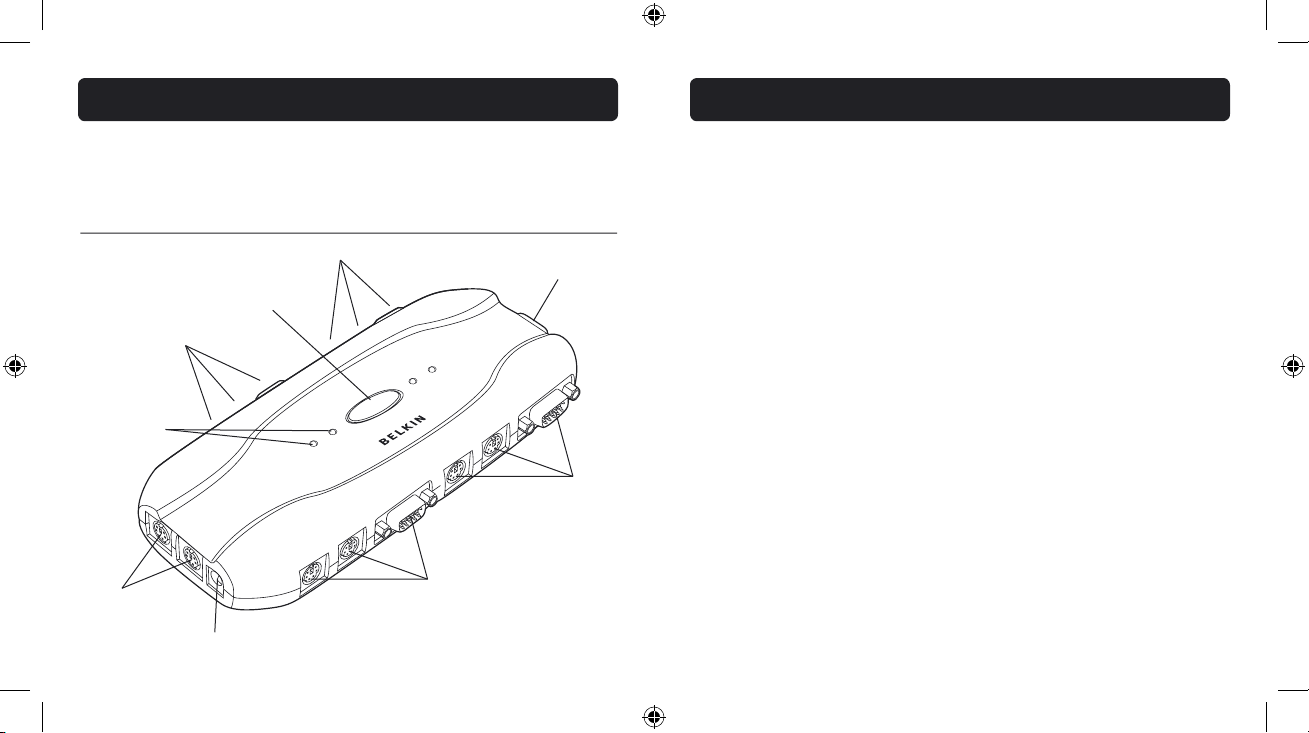
Port Status
Indicator LEDs
Front-Panel
Push Button
The 2-Port KVM Switch:
Console Keyboard
and Mouse Ports
DC Power Jack
Computer 2 Ports
Unit Display Diagrams
Console VGA Port
Computer 1 Ports
P74711ea_F1DJ10x_man.indd 4-5 12/11/04 11:35:35 am
Page 6

Specifications
Part No.: F1DJ102P, F1DJ104P
Power: Optional 9V DC, 600mA adapter with center-pin positive polarity
PCs Supported: F1DJ102P: 2
F1DJ104P: 4
Keyboard Emulation: PS/2
Mouse Emulation: PS/2 and Serial (with use of adapter)
Monitors Supported: VGA, SVGA, MultiSync, and LCD (with use of adapter cable)
Max. Resolution: 1940x1440@65Hz
Keyboard Input: 6-pin miniDIN (PS/2)
Mouse Input: 6-pin miniDIN (PS/2)
VGA Port: 15-pin HDDB type
LED Indicators: F1DJ102P: 2
F1DJ104P: 4
Enclosure: Plastic
Dimensions: F1DJ102P: (L) 4.5 x (W) 3.0 x (H) 1.0 in.
F1DJ104P: (L) 7.5 x (W) 3.0 x (H) 1.0 in.
Weight: F1DJ102P: 3.2oz.
F1DJ104P: 6.4oz.
Warranty: 3 years
Note: Specifications are subject to change without notice.
76
OVERVIEWOVERVIEW
Port Status
Indicator LEDs
Front-Panel
Push Button
The 4-Port KVM Switch:
Console Keyboard
and Mouse Ports
DC Power Jack
Computer 3 Ports
Computer 2 Ports
Console VGA Port
Computer 1 Ports
Computer 4 Ports
P74711ea_F1DJ10x_man.indd 6-7 12/11/04 11:35:36 am
Page 7
Step-by-Step Installation Guide
This section provides complete instructions for the hardware setup of a
single Switch.
Important Note
Before attempting to connect anything to the Switch or to any computer, make
sure that everything is powered off. Plugging and unplugging cables while
computers are powered on can cause irreversible damage to your computers,
data, and/or to the Switch. Belkin Corporation will not be responsible for damage
caused in this way.
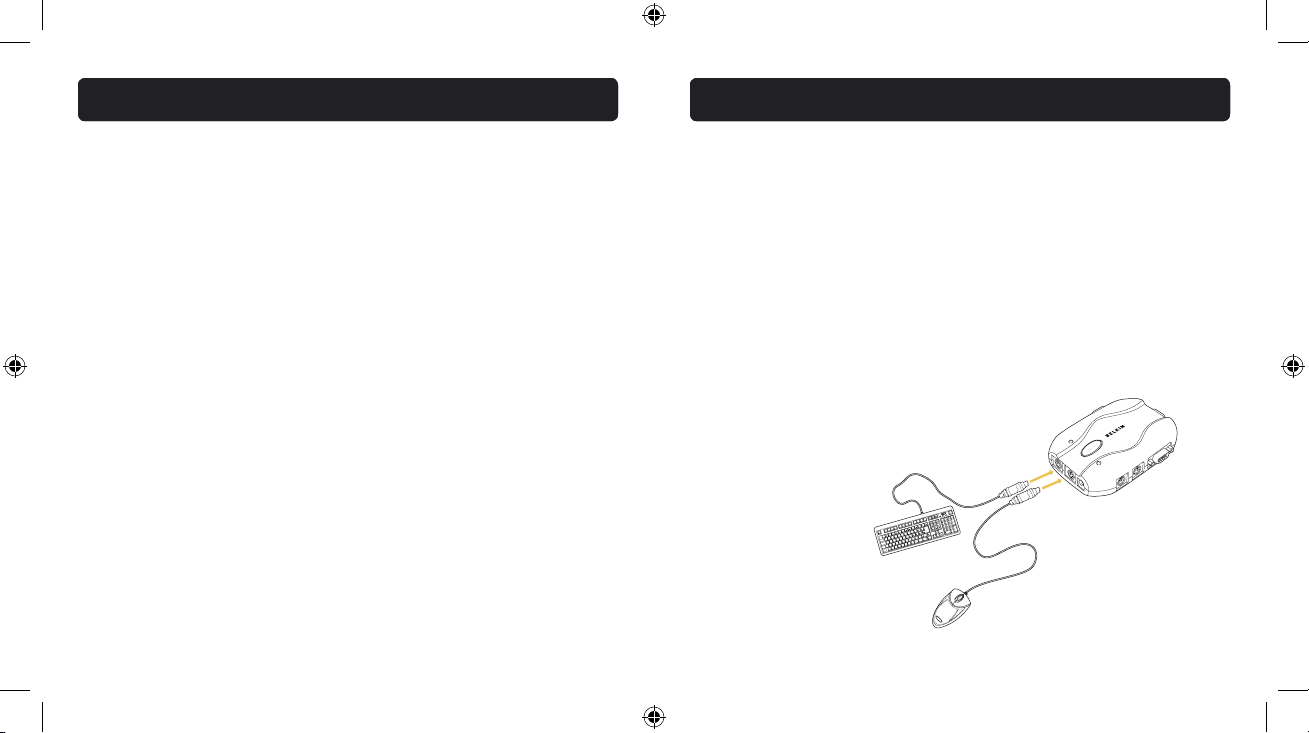
Connecting the Console
1. Connect your PS/2 type keyboard
and mouse to the KEYBOARD and
MOUSE ports located on the side
of your Switch.
98
INSTALLATION
INSTALLATION
Pre-Configuration
Where to Place the Switch
The Switch is designed for positioning on the desktop. The exact placement will
be based on the location of your CPUs and length of your cables.
Cable Distance Requirements
For PS/2 computers: VGA signals are best retained when transmitted up to 25
feet (7.6m). Beyond 25 feet, probability of video degradation increases with
an increase in distance. For this reason, your PS/2 computer should be placed
within 25 feet of the KVM Switch.
Note: If your computer needs to be more than 25 feet from the KVM Switch, you
can use the Belkin CAT5 Extender (part number F1D084) to extend your PS/2
keyboard, PS/2 mouse, and monitor up to 500 feet (152.4m) away using a
standard CAT5 UTP cable.
Cautions and Warnings
Avoid placing cables near fluorescent lights, air conditioning equipment, or
machines that create electrical noise (e.g., vacuum cleaners).
INSTALLATION
P74711ea_F1DJ10x_man.indd 8-9 12/11/04 11:35:37 am
Page 8
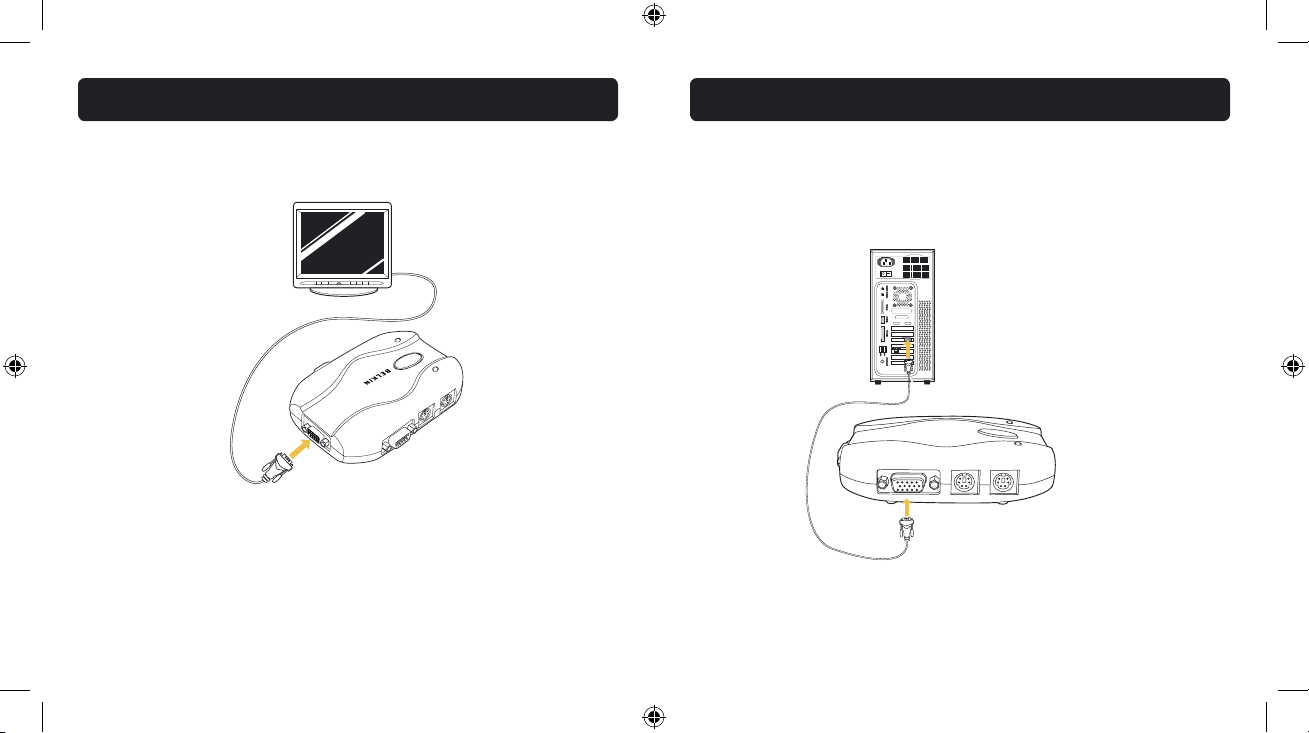
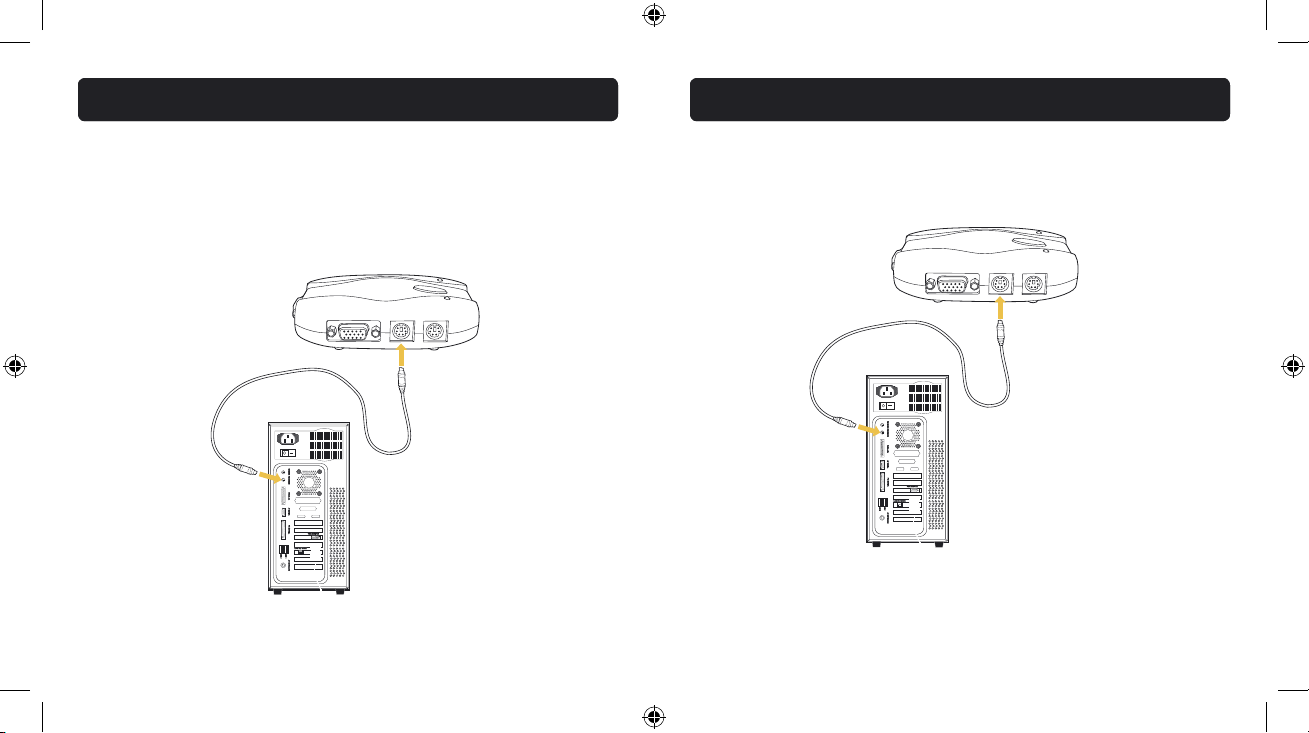
Connecting the Computer:
3. Using an OmniView KVM Cable kit, take the VGA cable and connect the male
end of the cable to the VGA port on the first computer. Connect the female
end to the VGA 1 port on the side of the Switch.
11
2. Take the video cable that is attached to your monitor and connect it to the
VGA OUT port located on the side of the Switch.
10
INSTALLATIONINSTALLATION
P74711ea_F1DJ10x_man.indd 10-11 12/11/04 11:35:38 am
Page 9
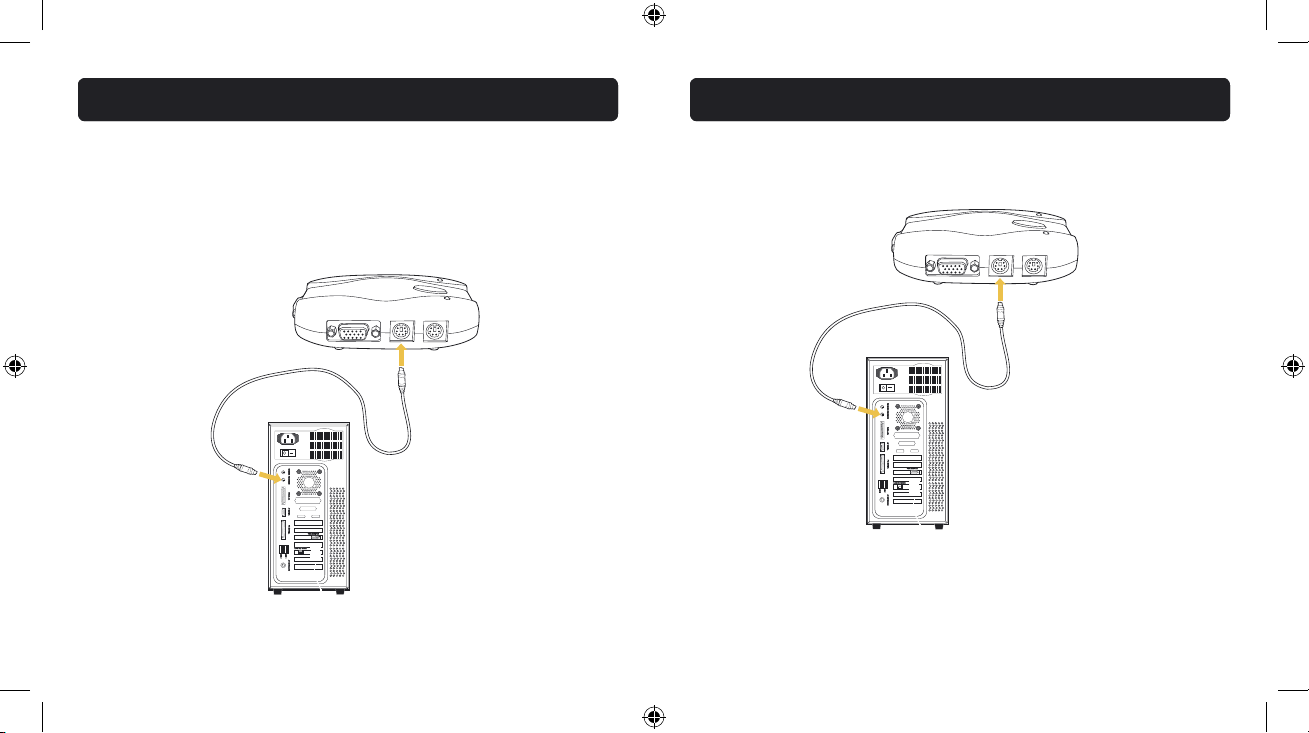
5. Connect one end of the PS/2 mouse KVM cable to the mouse port on your
computer and the other end to the MOUSE 1 port on the side of the Switch.
Repeat Steps 3 through 5 for each additional computer to be connected to
the Switch, connecting them to the corresponding CPU ports on the side.
13
4. Connect one end of the PS/2 keyboard KVM cable to the keyboard port on
the computer and the other end to the KEYBOARD 1 port on the side of
the Switch.
12
INSTALLATIONINSTALLATION
P74711ea_F1DJ10x_man.indd 12-13 12/11/04 11:35:41 am
Page 10
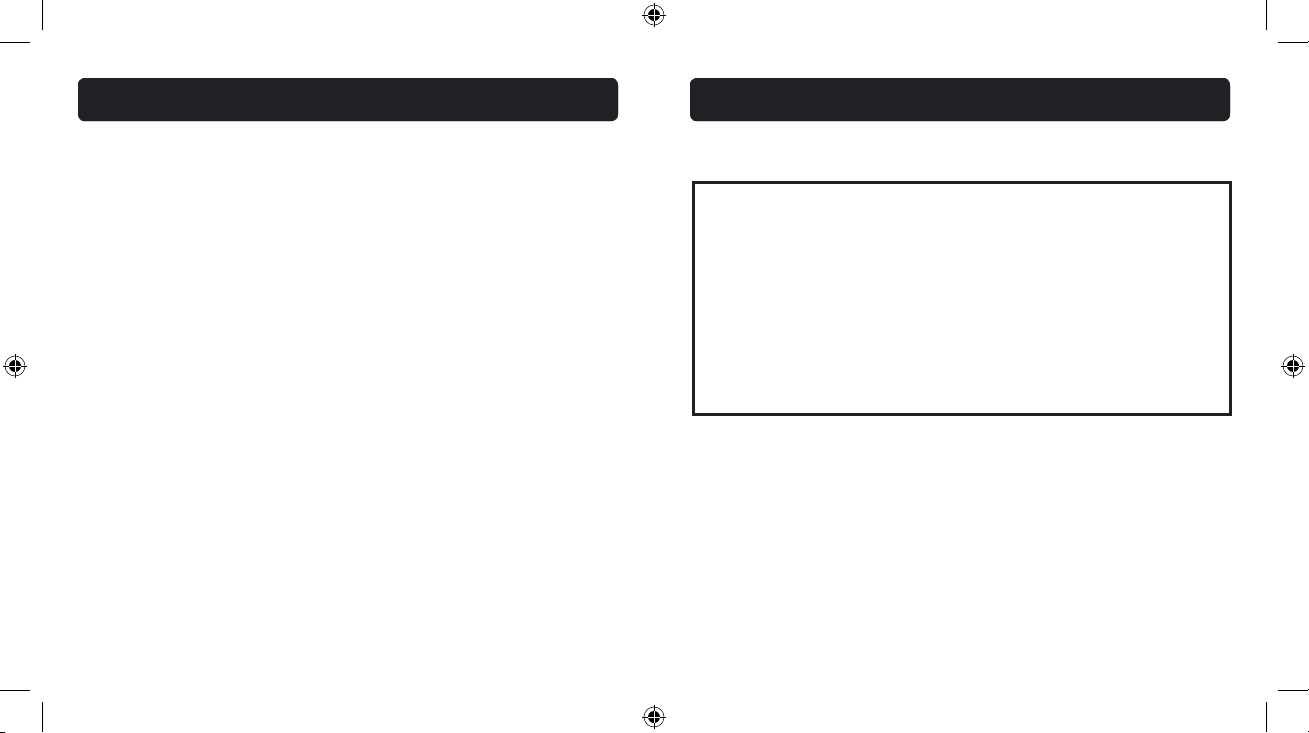
You can switch directly to any port by entering the Switch port number you
wish to use. For example, if you press “SCROLL LOCK”, “SCROLL LOCK”, “2”, the
computer on port 2 will be selected.
AutoScan Mode
In AutoScan mode, the Switch remains on one port for eight seconds before
switching to the next. This time interval cannot be changed.
To enable AutoScan mode, press “SCROLL LOCK”, “SCROLL LOCK”, “S”.
Note: There is no mouse or keyboard control in this mode by design, in order
to prevent errors. If it were enabled, the user could move the mouse or use the
keyboard while the KVM Switch is switching to the next port. This could interrupt
communication between the computer and Switch that might cause erratic mouse
movement, or result in errant display of characters when using the keyboard.
To disable AutoScan mode, press the space bar.
15
Powering Up the Systems
Once all cables have been connected, power up your CPUs that are attached
to the Switch. All computers can be powered on simultaneously. The Switch
emulates a mouse and keyboard on each port and will allow your computer to
boot normally. Your Switch should now be ready for use.
You can select which computer to operate by either the front-panel push button
located on the top of the Switch or through hot key commands. Note that it
will take 1-2 seconds for the video to display after switching. This is due to
the refresh of the video signal. A re-synchronization of the mouse and keyboard
signal also takes place. This is normal operation and ensures that proper
synchronization is established.
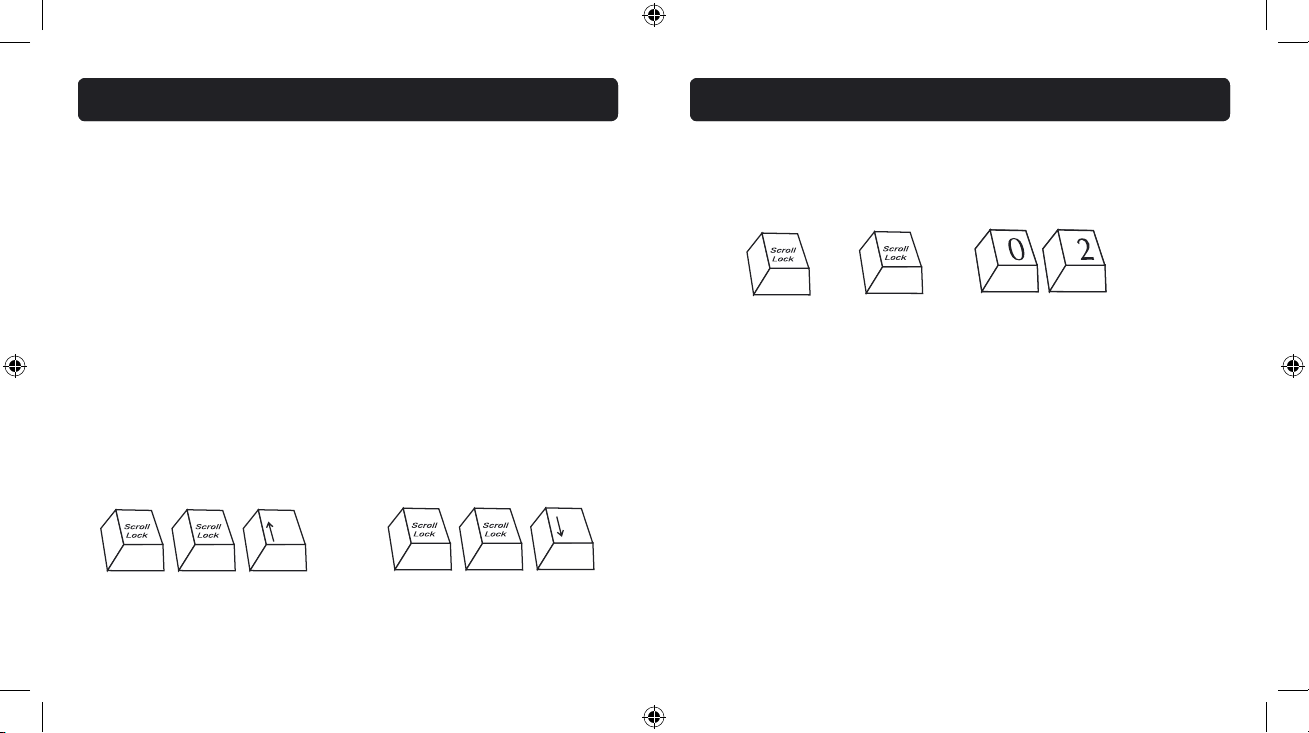
You can conveniently change ports on the Switch through a keyboard command
sequence using the “SCROLL LOCK” key and up and down arrow keys. To send
commands to the Switch, press the “SCROLL LOCK” key twice within two seconds.
You will hear a beep for confirmation. Then you can press the up or down arrow
keys to switch between ports.
14
USING YOUR SWITCH
+
+
Switch to Port 2—(02)
USING YOUR SWITCH
Switch to next active port,
up arrow
Switch to previous active port,
down arrow
P74711ea_F1DJ10x_man.indd 14-15 12/11/04 11:35:44 am
Page 11

1716
Q: What is the maximum video resolution the Switch supports?
A: The advanced video circuit in the Switch supports a maximum resolution of
1940x1440@65Hz. This higher resolution support is ideal for graphic artists
and designers who depend on high-quality video.
Q: What video bandwidth does the KVM Switch support?
A: The Switch supports 200MHz of video bandwidth.
Q: What is the difference between the KVM Switch and the SOHO Series KVM
Switch?
A: The SOHO Series KVM Switch offers additional audio and microphone support;
a sculpted, space-saving design; cable management; flash-upgrade capability;
and a USB option.
Q: What are the benefits of the Belkin KVM Switch over a similar
competitor product?
A: The Belkin KVM Switch is an affordable solution, packed with features usually
found in higher-priced units. The Belkin KVM Switch offers hot key command
switching, resolution support of up to 1940x1440@65Hz, AutoScan, and a
Belkin Three-Year Limited Warranty—all at a very affordable price.
Q: Can I use the Switch on my Sun computer?
A: Yes, the Switch works with Sun computers when used with the Belkin Sun
Adapter, part number F1D082.
FAQs
Q: What operating system does the Switch support?
A: The Switch will support any operating system that runs on a PS/2 platform.
It will also work with Sun and Mac operating systems using the appropriate
adapters (Belkin OmniView Sun Adapter F1D082, OmniView Mac Adapter
F1D080). Operating systems include, but are not limited to, DOS, Windows 3.x,
95, 98, 2000, Me, NT, XP, Linux, and Novell NetWare 4.x/5.x.
Q: Does the Switch function with the Microsoft IntelliMouse?
A: Yes, the Switch will function with Microsoft, Logitech, Kensington, as well as
with all Belkin mice. The Switch will support only two mouse buttons. Please
contact Belkin Technical Support for any compatibility questions you may have.
Q: How does the Switch allow the user to toggle between ports?
A: The Switch supports two methods of port selection. The user can choose
computers using specially designated hot keys from the keyboard, or by
pressing the front-panel push button.
Q: How far can the user be from the Switch?
A: When using PS/2 connections, the Switch can be up to 25 feet away from
your computer. If your computer needs to be more than 25 feet from the KVM
Switch, you can use the Belkin CAT5 Extender (part number F1D084) to extend
the operation distance of your PS/2 keyboard, PS/2 mouse, and monitor up to
500 feet away using standard CAT5 UTP cable.
FAQs
P74711ea_F1DJ10x_man.indd 16-17 12/11/04 11:35:45 am
Page 12

19
Q: Do I have to install any software to use the Switch?
A: No, the Switch does not require any drivers or software to be installed on your
computers. Simply connect all your computers to the PC ports on the Switch,
then attach one monitor, mouse, and keyboard to the corresponding console
ports and your Switch is ready for use.
Q: Does the Switch require an AC adapter?
A: The Switch can be powered by the PS/2 keyboard port of your computer. An
optional 9V DC, 600mA power adapter may be used for instances where power
cannot be drawn from a PS/2 port of a computer.
Q: Can I use the Switch to switch video signals only?
A: Yes, you may use the Switch to switch between video signals only without
having to connect the keyboard and mouse. The keyboard and mouse should
be connected directly to the computer that the video signal is taken from to
ensure that your computer functions properly.
Note: The Switch will require the use of the optional AC power adapter since power
cannot be drawn from the computer via the keyboard or through a USB port.
Q: How long is the warranty for the Switch?
A: The Switch comes with a Three-Year Limited Warranty.
18
Video
I am getting ghosting, shadowing, or fuzzy images on my monitor.
• Check that all video cables are inserted properly.
• Check that the monitor you are using supports the resolution and refresh-rate
setting on your computer.
• Check that the graphics card you are using supports the resolution and
refresh-rate setting on your computer.
• Connect the monitor directly into the computer you are having trouble with to
see if the problem still appears.
I am getting a black screen on my monitor.
• Check that all video cables are inserted properly.
• If you are not using a power adapter, check that the keyboard cable is
connected and inserted properly between the computer and the Switch.
• If you are using the Switch for video switching only and have no keyboard and
mouse connection between the Switch and computer, you will need to purchase
the optional 9V DC, 600mA power adapter (Belkin part number F1D065-PWR for
your appropriate country).
• Connect your monitor directly to the computer to verify that your monitor is
functioning properly.
TROUBLESHOOTINGFAQs
P74711ea_F1DJ10x_man.indd 18-19 12/11/04 11:35:45 am
Page 13

21
Keyboard
Computer does not detect your keyboard and you get a keyboard error reported
at boot up.
• Check that the keyboard cable between the Switch and the computer is
connected properly. Tighten any loose connections.
• Try swapping your keyboard with a different one.
• Try connecting the computer to a different port.
• If you are using the keyboard software that was included with your keyboard,
uninstall it and install the standard Microsoft keyboard driver.
Mouse
Mouse is lost when I switch to a different channel.
• Check that the mouse you are using is connected properly to the console port
of the Switch.
• If you are using a mouse driver that was included with your mouse, uninstall it
and install the standard Microsoft mouse driver.
• Disconnect and reconnect the mouse cable attached to the channel with which
you are experiencing problems to re-synchronize the mouse connection.
• Attach the mouse directly to the computer with which you are experiencing
mouse problems.
• Allow up to one minute following the computer’s waking from standby mode
for mouse function to return.
20
• Deactivate power management schemes on the PC with which you are
experiencing problems.
• Try swapping the mouse with a different one.
The mouse is not detected at boot up.
• Check the cables and make sure that they are inserted properly.
The computer boots up fine, but the mouse does not work.
• Make sure it is plugged-in properly.
• Make sure the mouse works when directly plugged into the computer.
Rebooting may be necessary when trying this.
• Try a different mouse.
When I switch from one port to another, mouse movement is
completely erratic.
• Make sure you do not have more than one mouse driver installed. Make sure
that the driver is either for a standard PS/2 mouse or a Microsoft compatible
PS/2 mouse.
• Make sure you do not have any mouse drivers loaded in your CONFIG.SYS or
AUTOEXEC.BAT files.
• Avoid moving the mouse or pressing the mouse button when switching ports
on the Switch.
• You can reset the mouse and resume proper mouse movement simply by
unplugging the mouse from the Switch and waiting 2–3 seconds before
plugging it in again.
TROUBLESHOOTINGTROUBLESHOOTING
P74711ea_F1DJ10x_man.indd 20-21 12/11/04 11:35:45 am
Page 14
FCC Statement
DECLARATION OF CONFORMITY WITH FCC RULES
FOR ELECTROMAGNETIC COMPATIBILITY
We, Belkin Corporation, of 501 West Walnut Street, Compton, CA 90220, declare
under our sole responsibility that the products:
F1DJ102P, F1DJ104P
to which this declaration relates:
Comply with Part 15 of the FCC Rules. Operation is subject to the following two
conditions: (1) this device may not cause harmful interference, and (2) this
device must accept any interference received, including interference that may
cause undesired operation.
CE Declaration of Conformity
We, Belkin Corporation, declare under our sole responsibility that the products F1DJ102P
and F1DJ104P to which this declaration relates, are in conformity with Emissions Standard
EN55022 and, with Immunity Standard EN55024, LVP EN61000-3-2, and EN61000-3-3.
ICES
This Class B digital apparatus complies with Canadian ICES-003. Cet appareil numérique de la
classe B est conforme á la norme NMB-003 du Canada.
23
General
My computer does not boot up when connected to the Switch, but works fine
when I connect the keyboard, video, and mouse directly to it.
• Make sure that the keyboard and mouse cables are connected tightly between
the Switch and the computer.
• Check that the keyboard and mouse cables are not crossed, i.e., make sure the
connectors are plugged into the correct ports.
22
INFORMATIONTROUBLESHOOTING
P74711ea_F1DJ10x_man.indd 22-23 12/11/04 11:35:45 am
Page 15

Belkin Corporation Limited Three-Year Product Warranty
Belkin Corporation warrants this product against defects in materials and workmanship
for its warranty period. If a defect is discovered, Belkin will, at its option, repair or
replace the product at no charge provided it is returned during the warranty period,
with transportation charges prepaid, to the authorized Belkin dealer from whom you
purchased the product. Proof of purchase may be required.
This warranty does not apply if the product has been damaged by accident, abuse, misuse,
or misapplication; if the product has been modified without the written permission of
Belkin; or if any Belkin serial number has been removed or defaced.
THE WARRANTY AND REMEDIES SET FORTH ABOVE ARE EXCLUSIVE IN LIEU OF ALL OTHERS,
WHETHER ORAL OR WRITTEN, EXPRESSED OR IMPLIED. BELKIN SPECIFICALLY DISCLAIMS
ANY AND ALL IMPLIED WARRANTIES, INCLUDING, WITHOUT LIMITATION, WARRANTIES OF
MERCHANTABILITY AND FITNESS FOR A PARTICULAR PURPOSE.
No Belkin dealer, agent, or employee is authorized to make any modification, extension,
or addition to this warranty.
BELKIN IS NOT RESPONSIBLE FOR SPECIAL, INCIDENTAL, OR CONSEQUENTIAL DAMAGES
RESULTING FROM ANY BREACH OF WARRANTY, OR UNDER ANY OTHER LEGAL THEORY,
INCLUDING BUT NOT LIMITED TO LOST PROFITS, DOWNTIME, GOODWILL, DAMAGE TO OR
REPROGRAMMING, OR REPRODUCING ANY PROGRAM OR DATA STORED IN OR USED WITH
BELKIN PRODUCTS.
Some states do not allow the exclusion or limitation of incidental or consequential
damages or exclusions of implied warranties, so the above limitations of exclusions
may not apply to you. This warranty gives you specific legal rights, and you may also
have other rights that vary from state to state.
24
INFORMATION
P74711ea_F1DJ10x_man.indd 24-25 12/11/04 11:35:45 am
Page 16

Belkin Ltd.
Express Business Park • Shipton Way
Rushden • NN10 6GL • United Kingdom
Tel: +44 (0) 1933 35 2000
Fax: +44 (0) 1933 31 2000
Belkin B.V.
Starparc Building • Boeing Avenue 333
1119 PH Schiphol-Rijk • The Netherlands
Tel: +31 (0) 20 654 7300
Fax: +31 (0) 20 654 7349
Belkin GmbH
Hanebergstrasse 2
80637 Munich • Germany
Tel: +49 (0) 89 143405 0
Fax: +49 (0) 89 143405 100
Belkin SAS
5 Rue du Petit Robinson • 3ème étage
78350 Jouy en Josas • France
Tel: +33 (0) 1 34 58 14 00
Fax: +33 (0) 1 39 46 62 89
Belkin Tech Support
Europe: 00 800 223 55 460
© 2004 Belkin Corporation. All rights reserved.
All trade names are registered trademarks of respective manufacturers listed.
KVM Switch
Fr
F1DJ102P-B
F1DJ104P-B
Manuel de l’utilisateur
Contrôle jusqu’à quatre ordinateurs PS/2 en
utilisant un écran, un clavier et une souris
Switch KVM
P74711ea_F1DJ10x_man.indd 2-3 12/11/04 11:35:52 am
Page 17

Merci d'avoir choisi ce Switch KVM de Belkin (le Switch).
Notre gamme variée de solutions KVM en tête du marché vous montre comment
Belkin s'engage à fournir des produits de grande qualité, résistants et à un prix
compétitif. Conçus pour vous donner le contrôle de plusieurs ordinateurs et/ou
serveurs à partir d'une console, les Switchs KVM de Belkin offre diverses possibilités
applicables à toutes les configurations, de petite ou de grande taille. Le Switch est
assorti d’une garantie Belkin de 3 ans et d’une assistance technique gratuite.
Ce manuel vous donnera des détails sur votre nouveau Switch, de l'installation
et du fonctionnement jusqu'au dépannage, —dans le cas peu probable où vous
rencontreriez un problème. Pour une installation rapide, reportez-vous au Guide
d'Installation Rapide fourni avec votre Switch.
Merci d'avoir choisi le Switch KVM de Belkin. Nous vous remercions de votre confiance.
Contenu de l’emballage
• Switch KVM
• Manuel de l’utilisateur
• Guide d’Installation Rapide
• Kits de câbles KVM OmniView
INTRODUCTION
1
Introduction
Contenu de l’emballage . . . . . . . . . . . . . . . . . . . . . . . . . . . . . . . . . . . .
1
Présentation
Présentation des fonctions
. . . . . . . . . . . . . . . . . . . . . . . . . . . . . . . . . .2
Configuration requise . . . . . . . . . . . . . . . . . . . . . . . . . . . . . . . . . . . . .
3
Systèmes d'exploitation
. . . . . . . . . . . . . . . . . . . . . . . . . . . . . . . . . . . .4
Illustrations de l'unité
. . . . . . . . . . . . . . . . . . . . . . . . . . . . . . . . . . . . .5
Spécifications
. . . . . . . . . . . . . . . . . . . . . . . . . . . . . . . . . . . . . . . . . . .7
Installation
Préconfiguration
. . . . . . . . . . . . . . . . . . . . . . . . . . . . . . . . . . . . . . . . .8
Guide d'installation pas-à-pas
. . . . . . . . . . . . . . . . . . . . . . . . . . . . . . . .9
Utilisation du Switch
Mise en route des systèmes . . . . . . . . . . . . . . . . . . . . . . . . . . . . . . . .
14
Mode autobalayage (AutoScan)
. . . . . . . . . . . . . . . . . . . . . . . . . . . . . . 15
Foire aux questions
. . . . . . . . . . . . . . . . . . . . . . . . . . . . . . . . . . . . . . . . 16
Dépannage . . . . . . . . . . . . . . . . . . . . . . . . . . . . . . . . . . . . . . . . . . . . . . 19
Information . . . . . . . . . . . . . . . . . . . . . . . . . . . . . . . . . . . . . . . . . . . . .
23
TABLE DES MATIÈRES
P74711ea_F1DJ10x_man.indd 4-1 12/11/04 11:35:52 am
Page 18

Configuration requise
Câbles
Pour pouvoir être connecté au Switch, chaque ordinateur PS/2 nécessite un câble
VGA, un câble clavier PS/2 et un câble souris PS/2. Les câbles clavier et souris
doivent être équipés de connecteurs PS/2 mâle-PS/2 mâle. Pour prendre en charge
des résolutions jusqu’à 1920 X 1440@65 Hz et préserver l'intégrité du signal, vous
devez utiliser un câble VGA coaxial 75 Ohms. Les câbles doivent être équipés de
connecteurs HDDB15 femelle-HDDB15 mâle. Les câbles KVM OmniView de Belkin
offrent la meilleure qualité possible pour assurer
la transmission optimale des données. Ils sont équipés de connecteurs à code de
couleur PC99 pour faciliter l'identification et le branchement. Les câbles de la Série
E, avec blindage double, serre-câble et perle de ferrite, comportent un câble coaxial
VGA à 14 broches normalisé ainsi que des connecteurs nickelés pour les applications
à résolution élevée. Les câbles suivants sont recommandés pour votre Switch KVM :
F1D9000-XX Kit de Câbles KVM OmniView Série E (PS/2)
(-XX indique la longueur en pieds)
PRÉSENTATION
3
Le Switch KVM de Belkin vous permet de contrôler de multiples ordinateurs à l'aide
d'un seul clavier, moniteur et souris. Il prend en charge les périphériques de saisie
PS/2 (clavier et souris) ainsi que les ordinateurs VGA, SVGA, XGA et PS/2.
Présentation des fonctions
Raccourcis clavier
Les raccourcis clavier vous permettent de sélectionner des ports à l'aide de
commandes clavier spéciales. Contrôlez de multiples ordinateurs grâce à de simples
raccourcis clavier.
Auto-balayage (AutoScan)
La fonction de balayage automatique AutoScan vous permet d'analyser et de
surveiller automatiquement les activités de tous les ordinateurs allumés connectés
au Switch KVM, l'un après l'autre.
Résolution Vidéo
Grâce à une bande passante de 200 MHz, le Switch prend en charge des résolutions
vidéo jusqu'à 1920 x 1440@65 Hz. Pour préserver l'intégrité du signal à des
résolutions élevées, vous devez utiliser un câble VGA coaxial 75 Ohms.
Bouton de la face avant
Ce bouton, placé sur la face avant du Switch pour plus de commodité, vous permet
de choisir un port simplement et manuellement.
Témoin lumineux
Le témoin lumineux situé sur la face avant du Switch sert d'indicateur d'état. Placé
d’un côté comme de l’autre du bouton de la face avant, le témoin indique le port
moniteur actuellement actif.
PRÉSENTATION
2
P74711ea_F1DJ10x_man.indd 2-3 12/11/04 11:35:52 am
Page 19

5
PRÉSENTATION
Témoins lumineux
de l’état du port
Bouton de la
face avant
Le Switch KVM à 2 Ports :
Ports Clavier
et Souris de la
Console
Fiche pour
alimentation CC
Ports de l'ordinateur 2
Illustrations de l'unité
Port VGA de la Console
Ports de l'ordinateur 1
Systèmes d’exploitation
Votre Switch KVM doit être employé avec des unités centrales utilisant :
Plateformes
• Windows® 95, 98, 2000, Me, NT®, XP • DOS • Linux®
• Novell® NetWare® 4.x/5.x
Claviers
• Prend en charge les claviers de 101, 102 et 104 touches
Souris
• Souris PS/2 compatibles Microsoft® avec 2, 3, 4 ou 5 boutons
Moniteurs
• VGA
• SVGA
• MultiSync®
Bloc d’alimentation (en option)
Un bloc d’alimentation 9 V, 600 mA est disponible. Visitez le site belkin.com
pour de plus amples informations.
PRÉSENTATION
4
P74711ea_F1DJ10x_man.indd 4-5 12/11/04 11:35:52 am
Page 20
Spécifications
Référence : F1DJ102P, F1DJ104P
Alimentation : Adaptateur de courant 9 VCC, 600 mA avec polarité positive sur la
broche centrale (en option)
PC pris en charge : F1DJ102P : 2
F1DJ104P : 4
Émulation du clavier : PS/2
Émulation de la souris : PS/2 et Série (si utilisé avec un adaptateur)
Moniteurs pris en charge : VGA et SVGA, MultiSync, LCD (avec un câble adaptateur)
Résolution maximum : 1940 x 1440@65 Hz
Entrée clavier : miniDIN 6 broches (PS/2)
Entrée souris : MiniDIN 6 broches (PS/2)
Port VGA : type HDDB 15 broches
Témoins indicateurs : F1DJ102P : 2
F1DJ104P : 4
Boîtier : Plastique
Dimensions : F1DJ102P : (L) 11,4 x (l) 7,6 x (h) 2,5 cm
F1DJ104P : (L) 19,1 x (l) 7,6 x (h) 2,5 cm
Poids : F1DJ102P : 91 g
F1DJ104P : 181 g
Garantie : 3 ans
Remarque : Ces spécifications sont sujettes à modification sans préavis.
7
PRÉSENTATION
6
PRÉSENTATION
Témoins lumineux
de l’état du port
Bouton de la
face avant
Le Switch KVM à 4 Ports :
Ports Clavier et
Souris de la Console
Fiche pour alimentation CC
Ports de l'ordinateur 3
Ports de l'ordinateur 2
Port VGA de la Console
Ports de l'ordinateur 1
Ports de l'ordinateur 4
P74711ea_F1DJ10x_man.indd 6-7 12/11/04 11:35:53 am
Page 21

Guide d'installation pas-à-pas
Cette section vous donne toutes les instructions nécessaires à l'installation d'un seul
Switch KVM.
Remarque importante :
Avant de brancher un périphérique sur vos ordinateurs ou sur le Switch, assurezvous que le matériel est éteint. Le branchement ou le débranchement de câbles
lorsque les ordinateurs sont allumés risque d'endommager les ordinateurs ou le
Switch de façon irrémédiable. Belkin Components ne peut être tenu responsable des
dommages causés par ces méthodes.
Branchement de la console
1. Branchez votre clavier et votre
souris PS/2 sur les ports CLAVIER et
SOURIS situés sur le panneau latéral
de votre Switch.
9
INSTALLATION
INSTALLATION
8
Préconfiguration
Emplacement du Switch
Le Switch a été conçu pour être placé sur une surface plane (bureau). Son
emplacement exact dépend de l’emplacement de vos unités centrales et de la
longueur de vos câbles.
Longueur requise des câbles
Pour ordinateurs PS/2 : Les signaux VGA sont plus forts lorsque la distance entre
le Switch et l’unité centrale ne dépasse pas 7,6 m. Au-delà de cette distance, les
probabilités de dégradation vidéo augmentent. Ainsi, votre ordinateur PS/2 devrait
être placé à moins de 7,6 m de votre Switch.
Remarque : Si votre ordinateur doit être éloigné de plus de 7,6 mètres du Switch
KVM, vous pouvez utiliser le câble d'extension CAT5 de Belkin (référence F1D084) pour
installer votre moniteur, votre clavier PS/2 et votre souris PS/2 jusqu'à 152,4 mètres
de votre Switch, grâce à un câble UTP CAT5 standard.
Avertissements
Ne placez pas les câbles près de lumières fluorescentes, de systèmes de climatisation
ou de machines produisant du bruit électrique (aspirateurs, par exemple).
INSTALLATION
P74711ea_F1DJ10x_man.indd 8-9 12/11/04 11:35:53 am
Page 22

Branchement de l’ordinateur :
3. À l’aide d’un kit de câbles KVM OmniView, saisissez le câble VGA et branchez
l'extrémité mâle de ce câble sur le port VGA du premier ordinateur. Branchez
l'extrémité femelle sur le port VGA 1, situé sur le côté du Switch.
11
INSTALLATION
2. Saisissez le câble vidéo relié au moniteur et branchez-le sur le port vidéo
SORTIE VGA situé sur le côté de votre Switch.
10
INSTALLATION
P74711ea_F1DJ10x_man.indd 10-11 12/11/04 11:35:54 am
Page 23
5. Branchez une extrémité du câble KVM PS/2 pour souris sur le port souris de
l’ordinateur, et l’autre extrémité dans le port SOURIS 1, situé sur le côté du
Switch.
Répétez les étapes 3 à 5 pour chaque ordinateur supplémentaire que vous
connectez au Switch. Branchez-les sur les ports CPU correspondants sur le
côté de l'unité.
13
INSTALLATION
4. Branchez une extrémité du câble KVM PS/2 pour clavier sur le port clavier de
l’ordinateur, et l’autre extrémité dans le port CLAVIER 1, situé sur le côté
du Switch.
12
INSTALLATION
P74711ea_F1DJ10x_man.indd 12-13 12/11/04 11:35:56 am
Page 24

quel port du Switch en entrant le numéro du port désiré. Par exemple, si vous
appuyez sur [ARRÊT DÉFIL], [ARRÊT DÉFIL], [2], l'ordinateur situé sur le port 2
est sélectionné.
Mode autobalayage [AutoScan]
En mode AutoScan, le Switch KVM reste sur un port pendant 8 secondes avant de
passer au port suivant. Il est impossible de modifier cet intervalle. Pour activer
le mode AutoScan, appuyez sur [ARRÊT DÉFIL], [ARRÊT DÉFIL], [S].
Remarque : En mode AutoScan, il n'existe aucun contrôle souris ou clavier. Ceci
prévient les erreurs. Si ce contrôle était activé, l’utilisateur pourrait bouger
la souris ou utiliser le clavier alors que le Switch passe d’un port à l’autre.
La communication entre l'ordinateur et le Switch serait alors interrompue et
engendrerait des déplacements chaotiques de la souris ou un affichage fantaisiste
lors de l'utilisation du clavier.
Pour désactiver le mode AutoScan, appuyez sur la barre d'espacement.
15
UTILISATION DU SWITCH
+
+
Passer au Port 2—[02]
Mise en route des systèmes
Une fois les câbles branchés, allumez toutes les unités centrales reliées au Switch
KVM. Tous les ordinateurs peuvent être allumés simultanément. Le Switch
KVM émule une souris et un clavier sur chaque port et permet l'amorçage
normal de votre ordinateur. Votre Switch KVM est prêt à l'emploi. Vous pouvez
choisir l'ordinateur à utiliser en vous servant du bouton situé sur la face avant
du Switch KVM ou des raccourcis clavier. Notez que la vidéo s'affiche 1 à 2
secondes après avoir effectué la permutation. Ceci est dû à la fréquence de
rafraîchissement du signal vidéo. La synchronisation du signal de la souris et du
clavier s'effectue également. Il s'agit d'un comportement normal qui garantit que
la synchronisation a été correctement établie. Vous pouvez permuter d’un port
à l’autre sur le Switch par une simple séquence au clavier en vous servant de
la touche [ARRÊT DÉFIL] ainsi que des touches [HAUT] et [BAS]. Pour envoyer
vos commandes au Switch KVM, vous devez appuyer deux fois sur la touche
[ARRÊT DÉFIL] dans un intervalle de deux secondes. Un bip de confirmation se
fait entendre. Vous pouvez alors appuyer sur les touches de direction [HAUT] ou
[BAS] pour changer de port. Vous pouvez aussi passer directement à n’importe
14
UTILISATION DU SWITCH
Passer au port actif suivant,
flèche [HAUT]
Passer au port actif précédent,
flèche [BAS]
P74711ea_F1DJ10x_man.indd 14-15 12/11/04 11:36:00 am
Page 25

17
Q : Quelle est la résolution vidéo maximum prise en charge par le Switch KVM ?
R : Le circuit vidéo évolué du Switch KVM prend en charge une résolution
maximum de 1940 x 1440@85 Hz. La prise en charge de résolutions élevées
est idéale pour les graphistes et les artistes qui exigent une vidéo de haute
qualité.
Q : Quelle bande passante vidéo le Switch KVM prend-il en charge ?
R : Le Switch prend en charge une bande passante vidéo de 200 MHz.
Q : Quelle est la différence entre le Switch KVM et le Switch KVM Série SOHO ?
R : Le Switch KVM de la Série SOHO offre une prise en charge audio et micro
supplémentaire, un design compact distinctif, un système de gestion des
câbles, la possibilité de mise à niveau Flash et une option USB.
Q : Quels sont les avantages à choisir un Switch KVM Belkin au lieu d’un
produit venant d’un compétiteur ?
R : Le Switch KVM Belkin représente une solution abordable, comprenant les mêmes
options que l’on retrouve généralement sur les unités beaucoup plus chères. Le
Switch KVM Belkin offre la commutation par raccourcis clavier, la prise en charge
de résolutions jusqu’à 1940 x 1400@65 Hz, l’autobalayage [AutoScan], et une
garantie limitée de 3 ans de Belkin—le tout à un prix vraiment abordable.
Q : Puis-je utiliser le Switch avec mon ordinateur Sun ?
R : Oui, le Switch fonctionne avec les ordinateurs Sun lorsqu’ils sont utilisés
avec un Adaptateur Sun de Belkin, référence F1D082.
FOIRE AUX QUESTIONS
16
Q : Quels systèmes le Switch KVM prend-il en charge ?
R : Le Switch KVM prend en charge tous les systèmes d'exploitation fonctionnant
sur une plate-forme PS/2. Il fonctionne également sous des systèmes
d'exploitation Sun et Mac en utilisant les adaptateurs appropriés (Adaptateur
OmniView PS/2 Sun de Belkin [F1D082], Adaptateur OmniView PS/2 Mac de
Belkin [F1D080]). Les systèmes d'exploitation possibles (liste non exhaustive) :
DOS, Windows 3.x, 95, 98, 2000, Me, NT, XP, Linux, et Novell NetWare 4.x/5.x.
Q : Le boîtier de commutation KVM prend-il en charge Microsoft IntelliMouse(r) ?
R : Oui, le Switch KVM prend en charge les souris Microsoft®, Logitech®,
Kensington®, etc. ainsi que les souris Belkin. Le Switch ne prend en charge que
2 boutons de souris. Veuillez contacter l'assistance technique de Belkin pour
obtenir réponse à vos questions concernant la compatibilité.
Q : Comment le Switch KVM permet-il à l'utilisateur de changer de port ?
R : Le Switch KVM accepte deux méthodes de sélection du port. L'utilisateur peut
sélectionner des ordinateurs en utilisant des raccourcis clavier spécialement
conçus à cet effet, ou indépendamment en appuyant sur le bouton situé sur
la face avant du Switch.
Q : Quelle est la distance maximum entre l'ordinateur et le Switch KVM ?
R : Dans le cas de connexions PS/2, le Switch KVM peut être installé à 7,6
mètres de l'ordinateur. Si votre ordinateur doit être éloigné de plus de 7,6
mètres du Switch KVM, vous pouvez utiliser le câble d'extension CAT5 de
Belkin (référence F1D084) pour étendre la distance de fonctionnement de
votre moniteur, votre clavier PS/2 et votre souris PS/2 jusqu'à 152,4 mètres
grâce à un câble UTP CAT5 standard.
FOIRE AUX QUESTIONS
P74711ea_F1DJ10x_man.indd 16-17 12/11/04 11:36:00 am
Page 26

19
Vidéo
J'obtiens des images imprécises ou fantômes sur mon écran.
• Vérifiez que tous les câbles vidéo sont correctement installés.
• Vérifiez sur votre ordinateur que le moniteur utilisé prend bien en charge la
résolution et le taux de rafraîchissement.
• Vérifiez sur votre ordinateur que la carte graphique utilisée prend bien en
charge la résolution et le taux de rafraîchissement.
• Branchez le moniteur directement sur l'ordinateur qui vous pose problème afin de
savoir si ce problème se produit toujours.
J'obtiens un écran noir.
• Vérifiez que tous les câbles vidéo sont correctement installés.
• Si vous n'utilisez pas d'adaptateur de courant, vérifiez que le câble du clavier est
correctement branché entre l'ordinateur et le Switch.
• Si vous utilisez le Switch pour la permutation vidéo uniquement et si vous ne
possèdez aucune connexion clavier ou souris entre le Switch et l’ordinateur, vous
devrez vous procurer le bloc d’alimentation 9 VCC, 600 mA (référence Belkin
F1D065-PWR, selon votre pays).
• Branchez directement le moniteur sur l'ordinateur afin de vérifier qu'il fonctionne
correctement.
DÉPANNAGE
Q : Dois-je installer un logiciel pour pouvoir utiliser le Switch KVM ?
R : Non. Le Switch KVM ne demande aucune installation de pilote ou de logiciel
sur vos ordinateurs. Il vous suffit de relier tous vos ordinateurs aux ports PC
du Switch, puis de brancher un clavier, un moniteur et une souris au port
correspondant sur la console et vous êtes prêt à l'utiliser.
Q : Le Switch a-t-il besoin d'un adaptateur de courant ?
R : Le Switch peut être alimenté via le port clavier PS/2 sur votre ordinateur. Un
bloc d’alimentation 9 VCC, 600 mA peut être utilisé lorsqu’il est impossible
pour le Switch de s’alimenter par le port PS/2 d’un ordinateur.
Q : Puis-je utiliser le Switch pour permuter uniquement les signaux vidéo ?
R : Oui, vous pouvez utiliser le Switch pour permuter uniquement les signaux
vidéo sans devoir brancher le clavier et la souris. Ces dernier doivent être
connectés directement à l'ordinateur source du signal vidéo afin de vous
assurer que votre ordinateur fonctionne correctement.
Remarque : Dans ce cas-ci, le Switch nécessite l’utilisation du bloc d’alimentation
CA facultatif, puisqu’il ne peut s’alimenter à partir de l’ordinateur via le port clavier
ou via un port USB.
Q : Quelle est la durée de garantie du Switch KVM ?
R : Le Switch KVM fait l'objet d'une garantie limitée de trois ans.
18
FOIRE AUX QUESTIONS
P74711ea_F1DJ10x_man.indd 18-19 12/11/04 11:36:00 am
Page 27

21
• Désactivez les programmes de gestion de l'énergie sur le PC qui vous cause des
problèmes.
• Esayez de changer de souris. La souris n'est pas détectée au démarrage.
• Vérifiez les câbles et assurez-vous qu'ils sont correctement insérés.
L'ordinateur démarre, mais la souris ne fonctionne pas.
• Assurez-vous que la souris est correctement branchée.
• Assurez-vous que la souris fonctionne lorsqu'elle est directement branchée sur
l'ordinateur.
Il se peut que vous deviez redémarrer l'ordinateur si vous choisissez cette solution.
• Essayez une autre souris. Lorsque je change de port, le mouvement de la souris
est complètement désordonné.
• Vérifiez qu'un seul pilote de souris est installé. Assurez-vous que le pilote est
prévu pour une souris PS/2 standard ou une souris PS/2 compatible Microsoft.
• Assurez-vous qu'aucun pilote de souris n'est chargé dans vos fichiers CONFIG.SYS
ou AUTOEXEC.BAT.
• Ne déplacez pas la souris ou n'appuyez pas sur un bouton lorsque vous changez de
port sur le Switch.
• Vous pouvez réinitialiser la souris afin d'obtenir un déplacement normal.
Débranchez-la simplement de l'avant du Switch pendant 2 ou 3 secondes, puis
rebranchez-la.
DÉPANNAGE
Clavier
L'ordinateur ne détecte aucun clavier et j'obtiens une erreur de clavier au démarrage.
• Vérifiez que le câble du clavier entre le Switch et l'ordinateur est correctement
branché. Si cela n'est pas le cas, resserrez-le.
• Esayez de changer de clavier.
• Branchez l'ordinateur sur un autre port..
• Si vous utilisez le logiciel fourni avec votre clavier, désinstallez-le, puis réinstallez
le pilote de clavier Microsoft standard.
Souris
Je perds la souris lorsque je passe à un autre canal.
• Vérifiez que la souris utilisée est correctement branchée sur le port CONSOLE du
Switch KVM.
• Si vous utilisez le pilote de souris fourni avec votre souris, désinstallez-le, puis
installez le pilote de souris Microsoft standard.
• Débranchez, puis rebranchez le câble relié au canal avec lequel vous avez des
problèmes afin de synchroniser à nouveau la connexion de la souris.
• Attachez la souris directement à l’ordinateur avec lequel vous rencontrez des
problèmes avec votre souris.
• Allouez jusqu’à 1 minute suivant le retour de l’ordinateur en mode actif avant le
retour du fonctionnement de la souris.
20
DÉPANNAGE
P74711ea_F1DJ10x_man.indd 20-21 12/11/04 11:36:00 am
Page 28

Déclaration FCC
DÉCLARATION DE CONFORMITÉ À LA RÉGLEMENTATION DE LA
FCC EN MATIÈRE DE COMPATIBILITÉ ÉLECTROMAGNÉTIQUE
Nous, Belkin Corporation, sis au 501 West Walnut Street , Compton CA, 90220,
États-Unis, déclarons sous notre seule responsabilité que les produits :
F1DJ102P, F1DJ104P
auxquels se réfèrent la présente déclaration :
Sont conformes aux normes énoncées à l'alinéa 15 de la réglementation FCC. Le
fonctionnement est assujetti aux deux conditions suivantes : (1) cet appareil ne peut
pas provoquer d'interférence nuisible et (2) cet appareil doit accepter toute interférence
reçue, y compris des interférences pouvant entraîner un fonctionnement non désiré.
Déclaration de conformité CE
Nous, Belkin Corporation, déclarons que les produits F1DJ102P et F1DJ104P auxquels se
rapporte la présente déclaration, ont été élaborés dans le respect des normes d'émissions
EN55022 ainsi que des normes d'immunité EN55024, LVP EN61000-3-2 et EN61000-3-3 en
vigueur.
ICES
This Class B digital apparatus complies with Canadian ICES-003. Cet appareil numérique de la
classe B est conforme á la norme NMB-003 du Canada.
23
INFORMATION
Général
Mon ordinateur ne démarre pas lorsqu'il est connecté au Switch, mais fonctionne
correctement lorsque je branche le clavier, le moniteur et la souris directement sur
l'ordinateur.
• Assurez-vous que les câbles du clavier et de la souris sont biens en place entre le
Switch et l'ordinateur.
• Assurez-vous que les cordons du clavier et de la souris ne sont pas inversés,
comme par exemple le cordon du clavier dans le port souris et vice versa.
22
DÉPANNAGE
P74711ea_F1DJ10x_man.indd 22-23 12/11/04 11:36:01 am
Page 29

Garantie du produit limitée de 3 ans de Belkin.
Belkin Corporation garantit ce produit contre tout défaut matériel ou de fabrication
pendant toute sa période de garantie. Si l'appareil s'avère défectueux, Belkin le réparera ou
le remplacera gratuitement, à sa convenance, à condition que le produit soit retourné,
port payé, pendant la durée de la garantie, au dépositaire Belkin agréé auprès duquel le
produit a été acheté. Une preuve d'achat peut être exigée.
La présente garantie est caduque si le produit a été endommagé par accident, abus, usage
impropre ou mauvaise application, si le produit a été modifié sans autorisation écrite de
Belkin, ou si un numéro de série Belkin a été supprimé ou rendu illisible.
LA GARANTIE ET LES VOIES DE RECOURS SUSMENTIONNÉES FONT FOI EXCLUSIVEMENT
ET REMPLACENT TOUTES LES AUTRES, ORALES OU ÉCRITES, EXPLICITES OU IMPLICITES.
BELKIN REJETTE EXPRESSÉMENT TOUTES LES GARANTIES IMPLICITES, Y COMPRIS MAIS SANS
RESTRICTION, LES GARANTIES AFFÉRENTES À LA QUALITÉ LOYALE ET MARCHANDE ET À LA
POSSIBILITÉ D'UTILISATION À UNE FIN DONNÉE.
Aucun dépositaire, représentant ou employé de Belkin n'est habilité à apporter des modifi
-
cations ou adjonctions à la présente garantie, ni à la proroger.
BELKIN N'EST PAS RESPONSABLE DES DOMMAGES SPÉCIAUX, DIRECTS OU INDIRECTS,
DÉCOULANT D'UNE RUPTURE DE GARANTIE, OU EN VERTU DE TOUTE AUTRE THÉORIE
JURIDIQUE, Y COMPRIS MAIS SANS RESTRICTION LES PERTES DE BÉNÉFICES, TEMPS D'ARRÊT,
FONDS DE COMMERCE, REPROGRAMMATION OU REPRODUCTION DE PROGRAMMES OU DE
DONNÉES MÉMORISÉS OU UTILISÉS AVEC DES PRODUITS BELKIN OU DOMMAGES CAUSÉS À
CES PROGRAMMES OU À CES DONNÉES.
Certains pays ne permettent pas d'exclure ou de limiter les dommages accidentels ou con
sécutifs ou les exclusions de garanties implicites, de sorte que les limitations d'exclusions
ci-dessus ne s'appliquent pas dans votre cas. La garantie vous confère des droits légaux
spécifiques. Vous pouvez également bénéficier d'autres droits qui varient d'un pays à
l'autre.
24
INFORMATION
P74711ea_F1DJ10x_man.indd 24-25 12/11/04 11:36:01 am
Page 30

Belkin Ltd.
Express Business Park • Shipton Way
Rushden • NN10 6GL • Royaume-Uni
Tel: +44 (0) 1933 35 2000
Fax: +44 (0) 1933 31 2000
Belkin B.V.
Starparc Building • Boeing Avenue 333
1119 PH Schiphol-Rijk • Pays-Bas
Tel: +31 (0) 20 654 7300
Fax: +31 (0) 20 654 7349
Belkin GmbH
Hanebergstrasse 2
80637 Munich • Allemagne
Tel: +49 (0) 89 143405 0
Fax: +49 (0) 89 143405 100
Belkin SAS
5 Rue du Petit Robinson • 3ème étage
78350 Jouy en Josas • France
Tel: +33 (0) 1 34 58 14 00
Fax: +33 (0) 1 39 46 62 89
Assistance technique Belkin
Europe: 00 800 223 55 460
© 2004 Belkin Corporation. Tous droits réservés. Toutes les raisons
commerciales sont des marques déposées de leurs fabricants respectifs.
Switch KVM
De
F1DJ102P-B
F1DJ104P-B
Benutzerhandbuch
Steuern Sie bis zu vier PS/2-Computer mit
einem Monitor, einer Tastatur und Maus
KVM-Switch
P74711ea_F1DJ10x_man.indd 2-3 12/11/04 11:36:07 am
Page 31

Wir beglückwünschen Sie zum Kauf dieses Belkin KVM-Switches.
Die vielfältige Palette marktführender KVM-Lösungen von Belkin zeigt die hohen
Qualitätsansprüche, die wir an uns stellen. Der Name Belkin steht für hochwertige,
langlebige Produkte zu einem günstigen Preis. Mit KVM-Switches von Belkin
steuern Sie mehrere Computer bzw. Server von einer Konsole aus. Die KVM-Switches
von Belkin sind in unterschiedlichen Ausführungen für alle großen und kleinen
Konfigurationen erhältlich. Für diesen Switch erhalten Sie von Belkin drei Jahre
Garantie und kostenlosen technischen Support.
Dieses Handbuch beschreibt Ihren neuen Switch detailliert: Von der Installation
über die Bedienung bis zur Fehlerbehebung,—sollte einmal ein Problem auftreten.
Benutzen Sie für eine einfache Installation die Installationsanleitung, die in der
Packung Ihres Switches enthalten ist.
Wir freuen uns, dass Sie sich für den KVM-Switch von Belkin entschieden haben. Wir
hoffen, Sie zu unseren zufriedenen Stammkunden zählen zu können.
Verpackungsinhalt
• KVM-Switch
• Benutzerhandbuch
• Installationsanleitung
• OmniView KVM-Kabelsätze
EINFÜHRUNG
1
Einführung
Verpackungsinhalt
. . . . . . . . . . . . . . . . . . . . . . . . . . . . . . . . . . . . . . . .1
Übersicht
Merkmale
. . . . . . . . . . . . . . . . . . . . . . . . . . . . . . . . . . . . . . . . . . . . . .2
Systemvoraussetzungen . . . . . . . . . . . . . . . . . . . . . . . . . . . . . . . . . . . .
3
Betriebssysteme . . . . . . . . . . . . . . . . . . . . . . . . . . . . . . . . . . . . . . . . .
4
Bestandteile
. . . . . . . . . . . . . . . . . . . . . . . . . . . . . . . . . . . . . . . . . . . .5
Technische Daten . . . . . . . . . . . . . . . . . . . . . . . . . . . . . . . . . . . . . . . .
7
Installation
Vorbereitung des Geräts
. . . . . . . . . . . . . . . . . . . . . . . . . . . . . . . . . . . .8
Einzelschrittanweisungen zur Installation
. . . . . . . . . . . . . . . . . . . . . . . .9
Verwenden des Switches
Hochfahren der Computer
. . . . . . . . . . . . . . . . . . . . . . . . . . . . . . . . . . 14
AutoScan-Modus
. . . . . . . . . . . . . . . . . . . . . . . . . . . . . . . . . . . . . . . . 15
Fragen und Antworten
. . . . . . . . . . . . . . . . . . . . . . . . . . . . . . . . . . . . . . 16
Fehlerbehebung
. . . . . . . . . . . . . . . . . . . . . . . . . . . . . . . . . . . . . . . . . . . 19
Rechtliche Hinweise . . . . . . . . . . . . . . . . . . . . . . . . . . . . . . . . . . . . . . .
23
INHALTSVERZEICHNIS
P74711ea_F1DJ10x_man.indd 4-1 12/11/04 11:36:07 am
Page 32

Systemvoraussetzungen
Kabel
Für den Anschluss an den Switch wird für jeden PS/2-Computer ein VGA-Kabel, ein
PS/2-Tastaturkabel und ein PS/2-Mauskabel benötigt. Die Tastatur- und Mauskabel
müssen jeweils mit zwei PS/2-Steckern versehen sein. Zur Unterstützung von
Bildschirmauflösungen von bis zu 1920 x 1440@65Hz wird ein 75-Ohm VGAKoaxialkabel benötigt, um die Signalintegrität zu gewährleisten. Die Kabel müssen
eine HDDB15-Buchse und einen HDDB15-Stecker besitzen. Belkin OmniView KVMKabel bieten die höchstmögliche Qualität und sorgen
für eine optimale Datenübertragung. Die farbliche Markierung der Anschlüsse nach
dem Standard PC99 vereinfacht die Installation der KVM-Kabel. Die Kabel aus der
E-Serie sind mit einem 14-poligen VGA-Koaxialkabel nach Industriestandard
mit Zugentlastung, Ferritperle und vernickelten Abschlusskontakten für hohe
Auflösungen ausgestattet.
Wir empfehlen Ihnen den folgenden Kabelsatz, der beim Kauf Ihres KVM-Switches
mitgeliefert wird:
F1D9000-XX OmniView E-Serie KVM-Kabelsatz (PS/2-Ausführung)
(-XX Länge in Fuß)
ÜBERSICHT
3
Mit dem KVM-Switch von Belkin können Sie mehrere Computer mit nur einer
Tastatur, einem Bildschirm und einer Maus steuern. Der Switch unterstützt PS/2Eingabegeräte (Tastatur und Maus), VGA-, SVGA-, XGA- und PS/2-Computer.
Merkmale
Tastaturbefehle
Die Auswahl der Schnittstelle erfolgt mit Hilfe von Tastaturbefehlen (Hot Keys) über
die Tastatur. Steuern Sie mehrere Computer mit einer einfachen Tastenkombination
auf Ihrer Tastatur.
AutoScan
Mit der AutoScan-Funktion kann der Switch die Aktivitäten aller betriebsbereiten
Computer, die am Switch angeschlossen sind, automatisch abfragen und
überwachen.
Bildschirmauflösung
Mit einer Bandbreite von 200 MHz kann der Switch Bildschirmauflösungen von bis
zu 1920 x 1440@65Hz unterstützen. Damit bei hoher Auflösung die Signalintegrität
gesichert bleibt, wird ein 75-Ohm VGA-Koaxialkabel benötigt.
Drucktaste an der Vorderseite
Mit einer Drucktaste, die bequem auf dem Bedienfeld des Switches angebracht ist,
können Sie Schnittstellen einfach und manuell auswählen.
Diodendisplay
Die Anzeigen an der Vorderseite des Switches zeigen Ihnen den Status an. Die LEDs,
die sich links und rechts von der Drucktaste auf dem Bedienfeld befinden, leuchten
auf, um anzuzeigen, welche Schnittstelle gerade ausgewählt ist.
ÜBERSICHT
2
P74711ea_F1DJ10x_man.indd 2-3 12/11/04 11:36:07 am
Page 33

5
ÜBERSICHT
AnschlussStatusanzeigen
Vorderseitendrucktaste
Der 2-Port KVM-Switch:
Konsolentastaturund -Mausschnittstellen
Netzteilanschluss
Computer 2 Schnittstellen
Bestandteile
Konsolen-VGASchnittstelle
Computer 1 Schnittstellen
Betriebssysteme
Der Switch ist auf folgende Computer-Plattformen ausgelegt:
Plattformen
• Windows® 95, 98, 2000, Me, NT®, XP
• DOS
• Linux®
• Novell® NetWare® 4.x/5.x
Tastaturen
• Unterstützt 101 / 102 / und 104 Tasten
Mäuse
• Microsoft®- systemkompatible PS/2-Mäuse mit 2, 3, 4, oder 5 Tasten
Monitore
• VGA
• SVGA
• MultiSync®
Optionales Netzteil
Ein Netzteil (9 V, 600 mA) kann bei Bedarf benutzt werden Besuchen Sie unsere
Website belkin.com, wenn Sie genauere Informationen zur Bestellung wünschen.
ÜBERSICHT
4
P74711ea_F1DJ10x_man.indd 4-5 12/11/04 11:36:08 am
Page 34

Technische Daten
Artikelnr.: F1DJ102P, F1DJ104P
Stromversorgung:
Optionaler Adapter (9 V Gleichstrom, 600 mA), Mittenkontakt positiv
Unterstützte PCs: F1DJ102P: 2
F1DJ104P: 4
Tastaturemulation: PS/2
Mausemulation: PS/2 und seriell (unter Verwendung eines Adapters)
Unterstützte Monitore: VGA, SVGA, MultiSync und LCD (unter Verwendung eines
Adapterkabels)
Max. Auflösung: 1940x1440@65Hz
Tastatureingang: MiniDIN 6-polig (PS/2)
Mauseingangf"OfficinaSans-Book">: MiniDIN 6-polig (PS/2)
VGA-Anschluss: HDDB 15-polig
LED-Anzeigen: F1DJ102P: 2
F1DJ104P: 4
Gehäuse: Kunststoff
Abmessungen: F1DJ102P: (L) 11,5 x (B) 7,5 x (H) 2,5 cm
F1DJ104P: (L) 19 x (B) 7,5 x (H) 2,5 cm
Gewicht: F1DJ102P: 3.2oz.
F1DJ104P: 6.4oz.
Garantie: 3 Jahre
Hinweis: Unangekündigte technische Änderungen jederzeit vorbehalten.
7
ÜBERSICHT
6
ÜBERSICHT
AnschlussStatusanzeigen
Vorderseitendrucktaste
Der 4-Port KVM-Switch:
Konsolentastaturund -Mausschnittstellen
Netzteilanschluss
Computer 3
Schnittstellen
Computer 2 Schnittstellen
Konsolen-VGA-Schnittstelle
Computer 1 Schnittstellen
Computer 4 Schnittstellen
P74711ea_F1DJ10x_man.indd 6-7 12/11/04 11:36:08 am
Page 35

Einzelschrittanweisungen zur Installation
In diesem Abschnitt wird die Hardware-Installation eines Switches (Einzelgerät)
beschrieben.
Wichtige Hinweise
Bevor Sie Geräte an den Switch oder einen der Computer anschließen, müssen
Sie unbedingt alle Einheiten ausschalten. Das Anschließen oder Herausziehen von
Kabeln bei eingeschaltetem Computer kann zu irreparablen Schäden am Computer,
an Datenbeständen bzw. Switch führen. Die Belkin Corporation übernimmt keinerlei
Haftung für Schäden, die auf diese Weise verursacht werden.
Konsolenanschluss
1. Schließen Sie Ihre PS/2-Tastatur und
die PS/2-Maus an die Schnittstellen
KEYBOARD (Tastatur) und MOUSE
(Maus) an der Seite
des Switches an.
9
INSTALLATION
INSTALLATION
8
Vorbereitung des Geräts
Austellung des Switches
Der Switch kann auf dem Schreibtisch aufgestellt werden. Die genaue Aufstellung ist
abhängig von der Aufstellung Ihrer Computer und der Länge Ihrer Kabel.
Zulässige Kabellängen
Für PS/2-Computer: VGA-Signale werden am besten über Entfernungen von bis zu
7,5 m übertragen. Bei mehr als 7,5 m kann sich die Bildqualität je nach Abstand
verschlechtern. Aus diesem Grunde sollte Ihr PS/2-Computer innerhalb eines
Abstands von 7,5 m von Ihrem KVM-Switch aufgestellt werden.
Hinweis: Werden größere Abstände gewünscht, benötigen Sie eine Belkin CAT5Verlängerung (Artikelnr. F1D084). Mit diesem Zubehör können Sie über ein
standardmäßiges CAT5 UTP-Kabel PS/2-Tastatur, PS/2-Maus und Monitor in einem
maximalen Abstand von 152,5 aufzustellen.
Warnhinweise
Kabel sollten nicht in der Nähe von fluoreszierenden Lichtquellen, Klimaanlagen
oder Geräten, die elektrische Störeinflüsse hervorrufen (z.B. Staubsauger) verlegt
werden.
INSTALLATION
P74711ea_F1DJ10x_man.indd 8-9 12/11/04 11:36:09 am
Page 36

Computeranschluss:
3. Benutzen Sie ein OmniView KVM-Kabel. Schließen Sie den Stecker des VGA-
Kabels an die VGA-Schnittstelle des ersten Computers an. Schließen Sie die
Buchse an die VGA-1-Schnittstelle an der Seite des Switches an.
11
INSTALLATION
2. Schließen Sie das Bildschirmkabel Ihres Monitors an die Grafikschnittstelle
VGA OUT an der Seite des Switches an.
10
INSTALLATION
P74711ea_F1DJ10x_man.indd 10-11 12/11/04 11:36:09 am
Page 37

5. Schließen Sie das PS/2-KVM-Mauskabel an die Mausschnittstelle des Computers
und an die MOUSE 1 Schnittstelle an der Seite des Switches an.
Wiederholen Sie die Schritte 3 bis 5 für jeden weiteren Computer, den
Sie an den Switch anschließen möchten, und verwenden Sie hierzu die
entsprechenden Computerschnittstellen („CPU") an der Seite.
13
INSTALLATION
4. Schließen Sie das PS/2-KVM-Tastaturkabel an die Tastaturschnittstelle
des Computers und an die KEYBOARD 1 Schnittstelle an der Seite
des Switches an.
12
INSTALLATION
P74711ea_F1DJ10x_man.indd 12-13 12/11/04 11:36:12 am
Page 38

Sie können direkt zu einer bestimmten Schnittstelle schalten, indem Sie die
Nummer der Switch-Schnittstelle eingeben. Wenn Sie z.B. „Rollen-Taste“, „RollenTaste“, „2“ drücken, wird der Computer an Schnittstelle 2 ausgewählt.
AutoScan-Modus
Im AutoScan-Modus verbleibt der Switch acht Sekunden lang an einer Schnittstelle,
bevor er zur nächsten schaltet. Dieses Intervall kann nicht geändert werden.
Drücken Sie „Rollen-Taste“, „Rollen-Taste“ und die Taste „S“, um den AutoScanModus zu aktivieren.
Hinweis: Um Fehler zu vermeiden, ist in diesem Modus absichtlich die Maus und die
Tastatur deaktiviert. Wenn sie aktiviert wären, könnte der Benutzer die Maus bewegen
oder die Tastatur verwenden, während der KVM-Switch zur nächsten Schnittstelle
schaltet. Das könnte die Datenübertragung zwischen dem Computer und dem Switch
unterbrechen, was zu fehlerhaften Mausbewegungen oder falschen Tastatureingaben
führen könnte.
Um den AutoScan-Modus zu beenden, drücken Sie die Leertaste.
15
VERWENDEN DES SWITCHES
+
+
Schnittstelle 2—(02)
Hochfahren der Computer
Sobald alle Kabel angeschlossen sind, können Sie die an den Switch
angeschlossenen Computer hochfahren. Alle Computer können gleichzeitig
eingeschaltet werden. Der Switch emuliert an jeder Schnittstelle eine Maus
und eine Tastatur und ermöglicht Ihrem Computer einen normalen Systemstart.
Ihr Switch ist jetzt einsatzbereit. Sie können einen angeschlossenen Computer
wahlweise mit der Drucktaste auf der Oberseite des Switches oder über die
Computertastatur auswählen. Bitte beachten Sie, dass es ein bis zwei Sekunden
dauert, bis die Bildschirmanzeige wechselt, da die Bildschirmsignale aktualisiert
werden müssen. Außerdem werden Maus- und Tastatursignal neu synchronisiert.
Dies ist die normale Auswirkung einer Funktion, die für eine ordnungsgemäße
Synchronisierung sorgt. Sie können mit einer einfachen Tastenfolge bequem
zwischen den Schnittstellen am Switch wechseln. Verwenden Sie hierzu die Taste
„Rollen“ („Scroll Lock“) und die obere und untere Pfeiltaste. Um Befehle an den
Switch zu senden, müssen Sie die Rollen-Taste innerhalb von zwei Sekunden
zweimal drücken. Dies wird durch einen Signalton bestätigt. Danach können Sie mit
der oberen und unteren Pfeiltaste zwischen den beiden Schnittstellen umschalten.
14
VERWENDEN DES SWITCHES
Nächste aktive Schnittstelle
Pfeil-nach-oben
Vorherige aktive Schnittstelle
Pfeil-nach-unten
P74711ea_F1DJ10x_man.indd 14-15 12/11/04 11:36:15 am
Page 39

17
F: Welche Bildschirmauflösung wird vom Switch maximal unterstützt?
A: Das fortschrittliche Grafikmodul des Switches ermöglicht Auflösungen bis zu
1940 x 1440@65Hz. Die höhere Auflösung ist ideal für Grafikkünstler und
Designer, die ein Bild mit Spitzenqualität brauchen.
F: Welche Videobandbreite unterstützt der KVM-Switch?
A: Der Switch unterstützt eine Videobandbreite von 200 MHz.
F: Worin unterscheiden sich der KVM-Switch und der KVM-Switch aus der Soho-Serie?
A: The KVM-Switch aus der SoHo-Serie bietet zusätzliche Audio- und
Mikrofonunterstützung; ein platzsparendes, elegantes Design; Kabelführung;
Flash-Aktualisierung und ist USB-fähig.
F: Welche Vorzüge hat der Belkin KVM-Switch gegenüber ähnlichen
Produkten anderer Hersteller?
A: Der Belkin KVM-Switch ist eine preiswerte Lösung mit Funktionen, über
die andere Geräte im höheren Preisniveau verfügen. Der Belkin KVM-Switch
verfügt über Tastaturbefehle (Hot Keys) zum Umschalten, unterstützt
Bildschirmauflösungen von bis zu 1940 x 1440@65Hz, AutoScan-Funktion,
und hat drei Jahre beschränkte Garantie von Belkin—all das bei einem
erschwinglichen Preis.
F: Kann ich den Switch mit meinem Sun Computer benutzen?
A: Ja, der Switch ist kompatibel zu Sun-Computern, wenn ein Belkin Sun Adapter
benutzt wird, Artikelnummer F1D082.
FRAGEN UND ANTWORTEN
16
F: Welche Betriebssysteme werden durch den Switch unterstützt?
A: Der Switch unterstützt alle PS/2-fähigen Betriebssysteme. Er eignet sich auch
für Sun- und Mac-Betriebssysteme wenn die entsprechenden Adapter benutzt
werden (Belkin OmniView Sun Adapter F1D082, OmniView Mac Adapter F1D080).
Es können u.a. die folgenden Betriebssysteme benutzt werden: DOS, Windows
3.x, 95, 98, 2000, Me, NT, XP, Linux, and Novell NetWare 4.x/5.x.
F: Unterstützt der Switch die Microsoft IntelliMouse®?
A: Ja, der Switch ist kompatibel zu Microsoft, Logitech, Kensington und allen
Belkin Mäusen. Der Switch unterstützt nur zwei Maustasten. Sollten Sie Fragen
zur Kompatibilität haben, wenden Sie sich bitte an den Technischen Support
von Belkin.
F: Wie kann ich zwischen den verschiedenen Schnittstellen umschalten?
A: Sie können Schnittstellen auf zwei verschiedene Arten auswählen. Benutzer/
innen können Computer mit speziellen Tastaturbefehlen (Hot Keys) wählen
oder indem Sie die Drucktaste an der Vorderseite benutzen.
F: Wie groß darf der Abstand zwischen Computer und Switch sein?
A: Bei PS/2-Verbindungen kann der Switch bis zu 7,5 m entfernt vom Computer
aufgestellt werden. Werden größere Abstände gewünscht, benötigen Sie eine
Belkin CAT5-Verlängerung (Artikelnr. F1D084). Mit diesem Zubehör können
Sie über ein standardmäßiges CAT5 UTP-Kabel PS/2-Tastatur, PS/2-Maus und
Monitor in einem maximalen Abstand von 152,5 aufzustellen.
FRAGEN UND ANTWORTEN
P74711ea_F1DJ10x_man.indd 16-17 12/11/04 11:36:16 am
Page 40

19
Bildschirm
Das Bild ist verschwommen oder Geisterbilder bzw. Schatten werden angezeigt.
• Überprüfen Sie, ob alle Bildschirmkabel ordnungsgemäß angeschlossen wurden.
• Überprüfen Sie, ob der verwendete Bildschirm die Auflösung und
Aktualisierungsrate unterstützt, die auf Ihrem Computer eingestellt wurde.
• Überprüfen Sie, ob die verwendete Grafikkarte die Auflösung und
Aktualisierungsrate unterstützt, die auf Ihrem Computer eingestellt wurde.
• Schließen Sie den Bildschirm direkt an den Computer an, und überprüfen Sie, ob
das Problem weiterhin auftritt. Der Bildschirm bleibt dunkel.
• Überprüfen Sie, ob alle Bildschirmkabel ordnungsgemäß angeschlossen wurden.
• Wenn Sie ohne Netzteil arbeiten, überprüfen Sie, ob das Tastaturkabel korrekt am
Computer und am Switch angeschlossen ist.
• Wenn Sie den Switch nur für Bildschirmumschaltung verwenden und keine
Tastatur- und Mausverbindung zwischen dem Switch und dem Computer besteht,
sollten Sie ein Netzteil (9 V Gleichstrom, 600 mA) (Belkin Artikelnummer F1D065PWR entsprechend Ihres Landes) kaufen.
• Schließen Sie den Bildschirm direkt an den Computer an, und überprüfen Sie, ob
der Bildschirm ordnungsgemäß funktioniert.
FEHLERBEHEBUNG
F: Muss ich für den KVM-Switch Software installieren?
A: Nein. Für den KVM-Switch müssen weder Treiber noch andere Software
installiert werden. Verbinden Sie einfach alle Computer mit den PCSchnittstellen am KVM-Switch, und schließen Sie eine Tastatur, einen
Bildschirm und eine Maus an die entsprechende Konsolenschnittstelle an. Der
KVM-Switch ist jetzt betriebsbereit.
F: Wird für den Switch ein Netzteil benötigt?
A: Der Switch kann über eine PS/2-Tastaturschnittstelle Ihres Computers mit
Strom versorgt werden. Ein Netzteil (9V Gleichstrom, 600 mA) kann benutzt
werden, wenn die Stromzufuhr über einen PS/2-Anschluss Ihres Computers
nicht möglich ist.
F: Kann ich den Switch ausschließlich zum Umschalten von Bildschirmsignalen
verwenden?
A: Ja, Sie können den Switch als reinen Bildschirmumschalter einsetzen,
ohne eine Tastatur oder eine Maus anzuschließen. In diesem Fall müssen
Sie Tastatur und Maus direkt an den Computer anschließen, von dem die
Bildschirmsignale stammen, damit der Computer fehlerfrei arbeiten kann.
Hinweis: In diesem Fall ist ein zusätzliches Netzteil erforderlich, da keine
Stromzufuhr über die Tastatur oder den USB-Anschluss möglich ist.
F: Wie lange ist die Garantiezeit für den Switch?
A: Auf den KVM-Switch gewähren wir fünf Jahre eingeschränkte Garantie.
18
FRAGEN UND ANTWORTEN
P74711ea_F1DJ10x_man.indd 18-19 12/11/04 11:36:16 am
Page 41

21
• Es kann eine Minute dauern, bis die Maus wieder funktioniert, wenn der Computer
im Standby-Modus gewesen ist.
• Deaktivieren Sie Energiesparmodi des Computers, bei welchem Probleme auftreten.
• Benutzen Sie eine andere Maus. Die Maus wird beim Systemstart nicht erkannt.
• Überprüfen Sie die Kabel, und stellen Sie sicher, dass sie richtig angeschlossen
sind. Der Computer fährt ganz normal hoch, aber die Maus funktioniert nicht.
• Überprüfen Sie, ob die Maus richtig angeschlossen ist.
• Stellen Sie sicher, dass die Maus funktioniert, wenn Sie direkt an den Computer
angeschlossen ist. Hierzu müssen Sie möglicherweise einen Neustart durchführen.
• Probieren Sie eine andere Maus aus. Wenn ich zu einem anderen Anschluss
umschalte, bewegt sich die Maus ruckartig und lässt sich nicht mehr ordentlich
steuern.
• Stellen Sie sicher, dass nicht mehr als ein Maustreiber installiert ist. Stellen Sie
sicher, dass der Treiber entweder für eine Standard-PS/2 oder eine Microsoftkompatible PS/2-Maus geeignet ist.
• Stellen Sie sicher, dass in den Dateien config.sys und autoexec.bat keine
Maustreiber geladen werden.
• Beim Umschalten zwischen den Schnittstellen des Switches darf die Maus nicht
bewegt oder betätigt werden.
• Sie können die Maus zurücksetzen und störungsfrei weiterarbeiten, indem Sie
die Maus für zwei bis drei Sekunden vom Switch entfernen und dann wieder
einstecken.
FEHLERBEHEBUNG
Tastatur
Der Computer erkennt die Tastatur nicht, und es wird beim Systemstart ein
Tastaturfehler gemeldet.
• Überprüfen Sie, ob das Kabel sicher am Switch und am Computer angeschlossen
ist. Befestigen Sie lose Verbindungen.
• Benutzen Sie eine andere Tastatur.
• Schließen Sie den Computer an eine andere Schnittstelle an.
• Wenn Sie die Tastatursoftware verwenden, die Sie mit der Tastatur erhalten haben,
deinstallieren Sie die Software. Installieren Sie den standardmäßigen Microsoft
Tastaturtreiber.
Maus
Wenn ich zu einem anderen Kanal umschalte, wird die Maus nicht mehr erkannt.
• Überprüfen Sie, ob die verwendete Maus ordnungsgemäß an die
Konsolenschnittstelle des Switches angeschlossen wurde.
• Wenn Sie den Maustreiber verwenden, den Sie mit der Maus erhalten haben,
deinstallieren Sie ihn. Installieren Sie dann einen standardmäßigen Microsoft
Maustreiber.
• Lösen Sie das Kabel des Kanals, an dem die Probleme auftreten, und schließen Sie
es wieder an, um die Mausverbindung neu zu synchronisieren.
• Schließen Sie die Maus direkt an den Computer, an welchem die Mausprobleme
auftreten, an.
20
FEHLERBEHEBUNG
P74711ea_F1DJ10x_man.indd 20-21 12/11/04 11:36:16 am
Page 42

FCC-Erklärung
KONFORMITÄTSERKLÄRUNG ZUR EINHALTUNG DER FCC-
BESTIMMUNGEN ÜBER ELEKTROMAGNETISCHE KOMPATIBILITÄT
Wir, Belkin Corporation, eine Gesellschaft mit Sitz in 501 West Walnut Street,
Compton, CA 90220, USA, erklären hiermit in alleiniger Verantwortung, dass
diese Produkte mit der Artikel Nr.
F1DJ102P, F1DJ104P
auf die sich diese Erklärung bezieht,
in Einklang mit Teil 15 der FCC- Regelungen steht. Der Betrieb unterliegt den
beiden folgenden Bedingungen: (1) Dieses Gerät darf schädigende Störungen nicht
verursachen, und (2) dieses Gerät muss jedwede Störung annehmen, einschließlich
der Störungen, die einen unerwünschten Betrieb verursachen könnten.
CE-Konformitätserklärung
Wir, Belkin Corporation, erklären hiermit in alleiniger Verantwortung, dass die Artikel
F1DJ102P und F1DJ104P, auf die sich diese Erklärung bezieht, in Einklang mit der
Fachgrundnorm Störaussendung EN55022 und der Europanorm für die Störfestigkeit
EN55024, LVP EN61000-3-2 und EN6100-3-3 stehen.
ICES-Erklärung
Dieses Digitalgerät der Klasse B entspricht der kanadischen Richtlinie ICES-003. Cet appareil
numérique de la classe B est conforme á la norme NMB-003 du Canada.
23
RECHTLICHE HINWEISE
Allgemeine Probleme
Mein Computer fährt nicht hoch, wenn er an den Switch angeschlossen ist,
funktioniert aber einwandfrei, wenn ich Tastatur, Bildschirm und Maus direkt an den
Computer anschließe.
• Stellen Sie sicher, dass Tastatur- und Mauskabel korrekt am Switch und am
Computer angeschlossen sind.
• Überprüfen Sie, dass Tastatur und Mauskabel nicht vertauscht sind. Die Stecker
müssen an den entsprechenden Anschlüssen angeschlossen sein.
22
FEHLERBEHEBUNG
P74711ea_F1DJ10x_man.indd 22-23 12/11/04 11:36:16 am
Page 43

Belkin Corporation Drei Jahre eingeschränkte Produktgarantie
Belkin Corporation gewährleistet hiermit, dass dieses Produkt während des Garantiezeitraums
keine Verarbeitungs- und Materialfehler aufweist. Bei Feststellung eines Fehlers wird Belkin
das Produkt nach eigenem Ermessen entweder kostenlos reparieren oder austauschen, sofern
es während des Garantiezeitraums ausreichend frankiert an den autorisierten Belkin-Händler
zurückgegeben wurde, bei dem es erworben wurde. Ein Kaufnachweis kann verlangt werden.
Diese Garantie erstreckt sich nicht auf die Beschädigung des Produkts durch Unfall, miss
bräuchliche, unsachgemäße oder fehlerhafte Verwendung oder Anwendung. Ebenso ist
die Garantie unwirksam, wenn das Produkt ohne schriftliche Genehmigung durch Belkin
verändert oder wenn eine Belkin-Seriennummer entfernt oder unkenntlich gemacht wurde.
DIE VORSTEHENDEN GARANTIEBEDINGUNGEN UND RECHTSBEHELFE SCHLIESSEN ALLE ANDEREN
GEWÄHRLEISTUNGEN UND RECHTSBEHELFE — OB MÜNDLICH ODER SCHRIFTLICH, AUSDRÜCKLICH
ODER KONKLUDENT — AUS UND TRETEN AN DEREN STELLE. BELKIN ÜBERNIMMT INSBESONDERE
KEINERLEI KONKLUDENTE GEWÄHRLEISTUNGEN, U.A. AUCH KEINE GEWÄHRLEISTUNG DER
EIGNUNG FÜR EINEN BESTIMMTEN ZWECK ODER DER HANDELSÜBLICHEN QUALITÄT.
Kein Händler, Bevollmächtigter bzw. Vertreter oder Mitarbeiter von Belkin ist befugt,
diese Gewährleistungsregelung in irgendeiner Weise abzuändern oder zu ergänzen.
BELKIN HAFTET NICHT FÜR BESONDERE, DURCH ZUFALL EINGETRETENE ODER FOLGESCHÄDEN
AUFGRUND DER VERLETZUNG EINER GEWÄHRLEISTUNG ODER NACH MASSGABE EINER
ANDEREN RECHTSLEHRE (U.A. FÜR ENTGANGENE GEWINNE, AUSFALLZEITEN, GESCHÄFTSUND FIRMENWERTEINBUSSEN BZW. DIE BESCHÄDIGUNG, NEUPROGRAMMIERUNG ODER
WIEDERHESTELLUNG VON PROGRAMMEN ODER DATEN NACH SPEICHERUNG IN ODER NUTZUNG
IN VERBINDUNG MIT BELKIN-PRODUKTEN).
In manchen Staaten sind Einschränkungen bezüglich der Dauer der Garantie nicht erlaubt.
Die oben erwähnten Einschränkungen treffen für Sie dementsprechend nicht zu. Diese
Garantie räumt Ihnen spezifische Rechte ein, die von Land zu Land unterschiedlich ausge
-
staltet sein können.
24
RECHTLICHE HINWEISE
P74711ea_F1DJ10x_man.indd 24-25 12/11/04 11:36:16 am
Page 44

Belkin Ltd.
Express Business Park • Shipton
Way Rushden
• NN10 6GL • Großbritannien
Tel: +44 (0) 1933 35 2000
Fax: +44 (0) 1933 31 2000
Belkin B.V.
Starparc Building • Boeing Avenue 333
1119 PH Schiphol-Rijk • Niederlande
Tel: +31 (0) 20 654 7300
Fax: +31 (0) 20 654 7349
Belkin GmbH
Hanebergstrasse 2
80637 München • Deutschland
Tel: +49 (0) 89 143405 0
Fax: +49 (0) 89 143405 100
Belkin SAS
5 Rue du Petit Robinson • 3ème étage
78350 Jouy en Josas • Frankreich
Tel: +33 (0) 1 34 58 14 00
Fax: +33 (0) 1 39 46 62 89
Belkin Technischer Support
Europa: 00 800 223 55 460
© 2004 Belkin Corporation. Alle Rechte vorbehalten.
Alle Produktnamen sind eingetragene Warenzeichen der angegebenen Hersteller.
KVM-Switch
Nl
F1DJ102P-B
F1DJ104P-B
Handleiding
Beheer tot wel vier PS/2-computers met
slechts één monitor, toetsenbord en muis
KVM-switch
P74711ea_F1DJ10x_man.indd 2-3 12/11/04 11:36:23 am
Page 45

Gefeliciteerd met de aankoop van de KVM-switch van Belkin (de switch).
Ons uitgebreide programma KVM-oplossingen bewijst de inzet van Belkin,
marktleider op dit gebied, om duurzame producten van hoge kwaliteit te leveren
voor een aantrekkelijke prijs. Met de KVM-switches van Belkin kunt u meerdere
computers en/of servers vanaf één console beheren. Ze zijn leverbaar in een groot
aantal uitvoeringen, zowel voor kleine als voor zeer grote configuraties en Belkin
geeft op deze switches vijf jaar garantie en kostenloos technische ondersteuning.
In deze handleiding vindt u alle gewenste informatie over uw nieuwe switch, vanaf
de installatie en de bediening tot en met het oplossen van problemen—in het
onwaarschijnlijke geval van een storing. Voor meer informatie over het installeren
van uw switch kunt u terecht in de Beknopte Installatiehandleiding.
Wij danken u hartelijk voor uw aankoop van de KVM-switch van Belkin.
Inhoud van de verpakking
• KVM-switch
• Handleiding
• Beknopte installatiehandleiding
• OmniView™ KVM-kabelsets
INLEIDING
1
Inleiding
Inhoud van de verpakking . . . . . . . . . . . . . . . . . . . . . . . . . . . . . . . . . .
1
Overzicht
Productkenmerken
. . . . . . . . . . . . . . . . . . . . . . . . . . . . . . . . . . . . . . . .2
Vereisten
. . . . . . . . . . . . . . . . . . . . . . . . . . . . . . . . . . . . . . . . . . . . . .3
Besturingssystemen
. . . . . . . . . . . . . . . . . . . . . . . . . . . . . . . . . . . . . . .4
Productafbeeldingen . . . . . . . . . . . . . . . . . . . . . . . . . . . . . . . . . . . . . .
5
Technische gegevens
. . . . . . . . . . . . . . . . . . . . . . . . . . . . . . . . . . . . . .7
Installatie
Pré-configuratie . . . . . . . . . . . . . . . . . . . . . . . . . . . . . . . . . . . . . . . . .
8
Stap-voor-stap installatiehandleiding
. . . . . . . . . . . . . . . . . . . . . . . . . . .9
Gebruik maken van uw switch
Systemen inschakelen . . . . . . . . . . . . . . . . . . . . . . . . . . . . . . . . . . . .
14
AutoScan-modus
. . . . . . . . . . . . . . . . . . . . . . . . . . . . . . . . . . . . . . . . 15
Veelgestelde vragen
. . . . . . . . . . . . . . . . . . . . . . . . . . . . . . . . . . . . . . . . 16
Problemen oplossen . . . . . . . . . . . . . . . . . . . . . . . . . . . . . . . . . . . . . . .
19
Informatie . . . . . . . . . . . . . . . . . . . . . . . . . . . . . . . . . . . . . . . . . . . . . .
23
INHOUD
P74711ea_F1DJ10x_man.indd 4-1 12/11/04 11:36:23 am
Page 46

Vereisten
Kabels
Voor elke PS/2-computer die u wilt aansluiten op de switch hebt u één VGA-kabel,
één PS/2-toetsenbordkabel en één PS/2-muiskabel nodig. De toetsenbord- en
muiskabels moeten zijn voorzien van PS/2-male-naar-PS/2-male-connectoren. Ten
behoeve van de ondersteuning van resoluties tot maximaal 1920x1440 bij 65 Hz
is voor het bewaren van de signaalintegriteit het gebruik van 75Ohm coaxiale
VGA-kabels noodzakelijk. VGA-kabels dienen te zijn uitgerust met HDDB15-femalenaar-HDDB15-female-connectoren. Belkin OmniView KVM-kabels bieden de hoogst
mogelijke kwaliteit die u de zekerheid geeft van optimale gegevensoverdracht
en zijn voorzien van connectoren met PC99-kleurcodering voor eenvoudige
identificatie en aansluiting. De reeks dubbel afgeschermde kabels uit de E-serie, met
trekontlasting en ferriet kraag omvat ondermeer een genormeerde veertienpolige
coaxiale VGA-kabel en vernikkelde connectoren voor hoge-resolutie-applicaties.
De volgende kabelset is meegeleverd en wordt aanbevolen voor gebruik in
combinatie met uw KVM-switch:
F1D9000-XX OmniView KVM-kabelset uit de E-serie (PS/2-stijl)
(-XX is de lengte in voet)
OVERZICHT
3
Deze KVM-switch van Belkin maakt het u mogelijk meerdere computers te
besturen met een toetsenbord, monitor en muis. De switch ondersteunt PS/2invoerapparatuur (toetsenbord en muis), VGA, SVGA, XGA en PS/2-computers.
Productkenmerken
Hot Keys
Sneltoetsen ofwel “hot keys” stellen u in staat met specifieke toetsencombinaties de
gewenste poort te kiezen. Bestuur meerdere computers via uw toetsenbord met een
eenvoudige sneltoetscombinatie.
AutoScan
Met de functie voor automatisch scannen (AutoScan) kunt u automatisch een voor
een de activiteiten scannen en in de gaten houden van de computers die op de
switch zijn aangesloten.
Videoresolutie
Met een bandbreedte van 200 MHz ondersteunt de switch videoresoluties tot
1920x1440 bij 65 MHz. Coaxiale VGA-bekabeling met een weerstand van 75 Ohm is
vereist om de signaalintegriteit bij hoge resoluties te behouden.
Drukknop frontpaneel
Dankzij de gemakkelijk bereikbare drukknop aan de bovenzijde van de switch kunt u
op eenvoudige wijze met de hand poorten kiezen.
LED-indicatoren
LED’s aan de voorzijde van de switch doen dienst als statusindicatoren. Aan beide
zijden van de drukknop bevindt zich een LED die aangeeft welke monitorpoort op
dat moment actief is door te gaan branden.
OVERZICHT
2
P74711ea_F1DJ10x_man.indd 2-3 12/11/04 11:36:23 am
Page 47

5
OVERZICHT
Poortstatus-LED’s
Drukknop
frontpaneel
De 2-poorts KVM-switch:
Toetsenbord- en
muispoorten console
Voedingsaansluiting
Poorten computer 2
Productafbeeldingen
VGA-poort Console
Poorten computer 1
Besturingssystemen
Uw KVM-switch is geschikt voor CPU’s die gebruik maken van de volgende
platformen
• Windows® 95, 98, 2000, Me, NT®, XP
• DOS
• Linux®
• Novell® NetWare® 4.x/5.x
Toetsenborden
• Ondersteunt toetsenborden met 101-, 102- en 104-toetsen
Muizen
• Met Microsoft®-systemen compatibele PS/2-muizen met 2, 3, 4 of 5 knoppen
Monitoren
• VGA
• SVGA
• MultiSync®
Optionele voeding
9V, 600mA voeding is verkrijgbaar, maar het gebruik ervan is optioneel. Breng een
bezoekje aan belkin.com voor informatie over het bestellen van dit product.
OVERZICHT
4
P74711ea_F1DJ10x_man.indd 4-5 12/11/04 11:36:23 am
Page 48

Technische gegevens
Artikelnr.: F1DJ102P, F1DJ104P
Voeding:
9V DC, 600mA voedingsadapter met positieve polariteit middenpin (optioneel)
Aantal ondersteunde pc’s: F1DJ102P: 2
F1DJ104P: 4
Toetsenbordemulatie: PS/2
Muisemulatie: PS/2 en serieel (bij gebruik van adapter)
Ondersteunde monitoren: VGA, SVGA, MultiSync en LCD
(bij gebruik van adapterkabel)
Max. resolutie: 1940x1440@65Hz
Toetsenbordingang: 6-polige miniDIN-aansluiting (PS/2)
Muisingang: 6-polige miniDIN-aansluiting (PS/2)
VGA-poort: Type HDDB, 15-polig
LED-indicatoren: F1DJ102P: 2
F1DJ104P: 4
Behuizing: Kunststof
Afmetingen: F1DJ102P: 11,4 x 7,6 x 2,5 cm (lxbxh)
F1DJ104P: 19,1 x 7,6 x 2,5 cm (lxbxh)
Gewicht: F1DJ102P: 91 g
F1DJ104P: 181 g
Garantie: 3 jaar
Opmerking: Er wordt een voorbehoud gemaakt voor wijzigingen in deze informatie.
7
OVERZICHT
6
OVERZICHT
Poortstatus-LED’s
Drukknop
frontpaneel
De 4-poorts KVM-switch:
Toetsenbord- en
muispoorten console
Voedingsaansluiting
Poorten computer 3
Poorten computer 2
VGA-poort console
Poorten computer 1
Poorten computer 4
P74711ea_F1DJ10x_man.indd 6-7 12/11/04 11:36:24 am
Page 49

Stapsgewijze installatiehandleiding
In dit hoofdstuk krijgt u instructies voor de hardware-setup van één KVM-switch.
Belangrijke opmerking
Zorg ervoor dat alle apparatuur is uitgeschakeld voordat u iets op de switch of
een van uw computers wilt aansluiten. Wanneer u kabels aansluit op of loskoppelt
van een computer die aan staat, kan dit onherstelbare schade toebrengen aan
uw computers, de gegevens die erop staatn en/of de switch. Belkin is niet
verantwoordelijk voor de schade die hierdoor ontstaat.
Het aansluiten van de console
1. Sluit uw PS/2-toetsenbord en -
muis aan op de daarvoor bestemde
poorten op de zijkant
van uw switch.
9
INSTALLATION
INSTALLATIE
8
Pré-configuratie
De beste plaats voor uw switch:
Wij raden u aan de switch op uw bureaublad te plaatsen. De exacte plaats zal
afhankelijk zijn van de lokatie van uw CPU’s en de lengte van uw kabels.
Vereisten voor wat betreft kabellengtes
Voor PS/2-computers: VGA-signalen blijven het best behouden wanneer zij worden
verzonden over maximaal 7,6 meter. Wanneer de afstand groter wordt, neemt de
kans op verslechtering van het signaal toe. Vandaar dat wij u aanraden uw PS/2computer op maximaal 7,6 meter van uw KVM-switch vandaan te plaatsen.
Opmerking: Als uw computer op een grotere afstand dan 7,5 m van de KVM-switch
moet staan, kunt u gebruik maken van de CAT5 Extender van Belkin (artikelnummer
F1D084). Dit product stelt u in staat uw PS/2-toetsenbord, PS/2-muis en monitor tot
op een afstand van 152,4 meter van uw switch vandaan te plaatsen, gebruik makend
van een CAT5 UTP-kabel.
Wij adviseren u het volgende:
Leg kabels niet in de buurt van tl-buizen, airconditioning-apparatuur of machines
die elektrische ruis veroorzaken (zoals stofzuigers).
INSTALLATIE
P74711ea_F1DJ10x_man.indd 8-9 12/11/04 11:36:24 am
Page 50

Het aansluiten van de computer
3. Maak gebruik van de OmniView KVM-kabelset en sluit de male connector van
de VGA-kabel aan op de VGA-poort van de eerste computer. Sluit de female
connector aan op de VGA-poort (1) aan de zijkant van de switch.
11
INSTALLATIE
2. Neem de videokabel die aan uw monitor is bevestigd en sluit deze aan op de
VGA- uitgang aan de zijkant van uw switch.
10
INSTALLATIE
P74711ea_F1DJ10x_man.indd 10-11 12/11/04 11:36:25 am
Page 51

5. Sluit het ene einde van de KVM-kabel voor PS/2-muizen aan op de daarvoor
bestemde poort op uw computer en het andere einde op de MUISPOORT (1)
aan de zijkant van de switch.
Herhaal stap 3 tot en met 5 voor elke volgende computer die u wilt
aansluiten op de switch, waarbij u ze aansluit op de desbetreffende CPUpoorten aan de zijkant van de switch.
13
INSTALLATIE
4. Sluit het ene eind van de KVM-kabel voor het PS/2-toetsenbord aan op
de toetsenbordaansluiting op de computer en het andere eind op de
TOETSENBORDAANSLUITING (1) aan de zijkant van de switch.
12
INSTALLATIE
P74711ea_F1DJ10x_man.indd 12-13 12/11/04 11:36:28 am
Page 52

een bepaalde poort overschakelen door het nummer in te voeren dat correspondeert
met de switch-poort die u wilt gebruiken. Als u bijvoorbeeld de combinatie
“SCROLL LOCK”, “SCROLL LOCK”, “2” intoetst, wordt de computer die is aangesloten
op poort 2 geselecteerd.
AutoScan-modus
In de AutoScan-modus blijft de switch acht seconden op een poort staan voordat
hij naar de volgende poort overschakelt. Dit tijdsinterval kan niet worden
gewijzigd. Voor het inschakelen van de AutoScan-modus drukt u op “SCROLL LOCK”,
“SCROLL LOCK” en “S”.
Opmerking: Om problemen te voorkomen, hebben wij ervoor gezorgd dat u in deze
modus de muis en het toetsenbord niet kunt gebruiken. Als dat namelijk wel zou
kunnen, dan zou tijdens het overschakelen naar een andere poort bij gebruik van
muis of toestenbord de communicatie tussen de computer en de switch onderbroken
worden. In dat geval zou de muis op het beeldscherm mogelijk ongecontroleerde
bewegingen kunnen maken of de weergave van de tekens bij gebruik van het
toetsenbord niet overeen kunnen komen met de ingetoetste toetsen.
Met een druk op de spatiebalk schakelt u de AutoScan-modus uit.
15
GEBRUIK MAKEN VAN UW SWITCH
+
+
Overschakelen naar poort 2—(02)
Het inschalen van de systemen
Als alle kabels zijn aangesloten, schakelt u de CPU’s in die zijn aangesloten op de
switch. Alle computers kunnen tegelijk worden ingeschakeld. De switch emuleert
zowel een muis als een toetsenbord op elke poort en laat u de computer normaal
opstarten. Uw switch zou nu klaar voor gebruik moeten zijn. De computer waarop
u wilt werken, kunt u selecteren met de drukknop op het frontpaneel aan de
bovenzijde van de switch of via sneltoetscommando's. Hou er rekening mee dat
de monitor een tot twee seconden nodig heeft om na het omschakelen beeld weer
te geven. Dit heeft te maken met de herhalingsfrequentie van het videosignaal.
Bovendien vindt er een hersynchronisatie van de muis- en toetsenbordsignalen
plaats. Dit behoort tot de normale werking en het zorgt ervoor dat de juiste
synchronisatie tot stand komt. U kunt op eenvoudige wijze naar de vorige of de
volgende poort van de switch overschakelen met behulp van de toets “SCROLL
LOCK” en de toetsen PIJL OMHOOG en PIJL OMLAAG. Het versturen van een
opdracht naar de switch doet u door binnen twee seconden twee maal op de
“SCROLL LOCK”-toets te drukken. Als bevestiging hoort u een geluidsignaal.
Vervolgens kunt u op de toetsen “PIJL OMHOOG” en “PIJL OMLAAG” drukken om
van de ene poort naar de andere over te schakelen. U kunt ook rechtstreeks naar
14
GEBRUIK MAKEN VAN UW SWITCH
Overschakelen naar de volgende
actieve poort, PIJL OMHOOG
Overschakelen naar de vorige
actieve poort, PIJL OMLAAG
P74711ea_F1DJ10x_man.indd 14-15 12/11/04 11:36:31 am
Page 53

17
V: Wat is de hoogste videoresolutie die ondersteund wordt door de switch?
A: Het geavanceerde videocircuit in de KVM-switch ondersteunt een maximale
resolutie van 1940 x 1440 bij 65 Hz. Deze hoge-resolutie-ondersteuning is
ideaal voor grafisch ontwerpers voor wie videomateriaal van hoge kwaliteit
van groot belang is.
V: Welke videobandbreedte wordt door de KVM-switch ondersteund?
A: De switch ondersteunt een videobandbreedte van 200 MHz.
V: Wat is het verschil tussen deze KVM-switch en de KVM-switch uit de SOHO-
Serie?
A: De KVM Switch uit de SOHO-Serie biedt u tevens audio- en microfoon-
ondersteuning; een ruimtebesparend design; een kabelmanagementsysteem;
flash-upgrade-functionaliteit; en een USB optie.
V: Wat zijn de voordelen van de KVM-switch van Belkin ten opzichte van
vergelijkbare producten van de concurrent?
A: De KVM-switch van Belkin is een betaalbare oplossing die beschikt over functies
die je normaal gesproken alleen tegen komt bij de duurdere switches. De KVMswitch van Belkin biedt u sneltoetsfunctionaliteit, ondersteuning van resoluties
tot 1940x1440 bij 65Hz, AutoScan-functionaliteit, en 3 jaar beperkte garantie
van Belkin— en dat allemaal voor een hele aantrekkelijke prijs.
V: Kan ik de switch in combinatie met mijn SUN-computer gebruiken?
A: Ja, dat is mogelijk. U kunt de switch gebruiken in combinatie met een Sun-
computer indien u gebruik maakt van een Belkin Sun Adapter, artikelnummer
F1D082.
VEELGESTELDE VRAGEN
16
V: Welk besturingssysteem wordt door de KVM-switch ondersteund?
A: De KVM-switch ondersteunt elk besturingssystemen dat draait op een PS/2-
platform. U kunt hem ook in combinatie met Sun- en Mac-besturingssystemen
gebruiken, maar u dient daarvoor wel gebruik te maken van de juiste adapters
(Belkin OmniView Sun-Adapter, met artikelnummer F1D082 of de OmniView MacAdapter, met artikelnummer F1D080). Besturingssystemen die gebruikt kunnen
worden zijn o.a., maar niet uitsluitend, DOS, Windows 3.x, 95, 98, 2000, Me, NT,
XP, Linux en Novell NetWare 4.x/5.x.
V: Ondersteunt de switch de Microsoft® IntelliMouse?
A: Ja, de switch werkt met muizen van Microsoft, Logitech, Kensington en Belkin.
De switch zal slechts twee muisknoppen ondersteunen. Als u vragen hebt over
compatibiliteit kunt u altijd contact opnemen met de afdeling Technische
Ondersteuning.
V: Welke mogelijkheden heeft de gebruiker van de KVM-switch om naar andere
poorten over te schakelen?
A: De switch ondersteunt twee manieren van poortkeuze. De gebruiker kan ervoor kiezen
de sneltoetsen op het toetsenbord te gebruiken of de drukknop op het frontpaneel.
V: Wat is de maximaal toegestane afstand tussen een computer en de switch?
A: Bij het gebruik van PS/2-connectoren mag de afstand tussen de switch en
een daarop aangesloten computer maximaal 7,5 m bedragen. Als uw computer
op een grotere afstand dan 7,5 m van de KVM-switch moet staan, kunt u
gebruik maken van de CAT5 Extender van Belkin (artikelnummer F1D084).
Dit product stelt u in staat uw PS/2-toetsenbord, PS/2-muis en monitor tot
op een afstand van 150 meter van uw switch vandaan te plaatsen, gebruik
makend van een CAT5 UTP-kabel.
VEELGESTELDE VRAGEN
P74711ea_F1DJ10x_man.indd 16-17 12/11/04 11:36:31 am
Page 54

19
Video
Op mijn beeldscherm krijg ik nalichten, schaduwen of vage beelden te zien.
• Controleer of alle videokabels op de juiste wijze zijn aangesloten.
• Controleer of de door u gebruikte monitor de resolutie en de op uw computer
ingestelde herhalingsfrequentie ondersteunt.
• Controleer of de grafische kaart die u gebruikt de resolutie en de ingestelde
herhalingsfrequentie op uw computer ondersteunt.
• Sluit de monitor rechtstreeks op de computer aan waarmee u problemen hebt om
te zien of het probleem blijft voortduren. Op mijn monitor krijg ik zwart beeld.
• Controleer of alle videokabels op de juiste wijze zijn aangesloten.
• Als u geen voedingsadapter gebruikt, controleer dan of de toetsenbordkabel
tussen de computer en de switch op de juiste wijze is aangesloten.
• Als u de switch uitsluitend voor het overschakelen van video-signalen
gebruikt zonder dat er een toetsenbord- en muisverbinding tussen de switch
en de computer bestaat, dient u de afzonderlijk leverbare 9 V DC/600 mA
voedingsadapter aan te schaffen (artikelnummer F1D065-PWR).
• Sluit uw monitor rechtstreeks op de computer aan om te controleren of uw
monitor op de juiste wijze functioneert.
PROBLEMEN OPLOSSEN
V: Moet ik nog software installeren om de switch te kunnen gebruiken?
A: Nee, er hoeven geen stuurprogramma's of software op uw computers te worden
geïnstalleerd. U kunt volstaan met het aansluiten van al uw computers op
de pc-poorten van de switch en een toetsenbord, monitor en muis op de
corresponderende consolepoorten - en uw switch is klaar voor gebruik.
V: Heeft de switch een AC-adapter nodig?
A: De switch wordt gevoed via de PS/2-toetsenbordpoort van uw computer. Een
optionele 9V DC, 600mA voedingsadapter kan worden gebruikt indien het niet
mogelijk is om stroom via de PS/2-poort van de computer te trekken.
V: Kan ik de switch ook gebruiken als ik alleen van videosignaal wil wisselen?
A: Ja, dat is mogelijk. U kunt de switch gebruiken voor het overschakelen tussen
videosignalen zonder dat u een toetsenbord en een muis hoeft aan te sluiten.
Om te bereiken dat uw computer op de juiste wijze functioneert, moeten het
toetsenbord en de muis rechtstreeks worden aangesloten op de computer die
het videosignaal levert.
Opmerking: In dit geval zult u echter wel de optionele AC voedingsadapter dienen
te gebruiken aangezien de switch geen stroom kan trekken uit een toetsenbord of
USB-poort.
V: Wat is de garantieperiode voor de switch?
A: The switch wordt geleverd met een beperkt garantie van 3 jaar.
18
VEELGESTELDE VRAGEN
P74711ea_F1DJ10x_man.indd 18-19 12/11/04 11:36:32 am
Page 55

21
• Deactiveer het programma voor energiebeheer op de pc waarmee u problemen
hebt.
• Kijk wat er gebeurt als u de muis verwisselt voor een andere muis. De muis wordt
bij het opstarten niet herkend.
• Controleer de kabels en zorg ervoor dat zij op de juiste wijze zijn bevestigd.
De computer start probleemloos op maar de muis werkt niet.
• Controleer of de muis op de juiste wijze is aangesloten.
• Controleer of de muis werkt als u deze rechtstreeks op de computer aansluit. Het
kan zijn dat u de computer hierna opnieuw moet opstarten.
• Probeer een andere muis. Als ik van de ene poort naar de andere overschakel, zijn
de muisbewegingen volledig oncontroleerbaar.
• Zorg ervoor dat er op uw computer slechts een muis-stuurprogramma is
geïnstalleerd. Controleer of u een stuurprogramma gebruikt voor een standaard
PS/2-muis of een Microsoft-compatible PS/2-muis.
• Zorg ervoor dat er in uw CONFIG.SYS- of AUTOEXEC.BAT-bestanden geen muisstuurprogramma's zijn geladen.
• Beweeg de muis niet en druk niet op muisknoppen tijdens het wisselen van poort.
• Om de muis te resetten en weer correcte muisbewegingen te verkrijgen, maakt u
de muiskabel los van de switch en wacht u 2–3 seconden voordat u de muis weer
aansluit.
PROBLEMEN OPLOSSEN
Toetsenbord
Bij het opstarten ziet de computer geen toetsenbord en krijgt u melding van een
toetsenbordfout.
• Controleer of de toetsenbordkabel tussen de switch en de computer op de juiste
wijze is aangesloten. Zet eventuele losse contacten vast.
• Verwissel uw toetsenbord voor een ander toestenbord. • Probeer de computer aan
te sluiten op een andere poort.
• Als u de software gebruikt die bij uw toetsenbord is geleverd, verwijder deze dan
en installeer het standaard Microsoft stuurprogramma voor toetsenborden.
Muis
De muisaanwijzer verdwijnt als ik overschakel naar een ander kanaal.
• Controleer of de muis die u gebruikt op de juiste wijze op de consolepoort van de
switch is aangesloten.
• Als u de software gebruikt die bij uw muis is geleverd, verwijder deze dan van uw
harde schijf en installeer het standaard Microsoft stuurprogramma voor muizen.
• Maak de muiskabel, die aangesloten is op het kanaal waarmee u problemen hebt,
los en weer vast om de muisverbinding opnieuw te synchroniseren.
• Sluit de muis direct aan op de computer waarmee u muisproblemen heeft.
• Geef de computer ongeveer een minuut de tijd om uit de standby-modus te
ontwaken en om de muisfunctie in te schakelen.
20
PROBLEMEN OPLOSSEN
P74711ea_F1DJ10x_man.indd 20-21 12/11/04 11:36:32 am
Page 56

FCC-verklaring
VERKLARING VAN OVEREENSTEMMING MET DE FCC-REGEL-
GEVING VOOR ELEKTROMAGNETISCHE COMPATIBILITEIT
Wij, Belkin Corporation, gevestigd 501 West Walnut Street, Compton, CA
90220, Verenigde Staten van Amerika, verklaren hierbij dat wij de volledige
verantwoordelijkheid aanvaarden dat de producten met artikelnummers:
F1DJ102P, F1DJ104P
waarop deze verklaring betrekking heeft,
voldoen aan Deel 15 van de FCC-voorschriften. Het gebruik van dit product
is onderworpen aan de volgende twee voorwaarden: (1) dit apparaat mag
geen schadelijke storingen veroorzaken en (2) dit apparaat dient alle hierop
inwerkende storingen te accepteren waaronder begrepen storingen die een niet
gewenste werking kunnen veroorzaken.
CE-conformiteitsverklaring
Wij, Belkin Corporation, verklaren hierbij dat wij de volle verantwoordelijkheid aanvaarden
dat de producten met artikelnummers F1DJ102P en F1DJ104P, waarop deze verklaring
van toepassing is, voldoen aan de emissienorm EN55022 en aan de immuniteitsnormen
EN55024, LVP EN61000-3-2 en EN61000-3-3.
ICES
Dit digitale apparaat uit Klasse B voldoet aan de Canadese norm ICES-003. Cet appareil
numérique de la classe B est conforme à la norme NMB-003 du Canada.
23
INFORMATIE
Algemeen
Mijn computer start niet op wanneer deze op de switch is aangesloten, maar
functioneert feilloos als het toetsenbord, de monitor en de muis direct op de
computer zijn aangesloten.
• Controleer of de toetsenbord- en muiskabels stevig op de switch en de computer
zijn aangesloten.
• Controleer of de toetsenbord- en muiskabels op de juiste poorten zijn aangesloten
en u niet per ongeluk de toetsenbordkabel op de muispoort hebt aangesloten of
vice versa.
22
PROBLEMEN OPLOSSEN
P74711ea_F1DJ10x_man.indd 22-23 12/11/04 11:36:32 am
Page 57

24
3 jaar beperkte productgarantie van Belkin
Belkin Corporation biedt garantie op dit product gedurende de garantieperiode voor zover
het materiaal- en fabricagefouten betreft. In geval van defecten heeft Belkin de keuze tus
sen een gratis reparatie of vervanging, in het geval het product binnen de garantieperiode
wordt teruggebracht naar de leverancier en dat de transportkosten aan de leverancier vooruit
worden betaald. Houdt u er rekening mee dat u op verzoek het aankoopbewijs moet kunnen
vertonen.
Deze garantie geldt niet voor beschadigingen als gevolg van ongelukken, misbruik, ver
keerd gebruik of verkeerde toepassing; en evenmin wanneer het product zonder schriftelijke
toestemming van Belkin is gewijzigd; of als het serienummer van Belkin is verwijderd of
veranderd.
ER KAN ALLEEN EEN BEROEP WORDEN GEDAAN OP DE BOVENSTAANDE GARANTIES EN
TOEZEGGINGEN, ONGEACHT ENIGE ANDERE UITDRUKKELIJKE OF IMPLICIETE, VERBALE OF
SCHRIFTELIJKE TOEZEGGINGEN. BELKIN WIJST UITDRUKKELIJK ELKE EN ALLE IMPLICIETE
AANSPRAKELIJKHEID OF GARANTIE AF, WAARONDER, ZONDER ENIGE BEPERKING, GARANTIES
BETREFFENDE DE VERKOOPBAARHEID OF GESCHIKTHEID VOOR EEN BEPAALDE TOEPASSING.
Leveranciers, vertegenwoordigers en werknemers van Belkin zijn niet gemachtigd deze garan
-
tie op enigerlei wijze te wijzigen, te verlengen of uit te breiden.
BELKIN IS NIET AANSPRAKELIJK VOOR BIJZONDERE, BIJKOMENDE OF VERVOLGSCHADE
ONTSTAAN DOOR GARANTIEVERBREKING VAN WELKE AARD OOK OF UIT HOOFDE VAN
ENIG ANDER JURIDISCH BEGINSEL, MET INBEGRIP VAN MAAR NIET BEPERKT TOT
BEDRIJFSSTILSTAND, VERLIES VAN WINST OF GOODWILL, BESCHADIGING HETZIJ
HERPROGRAMMERING OF REPRODUCTIE VAN ENIG PROGRAMMA OF VAN DATA OPGESLAGEN IN
OF GEBRUIKT IN SAMENHANG MET BELKIN PRODUCTEN.
In sommige staten of landen is het niet toegestaan om incidentele schade, voortvloeiende
schade en impliciete garanties uit te sluiten; in dat geval gelden de bovenstaande garantie
-
beperkingen wellicht niet voor u. Deze garantie verleent u specifieke rechten en
afhankelijk
van het land waarin u woont, hebt u mogelijk ook andere rechten.
24
INFORMATIE
P74711ea_F1DJ10x_man.indd 24-25 12/11/04 11:36:32 am
Page 58

Belkin Ltd.
Express Business Park • Shipton Way
Rushden • NN10 6GL • Verenigd Koninkrijk
Tel: +44 (0) 1933 35 2000
Fax: +44 (0) 1933 31 2000
Belkin B.V.
Starparc Building • Boeing Avenue 333
1119 PH Schiphol-Rijk • Nederland
Tel: +31 (0) 20 654 7300
Fax: +31 (0) 20 654 7349
Belkin GmbH
Hanebergstrasse 2
80637 München • Duitsland
Tel: +49 (0) 89 143405 0
Fax: +49 (0) 89 143405 100
Belkin SAS
5 Rue du Petit Robinson • 3ème étage
78350 Jouy en Josas • Frankrijk
Tel: +33 (0) 1 34 58 14 00
Fax: +33 (0) 1 39 46 62 89
Belkin technische ondersteuning
Europa: 00 800 223 55 460
© 2004 Belkin Corporation. Alle rechten voorbehouden. Alle handelsnamen
zijn gedeponeerde handelsmerken van de betreffende rechthebbenden.
KVM-switch
Es
F1DJ102P-B
F1DJ104P-B
Manual del usuario
Controla hasta cuatro ordenadores PS/2
utilizando un monitor, un teclado y un ratón
Conmutador KVM
P74711ea_F1DJ10x_man.indd 2-3 12/11/04 11:36:39 am
Page 59

Enhorabuena por la adquisición del conmutador KVM de Belkin (el conmutador).
La amplia línea de soluciones KVM líderes en el mercado de Belkin da muestra de
nuestro compromiso por suministrar productos duraderos de alta calidad a un precio
competitivo. Creado para proporcionarle el control sobre múltiples ordenadores y/o
servidores desde una única consola, los conmutadores KVM de Belkin se presentan
con una gran variedad de propiedades adaptables a todas las configuraciones,
grandes o pequeñas. Este conmutador está avalado por la garantía de tres años de
Belkin y una asistencia técnica gratuita.
El presente manual le ofrece los detalles acerca de su nuevo conmutador, desde la
instalación y funcionamiento a la resolución de problemas—para el improbable caso
de que se presenten dificultades. Para una instalación sencilla, consulte la guía de
instalación rápida incluida junto con su conmutador.
Muchas gracias por adquirir el conmutador KVM de Belkin. Sabemos valorar su negocio.
Contenido del paquete
• Conmutador KVM
• Manual del usuario
• Guía de instalación rápida
• Kits de cable KVM Omniview
INTRODUCCIÓN
1
Introducción
Contenido del paquete
. . . . . . . . . . . . . . . . . . . . . . . . . . . . . . . . . . . . .1
Generalidades
Esquema general de características . . . . . . . . . . . . . . . . . . . . . . . . . . . .
2
Requisitos de los equipos
. . . . . . . . . . . . . . . . . . . . . . . . . . . . . . . . . . .3
Sistemas operativos
. . . . . . . . . . . . . . . . . . . . . . . . . . . . . . . . . . . . . . .4
Diagramas de los indicadores de la unidad . . . . . . . . . . . . . . . . . . . . . . .
5
Especificaciones . . . . . . . . . . . . . . . . . . . . . . . . . . . . . . . . . . . . . . . . .
7
Instalación
Configuración previa . . . . . . . . . . . . . . . . . . . . . . . . . . . . . . . . . . . . . .
8
Guía de instalación paso a paso . . . . . . . . . . . . . . . . . . . . . . . . . . . . . .
9
Cómo usar el conmutador
Encendido de los sistemas . . . . . . . . . . . . . . . . . . . . . . . . . . . . . . . . .
14
Modo de auto-escaneado . . . . . . . . . . . . . . . . . . . . . . . . . . . . . . . . . .
15
Preguntas más frecuentes . . . . . . . . . . . . . . . . . . . . . . . . . . . . . . . . . . .
16
Resolución de problemas
. . . . . . . . . . . . . . . . . . . . . . . . . . . . . . . . . . . . 19
Información . . . . . . . . . . . . . . . . . . . . . . . . . . . . . . . . . . . . . . . . . . . . .
23
ÍNDICE DE CONTENIDOS
P74711ea_F1DJ10x_man.indd 4-1 12/11/04 11:36:39 am
Page 60

Requisitos de los equipos
Cables
Para cada ordenador PS/2 que planee conectar al conmutador, necesitará un cable
VGA, un cable PS/2 para teclado y un cable PS/2 para ratón. Los cables para teclado
y ratón deben tener conectores PS/2 de macho a macho.
Para soportar resoluciones de hasta 1920x1440@65Hz y para preservar la integridad
de la señal, se requiere la utilización de un cableado VGA coaxial de 75 ohmios. Los
cables deben tener conectores hembra HDDB15 a macho HDDB15.
Los cables KVM OmniView de Belkin ofrecen la más alta calidad posible para
asegurar que su información se transmita de manera óptima. Los cables KVM
incluyen conectores PC99 codificados por colores para una identificación y conexión
más sencillas. Los cables de la serie E con doble protección, con moldura en relieve
y toroides de ferrita incluyen conectores chapados en níquel y cable VGA coaxial de
14 clavijas estándar para aplicaciones de alta resolución.
El siguiente kit de cableado está incluido y recomendado para su conmutador KVM:
F1D9000-XX Kit de cableado KVM Serie E OmniView (Estilo PS/2)
(-XX denota la longitud en pies)
GENERALIDADES
3
El conmutador KVM de Belkin le permite controlar múltiples ordenadores con un
solo teclado, monitor y ratón. El conmutador soporta dispositivos de entrada PS/2
(teclado y ratón), VGA, SVGA, XGA y ordenadores PS/2.
Esquema general de características
Teclas de función directa
Las teclas de función directa le permiten seleccionar puertos utilizando las órdenes
a través de las teclas designadas. Controle múltiples ordenadores utilizando una
sencilla secuencia de teclas de función directa en su teclado.
Auto-escaneado
La propiedad de auto-escaneado le permite efectuar un rastreo y control
automáticos de la actividad de todos los ordenadores conectados a su conmutador
uno por uno.
Resolución de vídeo
Con una banda ancha de 200MHz, el conmutador soporta resoluciones de vídeo
de hasta 1920x1440@65Hz. Para preservar la integridad de la señal a altas
resoluciones, se necesita un cableado VGA coaxial de 75 ohmios.
Botón del panel frontal
Un botón convenientemente localizado en la parte frontal del conmutador para una
sencilla selección manual de puerto.
Display de diodo emisor de luz
Los indicadores LED de la parte frontal del conmutador funcionan como monitores
de estado. Ubicado en casa una de las partes del botón del panel central, las luces
LED indican qué monitor se encuentra activo en cada momento.
GENERALIDADES
2
P74711ea_F1DJ10x_man.indd 2-3 12/11/04 11:36:39 am
Page 61

5
GENERALIDADES
Indicadores LED del
estado de los puertos
Panel frontal
Botón
El conmutador KVM de 2 puertos:
Puertos de
consola para
teclado y ratón
Toma de alimentación CC
Ordenador 2 Puertos
Diagramas de los indicadores de la unidad
Consola puerto VGA
Ordenador 1 Puertos
Sistemas operativos
Su conmutador puede ser utilizado en CPUs que empleen:
Plataformas
• Windows® 95, 98, 2000, Me, NT®, XP • DOS • Linux®
• Novell® NetWare® 4.x/5.x
Teclados
• Soporta teclados 101, 102 y 104
Ratón
• Ratón PS/2 compatible con el sistema Microsoft® con 2, 3, 4 ó 5 botones
Monitores
• VGA
• SVGA
• MultiSync®
Suministro de alimentación opcional
Está disponible una fuente de alimentación opcional 9V, 600mA. Visite belkin.com
para obtener más información.
GENERALIDADES
4
P74711ea_F1DJ10x_man.indd 4-5 12/11/04 11:36:39 am
Page 62

Especificaciones
Número de artículo: F1DJ102P, F1DJ104P
Alimentación:
Adaptador opcional CC 9V, 600mA con un pin central de polaridad positiva
PCs válidos: F1DJ102P: 2
F1DJ104P: 4
Emulación de teclado: PS/2
Emulación de ratón: PS/2 y Serie (con uso de adaptador)
Monitores válidos: VGA, SVGA, MultiSync y LCD (con la utilización del cable
adaptador)
Máx. resolución: 1940x1440@65Hz
Entrada de teclado: MiniDIN de 6 clavijas (PS/2)
Entrada de ratón: MiniDIN de 6 clavijas (PS/2)
Puerto VGA: tipo HDDB de 15 clavijas
Indicadores LED: F1DJ102P: 2
F1DJ104P: 4
Empaquetado: plástico
Dimensiones: F1DJ102P: (L) 11,4 x (A) 7,6 x (A) 2,5 cm
F1DJ104P: (L) 19,5 x (A) 7,6 x (A) 2,5 cm
Peso: F1DJ102P: 3.2oz.
F1DJ104P: 6.4oz.
Garantía: de 3 años
Atención: Las especificaciones pueden ser objeto de modificación sin previo aviso.
7
GENERALIDADES
6
GENERALIDADES
Indicadores LED
del estado de
los puertos
Panel frontal
Botón
El conmutador KVM de 4 puertos:
Puertos de consola
para teclado y
ratón
Toma de alimentación CC
Ordenador 3 Puertos
Ordenador 2
Puertos
Consola puerto
VGA
Ordenador 1 Puertos
Ordenador 4 Puertos
P74711ea_F1DJ10x_man.indd 6-7 12/11/04 11:36:40 am
Page 63

Guía de instalación paso a paso
Este capítulo le proporciona instrucciones completas para la instalación del hardware
de un único conmutador.
Atención
Antes de intentar conectar algún dispositivo al conmutador o a cualquier ordenador,
asegúrese de que todos los elementos se encuentren desconectados. La conexión y
desconexión de cables mientras los ordenadores están encendidos puede provocar
daños irreversibles en sus ordenadores, sus datos y/o el conmutador. Belkin
Corporation no se responsabilizará del daño provocado de esta forma.
Cómo conectar la consola
1. Conecte su teclado y ratón tipo PS/2
a los puertos de TECLADO y RATÓN
situados en el panel lateral de su
conmutador.
9
INSTALLATION
INSTALACIÓN
8
Pre-configuración
Dónde ubicar el conmutador
El conmutador está diseñado para ubicarse en el escritorio. El lugar exacto
dependerá de la ubicación de sus CPUs y de la longitud de sus cables.
Requisitos de la distancia del cable
para ordenadores PS/2: Las señales VGA son retenidas con mayor facilidad cuando
se transmiten a una distancia máxima de 7,6 m. A partir de 7,6 m, la probabilidad
de un empeoramiento de la imagen aumentará con la distancia. Por esta razón,
su ordenador PS/2 deberá ser colocado a una distancia máxima de 7,6 m del
conmutador KVM.
Atención: Si es preciso que su ordenador se encuentre a una distancia superior de 25
pies del conmutador KVM, puede utilizar el cable alargador CAT5 de Belkin (número
de pieza F1D084) para ampliar su teclado PS/2, ratón PS/2 y monitor hasta una
distancia de 152,4 m utilizando un cable UTP CAT5 estándar.
Precauciones y advertencias
Evite colocar los cables cerca de luces fluorescentes, equipos de aire acondicionado
o máquinas que creen ruido eléctrico (ej. Aspiradoras).
INSTALACIÓN
P74711ea_F1DJ10x_man.indd 8-9 12/11/04 11:36:40 am
Page 64

Cómo conectar el ordenador:
3. Utilizando el kit de cableado Omniview KVM, tome el cable VGA y conecte el
extremo macho al puerto VGA del primer ordenador. Conecte el extremo hembra
al puerto VGA 1 en un lateral del conmutador.
11
INSTALACIÓN
2. Tome el cable de vídeo que se encuentra conectado a su monitor y conéctelo
al puerto de salida VGA situado en un lateral del conmutador.
10
INSTALACIÓN
P74711ea_F1DJ10x_man.indd 10-11 12/11/04 11:36:41 am
Page 65

5. Conecte un extremo del cable KVM del ratón PS/2 al puerto de ratón de
su ordenador y el otro extremo al PUERTO del ratón 1 en un lateral del
conmutador.
Repita los pasos del 3 al 5 por cada ordenador adicional que vaya a ser
conectado al conmutador. Conéctelos a los puertos CPU correspondientes
ubicados en el lateral.
13
INSTALACIÓN
4. Conecte un extremo del cable KVM del teclado PS/2 al puerto del teclado
del ordenador y el otro extremo al puerto del
TECLADO 1 en un lateral del
conmutador.
12
INSTALACIÓN
P74711ea_F1DJ10x_man.indd 12-13 12/11/04 11:36:43 am
Page 66

Podrá conmutar directamente a cualquiera de los puertos introduciendo el número
de puerto del conmutador que desea utilizar. Por ejemplo, si pulsa “SCROLL LOCK”,
“SCROLL LOCK”, “2”, será seleccionado el ordenador del puerto 2.
Modo de auto-escaneado
En el modo de auto-escaneado, el conmutador permanece en un puerto durante
ocho segundos antes de conmutar al siguiente. Este intervalo de tiempo no puede
ser modificado. Para activar el modo de auto-escaneado, pulse “SCROLL LOCK”,
“SCROLL LOCK”, “S”.
Atención: En este modo, no existe control del teclado ni del ratón con el fin de
evitar errores. Si estuviesen activados, el usuario podría mover el ratón o utilizar el
teclado mientras el conmutador KVM estuviese conmutando al siguiente puerto. Esto
interrumpiría la comunicación entre el ordenador y el conmutador y podría provocar
un movimiento errático del ratón o resultar en la aparición de caracteres irregulares
en pantalla cuando se utilizase el teclado.
Para desactivar el modo de auto-escaneado, pulse la barra de espacio.
15
CÓMO USAR EL CONMUTADOR
+
+
Conmutación al puerto 2—(02)
Cómo encender los sistemas
Una vez que todos los cables han sido conectados, encienda las CPUs que
se encuentran conectadas al conmutador. Todos los ordenadores pueden ser
encendidos de forma simultánea. El conmutador emula un ratón y un teclado en
cada puerto y permitirá que su ordenador se encienda normalmente. Su conmutador
deberá estar ahora listo para su utilización. Podrá seleccionar el ordenador que
va a utilizar por medio del botón en el panel frontal o bien mediante las teclas
de función directa. Tenga en cuenta que la imagen tardará 1-2 segundos en
aparecer tras la conmutación. Esto es debido a la actualización de la señal de
vídeo. Asimismo, tendrá lugar una nueva sincronización de la señal del teclado y
del ratón. Esta es una operación normal que garantiza el establecimiento de una
sincronización apropiada. Podrá cambiar los puertos del conmutador cómodamente
mediante una secuencia de órdenes a través del teclado utilizando la tecla “SCROLL
LOCK” (Bloq Desp) y las teclas de flecha hacia arriba y hacia abajo. Para enviar
órdenes al conmutador, pulse dos veces la tecla “SCROLL LOCK” en un plazo de dos
segundos. Será emitido un sonido agudo de confirmación. Entonces podrá pulsar
la tecla de la flecha hacia arriba o hacia abajo para conmutar entre los puertos.
14
CÓMO USAR EL CONMUTADOR
Conmutación al siguiente puerto
activo, flecha hacia arriba
Conmutación al puerto activo
precedente, flecha hacia abajo
P74711ea_F1DJ10x_man.indd 14-15 12/11/04 11:36:47 am
Page 67

17
P: ¿Cuál es la máxima resolución de vídeo que soporta el conmutador?
R: El circuito avanzado de vídeo del conmutador soporta una resolución máxima de
1940x1440@65Hz. El soporte de una resolución tan elevada es ideal para artistas
y diseñadores gráficos, cuyo trabajo depende de una imagen de alta calidad.
P: ¿Qué ancho de banda de vídeo soporta el conmutador KVM?
R: El conmutador soporta un ancho de banda de vídeo de 200MHz.
P: ¿Cuál es la diferencia entre el conmutador KVM y el conmutador KVM de la
serie SOHO?
R: El conmutador KVM de la serie SOHO ofrece un soporte adicional para audio
y micrófono, diseño reducido para ahorro de espacio, gestión de cables,
posibilidad de actualización por flash y una opción USB.
P: ¿Cuáles son las ventajas del conmutador KVM de Belkin frente a un producto
similar de la competencia?
R: El conmutador KVM de Belkin es una solución asequible, que incorpora
características que habitualmente sólo se encuentran en unidades de un precio
superior. El conmutador KVM de Belkin ofrece conmutación por teclas de función
directa, soporta una resolución de hasta 1940x1440 @65Hz, auto-escaneado y
una garantía limitada de tres años de Belkin: —todo a un precio muy asequible.
P: ¿Puedo utilizar el conmutador en mi ordenador Sun?
R: Sí, el conmutador funciona con ordenadores Sun cuando se emplea con un
adaptador para Sun de Belkin, número de artículo F1D082.
PREGUNTAS MÁS FRECUENTES
16
P: ¿Qué sistemas operativos soporta el conmutador?
R: El conmutador soportará cualquier sistema operativo que funcione en una
plataforma PS/2. Funcionará asimismo con los sistemas operativos Sun y Mac
utilizando los adaptadores apropiados (Adaptador para Sun OmniView de Belkin
F1D082, adaptador para Mac OmniView F1D080). Los sistemas operativos
incluyen DOS, Windows 3.x, 95, 98, 2000, Me, NT, XP, Linux y Novell NetWare
4.x/5.x (pero no se limitan sólo a éstos).
P: ¿Funciona el conmutador con el IntelliMouse de Microsoft?
R: Sí, el conmutador funcionará con ratones de Microsoft, Logitech, Kensington,
así como con todos los ratones Belkin. El conmutador soportará exclusivamente
dos botones de ratón. Póngase en contacto con el servicio de asistencia técnica
de Belkin para consultar cualquier duda sobre la compatibilidad.
P: ¿De qué forma permite el conmutador al usuario conmutar entre puertos?
R: El conmutador soporta dos métodos de selección de puertos. El usuario puede
seleccionar los ordenadores utilizando teclas de función directa del teclado o
bien mediante el botón del panel frontal.
P: ¿A qué distancia puede encontrarse el usuario del conmutador?
R: Cuando utilice conexiones PS/2, el conmutador podrá encontrarse a una
distancia de hasta 7,6 m del ordenador. Si es preciso que su ordenador se
encuentre a una distancia superior de 7,6 m del conmutador KVM, puede
utilizar el cable alargador CAT5 de Belkin (número de artículo F1D084) para
ampliar su teclado PS/2, ratón PS/2 y monitor hasta una distancia de 152,4 m
utilizando un cable UTP CAT5 estándar.
PREGUNTAS MÁS FRECUENTES
P74711ea_F1DJ10x_man.indd 16-17 12/11/04 11:36:47 am
Page 68

19
Vídeo
Obtengo imágenes borrosas o con sombras en mi monitor.
• Compruebe que todos los cables de vídeo estén insertados correctamente.
• Compruebe que el monitor que está utilizando soporta el ajuste de resolución y de
velocidad de actualización de su ordenador.
• Compruebe que la tarjeta de gráficos que está usando soporta el ajuste de
resolución y la velocidad de actualización de su ordenador.
• Conecte el monitor directamente al ordenador que está presentando problemas
para comprobar si la incidencia persiste.
Aparece una pantalla negra en el monitor.
• Compruebe que todos los cables de vídeo están insertados correctamente.
• Si no está usando el adaptador de alimentación, compruebe que el cable del
teclado está conectado e insertado de modo conveniente al ordenador y al
conmutador.
• Si está usando el conmutador solamente para la conmutación de vídeo y no tiene
conexión entre el conmutador y el ordenador, necesitará adquirir el adaptador de
alimentación opcional 9V CC, 600mA (Número de artículo de Belkin F1D065-PWR
para el país apropiado).
• Conecte su monitor directamente al ordenador para comprobar que funciona
correctamente.
RESOLUCIÓN DE PROBLEMAS
P: ¿Debo instalar algún tipo de software para utilizar el conmutador?
R: No, el conmutador no requiere la instalación en sus ordenadores de ningún
tipo de driver o de software. Conecte simplemente todos sus ordenadores a los
puertos del PC en el conmutador, después conecte un monitor, un ratón y un
teclado a los puertos correspondientes para consola y su conmutador estará
listo para ser utilizado.
P: ¿El conmutador requiere un adaptador CA?
R: El conmutador puede alimentarse del puerto del teclado PS/2 en su ordenador.
Un adaptador de alimentación opcional 9V CC, 600mA puede utilizarse, por
ejemplo, donde la alimentación no pueda extraerse del puerto PS/2 del
ordenador.
P: ¿Puedo emplear el conmutador para conmutar exclusivamente señales de vídeo?
R: Sí, puede usar el conmutador para conmutar sólo entre señales de vídeo sin
tener que conectar el teclado y el ratón. El teclado y el ratón deben de estar
conectados directamente al ordenador desde el que sale la señal de vídeo para
asegurar que su ordenador funciona de forma adecuada.
Atención: El conmutador requerirá el uso de un adaptador de alimentación CA
opcional ya que la alimentación no puede extraerse del ordenador a través del
teclado o del puerto USB.
P: ¿Qué duración tiene la garantía del conmutador?
R: El conmutador está avalado por una garantía limitada de tres años.
18
PREGUNTAS MÁS FRECUENTES
P74711ea_F1DJ10x_man.indd 18-19 12/11/04 11:36:47 am
Page 69

21
• Desactive los esquemas de gestión de la alimentación del PC en el que está
experimentando problemas.
• Pruebe sustituyendo el ratón por otro. El ratón no es detectado durante el
arranque.
• Compruebe los cables y asegúrese de que están insertados correctamente. El
ordenador arranca bien, pero el ratón no funciona.
• Asegúrese de que está conectado correctamente.
• Asegúrese de que el ratón funciona cuando está directamente conectado al
ordenador. Es posible que sea necesario reiniciar para comprobarlo.
• Pruebe con un ratón diferente. Cuando conmuto de un puerto a otro, el
movimiento del ratón es completamente errático.
• Asegúrese de que no tiene instalado más de un driver para el ratón. Asegúrese de
que el driver sea o bien para un ratón PS/2 estándar o bien para un ratón PS/2
compatible con Microsoft.
• Asegúrese de que no exista ningún driver de ratón cargado en sus archivos
CONFIG.SYS o AUTOEXEC.BAT.
• Evite mover el ratón o pulsar el botón del mismo cuando conmute puertos en el
conmutador.
• Puede reiniciar el ratón y restablecer un movimiento adecuado del mismo
simplemente desconectándolo del conmutador y esperando 2—3 segundos antes
de conectarlo de nuevo.
RESOLUCIÓN DE PROBLEMAS
Teclado
El ordenador no detecta su teclado y se obtiene un error de teclado durante el
arranque.
• Compruebe que el cable del teclado entre el conmutador y el ordenador se
encuentra perfectamente conectado. Apriete las conexiones flojas.
• Pruebe sustituyendo su teclado por otro.
• Pruebe conectando el ordenador a un puerto diferente.
• Si está haciendo uso del software del teclado que venía adjunto con el mismo,
desinstálelo e instale el driver estándar para teclados de Microsoft.
Ratón
El ratón se pierde cuando conmuto a un canal diferente.
• Compruebe que el ratón que está utilizando se encuentra correctamente conectado
al puerto de consola del conmutador.
• Si está haciendo uso del driver para ratón que venía adjunto con el mismo,
desinstálelo e instale el driver estándar para ratones Microsoft.
• Desconecte y vuelva a conectar el cable del ratón insertado en el canal que está
presentando problemas con el fin de sincronizar de nuevo la conexión del ratón.
• Conecte el ratón directamente al ordenador en el que está teniendo problemas con
el ratón.
• Espere un minuto después de que el ordenador abandone el modo standby para
que se retome el funcionamiento del ratón.
20
RESOLUCIÓN DE PROBLEMAS
P74711ea_F1DJ10x_man.indd 20-21 12/11/04 11:36:48 am
Page 70

Normativa FCC
DECLARACIÓN DE CONFORMIDAD CON LAS NORMATIVAS DE LA
FCC SOBRE COMPATIBILIDAD ELECTROMAGNÉTICA
Nosotros, Belkin Corporation, con sede en 501 West Walnut Street, Compton, CA
90220 (EEUU), declaramos bajo nuestra sola responsabilidad que los productos
F1DJ102P, F1DJ104P
a los que hace referencia la presente declaración:
Cumplen con la sección 15 de las normativas de la FCC. La operación está
bajo las siguientes dos condiciones: (1) este dispositivo no debe provocar
interferencias nocivas y (2) este dispositivo debe aceptar cualquier interferencia
recibida, incluidas las interferencias que puedan provocar un funcionamiento no
deseado.
Declaración de conformidad de la CE
Nosotros, Belkin Corporation, declaramos bajo nuestra sola responsabilidad que los productos F1DJ102P y F1DJ104P, a los que hacen referencia la presente declaración, están en con
formidad con el Estándar de Emisiones EN55022 y con el Estándar de Inmunidad EN55024,
LVP EN61000-3-2 y EN61000-3-3.
ICES
Este aparato digital de la clase B cumple con la norma canadiense ICES-003. Cet appareil
numérique de la classe B est conforme á la norme NMB-003 du Canada.
23
INFORMACIÓN
General
Mi ordenador no arranca cuando está conectado al conmutador, pero funciona bien
cuando conecto el teclado, el monitor y el ratón directamente al mismo.
• Asegúrese de que los cables de teclado y ratón se encuentren perfectamente
conectados entre el conmutador y el ordenador.
• Compruebe que los cables de teclado y ratón no estén cruzados, es decir,
asegúrese de que los conectores hayan sido insertados en los puertos apropiados.
22
RESOLUCIÓN DE PROBLEMAS
P74711ea_F1DJ10x_man.indd 22-23 12/11/04 11:36:48 am
Page 71

Garantía limitada de tres años del producto de Belkin
Corporation
Belkin Corporation proporciona para este producto una garantía de reparación gratuita, por
lo que respecta a mano de obra y materiales durante el periodo de garantía establecido. En
el caso de presentarse un fallo, Belkin decidirá entre la reparación del mismo o la sustitución
del producto, en ambos casos sin costes, siempre que se devuelva durante el periodo de
garantía con los gastos de transporte abonados al vendedor autorizado de Belkin en el que
se adquirió. Puede requerírsele la prueba de compra.
Esta garantía perderá su validez en el caso de que el producto haya sido dañado de forma
accidental, por abuso o empleo erróneo del mismo, si el producto ha sido modificado sin
la autorización por escrito de Belkin o si alguno de los números de serie de Belkin ha sido
eliminado o deteriorado.
LA GARANTÍA Y RESTITUCIONES LEGALES ESTABLECIDAS EXPRESAMENTE EN EL PRESENTE
ACUERDO SUSTITUYEN A TODAS LAS DEMÁS, ORALES O ESCRITAS, EXPRESAS O IMPLÍCITAS.
BELKIN RECHAZA DE MANERA EXPLÍCITA TODAS LAS DEMÁS GARANTÍAS IMPLÍCITAS,
INCLUYENDO, SIN LIMITACIÓN, LAS GARANTÍAS DE COMERCIABILIDAD Y DE IDONEIDAD PARA
UN FIN ESPECÍFICO.
Ningún comerciante, agente o empleado está autorizado a realizar ningún tipo de
modificación, extensión o alteración de la presente garantía.
BELKIN NO SE HARÁ EN NINGÚN CASO RESPONSABLE POR LOS DAÑOS IMPREVISTOS O
RESULTANTES DE UN INCUMPLIMIENTO DE LA GARANTÍA, O BAJO NINGUNA OTRA CONDICIÓN
LEGAL, INCLUYENDO, PERO NO EXCLUSIVAMENTE, LOS BENEFICIOS PERDIDOS, PERIODOS DE
INACTIVIDAD, BUENA VOLUNTAD, DAÑOS DURANTE LA REPROGRAMACIÓN O REPRODUCCIÓN
DE CUALQUIERA DE LOS PROGRAMAS O DATOS ALMACENADOS EN O EMPLEADOS CON LOS
PRODUCTOS BELKIN.
Algunas jurisdicciones no permiten la exclusión o limitación de los daños imprevistos o
consecuentesni las exclusiones de las garantías implícitas, por lo que cabe la posibilidad de
que las anteriores limitaciones de exclusiones no le afecten. Esta garantía le proporciona
derechos legales específicos y usted puede beneficiarse asimismo de otros derechos legales
específicos que varían entre las distintas jurisdicciones.
24
INFORMACIÓN
P74711ea_F1DJ10x_man.indd 24-25 12/11/04 11:36:48 am
Page 72

Belkin Ltd.
Express Business Park • Shipton Way
Rushden • NN10 6GL • Reino Unido
Tel: +44 (0) 1933 35 2000
Fax: +44 (0) 1933 31 2000
Belkin B.V.
Starparc Building • Boeing Avenue 333
1119 PH Schiphol-Rijk • Holanda
Tel: +31 (0) 20 654 7300
Fax: +31 (0) 20 654 7349
Belkin GmbH
Hanebergstrasse 2
80637 München • Alemania
Tel: +49 (0) 89 143405 0
Fax: +49 (0) 89 143405 100
Belkin SAS
5 Rue du Petit Robinson • 3ème étage
78350 Jouy en Josas • Francia
Tel: +33 (0) 1 34 58 14 00
Fax: +33 (0) 1 39 46 62 89
Asistencia técnica de Belkin
Europa: 00 800 223 55 460
© 2004 Belkin Corporation. Todos los derechos reservados.
Todas las marcas son marcas registradas de los respectivos fabricantes enumerados.
Conmutador KVM
It
F1DJ102P-B
F1DJ104P-B
Manuale utente
Per controllare fino a quattro
computer PS/2 mediante un singolo
insieme di monitor, tastiera e mouse
Switch KVM
P74711ea_F1DJ10x_man.indd 2-3 12/11/04 11:36:54 am
Page 73

Congratulazioni per l’acquisto di questo switch KVM Belkin (lo switch).
Le diverse gamme di soluzioni del leader del mercato KVM proposte dalla Belkin
esemplificano il nostro intento di fornire prodotti duraturi e di alta qualità a un
prezzo competitivo. Concepiti tecnicamente per assicurare il controllo di molteplici
computer e/o server a partire da una console, gli switch KVM Belkin dispongono di
una gamma di prestazioni tecniche adatte per tutte le configurazioni, siano esse
ampie o ridotte. Questo switch è provvisto di una garanzia di tre anni ed assistenza
tecnica gratuita Belkin.
Questo manuale fornisce dettagli sullo switch, dall’installazione all’operazione e alla
risoluzione dei problemi —nella remota eventualità dell’insorgere di un problema.
Per un’installazione facile, far riferimento alla Guida d’installazione rapida inclusa a
corredo di questo switch.
Grazie per aver acquistato lo switch KVM Belkin. Ci sta a cuore il vostro tipo di
attività.
Contenuto della confezione
• Switch KVM
• Manuale Utente
• Guida di installazione rapida
• Kit di cavi KVM OmniView
INTRODUZIONE
1
Introduzione
Contenuto della confezione . . . . . . . . . . . . . . . . . . . . . . . . . . . . . . . . .
1
Descrizione generale
Descrizione generale delle caratteristiche
. . . . . . . . . . . . . . . . . . . . . . . .2
Requisiti del sistema
. . . . . . . . . . . . . . . . . . . . . . . . . . . . . . . . . . . . . .3
Sistemi operativi . . . . . . . . . . . . . . . . . . . . . . . . . . . . . . . . . . . . . . . .
4
Diagrammi di visualizzazione dell’unità . . . . . . . . . . . . . . . . . . . . . . . . .
5
Specifiche . . . . . . . . . . . . . . . . . . . . . . . . . . . . . . . . . . . . . . . . . . . . .
7
Installazione
Configurazione preliminare
. . . . . . . . . . . . . . . . . . . . . . . . . . . . . . . . . .8
Guida all’installazione passo passo . . . . . . . . . . . . . . . . . . . . . . . . . . . .
9
Utilizzo dello switch
Avviamento dei sistemi . . . . . . . . . . . . . . . . . . . . . . . . . . . . . . . . . . .
14
Modalità di scansione automatica . . . . . . . . . . . . . . . . . . . . . . . . . . . .
15
Domande frequenti . . . . . . . . . . . . . . . . . . . . . . . . . . . . . . . . . . . . . . . .
16
Rilevazione e risoluzione delle anomalie
. . . . . . . . . . . . . . . . . . . . . . . . . 19
Informazioni
. . . . . . . . . . . . . . . . . . . . . . . . . . . . . . . . . . . . . . . . . . . . . 23
INDICE
P74711ea_F1DJ10x_man.indd 4-1 12/11/04 11:36:54 am
Page 74

Requisiti del sistema
Cavi
Per ogni computer PS/2 che si vuole collegare allo switch, si avrà bisogno di un
cavo VGA, un cavo per tastiera PS/2 e un cavo per mouse PS/2. Entrambi tastiera e
mouse devono essere provvisti di connettori PS/2 maschio-maschio.
Per raggiungere risoluzioni massime di 1920x1440@65Hz e per mantenere l’integrità
del segnale, si deve usare un cavo coassiale VGA da 75 Ohm. I cavi devono essere
provvisti di connettori HDDB15 femmina-maschio.
I cavi KVM OmniView Belkin sono progettati usando materiale della migliore qualità
per garantire trasmissioni ottimali. I cavi KVM includono dei connettori a schema
colorato PC99 che semplificano l’identificazione e la connessione. I cavi della
serie E, a doppia schermatura, con filtro in ferrite e la struttura ad alta resistenza,
includono il cavo coassiale VGA a 14 pin con connettori placcati nickel adatti ad
apparecchiature ad alte risoluzioni.
Con lo Switch KVM si consiglia di usare il seguente Kit di cavi incluso:
F1D9000-XX Kit di cavi KVM OmniView Serie E (PS/2)
(dove —XX indica la lunghezza in piedi)
DESCRIZIONE GENERALE
3
Lo Switch KVM Belkin rappresenta la soluzione più semplice per gestire vari
computer PS/2 da una sola tastiera, un monitor ed un mouse. Lo Switch supporta
periferiche di entrata PS/2 (tastiera e mouse), VGA, SVGA, XGA e computer PS/2.
Descrizione generale delle caratteristiche
Tasti di scelta rapida
I tasti di scelta rapida permettono di selezionare la porta desiderata utilizzando i
tasti di comando assegnati. Si possono controllare vari computer usando i tasti di
scelta rapida sulla tastiera.
Scansione automatica
La scansione automatica permette di analizzare e monitorare le attività dei singoli
computer collegati allo Switch.
Risoluzione Video
Con una larghezza di banda di 200 MHz, lo switch è in grado di supportare
risoluzioni video fino a 1920x1440@65Hz. Per mantenere l’integrità del segnale ad
alte risoluzioni video, si richiede un cablaggio coassiale VGA da 75 Ohm.
Pulsante sul pannello anteriore
Un pulsante, comodamente posizionato sul pannello anteriore dello switch, consente
di selezionare manualmente e in maniera semplice la porta desiderata.
Indicatori LED
Degli indicatori LED sulla parte anteriore dello switch fungono da controllo di stato.
Gli indicatori LED si trovano su entrambi i lati del pulsante sul pannello anteriore ed
indicano quale porta corrispondente è attiva.
DESCRIZIONE GENERALE
2
P74711ea_F1DJ10x_man.indd 2-3 12/11/04 11:36:55 am
Page 75

5
DESCRIZIONE GENERALE
Indicatori LED di
stato
Pulsante
pannello anteriore
Switch KVM a 2 porte:
Porte Console
Tastiera e Mouse
Jack di
alimentazione CC
Porte Computer 2
Diagrammi di visualizzazione unità
Porta console VGA
Porte Computer 1
Sistemi Operativi
Lo Switch deve essere usato con CPU che usano:
Piattaforme
• Windows® 95, 98, 2000, Me, NT®, XP • DOS • Linux®
• Novell® NetWare® 4.x/5.x
Tastiere
• Supporta tastiere 101-, 102 e 104 key
Mouse
• Compatibile con i mouse Microsoft® PS/2 a 2,3,4 o 5 tasti
Monitor
• VGA
• SVGA
• MultiSync®
Alimentatore opzionale
È disponibile un alimentatore da 9V, 600mA. Visitate il sito belkin.it per ulteriori
informazioni.
DESCRIZIONE GENERALE
4
P74711ea_F1DJ10x_man.indd 4-5 12/11/04 11:36:55 am
Page 76

Specifiche
Cod. Prodotto: F1DJ102P, F1DJ104P
Alimentazione: Opzionale CC a 9 Volt, con adattatore da 600 mA con polarità positiva
al contatto centrale.
Numero di PC assistiti: F1DJ102P: 2
F1DJ104P: 4
Emulazione tastiera: PS/2
Emulazione mouse PS/2 e seriale (mediante adattatore)
Tipi di monitor supportati: VGA e SVGA, MultiSync, LCD a cristalli liquidi (mediante
un cavetto adattatore)
Risoluzione massima: 1940x1440@65Hz
Presa della tastiera: Spinotto mini-DIN a sei contatti (PS/2)
Presa del mouse: Spinotto mini-DIN a sei contatti (PS/2)
Porta VGA: Tipo HDDB a 15 contatti
Indicatori LED: F1DJ102P: 2
F1DJ104P: 4
Rivestimento esterno: Plastica
Dimensioni: F1DJ102P: (Lung) 4.5 x (Larg) 3.0 x (Alt) 1.0 pollici
F1DJ104P: (Lung) 7.5 x (Larg) 3.0 x (Alt) 1.0 pollici
Peso: F1DJ102P: 3.2oz.
F1DJ104P: 6.4oz.
Garanzia: 3 anni
Nota: Le specifiche sono soggette a variazioni senza obbligo di preavviso.
7
DESCRIZIONE GENERALE
6
DESCRIZIONE GENERALE
Indicatori LED di
stato
Pulsante
pannello anteriore
Switch KVM a 4 porte:
Porte Console
Tastiera e Mouse
Jack di alimentazione CC
Porte Computer 3
Porte Computer 2
Porta console VGA
Porte Computer 1
Porte Computer 4
P74711ea_F1DJ10x_man.indd 6-7 12/11/04 11:36:55 am
Page 77

Guida all’installazione passo passo
Questa sezione fornisce tutte le istruzioni necessarie per impostare l’hardware
in un unico switch.
Nota importante
Prima di effettuare collegamenti tra Switch e computer, accertarsi che tutti i
computer e gli switch siano spenti. Infatti, attaccare e staccare cavi, mentre i
computer sono accesi, può provocare danni irreversibili ai computer, ai dati e/o allo
Switch. La Belkin Corporation declina qualsiasi responsabilità per eventuali danni
causati da un mancato adempimento a queste indicazioni.
Collegamento della console
1. Collegare la tastiera e il mouse,
ambedue di tipo PS/2, alle porte
indicate rispettivamente con
KEYBOARD e MOUSE, che si trovano
sui pannelli laterali
dello Switch.
9
INSTALLATION
INSTALLAZIONE
8
Configurazione preliminare
Dove posizionare lo Switch
Lo Switch è stato progettato per essere collocato su scrivania. La corretta
collocazione dipende da dove si trovano i CPU e dalla lunghezza dei cavi.
Requisiti della distanza dei cavi
Per computer PS/2: I segnali VGA si mantengono al meglio quando vengono
trasmessi fino a 7,6 m. Oltre i 7,6 metri, con l’aumentare della distanza vi sono
maggiori possibilità di un indebolimento del segnale. Perciò il computer PS/2
dovrebbe trovarsi entro un raggio di 7,6 metri di distanza dallo Switch KVM.
Nota: Se il computer deve essere situato a più di 7,6 metri dallo Switch KVM, si può
usare l’Extender CAT5 Belkin (codice prodotto F1D084) per estendere la tastiera PS/2,
il mouse PS/2 e il monitor ad un massimo di 152,4 metri, usando un cavo CAT5 UTP.
Avvertenze
Evitare di posizionare i cavi vicino a luci fluorescenti, a condizionatori d'aria o
apparecchiature che producono rumore elettrico (Es. aspirapolvere).
INSTALLAZIONE
P74711ea_F1DJ10x_man.indd 8-9 12/11/04 11:36:56 am
Page 78

Collegamento del Computer:
3. Utilizzando un kit di cavi KVM OmniView, collegare lo spinotto maschio del
cavo VGA alla porta VGA del primo computer. Collegare lo spinotto femmina alla
porta VGA 1 sul lato dello switch.
11
INSTALLAZIONE
2. Collegare il cavo video che proviene dal monitor alla porta VGA OUT che si
trova sul lato dello switch
10
INSTALLAZIONE
P74711ea_F1DJ10x_man.indd 10-11 12/11/04 11:36:57 am
Page 79

5. Collegare uno spinotto del cavo KVM PS/2 del mouse alla porta del mouse sul
computer e l'altro spinotto dello stesso cavo alla porta MOUSE 1 sul lato dello
switch.
Ripetere le fasi dal punto 3 al punto 5 per ciascun computer aggiuntivo
da collegare allo switch, tenendo conto delle porte che corrispondono al
computer e che si trovano sul lato dello switch
13
INSTALLAZIONE
4. Collegare lo spinotto del cavo KVM della tastiera PS/2 alla porta della tastiera
sul computer, e l'altro spinotto dello stesso cavo alla porta KEYBOARD 1 sul
lato dello Switch.
12
INSTALLAZIONE
P74711ea_F1DJ10x_man.indd 12-13 12/11/04 11:36:59 am
Page 80

direttamente una qualsiasi porta immettendo il numero della porta dello switch che
si desidera utilizzare. Ad esempio, se si preme “Scroll Lock”, “Scroll Lock” e “2”,
viene selezionato il computer della porta 2.
Modalità di Scansione automatica
In modalità di scansione automatica, lo switch resta su una data porta per otto
secondi prima di commutare verso la successiva. Questo intervallo di tempo non
può essere modificato. Per abilitare la scansione automatica, premere “Scroll Lock”,
“Scroll Lock” ed “S”.
Nota: in questa modalità volutamente non sono presenti controlli del mouse o
della tastiera, al fine di prevenire eventuali errori. Infatti, se tali controlli fossero
abilitati, l’utente potrebbe spostare il mouse o la tastiera mentre lo switch KVM sta
commutando verso la porta successiva. Ciò potrebbe interrompere la comunicazione
tra il computer e lo switch causando un movimento imprevedibile del mouse, o una
strana visualizzazione di caratteri durante l’utilizzo della tastiera.
Per disabilitare la scansione automatica, premere la barra spaziatrice.
15
UTILIZZO DELLO SWITCH
+
+
Commutazione verso la Porta 2—(02)
Accensione dei sistemi
Una volta collegati tutti i cavi, accendere i computer connessi allo switch. Tutti i
computer possono essere accesi contemporaneamente. Lo switch emula un mouse
e una tastiera per ciascuna porta e consentirà al computer un’inizializzazione
normale. Lo switch è ora pronto per essere utilizzato. Si può selezionare il
computer da rendere operativo sia tramite il pulsante che si trova sul pannello
frontale dello switch, sia mediante i tasti di scelta rapida. Da notare che saranno
necessari 1 o 2 secondi per la visualizzazione allo schermo dopo la commutazione.
Ciò è dovuto all’aggiornamento del segnale video. Viene compiuta inoltre una
risincronizzazione dei segnali del mouse e della tastiera. Si tratta di un’operazione
normale che assicura che venga stabilita una sincronizzazione appropriata. Si
possono cambiare a piacere le porte dello switch tramite una sequenza di comandi
dalla tastiera, servendosi del tasto "Scroll Lock" (blocco dello scorrimento) e dei
tasti con le frecce verso l'alto e il basso. Per inoltrare comandi verso lo switch,
premere il tasto “Scroll Lock” per due volte in un intervallo di due secondi. Si
sentirà un segnale sonoro di conferma. A questo punto si potrà premere il tasto
con la freccia verso l’alto o il basso per commutare le porte. Si può commutare
14
UTILIZZO DELLO SWITCH
Per commutare verso la successiva
porta attiva, premere sul tasto
con la freccia verso l’alto
Per commutare verso la porta atti
va precedente, premere sul tasto
con la freccia verso il basso
P74711ea_F1DJ10x_man.indd 14-15 12/11/04 11:37:02 am
Page 81

17
D: Qual è la risoluzione massima supportata dallo Switch?
R: Il circuito video avanzato dello switch raggiunge risoluzioni massime di
1940x1440@65Hz. La risoluzione più alta è ideale per grafici e disegnatori
che hanno bisogno di immagini di alta qualità.
D: Quale larghezza di banda video supporta lo Switch KVM?
R: Lo switch prevede una larghezza di banda video di 200MHz.
D: Qual è la differenza tra uno Switch KVM e uno Switch KVM Serie SOHO ?
R: Gli Switch KVM Serie SOHO offrono il supporto addizionale per audio e
microfono; design compatto; la gestione dei cavi; l’aggiornamento rapido e
l’opzione USB.
D: Quali sono i vantaggi di uno Switch KVM Belkin rispetto ad un prodotto
simile della concorrenza?
R: Lo Switch KVM Belkin rappresenta una soluzione economica, piena di
caratteristiche che solitamente si trovano in prodotti più costosi. Lo Switch KVM
Belkin è provvisto di tasti di scelta rapida e scansione automatica, supporta
risoluzioni massime di 1940x1440@65Hz e comprende una garanzia limitata di
tre anni Belkin —: il tutto ad un prezzo veramente conveniente.
D: Posso usare lo Switch con il mio computer Sun?
R: Si, lo switch funziona con i computer Sun, se usato con l’Adattatore Belkin per
Sun, codice prodotto F1D082.
DOMANDE FREQUENTI
16
D: Quali sistemi operativi supporta lo Switch?
R: Lo Switch supporta qualsiasi sistema operativo provvisto di piattaforma PS/2.
Funziona inoltre con i sistemi operativi Sun e Mac, se usato con i rispettivi
adattatori (Adattatore Omniview Belkin per Sun F1D082, Adattatore Omniview
Belkin per Mac F1D080). I sistemi operativi includono DOS, Windows 3.x, 95, 98,
2000, Me, NT, XP, Linux, Novell NetWare 4.x/5.x ed altri.
D: Lo Switch funziona con Microsoft IntelliMouse?
R: Sì, lo switch funziona con i mouse Microsoft, Logitech, Kensington e Belkin.
Lo switch supporta solo due tasti per il mouse. Contattarel’Assistenza Tecnica
Belkin per eventuali domande sulla compatibilità.
D: Come avviene la commutazione delle porte?
R: Lo switch supporta due metodi per la selezione delle porte. L’utente può
scegliere il computer usando i tasti di scelta rapida sulla tastiera o premendo
il tasto sul pannello anteriore.
D: A quale distanza dallo switch può trovarsi l’utente?
R: Quando si usano connessioni PS/2, lo switch può trovarsi ad un massimo di
7,6 metri di distanza dal computer. Se il computer deve essere situato a più
di 7,6 metri dallo Switch KVM, si può usare l’Extender CAT5 Belkin (codice
prodotto F1D084) per estendere la tastiera PS/2, il mouse PS/2 e il monitor ad
un massimo di 152,4 metri, usando un cavo CAT5 UTP.
DOMANDE FREQUENTI
P74711ea_F1DJ10x_man.indd 16-17 12/11/04 11:37:03 am
Page 82

19
Video
Le immagini sul monitor sono offuscate, sfocate.
• Verificare che tutti i cavi video siano ben collegati.
• Controllare se il monitor supporta la risoluzione e velocità di ripristino del
computer.
• Assicurarsi che la scheda grafica supporti la risoluzione e velocità di ripristino del
computer.
• Collegare il monitor direttamente al computer con il quale si stanno avendo dei
problemi per vedere se questi continuano a verificarsi.
Lo schermo è nero.
• Verificare che tutti i cavi video siano ben collegati.
• Se si usa un adattatore di alimentazione, controllare che il cavo della tastiera tra
il computer e lo switch sia ben collegato.
• Se si usa lo Switch solo per la commutazione video e non vi è una connessione
con tastiera o mouse tra lo switch e il computer, bisognerà acquistare un
adattatore di alimentazione 9 V CC da 600mA (Codice prodotto Belkin F1D065-PWR
per il vostro paese).
• Collegare il monitor direttamente al computer per assicurarsi che il monitor
funzioni bene.
RILEVAZIONE E RISOLUZIONE DELLE ANOMALIE
D: Devo installare qualche software per usare lo Switch?
R: No, lo Switch non necessita di alcun driver o software. È sufficiente collegare
tutti i computer alle porte PC sullo Switch, quindi collegare un monitor, un
mouse e la tastiera alle rispettive porte della console e lo switch è pronto per
essere usato!
D: È necessario usare un adattatore CA con lo Switch?
R: Lo Switch può essere alimentato mediante la porta per la tastiera PS/2 sul
computer. Se lo switch non può essere alimentato usando la porta PS/2 sul
computer, si può usare un adattatore opzionale da 9 V CC a 600mA.
D: Posso usare lo switch per commutare solo segnali video?
R: Sì, lo Switch può essere usato per commutare solamente segnali video senza
dover collegare la tastiera e il mouse. La tastiera e il mouse dovrebbero essere
collegati direttamente al computer dal quale proviene il segnale video per
assicurarsi che il computer funzioni in modo adeguato.
Nota: Poiché non si può prelevare corrente dal computer attraverso la tastiera o la
porta USB bisognerà usare un adattatore addizionale CA.
D: Qual è la durata della garanzia dello switch?
R: Lo switch è provvisto di una garanzia limitata di tre anni.
18
DOMANDE FREQUENTI
P74711ea_F1DJ10x_man.indd 18-19 12/11/04 11:37:03 am
Page 83

21
• Disattivare la gestione dell’alimentazione sul PC con il quale si stanno verificando
dei problemi.
• Provare a sostituire il mouse.
Il mouse non viene rilevato all’avvio.
• Controllare i cavi assicurandosi che siano ben collegati.
Il computer si avvia ma il mouse non funziona.
• Assicurarsi che sia ben collegato.
• Assicurarsi che il mouse funzioni quando è collegato direttamente al computer.
Potrebbe essere necessario far ripartire il computer.
• Provare un altro mouse.
Quando effettuo la commutazione delle porte, si verifica un movimento
imprevedibile del cursore.
• Assicurarsi di non avere più driver mouse installati. Assicurarsi che il driver sia per
un mouse standard PS/2 o per un mouse Microsoft compatibile PS/2.
• Assicurarsi di non aver alcun driver mouse scaricato tra i file CONFIG.SYS o
AUTOEXEC.BAT.
• Evitare di muovere il mouse o di premere il pulsante del mouse durante la
commutazione dello switch.
• Per far funzionare nuovamente il mouse, è sufficiente staccare il mouse dallo
switch e attendere 2-3 secondi prima di collegarlo di nuovo.
RILEVAZIONE E RISOLUZIONE DELLE ANOMALIE
Tastiera
Il computer non rileva la tastiera e all’avvio viene segnalato un errore in tastiera.
• Assicurarsi che il cavo per la tastiera sia ben collegato tra lo switch e il computer.
Stringere eventuali connessioni lente.
• Provare a sostituire la tastiera.
• Provare a collegare il computer ad un’altra porta.
• Se si sta usando il software in dotazione con la tastiera, disinstallarlo ed installare
il driver tastiera standard della Microsoft.
Mouse
Quando cambio il canale dello switch, non vedo più il cursore del mouse.
• Assicurarsi che il mouse sia ben collegato alla porta della console dello switch.
• Se si sta usando il software in dotazione con il mouse, disinstallarlo ed installare
il driver mouse standard della Microsoft.
• Disconnettere e collegare nuovamente il cavo del mouse attaccato al canale con il
quale si stanno verifando i problemi per risincronizzare il mouse.
• Collegare il mouse direttamente al computer con il quale si sono verificati i
problemi.
• Attendere un minuto dopo il riavvio del computer prima che il mouse riacquisti le
proprie funzioni.
20
RILEVAZIONE E RISOLUZIONE DELLE ANOMALIE
P74711ea_F1DJ10x_man.indd 20-21 12/11/04 11:37:03 am
Page 84

Dichiarazione FCC
DICHIARAZIONE DI CONFORMITÀ CON LE LEGGI FCC
PER LA COMPATIBILITÀ’ ELETTROMAGNETICA
Noi sottoscritti, Belkin Corporation, con sede al 501 West Walnut Street,
Compton, CA 90220, dichiariamo sotto la nostra piena responsabilità che i
prodotti:
F1DJ102P, F1DJ104P
ai quali questa dichiarazione fa riferimento,
sono conformi all'art. 15 delle norme FCC. Il funzionamento è consentito nelle
seguenti due condizioni: (1) il dispositivo non deve causare interferenze
dannose e (2) il dispositivo deve accettare qualsiasi interferenza ricevuta,
comprese eventuali interferenze che possano causare un funzionamento
anomalo.
Dichiarazione di conformità CE
Noi sottoscritti, Belkin Corporation, dichiariamo sotto la nostra piena responsabilità che i
prodotti F1DJ102P e F1DJ104P, ai quali questa dichiarazione fa riferimento, sono realizzati
in conformità allo Standard sulle Emissioni EN550022 e alla Norma di Immunità EN550024,
nonché agli standard LVD EN610003-2 e EN61000-3-3.
ICES
Questo apparecchio digitale di classe B è conforme allo standard canadese ICES-003. Cet
appareil numérique de la classe B conforme á la norme NMB-003 du Canada.
23
INFORMAZIONI
Generale
Il computer non si avvia quando è collegato allo switch, tuttavia funziona quando la
tastiera, il monitor e il mouse sono collegati direttamente a questo.
• Accertarsi che i cavi della tastiera e del mouse tra lo switch e il computer non si
siano allentati.
• Assicurarsi che i cavi della tastiera e del mouse non siano aggrovigliati, ad es.
assicurarsi che i connettori siano inseriti nelle rispettive porte.
22
RILEVAZIONE E RISOLUZIONE DELLE ANOMALIE
P74711ea_F1DJ10x_man.indd 22-23 12/11/04 11:37:03 am
Page 85

Garanzia limitata di tre anni Belkin Corporation
Belkin Corporation garantisce che, per il periodo di validità della garanzia, questo prodotto
non presenterà difetti di materiale e lavorazione. Qualora venisse rilevata un’anomalia,
Belkin provvederà, a propria discrezione, a riparare o sostituire il prodotto gratuitamente,
a condizione che esso sia restituito entro il periodo di garanzia, con le spese di trasporto
prepagate, al rivenditore Belkin autorizzato da cui è stato acquistato. Potrebbe venire
richiesta la prova di acquisto.
Questa garanzia non si applica nel caso in cui il prodotto sia stato danneggiato in seguito
a incidente, abuso, cattivo utilizzo o errata applicazione; se il prodotto è stato modificato
senza il consenso scritto da parte della Belkin; o se un qualsiasi numero di serie Belkin è
stato rimosso o cancellato.
LA GARANZIA ED I RIMEDI DI CUI SOPRA PREVALGONO SU QUALSIASI ALTRO ACCORDO, SIA
ORALE CHE SCRITTO, ESPRESSO O IMPLICITO. BELKIN DECLINA SPECIFICATAMENTE
QUALSIASI OBBLIGO DI GARANZIA IMPLICITO COMPRESE, SENZA LIMITI, LE GARANZIE DI
COMMERCIABILITÀ O IDONEITÀ AD UN PARTICOLARE SCOPO.
Nessun rivenditore, agente o dipendente Belkin è autorizzato ad apportare modifiche,
ampliamenti o aggiunte alla presente garanzia.
BELKIN DECLINA QUALSIASI RESPONSABILITA’ PER EVENTUALI DANNI SPECIALI,
ACCIDENTALI, DIRETTI O INDIRETTI DOVUTI AD UN’EVENTUALE VIOLAZIONE DELLA
GARANZIA O IN BASE A QUALSIASI ALTRA FORMA DI TEORIA LEGALE, COMPRESI, MA
NON SOLO, I CASI DI MANCATO GUADAGNO, INATTIVITA’, DANNI O RIPROGRAMMAZIONE O
RIPRODUZIONE DI PROGRAMMI O DATI MEMORIZZATI O UTILIZZATI CON I PRODOTTI BELKIN.
Alcuni Stati non consentono l’esclusione o la limitazione delle garanzie implicite o della
responsabilità per i danni accidentali, pertanto i limiti di esclusione di cui sopra
potrebbero non fare al caso vostro. Questa garanzia consente di godere di diritti legali
specifici ed eventuali altri diritti che possono variare di stato in stato.
24
INFORMAZIONI
P74711ea_F1DJ10x_man.indd 24-25 12/11/04 11:37:03 am
Page 86

Belkin Ltd.
Express Business Park • Shipton Way
Rushden • NN10 6GL • Regno Unito
Tel: +44 (0) 1933 35 2000
Fax: +44 (0) 1933 31 2000
Belkin B.V.
Starparc Building • Boeing Avenue 333
1119 PH Schiphol-Rijk • Paesi Bassi
Tel: +31 (0) 20 654 7300
Fax: +31 (0) 20 654 7349
Belkin GmbH
Hanebergstrasse 2
80637 Monaco di Baviera • Germania
Tel: +49 (0) 89 143405 0
Fax: +49 (0) 89 143405 100
Belkin SAS
5 Rue du Petit Robinson • 3ème étage
78350 Jouy en Josas • Francia
Tel: +33 (0) 1 34 58 14 00
Fax: +33 (0) 1 39 46 62 89
Assistenza tecnica Belkin
Europa: 00 800 223 55 460
© 2004 Belkin Corporation. Tutti i diritti riservati. Tutti i nomi
commerciali sono marchi registrati dai rispettivi produttori elencati.
Switch KVM
P74711ea_F1DJ10x_man.indd 2-3 12/11/04 11:37:04 am
Page 87

P74 711 ea
Belkin Ltd.
Express Business Park • Shipton Way
Rushden • NN10 6GL • United Kingdom
Tel: +44 (0) 1933 35 2000
Fax: +44 (0) 1933 31 2000
Belkin B.V.
Starparc Building • Boeing Avenue 333
1119 PH Schiphol-Rijk • The Netherlands
Tel: +31 (0) 20 654 7300
Fax: +31 (0) 20 654 7349
Belkin GmbH
Hanebergstrasse 2
80637 Munich • Germany
Tel: +49 (0) 89 143405 0
Fax: +49 (0) 89 143405 100
Belkin SAS
5 Rue du Petit Robinson • 3ème étage
78350 Jouy en Josas • France
Tel: +33 (0) 1 34 58 14 00
Fax: +33 (0) 1 39 46 62 89
Belkin Tech Support
Europe: 00 800 223 55 460
© 2004 Belkin Corporation. All rights reserved.
All trade names are registered trademarks of respective manufacturers listed.
KVM Switch
 Loading...