

Page 1

SOHO DVI KVM Switch
Belkin Tech Support
US: 800-223-5546 ext. 2263
310-898-1100 ext. 2263
Europe: 00 800 223 55 460
Australia: 1800 235 546
New Zealand: 0800 235 546
Singapore: 800 616 1790
Belkin Corporation
501 West Walnut Street
Los Angeles, CA 90220-5221, USA
310-898-1100
310-898-1111 fax
Belkin Ltd.
Express Business Park, Shipton Way
Rushden, NN10 6GL, United Kingdom
+44 (0) 1933 35 2000
+44 (0) 1933 31 2000 fax
© 2006 Belkin Corporation. All rights reserved. All trade names are registered trademarks of
respective manufacturers listed. Mac, Mac OS, and Apple are trademarks of Apple Computer,
Inc., registered in the U.S. and other countries.
Belkin Ltd.
7 Bowen Crescent, West Gosford
NSW 2250, Australia
+61 (0) 2 4372 8600
+61 (0) 2 4372 8603 fax
Belkin B.V.
Boeing Avenue 333
1119 PH Schiphol-Rijk, The Netherlands
+31 (0) 20 654 7300
+31 (0) 20 654 7349 fax
P7517 7
Page 2
User Manual
F1DD102U
F1DD104U
Page 3

Table of Contents
1. Introduction ............................................................................... 1
Packag e Contents ........................................................... 1
Features .......................................................................... 2
Displa y Diagrams .............................................................3
Specif ication s ..................................................................4
2. What You Need to Get Started .................................................... 5
Equipm ent Requirem ents ................................................ 5
3. How to Install Your SOHO KVM Switch ........................................ 6
Pre-Conf iguration ............................................................ 6
Connec ting Your Console ................................................. 7
Connec ting Your Computers .............................................8
Connec ting USB Devices ............................................... 10
4. Using Your SOHO KVM Switch ................................................... 11
Switch ing Betwee n Computer s ....................................... 11
5. Frequently Asked Questions ..................................................... 12
6. Troubleshooting ....................................................................... 13
7. Information .............................................................................. 16
Page 4
Introduction
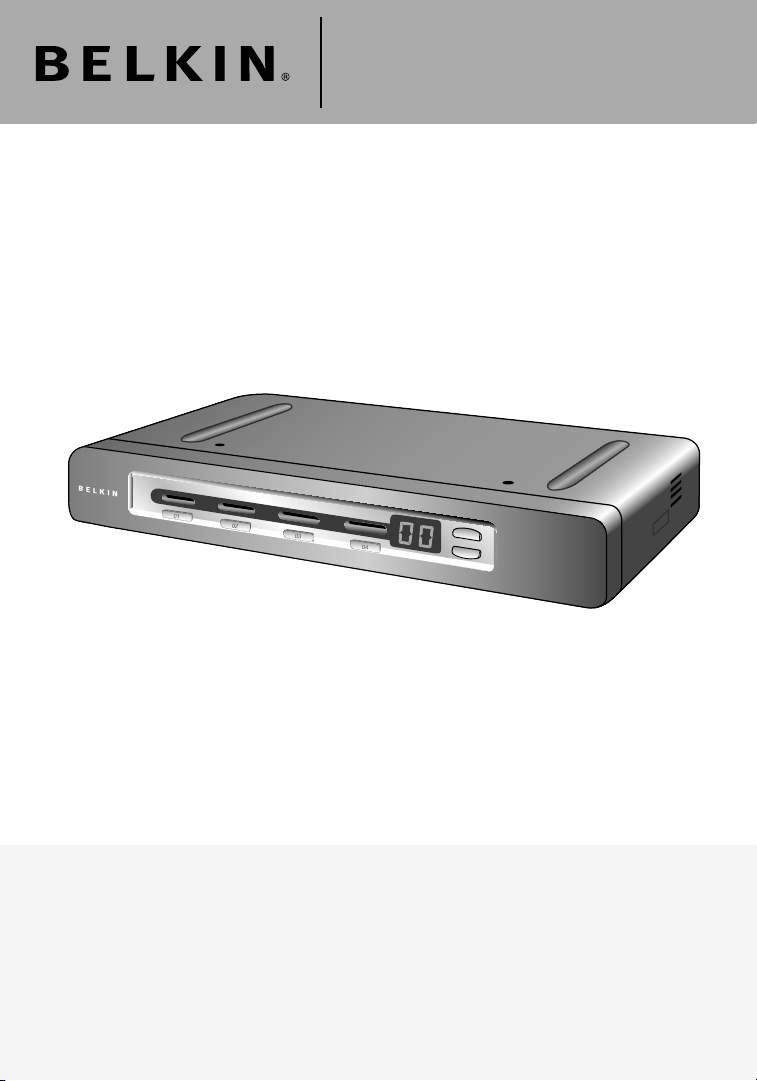
Congratulations and thank you for purchasing Belkin’s SOHO DVI KVM
Switch. The SOHO KVM Switch lets you share one DVI-D monitor, and one
USB keyboard and mouse with up to four computers. Designed to organize
and save your desk space, the SOHO KVM Switch sits neatly on your desk to
reduce clutter. It saves you money on additional peripherals while providing
great convenience with easy-to-use, advanced features.
For details about installation and operation, please consult this User Manual.
Our Quick Installation Guide, also enclosed with this purchase, offers quick
and easy setup directions. Please review these materials carefully to ensure
that you get the most from your new SOHO KVM Switch.
Package Contents
SOHO DVI
KVM Switch
9V DC, 2.5A
Power Adapter
section
1
2
3
4
5
6
7
User Manual
Quick
Installation Guide
11
Page 5

Introduction
Features
• Built-In USB 2.0 Hub
The SOHO KVM Switch features a built-in Hi-Speed USB 2.0 hub, so you can
share two USB peripheral devices, such as a printer, with all your computers.
• Speaker/Microphone Support
The SOHO KVM Switch allows you to share one set of speakers and one
microphone with all your computers so you won’t need to unplug and reconnect
your speakers and microphone every time you switch access from one computer
to the next.
• High Video Resolution
The SOHO KVM Switch is able to support video resolutions of up to
1600x1200@65Hz so you can use the latest in video display technology for all
your computers.
• Direct-Access Port Selectors
Direct-access port selectors, conveniently located on the front face of the SOHO
KVM Switch, allow you to easily switch access from one computer to the next.
• LED Indicators
The SOHO KVM Switch features four LEDs and a seven-segment LED display
on the front panel to let you know which computer is currently being accessed.
• Multi-Platform Support
The SOHO KVM Switch is fully compatible with USB-based Mac® or PC desktop
or notebook computers.
• ADC Monitor Support
The SOHO KVM Switch supports ADC monitors with Apple® adapters.
• Rack-Mountable
The SOHO KVM Switch can also be mounted to a standard 19-inch rack using
an optional rack-mount bracket (Belkin part number F1D005), sold separately.
• ADC Monitor Support
The SOHO KVM Switch supports ADC monitors with Apple® adapters.
• Rack-Mountable
The SOHO KVM Switch can also be mounted to a standard 19-inch rack using
an optional rack-mount bracket (Belkin part number F1D005), sold separately.
2
Page 6
DC 5V, 2.5A
audio
mic
audio
mic
audio
mic
audio
mic
audio
mic
Device B
Device A
Console
USB 04 USB 03 USB 02 USB 01
PC 4 PC 3 PC 2 PC 1
1
2
3
4
5
6
7
section
Introduction
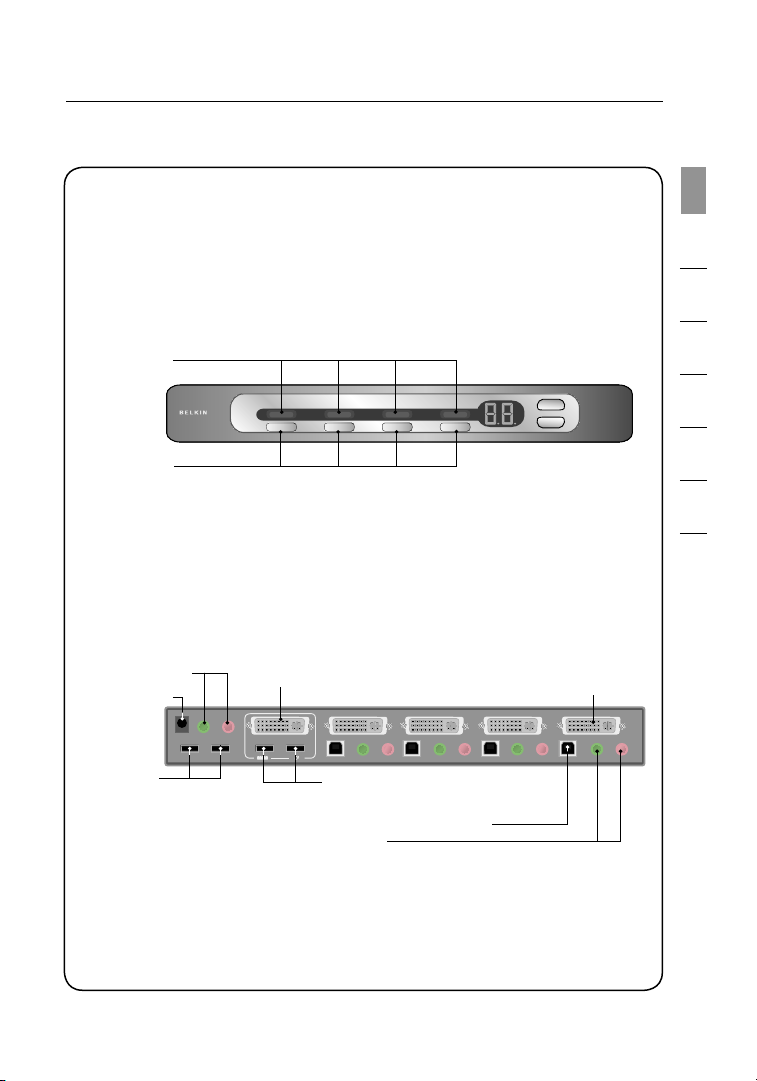
Display Diagrams
LED Indicators
Direct-Access
Port Selectors
Console Speaker and
Microphone Jacks
DC Power Jack
USB
Device Ports
Monitor Port
Console
1st Computer
Audio/Mic Jacks
(front panel)
(F1DD104U model shown)
(back panel)
Console Keyboard/Mouse Ports
1st Computer
USB Port
1st Computer
Monitor Port
(F1DD104U model shown)
3
Page 7

Introduction
Specifications
SOHO DVI KVM Switch
Part No.: F1DD102U, F1DD104U
Computers Supported: 2 and 4 for 2- and 4-port models
Monitors Supported: DVI-D, ADC (with DVI adapter)
Max. Resolution Support: Up to 1600x1200@65Hz
Monitor Connection: DVI
Keyboard Input: USB Type A
Mouse Input: USB Type A
Stereo Audio Input: 3.5mm jack
Microphone Input: 3.5mm jack
Keyboard Output: USB Type B
Mouse Output: USB Type B
Port Selectors: 2 and 4 for 2- and 4-port models
LED Indicators: 2 and 4 for 2- and 4-port models
Enclosure: 1U, metal, with plastic faceplate
Power Adapter: 9V DC, 2.5A power adapter
Operating Temp: 32° to 104° F (0~40° C)
Storage Temp: -4° to 140° F (-20~60° C)
Humidity: 0-80% RH, non-condensing
Warranty: 5 years
Dimensions:
(F1DD102U) 11.0 x 1.75 x 6.0 in. (279 x 44 x 152mm)
(F1DD104U) 11.0 x 1.75 x 6.0 in. (279 x 44 x 152mm)
Weight:
(F1DD102U) 2.75 lbs. (1.25kg.)
(F1DD104U) 2.75 lbs. (1.25kg.)
Note: Specifications are subject to change without notice.
4
4
Page 8

What You Need to Get Started
Equipment Requirements
Monitor
The SOHO KVM Switch supports any DVI-D monitor, or ADC monitor with
DVI-to-ADC display adapter.
Keyboard
The SOHO KVM Switch fully supports all USB Apple keyboards or PC
keyboards, including all function keys.
Mouse
The SOHO KVM Switch supports any USB-based mouse.
Cables
Belkin SOHO Series KVM Cables are required to connect your computers to
your SOHO KVM Switch. Belkin KVM Cables offer the highest quality possible
to support resolutions of up to 1600x1200@65Hz and to ensure that your data is
optimally transmitted. Cables are available in 6-, 10-, and 15-foot lengths (Belkin
part numbers F1D9201-06, F1D9201-10, and F1D9201-15). You will require one
cable kit per computer.
System
The SOHO KVM Switch can be used with USB-based Mac or PC desktop or
notebook computers that run on one of these platforms:
• Windows® 2000, XP, 2003
• Mac OS® X v10.3 and above
• Linux® with USB support
1
section
2
3
4
5
6
7
5
Page 9

How to Install Your SOHO KVM Switch
Pre-Configuration
Where to Place the SOHO KVM Switch
The compact size of the SOHO KVM Switch makes it perfect for desktop
placement. Consider the following when deciding where to place the SOHO KVM
Switch: the length of the cables attached to your keyboard, mouse, and monitor;
the location of your computers from your console; and the length of the cables you
use to connect your computers to the SOHO KVM Switch.
Cable Distance Requirements
DVI/USB signals are the strongest when transmitted up to 15 feet between the
SOHO KVM Switch and the computer. Beyond 15 feet, probability of signal
degradation increases, which can cause the device to fail.
Warning! Avoid having cables near fluorescent lights, air conditioning equipment,
or machines that create electrical noise (e.g., vacuum cleaners).
66
Page 10

How to Install Your SOHO KVM Switch
DC 5V, 2.5A
audio
mic
audio
mic
audio
mic
audio
mic
audio
mic
Device B
Device A
Console
USB 04 USB 03 USB 02 USB 01
PC 4 PC 3 PC 2 PC 1
Note: Before installing your SOHO KVM Switch, verify that your
USB keyboard and mouse work properly with all computers you
will be connecting.
1
Connecting Your Console
Step 1
Connect the video cable attached to your monitor and connect it to the DVI
monitor port on the back of your SOHO KVM Switch. See Fig. 1.
Step 2
Connect your keyboard and mouse cables to the keyboard and mouse USB
ports on the back of your SOHO KVM Switch. See Fig. 1.
Step 3
Connect your speaker and microphone cables to the speaker and
microphone jacks on the back of your SOHO KVM Switch (optional).
See Fig. 1.
2
section
3
4
5
6
7
(F1DD104U model shown)
Fig. 1
7
Page 11

How to Install Your SOHO KVM Switch
DC 5V, 2.5A
audio
mic
audio
mic
audio
mic
audio
mic
audio
mic
Device B
Device A
Console
USB 04 USB 03 USB 02 USB 01
PC 4 PC 3 PC 2 PC 1
Connecting Your Computers
Step 1
Make sure all your computers are powered off.
Step 2
Using Belkin SOHO KVM Cables (Belkin part number F1D9201-XX), connect one
end of the DVI cable to your computer’s DVI monitor port and the other end to the
monitor port on the SOHO KVM Switch labeled “PC 1”. See Fig. 2.
Step 3
Connect one end of the USB cable to your computer’s USB port and the other end
to the USB port on the SOHO KVM Switch labeled “USB 01”. See Fig. 2.
Step 4
Connect one end of the audio cable to the “Speaker Out” jack on your sound card
or computer, and the other end to the “audio” jack on your SOHO KVM Switch
below “PC 1” (optional). See Fig. 2.
Fig. 2
8
Page 12

How to Install Your SOHO KVM Switch
Step 5
Connect one end of a second audio cable to the “Mic Out” jack of your
sound card or computer and the other end to the “mic” jack on your SOHO
KVM Switch below “PC 1” (optional). See Fig. 2.
Step 6
Repeat Steps 1 through 5 for all computers.
Once you have connected all your computers, connect the power adapter
to your SOHO KVM Switch and power on the Switch. Next, power on
your computers.
You are now ready to use your SOHO KVM Switch.
1
2
section
3
4
5
6
7
9
Page 13

How to Install Your SOHO KVM Switch
Connecting USB Devices
You can connect up to two USB peripheral devices to the built-in USB 2.0 hub
on your SOHO KVM Switch. These devices may be connected at any time after
the installation procedure. Once a USB device is connected to your SOHO KVM
Switch, you will be able to access that device through whichever computer you are
currently using.
10
Page 14

Using Your SOHO KVM Switch
Switching Between Computers
After you install your SOHO KVM Switch and power on your computers, the
computer desktop of the computer connected to the “PC 1” port on your
SOHO KVM Switch will appear on your monitor. The number “01” LED on the
front of your SOHO KVM Switch will be lit. You can now use that computer
as if it were directly connected to your monitor, keyboard, mouse, speakers,
microphone, and USB peripheral devices. To switch access to your other
computers, press the corresponding button on the front of your SOHO KVM
Switch. The LED will light to indicate which computer is currently selected.
1
2
3
section
4
5
6
7
1111
Page 15

Frequently Asked Questions
How far can the computer be from the SOHO KVM Switch?
When using a USB connection between your SOHO KVM Switch and computer,
we recommend that your computer be no more than 15 feet (5m) away.
Does the SOHO KVM Switch support the volume up, volume down,
mute, and eject keys on Apple keyboards?
Yes, the SOHO KVM Switch fully supports all functionality on any
USB-based keyboard.
Does the SOHO KVM Switch support wireless mice and keyboards?
Yes, the SOHO KVM Switch supports wireless mice and keyboards.
Does the SOHO KVM Switch require a power supply?
Yes, the SOHO KVM Switch requires a 9-volt DC, 2.5-Amp power adapter
(included) to function properly.
Can I attach a USB hub to the built-in USB hub on the SOHO KVM
Switch to share more peripherals?
Yes, but only if the USB hub is powered by its own power adapter.
What type of DVI monitor can I use?
The SOHO KVM Switch will support DVI-D monitors and ADC monitors (using a
DVI-to-ADC display adapter).
What type of DVI cards will the SOHO KVM Switch support?
The SOHO KVM Switch will support DVI-D video cards.
12
Page 16

Troubleshooting
General
Problem:
My computer does not boot up when connected to the SOHO KVM
Switch, but it works fine when I connect the USB keyboard, video, and
USB mouse directly to the computer.
Solution:
• Make sure that the USB cable is properly connected between the SOHO
KVM Switch and the computer.
• Make sure that the USB keyboard and USB mouse are properly connected
on the console.
Video
Problem:
I am getting ghosting, shadowing, or fuzzy images on my monitor.
Solution:
• Check that all video cables are inserted properly.
• Check that the monitor you are using supports the resolution and
refresh-rate setting on your computer.
• Check that the graphics card you are using supports the resolution and
refresh-rate setting on your computer.
Problem:
My monitor is showing a “blank screen” only.
Solution:
• Check that all video cables are inserted properly.
• Make sure the 9-volt DC, 2.5-Amp power adapter is connected to the
SOHO KVM Switch.
• Connect your monitor directly to the computer to verify that your monitor is
functioning properly.
• Make sure the monitor you are using supports the resolution and
refresh-rate setting on your computer.
1
2
3
4
5
section
6
7
13
Page 17

Troubleshooting
Keyboard
Problem:
The computer does not detect a keyboard and I get a keyboard error reported
at boot up.
Solution:
• Activate USB support on boot up on the BIOS.
• Try using a different keyboard.
• Try connecting the computer to a different port on the SOHO KVM Switch.
• Try connecting the USB cable to a different port on the computer.
• Check that the USB cable between the SOHO KVM Switch and the computer
are properly connected.
Problem:
There is a loud, long beep coming from the SOHO KVM Switch.
Solution:
• Make sure the USB keyboard is properly connected to the specified USB
keyboard port on the SOHO KVM Switch.
• Check that the USB cable between the SOHO KVM Switch and the computer
are properly connected.
• Disconnect and reconnect the power jack.
14
Page 18

Troubleshooting
Mouse
Problem:
The mouse is lost when I switch to a different port.
Solution:
• Check that the USB mouse you are using is connected properly to the
console of the SOHO KVM Switch.
• Disconnect and reconnect the USB cable attached to the channel
with which you are experiencing problems to re-synchronize the
mouse connection.
• Make sure the mouse works when directly plugged into the computer.
• If the computer is coming out of standby mode, allow up to one minute to
regain mouse function.
• Deactivate power-management schemes on the computer with which you
are experiencing problems.
• Try a different mouse.
Problem:
The computer boots up, but the mouse does not work.
Solution:
• Make sure the mouse is properly connected to the console.
• Disconnect and reconnect the mouse cable attached to the channel
`with which you are experiencing problems to re-synchronize the
mouse connection.
• Connect the mouse to ports located on the console.
• Try a different mouse.
1
2
3
4
5
section
6
7
15
Page 19

Information
FCC Statement
Declaration of Conformity with FCC Rules
for Electromagnetic Compatibility
We, Belkin Corporation, of 501 West Walnut Street, Compton, CA 90220, declare under our
sole responsibility that the products:
to which this declaration relates:
Comply with Part 15 of the FCC Rules. Operation is subject to the following two conditions:
(1) this device may not cause harmful interference, and
(2) this device must accept any interference received, including interference that may cause
undesired operation.
CE Declaration of Conformity
We, Belkin Corporation, declare under our sole responsibility that the products F1DD102U and
F1DD104U, to which this declaration relates, are in conformity with Emissions Standard EN55022
and with Immunity Standard EN55024, LVP EN61000-3-2, and EN61000-3-3.
ICES
This Class B digital apparatus complies with Canadian ICES-003. Cet appareil numérique de la
classe B est conforme á la norme NMB-003 du Canada.
Belkin Corporation Limited 5-Year Product Warranty
What this warranty covers.
Belkin Corporation warrants to the original purchaser of this Belkin product that the product shall be
free of defects in design, assembly, material, or workmanship.
What the period of coverage is.
Belkin Corporation warrants the Belkin product for five years.
What will we do to correct problems?
Product Warranty.
Belkin will repair or replace, at its option, any defective product free of charge (except for shipping
charges for the product).
What is not covered by this warranty?
All above warranties are null and void if the Belkin product is not provided to Belkin Corporation
for inspection upon Belkin’s request at the sole expense of the purchaser, or if Belkin Corporation
determines that the Belkin product has been improperly installed, altered in any way, or tampered
with. The Belkin Product Warranty does not protect against acts of God (other than lightning)
such as flood, earthquake, war, vandalism, theft, normal-use wear and tear, erosion, depletion,
obsolescence, abuse, damage due to low voltage disturbances (i.e. brownouts or sags),
non-authorized program, or system equipment modification or alteration.
F1DD102U and F1DD104U,
16
Page 20

Information
How to get service.
To get service for your Belkin product you must take the following steps:
1. Contact Belkin Corporation at 501 W. Walnut St., Compton CA 90220,
Attn: Customer Service, or call (800)-223-5546, within 15 days of the Occurrence. Be
prepared to provide the following information:
a. The part number of the Belkin product.
b. Where you purchased the product.
c. When you purchased the product.
d. Copy of original receipt.
2. Your Belkin Customer Service Representative will then instruct you on how to forward
your receipt and Belkin product and how to proceed with your claim.
Belkin Corporation reserves the right to review the damaged Belkin product. All costs of
shipping the Belkin product to Belkin Corporation for inspection shall be borne solely by
the purchaser. If Belkin determines, in its sole discretion, that it is impractical to ship the
damaged equipment to Belkin Corporation, Belkin may designate, in its sole discretion, an
equipment repair facility to inspect and estimate the cost to repair such equipment. The cost,
if any, of shipping the equipment to and from such repair facility and of such estimate shall be
borne solely by the purchaser. Damaged equipment must remain available for inspection until
the claim is finalized. Whenever claims are settled, Belkin Corporation reserves the right to be
subrogated under any existing insurance policies the purchaser may have.
How state law relates to the warranty.
THIS WARRANTY CONTAINS THE SOLE WARRANTY OF BELKIN CORPORATION, THERE
ARE NO OTHER WARRANTIES, EXPRESSED OR, EXCEPT AS REQUIRED BY LAW, IMPLIED,
INCLUDING THE IMPLIED WARRANTY OR CONDITION OF QUALITY, MERCHANTABILITY
OR FITNESS FOR A PARTICULAR PURPOSE, AND SUCH IMPLIED WARRANTIES, IF ANY,
ARE LIMITED IN DURATION TO THE TERM OF THIS WARRANTY.
Some states do not allow limitations on how long an implied warranty lasts, so the above
limitations may not apply to you.
IN NO EVENT SHALL BELKIN CORPORATION BE LIABLE FOR INCIDENTAL, SPECIAL,
DIRECT, INDIRECT, CONSEQUENTIAL OR MULTIPLE DAMAGES SUCH AS, BUT NOT
LIMITED TO, LOST BUSINESS OR PROFITS ARISING OUT OF THE SALE OR USE OF ANY
BELKIN PRODUCT, EVEN IF ADVISED OF THE POSSIBILITY OF SUCH DAMAGES.
This warranty gives you specific legal rights, and you may also have other rights, which may
vary from state to state. Some states do not allow the exclusion or limitation of incidental,
consequential, or other damages, so the above limitations may not apply to you.
1
2
3
4
5
6
section
7
17
 Loading...