

Page 1

18.5" Widescreen Rack-Mount Console
with Built-In PRO3 KVM Switch
User Manual
8820-02661 Rev. A00 F1DC108V/F1DC116V
Page 2

TABLE OF CONTENTS
SE CT IO NS 1 2 3 654 87Tab le o f Co nte nts
1 Introduction . . . . . . . . . . . . . . . . . . . . . . . . . . . . . . . . . . . . . . . . . . . . . 1
Package Contents ............................................ 2
2 Overview. ............................................... 3
Feature Overview............................................. 3
Equipment Requirements ...................................... 4
System Requirements ......................................... 5
Unit Display Diagrams......................................... 6
Specifications ................................................ 7
3 Installation............................................... 8
Pre-Configuration ............................................. 8
Connecting Servers to the Rack-Mount Console.................... 9
Connecting the Rack-Mount Console with Multiple
PRO3 KVM Switches (Daisy-Chaining) .......................... 13
Powering Up the Syst ems ................................... 17
18.5” Widescreen Rack-Mount Console with Built-In PRO3 KVM Switch
4 Using your Rack-Moun
Selecting a Ser ver or BANK Usin g Hot -Key Commands ........ 18
AutoSca n Mode ............................................ 21
On-Screen Displ ay (OSD) ................................... 21
Keyb oard Hot-Key-Command S hor tcuts ...................... 27
Sun Combo and Mac Key Mappi ng ........................... 28
Updating Fi rmwa re ......................................... 29
5 Frequently Asked Questions. ............................ 30
6 Troubleshooting........................................ 32
7 Glossary .............................................. 35
8 Information ............................................ 37
t Console ......................... 18
i
Page 3
INTRODUCTION
SE CT IO NSTab le o f Co nte nts 2 3 654 871
Congratulations on your purchase of the Belkin 18.5-inch Widescreen
Rack-Mount Console with Built-In PRO3 KVM Switch (the Rack-Mount
Console). Our diverse line of K VM solutions exemplifies the Belkin
commitment to delivering high-quality, durable products at an
affordable price.
Designed to give you control over multiple servers, the Rack-Mount
Console provides an excellent solution for the
It outperforms any other rack console with KVM switch on the market.
Engineered to work with the most advanced server room and laboratory
environments, this Rack-Mount Console offers:
• Single -rail system with 1U compact design
• Video resolution support of up to 1366x768
• PS/2 and USB support for input devices
• On-Screen Display (OSD)
• Daisy-chain capability with other Belkin PRO switches
(up to 256 serve
• Security
• Flash-upgradeable firmware
• Dual-port micro-cabling (cable kits sold separately)
• Belkin 2-Year Warranty
• Free technical support
• 18.5-inch Widescreen LCD
rs)
server administrator.
18.5” Widescreen Rack-Mount Console with Built-In PRO3 KVM Switch
1
Page 4
INTRODUCTION
SE CT IO NSTab le o f Co nte nts 2 3 654 871
This User Manual will provide details about your new Rack-Mount
Console, from installation and operation to troubleshooting —in the
unlikely event of a problem. For quick and easy installation, please refer
to the Quick Installation Guide included in your Rack-Mount Console
packaging.
Thank you for purchasing the Belkin Rack-Mount Console with Built-In
PRO3 KVM Switch. We appreciate your business and have conf
that you will soon see for yourself why Belkin is the number-one -selling
brand in KVM switches worldwide.
18.5” Widescreen Rack-Mount Console with Built-In PRO3 KVM Switch
idence
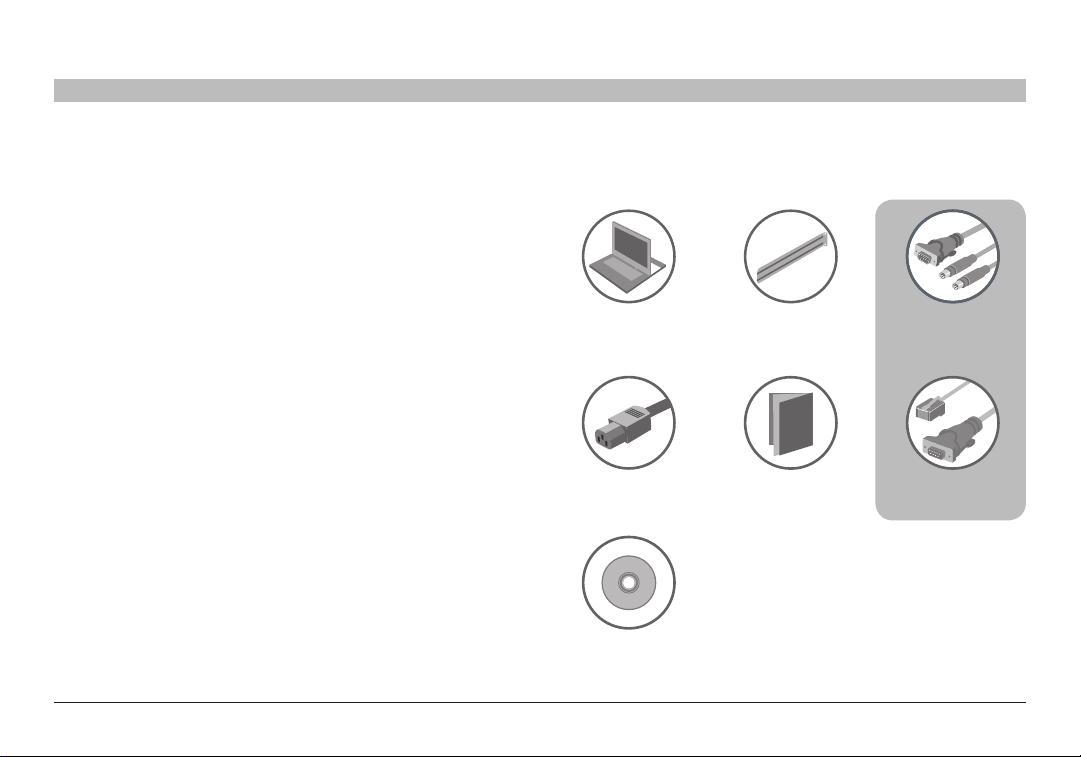
Package Contents
18.5” Widescreen
Rack-Mount Console
1 Power Cord Quick Installation
CD
2
2 Brackets
Guide
*Models containing KVM switch only
1 Cable Kit*
or
DB9-to-RJ11
Serial Flash Cable*
Page 5

OVERVIEW
SE CT IO NSTab le o f Co nte nts 1 3 654 87
2
Feature Overview:
Hot Keys
Hot-key functionality allows you to select a desired port using designated
key commands. By using a simple hot-key sequence on your keyboard,
you can select one server from as many as 256 ser vers, instantaneously.
AutoScan
The AutoScan feature allows you to set your Rack-Mount Console to
scan and monitor the activities of all connected servers, one by one.
he time interval allotted for each server can be adjusted through the
T
On-Screen Display (OSD) menu.
Video Resolution
The Rack-Mount Console supports video resolutions of up to 1366x768.
Securit y
Allows you to specif y user names and passwords to prevent unauthorized
users from accessing the OSD and KVM Switch.
Dedicated Daisy-Chain Port
Up to 16 KVM switches can be daisy-chained together using dedicated
ports, so you can easily exp
environment grows.
On-Screen Display (OSD)
The OSD feature simplifies server management by allowing you to assign
individual names to each connected server throughout the system. It
provides a visual means of switching between servers and assigning
the hot-key scheme. The OSD can also be set up to suppor t regional
languages.
Flash Upgrade
Flash-upgradeable firmware allows you to install the late
your Rack-Mount Console. This enables your KVM Switch to maintain
consistent compatibility with the latest devices and servers. Firmware
upgrades are free for the life of your Rack-Mount Console and can be
downloaded from Belkin’s support website at www.belkin.com/support.
and your KVM configuration as your server
st firmware on
18.5” Widescreen Rack-Mount Console with Built-In PRO3 KVM Switch
3
Page 6
OVERVIEW
F1D9400-XX (PS/2-style)
SE CT IO NSTab le o f Co nte nts 1 3 654 872
Equipment Requirements:
Cables:
Hot-key functionality allows you to select a desired port using designated
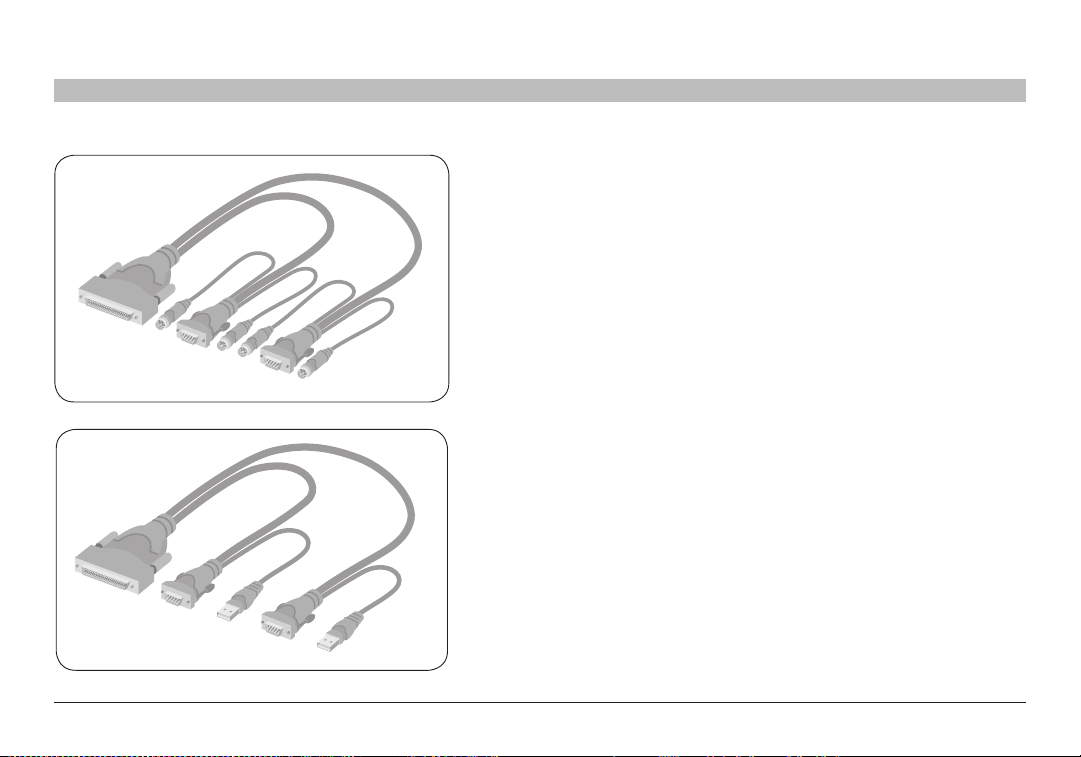
Connecting the Rack-Mount Console to a server requires a Belkin DualPort Micro-Cable Kit.
Belkin Dual-Port Micro-Cable Kits:
F1D9400-XX (PS/2-style)
F1D9401-XX (USB-st yle)
F1D9401-XX (USB-style)
18.5” Widescreen Rack-Mount Console with Built-In PRO3 KVM Switch
4
Page 7
OVERVIEW
SE CT IO NSTab le o f Co nte nts 1 3 654 872
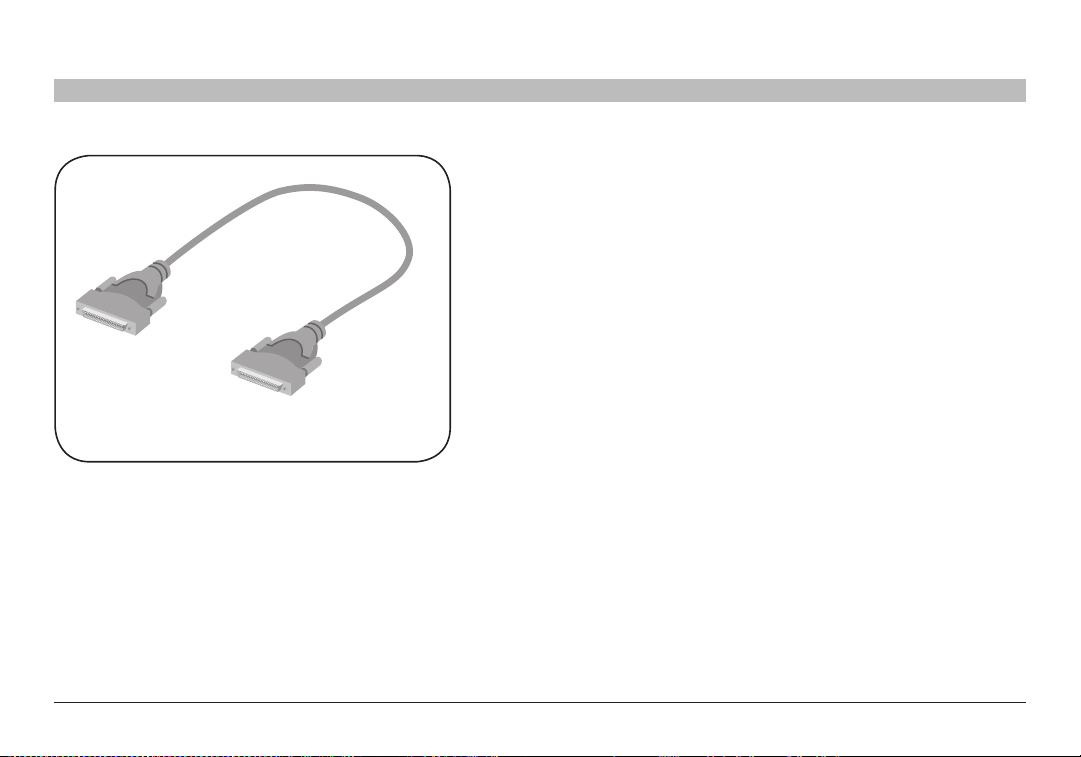
F1D108-CBL-XX
Belkin Daisy-Chain Cable: F1D108-CBL-XX
(-XX denotes length in feet)
Note: Product codes and availability may vary.
System Requirements
OS Plat forms
The Rack-Mount Console is compatible with CPUs running on, but not
limited to, the following OS platforms:
• Windows Server 2003 or later, Win 10/8.1/8/7/XP, Windows NT , 95,
• Microsof t® DOS 5.x and above
• Red Hat
• Novell
• Mac OS
• Sun
®
98, 2000, ME
Windows Vista
®
Linux® 8.x and above
®
NetWare® 5.x
®
X and above
TM
Solaris
®
TM
8.x and above
Keyboards
• PS/2-compatible
• USB-compatible
• Suppor ts 101-/102-/104-key keyboards
Mice
• PS/2- and USB-compatible mice having 2, 3, 4, or 5 buttons
• PS/2- and USB-compatible wireless or optical mice
®
18.5” Widescreen Rack-Mount Console with Built-In PRO3 KVM Switch
5
Page 8
OVERVIEW
SE CT IO NSTab le o f Co nte nts 1 3 654 872
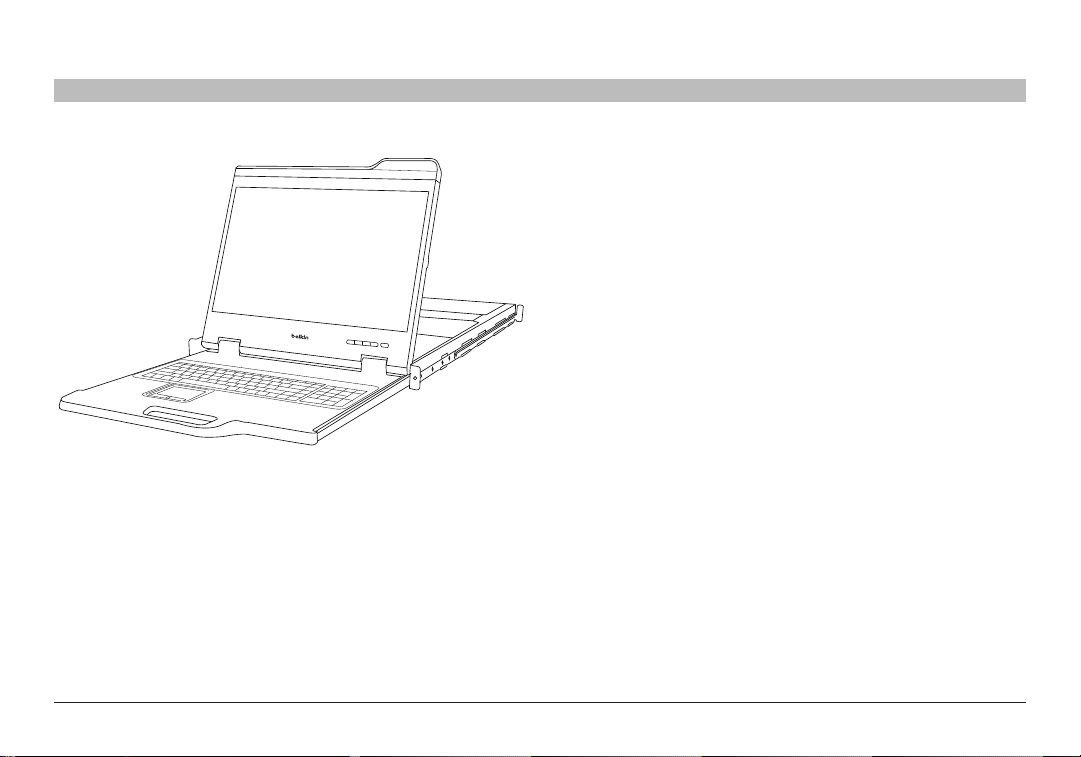
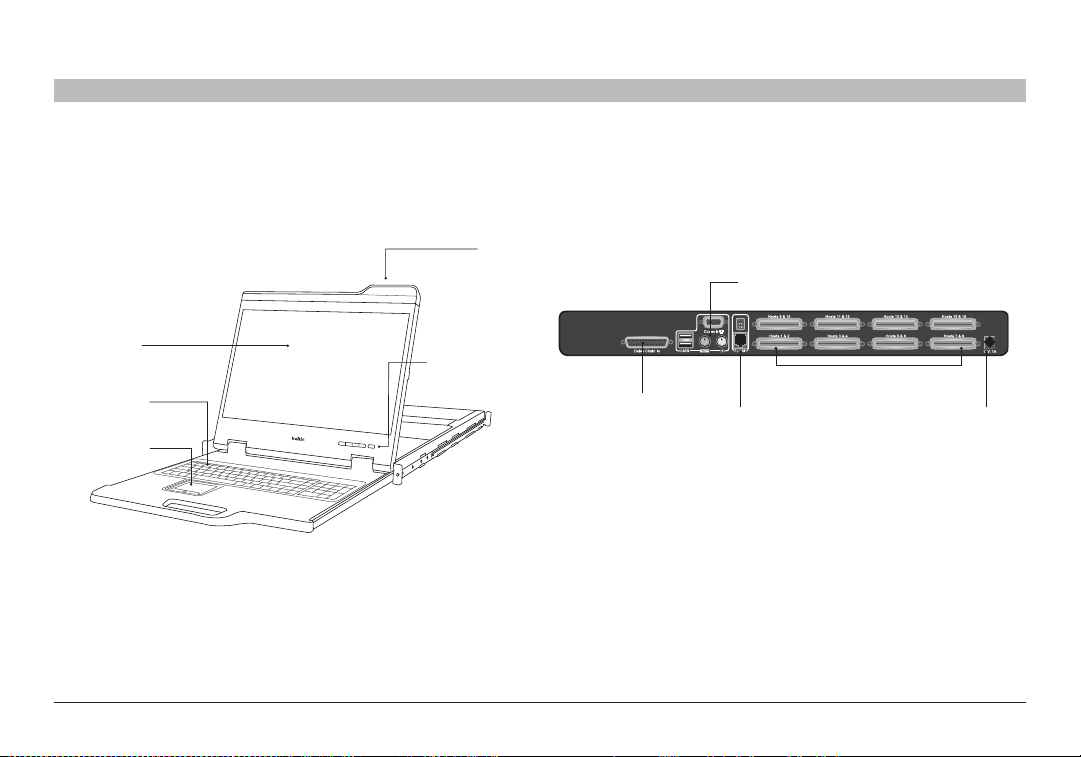
Unit Display Diagrams
Front View of the Widescreen Rack-Mount Console with Built-In
PRO3 KVM Switch:
TFT/LCD
Active-Matrix
Color Panel
105-Key
Keyboard
Touchpad
18.5” Widescreen Rack-Mount Console with Built-In PRO3 KVM Switch
LCD Front-Panel
Controls
Handle
Back View of the Widescreen Rack-Mount Console
with Built-In PRO3 KVM Switch:
Console: VGA, PS/2 mouse/keyboard ports,
USB mouse/keyboard ports
SCSI-50 dual-host ports
Daisy-chain out
Flash-upgrade
port and DIP
select switch
6
DC power jack
Page 9

OVERVIEW
Specifications
SE CT IO NSTab le o f Co nte nts 1 3 654 872
Part No.: F1DC108V, F1DC116V
Daisy-Chain: Maximum of 16 OmniView KVM Switches
No. of Servers Supported:
Keyboard Input:
Mouse Input:
Monitor Port: VGA (HDDB15 female)
CPU Ports: SCSI-50
18.5” Widescreen Rack-Mount Console with Built-In PRO3 KVM Switch
PS/2 (miniDIN6), USB (Type A)
PS/2 (miniDIN6), USB (Type A)
8 and 16 respectively for 8 - and 16-port
models (256 servers max. via daisy-chaining)
Daisy-Chain Ports: DB25 female
ash-Upgrade Port: RJ11
Fl
Operating Temp: 32° to 104° F (0~40° C)
Storage Temp: -4° to 140° F (20~60° C)
Humidity: 0-80% RH, non-condensing
Warranty: 2 years
Note: Specifications are subject to change without notice.
7
Page 10

INSTALLATION
SE CT IO NSTab le o f Co nte nts 1 2 654 87
Pre-Configuration
Consider the following when deciding where to place the
Rack-Mount Console with Built-In PRO3 KVM Switch:
• the location of your servers in relatio
• the lengths of the cables you use to connect your servers to the
Rack-Mount Console
Cable- Distance Requirements:
For PS/2 Servers:
VGA signals transmit best up to 25 feet (7.6m). Beyond that length,
the probability of video degradation increases. For this reason, Belkin
recommends that the length of the cables between the Rack-Mount
Console and the connected servers does not exceed 25 feet (7.6m).
n to your console
3
For USB Servers:
USB signals can be transmitted up to 15 feet (4.5m) between the RackMount Console and server. Beyond that length, the probabilit y of USBsignal failure is likely, and may cause the device to fail.
Note: The Belkin OmniView CAT5 Extender, F1D084 (PS/2) and F1D086U
(USB), may be used to extend your console (keyboard, mouse, and
monitor) by up to 300 feet (91m).
Cautions and Warnings!
Avoid placing cables near fluorescent lights, air-conditioning equipment,
or machines that create electrical noise (e.g., vacuum cleaners).
Before attempting to connect anything to the Rack-Mount Console or your
servers, ensure that everything is powered off. Plugging and unplugging
cables while servers are powered on may cause irreversible damage of
the servers and/or the Rack-Mount Console. Belkin
damage caused in this way.
You are now ready to begin installation of your Rack-Mount
Console. The following sections (pages 9–17) provide complete
instructions for the hardware setup of a single Rack-Mount Console
(F1DC108B-SR, F1DC116B-SR).
is not responsible for
18.5” Widescreen Rack-Mount Console with Built-In PRO3 KVM Switch
8
Page 11

INSTALLATION
SE CT IO NSTab le o f Co nte nts 1 2 654 873
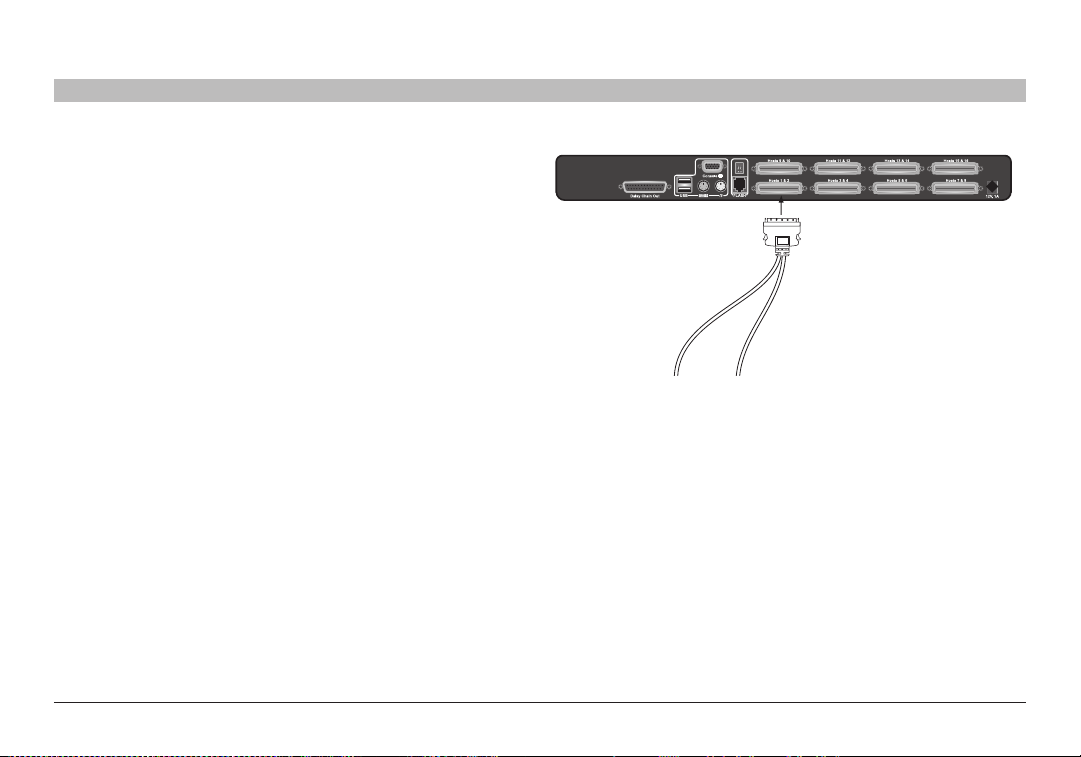
Connecting Servers to the Rack-Mount Console
(PS/2 Connection):
Step 1
Make sure your server is powered off.
Step 2
Using the Belkin Dual-Por t Micro- Cable Kit for PS/2 (F1D9400 -XX),
connect the VGA connector to the monitor port on your server. (Refer to
diagram on the right .)
Step 3
Connect the PS/2 mouse and keyboard connectors to the mouse and
keyboard por ts on the server. (Refer to diagram on
the right.)
18.5” Widescreen Rack-Mount Console with Built-In PRO3 KVM Switch
9
Page 12
INSTALLATION
SE CT IO NSTab le o f Co nte nts 1 2 654 873
Step 4
Connect the Belkin Dual-Port Micro- Cable Kit for PS/2 to the desired host
ports on the PRO3 KVM Switch. (Refer to diagram on the right.)
Step 5
Power up your server.
Step 6
Repeat Steps 1 through 5 for each additional PS/2 server you wish
to connect.
18.5” Widescreen Rack-Mount Console with Built-In PRO3 KVM Switch
10
Page 13
INSTALLATION
SE CT IO NSTab le o f Co nte nts 1 2 654 873
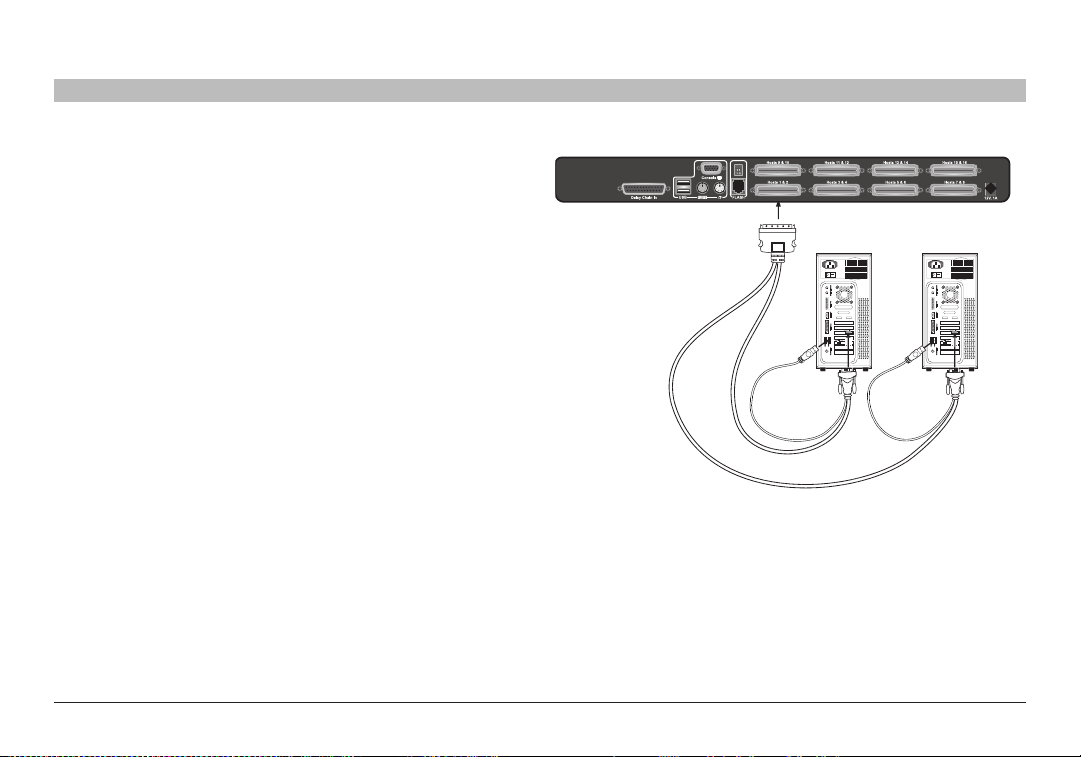
Connecting Servers to the Rack-Mount
Console (USB Connection):
Step 1
Make sure your ser ver is powered off.
Step 2
Using the Belkin Dual-Por t Micro- Cable Kit for USB (F1D9401-XX),
connect the VGA connector to the monitor port on your server. (Refer to
diagram on the right .)
Step 3
Connect the USB connector to an available USB port on the server.
(Refer to diagram on the right.)
18.5” Widescreen Rack-Mount Console with Built-In PRO3 KVM Switch
11
Page 14

INSTALLATION
SE CT IO NSTab le o f Co nte nts 1 2 654 873
Step 4
Connect the Belkin Dual-Port Micro- Cable Kit for USB to the desired host
ports on the PRO3 KVM Switch. (Refer to diagram on the left.) Your server
should recognize the KVM-Switch connection and automatically install the
HID USB driver, if necessary.
Step 5
Note: We recommend that you attach the Belkin Dual-Port Micro-Cable
USB Kit directly to a free USB port on your ser ver.
ote: When a USB Cable Kit is connected to a Sun server, the Server
N
Interface Module emulates the Sun keys using a set of key combinations
called “combo keys”. Refer to the table on page 28 for a list of Sun
functions supported by the Rack-Mount Console.
18.5” Widescreen Rack-Mount Console with Built-In PRO3 KVM Switch
12
Page 15

INSTALLATION
SE CT IO NSTab le o f Co nte nts 1 2 654 873
Connecting the Rack-Mount Console with Multiple
PRO3 KVM Switches (Daisy-Chaining)
You can daisy-chain up to 15 additional PRO3 KVM Switches (F1DA104Z,
F1DA108Z, F1DA116Z, F1DA104Q, F1DA108Q, and F1DA116Q), allowing
a server administrator to manage up to a maximum of 256 servers from
one console. Each daisy-chained PRO3 KVM Switch is referred to as a
“BANK” and is
00 and is referred to as the “primary” KVM switch. BANKs 01 through 15
are referred to as “secondary” KVM switches.
assigned an address. The Rack-Mount Console is BANK
cable 1
cable
unit (BANK 00)
Primary
unit (BANK
2
Secondary
01)
Note: The Rack-Mount Console (F1DC108B-SR, F1DC116B-SR) must be
designated as the primary KVM switch. Refer to the diagram on the right.
Note: A Daisy-Chain Cable (F1D108-CBL) is required to daisy-chain each
PRO3 KVM Switch and is availa
ble through your Belkin reseller, or online
at ww w.belkin.com.
18.5” Widescreen Rack-Mount Console with Built-In PRO3 KVM Switch
13
cable
Secondary
Secondary
unit (BANK
unit (BANK
3
02)
03)
Page 16

INSTALLATION
SE CT IO NSTab le o f Co nte nts 1 2 654 873
How to Assign a BANK Address
All PRO3 KVM Switches feature a “BANK DIP” switch. The “BANK DIP”
switch is used to assign the proper BANK address to each PRO3
KVM Switch.
For a multi-unit configuration, the primary KVM switch (Rack-Mount
Console) is always set to “BANK address 00”. Each secondary unit must
be set to a unique BANK address (from 01 through 15). Refer to the chart
on the right for “BANK DIP” switch settings.
Example: Three 8-Por t PRO3 K VM Switches (F1DA108Z) are daisychained together with a Rack-Mount Console to manage up to 32 servers.
DIP switch on the primary KVM (Rack-Mount Console) switch is set
The
to “BANK 00” (factory default) and the secondary units are each set to a
unique BANK (between 01 and 03).
18.5” Widescreen Rack-Mount Console with Built-In PRO3 KVM Switch
DIP SWITCH# BANK
1 2 3 4 5 6
ON ON ON ON ON ON BANK 0 PRIMARY (default)
ON ON OFF ON ON ON BANK 1 SECONDARY
ON ON ON OFF ON ON BANK 2 SECONDARY
ON ON OFF OFF ON ON BANK 3 SECONDARY
ON ON ON ON OFF ON BANK 4 SECONDARY
ON ON OFF ON OFF ON BANK 5 SECONDARY
ON ON ON OFF OFF ON BANK 6 SECONDARY
ON ON OFF OFF OFF ON BANK 7 SECONDARY
ON ON ON ON ON OFF BANK 8 SECONDARY
ON ON OFF ON ON OFF BANK 9 SECONDARY
ON ON ON OFF ON OFF BANK 10 SECONDARY
ON ON OFF OFF ON OFF BANK 11 SECONDARY
ON ON ON ON OFF OFF BANK 12 SECONDARY
ON ON OFF ON OFF OFF BANK 13 SECONDARY
ON ON ON OFF OFF OFF BANK 14 SECONDARY
ON ON OFF OFF OFF OFF BANK 15 SECONDARY
ON = Up Position, OFF = Down Position
ADDRESS
14
Page 17

INSTALLATION
SE CT IO NSTab le o f Co nte nts 1 2 654 873
Example of Daisy-Chain Configuration
Getting Started
Step 1 : Make sure that all servers, Rack-Mount Console, and PRO3 KVM
Switches are powered off and that each PRO3 KVM Switch has been
assigned a unique BANK address.
Step 2 : Place all primary and secondary KVM switches in the
desired location.
18.5” Widescreen Rack-Mount Console with Built-In PRO3 KVM Switch
15
cable 1
cable 2
cable 3
unit (B ANK 00)
Primary
Secondary unit ( B ANK
Secondary unit ( B ANK
Secondary unit ( B ANK
01)
02)
03)
Page 18

INSTALLATION
SE CT IO NSTab le o f Co nte nts 1 2 654 873
Connecting the Primary and Secondary KVM Switches:
Step 1
Using the Daisy-Chain Cable (F1D108-CBL), connect one end to the
“Daisy-Chain In” port on the Rack-Mount Console (BANK 0 0).
Step 2
Connect the other end of the Daisy-Chain Cable (F1D108-CBL) to the
“Daisy-Chain Out ” port of the first secondary KVM switch (BANK 01).
Step 3
To add secondar y units, connect one end of the Daisy-Chain
(F1D108 -CBL) to the “Daisy- Chain In” port on the first secondar y KVM
switch and the other end to the “Daisy-Chain Out” port of the next
secondary KVM switch (for example, BANK 01).
Step 4
Repeat Step 3 for additional PRO3 KVM Switches you wish to
daisy-chain together.
18.5” Widescreen Rack-Mount Console with Built-In PRO3 KVM Switch
Cable
Connecting the Servers:
Step 1:
Connect all server s to the primary and secondary KVM switches. Refer to
the “Connecting Servers to the Rack-Mount Console” se
for instructions.
Step 2:
Power up the secondary KVM switches sequentially, beginning with the
highest BANK, by connecting each unit’s power supply. Each KVM switch
should display its corresponding BANK-address number as it is powered up.
Step 3:
Verify that the primary K VM switch has detected all secondary KVM
switches by scrolling through the BANKs by using the OSD.
16
ction on page 9
Page 19

INSTALLATION
SE CT IO NSTab le o f Co nte nts 1 2 654 873
Powering Up the Systems
Verify that all servers connected to the PRO3 KVM Switch are powered
on. If any connected servers have not been powered on, it is okay to do so
at this time (servers can be powered on simultaneously). The PRO3 KVM
Switch emulates both a mouse and keyboard on each port and allows
your server to boot normally.
The server connected to Port “1” will be displayed
that the keyboard, monitor, and mouse are working normally. Check all
occupied ports to verify that all servers are connected and responding
correctly. If you encounter an error, check your cable connections
for that server and reboot. If the problem persists, please refer to the
“Troubleshooting” section in this User Manual .
on the monitor. Check
18.5” Widescreen Rack-Mount Console with Built-In PRO3 KVM Switch
17
Page 20

USING YOUR R UNT CONSOLE
SE CT IO NSTab le o f Co nte nts 1 2 3 5 874
Now that you have connected your console and servers to your RackMount Console, it is ready for use. Select connected ser vers through the
On-Screen Display; or by using hot-key commands through the console
keyboard. It takes approximately 1–2 seconds for the video signal to
refresh after switching servers. Re-synchronization of the mouse and
keyboard signals also occurs. This is normal operation and ensures
that proper
connected servers.
synchronization is established between the console and the
6
Selecting a Server or BANK Using Hot-Key Commands
Switch to previous active port, “Up” arrow.
Switch to the next or previous port with simple, keyboard hot-key
sequences using the “Scroll Lock” key, and either the “Up” or “Down”
arrow keys. To send commands to the K VM Switch, the “Scroll Lock ” key
must be pressed twice within two seconds. The Rack-Mount Console will
beep, confirming that it is in
hot-key mode. Next, press the “Up” arrow
key and the PRO3 KVM Switch will switch to the previous port. Press the
“Down” arrow key to switch to the next por t.
Switch to next active port,
“Down” arrow
18.5” Widescreen Rack-Mount Console with Built-In PRO3 KVM Switch
18
Page 21

USING YOUR R UNT CONSOLE
SE CT IO NSTab le o f Co nte nts 1 2 3 5 874
With a single-switch configuration (no daisy-chained K VM switches), you
can switch directly to any port by entering the 2-digit number of the port
you wish to access. For example, if you press “Scroll Lock”, “Scroll Lock”,
“02”, the PRO3 KVM Switch will switch to the server on Por t 2 located on
BANK 00.
64 6
Switch to BANK 00, Port 2 (02)
18.5” Widescreen Rack-Mount Console with Built-In PRO3 KVM Switch
19
Page 22

USING YOUR R UNT CONSOLE
Page
Down
Page
Up
SE CT IO NSTab le o f Co nte nts 1 2 3 5 874
With a daisy-chain switch configuration, you can switch between BANKs
(KVM switches) by pressing “Scroll Lock”, “Scroll Lock ”, “Page Up”, to
switch to the previous BANK. Press “Scroll Lock ”, “Scroll Lock”, “Page
Down”, to switch to the next BANK.
With a daisy-chain switch configuration, you can switch directly to any
port on any BANK by pressing “Scroll Lock ”, “Scroll Lock”, BANK address,
and port number. For exam
“03”, “05”, the server on BANK 03, Port 5 will become active.
Note: You will have approximately five seconds to complete each
hot-key sequence.
See page 26 for instructions on how to change the hot-key-initiator key.
ple, if you press “Scroll Lock”, “Scroll Lock”,
64 6
18.5” Widescreen Rack-Mount Console with Built-In PRO3 KVM Switch
20
Page 23

USING YOUR R UNT CONSOLE
SE CT IO NSTab le o f Co nte nts 1 2 3 5 874
AutoScan Mode
T
he AutoScan feature allows you to set your Rack-Mount Console to scan
and monitor the activities of all connected servers one by one. The RackMount Console remains on one server for a preset number of seconds,
before switching to the next server. The time inter val allotted for each ser ver
can be adjuste
When the Rack-Mount Console is in AutoScan mode, it is also in view-only
mode. This means that input from the console (keyboard and mouse) will not
be transmitted to the server in focus. Cancel AutoScan to regain control of
the server.
To activate the AutoScan function, press “Scroll Lock”, “Scroll Lock”, “A”.
To stop AutoScan, press any key on the keyboard.
Note: There is n
necessary to prevent data and synchronization errors. If the user is using
the mouse or keyboard when the Rack-Mount Console is switching between
ports, data flow may become interrupted and could result in erratic mouse
movement and/or wrong-character input when using the keyboard.
d through the OSD menu (see the “AutoScan Time” section).
o mouse or keyboard control in AutoScan mode. This is
64 6
On-Screen Display (OSD)
The OSD allows you to switch servers, assign names to your servers,
start and stop the AutoScan feature, set the desired scan-time interval for
AutoScan, enable the password security feature, and program hot keys .
To access the OSD menu, press “Scroll Lock”, “Scroll Lock”, and the
space bar. Immediately, the OSD screen will appear. The superimposed
menu screen is generated by the Rack-Mou
affect the function of your server, operating system, or sof tware function .
nt Console, and does not
18.5” Widescreen Rack-Mount Console with Built-In PRO3 KVM Switch
21
Page 24

USING YOUR R UNT CONSOLE
SE CT IO NSTab le o f Co nte nts 1 2 3 5 874
Main OSD Page
The main OSD menu displays the current selected BANK and connected
servers to that BANK. If you have only the Rack-Mount Console in your
configuration, the OSD menu will display “BANK 00”. A “*” symbol indicates
that the connected server is powered up.
OSD Keyboard Commands
( ): Navigate to different servers in the same BANK
(Page Up/Page Down): Select next or previous BANK
(Enter): Switch servers, complete action
(F1): Takes you to options in the Main Menu page
(F2): Session logout
(F3): Takes you to previous screen when navigating through OSD
(Esc): Exits the OSD
To switch servers using the main OSD menu, use the arrow keys on your
keyboard to navigate to the desired server, and press the “E
” symbol indicates which server is currently being accessed on your
A “
console. To select a dif ferent BANK, press the “Page Up” or “Page Down”
key to select the nex t BANK or the previous BANK.
nter” key.
64 6
18.5” Widescreen Rack-Mount Console with Built-In PRO3 KVM Switch
22
Page 25

USING YOUR R UNT CONSOLE
SE CT IO NSTab le o f Co nte nts 1 2 3 5 874
Main Menu Page
The following “Main Menu ” options are available only to the administrator.
The “Main Menu” page allows you to:
• 01 - Set the language for the OSD
• 02 - Edit the naming of individual ports
• 03 - Search for a por t by its name
• 04 - Assign user names and passwords
• 05 - Access securit y settings
• 06 - Change the hot-key trigger
• 07 - Set the AutoScan time interval
64 6
18.5” Widescreen Rack-Mount Console with Built-In PRO3 KVM Switch
23
Page 26

USING YOUR R UNT CONSOLE
SE CT IO NSTab le o f Co nte nts 1 2 3 5 874
Main-Menu-Page Keyboard Commands
( ): Navigate to the next field
(Enter): To select an option
(F3): Return to the main OSD menu
(Esc): Exit OSD
Language
This allows you to select which language the OSD will display. You have
eight languages to choose from:
• English
• French
• German
• Italian
• Spanish
• Simplified Chinese
• Japanese
• Russian
The default language is set to English. To designate a different language,
use the arrow keys to navigate to the
“Enter ” to select and save the entry.
desired language field, and then press
64 6
Port Name Edit
This option allows you to name each port with up to 10 characters. To name the
port, use the arrow keys to navigate to the desired server port, and then press
“Enter” to select and name the port. Press “Enter” again to save the entry.
18.5” Widescreen Rack-Mount Console with Built-In PRO3 KVM Switch
24
Page 27

USING YOUR R UNT CONSOLE
SE CT IO NSTab le o f Co nte nts 1 2 3 5 874
User Setting
This option allows you to specify an administrator/user name and passwords
to prevent unauthorized users from accessing the OSD and KVM Switch.
One administrator and eight users can be stored. To add the name and
password, use the arrow keys to navigate to th
press “Enter” to select and edit. Press “Enter” again to save the entr y. The
maximum characters for the name and password fields are eight characters.
The default administrator name and password are:
e desired field, and then
Username: admin
Password: belkin
64 6
Access List
This feature allows you to discretely specify the user access at a port level .
Only the administrator can set up the access list. The column on the left lists
the port names. The users are listed by their number (1 to 8). Navigate to the
user and port, and press the “Enter” key to enable/deny the access right for
each user and por t combination. “ X” represents access is denied and “O”
represents
Note: User name and password fields cannot be left blank . If two
identical user names are entered, the first user-name password will apply.
access is enabled.
18.5” Widescreen Rack-Mount Console with Built-In PRO3 KVM Switch
25
Page 28

USING YOUR R UNT CONSOLE
SE CT IO NSTab le o f Co nte nts 1 2 3 5 874
Hot Key
This allows you to select which key will be used to initiate hot-key
commands. You have nine key options to choose from:
• Scroll Lock
• Number Lock
• Caps Lock
• Lef t Crtl
• Right Ctrl*
• Lef t Alt
• Right Alt
• Lef t Win
• Right Win
The default key for all hot-key commands is “Scroll Lock ” (see “Keyboard
Hot-Key-Command Shortcuts” on the nex t page). To designate a different
key to initiate hot-key c
“Hot Key ” field, and then press “Enter ” to select and save the entry.
ommands, use the arrow keys to navigate to the
64 6
AutoScan Time
This specifies the amount of time the Rack-Mount Console remains on a
server before switching to the next ser ver while in AutoScan mode. You
can set the scan-time interval to anywhere between 05 and 99 seconds. To
change the scan time, use the arrow keys to navigate to the “Scan Time”
hit “Enter”, and then type the desired time interval (in seconds).
field and
To enable AutoScan, refer to the hot-key section on page 27.
Note: The number keypad will not function in the OSD.
*Right Ctrl key is available only on the back of the auxiliary console. This hot
key will not function on the console keyboard.
18.5” Widescreen Rack-Mount Console with Built-In PRO3 KVM Switch
26
Page 29

USING YOUR R UNT CONSOLE
SE CT IO NSTab le o f Co nte nts 1 2 3 5 874
Keyboard Hot-Key-Command Shortcuts
To the right is a complete list of hot-key commands that can be used for your
Rack-Mount Console:
Note: You will have approximately three seconds to complete each
hot-key sequence.
64 6
Command Function
Space Bar Activate OSD
Previous host
Next host
[01,02.,,,16] port Non-daisy-chain KVM switch
[00,01.,,,15] BANK Daisy-Chain Config: First and second digit specifies BANK
[01,02.,,,16] port Daisy-Chain: Third and fourth digit specifies number
PgUP Previous BANK
PgDown Next BANK
B Turn on/off beep while in AutoScan mode
S Enable/disable OSD security
P Turns console screen “Off ”, and prompts for user name
A Administrator activates AutoScan
Delete Administrator sets the OSD back to factory-default values
and password if security is enabled
(except for security settings)
18.5” Widescreen Rack-Mount Console with Built-In PRO3 KVM Switch
27
Page 30

USING YOUR R UNT CONSOLE
SE CT IO NSTab le o f Co nte nts 1 2 3 5 874
Sun Combo and Mac® Key Mapping
The keyboard does not support the Sun keypad to perform special functions in the
Sun operating-system environment. When the Rack-Mount Console is connected
to a Sun server, the KVM Switch emulates the Sun keys using a set of key
combinations called “combo keys”. Some Mac keys are also mapped. Please refer
to the table on the right.
64 6
Windows
USB Keyboard
Caps Lock & L_Alt Stop
Caps Lock & L_Ctrl Props
Caps Lock & L_Shift (Application) Compose
Caps Lock & 1 Mute
Caps Lock & 2 Volume down
Caps Lock & 3 Volume up
Caps Lock & F3 Find
Caps Lock & F1 Front
Caps Lock & F2 Open
Caps Lock & F4 Again
Caps Lock & F5 Undo
Caps Lock & F8 Cut
Caps Lock & F6 Copy
Caps Lock & F7 Paste
Caps Lock & F11 Help
Caps Lock & F12 Power Power
Windows key Apple key
Alt Option
Print Screen F13
Scroll Lock F14
Pause Break F15
Sun Micro
USB Keyboard
Mac
USB Keyboard
18.5” Widescreen Rack-Mount Console with Built-In PRO3 KVM Switch
28
Page 31

USING YOUR R UNT CONSOLE
SE CT IO NSTab le o f Co nte nts 1 2 3 5 874
Updating Firmware
The Rack-Mount Console features flash-upgradeable firmware to ensure
compatibility with the latest devices and servers. Firmware upgrades are free
for the life of your Rack-Mount Console.
To update your firmware, download the appropriate firmware file and utility
from www.belkin.com/support/. The utility will guide you through the process
of updating the firmware on your Rack-Mount Console.
Warning! We strongly recommend that you update your firmware only if
you are experiencing mouse and keyboard problems with your Rack-Mount
Console, as reconfiguring software may lead to unexpected operational
problems. Please contact Belkin Technical Support if you need assistance.
64 6
DB9-to-RJ11
Serial Flash Cable*
18.5” Widescreen Rack-Mount Console with Built-In PRO3 KVM Switch
29
Page 32

FREQUENTLY ASKED QUESTIONS
SE CT IO NSTab le o f Co nte nts 1 2 3 64 875
Q: Which operating systems does the Rack-Mount
Console support?
A: The Rack-Mount Console will support any operating system that runs
on a PS/2 and USB platform. Operating systems include, but are not
limited to, DOS; Windows 95, 98, 2000, Me, NT, XP, 2003 Server,
Vista; Sun; Linux; and Mac OS.
Q: Can I mix PS/2 and USB servers on the host side?
, the Rack-Mount Console will support any mix of PS/2 and USB
A: Yes
host servers at a time.
Q: What does flash-upgradeable mean?
With flash-upgrade capability, you can update your Rack-Mount
A:
Console firmware at any time through a simple serial connection.
Upgrade capability ensures that your Rack-Mount Console is always
the most current version on the market with the latest features and
enhancements. See the “Updating Firm
Manual.
18.5” Widescreen Rack-Mount Console with Built-In PRO3 KVM Switch
ware” section in this User
Q: How does the Rack-Mount Console allow the user to switch
between ports?
A: The Rack-Mount Console suppor ts two methods of port selection.
The user can select ser vers using specially designated keyboard hot
keys or through the On-Screen Display.
Q: How far can the ser ver be from the Rack-Mount Console?
A: The Rack-Mount Console can be placed up to 25 feet away from your
PS/2 ser ver
Q: What is the maximum video resolution that the Rack-Mount
Console supports?
A: The advanced video circuit in the Rack-Mount Console supports a
maximum resolution of up to 1366x768.
and up to 15 feet away from your USB server.
30
Page 33

FREQUENTLY ASKED QUESTIONS
SE CT IO NSTab le o f Co nte nts 1 2 3 64 875
Q: D o I have to install any software to use the Rack-Mount Console?
A: No, the Rack-Mount Console does not require any drivers or sof tware
to be installed in your servers. Simply connect all your servers to the
Belkin KVM Cable Kits and it is ready for use.
Q: Can I use the Rack- Mount Console to switch v
A: No, the Rack-Mount Console must be connected to both the video
and keyboard/mouse por ts on your servers. The Rack-Mount Console
detects the power from the PS/2 and USB ports on your servers in order
to function.
18.5” Widescreen Rack-Mount Console with Built-In PRO3 KVM Switch
ideo signals only?
Q: Can I use the Rack- Mount Console on my Sun ser ver that
suppor ts USB?
A: Yes, the Rack-Mount Console works with any USB-capable server.
Q: D oes the Rack-Mount Console suppor t Linux?
A: Yes,
the Rack-Mount Console works with Red Hat and other Linux
distributions configured for PS/2 or USB support.
Q: How long is the warranty for the Rack-Mount Console?
A: The Rack-Mount Console comes with a 2-Year Limited Warranty.
31
Page 34

TROUBLESHOOTING
SE CT IO NSTab le o f Co nte nts 1 2 3 54 876
My ser ver does not boot up when connected to the Rack-Mount
Console, but works fine when I connect the keyboard, video, and
mouse directly to the server.
• Make sure that the keyboard and mouse cables are connected tightly
between the Rack-M ount Console and the server.
• Check that the keyboard and mouse cables are not crossed.
• Check the cable connections.
I am getting ghosting
• Check that all video cables are inserted properly to the Cable Kit.
• Check that the monitor supports the resolution and refresh-rate set ting
on your server.
• L ower the v ideo resolution of the monitor.
• Check that the cable length does not exceed 25 feet.
• Check that the graphics card you are using supports the resolution and
refresh-rate setting on your server.
18.5” Widescreen Rack-Mount Console with Built-In PRO3 KVM Switch
, shadowing, or fuzzy images on my monitor.
I am g
etting a black screen on my monitor.
• Check that all video cables are inserted properly.
• Check that the keyboard cable is connected and inser ted properly
between the server the appropriate port on the Rack-Mount Console.
• Move the mouse and see if it is necessar y to log in as a user.
The server does not detect a keyboard and I get a keyboard error
reported at boot up.
• Check that the cable kit on the Rack-Mount Con
connected to your ser ver. Tighten any loose connections.
• Check whether USB-keyboard legacy support is enabled in the
system BIOS.
• If you are using the keyboard soft ware that was included with your
keyboard, uninstall it and then reinstall the standard Microsoft
keyboard driver.
• Try booting the problem computer while the port is selected and wait
until the operating system loads before switching away to ano
computer.
sole is completely
32
ther
Page 35

TROUBLESHOOTING
SE CT IO NSTab le o f Co nte nts 1 2 3 54 876
The mouse is lost when I switch to a different por t.
• Tighten any loose cable connections.
• If you are using a mouse driver that was included with your mouse,
uninstall it and install the standard Microsoft mouse driver.
• If the server is coming out of standby mode, allow up to one minute to
regain mouse function.
• De-activate power-management schemes on the PC with which
experiencing problems.
The mouse is not detected at boot up.
• Check the cables and make sure that they are inserted correctly.
18.5” Widescreen Rack-Mount Console with Built-In PRO3 KVM Switch
you are
The server boots up, but the mouse does not work .
• Try booting the problem computer while the port is selected and wait
until the operating system loads before switching away to another
computer.
When I switch from one port to another, mouse movement is
completely errat ic.
• Make sure you
sure that the driver is either for a standard PS/2 or USB mouse, or a
Microsoft server-compatible PS/2 or USB mouse.
• Make sure you do not have any mouse drivers loaded in your “CONFIG.
SYS” or “AUTOEXEC.BAT” files.
• Avoid moving the mouse or pressing the mouse button when switching
ports on the Rack-Mount Console.
do not have more than one mouse driver installed. Make
33
Page 36

TROUBLESHOOTING
SE CT IO NSTab le o f Co nte nts 1 2 3 54 876
USB
I am connecting the USB Cable Kit to a USB ser ver, and my keyboard
and mouse do not work.
• P rior to c onnecting the Rack-Mount Console, make sure that the HID
USB driver is installed on each server. (To install the HID USB driver,
connect a USB mouse and USB keyboard to the server. A Windows
operating system should automatically install the drivers.)
Some of the keys on
use a Mac server.
• If you are accessing a Mac system, a few of the option keys on your
keyboard may be reversed. All major keys will function as labeled. Refer
to the “Sun Combo and Mac Key Mapping” section in this User Manual.
my keyboard are not functioning properly when I
18.5” Widescreen Rack-Mount Console with Built-In PRO3 KVM Switch
34
Page 37

GLOSSARY
SE CT IO NSTab le o f Co nte nts 1 2 3 54 876
The following definitions are used throughout this User Manual.
AutoScan: A mode of operation where the KVM switch scans from one port
to another, on an ongoing basis, as configured by the user.
BANK: The address of a daisy-chained KVM switch (00–15), set by the
DIP switch.
Console: The all-in-one term for the keyboard, video m
connected to a KVM switch.
Console Port: Receptors for the console to connect to the KVM switch.
Control: When discussing switching between ports, control means that the
console is capable of sending input to the ser ver. Control requires that the
console also has focus on the port, and is viewing it.
DDC: Short for Display Data Channel, a VESA standard for communication
between a monitor and a video adapter
a computer ’s video card about its properties, such as maximum resolution
and color depth, to ensure that the user is presented with valid options for
configuring the display.
. Using DDC, a monitor can inform
onitor, and mouse
Daisy- Chain: A configuration of multiple KVM switches that are connected
one to another in a series. A KVM switch daisy-chain uses common settings
to allow seamless, complex interactions bet ween multiple consoles for
c
ontrol over many servers.
HID: Human Inter face Device, the USB device class that includes keyboards
and mice.
KVM: Literally “Keyboard Video Mouse”, this term refers to technology
that allows two or more computers to be controlled by one keyboard, video
monitor, and mouse; some switches that use K VM technology enable
sharing of other peripherals such as audio speakers, microphones, and
printers.
18.5” Widescreen Rack-Mount Console with Built-In PRO3 KVM Switch
35
Page 38

GLOSSARY
SE CT IO NSTab le o f Co nte nts 1 2 3 54 876
KVM Switch: A device that allows a user to access and control multiple
servers from a single console. It has at least one console por t and multiple
server ports.
OSD: On-Screen Display, a Graphical User Interface that can be used to
control and configure the KVM switch.
Port: An interface receptor on a server through which y
device or plug in a device cable.
Primar y KVM Switch: The KVM switch that is connected to the console
and is set to BANK address 0 0.
Secondary KVM Switch: Any K VM switch that is daisy-chained to the
primar y KVM switch and is set to BANK address 01–15 (and has no console
connected).
ou can at tach a
18.5” Widescreen Rack-Mount Console with Built-In PRO3 KVM Switch
36
Page 39

INFORMATION
SE CT IO NSTab le o f Co nte nts 1 2 3 54 876
FCC Statement
D
ECLARATION OF CONFORMITY WITH FCC RULES FOR
E
LECTROMAGNETIC COMPATIBILITY
We, Belkin Intemational, Inc., of 12045 E. Waterfront Drive,Playa Vista,CA 90094, declare under
our sole responsibility that the products:
F1DC108V, F1DC116V
to which this declaration relates:
Comply with Part 15 of the FCC Rules. Operation is subject to the following two conditions:
(1) This device may not cause harmful interference, and
(2) This device must accept any interference received, including interference hat may cause
undesired operation.
Federal Communications Commission Notice
This equipment has been tested and found to comply with the limits for a Class A digital device,
pursuant to Part 15 of the FCC Rules. These limits are designed to provide reasonable protection
against harmful interference in a non-residential installation. This equipment generates, uses, and
can radiate radio frequency energy and, if not installed and used in accordance with the instructions,
may cause harmful interference to radio communications. However, there is no guarantee that
interference
will not occur in a particular installation. If this equipment does cause harmful interference
to radio or television reception, which can be determined by turning the equipment off and on, the
user is encouraged to try to correct the interference by one of the following measures:
Reorient or relocate the receiving antenna.
Increase the distance between the equipment and the receiver.
Connect the equipment to an outlet on a circuit different from that to which the receiver is
connected.
Consult the dealer or an experienced radio/TV technician for help.
FCC Caution:
for compliance could void the user’s authority to operate this equipment.
Any changes or modifications not expressly approved by the party responsible
CE Declaration of Conformity
We, Belkin Intemational, Inc., declare under our sole responsibility that the products:
F1DC108V, F1DC116V
to which this declaration relates, are in conformity with EMC Directive 2014/30/EU and Low
Voltage Directive 2014/35/EU
EN 55032 (Emissions)
EN 55024 (Immunity)
EN 60950-1 (Safety)
The full text of the EU Declaration of Conformity is available at the following address:
http://www.belkin.com/DoC
ISED Canada Statement
This Class A digital apparatus complies with CAN ICES-3(A).
Cet appareil numérique de la classe A est conforme á la norme NMB-003(A) du Canada.
Safety Notices
English
WARNING: Do not use this product near water,for example, in a wet basement or
near a swimming pool.
WARNING: Avoid using this product during an electrical storm. There may be a
remote risk of electric shock from lightning.
WARNING: The power adaptor is the equipment’s disconnection device. The power
outlet must be located nearby the equipment and its access must be easy.
User Information for Consumer Products Covered by EU Directive 2012/19/EU
on Waste Electric and Electronic Equipment (WEEE)
This document contains important information for users with regards to the proper
disposal and recycling of Belkin KVM products. Consumers are required to comply with
this notice for all electronic products bearing the following symbol:
English - Environmental Information for Customers in the European Union
European Directive 2012/19/EU requires that the equipment bearing this symbol on the product
and/or its packaging must not be disposed of with unsorted municipal waste. The symbol indicates
that this product should be disposed of separately from regular household waste streams. It is your
responsibility to dispose of this and other electric and electronic equipment via designated collection
facilities appointed by the government or local authorities. Correct disposal and recycling will help
prevent potential negative consequences to the environment and human health. For more detailed
information about the disposal of your old equipment, please contact your local authorities, waste
disposal service, or the shop where you purchased the product.
18.5” Widescreen Rack-Mount Console with Built-In PRO3 KVM Switch
37
Page 40

INFORMATION
SE CT IO NSTab le o f Co nte nts 1 2 3 54 876
Belkin International, Inc., Limited 2-Year
Product Warranty
What this warranty covers .
Belkin International, Inc. (“Belkin”) warrants to the original purchaser of
this Belkin product that the product shall be free of defe
assembly, material, or workmanship.
What the period of coverage is.
Belkin warrants the Belkin product for two year s.
18.5” Widescreen Rack-Mount Console with Built-In PRO3 KVM Switch
cts in design,
What will we do to correct problems?
Product Warranty.
Belkin will repair or replace, at its option, any defective product free of
charge (except for shipping charges for the product). Belkin reserves the
right to discontinue any of its products without notice, and disclaims any
limited warranty to repair or replace any such discontinued products .
In the event that Belkin is unable to repair or replace the product (for
example, because it has been discontinued), Belkin will of fer
refund or a credit toward the purchase of another product from Belkin.com
in an amount equal to the purchase price of the product as evidenced on
the original purchase receipt as discounted by its natural use.
either a
38
Page 41

INFORMATION
SE CT IO NSTab le o f Co nte nts 1 2 3 54 876
What is not covered by this warranty?
All above warranties are null and void if the Belkin product is not provided
to Belkin fo
the purchaser, or if Belkin determines that the Belkin product has been
improperly installed, altered in any way, or tampered with. The Belkin
Product Warranty does not protect against acts of God such as flood,
lightning, earthquake, war, vandalism, theft, normal-use wear and tear,
erosion, depletion, obsolescence, abuse, damage due to low voltage
disturbances (i.e. brown
equipment modification or alteration.
18.5” Widescreen Rack-Mount Console with Built-In PRO3 KVM Switch
r inspection upon Belkin’s request at the sole expense of
outs or sags), non-authorized program, or system
How to get service.
To get service for your Belkin product you must take the following steps:
1. Contact Belkin International, Inc., at 12045 E. Waterfront Drive,
Playa Vista, CA 90094, Attn: Customer Service, or call (800)-2235546, within 15 days of the Occurrence. Be prepared to provide the
following information:
The part number of the Belkin product.
a.
b. Where you purchased the product.
c. When you purchased the product.
d. Copy of original receipt.
2. Your Belkin Customer Service Representative will then instruct you on
how to forward your receipt and Belkin product and how to proceed
with your claim.
39
Page 42

INFORMATION
SE CT IO NSTab le o f Co nte nts 1 2 3 54 876
Belkin reserves the right to review the damaged Belkin product. All costs
of shipping the Belkin product to Belkin for inspection shall be borne
s
olely by the purchaser. If Belkin determines, in its sole discretion, that
it is impractical to ship the damaged equipment to Belkin, Belkin may
designate, in its sole discretion, an equipment repair facility to inspect and
estimate the cost to repair such equipment. The cost, if any, of shipping
the equipment to and from such repair facility and of such estimate shall
be borne solely by the purchaser. Damaged equipment must remai
available for inspection until the claim is finalized. Whenever claims are
settled, Belkin reserves the right to be subrogated under any existing
insurance policies the purchaser may have.
18.5” Widescreen Rack-Mount Console with Built-In PRO3 KVM Switch
n
How state law relates to the warranty.
THIS WARRANTY CONTAINS THE SOLE WARRANTY OF BELKIN.
THERE ARE NO OTHER WARRANTIES, EXPRESSED OR, EXCEPT AS
REQUIRED BY LAW, IMPLIED, INCLUDING THE IMPLIED WARRANTY
OR CONDITION OF QUALIT Y, MERCHANTABILITY OR FITNESS FOR A
PARTICULAR PURPOSE, AND SUCH IMPLIED WARRANTIES, IF ANY,
ARE LIMI
Some states do not allow limitations on how long an implied warranty
lasts, so the above limitations may not apply to you.
IN NO EVENT SHALL BELKIN BE LIABLE FOR INCIDENTAL, SPECIAL,
DIRECT, INDIRECT, CONSEQUENTIAL OR MULTIPLE DAMAGES SUCH
AS, BUT NOT LIMITED TO, LOST BUSINESS OR PROFITS ARISING
OUT OF THE SALE OR USE OF ANY BELKIN PRODUCT, EVEN IF
ADVISED OF THE POSSIBI
This warranty gives you specific legal rights, and you may also have other
rights, which may var y from state to state. Some states do not allow the
exclusion or limitation of incidental, consequential, or other damages, so
the above limitations may not apply to you.
TED IN DURATION TO THE TERM OF THIS WARRANTY.
LITY OF SUCH DAMAGES.
40
Page 43

Belki n Tech Suppor t
US
http://www.belkin.c om/suppor t
UK
http://www.belkin.c om/uk /support
France
http://www.belkin.c om/fr/su pport
Australia
http://www.belkin.c om/au/su pport
New Zea land
http://www.belkin.c om/au/su pport
Europe
http://www.belkin.c om/uk /support
Germa ny
http://www.belkin.c om/de/support
© 2 017 Bel kin In ter national , Inc . All rights
re serve d. All trad e names ar e register ed
tradem ark s of r espectiv e manufactur ers
li ste d.
© 2 017 Bel kin In ter nationa
ré servé s. Tou tes les raisons co mmerc iale s
so nt d es m arq ues dép osées de leur s
fabri cant s respe ctifs.
l, Inc . Tous dr oit s
© 2 017 Bel kin In ter national , Inc . All e Recht e
vorbe halten . All e Pro duktna men sin d
ei ngetrag ene M ark en der angeg ebe nen
He rst eller.
 Loading...