

Page 1

OmniView
™
4-Port
U S B KV M
Switch
User Guide
P73428 F1D104-USB
Page 2

Belkin Components
F1D104-USB - OMNIVIEW
READ BEFORE INSTALLATION
Tech Notes:
1) Windows 98/98 SE systems
o HID (Human Interface Device) driver must be installed
the USB KVM switch. To install the HID driver, first connect a USB
keyboard and mice directly to computer (before installing KVM
switch) then follow the Windows installation instructions, this will
install the HID device driver and allow the use of the KVM switch.
Failure to do so may result in Windows not being able to detect
keyboard and mouse.
o If a mouse recognition error is displayed during system boot:
“Windows did not detect a mouse attached to the computer.
You can safely attach a serial mouse now.
To attach a mouse to a PS/2 mouse port, you must first turn the
computer off”
SE 4-Port
prior
to using
Press the
Press the
not show this message again”)
Press the
then recognize the mouse.
2) Windows 2000
o Switching channels while a USB storage device is connected to the
OmniView will prompt the message:
Before switching channels, double click on the “
Hardware
device(s) and click on the Stop button. This will prevent the error
message from appearing.
3) Beep sound can be turned on or off by pressing the scroll lock key twice then
press the “S” key.
4) Autoscan, Hot Keys, & OSD will only work with a PS/2 Keyboard
5) The computer will take 1~3 seconds to redetect the connected USB devices
when the channel is switched.
WARNING:
6)
acquisition device is in operation. Failure to do so will result in system error
and/or loss of data.
Tab
key once to select the check box
Space bar
Enter
“the device was removed unsafely”
“ icon, located in the taskbar. Highlight the storage
Do not switch channels when a connected data storage or
once (which will place a check in the box “Do
key once and Windows will continue to boot and will
Unplug or Eject
Page 3

Introduction
Thank you for purchasing the Belkin Components®4-Port
USB KVM Switch! Now you can control up to four different
USB computers on any operating system! With exclusive
Time-Delay Technology, USB switching is seamless and errorfree. The built-in USB to PS/2 converter allows users to work
on a standard PS/2 keyboard and take advantage of hot key
switching and On-Screen Display. And with video bandwidth
capable of 1600 x 1200 @ 85Hz, images are clear and
distortion-free. No other manufacturer makes a better
KVM switch!
NOTE ON RECOMMENDED
OPERATING SYSTEM COMPATIBILITY
Any USB-enabled operating system such as Windows®98,
Windows®98SE, Windows®2000, Mac®OS 8.x or higher.
Windows®95 and OSR2.1 are not recommended because of
immature USB support.
1
Page 4

Package Contents
• 4-Port USB KVM Switch F1D104-USB
• 12VDC, 1.6A switching power adapter
• This manual
• Registration card
2
Page 5
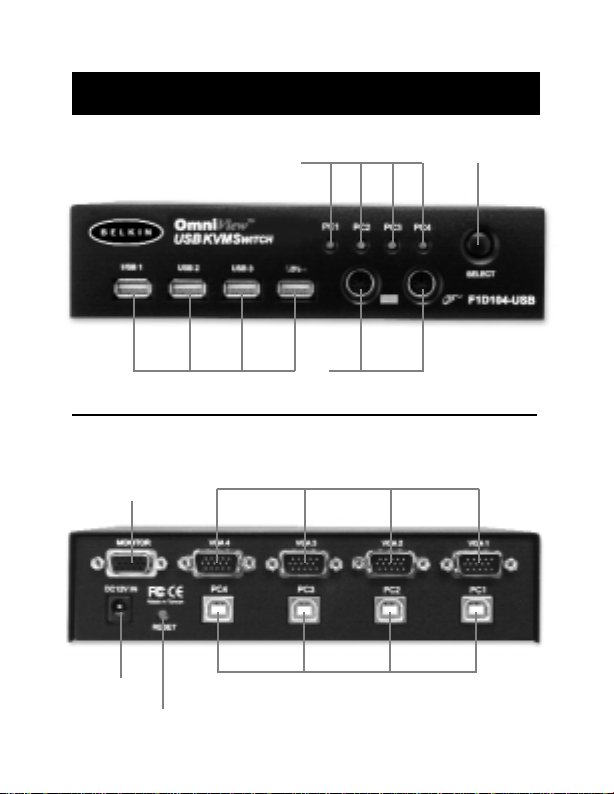
Product Detail
Front View
Four Downstream USB Ports PS/2 Keyboard
LED Port Indicators Select Button
Rear View
Monitor
Connector
DC Power
Jack
Reset
Button
VGA Connectors to Computers
Four Upstream USB Connectors to Computers
3
& Mouse Ports
Page 6
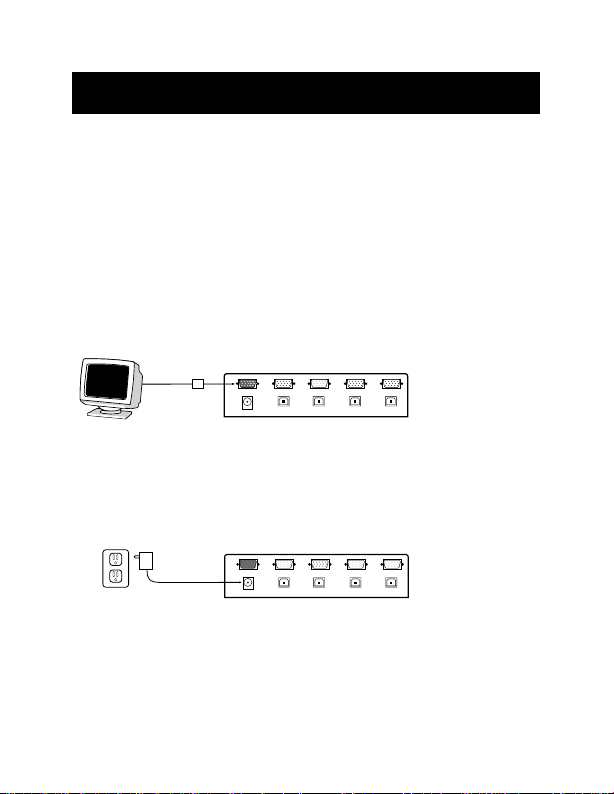
Installation Instructions
Please follow these instructions carefully to ensure proper
system functionality.
Do not power down any of your computers, and do
not unplug any PS/2 or USB keyboard or mouse device
just yet. Doing so may cause you unnecessary reboots
and other hassles.
First, connect your monitor to the monitor port at the back of
the USB KVM.
Rear View USB KVM
Then, plug in the power adapter to an AC outlet and plug the
power jack into the USB KVM.
Rear View USB KVM
Connect your keyboard and mouse to the USB KVM. You can
use either USB or PS/2 or both. However, we recommend
using a PS/2 keyboard, and either type of mouse. Using a PS/2
keyboard allows you to control the KVM switch through hot
keys and On-Screen Display.
4
Page 7

PC SERIAL
USB 1
USB 2
VGA MONITOR
AT KEYBOARD
PS/2 MOUSE
PS/2 KEYBOARD
PARALLEL
RJ45 NETWORK
AT SERIAL
Installation Instructions (continued)
Front View USB KVM
USB Mouse
OmniView
USBKVMS
WITCH
PS/2 Mouse
PS/2 Keyboard
Connecting a Windows-based PC to the USB KVM Switch
Using a USB KVM Cable Kit (Belkin F3X1895-XX), connect the VGA
and USB cables to an empty port at the back of the USB KVM.
HDDB15
USB “B”
F3X1895-XX
USB “A”
Connect the other ends of the USB KVM Cable to the
appropriate ports at the back of your PC. When connecting the
USB cable, plug it into an unused USB port. If all USB ports are
occupied, unplug a USB device that is NOT a keyboard or a
mouse. You need the keyboard and mouse to control Windows
when it starts detecting the USB KVM Switch components.
Back of
PC
5
®
Page 8

Installation Instructions (continued)
Once you have plugged in the USB cable, Windows®will detect
the built-in 4-port hub, PS/2 Keyboard, and Mouse I/F. Even if
Windows®asks for drivers, the drivers are built in. The USB KVM
uses standard HID-Class (Human Interface Device) drivers. So all
you need to do is keep hitting "NEXT" until Windows®loads the
drivers. Only when the drivers are loaded can you start using the
devices connected to the USB KVM Switch.
See below:
Click NEXT
Click NEXT
6
Page 9

Installation Instructions (continued)
Make sure no boxes are checked. Click NEXT
Click NEXT
You’re done! Click FINISH.
7
Page 10

Installation Instructions (continued)
Connecting a Macintosh®to the USB KVM Switch
Using a USB KVM Cable Kit (Belkin F3X1895-XX), connect the VGA
and USB cables to an empty port at the back of the USB KVM.
Rear View USB KVM
HDDB15
USB “B”
F3X1895-XX
USB “A”
Connect the other ends of the USB KVM Cable to the
appropriate ports at the back of your Mac. When connecting the
USB cable, plug it into an unused USB port. If all USB ports are
used up, unplug a USB device that is neither a keyboard or a
mouse.
Back of Mac
G3 or G4
Once you have plugged in the USB cable, Macintosh®OS will
detect the built-in 4-port hub, PS/2 Keyboard, and Mouse I/F.
The USB KVM uses standard HID-Class (Human Interface
Device) drivers so no other action is required.
8
Page 11

Usage
Connecting USB Devices to the built-in 4-Port hub
When you connect any USB device to the 4-port hub, that
device will be switched when you switch computers. For
instance, a USB Camera will be connected to computer 2 when
you switch from computer 1 to computer 2. This is fine for
many devices, but not suitable for storage devices such as LS120 drives and Zip
switch ports and disconnect a mounted storage device when it
is in use by the operating system.
For instance, if you are on computer 1 and have a file open that
is stored on a Zip drive connected to the USB KVM, and then
switch to computer 2, you will get an error message on
computer 1 saying that the file may be lost or corrupted.
The same is true when you are using a streaming device such as
the Belkin VideoBus USB Video Capture device. You can switch
from one computer to the next only if the VideoBus is no
longer in use by the first computer.
Selecting which computer to operate can be done by either
On-Screen Display, the SELECT button, or through keyboard
hot key commands. You will notice that after the USB KVM
switches to another computer, the mouse will be inoperative for
about 1-2 seconds. This is a normal operation ensuring that
proper USB synchronization is established.
NOTE: You must have a PS/2 keyboard in order to use
the On-Screen Display and/or keyboard hot keys.
®
drives because you cannot dynamically
9
Page 12

Usage (continued)
The SELECT Button:
OmniView
USBKVMS
WITCH
Pressing the SELECT button cycles you through
all the ports, including inactive ports.
Keyboard hot key commands (REQUIRES PS/2 KEYBOARD):
You can also conveniently command the USB KVM to switch
ports through simple keyboard key sequences. To send
commands to the USB KVM, the SCROLL LOCK key must be
pressed twice within 2 seconds. You will hear a beep for
confirmation. Below are the different commands:
Switch to PREVIOUS ACTIVE port
Switch to NEXT ACTIVE port
Directly switches to port Y
You can switch directly to any port by giving the USB KVM the
PORT number. For instance, if you press [SCROLL LOCK]
[SCROLL LOCK] [2], the computer on PORT 2 will be selected.
10
Page 13

Usage (continued)
AutoScan Mode:
Enable AutoScan mode
To enable AutoScan mode, press [SCROLL LOCK]
[SCROLL LOCK] [0]. In AutoScan mode, the USB KVM remains
on one port for a number of seconds, before switching to the
next. This time interval is set in the On-Screen Display menu.
NOTE: There is no mouse or keyboard control in this
mode. This is necessary to prevent errors. Otherwise, if
the user is moving the mouse or using the keyboard
when the USB KVM switches to the next port, data flow is
interrupted and will cause erratic mouse movement
and/or the wrong characters to show up when using the
keyboard.
To exit AutoScan mode, press the SPACEBAR.
On-Screen Display Menu Control:
Enable the On-Screen Display menu
To enable the On-Screen Display, press [SCROLL LOCK]
[SCROLL LOCK] [SPACEBAR]. Immediately, the On-Screen
Display overlay screen appears. This screen is generated by the
USB KVM and does not affect your computers or running
software in any way.
11
Page 14

Usage (continued)
The main OnScreen Display
menu is shown
on the right. It
shows the
currently selected
BANK.
If you have only
one USB KVM,
it will say
“BANK 0”.
The current
selected port is
shown in RED.
The current
selected
port is
shown in
RED.
“✹” indicates
that the
computer
connected
to that port
is powered
up.
12
Page 15

Usage (continued)
• You can navigate through the active ports by using the arrow
keys. The On-Screen Display menu will only allow you to move
to active ports.
NOTE: If a computer is connected and is powered up,
but the On-Screen Display menu does not display a “✹”,
you will have to RESET the USB KVM to re-detect the
powered computers. Simply press the reset button at the
back of the USB KVM.
• Pressing the [INSERT] key allows you to rename the port.
Press [ENTER] to complete.
• Pressing the [ESC] key exits the current screen.
• To view a different BANK, pressing the [PAGE UP] key goes to
a previous BANK, while the [PAGE DOWN] key brings you to
the next BANK.
• Once you have selected a computer on the menu, press
[ENTER] to switch to its port.
• Pressing the [TAB] key opens the Function menu.
In this menu, you can select SCAN TIME and
DISPLAY TIME.
• [SCROLL LOCK] [SCROLL LOCK] [DEL] erases all of the names
stored in the OmniView™ PRO’s memory. The names default
back to “Channel 1”, “Channel 2”, etc… Y
seconds in order for the memory to be reinitialized.
ou must wait 30
13
Page 16

SCAN TIME:
SCAN TIME:
Amount of time the
USB KVM stays
on one port before
switching to the next
port when in Scan
Mode.
DISPLAY TIME:
Amount of time the
On-Screen Display
m
enu or Port
Name remains
displayed on-screen
after making a port
selection.
Usage (continued)
14
Page 17

Troubleshooting
Monitor/Video Problems:
Q: I am getting ghosting, shadowing, or fuzzy images
on my monitor.
A: •Check the cables and make sure they are inserted properly.
• Your resolution and/or refresh rate is extremely high, or
your cable is too long. Replace your VGA cables with
coaxial double-shielded cables such as Belkin A3H981-XX.
•
Check to make sure that the power adapter is plugged in and
is working properly. It must be 12VDC, 1600mA minimum.
Make sure the power switch is on.
• Lower you refresh rate and/or screen resolution settings.
15
Page 18

Information
FCC Statement
DECLARATION OF CONFORMITY WITH FCC RULES FOR
We, Belkin Components, of 501 West Walnut Street, Compton CA 90220,
declare under our sole responsibility that the product:
to which this declaration relates:
Complies with Part 15 of the FCC Rules. Operation is subject to the following
two conditions: (1) this device may not cause harmful interference, and (2) this
device must accept any interference received, including interference that may
cause undesired operation.
CE Declaration of Conformity
We, Belkin Components, declare under our sole responsibility that the
which this declaration relates, is in conformity with Generic Emissions Standard EN50081-1
and with Generic Immunity Standard EN50082-1 1992.
Belkin Components Limited Lifetime Product Warranty
Belkin Components warrants this product against defects in materials and workmanship for
its lifetime. If a defect is discovered, Belkin will, at its option, repair or replace the product at
no charge, provided it is returned during the warranty period, with transportation charges
prepaid, to the authorized Belkin dealer from whom you purchased the product. Proof of
purchase may be required.
This warranty does not apply if the product has been damaged by accident, abuse, misuse,
or misapplication; if the product has been modified without the written permission of Belkin;
or if any Belkin serial number has been removed or defaced.
THE WARRANTY AND REMEDIES SET FORTH ABOVE ARE EXCLUSIVE IN LIEU OF ALL
OTHERS, WHETHER ORAL OR WRITTEN, EXPRESSED OR IMPLIED. BELKIN SPECIFICALLY
DISCLAIMS ANY AND ALL IMPLIED WARRANTIES, INCLUDING, WITHOUT LIMITATION,
WARRANTIES OF MERCHANTABILITY AND FITNESS FOR A PARTICULAR PURPOSE.
No Belkin dealer, agent, or employee is authorized to make any modification, extension, or
addition to this warranty.
BELKIN IS NOT RESPONSIBLE FOR SPECIAL, INCIDENTAL, OR CONSEQUENTIAL
DAMAGES RESULTING FROM ANY BREACH OF WARRANTY, OR UNDER ANY OTHER
LEGAL THEORY, INCLUDING BUT NOT LIMITED TO LOST PROFITS, DOWNTIME,
GOODWILL, DAMAGE TO OR REPROGRAMMING, OR REPRODUCING ANY PROGRAM
OR DATA STORED IN OR USED WITH BELKIN PRODUCTS.
Some states do not allow the exclusion or limitation of incidental or consequential damages
or exclusions of implied warranties, so the above limitations of exclusions may not apply to
you. This warranty gives you specific legal rights, and you may also have other rights that
vary from state to state.
ELECTROMAGNETIC COMPATIBILITY
F1D104-USB
F1D104-USB, to
16
Page 19

Belkin Components
501 West Walnut Street
Compton • CA • 90220 • USA
Tel: 310.898.1100
Fax: 310.898.1111
Belkin Components, Ltd.
Unit 13 • Gatelodge Close • Round Spinney
Northampton • Northants • NN3 8RX
United Kingdom
Tel: +44 (0) 1604678300
Fax: +44 (0) 1604678330
Belkin Components B.V.
Diamantlaan 8 • 2132 WV
Hoofddorp • The Netherlands
Tel: +31 (0) 235698765
Fax: +31 (0) 235612694
All Trade Names Are Registered Trademarks of Respective Manufacturers Listed.
© 2000 Belkin Components. All Rights Reserved.
 Loading...