

Page 1

FCC Statement
DECLARATION OF CONFORMITY WITH FCC RULES FOR ELECTROMAGNETIC
COMPATIBILITY
We, Belkin Components, of 501 West Walnut Street, Compton CA90220, declare under our sole
responsibility that the product:
MAC Adapter
™
F1D080
to which this declaration relates:
Complies with Part 15 of the FCC Rules. Operation is subject to the following two conditions: (1)
this device may not cause harmful interference, and (2) this device must accept any interference
received, including interference that may cause undesired operation.
CE Declaration of Conformity
We, Belkin Components, declare under our sole responsibility that the F1D080, to which this declaration relates, is in
conformity with Generic Emissions Standard EN50081-1 and with Generic Immunity Standard EN50082-1 1992. may
not apply to you. This warranty gives you specific legal rights, and you may also have other rights that vary from
state to state.
Belkin Components One Year Product Warranty
Belkin Components warrants this product against defects in materials and workmanship for one year. If a defect is
discovered, Belkin will, at its option, repair or replace the product at no charge provided it is returned during the
warranty period, with transportation charges prepaid, to the authorized Belkin dealer from whom you purchased the
product. Proof of purchase may be required.
This warranty does not apply if the product has been damaged by accident, abuse, misuse, or misapplication; if the product
has been modified without the written permission of Belkin; or if any Belkin serial number has been removed or defaced.
THE WARRANTYAND REMEDIES SET FORTH ABOVE ARE EXCLUSIVE IN LIEU OF ALLOTHERS, WHETHER
ORAL OR WRITTEN, EXPRESSED OR IMPLIED. BELKIN SPECIFICALLY DISCLAIMS ANYAND ALLIMPLIED
WARRANTIES, INCLUDING, WITHOUT LIMITATION, WARRANTIES OF MERCHANTABILITYAND FITNESS FOR A
PARTICULAR PURPOSE.
No Belkin dealer, agent, or employee is authorized to make any modification, extension, or addition to this warranty.
BELKIN IS NOT RESPONSIBLE FOR SPECIAL, INCIDENTAL, OR CONSEQUENTIAL DAMAGES RESULTING FROM
ANY BREACH OF WARRANTY, OR UNDER ANY OTHER LEGAL THEORY, INCLUDING BUT NOT LIMITED TO LOST
PROFITS, DOWNTIME, GOODWILL, DAMAGE TO OR REPROGRAMMING, OR REPRODUCING ANYPROGRAM
OR DATA STORED IN OR USED WITH BELKIN PRODUCTS.
Some states do not allow the exclusion or limitation of incidental or consequential damages or exclusions of implied
warranties, so the above limitations of exclusions may not apply to you. This warranty gives you specific legal rights,
and you may also have other rights that vary from state to state.
Information
Belkin Components B.V.
Diamantlaan 8 • 2132 WV
Hoofddorp • The Netherlands
Tel: +31 (0) 235698765
Fax: +31 (0) 235612694
Belkin Components, Ltd.
Unit 13 • Gatelodge Close • Round Spinney
Northampton • Northants • NN3 8RX • UK
Tel: +44 (0) 1604678300
Fax: +44 (0) 1604678330
belkin.com
Belkin Components
501 West Walnut Street
Compton • CA • 90220 • USA
Tel: 310.898.1100
Fax: 310.898.1111
© 2000 Belkin Components. All Rights Reserved.
All Trade Names Are Registered Trademarks Of Respective Manufacturers Listed.
P73037/F1D080 univ/man.qxd 4/21/00 2:01 PM Page 8
Page 2

Troubleshooting
1) There is no image on the monitor, or the images are distorted.
•Make sure the monitor is turned on.
•Make sure the correct port is selected on the OmniView™.
•Check all monitor cables. Make sure they are properly attached.
•Your monitor cannot handle the current resolution or refresh rates. Change
the DIP switch settings to Setting A shown in Table 3 and restart the
Macintosh
®
computer.
2) There is no response from the keyboard and/or mouse.
•Make sure that the Adapter is properly connected to the Macintosh
®
computer, and to the correct ports on the OmniView™.
•Make sure the correct port is selected on the OmniView
™
.
•Make sure that the OmniView™has a power adapter and is turned on.
•Check all the cables. Make sure they are properly attached, and that they
are straight-through.
3) The keyboard keys are not mapping correctly.
•Make sure that SW7 is set correctly. It must be ON for a 101-key, and OFF
for a 104-key.
4) The mouse is not working or the motion is erratic.
•The mouse must be PS/2 compatible. Aserial mouse on the OmniView
™
will not work with the Adapter.
For more information, consult the documentation included in your OmniView
™
.
En
7
P73037/F1D080 univ/man.qxd 4/21/00 2:01 PM Page 7
Page 3

Hardware Installation
6
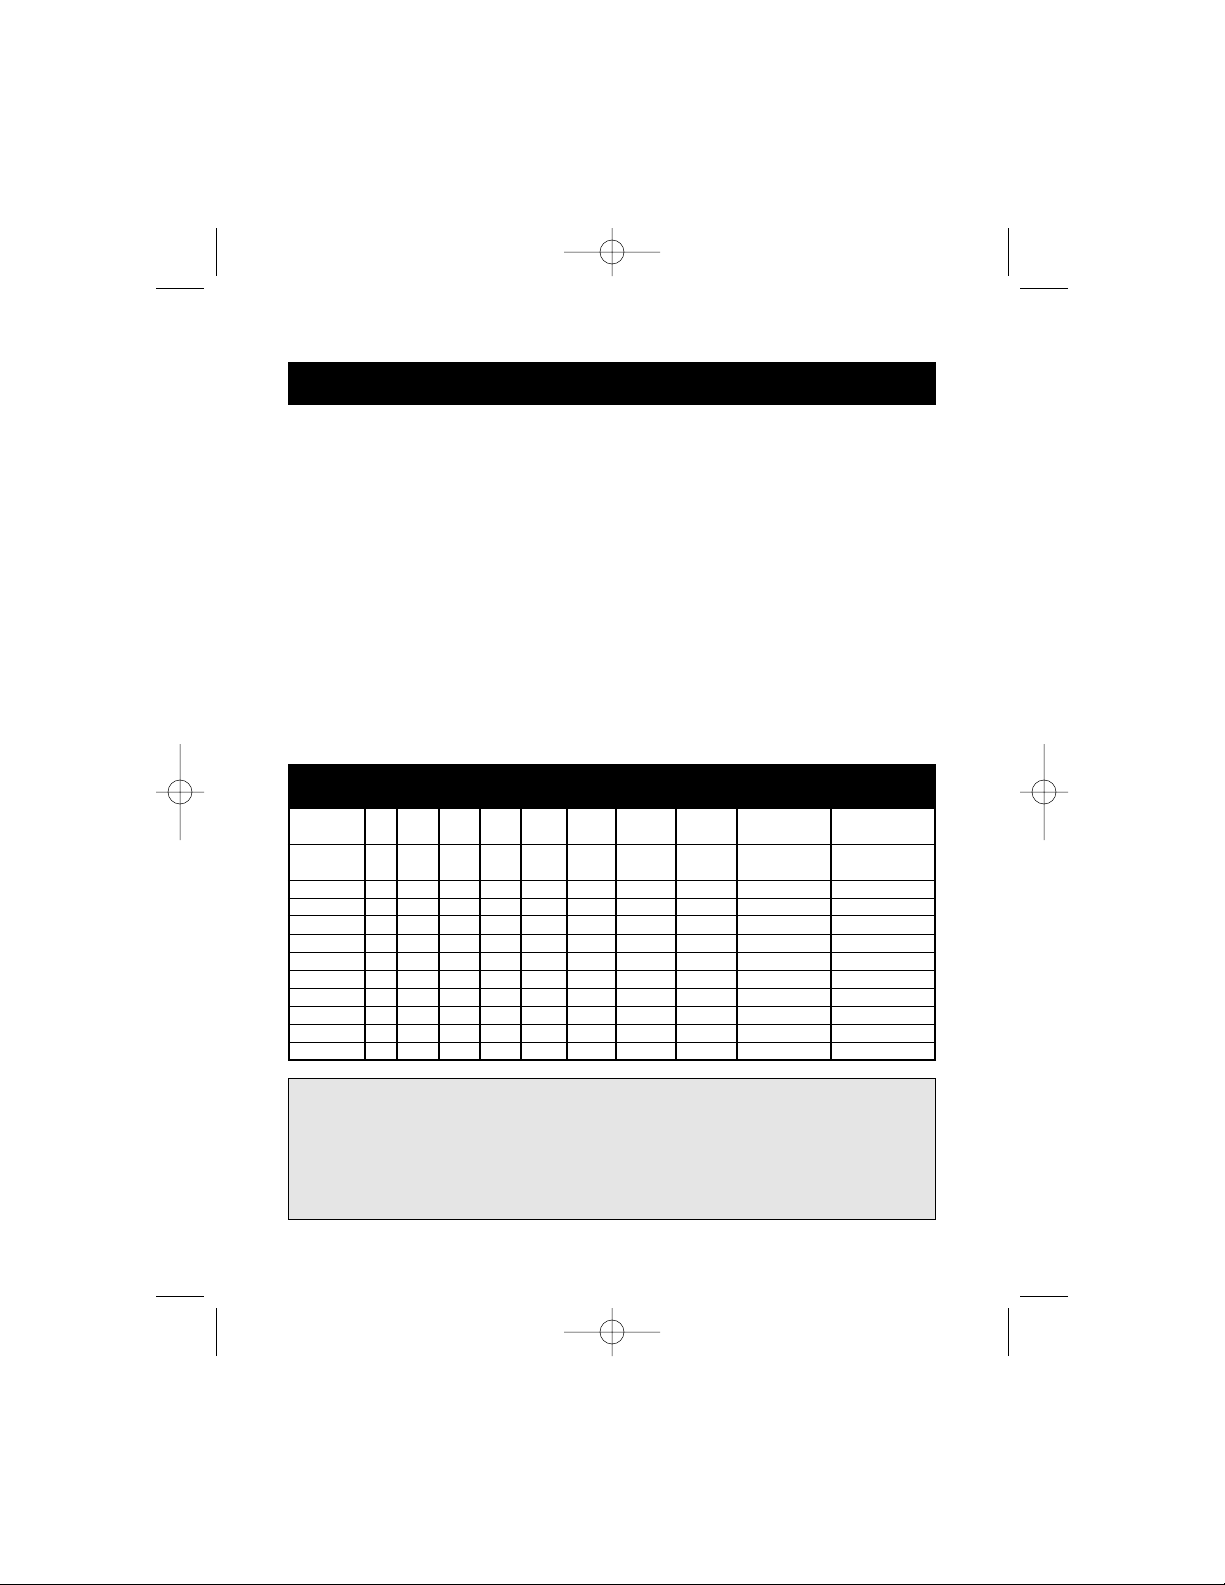
C. Monitor
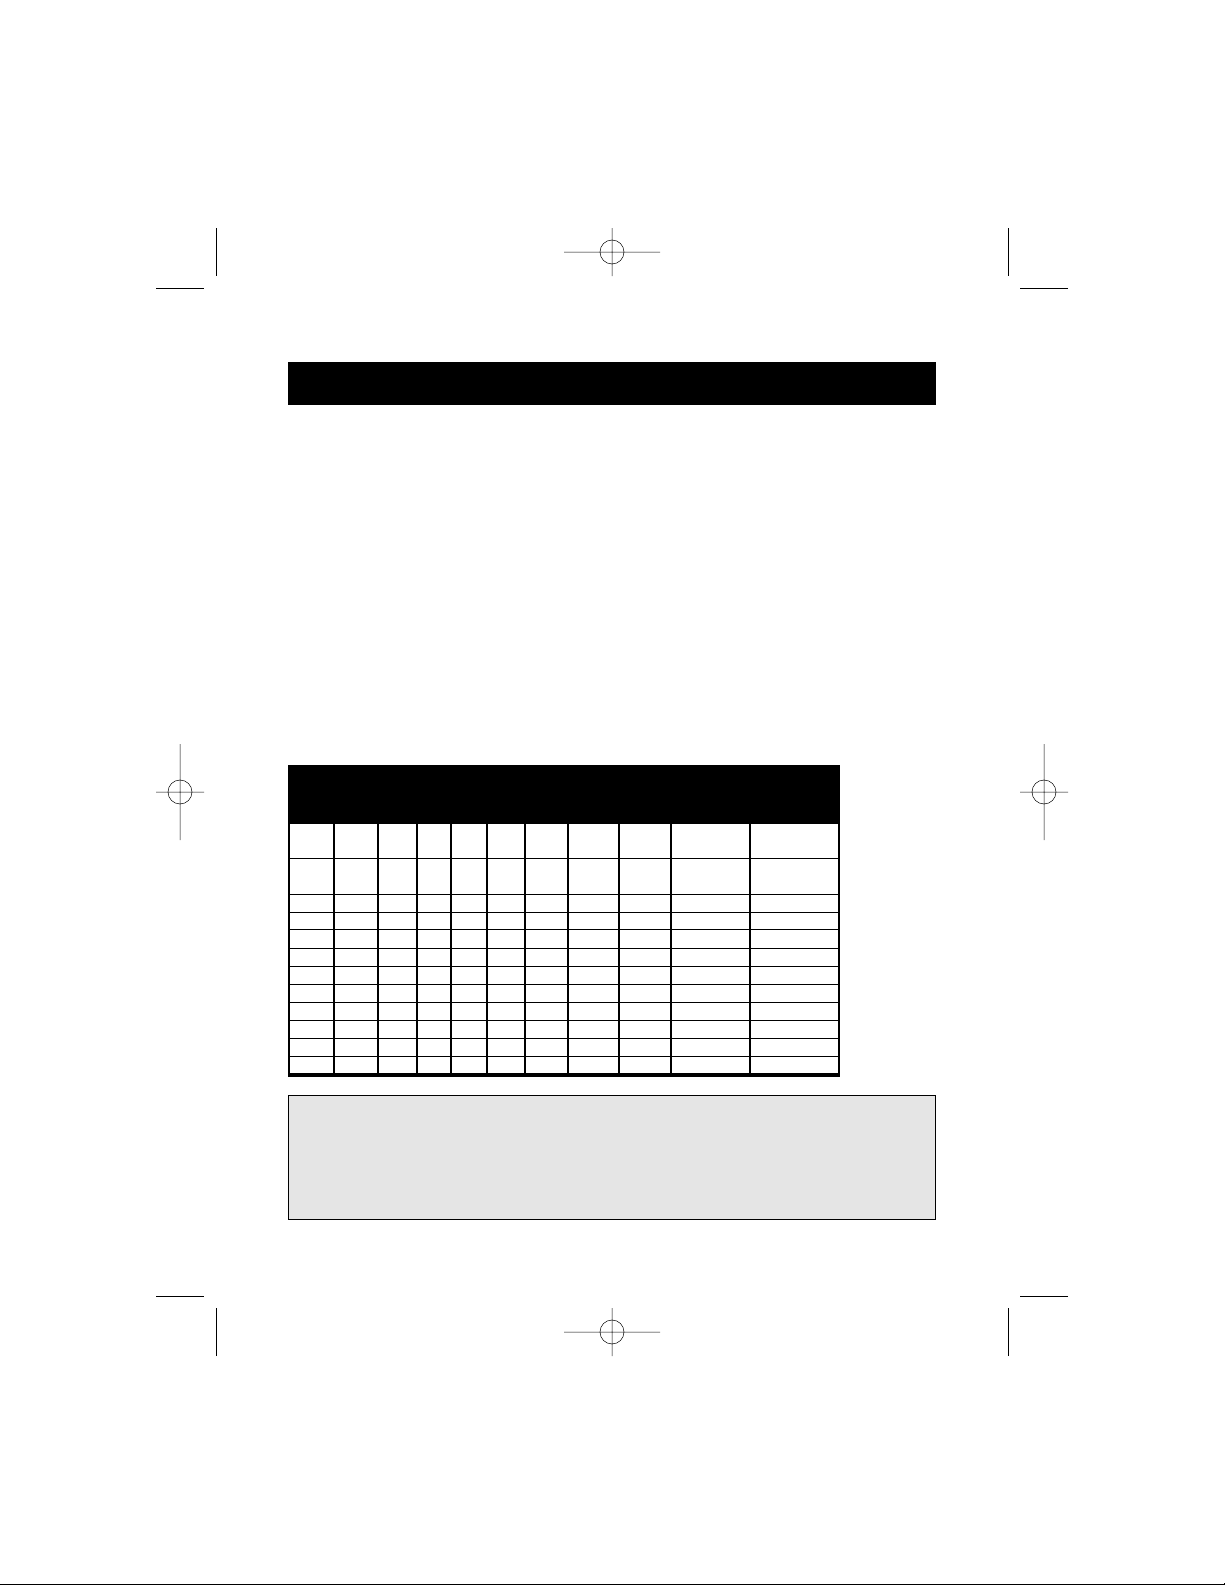
First you must determine the resolution your monitor supports. Then you
must set DIP switches SW1 through SW6 to the appropriate settings for
proper monitor operation. See Table 2 for additional information.
• Settings A and B below are recommended for most applications, wherein
the resolutions are selected in the Macintosh
®
Control Panel/Monitors menu.
• Setting A is the safest choice for older non-multisync SVGA monitors (640 x
480 only for VGA monitors).
• Setting B is the preferred choice for multisync SVGA monitors because of
the higher refresh rate.
Table 2
Setting SW1 SW2 SW3 SW4 SW5 SW6 Horiz. Vertical Resolution Monitor Notes
Scan Scan
(kHz) (Hz)
A ON ON 31.5 60 640 x 480 VGA
ON ON 35.2 50 800 x 600 SVGA
B ON ON ON 35 67 640 x 480 VGA
ON ON ON 49 75 800 x 600 SVGA
C ON 35 67 640 x 480 13” color
D ON ON 512 x 384
NTSC (underscan)
E ON ON 24.48 60.15 512 x 384 12” color
F ON ON ON 68.7 75 1152 x 870 21” color
G ON 640 x 480
NTSC (overscan)
H ON 1152 x 870
21” monochrome
I ON ON 640 x 870
Portrait
J ON ON 60.2 75 1024 x 768 19” color
K ON ON 49.7 75 832 x 624 16” color
L ON ON ON 640 x 480 PAL
PLEASE V E R I F Y YOU R M O N I TOR S P EC I F I CATION S AN D
SELECT THE CORRECT SETTING BEFORE POWERING UP. AN
INCORRECT SETTING MAY CAUSE IRREVERSIBLE DAMAGE
TO YOUR MONI TO R !
P73037/F1D080 univ/man.qxd 4/21/00 2:01 PM Page 6
Page 4
Hardware Installation
B. Mouse
• If you prefer a high-speed mouse pointer, set DIP switch
SW8 = ON
• If you prefer a normal-speed mouse pointer, set DIP switch
SW8 = OFF
En
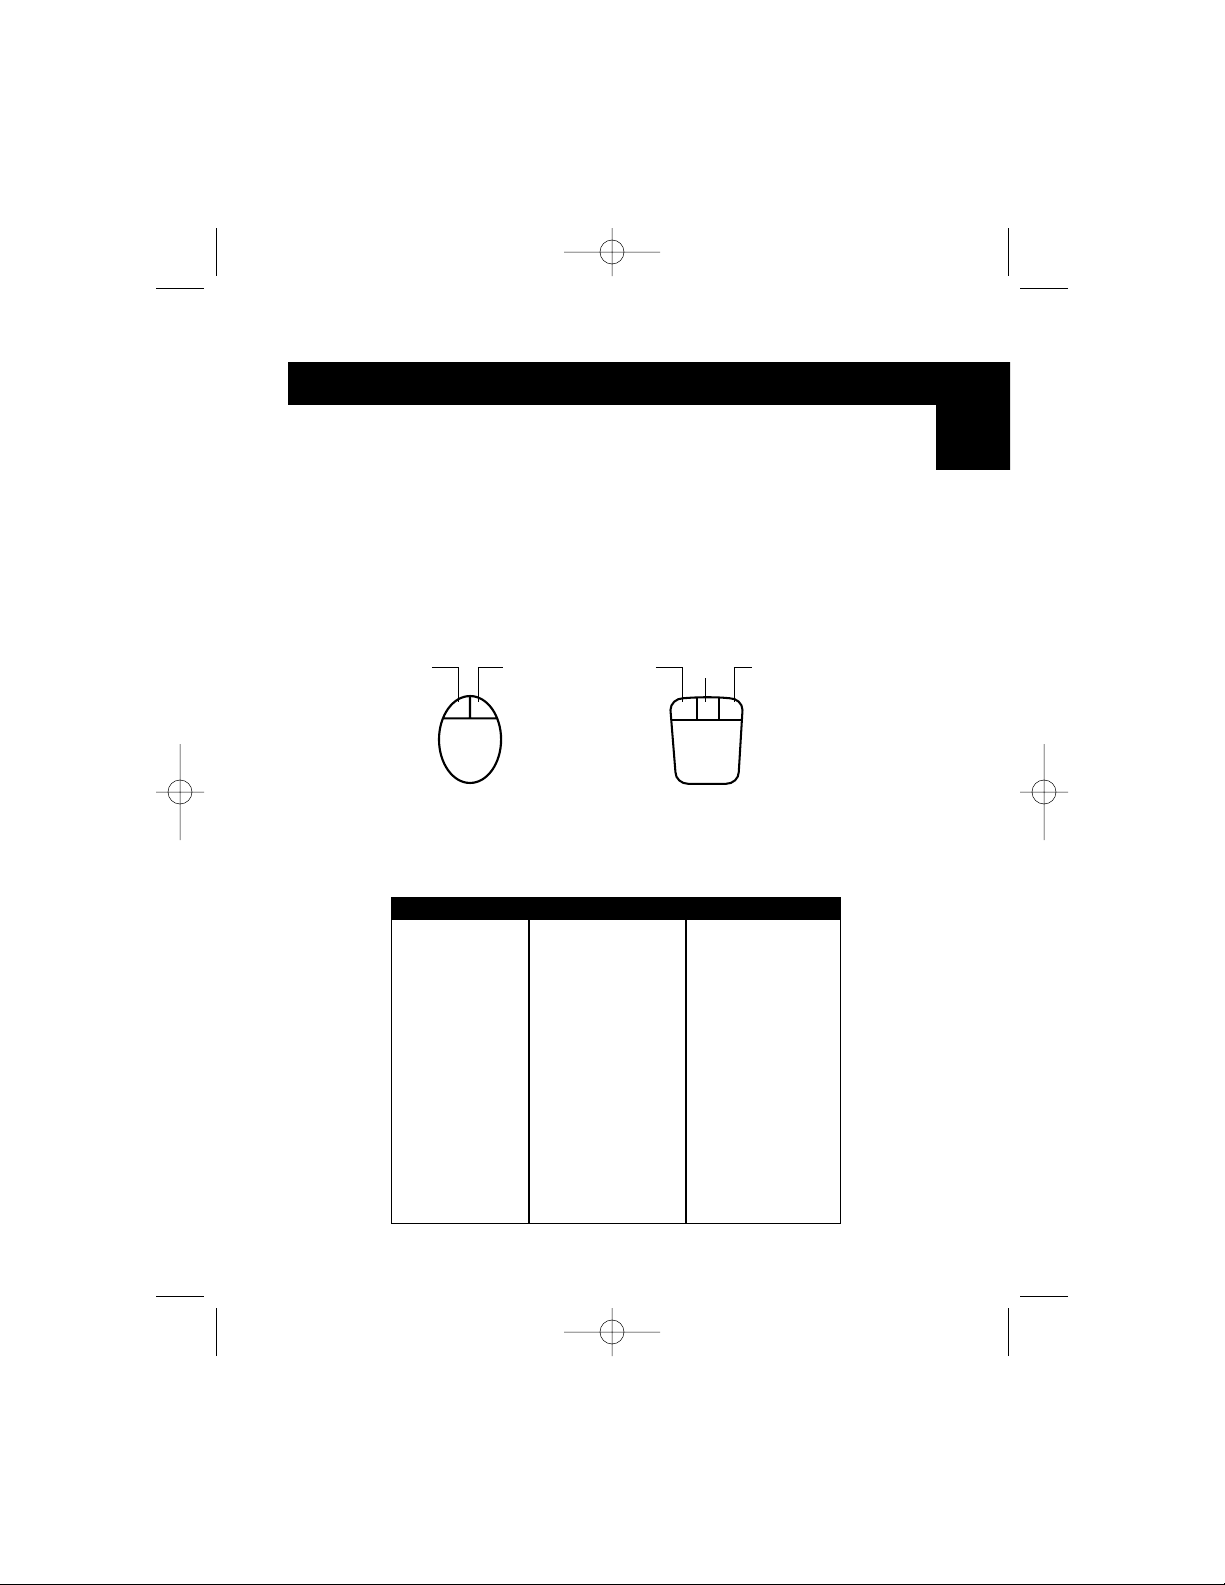
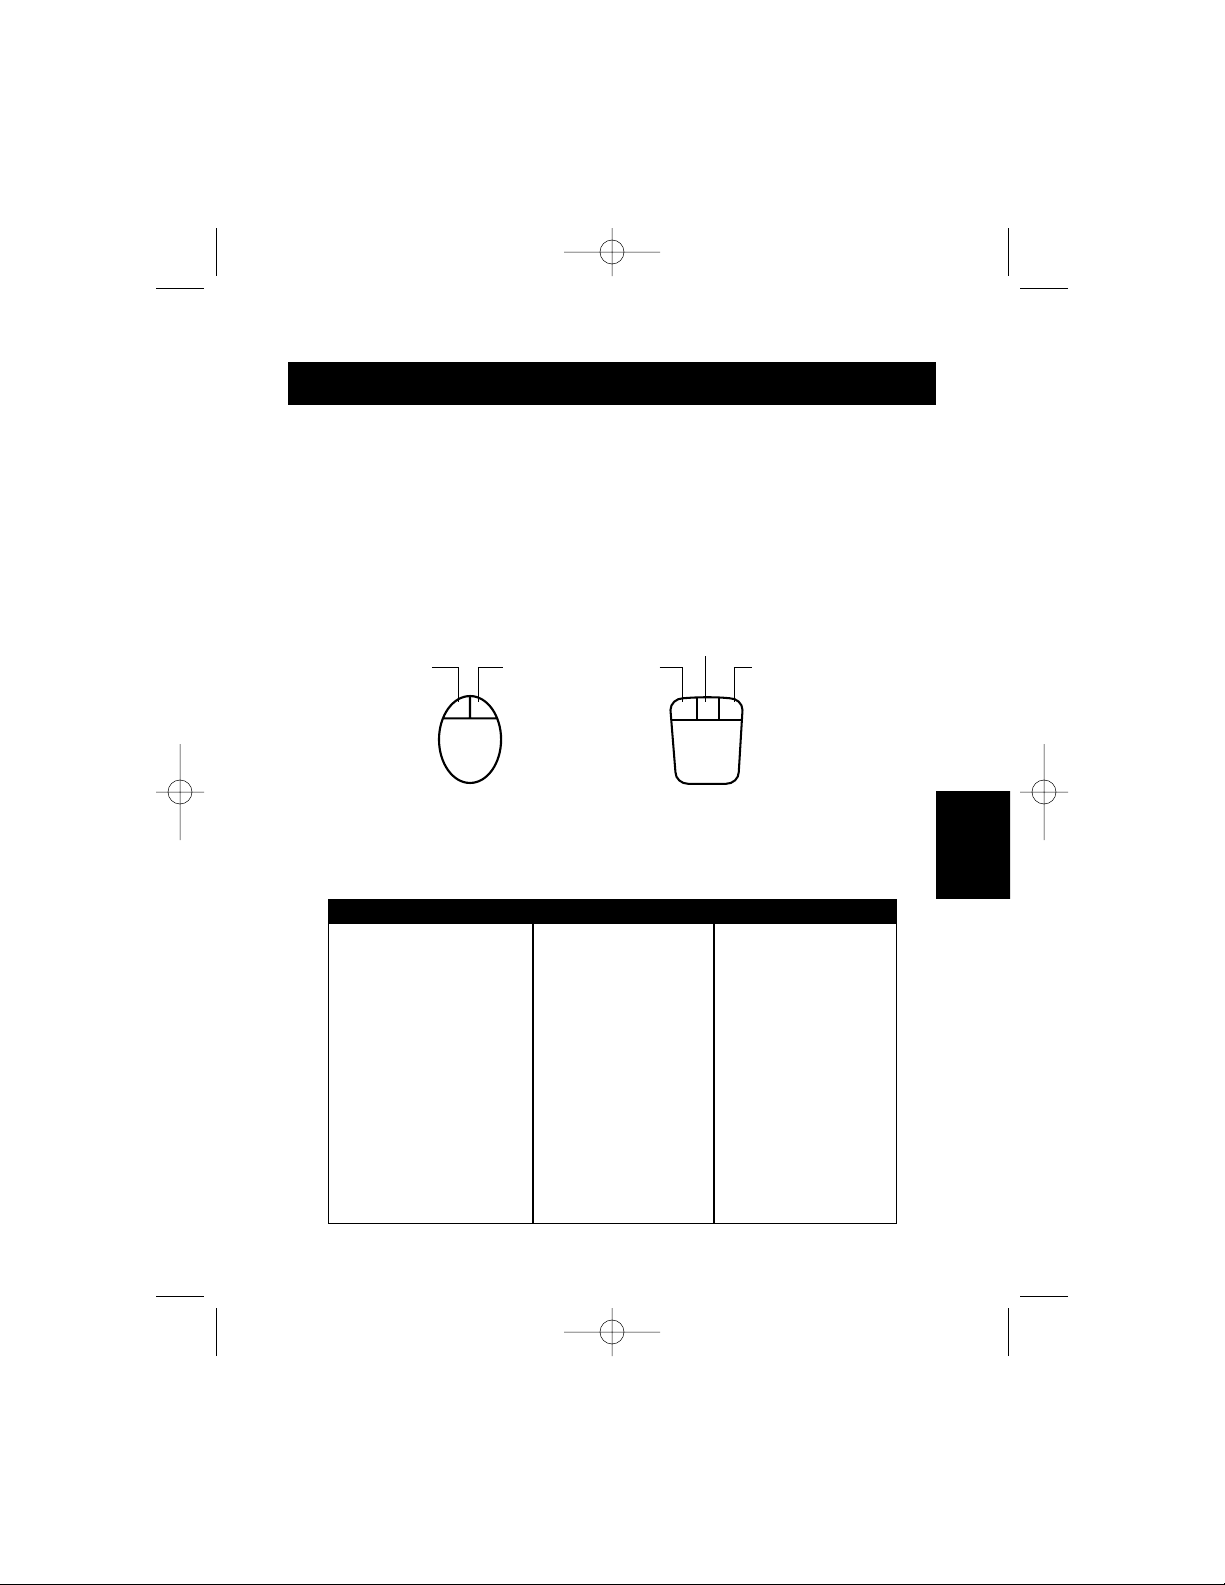
See Figure 4 for key mapping between the PS/2 2-button mouse and the
PS/2 3-button mouse.
Click
Contextual
Menu* Click
Lock &
Drag
Contextual
Menu*
*Contextual Menu:Ctrl + click (for Mac
®
OS 8 only)
Figure 4
MAC 101-Key 104-Key
Shift L or R_Shift L or R_Shift
Ctrl L_Ctrl L or R_Ctrl
Option R_Ctrl L or R_Alt
Command L_R_Alt L_R_WIN
F
13 Prt_Sc Prt_Sc
F
14 Scroll Lock Scroll Lock
F
15 L or R_Shift & Pause L or R_Shift & Pause
= Pause Pause
Power ON/OFF F1D080 Power Key F1D080 Power Key
Return Enter Enter
Delete Back Space Back Space
Help Ins Ins
Table 1
5
P73037/F1D080 univ/man.qxd 4/21/00 2:01 PM Page 5
Page 5
Hardware Installation
4
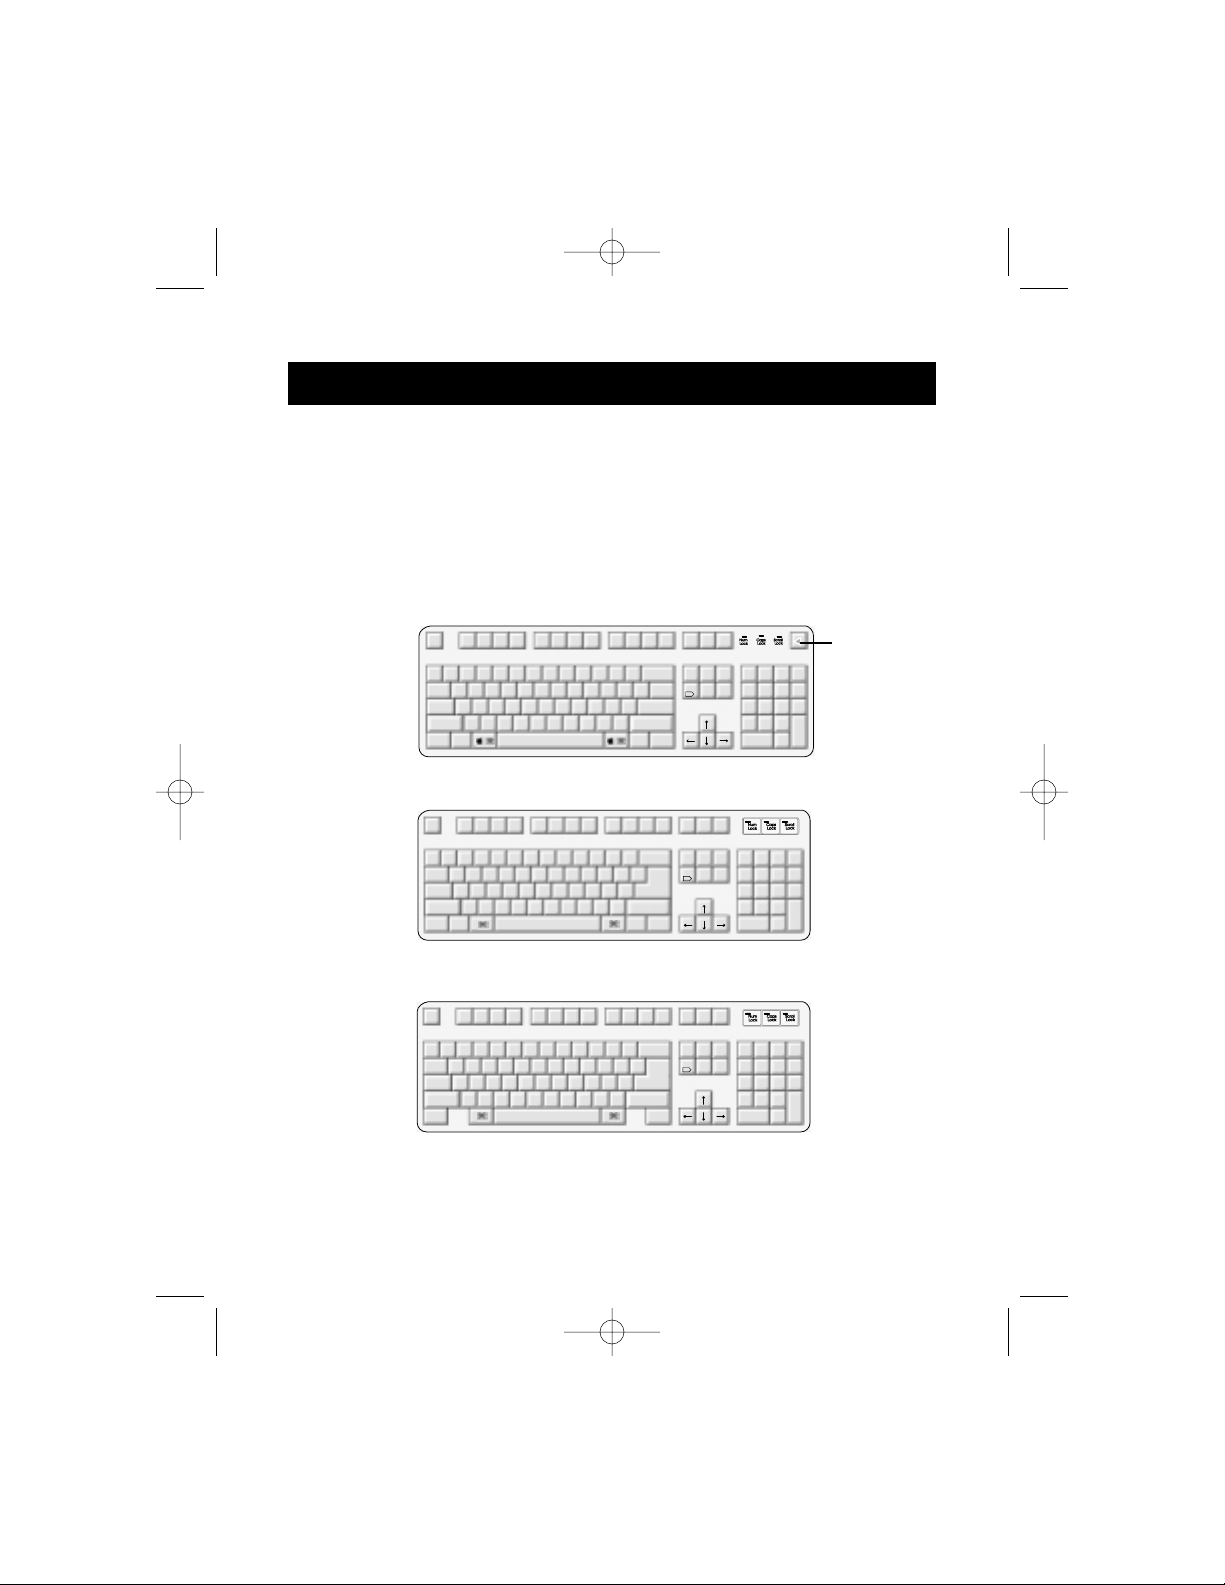
A. Keyboard
• If you are using a 101-key keyboard, set DIP switch
SW7 = ON
• If you are using a 104-key keyboard, set DIP switch
SW7 = OFF
See Figure 3 and Table 1 for key mapping between the Macintosh
®
and the IBM
PS/2 keyboards.
Mac®Standard Keyboard Layout
PS/2 104-key keyboard maps to Mac®keyboard
PS/2 101-key keyboard maps to Mac®keyboard
Power
Button
on
Adapter
Figure 3
F1
F2F3F4
F5 F6 F7 F8 F9 F10 F11
F12
print
screen
F13
scroll
lock
F14
pause
F15
esc
tab
caps
lock
!
1
@2#
3
$
4
~
`
%5^6&
7
*8(
9
)0_-+
=
delete
ins
help
home
page
up
end
page
down
QWERT YUI O P
{
[
}
]
|
\
AS
DF GHJKL
:
;
"
'
return
shift
control
alt
option
ZXCVBNM
<
,
shift
>
.
?
/
control
alt
option
num
lock
clear
=/
*
7
8
9
-
456+
123
enter
0
.
del
X
F1
F2F3F4
F5 F6 F7 F8 F9 F10 F11
F12
print
screen
F13
scroll
lock
F14
pause
F15
esc
tab
caps
lock
!
1
@
2
#
3
$
4
~
`
%5^6&
7
*8(
9
)
0
_-+
=
delete
ins
help
home
page
up
end
page
down
QWERT YUI O P
{
[
}
]
AS
DF GHJKL
:
;
"
'
return
shift
control
alt
option
ZXCVBNM
<
,
shift
>
.
?
/
control
alt
option
num
lock
clear
=/
*
7
8
9
-
456+
123
enter
0
.
del
X
F1
F2F3F4
F5 F6 F7 F8 F9 F10 F11
F12
print
screen
F13
scroll
lock
F14
pause
F15
esc
tab
caps
lock
!
1
@2#
3
$
4
~
`
%5^6&
7
*8(
9
)0_-+
=
delete
ins
help
home
page
up
end
page
down
QWERT YUI O P
{
[
}
]
AS
DF GHJKL
:
;
"
'
return
shift
control
ZXCVBNM
<
,
shift
>
.
?
/
option
num
lock
clear
=/
*
7
8
9
-
456+
123
enter
0
.
del
X
P73037/F1D080 univ/man.qxd 4/21/00 2:01 PM Page 4
Page 6
Hardware Installation
When connecting to a new blue G3, the DB15 cable is not used, and DIP
switches 1-6 need not be set. Simply connect the G3’s HD15 monitor port
directly to the OmniView™HD15 connector.
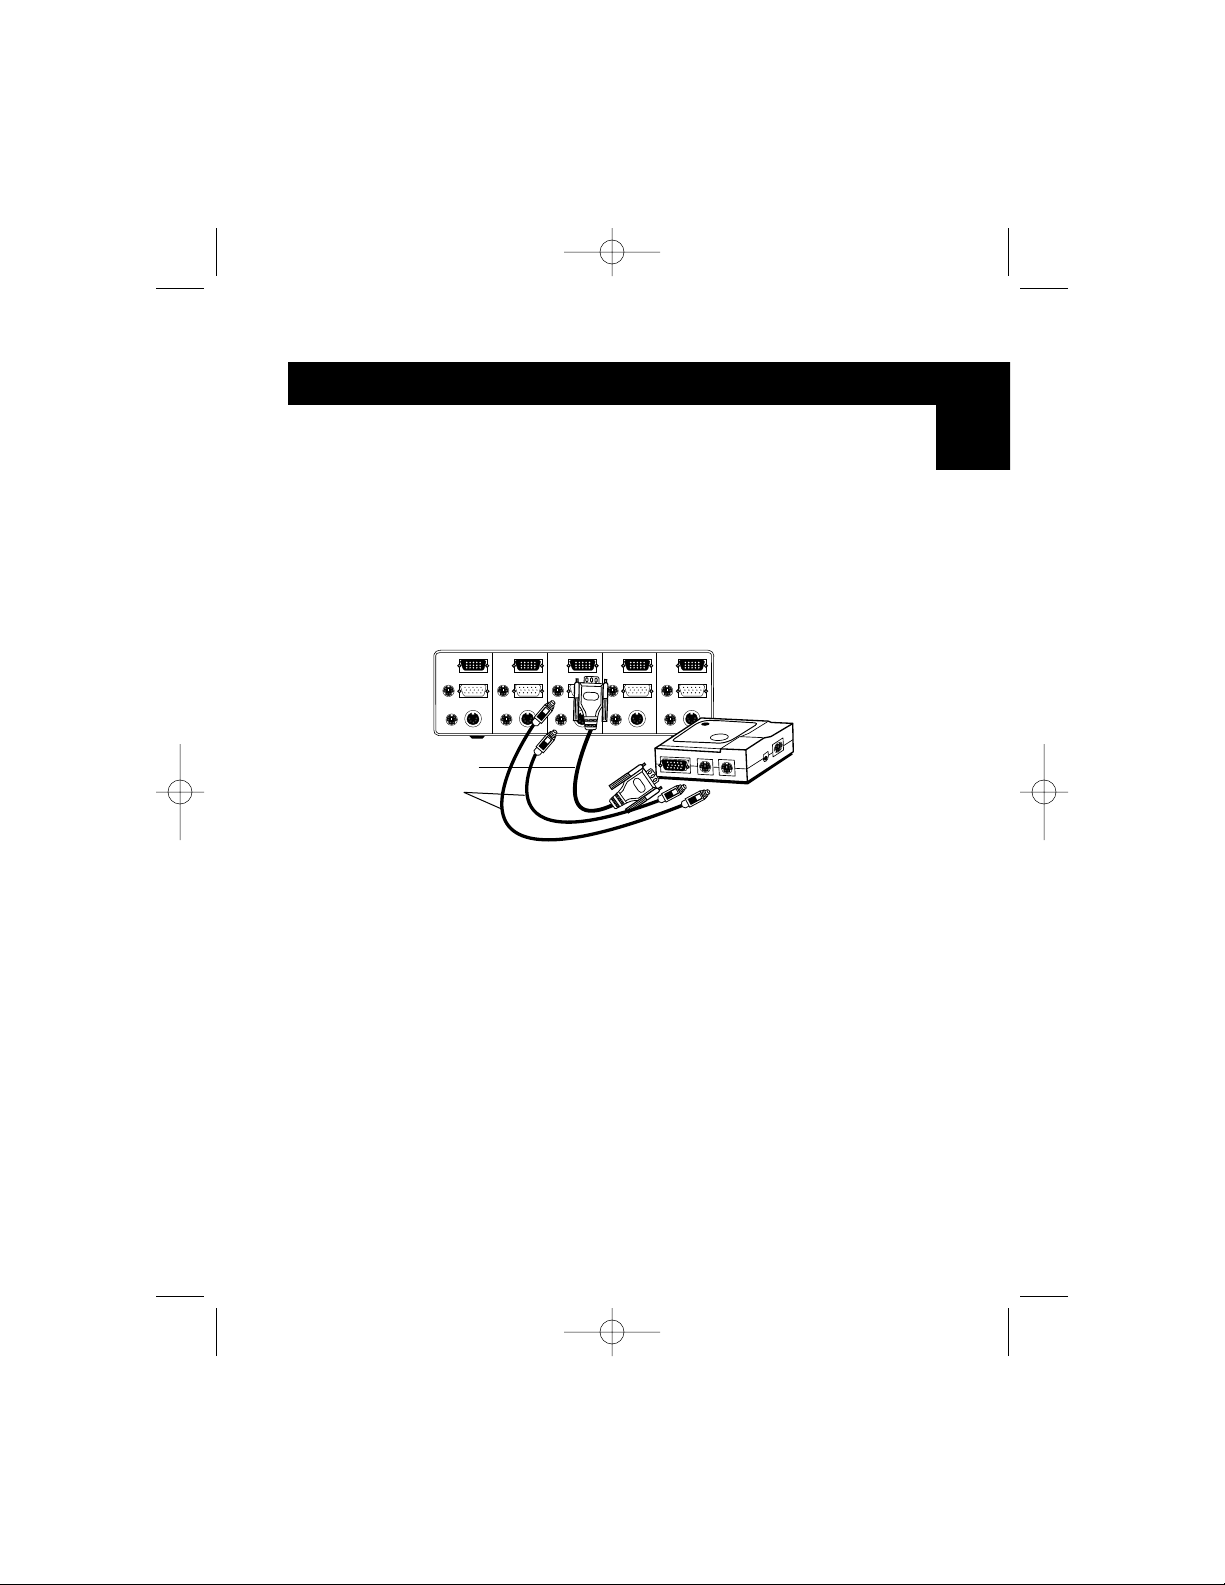
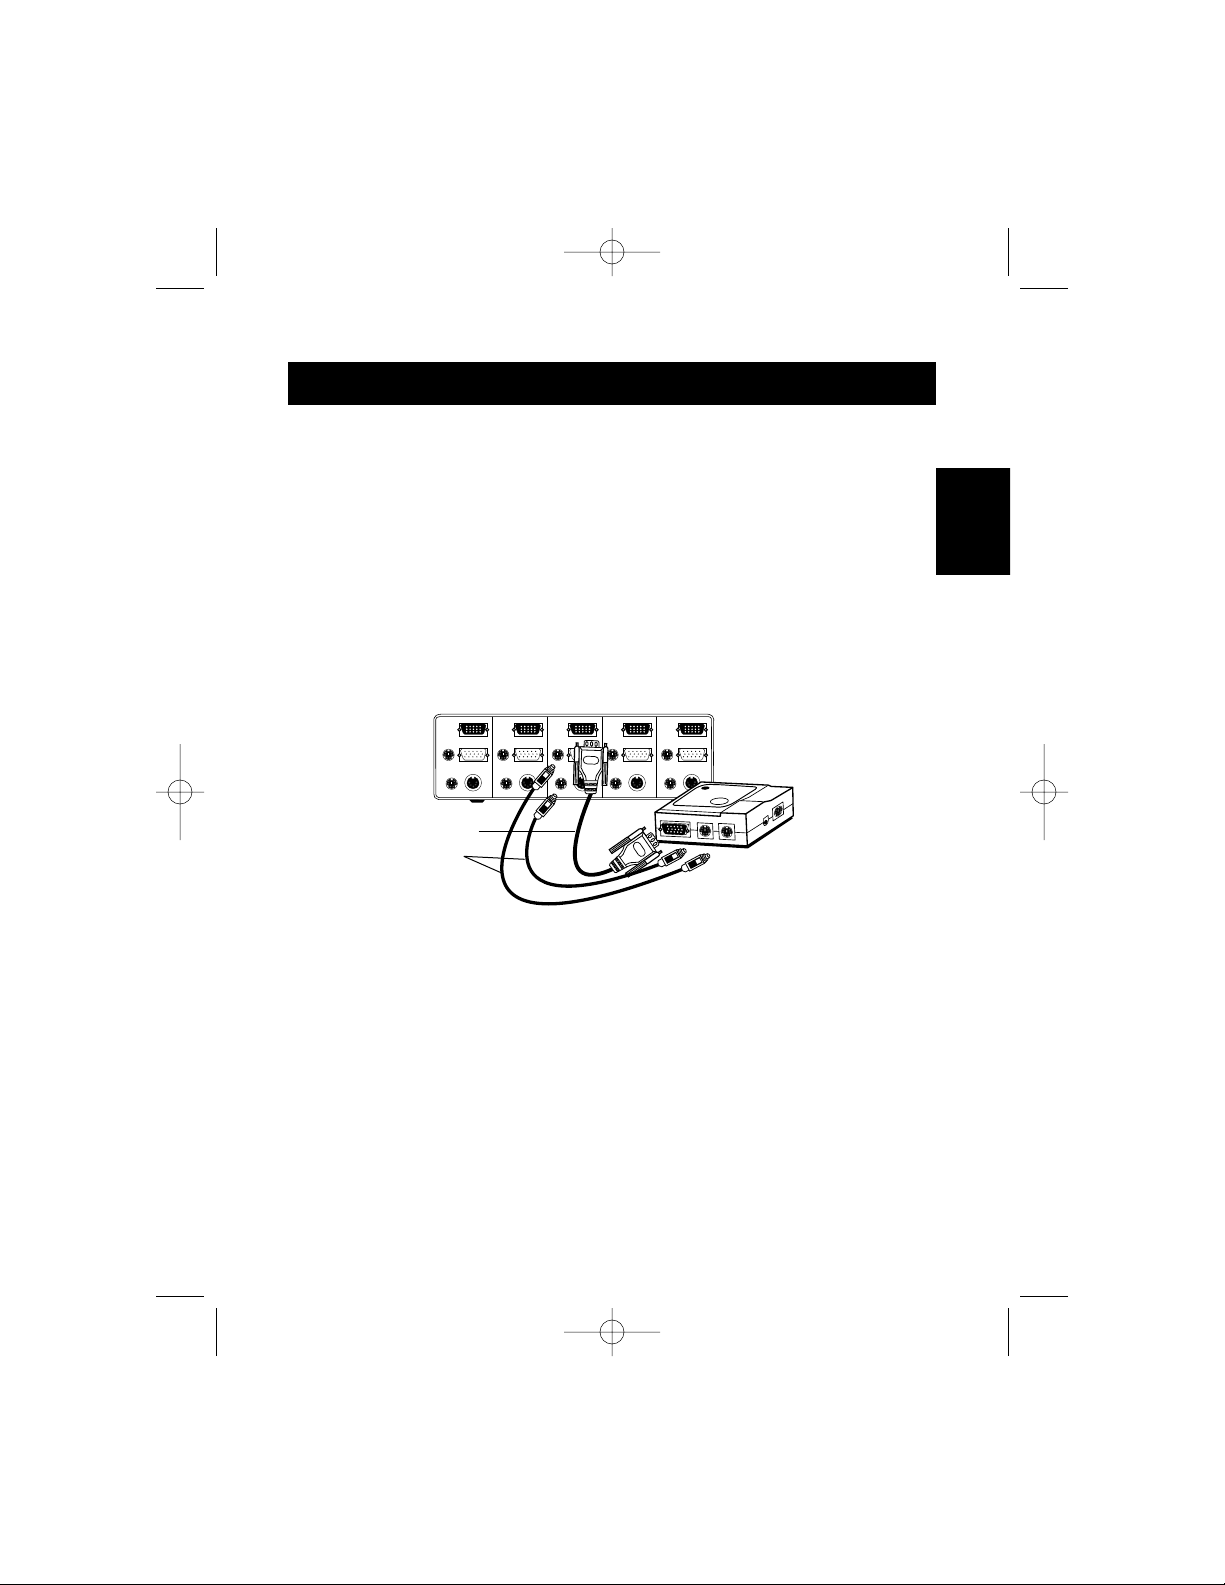
4) Connect the Adapter to a free port on your OmniView
™
PS/2. Note that only
the PS/2 mouse connector can be used. The cables required are NOT
included, however they can be purchased as a cable kit (Belkin part#
A3X982), or individually (two F2N036-06, one F2N025-06-T). See Figure 2.
En
F2N025-06-T
F2N036-06
Back of 4 Port OmniView
™
PS/2
Figure 2
5) Set the DIP switches on the Adapter according to the type of keyboard,
Mouse and Monitor you are using. The “ON” position is downward.
3
P73037/F1D080 univ/man.qxd 4/21/00 2:01 PM Page 3
1234
Page 7

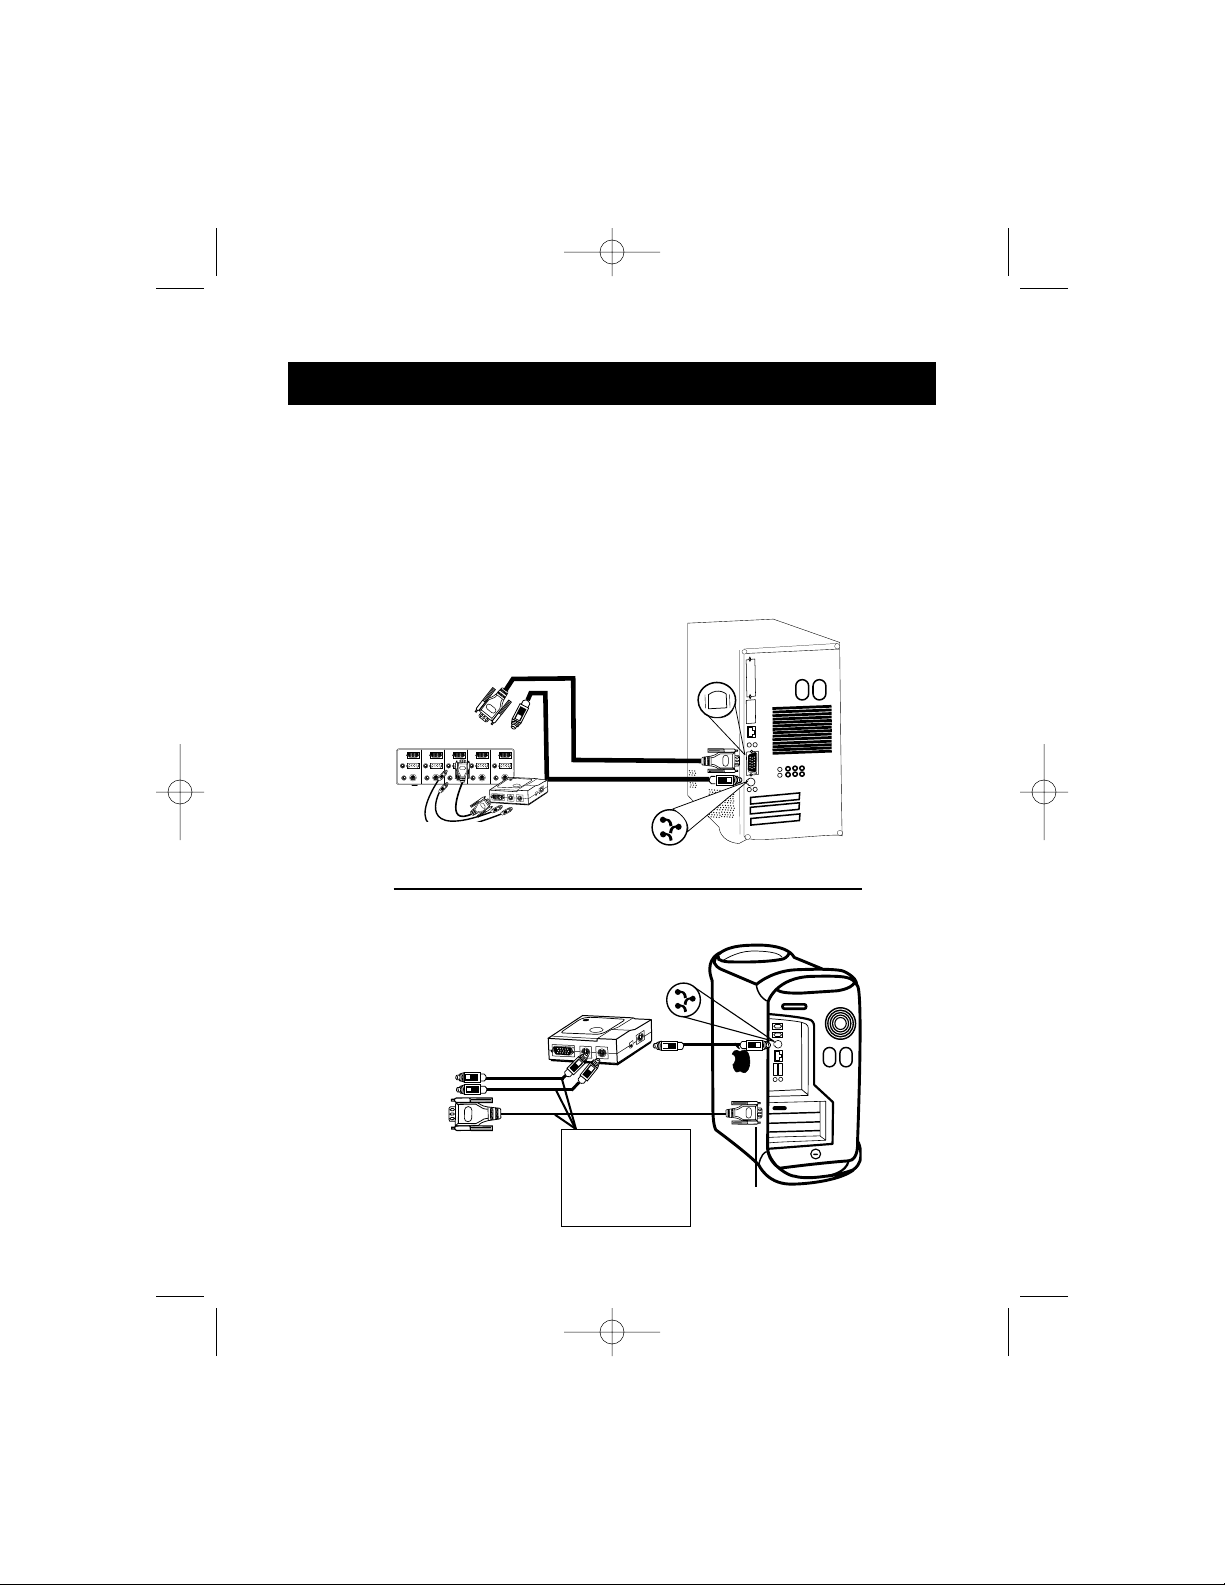
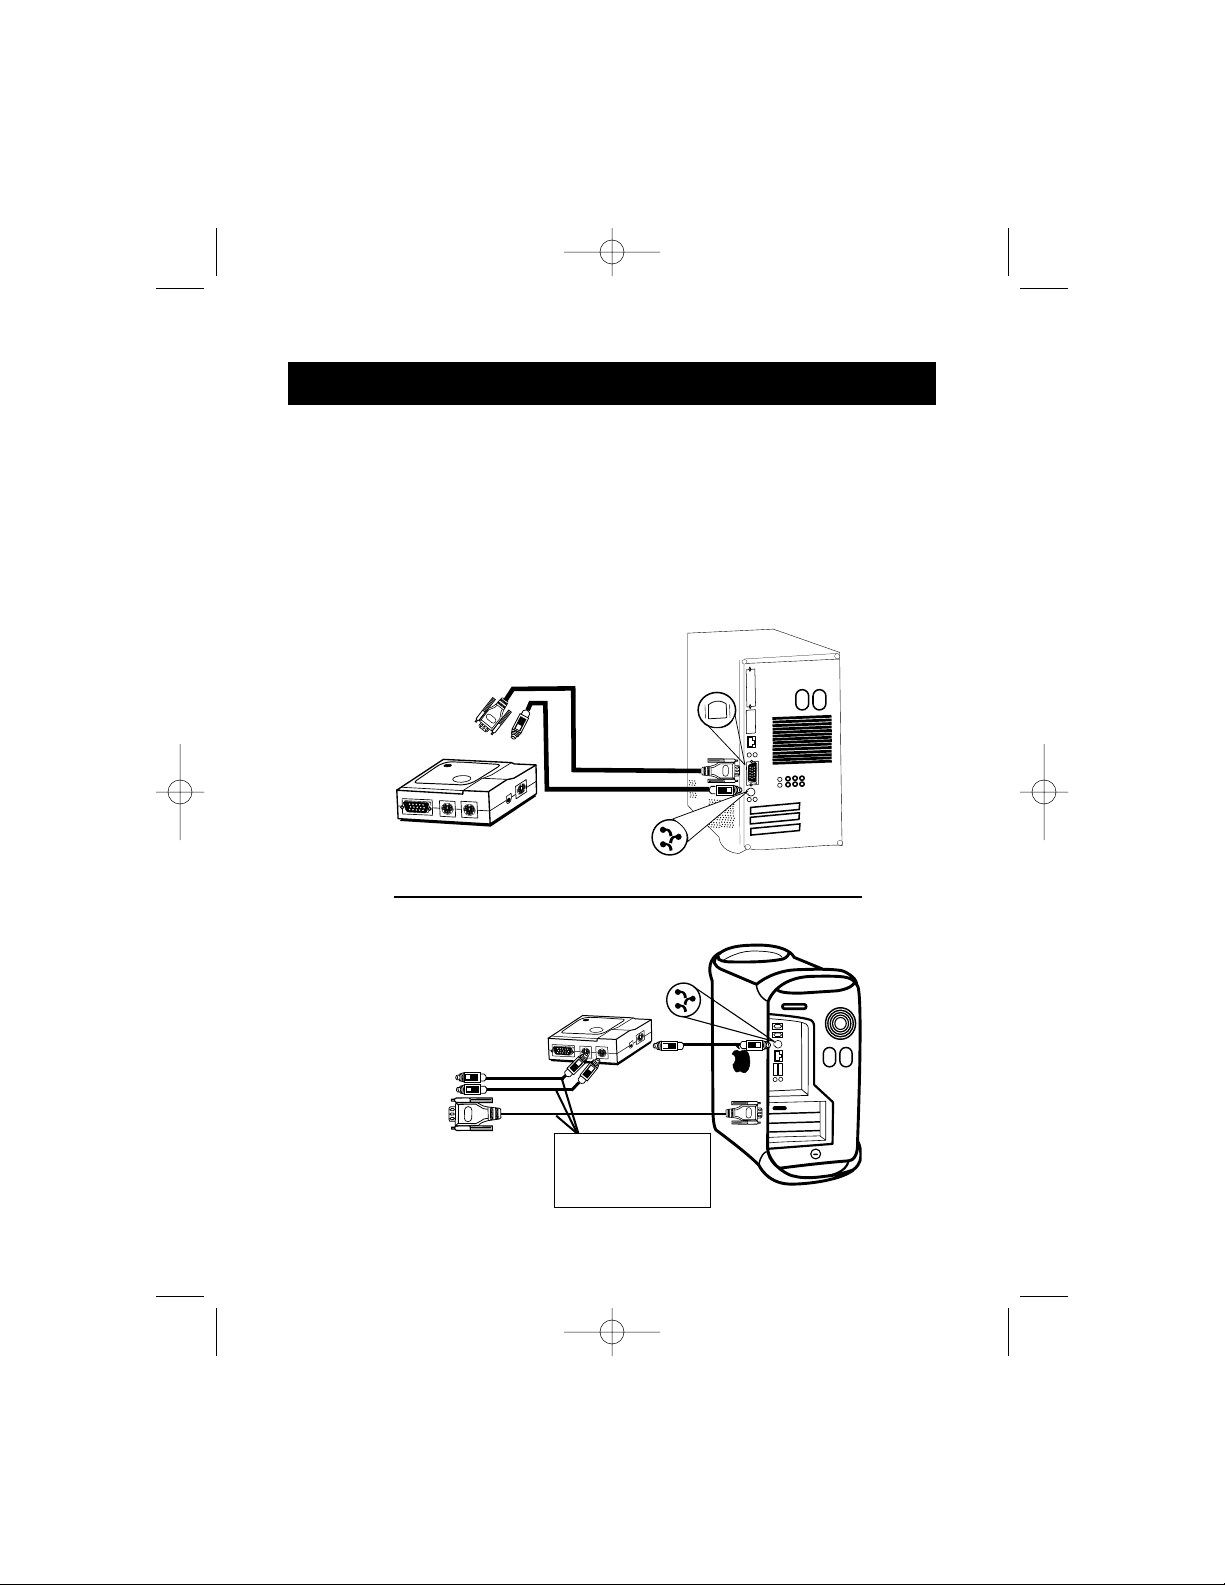
1) Make sure that all the devices are powered off.
2) Position the Adapter so that it is conveniently accessible. This is necessary
because the “POWER” button on the Adapter performs the function of the
Power button on the Macintosh
®
keyboard. You may want to situate the
Adapter so that the POWER button is facing you.
3) Connect the Adapter to your Macintosh
®
computer using the supplied ADB
and DB15 extension cables. See Figure 1 below.
Hardware Installation
2
Macintosh
®
computer
Video
(DB15) cable
ADB Cable
ADB
MAC Adapter
™
Figure 1
Back of G3
PS/2 and VGA
cables to the
OmniView
™
(not included)
Video
ADB
Video
P73037/F1D080 univ/man.qxd 4/21/00 2:01 PM Page 2
Page 8

1
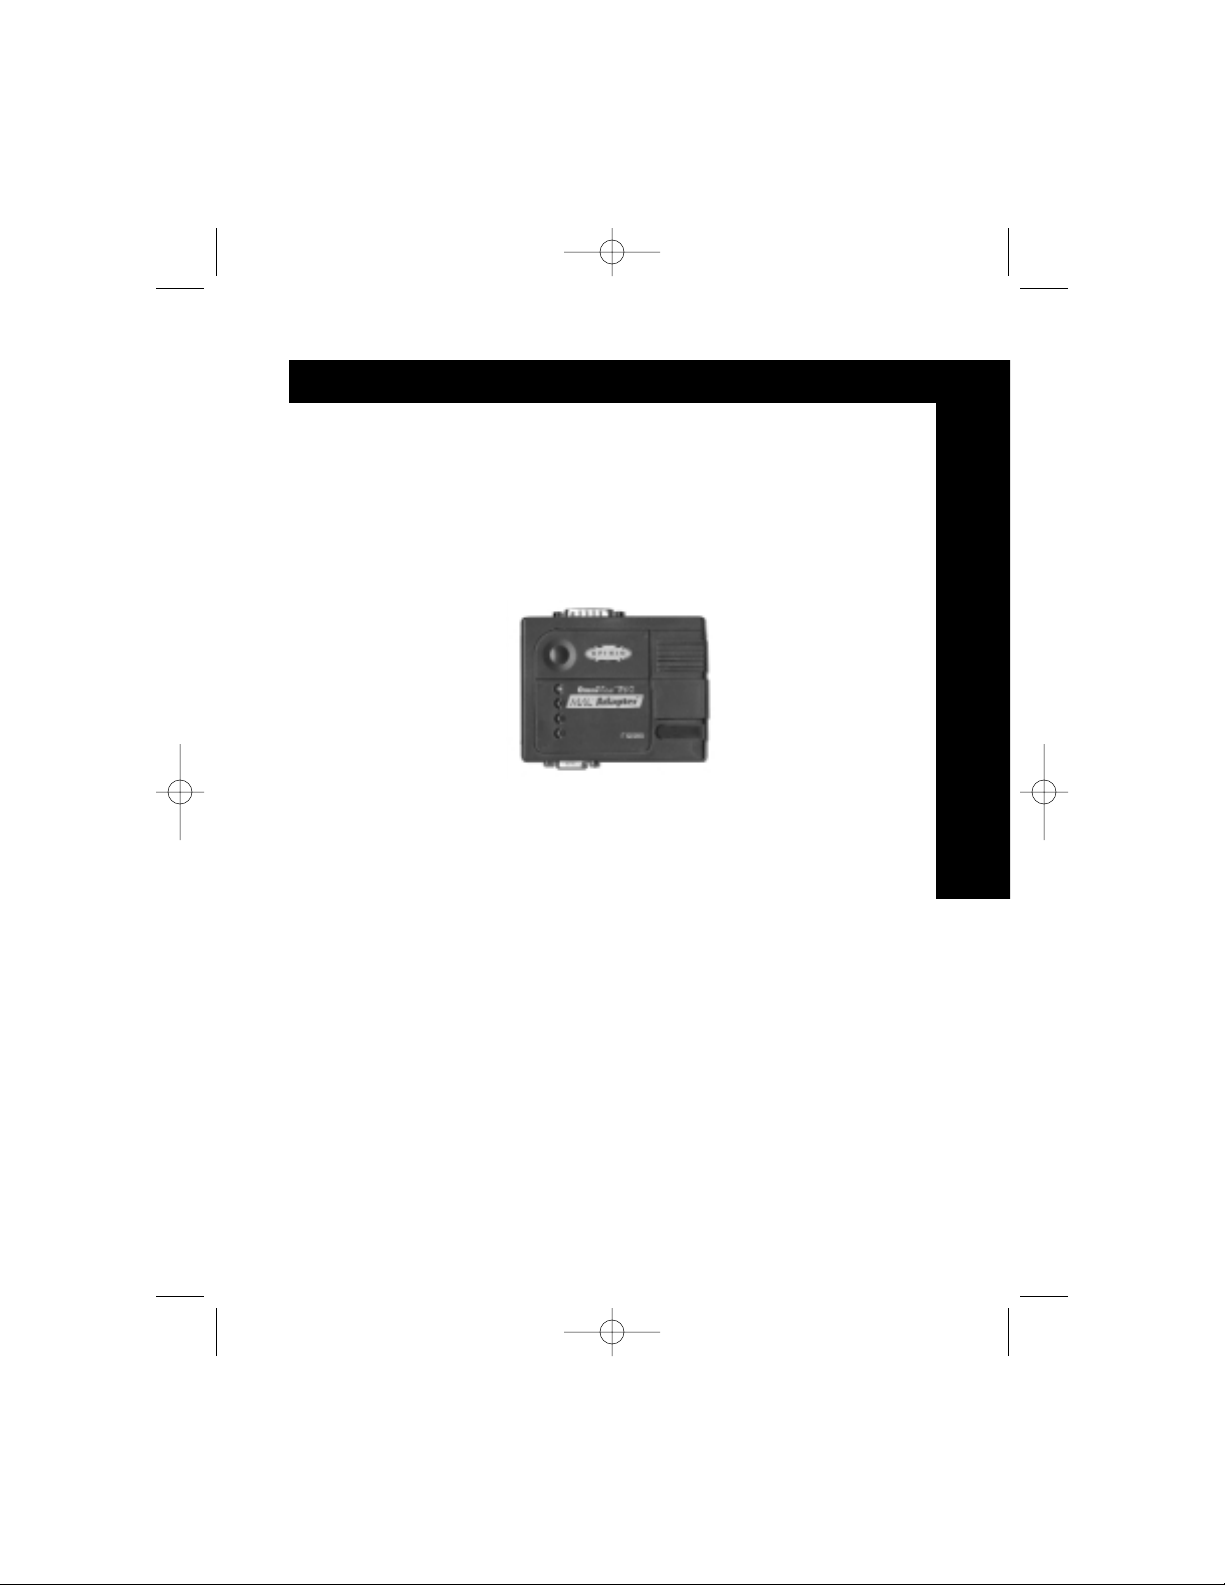
The Belkin Components MAC Adapter™is an accessory to the OmniView™PS/2
allowing control over a Macintosh®computer. It converts the PS/2 mouse and
keyboard signals from the OmniView™PS/2 to ADB (Apple Desktop Bus) f o rm a t,
and translates the video output of the Macintosh®to standard VGA/SVGA for the
monitor in use.
For convenience, the two cables required to connect the Adapter to the
Macintosh
®
are included:
•
Macintosh®monitor cable, DB15M to DB15F
•
Apple ADB cable, MiniDIN 4 M/M
With the MAC Adapter™, just about any Macintosh®computer becomes 100%
compatible with VGA/SVGA monitors, PS/2 mice and keyboards!
Introduction
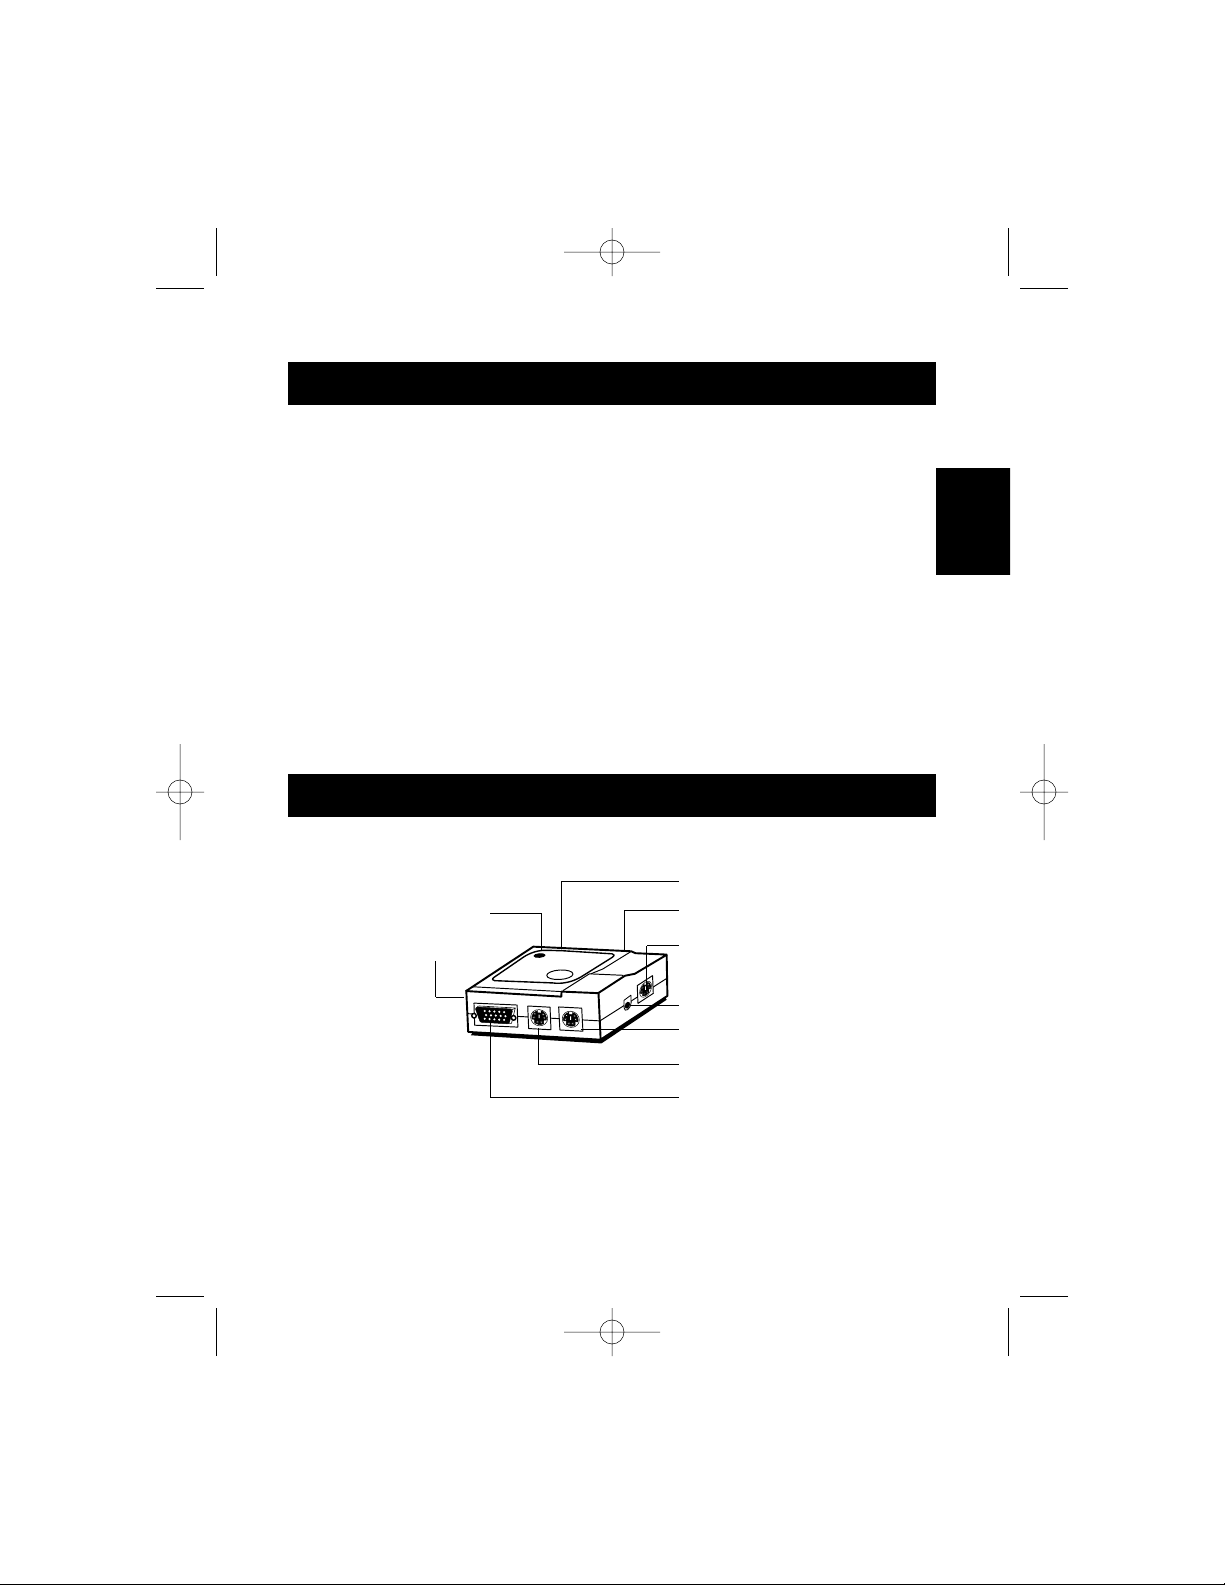
Product Overview
DB15 to Mac Video
Primary ADB to Mac
Secondary ADB
Connector
Power Button
PS/2 Mouse
PS/2 Keyboard
HD15
Activity LED
DIP Switches
En
P73037/F1D080 univ/man.qxd 4/21/00 2:01 PM Page 1
Page 9

Table of Contents
En
Fr
De
Ne
It
English . . . . . . . . . . . . . . . . . . . . . . . . . 1
Français (Europe) . . . . . . . . . . . . . . . . . 9
Deutsch . . . . . . . . . . . . . . . . . . . . . . . . 17
Nederlands . . . . . . . . . . . . . . . . . . . . . 25
Italiano . . . . . . . . . . . . . . . . . . . . . . . . 33
P73037/F1D080 univ/man.qxd 4/21/00 2:01 PM Page 2
Page 10
OmniView™ MAC Adapter™ User Manual
Guide de l’utilisateur de l’adaptateur MAC Adapter
™
Bedienungsanleitung für den Mac Adapter
™
MAC Adapter™Handleiding
Manuale Utente per l’ Adattator e MAC
™
P73037 F1D080
En
Fr
De
Ne
It
Please read this manual thoroughly and follow the procedures to prevent
any damage to the MAC Adapter
™
and/or to the connected devices.
Veuillez lire attentivement ce manuel et suivre la procédure indiquée afin
d’éviter d’endommager l’adaptateur MAC Adapter
™
et / ou les
périphériques connectés.
Dieses Handbuch vor dem Gebrauch des MAC Adapter™gründlich
durchlesen, um Schäden am MAC Adapter
™
oder den angeschlossenen
Geräten zu vermeiden.
Lees deze handleiding zorgvuldig en volg de instructies nauwkeurig
op om schade aan de MAC Adapter
™
en/of de daarop aangesloten
apparaten te voorkomen.
Vi preghiamo di leggere questo manuale molto attentamente e di seguire
le istruzioni per evitare qualsiasi danno all’adattatore MAC
™
e/o ai
dispositivi collegati.
P73037/F1D080 univ/man.qxd 4/21/00 2:01 PM Page 1
Page 11
9
L’adaptateur MAC Adapter™de Belkin Components est un accessoire de
l’OmniView™PS/2 permettant de commander un ordinateur Macintosh®. Il
convertit les signaux du clavier et de la souris PS/2 de l’OmniView PS/2 au format
ADB (Apple Desktop Bus) et traduit les données de sortie vidéo du Macintosh®en
VGA/SVGA standard pour le moniteur utilisé.
Par souci de commodité, les deux câbles nécessaires pour connecter
l’adaptateur au Macintosh
®
sont fournis :
•
Câble de moniteur Macintosh®, DB15M – DB15F
•
Câble ADB Apple, MiniDIN 4 M/M
Grâce à l’adaptateur MAC Adapter™, presque tous les Macintosh®deviennent
100 % compatibles avec les moniteurs VGA/SVGA et les claviers et
souris PS/2 !
Introduction
Diode électroluminescente
indiquant l’activité
Interrupteurs DIP
DB15- MAC Vidéo
ADB primaire –
ADB secondaire MAC
Connecteur
Bouton POWER (Mise sous tension)
Souris PS/2
Clavier PS/2
HD15
Brève présentation du produit
Fr
P73037/F1D080f univ/man.qxd 4/21/00 2:06 PM Page 9
Page 12

1) Assurez-vous que tous les périphériques sont hors tension
2) Positionnez l’adaptateur de telle sorte qu’il soit facilement accessible. Cela
est nécessaire car le bouton POWER (Mise sous tension) de l’adaptateur
exerce les mêmes fonctions que le bouton de mise sous tension du clavier
du Macintosh
®
. Peut-être voudrez-vous placer l’adaptateur de façon à ce que
le bouton POWER (Mise sous tension) soit face à vous.
3) Connectez l’adaptateur à votre Macintosh
®
en utilisant les câbles de rallonge
ADB et DB15 fournis. Voir figure 1 (ci-dessous).
Installation du matériel
10
Ordinateur
Macintosh
®
Video
(DB15) Câble
ADB Câble
ADB
MAC Adapter
™
Figure 1
Dos du G3
Câbles PS/2 et
VGA – OmniView
™
(non fournis)
Vidéo
ADB
Vidéo
P73037/F1D080f univ/man.qxd 4/21/00 2:06 PM Page 10
Page 13
11
Installation du matériel
Lorsque vous raccordez un nouveau G3 bleu, vous n’utilisez pas le câble DB15
et les interrupteurs DIP 1 à 6 doivent être dûment positionnés. Il vous suffit de
relier le port moniteur HD15 du G3 directement au connecteur HD15 de
l’OmniView
™
.
4) Connectez l’adaptateur à un port libre de votre OmniView
™
PS/2. Veuillez
noter que vous ne pouvez utiliser que le connecteur pour souris PS/2. Les
câbles nécessaires NE SONT PAS fournis mais vous pouvez vous les
procurer soit sous forme de kit de câbles (numéro de pièce A3X982f), soit
individuellement (deux F2N036f06 et un F2N025f06-T). Cf. figure 2.
F2N025f06-T
F2N036f06
Dos de l’OmniView
™
PS/2 4 ports
Figure 2
5) Positionnez les interrupteurs DIP de l’adaptateur selon le type de clavier,
de souris et de moniteur que vous utilisez. La position ON est la
position baissée.
Fr
P73037/F1D080f univ/man.qxd 4/21/00 2:06 PM Page 11
1234
Page 14

Installation du matériel
12
A. Clavier
• Si vous utilisez un clavier à 101 touches, mettez l’interrupteur DIP
SW7 sur ON
• Si vous utilisez un clavier à 104 touches, mettez l’interrupteur DIP
SW7 sur OFF
Référez-vous à la figure 3 et au tableau 1 pour le mappage des touches entre
les claviers du Macintosh
®
et de l’IBM PS/2.
Disposition du clavier Mac®standard
Clavier PS/2 à 104 touches - Clavier du Mac
®
Clavier PS/2 à 101 touches - Clavier du Mac
®
Bouton
POWER
(Mise sous
tension) de
l’adaptateur
Figure 3
F1
F2F3F4
F5 F6 F7 F8 F9 F10 F11
F12
print
screen
F13
scroll
lock
F14
pause
F15
esc
tab
caps
lock
!
1
@
2
#
3
$
4
~
`
%5^6&
7
*8(
9
)
0
_-+
=
delete
ins
help
home
page
up
end
page
down
QWERT YUI O P
{
[
}
]
|
\
AS
DF GHJKL
:
;
"
'
return
shift
control
alt
option
ZXCVBNM
<
,
shift
>
.
?
/
control
alt
option
num
lock
clear
=/
*
7
8
9
-
456+
123
enter
0
.
del
X
F1
F2F3F4
F5 F6 F7 F8 F9 F10 F11
F12
print
screen
F13
scroll
lock
F14
pause
F15
esc
tab
caps
lock
!
1
@
2
#
3
$
4
~
`
%5^6&
7
*8(
9
)
0
_-+
=
delete
ins
help
home
page
up
end
page
down
QWERT YUI O P
{
[
}
]
AS
DF GHJKL
:
;
"
'
return
shift
control
alt
option
ZXCVBNM
<
,
shift
>
.
?
/
control
alt
option
num
lock
clear
=/
*
7
8
9
-
456+
123
enter
0
.
del
X
F1
F2F3F4
F5 F6 F7 F8 F9 F10 F11
F12
print
screen
F13
scroll
lock
F14
pause
F15
esc
tab
caps
lock
!
1
@2#
3
$
4
~
`
%5^6&
7
*8(
9
)
0
_-+
=
delete
ins
help
home
page
up
end
page
down
QWERT YUI O P
{
[
}
]
AS
DF GHJKL
:
;
"
'
return
shift
control
ZXCVBNM
<
,
shift
>
.
?
/
option
num
lock
clear
=/
*
7
8
9
-
456+
123
enter
0
.
del
X
P73037/F1D080f univ/man.qxd 4/21/00 2:06 PM Page 12
Page 15

13
Installation du matériel
B. Souris
• Si vous préférez un pointeur de souris rapide, mettez l’interrupteur DIP
SW8 sur ON
• Si vous préférez un pointeur de souris à vitesse normale,
mettez interrupteur
SW8 sur OFF
Référez-vous à la figure 4 pour le mappage des touches entre la souris
PS/2 à deux boutons et la souris PS/2 à trois boutons.
Clic
Menu
contextuel*
Clic
Faire
glisser
Menu
contextuel*
*Menu contextuel :Ctrl + clic (pour le système d’exploitation Mac
®
OS 8 uniquement)
Figure 4
MAC 101 touches 104 touches
Shift L ou R_Shift L ou R_Shift
Ctrl L_Ctrl L ou R_Ctrl
Option R_Ctrl L ou R_Alt
Commande L_R_Alt L_R_WIN
F
13 Prt_Sc Prt_Sc
F
14 Arrêt du défilement Arrêt du défilement
F
15 L ou R_Shift & Pause L ou R_Shift & Pause
= Pause Pause
ON/OFF Touche d’alimentation F1D080f Touche d’alimentation F1D080f
Return (Retour) Enter (Entrée) Enter (Entrée)
Delete (Supprimer) Back Space Back Space
Help (Aide) Inser (Insérer) Inser (Insérer)
Tableau 1
Fr
P73037/F1D080f univ/man.qxd 4/21/00 2:06 PM Page 13
Page 16
Installation du matériel
14
C. Moniteur
Vous devez tout d’abord déterminer la résolution supportée par votre
moniteur. Vous devez ensuite dûment positionner les interrupteurs DIP SW1
à SW6 pour que le moniteur fonctionne correctement. Pour de plus amples
informations, veuillez vous référer au tableau 2.
• Les positions A et B ci-dessous sont conseillés pour la plupart des
applications lorsque les résolutions sont sélectionnées dans le panneau de
configuration/menu du moniteur Macintosh
®
.
• Aest le meilleur choix pour les anciens moniteurs SVGA non-multisync
(640 x 480 uniquement pour les moniteurs VGA).
• B est le meilleur choix pour les moniteurs multisync SVGA en raison du
taux de rafraîchissement plus élevé.
Tableau 2
Positionnement SW1 SW2 SW3 SW4 SW5 SW6 Balayage Balayage Résolution Remarques sur
horizontal vertical le moniteur
(kHz) (Hz)
A ON ON 31.5 60 640 x 480 VGA
ON ON 35.2 50 800 x 600 SVGA
B ON ON ON 35 67 640 x 480 VGA
ON ON ON 49 75 800 x 600 SVGA
C ON 35 67 640 x 480 Couleur 13"
DONON 512 x 384
NTSC (underscan)
E ON ON 24.48 60.15 512 x 384 Couleur 12"
F ON ON ON 68.7 75 1152 x 870 Couleur 21"
GON 640 x 480
NTSC (overscan)
H ON 1152 x 870
Monochrome 21"
I ON ON 640 x 870
Portrait
J ON ON 60.2 75 1024 x 768 Couleur 19"
K ON ON 49.7 75 832 x 624 Couleur 16"
L ON ON ON 640 x 480 PAL
VEU ILLEZ VÉRIFIER LES SPÉC I F I CATION S TEC HNIQUES DE
VOTRE MONITEUR ET SÉLECTIONNER LE PO SITIONNEM E NT
APPROP R IÉ AVANT LA MI SE SOUS T E N SION. UNE
IN STALLATION I NCORRECTE POURRAIT ENDOMMAGER
VOTRE MONITEUR DE FAÇON IRRÉMÉDIAB LE !!!
P73037/F1D080f univ/man.qxd 4/21/00 2:06 PM Page 14
Page 17

15
Détection des pannes
1) Il n’y a pas d’image sur le moniteur ou l’image est déformée.
•Assurez-vous que le moniteur est allumé.
•Assurez-vous que le port approprié est sélectionné sur l’OmniView™.
•Vérifiez tous les câbles du moniteur. Assurez-vous qu’ils sont
dûment branchés.
•Votre moniteur ne peut pas gérer les taux de rafraîchissement / la
résolution actuels. Modifiez les paramètres des interrupteurs DIP en optant
pour l’option Acomme indiqué dans le tableau 3, et redémarrez
le Macintosh
®
.
2) Le clavier et / ou la souris ne répond pas.
•Assurez-vous que l’adaptateur est dûment connecté au Macintosh
®
et aux
ports appropriés de l’OmniView
™
.
• Assurez-vous que le port approprié est sélectionné sur l’OmniView™.
•Assurez-vous que l’OmniView™dispose d’un adaptateur de courant et qu’il
est allumé.
•Vérifiez tous les câbles. Assurez-vous qu’ils sont bien branchés et qu’ils
sont droits.
3) Le mappage des touches du clavier ne s’effectue pas comme il se doit.
• Assurez-vous que le SW7 est dûment positionné. Il doit être sur ON pour
un clavier à 101 touches et sur OFF pour un clavier à 104 touches.
4) La souris ne fonctionne pas ou son mouvement est erratique.
•La souris doit être compatible PS/2. Une souris à connexion série sur
l’OmniView
™
ne fonctionnera pas avec l’adaptateur.
Pour de plus amples informations, veuillez consulter la documentation fournie
avec votre OmniView
™
.
Fr
P73037/F1D080f univ/man.qxd 4/21/00 2:06 PM Page 15
Page 18

Réglementation FCC
Déclaration de conformité avec les règles FCC en matière de compatibilité
électromagnétique
Nous, Belkin Components, sis au 501 West Walnut Street, Compton CA90220, Etats-Unis, déclarons
sous notre seule responsabilité que le produit
MAC Adapter
™
F1D080f
auquel se réfère la présente déclaration
est conforme à la partie XV des règles FCC. Le fonctionnement doit remplir les deux conditions
suivantes : (1) ce périphérique ne doit pas causer d’interférences nuisibles et (2) ce périphérique doit
accepter toute interférence reçue, y compris les interférences pouvant entraîner un fonctionnement
non désiré.
Déclaration de conformité CE
Nous, Belkin Components, déclarons sous notre seule responsabilité que le produit F1D080f, auquel se réfère la
présente déclaration, est conforme à la norme sur les émissions génériques EN50081-1 et à la norme sur l’immunité
générique EN50082-1 1992.
Belkin Components Garantie produit un an
Belkin garantit ce produit pendant un an contre tout défaut de matériau et de fabrication. Si l’appareil s’avère
défectueux, Belkin Components le réparera ou le remplacera gratuitement, à sa convenance, à condition que le produit
soit retourné, port payé, pendant la durée de la garantie, au distributeur Belkin agréé auquel le produit a été acheté.
Une preuve d’achat peut être exigée.
La présente garantie est caduque si le produit a été endommagé par accident, abus, usage impropre ou mauvaise
application, si le produit a été modifié sans autorisation écrite de Belkin, ou si un numéro de série Belkin a été supprimé
ou rendu illisible.
LA GARANTIE ET LES VOIES DE RECOURS SUSMENTIONNÉES FONT FOI EXCLUSIVEMENT ET REMPLACENT
TOUTES LES AUTRES, ORALES OU ÉCRITES, EXPLICITES OU IMPLICITES. BELKIN REJETTE EXPRESSÉMENT
TOUTES LES GARANTIES IMPLICITES, Y COMPRIS MAIS SANS RESTRICTION, LES GARANTIES AFFÉRENTES
À LA QUALITÉ LOYALE ET MARCHANDE ET À LA POSSIBILITÉ D’UTILISATION À UNE FIN DONNÉE.
Aucun revendeur, représentant ou employé de Belkin n’est habilité à apporter des modifications ou adjonctions à la
présente garantie,ni à la proroger.
BELKIN N’EST PAS RESPONSABLE DES DOMMAGES SPÉCIAUX, DIRECTS OU INDIRECTS, DÉCOULANT D’UNE
RUPTURE DE GARANTIE, OU EN VERTU DE TOUTE AUTRE THÉORIE JURIDIQUE, Y COMPRIS MAIS SANS
RESTRICTION LES PERTES DE BÉNÉFICES, TEMPS D’ARRÊT, FONDS DE COMMERCE, REPROGRAMMATION
OU REPRODUCTION DE PROGRAMMES OU DE DONNÉES MÉMORISÉS OU UTILISÉS AVEC DES PRODUITS
BELKIN OU DOMMAGES CAUSÉS À CES PROGRAMMES OU À CES DONNÉES.
Informations
Belkin Components B.V.
Diamantlaan 8 • 2132 WV
Hoofddorp • The Netherlands
Tel: +31 (0) 235698765
Fax: +31 (0) 235612694
Belkin Components, Ltd.
Unit 13 • Gatelodge Close • Round Spinney
Northampton • Northants • NN3 8RX • UK
Tel: +44 (0) 1604678300
Fax: +44 (0) 1604678330
belkin.com
Belkin Components
501 West Walnut Street
Compton • CA • 90220 • USA
Tel: 310.898.1100
Fax: 310.898.1111
© 2000 Belkin Components. Tous Droits Réservés.
Toutes Les Raisons Commerciales Sont Des Marques Déposées De Leurs Fabricants Respectifs.
P73037/F1D080f univ/man.qxd 4/21/00 2:06 PM Page 16
Page 19

17
Der MAC Adapter™von Belkin Components ist ein Zubehörteil für OmniView
™
PS/2, mit dem Sie einen Macintosh®- Rechner bedienen können. Er konvertiert
die PS/2-Maus- und -Tastatursignale von OmniView™PS/2 in das ADB-Format
(Apple Desktop Bus) und wandelt das Macintosh
®
-Format der Video-
Ausgabedaten für den Monitor in das VGA/SVGA-Format um.
Damit Sie den Adapter sofort an Ihren Macintosh
®
anschließen können, sind
bereits die folgenden Kabel enthalten:
•
DB15M/DB15F-Macintosh®-Monitorkabel
•
ADB-MiniDIN 4 M/M-Kabel
Mit dem MAC Adapter™kann praktisch jeder Macintosh®-Rechner problemlos
mit einem VGA/SVGA-Monitor und PS/2-Eingabegeräten (wie Maus oder
Tastatur) bedient werden!
Einführung
Produktübersicht
Sekundärer Anschluß für
ADB-Kabel
Netzschalter
PS/2-Mausanschluß
PS2/-Tastatur
HD15
Betriebsanzeig
DIP-Schalter
DB15/Mac-Bildschirmsausgang-Kabel
Primärer Anschluß für ADB-Kabel zum Mac
De
P73037/F1D080g univ/man.qxd 4/21/00 2:09 PM Page 17
1234
Page 20
1) Stellen Sie sicher, daß alle Geräte abgeschaltet sind.
2) Positionieren Sie den Adapter so, daß er leicht erreichbar ist. Dies ist
notwendig, da der Netzschalter "POWER" am Adapter die Funktion des
Netzschalters auf der Tastatur des Macintosh
®
-Rechners übernimmt. Der
Netzschalter sollte möglichst nach vorne zeigen.
3) Schließen Sie den Adapter mit den mitgelieferten ADB- und DB15-Kabeln an
den Macintosh
®
-Rechner an. Siehe Abbildung 1.
Installation der Hardware
18
Macintosh
®
-Rechner
Bildschirmanschluß
(DB15) Kabel
ADB Kabel
ADB-Anschluß
MAC Adapter
™
Abbildung 1
Rückseite des G3
PS/2- und VGAKabel für
OmniView
™
(nicht enthalten)
Bildschirmanschluß
ADB-Anschluß
Bildschirmanschluß
P73037/F1D080g univ/man.qxd 4/21/00 2:09 PM Page 18
1234
Page 21

19
Installation der Hardware
Wird der Adapter an einen neuen blauen G3 angeschlossen, ist das DB15Kabel nicht erforderlich, und die DIP-Schalter 1-6 müssen nicht gesetzt werden.
Schließen Sie in diesem Fall den HD15-Monitor-Port des G3 einfach direkt an
den HD15-Anschluß des OmniView
™
an.
4) Schließen Sie den Adapter an einem freien Port des OmniView
™
PS/2 an.
Bitte beachten Sie, daß nur der PS/2-Maus-Anschluß verwendet werden
kann. Die dafür erforderlichen Kabel sind nicht im Lieferumfang enthalten,
können jedoch im Fachhandel als Kabelsatz (Belkin-Artikelnummer A3X982g)
oder einzeln (zwei F2N036g06-Kabel, ein F2N025g06-T Kabel) bezogen
werden. Siehe Abbildung 2.
F2N025g06-T
F2N036g06
Rückseite des OmniView
™
PS/2 (4-Port)
Abbildung 2
5) Stellen Sie die DIP-Schalter am Adapter je nach verwendeter Tastatur, Maus
und Monitor ein. Der Schalter steht auf "ON", wenn er nach unten gekippt ist.
De
P73037/F1D080g univ/man.qxd 4/21/00 2:09 PM Page 19
1234
Page 22

Installation der Hardware
20
A.Tastatur
• Bei Verwendung einer Tastatur mit 101 Tasten müssen die DIP-Schalter
folgendermaßen gesetzt werden:
SW7 = ON
• Bei Verwendung einer Tastatur mit 104 Tasten müssen die DIP-Schalter
folgendermaßen gesetzt werden:
SW7 = OFF
Tastenbelegung der Macintosh
®
- bzw. IBM PS/2-Tastatur: siehe Abbildung 3
sowie Tabelle 1.
Layout der Standard-Mac®-Tastatur
Umsetzung der PS/2-Tastatur mit 104 Tasten auf die Mac®-Tastatur
Umsetzung der PS/2-Tastatur mit 101 Tasten auf die Mac®-Tastatur
Netzsch
alter
(Power)
am
Adapter
Abbildung 3
F1
F2F3F4
F5 F6 F7 F8 F9 F10 F11
F12
print
screen
F13
scroll
lock
F14
pause
F15
esc
tab
caps
lock
!
1
@2#
3
$
4
~
`
%5^6&
7
*8(
9
)
0
_-+
=
delete
ins
help
home
page
up
end
page
down
QWERT YUI O P
{
[
}
]
|
\
AS
DF GHJKL
:
;
"
'
return
shift
control
alt
option
ZXCVBNM
<
,
shift
>
.
?
/
control
alt
option
num
lock
clear
=/
*
7
8
9
-
456+
123
enter
0
.
del
X
F1
F2F3F4
F5 F6 F7 F8 F9 F10 F11
F12
print
screen
F13
scroll
lock
F14
pause
F15
esc
tab
caps
lock
!
1
@2#
3
$
4
~
`
%5^6&
7
*8(
9
)
0
_-+
=
delete
ins
help
home
page
up
end
page
down
QWERT YUI O P
{
[
}
]
AS
DF GHJKL
:
;
"
'
return
shift
control
ZXCVBNM
<
,
shift
>
.
?
/
option
num
lock
clear
=/
*
7
8
9
-
456+
123
enter
0
.
del
X
P73037/F1D080g univ/man.qxd 4/21/00 2:09 PM Page 20
Page 23

21
Installation der Hardware
B. Maus
• Zur Einstellung von schnellen Mausbewegungen setzen Sie den
DIP-Schalter
SW8 = ON
• Zur Einstellung von durchschnittlich schnellen Mausbewegungen setzen
Sie den DIP-Schalter
SW8 = OFF
Tastenbelegung der PS/2-Maus mit zwei Tasten und entsprechende
Belegung der PS/2-Maus mit drei Tasten: siehe Abbildung 4.
Klicken
Kontextmenü* Klicken
Gedrückt halten
& Ziehen
Kontextmenü*
*Kontextmenü:Strg + Klicken (gilt nur für Mac
®
OS 8)
Abbildung 4
MAC 101 Tasten 104 Tasten
Umschaltt Umschalt Umschalt
Ctrl Strg (links) Strg
Wahltaste Strg (rechts) Alt
Befehlstaste Alt Windows
F
13 Druck/S-Abf Druck/S-Abf
F
14 Rollen Rollen
F
15 LUmschalt + Pause/Unterbr Umschalt + Pause/Unterbr
= Pause/Unterbr Pause/Unterbr
Einschalttaste EIN/AUS F1D080g-Netzschalter F1D080g-Netzschalter
Zeilenschalttaste Eingabe Eingabe
Löschen Rückschritt Rückschritt
Hilfetaste Einfg Einfg
Tabelle 1
De
P73037/F1D080g univ/man.qxd 4/21/00 2:09 PM Page 21
Page 24

Installation der Hardwaren
22
C. Monitor
Zuerst müssen Sie die Auflösung bestimmen, die der Monitor unterstützt.
Setzen Sie dann die DIP-Schalter SW1 bis SW6 entsprechend der
Einstellungen für den jeweiligen Monitor. Weitere Informationen hierzu
siehe Tabelle 2.
• Die in der Tabelle gezeigten Einstellungen Aund B sind für die meisten
Anwendungen zu empfehlen, bei denen die Auflösung im Macintosh
®
-Menü
unter "Kontrollfelder" > "Monitore" ausgewählt wird.
• Einstellung A ist die sicherste Einstellung für ältere SVGA-Monitore ohne
MultiSync (für VGA-Monitore nur Auflösung 640 x 480 möglich).
• Einstellung B wird für MultiSync-SVGA-Monitore empfohlen, da die
Bildwiederholrate hier höher ist.
Tabelle 2
Einstellung SW1 SW2 SW3 SW4 SW5 SW6 Zeilenfrequenz Bildwiederholrate Auflösung Bildschirmangaben
(kHz) (Hz)
A EIN EIN 31.5 60 640 x 480 VGA
EIN EIN 35.2 50 800 x 600 SVGA
B EIN EIN EIN 35 67 640 x 480 VGA
EIN EIN EIN 49 75 800 x 600 SVGA
C EIN 35 67 640 x 480 13” Farbmonitor
D EIN EIN 512 x 384
NTSC ((Flächenunterschreitung)
E EIN EIN 24.48 60.15 512 x 384 12” Farbmonitor
F EIN EIN EIN 68.7 75 1152 x 870 21” Farbmonitorr
GEIN 640 x 480
NTSC (Flächenüberschreitung)
H EIN 1152 x 870
21” Monochrom-Bildschirm
I EIN EIN 640 x 870
Hochformat
J EIN EIN 60.2 75 1024 x 768 19” Farbmonitor
K EIN EIN 49.7 75 832 x 624 16” Farbmonitor
L EIN EIN EIN 640 x 480 PAL
BITTE ÜBERPRÜFEN SI E SPEZI FI KATIONEN IHRES
MONITORS UND WÄHLEN SIE DIE KORREKTEN
EINSTELLUNGEN, BEVOR SIE DEN MONITOR EINSCHALTEN.
EINE FALSCHE EINSTELLUNG KANN DEM MONITOR EINEN
IRR E PARABLEN S CHAD E N Z UFÜGE N!
P73037/F1D080g univ/man.qxd 4/21/00 2:09 PM Page 22
Page 25

23
Fehlersuche
1) Kein Bild auf dem Monitor oder verzerrtes Bild.
•Überprüfen Sie, ob der Monitor eingeschaltet ist.
•Überprüfen Sie, ob bei OmniView™der korrekte Anschluß gewählt wurde.
•Überprüfen Sie alle Monitorkabel. Prüfen Sie nach, ob sie richtig
angeschlossen sind.
•Ihr Bildschirm kann die eingestellte Auflösung oder Bildwiederholrate nicht
handhaben. Setzen Sie die DIP-Schalter wie unter Einstellung Ain Tabelle
3 gezeigt, und starten Sie den Macintosh
®
-Rechner neu.
2) Tastatur und/oder Maus reagieren nicht.
•Stellen Sie sicher, daß der Adapter am Macintosh
®
-Rechner und an den
richtigen OmniView™-Anschlüssen angeschlossen ist.
•Stellen Sie sicher, daß bei OmniView
™
der korrekte Anschluß
gewählt wurde.
•Stellen Sie sicher, daß das OmniView™-Netzteil angeschlossen und
eingeschaltet ist.
•Überprüfen Sie die Kabel. Prüfen Sie nach, ob sie richtig angeschlossen
sind oder eine Unterbrechung vorliegt.
3) Die Belegung der Tastatur stimmt nicht.
•Stellen Sie sicher, daß der DIP-Schalter SW7 in der richtigen Stellung
steht. Bei einer Tastatur mit 101 Tasten muß er auf ON stehen, bei einer
Tastatur mit 104 Tasten auf OFF.
4) Maus geht nicht oder Mausbewegungen sind unregelmäßig.
•Die Maus muß PS/2-kompatibel sein. Eine serielle Maus ist für den
OmniView
™
-Adapter ungeeignet.
Weitere Informationen finden Sie in der OmniView
™
-Dokumentation.
De
P73037/F1D080g univ/man.qxd 4/21/00 2:09 PM Page 23
Page 26

FCC-Erklärung
ERKLÄRUNG ZUR EINHALTUNG DER FCC-VORSCHRIFTEN BEZÜGLICH
ELEKTROMAGNETISCHER UND HOCHFREQUENTER STÖRUNGEN
Wir, Belkin Components, 501 West Walnut Street, USA- Compton CA90220, erklären hiermit in alleiniger
Verantwortung, daß unser Produkt:
MAC Adapter
™
F1D080g
folgende Voraussetzungen erfüllt:
Dieses Gerät entspricht Teil 15 der FCC-Vorschriften. Der Betrieb unterliegt den folgenden Bedingungen: (1) das
Gerät darf keine nachteiligen Störungen verursachen und (2) muß empfangene Störungen ausgleichen können,
auch wenn diese geeignet sind, den Betrieb nachteilig zu beeinflussen.
.
CE-Konformitätserklärung
Wir, Belkin Components, erklären hiermit in alleiniger Verantwortung, daß der Artikel F1D080g, auf den sich diese
Erklärung bezieht, in Einklang mit der Fachgrundnorm Störaussendung EN50081-1 und der Fachgrundnorm
Störfestigkeit EN50082-1 (1992) steht.
Belkin Components Ein Jahr Produktgarantie
Belkin Components gewährleistet hiermit, daß dieses Produkt während eines Zeitraums von einem Jahr keine
Verarbeitungs- und Materialfehler aufweisen wird. Bei Feststellung eines Fehlers wird Belkin das Produkt nach eigenem
Ermessen entweder kostenlos reparieren oder austauschen, sofern es während des Garantiezeitraums an den
autorisierten Belkin-Händler zurückgegeben wurde, bei dem es gekauft wurde. Die Kosten für den Rücktransport zum
Belkin-Händler sind vom Kunden zu tragen. Ein Kaufnachweis kann verlangt werden.
Diese Gewährleistung erstreckt sich nicht auf die Beschädigung des Produkts durch Unfall, mißbräuchliche,
unsachgemäße oder fehlerhafte Verwendung oder Anwendung. Ebenso ist die Gewährleistung unwirksam, wenn das
Produkt ohne schriftliche Genehmigung durch Belkin verändert wurde oder wenn eine Belkin-Seriennummer entfernt
oder unkenntlich gemacht wurde.
DIE VORSTEHENDEN GEWÄHRLEISTUNGEN UND RECHTSBEHELFE SCHLIEßEN ALLE ANDEREN
GEWÄHRLEISTUNGEN UND RECHTSBEHELFE - OB MÜNDLICH ODER SCHRIFTLICH, AUSDRÜCKLICH ODER
KONKLUDENT - AUS UND TRETEN AN DEREN STELLE. BELKIN ÜBERNIMMT INSBESONDERE KEINERLEI
KONKLUDENTE GEWÄHRLEISTUNGEN, U.A. AUCH KEINE GEWÄHRLEISTUNG DER EIGNUNG FÜR EINEN
BESTIMMTEN ZWECK UND DER HANDELSÜBLICHEN QUALITÄT.
Kein Händler, Bevollmächtigter bzw. Vertreter oder Mitarbeiter von Belkin ist befugt, diese Gewährleistungsregelung in
irgendeiner Weise abzuändern oder zu ergänzen.
BELKIN HAFTET NICHT FÜR BESONDERE, DURCH ZUFALL EINGETRETENE ODER FOLGESCHÄDEN
AUFGRUND DER VERLETZUNG EINER GEWÄHRLEISTUNG ODER NACH MAßGABE EINER ANDEREN
RECHTSLEHRE (U.A. FÜR ENTGANGENE GEWINNE, AUSFALLZEITEN, GESCHÄFTS- ODER
FIRMENWERTEINBUßEN BZW. DIE BESCHÄDIGUNG, NEUPROGRAMMIERUNG ODER WIEDERHERSTELLUNG
VON PROGRAMMEN ODER DATEN NACH SPEICHERUNG IN ODER NUTZUNG IN VERBINDUNG MIT
BELKIN-PRODUKTEN).
Informationen
Belkin Components B.V.
Diamantlaan 8 • 2132 WV
Hoofddorp • The Netherlands
Tel: +31 (0) 235698765
Fax: +31 (0) 235612694
Belkin Components, Ltd.
Unit 13 • Gatelodge Close • Round Spinney
Northampton • Northants • NN3 8RX • UK
Tel: +44 (0) 1604678300
Fax: +44 (0) 1604678330
belkin.com
Belkin Components
501 West Walnut Street
Compton • CA • 90220 • USA
Tel: 310.898.1100
Fax: 310.898.1111
© 2000 Belkin Components. Alle Rechte Vorbehalten.
Alle MarkennameEn Sind EingetraGene Marken Der Angegebenen Hersteller.
P73037/F1D080g univ/man.qxd 4/21/00 2:09 PM Page 24
Page 27

25
De Belkin Components’ MAC Adapter™is een aanvulling op de Belkin OmniView
™
PS/2 KVM schakelmodule waarmee u een Macintosh®computer kunt aansturen.
De Adapter converteert de PS/2 muis- en toetsenbordsignalen van de OmniView
™
PS/2 naar ADB (Apple Desktop Bus) formaat en vertaalt voor de gebruikte
monitor het videosignaal van de Macintosh
®
naar standaard VGA/SVGA.
De twee kabels die nodig zijn om de Adapter op de Macintosh
®
aan te sluiten,
worden meegeleverd.
•
Macintosh®monitorkabel, DB15M naar DB15F
•
Apple ADB kabel, MiniDIN 4 M/M
De MAC Adapter
™
maakt vrijwel elke Macintosh®computer 100% compatible
met VGA/SVGA monitoren, PS/2 muizen en toetsenborden!
Inleiding
Opbouw van de Adapter
DB15 naar MAC Video
Primaire ADB naar
secundaire MAC ADB
Ingang
aan/uit schakelaar
PS/2 muis
PS/2 toetsenbord
HD15
Activiteits-LED
Dipschakelaars
Ne
P73037/F1D080n univ/man.qxd 4/21/00 2:15 PM Page 25
Page 28
1) Zorg dat alle apparaten uitgeschakeld zijn.
2) Plaats de Adapter zo, dat hij gemakkelijk bereikbaar is. Dit is nodig omdat de
‘AAN/UIT’-knop van de Adapter fungeert als ‘aan/uit’-knop op het Macintosh
®
toetsenbord. Zet de Adapter bij voorkeur neer met de ‘AAN/UIT’-knop naar
u toe.
3) Verbind de Adapter met uw Macintosh
®
computer met de meegeleverde
ADB- en DB15-verlengkabels. Zie figuur 1.
Installatie
26
Macintosh
®
computer
Video
(DB15) Kabel
ADB Kabel
ADB
MAC Adapter
™
Figuur 1
Achterzijde G3
PS/2 en VGA kabels
voor de OmniView
™
(niet meegeleverd)
Video
ADB
Video
P73037/F1D080n univ/man.qxd 4/21/00 2:15 PM Page 26
Page 29

Installatie
Bij aansluiting op een nieuwe blauwe G3 wordt de DB15 kabel niet gebruikt en
is het niet nodig de dipschakelaars 1 t/m 6 in te stellen. Sluit de HD15
monitorpoort van de G3 gewoon rechtstreeks aan op de OmniView
™
HD15 connector.
4) Sluit de Adapter aan op een vrije poort van uw OmniView
™
PS/2. Let erop dat
uitsluitend een PS/2 muisconnector kan worden gebruikt. De vereiste kabels
worden NIET meegeleverd maar zijn afzonderlijk verkrijgbaar als set (Belkin
type A3X982n) of los (2x F2N036n06, 1x F2N025n06-T). Zie figuur 2.
F2N025n06-T
F2N036n06
Achterzijde OmniView
™
PS/2 met vier poorten
Figuur 2
5) Stel de dipschakelaars op de Adapter in, afhankelijk van het type
toetsenbord, muis en monitor dat u gebruikt. De stand ‘AAN’ is: omlaag.
Ne
27
P73037/F1D080n univ/man.qxd 4/21/00 2:15 PM Page 27
1234
Page 30

Installatie
28
A. Toetsenbord
• Gebruikt u een 101-key toetsenbord, stel de dipschakelaar dan in als volgt:
SW7 = AAN
• Maak U gebruik van een 104-key toetsenbord, stel dan de dipschakelaar in
als volgt:
SW7 = UIT
Zie figuur 3 en tabel 1 voor de toetsdefinitie tussen de Macintosh
®
en de IBM
PS/2 toetsenborden.
Standaard Mac®toetsenbordindeling
PS/2 104-key toetsen-layout m.b.t.Mac®toetsenbord
PS/2 101-key toetsen-layout m.b.t.Mac®toetsenbord
Aan/uit-knop
op de Adapter
Figuur 3
F1
F2F3F4
F5 F6 F7 F8 F9 F10 F11
F12
print
screen
F13
scroll
lock
F14
pause
F15
esc
tab
caps
lock
!
1
@
2
#
3
$
4
~
`
%5^6&
7
*8(
9
)
0
_-+
=
delete
ins
help
home
page
up
end
page
down
QWERT YUI O P
{
[
}
]
|
\
AS
DF GHJKL
:
;
"
'
return
shift
control
alt
option
ZXCVBNM
<
,
shift
>
.
?
/
control
alt
option
num
lock
clear
=/
*
7
8
9
-
456+
123
enter
0
.
del
X
F1
F2F3F4
F5 F6 F7 F8 F9 F10 F11
F12
print
screen
F13
scroll
lock
F14
pause
F15
esc
tab
caps
lock
!
1
@
2
#
3
$
4
~
`
%5^6&
7
*8(
9
)
0
_-+
=
delete
ins
help
home
page
up
end
page
down
QWERT YUI O P
{
[
}
]
AS
DF GHJKL
:
;
"
'
return
shift
control
alt
option
ZXCVBNM
<
,
shift
>
.
?
/
control
alt
option
num
lock
clear
=/
*
7
8
9
-
456+
123
enter
0
.
del
X
F1
F2F3F4
F5 F6 F7 F8 F9 F10 F11
F12
print
screen
F13
scroll
lock
F14
pause
F15
esc
tab
caps
lock
!
1
@2#
3
$
4
~
`
%5^6&
7
*8(
9
)
0
_-+
=
delete
ins
help
home
page
up
end
page
down
QWERT YUI O P
{
[
}
]
AS
DF GHJKL
:
;
"
'
return
shift
control
ZXCVBNM
<
,
shift
>
.
?
/
option
num
lock
clear
=/
*
7
8
9
-
456+
123
enter
0
.
del
X
P73037/F1D080n univ/man.qxd 4/21/00 2:15 PM Page 28
Page 31

29
Installatie
Zie figuur 4 voor toesten-layout tussen de PS/2 muis met twee knoppen en
de PS/3 muis met drie knoppen.
Klik
Inhoudsgeb
onden menu Klik
Lock & Drag
(Vergrendelen & Slepen)
Inhoudsgeb
onden menu
*Inhoudsgebonden menu: Ctrl + click (alleen voor Mac
®
OS 8)
Figuur 4
MAC 101-Key 104-Key
Shift L or R_Shift L or R_Shift
Ctrl L_Ctrl L or R_Ctrl
Optie R_Ctrl L or R_Alt
Command L_R_Alt L_R_WIN
F
13 Prt_Sc Prt_Sc
F
14 Scroll Lock Scroll Lock
F
15 L or R_Shift & Pause L or R_Shift & Pause
= Pause Pause
AAN/UIT F1D08 0n Power Key F1D0 80n Power Key
Return Enter Enter
Delete Back Space Back Space
Help Ins Ins
Tabel 1
B. Muis
• Geeft u de voorkeur aan een high-speed muiscursor, stel de dipschakelaar
dan in als volgt:
SW8 = AAN
• Geeft u de voorkeur aan een muiscursor met normale snelheid, stel de
dipschakelaar dan in als volgt:
SW8 = UIT
Ne
P73037/F1D080n univ/man.qxd 4/21/00 2:15 PM Page 29
Page 32
Installatie
30
C. Monitor
Bepaal eerst de resolutie die uw monitor ondersteunt. Stel dan de dip
schakelaars SW1 t/m SW6 zo in, dat de monitor naar behoren functioneert.
Zie tabel 2 voor meer informatie.
• De onderstaande instellingen A en B worden aanbevolen voor de meeste
applicaties waarvan de resolutie in het monitormenu van het Macintosh
®
besturingspaneel wordt geselecteerd.
• Voor oudere, niet-multisync SVGA monitoren (640 x 480 uitsluitend voor
VGA monitoren) is positie A de veiligste keuze.
• Met het oog op de hogere refresh rate heeft positie B heeft de voorkeur
voor multisync SVGA monitoren.
Tabel 2
Instelling
SW1 SW2 SW3 SW4 SW5 SW6 Horiz. Verticale Resolutie Opmerkingen
Scan Scan m.b.t.
(kHz) (Hz) monitoren
A AAN AAN 31.5 60 640 x 480 VGA
AAN AAN 35.2 50 800 x 600 SVGA
B AAN AAN AAN 35 67 640 x 480 VGA
AAN AAN AAN 49 75 800 x 600 SVGA
C AAN 35 67 640 x 480 13-inch kleur
D AAN AAN 512 x 384
NTSC (underscan)
E AAN AAN 24.48 60.15 512 x 384 12-inch kleur
F AAN AAN AAN 68.7 75 1152 x 870 21-inch kleur
G AAN 640 x 480
NTSC (overscan)
H AAN 1152 x 870
21-in. monochrome
I AAN AAN 640 x 870
Staand
J AAN AAN 60.2 75 1024 x 768 19-inch kleur
K AAN AAN 49.7 75 832 x 624 16-inch kleur
L AAN AAN AAN 640 x 480 PAL
CONTROLEER DE SPECIFICATI ES VAN UW MONITOR EN
KIES DE JUISTE INSTELLING VOORDAT U HET SYSTEEM
OPSTART. E E N O NJ UISTE I N ST E LLI N G KAN U W MO NITOR
ONHERSTELBAAR BESCHADIGEN.
P73037/F1D080n univ/man.qxd 4/21/00 2:15 PM Page 30
Page 33

31
Probleemoplossing
1) De monitor geeft geen beeld of het beeld is vervormd.
• Zorg dat de monitor ingeschakeld is.
• Zorg dat de juiste poort op de OmniView™gekozen is.
• Controleer alle monitorkabels. Zorg dat alle kabels correct zijn aangesloten.
• Uw monitor is niet geschikt voor de gekozen resolutie en refresh rate. Stel
de dipschakelaars in volgens positie Ain tabel 3 en start de Macintosh
®
computer opnieuw op.
2) Uw toetsenbord en/of de muis reageert niet.
• Zorg dat de Adapter correct op de Macintosh
®
computer en op de juiste
poorten van de OmniView™is aangesloten.
• Zorg dat de juiste poort op de OmniView™gekozen is.
• Zorg dat de OmniView
™
op de voedingsadapter aangesloten is en dat deze
ook ingeschakeld is.
• Controleer alle kabels. Zorg dat ze correct aangesloten zijn en dat er geen
lussen in zitten.
3) De toetsen van het toetsenbord geven geen of onjuiste tekens.
• Zorg dat dipschakelaar SW7 correct is ingesteld. Deze moet in de stand
AAN staan voor een 101-key toetsenbord en in de stand UIT voor een
104-key toetsenbord.
4) De muis werkt niet of maakt ongecontroleerde bewegingen.
• De muis moet compatibel zijn met PS/2. Een seriële muis op de
OmniView
™
werkt niet samen met de Adapter.
Raadpleeg de documentatie van uw OmniView™voor meer informatie.
Ne
P73037/F1D080n univ/man.qxd 4/21/00 2:15 PM Page 31
Page 34
FCC Verklaring
Verklaring van conformiteit met de FCC voorschriften inzake
elektromagnetische compatibiliteit
Belkin Components, gevestigd 501 West Walnut Street, Compton CA90220 (USA), verklaart onder
haar uitsluitende verantwoordelijkheid dat het product:
MAC Adapter
™
F1D080n
waarop deze verklaring betrekking heeft:
Voldoet aan paragraaf 15 van de FCC Voorschriften. De werking is onderworpen aan de volgende
twee voorwaarden: (1) dit apparaat mag geen schadelijke storing veroorzaken en (2) dit apparaat
moet elke hierop inwerkende storing accepteren inclusief storing die de werking mogelijk
kan belemmeren.
CE Conformiteitsverklaring
Belkin Components verklaart onder haar uitsluitende verantwoordelijkheid dat het product waarop deze verklaring
betrekking heeft, type F1D080n, voldoet aan de Generieke Emissiestandaard EN50081-1 en aan de Generieke
Immuniteitsstandaard EN50082-1 1992.
Belkin Components Eén jaar productgarantie
Belkin Components garandeert dit product gedurende één jaar op materiaal- en fabricagefouten. In geval van een
defect zal Belkin Components het product naar eigen inzicht repareren of gratis vervangen mits het binnen de
garantieperiode en met vooruitbetaling van verzendkosten wordt geretourneerd aan de geautoriseerde Belkin
leverancier waarvan u het product gekocht hebt. Deze kan u vragen het aankoopbewijs te tonen.
Deze garantie geldt niet indien de schade aan het product is ontstaan door een ongeval, door opzettelijk of onopzettelijk
onjuist gebruik, door foutieve toepassing of door wijziging van het product zonder de nadrukkelijke toestemming van
Belkin dan wel door verwijdering of verminking van enig Belkin serienummer.
DE BOVENVERMELDE GARANTIE EN MAATREGELEN SLUITEN ALLE ANDERE UIT, MONDELING DAN WEL
SCHRIFTELIJK, NADRUKKELIJK OF IMPLICIET. BELKIN VERWERPT MET NAME ELKE EN ALLE IMPLICIETE
GARANTIES, ONVERKORT MEEGEREKEND GARANTIES INZAKE COMMERCIËLE TOEPASSINGEN EN/OF
GESCHIKTHEID VOOR EEN INDIVIDUEEL DOEL.
Geen door Belkin aangestelde wederverkoper, tussenpersoon of werknemer is gemachtigd deze garantie op welke
wijze dan ook te wijzigen, uit te breiden of aan te vullen.
BELKIN IS NIET AANSPRAKELIJK VOOR BIJZONDERE, BIJKOMENDE OF VERVOLGSCHADE DOOR
GARANTIEVERBREKING OF VOORTSPRUITEND UIT ENIG ANDER JURIDISCH BEGINSEL, MET INBEGRIP VAN,
DOCH NIET BEPERKT TOT, VERLIES VAN BATEN EN/OF GOODWILL, BEDRIJFSSTILSTAND, BESCHADIGING
RESPECTIEVELIJK HERPROGRAMMERING OF REPRODUCTIE VAN ENIG PROGRAMMAOF ENIGE GEGEVENS
OPGESLAGEN IN OF GEBRUIKT MET BELKIN PRODUCTEN.
Informatie
Belkin Components B.V.
Diamantlaan 8 • 2132 WV
Hoofddorp • The Netherlands
Tel: +31 (0) 235698765
Fax: +31 (0) 235612694
Belkin Components, Ltd.
Unit 13 • Gatelodge Close • Round Spinney
Northampton • Northants • NN3 8RX • UK
Tel: +44 (0) 1604678300
Fax: +44 (0) 1604678330
belkin.com
Belkin Components
501 West Walnut Street
Compton • CA • 90220 • USA
Tel: 310.898.1100
Fax: 310.898.1111
© 2000 Belkin Components. Alle RechtenVoorbehouden.
Alle Handelsnamen Zijn Geregistreerde Handelsmerken Van De BetreffendeRechthebbenden.
P73037/F1D080n univ/man.qxd 4/21/00 2:15 PM Page 32
Page 35

33
L’Adattatore MAC®della Belkin Components è un accessorio del OmniView™PS/2
che permette la gestione di un computer Macintosh
®
. Esso trasforma i segnali del
mouse PS/2 e della tastiera dal OmniView
™
PS/2 in formato ADB (il bus del
desktop Apple), e trasforma l’uscita video di Macintosh
®
in un normale VGA/SVGA
per il monitor che si sta utilizzando.
Per comodità, i due cavi necessari a collegare l’adattatore al Macintosh
®
sono inclusi:
• Cavo del monitor Macintosh
®
da DB15 M a DB15F
• Cavo Apple ADB, MiniDIN 4 M/M
Con l’adattatore MAC
®
, quasi tutti i computer Macintosh®diventano compatibili
con i monitor VGA/SVGA, con i mouse e le tastiere PS/2!
Introduzione
Descrizione del Prodotto
Da DB15 al monitor MAC
Da ADB primario ad
ADB MAC secondario
Connector
Tasto di alimentazione
Mouse PS/2
Tastiera PS/2
HD15
LED di attività
Switch DIP
It
P73037/F1D080i univ/man.qxd 4/21/00 2:11 PM Page 33
Page 36

1)
Accertatevi che tutti i dispositivi siano spenti.
2)
Posizionate l’adattatore in modo che sia facilmente accessibile. Ciò è
necessario in quanto il pulsante POWER (ACCENSIONE) dell’adattatore ha
la funzione di pulsante d’accensione per la tastiera Macintosh
®
. Potete
posizionare l’adattatore in modo che il pulsante POWER (ACCENSIONE) sia
rivolto verso di voi.
3)
Collegate l’adattatore al vostro computer Macintosh®usando i cavi di
estensione ADB e DB15 forniti. Vedi figura 1 di seguito.
Installazione del Hardware
34
Computer
Macintosh
®
Video
(DB15) Cavo
ADB Cavo
ADB
Adattatore MAC
™
Figure 1
Retro del G3
Cavi da PS/2 e
VGA a
OmniView
™
(esclusi)
Monitor
ADB
Monitor
P73037/F1D080i univ/man.qxd 4/21/00 2:11 PM Page 34
Page 37

35
Installazione del Hardware
Nel caso di connessione ad un nuovo G3 blu, il cavo DB15 non viene utilizzato
e non è necessario impostare gli switch DIP 1-6. E’ sufficiente che colleghiate la
porta del monitor HD15 del G3 direttamente al connettore HD15 OmniView
™
.
4) Collegate l’adattatore ad un porta libera del vostro OmniView
™
PS/2. Vi
facciamo notare che può essere usato solo il connettore del mouse PS/2. I
cavi necessari NON sono inclusi, tuttavia potete acquistarli come kit di cavi
(componente n. A3X982i Belkin), o individualmente (due componenti n.
F2N036i06, un componente n. F2N025i06-T). Vedi figura 2.
F2N025i06-T
F2N036i06
Retro della porta 4 OmniView
™
PS/2
Figura 2
5) Impostate gli switch DIP sull’adattatore a seconda del tipo di tastiera, mouse
e monitor che state utilizzando. La posizione "ON" è verso il basso.
It
P73037/F1D080i univ/man.qxd 4/21/00 2:11 PM Page 35
1234
Page 38

Installazione del Hardware
36
A. Tastiera
• Se state usando una tastiera a 101 tasti, impostate lo switch DIP
come segue
SW7 = ON
• Se state usando una tastiera a 104 tasti, impostate lo switch DIP
come segue
SW7 = OFF
Per l’assegnazione dei tasti tra la tastiera Macintosh
®
e quella IBM PS/2 si
vedano figura 3 e tabella 1.
Struttura normale della tastiera Mac
®
Tastiera PS/2 a 104 tasti strutturata come tastiera Mac®s
Tastiera PS/2 a 101 tasti strutturata come tastiera Mac
®
Tasto di
alimentazione
dell’adattatore
Figura 3
F1
F2F3F4
F5 F6 F7 F8 F9 F10 F11
F12
print
screen
F13
scroll
lock
F14
pause
F15
esc
tab
caps
lock
!
1
@2#
3
$
4
~
`
%5^6&
7
*8(
9
)0_-+
=
delete
ins
help
home
page
up
end
page
down
QWERT YUI O P
{
[
}
]
|
\
AS
DF GHJKL
:
;
"
'
return
shift
control
alt
option
ZXCVBNM
<
,
shift
>
.
?
/
control
alt
option
num
lock
clear
=/
*
7
8
9
-
456+
123
enter
0
.
del
X
F1
F2F3F4
F5 F6 F7 F8 F9 F10 F11
F12
print
screen
F13
scroll
lock
F14
pause
F15
esc
tab
caps
lock
!
1
@2#
3
$
4
~
`
%5^6&
7
*8(
9
)
0
_-+
=
delete
ins
help
home
page
up
end
page
down
QWERT YUI O P
{
[
}
]
AS
DF GHJKL
:
;
"
'
return
shift
control
alt
option
ZXCVBNM
<
,
shift
>
.
?
/
control
alt
option
num
lock
clear
=/
*
7
8
9
-
456+
123
enter
0
.
del
X
F1
F2F3F4
F5 F6 F7 F8 F9 F10 F11
F12
print
screen
F13
scroll
lock
F14
pause
F15
esc
tab
caps
lock
!
1
@2#
3
$
4
~
`
%5^6&
7
*8(
9
)0_-+
=
delete
ins
help
home
page
up
end
page
down
QWERT YUI O P
{
[
}
]
AS
DF GHJKL
:
;
"
'
return
shift
control
ZXCVBNM
<
,
shift
>
.
?
/
option
num
lock
clear
=/
*
7
8
9
-
456+
123
enter
0
.
del
X
P73037/F1D080i univ/man.qxd 4/21/00 2:11 PM Page 36
Page 39
37
Installazione del Hardware
B. Mouse
• Tastiera PS/2 a 101 tasti strutturata come tastiera Mac
®
SW8 = ON
• Se preferite un puntatore di mouse a velocità normale, impostate lo
switch DIP come segue
SW8 = OFF
Per l’assegnazione dei tasti tra il mouse a 2 tasti PS/2 e il mouse a 3 tasti
PS/2 si veda la figura 4.
Cliccare
Menù
contestuale
Cliccare
Blocca e
trascina
Menù
contestuale
Menù contestuale: ctrl + cliccare (solo per Mac
®
OS 8)
Figura 4
Tabella 1
MAC 101 Tasti 104 Tasti
Shift Shift sinistro o de stro Shift sinistro o destro
Ctrl Ctrl sinistrol Ctrl sinistro o destro
Opzioni Ctrl destro Alt sinistro o destro
Comando Alt sinistro destro Win sinistro destro
F13 Stamp Stamp
F14 Bloc Scorr Bloc Scorr
F15 Shift sinistro o destro e pausa Shift sinistro o destro e pausa
= Pausa Pausa
Tasto d’alimentazione ON/OF F Tasto d’alimentazione F1D080i Tasto d’alimentazione F1D080i
Ritorno Invio Invio
Cancella Indietro Indietro
Aiuto Ins Ins
It
P73037/F1D080i univ/man.qxd 4/21/00 2:11 PM Page 37
Page 40

Installazione del Hardware
38
C. Monitor
Prima di tutto dovete determinare quale tipo di risoluzione sia in grado di
supportare il vostro monitor. Impostate gli switch DIP scegliendo
l’impostazione corretta tra SW1 e SW6 per le funzioni del monitor. Per
ulteriori informazioni si veda la tabella 2.
• Vi consigliamo di adottare le impostazioni A e B riportate di seguito per la
maggior parte delle applicazioni, le cui risoluzioni sono selezionate nel
menu Pannello di Controllo/Monitor di Macintosh
®
.
• L’impostazione A è la più sicura per i vecchi monitor senza multisincronia
SVGA (solo per i monitor VGA 640 x 480).
• L’impostazione B è la scelta migliore per i monitor multisincronia SVGA per
la sua più alta velocità di rigenerazione.
Tabella 2
Impostazioni SW1 SW2 SW3 SW4 SW5 SW6 Scansione Scansione Risoluzione Caratteristiche
orizzontale verticale del monitor
(kHz) (Hz)
A ON ON 31.5 60 640 x 480 VGA
ON ON 35.2 50 800 x 600 SVGA
B ON ON ON 35 67 640 x 480 VGA
ON ON ON 49 75 800 x 600 SVGA
C ON 35 67 640 x 480 13" a colori
DONON 512 x 384
NTSC (underscan)
E ON ON 24.48 60.15 512 x 384 12" a colori
F ON ON ON 68.7 75 1152 x 870 21" colore
GON 640 x 480
NTSC (overscan)
H ON 1152 x 870
21" monocromatico
I ON ON 640 x 870
Descrizione
J ON ON 60.2 75 1024 x 768 19" a colori
K ON ON 49.7 75 832 x 624 16" a colori
L ON ON ON 640 x 480 PAL
VI INVITIAMO A VERIFICARE LE SPECIFICHE DEL
VOSTRO MONITOR E DI S ELEZIONARE L’IM PO STAZIO N E
CORRETTA PRIMA DI ACCENDERLO. UN’IMPOSTAZION E
SBAGLIATA POTREBBE CAUSARE DANN I IRREVERSI BI LI
AL VOSTRO MONITOR!
P73037/F1D080i univ/man.qxd 4/21/00 2:11 PM Page 38
Page 41

39
Risoluzione dei problemi
1) Non c’è nessuna immagine sul monitor, o l’immagine è distorta.
• Accertatevi che il monitor sia acceso.
• Accertatevi che la porta corretta sia selezionata su OmniView™.
• Controllate tutti i cavi del monitor. Assicuratevi che siano
collegati correttamente.
• Il vostro monitor non è in grado di gestire la risoluzione corrente o la
velocità di rigenerazione. Cambiate le impostazioni dello switch DIP
passando all’Impostazione Aindicata nella tabella 3 e riavviate il
computer Macintosh
®
.
2) Non avete risposta dalla tastiera e/o dal mouse.
• Accertatevi che l’adattatore sia collegato correttamente al computer
Macintosh
®
e alla porta del OmniView™.
• Accertatevi che sia selezionata la porta corretta sul OmniView™.
• Accertatevi che l’OmniView
™
abbia un adattatore di corrente e che
sia acceso.
• Controllate tutti i cavi. Accertatevi che siano collegati correttamente e che
siano diritti.
3) I tasti della tastiera non sono stati assegnati correttamente.
• Assicurativi che il SW7 sia impostato correttamente. Deve essere su ON
per una tastiera a 101 tasti e OFF per una tastiera a 104 tasti.
4) Il mouse non funziona o ha un movimento erratico.
• Il mouse deve essere compatibile con PS/2. Un mouse seriale sul
OmniView
™
non funziona con l’adattatore.
Per ulteriori informazioni, consultate la documentazione inclusa nel
vostro OmniView
™
.
It
P73037/F1D080i univ/man.qxd 4/21/00 2:11 PM Page 39
Page 42
Dichiarazione FCC
Dichiarazione di conformità con le Norme FCC per la compatibilità
elettromagnetica
I sottoscritti, Belkin Components, di 501 West Walnut Street, Compton CA90220, dichiariamo sotto la
nostra piena responsabilità che il prodotto:
Adattatore MAC
™
F1D080i
a cui questa dichiarazione si riferisce:
È conforme all’art.15 delle Norme FCC. Il funzionamento è soggetto alle seguenti due condizioni: (1)
questo dispositivo non deve causare interferenze dannose, e (2) questo dispositivo deve accettare
qualsiasi interferenza ricevuta, comprese eventuali interferenze che possano causare un
funzionamento anomalo.
Dichiarazione di Conformità CE
Noi sottoscritti, Belkin Components, dichiariamo sotto la nostra piena responsabilità che il prodotto F1D080i a cui
questa dichiarazione fa riferimento, è in conformità con la Norma sulle Emissioni Generiche EN50081-1 e con la Norma
di Immunità Generica EN50082-1 1992.
Belkin Components Garanzia di un anno
La Belkin Components garantisce questo prodotto contro ogni difetto di materiale e costruzione per un anno. Nel caso
di un’eventuale anomalia la Belkin provvederà, a propria discrezione, a riparare o sostituire il prodotto senza alcuna
spesa, a condizione che questo sia presentato entro il termine di garanzia, con le spese di trasporto già pagate,
presso il rivenditore autorizzato Belkin da cui avete acquistato il prodotto. Potrebbe essere necessario presentare
la prova d’acquisto.
Questa garanzia non viene applicata se il prodotto è stato danneggiato involontariamente o in seguito ad un utilizzo
eccessivo, scorretto o errato; se il prodotto è stato modificato senza l’autorizzazione scritta della Belkin, o se un
qualsiasi numero di serie Belkin sia stato rimosso o cancellato.
LA GARANZIA E I PROVVEDIMENTI INDICATI INTENDONO SOSTITUIRE ESCLUSIVAMENTE TUTTI GLI ALTRI, SIA
ORALI CHE SCRITTI, ESPRESSI O TACITI. BELKIN DECLINAIN PARTICOLARE QUALSIASI TACITAGARANZIA,
COMPRESE, SENZAALCUN LIMITE, LE GARANZIE DI COMMERCIABILITÀ E IDONEITÀ AD UNO SCOPO
PARTICOLARE.
I rivenditori, gli agenti o i dipendenti della Belkin non sono autorizzati a modificare, prolungare o ampliare la
presente garanzia.
LA BELKIN DECLINA QUALSIASI RESPONSABILITÀ PER DANNI PARTICOLARE, INCIDENTALI O CONSEGUENTI
A QUALSIASI VIOLAZIONE DELLA GARANZIA O DETERMINATI DAQUALSIASI TEORIA LEGALE COMPRESI, MA
NON SOLO, IL LUCRO CESSANTE, I TEMPI DI ATTESAE L’AVVIAMENTO, NONCHÉ PER EVENTUALI
DANNEGGIAMENTI O RIPROGRAMMAZIONI O RIPRODUZIONI DI QUALSIASI DATO O PROGRAMMASALVATO O
UTILIZZATO CON I PRODOTTI BELKIN.
Informazioni
Belkin Components B.V.
Diamantlaan 8 • 2132 WV
Hoofddorp • The Netherlands
Tel: +31 (0) 235698765
Fax: +31 (0) 235612694
Belkin Components, Ltd.
Unit 13 • Gatelodge Close • Round Spinney
Northampton • Northants • NN3 8RX • UK
Tel: +44 (0) 1604678300
Fax: +44 (0) 1604678330
belkin.com
Belkin Components
501 West Walnut Street
Compton • CA • 90220 • USA
Tel: 310.898.1100
Fax: 310.898.1111
© 2000 Belkin Components. Tutti I Diritti RiserVati.
Tutti I Marchi Sono Marchi RegistrAti Dalle Rispettive Ditte Sotto Elencate.
P73037/F1D080i univ/man.qxd 4/21/00 2:11 PM Page 40
 Loading...