

Page 1

Basic
wireless router
User Manual
F7 D1301 88 20- 00 370
Page 2

TABLE OF CONTENTS
Getting Started ........................................... 1
What’s in the Box .............................................1
Initial Setup..................................................1
Advanced Tools & Settings.....................................6
The Belkin Router Manager ....................................7
Manual Setup Using Your Browser ..............................8
Adding Computers to Your Network .............................9
Getting to Know Your Router .............................. 11
Front Panel .................................................11
Back Panel .................................................12
Technical Details ........................................ 13
Technical Features ..........................................13
System Requirements........................................14
Troubleshooting, Support, and Warranty ................... 15
Troubleshooting .............................................15
Technical Support ...........................................22
Belkin International, Inc., Limited 2-Year Product Warranty .........23
Regulatory Information ...................................26
FCC Statement..............................................26
Page 3

GETTING STARTED
What’s in the Box
Basic Wireless Router
Ethernet cable (attached to router)
Power supply (attached to router)
Network information card (attached to router)
Belkin Setup CD with User Manual
Initial Setup
Whe re to Place Your Rout er
For th e best resul ts, p la ce th e Rou ter n ext t o your m od em in
an open location away from large metal objects and magnets
suc h as th ose found in sp eaker s. Ra ising t he Ro uter above
floor level can improve the strength of your wireless signal.
1
Page 4
GETTING STARTED
3
modem
1
2
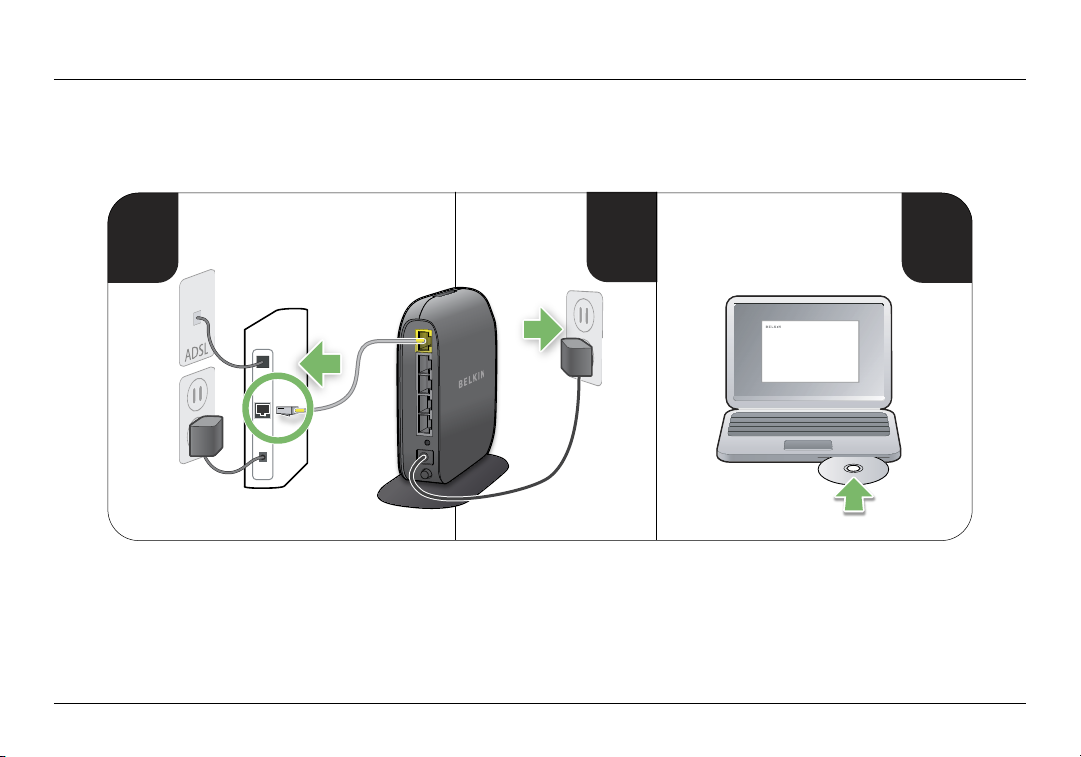
How to Set It Up
2
Page 5
GETTING STARTED
Setup
1. Co nn ec t your R outer ’s Eth er net c able to your mo dem’s Eth er net
por t (on the back of your m odem). Th is port m ight be labe le d
dif ferently on y our p ar ti cular m odem. If you ar e a dding a
Rou ter for the f ir st ti me, this p or t may be c onnecte d to you r
computer by an Ethernet cable. It is OK to disconnect your
computer and plug the Router into the modem instead.
2. Plug the Router’s power supply into a wall outlet.
3. Put the CD i nto your comput er. If th e CD doesn ’t
ope n aut omati ca ll y, p lease b row se to yo ur CD driv e
and double- click on the Belkin Setup CD icon.
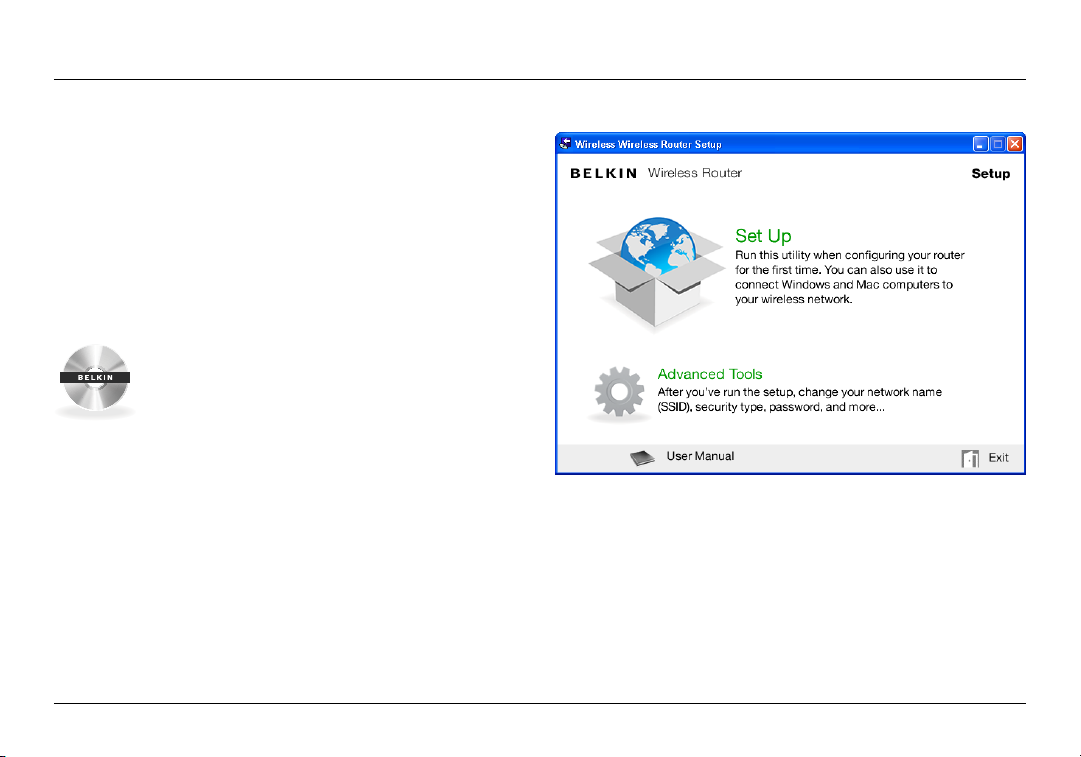
4. Click the Setup icon on the CD menu.
3
Page 6

GETTING STARTED
5. Afte r a b ri ef in stallat ion, the s etup soft ware will as k y ou
for th e net work name and p as swo rd fr om th e net work
informat io n car d tha t is at tached to your Route r. S tore the
card under the base of your Router for future reference.
4
Page 7
GETTING STARTED
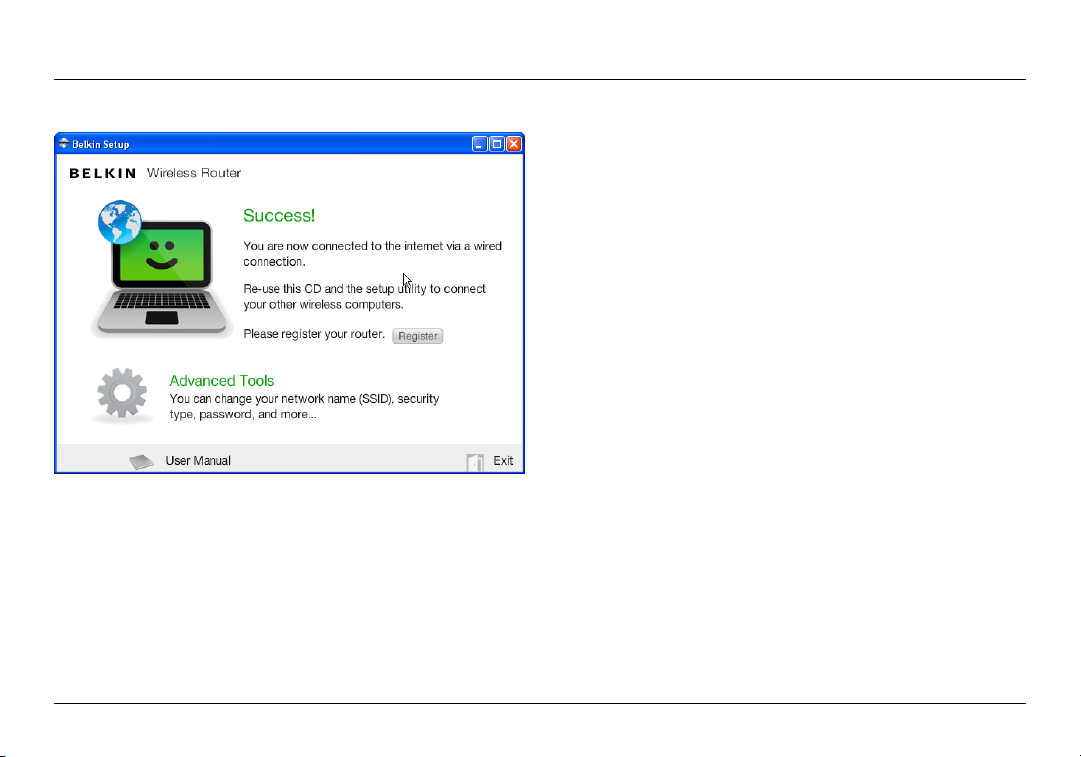
6. A progres s scree n wil l app ea r whi le ad ditiona l sof tware is
ins ta lled. This may take a few minut es to comp lete. Once
fin ished, a “ Su cc es s” me ss age w ill a pp ear i ndicati ng th at you
are connected to the Internet via your new Belkin Router.
During setup you may be asked for additional information.
You m ay ne ed to en ter a user na me an d pas sword prov ided
by you r ISP. T his u sername and passwor d i s likely to b e
found on materials that came f rom your ISP when you
sig ne d up for ser vi ce. If n ec essary, you m ay ne ed to cont act
your ISP to retrieve your username and password.
If you have a stati c IP addre ss, y ou may n ee d t o enter
additional information also provided by your ISP.
If you r compu ter d oesn’ t have a wire le ss ad apter, or the
set up so ft ware is unabl e to contr ol it, you may be as ked to
connect your computer to the Router with a network cable.
5
Page 8
GETTING STARTED
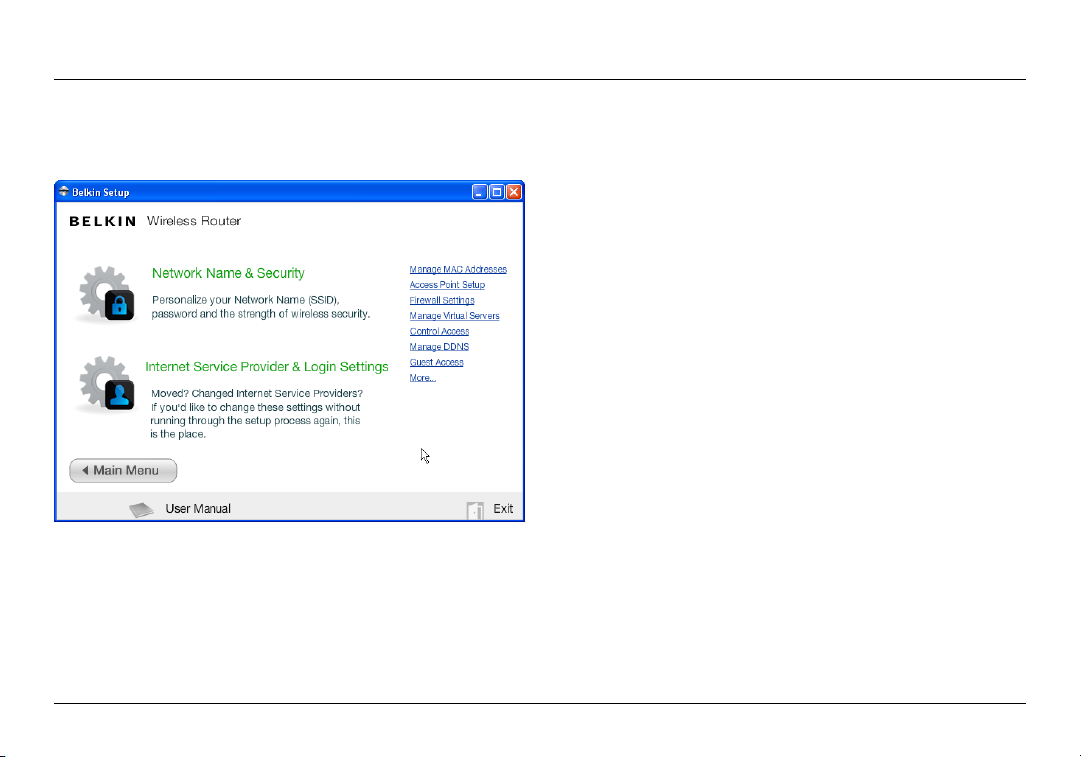
Advanced Tools & Settings
After the initi al setup i s compl ete, you have th e o pt ion to
change settings like your network name, security type, and
pas sword . To ma ke these changes and others, cli ck on t he
Advanced Tools ic on at the CD Setup menu and se lect on e
of the following set tings that you would like to change:
Network Name & Se curit y – Person al ize your networ k nam e
(SSID), password, and strength of wireless security.
Internet Service Provider & Login Settings – Ha ve
you moved or changed Internet Service Providers?
If you ’d like t o cha ng e the se se tt in gs wi th out r unning
through the setup process again, this is the place.
6
Page 9

GETTING STARTED
Belkin.2234
Router Settings
User Manual
Check for Updates
Options
Exit
The Belkin Router Manager
The Belkin Router Manager appears in your system tray
(Wind ows) or m en u bar (M ac). It s icon indicat es th e cur re nt
sta tus o f your R outer and al so al lows you to access your
Rou ter’s sett ings to ma ke ch anges. It also provide s qui ck
access to software that came bundled with your Router.
To access the Router set tings, click on the icon
and select from the menu that appears.
The status of your Router is shown by the Belkin Router Manager
icon, which closely mimics the light on the front of the Router.
Green: You a re co nn ec ted to your Belkin Rout er
and it is connected to the Internet.
Amber: You a re co nnected to your Belk in Ro uter,
but it is not connected to the Internet.
7
Page 10

GETTING STARTED
Manual Setup Using Your Browser
In you r bro wser, type “http://ro uter ” (you d o not need to t yp e
in any thing else such a s “w ww”). Then press the Enter key. If
you’re st ill h aving troubl e runni ng th e manua l set up op tion, t yp e
“192.168.2.1” i n your b rowse r (yo u do not need to t yp e in anything
else such as “http://” or “w ww”). Then press the Enter key.
8
Page 11

GETTING STARTED
Adding Computers to Your Network
Wir eless d evice s such as co mp uters , net work printers, and g aming
systems can connect to your Router with a few simple steps.
Using the CD
1. Pu t the Setu p CD into you r com pu ter. If t he CD
doe sn’t op en au tomat ic ally, bro wse to your CD
drive and open the Belkin Setup CD icon.
2. Click the Setup icon on the CD menu.
3. After a brief installation, the setup software will ask you for the
net wo rk na me an d password from t he ne twork i nform ation c ard
tha t cam e with you r Rou ter. This c ard i s mos t likely n ow lo cated
underneath the foot of your Router in the provided card slot.
4. A progres s scree n wil l app ea r whi le ad ditiona l sof tware is
ins ta lled. This may take a few minut es to comp lete. Once
fin ished, a “ Su cc es s” me ss age w ill a pp ear i ndicati ng th at you
are connected to the Internet via your new Belkin Router.
Note: Th e set up so ft ware run s onl y on
Windows and Mac OS X systems.
9
Page 12

GETTING STARTED
Manually
If you choose not to use t he in cl uded Setup CD for
add ing a ddition al comp uters or w ireless devi ce s, you
can manually add these items to your network.
1. Lo ca te the w ireless-net work- co nnections opti on
on your computer or wireless device.
2. Select your Belkin Router f rom t he li st of available networ ks. You
can identi fy your Belk in Router by lo ca ting the n et work name
(SSID) from the card located underneath the foot of your Router.
3. Enter your networ k password (located on
your network information card).
Your wireless device will take a few moments to connect to your
network. If the connection is not made the first time, try this
pro ce ss ag ain. If yo u sti ll have difficult y con necting to your networ k
after trying t his p rocess a few ti mes, see t he “Troublesh ooting”
section in this manual for help with connecting to your network.
Note: In some cases you may be prompted to select the
security type. It is printed on the card for your convenience.
Using the WPS But ton
1. St ar t WPS Pu sh Bu tton Co nn ec tion (W PS PBC) o n you r
com pu ter or o ther Wi -F i device t hat you would like to connec t
wir elessly to your Router. Of ten ther e wil l be a but ton fo r this
pur po se in software that came with the device, or a physica l
“WPS,” “PBC,” or “Security” button on the device itself.
2. Within two minutes, press the WPS button on your Router.
The WPS light (small light above WPS button) wi ll bl ink g reen while
it liste ns for y our W i- Fi device. Once a conn ec ti on is esta bl ished, the
lig ht wi ll tu rn gree n and then go o ut . If a c on nection is n ot es ta blished ,
the light will blink amber. You may repeat the process to try again.
You can repeat this process for each WPS-enabled
device you’d like to add to your network.
10
Page 13

GETTING TO KNOW YOUR ROUTER
Front Panel
(a)
(b)
A) Router Status Light
Your Router’s status is shown by the light on the front.
Off: The Router is not plugged into a power source.
Blinking Green: The Router is starting up.
Solid Green: The Router is connected to the Internet.
Blinking Amber: The Route r can ’t de tect the m od em. Either the
modem is off, is not plugged into the Router, or is unresponsive.
B) Wi-Fi Protected Setup (WPS) Light and Button
The WPS button on the front of your Router can be used to
help establish a secure connection between your Router and
other WPS-enabled Wi-Fi devices such as computers. To use
the WPS feature on your Router, see “Getting Started > Adding
Computers to Your Network > Using the WPS Button”.
The small light near the WPS button shows what is happening
while you are using WPS to establish a connection.
Off: Idle
Blinking Green: The Route r is liste ning for a
WPS-enabled computer or other device.
Solid Green: The Rout er ha s mad e a s ecure
connection with the computer or other device.
Amber: A connection was not created.
11
Page 14

GETTING TO KNOW YOUR ROUTER
Back Panel
(a)
(b)
(c)
(d)
A) Modem (WAN) Connector
Connect your modem to this
port using an Ethernet cable.
B) Wired (LAN) Connectors
Connect computers and other
wired network devices to these
ports using Ethernet cables.
C) Reset Button
This button is used to restart
your Router in rare cases when it
functions incorrectly. Resetting
the Router will preserve your
settings. This button may also
be used to restore the factory
default settings. Please see
the Troubleshooting section
for more information.
12
D) Power Connector
Con ne ct th e inclu de d power
supply to this jack.
Page 15

TECHNICAL DETAILS
Technical Features
Integrated 802.11n Wireless Access Point
The N150 techno lo gy en ha nces your Route r’s
wir eless c apabili ties, allowi ng for d at a t ra nsfer speeds
of up to 150Mbps across your network.
NAT IP Address Sharing
To save you the cost of ad ding IP ad dresses per
com pu ter in y our h ouse, yo ur Be lk in Ro uter uses Network
Address Translation (NAT) technology, allowing you to
share a single IP address across your network.
SPI Firewall
Your Route r is equip pe d wit h a f irewall that will prote ct yo ur
network from a wide array of common attacks and viruses.
Universal Plug-and-Play (UPnP) Compatibility
The UPnP (U ni ver sa l Plu g- an d- Play) featu re in yo ur Ro uter
offer s sea ml ess o pe ration of voice and vi deo m es sagin g,
games, and other applications that are UPnP-compliant.
Web-Based Advanced User Interface
You can easily make changes to your Router’s advanced
set ti ng s thr ough your web brow ser. These changes can
be made from any computer on your network.
Belkin Router Monitor
The Belkin Router Monitor application helps you to monitor
your R outer ’s status and c hange n et work settings.
Integrated 4-Port 10/100 Switch
Your Route r has a bu ilt-i n, 4-port n et work switc h to
all ow your wired comput er s t o sha re: printers, data,
MP3 file s, di gi tal p hotos , and much more.
13
Page 16

TECHNICAL DETAILS
System Requirements
Rou ter
Broadband Internet connection such as a cable or
DSL modem with RJ45 (Ethernet) connection
At least one computer with an installed network interface adapter
TCP/IP networking protocol installed on each computer
RJ45 Ethernet networking cable
Internet browser
Setup Software
A computer running Windows® XP SP2 or higher,
Windows Vista®, or Windows 7; or Mac OS® X v10.x
Minimum 1GHz processor and 256MB R AM
600MB of free hard-drive space for installation
14
Page 17

TROUBLESHOOTING, SUPPORT, AND WARRANTY
Troubleshooting
The Setup CD does not automatically start.
If Belkin Set up does not run w hen you insert th e CD-ROM, yo ur
computer may not be configured to open CDs automatically.
If Belkin Set up does not appea r wit hi n 15 second s, br ows e
to you r CD-RO M drive an d open the “ Be lk in Setup” icon.
Alternatively, you may visit http://router/ and perform t he
set up ma nually. Ple as e see “ Manual Setup Usin g Your
Browser” earlier in this manual for more information.
Belkin Setup cannot find my Router.
If Belkin Set up is not able to co mm unicate wi th yo ur Ro uter durin g
the installation process, please check the following items.
1. Ma ke su re th at th e wir eless h ardwa re on yo ur
computer is turned on, if available.
2. Try co nnecting you r compu ter to o ne of the four “w ired”
ports on the Router with an Ethernet cable.
3. Ensure that the Router is on. The front-panel light should be on.
4. Unplug the Router’s power supply for 10
seconds, then plug it back in.
5. Ther e may be firewall soft ware on your co mpute r preven ting
an outgoing connection. You may choose to temporarily
disable this software before attempting setup.
If Belkin Set up stil l can not f ind t he Ro uter, you migh t choos e
to do a man ual s etup. Refer t o “ Manua ll y C on figurin g
Network Settings” in this manual for details.
15
Page 18

TROUBLESHOOTING, SUPPORT, AND WARRANTY
Belkin Setup cannot connect my Router to the Internet.
If Belkin Set up is not able to co nn ect t he Ro uter to
the Internet, please check the following items:
1. Use the troubleshooting suggestions within Belkin Setup.
2. If yo ur ISP r equires a us er na me an d password, make s ure t hat
you ha ve ty pe d in you r use r name and p asswo rd co rr ectly. Some
use r nam es requ ire t hat t he IS P’s domain may be at th e end of the
nam e. Ex am ple: “my na me@myisp.co m”. Th e “@my isp.com” par t of
the user name may need to be typed as well as your user name.
3. If you conti nu e to have n o Internet connec ti on, r efe r
to “Manual ly Conf iguring Networ k Set tings ” in this
manual for an alternative setup method.
Belki n Setup comple te d ins ta ll ation, bu t I c annot browse the
Web. The light on the front of my Router is blinking amber.
1. Ma ke su re th e Rou ter is c on nected to your modem with an
Ethernet cable via the Router’s one WAN (modem) port.
2. Unplug the modem from its power source and make sure
that it goes dark. Then reapply power to the modem.
3. Unpl ug your Route r’s power s up ply, wait 10 se conds,
and plug it b ack i n. Th is wi ll caus e t he Router to tr y
to reestablish communication with the modem.
16
Page 19

TROUBLESHOOTING, SUPPORT, AND WARRANTY
Belki n Setup comple te d ins ta ll ation, bu t I c annot browse the
Web. The light on the front of my Router is solid amber.
1. Use the troubleshooting suggestions within Belkin Setup.
2. If yo ur ISP r equires a us er na me an d password, make s ure t hat
you ha ve ty pe d in you r use r name and p asswo rd co rr ectly. Some
use r nam es requ ire t hat t he IS P’s domain may be at th e end of the
nam e. Ex am ple: “my na me@myisp.co m”. Th e “@my isp.com” par t of
the user name may need to be typed as well as your user name.
3. If you hav e a static connec ti on, your ISP will have
assig ne d y ou an IP addres s, su bnet ma sk, a nd ga tew ay
add ress. Plea se re-run B elkin Setup and e nte r this
information when a static connection is mentioned.
4. You may n eed t o con figure you r Rou ter t o m ee t
the specific requirements of your ISP. To search
our know ledge b ase f or ISP-spe ci fic i ss ues, go to:
http://www.belkin.com/support and type in “ISP”.
5. If you continu e to have n o Int ernet connecti on, r efer
to “Manual ly Conf iguring Networ k Set tings ” in this
manual for an alternative setup method.
I can’t connect to the Internet wirelessly.
If the l ight on th e fro nt of the Route r is solid green, then yo ur
Rou ter i s con ne cted to th e I nternet . You m ay not b e con ne cted
to the Router ’s wir el ess n et work. Please refe r to “Adding
Computers to Your Network” in this manual for instructions.
17
Page 20

TROUBLESHOOTING, SUPPORT, AND WARRANTY
I c an’t connect t o the I ntern et wire le ss ly an d my
network name is not listed in Available Networks.
1. Verify that your Router is on and the
front-panel light shows solid green.
2. If you are far from the Router, you might tr y moving
closer to see if you might have been out of range.
3. Usin g a comput er at tach ed to the Router v ia a network c able,
visit http://router/ and e ns ure t hat “ Br oadcast SSID ” is ON.
This setting is found on the “Channel and SSID” page.
My wir e l ess netw o rk p e r for m ance is s low , i n con s i ste n t ,
suffers from weak signal, or I’m having difficulty maintaining a
VPN connection.
Wir eless technolo gy is radio-ba se d, wh ich m ea ns co nn ectivity
and the through pu t p er forma nce b et ween devices
dec reases when th e dis ta nce b et ween devic es incr ea ses.
Other factors that will cause signal degradation (metal is
gen er ally the w or st cu lprit) a re ob st ructions such as wa lls
and metal appli an ces. Note also that connect io n spe ed may
decrease as you move farther away from the Router.
In order to dete rm ine i f wir eless i ssues a re related to
ran ge, we s uggest tempo ra rily movin g the c omputer
within 10 feet from the Router if possible.
Changing the wireless channel—Depen di ng on local
wir eless t raffic an d inter feren ce, switch ing t he wi re less
cha nn el of yo ur ne tw ork c an im pr ove perfor ma nc e and
reliability. See the section titled “Changing the Wireless
Channel” for instructions on how to choose other channels.
18
Page 21

TROUBLESHOOTING, SUPPORT, AND WARRANTY
Limiting the wireless transmit rate—Limiting the wireless transmit
rate c an help impr ove rang e and c onnection stab il it y. Mos t wir eless
car ds have the a bi lity to limi t the transm is sion rate. To c ha nge t his
pro pert y in W indow s, go to th e Win dows Contr ol Panel, ope n “Networ k
Con ne ct ions”, and doubl e- click on your w irele ss card ’s connect io n. In
the prop er ties dialo g, se le ct th e “Conf ig ure” button on th e “Gene ra l”
tab, then choose the “Advanced” tab and select the rate property.
Wir eless c lient cards are u sually set to automa tically adjust
the wireless transmit rate for you, but doing so can cause
per io dic d is connect s when the w ireless signal is too weak; as
a r ule, slower t ransmis si on ra tes a re mo re st able. E xperime nt
wit h dif ferent c on nection rate s unt il yo u fin d the best one
for your environment. Note that all available transmission
rates sh ould be ac ce ptable for browsing the I ntern et . F or
more assistance, see your wireless card’s user manual.
I’ve ins ta ll ed this new Route r and s om e of my network clie nt s
(computers, game consoles, etc.) are now unable to connect.
Your new Router came pre-config ured wi th a net work name and
pas sword , found pr inted on a n a ttac he d c ar d. Al l cli ents mu st us e thi s
network name and password to connect wirelessly to your Router.
You w ill n ee d t o fin d the networ k set tings on your c lient , selec t the
net wo rk na me pr in ted on t he card from the list of avail ab le ne tw orks,
and enter the password when prompted to join the wireless network.
19
Page 22

TROUBLESHOOTING, SUPPORT, AND WARRANTY
Does the Router support Wireless
Protected Access (WPA) security?
The Rout er sh ips w it h W PA/WPA2 se curity tu rn ed on .
Win dows XP and s om e old er ne tw ork h ar dwa re may
require a sof tware update to support WPA/WPA2.
I am having difficulty setting up WPA security on my Router.
1. Log in to your Router by visiting http://router/ with your web browser.
Click on the “Login” button in the top right-hand corner of the
scr ee n. You will be as ked to e nte r you r pas sword . If you have never
set a password, leave the “Password” field blank and click “Submit”.
2. Click “ Wireless” in th e lef t-han d men u. Th en
click “Security” just below that.
3. Select the “WPA/WPA2” option.
4. Enter a pa ss word. This can be fr om 8 –63 ch aracter s of you r choic e,
inc lu ding space s and punctuat ion, OR a 64 -d igit hexad ec imal
number (using only the numbers 0–9 and letters A–F).
5. Clic k “App ly Ch an ges” to fi nish. You r wir eless
connection is now encrypted. Each computer using your
wireless net work will need to use the new key.
Note: If yo u are conf ig uring the Route r over a wire le ss
con ne ct ion, you will have to re -connect to th e
Router after changing any security settings.
Note: Some ol der n et working hardware supports
onl y WEP en cr yptio n. If yo ur olde r com pu ters cannot
con ne ct to yo ur ne tw ork, tr y 128- bit o r 64-bit WEP, or
seek software updates from their manufacturers.
20
Page 23

TROUBLESHOOTING, SUPPORT, AND WARRANTY
I a m hav ing d if fi culty s et ting up W ired Equival ent
Privacy (WEP) security on my Router.
1. Log in to your Router. Visit http://router/ with your web browser.
Click on the “Login” button in the top right-hand corner of the
scr ee n. You will be as ked to e nte r you r pas sword . If you have never
set a password, leave the “Password” field blank and click “Submit”.
2. Click “ Wireless” in th e lef t-han d men u. Th en
click “Security” just below that.
3. Select the “128-bit WEP” option.
4. You may t ype in a WEP key ma nually, or gener ate o ne fr om
a passphra se. Typ e a p hrase i n the “ Passphr as e” fi eld a nd
cli ck the “Genera te” but ton. A W EP key is c omposed of 26
hexadecimal digits (0–9, A–F.. For example, C 3 03 0F AF
4B B2 C3 D4 4B C3 D4 EE 74 is a valid 128-bit WEP key.
5. Clic k “App ly Ch an ges” to fi nish. You r wir eless
act iv it y is now e ncry pted. Each comput er us ing your
wireless net work will need to use the new key.
Note: If yo u are conf ig uring the Route r over a wire le ss
con ne ct ion, you will have to re -connect to th e
Router after changing any security settings.
Note: Some ol der n et working hardware supports
onl y 64 -bit WEP e ncry ption. If your older comput er s
cannot connect to your network, try 64-bit WEP.
21
Page 24

TROUBLESHOOTING, SUPPORT, AND WARRANTY
Technical Support
US
http://www.belkin.com/support
UK
http://www.belkin.com/uk/support
Australia
http://www.belkin.com/au/support
New Zealand
http://www.belkin.com/au/support
Singapore
65 62218850
Europe
http://www.belkin.com/uk/support
22
Page 25

TROUBLESHOOTING, SUPPORT, AND WARRANTY
Belkin International, Inc., Limited 2-Year Product Warranty
What this warrant y covers.
Bel ki n Internat io nal, Inc. (“Belkin” ) war rants to t he or ig inal
purchaser of this Belkin product that the product shall be free
of defects in design, assembly, material, or workmanship.
What the period of coverage is.
Belkin warrants the Belkin product for two years.
What will we do to correct problems?
Product Warranty.
Bel ki n wil l rep air o r rep lace, at its option, any def ective produ ct
fre e of charg e (except for shipp ing c ha rges for t he pr od uct).
Belkin reserves the right to discontinue any of its products without
not ice, and d isclaim s any limi ted warran ty to r epair or r eplace any
suc h disco ntinued produc ts. I n the event t hat B el kin i s una bl e to
repair or replace the product (for example, because it has been
dis co ntinu ed), B el kin w ill o ffer ei th er a ref un d or a c redit toward
the purc ha se of anot her p ro duct from Be lkin.com i n an amoun t
equ al to the purch as e price of the pr oduct a s evi denced on th e
original purchase receipt as discounted by its natural use.
What is not covered by this warranty?
All above warranties are null and void if the Belkin product is
not provided to Be lkin for i nspection upon Belk in’s r eq uest
at the sole expens e of the p urchase r, o r if Be lkin deter mi nes
tha t the Belk in prod uc t has been improp er ly in st alled, altered
in any way, o r tam pe red w ith. The B el kin P roduct War rant y
doe s not protect a gainst acts of Go d suc h as fl ood, light ni ng,
ear thqua ke, wa r, v andalis m, th ef t, norm al -u se wear an d tear,
erosion, depletion, obsolescence, abuse, damage due to low
vol tage disturb an ces (i.e. b rowno uts o r sags), non-aut ho rized
program, or system equipment modification or alteration.
23
Page 26

TROUBLESHOOTING, SUPPORT, AND WARRANTY
How to get service.
To ge t s er vice for your Belkin prod uc t you
must take the following steps:
1. Co nt act B el kin I ntern at ional, Inc ., at 12045 Wat er fr ont
Drive, Los Angeles, CA 900 94, Attn: Customer Service,
or call (80 0)-223-5546, w ithin 15 days of the O cc ur rence.
Be prepared to provide the following information:
a. The part number of the Belkin product.
b. Where you purchased the product.
c. When you purchased the product.
d. Copy of original receipt.
2. Your Belk in Cu stomer Serv ice R ep resen tative will then
ins tr uct y ou on how to for ward you r rec eipt and B el kin
product and how to proceed with your claim.
Belkin reserves the right to review the damaged Belkin product.
All cost s of shippin g the Belkin produc t to Belkin for insp ec ti on
sha ll be borne solely by the p urchaser. If Belkin deter mines,
in its s ole d is creti on, t hat i t is impract ic al to ship the damag ed
equ ipment to Belkin, Belk in may des ig nate, in its sole discret ion,
an equip me nt repair facil it y to inspe ct and estimate t he cost to
rep air s uc h e qu ipment. The cost, i f any, of sh ipping the e quipmen t
to and from such r epair faci lity and of su ch es timate sha ll be
bor ne sole ly by the purch as er. Damaged equipm ent m ust r emain
available for inspection until the claim is finalized. Whenever
cla im s are settle d, Be lk in re serv es th e rig ht to be s ubrogated
under any existing insurance policies the purchaser may have.
24
Page 27

TROUBLESHOOTING, SUPPORT, AND WARRANTY
How state law relates to the warranty.
THIS WARRANTY CONTAINS THE SOLE WARRANTY OF
BELKIN. THERE ARE NO OTHER WARRANTIES, EXPRESSED
OR, E XCEPT AS REQUI RED BY L AW, I MPLIED, I NCLUD ING
THE IM PLIED WAR RA NT Y OR CONDI TION OF QUALI TY,
MERCHANTABILITY OR FITNESS FOR A PARTICULAR
PURPOSE, AND SUC H IMPLIED WA RR ANTIES, IF AN Y, AR E
LIMITED IN DURATION TO THE TERM OF THIS WARRANTY.
Som e states d o not allow l im itation s on how long a n imp lied
warranty lasts, so the above limitations may not apply to you.
IN NO EV ENT SHAL L BELKIN BE L IABLE FO R INC IDENTAL ,
SPECIAL, DIRECT, INDIRECT, CONSEQUENTIAL OR
MULTI PLE DAMAGES SUCH AS, BU T NOT LI MITED TO,
LOST BUSINESS OR PROFITS ARISING OUT OF THE
SALE O R USE OF ANY BEL KIN P RODUCT, EVEN IF
ADVISED OF THE POSSIBILITY OF SUCH DAMAGES.
This warranty gives you specific legal rights, and you may also have
oth er ri ghts, w hich may var y fro m sta te to st ate. Some state s do
not allow t he exclusi on or limi ta tion of in ci dental, cons eq uenti al,
or other damages, so the above limitations may not apply to you.
25
Page 28

REGULATORY INFORMATION
FCC Statement
DEC LA RATION O F CONFO RM IT Y WITH FC C R UL ES
FOR ELECTROMAGNETIC COMPATIBILITY
We, Belkin Int ernatio na l, Inc., of 120 45 Wa terfront Drive, L os An ge les,
CA 90094, decla re un de r our sole resp on sibilit y that t he device,
F7D1301 v1, com plies w ith P ar t 15 of t he FC C R ul es. O peratio n is
sub ject to th e fol lowin g two c onditio ns: (1) this dev ic e may no t cau se
har mf ul inter feren ce, a nd (2) th is device mu st ac cept any inte rference
received, including interference that may cause undesired operation.
Caution: Exposure to Radio Frequency Radiation.
The devi ce shal l be used in su ch a manner that the p otent ial
for human contact normal operation is minimized
Thi s equip ment complie s with FCC radi ation expo su re
lim it s s et fo rth for an u ncontro lled environ ment. T his
equ ipment shoul d be install ed and opera ted w ith a mini mum
distance of 20cm between the radiator and your body.
Federal Communications Commission Notice
Thi s equip ment ha s b ee n tes ted and found to c omply w ith t he
lim it s f or a Class B di gi tal d evice, pur su ant to P ar t 15 of t he FC C
Rul es. T he se li mits are d es igned to p rovid e rea so nable prot ec tion
against harmful interference in a residential installation.
This equipment generates, uses, and can radiate radio frequency
ene rg y, a nd if not install ed an d use d in accorda nc e wit h the
ins tr uctions , may caus e har mf ul inter feren ce to radi o com mu nicatio ns .
However, there is no guarantee that interference will not occur
in a p ar ti cu lar i nstallati on. I f thi s equ ip ment does cause h armful
inter feren ce to radi o or telev ision recept io n, which c an be dete rm ined
by tur ni ng th e equ ip ment of f and on, the u ser i s enc ou raged to t ry and
correct the interference by one or more of the following measures:
• Reorientorrelocateth erecei vi ngan tenna .
• Increasethedistancebetweentheequipmentandthereceiver.
• Connec tthee quipm en ttoan outleton acir cu it di fferent
fro m tha t to which the receive r is connected.
• Consultthedealeroranexperiencedradio/TVtechnicianforhelp.
FCC Ca ution: A ny ch an ges o r mod if ication s not ex pressly
app roved by the part y respo ns ible for c ompli an ce coul d
void the user’s authority to operate this equipment.
Thi s dev ic e and its anten na(s) m ust n ot be co- located or
operating in conjunction with any other antenna or transmitter.
26
Page 29

REGULATORY INFORMATION
Canada-Industry Canada (IC)
The wire le ss ra dio o f thi s dev ic e com plies w ith R SS
139 & R SS 210 Indus tr y Canada . This Class B digi ta l
apparatus complies with Canadian ICES-003.
Opera tion is su bject t o t he fo ll owing t wo conditi on s: (1)
thi s dev ic e may no t cau se in terfere nc e, and (2) t his d evice
mus t acc ep t a ny in terfere nc e, includi ng in terfere nc e
that may cause undesired operation of the device.
Cet appa reil numériq ue de la c la ss e B confor me
á la norme NMB-0 03 du Canada.
Europe
European Union Radio products with the CE or CE alert
mar ki ng co mp ly wi th the R&TTE Direc ti ve (1999/5 /EC)
iss ue d by the Commis si on of the Europ ean C om munity.
Com pl iance w ith t his d irective imp li es co nform it y
to the following European Norms (in brackets are
the equi valent inter nationa l stand ards).
• EN6 09 50 -1:2006 (IEC6 09 50 -1)– Pr oductSafe ty
• EN3 00328Technicalrequ irementforradioequi pment
• ETS301489GeneralEMCrequirementsforradioequipment.
Information
Products with the CE marking comply with the EMC Directive
(2004/108/EC) and the Low Voltage Directive (2006/95/
EC) issue d by the C ommissi on of the Europ ea n Com munity.
Com pl iance w ith t hese directives i mp lies confo rm it y to
the following European Product Family Standards.
• EN55022 (CISPR22)–Electr omagnet icInterferenc e
• EN55024-1 –Ele ct romagne ticI mm unity
• EN61000-3 -2(IEC610000-3-2)–PowerLineHarmonics
• EN610 00 -3- 3(IEC61000 0)–P owe rLin eFli cker
• EN60950 -1(IEC60950-1)–ProductSafety
Pro ducts t hat c ontain the r adio tr ansmitter are somet imes
lab el ed wi th th e Not if ied B od y n um ber (CE0560) or CE
ale rt m arking if th e stand ard u se d i n the c onfor mity is
not harm on ize d acros s the Euro pean Co mmunity.
27
Page 30

© 2010 Belki n Internation al, Inc. All rig hts reserv ed. All trade na mes are registered trademar ks
of respective manufacturers listed. Mac and Mac OS are trademarks of Apple Inc., registered
in the U.S. and other countries. Windows and Windows Vista are either registered trademarks
or trad emarks of Micr osoft Corporatio n in the United States an d/or other cou ntries.
 Loading...