

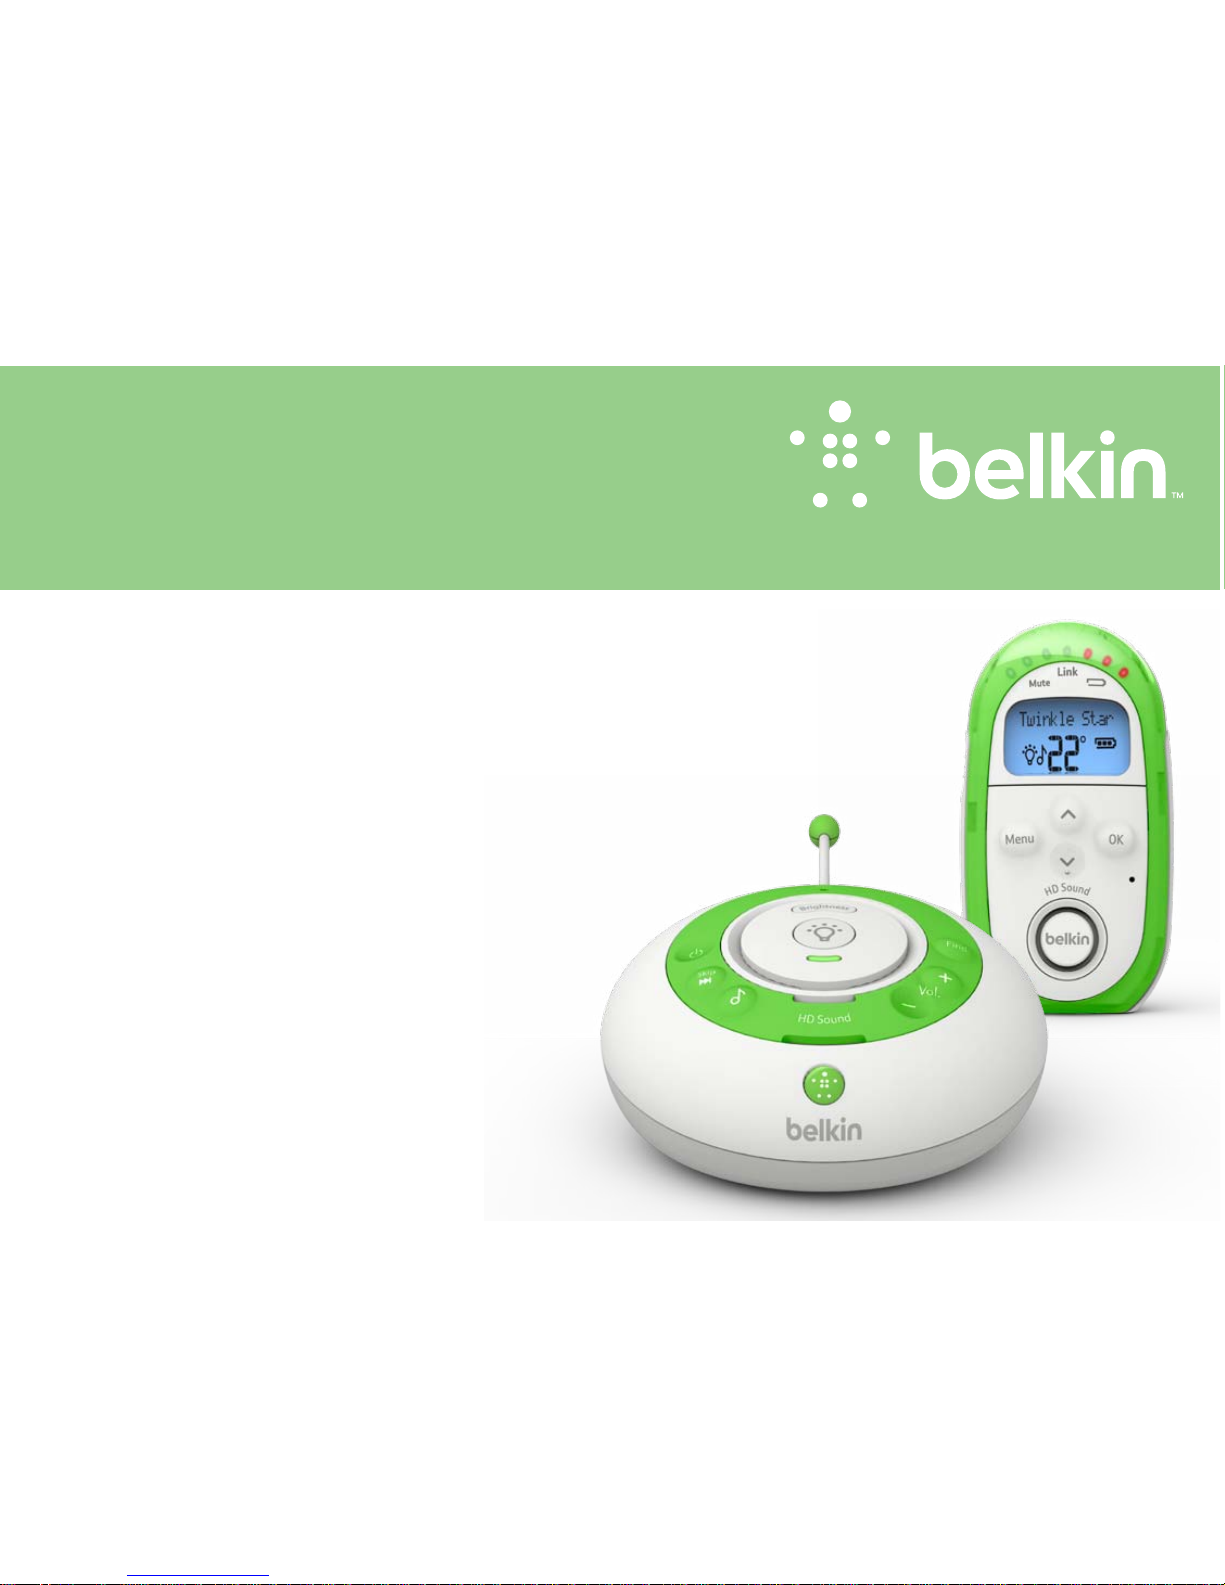
User Manual
F7C035_8830ed01742uk_Rev.A00
Digital BaBy Monitor with
rooMteMperature changing nightlight
BaBy 250

TABLE OF CONTENTS
Your Belkin baby 250 ...................................... 1
Setting up................................................ 7
Using your Belkin baby 250 ............................... 12
Help .................................................... 29
Support and warranty ....................................31
Regulatory ..............................................35

1
YOUR BELKIN BABY 250
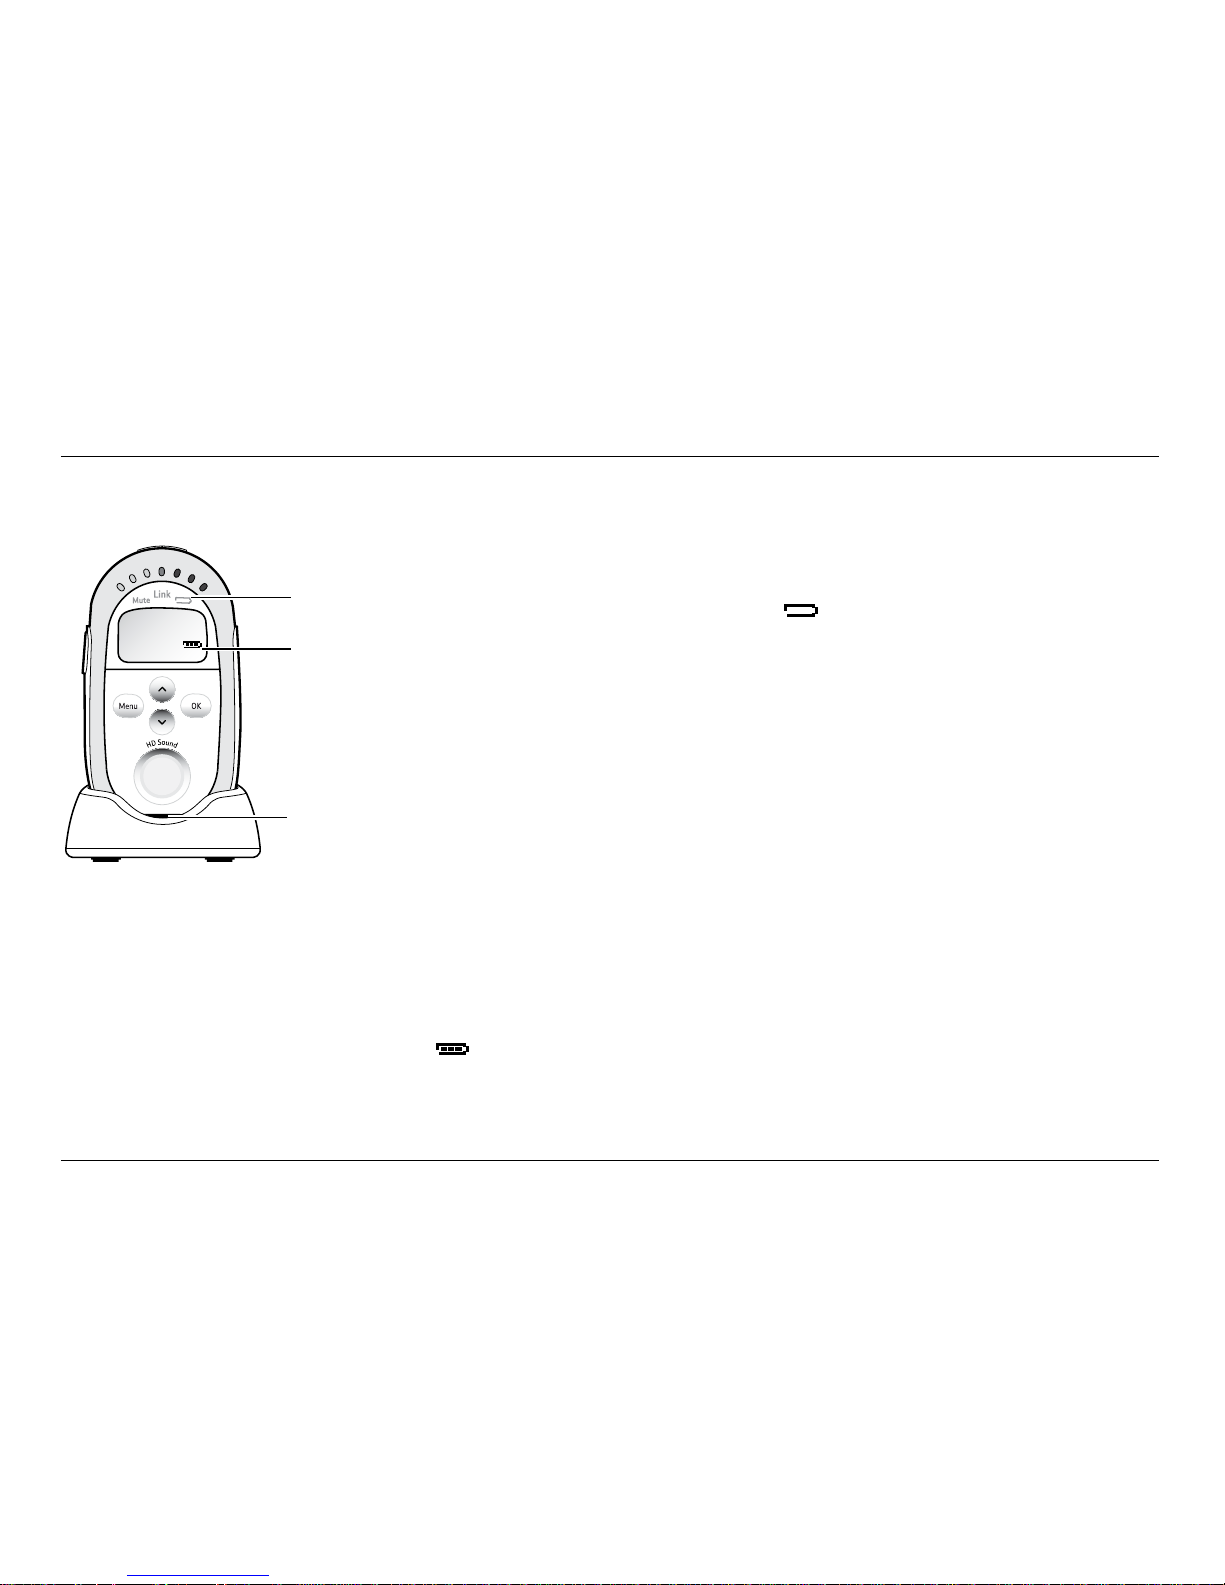
Parent unit
Parent unit
1 Baby sound level LEDs
Indicates the level of received sound. The LEDs
will light up progressively as the sound increases.
See page 18 for further information.
2 Mute LED
Steady red indicates that Mute All has been switched on.
Amber indicates that Mute Low has been switched on.
3 Talk (on side of unit)
Press to talk to your baby.
4 LCD Display
Power saving backlight turns on when you press any
button and then switches off after 15 seconds.
5 Menu
Press to open the menu. Press and hold to exit
the menu and return to the idle screen.
6 Down
Decrease speaker volume. Scroll through the menu options.
7 Up
Increase speaker volume. Scroll through the menu options.
8 OK
Press to confirm the menu option displayed.
9 Microphone
1
2
3
4
5 6
7
8
9
10
11
12
13
14
15

2
YOUR BELKIN BABY 250
Parent unit (continued)
10 Battery status indicator
Red light indicates the batteries are
low and need re-charging.
11 Link indicator
Steady green indicates that the Baby and Parent units
are linked. Flashes green if no link established for 30
seconds. Flashes red if no link established after 30
seconds. Also flashes green when the Talk button is
pressed on the Parent unit to initiate parental talk back.
12 Torch (on back of unit)
Press to switch the torch feature on and off.
13 Power on/off (on top of unit)
Press and hold to switch the power on or off.
14 Mute All (on top of unit)
Press to toggle the Parent unit receive
volume between on and off.
15 Mute Low(on top of unit)
Press to toggle the Baby unit microphone
sensitivity between normal and Mute Low.
3
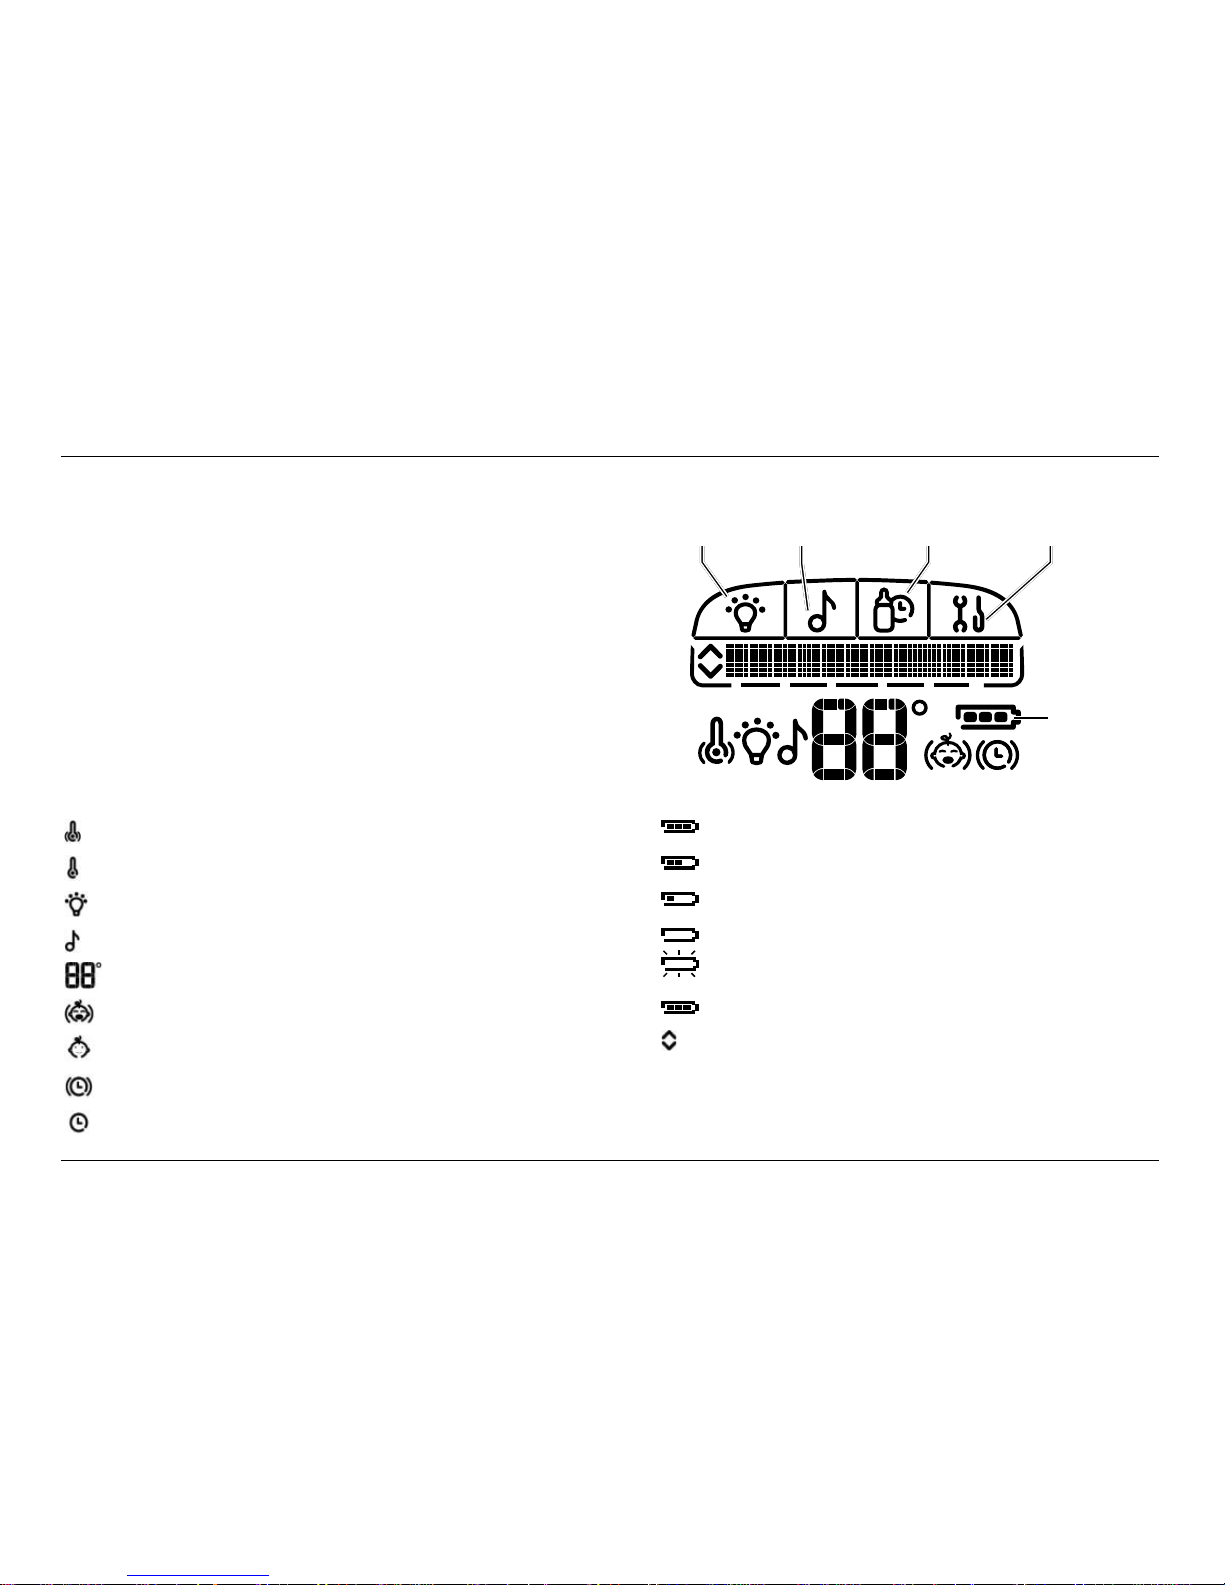
YOUR BELKIN BABY 250
Temperature alert (vibrate on)
Temperature alert (vibrate off)
Nightlight is on
Music is playing
Displays the temperature as measured at the Baby unit
Crying alert (vibrate on)
Crying alert (vibrate off)
Feed timer on (vibrate on)
Feed timer on (vibrate off)
Full charge (75-100%)
Medium charge (51-74%)
Low charge (25-50%)
Empty (8 -24%)
Flashing (0-7%)
Icon will scroll when charging
Indicates when you can scroll up or down
through the menu options
Nightlight Music Feed Timer Setup
Battery status
Parent unit display icons
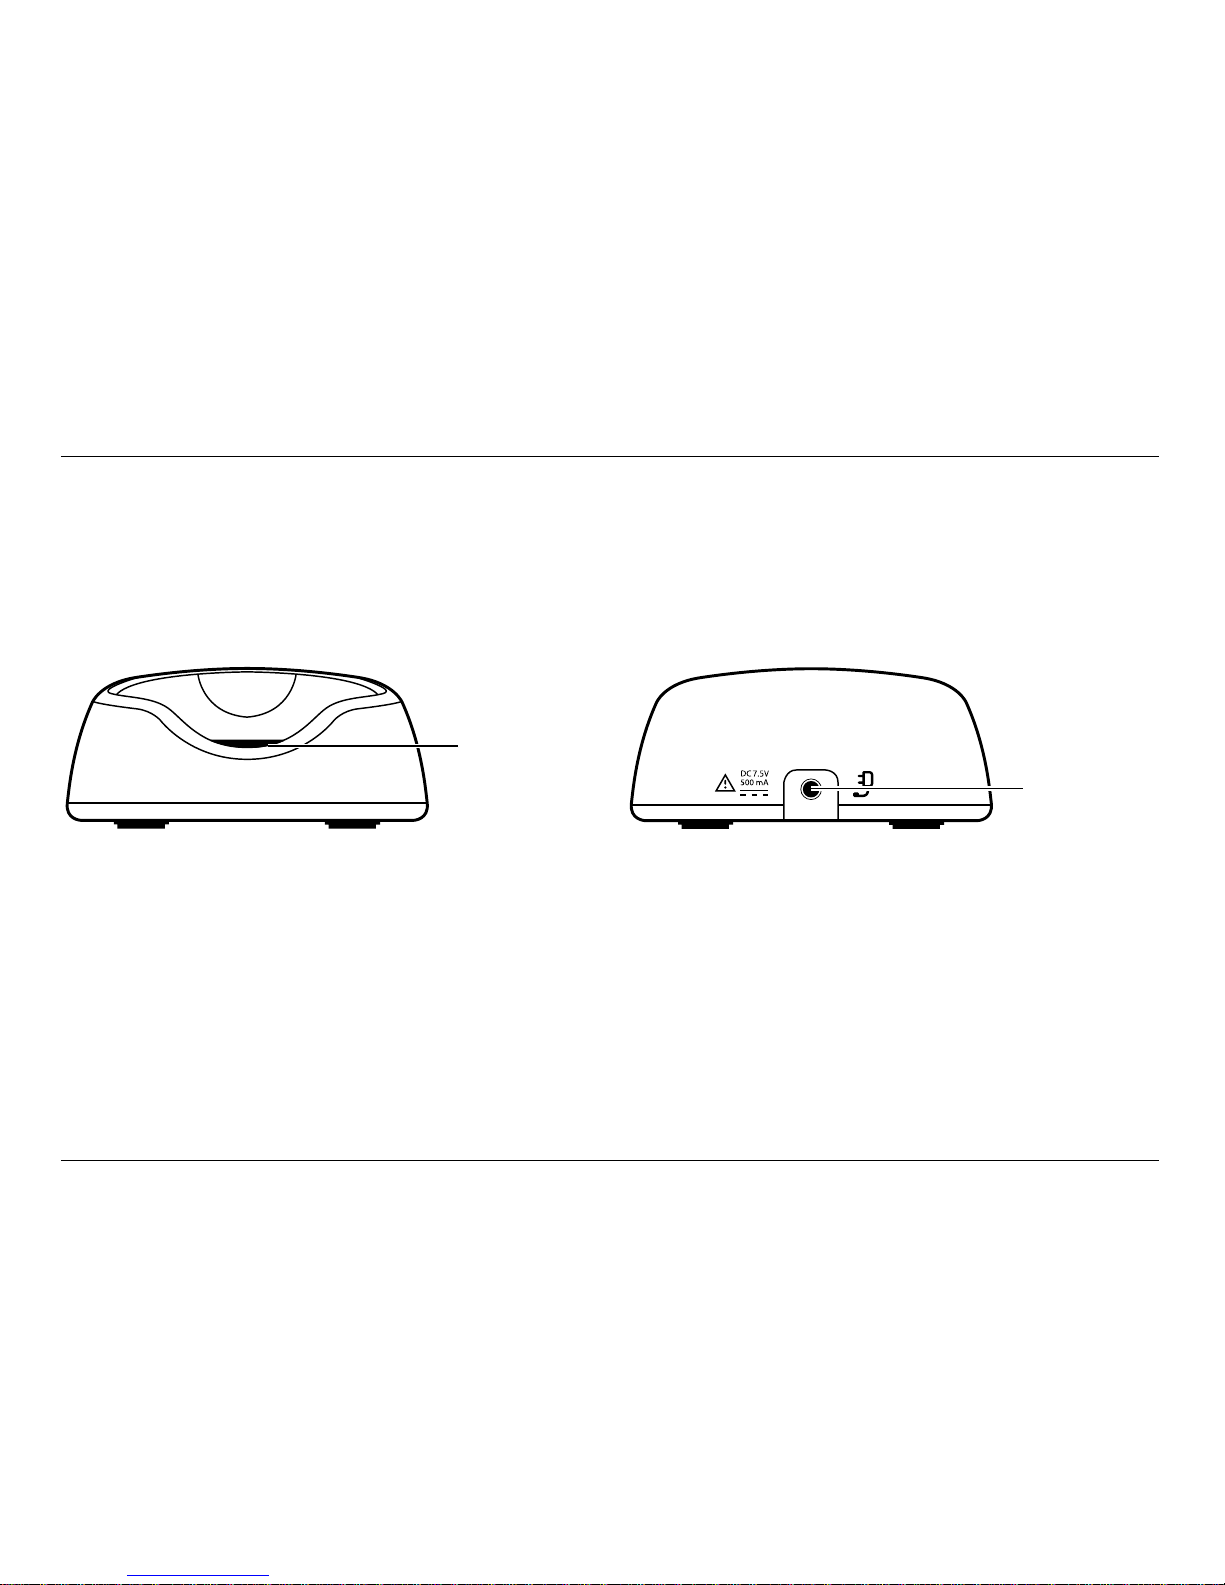
4
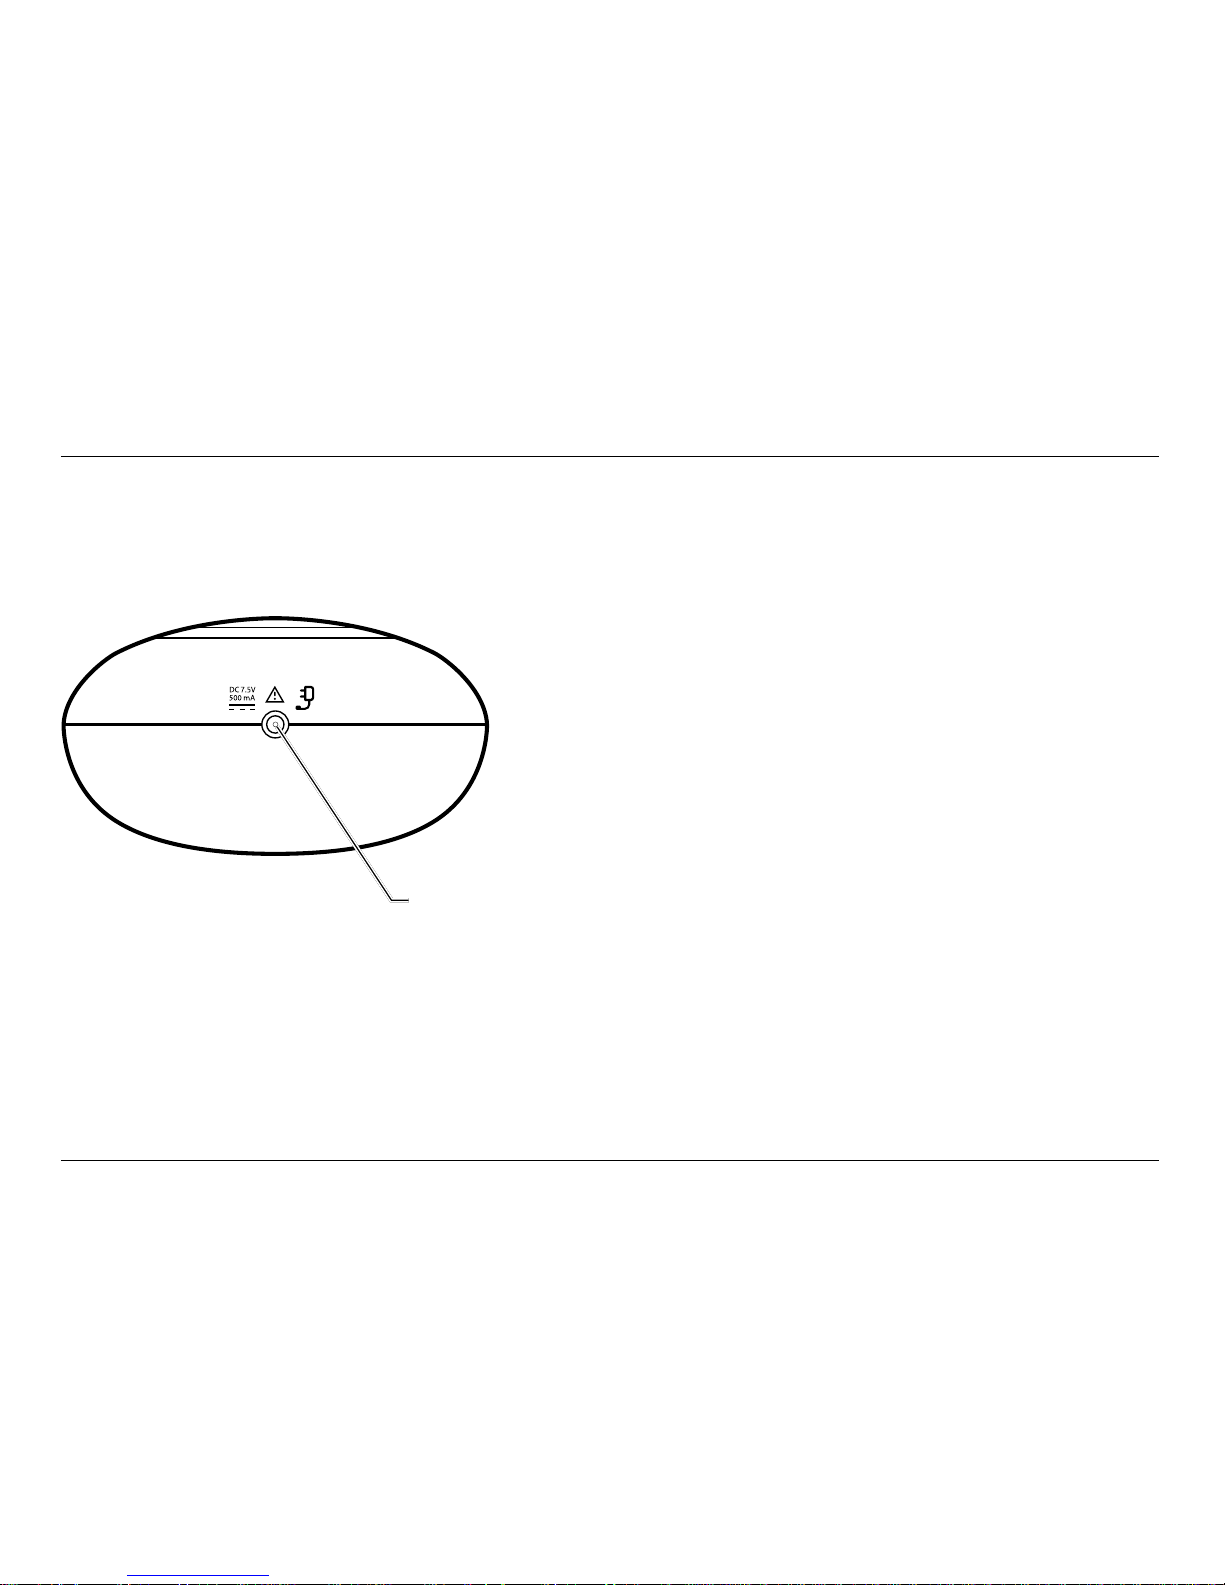
Charging light
Red when the Parent unit is correctly placed on the charger.
Power socket
For connection to the mains power socket via
the power adapter cable supplied.
Parent unit charger
BackFront
Charging light
Power socket
YOUR BELKIN BABY 250
5
1
11
YOUR BELKIN BABY 250
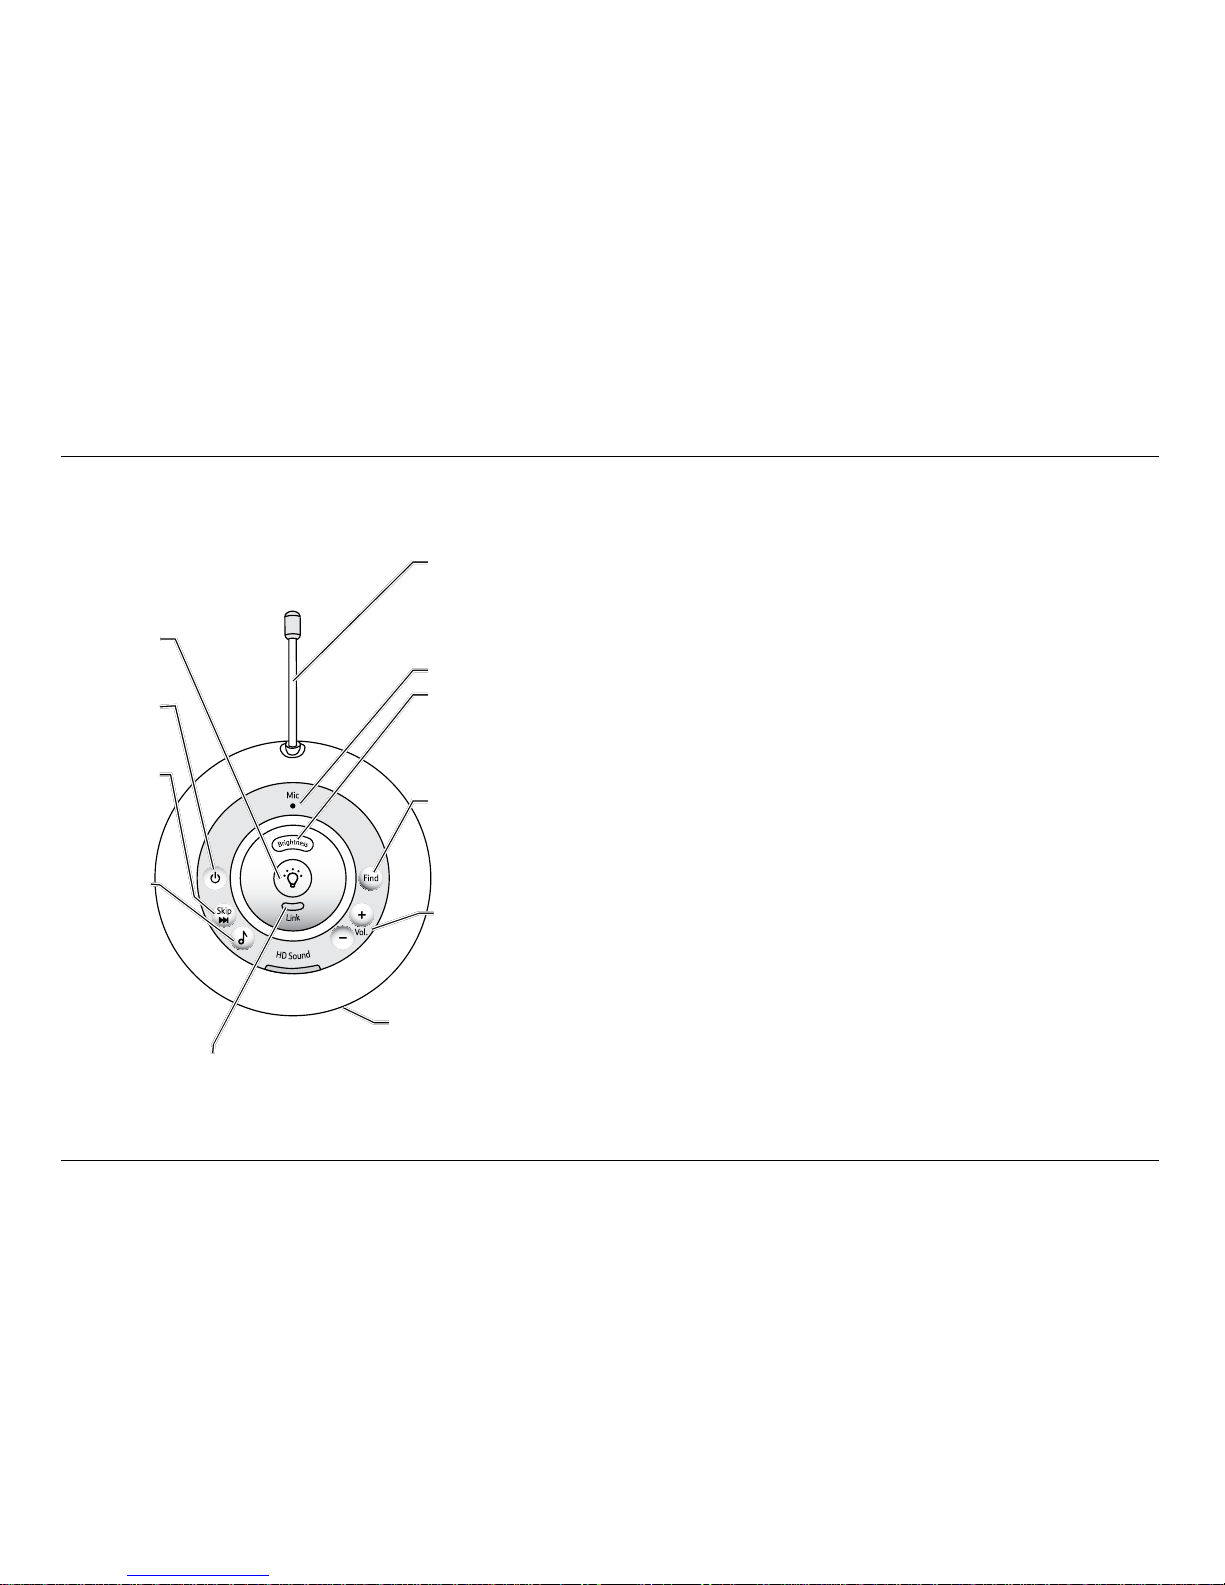
Baby unit
1 Nightlight
Press to switch the Nightlight on or off.
2 Power on/off
Press and hold to switch the power on or off.
3 Skip forwa rd
When music has been switched on (see Music button description
below), press to skip through the songs available.
4 Music
Press to switch music on at the Baby unit (the music and duration
will be as last set at the Parent unit). Press again to switch the
music off. To change the song, press the Skip button.
5 Link indicator
Steady green indicates that the Baby and Parent units are linked.
Flashes green if no link established for 30 seconds. Flashes red if no
link established after 30 seconds. Also flashes green when the Talk
button is pressed on the Parent unit to initiate parental talk back.
6 Temperature sensor
Make sure the sensor is placed with clear space around it and not
in contact with any sur faces to ensure it works effectively.
7 Microphone
8 Brightness
Press to adjust the nightlight brightness: high, medium or
low (once the nightlight has been switched on).
9 Find
Press to emit an alert beep from the Parent unit – useful
for finding the Parent unit if you’ve misplaced it.
10 Volume up/d own
Increase or decrease the loudspeaker volume for
playing music or for parental talk back.
11 Nightlight
Illuminates around the base.
Baby unit
2
3
4
5
6
7
8
9
10
6
Power socket
For connection to the mains power socket via
the power adapter cable supplied.
Back of Baby unit
Power socket
YOUR BELKIN BABY 250

7
SETTING UP
Warning!
Only use the power adapters supplied. Using incorrect
power adapters may permanently damage your product.
Battery performance
Rechargeable batteries in the Parent unit will last approximately 20
hours in normal use. Please note that new batteries do not reach full
capacity until they have been in normal use for several days.
The charge capacity of rechargeable batteries will reduce with
time as they wear out, so reducing the performance time of
the Parent unit. Eventually they will need to be replaced.
8
SETTING UP
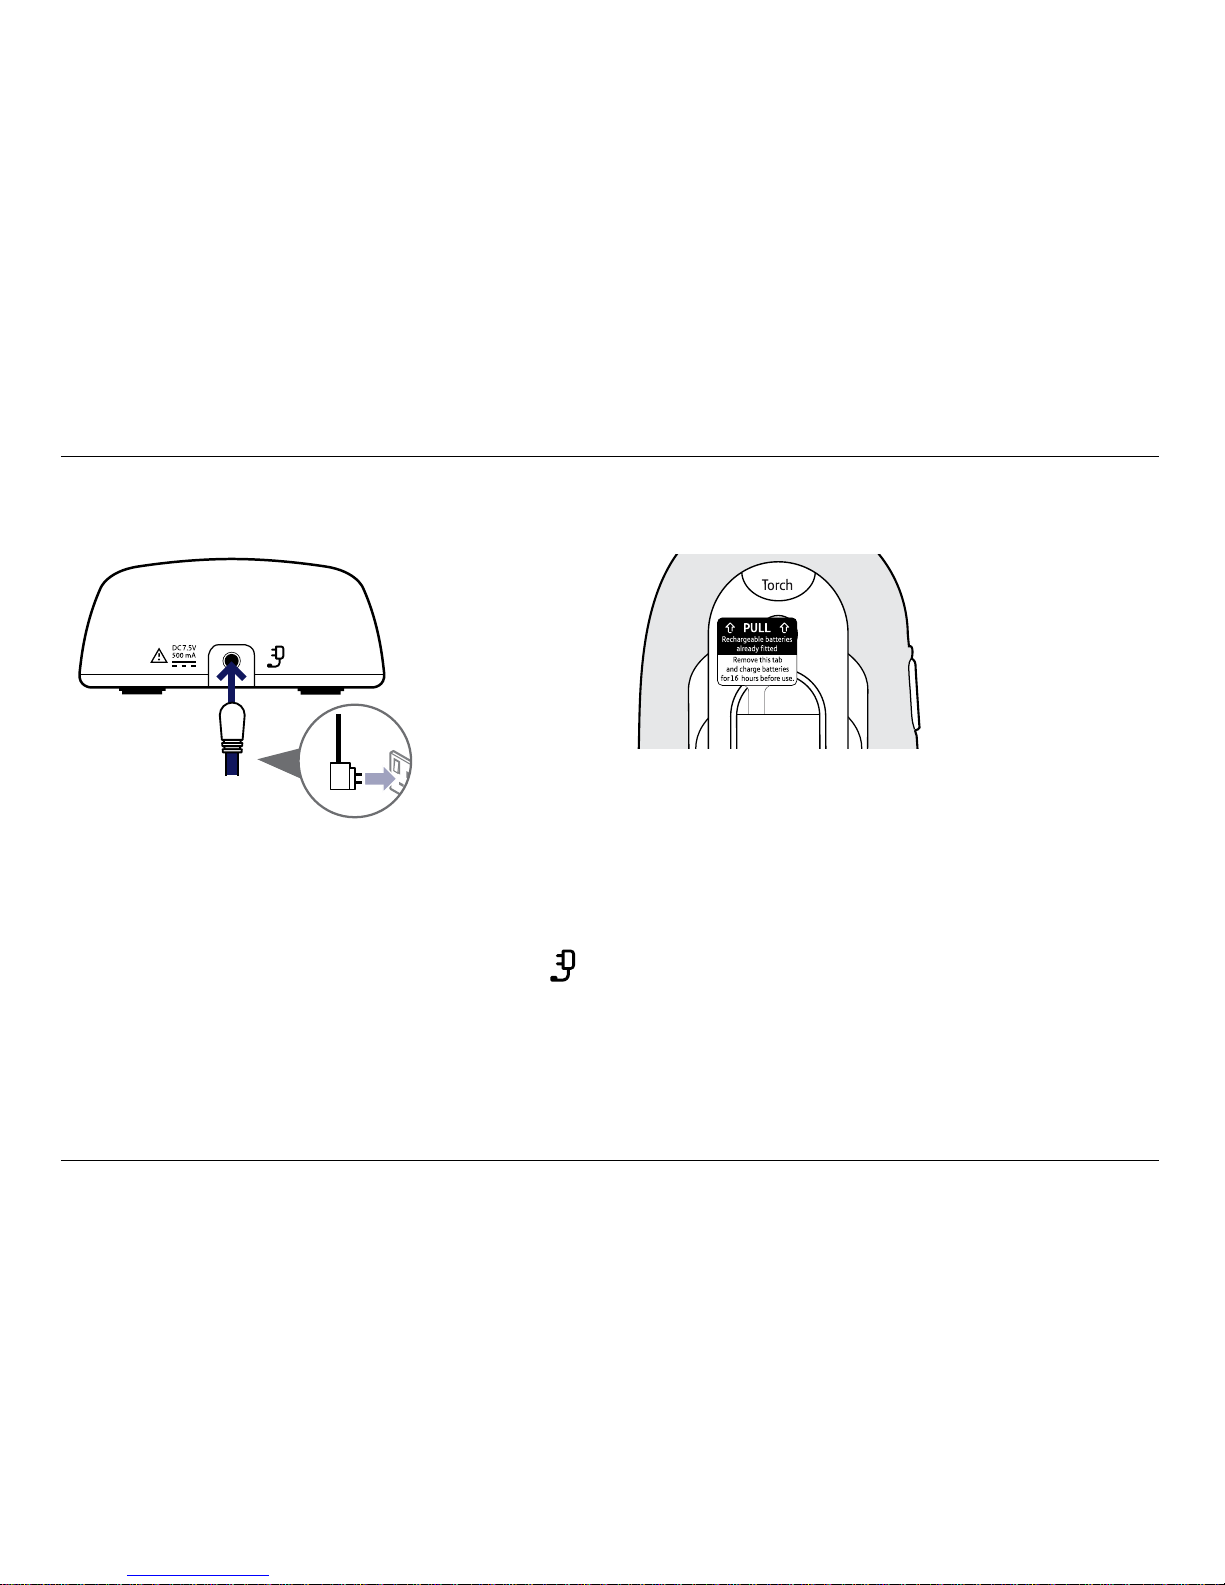
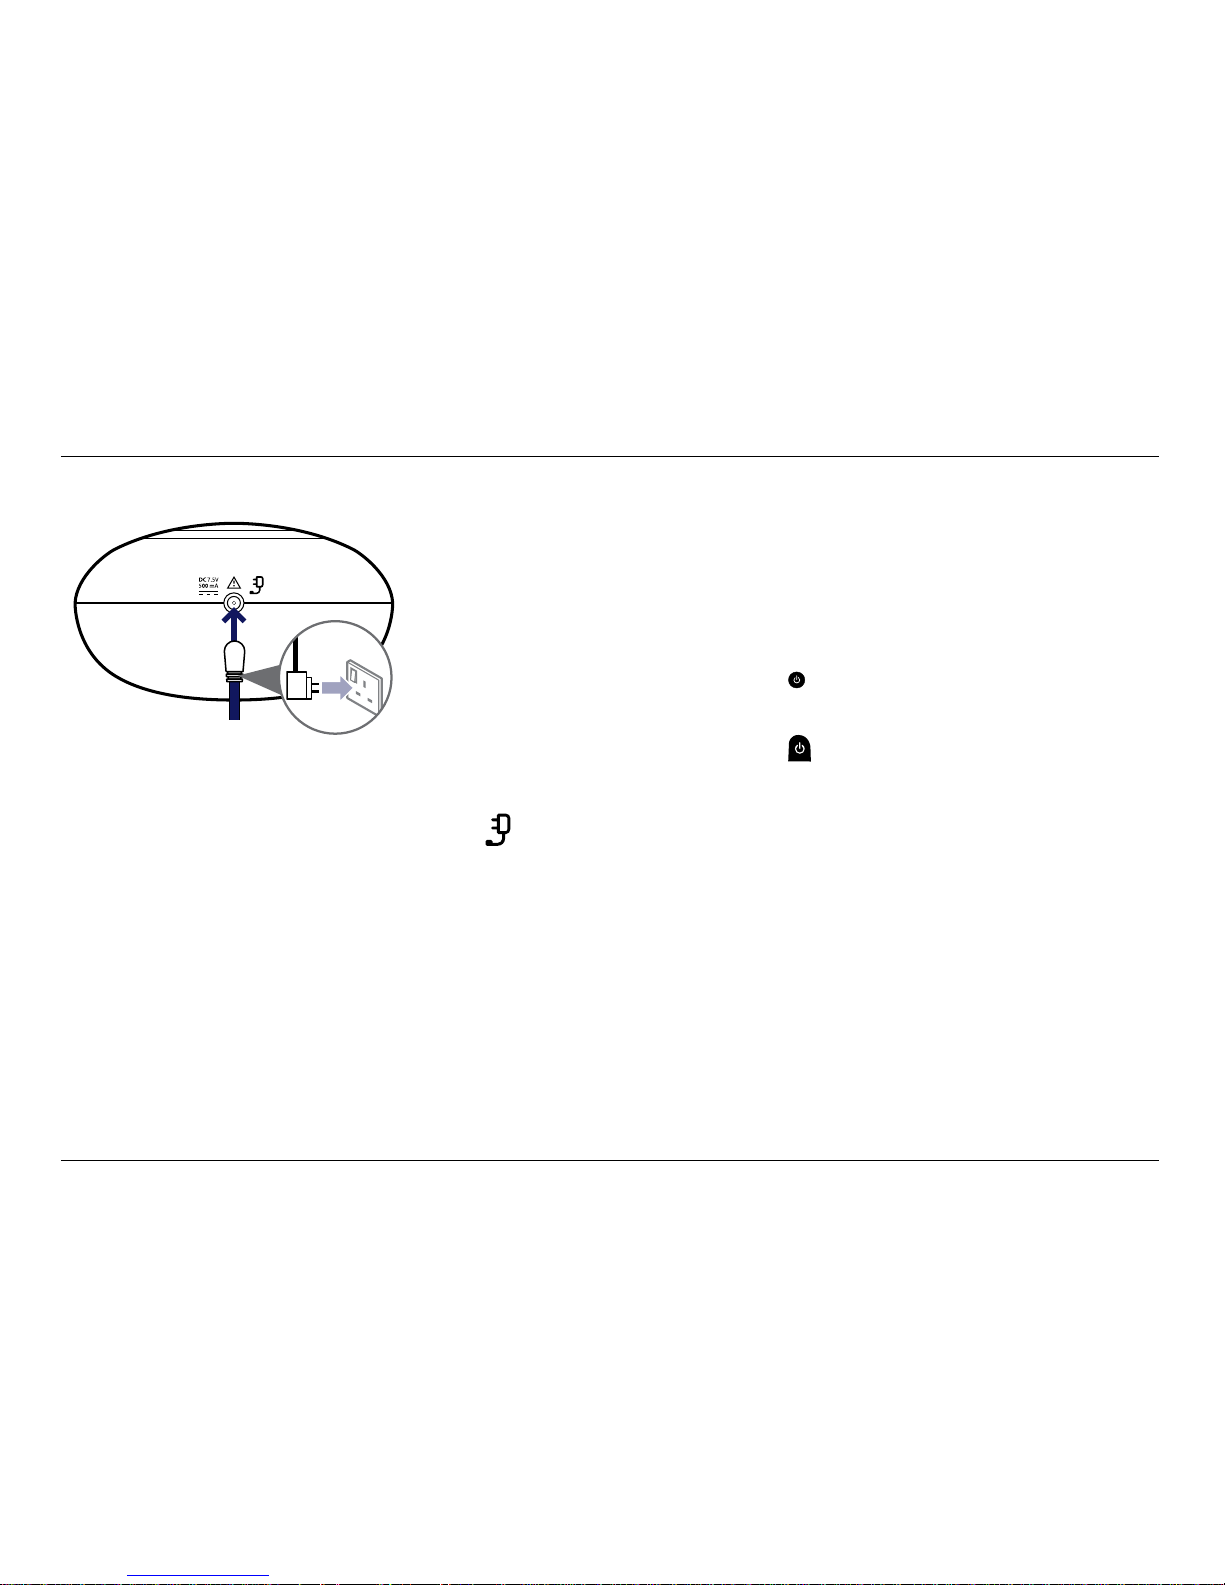
Parent unit
Plug one of the power adapter cables into the socket marked
on the back of the Parent unit charger and plug the other end
into the mains power wall socket and switch the power on.
Activate the batteries by pulling the plastic tab
away from the bottom of the Parent unit.
9
SETTING UP
Place the Parent unit into the charger. The red charging
light will illuminate on the charger and the battery
icon will star t scrolling on the Parent unit display to
indicate that the batteries are being charged.
Leave the batteries to charge for 16 hours to reach
maximum charge. When the batteries are fully charged the
battery icon on the display will show a full charge
.
Battery low warning – Parent unit
When the batteries are low – approximately within 1 hour
of running out – the Parent unit will emit a low battery alert,
the low battery indicator will turn red, the display will show
Low Battery and the
icon will flash. Place the Parent
unit back on the charger to charge the batteries.
To speed up the charging process turn the Parent
unit off when charging if it’s not being used.
You can still use your Parent unit to monitor your baby
even when the batteries are low, provided it remains
in the charger cradle to re-charge the batteries.
Charging light
Battery icon
Low batt ery ind icator
10
SETTING UP
Baby unit
Plug the remaining power adapter cable into the
socket marked on the back of the Baby unit and plug
the other end into the mains power and switch on.
Warning
Never use non-rechargeable batteries in the
Parent unit. Only use the recommended type – 2
x AA NiMH 1300mAh batteries. Using other types
could permanently damage the unit. Charge the
batteries as instructed in this user guide. The Parent
unit can still be used when it is in the charger.
Removing the batteries
If you ever need to remove the batteries, simply slide open the battery
compartment cover and use the ribbon to eject the batteries.
Switch on and link the Parent and Baby units
1.Press and hold the
button on the Baby unit
for 1 second. The nightlight will briefly illuminate
and then the green Link indicator will flash.
2.Press and hold the
button on the Parent unit until
all the LEDs on the unit briefly illuminate. The green Link
indicator will flash and the display will show I’m Linking.

11
SETTING UP
Positioning your units
The Baby unit should ideally be within 1m-2m
of your baby for best performance.
If you place the Parent and Baby units too close together you will
hear a high pitched noise, this is normal. The units are designed to
be located at a distance from one another, e.g. in separate rooms.
Important:
The link confirmation between the two units is vital for use so
they can communicate. If the link between the units is broken
at any time, the Link indicators on the Parent and Baby units
will flash green as they try to search for each other. After
30 seconds, if the link is still broken they will flash red and
you will also hear an alert signal from the Parent unit.
If the link is broken:
• check that the mains power is plugged in
and switched on at the Baby unit
• check that both units are switched on
• check that the batteries are charged in the Parent unit
• check that the Parent and Baby units are within
range of each other (in ideal conditions the range is
up to 300 metres outdoors and 50m indoors)

12
USING YOUR BELKIN BABY 250
Switch the Baby unit on
1. Press and hold the button for 1 second. The nightlight will
briefly illuminate and then the green LED will flash until it Links
with the Parent unit. Once linked the green LED will remain on.
Switch the Parent unit on
1. Press and hold the
button on the Parent unit
until all the LEDs on the top of the unit briefly
illuminate. The green Link indicator will flash.
Once the units are linked, the green Link indicators on
the Parent and Baby units will stop flashing and remain
a steady green. The units are now ready to use.
Switch the Baby unit off
1. Press and hold the
button on the Baby unit.
The green Link indicator will switch off.
Switch the Parent unit off
1. Press and hold the
button on the Parent unit until
an audible alert sounds. The green Link indicator
will switch off and the display will go blank.
Baby sound level LED indicatorsSwitching on/off
LEDs 1-2 = Green
(or Amber if Mute
Low is on)
LEDs 3- 4 = Green LEDs 5-7 = Red
The seven LEDs across the top of the Parent unit light up to
indicate the level of sound being received from the Baby unit.
The LEDs light up progressively as the sound increases.
LEDs 1-2 light up Green (or Amber if Mute
Low is on) when sounds of 57dB and 63dB are received.
LEDs 3- 4 light up Green when sounds of 69dB and 75dB are received.
LEDs 5-7 light up Red when sounds of 83dB,
89dB or 95dB are received.
Equivalent sound level examples: 60dB-70dB = normal conversation.
75dB = loud conversation and 83-95dB = loud traffic noise

13
USING YOUR BELKIN BABY 250
At the Parent unit:
1.Pre ss
or to select the required level. The first press will
show and sound the current setting. There are 5 volume levels
and off (Mute). The volume level will be heard and shown on the
display at each press, e.g. Level 3 is shown as Volume
.
If you wish to switch the volume off, keep pressing
until the
display shows Volume Off. The Mute All indicator will illuminate.
At the Baby unit:
There are 5 volume settings.
1.When Music is being played or Talk back is in progress from
the Parent unit, press the
or button to adjust the volume.
2.If no music or Talk back is in use, pressing the
or
buttons will adjust the volume and a beep will
sound at the appropriate volume level set.
If you tr y and set th e volume h igher or l ower than t he 5 sett ings
available on either unit you will hear an error tone.
Setti ng the Par ent unit to Vol ume off i s the equi valent o f switchi ng the
Mute All feature on . See page 20 for more in formation.
The default loudspeaker volume on both units is Level 3.
Mute All feature – Parent unit onlyAdjust the Parent unit loudspeaker volume
The Mute All feature prevents any sound coming out
from the Parent unit loudspeaker. With Mute All on you
can still monitor your baby using the Baby sound level
LED indicators and the Crying Alert (below).
1. To switch Mute All on, press the
button located on the
top of the unit. The Mute indicator will illuminate red.
2. To switch Mute All off, press the button again.
The red Mute indicator will go off

14
USING YOUR BELKIN BABY 250
Mute Low
For discreet operation when you do not wish to hear
any low level sounds, you can still monitor your baby
using the Baby sound level LED indicators.
When Mute Low is switched on, any sounds from the Baby
unit to the Parent unit will be muted unless a sound is
made above a set level. The set level are sounds that are
louder than the first two green LEDs would register
If the Parent unit receives sound up to the level of the first two LEDs
then they will turn amber but no sound will be heard, if the sound rises
above this level then the unit will un-mute so you can hear the sounds.
1.To switch Mute Low on, press the
button located on the
top of the Parent unit. The Mute indicator will turn amber.
2.To switch Mute Low off, press the button
again. The amber indicator will switch off.
Be careful not to accidentally
switch the torch feature on because
Mute All is automatically switched
on when the Torch is switched on.
Setting the Parent unit loudspeaker
volume to Volume o is the
equivalent of switching the Mute All
feature on.
If the
or buttons are
pressed whilst Mute All or Mute
Low has been set then Mute All or
Low will be switched o and the
loudspeaker volume will return to
Level 3 automatically.
Once the Mute Low sound
threshold has been exceeded,
baby sounds will be able to be
heard for a further six seconds
even if they do not reach the Mute
Low threshold.

15
USING YOUR BELKIN BABY 250
Find
You can press the
button on the Baby unit to make the Parent unit
sound an alert beep to help you find it if it’s been misplaced. If the
Parent unit loudspeaker volume had been Muted (or set to volume
off), the volume level will be reset to the default setting of Level 3.
1.Pre ss
on the Baby unit. The paging aler t will sound at
the Parent unit and the display will show Here I am!
2.To stop the alert, press any button on the Parent unit or press
the
button again on the Baby unit. If no button is pressed
after 2 minutes then the alert will automatically stop.
Tor ch
The Parent unit has a high intensity white LED torch that
can be used when the Parent unit is switched on or off.
1.Press the
button located on the back of the
Parent unit to switch the Torch on and off.
When the Torch is switched on it
will automatically switch Mute All
on as well. If you then press the
button Mute will be disabled and
the Torch will remain on. When the
Torch is switched o, the previous
Mute setting will be restored (No
Mute, Mute All or Mute Low).

16
USING YOUR BELKIN BABY 250
The Parent unit menu
The
button on the Parent unit can be used to select and
change settings on the Baby unit without having to risk
disturbing your baby. You can access the settings by:
1.Pre ss
then press or to scroll through the
menu options shown on the top of the display. Press
when the option you want is displayed.
2.The first sub menu option will be displayed, press
to scroll
through the options. The (
arrows) indicate when you can scroll
either up or down. Press
when the option you want is displayed.
3.To exit the menu at any time, press
briefly and step back one
menu level at a time, or press and hold
to return to the idle screen.
If no buttons are pressed for 10 seconds whilst accessing the menu,
the display will return to idle and any unsaved changes will be lost.

17
USING YOUR BELKIN BABY 250
Nightlight
You can set a comforting nightlight on the Baby unit.
There are 3 brightness levels to choose from and you can
set a period of time for the nightlight to illuminate.
Switch nightlight on/off and select brightness level using the Baby unit
1.To switch on, press the
button.
2.Press
repeatedly to select the brightness level.
3.To switch off, press
.
Switch nightlight on/off using the Parent unit
1.To switch on, press the
button. Nightlight is displayed, press .
2.Turn On? is displayed, press
. Light On will
briefly be displayed, then the
icon.
3.To switch off, press
. Nightlight is displayed, press
. Turn Off? is displayed, press . Light Off will briefly
be displayed and then the
icon will disappear.
The Baby unit must be switched on
for the nightlight to work, but need
not be linked to the Parent unit.

18
USING YOUR BELKIN BABY 250
Select the nightlight brightness level using the Parent unit
1. Press
. Nightlight is displayed, press .
2. Press
to display Brightness and press .
3. Press
or to display either Low, Medium or
High and press
to select. The display will show
Saved briefly and you’ll hear a confirmation tone.
Set the nightlight timer
1. Press
. Nightlight is displayed, press .
2. Press
to display Timer and press .
3. Press
or to display either 5 min, 10 min, 15 min
or Constant and press
to select. The display will show
Saved briefly and you’ll hear a confirmation tone.
Play music from the Baby unit
The Baby unit has eight songs that can be played to
gently soothe your baby. You can select one song to play
repeatedly or select the Play All option for a medley of all
eight songs. The songs can be set to play in a loop for 5, 10
or 15 minutes or you can leave them playing constantly.
The default setting is Medium.
The default setting is Constant.
The default music setting is Play All
songs Constantly.

19
USING YOUR BELKIN BABY 250
Turn music on/off using the Baby unit
1. To turn the music on, press the
button. The
most recently selected song will start playing at the
time period last selected using the Parent unit.
2. Press the
button repeatedly to change the pre-selected song.
3. To turn the music off, press the
button.
Turn music on/off using the Parent unit
1. To turn the music on, press
. Nightlight is displayed,
press
to display Music and press .
2. Play? is displayed, press
. The display will briefly
show Music On, then the name of the song and the
icon and the song will start to play on the Baby unit.
3. To turn the music off, press , press to display
Music and press
. The display will show Stop?, press
. The display will show Music Off, the icon will disappear
and the music will stop playing on the Baby unit.
Adjust the volume of the music
using the
or buttons on the
Baby unit.
If music is played at greater than
volume 3, the Crying Alert may
activate if Mute All is used.

20
USING YOUR BELKIN BABY 250
Choose a song to play using the Parent unit
1. Press
. Nightlight is displayed, press
to display Music and press .
2. Play? is displayed, press
to display Choose Song and press .
3. Use the
and buttons to scroll through the eight song titles
and Play All. Press
when the option you want is displayed. The
display will show Saved briefly and you’ll hear a confirmation tone.
Set a play time for music
1. Press
. Nightlight is displayed, press
to display Music and press
2. Play? is displayed, press until Timer is displayed and press .
3. Use the
and buttons to scroll through the options:
5 min, 10 min, 15 min or Constant and press
when
the option you want is displayed. The display will show
Saved briefly and you’ll hear a confirmation tone.
The eight song choices are: 3 Blind
Mice, Brahms, Canon in D, Dream
Chase, Dreaming, Hush Baby,
Night Night and Twinkle Star.
Play All will play a medley of all
eight songs.

21
USING YOUR BELKIN BABY 250
Feed Timer
You can set a Feed Timer on the Parent unit to act as a countdown
timer that will alert you when you next need to feed your baby.
You have a choice of alert types (beep, beep & vibe and vibrate)
and you can set the timer to repeat itself once the alert sounds.
Set the feed timer countdown duration
1. Press
. Nightlight is displayed, press un til
Feed Timer is displayed and press
.
2. Start? is displayed, press
to display Duration and press .
3. The display will show 00h:00m (or the currently set timer).
Use the and buttons to select the first digit and press
. Repeat this procedure for each digit and press .
The display will show Saved and you’ll hear a confirmation beep.
The timer can be set to countdown
from 1 minute to 99 hours 59
minutes.
The feed timer default countdown
duration is set at 02:00 (2 hours).
If the Parent unit is switched o,
the feed timer countdown will be
cancelled and you will need to start
it again when the unit is switched
back on. The duration, alert type
and repeat settings will still be
retained.

22
USING YOUR BELKIN BABY 250
Start the feed timer countdown
1. Press
. Nightlight is displayed, press un til
Feed Timer is displayed and press
.
2. Start? is displayed, press
. The display will
briefly show Timer On and then the timer will be shown
counting down the seconds from the time you set.
When the timer has finished counting down to 00:00 you will
hear an alert beep and the timer digits and
icon will flash.
Press any button on the Parent unit to stop the alert. If you
do not stop the alert it will automatically stop after 2 minutes
(or it will start again if Timer Repeat has been set).
Cancel the feed timer countdown
1. Press
. Nightlight is displayed, press un til
Feed Timer is displayed and press
.
2. Stop? is displayed, press
. The display will briefly show Timer
Off, the timer will then disappear and the display will return to idle.

23
USING YOUR BELKIN BABY 250
Switch timer repeat option on or off
1. Press
. Nightlight is displayed, press un til
Feed Timer is displayed and press
.
2. Start? is displayed, press
until Repeat is displayed and press .
3. Use the
and buttons to display either Repeat On
or Repeat Off and press
to select. The display will
show Saved and you will hear a confirmation beep.
When Repeat On has been set, the feed timer countdown will
start again once the alert has sounded if it is not switched of f.
Select the type of feed timer alert
1. Press
. Nightlight is displayed, press un til
Feed Timer is displayed and press
.
2. Start? is displayed, press
until Alert is displayed and press .
3. Use the
and buttons to display either Beep,
Beep&Vibe or Vibrate and press
to select. The display
will show Saved and you will hear a confirmation beep.
The default setting is Repeat On.
Feed timer alert options:
Beep = Parent unit will emit an alert
beep only.
Beep&Vibe = Parent unit will emit
an alert beep and vibrate.
Vibrate = Parent unit will vibrate
only.
The default setting is Beep&Vibe.

24
USING YOUR BELKIN BABY 250
Temperature monitor
There is a temperature sensor on the Baby unit to constantly
monitor the temperature in your baby’s room and you’ll be alerted
if it gets too hot, too warm or too cold by the colour of the Baby
unit nightlight changing and the Parent unit will vibrate, sound an
alert beep and display a message on the screen. The alert type
on the Parent unit can be changed, see page 32. The temperature
will be constantly shown on the Parent unit display in ˚C.
To stop an alert, press any button on the Parent unit.
Temperature monitor indicators
Temperature On the Baby unit On the Parent unit
Below 16°C Nightlight
glows Blue
Display shows
Too Cold
16 – 20°C Nightlight
glows Yellow
21 – 24°C Nightlight
glows Orange
Display shows
Too War m
Over 24°C Nightlight
glows Red
Display shows
Too H ot
IMPORTANT!
The temperature sensor used in
this Belkin baby 250 is intended as
a guide, to provide parents with an
indication of the room temperature
in which the unit has been placed.
It is designed to operate within an
approximate tolerance of +/- 1°C and
is not intended to be as accurate as
some medical devices. Please note
that your own temperature reference
e.g. your central heating thermostat
may not be as accurate, possibly
due to tolerances and positioning of
the thermostat in relation to the Baby
Monitor sensor.
Healthcare professionals advise
that the ideal temperature for your
baby’s room is between 16 °C and
20°C.
Your Parent unit has a built-in
mechanism to prevent repeated
annoying audible alerts if the room
temperature hovers around an
alerting threshold.

25
USING YOUR BELKIN BABY 250
Select the type of temperature alert
1. Press
. Nightlight is displayed, press
until SetUp is displayed and press
.
2. Crying Alert is displayed, press
until
Temp Alert is displayed and press
.
3. Use the
and buttons to display either Beep, Beep&Vibe,
Vibrate, Screen Only or Off and press
to select. The display will
show Saved and you will hear a confirmation beep.
To stop an alert, press any button on the Parent unit.
Temperature alert options
Beep = Parent unit will beep.
icon will flash.
Beep&Vibe = Parent unit will beep and vibrate.
icon will flash.
Vibrate = Parent unit will vibrate.
icon will flash.
Screen Only =
icon will flash.
Off = No alerts.
icon will not be displayed.
All of the above alerts will also display the appropriate
message: Too Hot, Too Warm or Too Cold.
Pre-set temperature alert range
The Baby unit comes with
pre-set maximum and minimum
temperatures, as stated by the
UK Department of Health as
part of the recommendations
to reduce the risk of cot death.
If the temperature falls below or
goes above the setting an alert
will sound on the Parent unit and
the display will show To o Cold or
Too Hot as appropriate. If it’s too
hot, the Baby unit nightlight will
turn red and if too cold it will turn
blue. The temperature alert pre-set
temperatures are 15°C (and below)
and 25°C (and above).
Alerts will be repeated if the
temperature creeps by 2°C into an
alerting range.
The default setting is Beep&Vibe.

26
USING YOUR BELKIN BABY 250
Crying alert
The crying alert will only be activated if Mute All has been switched
on (or if the Parent unit volume has been switched to volume
off), see page 20 for information on the Mute All feature.
With Mute All switched on, if your baby starts to cry you will not be
able to hear the cries, but if the cries sound above a certain level
i.e. if they reach 83dBA, which is the 1st red Baby sound level
LED, then the Parent unit will activate the crying alert. The default
crying alert type is for the Parent unit to vibrate and emit an audible
beep but you can select a different alert type if you want to.
Select the type of crying alert
1. Press
. Nightlight is displayed, press
until SetUp is displayed and press
.
2. Crying Alert is displayed, press
.
3. Use the
and buttons to display either Beep, Beep&Vibe,
Vibrate or Screen Only and press
to select. The display
will show Saved and you will hear a confirmation beep.
To stop an alert, press any button on the Parent unit.
Crying alert options
Beep = Parent unit will beep,
Crying Alert will be displayed and
icon will ash.
Beep&Vibe = Parent unit will beep
and vibrate. Crying Alert will be
displayed and
icon will ash.
Vibrate = Parent unit will vibrate
only (no alert beep will sound).
Crying Alert will be displayed and
the
icon will ash.
Screen Only = Crying Alert will
be displayed and the
icon will
ash.
The default setting is Beep&Vibe.
The crying alert is a ‘user alert’ as
described on page 34

27
USING YOUR BELKIN BABY 250
Backlight
You can select whether or not the LCD backlight comes on
when an alert is activated. When the backlight comes on it
will stay on for 15 seconds. The default setting is On.
1. Press . Nightlight is displayed, press
until SetUp is displayed and press
.
2. Crying Alert is displayed, press
unt il
Backlight is displayed and press
.
3. Use the
and buttons to display either On w alerts
or Off w alerts and press
to select. The display will
show Saved and you will hear a confirmation beep.
List of tones
Your Baby Monitor unit can
produce various tones. They
have the following meaning:
Tone Meaning
Single tone Confirmation tone e.g. setting saved.
Double tone (fast) Error tone e.g. max volume reached
when adjusting volume.
Double tone (slow) User alert e.g. crying alert, paging alert etc.
Triple tone (fast) System aler t e.g. link lost, batter y low etc.

28
USING YOUR BELKIN BABY 250
User Alert tones can be silenced by pressing
any button on the Parent unit.
System Alerts can be silenced for a 5 minute period
by pressing any button on the Parent unit.
Reset the units
Resetting either units will return the settings at
that unit back to its default settings.
Reset the Parent unit
1. Within 3 seconds of the Parent unit being switched on, press
and hold the
button for at least 10 seconds. The display will
show Reset for 2 seconds during the reset and then you will
hear a confirmation beep once the reset has been performed.
Reset the Baby unit
1. Within 3 seconds of the Baby unit being switched on,
press the
button for at least 10 seconds. You will hear a
confirmation beep once the reset has been performed.
Resetting the units is only
advisable if you are experiencing
diculties with your product. It is
a useful feature that ensures your
Baby Monitor is returned to its new
“out of the box” settings.

29
HELP
Parent unit is beeping
• The link has been lost between your units. Check that the
Baby unit Link indicator is illuminated. If not, please ensure
that the power adapter is still connected and if this still does
not switch on, please test in a different electrical socket.
• The feed timer has been set.
• The crying aler t is switched on.
• The temperature alert has been triggered.
• The batteries are low.
• The Find button has been pressed on the Baby unit.
If the Parent unit still beeps after checking the above, please try
switching the Baby unit off at the power and removing the batteries for
approximately 30 minutes. Ensure the Parent unit is clean by wiping
with a damp cloth. If the problem persists call the Helpline for advice.
Link indicator does not come on
• Check that both the Baby and Parent units are switched on.
• Check that the batteries in the Parent unit are
correctly installed and that they are charged.
• Check that the mains power is plugged in
and switched on at the Baby unit.
• Check that the units are within range of each other.
Link light is flashing green
• If you have pressed
to use the Talk Back feature, the Link light
will flash to indicate one-way communication between the units.
• The units are searching for a communication link.
• Check units are within range of one another.
• Check both units are turned on.
Link indicator is flashing red
• The Link between your units is broken. You will also hear an
alert on the Parent unit to let you know there is no communication
between the units. If this happens, check that the mains power (or
batteries) is correctly connected and that the units are within range
of one another. See page 15 for instructions on linking the units.
Battery low on Parent unit
• Put the Parent unit back on the charger to charge.
• Place Parent unit back on the charger as frequently as possible or
ideally leave it on the charger to ensure the batteries remain charged.
• To fully charge the batteries, the Parent unit should be on
charge for approximately 16 hours to reach maximum charge.
• To speed up the charging process turn the Parent
unit off when charging if it is not being used.

30
HELP
You can hear a high pitched noise
• The units might be too close to each other.
• The volume setting might be too high.
Talk back feature is not working
• Check that the volume is loud enough at the Baby unit
• Check the units are linked.
Parent unit remains silent or very quiet
• You may have set the volume too low
• You may have switched a Mute feature on.

31
SUPPORT, AND WARRANTY
Belkin International, Inc., Limited
2-Year Product Warranty
What this warranty covers.
Belkin International, Inc. (“Belkin”) warrants to the original
purchaser of this Belkin product that the product shall be free
of defects in design, assembly, material, or workmanship.
What the period of coverage is.
Belkin warrants the Belkin product for two years.
What will we do to correct problems?
Product Warranty.
Belkin will repair or replace, at its option, any defective product
free of charge (except for shipping charges for the product).
Belkin reserves the right to discontinue any of its products without
notice, and disclaims any limited warranty to repair or replace any
such discontinued products. In the event that Belkin is unable to
repair or replace the product (for example, because it has been
discontinued), Belkin will offer either a refund or a credit toward
the purchase of another product from Belkin.com in an amount
equal to the purchase price of the product as evidenced on the
original purchase receipt as discounted by its natural use.
What is not covered by this warranty?
All above warranties are null and void if the Belkin product is
not provided to Belkin for inspection upon Belkin’s request
at the sole expense of the purchaser, or if Belkin determines
that the Belkin product has been improperly installed, altered
in any way, or tampered with. The Belkin Product Warrant y
does not protect against acts of God such as flood, lightning,
earthquake, war, vandalism, theft, normal-use wear and tear,
erosion, depletion, obsolescence, abuse, damage due to low
voltage disturbances (i.e. brownouts or sags), non-authorized
program, or system equipment modification or alteration.

32
SUPPORT, AND WARRANTY
How to get service.
To get service for your Belkin product you
must take the following steps:
1. Contact Belkin International, Inc., on the telephone number
listed on the next page, within 15 days of the Occurrence.
Be prepared to provide the following information:
a. The part number of the Belkin product.
b. Where you purchased the product.
c. When you purchased the product.
d. Copy of original receipt.
2. Your Belkin Customer Service Representative will then
instruct you on how to forward your receipt and Belkin
product and how to proceed with your claim.
Belkin reserves the right to review the damaged Belkin product.
All costs of shipping the Belkin product to Belkin for inspection
shall be borne solely by the purchaser. If Belkin determines,
in its sole discretion, that it is impractical to ship the damaged
equipment to Belkin, Belkin may designate, in its sole discretion,
an equipment repair facility to inspect and estimate the cost to
repair such equipment. The cost, if any, of shipping the equipment
to and from such repair facility and of such estimate shall be
borne solely by the purchaser. Damaged equipment must remain
available for inspection until the claim is finalized. Whenever
claims are settled, Belkin reserves the right to be subrogated
under any existing insurance policies the purchaser may have.

33
SUPPORT, AND WARRANTY
Technical Support
US http://www.belkin.com/support
UK http://www.belkin.com/uk/support
Australia http://www.belkin.com/au/support
New Zealand http://www.belkin.com/au/support
Singapore 1800 622 1130
Europe http://www.belkin.com/uk/support
AUSTRIA 0820 20 0 766 www.belkin.com/de/networking/
BELGIUM 07 07 00 073
www.belkin.com/nl/networking/
www.belkin.com/fr/networking/
CZECH REPUBLIC 239 000 406 www.belkin.com/uk/networking/
DENMARK 701 22 403 www.belkin.com/uk/networking/
FINLAND 0972519123 www.belkin.com/uk/networking/
FRANCE 08 - 25 54 00 26 www.belkin.com/fr/networking/
GERMANY 0180 - 500 57 09 www.belkin.com/de/networking/
GREECE 00800 - 44 14 23 90 www.belkin.com/uk/networking/
HUNGARY 06 - 17 77 49 06 www.belkin.com/uk/networking/
ICELAND 800 8 534 www.belkin.com/uk/networking/
IRELAND 0818 55 50 06 www.belkin.com/uk/networking/
ITA LY 02 - 69 43 02 51 www.belkin.com/it /networking/
LUXEMBOURG 34 20 80 85 6 0 www.belkin.com/uk/networking/
NETHERLANDS 0900 -04 0 07 90
€0 .10m in www.belkin.com/nl/networking/
NO RWAY 81 50 0287 www.belkin.com/uk/networking/
POLAND 0080 0 - 441 17 37 www.belkin.com/uk/networking/
PORTUGAL 70 7 200 676 www.belkin.com/uk/networking/
RUSSIA 495 580 9541 www.belkin.com/networking/
SLOVAKIA 08000 04614 www.belkin.com/networking/
SLOVENIA 0800 80510 www.belkin.com/networking/
SOUTH AFRICA 0800 - 9 9 15 21 ww w.belkin.com/uk/networking/
SPAIN 902 - 02 43 6 6 ww w.belkin.com/es/networking/
SWEDEN 07 - 71 40 04 53 www.belkin.com/uk/networking/
SWITZERLAND 08 - 48 00 0 2 19 www.belkin.com/de/networking/
UNITED KINGDOM 0845 - 607 77 87
www.belkin.com/fr/networking/
www.belkin.com/uk/networking/
OTHER COUNTRIES
+44 - 1933 3 5 20 00 w ww.belkin.com/it/networking/

34
SUPPORT, AND WARRANTY
How state law relates to the warranty.
THIS WARRANTY CONTAINS THE SOLE WARRANTY OF
BELKIN. THERE ARE NO OTHER WARRANTIES, EXPRESSED
OR, EXCEPT AS REQUIRED BY LAW, IMPLIED, INCLUDING
THE IMPLIED WARRANTY OR CONDITION OF QUALITY,
MERCHANTABILITY OR FITNESS FOR A PARTICULAR
PURPOSE, AND SUCH IMPLIED WARRANTIES, IF ANY, ARE
LIMITED IN DURATION TO THE TERM OF THIS WARRANTY.
Some states do not allow limitations on how long an implied
warranty lasts, so the above limitations may not apply to you.
IN NO EVENT SHALL BELKIN BE LIABLE FOR INCIDENTAL,
SPECIAL, DIRECT, INDIRECT, CONSEQUENTIAL OR
MULTIPLE DAMAGES SUCH AS, BUT NOT LIMITED TO,
LOST BUSINESS OR PROFITS ARISING OUT OF THE
SALE OR USE OF ANY BELKIN PRODUCT, EVEN IF
ADVISED OF THE POSSIBILITY OF SUCH DAMAGES.
This warranty gives you specific legal rights, and you may also have
other rights, which may vary from state to state. Some states do
not allow the exclusion or limitation of incidental, consequential,
or other damages, so the above limitations may not apply to you.

35
REGULATORY INFORMATION
Declaration of Conformity with electromagnetic
compatibility and electromagnetic interference
We, Belkin International, Inc., of Schiphol-Rijk, Netherlands,
declare under our sole responsibility that the device, F7C035,
complies with Directives stated in our EU declaration
which can be obtained from our website given below.
Caution: Exposure to Radio Frequency Radiation.
This equipment complies with radiation exposure limits set forth for
an uncontrolled environment. This equipment should be installed and
operated with a minimum distance of 20cm between the radiator and
your body
CISPR 22 Interference Notice
This equipment has been tested and found to comply with the limits
for a Class B digital device, pursuant to the requirements of EN 55022
and EN 55024. These limits are designed to provide reasonable
protection against harmful interference in a residential installation.
This equipment generates, uses, and can radiate radio
frequency energy, and if not installed and used in accordance
with the instructions, may cause harmful interference to radio
communications. However, there is no guarantee that interference
will not occur in a particular installation. If this equipment does
cause harmful interference to radio or television reception, which
can be determined by turning the equipment off and on, the user is
encouraged to try and correct the interference by one or more of the
following measures:
• Reorient or relocate the receiving antenna.
• Increase the distance between the equipment and the receiver.
• Connect the equipment to an outlet on a circuit different
from that to which the receiver is connected.
• Consult the dealer or an experienced
radio/TV technician for help.
Caution: Any changes or modifications not expressly
approved by the party responsible for compliance could
void the user’s authority to operate this equipment.
This device and its antenna(s) must not be co-located or
operating in conjunction with any other antenna or transmitter.

36
REGULATORY INFORMATION
Europe – EU Declaration of Conformity
This device complies with the essential requirements of the R&TTE Directive 1999/5/EC, the EMC
Directive 2004/108/EC, and the low-voltage Directive 2006/95/EC. A copy of the European Union CE
marking “Declaration of Conformity” may be obtained at the website: www.belkin.com/doc
For information on product disposal please refer to
http://environmental.belkin.com
General Safety Information:
• For indoor installation only
• For installation with supplied power adapter only
• The supplied power adapter is the product’s switch-off device. The base socket must be near the product and easily accessible.

© 2014 Belkin International, Inc. All rights reserved. All trade names are registered trademarks of respective manufacturers
listed. iPad, iPhone, iPo d touch, Mac, Mac OS, and Safari are trademarks of Apple Inc., registered in the U.S. and other
countries. Windows, Windows Vista, Internet Explorer, and DirectX are either registered trademarks or trademarks of
Microsoft Corporation in the United States and/or other countries. Android and Google Chrome are trademarks of Google Inc.
Belkin Ltd.
Express Business Park
Shipton Way, Rushden
NN10 6GL, United Kingdom
Belkin Iberia
Avda de Baraja s, 24, Edificio G amma,
4ªpta, 28108 Alcobendas
Madrid - Sp ain
Belkin Ltd.
Express Business Park
Shipton Way, Rushden
NN10 6GL, United Kingdom
Belkin Italy & Greec e
Via Nino B onnet, 4/6
Milan 201 54
Italy
Belkin GmbH
Otto-Hahn-Straße 20
85609 Aschheim
Germany
Belkin B.V.
Tupolevlaan 1
1119 NW Schiphol-Rijk,
Netherlands
 Loading...