

Page 1

WIRELESS AC+ GIGABIT ROUTER
USER MANUAL
AC1600 DB
F9K1119 • 8860-00004 Rev. A01
Page 2

TABLE OF CONTENTS
Getting Started ............................................................1
What’s in th e Box................................................................1
Initial Setup .....................................................................1
Manually Set Up Your Internet Conn ection ......................................10
Additional Capabilities................................................... 22
Adding Other USB Devices .................................................... 24
USB Print and Storage Center ..................................................25
Guest Access...................................................................26
Media Ser ver by myTwonky.....................................................27
Website Filters. Powered by Norton............................................ 28
Intellistream QoS ..............................................................29
IPv6 Configuration .............................................................32
Getting to Know Your Router............................................. 33
Front Panel.....................................................................33
Back Panel .................................................................... 34
Technical Details ........................................................35
Technical Features .............................................................35
System Requirements ..........................................................36
Using Your Router .......................................................37
Auto Update on Your Belkin Router .............................................37
Updating th e Router’s Firmware via the Web Inte rface ......................... 38
Resetting the Router ...........................................................41
Restoring Your Router to Factory Defaults ......................................41
Troubleshooting, Support, and Warranty .................................44
Troubleshooting...............................................................44
Technical Support............................................................. 49
Belkin International, Inc., Limited 2-Year Product Warranty ..................... 50
Regulatory Information ..................................................53
FCC Statement .................................................................53
Page 3

GETTING STARTED
What’s in the Box
AC1600 DB Wi- Fi AC+ Gigabit Router
Ethernet cable (attached to router)
Power supply (at tached to ro uter)
Network information card (attache d to router)
Quick Setup Guide
Initial Setup
Where to Place Your Router
For the best results, place the Router next to your mo dem in an open location ,
away from large metal objects and magnets such as tho se found in speakers.
Raising the Ro uter above flo or level can im prove the strength of your wireless signal .
1
Page 4
GETTING STARTED
How to Set It Up
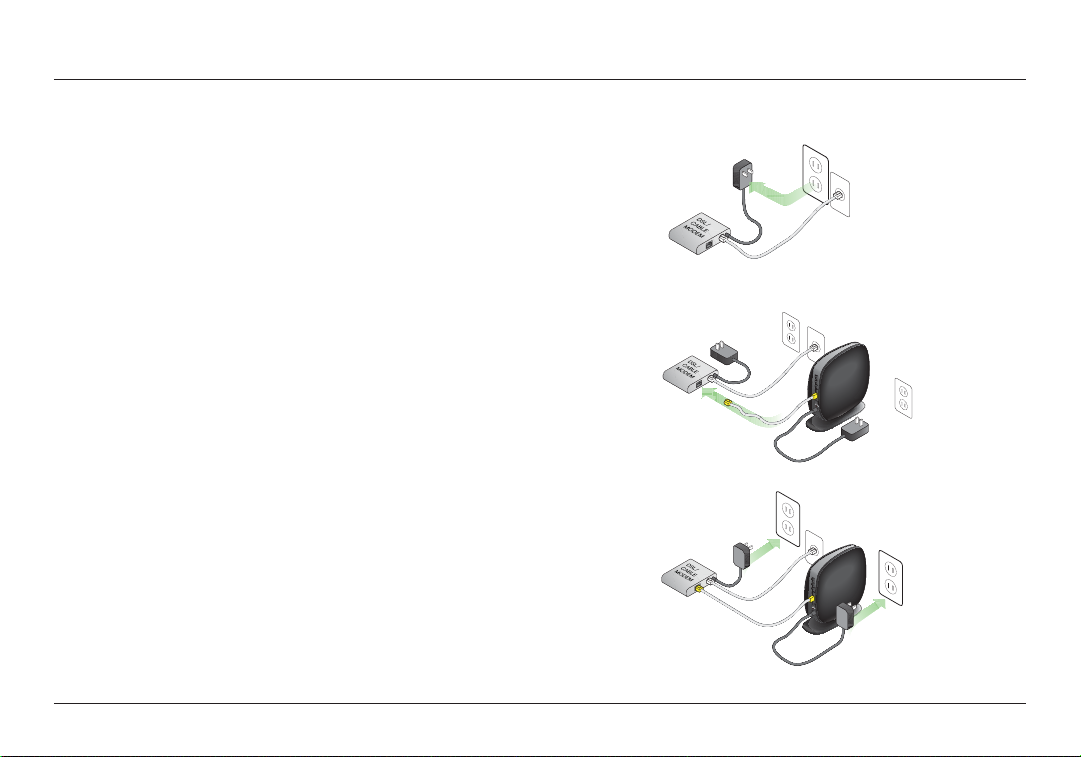
Connect Your AC1600 DB Router
Turn off your modem by disconnecting its power supply. Some modems have a
battery backup; this will need to be disconnected at this time as well.
Connect yo ur Router to your m odem using the cable (already attached).
Power up your modem by plugging in its power supply. If your mod em has a
battery backup, it c an be reconn ected at thi s time; you may ne ed to hold the
reset button for 10 seconds.
Power up your Router by plugging in its power sup ply.
2
Page 5
GETTING STARTED
Connect to Your Router
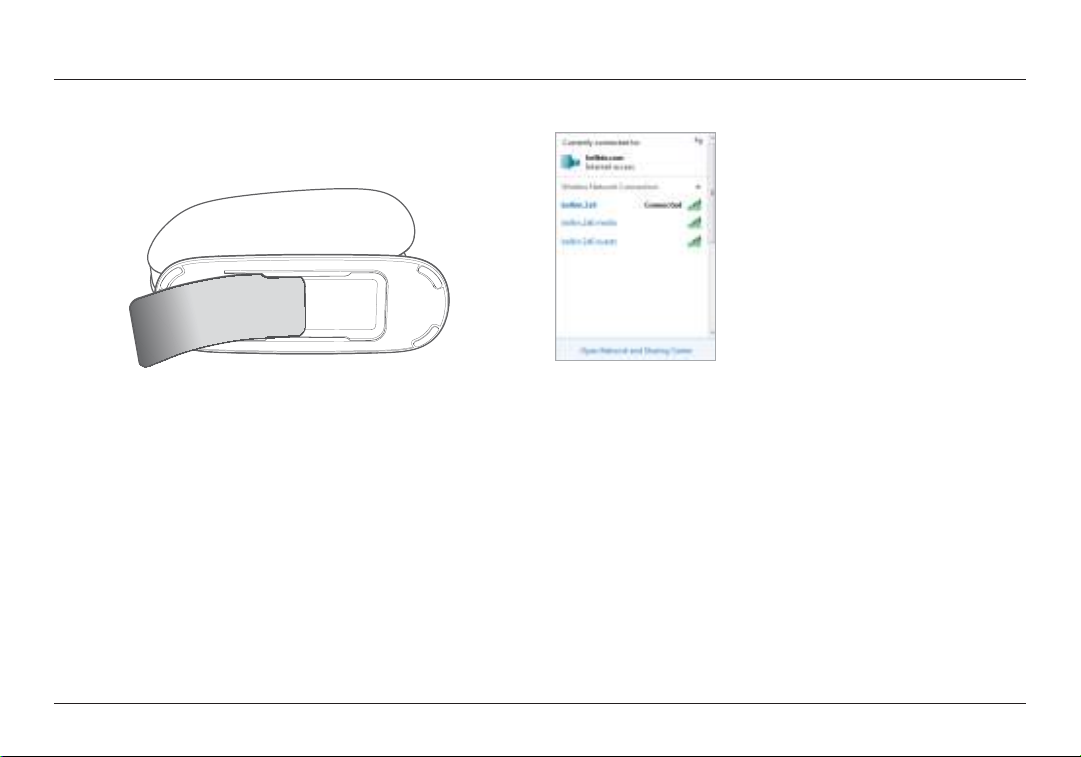
Retrieve the network ID card from the foot of yo ur new Belkin Router.
Can’t fin d the card? The default net work name and password are also printed o n
the foot of the Ro uter.
Use your computer, tablet, or smar tphone to co nnect to the wireless network
shown on the network ID ca rd.
For information on how to conn ect your wireless devices, pleas e see the
“Connec t Your Wireless Dev ices” sec tion on page 20.
When reque sted, please enter the password (se curity key) provide d on
the card.
When your device has conne cted to the Router, use a browser
to visit http ://router/. The router homepage will appear.
3
Page 6
GETTING STARTED
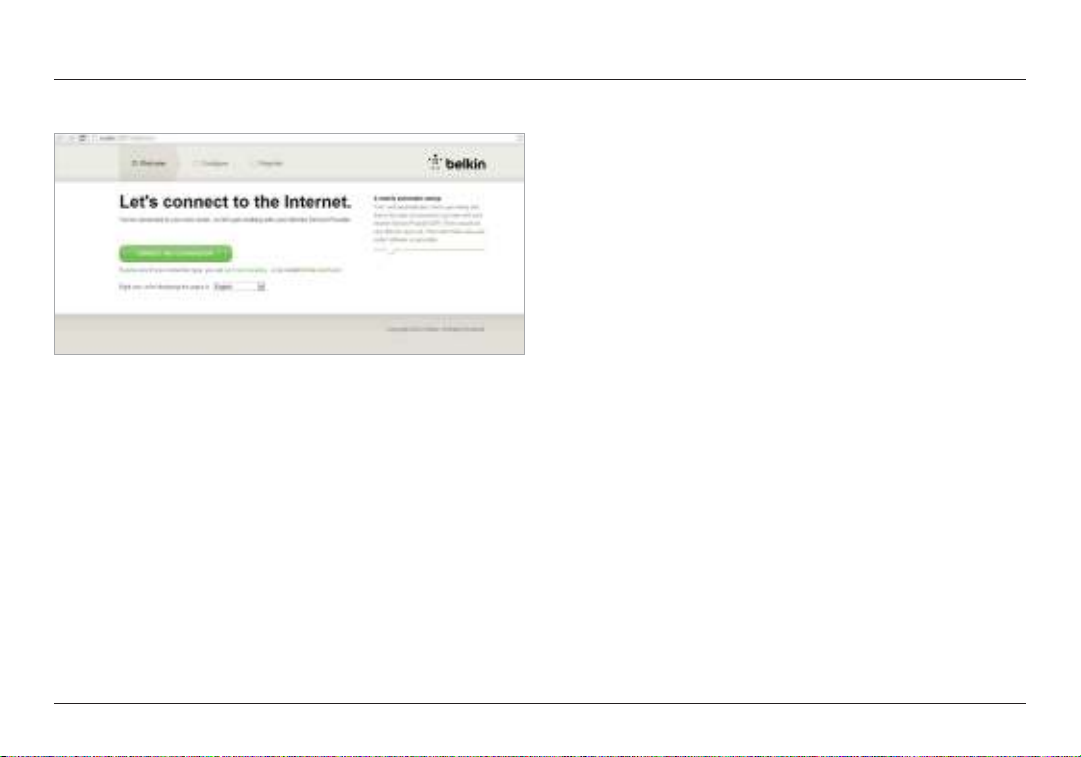
If the page does not load , then try visiting http://192.168.2.1 to see the
router homepage.
Click the “D etect my connection” b utton in gre en. (If you would rather set up
the Router manually, click the “set it up manually” link and proceed to page 10.)
After several m oments, yo ur Router should automatically detec t your Interne t
connection and restart. This can take any where from 30 seconds to 3 minutes
depending on your connection type.
If your Router is unable to establish an Internet connec tion on its own, you
may be asked to restart your modem or provide a username and password if
your connection requires one. Follow the on-screen instructions provided.
4
Page 7
GETTING STARTED
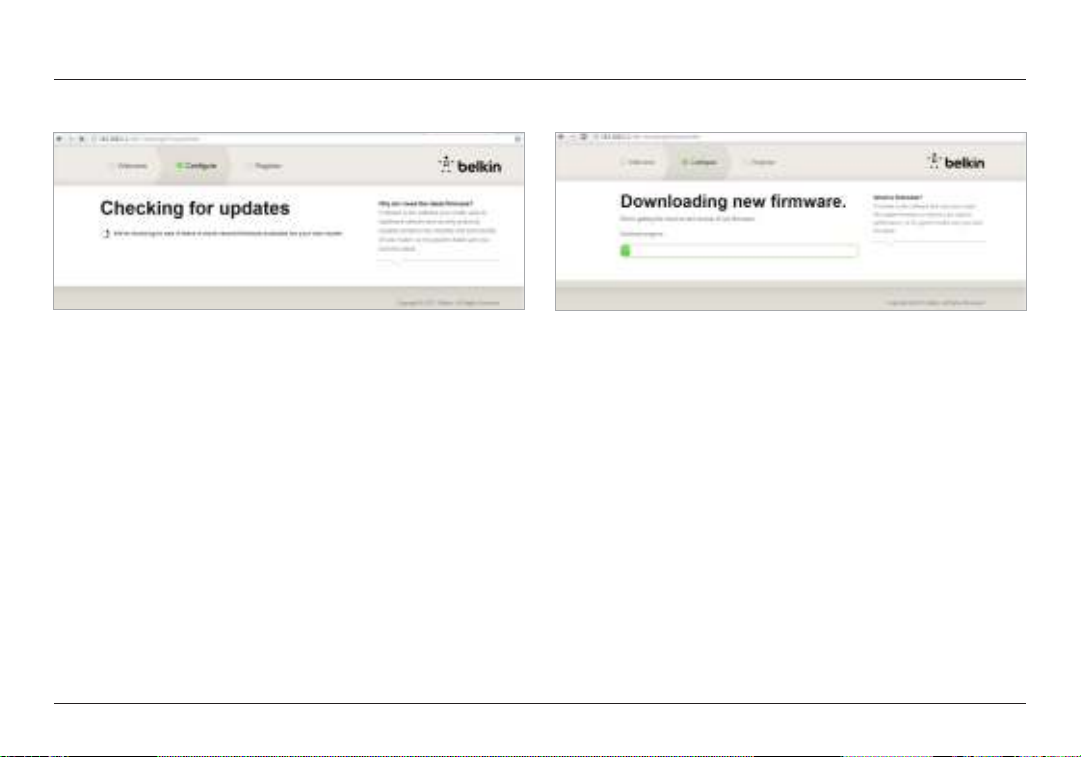
Once your Router is online, it will determine if there is a f irmware update
available and offer to install it. Please all ow up to 5 minutes fo r the firmware to update.
If there are no updates availab le, then setup will proceed.
5
Page 8
GETTING STARTED
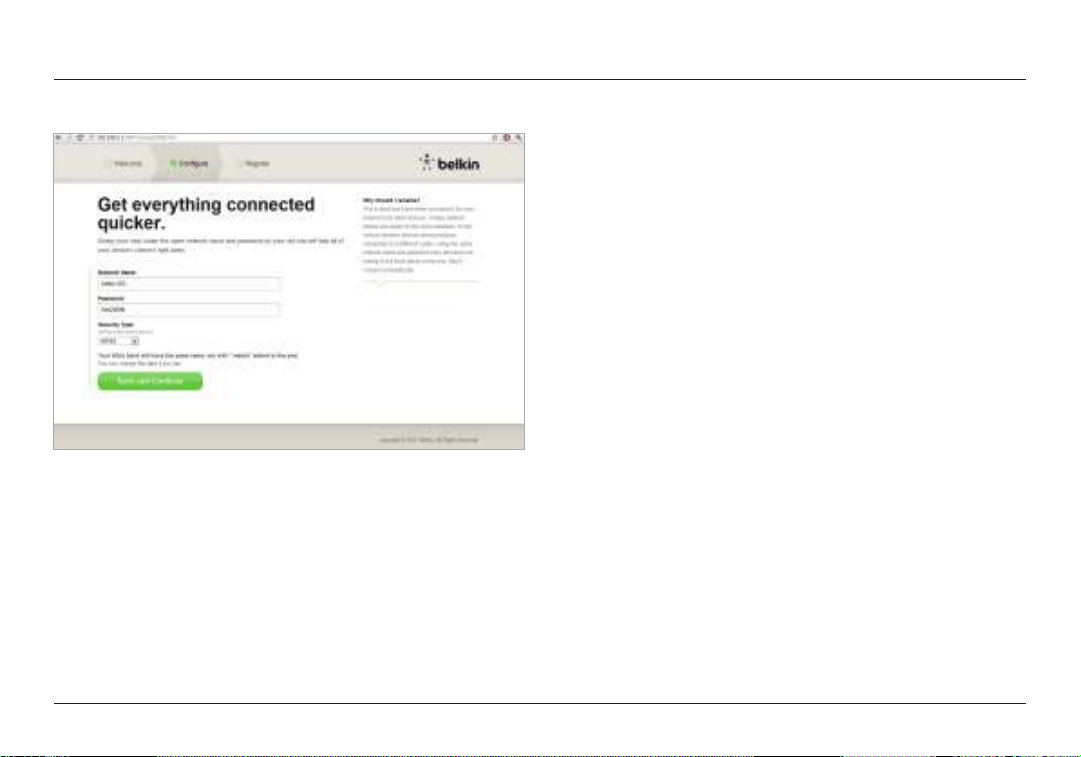
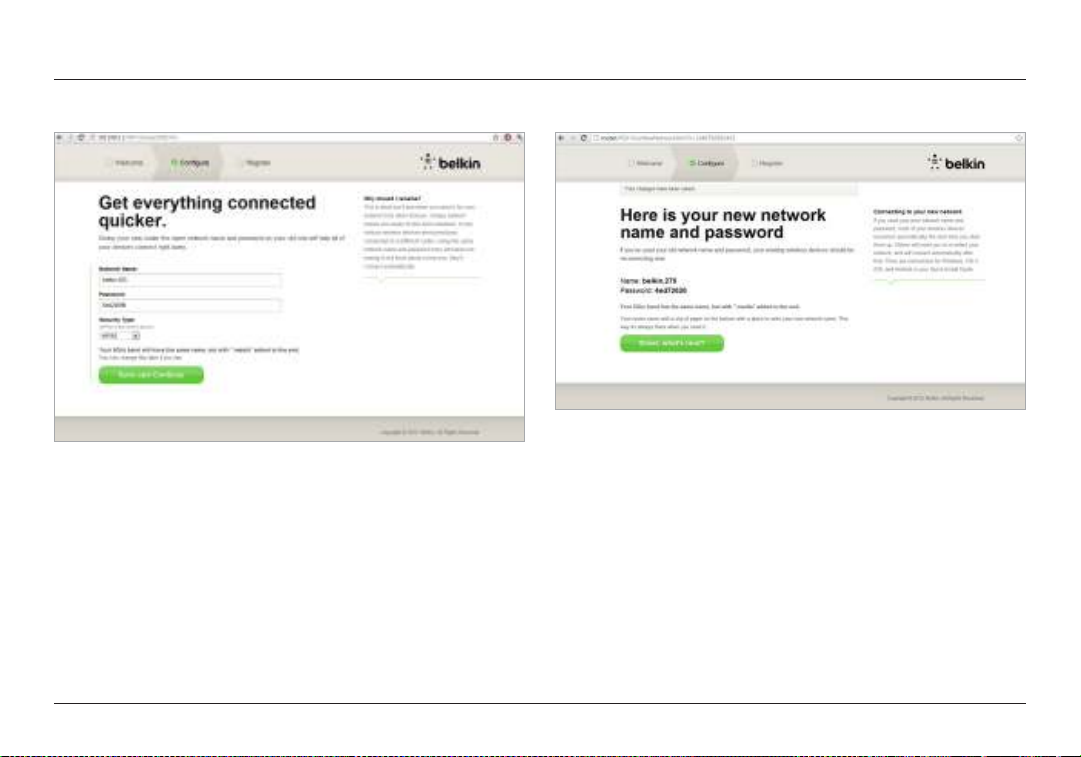
At the next screen you will be invited to chang e your netwo rk name and
password . Re-using yo ur previous n etwork name (SSID) and password makes
connecting your existing devices to the new router much easier.
If you decide to change the se settings, then enter the new value s and click
“Save and Continue.” (Note: The password must be at lea st 8 characte rs long. )
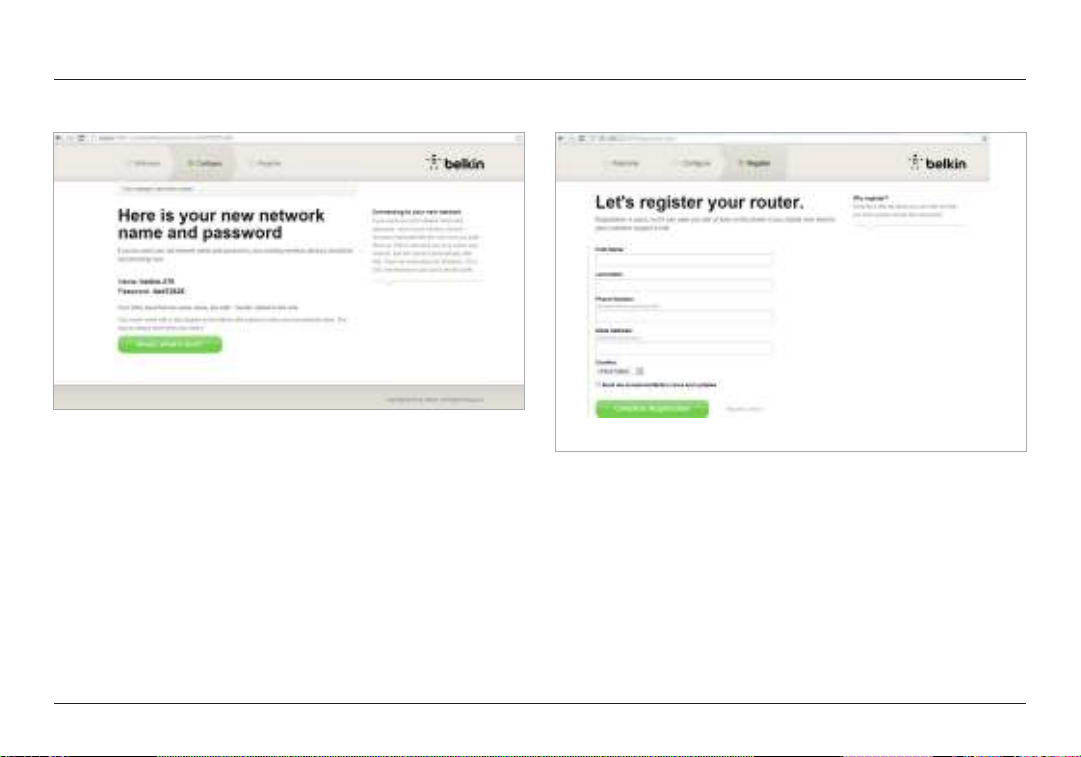
If you change d your netwo rk name and password, ma ke note of it on the
service c ard located on the foot of the Router. You will then have to conn ect
to the new net work.
6
Page 9
GETTING STARTED
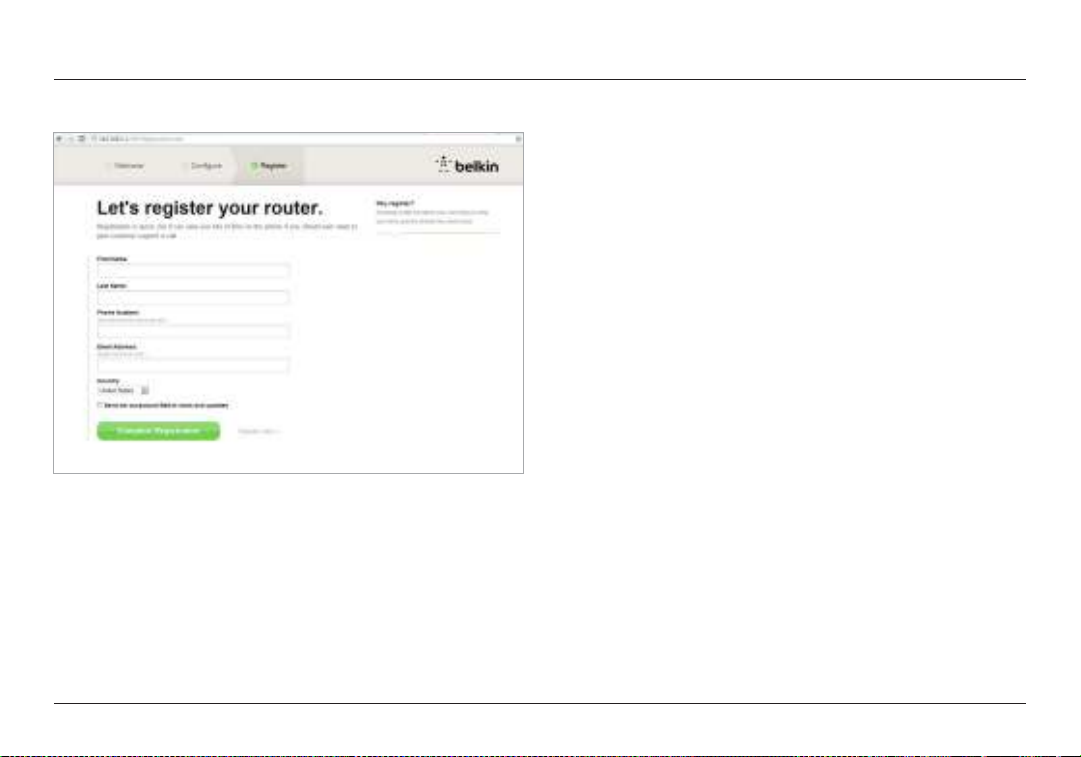
Please take this opportunity to regi ster your Router. This will help
technical support if there is a prob lem with your Router.
Simply comp lete each of the required f ields and click “Compl ete Registration.”
If you don’t want to register ri ght now, click “ Register Later” to proceed.
7
Page 10

GETTING STARTED
At the next screen you can download optional soft ware that was bundled with
your Router.
This screen shows you optio nal soft ware that is availa ble for your Router, such
as the USB sof tware to all ow you to print thro ugh the Router’s USB por t. If you
wish to download and insta ll any of these software programs, sim ply click on the
button appropriate for your device.
8
Page 11
GETTING STARTED
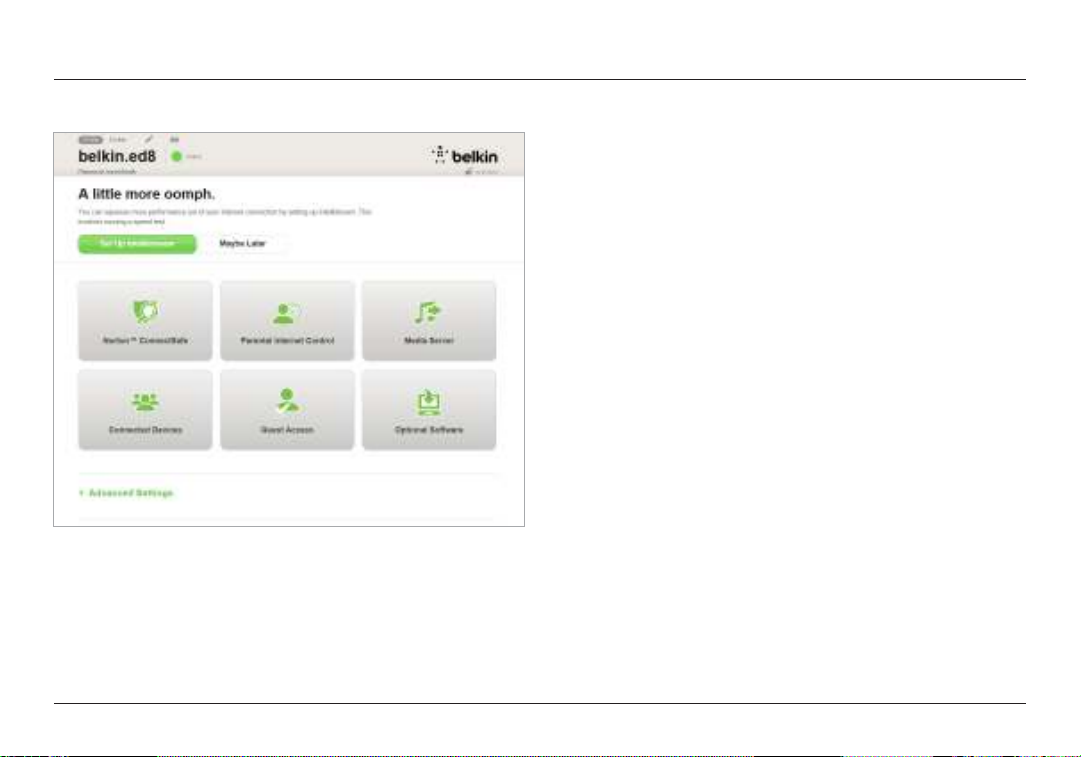
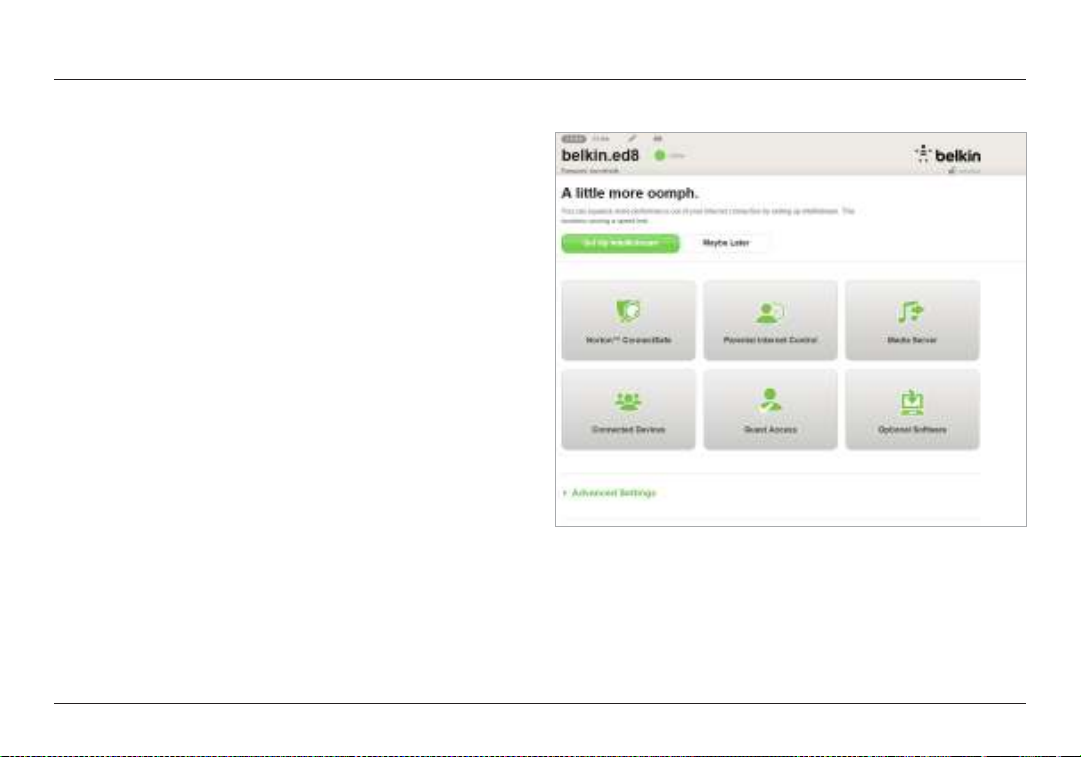
When finished installing optional software, click “Thanks, take me to
the dashboard.”
Congratulations! You are now at your Router’s dash board. Your Router
is set up and rea dy to use.
Using the WPS Button
1. Start WPS Pu sh Button Connectio n (WPS PBC) on your computer or other
Wi-Fi device that you would like to connect wirelessly to your Router. Ofte n
there will be a b utton for this purpose in software that came with the device,
or a physical “ WPS,” “PBC,” or “Security ” button o n the device it self.
2. Within t wo minutes , press the WP S button on
your Router and hold for two seconds.
The WPS light (small light ab ove WPS butto n) will blink blue while it listens for
your Wi-Fi dev ice. Once a co nnection is established, the light will turn blu e and
then go out. If a connection is not established, the light will blink amber. You
may repeat the p rocess to tr y again.
You can repeat this process for ea ch WPS-enabled device you’d like to add to
your network.
9
Page 12
GETTING STARTED
Manually Set Up Your Internet Connection
Use a browser to visit http: //router/. You can also try visiting
http://192 .168.2.1/. The Router’s Welcome page should appear.
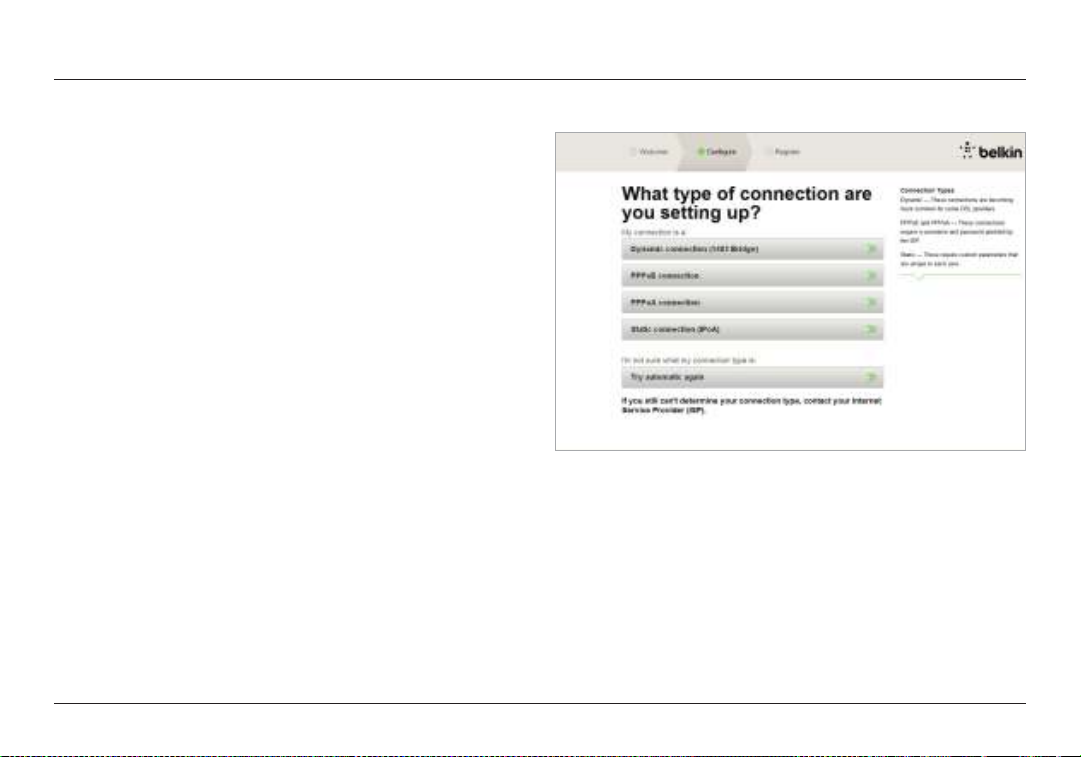
Click the “Set it up manually” link. Please select the type of connec tion
your ISP provides. Refer to p age 16 for a description of th e connection types.
If the selec ted conne ction type requires a dditional information (such as an ISP
username and password), the system will ask you for it.
At the next screen you will be invited to chang e your netwo rk name and
password . Reusing your previous network name (SSID) and password makes
connecting your existing devices to the new router much easier.
10
Page 13
GETTING STARTED
If you decide to change the se settings, then enter the new value s and click
“Save and Continue.” (Note: The password must be at lea st 8 characte rs long. )
If you change d your netwo rk name and password, ma ke note of it on the service
card located on the foot of the Router. You will then have to connect to the n ew
network . Please refer to page 20 to do th is.
Click “Great, what’s next?”
11
Page 14
GETTING STARTED
Please take this opportunity to regi ster your Router. This will help tec hnical
support if there is a prob lem with your Ro uter.
Simply comp lete each of the required f ields and click “Compl ete Registration.” If
you don’t want to register right now, click “Register Later” to proce ed.
At the next screen you can download optional soft ware that was bundled with
your Router.
12
Page 15

GETTING STARTED
This screen shows you optio nal soft ware that is availa ble for your Router, such
as the USB sof tware to all ow you to print thro ugh the Router’s USB por t. If you
wish to download and insta ll any of these software programs, sim ply click on the
button appropriate for your device.
When finished installing optional software, click “Thanks, take me to the dashboard.”
13
Page 16
GETTING STARTED
Congratulations! You are now at your Router’s dash board. Your Router is
now set up and ready to use.
The status of your Internet connection is shown in the upper left corner of
the Router’s homepage.
If it does not s ay “Online,” troublesho oting information will be displayed.
14
Page 17
GETTING STARTED
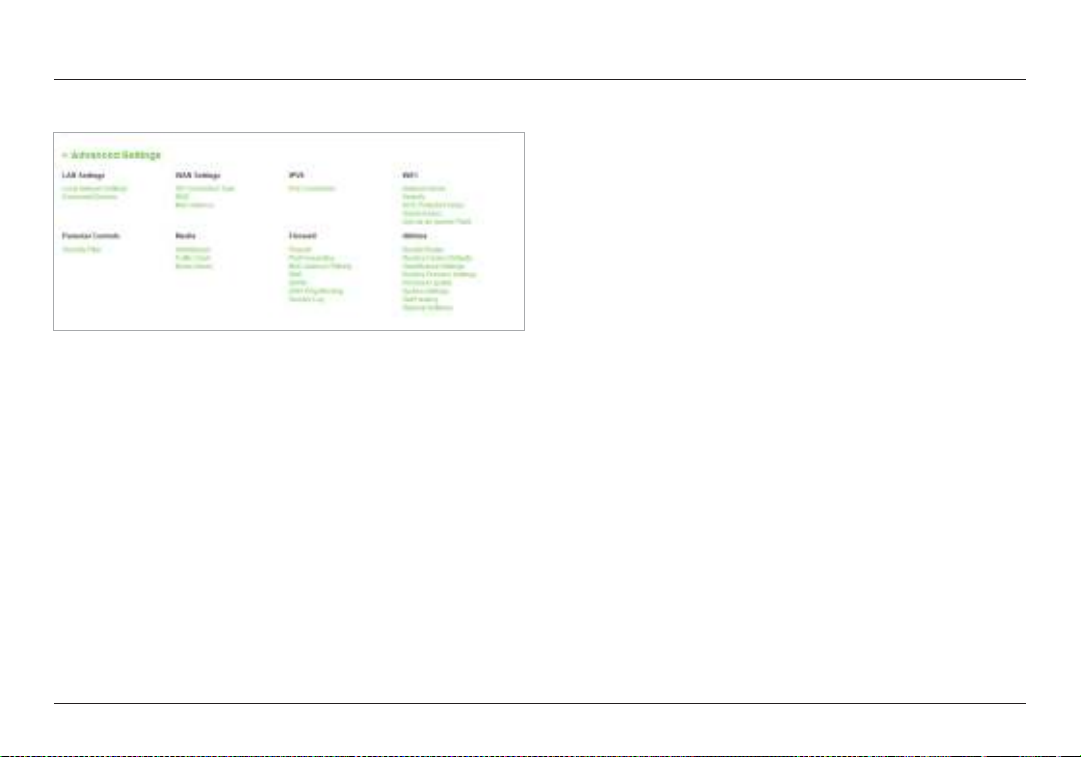
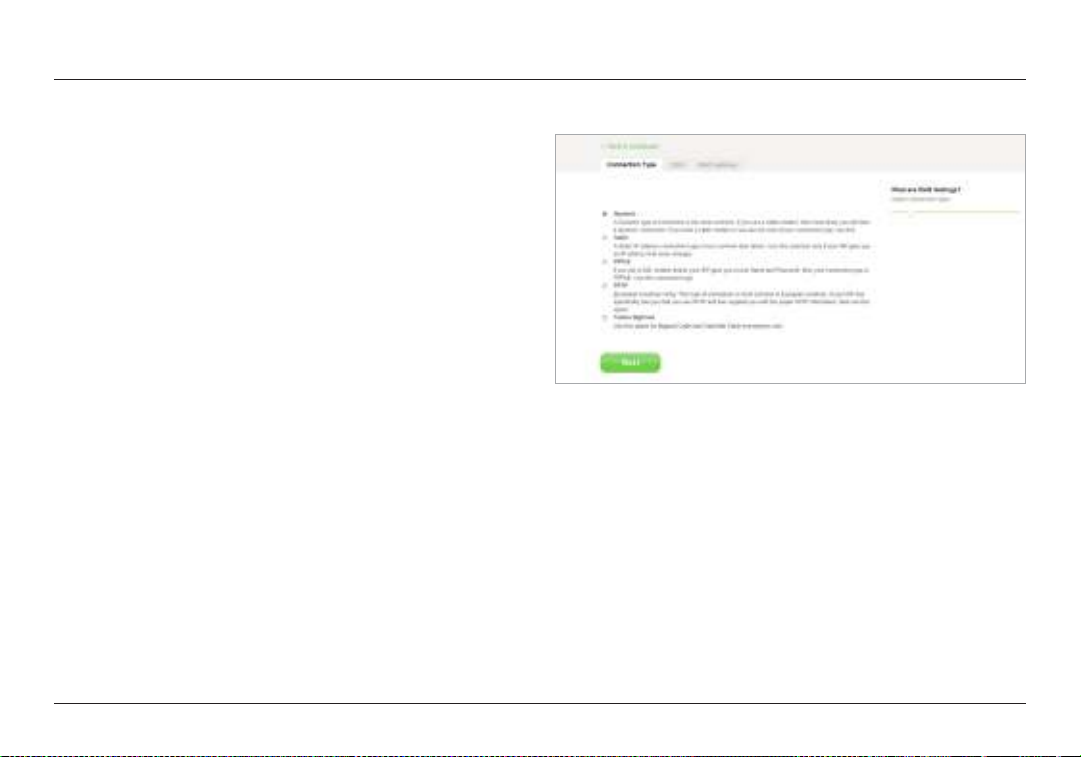
Manually Configuring Your Router’s Internet from the Dashboard
To set up your ISP connection manua lly, select “ ISP Connection Type”
from the list under the hea der “WAN Set tings.”
15
Page 18
GETTING STARTED
Dynamic Connection
Cable and fiber customers generally require a dynamic connection. Some DSL
customers require a PPPoE connection. Let’s try dynamic first. Select “Dynamic”
from the menu that appear s and press “ Next.”
16
Page 19

GETTING STARTED
A host name is generally not required. Hit “Save.” The Router will restart.
If after a few minutes your Internet Status says “Online,” you’re done! You can
surf the Internet.
If these step s do not work, try restar ting your modem and repeating the process.
If not, we’ll tr y a PPPoE connection next.
17
Page 20

GETTING STARTED
PPPoE Connection
Some DSL customers require a PPPoE connection . Select PPPoE this time and
press “Next.”
18
Page 21

GETTING STARTED
Enter the username and password supplied by your Internet provider and click
“Save.” Ig nore the other fields unless required by your ISP. The Router will restar t.
If after a few minutes your Internet Status says “Connecte d,” you’re done ! You
can surf the Internet.
If these step s do not work, try restar ting your mod em and repeating the process.
19
Page 22

GETTING STARTED
Connect Your Wireless Devices
iOS
(iPhone, iPad, and iPod touch)
1. Open the Settings app and selec t the Wi-Fi me nu item.
2. Select your wireless n etwork from the list that appears there.
If asked to do so, e nter the net work passwo rd.
Mac OS® X
Your Mac® provides a me nu of available w ireless networks
at the right end of the menu bar.
1. Click on the
2. Select your wireless n etwork from the list that appears there.
If asked to do so, e nter the net work passwo rd.
icon showin g wireless wave s.
Android™
(Phones and tablets)
1. Open the Settings app and selec t Wireless and Network.
2. From there, select Wi-Fi to see the list of available net works.
3. Select your wire less network from the list. If asked to do so, e nter your
network password .
20
Page 23

GETTING STARTED
Windows® 7
Your computer provides a menu of available wireless networks at the right e nd
of the task bar.
1. Left-click on the
2. Select your wireless network f rom the list. If asked, enter your network
password (network key).
Windows Vista® and Windows XP
Your device provide s a menu of availab le wireles s network s at the right end of
the task bar.
1. Right-click on the icon that shows a computer with
wireless wave s (XP)
2. Choose “View Availabl e Wireless N etworks (XP)” or “Connect to a network (Vista)”
from the menu.
3. Select your wireless net work from the list. If asked, enter your net work password
(net work k ey)
icon that looks like signal strength bars.
or two computers (Windows Vista).
21
Page 24

ADDITIONAL CAPABILITIES
Adding USB Devices
3.0
22
Page 25

ADDITIONAL CAPABILITIES
Adding a Drive
You can share a USB hard drive or flash drive to your net work via
your Router’s USB port. On ce connected, you can share files and
music with other computers and device s within your network.
Plug your USB hard drive into the USB port on th e back of your Router.
You can manually check the status of your shared drive by visiting the
USB Print and Storage Manage r. If you have difficulty sharing a drive on
your network, pleas e see the “Troubleshooting” section of this manual.
A few USB hard disks require m ore power than the Router’s USB port
provides. In these cas es, you may notice the drive failing to come on
or remaining on for a short time. If your disk has an optional power
supply, pleas e use it while th e disk is atta ched to your Router.
Adding a Printer
You can add a printer to your network via your Router ’s USB port. Once
connected, you can print from various computers and wireles s devices within
your network.
Plug your printer’s USB cable into the USB p ort located on the back of
your Router.
You can manually check the status of your printer by visiting the USB Print and
Storage Manag er, found under the Belkin icon displayed in yo ur system tray
(Window s) or menu bar (M ac). If you have dif ficult y sharing a printer on your
network , please se e the “Troubleshooting” se ction of this manual.
Note: Each computer that will us e the printer must have both the B elkin
software and the printe r’s driver installed. If th e print driver is n ot installed, you
will be asked to install it by the Belkin USB Print and Storage Man ager.
23
Page 26

ADDITIONAL CAPABILITIES
Adding Other USB Devices
Other USB d evices may als o be shared via your Router. Plug your
device into the USB port located on the back of your Router.
Computers running the Belkin USB Print and Storage Manager
will be able to m ake use of the shared device.
24
Page 27

ADDITIONAL CAPABILITIES
Optional Software
USB Print and Storage Center
The USB Print an d Storage Center h elps to manage and monito r the use
of your USB printers, scan ners, hard drives, and other devices that are
connected to your Router ’s USB port and shared ac ross your net work.
25
Page 28

ADDITIONAL CAPABILITIES
Guest Access
You can allow guest s to use your Internet connection witho ut joining your
personal network . The netwo rk name and pa ssword for the guest net work is
located on the network information c ard found und er the foot of your Router.
A person using your guest network will be able to join without a password,
but will be shown a login page when they at tempt to surf the Web. They
will need to enter the guest password into this page to co ntinue.
26
Page 29

ADDITIONAL CAPABILITIES
Media Server by myTwonky
Media Ser ver by myTwonky lets your Router stream music, m ovies,
and photos to different DLNA/UPnP devices on your network.
In order to use Media Ser ver by myTwo nky, you will ne ed to insert a
USB storage d evice with me dia content into a free USB por t on the
back of your Router. Your Router will begin to make your content
available to oth er devices on your network automatica lly.
If you want to conf igure Media Server by myTwonky, visit
http://router/ and choose “Media Server.”
There are severa l settings in the configuration page:
DLNA Server: Enables or disables your media s erver
Server Name: The name under which other devices will see your content
Refresh: Re-scans your US B storage devi ces for media content
Shared Drives: Show s information about and status of each of your
attached drives. You can see the name of the drive, its
capacit y, and whether media is bein g served fro m it or not.
When you clic k “Save,” your Ro uter will save your changes.
27
Page 30

ADDITIONAL CAPABILITIES
Website Filters. Powered by Norton
Web filters provide a first layer of whole-home Internet protection to guard
you from unsafe and inappro priate websites on any device on your network.
There are four different filtering options:
1. Block malicious, adult, and other non-family-friendly sites
2. Block malicious and adult sites
3. Block malicious sites
4. No filters
If you think a site should be added to the filtering list, sub mit a request at
safeweb.norton.com.
Content filtering may not work as inten ded if:
1. You are connecting through a VPN router.
2. You are routing traffic thro ugh a proxy server.
3. You have previously v isited the site and it has been stored in your cache.
4. You manually set the DNS servers on your computer, tablet, or smartphone.
28
Page 31

ADDITIONAL CAPABILITIES
Intellistream QoS
Intellistream prioritize s video and gaming traff ic for a better online ente rtainment
experience.
There are two ways to enable Intellistream:
Run a Spee d Test:
In order for Intellistream to provide you the b est media experience, your Router
needs to kn ow what your approximate Internet speeds are.
Click “Run a Sp eed Test” and th e test will begin.
Once complete you will see the results .
29
Page 32

ADDITIONAL CAPABILITIES
If your Interne t speed is greater than 70Mbp s when downloading, Intellistream
QoS will only improve your upl oading exp erience.
Refresh – This will retest your Internet speed.
When you clic k “Save,” your Ro uter will save your changes.
30
Page 33

ADDITIONAL CAPABILITIES
Manual set – This will let yo u set your approximate Internet speeds .
If you do not know your Internet speeds, contact your ISP.
When you clic k “Save,” your Ro uter will save your changes. Intellistream is now enabled.
31
Page 34

ADDITIONAL CAPABILITIES
IPv6 Configuration
A new version of Internet Proto col (IP) uses a 128-bit address to imple ment
additional features that are not present in current IP addresses.
Contact your I SP to inquire about their support for I Pv6.
Pass-Through
Devices connected to your Router can talk to each other u sing native IP v6
packets, b ut informatio n will be sent to all connected devices . Pass-through is
not efficient and is not recommended for consistent use.
32
Page 35

GETTING TO KNOW YOUR ROUTER
Front Panel
A
B
A) Router Status Light
Your Router’s status is shown by the light on the front.
Off: The Router is not plugged into a p ower source.
Blinking Blue: The Router is star ting up.
Solid Blue: The Router is connected to the Internet.
Blinking Amber: The Router can’ t detect the modem. Either the
modem is of f, is not plugged into the Router, or is unresponsive.
B) W i-Fi Prote cted Setup (WPS) Light a nd Button
The WPS but ton on the front of your Router can be used to help establish a
secure connection between your Router and other WPS-enabled Wi-Fi devices
such as comp uters. To use WPS, refer to page 9.
The small light near the WPS button shows what is happ ening while you are
using WPS to establish a connection.
Off: Idle
Blinking Blue: The Router is listening for a WPS-enabled computer or
other device.
Solid Blue: The Router has ma de a secure connection with the computer or
other device.
Amber: A connection was not created.
33
Page 36

GETTING TO KNOW YOUR ROUTER
Back Panel
D
A) Modem (WAN) Connector
Connect yo ur modem to this
port using an Ethernet c able.
B
B) Wired (LAN) Connectors
Connect computers and other
wired network devices to these
A
ports using Ethernet cables.
C
C) USB Port
USB printers, disks, and other
USB devices plugged into this
port will b e shared on your
network . Each USB port has a
light that indicates its status.
Off: No USB device is connecte d or
the attach ed USB device is not in use.
Blinking: Please wait to un plug the
device until the light turns off.
On: The USB device is connecte d
and being shared on your network.
D) Reset Button
This butto n is used to restart your
Router in rare cases when it functions
incorrectly. Resetting the Router will
preserve your settings. This button
may also be used to restore the
factory d efault settings. Please see
the Troubleshooting section for more
information.
E) Power Connector
Connect the include d power supply
to this jack .
E
34
Page 37

TECHNICAL DETAILS
Technical Features
Integrated 802.11AC Wireless Acce ss Point
Utilizing Dual-Band Network technology, your Router creates t wo separate
network s (one at 2.4G Hz band and th e other at 5GHz b and), allowing increased
bandwidth to all your connected wireless device s and compute rs.
NAT IP Address Sh aring
To save you the cost of adding IP addresses per computer in your house, your
Belkin Router uses Net work Address Translation (NAT) technology, allowing you
to share a singl e IP address a cross your network.
SPI Firewa ll
Your Router is equipped with a firewall that will protect your ne twork from a
wide array of common attack s and viruses.
Universal Plug-and-Play (UPnP) Compatibility
UPnP offers seamless operation of vo ice and vide o messaging, games , and other
applications that are UPnP-compliant.
Web-Based Advanced User Interface
You can easily make changes to your Router’s advanced settin gs through your
web browser. Thes e changes can be made from any computer on your network.
Integrated 4-Port G igabit Switch
Your Router has a built-in, 4-port network switch to allow your wired computers
to share: printers, data, M P3 files, digital photo s, and much m ore.
USB Port
The USB por t lets you plu g in printers , hard drives, and other USB d evices to
share acros s your netwo rk.
35
Page 38

TECHNICAL DETAILS
System Requirements
Router
Broadband Internet connection such as a cable or DSL modem with RJ45
(Ethernet) connection
At least one computer with an installed network inter face adapter
TCP/IP networking protocol installed on each computer
RJ45 Ethernet networking cable
Internet browser
Setup
A computer running Internet Explorer® 8 or higher,
Firefox®, Google Chrome™, or Safari
Minimum 1GHz processor and 512MB RAM
Or a smart device running iOS or Androi d operating systems
USB Print and Storage Manager
Windows XP SP3 or higher, Wind ows Vista, or
Windows 7; or Mac OS X v10. 5 or above
Minimum 1GHz processor and 512MB RAM
50MB of free hard-drive sp ace for installation
®
36
Page 39

USING YOUR ROUTER
Auto Update on Your Belkin Router
The Router will automatically check for a newer versio n of firmware
every time you log into the dashboard and alert you with a
message at the top of the screen if there is an update available.
You can choose to download the n ew version or ignore it.
You will see a series of prompts warning you that the f irmware is
about to be up dated. Please do not disconnect th e power from
the Router at this time as it could cause the s ystem to fail.
37
Page 40

USING YOUR ROUTER
Updating the Router’s Firmware via the Web Interface
The followin g steps show you how to update your Router’s firmware
using its web interface. You do not need to be con nected to th e
Internet as th is interface is built into the Router itself.
Setup steps:
1. Locate and download th e firmware file from the Belkin support site. (Type
your part number into the search box in the to p right corner and look for
“Firmware” in the title.)
2. Save the file to a location on your computer where you can get to it easily,
such as your desktop.
3. Connect the computer to one of the four L AN ports on the Router (refer to image).
4. Open a web browser on the computer.
5. In the address bar of the web browser, type “ht tp://router” or
“http://192.168.2 .1” and press “Enter” on yo ur keyboard.
38
38
Page 41

USING YOUR ROUTER
6. Click on “ Firmware Update” toward the b ottom. 7. Click the “Choos e File” but ton toward the middle of the
screen to sea rch for the file you saved previ ously.
Note: The f irmware version in the image above is depicted as an example.
Your file name will vary depending on your model and version.
39
39
Page 42

USING YOUR ROUTER
8. Select the firmware file by left-cli cking on it an d then click
the “Open ” button in th e lower-right corne r of the window.
This will take you back into the Router’s interface.
9. Click the “Upd ate” button.
10. A prompt asking, “Are you sure you want to continue
with upgrading?” will appear. Click “OK”.
11. A second prompt will open telling you the Router will not
respond during the upgrade and warnin g you not to remove
the power supply from the Router. Click “OK” on ce more.
Congratulations. The f irmware has been updated successfully.
40
40
Page 43

USING YOUR ROUTER
Resetting the Router
Reset But ton – Red
The “Reset” button is used in rare cases when the Router may function
improperly. Resetting the Router will restore the Router’s normal operation
while maintaining the programmed set tings. You can al so restore the
factory d efault settings by using the “Reset ” button. Use the restore option
in instances where you may have forgotten your custom password.
Resetting the Router
Push and release the “Re set” button. The lights on the Router will
momentarily flash. Th e “Router ” light will be gin to blink. When the
“Router ” light becomes solid again, the reset is complete.
Restoring Your Router to Factory Defaults
Press and hold the “Reset” but ton for at least 5 seconds, and then release it.
The lights on the Router will momentarily f lash. The “ Router” light will begin
to blink. Wh en the “Router” light becomes solid again, the restore is complete.
41
Page 44

USING YOUR ROUTER
Restoring the Router to Default Settings
Using the Web Interface
Symptoms
You need to restore th e factory d efaults using the web inter face.
This may be because the Router is not per forming as expected
or you wish to rem ove all previously configured settings.
Setup steps
1. Open a web browser on the computer.
2. In the address bar of th e web browser, type “http://
router” or “http://192.168.2.1”.
3. Click on “Restore Factory D efaults” in the left-hand column unde r the
“Utilities” heading.
42
Page 45

USING YOUR ROUTER
4. Click on the “Restore Defaults” button. 5. A warning box will open that says, “ Warning: All your setting s
will be lost. Are you sure you want to do this?” Click “OK”.
6. The Router will begin the restoring process. Once the
restore is complete, the Router will reboot.
Note: This may take several minute s.
Your Router has been successfully restored to its factor y settings.
43
Page 46

TROUBLESHOOTING, SUPPORT, AND WARRANTY
Troubleshooting
I can’t connect to the Internet wirelessly.
If the light on th e front of the Router is solid blue, then your Ro uter is connected
to the Internet. You may not be connected to the Router ’s wireless network . Please
refer to “Conn ect Your Wireless Devices” on page 20 of thi s manual for instructions.
If your Windows XP computer is running SP 2, you will not b e able to set up th e
Router via the w ireless setup process . You will need to either update to Windows
XP SP3 or complete the setup via a wired conn ection.
I can’t connect to the I nternet wirelessly and my network name is not l isted in
Available Networks.
1. Verify that your Router is on and the front-panel light shows solid blue.
2. If you are far from the Router, you might try moving closer to se e if you might
have been out of ra nge.
3. U sing a computer attache d to the Router via a network cable, visit h ttp ://
rou ter/ and ensure that “Bro adcast SSID” is ON. This settin g is found on the
“Channel an d SSID” page.
My wireless network performance is slow, inconsistent, suffers from weak signal,
or I’m having difficulty maintaining a VPN connection.
Wireless technology is radio-based, which means connectivity and
the throughput performance between devices decreases when the
distance between devices increases. Other factors that will cause signal
degradation (metal is generally the worst culprit) are obstructions
such as walls a nd metal appliances. Note also that connection speed
may decreas e as you move farther away from the Ro uter.
In order to determine if wireless issues are related to ra nge, we sugg est
temporaril y moving the computer within 10 feet from the Router if pos sible.
Changing the wireless channel – Depending on local wireless traffic
and interference, switching the wireless channel of your net work can
improve performance and reliability. See the section titled “Changing the
Wireless Channel” for instructions on how to ch oose other c hannels .
44
Page 47

TROUBLESHOOTING, SUPPORT, AND WARRANTY
Limiting th e wireless transmit rate – Limiting the wireless transmit rate can
help improve ran ge and connection stab ility. Most wireless cards have the
ability to limit the transm ission rate. To change this proper ty in Windows, go to
the Windows Control Panel , open “Network Connections”, and double-click on
your wireless card’s connection . In the properties dialog, sele ct the “Configure”
button on the “General” tab, then choose the “Advanced” tab and select the
rate property.
Wireless c lient cards a re usually set to automatically adjust the wireless
transmit rate for you, but doin g so can caus e periodic disconnec ts when the
wireless signal is too weak; as a rule, s lower transmission rates are more
stable. Experiment with different connection rates until you find the best one
for your environment. Note that all available transmission rates should be
acceptable for browsing th e Internet. For m ore assistance, see your w ireless
card’s user manual.
I’ve installed this n ew Router and some of my network client s
(computers, game consoles, etc.) are now unable to connect.
Your new Router came pre-conf igured with a n etwork nam e and
password , found printe d on an attached card. All clients must use this
network name and password to connect wireles sly to your Router. You
will need to f ind the net work settings on your client, select the network
name printed on the card from the list of availa ble netwo rks, and
enter the password when prompted to join the wireless network .
45
Page 48

TROUBLESHOOTING, SUPPORT, AND WARRANTY
Does the Ro uter supp ort Wireless Protected Acces s (WPA) security?
The Router ships with WPA/WPA2 security turned on. Windows XP and some
older net work hardware may require a sof tware update to suppor t WPA/WPA2.
I am having difficult y setting up WPA security on my Router.
1. Log in to your Router by visiting “http://router/” or “http://192 .168.2 .1” with
your web browser. Click “Security” under the WiFi h eading. You should now
be on the Security page.
2. Under S ecurity M ode, sele ct WPA/WPA2-Personal (PSK).
3. Select “WPA/WPA2 ” from the drop-down menu under the Authentication heading.
4. Enter a password. This can be from 8–63 characters of your choice, including
spaces and punctuation, OR a 64-digit hexadecimal number (using only the
numbers 0 –9 and letters A–F).
5. Click “Save” to finish. Your wire less connection is now encrypte d. Each
computer using your wirel ess network will need to use the new key.
Note: If you are conf iguring the Router over a wirel ess connection, you will
have to re-connect to the Router after changing any security set tings.
Note: Some older networking hardware supports only WEP encryption.
If your older computers cannot conne ct to your net work, tr y 128-bit or
64-bit WEP, or seek software up dates from their manufacturers.
46
Page 49

TROUBLESHOOTING, SUPPORT, AND WARRANTY
I am having difficulty setting up Wired Equivalent Privacy (WEP) security
on my Router.
1. Log in to your Router. Visit “http://router/” or “http ://192.168. 2.1” with your
web browser. Click “ Securit y” unde r the WiFi hea ding. You should n ow be on
the Security page.
2. Under S ecurity M ode, sele ct the “128-bit WEP ” option.
3. You may type in a WEP key manually, or generate one from a passphrase.
Type a phrase in the “Passphrase” f ield and click the “Generate” but ton. A
WEP key is composed of 26 hexadecimal digits (0–9, A–F). For examp le, C3 03
0F AF 4B B2 C3 D4 4B C3 D4 EE 74 is a valid 128-bit WEP key.
4. Click “Save” to finish. Your wireless activity is now e ncrypted. Each comp uter
using your wireless net work will need to use the new key.
Note: If you are conf iguring the Router over a wirel ess connection, you will have
to re-conn ect to the Router after cha nging any security set tings.
Note: Some older networking hardware supports only 64-bit WEP encryption. If
your older co mputers ca nnot connect to your net work, try 64-bit WEP.
A disk I plu gged into the USB por t is not showi ng up on my computer.
1. Try un plugging and re-plugging the disk . Please ch eck that
the USB conn ector is firmly plugg ed into the Router.
2. If your disk has an option al power supp ly, please use
it while the disk is attach ed to your Router.
3. The Router supp orts FAT16, FAT32-, or NTFS-formatted
disks. Disks in other formats will not appear in the Finder
(Mac OS X) or Windows Internet Explo rer®.
A disk I plu gged into the USB por t is not coming
on or remains on only for a short time.
Some drives require more p ower than the Router’s USB port
provides. If your disk has a n optional power supply, plea se
use it while th e disk is atta ched to your Router.
47
Page 50

TROUBLESHOOTING, SUPPORT, AND WARRANTY
A printer I pl ugged into the USB po rt is not showing up on my computer.
1. Try un plugging and re-plugging the printer. Please check that the USB
connector is firmly plugged into the Router.
2. To print to a printer at tached to the Router, your computer must have that
printer’s driver installe d. Please check that the driver is installed.
3. The printer may not be set to auto- connect. Open the USB Print and Storage
Center. Check that the printer app ears in the list of available devices. View
the proper ties of the printer, and check that “auto-connect ” is selected.
A different sort of US B device that I p lugged i nto the USB p ort is not
showing up on my computer.
Most USB dev ices other than disks and p rinters must be accesse d via the USB
Print and Storage Center.
1. Try un plugging and re-plugging the device. Please ch eck that
the USB conn ector is firmly plugg ed into the Router.
2. Open the USB Print and Sto rage Center. Check that the
device appears in the list of available devices.
3. S elect the device and click the “Use” button . The device will be
virtually connecte d to your computer until you cho ose to “Stop
Using” the device, or another person request s use of the device.
48
Page 51

TROUBLESHOOTING, SUPPORT, AND WARRANTY
Technical Support
US
http://www.belkin.com/support
UK
http://www.belkin.com/uk/support
Australia
http://www.belkin.com/au/support
New Zealand
http://www.belkin.com/au/support
Singapore
1800 622 1130
Europe
http://www.belkin.com/uk/support
49
Page 52

TROUBLESHOOTING, SUPPORT, AND WARRANTY
Belkin International, Inc., Limited 2-Year Product Warranty
What this warranty covers.
Belkin Inte rnational, Inc. (“Belkin” ) warrants to the original purchaser of this
Belkin pro duct that the product shall be free of defects in design, ass embly,
material, or workmanship.
What the period of coverage is.
Belkin warra nts the Belk in product for two years .
What will we do to correct problems?
Product Warranty.
Belkin will repair or replace, at its option, any defe ctive product free of charge
(except for shipping charges for the product). Belkin reserves the right to
discontinue any of its products without notice, and disclaims any limited
warranty to repair or replace any such discontinued products . In the event
that Belkin is unable to rep air or replace the produc t (for example , because
it has been discontinue d), Belkin will offer either a refund or a c redit toward
the purchase of another product from Belkin.com in an amount e qual to the
purchase price of the product as evidenced on the original purchase receipt as
discounted by its natural use.
What is not covered by this warranty?
All above warranties are null and void if the Belkin produc t is not provided
to Belkin for inspection upon Belkin’s request at the sole exp ense of the
purchaser, or if Belkin determines that th e Belkin pro duct has been improperly
installed , altered in any way, or tampered with . The Belkin Product Warranty
does not protect against acts of Go d such as flo od, lightning, earthquake, war,
vandalism, theft, normal-use wear and tear, erosion, depletion, obsolescence,
abuse, damage due to low voltage disturbances (i.e. brownouts or sags),
non-authorized program, or system equipment modification or alteration.
50
Page 53

TROUBLESHOOTING, SUPPORT, AND WARRANTY
How to get ser vice.
To get service for your Belkin product you must take the following steps:
1. Contact Belkin International, In c., at 1204 5 E. Waterfront Drive, Playa Vi sta,
CA 90094, Attn: Customer S ervice, or call (800)-22 3-554 6, within 15 days
of the Occurrence. Be prepared to provid e the following informatio n:
a. Th e part numb er of the Belk in produc t.
b. Where you purcha sed the product.
c. W hen you purchased the pro duct.
d. Copy of original re ceipt.
2. Your Belkin Customer Ser vice Representative will th en instruc t you on how to
forward your receipt and Belkin product and how to proceed with yo ur claim.
Belkin res erves the right to review the damaged Belkin produc t. All costs of
shipping th e Belkin pro duct to Belkin for inspection sha ll be borne solely by
the purchaser. If Belkin determines, in its sole discretion, that it is impractical
to ship the damaged equipment to Belkin, Belkin may designate, in its sole
discretion, an equipment repair facility to inspect and estimate the cost to
repair such equipment. Th e cost, if any, of shipping the equipment to and
from such rep air facilit y and of such estimate shall be borne sole ly by the
purchaser. Damaged equip ment must remain available for inspec tion until the
claim is finalized. Whe never claims are settled, Belkin reserves the right to be
subrogated under any existing insuran ce policie s the purchaser may have.
51
Page 54

TROUBLESHOOTING, SUPPORT, AND WARRANTY
How state law relates to the warranty.
THIS WARRANT Y CONTAINS THE SOLE WARRANTY OF BELKIN .
THERE ARE NO OTHER WARR ANTIES, EXPRESSED OR , EXCEPT AS
REQUIRED BY LAW, IMPLIED, INCLUDING THE IMPLIED WARRANTY
OR CONDITIO N OF QUALITY, MERCHANTABILITY O R FITNESS FOR A
PARTICULAR PURPOSE, AND SU CH IMPLIED WARRANTIES, IF ANY,
ARE LIMITED IN DU RATION TO THE TERM OF THIS WARR ANTY.
Some states do not allow limitations on how long an implie d
warranty lasts, so the ab ove limitation s may not apply to yo u.
IN NO EVENT SHALL BELKIN BE LIABLE FOR INCIDENTAL, SPECIAL,
DIRECT, INDIRECT, CONSEQUENTIAL OR MULTIPLE DAMAGES
SUCH AS, BUT NOT LIMITED TO, LOST BUSINESS OR PROFITS
ARISING OUT OF THE SALE OR US E OF ANY BELKIN PRODUCT,
EVEN IF ADVISED O F THE POSSIB ILITY OF SUCH DAMAGES.
This warrant y gives you specific lega l rights, and you may also have
other rights, which may var y from state to state. Some states do
not allow the exclusion or limitation of incidental, consequential, or
other damag es, so the ab ove limitations may not apply to you.
52
Page 55

REGULATORY INFORMATION
FCC Statement
DECLAR ATION OF CONFO RMITY WITH FCC RULES FO R
ELECTROMAGNETIC CO MPATIBILITY
We, Belkin International , Inc., of 12045 E. Water front Drive, Pl aya Vista, CA
90094, declare under o ur sole resp onsibilit y that the device, F9K1119 V1,
complies with Part 15 of the FCC Rules. Operation is subject to the following
two conditions: (1) this device may not c ause harmful interference, and (2) this
device must a ccept any inter ference received, inc luding interference th at may
cause undesired operation.
Federal Communications Commission Notice
This equipment has bee n tested and fo und to comply with the limits for a Class
B digital device, pursuant to Part 15 of the FCC Rules. These limits are designed
to provide reasonable protection against harmful interference in a residential
installation.
This equipment generates, uses, and can radiate radio freque ncy energy,
and if not installed and used in accordance with the instructions, may cause
harmful interference to ra dio communi cations. However, there is no guarantee
that interference will not occur in a particular installation. If this equipment
does caus e harmful interference to ra dio or television reception, which c an be
determine d by turning the e quipment of f and on, th e user is encouraged to tr y
and correc t the interference by one or m ore of the following measures:
• Reorient or relocate the receivin g antenna.
• Increase the distance between the equipment and the receiver.
• Connect the equipment to an outlet on a circuit different from that to
which the receiver is conn ected.
• Consult the dealer or an experienced radio/TV technician for h elp.
FCC Caution: Any changes o r modifications not expressly approved by the
party re sponsible for compliance could void the user’s authority to o perate this
equipment.
53
Page 56

REGULATORY INFORMATION
IMPORTANT NOTICE:
FCC Radiation Exposure Statement:
This equipment complies with FCC radiation exposure limits set forth for an
uncontrolled environment. This equipment should be installed and operated
with a minimum d istance of 20cm betwee n the radiator and your body.
This transmitter must not be co-loc ated or operating in conjunction with a ny
other antenna or transmitter.
54
Page 57

belkin.com
© 2015 Belk in International, Inc . All rights reserved . All trade names are registered trademarks of
respective manufacturers liste d. iPad, iPhone, iPod to uch, Mac, Mac OS, and Safari are trademarks
of Apple Inc ., registered in the U. S. and other countrie s. Windows, Window s Vista, Internet Explorer,
and DirectX are either regi stered trademarks or tra demarks of Microsof t Corporation in the Unite d
States and/or other countries. A ndroid and Google Chro me are trademarks of Google Inc.
 Loading...