

Page 1
TuneBase™ FM
with Hands-Free
English
Français
DEutsch
nEDErlanDs
Español
User Manual
8820-00074ea F8Z441ea
italiano
Page 2

TABLE OF CONTENTS
SECTIONS 1 2 3 654Table of Cont ents
1 Introduction .............................................................................................................1
Features .........................................................................................................................1
What’s in the Box .........................................................................................................2
Controls .........................................................................................................................2
2 Set Up Your TuneBase ...........................................................................................3
Plug In Your TuneBase .................................................................................................3
Dock Your iPod .............................................................................................................4
Dock Your iPod After Initial Setup ..............................................................................9
3 Use Your TuneBase ..............................................................................................11
Find a Clear Station .................................................................................................... 11
Play Music ...................................................................................................................13
Receive Calls ..............................................................................................................14
Connect to Your Stereo Using the Audio-Out Jack ................................................15
Charge Other USB Devices .......................................................................................16
Use the PRO Button to Boost Sound .......................................................................17
4 Troubleshooting ....................................................................................................18
5 Safety Warnings ....................................................................................................21
6 Information .............................................................................................................22
TuneBas e™ FM wit h Hands-Fre e
i
Page 3

INTRODUCTION
SECTIONS 2 3 654Table of Cont ents 1
Features
iPod and iPhone
Play your iPod through your car’s FM stereo
Keep your iPod in its case
Rotate your iPod to horizontal view
One-touch tuning with ClearScan
Secure and flexible cradling for any size iPod
Use with a tape adapter or auxiliary cable
Charge another USB device
TuneBas e™ FM wit h Hands-Fre e
iPhone only
Receive calls from your iPhone and talk
hands-free
Listen to calls through your car stereo
Built-in mic for hands-free phone calls
1
Page 4
INTRODUCTION
What’s in the Box
1.
2.
3.
pro
2
1
1.
2.
3.
4.
5.
6.
SECTIONS 2 3 654Table of Cont ents 1
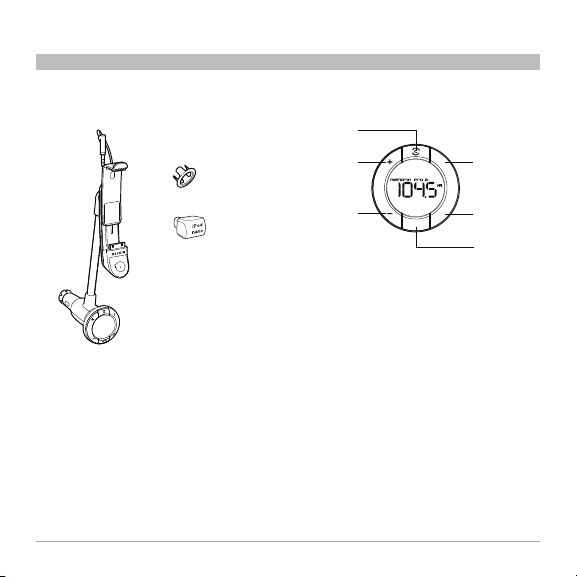
What’s in the Box Controls
1. TuneBase FM with Hands-Free
2. Fit Ring (optional)
3. Cushion for iPod nano
TuneBas e™ FM wit h Hands-Fre e
1. ClearScan
2. Tun e u p
3. Tune down
4. Memory 1
5. Memory 2
6. PRO button
2
Page 5
SET UP YOUR TUNEBASE
SECTIONS 1 3 654Table of Cont ents 2
Plug In Your TuneBase
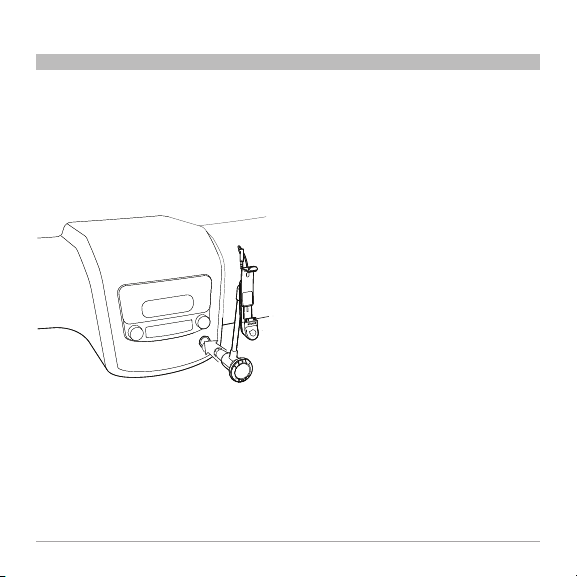
Follow the steps in this section to set up your TuneBase FM with Hands-Free (the TuneBase).
These steps coincide with those in the Quick Install Guide but provide more detail.
1. Insert your TuneBase into the power
outlet in your car.
Warning: Do not rotate the TuneBase in the
power outlet. If you experience resistance,
unplug the TuneBase and reinsert it in
the desired position. Failure to do so may
damage the cigarette lighter adapter or
power outlet.
2. Test the tightness of fit in the power
outlet. The TuneBase should give some
resistance when you try to rotate it
inside the power outlet. It should not
rotate or move on its own.
If the TuneBase is too loose or too
tight in the power outlet, see the
troubleshooting section for instructions
on adjusting the fit.
TuneBas e™ FM wit h Hands-Fre e
3
Page 6
SET UP YOUR TUNEBASE
SECTIONS 1 3 654Table of Cont ents 2
Dock Your iPod
You can keep your iPod in its case when you dock it.
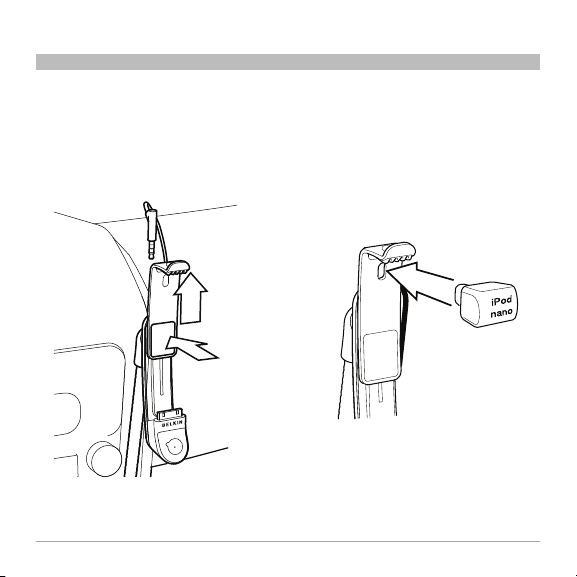
1. Push the button on the springboard and
slide it to its maximum height.
TuneBas e™ FM wit h Hands-Fre e
2. If you have an iPod nano, insert the
cushion into the slot on the springboard.
The cushion works with all versions of
the iPod nano.
4
Page 7
SET UP YOUR TUNEBASE
SECTIONS 1 3 654Table of Cont ents 2
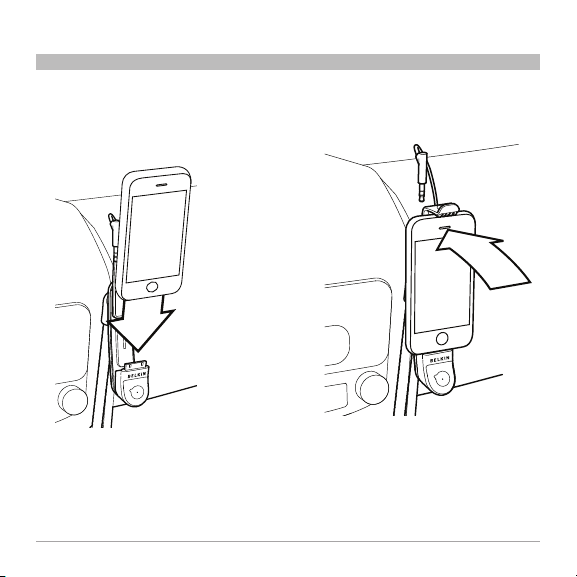
3. Connect your iPod to the TuneBase
dock connector, making sure it is fully
seated.
TuneBas e™ FM wit h Hands-Fre e
4. Push the front of the iPod back until the
back of the iPod touches the front of
the springboard.
5
Page 8

SET UP YOUR TUNEBASE
SECTIONS 1 3 654Table of Cont ents 2
5. Push down on the top of the springboard
until it holds your iPod securely in place.
Note: After you have adjusted the height
of the springboard, there is no need to
adjust the TuneBase to insert and remove
your iPod.
TuneBas e™ FM wit h Hands-Fre e
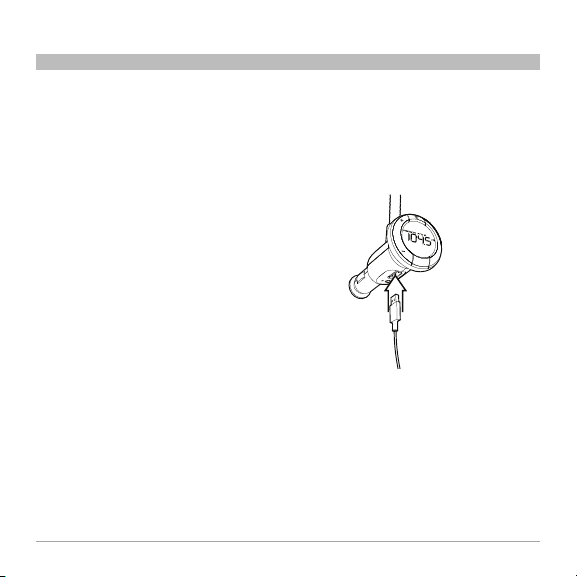
6. Connect the audio cable to the
headphone jack on your iPod.
6
Page 9
SET UP YOUR TUNEBASE
ok
Rotating
Landscape
SECTIONS 1 3 654Table of Cont ents 2
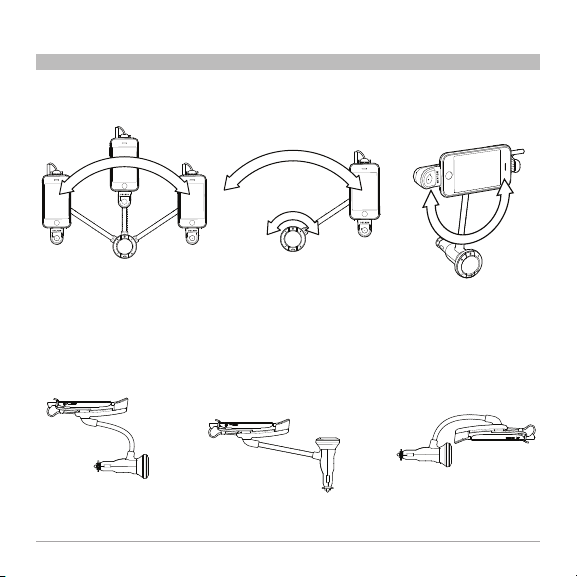
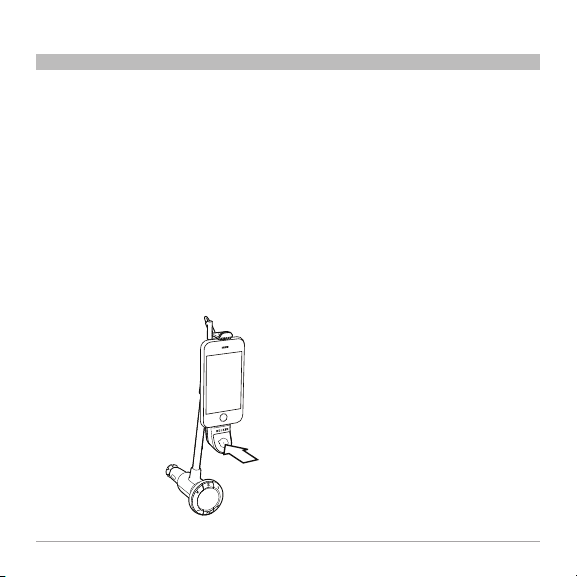
7. Bend the flexible neck to position your iPod.
Warning: Do not remove the TuneBase from
the cigarette lighter adapter when an iPod is
in the cradle.
Do not position your TuneBase as follows:
TuneBas e™ FM wit h Hands-Fre e
7
Page 10
SET UP YOUR TUNEBASE
Removal
SECTIONS 1 3 654Table of Cont ents 2
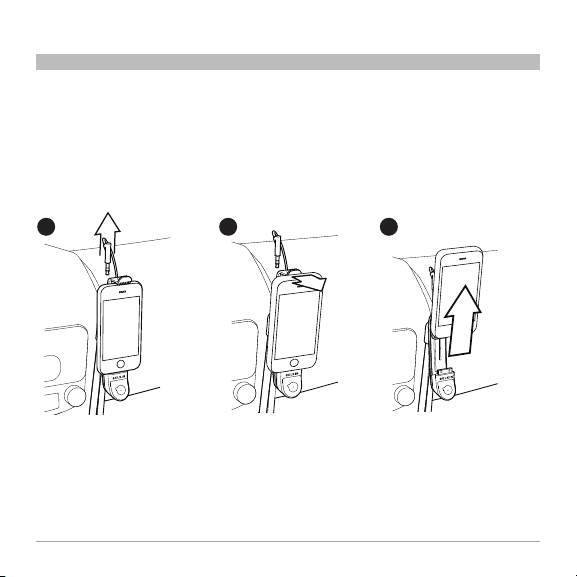
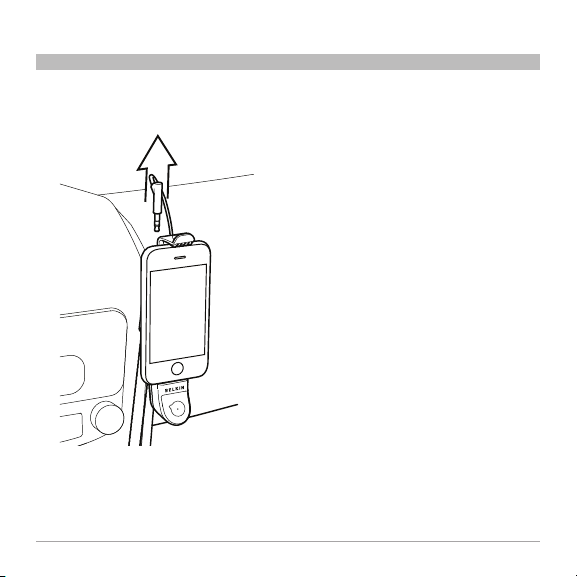
Remove your iPod from your TuneBase
1. Disconnect the audio cable from your iPod.
2. Push back on the front of the springboard and tilt your iPod forward until it clears
the lip of the springboard.
3. Lift your iPod out of the cradle.
1 2 3
TuneBas e™ FM wit h Hands-Fre e
8
Page 11
SET UP YOUR TUNEBASE
SECTIONS 1 3 654Table of Cont ents 2
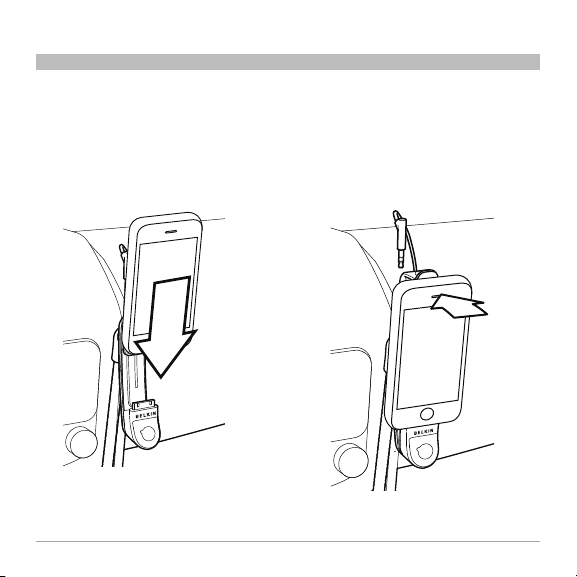
Dock Your iPod After Initial Setup
After you have adjusted the TuneBase to fit your iPod, you can inser t and remove your iPod
without further adjustment.
1. Seat your iPod on the dock connector. 2. Push the face of the iPod so that it
snaps into place under the lip of the
springboard.
TuneBas e™ FM wit h Hands-Fre e
9
Page 12
SET UP YOUR TUNEBASE
SECTIONS 1 3 654Table of Cont ents 2
3. Connect the audio cable from your
TuneBase to your iPod.
You only need to adjust the height of the
springboard when you are using a different
iPod or different case.
TuneBas e™ FM wit h Hands-Fre e
Power behavior
Your iPod will automatically pause when you
remove it from the TuneBase or when power
is unavailable from the power outlet.
Your TuneBase will automatically turn on
when your iPod is connected and power is
available. It turns off when you remove the
iPod or power becomes unavailable.
10
Page 13
USE YOUR TUNEBASE
SECTIONS 1 2 654Table of Cont ents 3
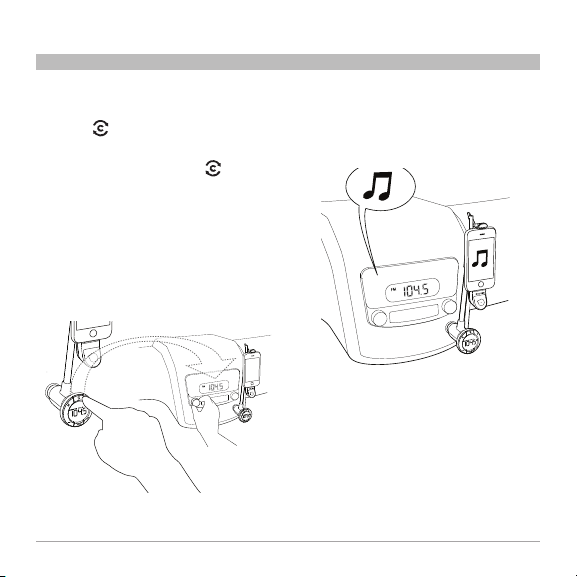
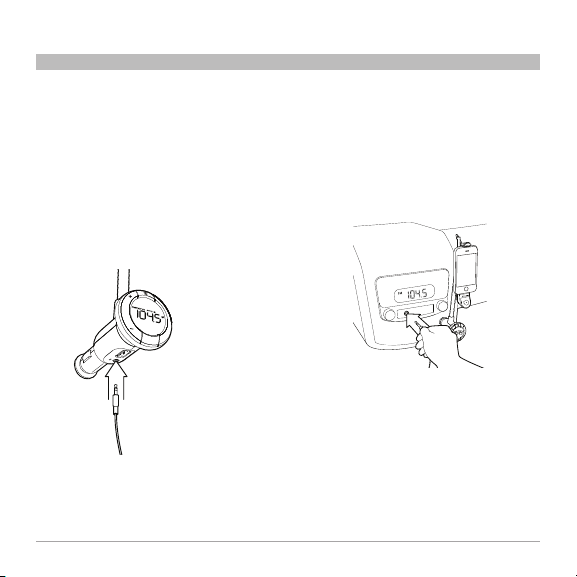
Find a Clear Station
1. Press (ClearScan). The TuneBase
will search for a clear frequency.
Note: If you immediately press when
you turn on your TuneBase, it may take 30
seconds to locate the best frequency.
2. On the TuneBase screen, “Tune to” will
appear followed by a frequency.
3. Tune your car stereo to the frequency
shown on the TuneBase.
TuneBas e™ FM wit h Hands-Fre e
4. If you hear interference on the new
frequency, repeat steps 1–3 or find a
station manually (below).
11
Page 14
USE YOUR TUNEBASE
SECTIONS 1 2 654Table of Cont ents 3
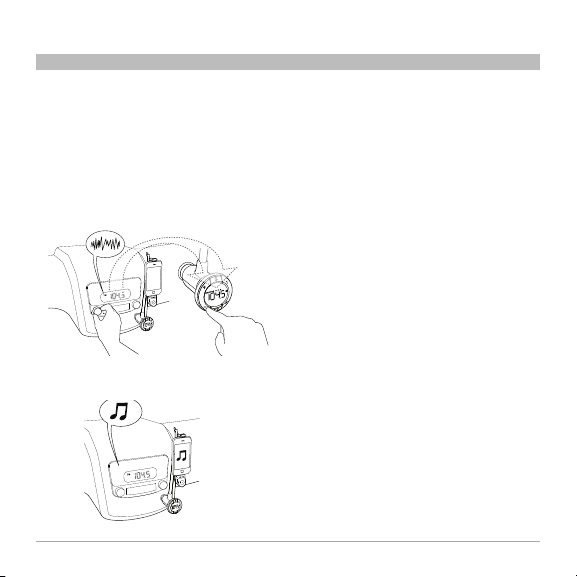
If you cannot find a clear frequency by
using ClearScan:
1. On your car stereo, tune to a frequency
that has a weak signal. For best results,
find a frequency that has only static.
2. On your TuneBase, press + or - to tune
to the same frequency.
3. You should be able to hear music from
your iPod clearly through your car
stereo.
TuneBas e™ FM wit h Hands-Fre e
Adjust your car stereo’s volume to get
the right level of sound. If the volume
remains too faint, increase the volume
on your iPod to boost the signal.
Save clear frequencies
You can save two frequencies by pressing
and holding buttons 1 and 2.
1. On the TuneBase, tune to the frequency
you want to save.
2. Press and hold the preset button 1 or 2
for two seconds. You will hear a beep
when the frequency is saved and the
memor y icon will flash on the screen.
3. Press and release the preset button to
tune the TuneBase to the station.
4. Tune your car stereo to the same
station.
12
Page 15
USE YOUR TUNEBASE
Play Pause
SECTIONS 1 2 654Table of Cont ents 3
Play Music
1. On your iPod, set the volume to
maximum. This helps to boost the
signal from the TuneBase.
2. Navigate to the track you want to play.
3. Use the Multifunction button to play and
pause music.
TuneBas e™ FM wit h Hands-Fre e
• Toplayorpausemusic,pressthe
Multifunction button once.
• Toskiptothenexttrack,pressthe
Multifunction button twice.
• Toskiptotheprevioustrack,pressthe
Multifunction button three times.
Note: Your iPod will automatically pause
when you remove it from the TuneBase
or when power is unavailable from the
power outlet.
13
Page 16
USE YOUR TUNEBASE
Play Pause
SECTIONS 1 2 654Table of Cont ents 3
Receive Calls
When there is an incoming call, the music will automatically pause to allow you to hear the
ringtone of your iPhone.
Receive calls through your TuneBase
The TuneBase has a built-in microphone that
lets you talk without a headset. The caller’s
voice will play through your car stereo
speakers.
1. Press the Multifunction button to receive
an incoming call.
2. Press the Multifunction
button again to hang up.
Your music will resume
when the call ends.
TuneBas e™ FM wit h Hands-Fre e
Reduce echo
If you hear an echo when talking hands-free,
do the following:
1. Position your iPhone so that its screen
is facing toward you and away from your
car’s speakers.
2. Set the ringer volume on your iPhone to
maximum and turn down the volume on
your car stereo until you no longer hear
the echo.
Receive calls through your
Bluetooth® headset
If you have a Bluetooth headset paired with
your iPhone, you can receive calls on your
headset. Press the button on your headset
to receive an incoming call. Your music will
resume when you hang up.
14
Page 17
USE YOUR TUNEBASE
Aux out cable
5V/500mA
pro
2
1
SECTIONS 1 2 654Table of Cont ents 3
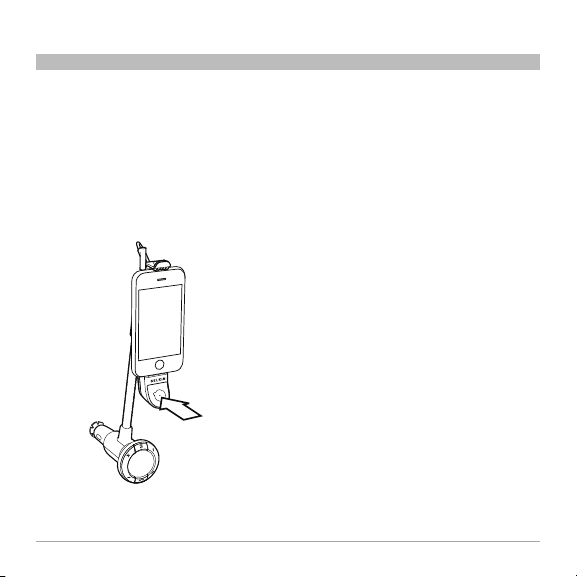
Connect to Your Stereo Using the Audio-Out Jack
The 3.5mm audio-out jack on the TuneBase lets you connect an audio cable (sold separately)
to the aux-in jack on your car stereo. You can also use the jack to connect to your car’s
cassette tape player using a tape adapter (sold separately).
1. Make sure your car stereo and
TuneBase are powered off.
3. Connect the audio cable to the aux-in
jack on your car stereo.
2. Connect an audio cable to the audio-out
jack on the TuneBase.
4. Power on your car stereo and
TuneBase.
5. On your car stereo, change the source
to “aux”.
6. You are now ready to listen to your iPod.
TuneBas e™ FM wit h Hands-Fre e
15
Page 18
USE YOUR TUNEBASE
USB
5V/500mA
pro
2
1
SECTIONS 1 2 654Table of Cont ents 3
Music on your iPod will now play through
your car stereo. Adjust your car stereo’s
volume to get the right level of sound. If
the volume remains too faint, increase the
volume on your iPod to boost the signal.
Note: Make sure you select the correct
source on your car stereo.
• Select“aux”whenthecableis
connected to the aux-in on your stereo.
• Select“tape”ifyouareusingacassette
adapter.
Warning: To prevent damage to your
TuneBase, turn off your car stereo and
TuneBase before connecting an audio
cable.
TuneBas e™ FM wit h Hands-Fre e
Charge Other USB Devic es
Use the USB port on the bottom of the
TuneBase to charge USB-powered devices
such as MP3 players and GPS units.
16
Page 19

USE YOUR TUNEBASE
SECTIONS 1 2 654Table of Cont ents 3
Use the PRO Button to Boost Sound
If you find the sound is too weak, press “PRO” to boost the sound coming from your iPod.
PRO will cycle through the following settings:
PRO Setting Use Description
Normal All types of audio No change to audio
PRO 1 Most types of music Increases the average
PRO 2 Quieter music Increases the average
Phone calls, mono
recordings, audio books,
podcasts
Try this if you do not receive
a clear signal
volume of the audio
volume more than PRO 1;
may cause distortion of
louder music
Increases the average
volume and transmits in
mono
TuneBas e™ FM wit h Hands-Fre e
17
Page 20

TROUBLESHOOTING
SECTIONS 1 2 3 65Table of Cont ents 4
You can quickly solve most problems with your TuneBase by following the advice in this
section.
You experience an echo when talking
hands-free.
Solution
• PositionyouriPhonesothatitsscreen
is facing toward you and away from your
car’s speakers.
• Makesuretheringervolumeonyour
iPhone is set to maximum.
• Turndownyourstereovolumeuntilyou
no longer hear an echo.
Your iPod or iPhone is not charging.
Solution
• MakesureyourTuneBasehasagood
connection to your car’s power outlet.
• MakesureyouriPodisfullyseatedin
the cradle.
• Makesurethepoweroutletisreceiving
power. Some vehicles do not provide
power to the power outlet unless the
vehicle is in ignition mode or the engine
is running.
Your TuneBase and iPod are in the way of
your vehicle’s controls.
Solution
Use the flexible gooseneck and the
articulation behind the docking cradle to
position your TuneBase away from your
vehicle’s controls. Position the gooseneck in
as upright a position as possible in relation
to the power adapter.
TuneBas e™ FM wit h Hands-Fre e
18
Page 21
TROUBLESHOOTING
CUT
CUT
CUT
SECTIONS 1 2 3 65Table of Cont ents 4
Your TuneBase rotates out of position around the center of the power outlet.
Solution 1
Be sure to solidly attach the cigarette lighter
adapter of the TuneBase to the power outlet.
Test the stability by pushing it sideways
before driving.
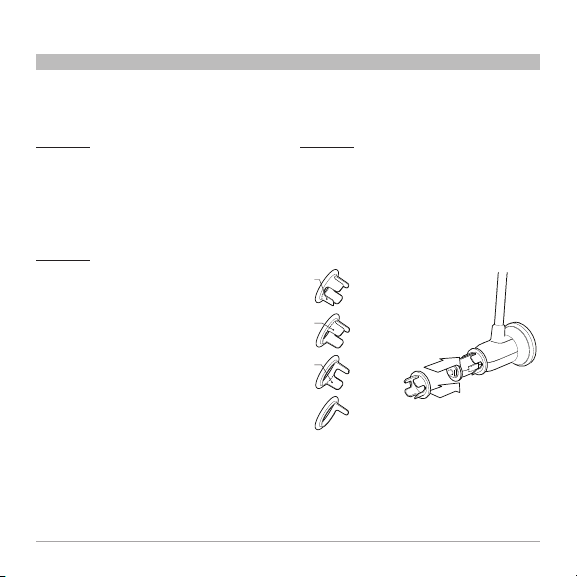
Solution 2
In some vehicles, the power outlet is wider
than the cigarette lighter adapter of the
TuneBase. You may notice a wiggle in your
TuneBase when you push it. In that case,
slide the fit ring around the cigarette lighter
adapter of the TuneBase. Then, insert the
cigarette lighter adapter into the power
outlet, making sure that all four prongs of the
fit ring securely fit in the power outlet. If the
fit is too tight, you can cut off one or more of
the prongs on the fit ring and try the fit again
(see Solution 3).
TuneBas e™ FM wit h Hands-Fre e
Solution 3
The fit ring may be too large for some cars’
power adapters. Use scissors to carefully
cut as many prongs as you need. Try to fit
your TuneBase into the power outlet after
each cut. When cutting multiple prongs, cut
prongs on opposing sides.
19
Page 22

TROUBLESHOOTING
SECTIONS 1 2 3 65Table of Cont ents 4
Your TuneBase connects firmly to the
power outlet, but it still rotates.
Solution
Check to see if the power outlet rotates
in its socket. If so, please consult your
vehicle’s manufacturer.
You cannot insert the cigarette lighter
adapter into the power outlet.
Solution
The cigarette lighter adapter’s rubber friction
washer may need to be centered. Follow the
steps below to center the friction washer.
1. Use pliers to loosen the nut on the front
of the cigarette lighter adapter slightly. It
is not necessary to remove the nut.
2. Move the friction washer back into
centered position.
3. Tighten the nut firmly.
TuneBas e™ FM wit h Hands-Fre e
The rubber friction washer remained in
the power outlet when you removed
your TuneBase.
Solution
This is rare, but if it occurs you can remove
the rubber washer from the power outlet and
place it back on the cigarette lighter adapter.
Warning: Disconnect the vehicle’s
battery. Any attempt to remove the
washer without disconnecting the
battery may result in physical harm to
you or damage to the vehicle.
Use pliers to carefully remove the friction
washer from the power outlet. Place the
friction washer back on the cigarette
lighter adapter. Then, reconnect the
vehicle’s battery.
20
Page 23

SAFET Y WARNINGS
SECTIONS 1 2 3 64Table of Cont ents 5
Your TuneBase requires full concentration
and both hands to install. Do not attempt
to connect your TuneBase while driving.
Make sure your TuneBase fits securely
and firmly into the power outlet before
driving. After installation, make sure your
TuneBase does not freely rotate in the
power outlet. Do not attempt to adjust or
retrieve an unsecured TuneBase or iPod
while driving. Adjust the position of your
TuneBase so that it and your iPod do not
interfere with any of the operating controls
of the vehicle.
TuneBas e™ FM wit h Hands-Fre e
Do not insert any objects other than the
cigarette lighter adapter into the power
outlet without disconnecting the batter y
of the vehicle first. Failure to observe
this safety warning can result in injury or
property damage.
Belkin does not assume any responsibilit y
for personal injury or propert y damage
incurred due to hazardous driving as a result
of interaction with the TuneBase, the iPod
and iPhone, or the vehicle’s power outlet.
21
Page 24

INFORMATION
SECTIONS 1 2 3 54Table of Cont ents 6
FCC Statement
Declaration of Conformity with FCC
Rules for Electromagnetic Compatibility
We, Belkin International, Inc., of 501 West
Walnut Street, Compton, CA 90220, declare
under our sole responsibility that the
product:
F8 Z441
to which this declaration relates, complies
with Part 15 of the FCC Rules. Operation
is subject to the following two conditions:
(1) this device may not cause harmful
interference, and (2) this device must
accept any interference received, including
interference that may cause undesired
operation.
This equipment has been tested and found
to comply with the limits for a Class B digital
device, pursuant to part 15 of the FCC
Rules. These limits are designed to provide
reasonable protection against harmful
interference in a residential installation.
This equipment generates, uses, and can
radiate radio frequency energy and, if not
installed and used in accordance with the
instructions, may cause harmful interference
TuneBas e™ FM wit h Hands-Fre e
to radio communications. However, there
is no guarantee that interference will not
occur in a particular installation. If this
equipment does cause harmful interference
to radio or television reception, which can be
determined by turning the equipment off and
on, the user is encouraged to try to correct
the interference by one of the following
measures:
• Reorientorrelocatethereceiving
antenna.
• Increasetheseparationbetweenthe
equipment and receiver.
• Connecttheequipmentintoanoutlet
on a circuit different from that which the
receiver is connected.
• Consultthedealeroranexperienced
radio/TV technician for help.
ICES
This Class B digital apparatus complies with
Canadian ICES-003.
IC
This Class B digital apparatus complies with
Canada RSS-210.
22
Page 25

INFORMATION
EU DECLARATION OF CONFORMITY
ýesky
[Czech]
[Belkin Ltd] tímto prohlašuje, že tento [F8Z441ea] je ve shodČ se základními požadavky a
dalšími pĜíslušnými ustanoveními smČrnice 1999/5/ES.
Dansk
[Danish]
Undertegnede [Belkin Ltd] erklærer herved, at følgende udstyr [F8Z441ea] overholder de
væsentlige krav og øvrige relevante krav i direktiv 1999/5/EF.
Deutsch
[German]
Hiermit erklärt [Belkin Ltd], dass sich das Gerät [F8Z441ea] in Übereinstimmung mit den
grundlegenden Anforderungen und den übrigen einschlägigen Bestimmungen der Richtlinie
1999/5/EG befindet.
Eesti
[Estonian]
Käesolevaga kinnitab [Belkin Ltd] seadme [F8Z441ea] vastavust direktiivi 1999/5/EÜ
põhinõuetele ja nimetatud direktiivist tulenevatele teistele asjakohastele sätetele.
English
Hereby, [Belkin Ltd], declares that this product [F8Z441ea] is in compliance with the essential
requirements and other relevant provisions of Directive 1999/5/EC.
Español
[Spanish]
Por medio de la presente [Belkin Ltd] declara que el [F8Z441ea] cumple con los requisitos
esenciales y cualesquiera otras disposiciones aplicables o exigibles de la Directiva 1999/5/CE.
ǼȜȜȘȞȚțȒ
[Greek]
ȂǼ ȉǾȃ ȆǹȇȅȊȈǹ [Belkin Ltd] ǻǾȁȍȃǼǿ ȅȉǿ [F8Z441ea] ȈȊȂȂȅȇĭȍȃǼȉǹǿ ȆȇȅȈ ȉǿȈ
ȅȊȈǿȍǻǼǿȈ ǹȆǹǿȉǾȈǼǿȈ Ȁǹǿ ȉǿȈ ȁȅǿȆǼȈ ȈȋǼȉǿȀǼȈ ǻǿǹȉǹȄǼǿȈ ȉǾȈ ȅǻǾīǿǹȈ 1999/5/ǼȀ.
Français
[French]
Par la présente [Belkin Ltd] déclare que l'appareil [F8Z441ea] est conforme aux exigences
essentielles et aux autres dispositions pertinentes de la directive 1999/5/CE.
Italiano
[Italian]
Con la presente [Belkin Ltd] dichiara che questo [F8Z441ea] è conforme ai requisiti essenziali
ed alle altre disposizioni pertinenti stabilite dalla direttiva 1999/5/CE.
Latviski
[Latvian]
Ar šo [Belkin Ltd Belkin Ltd ] deklarƝ, ka [F8Z441ea] / iekƗrtas tip s] atbilst DirektƯvas 1999/5/EK
bnjtiskajƗm prasƯbƗm un citiem ar to saistƯtajiem noteikumiem.
Lietuviǐ
[Lithuanian]
Šiuo [Belkin Ltd] deklaruoja, kad šis [F8Z441ea] atitinka esminius reikalavimus ir kitas
1999/5/EB Direktyvos nuostatas.
Nederlands
[Dutch]
Hierbij verklaart [Belkin Ltd] dat het toestel [F8Z441ea] in overeenstemming is met de
essentiële eisen en de andere relevante bepalingen van richtlijn 1999/5/EG.
Malti
[Maltese]
Hawnhekk, [Belkin Ltd], jiddikjara li dan [F8Z441ea] jikkonforma mal-ƫtiƥijiet essenzjali u ma
provvedimenti oƫrajn relevanti li hemm fid-Dirrettiva 1999/5/EC.
Magyar
[Hungarian]
Alulírott, [Belkin Ltd] nyilatkozom, hogy a [F8Z441ea] megfelel a vonatkozó alapvetõ
követelményeknek és az 1999/5/EC irányelv egyéb elõírásainak.
Polski
[Polish]
Niniejszym [Belkin Ltd] oĞwiadcza, Īe [F8Z441ea] jest zgodny z zasadniczymi wymogami oraz
pozostaáymi stosownymi postanowieniami Dyrektywy 1999/5/EC.
Português
[Portuguese]
[Belkin Ltd] declara que este [F8Z441ea] está conforme com os requisitos essenciais e outras
disposições da Directiva 1999/5/CE.
Slovensko
[Slovenian]
[I Belkin Ltd] izjavlja, da je ta [F8Z441ea] v skladu z bistvenimi zahtevami in ostalimi
relevantnimi doloþili direktive 1999/5/ES.
Slovensky
[Slovak]
[Belkin Ltd] týmto vyhlasuje, že [F8Z441ea] spĎĖa základné požiadavky a všetky príslušné
ustanovenia Smernice 1999/5/ES.
Suomi
[Finnish]
[Belkin Ltd] vakuuttaa täten että [F8Z441ea] tyyppinen laite on direktiivin 1999/5/EY oleellisten
vaatimusten ja sitä koskevien direktiivin muiden ehtojen mukainen.
Svenska
[Swedish]
Härmed intygar Belkin Ltd] att denna [F8Z441ea] står I överensstämmelse med de väsentliga
egenskapskrav och övriga relevanta bestämmelser som framgår av direktiv 1999/5/EG.
Íslenska
[Icelandic]
Hér með lýsir [Belkin Ltd] yfir því að [F8Z441ea] er í samræmi við grunnkröfur og aðrar kröfur,
sem gerðar eru í tilskipun 1999/5/EC.
Norsk
[Norwegian]
[Belkin Ltd] erklærer herved at utstyret [F8Z441ea] er i samsvar med de grunnleggende krav og
øvrige relevante krav i direktiv 1999/5/EF.
SECTIONS 1 2 3 54Table of Cont ents 6
TuneBas e™ FM wit h Hands-Fre e
0673
23
Page 26

INFORMATION
SECTIONS 1 2 3 54Table of Cont ents 6
Belkin International, Inc., Limited 3-Year Product Warranty
What this warrant y covers.
Belkin International, Inc. (“Belkin”) warrants
to the original purchaser of this Belkin
product that the product shall be free of
defects in design, assembly, material, or
workmanship.
What the period of cover age is.
Belkin warrants the Belkin product for
three years.
What will we do to correct problems?
Product Warranty.
Belkin will repair or replace, at its option,
any defective product free of charge (except
for shipping charges for the product). Belkin
reser ves the right to discontinue any of its
products without notice, and disclaims any
limited warranty to repair or replace any
such discontinued products. In the event
that Belkin is unable to repair or replace the
product (for example, because it has been
discontinued), Belkin will offer either a refund
or a credit toward the purchase of another
product from Belkin.com in an amount equal
TuneBas e™ FM wit h Hands-Fre e
to the purchase price of the product as
evidenced on the original purchase receipt
as discounted by its natural use.
What is not covered by this warranty?
All above warranties are null and void if the
Belkin product is not provided to Belkin
for inspection upon Belkin’s request at the
sole expense of the purchaser, or if Belkin
determines that the Belkin product has been
improperly installed, altered in any way, or
tampered with. The Belkin Product Warranty
does not protect against acts of God
such as flood, lightning, earthquake, war,
vandalism, theft, normal-use wear and tear,
erosion, depletion, obsolescence, abuse,
damage due to low voltage disturbances
(i.e. brownouts or sags), non-authorized
program, or system equipment modification
or alteration.
24
Page 27

INFORMATION
SECTIONS 1 2 3 54Table of Cont ents 6
How to get service.
To get service for your Belkin product you
must take the following steps:
1. Contact Belkin Ltd Express Business
park, Shipton Way, Rushden, NN106GL,
United Kingdom, Attn: Customer
Service or call Free Tech Support
(see next page), within 15 days of the
Occurence. Be prepared to provide the
following information:
a. The part number of the Belkin
product.
b. Where you purchased the product.
c. When you purchased the product.
d. Copy of original receipt.
TuneBas e™ FM wit h Hands-Fre e
2. Your Belkin Customer Service
Representative will then instruct you on
how to forward your receipt and Belkin
product and how to proceed with
your claim.
Belkin reserves the right to review the
damaged Belkin product. All costs of
shipping the Belkin product to Belkin for
inspection shall be borne solely by the
purchaser. If Belkin determines, in its sole
discretion, that it is impractical to ship
the damaged equipment to Belkin, Belkin
may designate, in its sole discretion, an
equipment repair facility to inspect and
estimate the cost to repair such equipment.
The cost, if any, of shipping the equipment
to and from such repair facility and of
such estimate shall be borne solely by
the purchaser. Damaged equipment must
remain available for inspection until the claim
is finalized. Whenever claims are settled,
Belkin reserves the right to be subrogated
under any existing insurance policies the
purchaser may have.
25
Page 28

INFORMATION
Free Tech Support*
SECTIONS 1 2 3 54Table of Cont ents 6
*Nation al call rates may ap ply
www.belkin.com
You can find additional
support information
on our website www.
belkin.com through the
tech-support area. If you
want to contact technical
support by phone,
please call the number
you need from this list*.
TuneBas e™ FM wit h Hands-Fre e
COUNTRY NUMBER INTERNET ADRESS
AUSTRIA 0820 200766 www.belkin.com/de/
BELGIUM 07 07 00 073
CZECH REPUBLIC 239 000 4 06 www.belkin.com/uk/
DENMARK 701 22 403 www.belkin.com/uk/
FINLAND 0972519123 www.belkin.com/uk/
FRANCE 08 - 25 54 00 26 www.belkin.com/fr/
GERMANY 0180 - 500 57 09 www.belkin.com/de/
GREECE 00800 - 44 14 23 90 www.belkin.com/uk/
HUNGARY 06 - 17 77 49 06 www.belkin.com/uk/
ICELAND 800 8534 www.belkin.com/uk/
IRELAND 0818 55 50 06 www.belkin.com/uk/
ITA LY 02 - 69 43 02 51 www.belkin.com/it/
LUXEMBOURG 34 20 80 85 60 www.belkin.com/uk/
NETHERLANDS 0900 - 040 07 90 €0.10 per minute www.belkin.com/nl/
NOR WAY 81 50 0287 www.belkin.com/uk/
POLAND 00800 - 441 17 37 www.belkin.com/uk/
PORTUGAL 707 200 676 ww w.belkin.com/uk/
RUSSIA 495 580 9541 www.belkin.com/
SOUTH AFRICA 0800 - 99 15 21 www.belkin.com/uk/
SPAIN 902 - 02 4 3 66 www.belkin.com/es/
SWEDEN 07 - 71 40 0 4 53 www.belkin.com/uk/
SWITZERLAND 08 - 48 00 02 19
UNITED KINGDOM 0845 - 607 77 87 www.belkin.com/uk/
OTHER COUNTRIES +44 - 1933 35 20 00
www.belkin.com/nl/
www.belkin.com/fr/
www.belkin.com/de/
www.belkin.com/fr/
26
Page 29

INFORMATION
SECTIONS 1 2 3 54Table of Cont ents 6
How state law relates to the warranty.
THIS WARRANTY CONTAINS THE SOLE
WARRANTY OF BELKIN. THERE ARE
NO OTHER WARRANTIES, EXPRESSED
OR, EXCEPT AS REQUIRED BY L AW,
IMPLIED, INCLUDING THE IMPLIED
WARRANTY OR CONDITION OF QUALITY,
MERCHANTABILITY OR FITNESS FOR
A PARTICULAR PURPOSE, AND SUCH
IMPLIED WARRANTIES, IF ANY, ARE
LIMITED IN DURATION TO THE TERM OF
THIS WARRANTY.
Some states do not allow limitations on how
long an implied warranty lasts, so the above
limitations may not apply to you.
TuneBas e™ FM wit h Hands-Fre e
IN NO EVENT SHALL BELKIN BE LIABLE
FOR INCIDENTAL, SPECIAL, DIRECT,
INDIRECT, CONSEQUENTIAL OR MULTIPLE
DAMAGES SUCH AS, BUT NOT LIMITED
TO, LOST BUSINESS OR PROFITS ARISING
OUT OF THE SALE OR USE OF ANY
BELKIN PRODUCT, EVEN IF ADVISED OF
THE POSSIBILITY OF SUCH DAMAGES.
This warranty gives you specific legal rights,
and you may also have other rights, which
may vary from state to state. Some states
do not allow the exclusion or limitation of
incidental, consequential, or other damages,
so the above limitations may not apply to you.
Licensed Under U.S. Patent No. 6,591,085
27
Page 30

Belkin Tech Support
Europe: www.belkin.com/support
Belkin Ltd .
Expre ss Business Par k
Shipton Way, Rushden
NN10 6GL, Unite d Kingdom
Belkin Ib eria
C/ Anabel Segura, 10 planta baja, Of. 2
28108, Alcobendas, Madrid
Spain
© 2009 Belkin International, Inc. All rights reserved. All trade names are registered trademarks of respective
manufacturers listed. iPod is a trademark of Apple Inc., registered in the U.S. and other countries. iPhone is
a tradem ark of Apple Inc. Th e Bluetooth name and the Bluetooth trade marks are owned by B luetooth SIG,
Inc., and ar e used by Belkin Inte rnational, Inc ., under license.
8820-00074ea
F8Z 441ea
Belkin SA S
130 rue de Sill y
92100 Boulogne-Billancourt,
France
Belkin It aly & Greece
Via Cardu cci, 7
Milano 20123
Italy
0673
Belkin G mbH
Hanebergstrasse 2
80637 Mun ich
Germany
Belkin B.V.
Boeing Ave nue 333
1119 PH Schipho l-Rijk,
Netherlands
Page 31

English
Français
DEutsch
nEDErlanDs
TuneBase™ FM
avec kit mains libres
Manuel de l'utilisateur
8820-00074ea F8Z441ea
Español
italiano
Page 32

TABLE DES MATIÈRES
SECTIONS 1 2 3 654Table des mat ières
1 Introduction .............................................................................................................1
Caractéristiques ...........................................................................................................1
Vous trouverez dans la boîte ....................................................................................... 2
Commandes .................................................................................................................2
2 Configurer votre TuneBase...................................................................................3
Brancher votre TuneBase ............................................................................................3
Ancrer l'iPod ..................................................................................................................4
Ancrer l'iPod après la configuration initiale ...............................................................9
3 Utiliser votre TuneBase .......................................................................................11
Trouver une fréquence nette .....................................................................................11
Lancer la lecture musicale ......................................................................................... 13
Recevoir des appels ...................................................................................................14
Se connecter à l'autoradio à l'aide de la prise audio en sortie ..............................15
Charger d'autres appareils USB ...............................................................................16
Utiliser le bouton PRO pour optimiser le son ..........................................................17
4 Dépannage .............................................................................................................18
5 Avertissements de sécurité ................................................................................21
6 Information .............................................................................................................22
TuneBas e™ FM avec k it mains lib res
i
Page 33

INTRODUCTION
SECTIONS 2 3 654Table des mat ières 1
Caractéristiques
iPod et iPhone
Écoutez votre iPod via votre autoradio
Gardez votre iPod dans son étui
Faites pivoter votre iPod à l'horizontale
Réglage d'une seule touche avec ClearScan
Support sûr et flexible pour iPod de tous
formats
Utilisez un adaptateur pour cassettes ou un
câble AUX
Chargez un autre appareil USB
TuneBas e™ FM avec k it mains lib res
iPhone seulement
Recevez des appels sur votre iPhone en
mains libres
Écoutez votre interlocuteur par les hautparleurs de votre autoradio
Microphone intégré pour appels en mains
libres
1
Page 34

INTRODUCTION
What’s in the Box
1.
2.
3.
pro
2
1
1.
2.
3.
4.
5.
6.
SECTIONS 2 3 654Table des mat ières 1
Contenu du coffret Commandes
1. TuneBase FM avec kit mains libres
2. Rondelle (facultative)
3. Coussinet pour iPod nano
TuneBas e™ FM avec k it mains lib res
1. ClearScan
2. Haut
3. Bas
4. Mémoire 1
5. Mémoire 2
6. Bouton PRO
2
Page 35

CONFIGURER VOTRE TUNEBASE
SECTIONS 1 3 654Table des mat ières 2
Brancher votre TuneBase
Suivez la procédure décrite dans cette section pour configurer votre TuneBase FM avec kit
mains libres (le TuneBase). Les étapes de la procédure sont les mêmes que celles du Guide
d'installation rapide, mais fournissent plus de détails.
1. Insérez le TuneBase dans l'allumecigare de votre voiture.
Avertissement : Ne faites pas pivoter le
TuneBase dans la prise allume-cigare. Si
vous rencontrez une résistance, débranchez
le TuneBase et réinsérez-le dans la position
voulue. Si vous ne le faites pas, vous risquez
d'endommager l'adaptateur de l'allumecigare ou la sortie d'alimentation.
2. Vérifiez l'ajustement dans la prise
allume-cigare. Le TuneBase devrait
offrir un peu de résistance lorsque vous
tentez de le faire pivoter dans la prise
allume-cigare. Il ne devrait pas pivoter
ou bouger de lui-même.
Si l'ajustement du TuneBase dans
la prise allume-cigare est trop lâche
ou trop serré, consultez la section
de dépannage pour savoir comment
obtenir un meilleur ajustement.
TuneBas e™ FM avec k it mains lib res
3
Page 36

CONFIGURER VOTRE TUNEBASE
SECTIONS 1 3 654Table des mat ières 2
Ancrer l'iPod
Vous pouvez garder votre iPod dans son étui lorsque vous l'ancrez.
1. Appuyez sur le bouton du support
et faites-le glisser jusqu'à sa hauteur
maximale.
TuneBas e™ FM avec k it mains lib res
2. Si vous possédez un iPod nano, insérez
le coussinet dans la fente du suppor t.
Le coussinet est compatible avec toutes
les versions de l'iPod nano.
4
Page 37

CONFIGURER VOTRE TUNEBASE
SECTIONS 1 3 654Table des mat ières 2
3. Connectez votre iPod au connecteur
dock du TuneBase, en vous assurant
qu'il soit bien en place.
TuneBas e™ FM avec k it mains lib res
4. Poussez sur votre iPod jusqu'à ce que le
dos de votre iPod touche au devant
du support.
5
Page 38

CONFIGURER VOTRE TUNEBASE
SECTIONS 1 3 654Table des mat ières 2
5. Poussez sur le dessus du support de
sorte qu'il tienne votre iPod bien en
place.
Remarque : Après avoir ajusté la hauteur du
support, il n'est pas nécessaire d'ajuster le
TuneBase pour insérer ou retirer votre iPod.
TuneBas e™ FM avec k it mains lib res
6. Connectez le câble audio à la prise pour
écouteurs de votre iPod.
6
Page 39

CONFIGURER VOTRE TUNEBASE
ok
Rotating
Landscape
SECTIONS 1 3 654Table des mat ières 2
7. Pliez la tige flexible pour positionner votre iPod tel que désiré.
Avertissement : Ne retirez pas le TuneBase de la prise allume-cigare
lorsque l'iPod est dans le support.
Évitez de positionner pas le TuneBase comme suit :
TuneBas e™ FM avec k it mains lib res
7
Page 40

CONFIGURER VOTRE TUNEBASE
Removal
SECTIONS 1 3 654Table des mat ières 2
Retirer l'iPod du TuneBase
1. Débranchez le câble audio de votre iPod.
2. Appuyez sur le devant du support et inclinez votre iPod vers l'avant jusqu'à ce qu'il
dépasse
la languette du support.
3. Retirez votre iPod du support.
1 2 3
TuneBas e™ FM avec k it mains lib res
8
Page 41

CONFIGURER VOTRE TUNEBASE
SECTIONS 1 3 654Table des mat ières 2
Ancrer l'iPod après la configuration initiale
Après avoir ajusté le TuneBase pour votre iPod, vous pouvez insérer et retirer ce dernier sans
faire d'ajustements.
1. Branchez votre iPod sur le connecteur
dock.
2. Appuyez sur la face de votre iPod
de sor te qu'il clique en place sous la
languette du support.
TuneBas e™ FM avec k it mains lib res
9
Page 42

CONFIGURER VOTRE TUNEBASE
SECTIONS 1 3 654Table des mat ières 2
3. Connectez le câble audio du TuneBase
vers votre iPod.
Vous n'aurez à ajuster la hauteur du support
que lorsque vous utilisez un autre iPod ou
un étui différent.
TuneBas e™ FM avec k it mains lib res
Alimentation
La lecture sera automatiquement
interrompue lorsque vous retirez votre
iPod du TuneBase ou lorsque aucune
alimentation n'est disponible à la prise
allume-cigare.
Votre TuneBase s'allume automatiquement
lorsque votre iPod est connecté et que
l'alimentation est disponible. Il s'éteint
lorsque vous retirez l'iPod ou lorsque
aucune alimentation n'est disponible à la
prise allume-cigare.
10
Page 43

UTILISER VOTRE TUNEBASE
SECTIONS 1 2 654Table des mat ières 3
Trouver une fréquence nette
1. Appuyez sur (ClearScan).
Le TuneBase cherchera alors une
fréquence nette.
Remarque : Si vous appuyez
immédiatement sur lorsque vous
allumez votre TuneBase, trouver la meilleure
fréquence peut prendre jusqu'à 30
secondes.
2. À l'écran du TuneBase, le message
« Tune to » apparaît, suivi d'une
fréquence.
3. Syntonisez sur votre autoradio la
fréquence affichée par le TuneBase.
TuneBas e™ FM avec k it mains lib res
4. Si vous entendez des interférences
sur cette nouvelle fréquence, répétez
les étapes 1 à 3 ou recherchez
manuellement une fréquence (voir
ci-dessous).
11
Page 44

UTILISER VOTRE TUNEBASE
SECTIONS 1 2 654Table des mat ières 3
Si vous ne pouvez pas trouver une
fréquence nette à l'aide de ClearScan :
1. Réglez votre autoradio sur une
fréquence avec un signal faible. Pour
de meilleurs résultats, choisissez une
fréquence avec beaucoup de parasites.
2. Appuyez ensuite sur + ou - pour régler
cette même fréquence sur le TuneBase.
3. Vous devriez entendre la musique de
votre iPod par les haut-parleurs de votre
autoradio.
TuneBas e™ FM avec k it mains lib res
Réglez le volume de votre autoradio
selon le niveau désiré. Si le son est trop
faible, montez le volume sur votre iPod
pour optimiser le signal.
Sauvegarder les fréquences nettes
Vous pouvez sauvegarder deux fréquences
en appuyant et en maintenant les boutons
1 et 2.
1. Syntonisez la fréquence à enregistrer
sur le TuneBase.
2. Appuyez sur le bouton 1 ou 2 et tenezle enfoncé pendant deux secondes.
Un bip sonore vous indique que la
fréquence est enregistrée et l'icône de
mémoire clignote à l'écran.
3. Appuyez et relâchez le bouton de
mémoire pour syntoniser la fréquence
enregistrée sur le TuneBase.
4. Syntonisez cette même fréquence sur
votre autoradio.
12
Page 45

UTILISER VOTRE TUNEBASE
Play Pause
SECTIONS 1 2 654Table des mat ières 3
Lancer la lecture musicale
1. Réglez le volume au maximum sur votre
iPod. Ceci aide à optimiser le signal
provenant du TuneBase.
2. Naviguez vers la piste que vous désirez
faire jouer.
3. Servez-vous du bouton multifonctionnel
pour faire faire jouer/interrompre la
musique.
TuneBas e™ FM avec k it mains lib res
• Pourlire/arrêtertemporairement
la musique, appuyez sur le bouton
multifonctionnel.
• Pourpasseràlapistesuivante,appuyez
deux fois sur le bouton multifonctionnel.
• Pourpasseràlapisteprécédente,
appuyez trois fois sur le bouton
multifonctionnel.
Remarque : La lecture sera
automatiquement interrompue lorsque vous
retirez votre iPod du TuneBase
ou lorsque aucune alimentation n'est
disponible à la prise allume-cigare.
13
Page 46

UTILISER VOTRE TUNEBASE
Play Pause
SECTIONS 1 2 654Table des mat ières 3
Recevoir des appels
Lorsque vous recevez un appel, la lecture musicale est automatiquement interrompue pour
faire entendre la sonnerie de votre iPhone.
Recevoir des ap pel via le TuneBase
Le TuneBase possède un microphone
intégré vous permettant de faire des
appels en mains libres. La voix de votre
interlocuteur se fera entendre dans les hautparleurs de l'autoradio.
1. Appuyez sur le bouton multifonctionnel
pour prendre l'appel entrant.
2. Appuyez de nouveau sur le bouton
multifonctionnel
pour raccrocher.
La lecture musicale reprendra
à la fin de l'appel.
Réduire l'écho
Si vous entendez de l'écho lorsque vous
parlez en mains libres, procédez comme
suit :
1. Positionnez votre iPhone de sorte que
l'écran soit face à vous, en l'éloignant
des haut-parleurs de la voiture.
2. Réglez le volume de la sonnerie de
votre iPhone au maximum et diminuez
le volume de l'autoradio jusqu'à ce que
vous n'entendiez plus d'écho.
Recevoir des appel via une
oreillette B luetooth
®
Si vous possédez une oreillette Bluetooth
associée à votre iPhone, vous pouvez
recevoir des appels dans votre oreillette.
Appuyez sur le bouton de votre oreillette
pour recevoir l'appel entrant. La lecture
de votre musique reprendra lorsque vous
raccrochez.
TuneBas e™ FM avec k it mains lib res
14
Page 47

UTILISER VOTRE TUNEBASE
Aux out cable
5V/500mA
pro
2
1
SECTIONS 1 2 654Table des mat ières 3
Se connecter à l'autoradio à l'aide de la prise audio en sortie
La prise audio en sortie 3,5 mm du TuneBase permet de connecter un un câble audio (vendu
séparément) à la prise AUX-in de votre autoradio. Vous pouvez également utiliser cette prise
pour la connexion à votre lecteur de cassettes au moyen d'un adaptateur (vendu séparément).
1. Assurez-vous que l'autoradio et le
TuneBase sont éteints.
3. Connectez le câble audio à la prise
AUX-in sur l'autoradio.
2. Connectez le câble audio à la prise de
sortie audio du TuneBase.
4. Allumez l'autoradio et le TuneBase.
5. Sur l'autoradio, changez la source audio
pour « AUX ».
6. Vous pouvez désormais écouter la
musique de votre iPod.
TuneBas e™ FM avec k it mains lib res
15
Page 48

UTILISER VOTRE TUNEBASE
USB
5V/500mA
pro
2
1
SECTIONS 1 2 654Table des mat ières 3
Vous entendrez maintenant la musique de
votre iPod par votre autoradio. Réglez le
volume de votre autoradio selon le niveau
désiré. Si le son est trop faible, montez le
volume sur votre iPod pour optimiser le
signal.
Remarque : Assurez-vous de sélectionner
la source appropriée sur votre autoradio.
• Sélectionnez«AUX»lorsquelecâble
est connecté à la prise AUX-in de votre
autoradio.
• Sélectionnez«tape»(cassette)sivous
utilisez un adaptateur pour lecteur de
cassettes.
Avertissement : Afin d'éviter
d'endommager votre TuneBase, éteignez
l'autoradio et le TuneBase avant de
connecter un câble audio.
TuneBas e™ FM avec k it mains lib res
Charger d'autres appareils USB
Utilisez le port USB sous le TuneBase
pour charger des appareils à chargement
par USB comme un baladeur MP3 ou un
appareil GPS.
16
Page 49

UTILISER VOTRE TUNEBASE
SECTIONS 1 2 654Table des mat ières 3
Utiliser le bouton PRO pour optimiser le son
Si le son est trop faible, appuyez sur « PRO » pour optimiser le son provenant de votre iPod.
Le bouton PRO propose les réglages suivants :
Réglage PRO Utilisation Description
Normal Tout type de son Aucun changement au son
PRO 1 La plupart des t ypes de
musique
PRO 2 Musique calme Augmente le volume
Appels, enregistrements
mono, audiolivres, podcasts
Essayez ce réglage si vous
ne recevez pas un signal
clair
Augmente le volume moyen
du son
moyen plus fortement que
PRO1 ; peut entraîner une
distorsion de la musique
plus forte
Augmente le volume moyen
et transmet en mode mono
TuneBas e™ FM avec k it mains lib res
17
Page 50

DÉPANNAGE
SECTIONS 1 2 3 65Table des mat ières 4
Vous pouvez rapidement résoudre la plupart des problèmes du TuneBase en suivant les
conseils proposés dans cette section.
Vous entendez de l'écho lorsque vous
parlez en mains libres.
Solution
• PositionnezvotreiPhonedesorteque
l'écran soit face à vous, en l'éloignant
des haut-parleurs de la voiture.
• Assurez-vousquelevolumedela
sonnerie sur votre iPhone est réglé au
maximum.
• Diminuezlesondel'autoradiojusqu'à
ce que vous n'entendiez plus d'écho.
L'iPod ou iPhone ne se charge pas.
Solution
• Assurez-vousqueleTuneBaseestbien
connecté à la prise allume-cigare.
• Assurez-vousquel'iPodestbienancré
dans le support.
• Assurez-vousquelaprisedecourant
est alimentée. Certains véhicules
n'alimentent pas le connecteur sauf si la
voiture est en mode d'allumage ou si le
moteur tourne.
Le TuneBase et l'iPod empêchent
d'accéder aux commandes du tableau de
bord du véhicule.
Solution
Utilisez le col et l'articulation derrière le
support pour éloigner le TuneBase des
commandes du véhicule. Positionnez
le col dans une position aussi verticale
que possible par rapport à l'adaptateur
d'alimentation.
TuneBas e™ FM avec k it mains lib res
18
Page 51

DÉPANNAGE
CUT
CUT
CUT
SECTIONS 1 2 3 65Table des mat ières 4
Le TuneBase pivote hors position dans la prise de l'allume-cigare.
Solution 1
Assurez-vous que l'adaptateur pour
prise allume-cigare du TuneBase FM est
solidement branché dans l'allume-cigare de
votre voiture. Vérifiez sa stabilité en tentant
de faire bouger l'unité de gauche à droite,
avant de conduire votre voiture.
Solution 2
Dans certains véhicules, la prise est plus
grande que l'adaptateur pour allume-cigare
du TuneBase. Vous risquez de remarquer
un petit mouvement du TuneBase lorsque
vous le poussez. Le cas échéant, enfilez la
rondelle autour de l'adaptateur pour prise
allume-cigare du TuneBase. Ensuite, insérez
l'adaptateur dans la prise allume-cigare, en
vous assurant que les quatre saillies de la
rondelle s'ajustent parfaitement à l'allumecigare. Si l'ajustement est trop serré, coupez
une ou plusieurs saillie(s) de la rondelle et
vérifiez à nouveau l'ajustement
(voir Solution 3).
TuneBas e™ FM avec k it mains lib res
Solution 3
Il se peut que la rondelle soit trop grande
pour certains allume-cigares. Vous pouvez
vous servir de ciseaux pour couper avec
précaution autant de saillies que nécessaire.
Vérifiez l'ajustement du TuneBase dans
l'allume-cigare après chaque coupe.
Lorsque vous coupez plusieurs saillies,
coupez les saillies opposées.
19
Page 52

DÉPANNAGE
SECTIONS 1 2 3 65Table des mat ières 4
Le TuneBase est fermement fixé sur la
prise, mais il continue à pivoter.
Solution
Vérifiez si la prise allume-cigare pivote elle-
même
dans son réceptacle. Si c'est le cas,
contactez le fabricant du véhicule.
Vous ne parvenez pas à insérer
l'adaptateur pour allume-cigare dans
la prise.
Solution
La rondelle de friction en caoutchouc de
l'adaptateur pour allume-cigare doit être
recentrée. Pour ce faire, procédez avec
précaution comme indiqué ci-dessous.
1. À l'aide de pinces, dévissez légèrement
l'écrou situé à l'extrémité de l'adaptateur
pour prise allume-cigare. Il n'est pas
utile de le retirer.
2. Replacez la rondelle de friction dans sa
position centrée.
3. Serrez fermement l'écrou.
TuneBas e™ FM avec k it mains lib res
La rondelle de friction en caoutchouc est
restée dans la prise lorsque vous
avez retir é le TuneBase.
Solution
Ceci est rare, mais si cela se produit vous
pouvez la retirer de la prise et la remettre sur
l'adaptateur pour allume-cigare.
Avertissement : Débranchez la batterie
du véhicule. Toute tentative de retirer la
rondelle sans préalablement débrancher
la batterie peut entraîner des blessures
graves ou endommager le véhicule.
Utilisez des pinces pour délicatement retirer
la rondelle de friction de la prise. Replacez la
rondelle de friction sur l'adaptateur
pour allume-cigare. Ensuite, rebranchez la
batterie du véhicule
20
Page 53

AVERTISSEMENTS DE SÉCURITÉ
SECTIONS 1 2 3 64Table des mat ières 5
L'installation du TuneBase requiert de la
concentration et vos deux mains. N'essayez
pas de brancher le TuneBase en
conduisant. Assurez-vous que le TuneBase
est bien fixé sur la prise de courant avant
de vous mettre à rouler. Après l'installation,
assurez-vous que TuneBase ne pivote pas
librement dans la prise d'alimentation.
N'essayez pas d'ajuster ou de replacer
un TuneBase qui n'est pas stable en
cours de conduite. Ajustez le TuneBase
de façon à ce que le TuneBase et l'iPod
n'empêchent pas l'accès aux commandes
du véhicule.
TuneBas e™ FM avec k it mains lib res
N'insérez aucun objet autre que
l'adaptateur pour allume-cigare dans la
prise sans préalablement débrancher
la batterie du véhicule. Ignorer cet
avertissement risque d'entraîner des
blessures graves ou des dommages
matériels.
Belkin n'accepte aucune responsabilité
en cas de blessure corporelle ou de
dommage matériel à la suite d'une conduite
dangereuse résultant de l'interaction avec
le TuneBase, l'iPod et l'iPhone, ou la prise
d'alimentation du véhicule.
21
Page 54

INFORMATIONS
SECTIONS 1 2 3 54Table des mat ières 6
Déclaration FCC
Déclaration de conformité à la
réglementation FCC en matière de
compatibilité électromagnétique
Nous, Belkin International, Inc., sis au 501
West Walnut Street, Compton CA, 90220,
États-Unis, déclarons sous notre seule
responsabilité que le produit : F8 Z441
auquel se réfère la présente déclaration,
est conforme aux normes énoncées à
l'alinéa 15 de la réglementation de la FCC.
Son fonctionnement doit satisfaire aux
deux conditions suivantes : (1) cet appareil
ne peut pas provoquer d'interférence
nuisible et (2) cet appareil doit accepter
toute interférence reçue, y compris
des interférences pouvant entraîner un
fonctionnement non désiré.
L'appareil a été testé et satisfait aux
limites de la classe B des appareils
numériques, conformément à l'alinéa
15 de la réglementation de la FCC. Ces
limites sont conçues de manière à assurer
une protection raisonnable contre les
interférences nuisibles au sein d'une
installation domestique. L'appareil génère,
utilise et peut irradier une énergie de
fréquence radio. S'il n'est pas installé et
utilisé conformément aux instructions, il
TuneBas e™ FM avec k it mains lib res
peut causer des interférences nuisibles sur
le plan de la réception radio ou télévision.
Toutefois, il n'est nullement garanti que des
interférences ne se produiront pas dans
certaines installations. Si cet équipement
cause des interférences nuisibles sur le plan
de la réception radio ou télévision pouvant
être déterminées en mettant l'appareil sous
et hors tension, l'utilisateur est invité à tester
et à corriger l'interférence en prenant l'une
des mesures suivantes :
• Réorienteroudéplacerl'antennede
réception.
• Augmenterladistanceentrel'appareilet
le récepteur.
• Connecterl'appareilàuneprisesituée
sur un circuit différent de celui sur lequel
le récepteur est connecté.
• Consulterlerevendeurouuntechnicien
radio/ TV pour obtenir de l'aide.
ICES
Cet appareil numérique de la classe B est
conforme à la norme NMB-003 du Canada.
IC
Cet appareil numérique de classe B est
conforme à la norme CNR-210 du Canada.
22
Page 55

INFORMATIONS
EU DECLARATION OF CONFORMITY
ýesky
[Czech]
[Belkin Ltd] tímto prohlašuje, že tento [F8Z441ea] je ve shodČ se základními požadavky a
dalšími pĜíslušnými ustanoveními smČrnice 1999/5/ES.
Dansk
[Danish]
Undertegnede [Belkin Ltd] erklærer herved, at følgende udstyr [F8Z441ea] overholder de
væsentlige krav og øvrige relevante krav i direktiv 1999/5/EF.
Deutsch
[German]
Hiermit erklärt [Belkin Ltd], dass sich das Gerät [F8Z441ea] in Übereinstimmung mit den
grundlegenden Anforderungen und den übrigen einschlägigen Bestimmungen der Richtlinie
1999/5/EG befindet.
Eesti
[Estonian]
Käesolevaga kinnitab [Belkin Ltd] seadme [F8Z441ea] vastavust direktiivi 1999/5/EÜ
põhinõuetele ja nimetatud direktiivist tulenevatele teistele asjakohastele sätetele.
English
Hereby, [Belkin Ltd], declares that this product [F8Z441ea] is in compliance with the essential
requirements and other relevant provisions of Directive 1999/5/EC.
Español
[Spanish]
Por medio de la presente [Belkin Ltd] declara que el [F8Z441ea] cumple con los requisitos
esenciales y cualesquiera otras disposiciones aplicables o exigibles de la Directiva 1999/5/CE.
ǼȜȜȘȞȚțȒ
[Greek]
ȂǼ ȉǾȃ ȆǹȇȅȊȈǹ [Belkin Ltd] ǻǾȁȍȃǼǿ ȅȉǿ [F8Z441ea] ȈȊȂȂȅȇĭȍȃǼȉǹǿ ȆȇȅȈ ȉǿȈ
ȅȊȈǿȍǻǼǿȈ ǹȆǹǿȉǾȈǼǿȈ Ȁǹǿ ȉǿȈ ȁȅǿȆǼȈ ȈȋǼȉǿȀǼȈ ǻǿǹȉǹȄǼǿȈ ȉǾȈ ȅǻǾīǿǹȈ 1999/5/ǼȀ.
Français
[French]
Par la présente [Belkin Ltd] déclare que l'appareil [F8Z441ea] est conforme aux exigences
essentielles et aux autres dispositions pertinentes de la directive 1999/5/CE.
Italiano
[Italian]
Con la presente [Belkin Ltd] dichiara che questo [F8Z441ea] è conforme ai requisiti essenziali
ed alle altre disposizioni pertinenti stabilite dalla direttiva 1999/5/CE.
Latviski
[Latvian]
Ar šo [Belkin Ltd Belkin Ltd ] deklarƝ, ka [F8Z441ea] / iekƗrtas tip s] atbilst DirektƯvas 1999/5/EK
bnjtiskajƗm prasƯbƗm un citiem ar to saistƯtajiem noteikumiem.
Lietuviǐ
[Lithuanian]
Šiuo [Belkin Ltd] deklaruoja, kad šis [F8Z441ea] atitinka esminius reikalavimus ir kitas
1999/5/EB Direktyvos nuostatas.
Nederlands
[Dutch]
Hierbij verklaart [Belkin Ltd] dat het toestel [F8Z441ea] in overeenstemming is met de
essentiële eisen en de andere relevante bepalingen van richtlijn 1999/5/EG.
Malti
[Maltese]
Hawnhekk, [Belkin Ltd], jiddikjara li dan [F8Z441ea] jikkonforma mal-ƫtiƥijiet essenzjali u ma
provvedimenti oƫrajn relevanti li hemm fid-Dirrettiva 1999/5/EC.
Magyar
[Hungarian]
Alulírott, [Belkin Ltd] nyilatkozom, hogy a [F8Z441ea] megfelel a vonatkozó alapvetõ
követelményeknek és az 1999/5/EC irányelv egyéb elõírásainak.
Polski
[Polish]
Niniejszym [Belkin Ltd] oĞwiadcza, Īe [F8Z441ea] jest zgodny z zasadniczymi wymogami oraz
pozostaáymi stosownymi postanowieniami Dyrektywy 1999/5/EC.
Português
[Portuguese]
[Belkin Ltd] declara que este [F8Z441ea] está conforme com os requisitos essenciais e outras
disposições da Directiva 1999/5/CE.
Slovensko
[Slovenian]
[I Belkin Ltd] izjavlja, da je ta [F8Z441ea] v skladu z bistvenimi zahtevami in ostalimi
relevantnimi doloþili direktive 1999/5/ES.
Slovensky
[Slovak]
[Belkin Ltd] týmto vyhlasuje, že [F8Z441ea] spĎĖa základné požiadavky a všetky príslušné
ustanovenia Smernice 1999/5/ES.
Suomi
[Finnish]
[Belkin Ltd] vakuuttaa täten että [F8Z441ea] tyyppinen laite on direktiivin 1999/5/EY oleellisten
vaatimusten ja sitä koskevien direktiivin muiden ehtojen mukainen.
Svenska
[Swedish]
Härmed intygar Belkin Ltd] att denna [F8Z441ea] står I överensstämmelse med de väsentliga
egenskapskrav och övriga relevanta bestämmelser som framgår av direktiv 1999/5/EG.
Íslenska
[Icelandic]
Hér með lýsir [Belkin Ltd] yfir því að [F8Z441ea] er í samræmi við grunnkröfur og aðrar kröfur,
sem gerðar eru í tilskipun 1999/5/EC.
Norsk
[Norwegian]
[Belkin Ltd] erklærer herved at utstyret [F8Z441ea] er i samsvar med de grunnleggende krav og
øvrige relevante krav i direktiv 1999/5/EF.
SECTIONS 1 2 3 54Table des mat ières 6
TuneBas e™ FM avec k it mains lib res
0673
23
Page 56

INFORMATIONS
SECTIONS 1 2 3 54Table des mat ières 6
Garantie produit limitée de 3 ans de Belkin International, Inc.
Couverture offerte par la garantie
Belkin International, Inc. (« Belkin ») garantit
à l'acheteur initial de ce produit Belkin
que le produit est exempt de défauts de
conception, de montage, de matériau et de
fabrication.
Période de garantie
Belkin garantit ce produit Belkin pour
une période de trois ans.
En cas de problème
Garantie du produit
Belkin s'engage à réparer ou à remplacer
gratuitement, à sa convenance, tout
produit défectueux (à l'exception des frais
d'expédition du produit). Belkin se réserve
le droit de mettre fin, sans avis préalable,
à la production de n'impor te quel produit
et rejette toute garantie limitée consistant
en la réparation ou au remplacement de
ces produits dont la fabrication a cessé. Si
Belkin n'est pas en mesure de réparer ou
de remplacer le produit (par exemple, parce
que sa production a été arrêtée), Belkin
proposera soit un remboursement ou une
TuneBas e™ FM avec k it mains lib res
note de crédit pour l'achat d'un autre produit
de Belkin.com, pour un montant égal à celui
du prix d'achat du produit, tel que figurant
sur la preuve d'achat originale et après
déduction de la valeur équivalant à son
usage normal.
Exclusions de la garantie
Toutes les garanties précitées sont nulles et
non avenues si le produit Belkin n'est pas
retourné à Belkin, à la demande expresse
de celui-ci, l'acheteur étant responsable de
l'acquittement des frais d'expédition, ou si
Belkin détermine que le produit Belkin a été
installé de façon inappropriée ou modifié
d'une quelconque manière. La garantie du
produit Belkin ne protège pas contre des
calamités naturelles comme les inondations,
les tremblements de terre, la foudre, la
guerre, le vandalisme, le vol, l'usure normale,
l'érosion, l'épuisement, l'obsolescence,
l'abus, les dommages provoqués par des
perturbations de basse tension (baisses
ou affaissements de tension, par exemple),
un programme non autorisé ou une
modification de l'équipement du système.
24
Page 57

INFORMATIONS
SECTIONS 1 2 3 54Table des mat ières 6
Pour une demande d'intervention
Procédez comme suit pour obtenir une
réparation de votre produit Belkin :
1. Communiquez avec Belkin Ltd., Express
Business Park, Shipton Way, Rushden,
NN10 6GL, Royaume-Uni, à l'attention
de : Customer Service (service client)
ou téléphonez au service d'assistance
technique gratuit (voir en page suivante)
dans les 15 jours suivant l'événement.
Préparez-vous à fournir les informations
suivantes :
a. Référence du produit Belkin.
b. Lieu d'achat du produit.
c. Date de l'achat du produit.
d. Copie de la preuve d'achat originale.
2. Le représentant du service client Belkin
vous indiquera alors comment envoyer
votre facture et le produit Belkin, et
comment présenter
votre réclamation.
TuneBas e™ FM avec k it mains lib res
Belkin se réserve le droit d'examiner
le produit Belkin endommagé. Tous
les frais d'expédition du produit Belkin
à l'adresse de Belkin en vue de son
inspection seront entièrement à la charge
de l'acheteur. Si Belkin détermine, à son
entière discrétion, qu'il serait impossible
d’expédier l’équipement endommagé à
Belkin, Belkin peut désigner un atelier de
réparation de son choix pour l'inspection
du produit et l'établissement d'un devis
de réparation. Les coûts, s’il en est, pour
l’expédition de l’équipement jusqu’à l’atelier
de réparation et le retour, ainsi que pour
l’estimation, seront entièrement à la charge
de l’acheteur. L’équipement endommagé
doit être disponible pour inspection jusqu’au
règlement de la demande de réclamation.
Lorsqu’un règlement intervient, Belkin se
réser ve le droit d'un recours en subrogation
sous toute autre police d'assurance détenue
par l'acheteur.
25
Page 58

INFORMATIONS
Assistance
technique gratuite*
*Hors co ût de
communication nationale
www.belkin.com
Vous trouverez des
informations techniques
supplémentaires sur
le site www.belkin.
com dans la section
d'assistance technique-.
Pour contacter le service
d'assistance technique
par téléphone, veuillez
composer le numéro
correspondant dans la
liste ci-contre*.
TuneBas e™ FM avec k it mains lib res
SECTIONS 1 2 3 54Table des mat ières 6
PAYS NUMÉRO
AUTRICHE 0820 200766 www.belkin.com/de/
BELGIQUE 07 07 00 073
RÉPUBLIQUE TCHÈQUE 239 000 406 www.belkin.com/uk/
DANEMARK 701 22 403 www.belkin.com/uk/
FINLANDE 0972519123 www.belkin.com/uk/
FRANCE 08 - 25 54 00 26 www.belkin.com/fr/
ALLEMAGNE 0180 - 500 57 09 ww w.belkin.com/de/
GRÈCE 00800 - 44 14 23 90 www.belkin.com/uk/
HONGRIE 06 - 17 77 49 06 ww w.belkin.com/uk/
ISLANDE 800 8534 www.belkin.com/uk/
IRLANDE 0818 55 50 06 ww w.belkin.com/uk/
ITAL IE 02 - 69 43 02 51 www.belkin.com/it/
LUXEMBOURG 34 20 80 8 5 60 www.belkin.com/uk/
PAYS- BA S 0900 - 040 07 90 0,10 € par minute www.belkin.com/nl/
NORVÈGE 81 50 0287 www.belkin.com/uk/
POLOGNE 00800 - 441 17 37 www.belkin.com/uk/
PORTUGAL 707 200 676 www.belkin.com/uk/
RUSSIE 495 580 95 41 ww w.belkin.com/
AFRIQUE DU SUD 0800 - 99 15 21 www.belkin.com/uk/
ESPAG NE 902 - 02 43 66 www.belkin.com/es/
SUÈDE 07 - 71 4 0 04 53 www.belkin.com/uk/
SUISSE 08 - 48 00 02 19
ROYAUME-UNI 0845 - 607 77 87 www.belkin.com/uk/
AUTRES PAYS +44 - 1933 35 20 00
ADRESSE INTERNET
www.belkin.com/nl/
www.belkin.com/fr/
www.belkin.com/de/
www.belkin.com/fr/
26
Page 59

INFORMATIONS
SECTIONS 1 2 3 54Table des mat ières 6
La législation nationale face à la garantie
CETTE GARANTIE NE COMPREND QUE
LA GARANTIE BELKIN. BELKIN REJETTE
PAR LE PRÉSENT DOCUMENT TOUTES
LES AUTRES GARANTIES, EXPLICITES OU
IMPLICITES, SAUF EXCEPTIONS PRÉVUES
PAR LA LOI, Y COMPRIS MAIS SANS S'Y
LIMITER, LES GARANTIES IMPLICITES
AFFÉRENTES À LA QUALITÉ LOYALE ET
MARCHANDE ET À L'ADÉQUATION À UNE
FINALITÉ DONNÉE. CES GARANTIES
IMPLICITES, LE CAS ÉCHÉANT, SONT
D'UNE DURÉE LIMITÉE AUX CONDITIONS
DE LA PRÉSENTE GARANTIE.
Certains pays ne permettent pas d’imposer
de limite à la durée de validit des garanties
implicites. Il se peut donc que les limites
ci-dessus ne s'appliquent pas dans votre
cas.
TuneBas e™ FM avec k it mains lib res
BELKIN NE PEUT EN AUCUN CAS ÊTRE
TENU RESPONSABLE DE DOMMAGES
ACCESSOIRES, DIRECTS, INDIRECTS OU
MULTIPLES, Y COMPRIS, MAIS SANS S'Y
LIMITER, LES PERTES COMMERCIALES
OU DE REVENUS DÉCOULANT DE LA
VENTE OU DE L'UTILISATION DE TOUT
PRODUIT BELKIN, MÊME LORSQU'IL A
ÉTÉ AVISÉ DE LA PROBABILITÉ DES DITS
DOMMAGES.
La garantie vous confère des droits légaux
spécifiques. Vous pouvez également
bénéficier d'autres droits qui varient d'un
pays à l'autre. Certains pays ne permettent
pas d'exclure ou de limiter les dommages
accidentels, consécutifs ou autres, de sorte
que les limitations d'exclusions précitées
peuvent ne pas s'appliquer dans votre cas.
Autorisé en vertu du brevet américain
n° 6,591,085
27
Page 60

Assistance technique Belkin
Europe : www.belkin.com/support
0673
Belkin SA S
130 rue de Sill y
92100 Boulogne-Billancourt
France
Belkin It alie & Grèce
Via Cardu cci, 7
Milan 20123
Italie
Belkin G mbH
Hanebergstraße 2
80637 Mun ich
Allemagne
Belkin B.V.
Boeing Ave nue 333
1119 PH Schipho l-Rijk,
Pays-Bas
Belkin Ltd .
Expre ss Business Par k
Shipton Way, Rushden
NN10 6GL, Royau me-Uni
Belkin Ib eria
C/ Anabel Segura, 10 planta baja, Of. 2
28108, Alcobendas, Madrid
Espagne
© 2009 Bel kin Internation al, Inc. Tous droits rés ervés. Toutes les ra isons commer ciales sont des m arques
déposées de leurs fabricants respectifs. iPod est une marque de commerce d'Apple Inc., déposée aux
États- Unis et dans d'autres p ays. iPhone est une m arque de commer ce d'Apple Inc. Le nom Bluetooth et
les marq ues de commerce Bl uetooth sont prop riété de Bluetooth SIG, Inc., et sont utilisés sous licence par
Belkin In ternational, In c.
8820-00074ea
F8Z 441ea
Page 61

English
Français
DEutsch
nEDErlanDs
TuneBase™ FM
mit Freisprech-Funktion
Benutzerhandbuch
8820-00074ea F8Z441ea
Español
italiano
Page 62

INHALTSVERZEICHNIS
KAPITEL 1 2 3 654Inhaltsverzeichnis
1 Einleitung ..................................................................................................................1
Merkmale.......................................................................................................................1
Verpackungsinhalt ........................................................................................................2
Bedienelemente ............................................................................................................2
2 TuneBase installieren ............................................................................................3
TuneBase anschließen ................................................................................................. 3
iPod andocken ..............................................................................................................4
iPod nach Anfangsinstallation andocken ................................................................... 9
3 TuneBase verwenden...........................................................................................11
Eine geeignete Frequenz suchen .............................................................................. 11
Musikwiedergabe .......................................................................................................13
Anrufe empfangen ......................................................................................................14
Anschluss ans Radio über den Audioausgang .......................................................15
USB-Geräte laden ...................................................................................................... 16
PRO-Taste zur Wiedergabe-Verbesserung verwenden ..........................................17
4 Fehlerbehebung ....................................................................................................18
5 Sicherheitshinweise .............................................................................................21
6 Informationen ........................................................................................................22
TuneBas e™ FM mit Fr eisprech funktion
i
Page 63

EINLEITUNG
KAPITEL 2 3 654Inhaltsverzeichnis 1
Merkmale
iPod und iPhone
Wiedergabe von iPod-Musik über das
Autoradio
iPod im Etui befestigen
iPod horizontal ausrichten
Einstellung per Tastendruck mit ClearScan
Sichere Befestigung in der Halterung für
iPod-Geräte verschiedener Größen
Verwendung mit Kassettenadapter oder
Aux-Kabel
USB-Geräte laden
TuneBas e™ FM mit Fr eisprech funktion
Nur iPhone
Anrufe über iPhone empfangen und über
Freisprechfunktion Gespräche führen
Wiedergabe der Stimme des
Gesprächspartners über das Autoradio
Integriertes Mikrofon zur Nutzung der
Freisprechfunktion
1
Page 64

EINLEITUNG
What’s in the Box
1.
2.
3.
pro
2
1
1.
2.
3.
4.
5.
6.
KAPITEL 2 3 654Inhaltsverzeichnis 1
Verpackungsinhalt Bedienelemente
1. TuneBase FM mit Freisprechfunktion
2. Einpassmanschette (optional)
3. Abstandhalter für iPod nano
TuneBas e™ FM mit Fr eisprech funktion
1. ClearScan
2. Lautstärke +
3. Lautstärke -
4. Speicher 1
5. Speicher 2
6. PR O-Tas te
2
Page 65

TUNEBASE INSTALLIEREN
KAPITEL 1 3 654Inhaltsverzeichnis 2
TuneBase anschließen
Folgen Sie den Schritten in diesem Kapitel, um TuneBase FM mit Freisprechfunktion zu
installieren. Diese Schritte stimmen mit denen in der Installationsanleitung überein, aber
enthalten mehr Einzelheiten.
1. Setzen Sie TuneBase in die
Strombuchse (Zigarettenanzünder) des
Autos ein.
Achtung: Drehen Sie TuneBase nicht in der
Strombuchse. Wenn Sie Widerstand spüren,
ziehen Sie den TuneBase aus der Buchse
und stecken Sie ihn in der korrekten Position
erneut ein. Andernfalls kann es zu Schäden
am Zigarettenanzünder-Adapter oder an der
Buchse kommen.
2. Überprüfen Sie den Spielraum in der
Strombuchse. Sie sollten leichten
Widerstand spüren, wenn Sie TuneBase
in der Strombuchse bewegen. Gerät
sollte nicht lose sitzen oder sich drehen.
Wenn der TuneBase zu lose oder zu
fest in der Strombuchse sitzt, gehen
Sie für eine optimale Befestigung
nach den Anweisungen im Kapitel
Fehlerbebebung vor.
TuneBas e™ FM mit Fr eisprech funktion
3
Page 66

TUNEBASE INSTALLIEREN
KAPITEL 1 3 654Inhaltsverzeichnis 2
iPod andocken
Die können den iPod im Etui andocken.
1. Drücken Sie auf die Taste des Schiebers
und schieben sie ihn so weit wie
möglich nach oben.
TuneBas e™ FM mit Fr eisprech funktion
2. Wenn Sie einen iPod nano haben,
setzen Sie den Abstandhalter in
die Öffnung des Schiebers ein. Der
Abstandhalter eignet sich für alle
Ausführungen des iPod nano.
4
Page 67

TUNEBASE INSTALLIEREN
KAPITEL 1 3 654Inhaltsverzeichnis 2
3. Schließen Sie den iPod dann so an den
TuneBase Dock Connector an, dass er
richtig einrastet.
TuneBas e™ FM mit Fr eisprech funktion
4. Drücken Sie die Vorderseite des iPod
so weit nach hinten, bis der iPod die
Vorderseite des
Schiebers berührt.
5
Page 68

TUNEBASE INSTALLIEREN
KAPITEL 1 3 654Inhaltsverzeichnis 2
5. Drücken Sie den Schieber dann so weit
nach unten, bis der iPod sicher befestigt
ist.
Hinweis: Wenn Sie die Höhe des Schiebers
eingestellt haben, brauchen Sie den
TuneBase nicht anzupassen, um den iPod
einzusetzen oder zu entfernen.
TuneBas e™ FM mit Fr eisprech funktion
6. Schließen Sie das Audiokabel an den
Kopfhöreranschluss des iPod an.
6
Page 69

TUNEBASE INSTALLIEREN
ok
Rotating
Landscape
KAPITEL 1 3 654Inhaltsverzeichnis 2
7. Biegen Sie den Schwanenhals in die gewünschte Position.
Achtung: Ziehen Sie den TuneBase nicht am
Zigarettenanzünder-Adapter ab, wenn sich ein iPod in der
Halterung befindet.
Richten Sie TuneBase nicht folgendermaßen aus:
TuneBas e™ FM mit Fr eisprech funktion
7
Page 70

TUNEBASE INSTALLIEREN
Removal
KAPITEL 1 3 654Inhaltsverzeichnis 2
iPod aus dem TuneBase nehmen
1. Entfernen Sie das Audiokabel am iPod.
2. Drücken Sie die Vorderseite des Schiebers nach hinten und ziehen Sie den iPod nach
vorne, bis er sich
von der Lippe des Schiebers löst.
3. Nehmen Sie den iPod aus der Halterung.
1 2 3
TuneBas e™ FM mit Fr eisprech funktion
8
Page 71

TUNEBASE INSTALLIEREN
KAPITEL 1 3 654Inhaltsverzeichnis 2
iPod nach Anfangsinstallation andocken
Wenn Sie den TuneBase auf Ihren iPod abgestimmt haben, können Sie ihn ohne weitere
Einstellung immer wieder einsetzen oder herausnehmen.
1. Stecken Sie den iPod auf den Dock
Connector.
2. Drücken Sie auf die Vorderseite des iPod,
bis er einrastet.
TuneBas e™ FM mit Fr eisprech funktion
9
Page 72

TUNEBASE INSTALLIEREN
KAPITEL 1 3 654Inhaltsverzeichnis 2
3. Schließen Sie das Audiokabel an den
TuneBase und den iPod an.
Sie brauchen den Schieber der Halterung
nur anzupassen, wenn Sie einen anderen
iPod oder ein anderes Etui verwenden.
TuneBas e™ FM mit Fr eisprech funktion
Stromversorgung
Die iPod-Wiedergabe wird automatisch
unterbrochen, wenn Sie den iPod am
TuneBase abziehen oder wenn kein Strom
von der Strombuchse übertragen wird.
TuneBase wird automatisch eingeschaltet,
wenn der iPod angeschlossen und die
Stromversorgung ordungsgemäß erfolgt.
Er wird ausgeschaltet, wenn Sie den
iPod entfernen oder kein Strom mehr zur
Verfügung steht.
10
Page 73

TUNEBASE VERWENDEN
KAPITEL 1 2 654Inhaltsverzeichnis 3
Eine geeignete Frequenz suchen
1. Drücken Sie auf (ClearScan).
TuneBase sucht dann nach einer
geeigneten Frequenz.
Hinweis: Wenn Sie sofort auf drücken,
wenn Sie den TuneBase einschalten, kann
es 30 Sekunden dauern, bis die beste
Frequenz gefunden wird.
2. Auf dem Display des TuneBase
erscheint hinter „Tune to” (Eingestellt
auf) eine Frequenz.
3. Stellen Sie Ihr Autoradio auf die
Frequenz ein, die auf dem TuneBase
angezeigt wird.
TuneBas e™ FM mit Fr eisprech funktion
4. Wenn die neue Frequenz nicht
störungsfrei ist, wiederholen Sie die
Schritte 1–3 oder stellen Sie manuell
eine Frequenz ein (s. u.).
11
Page 74

TUNEBASE VERWENDEN
KAPITEL 1 2 654Inhaltsverzeichnis 3
Gehen Sie nach folgenden Schritten vor,
wenn Sie mit ClearScan keine geeignete
Frequenz finden können:
1. Stellen Sie das Autoradio auf eine
Frequenz mit schwachem Signal ein. Sie
erzielen das beste Resultat, wenn auf einer
Frequenz nur Rauschen zu hören ist.
2. Drücken Sie dann auf dem TuneBase
auf + oder – , um dieselbe Frequenz
einzustellen.
3. Die Wiedergabe der Musik auf Ihrem
iPod über das Autoradio sollte nun
störungsfrei erfolgen.
TuneBas e™ FM mit Fr eisprech funktion
Stellen Sie die Lautstärke des
Autoradios so ein, dass Sie eine
optimale Wiedergabe erhalten. Wenn
die Wiedergabe zu schwach ist,
erhöhen Sie die Lautstärke auf dem
iPod, damit das Signal verstärkt wird.
Geeignete Frequenzen speichern
Sie können zwei Frequenzen speichern,
indem Sie die Tasten 1 und 2 gedrückt
halten.
1. Stellen Sie auf dem TuneBase die
Frequenz ein, die sie speichern wollen.
2. Halten Sie die Speichertaste 1 oder
2 zwei Sekunden lang gedrückt. Es
ertönt ein Piepton, wenn die Frequenz
gespeichert ist. Auf dem Display blinkt
ein Speichersymbol.
3. Drücken Sie auf die Speichertaste, um
TuneBase auf die Frequenz einzustellen,
und lassen sie sie wieder los.
4. Stellen Sie Ihr Autoradio auf dieselbe
Frequenz ein.
12
Page 75

TUNEBASE VERWENDEN
Play Pause
KAPITEL 1 2 654Inhaltsverzeichnis 3
Musikwiedergabe
1. Stellen Sie die Lautstärke auf dem iPod
auf das Maximum ein. Dadurch wird das
Signal vom TuneBase verstärkt.
2. Gehen Sie zu dem Titel, den Sie sich
anhören wollen.
3. Verwenden Sie zur Wiedergabe
und Unterbrechung der Musik die
Multifunktionstaste.
TuneBas e™ FM mit Fr eisprech funktion
• DrückenSiezurWiedergabeoder
Unterbrechung der Musik einmal auf die
Multifunktionstaste.
• DrückenSiezumSpringenzum
nächsten Titel zweimal auf die
Multifunktionstaste.
• DrückenSiezumSpringenzum
vorherigen Titel dreimal auf die
Multifunktionstaste.
Hinweis: Der Betrieb des iPod wird
automatisch unterbrochen, wenn Sie ihn
vom TuneBase trennen
oder wenn kein Strom von der Strombuchse
übertragen wird.
13
Page 76

TUNEBASE VERWENDEN
Play Pause
KAPITEL 1 2 654Inhaltsverzeichnis 3
Anrufe empfangen
Wenn ein Anruf eingeht, wird die Wiedergabe der Musik automatisch unterbrochen, so dass
Sie den Klingelton des iPhone hören können.
Anrufe über TuneBase empfangen
Der TuneBase ist mit einem integrierten
Mikrofon ausgestattet, so dass Sie kein
Headset zum Telefonieren brauchen. Die
Stimme des Gesprächspartners ertönt über
die Lautsprecher des Autoradios.
1. Drücken Sie auf die Multifunktionstaste,
um einen Anruf entgegenzunehmen.
2. Drücken Sie erneut auf die
Multifunktionstaste,
um aufzulegen.
Ihre Musik beginnt wieder,
wenn das Gespräch
beendet ist.
TuneBas e™ FM mit Fr eisprech funktion
Echo reduzieren
Wenn Sie beim Verwenden der
Freisprechfunktion ein Echo hören, gehen
Sie nach folgenden Schritten vor:
1. Richten Sie das iPhone so aus, dass sein
Display zu Ihnen gedreht ist und nicht zu
den Lautsprechern des Autoradios.
2. Stellen Sie die Ruflautstärke des iPhone
auf das Maximum ein und stellen Sie
das Autoradio leiser, bis kein Echo mehr
ertönt.
Anrufe über
Bluetooth®-Headset empfangen
Wenn Sie ein Bluetooth-Headset haben, das
mit Ihrem iPhone gekoppelt ist, können Sie
auf Ihrem Headset Gespräche empfangen.
Drücken Sie auf die Taste Ihres Headsets,
um Anrufe zu empfangen. Ihre Musik beginnt
wieder, wenn Sie auflegen.
14
Page 77

TUNEBASE VERWENDEN
Aux out cable
5V/500mA
pro
2
1
KAPITEL 1 2 654Inhaltsverzeichnis 3
Anschluss ans Radio über den Audioausgang
Mit einem Audiokabel (separat erhältlich) können Sie eine Verbindung zwischen dem
3,5-mm-Klinken-Audioausgang des TuneBase und dem Aux-Eingang des Autoradios
herstellen. Sie können den Anschluss auch verwenden, um mit einem Kassettenadapter
(separat erhältlich) eine Verbindung zum Auto-Kassettenrekorder herzustellen.
1. Stellen Sie sicher, dass Ihr Autoradio
und TuneBase ausgeschaltet sind.
3. Schließen Sie das Audiokabel an den
Aux-Anschluss des Autoradios an.
2. Schließen Sie ein Audiokabel an den
Audioausgang des TuneBase an.
4. Schalten Sie das Autoradio und den
TuneBase ein.
5. Stellen Sie die Quelle am Autoradio auf
„aux” ein.
6. Jetzt können Sie sich die Musik auf dem
iPod anhören.
TuneBas e™ FM mit Fr eisprech funktion
15
Page 78

TUNEBASE VERWENDEN
USB
5V/500mA
pro
2
1
KAPITEL 1 2 654Inhaltsverzeichnis 3
Die Wiedergabe der Musik des iPod erfolgt
jetzt über das Autoradio. Stellen Sie die
Lautstärke des Autoradios so ein, dass Sie
eine optimale Wiedergabe erhalten. Wenn
die Wiedergabe zu schwach ist, erhöhen
Sie die Lautstärke auf dem iPod, damit das
Signal verstärkt wird.
Hinweis: Auf Ihrem Autoradio muss die
richtige Quelle eingestellt sein.
• WählenSie„aux”,wenndasKabel
an den Aux-Eingang des Autoradios
angeschlossen ist.
• WählenSie„tape”(Kassette),wennSie
einen Kassettenadapter verwenden.
Achtung: Sie sollten vor dem Anschluss
eines Audiokabels Ihr Autoradio
und TuneBase ausschalten, um eine
Beschädigung des TuneBase zu verhindern.
TuneBas e™ FM mit Fr eisprech funktion
USB-Geräte laden
Verwenden Sie zum Laden von Geräten
mit USB-Anschluss wie MP3-Playern oder
GPS-Geräten den USB-Anschluss an der
Unterseite des TuneBase.
16
Page 79

TUNEBASE VERWENDEN
KAPITEL 1 2 654Inhaltsverzeichnis 3
PRO-Taste zur Wiedergabe-Verbesserung verwenden
Wenn die Wiedergabe zu schwach ist, drücken Sie auf „PRO”, um den Klang des iPod zu
verbessern. Mit PRO können folgende Einstellungen vorgenommen werden:
PRO-Einstellung Verwendung Beschreibung
Normal Alle Audioarten Keine Änderung der
PRO 1 Die meisten Musikarten Erhöht die durchschnittliche
PRO 2 Leisere Musik Höhere
Telefongespräche,
Monoaufnahmen,
Audiobücher, Podcasts
Wählen Sie diese Option,
wenn Sie kein klares Signal
empfangen
Wiedergabe
Wiedergabelautstärke
Durchschnittslautstärke als
bei PRO 1; bei lauter Musik
kann es zu Verzerrungen
kommen
Die Durchschnittslautstärke
wird erhöht und die
Übertragung erfolgt in
Mono
TuneBas e™ FM mit Fr eisprech funktion
17
Page 80

FEHLERBEHEBUNG
KAPITEL 1 2 3 65Inhaltsverzeichnis 4
Die Hinweise in diesem Kapitel können Ihnen helfen, die meisten Probleme mit Ihrem
TuneBase schnell zu beseitigen.
Sie hören beim Verwenden der
Freisprechfunktion ein Echo.
Lösung
• RichtenSiedasiPhonesoaus,dass
sein Display zu Ihnen gedreht ist
und nicht zu den Lautsprechern des
Autoradios.
• DieRuflautstärke aufdemiPhonesollte
auf das Maximum eingestellt sein.
• VerringernSiedieLautstärkedes
Radios, bis Sie kein Echo mehr hören.
iPod bzw. iPhone wird nicht geladen.
Lösung
• ÜberprüfenSie,obTuneBaserichtig
an die Strombuchse des Autos
angeschlossen ist.
• StellenSiesicher,dassderiPod
in der Halterung einrastet.
• StellenSiesicher,dassdie
Zigarettenanzünderbuchse
(Strombuchse) mit Strom versorgt
wird. Bei manchen Fahrzeugen
wird die Strombuchse nur dann mit
Strom versorgt, wenn die Zündung
eingeschaltet ist oder wenn der Motor
läuft.
TuneBase und iPod behindern den
Zugriff auf Bedienelemente oder Schalter
des Autos.
Lösung
Mit Hilfe des schwenkbaren
Schwanenhalses und des Gelenks hinter
der Halterung können Sie Ihren TuneBase
von Bedienelementen und Schaltern des
Autos wegdrehen. Achten Sie dabei darauf,
dass der Schwanenhals im Verhältnis zum
Netzadapter möglichst vertikal ausgerichtet
ist.
TuneBas e™ FM mit Fr eisprech funktion
18
Page 81

FEHLERBEHEBUNG
CUT
CUT
CUT
KAPITEL 1 2 3 65Inhaltsverzeichnis 4
TuneBase dreht sich um die Achse der Strombuchse.
Lösung 1
Stellen Sie sicher, dass der
Zigarettenanzünder-Adapter des
TuneBase fest im Zigarettenanzünder (der
Strombuchse) sitzt. Überprüfen Sie den
stabilen Sitz, indem Sie versuchen, das
Gerät nach links oder rechts zu stoßen,
bevor Sie losfahren.
Lösung 2
Bei einigen Autos hat der
Zigarettenanzünder (die Strombuchse)
einen größeren Durchmesser als der
Zigarettenanzünder-Adapter des TuneBase.
Möglicherweise wackelt TuneBase, wenn sie
ihn anstoßen. Verwenden Sie in diesem Fall
die Manschette für den ZigarettenanzünderAdapter von TuneBase. Führen Sie den
Zigarettenanzünder-Adapter dann so in die
Zigarettenanzünderbuchse ein, dass alle
vier Nasen sicher in der Strombuchse sitzen.
Wenn er zu fest in der Buchse sitzt, können
Sie eine oder mehrere Nasen abschneiden
und erneut versuchen, ob der Adapter in die
Buchse passt (s. Lösung 3).
TuneBas e™ FM mit Fr eisprech funktion
Lösung 3
Die Manschette ist für die Strombuchse
mancher Autos zu groß. Schneiden Sie mit
einer Schere so viele Nasen ab, wie nötig.
Probieren nach jedem Schnitt den TuneBase
in die Strombuchse zu stecken. Wenn Sie
mehrere Nasen abschneiden, sollten Sie
erst diejenigen abschneiden, die gegenüber
voneinander liegen.
19
Page 82

FEHLERBEHEBUNG
KAPITEL 1 2 3 65Inhaltsverzeichnis 4
Der TuneBase sit zt fest in der
Strombuchse des Autos, dreht sich aber
immer noch hin und her.
Lösung
Überprüfen Sie, ob sich die Strombuchse
in der Einbaubuchse dreht. Falls dies der Fall
ist, wenden Sie sich an den Autohersteller.
Der Adapter lässt sich nicht in die
Zigarettenanzünderbuchse stecken.
Lösung
Die Gummi-Spannscheibe des
Zigarettenanzünder-Adapters muss
möglicherweise zentriert werden. Gehen
nach folgenden Schritten vor, um die
Spannscheibe zu zentrieren.
1. Lösen Sie mit einer Zange vorsichtig
die Mutter an der Vorderseite des
Zigarettenanzünder-Adapters. Sie
braucht nicht ganz entfernt zu werden.
2. Korrigieren Sie die Position der
Spannscheibe.
3. Ziehen Sie die Mutter fest an.
TuneBas e™ FM mit Fr eisprech funktion
Die Gummispannscheibe hat sich beim
Entfernen des TuneBase gelöst und ist in
der Strombuchse steckengeblieben.
Lösung
Dies kommt selten vor, aber
wenn es passiert, können Sie die
Gummispannscheibe aus der
Zigarettenanzünderbuchse entfernen und
wieder am Zigarettenanzünder-Adapter
anbringen.
Achtung: Klemmen Sie die Autobatterie
ab. Jeder Versuch, die Spannscheibe
zu entfernen, ohne vorher die Batterie
abzuklemmen, kann zu Verletzungen und
zur Beschädigung des Fahrzeugs führen.
Entfernen Sie die Spannscheibe
vorsichtig mit einer Zange aus der
Zigarettenanzünderbuchse. Bringen
Sie die Spannscheibe wieder am
ZigarettenanzünderAdapter an. Klemmen Sie die
Batterie wieder an.
20
Page 83

SICHERHEITSHINWEISE
KAPITEL 1 2 3 64Inhaltsverzeichnis 5
Die Installation des TuneBase erfordert
Ihre volle Aufmerksamkeit. Sie benötigen
dafür beide Hände. Versuchen Sie nicht,
TuneBase zu installieren, während Sie
fahren. Stellen Sie sicher, dass TuneBase
stabil in der Strombuchse des Autos sitzt,
bevor Sie losfahren. Überprüfen Sie nach
dem Einbau, dass TuneBase nicht lose
in der Strombuchse sitzt und sich dreht.
Versuchen Sie niemals, den Sitz des
TuneBase bzw. iPod zu korrigieren
oder TuneBase bzw. iPod aufzuheben,
während Sie fahren. Richten Sie TuneBase
so aus, dass weder TuneBase noch der
iPod Sie an der Betätigung von Schaltern
und anderen Bedienelementen des Autos
hindern.
TuneBas e™ FM mit Fr eisprech funktion
Führen Sie keine anderen Gegenstände
als den Zigarettenanzünder-Adapter in
die Strombuchse d es Autos ein, ohne
vorher die Autobatterie abzuklemmen.
Wenn Sie diesen Sicherheitshinweis
nicht beachten, kann es zu Personenund Sachschäden kommen.
Belkin übernimmt keine Verantwortung
für Personen- oder Sachschäden
aufgrund gefährlicher Fahrweise infolge
der Bedienung von oder des Hantierens
mit TuneBase, iPod und iPhone und/oder
Strombuchse des Autos.
21
Page 84

INFORMATIONEN
KAPITEL 1 2 3 54Inhaltsverzeichnis 6
FCC-Erklärung
Erklärung der Konformität mit den FCC-
Bestimmungen zur elektromagnetischen
Verträglichkeit
Wir, Belkin International, Inc., 501 West
Walnut Street, Compton, CA 90220, USA,
erklären hiermit alleinverantwortlich, dass der
Artikel: F8Z441
auf den sich diese Erklärung bezieht,
Abschnitt 15 der FCC-Bestimmungen
entspricht. Der Betrieb unterliegt den beiden
folgenden Bedingungen: (1) Dieses Gerät darf
schädigende Störungen nicht verursachen,
und (2) dieses Gerät muss jedwede Störung
annehmen, einschließlich der Störungen, die
einen unerwünschten Betrieb verursachen
könnten.
Dieses Gerät entspricht nachweislich den
Grenzwerten für digitale Geräte der Klasse
B gemäß Teil 15 der FCC-Bestimmungen.
Diese Grenzwerte dienen dem angemessenen
Schutz vor schädlichen Strahlungen beim
Betrieb von Geräten im Wohnbereich. Durch
dieses Gerät wird hochfrequente Energie
erzeugt, genutzt und unter Umständen
abgestrahlt, und es kann daher bei nicht
vorschriftsmäßiger Installation und Nutzung
TuneBas e™ FM mit Fr eisprech funktion
Funkstörungen verursachen. Eine Garantie
dafür, dass entsprechende Störungen am
konkreten Installationsort ausgeschlossen
sind, kann nicht abgegeben werden.
Verursacht dieses Gerät schädigende
Störungen des Funk- oder Fernsehempfangs
– was sich durch Aus- und Einschalten des
Geräts feststellen lässt –, so ist der Anwender
aufgefordert, die Störung durch einen der
folgenden Schritte zu beheben:
• NeuausrichtungoderStandortänderung
der Empfangsantenne.
• VergrößerungdesAbstandszwischen
Gerät und Empfänger.
• AnschlussdesGerätsaneineSteckdose
in einem anderen Stromkreis als dem des
Empfängers.
• DenHändlerodereinenerfahrenen
Rundfunk- und Fernsehtechniker
hinzuziehen.
ICES-Erklärung
Dieses digitale Gerät der Klasse B entspricht
der kanadischen Norm ICES-003.
IC
Dieses digitale Gerät der Klasse B entspricht
der kanadischen Norm RSS-210.
22
Page 85

INFORMATIONEN
EU DECLARATION OF CONFORMITY
ýesky
[Czech]
[Belkin Ltd] tímto prohlašuje, že tento [F8Z441ea] je ve shodČ se základními požadavky a
dalšími pĜíslušnými ustanoveními smČrnice 1999/5/ES.
Dansk
[Danish]
Undertegnede [Belkin Ltd] erklærer herved, at følgende udstyr [F8Z441ea] overholder de
væsentlige krav og øvrige relevante krav i direktiv 1999/5/EF.
Deutsch
[German]
Hiermit erklärt [Belkin Ltd], dass sich das Gerät [F8Z441ea] in Übereinstimmung mit den
grundlegenden Anforderungen und den übrigen einschlägigen Bestimmungen der Richtlinie
1999/5/EG befindet.
Eesti
[Estonian]
Käesolevaga kinnitab [Belkin Ltd] seadme [F8Z441ea] vastavust direktiivi 1999/5/EÜ
põhinõuetele ja nimetatud direktiivist tulenevatele teistele asjakohastele sätetele.
English
Hereby, [Belkin Ltd], declares that this product [F8Z441ea] is in compliance with the essential
requirements and other relevant provisions of Directive 1999/5/EC.
Español
[Spanish]
Por medio de la presente [Belkin Ltd] declara que el [F8Z441ea] cumple con los requisitos
esenciales y cualesquiera otras disposiciones aplicables o exigibles de la Directiva 1999/5/CE.
ǼȜȜȘȞȚțȒ
[Greek]
ȂǼ ȉǾȃ ȆǹȇȅȊȈǹ [Belkin Ltd] ǻǾȁȍȃǼǿ ȅȉǿ [F8Z441ea] ȈȊȂȂȅȇĭȍȃǼȉǹǿ ȆȇȅȈ ȉǿȈ
ȅȊȈǿȍǻǼǿȈ ǹȆǹǿȉǾȈǼǿȈ Ȁǹǿ ȉǿȈ ȁȅǿȆǼȈ ȈȋǼȉǿȀǼȈ ǻǿǹȉǹȄǼǿȈ ȉǾȈ ȅǻǾīǿǹȈ 1999/5/ǼȀ.
Français
[French]
Par la présente [Belkin Ltd] déclare que l'appareil [F8Z441ea] est conforme aux exigences
essentielles et aux autres dispositions pertinentes de la directive 1999/5/CE.
Italiano
[Italian]
Con la presente [Belkin Ltd] dichiara che questo [F8Z441ea] è conforme ai requisiti essenziali
ed alle altre disposizioni pertinenti stabilite dalla direttiva 1999/5/CE.
Latviski
[Latvian]
Ar šo [Belkin Ltd Belkin Ltd ] deklarƝ, ka [F8Z441ea] / iekƗrtas tip s] atbilst DirektƯvas 1999/5/EK
bnjtiskajƗm prasƯbƗm un citiem ar to saistƯtajiem noteikumiem.
Lietuviǐ
[Lithuanian]
Šiuo [Belkin Ltd] deklaruoja, kad šis [F8Z441ea] atitinka esminius reikalavimus ir kitas
1999/5/EB Direktyvos nuostatas.
Nederlands
[Dutch]
Hierbij verklaart [Belkin Ltd] dat het toestel [F8Z441ea] in overeenstemming is met de
essentiële eisen en de andere relevante bepalingen van richtlijn 1999/5/EG.
Malti
[Maltese]
Hawnhekk, [Belkin Ltd], jiddikjara li dan [F8Z441ea] jikkonforma mal-ƫtiƥijiet essenzjali u ma
provvedimenti oƫrajn relevanti li hemm fid-Dirrettiva 1999/5/EC.
Magyar
[Hungarian]
Alulírott, [Belkin Ltd] nyilatkozom, hogy a [F8Z441ea] megfelel a vonatkozó alapvetõ
követelményeknek és az 1999/5/EC irányelv egyéb elõírásainak.
Polski
[Polish]
Niniejszym [Belkin Ltd] oĞwiadcza, Īe [F8Z441ea] jest zgodny z zasadniczymi wymogami oraz
pozostaáymi stosownymi postanowieniami Dyrektywy 1999/5/EC.
Português
[Portuguese]
[Belkin Ltd] declara que este [F8Z441ea] está conforme com os requisitos essenciais e outras
disposições da Directiva 1999/5/CE.
Slovensko
[Slovenian]
[I Belkin Ltd] izjavlja, da je ta [F8Z441ea] v skladu z bistvenimi zahtevami in ostalimi
relevantnimi doloþili direktive 1999/5/ES.
Slovensky
[Slovak]
[Belkin Ltd] týmto vyhlasuje, že [F8Z441ea] spĎĖa základné požiadavky a všetky príslušné
ustanovenia Smernice 1999/5/ES.
Suomi
[Finnish]
[Belkin Ltd] vakuuttaa täten että [F8Z441ea] tyyppinen laite on direktiivin 1999/5/EY oleellisten
vaatimusten ja sitä koskevien direktiivin muiden ehtojen mukainen.
Svenska
[Swedish]
Härmed intygar Belkin Ltd] att denna [F8Z441ea] står I överensstämmelse med de väsentliga
egenskapskrav och övriga relevanta bestämmelser som framgår av direktiv 1999/5/EG.
Íslenska
[Icelandic]
Hér með lýsir [Belkin Ltd] yfir því að [F8Z441ea] er í samræmi við grunnkröfur og aðrar kröfur,
sem gerðar eru í tilskipun 1999/5/EC.
Norsk
[Norwegian]
[Belkin Ltd] erklærer herved at utstyret [F8Z441ea] er i samsvar med de grunnleggende krav og
øvrige relevante krav i direktiv 1999/5/EF.
KAPITEL 1 2 3 54Inhaltsverzeichnis 6
TuneBas e™ FM mit Fr eisprech funktion
0673
23
Page 86

INFORMATIONEN
KAPITEL 1 2 3 54Inhaltsverzeichnis 6
Drei Jahre eingeschränkte Herstellergarantie von Belkin International, Inc.
Garantieleistung.
Belkin International, Inc. („Belkin”) garantiert
dem ursprünglichen Käufer dieses
Belkin-Produkts, dass dieses Produkt
frei von Material-, Verarbeitungs-, und
Konstruktionsfehlern ist.
Garantiedauer.
Belkin gewährt für dieses Belkin-Produkt
drei Jahre Garantie.
Problembehebung.
Herstellergarantie.
Belkin wird das Produkt nach eigenem
Ermessen entweder kostenlos (abgesehen
von den Versandkosten) reparieren oder
austauschen. Belkin behält sich vor, seine
Produkte ohne Vorankündigung auslaufen zu
lassen und übernimmt keine eingeschränkte
Garantie für die Reparatur oder den Ersatz
solcher ausgelaufenen Produkte.
Garantieausschluss.
Alle oben genannten Garantien verlieren
ihre Gültigkeit, wenn das BelkinProdukt Belkin auf Anfrage nicht auf
TuneBas e™ FM mit Fr eisprech funktion
Kosten des Käufers zur Überprüfung
zur Verfügung gestellt wird oder wenn
Belkin feststellt, dass das Belkin-Produkt
nicht ordnungsgemäß installiert worden
ist, und dass unerlaubte Änderungen
daran vorgenommen worden sind. Die
Herstellergarantie von Belkin gilt nicht für
(Natur)gewalten wie Überschwemmungen,
Erdbeben und Blitzschlag sowie Krieg,
Vandalismus, Diebstahl, normalen
Verschleiß, Wertminderung, Veralterung,
schlechte Behandlung, Beschädigung durch
Störungen aufgrund von Unterspannung
(z. B. Spannungsabfall oder -Senkung)
oder nicht erlaubte Programm- oder
Systemänderungen
24
Page 87

INFORMATIONEN
KAPITEL 1 2 3 54Inhaltsverzeichnis 6
Service.
Um Unterstützung von Belkin zu bekommen,
gehen Sie nach folgenden Schritten vor:
1. Schreiben Sie an Belkin Ltd. Express
Business Park, Shipton Way, Rushden,
NN106GL, Großbritannien, Attn:
Customer Service oder wenden Sie sich
innerhalb von 15 Tagen nach dem Vorfall
telefonisch an den Kundendienst von
Belkin. Die Telefonnummer finden Sie
auf der nächsten Seite. Halten Sie die
folgenden Informationen bereit:
a. Die Artikelnummer des Belkin-
Produkts.
b. Wo Sie das Produkt erworben haben.
c. Das Kaufdatum.
d. Eine Kopie der Originalquittung.
2.Die entsprechenden Mitarbeiter/innen
informieren Sie darüber, wie Sie Ihre
Rechnung und das Belkin-Produkt
versenden müssen und wie Sie
fortfahren müssen, um Ihre Ansprüche
geltend zu machen.
TuneBas e™ FM mit Fr eisprech funktion
Belkin behält sich vor, das beschädigte
Belkin-Produkt zu überprüfen. Alle
Kosten, die beim Versand des BelkinProduk ts an Belkin zum Zweck der
Überprüfung entstehen, sind vollständig
durch den Käufer zu tragen. Wenn
Belkin nach eigenem Ermessen
entscheidet, dass es nicht angebracht
ist, das beschädigte Gerät an die Belkin
zu schicken, kann Belkin nach eigenem
Ermessen eine Reparaturstelle damit
beauftragen, das Gerät zu überprüfen
und einen Kostenvoranschlag für
die Reparaturkosten des Gerätes zu
machen. Die Kosten für den Versand
zu einer solchen Reparaturstelle
und die eventuellen Kosten für einen
Kostenvoranschlag gehen vollständig zu
Lasten des Käufers. Beschädigte Geräte
müssen zur Überprüfung zur Verfügung
stehen, bis das Reklamationsverfahren
abgeschlossen ist. Wenn Ansprüche
beglichen werden, behält sich Belkin
das Recht vor, Ersatzansprüche an eine
bestehende Versicherung des Käufers
zu übertragen.
25
Page 88

INFORMATIONEN
Kostenloser
technischer Support*
*Zum normalen Telefontarif
www.belkin.com
Technische
Informationen und
Unterstützung
erhalten Sie unter
www.belkin.com im
Bereich technischer
Support.- Wenn Sie den
technischen Support
telefonisch erreichen
wollen, wählen Sie die
entsprechende Nummer
in dieser Liste * aus.
TuneBas e™ FM mit Fr eisprech funktion
KAPITEL 1 2 3 54Inhaltsverzeichnis 6
LAND NUMMER
ÖSTERREICH 0820 200766 www.belkin.com/de/
BELGIEN 07 07 0 0 073
TSCHECHISCHE REPUBLIK
DÄNEMARK 701 22 403 www.belkin.com/uk/
FINNLAND 0972519123 www.belkin.com/uk/
FRANKREICH 08 - 25 54 00 26 www.belkin.com/fr/
DEUTSCHLAND 0180 - 500 57 09 www.belkin.com/de/
GRIECHENLAND 00800 - 44 14 23 90 www.belkin.com/uk/
UNGARN 06 - 17 77 49 06 www.belkin.com/uk/
ISLAND 800 8534 www.belkin.com/uk/
IRLAND 0818 55 50 06 www.belkin.com/uk/
ITAL IEN 02 - 69 43 02 51 www.belkin.com/it/
LUXEMBURG 34 20 80 85 60 www.belkin.com/uk/
NIEDERLANDE
NORWEGEN 81 50 0287 www.belkin.com/uk/
POLEN 00800 - 441 17 37 www.belkin.com/uk/
PORTUGAL 707 200 676 www.belkin.com/uk/
RUSSLAND 49 5 580 9541 www.belkin.com/
SÜDAFRIKA 0800 - 99 15 21 www.belkin.com/uk/
SPANI EN 902 - 02 43 66 www.belkin.com/es/
SCHWEDEN 07 - 71 40 04 53 www.belkin.com/uk/
SCHWEIZ 08 - 48 00 02 19
GROSSBRITANNIEN 0845 - 607 77 87 www.belkin.com/uk/
SONSTIGE LÄNDER +44 - 1933 35 20 00
INTERNET-ADRESSE
www.belkin.com/nl/
239 000 4 06 www.belkin.com/uk/
0900 - 0 40 07 90 0,10 € pro Minute
www.belkin.com/fr/
www.belkin.com/nl/
www.belkin.com/de/
www.belkin.com/fr/
26
Page 89

INFORMATIONEN
KAPITEL 1 2 3 54Inhaltsverzeichnis 6
Garantiegesetze.
DIESE GARANTIE BILDET DIE
ALLEINIGE GARANTIE VON BELKIN.
ES GIBT KEINE ANDERE GARANTIE,
EXPLIZIT ERWÄHNT ODER IMPLIZIT,
AUSSER WENN DIES VOM GESETZ
VORGESCHRIEBEN IST, EINSCHLIESSLICH
DER IMPLIZITEN GARANTIE ODER
DES QUALITÄTSZUSTANDS,
DER ALLGEMEINEN
GEBRAUCHSTAUGLICHKEIT ODER
EIGNUNG FÜR EINEN BESTIMMTEN
ZWECK, UND SOLCHE IMPLIZITEN
GARANTIEN, WENN ES SOLCHE GIBT,
BEZIEHEN SICH AUSSCHLIESSLICH AUF
DIE DAUER, DIE IN DIESER GARANTIE
ZUGRUNDE GELEGT WIRD.
In manchen Ländern sind Einschränkungen
bezüglich der Dauer der Garantie
nicht zulässig. Die oben erwähnten
Einschränkungen treffen für Sie
dementsprechend nicht zu.
TuneBas e™ FM mit Fr eisprech funktion
UNTER KEINEN UMSTÄNDEN HAFTET
BELKIN FÜR ZUFÄLLIGEN, BESONDEREN,
DIREKTEN, INDIREKTEN, MEHRFACHEN
SCHADEN ODER FOLGESCHÄDEN
WIE, ABER NICHT AUSSCHLIESSLICH,
ENTGANGENES GESCHÄFT ODER
PROFITE, DIE IHNEN DURCH DEN
VERKAUF ODER DIE BENUTZUNG VON
EINEM BELKIN-PRODUKT ENTGANGEN
SIND, AUCH WENN SIE AUF DIE
MÖGLICHKEIT SOLCHER SCHÄDEN
AUFMERKSAM GEMACHT WORDEN SIND.
Diese Garantie räumt Ihnen spezifische
Rechte ein, die von Land zu Land
unterschiedlich ausgestaltet sein können. Da
in manchen Ländern der Ausschluss oder
die Beschränkung der Haftung für durch
Zufall eingetretene oder Folgeschäden
nicht zulässig ist, haben die vorstehenden
Beschränkungen und Ausschlussregelungen
für Sie möglicherweise keine Gültigkeit.
Lizenz unter U.S. Patent-Nr. 6 591 085
27
Page 90

Belkin Technischer Support
Europa: www.belkin.com/support
0673
Belkin SA S
130 rue de Sill y
92100 Boulogne-Billancourt
Frankreich
Belkin It aly & Greece
Via Cardu cci, 7
Mailand 2 0123
Italien
Belkin G mbH
Hanebergstraße 2
80637 Mün chen
Deutschland
Belkin B.V.
Boeing Ave nue 333
1119 PH Schiphol-Rijk
Niederlande
Belkin Ltd .
Expre ss Business Par k
Shipton Way, Rushden
NN10 6GL, Groß britannien
Belkin Ib eria
C/ Anabel Segura, 10 planta baja, Of. 2
28108, Alcobendas, Madrid
Spanien
© 2009 Belkin International, Inc. Alle Rechte vorbehalten. Alle Produktnamen sind eingetragene Marken
der angegebenen Hersteller. iPod ist eine Marke von Apple Inc., die in den USA und anderen Ländern
eingetr agen ist. iPhone i st ein Warenzeich en der Apple Inc. Die Bezei chnung Bluetooth und die
Bluetooth-Marken sin d Eigentum von Bluetooth SIG, Inc.; Verwendung durch Belkin International, Inc. unter
Lizenz.
8820-00074ea
F8Z 441ea
Page 91

English
Français
DEutsch
nEDErlanDs
TuneBase™ FM
met handsfree belfunctie
Handleiding
8820-00074ea F8Z441ea
Español
italiano
Page 92

INHOUDSOPGAVE
HOOFDSTUK 1 2 3 654Inhoud
1 Inleiding.....................................................................................................................1
Productkenmerken .......................................................................................................1
Inhoud van de verpakking ...........................................................................................2
Bedieningsknoppen .....................................................................................................2
2 Installatie van de TuneBase..................................................................................3
De TuneBase aansluiten ..............................................................................................3
Uw iPod op de dock-connector aansluiten ...............................................................4
Uw iPod op de dock-connector aansluiten na de initiële installatie .......................9
3 Gebruik maken van de TuneBase...................................................................... 11
Een geschikte frequentie zoeken .............................................................................. 11
Muziek afspelen ..........................................................................................................13
Inkomende telefoonoproepen beantwoorden .........................................................14
Een verbinding maken met uw autoradio via de audio-uitgang ............................15
USB-apparaten opladen ............................................................................................16
De PRO-knop gebruiken om het geluid te versterken ............................................17
4 Problemen oplossen ............................................................................................18
5 Veiligheidswaarschuwingen ...............................................................................21
6 Informatie ...............................................................................................................22
TuneBas e™ FM met h andsfree b elfuncti e
i
Page 93

INLEIDING
HOOFDSTUK 2 3 654Inhoud 1
Productkenmerken
iPod en iPhone
De muziek van uw iPod beluisteren via de
luidsprekers van uw autoradio
De iPod in z'n etui laten
Uw iPod in horizontale stand zetten
Automatisch zoeken naar een geschikte
frequentie met ClearScan-functie
Veilige en flexibele houder voor elk type iPod
Geschikt voor aansluiting op een
cassetteadapter of aux-kabel
USB-apparaten opladen
TuneBas e™ FM met h andsfree b elfuncti e
Alleen iPhone
Inkomende telefoonoproepen op uw iPhone
beantwoorden en handsfree telefoneren
De stem van degene met wie u spreekt via
de luidsprekers van uw auto horen
Ingebouwde microfoon ten behoeve van
handsfree telefoneren
1
Page 94

INLEIDING
What’s in the Box
1.
2.
3.
pro
2
1
1.
2.
3.
4.
5.
6.
HOOFDSTUK 2 3 654Inhoud 1
Inhoud van de verpakking Bedieningsknoppen
1. TuneBase FM met handsfree belfunctie
2. Pasring (gebruik optioneel)
3. Pasblokje voor iPod nano
TuneBas e™ FM met h andsfree b elfuncti e
1. ClearScan
2. Hogere frequentie
3. Lagere frequentie
4. Programmeerbare
frequentie-voorkeuzeknop 1
5. Programmeerbare
frequentie-voorkeuzeknop 2
6. PRO-knop
2
Page 95

INSTALLATIE VAN DE TUNEBASE
HOOFDSTUK 1 3 654Inhoud 2
De TuneBase aansluiten
Ga als volgt te werk bij de installatie van uw TuneBase FM met handsfree belfunctie
(de TuneBase). Deze stappen komen overeen met de stappen die in de beknopte
installatiehandleiding worden vermeld, maar zijn wat gedetailleerder omschreven.
1. Sluit uw TuneBase aan op de
aanstekeraansluiting in uw auto.
Waarschuwing: Draai de stekker
van de TuneBase niet rond in de
aanstekeraansluiting. Als u bij het aansluiten
tegenstand voelt, moet u de stekker uit
de aanstekeraansluiting trekken en in de
gewenste stand terugplaatsen. Doet u dit
2. Controleer of de TuneBase stevig op de
aanstekeraansluiting is aangesloten. U
zou enige weerstand moeten voelen als
u de stekker in de aanstekeraansluiting
probeert te draaien. De TuneBase mag
niet uit zichzelf draaien of bewegen.
Als de stekker van de TuneBase te los
of te strak in de aanstekeraansluiting
zit, raden wij u aan het hoofdstuk
"Problemen oplossen" te raadplegen.
Hier wordt uitgelegd hoe u dit probleem
kunt verhelpen.
TuneBas e™ FM met h andsfree b elfuncti e
3
Page 96

INSTALLATIE VAN DE TUNEBASE
HOOFDSTUK 1 3 654Inhoud 2
Uw iPod op de dock-connector aansluiten
U kunt de iPod in het etui laten zitten als u hem op de dock-connector aansluit.
1. Druk op de knop op het verschuifbare
deel van de houder en schuif de houder
volledig uit.
TuneBas e™ FM met h andsfree b elfuncti e
2. Als u een iPod nano op de TuneBase
wilt aansluiten, dient u het pasblokje op
de houder te bevestigen. Het pasblokje
is geschikt voor elk type iPod nano.
4
Page 97

INSTALLATIE VAN DE TUNEBASE
HOOFDSTUK 1 3 654Inhoud 2
3. Sluit uw iPod aan op de dock-connector
van de TuneBase.
TuneBas e™ FM met h andsfree b elfuncti e
4. Duw tegen de voorkant van uw iPod
totdat de achterkant de houder raakt.
5
Page 98

INSTALLATIE VAN DE TUNEBASE
HOOFDSTUK 1 3 654Inhoud 2
5. Duw het bovenste deel van de houder
naar beneden totdat uw iPod stevig op
zijn plaats zit.
Let op: Zodra u de hoogte van de houder
eenmaal hebt ingesteld, hoeft u de
TuneBase niet opnieuw uit te schuiven voor
het plaatsen en verwijderen van uw iPod.
TuneBas e™ FM met h andsfree b elfuncti e
6. Sluit de audiokabel aan op de
hoofdtelefoonaansluiting van uw iPod.
6
Page 99

INSTALLATIE VAN DE TUNEBASE
ok
Rotating
Landscape
HOOFDSTUK 1 3 654Inhoud 2
7. Buig de flexibele hals in de gewenste stand.
Waarschuwing: U mag de TuneBase niet uit de aanstekeraansluiting trekken als uw
iPod nog in de houder zit.
U mag de TuneBase niet in de volgende standen zetten:
TuneBas e™ FM met h andsfree b elfuncti e
7
Page 100

INSTALLATIE VAN DE TUNEBASE
Removal
HOOFDSTUK 1 3 654Inhoud 2
Haal uw iPod uit de TuneBase
1. Trek de stekker van de audiokabel uit uw iPod.
2. Duw het bovenste gedeelte van de houder naar achteren en beweeg uw iPod zachtjes
naar voren totdat hij loskomt van de houder.3. Haal uw iPod uit de houder.
1 2 3
TuneBas e™ FM met h andsfree b elfuncti e
8
 Loading...