

Page 1
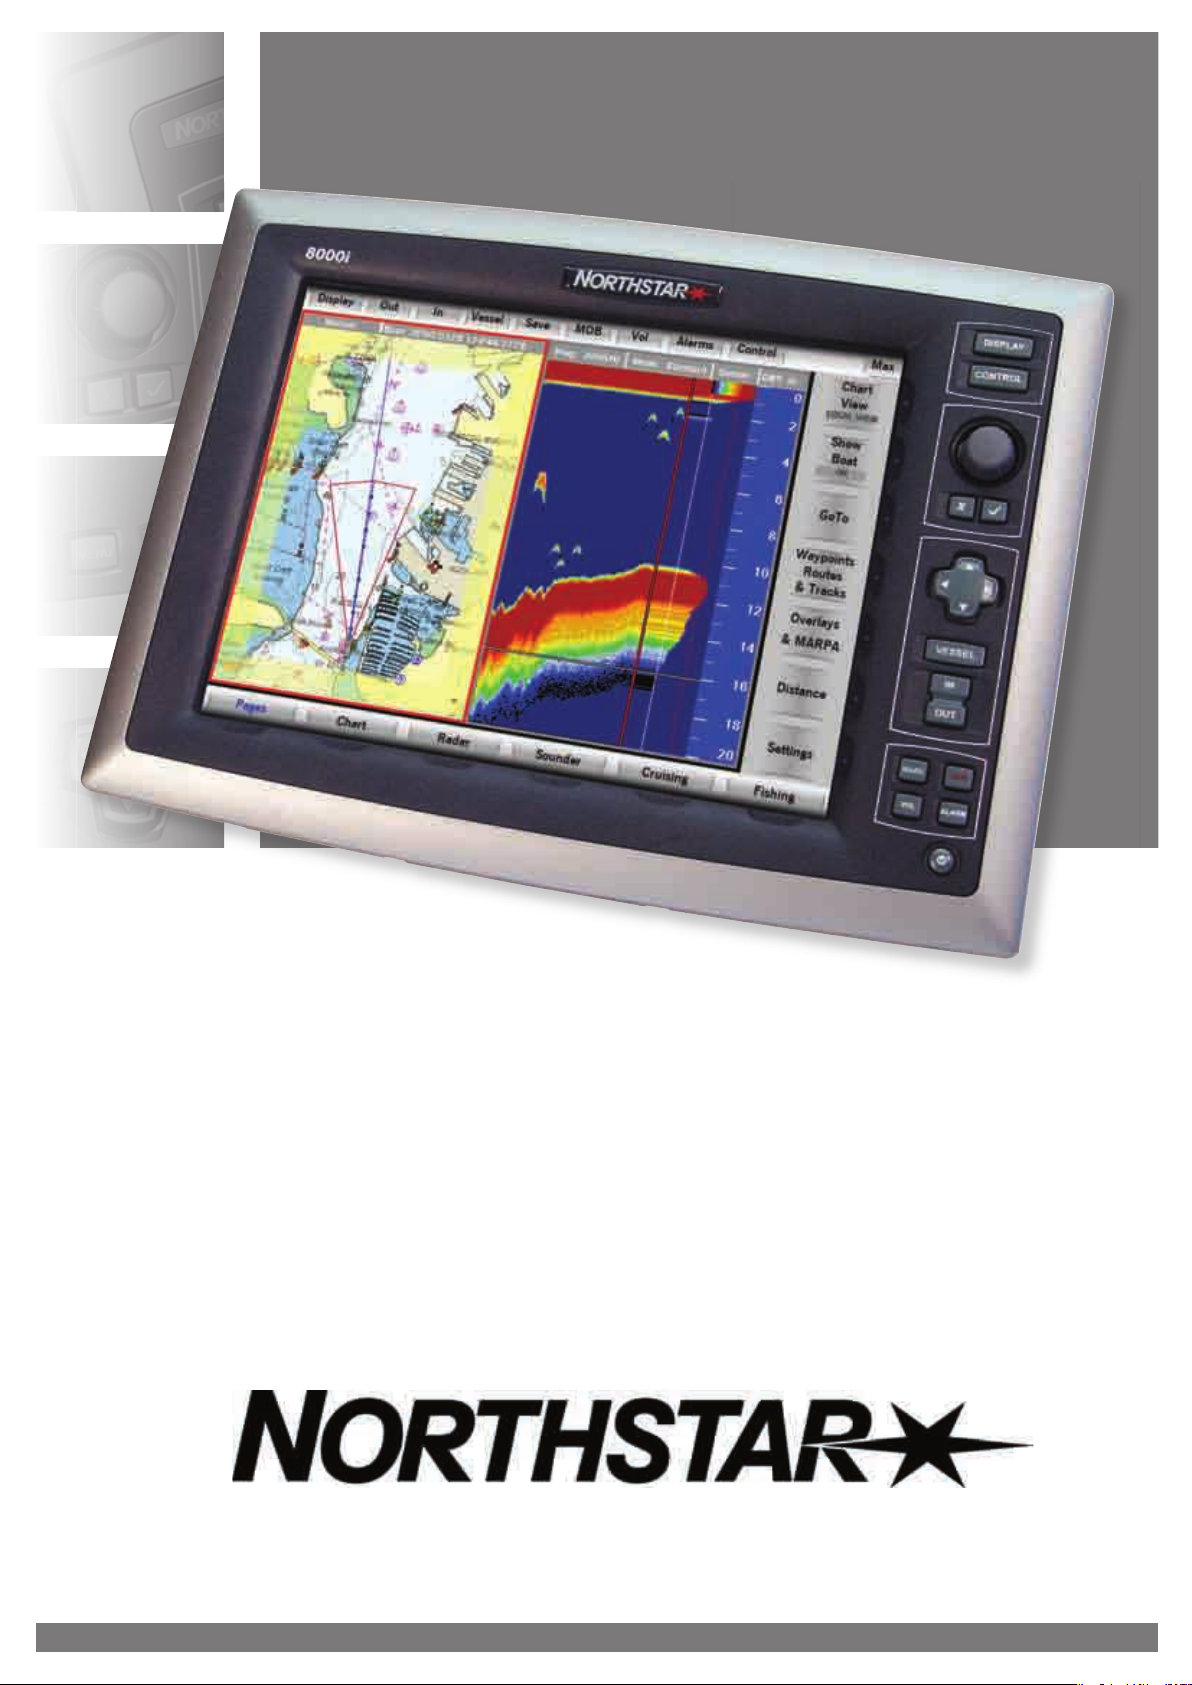
Northstar 8000i
12" Display Processor and
System
Installation Manual
www.northstarnav.com
Page 2
1 Preface
In this chapter
Important Safety Information........................................ 2
Disclaimer .............................................................................4
Warranty................................................................................4
1.1 Important Safety Information
IMPORTANT SAFETY INFORMATION
Please read carefully before use
This is the safety alert symbol. It is used to alert you to potential
personal injury hazards. Obey all safety measures that follow this
symbol to avoid possible injury or death.
WARNING indicates a potentially hazardous situation which, if not
avoided, could result in death or serious injury.
CAUTION indicates a potentially hazardous situation which, if not
avoided, may result in minor or moderate injury.
CAUTION used without the safety alert symbol indicates a
potentially hazardous situation which, if not avoided, may result in
property damage.
It is your sole responsibility to use the Northstar 8000i in a manner that will not cause
accidents, personal injury or property damage. Always observe safe boating practices.
When navigating the vessel, use the Northstar 8000i only as a navigational aid. Proper
navigation of the vessel is the sole responsibility of the vessel operator.
Depth soundings should be used only for navigation. Never use a depth sounding to gauge
depth, range or other conditions for swimming or diving.
The Global Positioning System (GPS) is operated by the US Government which is solely
responsible for its operation, accuracy, and maintenance. The GPS system is subject to
changes which could affect the accuracy and performance of all GPS equipment anywhere in
the world.
2
Northstar 8000i System - 12" Display Processor Installation Manual
Page 3
The electronic chart used by the Northstar 8000i is an aid to navigation designed to
supplement, not replace, official government charts. Only official government charts
supplemented by notices to mariners contain the information required for safe and prudent
navigation. Always supplement the electronic information provided by the Northstar 8000i
with other plotting sources such as observations, depth soundings, radar and hand compass
bearings. Should the information not agree, the discrepancy must be resolved before
proceeding any further.
Never operate the 8000i in Simulate Mode while you're underway.
It is the user's responsibility to ensure that Simulate Mode is used only in safe situations such
as when you are moored in a marina.
The accuracy of the sonar depth display can be limited by many factors, including the type of
transducer, the location of the transducer, and water conditions. Ensure that the transducer
is installed and used correctly.
The radar must be set up before it is used for the first time.
See "Set up the radar before using it" in the Radar Installation manual.
Radar scanners emit electromagnetic energy at a frequency that can be harmful at close
range. Always keep the recommended safe distance from the scanner as follows:
Scanner
Model
Vertical beam
angle of scanner
(degrees)
Minimum safe distance
(100 Watts per m² average
power density) Note 1
Minimum safe distance
(10 Watts per m² average
power density) Note 2
2 kW 30 1.6 ft (0.5 m) 4.6 ft (1.4 m)
4 kW 25 3 ft (0.9 m) 9.3 ft (2.8 m)
6 kW 20 3.6 ft (1.1 m) 11.5 ft (3.5 m)
10 kW 20 9.5 ft (2.9 m) 30 ft (9.0 m)
25 kW 20 18 ft (5.5 m) 57 ft (17.4 m)
NOTES: Limits apply to exposure within the vertical beam angle.
Note 1: Peak occupational exposure limit pursuant to IEC 60936 Clause 3.27 and IEC 62252
Clause 4.32
Note 2: General public exposure limit pursuant to IEC 60936 Clause 3.27 and IEC 62252
Clause 4.32
Northstar 8000i System - 12" Display Processor Installation Manual
3
Page 4

Failure to adhere to these warnings may lead to death, serious injury or property damage.
Northstar disclaims all liability for installation or use of this product that causes or
contributes to death, injury or property damage or that violates any law.
You are strongly recommended to scan all removable media (such as USB memory sticks or
CDs) for viruses or corrupt data on a separate device BEFORE connecting or using the
removable media with the 8000i.
1.2 Disclaimer
As Northstar is continuously improving this product we retain the right to make changes to
the product at any time which may not be reflected in this version of the manual. Please
contact your nearest Northstar distributor if you require any further assistance.
It is the owner’s sole responsibility to install and use the instrument and transducers in a
manner that will not cause accidents, personal injury or property damage. The user of this
product is solely responsible for observing safe boating practices.
BRUNSWICK NEW TECHNOLOGIES INC. AND ITS SUBSIDIARIES AND AFFILIATES DISCLAIM ALL
LIABILITY FOR ANY USE OF THIS PRODUCT IN A WAY THAT MAY CAUSE ACCIDENTS, DAMAGE
OR THAT MAY VIOLATE THE LAW.
Governing Language: This statement, any instruction manuals, user guides and other
information relating to the product (Documentation) may be translated to, or has been
translated from, another language (Translation). In the event of any conflict between any
Translation of the Documentation, the English language version of the Documentation will
be the official version of the Documentation.
This manual represents the product as at the time of printing. Brunswick New Technologies
Inc. and its subsidiaries and affiliates reserve the right to make changes to specifications
without notice.
Copyright © 2006 Brunswick New Technologies Inc. Northstar™ is a registered trademark of
Brunswick New Technologies Inc.
1.3 Warranty
The Northstar Warranty Statement is supplied as a separate document.
It is shipped with the Product Registration Card.
In case of any queries, refer to www.northstarnav.com.
4
Northstar 8000i System - 12" Display Processor Installation Manual
Page 5

Contents
1 Preface 2
1.1 Important Safety Information....................................................................................... 2
1.2 Disclaimer............................................................................................................................. 4
1.3 Warranty ............................................................................................................................... 4
2 Introducing the Northstar 8000i System 8
3 Check the 12 inch Display Processor parts 8
4 Find your way around the 12 inch Display Processor 11
5 The Network Master Unit 13
6 8000i System Installation 14
6.1 Northstar 8000i 12 inch Display Processor ............................................................15
6.2 Northstar 8000i Black Box Processor........................................................................16
6.3 Northstar 8000i 15 inch Monitor ...............................................................................17
6.4 Northstar 8000i Network Radar .................................................................................19
6.5 Northstar 8000i 8 Port Network Linker....................................................................20
6.6 Northstar 8000i 4 Port USB Hub.................................................................................21
6.7 Northstar 8000i 1 kW Network Sounder.................................................................22
6.8 Northstar 8000i DVD-CD Player .................................................................................23
6.9 Northstar 8000i Remote Keypad ...............................................................................24
6.10 Northstar 8000i Video Interface.................................................................................25
6.11 Northstar 8000i C-MAP Chart License Key.............................................................25
6.12 Northstar GPS Antenna (NS004743).........................................................................26
6.13 Other Components.........................................................................................................27
6.13.1 Autopilot.............................................................................................................................27
6.13.2 Heading Sensor................................................................................................................28
6.13.3 Audio....................................................................................................................................28
6.13.4 NMEA-0183 Data .............................................................................................................29
6.13.5 Mass Storage Devices ....................................................................................................31
6.13.6 Human Interface Devices .............................................................................................32
6.13.7 Network Camera..............................................................................................................32
Page 6

7 Mounting the 8000i 12 inch Display Processor 33
8 Wiring Guidelines 37
8.1 Power...................................................................................................................................38
8.2 GPS Port ..............................................................................................................................40
8.3 Utility Port ..........................................................................................................................41
8.3.1 External Wake Up and Remote Power On .............................................................41
8.3.2 NMEA ...................................................................................................................................44
8.3.3 NMEA Multiplexer (Noland NM42) ...........................................................................44
8.3.4 External Alarm ..................................................................................................................46
8.4 USB........................................................................................................................................ 48
8.5 Auxiliary port.....................................................................................................................49
8.6 RGB port..............................................................................................................................50
8.7 Network ..............................................................................................................................50
8.7.1 Field Terminated Network Cable ..............................................................................52
9 Example System Layouts 56
9.1 8000i Chart Plotter..........................................................................................................56
9.2 8000i Plotter Sounder.................................................................................................... 57
9.3 Entertainment ..................................................................................................................59
9.4 Full System......................................................................................................................... 61
10 Northstar 8000i Initial Setup 63
10.1 Turn on the 12 inch Display Processor.................................................................... 63
10.2 Adjust the brightness on a 12 inch Display Processor......................................63
10.3 Set the network master unit .......................................................................................64
10.4 Install the chart data ......................................................................................................65
10.5 Turn off the 12 inch Display Processor....................................................................66
10.6 Set the system preferences ......................................................................................... 67
10.6.1 Select the time format...................................................................................................67
10.6.2 Select your time zone ....................................................................................................67
10.6.3 Turn the keypad beeps on or off...............................................................................67
10.6.4 Change the transducer depth ....................................................................................68
10.6.5 Turn the keypad backlight on or off ........................................................................68
10.6.6 Show/hide the top control bar ..................................................................................69
10.7 Specify your vessel statistics.......................................................................................69
10.8 Set the location of the media library .......................................................................69
10.9 Set NMEA Output............................................................................................................70
10.10 Set NMEA Baud Rate ......................................................................................................71
10.11 Calibrate the touch screen........................................................................................... 71
10.12 Set the device (processor) name ............................................................................... 71
Set the screen resolution.............................................................................................. 72
10.13
10.14 Set the units.......................................................................................................................72
10.14.1 Select the speed units ...................................................................................................72
10.14.2 Select the depth units ...................................................................................................72
10.14.3 Select the pressure units ..............................................................................................72
10.14.4 Select the volume units for liquids...........................................................................73
6
Northstar 8000i System - 12" Display Processor Installation Manual
Page 7

10.14.5 Select the large scale distance units ........................................................................73
10.14.6 Select the small scale distance units ........................................................................73
10.14.7 Select the temperature units ......................................................................................74
10.15 Radar ....................................................................................................................................74
10.15.1 Set up the radar before using it for the first time................................................74
10.15.2 Change the radar startup mode ................................................................................75
10.15.3 Change the radar range offset (trigger delay)......................................................75
10.15.4 Change the radar bearing alignment ......................................................................76
10.15.5 Change the parking angle ...........................................................................................76
10.16 Sounder...............................................................................................................................77
10.16.1 Change the water temperature offset.....................................................................77
10.16.2 Change the water temperature averaging time .................................................77
10.16.3 Change the sounder's speed offset..........................................................................77
10.16.4 Change the sounder's speed filter ............................................................................78
10.17 Instruments........................................................................................................................78
10.17.1 Create an instrument panel.........................................................................................78
10.17.2 Add an instrument..........................................................................................................78
10.17.3 Resize an instrument......................................................................................................79
10.17.4 Rename an instrument panel .....................................................................................79
10.17.5 Delete an instrument panel.........................................................................................80
10.17.6 Delete an instrument panel.........................................................................................80
11 Maintenance 81
11.1 Technical support, service and repairs....................................................................81
12 Restore 82
12.1 Restore settings and information..............................................................................82
12.2 Restore processor software .........................................................................................82
13 Upgrading the 8000i system 83
13.1 Install Software patch on to a stand alone processor .......................................83
13.2 Install a software patch to multi processor system ............................................84
13.3 Install a system image upgrade.................................................................................84
14 Specifications 86
Northstar 8000i System - 12" Display Processor Installation Manual
7
Page 8

2 Introducing the Northstar 8000i System
Congratulations on your purchase of the Northstar 8000i, the revolutionary new integrated
marine electronics system. The 8000i is designed for ease of use in the marine environment,
with Touch Screen technology and online help.
The 8000i can integrate navigation, fishfinding, instrumentation, multimedia entertainment,
and an onboard camera. Whatever type of boat you have and however you use it, you can
customize the 8000i to meet your needs.
Flexible, modular, and innovative, the 8000i delivers awesome performance.
Please take a few minutes to read through this manual before cutting holes or locating
equipment.
NOTE: The 8000i has several requirements that must be met to ensure safe and proper
operation. Installation and interfacing of the 8000i should be handled by a marine
technician.
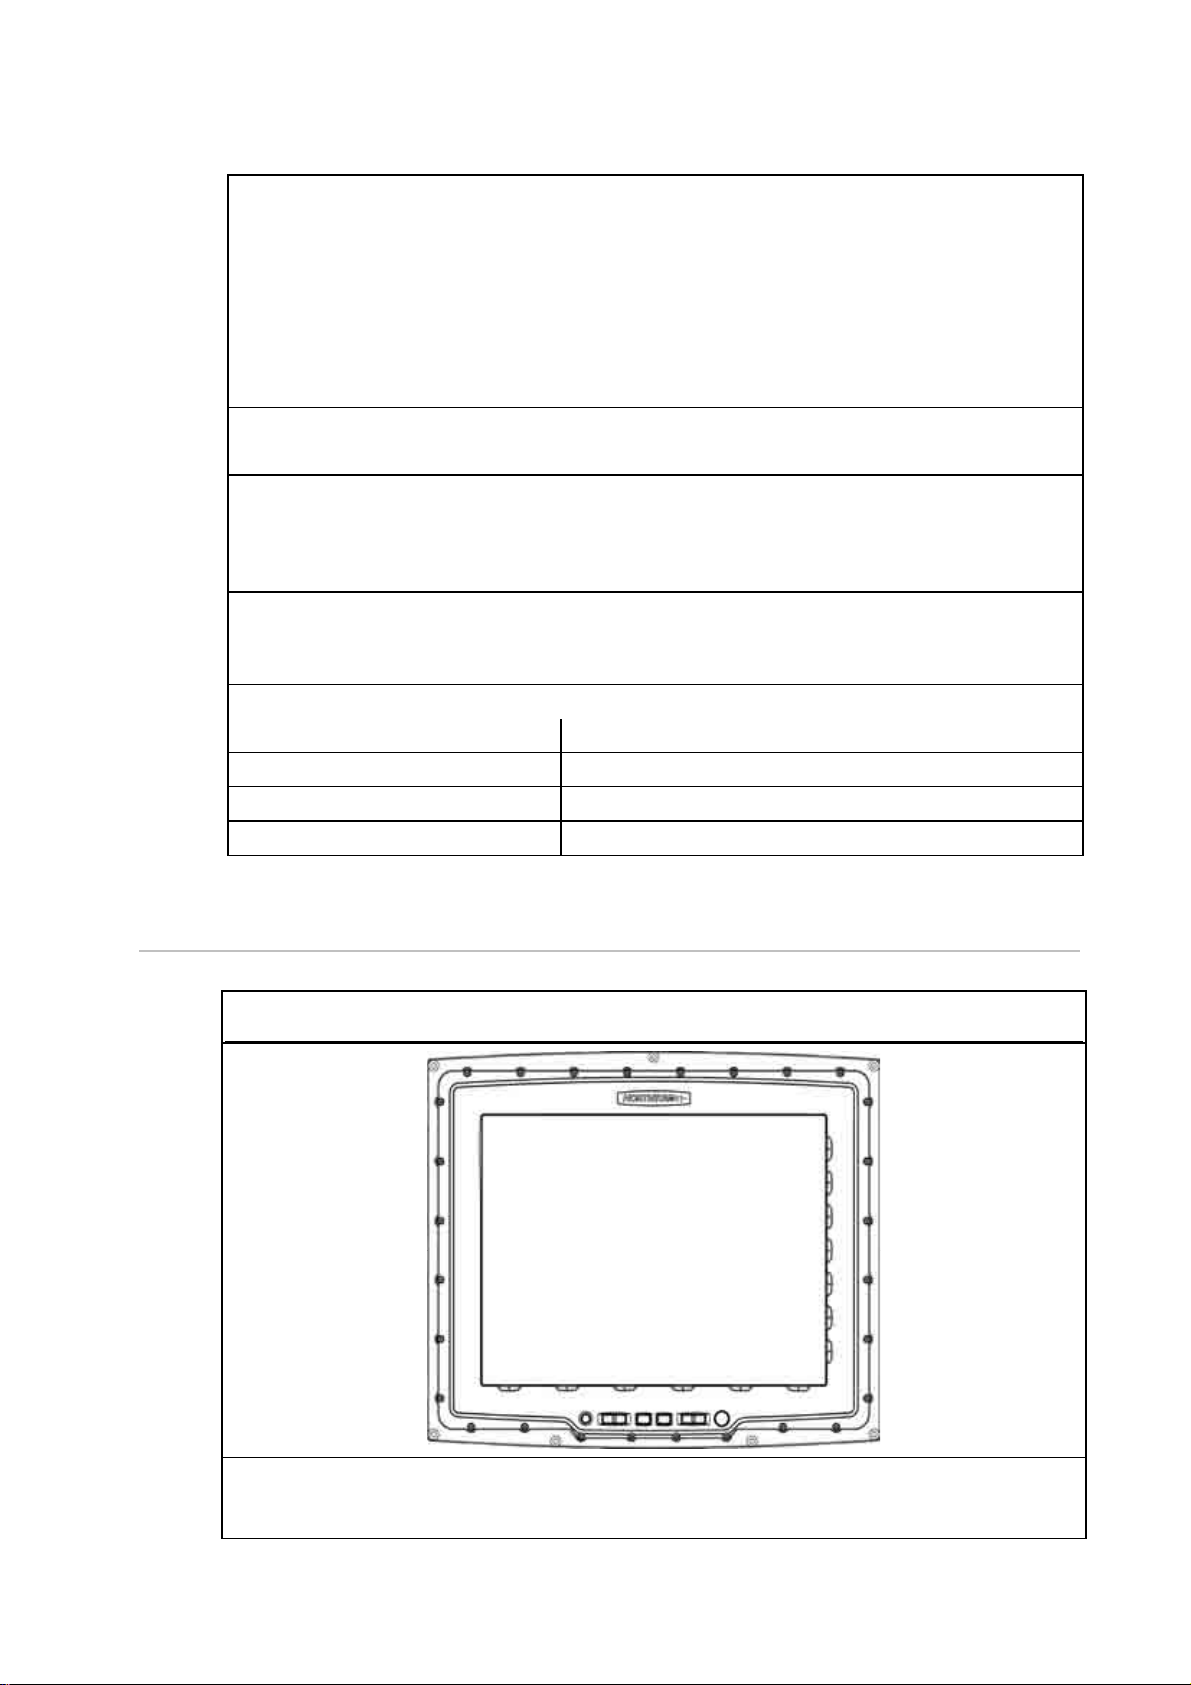
3 Check the 12 inch Display Processor parts
12" Display Processor NS004700 Sun Cover CV000074A-G
Mounting Bezel CS000661A-G Mounting Gasket GA000141A-G
8
Northstar 8000i System - 12" Display Processor Installation Manual
Page 9
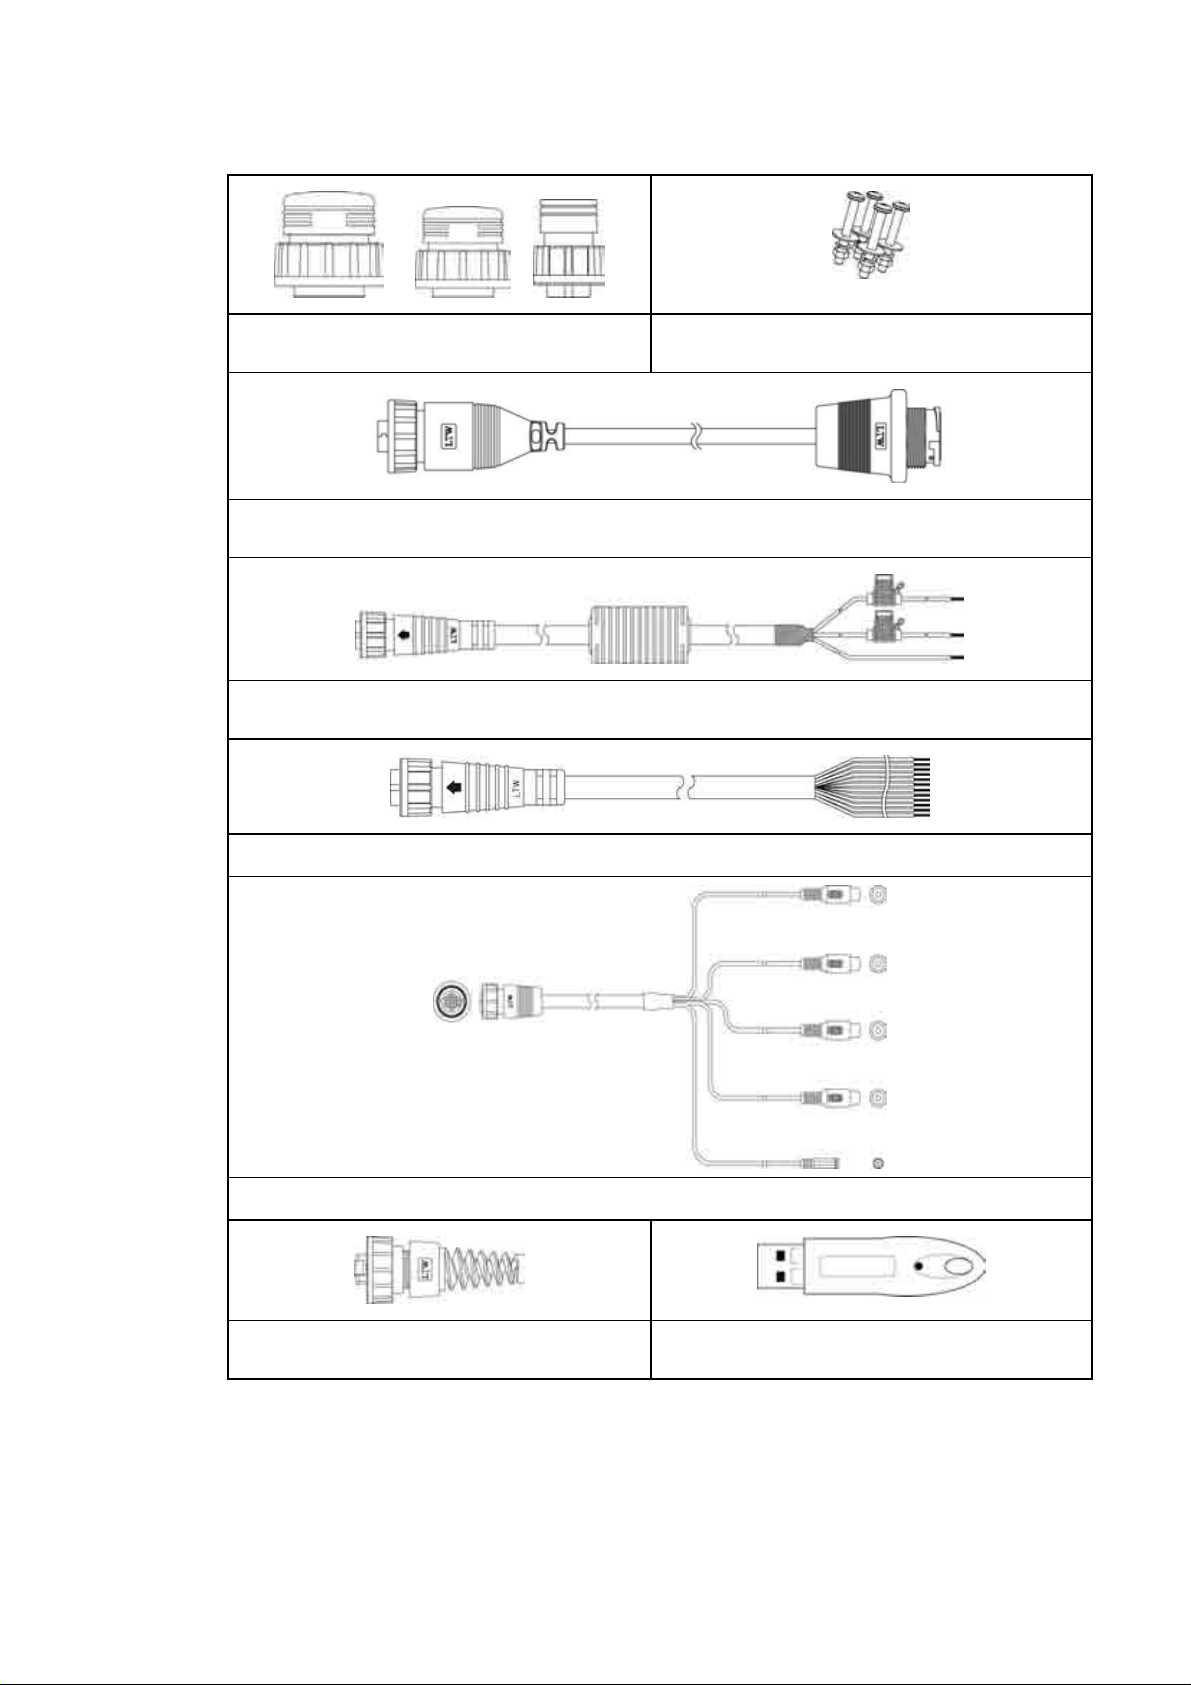
Protective Caps HR000099 Mounting Screws HR000089
USB Dash Mount Connector CB000319B-G
Power Cable and Fuses AS000453-G
Utility Cable NS004801
Audio Cable NS004802
Ethernet Loopback AS010646A Chart License Key NS004820
Northstar 8000i System - 12" Display Processor Installation Manual
9
Page 10
Mounting Template LA000600A-G Chart Licence Key Holder MS000622A-G
This Installation Manual MN000605C-G 8000i Operation Manual MN000603C-G
8000i Quick Start Guide MN00643D-G LCD Cleaning Cloth MS000619A-G
Warranty Registration Card
NOTE: Other system components are listed in the 8000i System Installation section. Be sure
you have all required units and cabling BEFORE starting the installation.
10
Northstar 8000i System - 12" Display Processor Installation Manual
Page 11
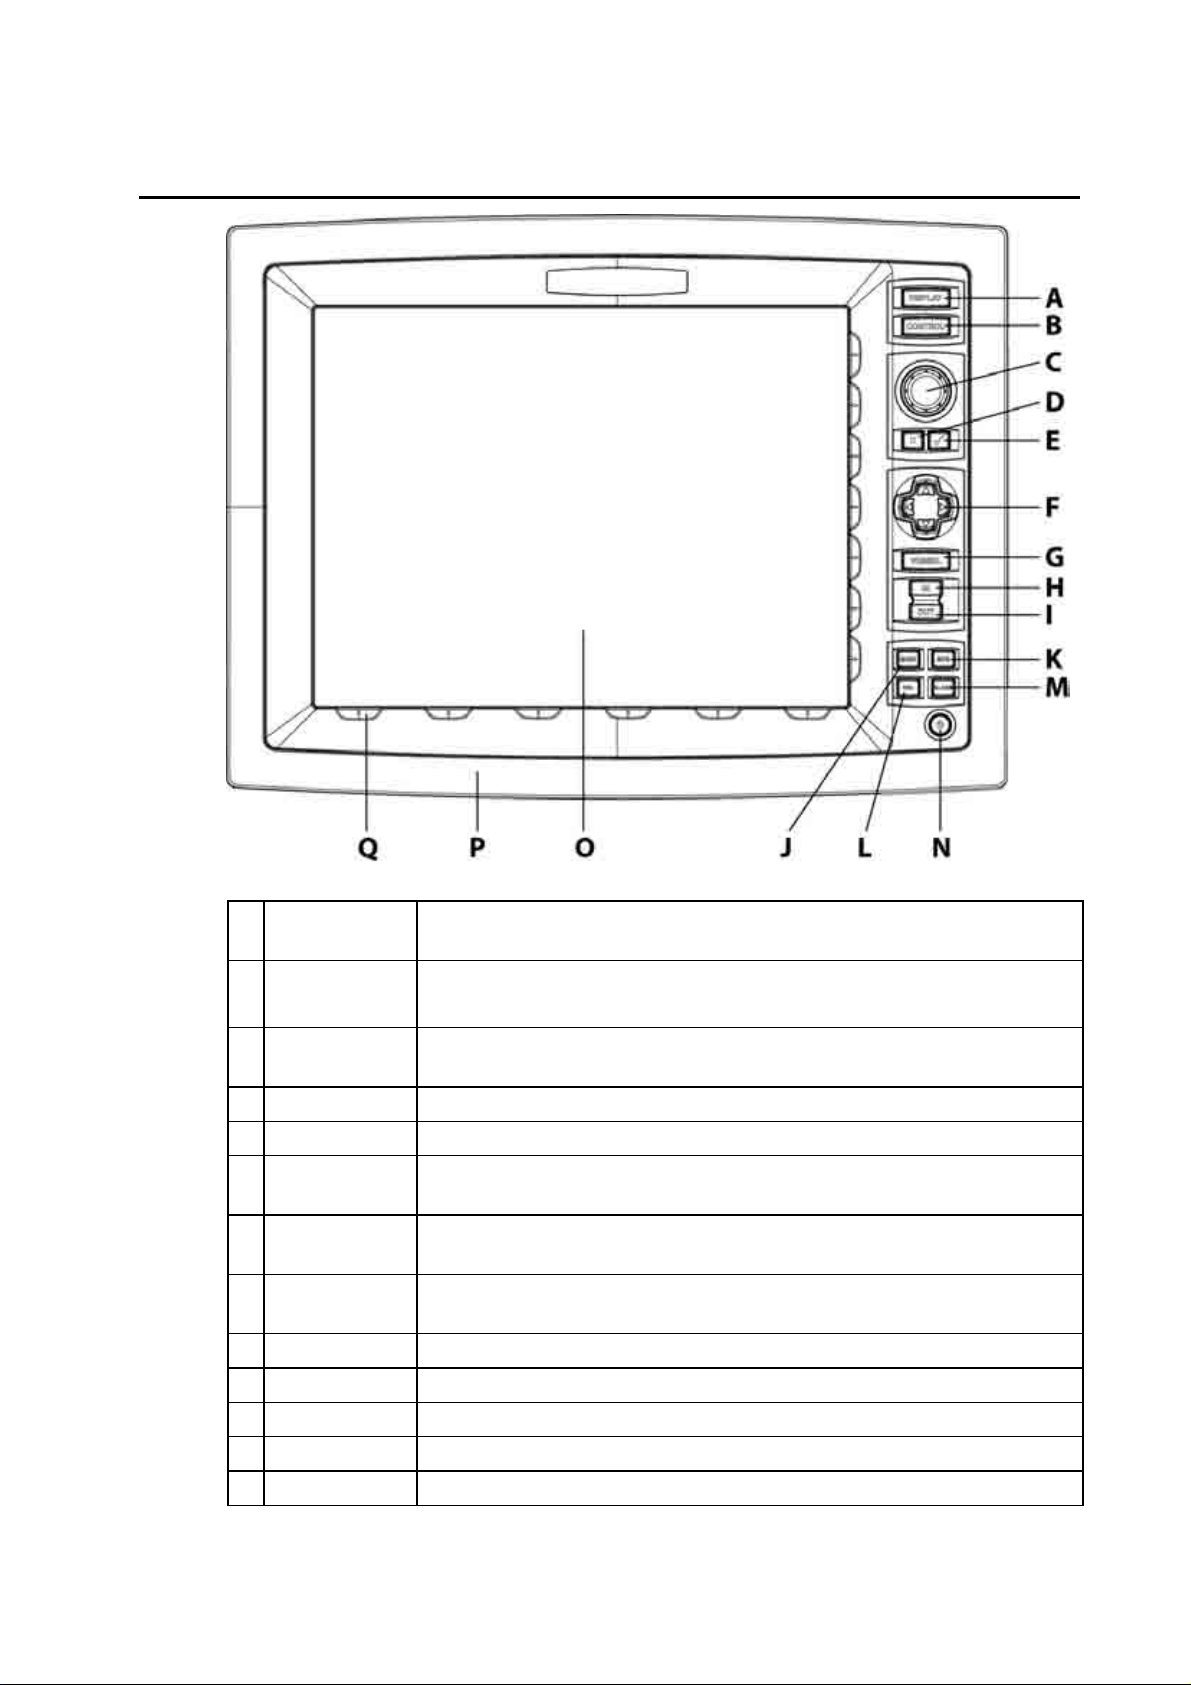
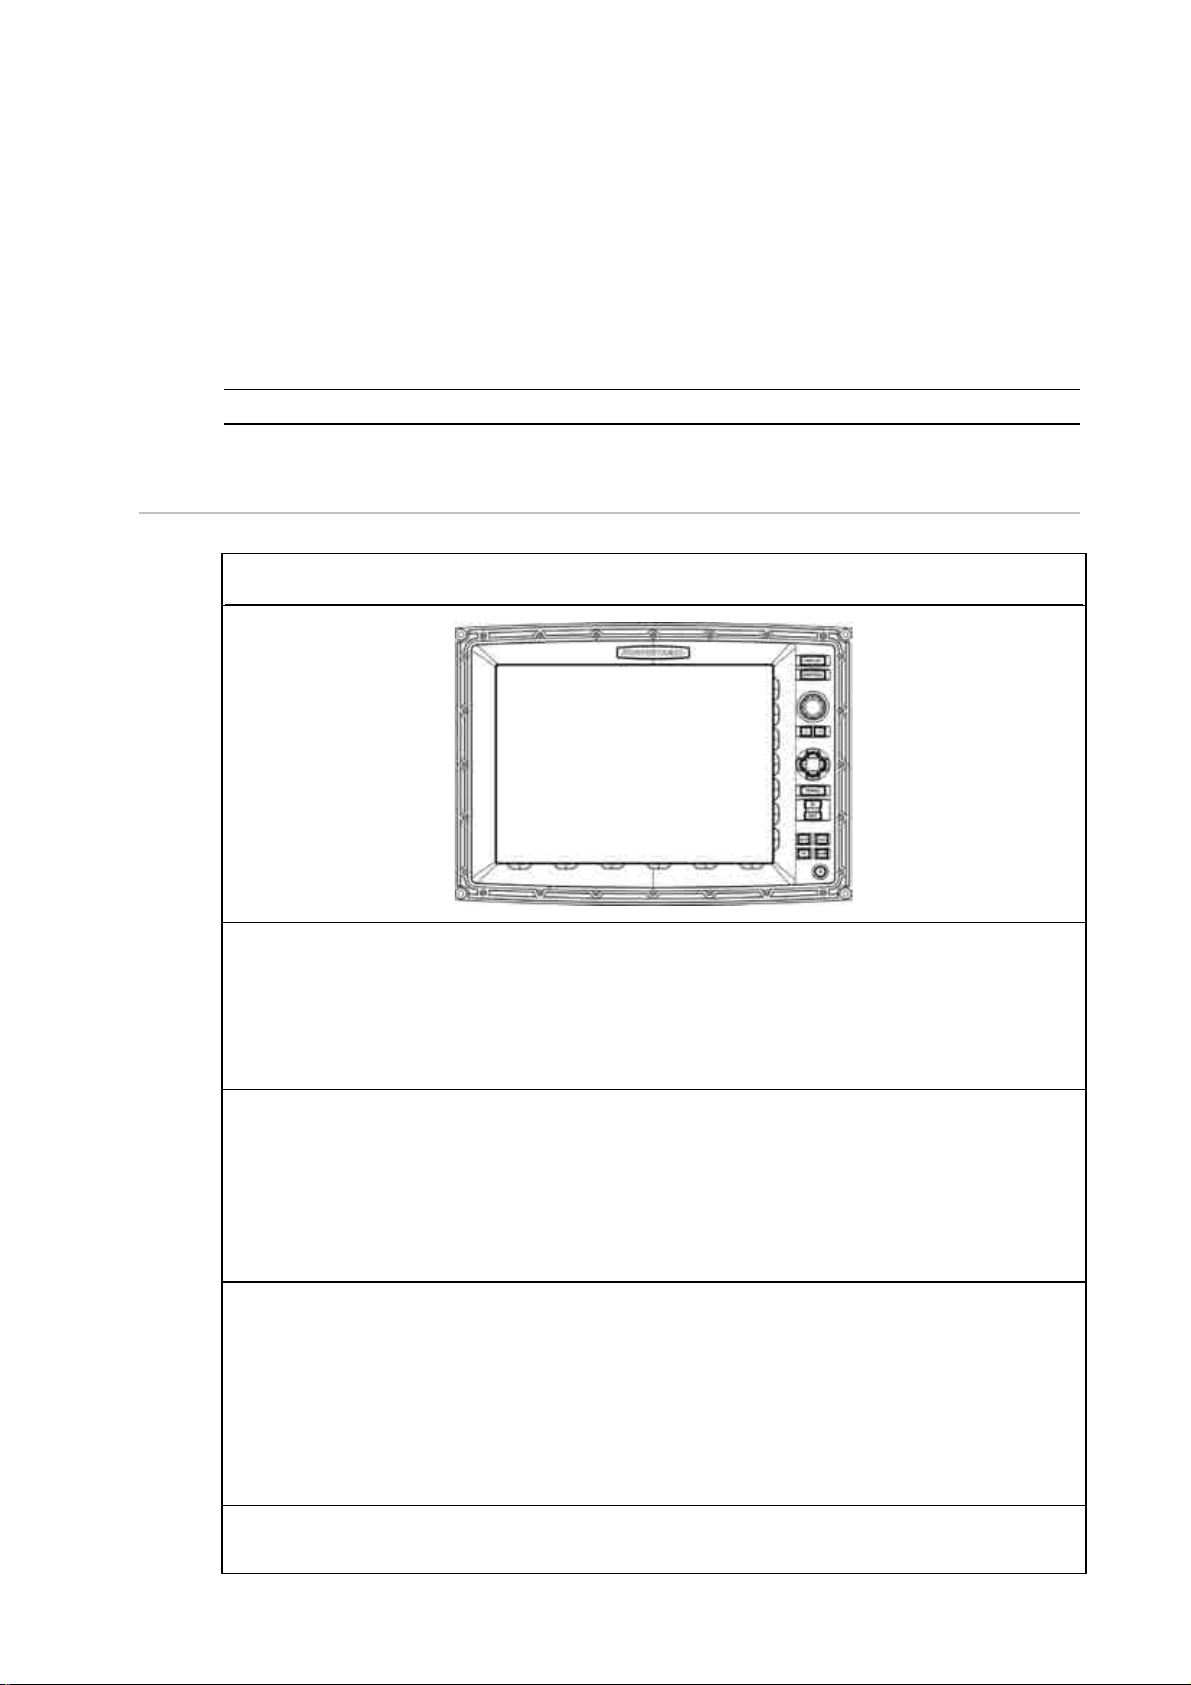
4 Find your way around the 12 inch Display Processor
A DISPLAY Key
Press once to show single pane options; press again to show page
options
B CONTROL Key
Press to change the active pane on a page; and, if you expand the pane
to full size, press again to cycle through the other panes at full size
C Rotary knob
Turn left (counter-clockwise) to scroll down, turn right (clockwise) to
scroll up
D Cancel Key Press to cancel or exit
E Confirm Key Press to select or confirm
4 directional
F
Press an arrow to pan the chart or move the Radar PPI in that direction
arrows
G VESSEL Key
Press to center the Chart screen on your vessel or to re centre the Radar
PPI
H IN Key
Press once to zoom in one step. (This affects the active applicationChart, 3D Chart, Radar, Sounder or 3D Steer).
I OUT Key Press once to zoom out one step
J MARK Key Press to mark the current position with a default event mark icon
K MOB Key Man Overboard
L VOL Key Press to adjust the volume of the audio currently playing
M ALARM Key Press to show the alarm log
Northstar 8000i System - 12" Display Processor Installation Manual
11
Page 12
N POWER Key
Press once to power the 8000i and the display unit On. Hold down for
four (4) seconds to commence power Off. When the system is running
press once to display on screen display to adjust screen brightness or
to disable touch screen e.g. for cleaning
O The Screen 12", 800 x 600 resolution
Mounting
P
Remove to reveal mounting screws
Bezel
Q Finger Guides To guide fingers to onscreen controls
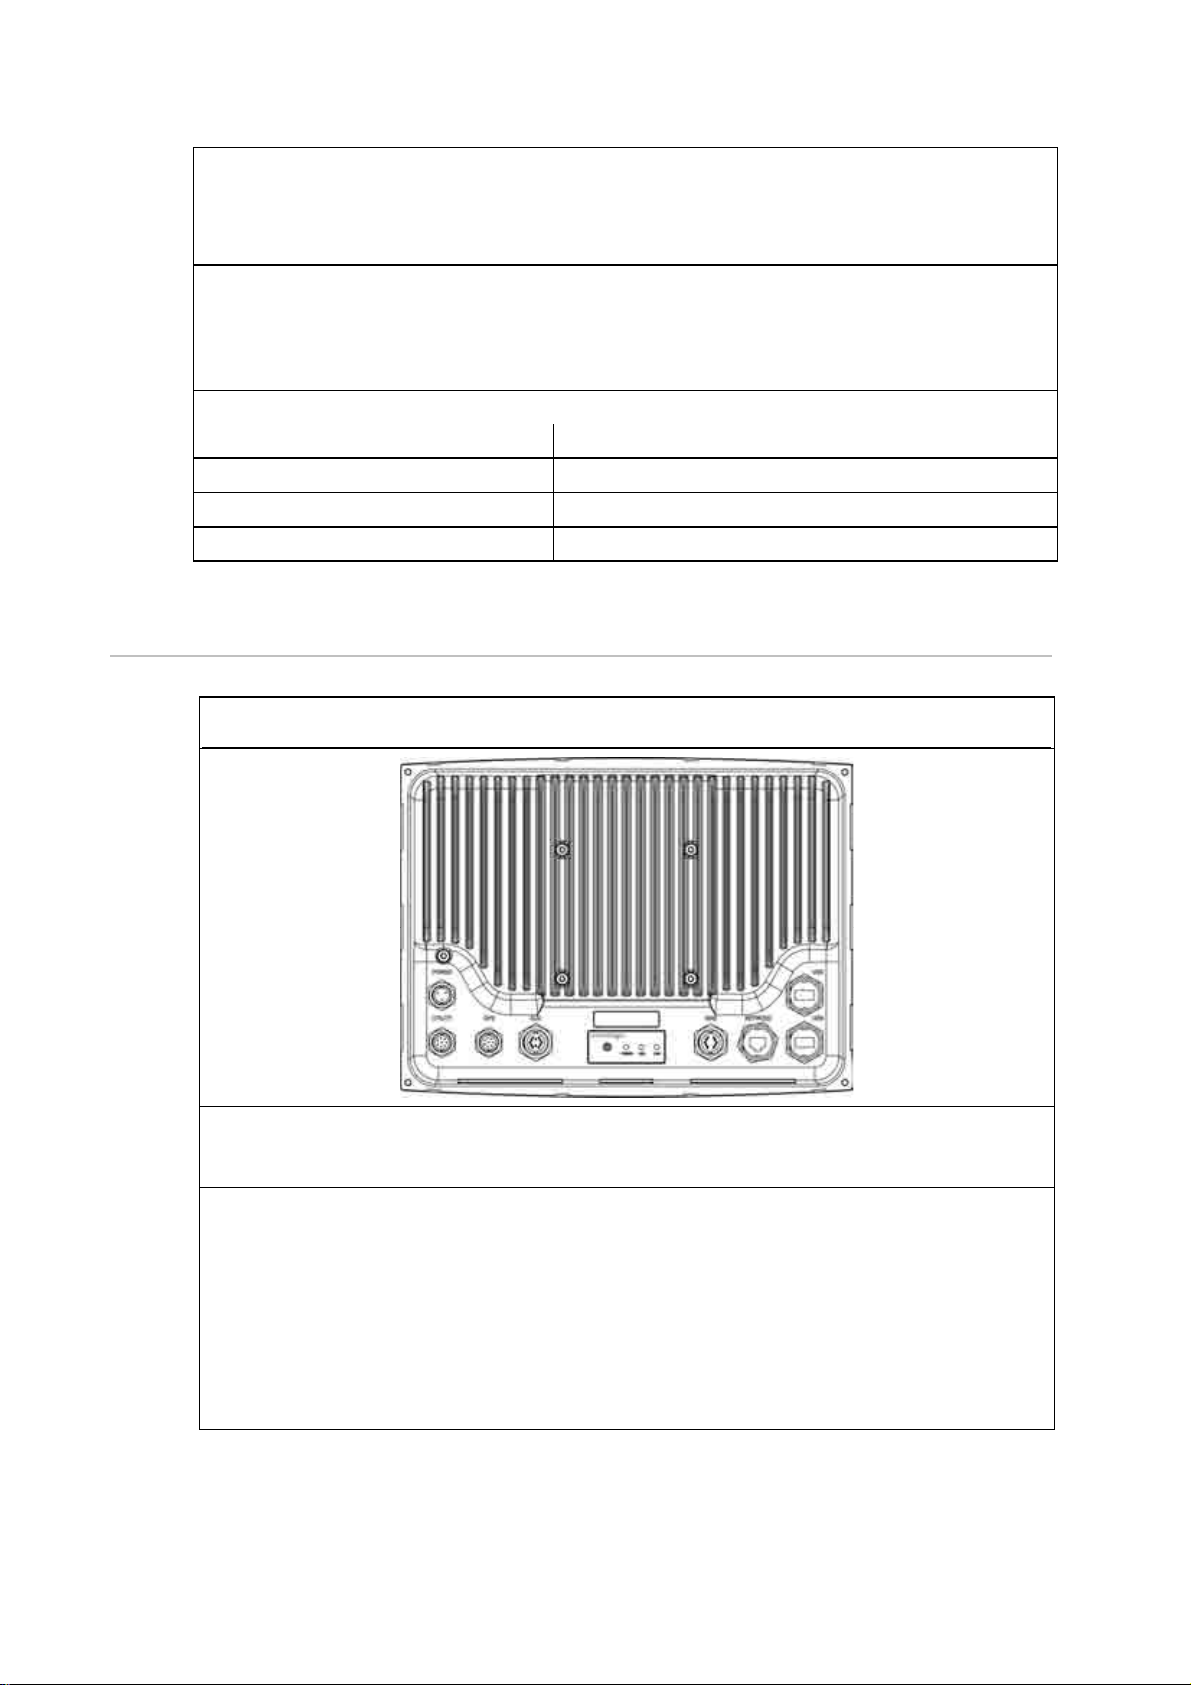
A Power Three pin power input (see "Power" page 38)
B Utility
Communication to and from external devices. Use optional 12 pin cable
(Part No. NS004801)
C GPS Connect to optional Northstar GPS (Part No. NS004743)
D Aux Auxiliary port. provides audio line out
E RGB External monitor connection (see "RGB port" page 50)
F Network Network Connection (see "Network" page 50)
G USB USB Connection (see "USB" page 48)
H USB USB Connection
Panel
I
Panel mounting holes
Mounting
Holes
VESA Mount
J
Pedestal mounting holes
Holes
12
Northstar 8000i System - 12" Display Processor Installation Manual
Page 13
5 The Network Master Unit
The simplest type of 8000i System consists of a single stand-alone processor. A more
sophisticated 8000i System consists of multiple processors, which can be a combination of
12" Display Processors or Black Box Processors, networked together.
If more than one processor is used in the 8000i System, one processor only MUST be
specified as the master unit. You must decide which processor on the 8000i network will be
responsible for handling incoming and outgoing navigation data. Therefore, when planning
the wiring, make sure that all the data inputs and outputs, such as NMEA, are supplied to the
master unit. Typically the master unit will be located at the main helm station.
The master unit MUST:
have all the data wiring (such as NMEA) run to it. Incoming navigation data, such
as GPS and NMEA, is received by the master unit and then distributed over the
network to other processors.
have the GPS antenna connected to it.
have the chart license key connected to it. When the chart license key is
connected and the charts unlocked, other processors can share the one license
(see "Northstar 8000i C-MAP Chart License Key" page 25) and display the charts.
have the autopilot connected to it (if applicable).
have a USB port accessible by using the provided panel mount cable (this is to
allow easy access to upgrade the system)
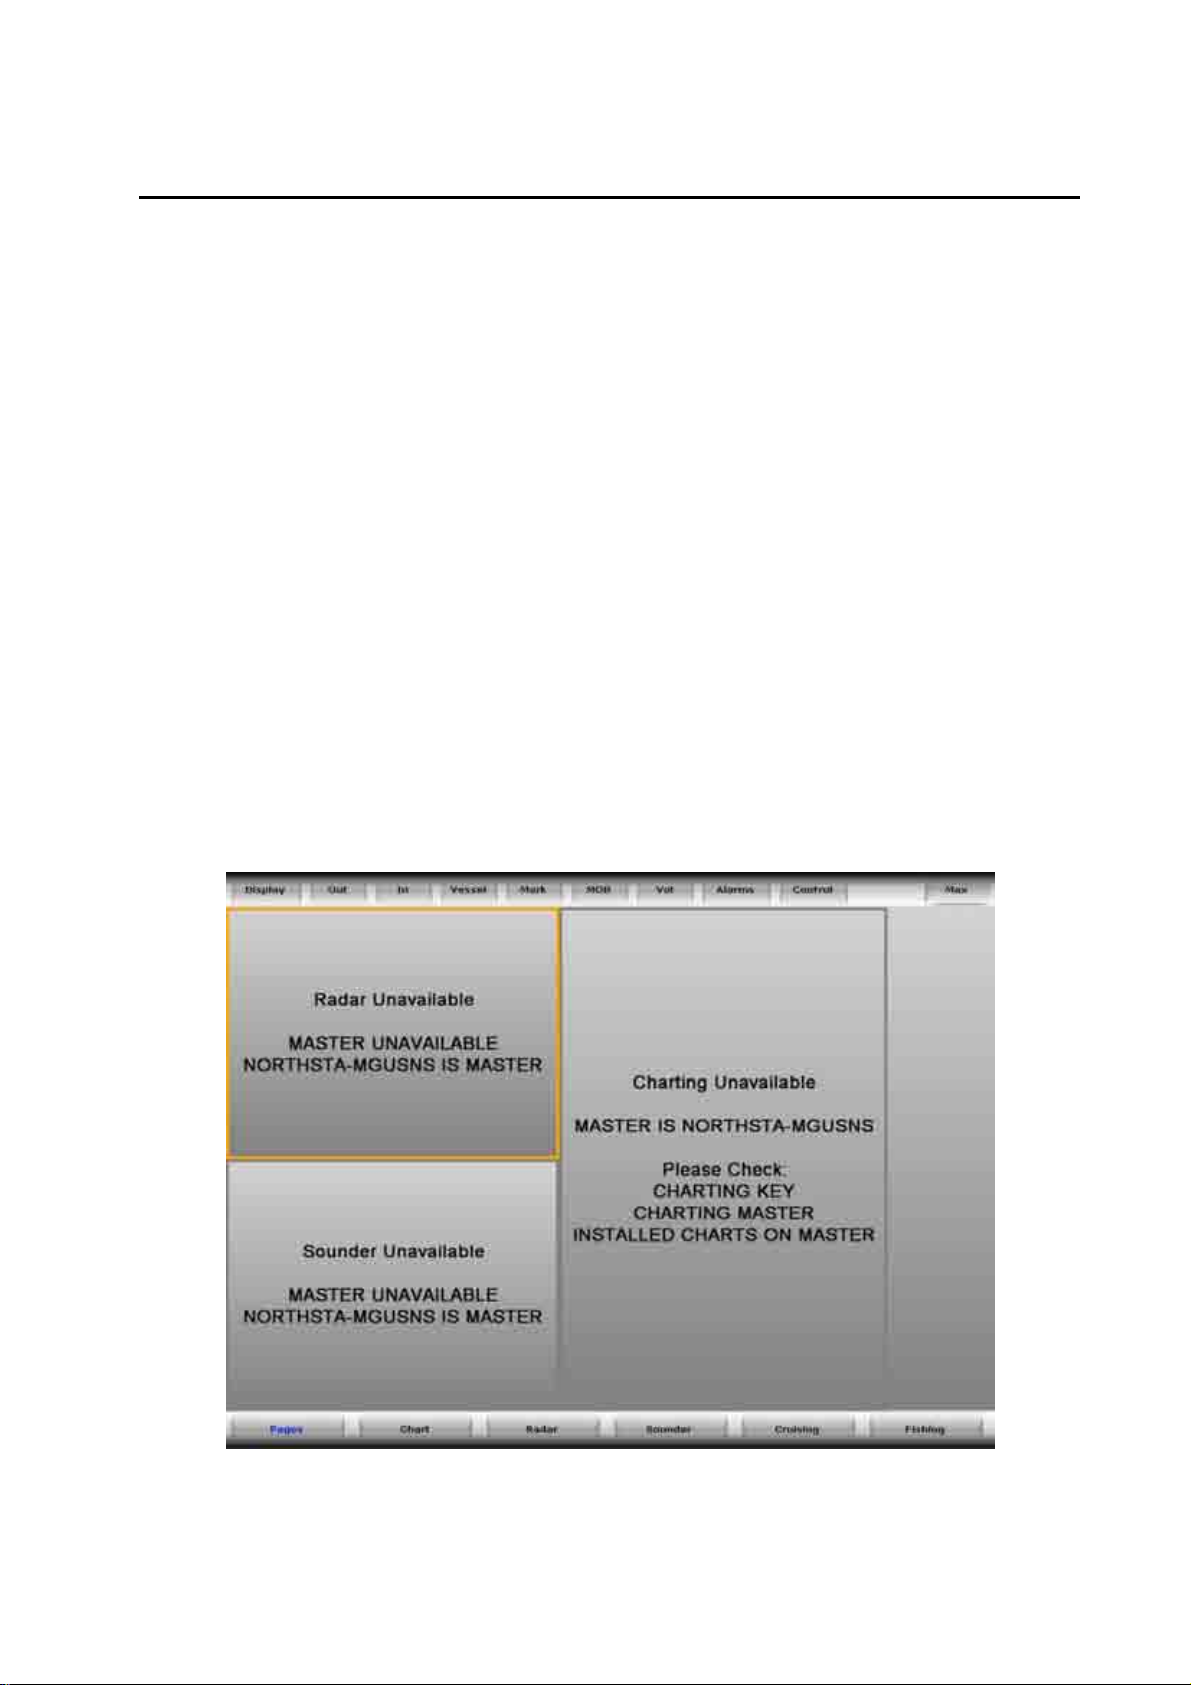
The master unit MUST be operating FIRST in order for the other processors to function with
navigational information.
If the master is NOT operating, all the other display units will show a grey screen with the
message "Master [name] unavailable". This will be the case for Chart, Radar, Sounder, 3D
Chart and 3D steer.
Northstar 8000i System - 12" Display Processor Installation Manual
13
Page 14

6 8000i System Installation
A minimum 8000i System consists of a processor, display and GPS antenna. The system
consists of either the Black Box Processor combined with a 12" Display Processor or the ALLIN-ONE processor inside the 12" Display. This would be a stand alone system.
The versatility of the 8000i System means that it can be customized and expanded to suit
each vessel and budget. Extra 12" Display Processors, 15" Monitors, and remote keypads can
be added to create an 8000i network, so that the 8000i System can be operated or viewed
from different locations around the vessel.
In addition, there is a wide range of Northstar (and compatible third party) components such
as the Network Sounder and the Northstar Radar that can also be installed and added to the
8000i system to provide a totally integrated system, with the information from these devices
available across the entire 8000i network. These components are outlined in the equipment
sections of this manual.
Installation Sequence Summary Guidelines
1. Plan what will be the desired functionality for the system. Ensure you have acquired
all the units and cabling before starting
2. If you are using an 8000i System in a multi-system installation, decide which
processor is going to be the master processor and plan the wiring around this unit
(see "The Network Master Unit" page 13)
3. Plan location of components: Location check list: Check screen viewing angles (see
"Mounting the 8000i 12 inch Display Processor" page 33)
4. Check location constraints: magnetic fields, heat, direct sunlight, rain or spray. etc.
5. Check wiring constraints:
USB maximum cable length 16.5 ft (5 m)
Video and Audio cables away from high current cables
Power cables using the correct gauge
To help ensure proper operation, do not mount any part or cable within 1.6 ft
(0.5 m) of the plane of a radar scanner or within 3 ft (1 m) of a compass or source
of electrical noise such as engines, fluorescent lights, and power inverters.
6. Decide power requirements:
Check system current draw:
Decide breaker assignments.
7. Mount each Northstar 8000i System unit:
Close to the other parts of the system and to the boat power supply
Where there is space for the wiring and clearance to fit connectors without
having sharp bends in the cables
Where there is access to wire the unit and to fit connectors
In a ventilated place
Away from exposure to direct sunlight, rain or spray
Where any front-panel controls can be operated easily.
8. If the unit is mounted on a flat panel, ensure the panel does not vibrate.
9. Do not mount any part where it can be used as a hand hold, where it might be
submerged or where it will interfere with the operation, launching or retrieving of
the boat.
10. Run Cables.
11. Connect all cables. It is recommended to fill out the System Installation Record
sheet for each processor
12. Connect Chart licence key to the master unit.
13. Power on the master processor (see "Turn on the 12 inch Display Processor" page
63) and set to be the master (see "Set the network master unit" page 64) (ensure
14
Northstar 8000i System - 12" Display Processor Installation Manual
Page 15
other processors are off). Take note of the master processor name. It will be a good
idea to use the provided System Setup Check sheet. This will provide a record of the
settings on install and serve as a reminder to check all settings.
14. Install purchased charts. (see "Install the chart data" page 65)
15. Configure System attributes such as time offset, draft, NMEA output etc (see
"Northstar 8000i Initial Setup" page 63).
16. Power on the next processor and nominate the master processor when prompted
(this can be done form this processor or from the master). Setup the processor.
Repeat till all processors are on and configured.
6.1 Northstar 8000i 12 inch Display Processor
Northstar 8000i 12" Display Processor NS004700
Description
The 12" Display Processor is an 8000i Processor and 12" Display rolled into one. It shares the
same processor internal components as the 8000i Black Box Processor. The 12" Display has a
direct bonded anti reflective coating using an infrared touch screen to control the system.
The system can also be controlled by the built in Keypad, or by the optional 8000i Remote
Keypad.
NOTE: Pay particular attention to wiring constraints, and cable installation.
Place in 8000i System
The 12" Display Processor is used to view and control the 8000i Software. The 12" Display
Processor also provides interface to external devices both within the 8000i range of products
and with external devices such as an autopilot and other instruments. The unit can be stand
alone or be connected the 8000i Network as part of a multi processor system. If this is to be
the master processor be sure to have easy access to one of the USB ports for future upgrades
of the system. Use the provided USB panel mount cable if necessary
Optional Parts
GPS Antenna (see "Northstar GPS Antenna (NS004743)" page 26),
Network Sounder (see "Northstar 8000i 1 kW Network Sounder" page 22),
Network Radar (see "Northstar 8000i Network Radar" page 19),
Chart licences (see "Northstar 8000i C-MAP Chart License Key" page 25),
USB Hub, Network Linker, DVD/CD Player, USB Video Interface, Remote Keypad, ethernet
cables if connecting to network.
Other Functions
1 x NMEA in, 1 x NMEA out, NavBus, external alarms, repeater video out (800 x 600),
Northstar 8000i System - 12" Display Processor Installation Manual
15
Page 16
Location Guide
The 12" Display Processor is sunlight viewable with an anti reflective coating. For best results
position out of direct sunlight. The ideal location should have minimal glare from windows or
bright objects. The unit is waterproof to IPX5 specification.
Mounting
The unit can be flush mounted or mounted on a third party VESA bracket using the holes in
the rear of the case.
Best viewing angles within a 120 degrees vertical range.
Power requirements
Operation Voltage (once powered) 10 V DC - 35 V DC
Operation Voltage less than 1 min 7 V DC - 9 V DC
Power consumption Max @ 12 V 50 W
Fuse 10 Amp @ 12 V DC (5 Amp @ 24 V DC)
6.2 Northstar 8000i Black Box Processor
Northstar 8000i Black Box Processor NS004730
Description
Northstar 8000i Black Box Processor:
Place in 8000i System
The Black Box Processor is used to run the 8000i software, which can be displayed either on
a Northstar 15" Monitor, a 3rd party screen capable of displaying 1024 x 768 resolution or
widescreen monitor that can support 1280 x 720. The processor provides interface to
external devices both within the 8000i range of products and with external such as
autopilot's and instruments. The unit can be stand alone or be connected the 8000i network
as part of a multi processor system. If this is to be the master processor be sure to have easy
access to one of the USB ports for future upgrades of the system. Use the provided USB
panel mount cable if necessary
16
Northstar 8000i System - 12" Display Processor Installation Manual
Page 17
Optional Parts
GPS Antenna (see "Northstar GPS Antenna (NS004743)" page 26),
Network Sounder (see "Northstar 8000i 1 kW Network Sounder" page 22),
Network Radar (see "Northstar 8000i Network Radar" page 19),
Chart licences (see "Northstar 8000i C-MAP Chart License Key" page 25),
USB Hub, Network Linker, DVD/CD Player, USB Video Interface, Remote Keypad
Ethernet cables if connecting to network.
Other Functions
1 x NMEA in, 1 x NMEA out, NavBus, external alarms, repeater video out (800 x 600),
Location Guide
Mount away from strong magnetic fields. Mount no more than 16.5 ft (5 m) away from the
15" Monitor when connecting to the USB of the monitor. This is used to drive the touch
screen
Mounting
Mount horizontally or vertically. If mounting vertically, mount to a bulkhead or other
structurally sound vertical surface. Do not mount to thin panels which are prone to vibration
Power requirements
Operation Voltage 10 V DC - 35 V DC
Operation Voltage less than 1 min 7 V DC - 9 V DC
Power consumption @12 V 45 W
Fuse 10 Amp @ 12 V DC (5 Amp @ 24 V DC)
6.3 Northstar 8000i 15 inch Monitor
Northstar 8000i 15" Monitor NS004710
Description
This is a 15 inch waterproof, sunlight viewable monitor
Northstar 8000i System - 12" Display Processor Installation Manual
17
Page 18

Place in 8000i System
Primarily to display the 8000i software from a Northstar 8000i Black Box Processor. The 15"
Monitor may also be used to display the video output of a PC or compatible video source,
composite, S-video and DVI video sources.
Other parts required
For connecting to external 3rd party video sources, order the following cables
VGA DB15 Video cable 6 ft (2 m) NS004710
Composite Video cable 6 ft (2 m) NS004803
DVI-D Video cable 6 ft (2 m) NS004805
S-Video cable 6 ft (2 m) NS004804
Other Functions
The 15" Display has 2 x VGA inputs, 1 x DVI connector, 2 x composite video inputs, 2 x S-video
inputs. Internal 2 Port USB Hub. It may also control the power state of a Northstar Black Box
Processor
Location Guide
The 15" Display is sunlight viewable, with an anti reflective coating. For best results position
out of direct sunlight. The ideal location should have minimal glare from windows or bright
objects. The unit is waterproof to IPX5 specification.
If connecting to the USB port of a Black Box Processor, mount no further than a 16.5 ft (5 m)
cable run: mount any USB peripherals no further than 16.5 ft (5 m) away
Mounting
The unit can be flush mounted or mounted on a third party VESA bracket using the holes in
the rear of the case.
Power requirements
Operation Voltage (once
10 V - 35 V DC
powered)
Operation Voltage less than
7 V - 9 V DC
1 min
Power consumption @12 V 60 W
Fuse 10 Amp @12 V DC (5 Amp @ 24 V DC)
18
Northstar 8000i System - 12" Display Processor Installation Manual
Page 19
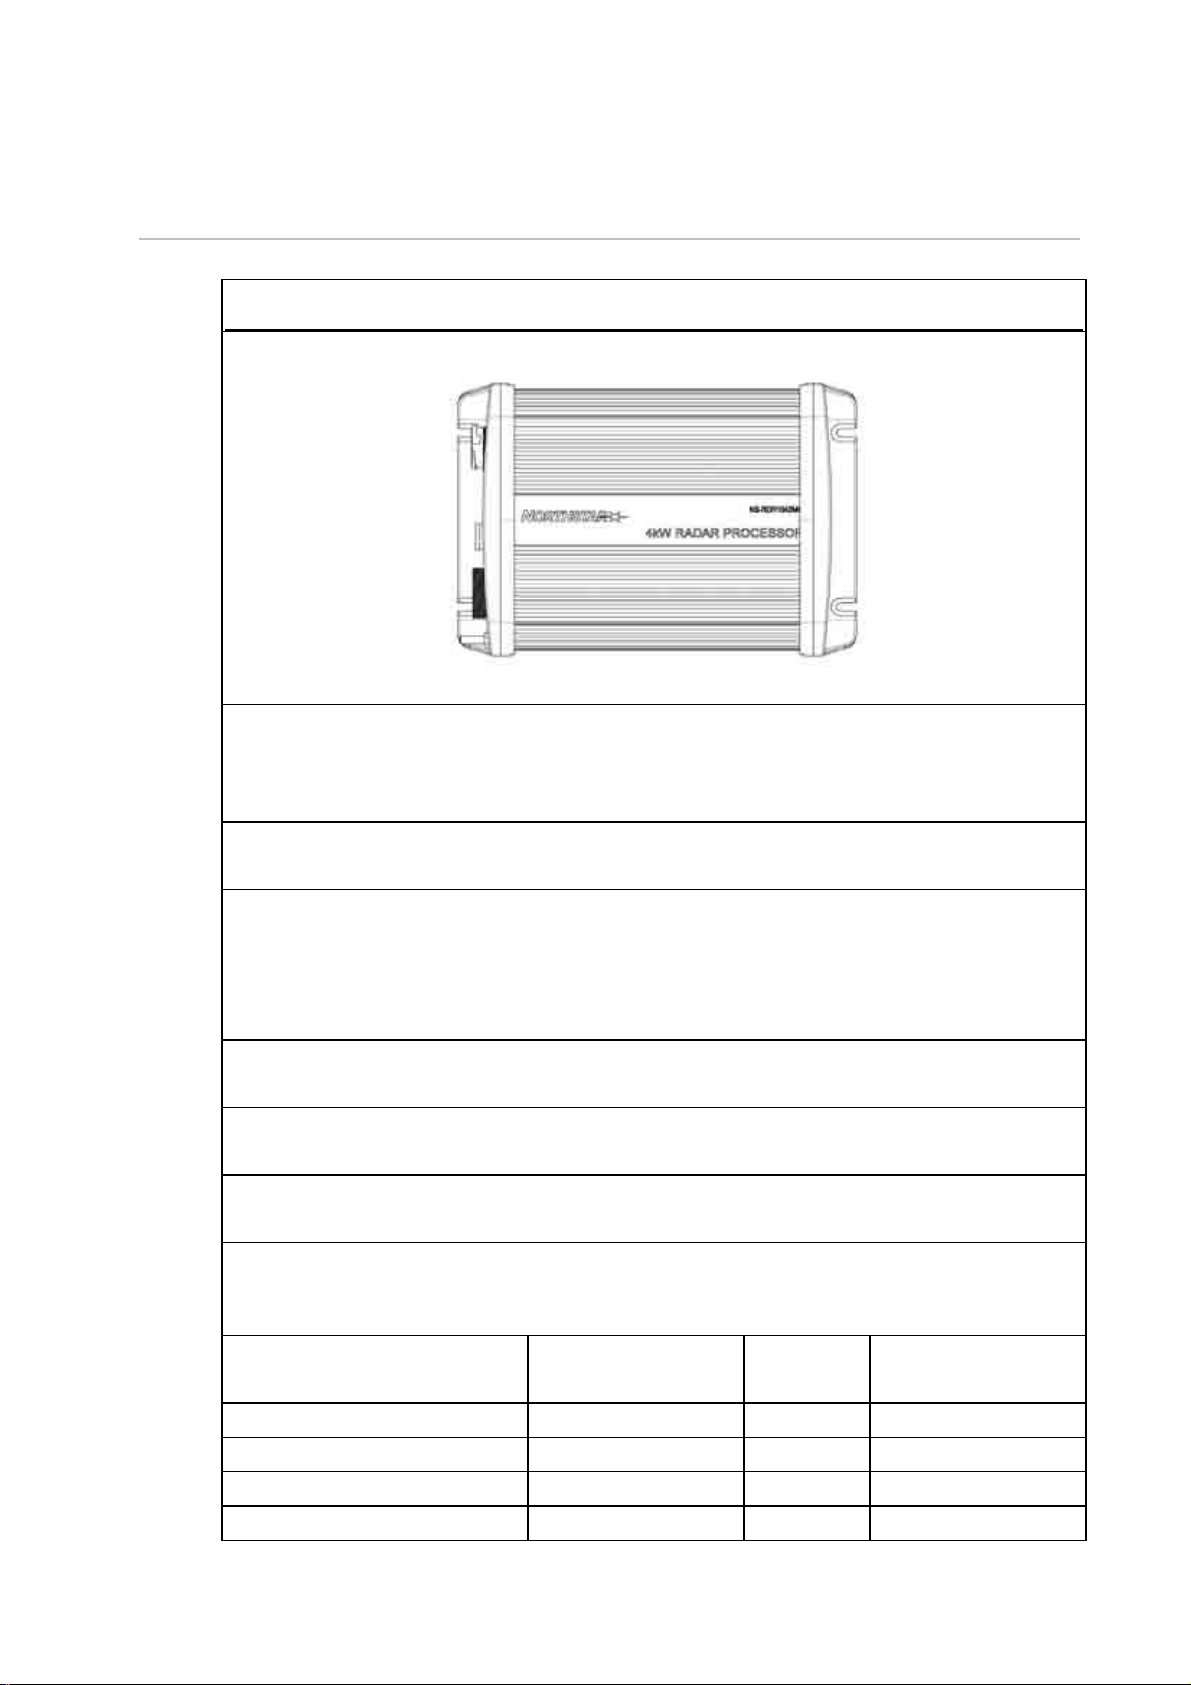
6.4 Northstar 8000i Network Radar
Northstar HD Digital Radar
Description
The Northstar HD Digital Radar consists of a Scanner and a Radar processor box. Information
from the scanner is processed and broadcast onto the 8000i Network. Systems available in 5
models from 2 kW to 25 kW.
Functions
Radar functionality on 8000i, 6000i or 6100i displays
Place in 8000i System
The Northstar HD Digital Radar connects to the 8000i System Network, to the Northstar 8
Port Network linker or if it is the only Network device a crossover cable can be used to
connect directly to a 8000i processor.
Different size scanners require their own same size processor box
Optional Parts
NS002437R Heading Sensor required for chart overlay.
Other Functions
Receive heading sensor over NMEA
Location Guide
Mount in dry environment
Mounting
Mount vertically or horizontally. The unit has LED status lights on left hand side, next to
connectors
Power requirements Voltage Fuse Draw*
2 kW Processor with Scanner 12 V DC 2 Amp 25 W
4 kW Processor with Scanner 12 V - 24 V DC 10 Amp 30 W
6 kW Processor with Scanner 12 V - 24 V DC 10 Amp 120 W
10 kW Processor with Scanner 24 V DC 15 Amp 250 W
25 kW Processor with Scanner 24 V DC 15 Amp 180 W
*Current Draw (with scanner under maximum wind conditions).
Northstar 8000i System - 12" Display Processor Installation Manual
19
Page 20

DON'T install the scanner inside of the recommended compass safe distances of any
navigation instruments such as the magnetic compass and the chronometer. The compass
safe distances are as follows:
2 kW radar STD 2.3 ft (0.7 m)
STEER 1.6 ft (0.5 m)
4 kW radar STD 6.5 ft (2.0 m)
STEER 5 ft (1.5 m)
6 kW radar STD 7.5 ft (2.3 m)
STEER 5.7 ft (1.75 m)
10 kW radar STD 7.9 ft (2.4 m)
STEER 6 ft (1.8 m)
25 kW radar STD 7.9 ft (2.4 m)
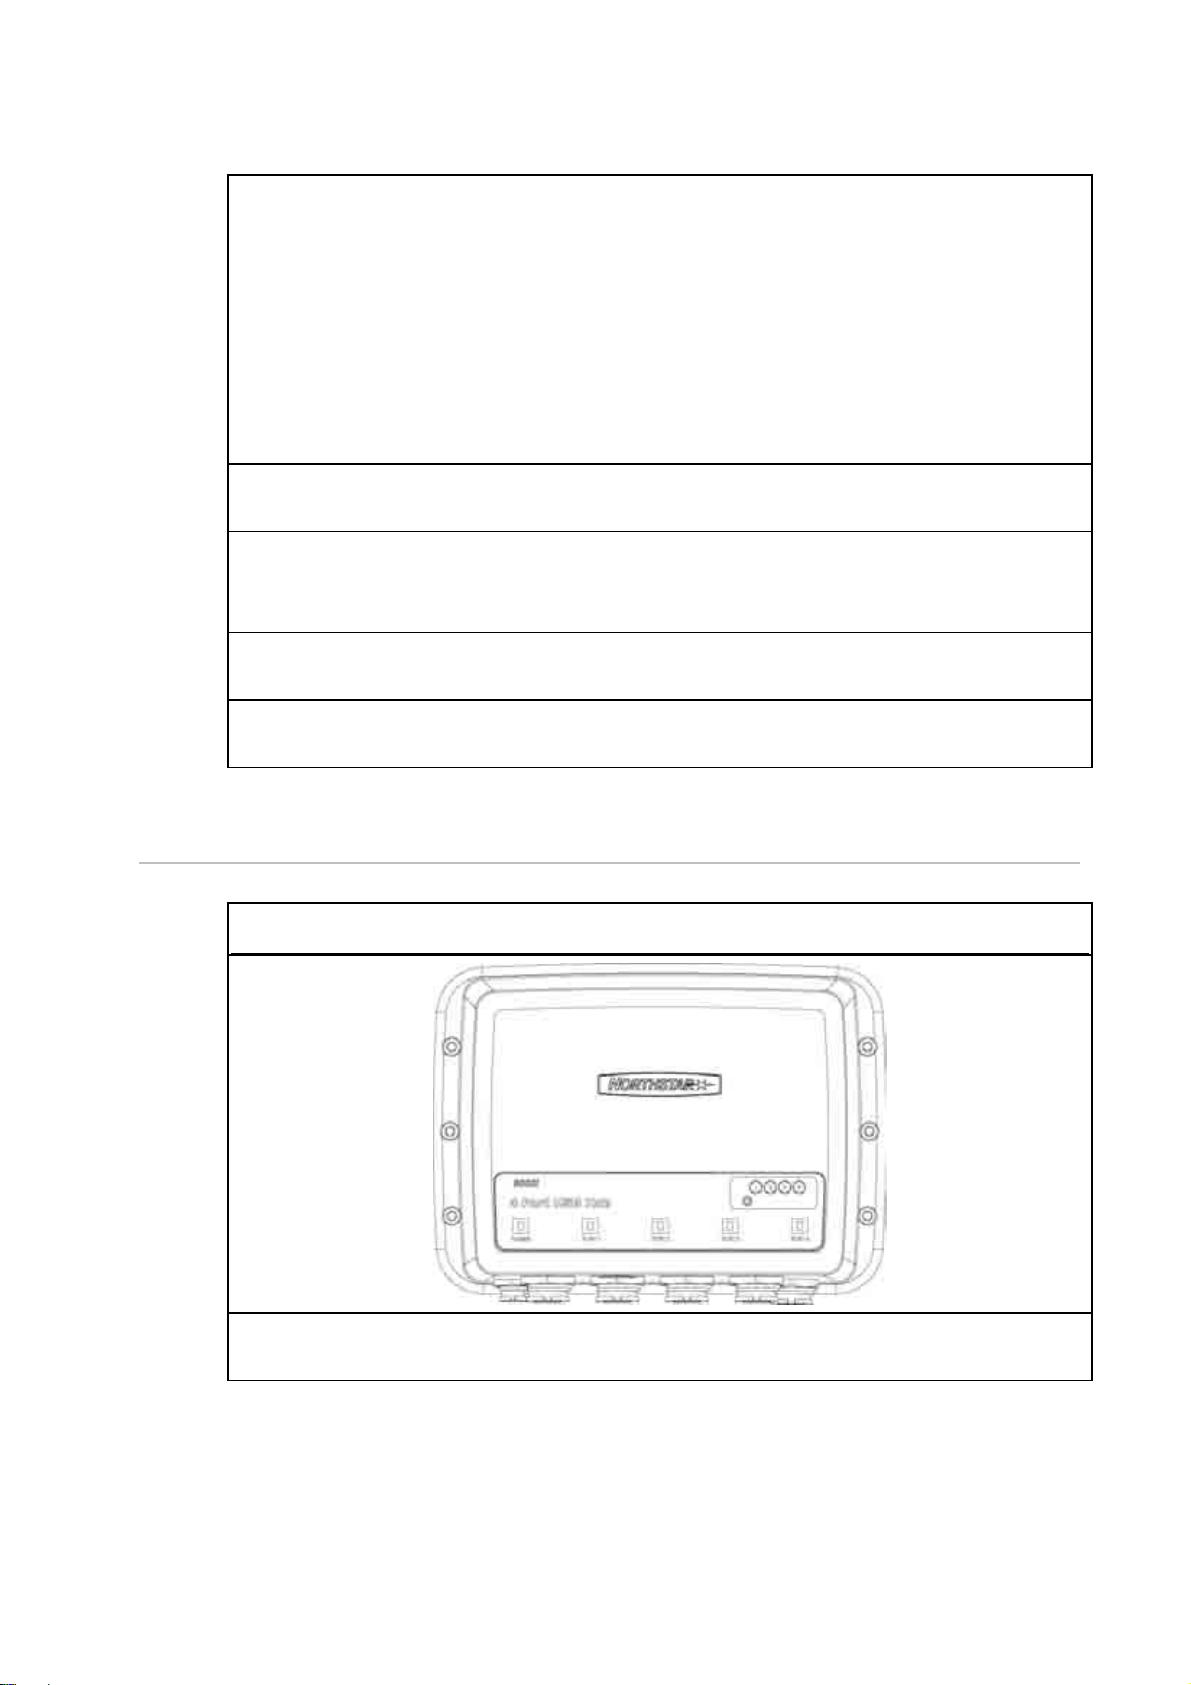
6.5 Northstar 8000i 8 Port Network Linker
Northstar 8000i 8 Port Network Linker NS004721
STEER 6 ft (1.8 m)
Description
The Northstar 8000i 8 Port Network Linker is a marinized 100 base ethernet switch.
Place in 8000i System
The Northstar 8000i 8 Port Network Linker is used to connect up to eight (8) Northstar 8000i
network devices. Use the Linker when joining three (3) or more network devices together.
You can use a crossover cable when joining just two (2) network devices together. Connect
more than one linker together to give 16, 24 etc ports
20
Northstar 8000i System - 12" Display Processor Installation Manual
Page 21
Optional Parts
Ethernet cables to connect to other devices. Choose from the following lengths:
• Network Cable 1.6 ft (0.5 m) NS004810
• Network Cable 6.5 ft (2 m) NS004811
• Network Cable 16.5 ft (5 m) NS004812
• Network Cable 33 ft (10 m) NS004813
• Northstar 8000i Cable - Ethernet Joiner, male to male NS004814
• Unterminated Cable 328 ft (100 m) NS004817
• Network Connector Field Terminating Kit NS004816
Other Functions
LEDs indicate connectivity and network activity.
Location Guide
It has eight (8) x waterproof RJ45 connectors and one (1) x waterproof power connector.
Access to ships DC power
Mounting
Preferably mount vertically on to a panel. Create drip loops with all cables
Power Requirements
Voltage: 10 V - 35 V DC: current draw 2 W
6.6 Northstar 8000i 4 Port USB Hub
Northstar 8000i 4 Port USB Hub NS004720
Description
This is a marinized 4 Port USB Hub. It can accept USB 1.0 or 2.0 accessories
Northstar 8000i System - 12" Display Processor Installation Manual
21
Page 22
Functionality
Allows up to four (4) USB devices to be connected to a 8000i processor.
Can accept the following devices
• NS004740 Northstar 8000i DVD-CD Player (see "Northstar 8000i DVD-CD Player" page
23)
• NS004747 Northstar 8000i Remote Keypad (see "Northstar 8000i Remote Keypad" page
24)
• NS004745 Northstar 8000i Video Interface (see "Northstar 8000i Video Interface" page
25)
• C-MAP Chart Licence Key (see "Northstar 8000i C-MAP Chart License Key" page 25)
• NS004710 Northstar 8000i 15" Monitor (see "Northstar 8000i 15 inch Monitor" page 17)
• MS Windows Compliant Human Interface Devices
• MS Windows XP Compliant USB Mass Storage Devices
Place in 8000i System
This unit attaches to a Northstar 8000i system processor via the supplied USB Cable. The
processor needs to be on for the USB Hub to operate
Optional Parts
USB Devices (see above)
Location Guide
Needs to be within a 16.5 ft (5 m) Cable run from the system processor
Mounting
Preferably mount vertically on to a panel. Create drip loops with all cables
Power Requirements
Voltage: 10 V DC - 35 V DC: current draw 12.5 W
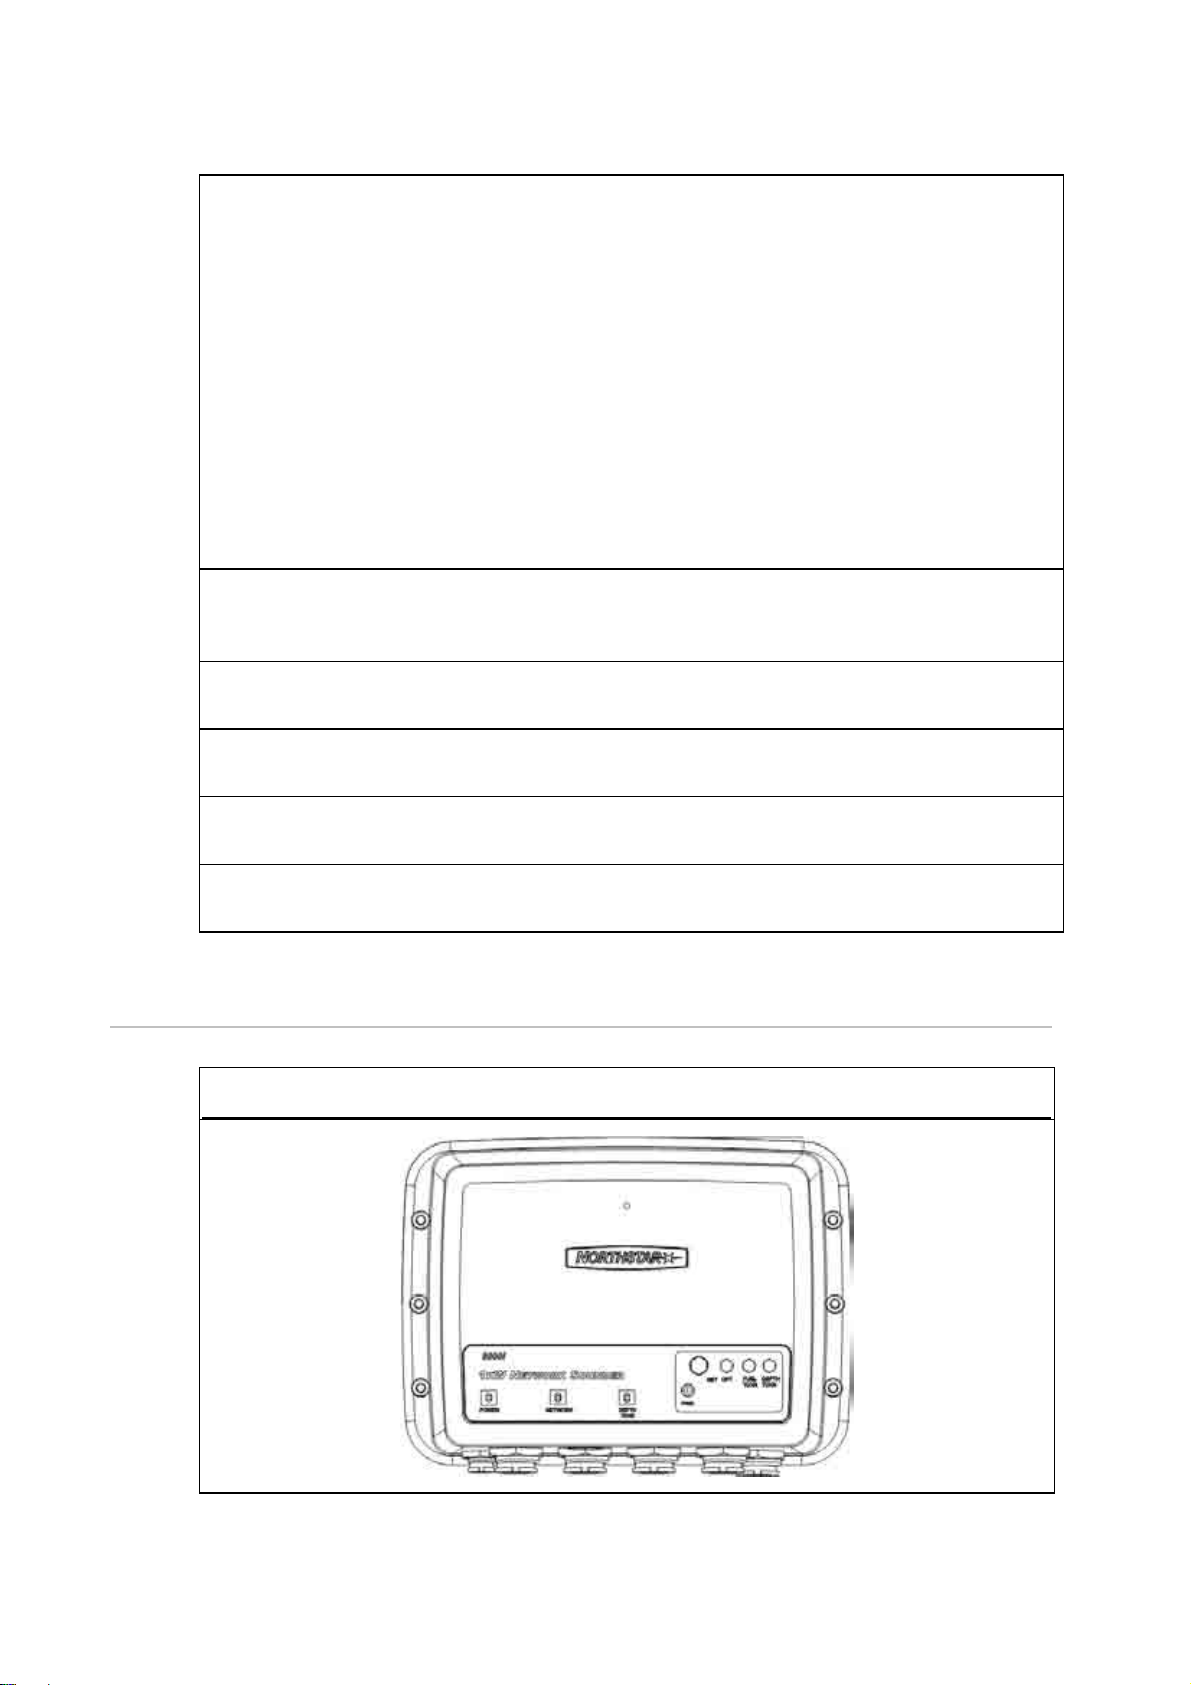
6.7 Northstar 8000i 1 kW Network Sounder
Northstar 8000i 1 kW Network Sounder NS004741
22
Northstar 8000i System - 12" Display Processor Installation Manual
Page 23
Description
The 8000i Sounder is an Ethernet based 1000 W/600 W auto-sensing depth sounder. It’s
Ethernet output provides fast accurate updates of depth data over the network to all 8000i
processors.
Place in 8000i System
You can connect the sounder to an 8000i processor either directly with a network crossover
cable, (see "Network" page 50) or if there is more than one networked function in the 8000i
system, through an 8000i 8 Port Network Linker.
Other parts required
A transducer will need to be purchased separately. For additional transducer options,
contact your Authorized Northstar Dealer.
• NS002660R Airmar B260 1 kW Through Hull
• NS002657R Airmar B258 1 kW Through Hull
• NS002658R Airmar TM258 1 KW Transom Mount
• AA00210R Airmar P319 plastic trough hull 600 W
• Radarsonics 210B thru hull 600 W
• Radarsonics 250 transom mount 600 W
Network cable: A choice of network cables are sold separately in different lengths (see
"Network" page 50)
Other Functions
Capable of interfacing to Northstar Fuel Transducers (Future)
Location Guide
This unit can be mounted closer to the transducer, for example, in the engine room or bilge
area. It requires 10 V DC- 35 V DC to operate. Use a 5 Amp (see "Power" page 38). Network
cable needs to be run to either a Northstar 8000i 8 Port Network Linker or a Northstar 8000i
Processor (see "Network" page 50)
Mounting
Preferably mount vertically on to a panel. Create drip loops with all cables
For more information regarding installation please see the Northstar 8000i 1 kW Network
Sounder Installation manual
Power Requirements
Voltage: 10 V DC - 35 V DC: current draw 7.2 W
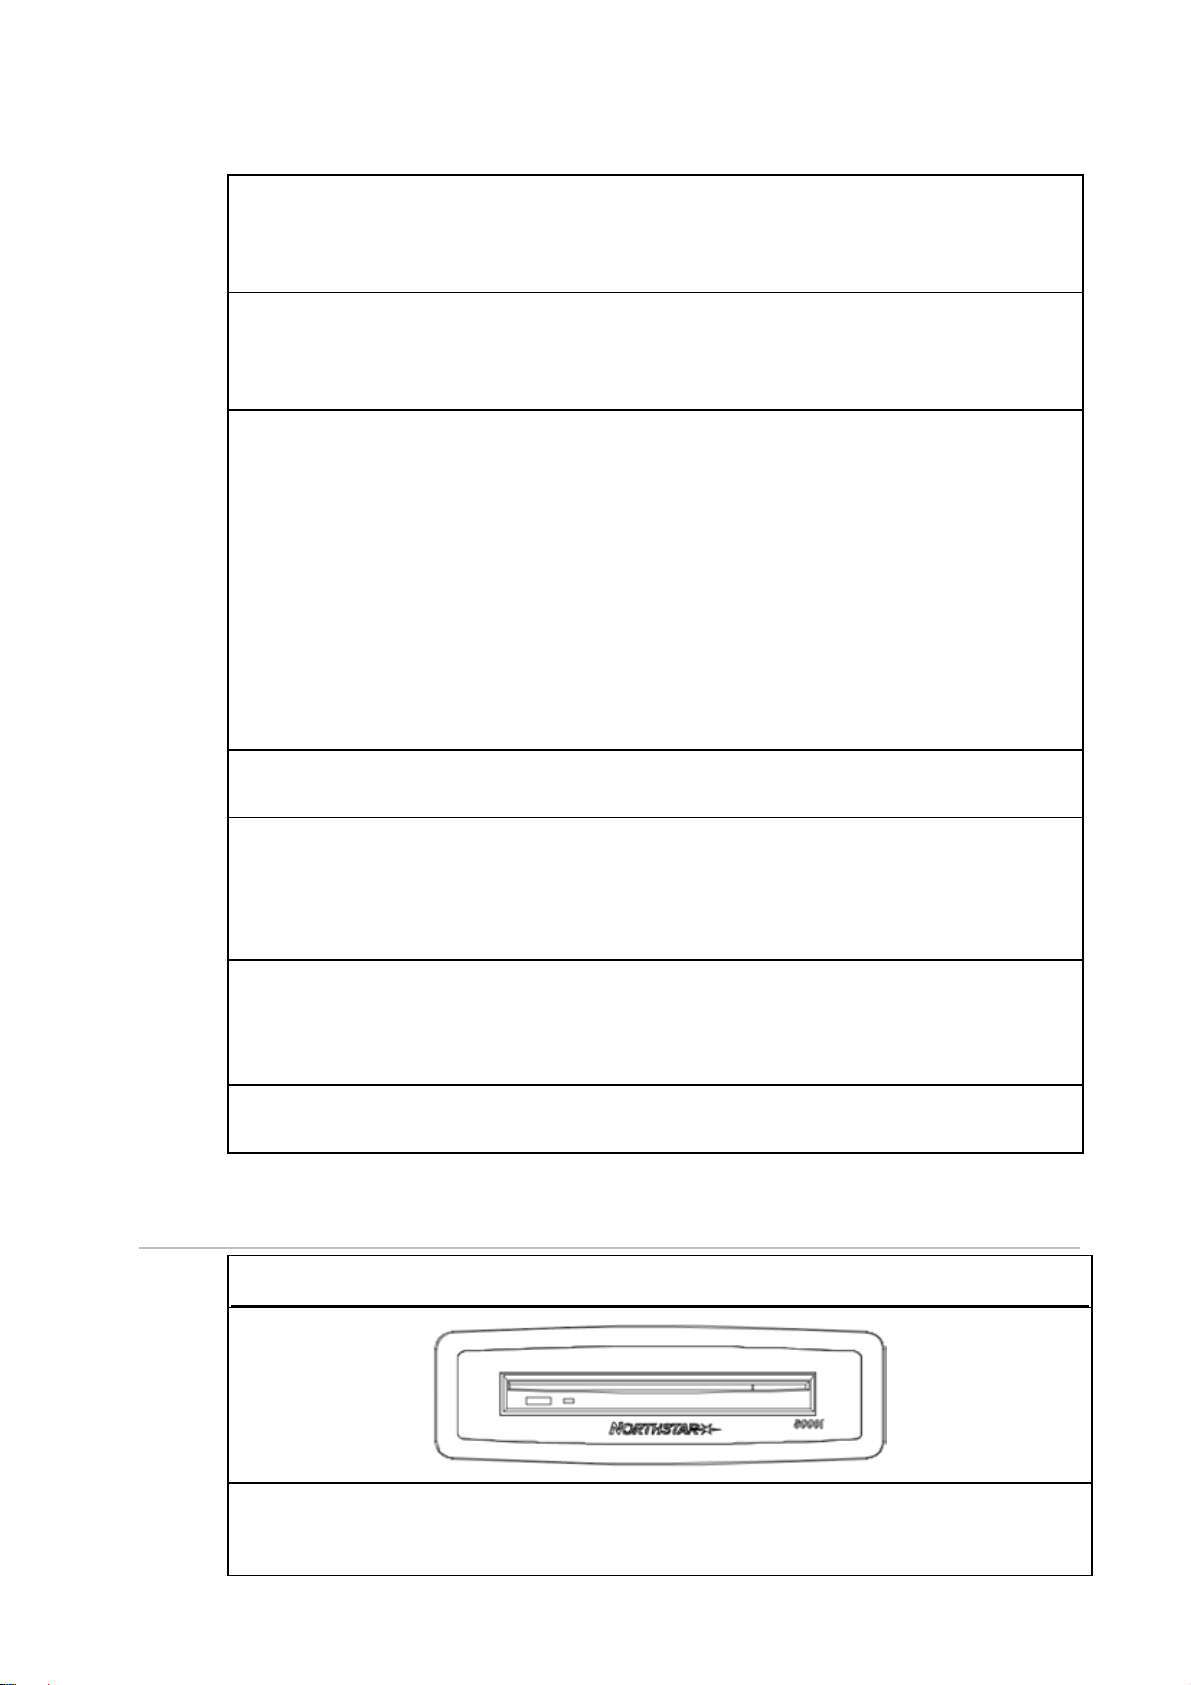
6.8 Northstar 8000i DVD-CD Player
Northstar 8000i DVD-CD Player NS004740
Description
The Northstar 8000i DVD-CD Player is used for playing movie DVDs, Music CDs and for
upgrading the system software. It can be either free standing or mounted into a panel.
Northstar 8000i System - 12" Display Processor Installation Manual
23
Page 24
Functionality
• Plays Music CDs, Music DVDs, MP3,
• Plays DVD Movies, Video CDs
• Loads Music on to 8000i system media location.
• Loads new system software.
Place in 8000i System
The DVD-CD player is not a network device. The media in the drive is only accessible by the
processor it is connected to.
The unit connects to the 8000i system via the supplied USB cable. It requires ships' DC power
and the 8000i processor to be on to operate.
Optional Parts
If both 8000i processor USB ports are used, a NS004720 4 Port USB Hub may be used (see
"Northstar 8000i 4 Port USB Hub" page 21)
Location Guide
Location should have easy access to the slot loading mechanism.
Locate no more than a 16.5 ft (5 m) Cable run away from the processor, USB Hub, or 15"
Monitor it is attached to.
Access to power: The DVD requires 10 V DC - 35 V DC. Current Draw 7 W Use a 5 Amp breaker
Mounting
The DVD/CD Player can be flush mounted into a panel or be free standing. For installation
information, see the Northstar 8000i DVD-CD Player Installation Manual.
Power Requirements
Voltage: 10 V DC - 35 V DC: current draw 7 W
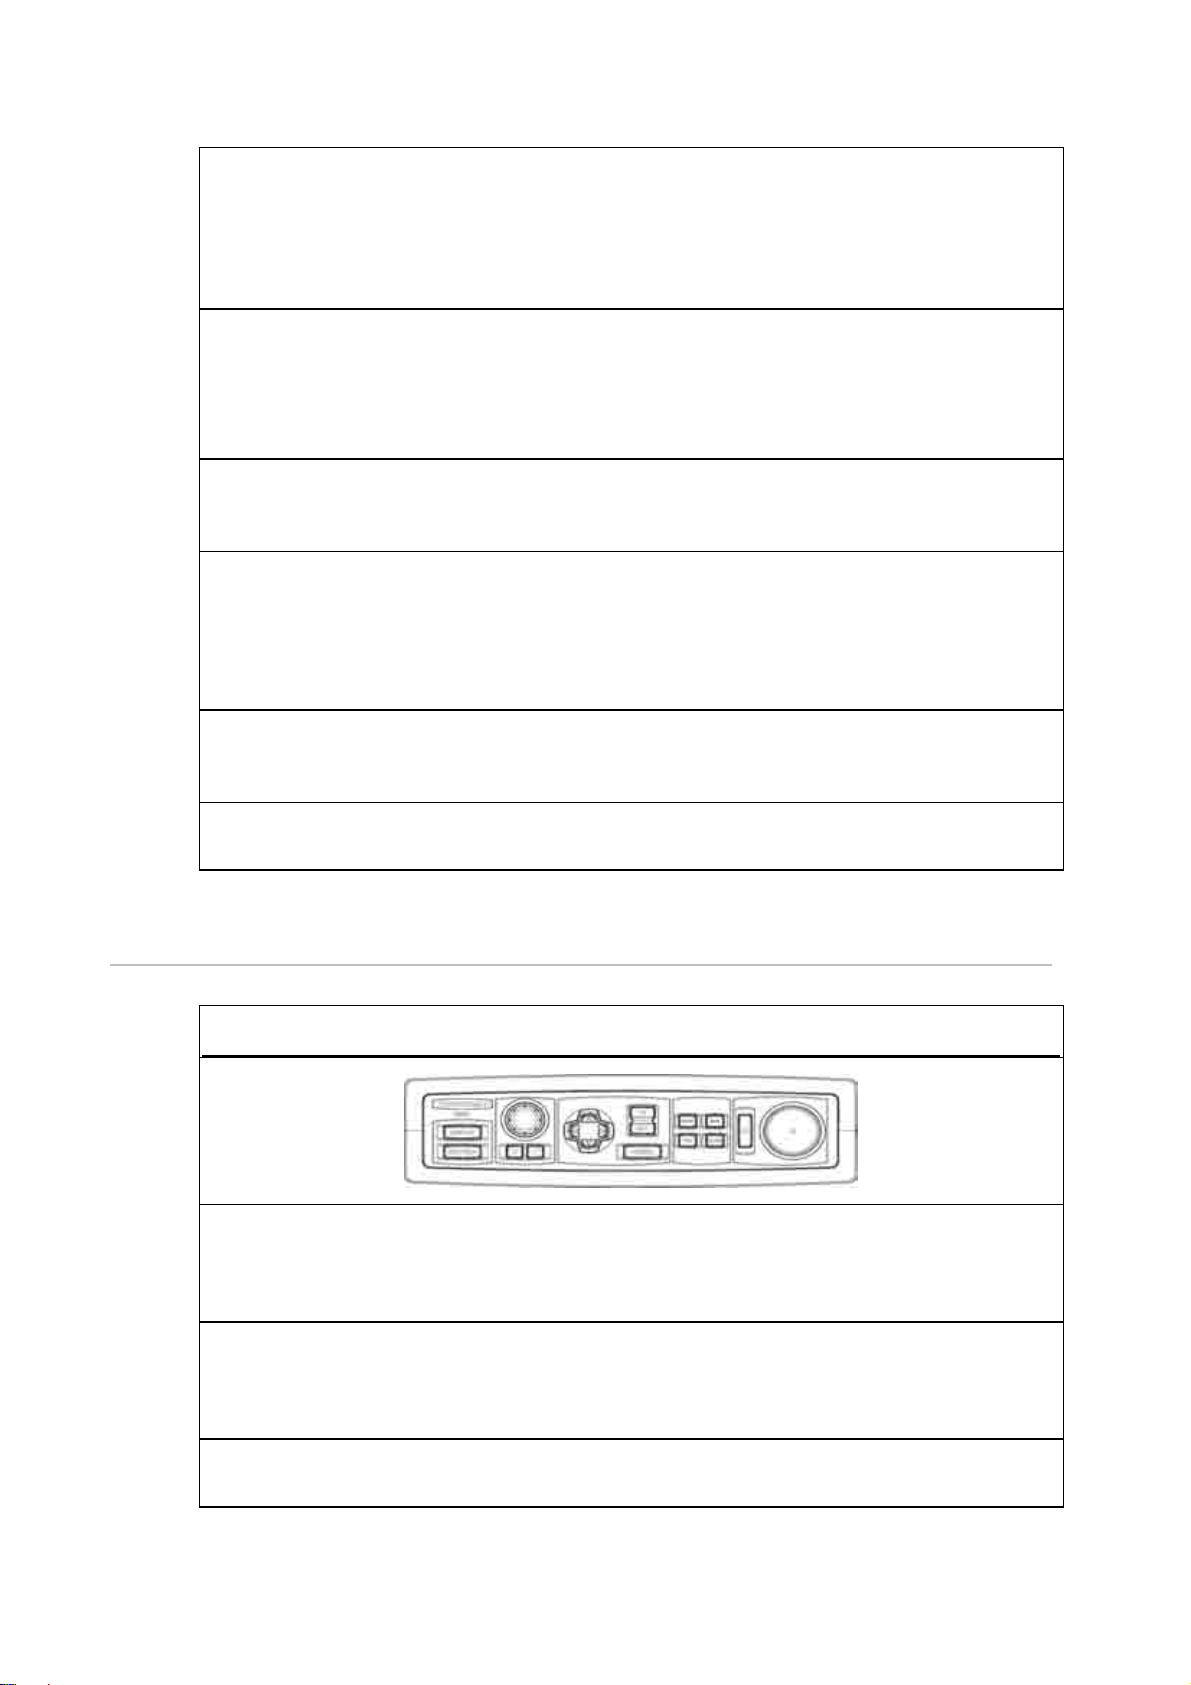
6.9 Northstar 8000i Remote Keypad
Northstar 8000i Remote Keypad NS004747
Description
The Northstar 8000i Remote Keypad is a control interface for the 8000i System. It duplicates
the controls of the 12" Display Processor and is mainly used to control the Northstar 8000i
Black Box Processor, however it can be used as a second control for a 12" Display Processor
Place in 8000i System
It connects to the 8000i processor via USB. It can be connected to any 8000i processor, a
Northstar 8000i 15" Monitor or to a Northstar 8000i USB Hub. The unit is self powered
through the USB Cable
Optional Parts
If both processor, and or 15" Monitor USB ports are full use NS004720 4 Port USB Hub
24
Northstar 8000i System - 12" Display Processor Installation Manual
Page 25
Location Guide
Locate the keypad relative to the screen it is controlling. The keypad does not require
external power
Mounting
Select an area that has easy access in order to control the 8000i. Make sure the panel it is
being mounted into is flat, to ensure a watertight seal
6.10 Northstar 8000i Video Interface
USB Video capture device NS004745
Description
Video to USB converter
Functionality
Interfaces composite or S-Video feeds to a 8000i processor. Composite or S-Video can be
from a security camera or a an entertainment source. It is converted to a USB feed which
connects to a 8000i possessor or USB hub. The feed is then displayed on the 8000i processor
it is connected to. The video is not networked. It is only visible on the local processor. The
device can use NTSC PAL or SECAM. Select which source you use from with in the 8000i
software.
NOTE: Only one video capture device can be used per processor
Other parts required
Third party video feed. If using audio; connect the audio feed of the device to NS004802
audio cable which then connects to the Aux connector of the processor
Location Guide
Connect to a 8000i processor. Don't use a USB cable longer than 16.5 ft (5 m). Pay special
attention to the video and audio cable runs. Refer to wiring guide (see "Wiring Guidelines"
page 37)
6.11 Northstar 8000i C-MAP Chart License Key
C-Map Chart License Key
Description
C-Map Chart License Key
Functionality
Holds the license information of the purchased charts.
Northstar 8000i System - 12" Display Processor Installation Manual
25
Page 26
Place in 8000i System
Connects to any USB port of a processor, USB hub or 15" Monitor USB hub.
One (1) license key is required per system. The licence key is inserted into the master
processor on a multiprocessor system. This processor needs to be on in order for the rest of
the displays to see chart detail.
Optional Parts
Chart Licenses. To Purchase C-Map MaxPro charts. Please refer to operation manual how to
do this or contact an authorized Northstar dealer.
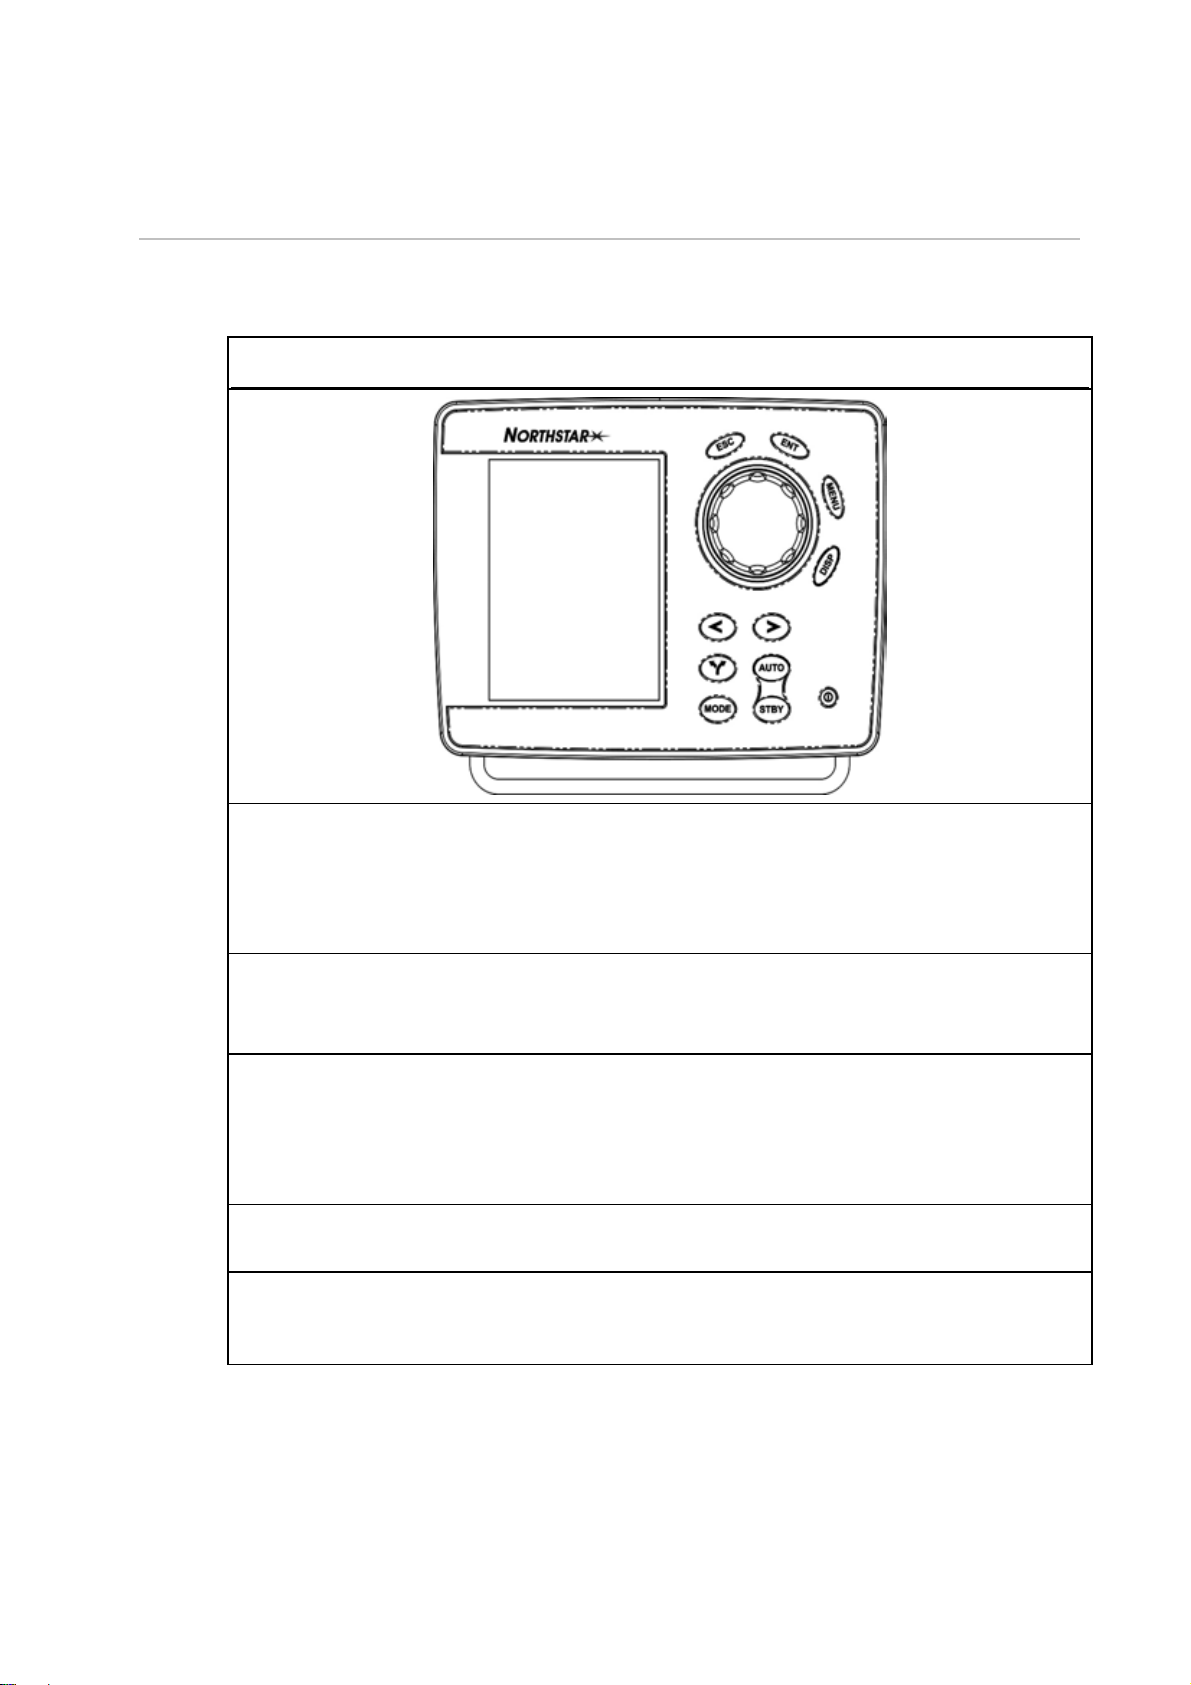
6.12 Northstar GPS Antenna (NS004743)
Read and observe the Warnings and Notices in the GPS Installation Manual
Northstar GPS Antenna NS004743
Description
12 Channel GPS Antenna
Functionality
Provides vessel's position, course over ground and speed over ground to the 8000i System.
The unit is powered from the 8000i processor
Place in 8000i System
Connects directly to the GPS port of a Northstar 8000i processor
Other parts required
Unit comes with a 33 ft (10 m) cable. Extensions may be required, contact your local
Northstar dealer
Location Guide
Read the location guide in the GPS Installation Manual
Mounting
Carefully follow the mounting instructions in the GPS Installation Manual
26
Northstar 8000i System - 12" Display Processor Installation Manual
Page 27
6.13 Other Components
6.13.1 Autopilot
Northstar Autopilot 3300 Display NS002881 Core Pack NS002874
Description
The Autopilot system comprises of a display, a main control unit (MCU), a heading sensor and
rudder feed back unit. It is intended to aid the helmsman in steering the boat for long
periods of time.
The heading sensor can be the separate fluxgate and gyro compass or the new HS02/HS03
Functionality
Steers the boat to follow a course or route created in the 8000i system.
Provides true heading in to the 8000i system
Place in 8000i System
The unit has the ability to follow a course sent from the 8000i system. The Autopilot connects
to the 8000i system using NMEA (see "NMEA" page 44) on the 12 pin Utility connector.
For more information on connecting NMEA (see "NMEA" page 44). To setup NMEA in the
8000i software (see "Set NMEA Output" page 70)
Other parts required
Junction box or terminal strip
Location Guide
The display is a visible component and requires dash space. The MCU and other components
can be hidden. For more information see the installation manual of the Autopilot
Northstar 8000i System - 12" Display Processor Installation Manual
27
Page 28

6.13.2 Heading Sensor
HS02 , HS03 Rate Gyro Heading Sensor NS002437, NS002443
Description
The Northstar family of heading sensors utilize a combination of a fluxgate compass and a
rate gyro to provide a gyro stabilized heading. Both the fluxgate and gyro are enclosed
together in a single rugged housing
Functionality
Provides the vessels heading to the 8000i system. Use the heading sensor when installing a
Northstar radar to give accurate radar overlay.
Place in 8000i System
The heading sensor outputs NMEA which is connects to the utility cable of a 8000i processor
Location Guide
Use the HS03 with external fluxgate when using around large quantities of ferrous metal, for
example a steel or ferro-cement hull or cabin or steel or iron equipment, such as motors,
cooking equipment and places where steel objects are stored.
Mounting and Calibration
Refer to the instructions supplied with the heading sensor you are using. After installation of
the heading sensor, it is mandatory to perform a heading CALIBRATION procedure to assure
alignment with ship's compass and compensation for deviation. See the HS 02/03
installation manual.
6.13.3 Audio
Northstar Audio Cable NS004802
28
Northstar 8000i System - 12" Display Processor Installation Manual
Page 29

Description
The 8000i System provides audio from music or movies that are played on the system.
Audio out is achieved by connecting the 8000i processor to an external amplifier and
speakers. This could be a car stereo head unit with Aux in or a high end home theater
system
Functionality
Left and right audio channel out
Left and right audio channel in
Microphone in
Place in 8000i System
Although music files can be stored on any 8000i system processor, the audio output is local
to the processor that produces it.
Other parts required
Amplifier and speakers
Location Guide
Be careful running composite audio cable near power cables or other sources of
interference as electrical interference can cause a hiss or hum over the speakers. And keep
the length to minimum
Mounting
Connect to Aux port on a 8000i processor
6.13.4 NMEA-0183 Data
Description
NMEA-0183 is a very common data protocol in the marine industry. it is used to pass
information between many different types of instruments, such as autopilots, wind, speed
and depth sensors
Place in 8000i System
NMEA should be connected to the master processor
Optional Parts
For more NMEA inputs use the Noland MN 42 4 port multiplexer (see "NMEA Multiplexer
(Noland NM42)" page 44). This expands the 8000i from one NMEA in to four NMEA inputs.
If more NMEA outputs are required use the Noland XP15 four port expander. This will take
the output of the 8000i processor and provide four duplicated NMEA ports
Location Guide
Connect all NMEA inputs and outputs to the master 8000i processor only
The following is a list of NMEA-0183 sentences supported by the 8000i system
Sentence Input
DBT Depth below the transducer
DPT Depth
GGA Global Positioning System Fix Data
GLL Geographic Position, Latitude / Longitude
Northstar 8000i System - 12" Display Processor Installation Manual
29
Page 30

GSA GPS DOP and Active Satellites
GSV GPS Satellites in View
HDG Heading, Deviation and Variation
HDM Heading, Magnetic
HDT Heading, True
MTW Water Temperature
MWD Marine Weather Discussion
MWV Wind Speed and Angle
RMC Recommend Minimum Specific GPS/TRANSIT Data
VHW Water Speed and Heading
VTG Track Made Good and Ground Speed
Sentence Output
APA Autopilot (subset of APB)
APB Autopilot Sentence "B"
BEC Bearing and Distance to Waypoint, Dead Reckoning
BOD Bearing, Origin to Destination
BWC Bearing and Distance to Waypoint, Great Circle
BWR Bearing and Distance to Waypoint, Rhumb Line
BWW Bearing, Waypoint to Waypoint
DBT Depth Below Transducer
DPT Depth
GGA Global Positioning System Fix Data
GLL Geographic Position, Latitude/Longitude
HCC Basic Compass Heading
HDG Heading, Deviation and Variation
HDM Magnetic Heading
HDT Heading, True
HSC Heading Steering Command
MWD Wind Direction and Speed
MWV Wind Speed and Angle
RMB Recommend Minimum Navigation Information
RMC Recommend Minimum Specific GPS / TRANSIT Data
VHW Water Speed and Heading
VTG Track Made Good and Ground Speed
WCV Waypoint Closure Velocity
WPL Waypoint Location
XTE Cross-Track Error, Measured
ZDA Time and Date
30
Northstar 8000i System - 12" Display Processor Installation Manual
Page 31

6.13.5 Mass Storage Devices
Description
Mass storage devices are third party products such as portable hard drives, and
flash drives. These may be used to store music and movies. Many people have
large music libraries which are too big to fit onto a 8000i System. Mass storage
drives can be a great way to share music and videos between the home and
boat. Connect the drive to the 8000i System which can then access the drive
and share the stored media across the 8000i network.
Refer to the "Manage your media files with a portable drive" in the 8000i
Operation Manual.
Place in 8000i System
Mass storage devices need to be USB. Attach to any USB port on a 8000i
processor, USB Hub or a 8000i 15" Monitor.
Other Functions
The 8000i can synchronize media with the storage drive and the 8000i processor
(If enough space is available on the 8000i).
Can play stored media directly from the drive
Location Guide
Mount within a 16.5 ft (5 m) cable run to the 8000i USB port.
Power requirements
Most USB hard drives use mains power (110 V AC - 240 V AC). Refer to the
manufactures manual for installation instructions
Northstar 8000i System - 12" Display Processor Installation Manual
31
Page 32

6.13.6 Human Interface Devices
HID pointing devices
Description
The 8000i processors are compatible with most USB, Widows XP compliant pointing
devices. The user may prefer to operate the system using a remote wireless pointing
device. There is a large selection available.
Place in 8000i System
Used to control an 8000i processor
Mounting
Connect directly to an 8000i processor or to the USB ports on the Northstar 8000i 15"
Monitor or 4 port USB hub
6.13.7 Network Camera
Description
A Network camera connects to the 8000i system via the ethernet network. Once a
camera is installed it can be viewed from all processors on the network. Only one
camera may be connected to the network. Capability for multiple cameras is
anticipated in subsequent releases. Cameras supported are supplied by Axis
communication www.axis.com. Recommended models for dry areas 206, 211, 221, for
outdoors 225FD
Place in 8000i System
Connects via ethernet cable to the 8000i 8 Port Network Linker
Other Functions
Location Guide
Check with manufactures information on locations specific to the model of camera
Power requirements
Requires power. See manufactures installation guide for more information
32
Northstar 8000i System - 12" Display Processor Installation Manual
Page 33

7 Mounting the 8000i 12 inch Display Processor
Choosing the best mounting location
Choose the mounting locations carefully before you drill or cut. The 8000i Display should be
mounted so that the operator can easily use the controls and clearly see the display screen.
Be sure to leave a direct path for all of the cables. The display screen is high-contrast and
anti-reflective, and is viewable in direct sunlight. For best results, install the 8000i 12" Display
out of direct sunlight. The chosen location should have minimal glare from windows or
bright objects.
NOTE: The LCD itself is the front panel. There is no plastic lens in front of the LCD. It has a
special bonded anti-reflective and scratchproof film on the LCD front to assure no fogging
and best contrast. DO NOT hit the lens with sharp or heavy objects because expensive LCD
damage may occur.
The system is designed to allow full operation of the unit from a Windows compatible
mouse. If the mounting location means that the unit is not easily within reach of the user in
the helm chair you may wish to also install a 8000i Remote Keypad or third party USB
Trackball to the helm chair.
Leave sufficient clearance space behind the 8000i 12" Display Processor to connect all
relevant cables.
Good ventilation is required behind the mounting panel. Poor ventilation may cause the
8000i 12" Display Processor to overheat, which, in turn, will cause the unit not to run at
optimum performance. For overall width and height requirements, please see the diagram
below.
The system requires the use of the touch screen or external mouse. If the unit is to be
mounted outdoors and may experience conditions that would require the touch screen to
be disabled (e.g. Hail, Snow) we recommend that a water proof pointing device (e.g. 8000i
Remote Keypad or water proof USB mouse) is connected to the system.
Northstar 8000i System - 12" Display Processor Installation Manual
33
Page 34

Viewing Angle
The viewing angle can influence the viewability of the 8000i Display Processor. The best
angle is from the top to slightly below perpendicular. Lower than perpendicular and the
screen image will fade slightly. See following diagram.
Viewing angle
A Optimum viewing angle
B Good viewing angle
C Poor viewing angle or obstructed view
Ensure that any holes cut are in a safe position and will not weaken the boat's structure.
If in doubt, consult a qualified boat builder.
Do not mount any part where it can be used as a hand hold, where it might be submerged or
where it will interfere with the operation, launching or retrieving of the boat.
34
Northstar 8000i System - 12" Display Processor Installation Manual
Page 35

Before you cut a hole in a panel, make sure that there are no hidden electrical wires or other
parts behind the panel.
When flush mounting, be sure to mount the 8000i component on a flat surface.
Mounting on a curved surface can result in water leaks around the cutout.
To prolong life of this product, use the supplied sun cover when not in use and during
washdown.
After washdown or use in a wet environment remove excess water from screen
Use the supplied mounting template as a guide to cut a hole in the panel. OBSERVE the
instructions on the template for drill bit and corner hole sizes.
Hold the gasket in place on the back of the unit; the gasket can fit any way round. Hold the
unit in place in the mounting hole and use the supplied screws to secure the unit.
Clip the bezel to the front of the unit; it can fit either way round. The bezel is a tight fit and is
not easy to remove. It is however quite strong and if removal is necessary, gently pull upward
on the bezel by holding the inside edge just above the Northstar logo
Northstar 8000i System - 12" Display Processor Installation Manual
35
Page 36

Form the cables into loops below the unit so that any condensation will drip off.
Turn on the processor (see "Turn on the 12 inch Display Processor" page 63).
36
Northstar 8000i System - 12" Display Processor Installation Manual
Page 37

8 Wiring Guidelines
Avoiding cable wiring shortcuts
Most installation problems are caused by shortcuts taken with system cables. When wiring
the 8000i, follow the guidelines below.
DO NOT DO THIS! DO THIS!
Do not make sharp bends in the cables Do make drip and service loops
Do not run cables in a way that allows
water to flow down into the connectors
Don’t route the data cables in areas
adjacent to radar, transmitter, or largecurrent-carrying cables
Don’t attempt to cut or splice the DVI,
RGB or control cables. If longer versions
are necessary, use the optional longer
cables.
Do tie-wrap all cables to keep them secure
If cables are shortened, lengthened, or reterminated, do seal and protect all wiring
connections
Do leave room at the back to install and remove
cables
Waterproof Connections
Locate the cable in to the
socket. Do not use force as this
may damage the pins of the
connector
Push cable in to connector.
Use care when locating pins
Turn lock nut in a clockwise
direction until tight
Northstar 8000i System - 12" Display Processor Installation Manual
37
Page 38

8.1 Power
Before starting the installation, be sure to turn electrical power off. If power is left on or
turned on during the installation, fire, electrical shock, or other serious injury may occur. Be
sure that the voltage of the power supply is compatible with the 8000i’s voltage rating of 12
Connecting to the wrong power supply can cause fire or damage to the equipment.
V DC or 24 V DC. (10 V DC - 35 V DC max range)
Be sure to ground the equipment to prevent electrical shock and mutual interference. Be
sure to use the fuse in the supplied power cable. Not using a fuse can cause fire or damage to
the 8000i.
All 8000i units are shipped with a 6 ft (2 m) power cable. This can be extended using the
following guidelines
for a cable length up to 15 ft (5 m), use 14-gauge wire or heavier
for a cable length from 15 ft (5 m) to 30 ft (10 m), use 12-gauge wire or heavier
If you lengthen the power cable, use an external fuse at the battery end as an added safety
precaution. The fuse size should be chosen to be appropriate for the size of the smallest
conductor in the circuit. See the NMEA or American Boating and Yachting Counsel
specifications to find the correct fuse for your wiring.
For the best protection from noise, connect the power wiring directly to the battery or
dedicated electronics bus. The brown ground wire should be connected directly to ship’s
ground. The power cable has an inline fuse on the positive and negative side to protect the
vessel’s wiring, and prevent electrical fires and damage to the unit. If you shorten or lengthen
this cable, be sure to keep the inline fuse intact (or provide circuit protection).
Spare in-line fuses are standard automotive type and are not supplied with the unit and
should be purchased locally to avoid loss of function.
The 8000i can operate on voltages ranging from 10 V DC to 35 V DC. All Northstar 8000i
components except the use the same 3 Pin power connector and cable as below.
NOTE: Make sure the correct fuse is used
38
Northstar 8000i System - 12" Display Processor Installation Manual
Page 39

Supplied NS004800 Power cable
A Red
Battery positive supply 12 V DC or 24 V DC
B Black
C
Green / Yellow Stripe
Battery negative supply
Ships ground (optionally connect to battery negative)
(or Brown on older
cables
D Fuse
E Battery
Fuse
Battery
8000i System Power requirements
Part No Description
NS004700
Northstar 8000i 12" Display
Fuse or breaker
size @ 12 V
10 Amp 5 Amp 50W
Fuse or
breaker @24 V
Max Power
consumption
Processor
NS004710 Northstar 8000i 15" Monitor 10 Amp 5 Amp 50 W
NS004730
Northstar 8000i Black Box
10 Amp 5 Amp 45 W
Processor
NS004740
Northstar 8000i DVD-CD
5 Amp 3 Amp 7 W
Player
NS004741 Northstar 8000i 1 kW Sounder 5 Amp 3 Amp 7.2 W
NS004720
Northstar 8000i 4 Port USB
5 Amp 3 Amp 14 W
Hub
Northstar 8000i 2 kW Radar
10 Amp NA 25 W
Scanner and Processor
Northstar 8000i 4 kW Radar
10 Amp 5 Amp 30 W
scanner and processor
Northstar 8000i 6 kW Radar
10 Amp 5 Amp 120 W
scanner and processor
Northstar 8000i 10 kW Radar
NA 7 Amp 250 W
scanner and processor
Northstar 8000i 25 kW Radar
NA 7 Amp 180 W
scanner and processor
NS8000i Processor Power Pinout (view looking at connector on unit)
Pin Function
Northstar 8000i System - 12" Display Processor Installation Manual
39
Page 40

1 Battery -
2 Battery +
3 Ground
Note: Drawing is the unit connector, not the cable
8.2 GPS Port
Install an optional Northstar GPS (NS004743) Antenna using the supplied instructions and
connect to Northstar 8000i processor GPS port. The GPS is self powered from the 8000i
processor
NS8000i Processor GPS Port Pinout
Pin Function
1 Ground
2 + 9 V out GPS Power
3 Comms Out - (DGPS)
4 Comms Out +
5 Cmds to DGPS
6 Comms In
7 Differential Data to GPS, Cmds to DGPS
8 -
40
Northstar 8000i System - 12" Display Processor Installation Manual
Page 41

8.3 Utility Port
Connect to other electronic devices using the the optional Northstar 8000i Utility cable
(NS004801). The Utility cable has the following communication capabilities.
• 1 x NMEA Receive (see "NMEA" page 44)
• 1 x NMEA Transmit
• External Alarm (see "External Alarm" page 46)
• Remote Power On
• External Wake Up (see "External Alarm" page 46)
• System Controller re program (Service only)
NS004801 Utility Cable
Utility connector Pinout viewed looking at connector
Pin Color Signal
3 Yellow NMEA RX +
6 Black/White NMEA RX -
5 White NMEA TX +
4 Black NMEA TX - (Ground)
7 Orange NavBus + (Future)
8 Blue NavBus - (Future)
9 Dark Green External Alarm
11 Gray External Wake Up
12 Light Green Remote Power On
1 Purple System Controller (re program TX Service Only)
2 Pink System Controller (re program RX Service Only)
10 Brown/White System Controller (reset Service Only)
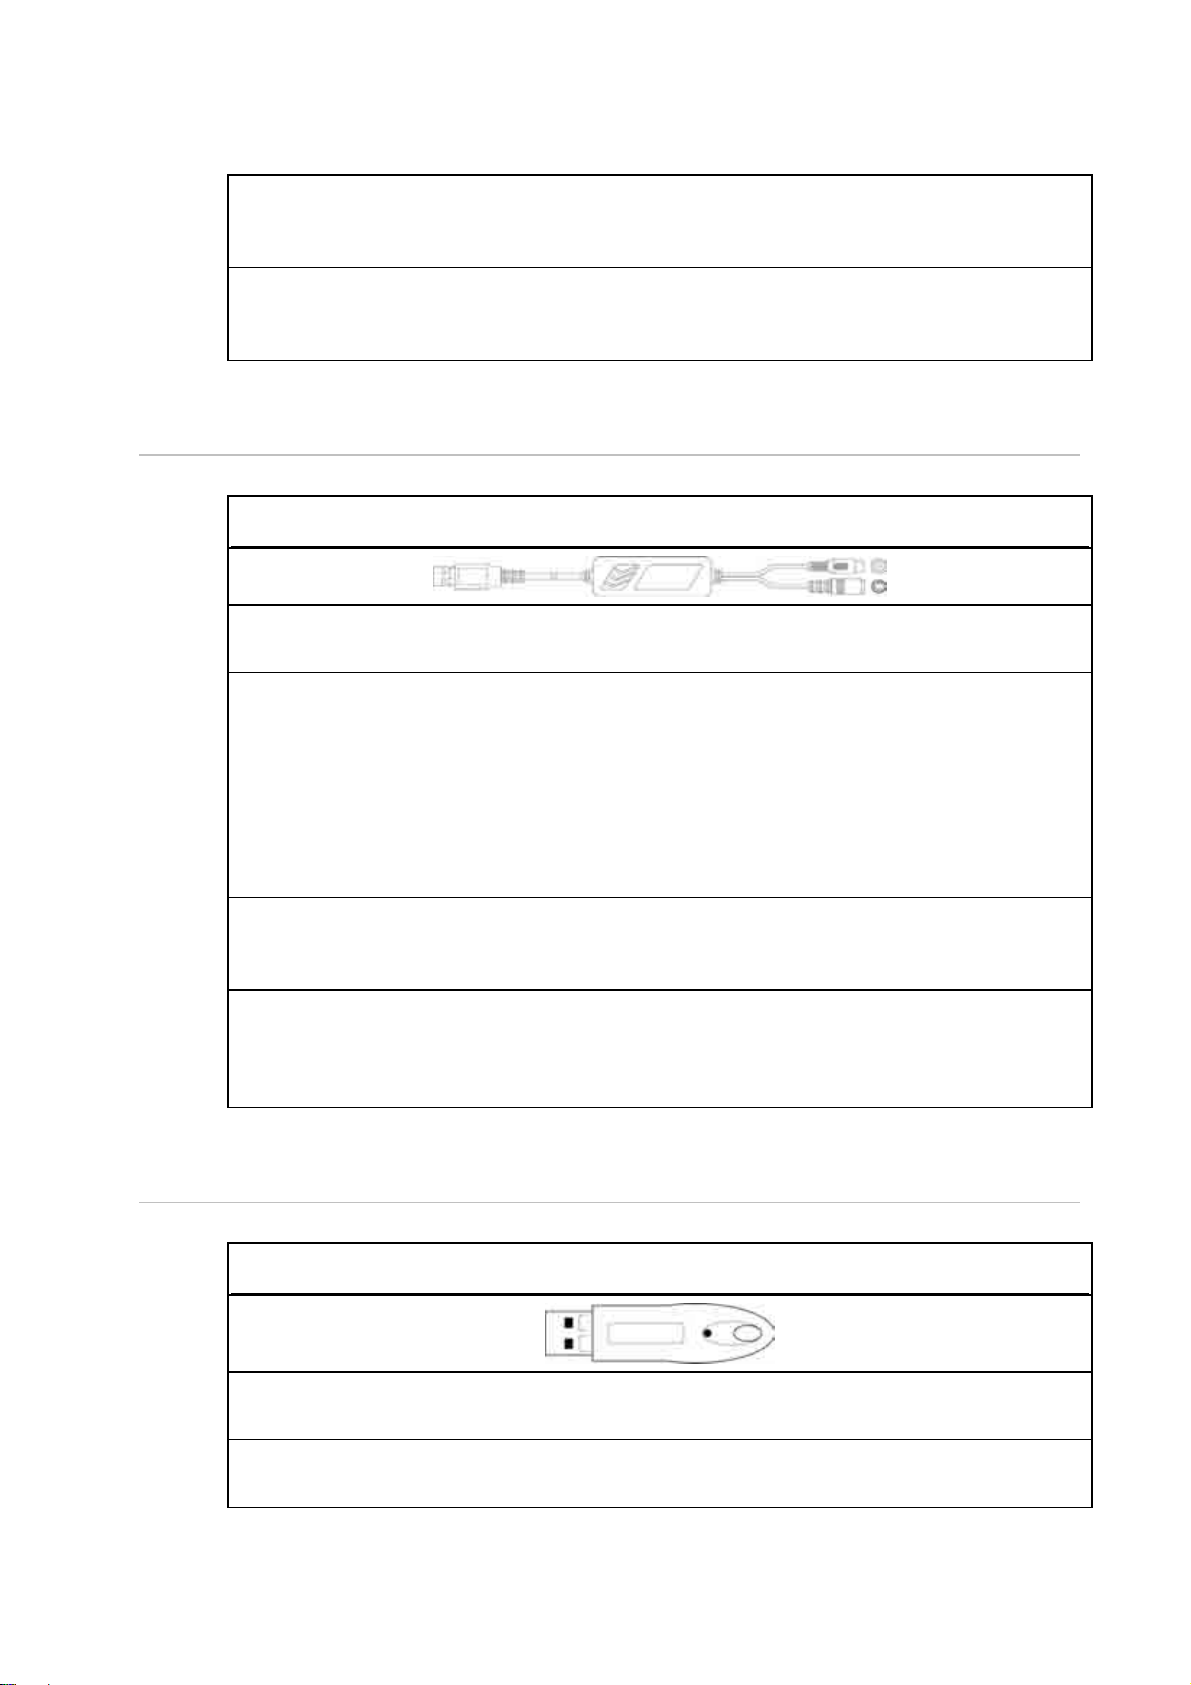
8.3.1 External Wake Up and Remote Power On
External Wake Up sends a signal to another device to initiate Power On. Connect External
Wake to the Remote Power On of the other device.
The External Wake Up feature of the 8000i provides the ability for an 8000i Device to control
the power state of another 8000i device that it is attached to.
Northstar 8000i System - 12" Display Processor Installation Manual
41
Page 42

For example when the power button is pressed on the Northstar 15" Monitor it sends a +
Volts signal through its Utility Cable (External Wake Up) to the Black Box Processors Utility
Cable (Remote Power On). The processor detects the voltage and powers on. When the
monitor is turned off, the 8000i Black Box Processor detects zero volts and and after (four) 4
seconds powers down.
NOTE: that the processor takes up to 30 Seconds to power down. This will not be visible on
the 15" Monitor. Allow time for the processor to shut down before removing power to the
system.
A Yellow
B Black / White
C White
D Black
E Orange
F Blue
G Dark Green
H Grey
External Wake Up (Grey Wire) on the Utility Cable.
Connect this to the Light Green wire on the
Processor Utility Cable
I Light Green
Remote Power On wire connected to the Black Box
Processor
J Purple
K Pink
42
Northstar 8000i System - 12" Display Processor Installation Manual
Page 43

L Brown / White
M Northstar 8000i 15" Monitor
Northstar 8000i Black Box
N
Processor
O NS004801 Utility Cable
Remote power is a feature of the 12" Display Processor, Black Box Processor, 15" Monitor,
Network Sounder and Network Radar. This means that connecting the Remote Power On
wire (Light Green) to a device that outputs voltage such as a 8000i Processor, breaker or
switch will start the Unit. The voltage required for remote power on needs to be greater than
5 V DC.
For example: Connect the Remote Power On wires (Light Green) of the (M)12" Processor
(Upper Helm), (N) 12" Lower Helm, (T) Black Box Processor, (S) Sounder and (R) Radar to the
External Wake Up of the (P) 15" Monitor. When the monitor is turned on the rest of the
system will also turn on.
Northstar 8000i System - 12" Display Processor Installation Manual
43
Page 44

8.3.2 NMEA
NMEA connection on the Northstar 8000i processor Utility Cable. For more information on
NMEA (see "NMEA-0183 Data" page 29)
On a multiple processor unit connect NMEA to the Master Unit
Receive NMEA
Pin 3 Yellow NMEA Receive + Transmit + NMEA out +
8000i Utility Cable NMEA Device
Pin 6
Black/
NMEA Receive - Transmit -
White
Transmit NMEA
8000i Utility Cable NMEA Device
Pin 5 White NMEA Transmit + Receive + NMEA in +
Pin 4 Black
NMEA Transmit
(Ground)
8.3.3 NMEA Multiplexer (Noland NM42)
Introduction
This section describes the setup and operation of the Noland NM42 NMEA Multiplexer with
the 8000i system.
The multiplexer can be used to feed multiple NMEA talkers (e.g. heading, wind and depth
sensors) into one Com port without causing the data clashes that would result from
attempting to connect them directly. It will also allow the connection of one listener device
such as an autopilot.
The multiplexer is intended for use with the general purpose NMEA port (NMEA5) contained
within the Utility connector of the 8000i processor units (12” Display processor or Black Box
Processor). It will not work with the GPS connector.
Commissioning
The Noland NM42 NMEA multiplexer must be setup to operate correctly with the 8000i,
which involves increasing the default baud rate of the DB9 port (the communication link to
the 8000i processor) to 19200. Error reporting will also be disabled to maximize bandwidth.
This will not affect the operation of the ports connected to the external NMEA devices –
these ports are set to 4800 baud.
Equipment required
• Noland NM42 NMEA Multiplexer
• PC with one DB9 serial port (or DB25 to DB9 adapter)
• One DB9 extension cable (DB9 female to DB9 Male, straight through, not null-modem)
• Com port application such as HyperTerminal
• Small wire link
Receive -
NMEA out - (or power ground if no NMEA
Transmit - )
NMEA in - (or to power ground if no NMEA
Receive - )
Procedure
1. Connect multiplexer to PC using DB9 extension and apply power to the
multiplexer.
44
Northstar 8000i System - 12" Display Processor Installation Manual
Page 45

N.B. ensure Baud connector on multiplexer is NOT connected to GND. If it is,
remove the link and power cycle the multiplexer.
2. Start com port application, set port to 4800, 8, N, 1, no flow control and connect to
port.
3. To set up the baud rate, send the following characters to the multiplexer and
ensure the LED on the multiplexer blinks briefly as characters are sent;
@b2
4. To turn off error reporting, send the following characters to the multiplexer;
@e2
5. To check the new settings send the following characters and confirm HIGH baud =
19200 and Err Report = OFF;
@?
6. Disconnect the multiplexer from the PC and power and short the Baud connector
on the multiplexer to GND. This enables the high speed baud rate (DB9 and Out
ports only).
Wiring
Northstar 8000i System - 12" Display Processor Installation Manual
45
Page 46

Noland NM42 Connections
A Noland NM42 NMEA 0183 Multiplexer
B DB9 Serial Connector DB9 Terminated to the 8000i Utility cable
C Power Power 8 V DC - 28 V DC
D Baud / Ground Connection
Connect the Baud to ground. This enables
19200 high speed baud rate
E NMEA output Talker. Output to Auto pilot
F NMEA in NMEA for Instrument e.g. Heading
G NMEA in NMEA for Instrument e.g. Depth
H NMEA in NMEA for Instrument e.g. Wind
Connect the following;
1. Power (8 V DC to 28 V DC), check polarity.
2. Baud shorted to GND, as per Commissioning section.
3. Up to 4 NMEA talkers (input to 8000i) to IN1 through IN4.
4. Talkers must be 4800 baud
5. If talkers are single-ended, connect In1- to common ground.
6. 1 optional NMEA listener (output from 8000i) to TLK
7. Listener must be 4800 baud
8. If listener is single-ended, leave TLK- disconnected and connect listener GND to
common ground.
9. Connect 8000i Utility port to multiplexer DB9 port by constructing a cable with the
following pin-out
8000i Utility Function 8000i Utility Wire Color DB9 Pin Number
TX+ White 3
GND Black 5
RX+ Yellow 2
RX- Black / White
N.B. OUT+/- port contains the combined talkers at 19200 baud (a duplicate of the DB9 port)
and is redundant in this system.
8000i Utility Port
Change the Baud rate of the 8000i processor to 19200 (see "Set NMEA Baud Rate" page 71)
If a listener device is connected to TLK, configure the required 8000i NMEA output sentences
(see "Set NMEA Output" page 70)
N.B. the output from the multiplexer is at 4800 baud.
8.3.4 External Alarm
Connect 8000i to external alarms. The external alarm output (dark green wire on the
NS004801 Utility Cable) switches to ground to sound the alarm. If the current drawn by the
external alarms is more than 250 mA, fit a relay.
5 (Common with
ground)
46
Northstar 8000i System - 12" Display Processor Installation Manual
Page 47

Refer to the Northstar 8000i Operation Manual for instructions on operation.
Connect 8000i to a low current external alarm which requires less than 250 mA
A Battery Positive (12 V DC or 24 V DC)
B External Alarm
C Dark green wire from 8000i Utility cable
Connect 8000i to a high current external alarm which requires more than 250 mA
A Battery Positive (12 V DC or 24 V DC)
B External Alarm
C Relay
D Dark green wire from 8000i Utility cable
E >240 ohm resistor
Northstar 8000i System - 12" Display Processor Installation Manual
47
Page 48

8.4 USB
An 8000i processor has two type A connectors, which are designed for Northstar 8000i USB
cables. Each USB port’s 5 V DC power output can provide up to 500 mA.
Connect a USB accessory, such as an 8000i System Remote Keypad, or a Northstar 8000i
4 Port Hub.
NOTE: It is recommended you use the install the supplied USB dash mount cable to a
location that will provide easy access to attach USB devices. This especially applies to the
Master 8000i processor. This make system upgrades much easier
USB can be run to maximum distance of 16.5 ft (5 m).
Use NS004809 USB Dash mount cable to bring make any single USB port more accessible:
Do not use this cable as an USB extension cable. i.e. Do not join two (2) cables together. Use
the 16.5 ft (5 m) cable instead
Connect to either
A NS004809 USB Dash mount cable
USB Port on 8000i
Processor
Use NS004808 to connect to the following. This cable is included with the following. This
cable is also available in a 16.5 ft (5 m) length.
48
Northstar 8000i System - 12" Display Processor Installation Manual
Page 49

Connection on
8000i Processor
Either USB on
processor
8.5 Auxiliary port
The 8000i can connect to external audio equipment using the cable shown below.
Connect to external audio equipment using optional NS004802 Audio Cable
USB Device Connection on Device
B Northstar 8000i 15" Monitor Connect to port labeled USB OUT
Northstar 8000i Remote
C
Connect to USB "B Type"
Keypad
Northstar 8000i DVD-CD
D
Connect to USB "B Type"
Player
Northstar 8000i 4 Port USB
E
Connect to USB "B Type"
Hub
Northstar 8000i Chart
F
Connects directly
Dongle
Northstar 8000i USB Video
G
Connects directly
Capture
Red
RCA
Audio line output, right
connector
White
RCA
Audio line output, left
connector
Brown
RCA
Audio line input, right
connector
Blue
RCA
Audio line input, left
connector
Black
0.14"
Audio line input, mono. Centre pin is signal, surround is ground.
(3.5 mm)
mono jack
Northstar 8000i System - 12" Display Processor Installation Manual
49
Page 50

8.6 RGB port
The RGB port is used to connect the Northstar 8000i processor to an external monitor. This
can be either the Northstar 8000i 15" Monitor or any third party monitor capable of
displaying a minimum of 800 x 600 resolution.
To connect an 8000i processor to a 8000i 15" Monitor. Use optional NS004806 Cable
From To Resolution
12" Display RGB Port
Northstar 15" Monitor
RGB 1 or 2
800 x 600
Black Box Processor
Northstar 15" Monitor
1024 x 768
RGB 1 or 2
To connect an 8000i processor to a third party monitor
From To Resolution
12" Display RGB Port Third party Monitor 800 x 600
Black Box Processor Third Party Monitor 1024 x 768
NS8000i RGB Pinout
Pin Function
1 Red
2 + 9 V out GPS Power
8.7 Network
If the Northstar 8000i processor is a stand alone unit, i.e. not connected to any other network
device. Be sure to use the supplied Network Loop Back Plug. Connect this to the Network
Port
50
3 Comms Out - (DGPS)
4 Comms Out +
5 Cmds to DGPS
6 Comms In
7 Differential Data to GPS, Cmds to DGPS
8 -
Northstar 8000i System - 12" Display Processor Installation Manual
Page 51

Insert loop back in to network socket if unit is operating as a standalone system
Use a Northstar 8000i Network Cable to connect to other 8000i network devices. If
connecting to only one other network device, use optional cable NS004815 Crossover cable
joiner in between two (2) conventional network cables
NS004815 Crossover Cable
Use any of the following from 8000i
Use any of the following to network device
Processor
NS004810 Network Cable 1.6 ft (0.5 m) NS004810 Network Cable 1.6 ft (0.5 m)
NS004811 Network Cable 6.5 ft (2 m) NS004811 Network Cable 6.5 ft (2 m)
Northstar 8000i System - 12" Display Processor Installation Manual
51
Page 52

NS004812 Network Cable 16.5 ft (5 m) NS004812 Network Cable 16.5 ft (5 m)
NS004813 Network Cable 33 ft (10 m) NS004813 Network Cable 33 ft (10 m)
NS004817 Unterminated Cable 328 ft
(100 m) (Use NS4816 network Connector
Field Terminating Kit)
NS004817 Unterminated Cable 328 ft (100 m)
(Use NS4816 network Connector Field
Terminating Kit)
NS048140 Northstar 8000i Cable - Ethernet Joiner, male to male
If connecting to three (3) network devices, use NS004721 Northstar 8000i 8 Port Network
Linker
8.7.1 Field Terminated Network Cable
The Northstar 8000i Field terminating kit is a waterproof RJ45 connector. It is used when a
pre-terminated network cable is not suitable for the situation at hand, such as a difficult
cable run. Following the instructions below it can be used to terminate either NS004717
Network cable, which comes in 328 ft (100 m) lengths or to re-terminate any Northstar 8000i
Network cable which may have had a connector cut off to pass through a bulkhead
52
Northstar 8000i System - 12" Display Processor Installation Manual
Page 53

NS004816 Northstar 8000i Field Terminate Kit parts
RJ45 Connector Lock Nut Gasket
Body Seal Strain Relief
Order of assembly
Northstar Field Terminating ethernet kit pinouts
A Brown
B White/Brown
C Blue
D White/Green
E Green
F White/Blue
Northstar 8000i System - 12" Display Processor Installation Manual
53
Page 54

G Orange
H White/Orange
I RJ45 Connector viewed from top with tang underneath
J Cat 5e Cable
K Shield
Terminating a Northstar 8000i RJ45 Field Kit
1. Cut the network cable to the desired length
2. Slide the strain relief boot on to the cable
3. Slide the locking nut on to the cable
4. Slide the connector collar on to cable
5. Remove 1½" (38.1 mm) of outer cable sleeve.
6. Remove the foil shield and plastic film. There is no need to strip the individual wires
7. Untwist the twisted paired wires.
8. Arrange them in the order as shown in the diagram above. From left to right. The
shield is bent backwards
54
Northstar 8000i System - 12" Display Processor Installation Manual
Page 55

9. Hold the arranged wires between your thumb and index finger so that the wires are
close together and flatten
10. Once the wires are in the right order and flat cut them off to a length of ½"
(12.7 mm) (see diagram above)
11. Insert the wires in the RJ 45 connector (NOTE Make sure the connector is
positioned tang down)
12. Make sure the wires are pushed the very end of the connector and that some of the
outer sleeve is inside the connector (see diagram below
13. Using an RJ45 crimp tool and following the instructions of the tool terminate the
connection
Before crimp After crimp
Crimp tool. The crimp tools jaw presses the gold plated contacts down so they pierce
A
through the insulation of all eight wires to make contact with the copper conductor
B Network cable
C Make sure sheath is pushed well inside the connector
14. Cut any spare shield wire close to the plug
16. Slide the gasket, body and locking nut over the RJ45 connector slide
17. Slide the sealing nut and seal towards the body and screw together.
Northstar 8000i System - 12" Display Processor Installation Manual
55
Page 56

9 Example System Layouts
9.1 8000i Chart Plotter
A Northstar 8000i 12" Display Processor
B Ships DC Power. Use a 10 Amp fuse or breaker
C NS0004743
D Chart License Key
E Ethernet Loopback
56
Northstar 8000i System - 12" Display Processor Installation Manual
Page 57

9.2 8000i Plotter Sounder
Northstar 8000i System - 12" Display Processor Installation Manual
57
Page 58

A Northstar 8000i 12" Display Processor
B Ships DC Power (see "Power" page 38) Connect using 10 Amp fuse or breaker
C NS004743 Northstar GPS Antenna
D Network Cable (see "Network" page 50)
E NS004815 Network Crossover Cable
F NS004741 1 kW Network Sounder
G Choice of transducers
H Ships DC Power. Connect using a 5 Amp fuse or breaker
58
Northstar 8000i System - 12" Display Processor Installation Manual
Page 59

9.3 Entertainment
Northstar 8000i System - 12" Display Processor Installation Manual
59
Page 60

A Northstar 8000i Processor
B
Ships DC Power 10 V DC - 35 V DC 10 Amp fuse or Breaker (see
"Power" page 38)
C NS004743 Northstar GPS Antenna
D NS004802 Northstar Aux in / out Audio Cable 6.5 ft (2 m)
E
Vessels Audio System: Connect to line in of a the vessels Audio
System
F 3rd party composite camera or video source
G Northstar 8000i 15" Monitor
H NS004803 Northstar 8000i Composite Video Cable 6.5 ft (2 m)
I
NS004747 Northstar 8000i Remote Keypad (see "Northstar 8000i
Remote Keypad" page 24)
J
NS004740 Northstar 8000i DVD / CD Player (see "Northstar 8000i
DVD-CD Player" page 23)
K Chart License Key
L NS004745 Northstar 8000i USB Video Interface
M NS004720 Northstar 8000i USB Hub
N Ships DC Power 10 V DC - 35 V DC 5 Amp fuse or breaker
60
Northstar 8000i System - 12" Display Processor Installation Manual
Page 61

9.4 Full System
Northstar 8000i System - 12" Display Processor Installation Manual
61
Page 62

A
B Northstar Black Box Processor NS004730
C Northstar 8000i Remote Keypad
D Northstar 8000i 15" Monitors NS004710
Northstar Black Box Processor NS004730. This unit is set up as the system master, All
NMEA is connected to this processor as is the C-MAP chart licence
E
Northstar 8000i 12" Display Processor NS004700. A back up GPS and C-Map Licence
key is attached. This unit can be made to take over as master if needed
F Northstar 8000i 4 Port USB Hub NS004720
G Northstar 8000i 1 kW Network Sounder NS004741
H Northstar HD Radar
I Northstar 8000i 8 Port Network Linker NS004721
J Northstar GPS Antenna NS004743
K Northstar or other Autopilot
L Northstar Heading Sensor HS02 /03 NS002437, NS002443
M Entertainment system.
N Northstar 8000i DVD/CD player NS004740
O
USB Video Capture NS004745: Connect any composite video source to this device to
view video on the display it is attached to
P Axis Network camera
Q C-Map Chart licence key
R
Eternal Wake up. This system has the external wake up wire (grey) of the master 15"
Monitor connected to the remote power on of the two 12" processors and the other
15" Monitor so when the master is turned on the other processors will start
S Northstar 8000i 12" Display Processor NS004700.
62
Northstar 8000i System - 12" Display Processor Installation Manual
Page 63

10 Northstar 8000i Initial Setup
When starting a multi-processor system for the first time. The following sequence should be
followed.
1. Power on the master processor (see "Turn on the 12 inch Display Processor" page
63) and set to be the master (see "Set the network master unit" page 64) (ensure
other processors are off). Take note of the master processor name. It will be a good
idea to use the provided System Setup Check sheet. This will provide a record of the
settings on install and serve as a reminder to check all settings.
2. Install purchased charts. (see "Install the chart data" page 65)
3. Configure System attributes such as time offset, draft, NMEA output etc.
4. Power on the next processor and nominate the master processor when prompted
(this can be done form this processor or from the master). Setup the processor.
Repeat till all processors are on and configured.
5. Start one processor at a time nominating the system master when prompted (see
10.1 Turn on the 12 inch Display Processor
Just press the Power key to turn on the 8000i. The Northstar 8000i screen appears briefly,
followed by the Chart screen in a single pane. The 8000i is ready to use. Refer to the Northstar
8000i System Operation Manual for instructions on how to use the 8000i System.
When starting for the first time. the system will prompt you to nominate master processor
(see "Set the network master unit" page 64).
"Set the network master unit" page 64)
10.2 Adjust the brightness on a 12 inch Display Processor
The brightness on the 8000i can be adjusted to allow for various lighting situations. For night
time, the backlight can be turned down to aid night vision.
To adjust the backlight brightness
1. Briefly press the 8000i processor power key to bring up the onscreen display.
2. Select brightness control.
3. Use the rotary knob to adjust the brightness, then either:
wait until the 8000i exits the onscreen display automatically, or
select the Exit option (using the down arrow) then press the Confirm key.
Northstar 8000i System - 12" Display Processor Installation Manual
63
Page 64

10.3 Set the network master unit
When starting the processor for the first time, the system needs to be told which is going to
be the master on the network. This also applies for stand alone processors. The following
screen will appear
To set the master
. select Retry Master Selection
. select the unit to become master.
. press
Select As Master
. select Return to exit master selection
64
. select Launch Chart Manager to install charts (see "Install the chart data" page 65)
Northstar 8000i System - 12" Display Processor Installation Manual
Page 65

10.4 Install the chart data
When you've purchased your chart collection licenses and any subscriptions, all the license
code information for those charts is uploaded onto your C-Map Chart Master Key.
You must install the charts on the display unit that is set up as the 8000i master unit. Any
other display units can access the chart collections when the 8000i master unit is On.
If the 8000i master unit is not Off, the chart collections cannot be accessed and a gray screen
shows the message "Master Unavailable".
To install the charts means to register the data that you have purchased on the hard disk
database (indicated by the licensed collections(s) on your Chart License Key) so that you can
work with charts of the collection.
You can only install the collections you have licenses to in your dongle. Even if you have
more than one dongle with licenses to different chart collections, you can only use one of
the keys at a time.
You are strongly recommended to scan all removable media (such as CDs) for viruses or
corrupt data on a separate device BEFORE connecting or using the removable media with the
8000i System.
Install Charts interface
The Install Chart interface allows you to install and to uninstall chart collections to your hard
drive.
The interface has the header displaying the program name and the hardware key serial
number and three integrated windows: Collection Data window, Control Panel, and
Collection Status section:
• Collections Data window displays the list of chart collections, which contains the chart
collections the licenses to which are loaded to the dongle, as well as the chart
collection already installed to the hard drive. To navigate up and down the list, use
the scroll panel at the right side of the chart collections list.
• Control Panel holds the buttons managing the process of chart collections installing
and uninstalling.
• Collection Status section provides information on the current status of a selected chart
collection.
To install chart collections
You can install either all the collections in the list or a selected collection.
To install all collections:
1. Touch Install All in Control Panel.
2. A dialog box requesting your confirmation opens. Select:
Yes to install all of the collections in the list,
No if you do not want to install all of the collections
3. A progress bar appears indicating the installation status.
To install a selected collection:
1. Select a collection in the list.
2. Touch
3. A dialog box requesting your confirmation opens. Select:
Install Selected.
Northstar 8000i System - 12" Display Processor Installation Manual
65
Page 66

Yes to install the selected collection,
No if you do not want to install the collection.
4. A progress bar appears indicating the installation status.
You can only install the chart collection you have the license to. The presence of the license
in the dongle is indicated by the green key icon near the chart collection name in the list of
chart collections.
After a collection is installed, the globe and eye icons indicating the collection status are
activated and the green circle with or without the lightning icon appears near the installed
collection name:
• the active globe icon indicates that the collection is installed
• the active eye icon indicates that the collection is visible; if the eye icon is dimmed, the
collection is invisible
• the green circle with the lightning indicates that the real-time updating is available;
without the lightning – the real-time updating is unavailable.
The Collection Status section contains expanded information on the status of collections. To
see an expanded description of a particular chart collection, select it in the list of chart
collections.
If the chart collection is not installed yet, the Collection Status section contains the following
information about the collection:
• the collection name and the name of the database to which the collection belongs
• the access to data status. It can be permanent if the collection is purchased, the date of
the access to data term termination if the collection is rented, or expired if the access
to data term is over
• the access to updates status. It can be the date of the access to updates term
termination if the collection is purchased or rented, or expired if the access to data
term is over
• the date indicating that you can not install collections from the databases issued later
than this date
• the line telling that the collection is not installed.
If the chart collection is installed, the Collection Status section contains the following
information:
• the collection name and the name of the database to which the collection belongs
• the collection contents
• the access to data status. It can be permanent if the collection is purchased, the date of
the access to data term termination if the collection is rented, or expired if the access
to data term is over
• the access to updates status. It can be the date of the access to updates term
termination if the collection is purchased or rented, or expired if the access to data
term is over
• the date indicating that you can not install collections from the databases issued later
than this date;
• the line telling that the collection is installed
• the collection updating date.
10.5 Turn off the 12 inch Display Processor
Just hold down the Power key for about ten seconds. The Northstar 8000i screen appears,
then the 12" Display Processor turns off automatically.
66
A small bar appears, counting down the seconds for you to hold the power switch down.
Northstar 8000i System - 12" Display Processor Installation Manual
Page 67

10.6 Set the system preferences
10.6.1 Select the time format
You can use the 12 hour or 24 hour time format. 24 hour is the default.
To select the time format:
1. Select Display.
2. Select
3. Select
4. The
Setup from the control panel.
+ System to display a list of system specification options.
Time Format button shows the current setting. Select the button if you want
to change the setting and a drop down list of choices appears.
5. Select the new setting. The new setting is applied immediately and stays until you
change it again.
6. When you are finished, select
10.6.2 Select your time zone
To select your time zone:
1. Select Display.
2. Select
3. Select
4. The
5. Select
6. When you are finished, select
Setup from the control panel.
+ System to display a list of system specification options.
Time Zone button shows the current setting offset from GMT. Select EDIT if
you want to change the setting and enter the offset using the onscreen keyboard.
OK to confirm the new setting. The new setting is applied immediately and
stays until you change it again.
– System.
– System.
10.6.3 Turn the keypad beeps on or off
You can have the 8000i beeps On or Off. On is the default.
To turn the beeps on or off:
1. Select Display.
2. Select
3. Select
Setup from the control panel.
+ System to display a list of system specification options.
Northstar 8000i System - 12" Display Processor Installation Manual
67
Page 68

4. The Keyboard Beeps check box shows the current setting.
5. Select the check box if you want to toggle to the other setting. The new setting is
applied immediately and stays until you change it again.
6. When you are finished, select
Alternatively:
1. If you are using a 12" Display Processor, press the
of options, then use the directional arrows to select
Cancel keys to change the setting.
2. When you are finished, use the directional keys to select
Confirm key.
10.6.4 Change the transducer depth
The transducer depth is the difference in depth between the water line and the location of
the transducer on the hull.
The depth column on the extreme right of the Sounder screen shows the DBT (Depth Below
Transducer), and not the the depth below the water line.
The default offset is 0. (This default assumes that the transducer is located on the hull at the
water line.)
– System.
Power key briefly to display a list
Key Beep. Use the Confirm or
Exit, then select the
You must enter an accurate value for the transducer depth. If you don't, all the depths on the
Sounder screens will be wrong.
To change the transducer depth:
1. Select Display.
2. Select
3. Select
4. The
Setup from the control panel.
+ Sounder to display a list of sounder specification options.
Transducer Depth button shows the current setting. Select Edit, then enter
the difference in depth between the water line and the transducer. For example, if
the transducer is 5 ft (1.5 m) below the water line, just enter 5. If you want to check
or change the distance units, (see "Select the small scale distance units" page 73) .
5. The new setting is applied immediately to all the Sounder screens.
6. When you are finished, select
– Sounder.
10.6.5 Turn the keypad backlight on or off
You can have the backlight On or Off. On is the default.
To turn the backlight on or off:
1. Select Display.
2. Select
3. Select
4. The
5. Select the check box if you want to toggle to the other setting. The new setting is
6. When you are finished, select
Setup from the control panel.
+ System to display a list of system specification options.
Keyboard Backlight check box shows the current setting.
applied immediately and stays until you change it again.
– System.
68
Northstar 8000i System - 12" Display Processor Installation Manual
Page 69

Alternatively:
1. If you are using a 12" Display Processor, press the
of options, then use the directional arrows to select
knob to change the setting.
10.6.6 Show/hide the top control bar
You can choose whether to show or hide the top control bar along the top of the screen.
(The buttons in the top control bar duplicate the keys.)
If you change this setting, the 8000i will restart automatically.
To show or hide the top control bar:
1. Select Display, then select Setup from the control panel.
2. Select
3. The
+ Installation to display a list of installation specification options.
Display Top Control Bar check box shows the current setting.
4. Select the check box if you want to toggle to the other setting. The 8000i restarts
automatically and the new setting stays until you change it again.
5. When you are finished, select
10.7 Specify your vessel statistics
Power key briefly to display a list
Key Backlight. Use the rotary
– Installation.
The following important information about your vessel should already be set up as part of
the installation process, but you can change any of this if necessary.
If you do not enter an accurate draft AND an accurate safe depth, the "Depth Below Keel"
alarm will not work correctly and your vessel is at risk of grounding.
To calculate the safe depth, use the draft of your vessel and then add
a safety margin.
To specify your vessel statistics:
1. Select Display.
2. Select
3. Select
4. Select
5. The new setting is applied immediately and stays until you change it again. If you
6. When you are finished, select
Setup from the control panel.
+ Vessel Statistics to display the current settings for the:
Cruising Speed
Draft
Safe Depth (vessel draft, plus a safety margin)
EDIT next to the item that you want to change, then use the online
keyboard to enter the new setting. Press
OK to return to the vessel statistics
options.
want to change another setting, repeat the previous step.
– Vessel Statistics.
10.8 Set the location of the media library
You must enter the location of the media library so that the 8000i can find your stored music
and videos.
To set the location of the media library:
1. Select Display.
Northstar 8000i System - 12" Display Processor Installation Manual
69
Page 70

2. Select Setup from the control panel.
3. Select
+ Installation to show a list of system installation specification options. (If
you can't see these, select the down arrow to scroll them into view.)
4. Select
Change next to Change Location of Media Storage. A data box appears,
showing a list of all the available 8000i processors.
5. Select the new processor and select
The new settings are applied immediately and stay until you change them again.
6. When you are finished, select
10.9 Set NMEA Output
To select NMEA Output sentences:
1. Select Display.
2. Select
3. Select
4. Select
5. Select the NMEA output to toggle between
6. Select
NOTE: It is not possible to select all the parameters at the same time, due to frame rate
timing. Please select only the ones required.
Setup from the control panel.
+ Installation to display a list of installation specification options.
Configure NMEA output.
Save to confirm the new settings or Return to cancel.
Set Location to confirm the new processor.
Return.
Yes / No
Sentence Output
APA Autopilot (subset of APB)
APB Autopilot Sentence "B"
BEC Bearing and Distance to Waypoint, Dead Reckoning
BOD Bearing, Origin to Destination
BWC Bearing and Distance to Waypoint, Great Circle
BWR Bearing and Distance to Waypoint, Rhumb Line
BWW Bearing, Waypoint to Waypoint
DBT Depth Below Transducer
DPT Depth
GGA Global Positioning System Fix Data
GLL Geographic Position, Latitude/Longitude
HCC basic compass heading
HDG Heading, Deviation and Variation
HDM Magnetic Heading
HDT Heading, True
HSC Heading Steering Command
MWD Wind direction and speed
MWV Wind Speed and Angle
RMB Recommend Minimum Navigation Information
RMC Recommend Minimum Specific GPS / TRANSIT Data
VHW Water Speed and Heading
VTG Track Made Good and Ground Speed
70
Northstar 8000i System - 12" Display Processor Installation Manual
Page 71

WCV Waypoint Closure Velocity
WPL Waypoint Location
XTE Cross-Track Error, Measured
ZDA Time and Date
10.10 Set NMEA Baud Rate
The baud rate for NMEA in and out can be changed between 4800 and 19200
To select NMEA Output sentences:
1. Select Display.
2. Select
3. Select
4. Select
5. The
Setup from the control panel.
+ installation to display a list of installation specification options.
NMEA Baud Rate
NMEA Baud Rate button shows the current setting. Select the button if you
want to change the setting and a drop down list of choices appears.
6. Select the new setting. The new setting is applied immediately and stays until you
change it again.
10.11 Calibrate the touch screen
You can calibrate the touch screen so that the cursor is lined up with your finger more
accurately. This makes it easier to select items on the screen.
To calibrate the touch screen:
1. If you are using a 12" Display Processor, press the Power key briefly to display a list
of options, then use the directional arrows to select
2. Press the tick key to start the calibration process, then see Step 5.
Alternatively, or if you are using a 15" Monitor:
1. Select
2. Select
3. Select
4. Select
5. Follow the instructions on the screen. (If you want to be able to select the buttons
6. When you are finished, select
Display.
Setup from the control panel.
+ System to display a list of system options.
Calibrate next to Calibrate Touch Screen.
at the bottom of the screen easily, you must touch the center of the targets.) When
the cursor follows your finger across the screen, select the green arrow. This ends
the calibration process.
Calibrate Touch Screen.
– System.
10.12 Set the device (processor) name
The processor name can be changed to help identify it one the network. eg STARBOARD or
FLYBRIDGE. If you change the processor name, the 8000i must be restarted to apply the new
setting.
To set the processor name:
1. Select Display.
2. Select
3. Select
4. The
Setup from the control panel.
+ System to display a list of system specification options.
Device Name button shows the current setting. Select EDIT if you want to
change the setting and enter the new name using the onscreen keyboard.
Northstar 8000i System - 12" Display Processor Installation Manual
71
Page 72

5. Select OK to confirm the new name. The 8000i restarts with the new name. The
setting stays until you change it again.
10.13 Set the screen resolution
The screen resolution can be changed on the 8000i Black Box Processor to match the
monitor it is attached too. Default is 1024 x 768. Other options are 800 x 600 and 1280 x 720.
If you change the screen resolution, the 8000i must be restarted to apply the new setting.
To set the screen resolution:
1. Select Display.
2. Select
3. Select
4. The
Setup from the control panel.
+ System to display a list of system specification options.
Screen Resolution button shows the current setting. Select the button if you
want to change the setting and a drop down list of choices appears.
5. Select the new setting and select
screen resolution. The setting stays until you change it again.
6. When you are finished, select
10.14 Set the units
OK to confirm. The 8000i restarts with the new
– System.
10.14.1 Select the speed units
You can select from Knots, mph, or kph for speed units. Knots is the default.
To select the speed units:
1. Select Display.
2. Select
3. Select
4. The
Setup from the control panel.
+ Units to display a list of unit specification options.
Speed Units button shows the current setting. Select the button if you want to
change the setting and a drop down list of choices appears.
5. Select the new setting. The new setting is applied immediately and stays until you
change it again.
6. When you are finished, select
10.14.2 Select the depth units
You can select from Feet, Meters, or Fathoms for depth units. Feet is the default.
To select the depth units:
1. Select Display.
2. Select
3. Select
4. The
5. Select the new setting. The new setting is applied immediately and stays until you
6. When you are finished, select
Setup from the control panel.
+ Units to display a list of unit specification options.
Depth Units button shows the current setting. Select the button if you want to
change the setting and a drop down list of choices appears.
change it again.
– Units.
– Units.
10.14.3 Select the pressure units
You can select from PSI, Bar, or hPa for pressure units. PSI is the default.
To select the pressure units:
1. Select Display.
72
Northstar 8000i System - 12" Display Processor Installation Manual
Page 73

2. Select Setup from the control panel.
3. Select
4. The
+ Units to display a list of unit specification options.
Pressure Units button shows the current setting. Select the button if you
want to change the setting and a drop down list of choices appears.
5. Select the new setting. The new setting is applied immediately and stays until you
change it again.
6. When you are finished, select
10.14.4 Select the volume units for liquids
You can select from US Gallons, Liters, or Imperial Gallons for volume units for measuring
liquids. US Gallons is the default.
To select the volume units for liquids:
1. Select Display.
2. Select
3. Select
4. The
5. Select the new setting. The new setting is applied immediately and stays until you
6. When you are finished, select
Setup from the control panel.
+ Units to display a list of unit specification options.
Liquid Volume Units button shows the current setting. Select the button if
you want to change the setting and a drop down list of choices appears.
change it again.
– Units.
– Units.
10.14.5 Select the large scale distance units
You can select from Nautical Miles, Statute Miles, or Kilometers for large scale distances.
Nautical Miles is the default.
To select the large scale distance units:
1. Select Display.
2. Select
3. Select
4. The
Setup from the control panel.
+ Units to display a list of unit specification options.
Distance Units button shows the current setting. Select the button if you want
to change the setting and a drop down list of choices appears.
5. Select the new setting. The new setting is applied immediately and stays until you
change it again.
6. When you are finished, select
– Units.
10.14.6 Select the small scale distance units
You can select from Yards, Feet, or Meters for small scale distances. Yards is the default.
To select the small scale distance units:
1. Select Display.
2. Select
3. Select
4. The
5. Select the new setting. The new setting is applied immediately and stays until you
6. When you are finished, select
Setup from the control panel.
+ Units to display a list of unit specification options.
Distance Units Small button shows the current setting. Select the button if
you want to change the setting and a drop down list of choices appears.
change it again.
– Units.
Northstar 8000i System - 12" Display Processor Installation Manual
73
Page 74

10.14.7 Select the temperature units
You can select either Celsius or Fahrenheit for temperature. Fahrenheit is the default.
To select the temperature units:
1. Select Display.
2. Select
3. Select
4. The
Setup from the control panel.
+ Units to display a list of unit specification options.
Temperature Units button shows the current setting. Select the button if you
want to change the setting and a drop down list of choices appears.
5. Select the new setting. The new setting is applied immediately and stays until you
change it again.
6. When you are finished, select
10.15 Radar
CRITICAL NOTE: ON FIRST TIME STARTUP, LEAVE THE RADAR IN STANDBY FOR AT
LEAST 30 MINUTES (NO TRANSMISSION).
THIS ACTION EXTENDS MAGNETRON LIFETIME. DO NOT BE OVER ANXIOUS TO
TRANSMIT!
– Units.
10.15.1 Set up the radar before using it for the first time
IMPORTANT: You must set up the radar before using it for the first time.
The 8000i automatically detects the type of radar that's installed, but you need to enter some
other information, as follows:
To set up the radar before using it:
1. Select Display.
2. Select
3. Select
4. Select
5. Select
6. If your radar has an open array, select
7. Otherwise, skip this step.
8. Select
Setup from the control panel.
+ Radar to show a list of radar specification options.
EDIT next to the Radar Antenna Height option, then use the online
keyboard to enter the height of the radar scanner above sea level. (If you want to
change the height units, see "Change the small distance units"). Select
confirm the new setting.
EDIT next to the Radar Range Offset option, then use the online keyboard
to enter the amount of range offset. Select
Parking Angle option, then enter the new parking angle using the online
keyboard. Select
Radar Power on Action, then select:
Remain Off to have the radar to remain Off when the 8000i starts up. This saves
OK to confirm the new setting.
OK to confirm the new setting.
EDIT next to the Radar Open Array
on power and magnetron usage.
Standby to have the radar warm up then remain in Standby mode when the
8000i starts up. This is the default.
This completes the initial set up. When you are finished, select – Radar.
OK to
74
Northstar 8000i System - 12" Display Processor Installation Manual
Page 75

10.15.2 Change the radar startup mode
To change the radar startup mode:
1. Select Display.
2. Select
3. Select
4. Select
5. When you are finished, select
10.15.3 Change the radar range offset (trigger delay)
The radar range offset is also known as the trigger delay.
Ideally, the radar sweep should commence at your vessel (a radar range of zero). You may
need to adjust the radar range offset to achieve this.
Symptoms that occur when this is set incorrectly are a large dark circle in the center of the
sweep or you may notice straight objects such as a straight sea wall or jetty having a curve or
indentation. Similarly, objects close to your vessel may appear “pulled in” or “pushed out”. To
rectify this adjust the radar range offset (trigger delay)
The best way to perform this procedure is to position the vessel about 50 yards to 100 yards
(45 m to 90 m) from a straight-walled jetty or similar feature that produces a straight line
echo on the display.
Select the 1/8 mile range
Adjust the gain setting until a reasonably good image of the jetty echo is displayed.
Adjust the radar range offset to make the jetty echo appear as a straight line on the
Setup from the control panel.
+ Radar to show a list of radar specification options.
Radar Power on Action, then select:
Standby if you want the scanner to warm up and then remain in Standby mode
when the 8000i starts up. This is the default. The warm up can take 90 - 180
seconds, and an open array will rotate to face the bow.
Remain Off if you want the scanner to remain Off when the 8000i starts up. This
saves on power consumption and magnetron usage.
– Radar.
display, as shown:
If it‘s not possible to position the vessel near a suitable target, perform a rough set up of the
range offset by using the circle at the center of the radar screen as a guide.
If your Radar screen has:
• a wide black circle around the center, decrease the radar range offset until it almost
disappears.
• no black circle at the center, increase the radar range offset until a black circle just
starts to appear at the center.
Northstar 8000i System - 12" Display Processor Installation Manual
75
Page 76

To change the radar range offset:
1. Display the Radar screen and control panel. If you can't see the Adjust Radar
button, select
2. Select
3. Select
Adjust Radar, then select Installation.
Radar Range Offset then use Up and Down or the rotary knob to adjust the
Return.
current setting.
4. Select
OK to confirm the new setting.
10.15.4 Change the radar bearing alignment
Use the radar bearing alignment to rotate Radar image, one degree at a time, so that a
known object dead ahead is directly under the vessel's heading marker.
This means that the Radar image is aligned with the displayed chart and the compass. An
accurate bearing alignment is particularly important when the radar image is overlain onto
the chart.
It's best to do this on a page showing a Chart screen with the radar overlay On in one pane,
and a Radar screen in the other pane.
To change the radar bearing alignment:
1. Select Pages. If you:
don't have a page that shows the Radar screen in one pane and the Chart screen
in the other pane, edit or create a page that shows these two screens. See "Edit a
Page" in the Northstar Quickstart Guide.
do have a page that shows the Radar screen in one pane and the Chart screen in
the other, select it.
2. Check that the Chart screen has the Radar Overlay turned On. If not, turn it on (see
"Overlay the radar" in Chart).
3. Select the Radar pane so that it becomes the active pane. If you can't see the
Adjust Radar button, select Return.
4. Select
5. The
Adjust Radar, then select Installation.
Bearing Alignment button shows the current setting. Select the button if you
want to change the setting, then use the
to move the radar image one degree at a time, until the radar overlay is aligned
with the chart.
6. Select
7. When you are finished, select
OK to confirm the new setting.
10.15.5 Change the parking angle
When an open array radar is turned Off, it continues to rotate for a while before it finally
stops. The stop position is known as the parking angle. You can adjust the parking angle so
that the open array will stop at your preferred position.
ALWAYS turn the radar scanner to standby before turning the 8000i OFF, of the scanner will
keep turning for a while then shut down at some position other than the memorized one.
Up and Down buttons or the rotary knob
Return.
NOTE: The memorized open scanner parking position has some tolerance after the antenna
stops turning due to wind speed and temperature at the time of setting this parameter.
There is no mechanical clutch or brake inside the scanner. Please try this action several times
for best compromise. After several hundred hours of running time, you may wish to re-check
it.
To change the parking angle:
1. Select Display.
76
Northstar 8000i System - 12" Display Processor Installation Manual
Page 77

2. Select Setup from the control panel.
3. Select
4. Select
+ Radar to show a list of radar specification options.
EDIT next to the Radar Open Array Parking Angle option, then enter the new
setting using the online keyboard.
5. Select
6. When you are finished, select
OK to confirm the new setting.
– Radar.
10.16 Sounder
10.16.1 Change the water temperature offset
If there's a difference between the displayed water temperature and the actual water
temperature, you can enter an offset to adjust the water temperature readouts to the correct
level. The default offset is 0 (0°).
To change the offset for the water temperature:
1. Select Display from the top of the screen.
2. Select
3. Select
4. The
5. The new setting is applied immediately to all the Sounder screens.
6. When you are finished, select
Setup from the control panel.
+ Sounder to display a list of sounder specification options.
Water Temperature Offset button shows the current setting. Select Edit,
then enter the difference between the displayed water temperature and the actual
water temperature. The difference must be within -10 to 10. If you want to check or
change the temperature units, (see "Select the temperature units" page 74).
– Sounder.
10.16.2 Change the water temperature averaging time
The water temperature sensor usually displays a readout every two seconds. If you'd prefer
to see the readout averaged out over a different time period, use this setting to specify the
time period.
To change the water temperature averaging time:
1. Select Display.
2. Select
3. Select
4. The
5. When you are finished, select
10.16.3 Change the sounder's speed offset
If there's a difference between the displayed speed and the actual speed, you can enter an
offset to adjust the speed readouts to the correct level. The default offset is 0.
You'll need to obtain an accurate measurement of your vessel's speed. You can use a GPS
receiver when you're travelling faster than 5 knots, follow another vessel travelling at a
known speed between 5 knots and 20 knots, or make a timed run over a known distance.
Best results are obtained in calm conditions where there is minimal current.
Setup from the control panel.
+ Sounder to display a list of sounder specification options.
Water Temperature Averaging button shows the current time period in
seconds. Select
Edit, then enter the time period between temperature readouts.
This can be a minimum of one second and a maximum of 30 seconds.
– Sounder.
To change the speed offset:
1. Select Display.
2. Select
3. Select
Setup from the control panel.
+ Sounder to display a list of sounder specification options.
Northstar 8000i System - 12" Display Processor Installation Manual
77
Page 78

4. The Sounder Speed Offset button shows the current setting. Select Edit, then
enter the difference between the displayed speed and the actual speed.
5. The new setting is applied immediately to all the Sounder screens.
6. When you are finished, select
10.16.4 Change the sounder's speed filter
The transducer usually displays a speed readout every two seconds. If you'd prefer to see the
readout averaged out over a different time period, use the speed filter offset to specify the
time period.
To change the speed offset:
1. Select Display.
2. Select
3. Select
4. The
Setup from the control panel.
+ Sounder to display a list of sounder specification options.
Sounder Speed Filter button shows the current setting. Select Edit, then
enter the difference between the displayed speed and the actual speed.
5. The new setting is applied immediately to all the Sounder screens.
6. When you are finished, select
10.17 Instruments
– Sounder.
– Sounder.
You can:
• choose how to view the instruments
• rename an instrument panel
• select the color scheme for an instrument panel
• change the layout of the instrument panel
• add a new instrument to a panel
• resize an instrument on a panel
• create an instrument panel
• change the appearance of an instrument
• delete an instrument from a panel
• delete an instrument panel
10.17.1 Create an instrument panel
Use this to create an instrument panel. You can create and store a maximum of 100
instrument panels, to suit different activities.
To create an instrument panel:
1. Select Display then select Instruments. If you can't see the Config button, select
Return.
2. Select
3. Select
4. Now you can add each new instrument (see "Add a new instrument").
Config from the control panel, then Panel Config.
New Panel then enter the name for the new instrument panel using the
onscreen keyboard, and select
OK.
10.17.2 Add an instrument
Use this to add a new instrument to your Instruments screen.
New instruments are always shown in the top left corner of the Instruments screen, so if you
want to locate a particular instrument in the top left corner, add this last of all so that you
don't need to reposition it.
The instrument must have been physically installed as part of your 8000i network, and must
send and receive data using NMEA or NavBus formats.
78
Northstar 8000i System - 12" Display Processor Installation Manual
Page 79

To add a new instrument:
1. Select Display then select Instruments. If you can't see the Select Panel button,
select
Return.
2. Choose
and select
3. Select
displayed.
4. The
the data channels that are currently receiving that data. (If it's Off, the 8000i shows
all the data channels that are available.) Select the button to toggle the Active
Channels button
5. Select
you're adding (for example, if you're adding a water temperature sensor, select +
Environment). The 8000i lists the instrument data available from that data channel.
6. Select the instrument data that you want to show, then choose
7. The new instrument is shown immediately on the selected Instruments screen in
the top left corner.
8. You can select the new instrument and drag it to a new location on the instrument
panel. The yellow lines help you to align the new instrument with the existing
instruments.
9. When you are finished, select
10. If you want to add another new instrument, select
procedure. Otherwise, select
Select Panel then select the instrument panel that you want to change
Return.
Config then select Add Instrument. The Select Data Channel box is
Active Channels button shows the current setting. If it's On, the 8000i shows
On, if necessary.
+ next to the data channel that is most appropriate for the instrument that
Next.
Save Changes
Add Instrument and repeat the
Return.
10.17.3 Resize an instrument
You can use this to change the size of an instrument displayed on an instrument panel. The
instrument can be set to small, medium, or large.
The default size is medium.
To resize an instrument:
1. Select Display then select Instruments. If you can't see the Select Panel button,
select
Return.
2. Choose
and select
3. Select
4. The
Select Panel then select the instrument panel that you want to change
Return.
Config from the control panel then select the instrument to be resized.
Resize Instrument button shows the current setting. Select the button if you
want to change the setting and a drop down list of choices appears.
5. Select the new setting then select
6. The new setting is applied immediately and stays until you change it again.
7. When you are finished, select
10.17.4 Rename an instrument panel
You can use this to change the name of an instrument panel.
To rename an instrument panel:
Save Changes to confirm.
Return.
1. Select Display, then Instruments.
2. Choose
Config, then Panel Config, then Rename Panel to display the Rename
Panel box.
3. Select the instrument panel that you want to rename.
4. Select
5. Select
6. When you are finished, select
EDIT then enter the new name using the onscreen keyboard.
OK to confirm the new name.
Return.
Northstar 8000i System - 12" Display Processor Installation Manual
79
Page 80

10.17.5 Delete an instrument panel
You can use this to delete an instrument panel.
To delete an instrument panel:
1. Select Display then Instruments. If you can't see the Config button, select
Return.
2. Select
3. Select
Config, then select Panel Config.
Delete Panel to display the Delete Panel box.
4. Select the instrument panel that you want to delete then select
5. Select
OK to confirm the deletion. The instrument panel is deleted and the Delete
Panel box is re-displayed.
6. If you don't want to delete another instrument panel, select
10.17.6 Delete an instrument panel
You can use this to delete an instrument panel.
To delete an instrument panel:
1. Select Display then Instruments. If you can't see the Config button, select
Return.
2. Select
3. Select
4. Select the instrument panel that you want to delete then select
5. Select
6. If you don't want to delete another instrument panel, select
Config, then select Panel Config.
Delete Panel to display the Delete Panel box.
OK to confirm the deletion. The instrument panel is deleted and the Delete
Panel box is re-displayed.
Delete.
Cancel.
Delete.
Cancel.
80
Northstar 8000i System - 12" Display Processor Installation Manual
Page 81

11 Maintenance
Unless specified, clean the parts of the system with a damp cloth or mild detergent. Avoid
abrasive cleaners, petrol or other solvents. Do not paint any part except for the cables or
Cleaning a glass LCD display: Clean a glass display with the cloth supplied or with a lint free
cloth a fluid for cleaning glass. Rub the display gently so as not to scratch it.
Keep sensors and transducers free of weeds, paint and debris. Do not use a high pressure
water jet on a paddle wheel speed sensor because it may damage the bearings.
removable bezels.
If you unplug a cable from a unit, fit the blanking caps supplied onto the connector on the
unit.
Do not expose any part of a plastic transducer to gasoline or paint solvents as they may
weaken the plastic material. Wash only with water and detergent. Through hull and transom
mount depth and speed transducers may be coated with a thin layer of antifouling paint.
Only use water based antifouling paint.
11.1 Technical support, service and repairs
Northstar products are manufactured and serviced by BNT Marine Electronics.
The product is covered by a warranty which is supplied as a separate document.
If you need technical support, or answers to other questions after you've followed the
instructions in this manual, you can:
• contact your Northstar distributor or
• see the inside back cover of the manual or
• visit www.northstarnav.com.
Before you make contact, be sure to have:
• the serial number of the hardware (usually shown on the faceplate of the unit).
When you describe the problem, be as complete and as accurate as possible.
Northstar 8000i System - 12" Display Processor Installation Manual
81
Page 82

12 Restore
12.1 Restore settings and information
You can restore the:
global settings that are stored on the master unit. This option deletes all the
changes that you've made and resets all the display units in your 8000i System
local settings. This option affects only the display unit that you're currently using
12.2 Restore processor software
This function will restore the operating system firstly back to factory defaults the it will apply
any software patches that have been installed post factory.
To restore the system processor:
routes, tracks, and waypoints information if the data has been corrupted.
1. Start the Northstar 8000i System processor
2. Select
Restore
3. Wait for the Northstar 8000i Installation environment to start. This can take up to
five minutes.
4. To restore the system select
Recover / Restore Current Version
5. To upgrade, select the source listed on the screen (this could be the DVD drive or
other mass storage device that the upgrade file is located on).
6. The system will prompt you to confirm. Select
7. The upgrade files will be copied across to the 8000i processor. This will take
approximately five to six minutes
8. Once this is done the system will reboot automatically and the files are installed
into the system, this should take approximately four to five minutes.
9. A message appears: "System resealed OK to Reboot?" Select
10. The system will restart and the Northstar 8000i screen will appear. This will take up
to three minutes for the first time following a upgrade.
Yes.
OK.
82
Northstar 8000i System - 12" Display Processor Installation Manual
Page 83

13 Upgrading the 8000i system
Upgrades to 8000i system can be implemented very easily. Upgrades are available from the
Northstar website. The upgrade is a single file that is downloaded and copied to the root of a
USB pen drive. The upgrades can apply to all 8000i processors and the following network
modules
• Northstar 8000i 1 kW Network Sounder.
• Northstar 8000i Radar (all models)
There two types of upgrade for a 8000i processor.
1. Software patch upgrade. This is a quick procedure using a small file that can be
downloaded from the Northstar website www.northstarnav.com or from a
Northstar dealer. This method will be used to fix known issues or for minor feature
additions. Install this on to the system master. Other processors will upgrade off the
master unit
2. System image upgrade. This is large file that can be downloaded and will be
available from Northstar dealers on DVD format. This will erase the current system
software and replace with a new version. It will not remove user settings such as
waypoints, routes and page settings. This system will be used when major features
have been introduced that require changes to the underlying operating system.
A power disconnect during upgrade or installation will corrupt the system completely.
To avoid loss of information such as waypoints etc. always back up your information.
When upgrading a multi-processor system. Start with the system master. When the master is
being upgraded, all other units will be unusable and display a message alerting the user that
the master is being upgraded.
13.1 Install Software patch on to a stand alone processor
Software patch: Stand alone processor
1. Down load upgrade file and copy to the root of your USB pen drive.
2. Start the 8000i processor and wait till system has finished loading and is running
normally.
3. Make sure you have backed up your user settings and information such as
waypoints etc (recommended)
4. Insert Pen drive into a spare USB port on the processor or USB hub connected to
the processor.
5. Select
6. Select
Display.
Installation
Northstar 8000i System - 12" Display Processor Installation Manual
83
Page 84

7. Select Software Upgrade
8. When the upgrade screen appears select
the
Tick or X on the keypad to continue or cancel)
OK to continue. or Cancel. (optionally use
9. When the system has finished copying files you will be prompted to remove the
USB pen drive and power down the processor
10. Start the processor for the changes to take effect
13.2 Install a software patch to multi processor system
Software patch: multi-processor system MASTER
1. Upgrade the Software on the Master Processor First as outlined above. if you
don't want to upgrade the other processors at this stage power them down before
upgrading the master.
NOTE: All processors on the network must have the same software version. Once the master
has being upgraded, all other units wont function until they have being upgraded
Software patch: multi-processor system Client.
1. Once the master has been upgraded. Power up the client processor. The upgrade
will commence automatically. Files will be copied from the master and installed on
to the client.
2. If the client processor was running when the master was upgraded it will display
am message saying the software is incompatible with the master and prompt you
to upgrade. Power down the unit and restart. The upgrade will commence
automatically
13.3 Install a system image upgrade
System image upgrade
1. Start the 8000i processor and wait till system has finished loading and is running
normally
2. Back up user settings (recommended)
3. Make sure there are no USB pen drives or other USB mass storage devices attached
to the system. This can cause problems and possibly result in a mass storage device
losing its data
4. Start the 8000i processor and wait till system has finished loading and is running
normally
5. Make sure the 8000i DVD is connected to the processor being upgraded. Insert the
image DVD (this can be obtained from your Northstar dealer.
6. Select
7. Select
8. Select
9. Acknowledge that there is no software upgrade available and go to image upgrade
Display.
Installation.
Software upgrade
page by selecting
OK
84
Northstar 8000i System - 12" Display Processor Installation Manual
Page 85

10. Select the location of the Image:
Files will be copied to the processor. This will take approximately ten minutes
The system will restart and start installing the image. This will take approximately
thirty minutes.
NOTE: DO NOT TURN OFF the system while updating the image
The system will then restart automatically.
Northstar 8000i System - 12" Display Processor Installation Manual
85
Page 86

14 Specifications
Display
12 inches (0.3 m), 24-bit colour. Resolution: 800 x 600 to 640 x 480.
Direct bonded glass improves contrast and eliminates the possibility
of condensation.
Touch Screen: Infrared touch screen
Power:
12 V DC or 24 V DC (max range 10 V - 35 V DC). 33.6 W (see "Power"
page 38)
Analog RGB
800 x 600 (SVGA) (see "RGB port" page 50)
Output
Control
Touch screen, built in keypad, remote keypad or third party pointing
device
USB Interface USB 2.0 and 1.0, 1.1 compliant. (see "USB" page 48)
NMEA 1 x NMEA in, 1 x NMEA out
Network 1 x waterproof ethernet 100 Base T
GPS Optional Northstar NS004703 active GPS antenna 8 Pin connector
Audio via NS004802 Cable 14 Pin Aux connector
Image control Auto setup, Brightness, Contrast,
Connectors
All waterproof connectors with cable retention. Caps supplied for
unused ports
Environmental 5ºF to 131ºF (-15ºC to 55ºC).
The case and cables are waterproof to IPX5.
Overall dimensions 14" (357 mm) (W) x 10.5" (267 mm) (H) x 2.9" (74 mm (D))
86
Northstar 8000i System - 12" Display Processor Installation Manual
Page 87

UNITED STATES
EUROPE
30 Sudbu
ry Road,
Acton, MA 01720,
United States
Ph: +1 978.897.6600
Fax: +1 978.897.7241
sales@bntma
rine.com
AUSTRALIA
PO B
Gladesvill
e, NSW 2111,
Australia
Ph: +61 2 9879 9000
Fax: +61 2 9879 9001
rthstaraus@northstarnav.com
no
ox 479,
Unit 2,
Belvide
SO14 5
Ocean Quay,
re Rd, Southampton,
QY, England
Ph: +44 2380 339922
Fax: +44 2380 330345
rthstaruk@northstarnav.com
no
NEW ZEALAND
ox 68 155,
PO B
Newton, Auckland
New Zealand
Ph: +64 9 481 0500
Fax: +64 9 481 0590
rthstarnz@northstarnav.com
no
www.northstarnav.com
Page 88

www.northstarnav.com
Made in New Zealand
MN000605C-G
 Loading...