

Page 1
Page 2
ENGLISH
Belinea 2080 S2 - Operating Instructions - 1
INTRODUCTION
This manual will familiarize you with the installation
and use of your Belinea monitor. Please take the time
to look through these instructions even if you are familiar with monitors.
We have taken all possible care to ensure that this
manual contains correct and accurate information.
However the manufacturer cannot assume liability for
any possible errors. In addition, the manufacturer can
not guarantee that the hardware will meet the purpose you require. We would appreciate reports of any
errors, suggestions or criticism.
© Copyright 2006, MAXDATA Systeme
GmbH, 45768 Marl, Deutschland,
www.maxdata.com
Editing, DTP and translation by Linguagem, www.Linguagem.de.
All rights reserved. No part of this manual may be reproduced, processed or distributed in any form (print,
photocopy, microfilm or any other process) or processed, duplicated or distributed by an electronic system without prior written permission from the
manufacturer.
We reserve the right to make changes according to
the technical progress. Belinea is an internationally
registered trademark. Other brand names may be reg
istered trademarks and must be treated as such.
Environment protection
We are all responsible for the environment: As many
of our customers are already familiar with monitors
we have not printed this manual in order to save paper
and by this protect our environment. Help to protect
the environment and only print the pages you need.
TABLE OF CONTENTS
INTRODUCTION...................................................... 1
IMPORTANT INFORMATION................................... 2
UNPACKING ............................................................. 2
MOUNTING .............................................................. 3
CONNECTING........................................................... 3
STARTUP.................................................................. 4
ERGONOMICS ......................................................... 4
CONFIGURATION..................................................... 4
SETTINGS................................................................. 5
CARING FOR YOUR MONITOR ............................... 7
TROUBLESHOOTING............................................... 8
TECHNICAL SPECIFICATIONS................................. 9
MAXDATA WARRANTY ........................................... 9
Guide to symbols
The symbols below are used in this manual to indicate
where there is risk of injury or damaging devices or to
indicate specially useful information.
DANGER! Indicates risk of injury. When not
following the instructions, severe injury or
death may result.
ATTENTION! Indicates possible damage to devices. When not following instructions, devices may be heavily damaged.
IMPORTANT! Indicates hints on operation and
other useful information.
Page 3
ENGLISH
Belinea 2080 S2 - Operating Instructions - 2
IMPORTANT INFORMATION
Note on monitor placement
• The setup location must not be extremely hot,
cold, humid or dusty. Heat and cold can impair
the functionality of the monitor. Humidity and
dust can cause the monitor to fail.
• Do not place the monitor near heat sources
such as heaters or radiators. Do not expose
the monitor to mechanical vibrations or jarring.
Notes on power connection
Only use the power cord designated for use in
your country.
The wall outlet should be within easy reach.
Pulling the power plug is the only way to disconnect the monitor from the power source.
This monitor is ENERGY STAR®-compatible.
MAXDATA is an ENERGY STAR®- partner and
guarantees that this monitor complies with the
ENERGY STAR® guidelines for optimising
power consumption.
Safety instructions for operation
The power cord must not be damaged. Do not
place any objects on the power cord and make
sure it does not have any knots. To unplug the
cord, always pull on the plug and not on the cable itself. Damage to the power cord may result in fire or cause electric shocks.
• Avoid covering the ventilation slots. Air circulation is necessary to prevent the monitor from
overheating. If the air circulation is restricted, it
could cause fire or damage the monitor.
• Do not use any solvents to clean the monitor,
as the housing could be damaged. For more information about cleaning the monitor see section “Caring for your monitor” on page 7.
Make sure that no humidity or liquids can enter
the monitor.
Never open the monitor housing yourself.
There is a danger of electric shocks and other
hazards. The monitor may only be opened and
services by qualified professionals.
UNPACKING
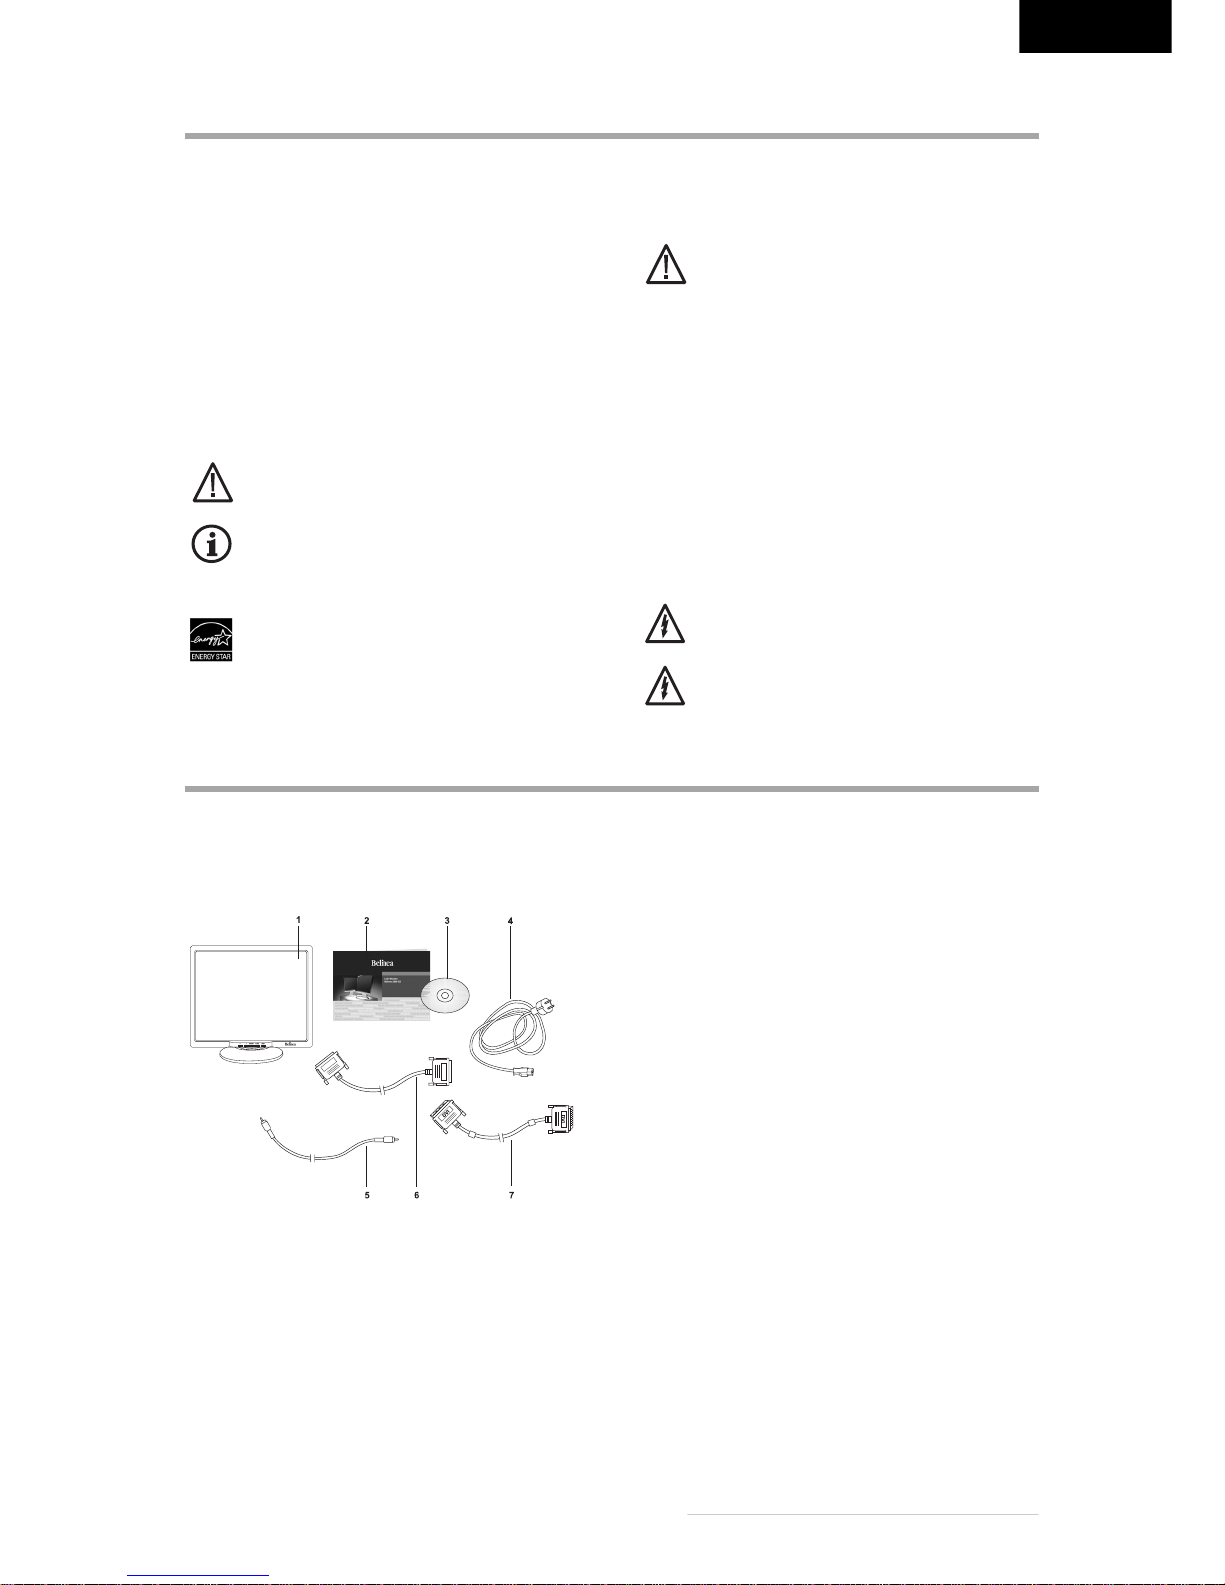
Scope of supply
Check if the delivery is complete.
1 Monitor
2 Instructions
3CD
4 Power cord
5 Audio cable
6 VGA cable
7 DVI cable (option)
Handling the monitor
Carefully lift the monitor out of the packaging.
• The monitor's LCD screen surface is very sensitive! Please avoid any pressure on the surface (finger, pencil etc.) and be especially
cautious during transportation since jolts and
shocks can cause the screen to become
scratched (always use the original packaging).
Keep the original box and packaging material in case
you have to ship or transport the monitor.
Intended purpose
This monitor developed as a display for computers.
Page 4
ENGLISH
Belinea 2080 S2 - Operating Instructions - 3
MOUNTING
Mounting on the base
Make sure the footplate points forward. Otherwise the monitor may tilt over.
Insert the shaft into the base until it locks in. Tighten
the screw below the footplate.
Wall Mounting
The monitor is shipped with the standard desktop
configuration. However, you can optionally mount the
device on a wall or on a monitor swivel arm (optional
accessory). For mounting remove the screws from
the back of the monitor (4 screws). Use a VESA com
patible support (4-hole assembly of 100 x 100 mm according the international VESA FDMI standard) and
follow the corresponding instructions.
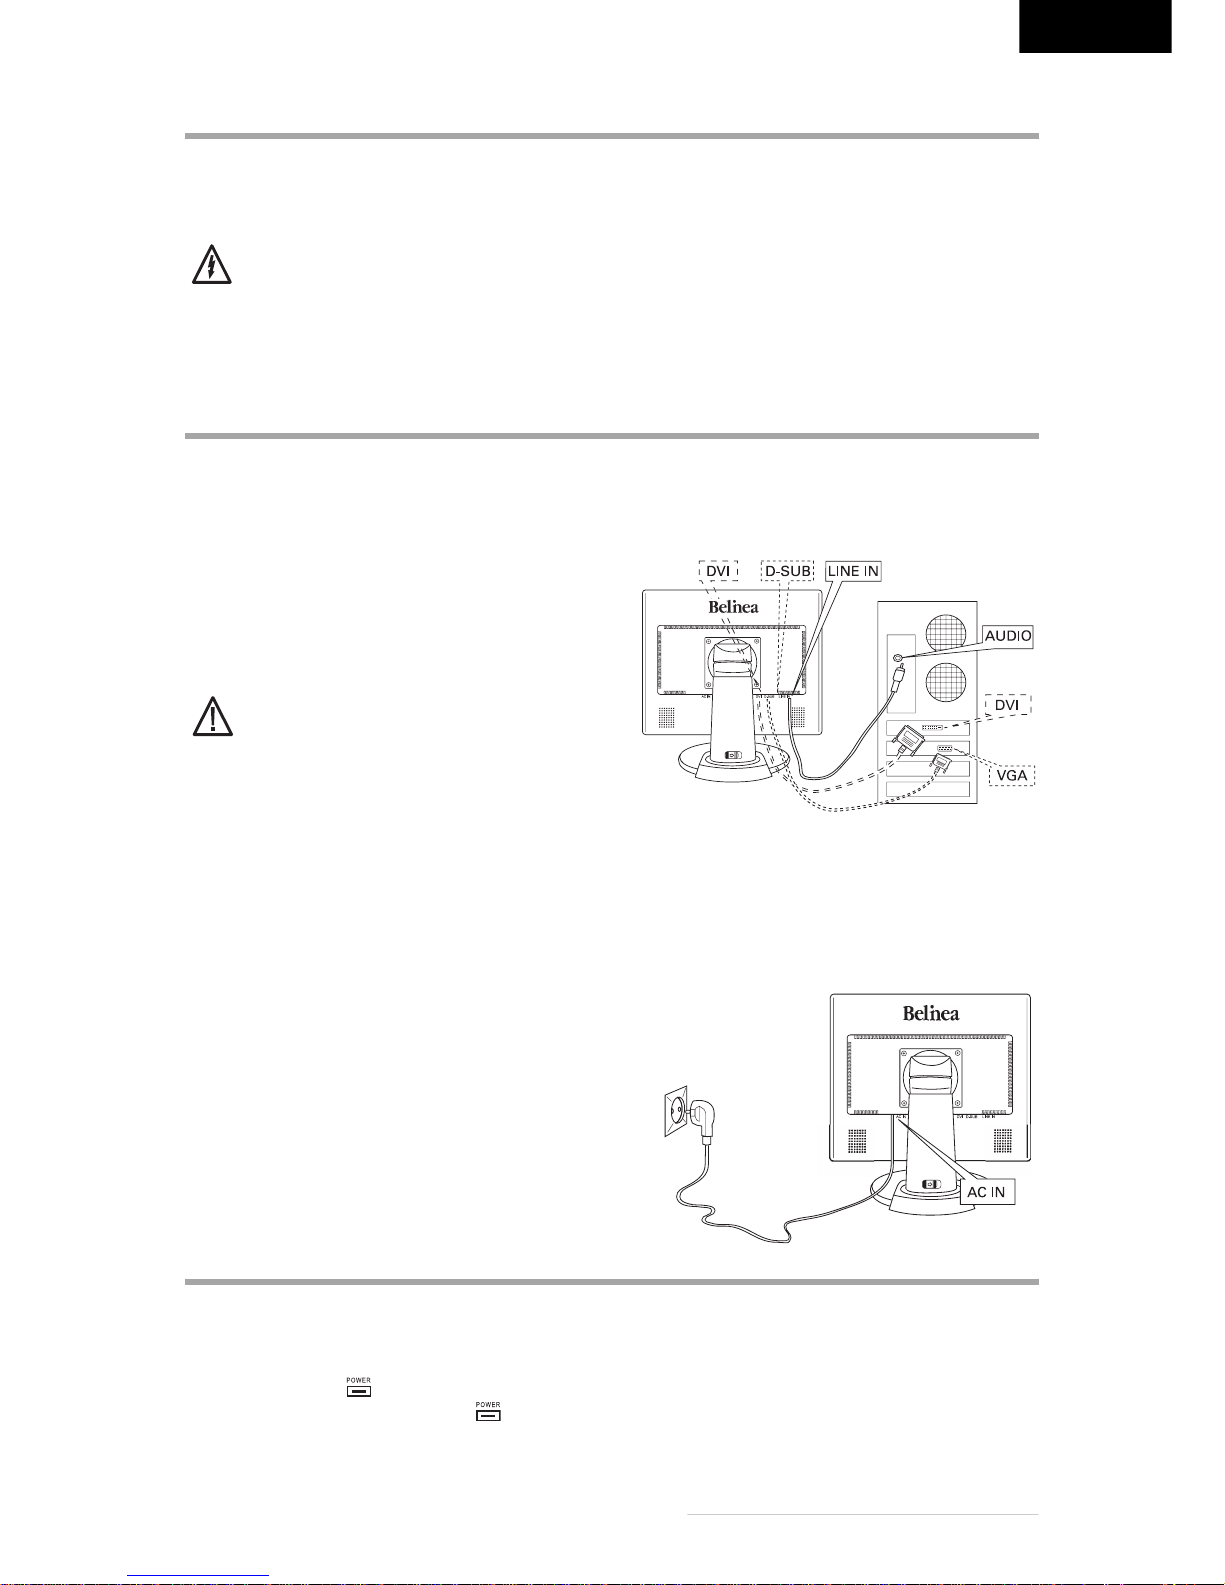
CONNECTION
1 Make sure that the monitor and the PC are
disconnected from the mains supply.
Connecting to an analogue graphics
card
You can connect the monitor to an analogue graphic
board or to a digital graphics card.
Connect the plugs carefully in order not to
bend the pins.
1 Connect the supplied signal cable to the socket D-
SUB.
2 Connect the other end of the signal cable to the
output socket of your graphics card.
Connecting to a digital graphics card
1 Connect the optional signal cable to the socket
DVI.
2 Connect the other end of the signal cable to the
output socket of your graphics card.
Audio connection
If you PC has a separate audio output, use the audio
cable to connect the monitor to the PC.
1 Connect the supplied audio cable to the socket
AUDIO IN.
2 Plug the other end of the audio cable into the
output socket on the PC.
Mains connection
1 Connect the supplied power cable to the socket
AC IN.
2 Plug the other end of the power cable into a
grounded wall outlet.
3 Reconnect your PC to the mains supply.
STARTUP
1 Switch your PC on.
2 Press the button [ ] on the front of the monitor.
The status indicator on the button [ ] lights up
green or orange.
Green = monitor active
Orange = monitor on stand-by (power save mode).
Page 5

ENGLISH
Belinea 2080 S2 - Operating Instructions - 4
ERGONOMICS
The best alignment
Align the monitor in such a way, that distance and angle correspond to the figure.
The best height
To adjust the height of the monitor, push the
lock on the back of the base sideward. Make
sure that the monitor stands firmly on the
base, when pushing the lock.
Ergonomically, your posture is best when elbows, pelvis, knees and ankles are all at right angles.
Furthermore, you should regularly focus on an object
around 6 m away from you to help your eyes relax.
Putting the monitor in upright position
If needed, you can turn the monitor so that the screen
is in an upright position (Pivot function). Use the software settings to adapt the picture accordingly.
Non-reflecting operation
Adjust the monitor so that there are no reflections on
the screen. By this you protect your eyes from excessive strain.
This monitor meets the requirements for non-reflection. This makes it suitable for normal office applications and you do not need to take any special
additional measures.
CONFIGURATION
Windows® 9x/ME/2000 and XP
If using the monitor under Windows® 9x/ME/2000
and XP, we strongly recommend installing the Belinea
configuration file. You can obtain this file from your
Belinea dealer or download it from the MAXDATA FTP
server at ftp.maxdata.com. Here click the
"Belinea_Treiber_Driver" directory and download the
Belinea.inf and README_Belinea.TXT files. Follow
the instructions in the README-Belinea.TXT file.
Windows® NT 4.0
Under Windows® NT 4.0 no separate setup file is required. Select the vertical frequency and the number
of colours directly on your PC within the "Start” g
“Settings” g “Control Panel” g “Display” g “Settings” menu.
~70
90°
ca. 35° 60°
Page 6

ENGLISH
Belinea 2080 S2 - Operating Instructions - 5
SETTINGS
Settings using the keys on the
monitor
You can make some adjustments directly using the
keys on the monitor (hot key function).
Automatic setting
Use this function to automatically adjust the individual
image parameters (brightness, contrast, image posi
tion, phase etc.) to the optimum values for the current
graphic mode.
1 To start the automatic adjustment press the key
[ ].
Wait until the automatic adjustment is completed.
Image adjustment
Brightness
Use this function to adjust the brightness directly using the keys on the monitor.
1 Press the key [ ].
2 Press [ ] or [ ], and select [BRIGHTNESS].
3 Press the key [ ].
4 Press the key [ ] or [ ] until the desired
brightness is set.
5 Press the key [ ] twice to quit the menu, if you
have made any changes.
Contrast
Use this function to adjust the contrast directly using
the keys on the monitor.
1 Press the key [ ].
2 Press [ ] or [ ], and select [CONTRAST].
3 Press the key [ ].
4 Press the key [ ] or [ ] until the desired
contrast is set.
5 Press the key [ ] twice to quit the menu, if you
have made any changes.
Set volume
This function sets the volume.
1 Press the key [ ].
2 Press the key [ ] or [ ] until the desired
volume is set.
3 Press the key [ ] to quit the menu.
Mute
Use this function to switch the loudspeakers of the
monitor off.
1 Press the key [ ].
2 Press the key [ ].
3 Press the key [ ] to quit the menu.
4 To unlock the key, repeat the steps 1 and 2.
Lock on screen display (OSD)
Use this function to lock the on screen menu (OSD) of
the monitor. This prevents unauthorised people to
change the settings. The power key will remain un
-
locked.
1 Press the key [ ] and keep it pressed.
Additionally, press the key [ ].
2 To unlock the key, repeat step 1.
Settings using the OSD menu
The individual settings of the monitor can be made in
the on screen display (OSD).
Open the OSD menu
1 Press the key [ ] to open the OSD menu.
2 Press the key [ ] or [ ] to select the desired
sub menu.
3 Press the key [ ] to open the desired menu or
the desired function.
4 In further sub-menus proceed correspondingly.
5 After you have made the desired adjustment,
press [
] of save the setting and quit the menu.
In some cases you have to press the key [ ]
several times.
Display current settings
Use this function to show the current settings.
1 Open the OSD menu and select [ ].
Automatic setting
Use this function to automatically adjust the individual
image parameters (brightness, contrast, image posi
tion, phase etc.) to the optimum values for the current
graphic mode.
1 Open the OSD menu and select [ ].
Page 7

ENGLISH
Belinea 2080 S2 - Operating Instructions - 6
2 Press the key [ ].
3 Select [AUTO ADJUSTMENT].
4 Press the key [ ].
5 Select the desired setting.
The automatic adjustment is executed at each switch
on of the monitor.
Adaptation to the graphics card
If this function is switched on, the image parameters
are adapted automatically, if the settings are changed
on the PC.
1 Open the OSD menu and select [ ].
2 Press the key [ ].
3 Select [AUTOSWITCH].
4 Press the key [ ].
5 Select the desired setting.
Adaptation to the input signal
With this function the monitor is automatically set to
the input signal (digital or analogue). You can use the
digital or analogue input at the same time.
1 Open the OSD menu and select [ ].
2 Press the key [ ].
3 Select [INPUT].
4 Press the key [ ].
5 Select the desired setting.
Set contrast and brightness
1 Open the OSD menu and select [ ].
2 Press the key [ ].
3 Press the key [ ].
4 Press the key [ ] or [ ] until the desired
brightness is set.
5 Press the key [ ].
6 Select [CONTRAST]
7 Press the key [ ].
8 Press the key [ ] or [ ] until the desired
contrast is set.
If you have selected the colour setting sRGB
(standard RGB), the contrast cannot be set.
Colour control (colour temperature)
The monitor offers 3 preset modes of colour settings.
Additionally, a separate mode allowing individual setting of each colour channel is available.
1 Open the OSD menu and select [ ].
2 Press the key [ ].
3 Select the desired setting.
sRGB = standard Windows setting
9300 = cool colour
6500 = warm colour
CUSTOM COLOUR = individual setting for Red/
Green/Blue. Use the key [
] or [ ] to set the col-
our channels.
Set image width
1 Open the OSD menu and select [ ].
2 Press the key [ ].
3 Select [CLOCK].
4 Press the key [ ].
5 Press the key [ ] or [ ] until the desired
width is set.
Set image position
1 Open the OSD menu and select [ ].
2 Press the key [ ].
3 Select [H.POSITION].
4 Press the key [ ].
5 Press the key [ ] or [ ] until the desired
horizontal position is set.
6 Press [ ] and select [V.POSITION].
7 Press the key [ ] or [ ] until the desired
vertical position is set.
Fine adjustment
1 Open the OSD menu and select [ ].
2 Press the key [ ].
3 Select [PHASE].
4 Press the key [ ].
5 Press the key [ ] or [ ] until the desired
adjustment is set.
To achieve best results, make the adjustment on a
white background with horizontal and vertical black
lines.
Set image sharpness
All resolutions provided by the graphics card that deviated from the physical resolution of the monitor are interpolated. This may impair the quality of the image.
1 Open the OSD menu and select [ ].
2 Press the key [ ].
3 Select [SHARPNESS].
4 Press the key [ ].
5 Press the key [ ] or [ ] until the desired
adjustment is set.
If the resolution of the graphics card is set to
the standard resolution of the monitor, the
sharpness cannot be adapted.
Language selection
This function selects the language of the OSD menu.
1 Open the OSD menu and select [ ].
2 Press the key [ ].
3 Select [LANGUAGE].
4 Press the key [ ].
5 Press [ ] or [ ] to select the desired
language.
Page 8

ENGLISH
Belinea 2080 S2 - Operating Instructions - 7
Resolution notice
If this function is active, a message indicates if the
resolution and frequency are not optimally set to the
monitor.
1 Open the OSD menu and select [ ].
2 Press the key [ ].
3 Select [INFORMATION].
4 Press the key [ ].
5 Press the key [ ] or [ ] until the desired
adjustment is set.
Make the necessary adjustments in the settings of
your PC, if this message is displayed.
OSD Position
This function sets the position of the OSD menu.
1 Open the OSD menu and select [ ].
2 Press the key [ ].
3 Select [H.OSD POSITION].
4 Press the key [ ].
5 Press the key [ ] or [ ] until the desired
horizontal position is set.
6 Press the key [ ].
7 Select [V.OSD POSITION].
8 Press the key [ ].
9 Press the key [ ] or [ ] until the desired
vertical position is set.
OSD switch off time
This function sets the time for which the OSD menu
will be displayed.
1 Open the OSD menu and select [ ].
2 Press the key [ ].
3 Select [OSD TIMEOUT].
4 Press the key [ ].
5 Press the key [ ] or [ ] until the desired time
is set.
Set volume
This function sets the volume.
1 Open the OSD menu and select [ ].
2 Press the key [ ].
3 Select [SPEAKER VOLUME].
4 Press the key [ ].
5 Press the key [ ] or [ ] until the desired
volume is set.
Restore default
1 Open the OSD menu and select [ ].
2 Press the key [ ].
3 Select [YES].
4 Press the key [ ].
Resolution and frequency
To allow fatigue free working the horizontal and vertical image frequency must match. Make the necessary
adjustments in the settings of your PC.
For this monitor, we recommend a resolution of 1600
x 1200 at a frequency of 60 Hz.
CARING FOR YOUR MONITOR
The screen of the monitor is covered with an anti-reflex coating. Keep the screen clean to ensure full functionality. Clean the surface very cautiously using a soft
cloth only as otherwise the coating may be damaged.
If the housing is very dirty, clean it using a cloth.
No humidity into the monitor! Before cleaning
the monitor pull the power cord and make sure
no liquids can enter the monitor when clean
-
ing.
Do not use any solvents to clean the monitor, as the
housing could be damaged.
If only moderately dirty use a dry, soft antistatic cloth
to clean the monitor.
Disposal
This product is subject to the European
guideline 2002/96/EC.
All electric and electronic devices must be disposed of
separately from household waste at publicly estab
-
lished facilities.
Avoid hazard to the environment and dangers to your
personal health by disposing the device properly.
For general information about the proper disposal,
contact the relevant local government department,
the disposal facility or the shop where you bought the
device.
Belinea monitors are designed for ecofriendly recycling according to TCO. For all
questing concerning the disposal of your
monitor, also contact our recycling partner
for Europe and visit the web site www.be
-
linea.com/service/recycling.
Page 9

ENGLISH
Belinea 2080 S2 - Operating Instructions - 8
TROUBLESHOOTING
Bland screen
Power indicator is off
- Make sure the power cable and the power adapter
are connected properly. (See “Connection” on page
3.)
- Make sure that the monitor was turned on using the
power switch. (
See “Startup” on page 3.)
Power indicator lights orange
- Is a power saving mode active?
Power indicator lights green
- A screen saver may be installed on your PC and was
automatically activated after a certain period of inactiv
-
ity.
Press a key on your keyboard or move the mouse.
Message "No Signal"
- Is the signal cable connected to the monitor and the
PC's graphic port? (See “Connection” on page 3.)
Is the PC turned on (see your PC's documentation)?
Display problems
Image is displaced to the left/right or to the
top/bottom
- If the image appears normal but off-centre, you can
adjust it using the OSD functions. (See “Automatic
setting” on page 5.)
Image flickers or is shaky
- Perhaps the setup file chosen for the monitor is incorrect. (See “Configuration” on page 4.)
Image is blurred
- Check the sharpness settings. (See “Set image
sharpness” on page 6.)
- Check the brightness and contrast settings. (See
“Set contrast and brightness” on page 6.)
Colour problems
- If the colours are off (e.g. white is not really displayed
as white etc.), you should adjust the colour tempera
ture. (See “Colour control (colour temperature)” on
page 6.)
Page 10

ENGLISH
Belinea 2080 S2 - Operating Instructions - 9
TECHNICAL SPECIFICATIONS
MAXDATA WARRANTY
Belinea Premium Service
The three-year return to base warranty for your Belinea monitor includes all parts and labour. In additions
many countries offer a free of charge swap out war
ranty programme. This does not affect your Statutory
Rights.
For further information on the warranty or service,
please visit http://www.belinea.com or contact the
phone numbers listed in the enclosed short guide.
Please have the serial and model number ready when
calling.
Definitions Maxdata Warranty
The explanations below apply to all Belinea monitors.
The MAXDATA warranty covers all failures resulting
from defective components and manufacturing de
fects that occur within the product specific warranty
period. The warranty period begins on the date of purchase (date of original customer invoice).
Please be aware the in order to maintain the warranty
claim the product concerned has to be received by
MAXDATA together with the serial number and a
copy of the original customer invoice within the war
ranty period.
MAXDATA's obligation under the warranty is restricted to repairing or exchanging defective components.
Defective components removed during repair process
become the property of MAXDATA. Components re
-
LCD-Panel 20.1 inch diagonal size (51.05 cm visible), low radiation according to
TCO'03, certified to ISO 13406-2, pixel fault class II
Panel-Technology PMVA
Viewing angle (Contrast ratio CR 10:1) horizontal 178°, vertical 178° (typical)
(Contrast ratio CR 5:1) horizontal 178°, vertical 178° (typical)
Contrast ratio typical 1000:1, max. 1200:1
Reaction time 8 ms (grey/grey)
Brightness typical 300 cd/m
2
, max. 320 cd/m
2
Input signal video analogous: 15-Pin Mini-D-SUB, digital: 24 pin DVI-D
Display colours 16.7 mill. colours
Synchronisation 30-81 kHz horizontal, 50-75 Hz vertical
Video band width 162 MHz pixel rate
Ergonomic resolution 1600 × 1200 (60 Hz)
Audio
Amplifier 2 W at 8 Ohm loudspeaker
Peak audio 1.5 W
Power supply 100-240 V AC, 50-60 Hz
Power consumption
ON-Status max. 60 W with audio
Power saving function TCO 03, EPA Power Management
Colour of the status indicator:
green ON Status max. 60 W with audio
orange power saving
according to EPA < 2 W
Dimensions/weight: width 449 mm, height 395 mm, depth 211 mm, 8.0 kg (net)
Environment conditions:
Operation 0 to +40 °C, r. h. 20%-80% (non-condensing)
Storage -20 to +60 °C, r. h. 8%-95% (non-condensing)
Page 11

ENGLISH
Belinea 2080 S2 - Operating Instructions - 10
placed within the warranty coverage assume the remaining valid warranty period of the system.
MAXDATA's obligation under the warranty is limited
to failures resulting from defective components and
manufacturing defects in the CRT, panel and background lighting for electrical errors (please also refer
to the term definition and liability restrictions).
Exclusion from the MAXDATA warranty
The MAXDATA warranty does not cover damage of
any kind that results from:
• The use of peripheral devices
• Improper use/operating faults
• Non-adherence to the user instructions.
• Attempted repairs by the customer or third
parties without authorisation by MAXDATA
• Defective maintenance by third parties
• Device defects due to power failure, heat losses, missing EMC (electro magnetic compatibility) cabling or similar reasons.
• Accidents, storms, lightning, fire, water/other
liquids, other natural catastrophes, theft, riots,
plundering, the effects of war or other instanc
-
es of acts of god
• The use of third party components
• Non-authorised system changes
• BIOS versions/firmware updates/programmes
to remove defects of all kinds (e.g. service
packs, bug-fixes, hot-fixes)
• Resetting safety functions, deletion of passwords etc.
• Loss of customer specific data or software
from repair and installation processes
• Improper use of machine capacity or output
• Inappropriate customer operating environment
The MAXDATA warranty also does not cover the following:
• MAXDATA products from which the type labels, serial numbers and the machine or of machine parts have been removed or changed.
• Decline in rechargeable battery capacity after
the end of the 6 month warranty period (see
web site of the competent MAXDATA subsidiary)
• The provision and installation of BIOS, driver or
software updates/upgrades
• The new installation of software/operating systems that are no longer able to run (e.g. because of deletion of system-relevant files,
incorrect system settings or self-copying pro
-
grammes, e.g. computer viruses)
• Wear and tear on data storage media, LCD
background lighting, CRTs on CRT monitors,
picture tube burn-in or loss of brightness
• MAXDATA products of which the warranty
seal has been broken by entities other than
MAXDATA or those authorised by MAXDATA
• Breaks and scratches on TFT panels and CRT
displays
• Damage by use of force or external impact respectively
• Spots on the panel caused by external impacts
• Colour spots caused by dropping the device
• Error class 2 pixel errors (please note the information on ISO 13406-2 on the web site of the
MAXDATA subsidiary concerned)
If the device received by MAXDATA shows two defects and only one of these is covered by the MAXDATA warranty claim, the customer only has the right to
repair for the damage of his device covered by the
warranty.
In this case MAXDATA reserves the right to offer the
customer several options on resolution in form of a
quotation and to charge the relevant processing costs.
This also applies to those devices for which upon receipt, it is found that they are not covered by the warranty. In these cases MAXDATA reserves ownership
of the exchange device provided and is entitled to de
-
mand its return.
MAXDATA reserves the right to charge costs incurred
for unsuccessful attempts to collect a devices that
has been registered as defective from the customer.
If an exchange device is not provided in spite of a period having been set, MAXDATA is entitled to charge
the net sales price as per the current price list plus the
processing costs incurred. The customer has the right
to provide evidence for the existence of a lower dam
-
age.
MAXDATA restriction to liability:
MAXDATA expressly excludes customer claims that
go beyond the warranty conditions if there is no obli
gation of liability imposed on MAXDATA by the laws
of the country where the device was bought. This also
Page 12

ENGLISH
Belinea 2080 S2 - Operating Instructions - 11
applies in particular with regard to claims for damages
as a result of default, damages for claims arising as a
result of defects, loss of profit, transport damage that
was not registered within a period of 6 days after re
ceipt of the goods, loss of data or information through
repair processes or damages resulting from interruption to operations.
Governing law:
All rights and duties are subject to the law of the country in which the MAXDATA product was purchased.
The Agreement on Contracts for the International Sale
of Goods (CISG) is not applicable.
Data Backup
The responsibility for complete data backups, including of applications and operating system software remains exclusively with the customer. The data must
be backed before the warranty claim is made. MAX
DATA excluded liability for any information lost for this
reason during a warranty claim.
For further details regarding the MAXDATA warranty
conditions, please refer to www.maxdata.co.uk.
Page 13

Congratulations!
The display you have just purchased carries the TCO’03
Displays label. This means that your display is designed,
manufactured and tested according to some of the strictest
quality and environmental requirements in the world. This
makes for a high performance product, designed with the
user in focus that also minimizes the impact on our natural
environment.
Some of the features of the TCO’03 Display requirements:
Ergonomics
• Good visual ergonomics and image quality in order to improve the working environment
for the user and to reduce sight and strain problems. Important parameters are luminance,
contrast, resolution, reflectance, colour rendition and image stability.
Energy
• Energy-saving mode after a certain time – beneficial both for the user and the
environment
• Electrical safety
Emissions
• Electromagnetic fields
• Noise emissions
Ecology
• The product must be prepared for recycling and the manufacturer must have a certified
environmental management system such as EMAS or ISO 14 000
• Restrictions on
o chlorinated and brominated flame retardants and polymers
o heavy metals such as cadmium, mercury and lead.
The requirements included in this label have been developed by TCO Development in cooperation with scientists, experts, users as well as manufacturers all over the world. Since the
end of the 1980s TCO has been involved in influencing the development of IT equipment in a
more user-friendly direction. Our labelling system started with displays in 1992 and is now
requested by users and IT manufacturers all over the world.
For more information, please visit
www.tcodevelopment.com
Page 14

 Loading...